

Page 1
OPERATION
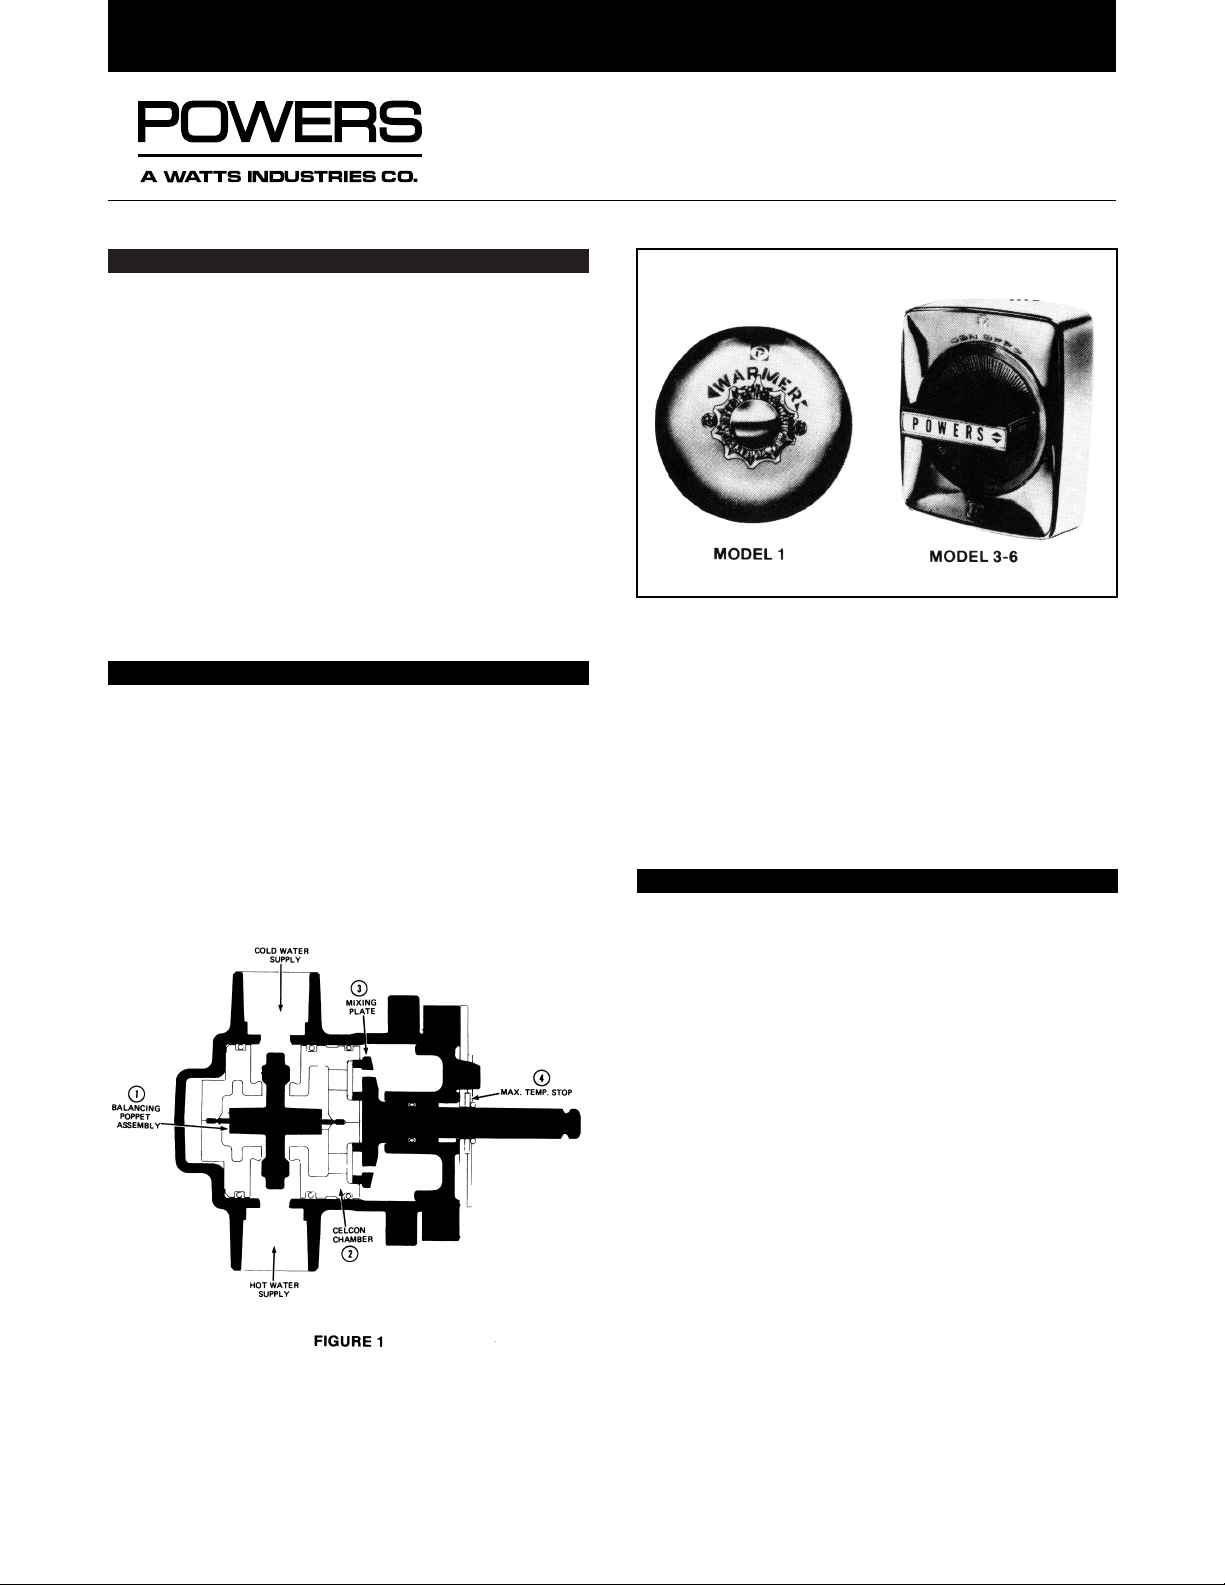
Hot and cold water enter their respective ports and the pressures are equalized through the action of the balancing poppet (1). The entire balancing poppet assembly is contained in
a celcon chamber (2). This chamber is replaceable as a complete cartridge. After the hot and cold presses are equalized,
they are mixed by the action of the mixing plate (3). As the
temperature adjustment stem is rotated from shutoff to maximum hot water temperature (approximately 180°), the mixing
plate passes the required proportion of hot and cold water to
produce the control point. With the adjustment stem in its full
clockwise position, shutoff is obtained by shutting off both
supplies. The maximum temperature stop (4) allows the user
to set the maximum discharge temperature. This mixer does
not recognize supply water temperature changes so any variation in the water temperature will affect the control point
and the maximum temperature setting.
SPECIFICATIONS
Operating Capacity
Model 1–3
................... 9 GPM @ 45 psi (.57L/sec @ 310 kPa)
Model 4 3-port
.......... 6 GPM @ 45 psi (.38L/sec @ 310 kPa)
4-port
To p
..........6 GPM @ 45 psi (.38L/sec @ 310 kPa)
Bottom
....6 GPM @ 4S psi (.38L/sec @ 310 kPa)
Model 6
.........................6 GPM @ 45 psi (.38L/sec @ 310 kPa)
Inlet and Outlet Sizes
Model 1–3: Inlet and Top
....................................1/2″ NPT
Bottom
...........................................3/4″ NPT
Model 4–6, all ports
..............................................1/2″ NPT
Maximum pressure (static)
........................ 125 psi (862 kPa)
Maximum inlet temperature
..............................180°F (82°C)
Built-in shutoff
...................................................All models
Roughing-in template
.........................................All models
Maximum temperature adjustment
.......................All models
MAINTENANCE
Troubleshooting Pointers
What to look for if:
1. The flow of water is less than desired.
a. Valves upstream from supply not fully open.
b. Low supply pressures.
c. Accumulation of lime deposits in hot water pipes,
restricting the flow of hot water.
d. Shower head clogged.
2. Flow of water is completely shut off.
a. Valves upstream from supply completely closed.
b. Failure of hot or cold water supply pressure. The
Hydroguard is constructed to restrict the flow of water
on hot or cold water supply failure,
3. The temperature of the water goes from hot to cold when
the adjustment handle is rotated counter-clockwise.
a. The water supplies are connected to the wrong port.
4. Flow of water continues when Hydroguard is shut off.
a. Worn SHUTOFF DISCS. Replace worn disc.
5. Maximum temperature is too low.
a. Accumulation of lime deposits in hot water pipes,
which restricts the flow of hot water.
b. The concealed maximum temperature is not at its
maximum adjustment.
c. Hot water temperature too low.
TECHNICAL INSTRUCTIONS
Hydroguard 400 Valves
Models 1–6
Form TI400 v2
A Watts Industries Co.
Page 2
TI400 v2 Page 2
To Remove Balancing Cartridge Assembly
1. Insert hooked ends of puller into HOT and COLD outlet
ports of Balancing Cartridge. (See figure 4)
2. Push puller clasp into notches of puller.
3. Insert screwdriver or similar type bar through puller.
4. Place a 3″ wood or plastic block (do NOT use metal)
between bar end and mixer body. Pull other end of bar.
5. Release puller clasp, spread hooked ends of puller slightly and remove from cartridge.
To Install Balancing Cartridge
1. Apply small amount of oil or grease or soap to inner
surface of body.
2. Align cartridge and body holes.
3. Slowly push cartridge in, side O-rings. Be careful not to
pinch side O-rings.
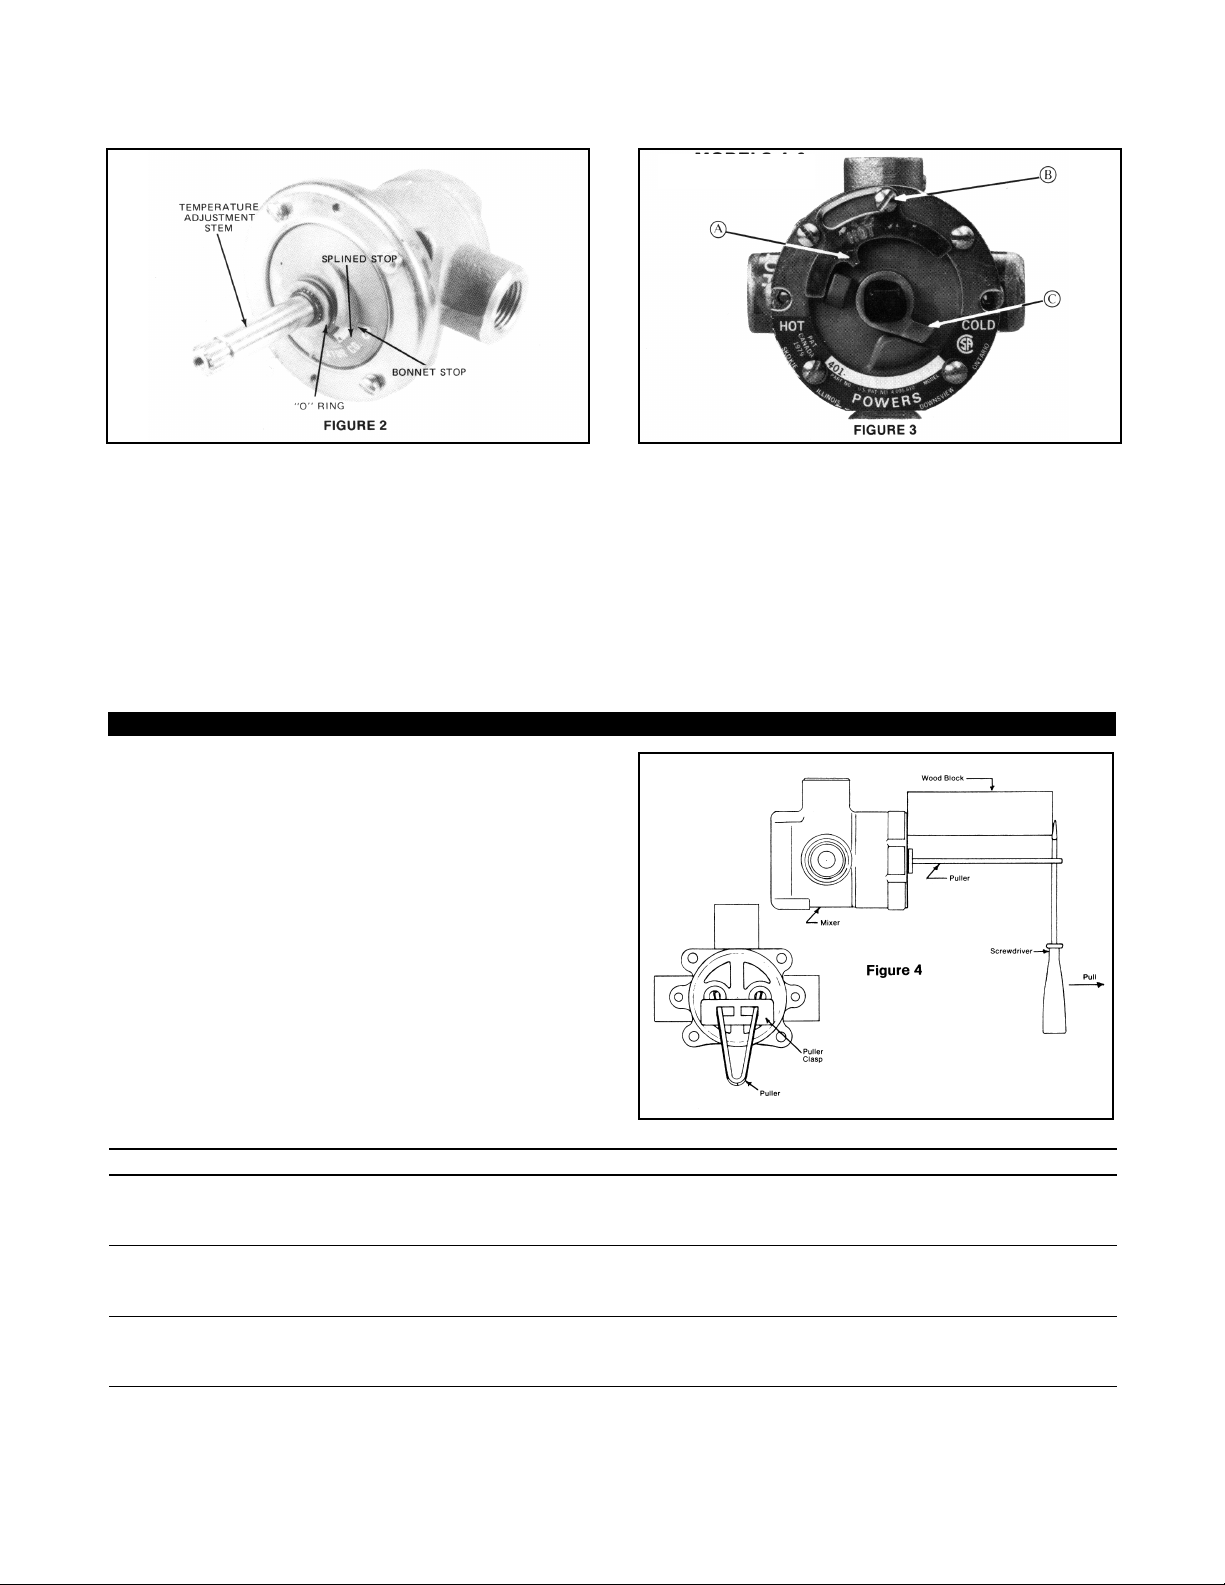
MAXIMUM TEMPERATURE SETTING:
MODELS 1–3
CAUTION: MAXIMUM TEMPERATURE SETTING. To change
setting, remove splined stop by slipping O-ring up on stem.
(Do not remove from stem.) Rotate temperature adjustment
stem to required maximum temperature setting. Position
splined stop on adjustment stem so that it contacts bonnet
stop, See figure 2. Slip O-ring back to original position. Shutoff is made by rotating temperature adjustment stem clockwise. This mixer cannot sense supply water temperature
changes, so any variation in inlet temperatures will affect
control point and maximum temperature setting.
MODELS 4–6
MAXIMUM TEMPERATURE SETTING (Refer to figure 3). This
must be set on the job. Mixer will pass full HOT water.
Loosen screw B (do not remove). Rotate stem to get desired
maximum temperature. Move stop A until it touches stop C.
Tighten screw B. Special case—with high (over 140°F–60°C)
hot water. Remove screw B, turn stop A over as shown by
dashed lines (the word “HOT” will face in) replace screw B.
Reset stop A per above.
CAUTION: Adjustable stop A must be present for proper
operation.
BALANCING CARTRIDGE PULLER
Troubleshooting Recommended Repair Kit
Gasket and 1. Water leak at stem and/or bonnet 410-182
Disc Replacement 2. Flow of water continues after mixer is turned off. Includes items:
10, 14, 18, 19(2), 20(2), 23(2)
Balancing Cartridge 1. Variable or untempered discharge temperature. 410-183 (Models 1–3)
Replacement 401-175 (Models 4–6)
Includes items 18 through 24
Throttling Stem and 1. Flow continues after mixer is turned off. 410-378 (Models 1–3)
Plate Replacement 2. Handle splines on stem damaged. 401-176 (Models 4–6)
includes items 10, 14, 15, 16, 17 and 18
Note: When replacing cartridge “O” ring (item 23), coat the body surface with a small amount of grease or soap.
Page 3

TI400 v2 Page 3
Hydroguard 400
Models 1–3
PARTS LIST
1 034-224G Handle Screw (8-32 x 7⁄8″) C.P. Steel
2 420-301E Lever Handle C.P. Cast
3 420-314 (4) Plug Button C.P. Steel
4 034-515K Handle Screw (8-32 x 1⁄2″) C.P. Steel
5 420-300 Handle (includes items 3, 4, 5) —
5A 420-213 Insert
9 030-889 Bonnet Screws (10-24 x 7⁄8″) Stainless Steel
10 410-366 (25) O-Ring (3⁄8 x 1⁄2 x 1⁄16″) Buna-N
11 410-371 (6) Temperature Stop Brass
12 410-377 Support Ring Stainless Steel
13 410-346 Bonnet Noryl
14 410-366 (25) O-Ring (3⁄8 x 1⁄2 x 1⁄16″) Buna-N
15 410-368 (15) Washer Synthane
16 410-369 (10) Wavy Washer Stainless Steel
17 * Adjustment Stem —
18 * Bonnet Gasket Rubber
19 * Shut-Off Disc Buna-N
20 410-366 (25) O-Rings Buna-N
21 * Guide Brass
22 * Spring Monel
23 * O-Ring (3⁄4 x 15⁄16 x 3⁄32″) Buna-N
24 * Cartridge Celcon
25 N/A Body Bronze
26 400-062 Dial Plate (includes 27, 28, 31, 32) —
26A 401-086 Handle Only Duralac
27 401-090 Plug Button —
28 420-216 (20) Screw (8-32 x 2″) Steel
29 401-092 Button in Kit 400-085 Duralac
30 OBS Dial Plate with Diverter Assembly —
31 032-064 Screw (8-32 x 1⁄2″) Brass
32 401-088 Stem Guide C.P. Cast
34 OBS Body (Diverter) Bronze
Item Product No. Description Material Item Product No. Description Material
( ) Number of items per package.
* Available in kits (page 2).
NOTE: Model 1 dial is not available.
Page 4

TI400 v2 Page 4
Hydroguard 400
Models 4–6
PARTS LIST
1 401-090 Plug Button —
2 080-008 Screws Brass
3 401-230A Complete Dial Assembly —
4 401-231 Handle —
5 030-885 Bonnet Screws 10-32 x 1″ St. Steel
6 030-884 Adj. Stop Screw 10-32 x 5⁄16″ St. Steel
9 401-228 Adjustment Stop Stl. Zinc Pl.
10 401-366 (25) O-Rings 3⁄8 x 1⁄2 x 1⁄16″ Buna-N
11 401-165 Max. Temp. Stp Brass
12 410-377 Support Ring St. Steel
13 401-162 Bonnet Noryl
14 410-366 (25) O-rings 3⁄8 x 1⁄2 x 1⁄16″ Buna-N
15 410-368 (15) Flat Washer Synthane
16 410-369 (10) Wavy Washer St. Steel
17 * Throttling Stem Celcon
18 * Bonnet Gasket Rubber
19 * Shut-Off Discs Buna-N
20 * O-rings 13⁄4 x 17⁄8 x 1⁄16″ Buna-N
21 * Quad Rings Buna-N
23 * O-Ring 3⁄4 x 15⁄16 x 3⁄32″ Buna-N
24 * Balance Chamber Celcon
25 401-158 Body (4-Port) Bronze
401-160 Body (3-Port) Bronze
26 401-210 Strainer Caps Celcon
Item Product No. Description Material Item Product No. Description Material
( ) Number of items per package.
* Available in kits (page 2).
© Reprinted March 2002 Powers, a Watts Industries Co.
USA Phone: 800.669.5430 • Canada Phone: 888.208.8927
www.powerscontrols.com
A Watts Industries Co.
Form TI400 v2 0218 EDP # 6511203 Printed in U.S.A.
 Loading...