

Page 1

Look inside for:
Page
Safety Definitions ........................1
Important Safety Information .............. 2-3
Product Specifications ....................4
Parts & Features ........................4
Assembly ............................. 5-6
Operation .............................7-10
Routine Maintenance ................... 11-12
Storage................................12
Troubleshooting ........................13
Technical Service .......................13
Warranty...............................14
09/28/18 Printed in China A204064
Operator’s Manual
WHEELED STRING
TRIMMER MOWER
Gasoline Powered 43cc, 2 Cycle
Record the following for future reference:
Mfg. Date Code : _____________________
Date of Purchase: Attach a copy of your sales receipt.
Consumer Toll Free Number: 1-800-737-2112
Refer to the website for electronic manual and parts book.
www.powermateoutdoor.com
IMPORTANT:
Thank you for purchasing this Powermate® Trimmer.
This manual provides complete instructions for safely operating, and maintaining your Trimmer. Read and
save these instructions. Refer to this manual each time before using your Trimmer.
WARNING: CONTAINS LEAD. May be harmful if eaten or chewed. May generate dust containing lead. Wash
hands after use. Keep out of reach of children.
WARNING: This product can expose you to chemicals including lead, which is known to the State of
California to cause cancer and birth defects or other reproductive harm. For more information go to www.
P65Warnings.ca.gov.
KEEP THIS MANUAL FOR FUTURE REFERENCE
If you have a question or problem...CALL TOLL FREE:
1-800-737-2112
Model No. PWSTM4317.2
Page 2
Questions? Call Toll Free at 1-800-737-2112 EN-2 Copyright © 2018 MAT Engine Technologies, LLC
Safety Definitions
• Save all instructions
DANGER
Indicates an imminently hazardous situation which, if not avoided, will result in death or serious injury.
WARNING
Indicates a potentially hazardous situation which, if not avoided, could result in death or serious injury.
CAUTION
Indicates a potentially hazardous situation which, if not avoided, may result in minor or moderate injury.
NOTICE
Indicates a practice not related to personal injury which, if not avoided, may result in property damage.
The information listed below should be read and understood by the operator. We utilize the symbols below to allow the
reader to recognize important information about their safety.
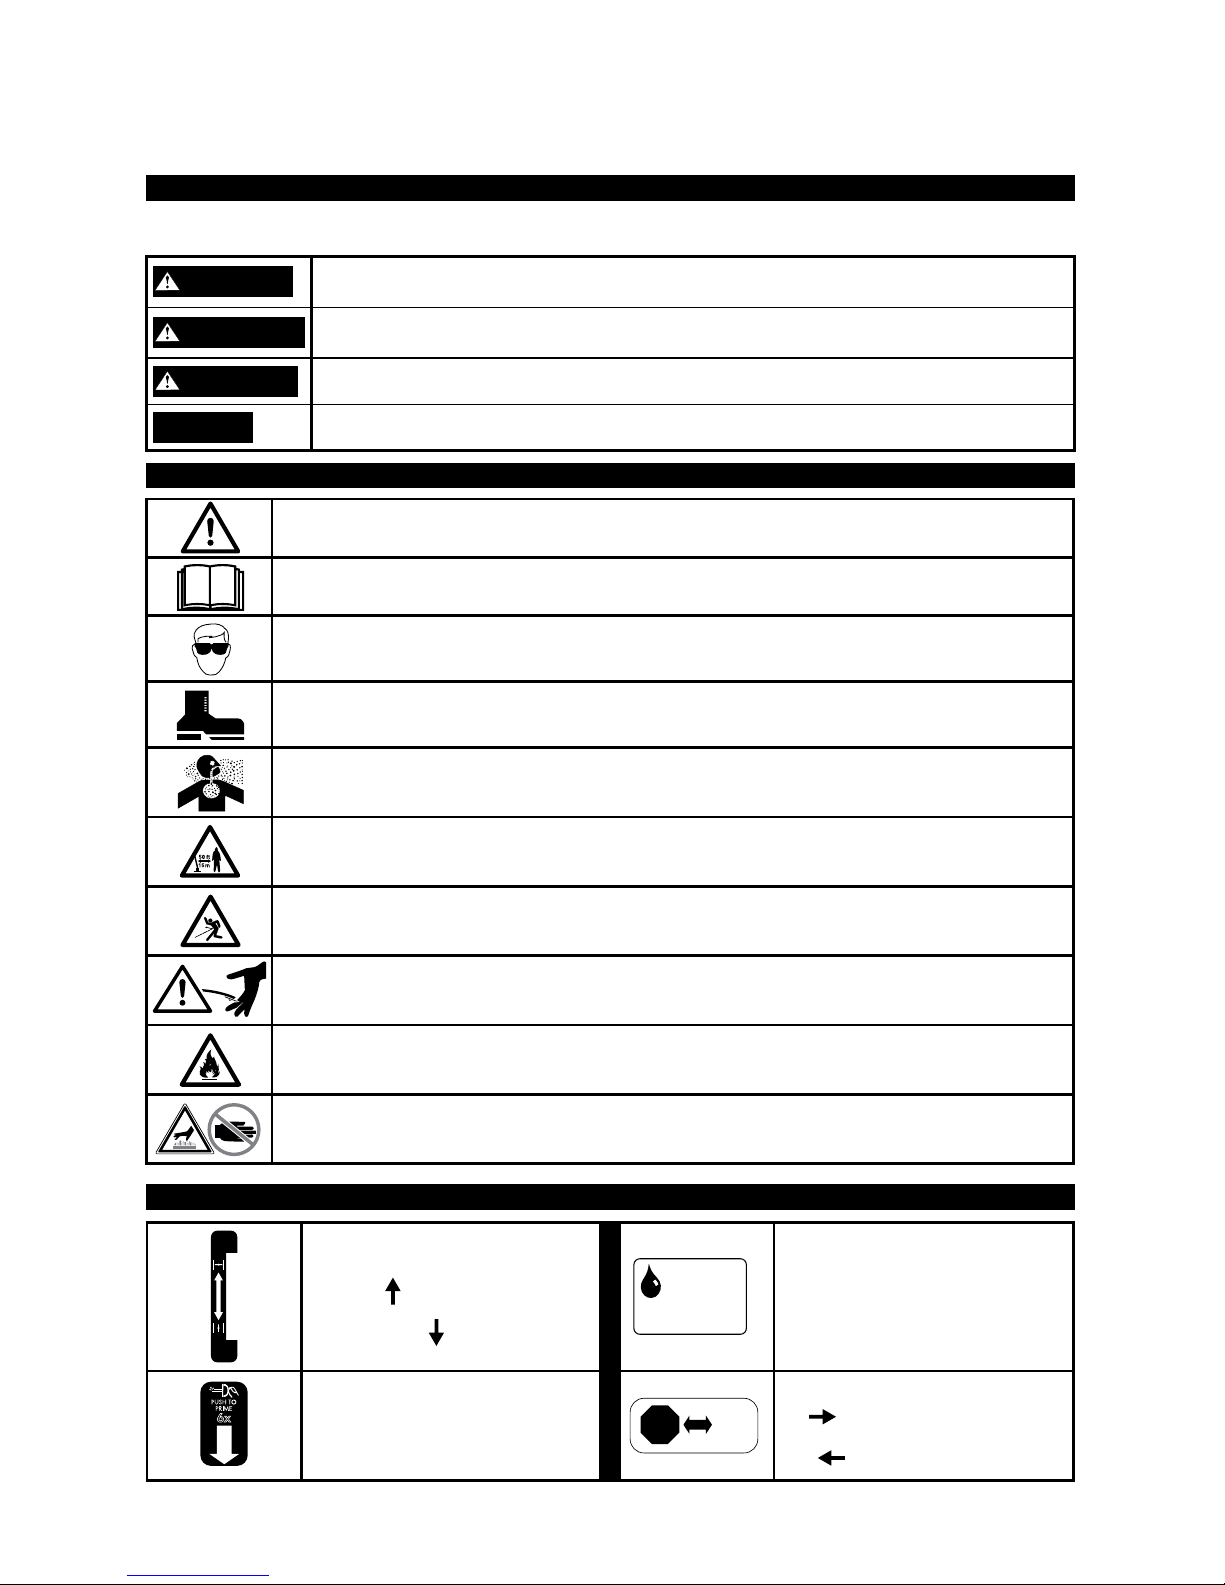
Safety Alert Symbols:
Safety Warning Symbols:
Control and Operating Symbols:
CHOKE/
COLD
START
RUN/
WARM
START
6x
PRIMER BULB
ON
UNDER SIDE
Choke Control:
Cold Start
Run/Warm Start
Fuel Mixture
50:1
Unleaded Gas: 2 Cycle Oil
Caution: Do Not Use Gas
Mix with More Than 10%
Methanol or Ethanol
Fuel Mixture:
50:1
(Unleaded Gas : 2 Cycle Oil)
6x
PRIMER BULB
ON
UNDER SIDE
Fuel Primer:
Press 6 times
STOP
ON/
RUN
Ignition Switch:
ON
OFF
Look for this symbol to point out important safety precautions. It means: Attention! Become Alert!
Your Safety Is Involved.
Read, understand and follow operator’s manual before operating this machine. Failure to follow
directions could result in serious injury.
Always wear eye protection that meets or exceeds the requirements of ANSI Z87.1.
Wear hearing protection.
Wear safety footwear.
Engine exhaust contains carbon monoxide, an odorless and deadly gas. NEVER run unit indoors
or in a poorly ventilated area.
Keep all by-standers at least 50 ft. (15 m) away. Stop machine if anyone enters the area.
This equipment can throw small objects at high speed causing personal injury. Inspect area
where used and remove all foreign objects.
Keep all parts of your body away from the rotating trimmer lines.
To reduce risk of fire, clean spilled gas and keep unit free from debris. Gasoline is extremely
flammable. Allow machine to cool before refueling.
Hot surface. Do not touch a hot muffler, gear box or cylinder, you may get burned. These parts get
extremely hot from operation and remain hot for a short time after the unit is turned off.
Page 3

Questions? Call Toll Free at 1-800-737-2112 EN-3 Copyright © 2018 MAT Engine Technologies, LLC
Before Operating Trimmer:
READ AND UNDERSTAND ALL INSTRUCTIONS BEFORE OPERATING TRIMMER.
Read and follow all warnings and safety instructions. Failure to do so can result in serious injury to you or bystanders.
WARNING
1. Avoid dangerous environments.
a. Do not operate Trimmer while under the influence of alcohol, medications, or drugs.
b. Do not operate Trimmer when you are tired.
c. Do not use this Trimmer if you are mentally or physically unable to operate safely.
2. Inspect Trimmer for damaged parts, and make sure all fasteners and guards are in place and secure. Replace any
damaged parts.
3. Use only 0.095 or 0.105 inch diameter flexible, nonmetallic line with this Trimmer.
This Trimmer is designed for use with a non-metallic flexible string. Never use this Trimmer with other accessories not
specifically approved for use in this manual. Never use alternative cutting members such as wire or wire-rope, which can
break off and become a dangerous projectile.
4. Dress properly when operating Trimmer.
a. Always wear heavy long pants, boots, gloves, and a long-sleeve shirt.
b. Do not wear loose clothing or jewelry that can get caught in the moving parts of the Trimmer.
c. Always wear gloves and substantial foot wear when working outside.
d. Always wear protective hair covering to contain long hair.
5. Always wear a face or dust mask if operating in dusty conditions.
6. Always wear eye protection that meets or exceeds the requirements of ANSI Z87.1.
7. Always wear hearing protection which meets or exceeds ANSI standards.
8. Thoroughly inspect the area where the Trimmer is to be used and remove all foreign objects.
Your equipment can throw small objects at high speed causing personal injury or property damage.
WARNING
DANGER
Important Safety Information
• Save all instructions
DANGER
While Operating Trimmer:
1. Stay alert. Focus on safe operation and be aware of your operating environment.
2. Do not operate Trimmer if it is damaged or not securely and fully assembled.
3. Only well instructed adults should operate Trimmer. Never allow children to operate Trimmer.
4. Keep children away. Keep all bystanders at least 50 ft (15 m) away.
5. This Trimmer is only intended for trimming, scalping, and mowing. Do not use Trimmer for any job except that for
which it is intended. Do not use for edging, pruning or hedge trimming.
6. The Trimmer line may be spinning during carburetor adjustments. Make carburetor adjustments with lower end
supported to prevent trimmer line from contacting any object.
7. Maintain your balance and proper footing at all times. Do not overreach.
8. Keep all parts of your body away from cutting area, the rotating trimmer lines and hot surfaces.
9. Hold the unit firmly with both hands.
10. Do not force Trimmer. It will do the job better and with less likelihood of a risk of injury by using it at the rate for
which it was designed.
11. Never start or run the unit inside a closed room or building; breathing exhaust fumes can kill.
12. After turning the Trimmer off, make sure the trimmer line has stopped before approaching the trimmer head.
Page 4

Questions? Call Toll Free at 1-800-737-2112 EN-4 Copyright © 2018 MAT Engine Technologies, LLC
Important Safety Information (Continued)
• Save all instructions
While Operating Trimmer:
Prolonged exposure to vibrations through use of gasoline powered hand tools could cause blood vessel or nerve
damage in fingers, hands, and joints of people prone to circulation disorders or abnormal swellings. Extensive use
in cold weather has been linked to blood vessel damage in otherwise healthy people. If symptoms occur such as
numbness, pain, loss of strength, change in skin color or texture, or loss of feeling in the fingers, hands, or joints,
discontinue the use of this tool and seek medical attention.
CAUTION
Fuel Safety:
1. Mix and pour fuel outdoors WHERE THERE ARE NO SPARKS OR FLAMES.
2. Use a container approved for gasoline.
3. Do not smoke or allow smoking near fuel or the Trimmer.
4. Avoid spilling fuel or oil. Wipe up all fuel spills.
5. Move at least 10 ft (3 m) away from fueling site before starting engine.
6. Stop engine and allow to cool before removing fuel cap. Remove fuel cap slowly.
Maintenance & Storage of Trimmer:
1. Disconnect the spark plug before performing maintenance.
2. Maintain Trimmer with care. Inspect Trimmer periodically. If Trimmer is not working properly or damaged, have it
repaired by a qualified service center.
3. Check for misalignment of moving parts, binding of moving parts, broken parts, mounting, and any other condition
that may affect its operation.
4. Keep guards in place and in working order.
5. A guard or other part that is damaged should be properly repaired or replaced by a qualified service center.
6. Use only genuine Powermate
®
replacement parts and accessories. Use of any non-Powermate® parts or
accessories could lead to injury, damage to the unit, and will void your warranty.
7. Do not remove or modify any parts. Removing or modifying parts could lead to injury, damage the Trimmer and will
void the warranty.
8. Keep handles dry, clean, and free from oil and grease.
9. Allow engine to cool and empty the fuel tank before storing or transporting in vehicle. Use up remaining fuel in the
carburetor by starting the engine and letting it run until it stops.
10. When not in use, store Trimmer indoors in a dry location. Store Trimmer in a locked area out of the reach of children.
11. Store unit and fuel in area where fuel vapors cannot reach sparks or open flames from water heaters, electric motors
or switches, furnaces, etc.
WARNING
Page 5
Questions? Call Toll Free at 1-800-737-2112 EN-5 Copyright © 2018 MAT Engine Technologies, LLC
Engine .............................. 43 cc, 2 cycle
Speed ........7,000-8,500 RPM depending on string size
Cutting Diameter .................17 inches (432 mm)
Line Diameter.....................0.095 or 0.105 inch
Spool Type . . . . . . . . . . . . . . . . . Manual loaded, Twin-Line
Fuel Tank Capacity.................... 28 oz (840 ml)
Fuel Type .......
Unleaded Gasoline – 87 Octane or higher
2-Cycle Oil Type........
2-Cycle Oil that meets or exceeds
JASO – FC Specifications
Fuel Mixture ................
50:1 (Gasoline: 2-Cycle Oil)
Spark Plug . . . . . . . . . . . . . . . . . . . . . . . . . NGK - BPMR6A
CHAMPION - CJ8 or equivalent
Net Weight ...........................39 lbs (18 kg)
Product Specifications
• Save all instructions
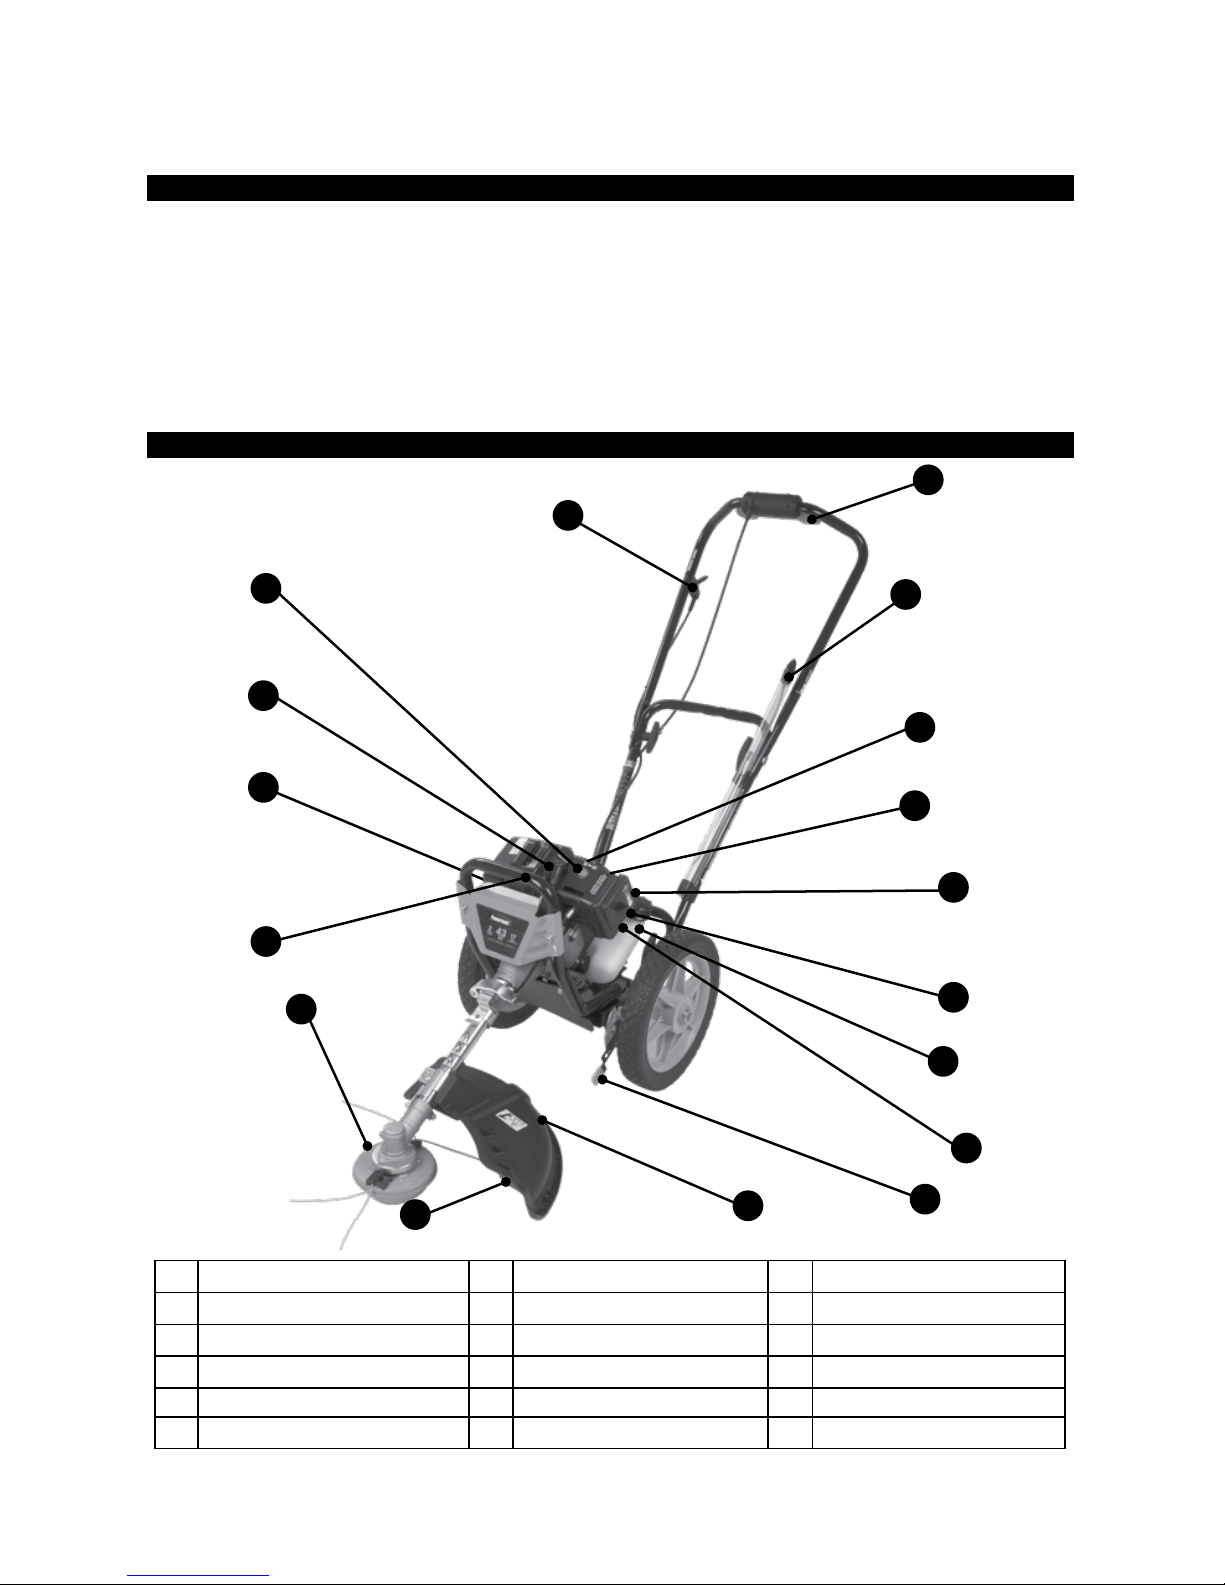
Parts & Features
1.
Trimmer Head Assembly
7.
On/Off Ignition Switch
13.
Fuel Tank
2.
Engine Air Intake Screen
8.
Recoil Starter Handle
14.
Air Filter Cover
3.
Trimmer Guard
9.
Choke
15.
String Storage
4.
Trimmer Line Knife
10.
Fuel Primer Bulb 16. Bevel Handle
5.
Front Handle
11.
Spark Plug 17. Swivel Control
6.
Throttle Lever
12.
Muffler
8
9
1
4
5
11
3
6
7
10
12
13
14
15
2
16
17
Page 6
Questions? Call Toll Free at 1-800-737-2112 EN-6 Copyright © 2018 MAT Engine Technologies, LLC
Assembly
• Save all instructions
Parts Included With The Packaged Trimmer:
If you need assistance or find any parts missing,
CALL TOLL FREE: 1-800–737-2112
Handle Assembly:
A
Cutting Head Assembly:
B
Tools Needed For Assembly:
Unpacking:
• 10 mm wrench or adjustable wrench
• 14 mm socket or open wrench
1. Remove components from carton.
2. Cut white cable ties. Do not cut black cable ties.
3. Remove foam and corrugated protection.
Do not operate Trimmer if it is damaged or not securely and fully assembled.
WARNING
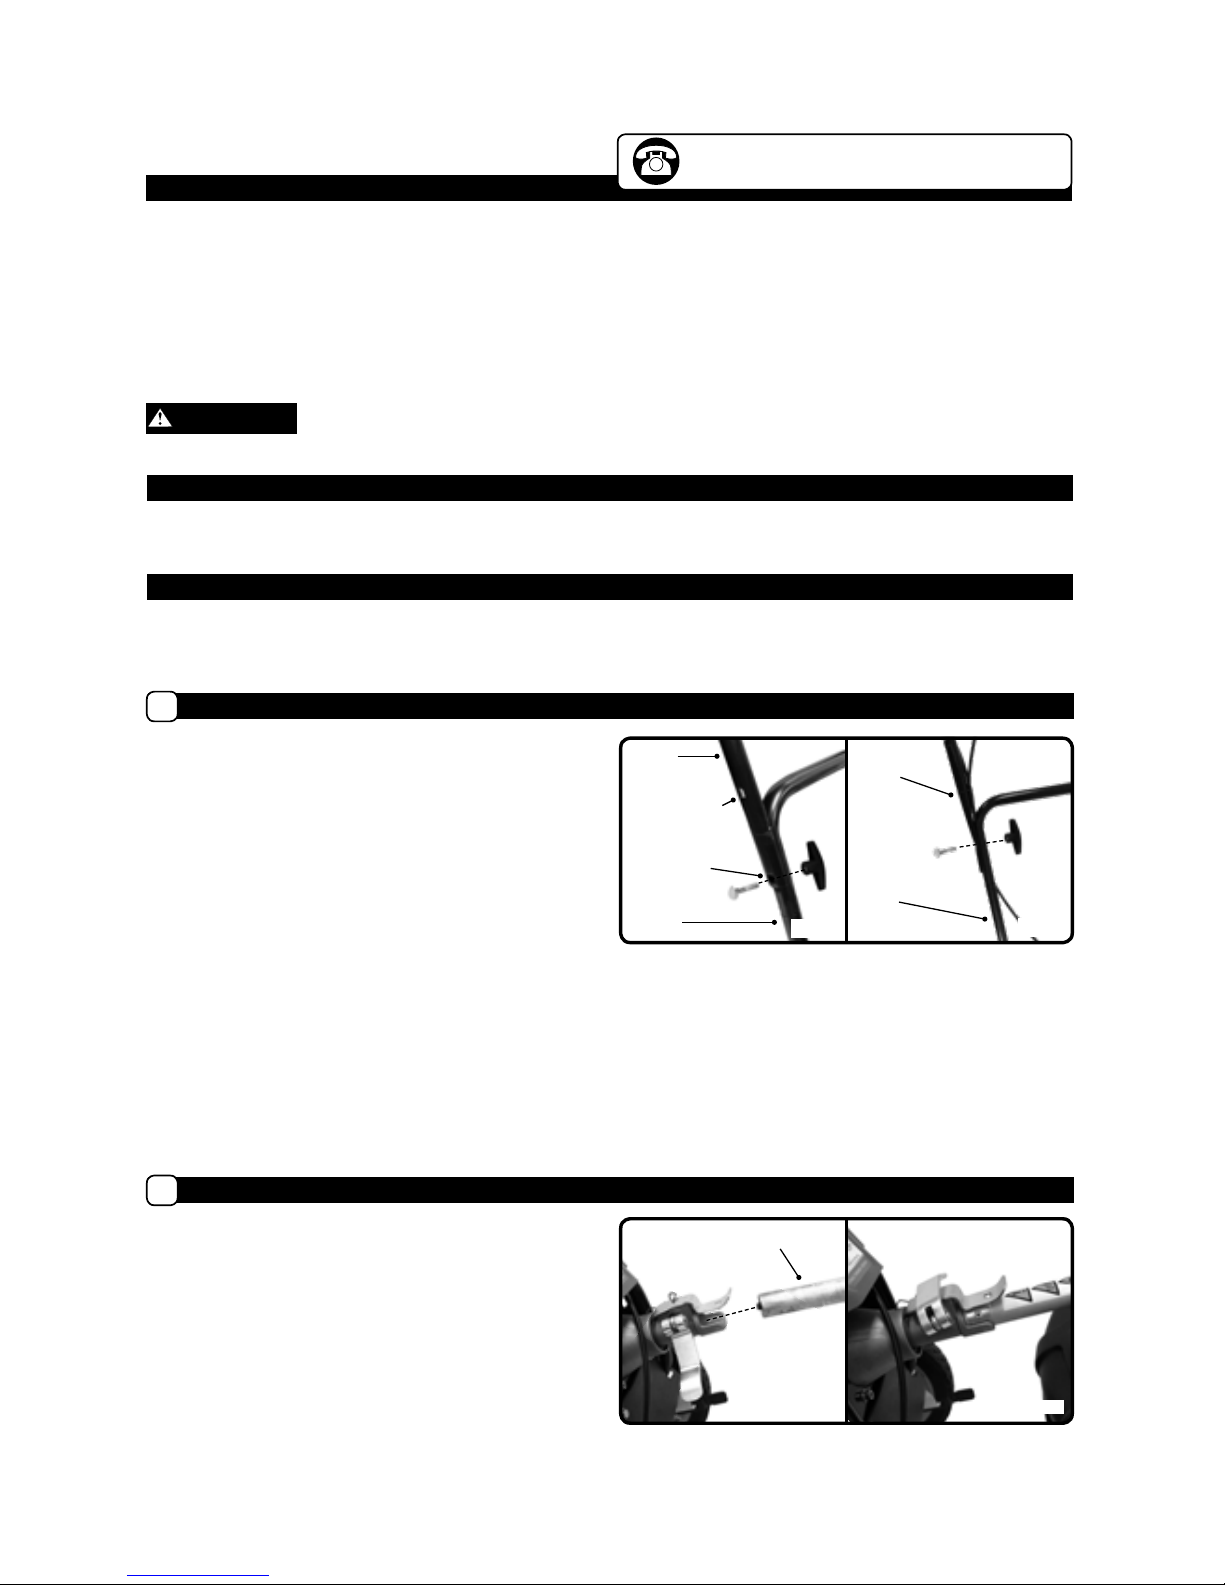
1. Install middle handle to lower handle at one of the two
height adjustment locations and secure using two
saddle bolts and plastic knobs. Orient handle so small
metal clips are to the right side. Route pivot cable
through middle handle. Assemble with knobs to the
inside of the lower handle. Tighten knobs securely.
(Fig. 1)
2. Install upper handle to middle handle and secure using
two saddle bolts and plastic knobs. Orient handle so
the “V” shape is upward. Assemble with knobs to the
inside of the middle handle. Route the throttle cable
below the right side of the middle handle. Tighten
knobs securely. Secure throttle cable to the handles
with provided metal clips as shown. Secure the pivot
cable with provided plastic cable tie.
(Fig. 2)
3. Use handle height adjustment holes on middle handle
to adjust to your preferred handle height.
1. Install the cutting head assembly into the
clutch housing with the metal saddle engaging the
clutch housing. (Fig. 3) It may be necessary to rotate
the trimmer head slightly to align the shaft splines.
2. Screw the camlock inward and rotate the handle
to clamp the tube to the housing. Try to rotate the
tube within the housing. If you can rotate the tube
at all, unlock the camlock handle and screw inward
an additional one half turn. Rotate the handle to
clamp the tube. Recheck for tube tightness and
repeat if necessary.
(Fig. 4)
Fig. 2
Fig. 4
• Operator’s Manual
• Upper and Middle Handles
• Trimmer Guard
• Spark Plug Wrench
• Replacement String Tube and Clips
• 50:1 2-Cycle Engine Oil (2.6 Fluid Ounces.)
• Front Tube with Trimmer Head
• (2) Wheel Assemblies
• (4) Plastic Wing Nuts (For Attaching Handles)
• (4) Saddle Bolts (For Attaching Handles)
• (2) Cable Ties
• (1) Wheel Shoulder Bolt (Longer for Right Side Wheel)
• (1) Wheel Shoulder Bolt (Shorter for Left Side Wheel)
• (1) Wheel Spacer (For Right Side Wheel)
• (1) Hex Head Cap Screw (For Attaching Trimmer Guard)
MIDDLE
HANDLE
UPPER
HANDLE
Fig. 1
Fig. 3
CUTTING HEAD
ASSEMBLY
MIDDLE
HANDLE
SHORT HANDLE
HEIGHT HOLE
TALL HANDLE
HEIGHT HOLE
LOWER
HANDLE
Page 7
Questions? Call Toll Free at 1-800-737-2112 EN-7 Copyright © 2018 MAT Engine Technologies, LLC
Assembly (Continued)
• Save all instructions
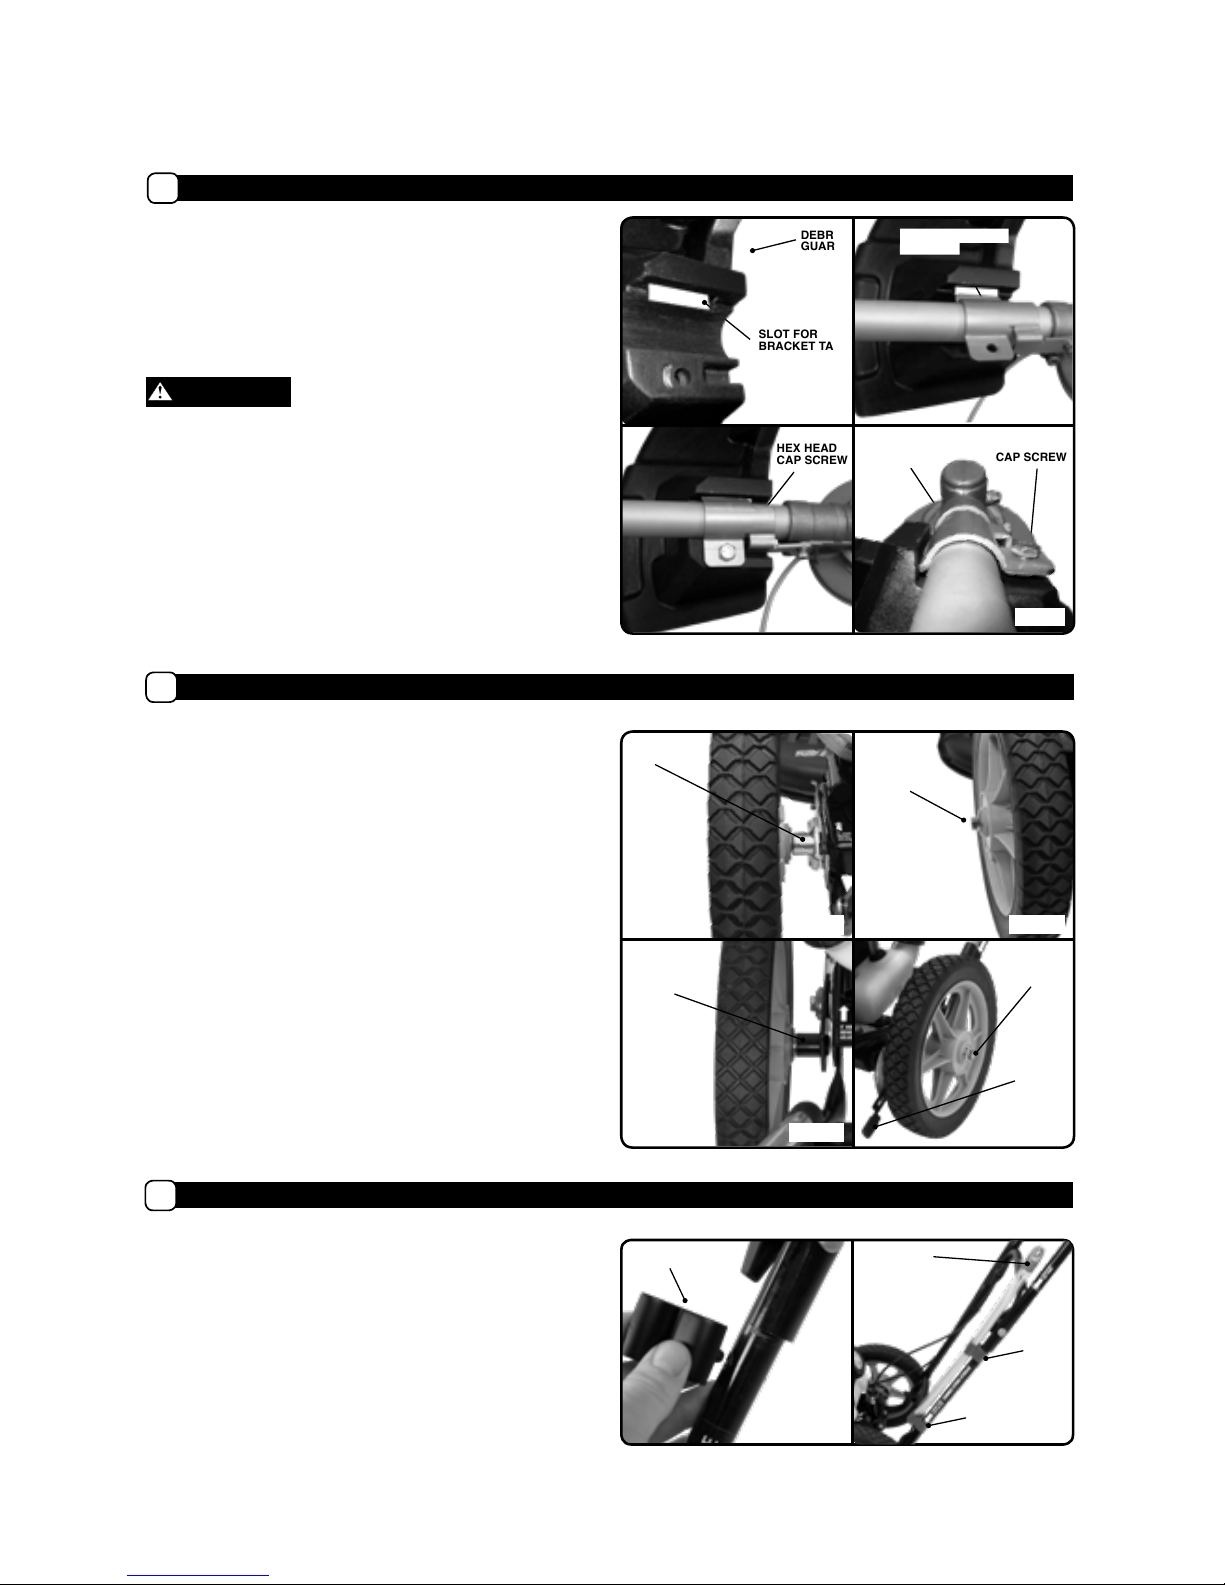
Wheel Assembly:
D
String Storage:
E
1. Install the right wheel to the frame using the longer
shoulder screw and spacer. Tighten to 25 ft. lbs.
(34 N.m) torque using a 14 mm wrench. (Fig. 9-10)
2. Install the left wheel to the adjuster assembly stud
using the shorter shoulder screw. Tighten to 25 ft. lbs.
(34 N.m) torque. (Fig. 11 & 12)
3. Move the bevel handle to the low position for
level mowing.
1. Snap the lower tube clip onto the left middle handle
using the pierced hole. (Fig. 12)
2. Snap the upper tube clip onto the left middle handle
above using the pierced hole.
3. Install the clear tube with provided extra string
into the clips. (Fig. 13)
Fig. 12
TUBE CLIP
Fig. 13
UPPER
CLIP
TOP CAP
LOWER
CLIP
Debris Guard:
C
1. Insert the tab on the metal mounting bracket into the
slot on the debris guard.
(Fig. 5-6)
2. Install the hex head cap screw through the bracket
and into the metal insert of the debris guard.
Tighten securely using a 10 mm wrench.
(Fig. 7-8)
The trimmer line knife attached to the debris guard is
sharp and can cut you. Handle with care.
CAUTION
SLOT FOR
BRACKET TAB
DEBRIS
GUARD
HEX HEAD
CAP SCREW
HEX HEAD
CAP SCREW
METAL MOUNTING
BRACKET
METAL MOUNTING
BRACKET
Fig. 5
Fig. 7
Fig. 6
Fig. 8
SPACER
Fig. 9
Fig. 11
Fig. 10
Fig. 12
SHOULDER
SCREW
(SHORTER)
BEVEL
HANDLE
SHOULDER
SCREW
ADJUSTER
ASSEMBLY
Page 8
Questions? Call Toll Free at 1-800-737-2112 EN-8 Copyright © 2018 MAT Engine Technologies, LLC
Operation
• Save all instructions
Control Identification and Use:
A
Recommendations:
B
1. Your Trimmer performs best when the engine
operates at high speed and the tips of the line cut the
vegetation. Do not force the trimmer line into grass
faster than the Trimmer’s cutting speed permits.
2. The tips of the line can cause damage to trees, shrubs
and fences. To avoid damage in these conditions, you
may choose to run the engine at lower speeds and
should carefully monitor the location of the cutting line.
3. Because the cutting head can be pivoted to the right
side, plan to trim objects (fences, buildings, etc.)
in a clockwise manner.
4. When trimming next to wire type fencing, avoid
cutting-line contact with the fence. Contact will
result in rapid line wear. Likewise, contact with
concrete and brick surfaces will result in rapid
line wear.
Thoroughly inspect the area where the Trimmer is to be used and remove all foreign objects. Your equipment can throw
small objects at high speed causing personal injury or property damage.
Keep all children and bystanders at least 50 ft (15 m) away when operating. Stop machine if anyone enters the area.
WARNING
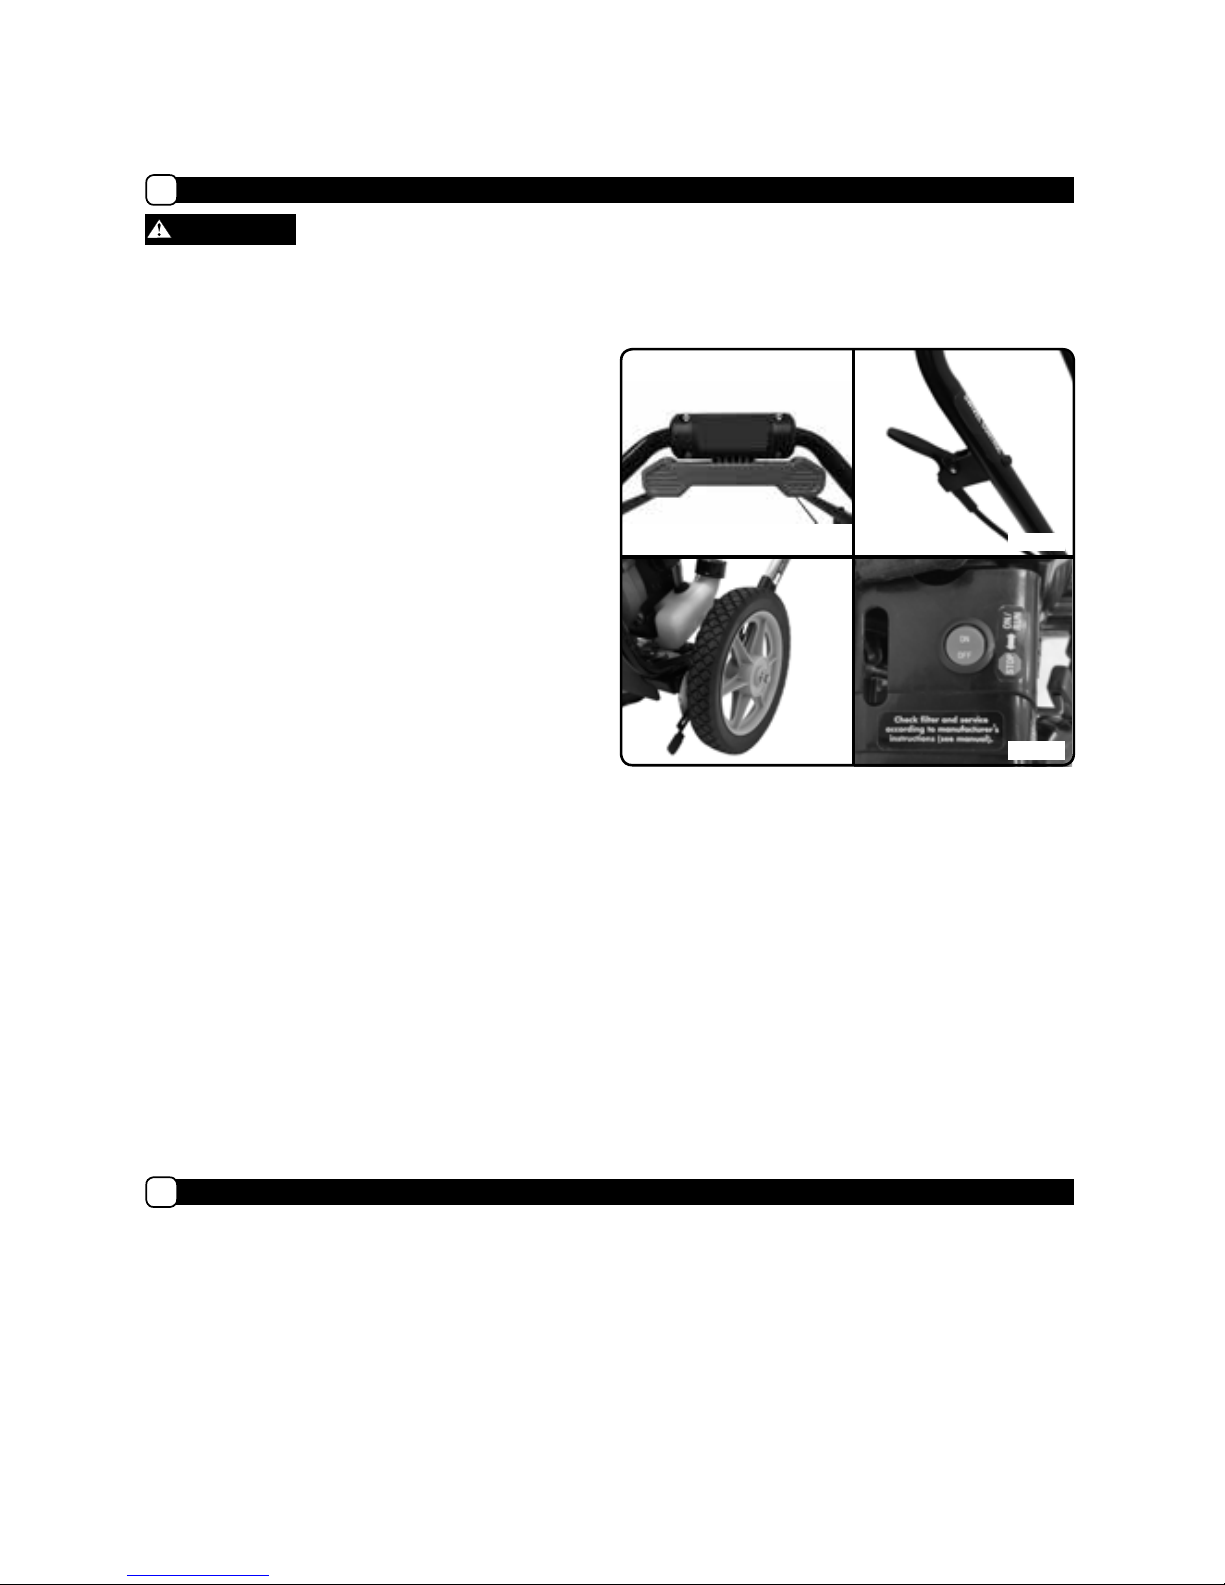
1. Throttle:
The throttle is located on the top crossbar on the
upper handle. Depressing the lever will increase the
engine speed. At idle speed the clutch is disengaged
and the trimmer head will not turn. As engine speed
is increased, the automatic clutch will engage and
rotate the trimmer head. Upon release, the throttle
lever is spring loaded to return to idle speed. (Fig. 14)
2. Swivel to offset trimmer head:
Your wheeled string trimmer mower is designed
with the ability to offset the trimming head from
a centered position to a right side position. This
is accomplished by depressing the finger control
on the right upper handle. By depressing the finger
control, the head becomes unlocked and can be
swiveled to two positions to the right. Upon release
of the finger control, a pin will lock the trimmer head
into the desired position. Swiveling the trimmer head
allows for easy mowing / trimming around obstacles
such as posts or trees and under fences. (Fig. 15)
3. Bevel trimming adjustment:
The line will normally cut approximate 2 inches
(50 mm) high. When it is desired that the line cut
closer to the ground, a bevel adjustment is available.
A handle is located just in front of the left wheel. This
handle can be deflected outward and rotated to two
different positions. This will position the trimmer head
at an angle and allow the line to cut closer to the
ground. This is especially useful when trimming next
to raised sidewalks or building foundations. (Fig. 16)
4. Start / Stop switch:
An ignition switch is located on the engine air filter
housing. The switch must be in the “On” position
for the engine to run. Moving the switch to the “Off”
position will stop the engine. (Fig. 17)
Fig. 14
Fig. 16
Fig. 15
Fig. 17
Page 9

Questions? Call Toll Free at 1-800-737-2112 EN-9 Copyright © 2018 MAT Engine Technologies, LLC
Operation (Continued)
• Save all instructions
Starting Engine:
B
Keep all parts of your body away from cutting area, the rotating trimmer lines and hot surfaces.
NOTE: DO NOT depress the throttle lever until engine starts and runs.
NOTE: When the weather gets cold, please allow the engine to warm up at idle for longer period of time,
before engaging to RUN/WARM START position.
WARNING
The 2-cycle engine on your Trimmer requires that fuel and
2-cycle engine oil be pre-mixed before adding to the
trimmer’s fuel tank. To mix the fuel/ 2-cycle oil:
1. Use fresh unleaded gasoline with an octane rating
of 87 or higher. Do not use gasoline containing more
than 10% ethanol.
NOTICE
Use of gasoline containing more than 10% ethanol can
damage Trimmer. Use of non-ethanol gasoline is best.
We recommend the continuous use of a fuel additive/
stabilizer to counteract the effects of ethanol. These
additives also prolong the shelf life of gasoline.
2. Always use 2-cycle oil that meets or exceeds
JASO – FC specifications and is intended for mixing at
a fuel/oil ratio of 50:1
3. Do not use automotive or 2-cycle marine outboard oil.
These will damage your Trimmer’s engine and void
the warranty.
4. Always mix the gasoline and 2-cycle oil in a container
approved for gasoline. Never mix fuel directly in the
trimmer’s fuel tank.
5. Follow instructions on 2-cycle oil container for mixing
fuel. Mix gasoline and 2-cycle oil at a ratio of 50:1.
A mixture with a 50:1 ratio is obtained by mixing
1 gallon (4 liters) of gasoline with 2.6 ounces of oil
(77 ml). After adding oil to gasoline, shake container
momentarily to ensure proper mixing.
6. Mix only enough fuel for your immediate needs.
Do not store pre-mixed fuel.
7. Stop engine and allow to cool before refueling.
8. To fill the Trimmer’s fuel tank with the gasoline/oil
mixture, place the Trimmer upright on the ground or on
a sturdy bench and wipe and any debris from around
the fuel cap.
9. Remove fuel cap slowly and use a funnel to pour the
mixture into the tank, and replace the fuel cap.
10. Avoid spilling fuel or oil. Wipe up all fuel spills.
11. Move at least 10 ft (3 m) away from fueling site
before starting engine.
Before Starting Engine:
A
Mixing Fuel / 2-Cycle Oil
Do not smoke or allow smoking near fuel or the Trimmer. Mix and pour fuel outdoors WHERE THERE ARE NO SPARKS
OR FLAMES.
WARNING
Recommendations (cont.):
B
5. Do not allow the trimmer head metal bowl to ride on top of concrete or asphalt surfaces. This will cause
wear to the metal bowl. The bowl was designed to ride on grass surfaces.
6. It is recommended that the line be replaced when it is worn to approximately ½ the original length. This will
help maintain a high tip speed and result in a clean cut. It is strongly recommended that the engine
cooling air screen be wiped clean at every string change. This will prevent engine overheating.
Page 10
Questions? Call Toll Free at 1-800-737-2112 EN-10 Copyright © 2018 MAT Engine Technologies, LLC
Operation (Continued)
• Save all instructions
Starting Engine:
C
Starting Engine (cont.):
B
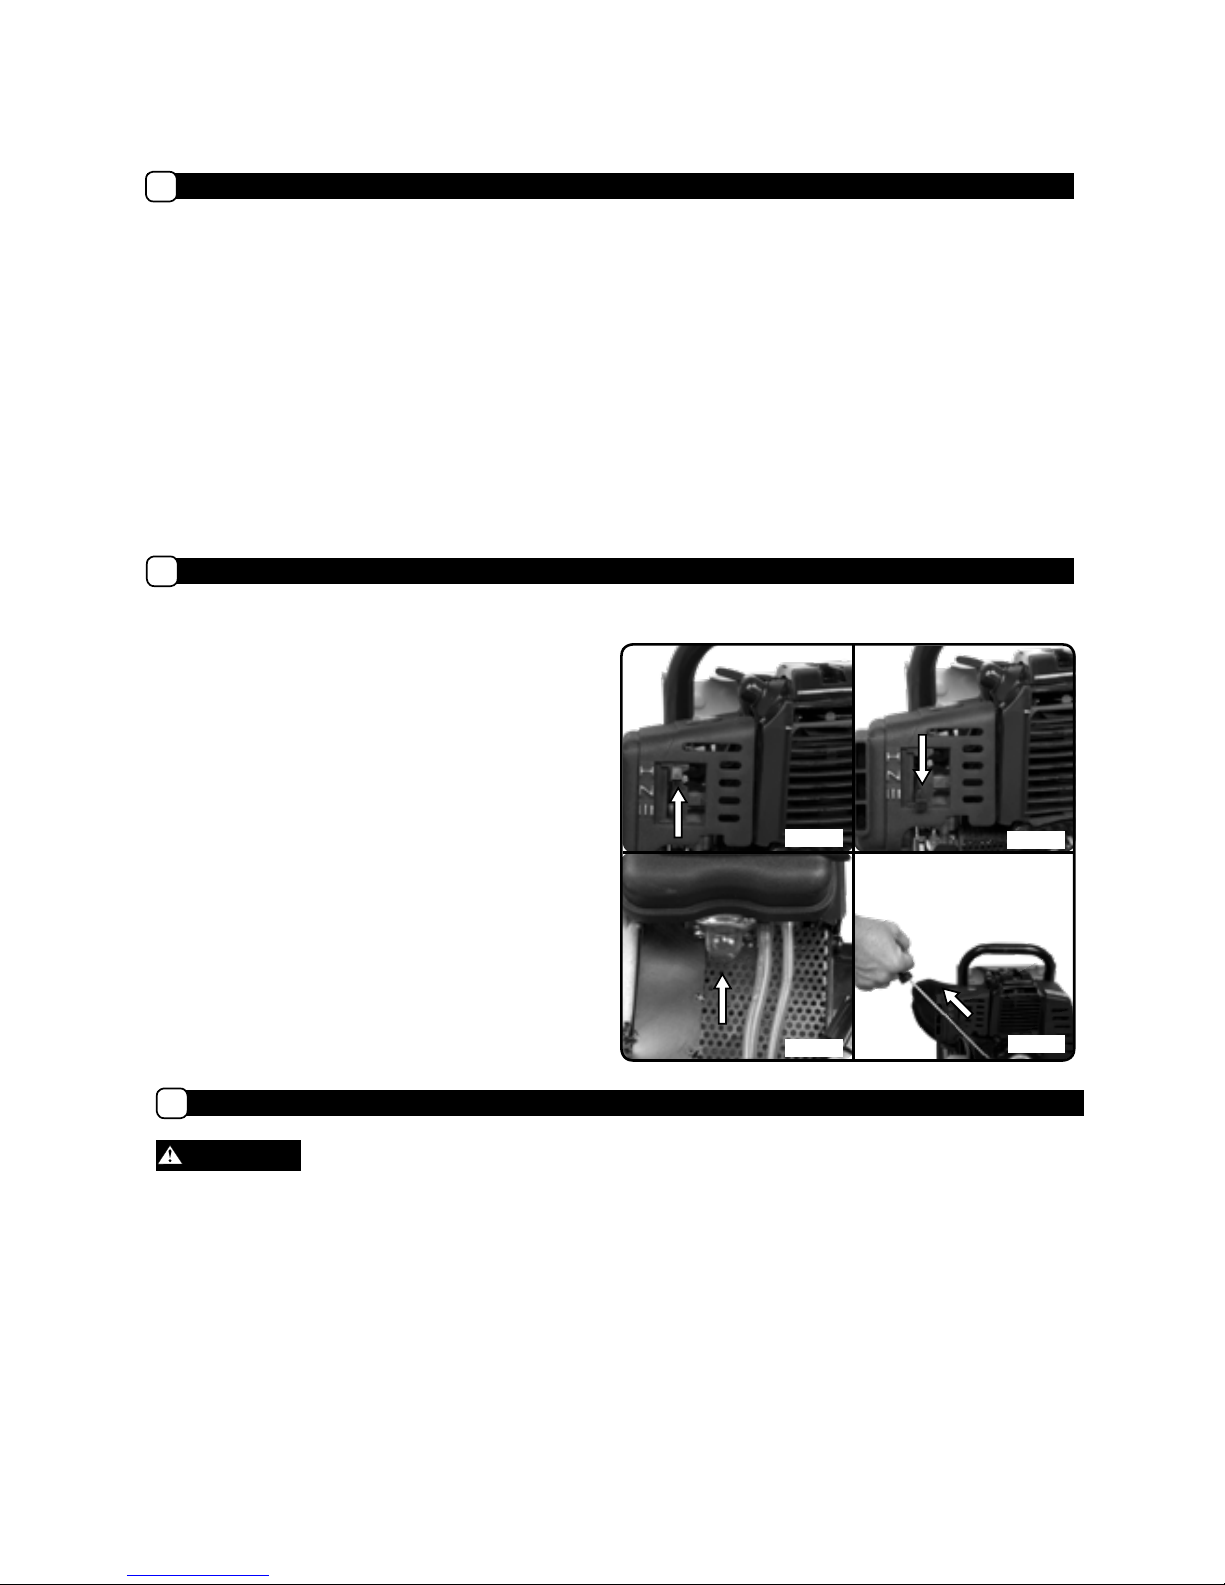
Cold Starting The Engine:
1. Place the Trimmer on a flat surface.
2. Move the ignition switch to the “ON” position.
3. Move the choke lever up to the “COLD
START” position. (Fig. 18)
4. Press the primer bulb slowly 6 times. (Fig. 20)
5. Pull the recoil starter handle sharply until the engine
starts and runs. (Fig. 21)
6. After engine starts and runs for 10-15 seconds, move
choke lever to “RUN/WARM START” position. (Fig. 19)
Starting A Flooded Engine:
1. Place the Trimmer on a flat surface.
2. Move the ignition switch to the “ON” position.
3. Move the choke lever to “RUN/WARM START”
position. (Fig. 19)
4. Fully depress the throttle lever and pull the starter
handle repeatedly until engine starts and runs. This
could require pulling the starter handle many times,
depending on how badly the unit is flooded. (Fig. 21)
5. If the engine still does not start, allow the unit to sit for
about 30 minutes, and repeat step 1-4.
Warm Starting The Engine:
1. Place the Trimmer on a flat surface.
2. Move the ignition switch to the “ON” position.
3. Move the choke lever to “RUN/WARM
START” position. (Fig. 19)
4. Pull the recoil starter handle sharply until the
engine starts and runs. (Fig. 21)
Fig. 18
Fig. 20
Fig. 19
Fig. 21
NOTE: If the unit still doesn’t start, refer to the TROUBLESHOOTING section of this manual.
Stopping The Trimmer:
D
The trimmer head and line will continue to rotate for a few seconds after the engine has stopped.
CAUTION
1. Release the throttle lever and allow the engine to
idle for a few moments.
2. Move the Ignition Switch to the “OFF” position.
Page 11
Questions? Call Toll Free at 1-800-737-2112 EN-11 Copyright © 2018 MAT Engine Technologies, LLC
WARNING
Techniques / Applications:
F
Thoroughly inspect the area where the Trimmer is to be used and remove all foreign objects. Your equipment can throw
small objects at high speed causing personal injury or property damage.
Your Trimmer is most effective when using the tips of the trimmer line for trimming grass and other vegetation. Do not
force the trimmer line into grass or vegetation faster than Trimmer’s cutting speed permits. Forcing the Trimmer will
cause your Trimmer to be less effective, and may cause the engine to overheat.
Trimming Tip
To extend the life of the trimmer line, keep the trimmer line moist. If not kept moist, the nylon line will become dry and
brittle. Keep extra trimmer line in a container of water. The line will stay flexible and easy to change. A flexible line will
also last longer.
It is recommended that the engine air intake screen be cleaned every time the trimmer line is replaced. Failure to keep
the air intake screen clean may result in overheating and damage to engine.
(See instructions under the Maintenance section)
NOTICE
Operation (Continued)
• Save all instructions
Installing Trimmer Line:
E
WARNING
Use 0.095 or 0.105 inch diameter flexible, nonmetallic
line with Trimmer. Never use alternative cutting members
such as wire or wire-rope, which can become a dangerous
projectile.
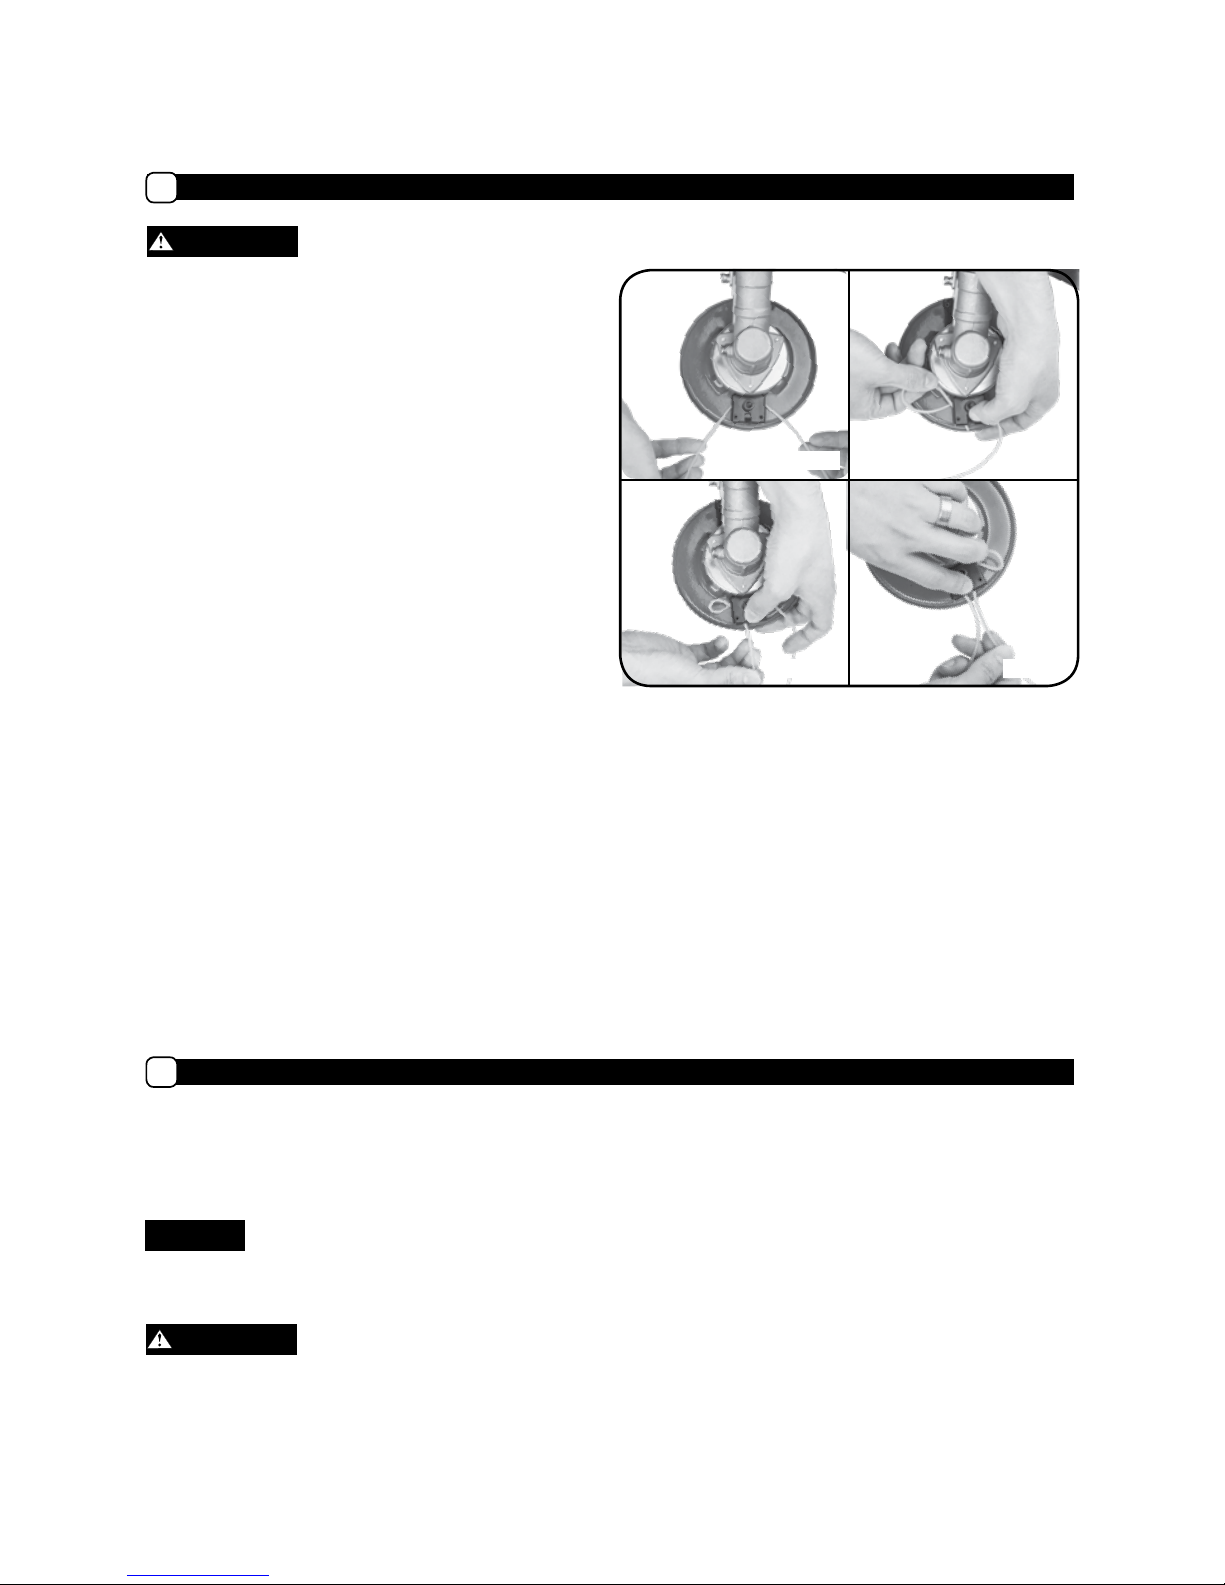
For 0.095 and 0.105 Inch Diameter Line: (Fig. 22-25)
1. Stop the engine and remove spark plug lead.
2. Cut two lengths of new trimmer line 16.5 inches long.
Use the instructions on the left handle to gage the
proper cut length.
3. Insert one end of string into the side opening and
route around the rear and out the opposite side
opening. (Fig 22)
4. Pull string so that equal lengths are on each side.
5. While pushing tab inward, route one end back
through side opening and out the front of retainer.
(Fig. 23 and 24)
6. Likewise, route the remaining end through its side
opening and out the front of retainer. (Fig 25)
7. Adjust string so equal lengths extend from retainer.
8. Repeat on opposite side.
Fig. 22
Fig. 24
Fig. 23
Fig. 25
Page 12
Questions? Call Toll Free at 1-800-737-2112 EN-12 Copyright © 2018 MAT Engine Technologies, LLC
Routine Maintenance
• Save all instructions
Engine Air Intake Screen:
B
Air Filter:
A
Your Trimmer has been equipped with two air filters inside the housing. Accumulated debris and dust in the air filter will
reduce engine performance, increase fuel consumption and increases the risk of engine damage. Clean the air filters
every 5 hours of operation. It may be necessary to clean the air filter more often in dry conditions due to a large amount
of airborn debris.
NOTICE
It is critical that the engine air intake screen be cleaned of debris to maintain acceptable engine temperatures. It is
recommended that the screen be cleaned every time the trimmer string is replaced.
WARNING
Disconnect the spark plug before performing maintenance.
WARNING
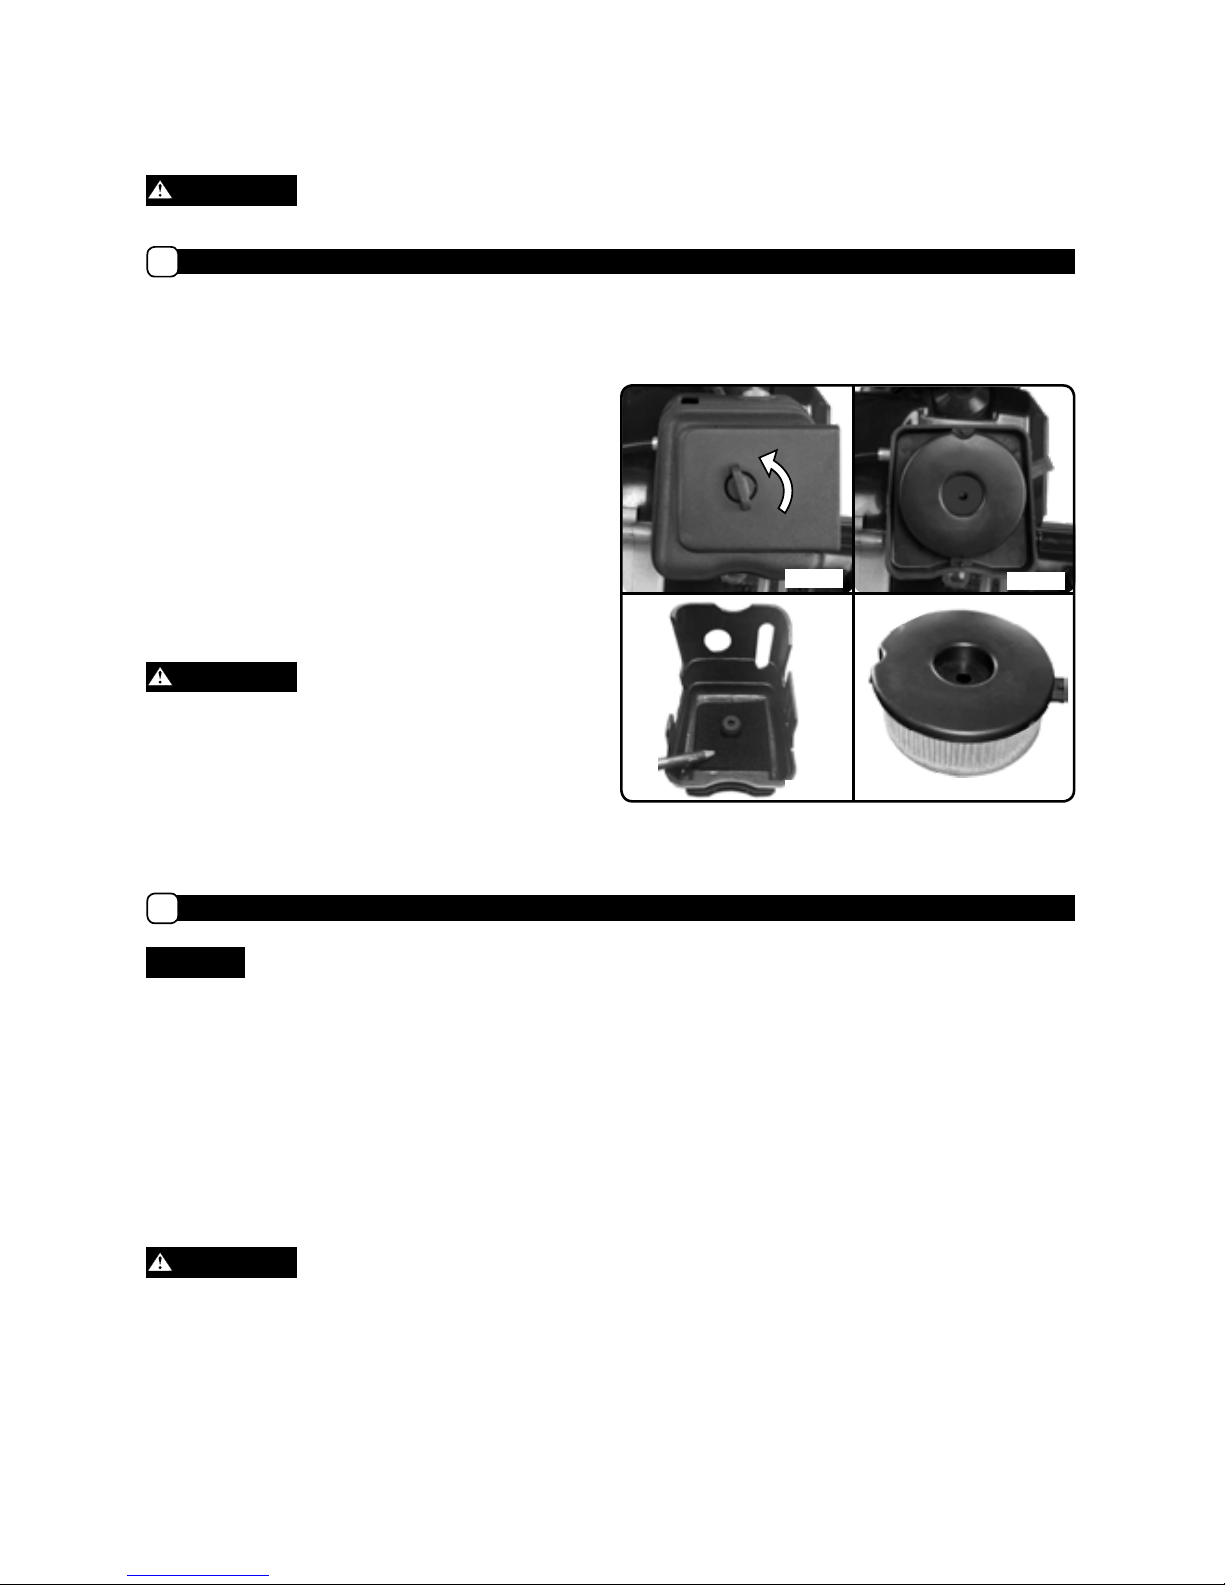
1. Before removing air filter cover, brush away any loose
dirt or debris on and around the pre-filter located in
the outer filter housing.
2. Remove air filter by unscrewing the retaining fastener.
(Fig. 28)
3. Remove and clean foam filter. (Fig. 30)
•
Light surface dust can readily be removed by
tapping the filter.
• Heavy deposits should be washed out in soap
and water. Squeeze out any remaining water and
allow the filter to completely dry.
Never clean filter in gasoline or other flammable solvents.
4. Add four drops of thin oil to the foam filter, squeeze
out excess and replace.
5. Remove the paper air filter element. (Fig 31) Clean
filter by gently tapping it on a flat surface. If very dirty,
replace with a new filter.
6. Reassemble the air filter element and air filter cover.
WARNING
Fig. 28
Fig. 30
Fig. 29
Fig. 31
1. Stop the engine and disconnect the spark plug wire.
2. Allow the unit to cool.
3. Using a dry cloth or brush, remove debris from the
screen. The screen is located between the engine and
the fuel tank and is accessible on all sides.
4. The front flexible shield can be deflected for access to
the front screen.
The engine and exhaust system may be hot and can cause skin burns. Allow engine to cool and use caution around
hot surfaces.
Page 13

Questions? Call Toll Free at 1-800-737-2112 EN-13 Copyright © 2018 MAT Engine Technologies, LLC
Storage
• Save all instructions
NOTICE
To prevent fuel gum deposits and corrosion in the
Trimmer’s carburetor and fuel system, it is highly
recommended to use a fuel additive / stabilizer formulated
for ethanol fuels. Follow the stabilizer manufacturer’s
instructions. Run the engine at least 5 minutes after adding
stabilizer.
1.
Allow engine to cool and empty the fuel tank before
storing or transporting in vehicle. Use up remaining fuel
in the carburetor by starting the engine and letting it run
until it stops. Squeeze primer bulb several times to purge
fuel from the carburetor.
2. When not in use, store Trimmer indoors in a dry
location. Store Trimmer in a locked area out of the
reach of children.
3. Store unit and fuel in area where fuel vapors cannot
reach sparks or open flames from water heaters,
electric motors or switches, furnaces, etc.
4. When preparing the Trimmer for storage or when
Trimmer will not be used for 30 days or more:
a. Inspect and clean the Trimmer thoroughly.
b. Lightly oil all external metal surfaces.
c. Remove the spark plug, place a few drops of
2-cycle engine oil into the cylinder. Pull the recoil
starter several times to distribute the oil. Replace
the spark plug.
d. Inspect and clean air filter as required.
Trimmer Head:
D
1. If the string retention parts become filled with debris,
they can be removed using a 5 mm hex wrench. When
reinstalling, only tighten to 5 N.m and assure the inner
part is free to move.
Spark Plug:
C
Inspect the spark plug after every 10-15 hours of use; adjust spark plug gap and replace spark plug as necessary.
Replace spark plug every year to maintain engine performance and easy starting.
To inspect or replace the spark plug:
1. Remove the insulated spark plug boot.
2. Use the spark plug wrench to remove the spark plug,
by turning counter-clockwise.
3. Clean and adjust the spark plug gap to
0.024 – 0.028 inches (0.6 - 0.7 mm).
4. Replace any worn plug with a recommended
replacement (see PRODUCT SPECIFICATIONS)
Clean and adjust the spark plug gap to
0.024 – 0.028 inches (0.6 - 0.7 mm).
5. Install the spark plug finger tight in the cylinder head,
then tighten firmly with the spark plug wrench.
6. Attach the insulated spark plug boot.
Routine Maintenance
• Save all instructions
2. If it is necessary to remove the trimmer bowl and head
note that the large retaining nut has a left hand thread
(i.e. to remove the nut turn clockwise).
Page 14

Questions? Call Toll Free at 1-800-737-2112 EN-14 Copyright © 2018 MAT Engine Technologies, LLC
You may have further questions about assembling, operating, or maintaining this Trimmer. If so, you can contact our
Technical Service Department at 1-800-737-2112 (English only).
You may also write to:
METL Corporate Office - CORRESPONDENCE ONLY
ATTN: Technical Service – METL
6700 Wildlife Way
Long Grove, IL 60047
Technical Service
• Save all instructions
When contacting the Technical Service Department, have
ready:
• Your Name
• Your Address
• Your Phone Number
• Model Number of Product
• Date of Purchase (include copy of receipt for written requests)
If you need assistance or have any questions,
CALL TOLL FREE: 1-800–737-2112
PROBLEM POSSIBLE CAUSE(S) SOLUTION(S)
Engine will not start.
1.
Ignition Switch in the “OFF” position.
2. Engine flooded.
3. Fuel Tank empty.
4. Spark Plug not firing.
5. Fuel not reaching carburetor.
6. Carburetor requires adjustment.
1. Move ignition switch to the ON position.
2. See Starting a Flooded Engine in
OPERATION section.
3. Fill tank with correct fuel mixture.
4. Replace Spark Plug.
5. Check for kinked or split fuel line; repair
or replace.
6. Contact a qualified service center.
Engine will not accelerate, lacks
power or stalls.
1.
Grass wrapped around Trimmer Head.
2. Air filter dirty.
3. Spark plug fouled.
4. Carburetor requires adjustment.
5. Carbon build-up on muffler outlet
screen.
6. Compression low.
1.
Clear debris and grass from Trimmer Head.
2. Clean air filter.
3. Clean or replace plug.
4. Contact a qualified service center.
5. Contact a qualified service center.
6. Contact a qualified service center.
Engine smokes excessively.
1. Fuel mixture incorrect.
2. Air filter dirty.
3. Carburetor requires adjustment.
1. Empty Fuel Tank and refill with correct fuel
mixture.
2. Clean or replace air filter.
3. Contact a qualified service center.
Engine runs hot.
1. Fuel mixture incorrect.
2. Spark Plug incorrect.
3. Carburetor requires adjustment.
4. Carbon build-up on muffler outlet
screen.
5. Engine air screen covered
with debris.
1. See Mixing Fuel / 2-Cycle Oil in
OPERATION section.
2. Replace with correct Spark Plug.
3. Contact a qualified service center.
4. Contact a qualified service center.
5. Clean engine cooling air screen.
Engine will not idle properly.
1. Carburetor requires adjustment.
2. Crankshaft seals worn.
3. Compression low.
1. Contact a qualified service center.
2. Contact a qualified service center.
3. Contact a qualified service center.
Troubleshooting
• Save all instructions
Page 15

Questions? Call Toll Free at 1-800-737-2112 EN-15 Copyright © 2018 MAT Engine Technologies, LLC
Warranty
• Save all instructions
Always specify model number when contacting the factory.
We reserve the right to amend these specifications at any time without notice. The only warranty applicable is our standard
written warranty. We make no other warranty, expressed or implied.
MAT Engine Technologies, LLC
warrants this Trimmer
and any parts thereof, to be free from defects in material and workmanship for two years (90 days for reconditioned unit) from
the date of first purchase from an authorized dealer, provided that the product has been properly maintained and operated in
accordance with all applicable instructions. This warranty is extended only to the original retail purchaser. The bill of sales or
proof of purchase must be presented at the time a claim is made under this warranty. This warranty does not cover commercial,
industrial, or rental usage, nor does it apply to parts that are not in original condition because of normal wear and tear, or parts
that fail or become damaged as a result of misuse, accident, lack of proper maintenance, tampering, or alteration. Exceptions
to the standard warranty period would be normal wear items such as cutting line, cutting head, air filters and spark plugs which
are only covered for 60 days against defects in material or workmanship. Travel, handling, transportation, and incidental costs
associated with warranty repairs are not reimbursable under this warranty and are the responsibility of the owner. To the full
extent allowed by the law of the jurisdiction that governs the sale of the product, this express warranty excludes any and all other
expressed warranties and limits the duration of any and all implied warranties, including warranties of merchantability and fitness
for a particular purpose to two years from the date of first purchase, and
MAT Engine Technologies, LLC’s
liability is hereby
limited to the purchase price of the product and
MAT Engine Technologies, LLC
shall not be liable for any other damages
whatsoever including indirect, incidental, or consequential damages. Some states do not allow limitation of how long an implied
warranty lasts or an exclusion or limitation of incidental or consequential damages, so the above limitation of damages may not
apply to you. This warranty provides the original purchaser with specific rights.
For information regarding those rights, please consult the applicable state laws.
METL Corporate Office - CORRESPONDENCE ONLY
ATTN: Technical Service – METL
6700 Wildlife Way
Long Grove, IL 60047
Powermate™ TRIMMER Limited Warranty
If you have any questions regarding your warranty coverage, you
should contact METL customer service:
If you need assistance or have any questions,
CALL TOLL FREE: 1-800–737-2112
The Engine Emissions Control System Warranty is provided by the engine manufacturer, included with this product and administered by
MAT Engine Technologies, LLC.
Page 16

Retrouver à l’intérieur :
Page
Définitions de sécurité ....................1
Importante information de sécurité ......... 2-3
Spécifications du produit ..................4
Pièces et caractéristiques .................4
Assemblage ........................... 5-6
Fonctionnement ........................7-11
Entretien ...............................12
Rangement.............................12
Dépannage ............................13
Service technique ......................14
Garantie ...............................14
09/28/18 Imprimé en Chine A204064
Manuel de l’usager
COUPE-HERBE SUR ROUES,
AVEC FIL
Unité à essence – 43 cc, 2 temps
Veuillez noter les éléments suivants pour une référence future :
Code – Date de fabrication : ______________
Date d’achat : Joignez une copie de votre reçu de caisse.
Numéro sans frais – service à la clientèle : 1-800-737-2112
Référez au site Web pour un manuel sous forme électronique
et un catalogue des pièces. www.powermateoutdoor.com
IMPORTANT :
Nous vous remercions d’avoir acheté cette Coupe-herbe Powermate®
Veuillez lire et comprendre tous les avertissements et directives dans ce manuel, avant de faire fonctionner
cet appareil. Un usage inapproprié de cet appareil peut causer de sérieuses blessures ou la mort. Conservez
ce manuel pour référence ultérieure.
AVERTISSEMENT : CONTIENT DU PLOMB. Peut être nocif s’il est ingéré ou mâché. Peut générer de la
poussière contenant du plomb. Se laver les mains après usage. Garder hors de la portée des enfants.
AVERTISSEMENT : Ce produit pourrait vous exposer à des produits chimiques, y compris plomb, reconnu
par l’État de Californie comme cause de cancer, malformations congénitales ou autres problèmes du système
de reproduction. Pour obtenir plus d’information, visitez www.P65Warnings.ca.gov.
Si vous avez une question ou un problème...APPELEZ SANS FRAIS : 1-800-737-2112
CONSERVEZ CE MANUEL POUR RÉFÉRENCE FUTURE
Modèle N° PWSTM4317.2
Page 17

Questions? Appelez sans frais à : 1-800-737-2112 FR-2 Copyright © 2018 MAT Engine Technologies, LLC
Définitions de sécurité
• Conservez ces directives
Signale une situation imminente et dangereuse qui, si elle n’est pas évitée, entraînera la
mort ou des blessures graves.
Indique une situation potentiellement dangereuse qui, si elle n’est pas évitée, peut
entraîner des blessures graves voire la mort.
Indique une situation potentiellement dangereuse qui,
si elle n’est pas évitée, peut
entraîner des blessures légères ou modérées.
Indique une pratique non liée à des blessures qui,
si elle n’est pas évitée, peuvent
entraîner des dommages matériels.
DANGER
MISE EN GARDE
AVIS
AVERTISSEMENT
Les symboles suivants sont utilisés sur le produit et dans ce manuel pour alerter l’opérateur de potentiels dangers
concernant la sécurité. Assurez-vous de les lire attentivement et de comprendre leur signification.
Symboles d’alerte de sécurité :
Symboles d’avertissement de sécurité :
Symboles de contrôle et de fonctionnement :
Contrôle d’étrangleur :
Démarrage à froid
Démarrage en marche / à chaud
Mélange de carburant :
50:1
(Essence sans plomb : Huile à 2
temps)
Ampoule d’amorce pour carburant :
Comprimez 6 fois.
Interrupteur d’allumage
MARCHE (ON)
ARRÊT (OFF)
6x
PRIMER BULB
ON
UNDER SIDE
Fuel Mixture
50:1
Unleaded Gas: 2 Cycle Oil
Caution: Do Not Use Gas
Mix with More Than 10%
Methanol or Ethanol
STOP
ON/
RUN
Recherchez ce symbole qui indiquera d’importantes mises en garde de sécurité, relativement aux risques
de blessures. Il signifie : “ Attention! Soyez attentifs! Votre sécurité est en jeu.”
Veuillez lire le manuel de l’usager, avant de faire fonctionner cet appareil. Le défaut de suivre les
directives pourrait provoquer de sérieuses blessures.
Portez toujours une protection oculaire qui rencontre ou excède les exigences ANSI Z87.1.
Portez une protection auditive.
Portez des souliers de sécurité.
Le gaz d’échappement du moteur contient du monoxyde de carbone, un gaz inodore et mortel. Ne
JAMAIS faire fonctionner cette unité à l’intérieur ou dans un espace mal ventilé.
Maintenez tous les spectateurs à une distance d’au moins 15 m. Arrêtez l’appareil si quelqu’un s’en
approche.
Cet appareil peut projeter de petits objets à haute vitesse et causer des blessures. Vérifiez la zone
de travail et assurez-vous de retirer tous les corps étrangers.
Maintenez toutes les parties du corps à l’écart du fil rotatif de coupe.
Pour réduire les risques d’incendie, nettoyez les gaz déversés et maintenez l’appareil exempt de
débris. L’essence est extrêmement inflammable. Laissez la machine refroidir avant le remplissage.
Surface chaude. Ne touchez pas un tuyau d’échappement, un multiplicateur de vitesse ou un cylindre, vous
pourriez vous brûler. Ces pièces deviennent extrêmement chaudes durant le fonctionnement et peuvent
demeurer ainsi pour une courte période de temps après avoir fermé l’unité.
CHOKE/
COLD
START
RUN/
WARM
START
6x
PRIMER BULB
ON
UNDER SIDE
Page 18

Questions? Appelez sans frais à : 1-800-737-2112 FR-3 Copyright © 2018 MAT Engine Technologies, LLC
Avant de faire fonctionner le coupe-herbe :
LISEZ ET COMPRENEZ BIEN TOUTES LES DIRECTIVES, AVANT D’UTILISER LE COUPE-HERBE.
Veuillez lire et suivre toutes les mises en garde et les directives de sécurité. Le défaut de pourrait provoquer de
sérieuses blessures à vous-même et aux spectateurs.
1. Évitez des environnements dangereux.
a. N’utilisez pas le coupe-herbe lorsque sous l’influence d’alcool, drogues ou autre médication.
b. N’utilisez pas le coupe-herbe lorsque vous êtes fatigué.
c. N’utilisez pas le coupe-herbe si vous êtes mentalement ou physiquement inapte à opérer cet appareil
en toute sécurité.
2. Inspectez le coupe-herbe pour détecter des pièces endommagées et assurez-vous que les attaches et les
protecteurs sont bien en place et en sécurité. Remplacez les pièces endommagées.
3. Utilisez uniquement un fil flexible non métallique de 0.095 ou 0.105 po de diamètre avec ce coupe-herbe.
Ce coupe-herbe est conçu pour utiliser un fil flexible non métallique. N’utilisez jamais ce coupe-herbe avec des
accessoires dont l’usage n’est non spécifiquement approuvé dans ce manuel. N’utilisez jamais des accessoires
alternatives de coupe comme un fil ou câble métallique, pouvant se briser et devenir on projectile dangereux.
4. Portez des vêtements appropriés à l’usage de ce coupe-herbe.
a. Portez toujours des pantalons de travail, bottes, gants, et une chemise à manches longues.
b. Ne portez pas de vêtements amples ou des bijoux pouvant se mêler aux pièces mobiles du coupe-herbe.
c. Portez toujours des gants de travail, bottes/souliers robustes, durant un travail à l’extérieur.
d. Portez toujours une coiffe protectrice pour contenir les cheveux longs.
5. Portez toujours un masque facial ou un masque qui filtre la poussière si vous travaillez dans un environnement
poussiéreux.
6. Portez toujours une protection oculaire qui rencontre ou excède les exigences ANSI Z87.1.
7. Portez toujours une protection auditive, rencontrant ou excédant les normes ANSI.
8. Vérifiez avec soin la zone où le coupe-herbe sera utilisé et retirez tous les corps étrangers.
Votre équipement peut jeter des petits objets à haute vitesse, causant des blessures corporelles ou dommages
matériels.
DANGER
Importante information de sécurité
• Conservez ces directives
Durant l’opération du coupe-herbe :
1. Demeurez vigilant. Concentrez sur une opération sécuritaire et soyez conscient de l’environnement de l’opération.
2. N’utilisez pas le coupe-herbe si celui-ci est endommagé ou si elle n’est pas assemblée complètement et de façon
sécuritaire.
3. Ce coupe-herbe ne devrait être opéré que par des adultes bien formés à cet effet. Ne permettez jamais à des
enfants d’opérer le coupe-herbe.
4. Maintenez les enfants à l’écart. Maintenez les spectateurs à au moins 15 m / 50 pi de distance.
5. Ce coupe-herbe n’a pour but que de couper, scalper et tondre. N’utilisez le coupe-herbe que pour les travaux
prévus. Ne l’utilisez pas pour découper des bordures, élaguer ou couper des haies.
6. Le fil du coupe-herbe pourrait tourner durant les réglages du carburateur. Procédez aux réglages du carburateur,
en supportant l’extrémité inférieur pour éviter que le fil de coupe ne touche à quelque objet.
7. Maintenez votre équilibre et tenez-vous bien campé en tout temps. Ne vous étirez pas démesurément.
8. Tenez toutes les parties de votre corps à l’écart de la zone de coupe, des lignes rotatives du coupe-herbe et des
surfaces chaudes.
9. Maintenez l’unité solidement à l’aide des deux mains.
10. Ne forcez pas le coupe-herbe. Il effectuera un meilleur travail et diminuera le risque de blessures, en l’utilisant selon
la méthode pour laquelle il a été conçu.
AVERTISSEMENT
AVERTISSEMENT
Page 19

Questions? Appelez sans frais à : 1-800-737-2112 FR-4 Copyright © 2018 MAT Engine Technologies, LLC
Importante information de sécurité (Suite)
• Conservez ces directives
Durant l’opération du coupe-herbe :
11. Ne jamais démarrer ou faire fonctionner l’unité à l’intérieur d’une pièce fermée ou d’un édifice ; respirer les
émanations de l’échappement peuvent tuer.
12. Après avoir fermé le coupe-herbe, assurez-vous que la ligne de coupe s’est arrêtée, avant de vous approcher de la
tête du coupe-herbe.
Une exposition prolongée à des vibrations lors de l’usage d’outils motorisés à essence peut causer des dommages aux
vaisseaux sanguins et aux nerfs des doigts, des mains et des articulations des personnes sujettes à des désordres de
circulation ou à des enflures anormales. Un usage intensif par temps froid a été relié à des dommages aux vaisseaux
sanguins, auprès de personnes normalement en santé. Si des symptômes comme l’engourdissement, douleur, perte de
force, changement de couleur ou de texture de peau ou encore, une perte de sensibilité des doigts, des mains ou des
articulations, cessez l’utilisation de cet outil et consultez un médecin.
DANGER
Manipulation sécuritaire - carburant :
1. Mélangez et versez le carburant à l’extérieur, OÙ IL N’Y A PAS D’ÉTINCELLES, NI DE FLAMMES NUES.
2. Utilisez un contenant approuvé pour l’essence.
3. Assurez-vous de ne pas fumer, ni de permettre de le faire près de carburants ou du coupe-herbe.
4. Évitez de renverser du carburant ou de l’huile. Essuyez tous les déversements de carburant. Ne remplissez pas un
moteur chaud. Ne remplissez pas un moteur en marche.
5. Déplacez-vous à au moins 3 m (10 pi) à l’écart du point de remplissage, avant de démarrer le moteur.
6. Arrêtez le moteur et laissez refroidir, avant de retirer le bouchon de réservoir. Retirez lentement le bouchon
de réservoir.
Entretien et rangement du coupe-herbe :
1. Débranchez la bougie d’allumage avant de procéder au nettoyage.
2. Prenez grand soin du coupe-herbe. Vérifiez l’unité périodiquement. Si le coupe-herbe ne fonctionne pas
adéquatement ou est endommagé, assurez-vous de le faire réparer dans un centre de service qualifié.
3. Vérifiez pour détecter un alignement défectueux ou un coincement des pièces mobiles, des pièces brisées, le
montage et toute autre condition qui pourrait en affecter l’opération.
4. Maintenez les dispositifs de protection en place et en bon ordre de fonctionnement.
5. Un dispositif de protection ou toute pièce endommagée devrait être réparée ou remplacée correctement dans un
centre de service qualifié.
6. Utilisez uniquement des pièces de rechange et accessoires originaux Powermate®. L’utilisation de pièces de
rechange et accessoires autres que Powermate®, pourrait provoquer des blessures, endommager l’unité et annuler
votre garantie.
7. Assurez-vous de ne pas retirer, ni de modifier quelque pièce. Le fait de retirer ou de modifier quelque pièce pourrait
provoquer des blessures, endommager le coupe-herbe et annulera la garantie.
8. Assurez-vous de conserver les guidons secs, propres et libres d’huile et de graisse.
9. Laissez le moteur refroidir et videz le réservoir de carburant, avant de le ranger ou le transporter dans un véhicule.
Utilisez le carburant restant dans le carburateur, en démarrant le moteur et en le laissant fonctionner, jusqu’à ce
qu’il s’arrête.
10. Lorsque vous ne l’utilisez pas, rangez la tondeuse à l’intérieur, dans un environnement sec. Rangez la tondeuse
dans un endroit verrouillé hors de la portée des enfants.
11. Rangez l’unité et le carburant à un endroit où les émanations de carburant ne peuvent rejoindre des étincelles ou
des flammes nues, provenant de chauffe-eau, moteurs ou interrupteurs électriques, fournaises, etc.
AVERTISSEMENT
MISE EN GARDE
Page 20

Questions? Appelez sans frais à : 1-800-737-2112 FR-5 Copyright © 2018 MAT Engine Technologies, LLC
Moteur. . . . . . . . . . . . . . . . . . . . . . . . . . . . . . 43 cc, 2 temps
Vitesse . . . . . .7,000-8,500 tours/minute selon la taille du fil
Diamètre de coupe. . . . . . . . . . . . . . . . 432 mm (17 inches)
Diamètre du fil de coupe . . . . . . . . . . . . . . . 0.095 ou 0.105
Type de bobine............. Charge manuelle, fil double
Capacité du réservoir de carburant . . . . . . . 840 ml (28 oz)
Type de carburant
Unleaded Gasoline – 87 Octane or higher
Huile à 2 temps ..........
Huile à 2 temps rencontrant ou
excédant les spécifications JASO – FC
Mélange de carburant .....
50 :1 (Essence Huile à 2 temps)
Bougie d’allumage . . . . . . . . . . . . . . . . . . . NGK - BPMR6A
CHAMPION - CJ8 ou équivalent
Poids net ............................18 kg (39 lbs)
Spécifications du produit
• Conservez ces directives
Pièces et caractéristiques
1. Ensemble de tête de coupe-herbe 7. OInterrupteur d’allumage ON/OFF 13. Réservoir de carburant
2. Grille d’entrée d’air du moteur 8. Poignée du lanceur à rappel 14. Couvercle de filtre à air
3. Protecteur du coupe-herbe 9. Étrangleur 15. Porte-cordon
4. Couteau du fil de coupe-herbe 10. Ampoule d’amorce pour carburant 16.
Le volant de réglage de
biseau
5. Poignée avant de transport 11. Bougie d’allumage 17. Commande de pivotement
6. Levier d’accélérateur 12. Silencieux
8
9
1
4
5
11
3
6
7
10
12
13
14
15
2
16
17
Page 21

Questions? Appelez sans frais à : 1-800-737-2112 FR-6 Copyright © 2018 MAT Engine Technologies, LLC
Assemblage
• Conservez ces directives
Pièces incluses avec le coupe-herbe emballé :
Assemblage des guidons :
A
Outils requis pour l’assemblage :
Ne pas opérer le coupe-herbe s’il est endommagé ou non complètement assemblé ou fixé.
1. Installez la barre de manoeuvre du milieu sur la
barre de manoeuvre inférieure à l’un des deux
réglages de hauteur et fixez-la solidement à l’aide
des deux boulons de selle et boutons en plastique.
Orientez la barre de manœuvre de façon à ce
que les petites pinces en métal soient du côté
droit. Acheminez le câble pivotant par la barre de
manoeuvre du milieu. Assemblez avec les boutons à
l’intérieur de la barre de manœuvre inférieure. Serrez
bien les boutons. (Fig. 1)
2. Installez la poignée supérieure à la poignée du
milieu et fixez à l’aide de deux boulons d’embase et
de boutons en plastique. Orientez la poignée afin que
le « V » soit vers le haut. Montez avec les boutons
vers l’intérieur de la poignée du milieu. Faites passer
le câble de la manette en dessous du côté droit de la
poignée du milieu. Vissez les boutons fermement.
Fixez le câble de la manette aux poignées avec les
pinces en métal fournies. Fixez les câble de pivot avec
le câble de plastique fourni.
3.
Servez-vous des orifices de réglage de hauteur de
la barre de manoeuvre du milieu pour régler à votre
hauteur de barre de manœuvre souhaitée.
• Manuel de l’usager
• Guidons supérieur et intermédiaire
• Protecteur du coupe-herbe
• Clé pour bougie d’allumage
• Tube de remplacement de fil et attaches
• 50 :1 Huile à moteur à 2 temps (59 1 ml)
• Tube avant avec tête de coupe-herbe
• (2) Assemblage des roues
• (4) Écrous papillon en plastique (pour attacher les guidons)
• (4) Fixations de selle (pour attacher les guidons)
• (2) Attaches pour câbles
• (1) Boulon à épaulement de la roue (plus long pour la
roue du côté droit)
• (1) Boulon à épaulement de la roue (plus court pour la
roue du côté gauche)
• (1) Espaceur de roue (pour roue du côté droit)
• (1) Vis de blocage à tête hex (pour fixer le protecteur
du coupe-herbe)
Si vous avez besoin d’assistance ou devez trouver des pièces
manquantes, APPELEZ SANS FRAIS : 1-800-737-2112.
AVERTISSEMENT
Assemblage de la tête de coupe :
B
1. Installez l’assemblage de la tête de coupe dans la
boîte d’embrayage avec la selle métallique
s’emboitant dans la boîte d’embrayage. (Fig. 3) Il
peut s’avérer nécessaire de tourner légèrement la
tête de la tondeuse pour aligner les cannelures de
l’axe d’entraînement.
2. Essayez de tourner le tube à l’intérieur du boîtier
S’il vous est possible le tourner tube de quelque
façon, dégagez la poignée de la serrure et vissezla
vers l’intérieur d’un demi-tour additionnel. Tournez la
poignée, pour resserrer le tube. Vérifiez à nouveau
l’étanchéité et répétez si nécessaire. (Fig. 4)
ASSEMBLAGE
DE LATÊTE DE
COUPE
Fig. 4Fig. 3
GUIDON
INTERMÉDIAIRE
GUIDON
SUPÉRIEUR
Fig. 2
Fig. 1
Déballage :
1. Enlevez les composantes du carton.
2. Coupez les attaches de câble blanches. Ne coupez
pas les attaches de câble noires.
3. Enlevez la mousse et la protection en carton ondulé.
BARRE DE
MANOEUVRE
DU MILIEU
ORIFICE DE
FAIBLE HAUTEUR
DE LA BARRE DE
MANOEUVRE
ORIFICE DE
GRANDE HAUTEUR
DE LA BARRE DE
MANOEUVRE
BARRE DE MANOEUVRE
INFÉRIEURE
• Clé à douille ou à fourche -14 mm• Clé 10 mm ou à molette
Page 22

Questions? Appelez sans frais à : 1-800-737-2112 FR-7 Copyright © 2018 MAT Engine Technologies, LLC
Assemblage (Suite)
• Conservez ces directives
Assemblage des roues :
D
Rangement de fil :
E
1. Installez la roue droite au cadre en utilisant la vis
à épaulement et la rondelle la plus longue. Serrez
jusqu’à 25 pieds livre. (34 N.m) de couple à l’aide
d’une clé de 14 mm. (Fig. 9-10)
2. Installez la roue gauche au goujon de l’assemblage
de l’ajusteur à l’aide de la vis à épaulement la plus
courte. Serrez jusqu’à 25 pieds livre. (34 N.m) de
couple. (Fig. 11-12)
3. Déplacez le volant de réglage de biseau à la position
inférieure pour un fauchage à niveau.
1. En utilisant l’orifice existant, fixez en place avec un
clic sur le guidon intermédiaire gauche, l’attache
inférieure du tube. (Fig. 12)
2. En utilisant l’orifice existant, fixez en place avec
un clic sur le guidon intermédiaire gauche, l’attache
supérieure du tube.
3. Installez le tube transparent avec le ressort
supplémentaire fourni dans les pinces en métal.
(Fig. 13)
ATTACHE
Protecteur contre les débris :
C
1. Introduisez la patte du support métallique de montage
dans l’insert du protecteur contre les débris.
(Fig. 5-6)
2. Installez les vis à tête hexagonale à travers le support
et dans la garniture de métal de la protection contre
les débris. Serrez fermement à l’aide d’une clé de
10 mm.
(Fig. 7-8)
Le couteau pour le fil du coupe-herbe, fixé sur le
protecteur contre les débris, est effilé et peut vous couper.
Manipulez-le avec soin.
MISE EN GARDE
Fig. 12
Fig. 13
BOUCHON
ATTACHE
ATTACHE
Fig. 5
Fig. 7
Fig. 6
Fig. 8
MONTAGE MÉTALLIQUE
SUPPORT
RAINURE POUR
LA PATTE DE
SUPPORT
PROTECTEUR
CONTRE LES
DÉBRIS
TÊTE
HEXAGONALE
BOULON DE
MONTAGE
MÉTALLIQUE
SUPPORT
TÊTE
HEXAGONALE
BOULON DE
ENTRETOISE ET
Fig. 9
Fig. 11
Fig. 10
Fig. 12
VIS À ÉPAULEMENT
(PLUS COURTE)
RÉGLAGE
DE BISEAU
VIS À
ÉPAULEMENT
DE L’ASSEMBLAGE
DE L’AJUSTEUR
Page 23

Questions? Appelez sans frais à : 1-800-737-2112 FR-8 Copyright © 2018 MAT Engine Technologies, LLC
Fonctionnement
• Conservez ces directives
Identification et usage des contrôles :
A
Recommandations :
B
1. Votre coupe-herbe offre le meilleur rendement à haute
vitesse et les extrémités du fil coupent la végétation.
Ne forcez pas le fil du coupe-herbe sur le gazon,
d’une façon plus rapide que la vitesse de coupe du
coupe-herbe ne le permet.
2. Les extrémités du fil peuvent endommager les arbres,
arbustes et clôture. Pour éviter de tels dommages, il
est possible de décider de faire tourner le moteur à
vitesse réduite. Il faut toujours vérifier l’emplacement
du fil de coupe.
Vérifiez la zone de travail où le coupe-herbe sera utilisé et assurez-vous de retirer tous les corps étrangers. Cet appareil
peut projeter de petits objets à haute vitesse et causer des blessures et des dommages matériels.
Maintenez tous les spectateurs à une distance d’au moins 15 m. Arrêtez l’appareil si quelqu’un s’en approche.
AVERTISSEMENT
Fig. 14
Fig. 16
Fig. 15
Fig. 17
1. Accélérateur :
L’accélérateur est situé sur la barre horizontale
du guidon supérieur. En abaissant le levier, la vitesse
du moteur sera augmentée. À une vitesse au ralenti,
l’embrayage est désengagé et la tête du coupe-
herbe ne tournera pas. Lorsque la vitesse du moteur
est augmentée, l’embrayage automatique s’engagera
et fera tourner la tête du coupe-herbe. Après avoir
été relâché, le levier de l’accélérateur équipé d’un
ressort retournera à une vitesse au ralenti. (Fig. 14)
2. Faites basculer pour contrebalancer la tête de la tondeuse :
Le coupe-herbe sur roues avec fil est conçu avec
la caractéristique de pouvoir décentrer la tête du
coupe-herbe, à partir d’une position centrale vers une
position à droite. Cette procédure s’exécute en
enfonçant le contrôle digital sur le guidon supérieur
droit. En appuyant sur le contrôle du doigt, la tête se
déverrouille et peut être orientée dans deux positions
à la droite. En relâchant le contrôle digital, une tige
bloquera la tête du coupe-herbe à la position désirée.
Faire pivoterla tête de la tondeuse vous permet
d’effectuer une tonte / une taille facile autour des
obstacles comme les poteaux ou les arbres et sous
les clôtures. (Fig. 15)
3. Réglage pour une coupe biseautée :
Le fil coupera normalement à environ 50 mm de
hauteur. Quand il est requis que le fil coupe plus près
du sol, un réglage de coupe biseautée est disponible.
Une poignée se trouve juste en face de la roue gauche.
Cette poignée peut être déviée vers l’extérieur et
orientée en deux positions différentes. Cette procédure
placera la tête du coupe-herbe en angle et permettra
au fil de couper plus près du sol. Cette caractéristique
est spécialement pratique pour effectuer une coupe
près de trottoirs surélevés ou des fondations d’édifices.
(Fig. 16)
4. Interrupteur marche / arrêt :
Un interrupteur d’allumage est situé sur le boîtier du
filtre à air du moteur. L’interrupteur doit être en position
de marche (ON) pour faire fonctionner le moteur. Le
moteur s’arrêtera en déplaçant l’interrupteur en
position d’arrêt (OFF). (Fig. 17)
Page 24

Questions? Appelez sans frais à : 1-800-737-2112 FR-9 Copyright © 2018 MAT Engine Technologies, LLC
Fonctionnement (Suite)
• Conservez ces directives
Le moteur à 2 temps de votre coupe-herbe exige d’abord
un prémélange d’essence et d’huile à moteur à 2 temps,
avant de l’ajouter dans le réservoir de carburant du coupeherbe. Pour mélanger l’essence/ huile à 2 temps :
1. Utilisez de l’essence sans plomb fraîche, possédant
un indice d’octane 87 ou plus. N’utilisez pas d’essence
contenant plus de 10% d’éthanol.
L’usage d’essence contenant plus de 10% d’éthanol peut
endommager le coupe-herbe. L’usage d’essence sans
éthanol est recommandé. Nous recommandons l’usage
continuel d’un additif / stabilisateur de combustible pour
neutraliser les effets de l’éthanol. Ces additifs prolongent
également la vie utile de l’essence.
2. Utilisez toujours une huile à 2 temps, rencontrant ou
excédant les spécifications JASO – FC et destiné pour
un mélange d’essence et d’huile à un ratio 50:1.
3. N’utilisez pas d’huile pour automobiles ou d’huile à
2 temps pour moteur hors-bord. L’usage de ces huiles
endommagera le moteur du coupe-herbe et annulera
la garantie.
4. Mélangez toujours l’essence et l’huile à 2 temps
dans un contenant approuvé pour l’essence.
Ne mélangez jamais le carburant directement dans le
réservoir à carburant du coupe-herbe.
5. Suivez les directives sur le contenant d’huile à 2
temps pour le mélanger au carburant. Mélangez
l’essence et l’huile à 2 temps à un ratio 50 :1. Un
mélange possédant un ratio 50 :1 est obtenu en
mélangeant 4 litres d’essence et 77 ml d’huile. Après
avoir ajouter l’huile à l’essence, brassez le contenant
pour quelques instants, pour assurer l’homogénéité
du mélange.
6. Ne mélangez que la quantité nécessaire
pour subvenir à vos besoins immédiats. Ne rangez pas
en réserve un carburant prémélangé.
7. Arrêtez le moteur et laissez-le refroidir, avant de
procéder au remplissage.
8. Pour remplir le réservoir à carburant du coupe-herbe
avec le mélange d’essence / huile, placez le coupe-
herbe en position normale sur le sol ou sur un banc
solide et essuyez tout débris se trouvant autour du
bouchon de réservoir.
9. Retirez lentement le bouchon de réservoir et utilisez
un entonnoir pour verser le mélange dans le réservoir
et replacez le bouchon de réservoir.
10. Évitez de renverser du carburant ou de l’huile.
Essuyez tous les déversements de carburant.
11. Déplacez-vous à au moins 3 m à l’écart du point de
remplissage, avant de démarrer le moteur.
Avant de démarrer le moteur :
A
Mélange essence / huile à 2 temps
Assurez-vous de ne pas fumer, ni de permettre de fumer près de carburants ou du coupe-herbe. Mélangez et versez le
carburant à l’extérieur, OÙ IL N’Y A PAS D’ÉTINCELLES, NI DE FLAMMES NUES.
AVERTISSEMENT
AVIS
3. Considérant que la tête de coupe peut pivoter vers la droite, planifiez de procéder à découper autour des
objets (clôtures, édifices, etc.) dans le sens horaire.
4. En travaillant près de clôtures en mailles métalliques, éviter le contact du fil de coupe avec la clôture. Un
tel contact provoquerait une usure rapide du fil. De la même façon, un contact avec des surfaces en béton
et en briques, provoquerait une usure rapide du fil.
5. Ne laissez pas le bol métallique de la tête du coupe-herbe toucher la partie supérieure des surfaces en
béton et en asphalte. Une telle procédure provoquerait une usure rapide du bol métallique. Le bol métallique
a été conçu pour toucher des surfaces en gazon.
6. Il est recommandé que le fil soit remplacé, lorsqu’il est usé environ à la ½ de la longueur originale.
Cette procédure contribuera à maintenir une haute vitesse des extrémités et procurer une coupe nette.
Il est hautement recommandé que la grille d’entrée d’air pour le refroidissement du moteur soit nettoyée
à chaque changement de fil de coupe. Cette procédure préviendra une surchauffe du moteur.
Recommandations (suite) :
B
Page 25

Questions? Appelez sans frais à : 1-800-737-2112 FR-10 Copyright © 2018 MAT Engine Technologies, LLC
Fonctionnement (Suite)
• Conservez ces directives
Démarrage de moteur :
C
Démarrage du moteur :
B
Tenez toutes les parties de votre corps à l’écart de la zone de coupe, des lignes rotatives du coupe-herbe et des surfaces
chaudes.
REMARQUE : N’abaissez PAS le levier de l’accélérateur, avant que le moteur ne démarre et fonctionne.
REMARQUE : Lorsque le temps se refroidit, veuillez laisser le moteur se réchauffer au ralenti durant une plus longue période de
temps, avant de le déplacer en position de “ marche / démarrage à chaud “
(RUN/WARM START).
Démarrage de moteur à froid :
1. Placez le coupe-herbe sur une surface unie.
2.
Déplacez l’interrupteur d’allumage en position de
marche (ON).
3. Soulever le levier de l’étrangleur à la position de
démarrage à froid (COLD START). (Fig. 18)
4. Comprimez lentement l’ampoule d’amorce 6 fois.
(Fig. 20)
5. Tirez la poignée de lanceur à rappel fermement,
jusqu’à ce que le moteur démarre et fonctionne.
(Fig. 21)
6. Après avoir démarré et avoir laissé fonctionner le
moteur pendant 10-15 secondes, déplacez le levier de
l’étrangleur en position de “ marche / démarrage à
chaud “ (RUN/WARM START). (Fig. 19)
AVERTISSEMENT
Démarrage de moteur à chaud :
1. Placez le coupe-herbe sur une surface unie.
2.
Déplacez l’interrupteur d’allumage, en position de
marche (ON). (Fig. 10)
3. Déplacez le levier de l’étrangleur, en position de
démarrage marche / démarrage à chaud “ (RUN/
WARM START). (Fig. 19)
4. Tirez la poignée de lanceur à rappel fermement,
jusqu’à ce que le moteur ne démarre et fonctionne.
(Fig. 21)
Fig. 18
Fig. 20
Fig. 19
Fig. 21
REMARQUE : Si l’unité ne démarre toujours pas, référez à la section DÉPANNAGE de ce manuel.
Démarrage de moteur noyé :
1. Placez le coupe-herbe sur une surface unie.
2. Déplacez l’interrupteur d’allumage, en position de
marche (ON).
3. Déplacez le levier de l’étrangleur, en position de
démarrage marche / démarrage à chaud “ (RUN/
WARM START). (Fig. 19)
4. Abaissez le levier de l’accélérateur et tirez la poignée
de lanceur à rappel fermement à plusieurs reprises,
jusqu’à ce que le moteur ne démarre et fonctionne.
Il est possible que plusieurs tentatives soient requises,
dépendant à quel point le moteur est noyé.
(Fig. 21)
5. Si le moteur ne démarre toujours pas, laissez l’unité
reposer pendant environ 30 minutes et répétez les
étapes 1 à 3.
Page 26

Questions? Appelez sans frais à : 1-800-737-2112 FR-11 Copyright © 2018 MAT Engine Technologies, LLC
Techniques / Applications :
F
Conseil pratique de coupe
Pour prolonger la vie du fil de coupe-herbe, il est nécessaire de maintenir le fil humide. S’il n’est pas maintenu humide, le
nylon séchera et deviendra cassant. Conservez un fil de coupe-herbe additionnel dans un seau d’eau. Le fil demeurera
flexible et facile à changer. Un fil flexible durera également plus longtemps.
Il est recommandé que la grille d’entrée d’air du moteur soit nettoyée, à chaque fois que le fil du coupe-herbe est
remplacé. Le défaut de maintenir la grille d’entrée d’air propre pourrait causer une surchauffe et endommager le moteur.
(Voir directives à la section Entretien)
Fonctionnement (Suite)
• Conservez ces directives
AVIS
Installer le fil du coupe-herbe :
E
Utilisez un fil flexible non métallique de 0.095 ou 0.105
po de diamètre avec ce coupe-herbe. N’utilisez jamais
des accessoires alternatifs de coupe comme un fil ou
câble métallique, pouvant se briser et devenir un projectile
dangereux.
Pour un fil de 0.095 et 0.105 po de diamètre : (Fig. 22-25)
1. Arrêtez le moteur et retirez la bougie d’allumage.
2. Coupez deux longueurs de 42 cm du nouveau fil.
Référez aux directives sur guidon gauche pour établir
la longueur appropriée de la coupe.
3. Introduisez une extrémité du fil dans l’ouverture
latérale et dirigez-la autour de la partie arrière et vers
l’extérieur à travers l’ouverture de côté opposé.
(Fig 22)
4. Tirez le fil de façon à obtenir des longueurs égales
de chaque côté.
5. Toute en poussant la languette vers l’intérieur, faites
passer une extrémité à travers une ouverture latérale
et par l’avant de la retenue. (Fig 23-24)
6. De la même façon, dirigez l’autre extrémité à travers
l’ouverture latérale et vers l’extérieur à travers la
partie avant de la fixation. (Fig 25)
7. Ajustez le fil de façon à ce que des longueurs égales
sortent de la fixation.
8. Répétez de l’autre côté.
AVERTISSEMENT
Fig. 22
Fig. 24
Fig. 23
Fig. 25
Page 27

Questions? Appelez sans frais à : 1-800-737-2112 FR-12 Copyright © 2018 MAT Engine Technologies, LLC
Entretien
• Conservez ces directives
Grille d’entrée d’air du moteur :
B
Filtre à air :
A
Votre coupe-herbe est équipé de deux filtres à air en, à l’intérieur du boîtier. La poussière et les débris accumulés dans
les filtres à air réduiront le rendement du moteur, augmenteront la consommation de carburant et le risque de dommages
pour le moteur. Nettoyez les filtres à air à chaque période de 5 heures d’usage. Il peut être nécessaire de nettoyer les
filtres à air plus souvent en périodes sèches, dû à la quantité élevée de débris en suspension.
Il est essentiel que la grille d’entrée d’air du moteur soit libre de tout débris, de façon à maintenir des températures de
moteur acceptables. Il est recommandé que la grille soit nettoyée. à chaque fois que le fil du coupe-herbe est remplacé.
Débranchez la bougie d’allumage avant de procéder à l’entretien.
Techniques / Applications (suite) :
F
Vérifiez la zone de travail où le coupe-herbe sera utilisé et assurez-vous de retirer tous les corps étrangers. Cet appareil
peut projeter de petits objets à haute vitesse et causer des blessures et des dommages matériels.
Yo Le coupe-herbe sera efficace en suivant les conseils relatifs au fil de coupe-herbe, pour couper le gazon et autre
type de végétation. Ne forcez pas le fil du coupe-herbe sur le gazon ou autre type de végétation, d’une façon plus
rapide que la vitesse de coupe du coupe-herbe ne le permet. Forcer la tondeuse rendra celle-ci moins efficace et peut
entraîner la surchauffe du moteur.
1. Avant d’enlever le couvercle du filtre à air, brosser la
saleté ou les débris sur et autour du pré-filtre situé
dans le compartiment externe du filtre.
2. Retirez les filtres à air en dévissant la fixation.
(Fig. 28)
3. Retirez et nettoyez les filtre en mousse. (Fig. 30)
•
Une légère poussière de surface peut être retirée
rapidement en cognant légèrement les filtres.
• Nettoyez les dépôts plus lourds à l’aide d’eau
savonneuse. Retirez l’excédent d’eau et laissez
sécher les filtres complètement.
AVERTISSEMENT
Ne nettoyez jamais les filtres à l’aide d’essence ou
d’autres solvants inflammables.
4. Ajouter quatre gouttes d’huile mince au filtre en
mousse, extraire l’excédent et le remplacer.
5. Supprimer l’Elément filtrant en papier. (Fig. 31)
Nettoyer le filtre par doucement tapant sur une
surface plane. S’il est très sale, remplacez-le par un
filtre neuf.
Fonctionnement (Suite)
• Conservez ces directives
AVERTISSEMENT
AVERTISSEMENT
AVIS
Fig. 28
Fig. 30
Fig. 29
Fig. 31
1. Arrêtez le moteur et débranchez le fil de la bougie
d’allumage.
2. Laissez l’unité refroidir.
3. À l’aide d’un chiffon sec ou d’une brosse, retirez les
débris de la grille. La grille est située entre le moteur
et le réservoir de carburant et est accessible de tous
les côtés.
4. Il est possible de dévier le protecteur flexible avant,
pour accéder à la grille avant.
6. Réassemblez l’élément de filtre à air et le couvercle
de filtre à air.
Page 28

Questions? Appelez sans frais à : 1-800-737-2112 FR-13 Copyright © 2018 MAT Engine Technologies, LLC
Rangement
• Conservez ces directives
AVIS
Pour éviter la formation de dépôts de gomme et de
corrosion dans le carburateur et le système de carburant
de la tondeuse, il est fortement suggéré d’utiliser un additif
de carburant / stabilisateur formulé pour les carburants à
l’éthanol. Suivez les instructions du fabricant stabilisateur.
Faites tourner le moteur au moins 5 minutes après l’ajout
de stabilisateur.
1.
Laissez le moteur refroidir et videz le réservoir de
carburant, avant de le ranger ou le transporter dans un
véhicule. Utilisez le carburant restant dansle carburateur,
en démarrant le moteur et en le laissant fonctionner,
jusqu’à ce qu’il s’arrête. Comprimez l’ampoule d’amorce
à plusieurs reprises, pour drainer le combustible
du carburateur.
2. Lorsque vous ne l’utilisez pas, rangez la tondeuse à
l’intérieur, dans un environnement sec. Rangez la
tondeuse dans un endroit verrouillé hors de la portée
des enfants.
3. Rangez l’unité et le carburant à un endroit où les
émanations de carburant ne peuvent rejoindre des
étincelles ou des flammes nues, provenant de chauffe eau, moteurs ou interrupteurs électriques,
fournaises, etc.
4. Lors de la préparation du coupe-herbe pour le
rangement ou que le coupe-herbe ne sera pas utilisé
pour 30 jours ou plus :
a. Vérifiez et nettoyez le coupe-herbe complètement.
b. Huilez légèrement toutes les surfaces métalliques
extérieures.
c. Retirez la bougie d’allumage, placez quelques
gouttes d’huile à moteur à 2 temps dans le
cylindre. Tirez à plusieurs reprises la poignée de
lanceur à rappel, pour distribuer l’huile. Replacez
la bougie d’allumage.
d. Vérifiez et nettoyez les filtres à air, selon le
besoin.
Tête de la tondeuse :
D
1. Si les parties de corde de rétention se remplissent de
débris, elles peuvent être démontées à l’aide d’une
clé hexagonale de 5 mm. Lorsque vous les remettez
en place, serrez uniquement jusqu’à 5 N.m de
couple et veillez à ce que la partie intérieure puisse se
déplacer librement.
Bougie d’allumage :
C
Vérifiez la bougie d’allumage après chaque période de 10-15 heures d’usage; réglez l’écartement d’électrode de la
bougie d’allumage et remplacez la bougie d’allumage au besoin. Remplacez la bougie d’allumage à chaque année, pour
maintenir le rendement du moteur et en faciliter le démarrage.
Pour vérifier ou remplacer la bougie d’allumage :
1. Retirez le couvre-borne isolé de la bougie d’allumage.
2. Utilisez la clé de bougie d’allumage pour retirer la
bougie, en tournant dans le sens contraire des
aiguilles d’une montre.
3. Nettoyez et réglez l’écartement d’électrode de la
bougie d’allumage à 0,6 – 0,7 mm (0.024 – 0.028 po).
4. Remplacez toute bougie d’allumage usée par une
pièce de rechange recommandée
(voir SPÉCIFICATIONS DE PRODUIT).
5. Installez la bougie d’allumage à la main dans la
culasse de cylindre et par la suite, resserrez à l’aide
de la clé de bougie d’allumage.
6. Replacez le couvre-borne isolé de la bougie
d’allumage.
Entretien (Suite)
• Conservez ces directives
AVERTISSEMENT
Le moteur et le système d’échappement peut être chaud et peut causer des brûlures de la peau. Laissez le moteur se
refroidir et faites preuve de prudence autour des surfaces chaudes.
2. S’il s’avère nécessaire d’enlever la cuvette et la tête
de la tondeuse, prenez note que le grand écrou
de maintien possède un filetage à gauche (p.ex : pour
enlever l’écrou, tournez dans le sens des aiguilles
d’une montre).
Page 29

Questions? Appelez sans frais à : 1-800-737-2112 FR-14 Copyright © 2018 MAT Engine Technologies, LLC
PROBLÈME CAUSE(S) POSSIBLE(S) SOLUTION(S)
Le moteur ne démarre pas. 1. L’interrupteur d’allumage est en
position d’arrêt (OFF).
2. Moteur noyé.
3. Réservoir de carburant vide.
4. Aucun feu dans la bougie
d’allumage.
5. Le carburant n’atteint pas le
carburateur.
6. Le carburateur requiert un
réglage.
1. Déplacez l’interrupteur d’allumage vers la
position de marche (ON).
2. Consultez le démarrage de moteur noyé à
la section FONCTIONNEMENT.
3. Remplissez le réservoir avec le mélange
approprié de carburant.
4. Remplacez la bougie d’allumage.
5. Vérifiez pour détecter une conduite de
carburant pliée ou fendue ; réparez ou
remplacez.
6. Contactez un centre de service qualifié.
Engine will not accelerate, lacks
power or stalls.
1. Végétation enroulée autour de la
tête du coupe-herbe.
2. Filtre à air vicié.
3. Bougie d’allumage encrassée.
4. Carburateur requiert un réglage.
5. Accumulation de carbone sur la
grille de sortie du silencieux.
6. Basse compression.
1. Dégagez les débris et la végétation de la
tête du coupe-herbe.
2. Nettoyez le filtre à air.
3. Nettoyez ou remplacez la bougie
d’allumage.
4. Contactez un centre de service qualifié.
5. Contactez un centre de service qualifié.
6. Contactez un centre de service qualifié.
Le moteur fume excessivement. 1. Mélange de carburant incorrect.
2. Filtre à air vicié.
3. Carburateur requiert un réglage.
1. Videz le réservoir de carburant et
remplissez avec le avec le mélange
approprié de carburant.
2. Nettoyez ou remplacez le filtre à air.
3. Contactez un centre de service qualifié.
Le moteur surchauffe. 1. Mélange de carburant incorrect.
2. Bougie d’allumage incorrecte.
3. Carburateur requiert un réglage.
4. Accumulation de carbone sur la
grille de sortie du silencieux.
5. Grille d’entrée d’air du moteur
recouverte de débris.
1. Consultez le mélange d’essence / huile à 2
temps à la section FONCTIONNEMENT.
2. Remplacez par une bougie d’allumage
appropriée.
3. Contactez un centre de service qualifié.
4. Contactez un centre de service qualifié.
5. Nettoyez la grille d’entrée d’air pour le
refroidissement du moteur.
Le moteur ne tourne pas
correctement au ralenti.
1. Carburateur requiert un réglage.
2. Joints d’étanchéité de vilebrequin
usés.
3. Basse compression.
1. Contactez un centre de service qualifié.
2. Contactez un centre de service qualifié.
3. Contactez un centre de service qualifié.
Dépannage
• Conservez ces directives
Page 30

Questions? Appelez sans frais à : 1-800-737-2112 FR-15 Copyright © 2018 MAT Engine Technologies, LLC
Garantie
• Conservez ces directives
Spécifiez toujours le numéro de modèle en contactant l’usine.
Nous nous réservons le droit de modifier ces spécifications en tout temps sans préavis. La seule garantie applicable est notre
garantie régulière écrite. Nous n’offrons aucune autre garantie, expresse ou implicite. MAT Engine Technologies, LLC garantit que
ce coupe-herbe et toute autre pièce constituante sera libre de tout défaut relatif aux matériaux et à la main-d’œuvre, pendant une
période de deux ans (90 jours pour une unité remise à neuf), à partir de la date du premier achat auprès d’un concessionnaire
autorisé, à condition que le produit ait été entretenu et opéré adéquatement, selon les directives applicables. Cette garantie est
accordée seulement à l’acheteur original au détail. Le contrat de vente ou la preuve d’achat doit être présenté au moment où une
réclamation est faite au titre de la garantie. Cette garantie ne couvre pas un usage commercial, industriel ou locatif; elle ne couvre
pas non plus les pièces qui ne sont pas dans leur condition originale, due à l’usure normale ou des pièces qui sont défectueuses ou
qui deviennent endommagées, suite à un mauvais usage, accident, manque d’entretien approprié, modification ou altération. Les
exceptions relatives à la période de garantie normale s’appliquent aux pièces d’usure normales comme la ligne de découpe, la tête
de coupe, les filtres à air et les bougies d’allumage qui sont uniquement couverts pendant 60 jours contre le défaut de matériel et
de fabrication. Les frais de déplacement, manutention, transport et autres frais additionnels associés aux réparations sous garantie
ne sont pas remboursables sous cette garantie et demeurent la responsabilité du propriétaire. Dans la mesure autorisée par la loi
de la juridiction régissant la vente de ce produit, cette garantie expresse exclut toutes les autres garanties expresses et limite la
durée de toutes les garanties implicites, incluant les garanties de qualité marchande ou d’adaptation à un usage particulier à une
période de deux ans, à partir de la date du premier achat et par la présente, MAT Engine Technologies, LLC ne sera en aucun
cas tenu responsable de quelque dommage que ce soit, incluant les dommages indirects, accessoires ou consécutifs. Certains
états / provinces ne permettent pas la limitation de la durée d’une garantie implicite ou l’exclusion ou la limitation des dommages
accessoires ou consécutifs ; ainsi les limitations ci-haut mentionnées relatives aux dommages pourraient ne pas s’appliquer à vous.
Cette garantie confère à l’acheteur original des droits juridiques spécifiques.
Pour obtenir plus d’information au sujet de ces droits, veuillez consulter les lois applicables selon l’état / province.
METL - CORRESPONDANCE SEULEMENT
ATT’N: Service technique– METL
6700 Wildlife Way
Long Grove, IL 60047
La garantie du système de contrôle des émissions est fournie par le fabricant du moteur et est incluse avec ce produit et administrée
par MAT Engine Technologies, LLC.
Garantie limitée pour Coupe-herbe Powermate®
Vous pourriez avoir d’autres questions au sujet de l’assemblage, du fonctionnement ou de l’entretien de cette motobineuse.
Dans ce cas, vous pouvez contacter notre département de service technique au 1-800-737-2112 (Anglais seulement).
Vous pouvez également nous écrire :
METL - CORRESPONDANCE SEULEMENT
ATT’N: Service technique– METL
6700 Wildlife Way
Long Grove, IL 60047
Service technique
• Conservez ces directives
En contactant le département de service technique, ayez en
main :
• Votre nom
• Votre adresse
• Votre numéro de téléphone
• Numéro de modèle du produit
• Date de l’achat(inclure une copie de votre reçu pour les
demandes écrites)
Si vous avez besoin d’assistance ou si vous avez des
questions, APPELER SANS FRAIS : 1-800-737-2112.
SI VOUS AVEZ DES QUESTIONS AU SUJET DE LA COUVERTURE DE
VOTRE GARANTIE, VOUS DEVRIEZ CONTACTER LE SERVICE A LA
CLIENTELE DE METL
Si vous avez besoin d’assistance ou si vous avez des
questions, APPELER SANS FRAIS : 1-800-737-2112.
Page 31

Contenido:
Page
Definiciones de seguridad .................1
Información importante sobre seguridad .....2-3
Especificaciones del producto ..............4
Piezas y características ...................4
Ensamblaje............................ 5-6
Funcionamiento ........................7-11
Mantenimiento ........................ 11-12
Almacenamiento.........................12
Diagnóstico y resolución de problemas ......13
Servicio técnico .........................14
Garantía . . . . . . . . . . . . . . . . . . . . . . . . . . . . . . .14
09/28/18 Impreso en China A204064
Manual de operación
BORDEADORA DE
RUEDAS, CON HILO
Unidad a gasolina – 43 cc – 2 tiempos
Anotar lo siguiente para referencia futura:
Código de fecha de fabricación: _________________
Fecha de compra: adjuntar una copia del recibo de venta.
Número gratuito para el consumidor: 1-800-737-2112
Consultar el sitio web para obtener una copia electrónica del manual y del catálogo
de piezas.www.powermateoutdoor.com
IMPORTANTE:
Gracias por comprar esta Bordeadora Powermate®.
Leer y entender todas las advertencias e instrucciones en este manual antes de usar esta máquina. El uso
indebido del equipo puede causar lesiones graves o la muerte. Guardar este manual para referencia futura.
ADVERTENCIA: CONTIENE PLOMO. Puede ser dañino si se ingiere o se mastica. Puede generar polvo
que contenga plomo. Lávese las manos después del uso. Manténgalo fuera del alcance de los niño.s
ADVERTENCIA: Este producto le podría exponer a productos químicos incluyendo plomo, reconocido
por el Estado de California como causante de cáncer, defectos de nacimiento u otros daños del sistema
reproductivo. Para obtener más información, visite www.P65Warnings.ca.gov.
GUARDAR ESTE MANUAL PARA REFERENCIA FUTURA
Si tiene una duda o un problema...LLAME SIN COSTO AL: 1-800-737-2112
Número de Modelo PWSTM4317.2
Page 32

¿Preguntas? Llamar gratuitamente al 1-800-737-2112 SP-2 Copyright © 2018 MAT Engine Technologies, LLC
Definiciones de seguridad
• Guarde todas las instrucciones
Indica una situación inminentemente peligrosa que, si no se evita, resultará en muerte o lesiones
graves.
Indica una situación potencialmente peligrosa que, si no se evita, podría resultar en lesiones
graves o la muerte.
Indica una situación potencialmente peligrosa que, si no se evita, podría resultar en lesiones
menores o moderadas.
Indica una práctica no relacionados con lesiones personales que si no se evita, podrán resultar
en daños a la propiedad.
PELIGRO
CUIDADO
AVISO
ADVERTENCIA
Lea la información a continuación y entendida por el operador. Utilizan los símbolos siguientes para permitir al lector
reconocer información importante acerca de su seguridad.
Símbolos de alerta sobre seguridad:
Símbolos de advertencia sobre seguridad:
Símbolos de control y operación:
Control del estrangulador:
Arranque en frío
Arranque en marcha / caliente
Mezcla de combustible:
50:1
(Gasolina sin plomo: aceite de 2
tiempos)
Cebador de combustible:
Oprimirlo 6 veces.
Interruptor de encendido:
Motor encendido (ON)
Motor apagado (OFF)
CHOKE/
COLD
START
RUN/
WARM
START
6x
PRIMER BULB
ON
UNDER SIDE
6x
PRIMER BULB
ON
UNDER SIDE
Fuel Mixture
50:1
Unleaded Gas: 2 Cycle Oil
Caution: Do Not Use Gas
Mix with More Than 10%
Methanol or Ethanol
STOP
ON/
RUN
Busque este símbolo que indica precauciones de seguridad importantes, respecto a riesgos de lesiones.
Significa: ¡Atención! ¡Esté alerta! Su seguridad está en juego.
Leer el manual de operación antes de utilizar esta máquina. El no seguir las directrices podría
conducir a lesiones graves.
Siempre lleve una protección ocular que cumpla con los requisitos ANSI Z87.1.
Lleve una protección auditiva.
Lleve calzado de seguridad.
Los gases de escape del motor contienen monóxido de carbono, un gas inodoro y letal. JAMÁS hacer funcionar
la unidad en espacios interiores o en áreas con ventilación deficiente.
Mantenga a los circunstantes a una distancia al menos de 15 m. Pare la maquina, si alguien ingresa al
área.
Este aparato puede lanzar objetos pequeños a gran velocidad y causar lesiones. Verifique la zona de
trabajo y asegúrese de quitar todos los objetos extraños.
Mantenga todas las partes del cuerpo alejadas del hilo giratorio de la bordeadora.
Para reducir el riesgo de incendio, limpie derramado gas y mantenga libre de residuos. La gasolina es
extremadamente inflamable. Dejar que la máquina se enfríe antes de repostar combustible.
Superficie caliente. NO toque el silenciador caliente, caja de engranajes, ni el cilindro. Éstos podrían
causarle quemaduras. Estas piezas se ponen extremadamente calientes y permanecen calientes durante
un período de tiempo corto después de apagarse la unidad.
Page 33

¿Preguntas? Llamar gratuitamente al 1-800-737-2112 SP-3 Copyright © 2018 MAT Engine Technologies, LLC
Antes de operar la bordeadora:
LEA Y ENTIENDA BIEN TODAS LAS INSTRUCCIONES ANTES DE ENCENDER LA BORDEADORA.
Lea y siga todas las advertencias e instrucciones de seguridad. Al no hacerlo podría provocar lesiones graves a sí
mismo y a los espectadores.
1. Evite entornos peligrosos.
a. No utilice la bordeadora bajo la influencia de alcohol, fármacos u otro medicamento.
b. No utilice la bordeadora cuando se esté cansado.
c. No utilice la bordeadora si se es mental o físicamente incapaz de utilizarla de manera segura.
2. Verifique la bordeadora para detectar si hay piezas dañadas y asegúrese de que todos los sujetadores y
dispositivos de protección estén en sus lugares y bien fijados. Reemplace todas las piezas dañadas.
3. Utilice solamente un hilo flexible no metálico de 0.095 o 0.105 pulg. de diámetro con esta bordeadora.
Esta bordeadora está diseñada para ser utilizada con un hilo flexible y no metálico. Nunca utilice esta bordeadora
con accesorios no autorizados específicamente en este manual. Nunca utilice accesorios alternativos de corte como
alambre o cable metálico que pueden romperse y convertirse en peligrosos proyectiles.
4. Lleve ropa adecuada cuando utilice la bordeadora.
a. Siempre lleve pantalones largos gruesos, botas, guantes y camisa de manga larga.
b. No lleve ropa holgada o joyería que pudiera atorarse en las piezas móviles de la bordeadora.
c. Siempre lleve guantes y calzado fuerte, cuando trabaje en exteriores.
d. Siempre póngase una malla para pelo para contener el pelo largo.
5. Utilice siempre una máscara facial o una antipolvo cuando trabaje en ambientes polvorientos.
6. Siempre utilice protección ocular que cumpla o exceda los requisitos ANSI Z87.1.
7. Siempre utilice protección auditiva que cumpla o exceda las normas ANSI.
8. Verifique cuidadosamente el área en que se va a utilizar la bordeadora y quite todos los objetos extraños.
Este aparato puede lanzar objetos pequeños a gran velocidad y causar lesiones.
Información importante sobre seguridad
• Guarde todas las instrucciones
Durante el funcionamiento de la bordeadora:
1. Manténgase alerta. Concéntrese en un funcionamiento seguro. Preste atención al ambiente del trabajo.
2. No opere la bordeadora si está dañada o no montada de manera segura y completa.
3. Únicamente adultos instruidos adecuadamente deben operar la bordeadora. Jamás permita que niños operen la
bordeadora.
4. Mantenga a los niños alejados. Mantenga a los circunstantes a una distancia al menos de 15 m (50 pi).
5. Utilice esta bordeadora solamente para recortar, escalpar y segar. Utilícela solamente para los tipos de trabajos
previstos. No la utilice para hacer bordes, ni poder, ni cortar setos.
6. El hilo de la bordeadora puede girar durante los ajustes del carburador. Proceda con los ajustes del carburador
apoyando el extremo inferior, para evitar que toque algo el hilo de corte.
7. Mantenga el equilibrio y los pies sobre suelo en todo momento. No incline demasiado su cuerpo hacia fuera.
8. Mantenga todas las partes del cuerpo lejos de la zona de corte, de las líneas giratorias de la bordeadora y de las
superficies calientes.
9. Mantenga la unidad sólidamente con las dos manos.
10. No intente forzar la bordeadora. Utilizándola de la manera diseñada, realizará un mejor trabajo y así habrá menos
riesgo de lesiones.
11. Nunca arranque o ponga en marcha la bordeadora dentro de un área o edificio cerrado. La inhalación de los gases
de escape puede causar la muerte.
12. Después de haber apagado la bordeadora, asegúrese de que el hilo de corte se ha detenido, antes de acercarse a
la cabeza de la bordeadora.
ADVERTENCIA
ADVERTENCIA
PELIGRO
PELIGRO
Page 34

¿Preguntas? Llamar gratuitamente al 1-800-737-2112 SP-4 Copyright © 2018 MAT Engine Technologies, LLC
Información importante sobre seguridad (Continuación)
• Guarde todas las instrucciones
Durante el funcionamiento de la bordeadora:
Una exposición prolongada a vibraciones utilizando herramientas mecánicas manuales podría causar daños en los
vasos sanguíneos o a los nervios en los dedos, las manos y en las articulaciones de personas propensas a trastornos
circulatorios o inflamaciones anormales. Se ha relacionado el uso extensivo en clima frío con daños a los vasos
sanguíneos de personas normalmente saludables. Si ocurrieran síntomas como entumecimiento, dolor, pérdida
de fuerza, cambio en el color o la textura de la piel o pérdida de sensación en los dedos, las manos o articulaciones,
descontinúe el uso de esta herramienta y busque atención médica.
Manejo seguro – combustible:
1. Mezcle y vierta el combustible en exteriores, DONDE NO HAYA CHISPAS, NI LLAMAS.
2. Utilice un contenedor aprobado para gasolina.
3. No fume ni permita fumar cerca del combustible ni de la bordeadora.
4. Evite derrames de combustible o de aceite. Limpie todos derrames de combustible. No llene un motor caliente. No
llene un motor en marcha.
5. Mueva la bordeadora al menos 3 m del sitio de abastecimiento del combustible, antes de arrancar el motor.
6. Pare el motor y déjelo enfriar, antes de retirar la tapa del tanque. Retire lentamente la tapa del tanque.
Mantenimiento y almacenamiento de la bordeadora:
1. Desconecte la bujía antes de dar mantenimiento.
2. Déle mantenimiento esmerado a la bordeadora. Verifique la unidad periódicamente. Si la bordeadora no está
funcionando adecuadamente o está dañada, llévela a un centro de servicio calificado.
3. Verifique la unidad para detectar si hay piezas móviles desalineadas o atascadas, piezas rotas, un montaje
incorrecto o cualquier otra condición que pudiera afectar su funcionamiento.
4. Asegúrese de que todos los dispositivos de protección estén en su lugar y funcionen correctamente.
5. Debe reparar o reemplazar adecuadamente un dispositivo de protección o cualquier otra pieza dañada, por un
centro de servicio calificado.
6. Utilice únicamente piezas de repuesto y accesorios Powermate® genuinos. El uso de cualquier pieza o accesorio
que no sea Powermate® puede conducir a lesiones, daños a la unidad e invalidará la garantía.
7. No retire ni modifique ninguna pieza. Al hacerlo podría provocar lesiones, daños a la bordeadora e invalidará
la garantía.
8. Mantenga los asideros secos, limpios y libres de aceite y grasa.
9. Deje enfriar el motor y vacíe el tanque de combustible, antes de almacenar o transportarlo dentro de un vehículo.
Agote el combustible restante arrancando el motor y dejándolo funcionar hasta que se pare.
10. Cuando no utilice la podadora, guárdela bajo techo en un lugar seco. Guarde la podadora en un lugar bajo llave
fuera del alcance de los niños.
11. Almacene la unidad y el combustible en un área donde los vapores del combustible no puedan llegar a las chispas
o a las llamas abiertas de los calentadores de agua, motores o interruptores eléctricos, hornos, etc.
ADVERTENCIA
CUIDADO
Page 35

¿Preguntas? Llamar gratuitamente al 1-800-737-2112 SP-5 Copyright © 2018 MAT Engine Technologies, LLC
Motor . . . . . . . . . . . . . . . . . . . . . . . . . . . 43 cc – 2 tiempos
Velocidad . . . . . 7,000-8,500 rpm, según el tamaño del hilo
Diámetro de corte.................432 mm (17 inches)
Diámetro de hilo ...................0.095 o 0.105 pulg.
Tipo de bobina .............. Carga manual, hilo doble
Capacidad del tanque de combustible.....840 ml (28 oz)
Tipo de combustible .......
Unleaded Gasoline – 87 Octane
or higher
Aceite de 2 tiempos . . . . Aceite de 2 tiempos que cumpla o
exceda las especificaciones JASO –FC
Mezcla de combustible.
50:1 (Gasolina: Aceite de 2 tiempos)
Bujía . . . . . . . . . . . . . . . . . . . . . . . . . . . . . . NGK - BPMR6A
CHAMPION - CJ8 o equivalente
Peso neto . . . . . . . . . . . . . . . . . . . . . . . . . . . . 18 kg (39 lbs)
Especificaciones del producto
• Guarde todas las instrucciones
Piezas y características
1. Ensamble de cabeza de bordeadora 7. Interruptor de encendido ON/OFF 13. Tanque de combustible
2. Rejilla de entrada de aire del motor 8. Empuñadura del arrancador de retroceso 14. Cubierta del filtro de aire
3. Protector de la bordeadora 9. Estrangulador 15. Soporte para cordón
4. Cuchillo del hilo de la bordeadora 10. Bulbo de cebado de combustible 16. Manija de bisel
5. Asidero delantero de transporte 11. Bujía 17. Control rotatorio
6. Palanca del acelerador 12. Silenciador
8
9
1
4
5
11
3
6
7
10
12
13
14
15
2
16
17
Page 36

¿Preguntas? Llamar gratuitamente al 1-800-737-2112 SP-6 Copyright © 2018 MAT Engine Technologies, LLC
Ensamblaje
• Guarde todas las instrucciones
Piezas incluidas en el embalaje de la bordeadora:
Ensamblaje de los asideros:
A
Ensamblaje de la cabeza de corte:
B
Herramientas requeridas para el ensamblaje:
No opere la bordeadora si está dañada o no montada de manera segura y completa.
1. Instalar la manija intermedia a la manija inferior en una
de las dos posiciones de ajuste de altura y asegurar
usando pernos de sujeción y perillas plásticas. Orientar
la manija de manera que las presillas metálicas
pequeñas queden del lado derecho. Pasar el cable de
pivote a través de la manija intermedia. Ensamblar
con perillas dentro del mango inferior. Apretar las
perillas firmemente. (Fig. 1)
2. Instale la manija superior a la central y asegúrelas con
dos pernos de soporte y perillas de plástico. Coloque
la manija de tal manera que la forma “V” se encuentre
hacia arriba. Realice el ensamblado con las perillas
hacia el interior de la manija central. Coloque el cable
del acelerador en la parte inferior derecha de la manija
central. Ajuste las perillas de manera segura. Asegure
el cable de aceleración a las manijas con las tachuelas
que se proporcionan, como se muestra a continuación.
Asegure el cable del pivote con el sujetacables de
plástico que se proporciona. (Fig. 2)
3. Usar los orificios de ajuste de altura en la manija inferior
para fijar la altura deseada.
1. Instale el conjunto del cabezal cortador en la carcasa
del embrague con el soporte de metal que involucra
dicha carcasa. (Fig. 3) Es posible que sea necesario
rotar ligeramente el cabezal de la podadora para
alinear las estrías del eje.
2. Para apretar el tubo sobre la caja. Intente girar el
tubo dentro del de la caja. Si puede girarlo de alguna
manera, desenganche la manija de la leva de fijación
y atorníllela hacia el interior media vuelta adicional.
Gire la manija para apretar el tubo. Vuelva a verificar
la estanquidad y repitalo, si es necesario.
(Fig. 4)
• Manual de operación
• Asideros superior e intermedio
• Protector de la bordeadora
• Llave de bujía
• Tubo de reemplazo de hilo y ataduras
• 50:1 Aceite de 2 tiempos (59.1 ml)
• Tubo delantero con cabeza de bordeadora
• (2) Ensamblaje de ruedas
• (4) Tuercas mariposa de plástico (para fijar los asideros)
• (4) Fijaciones en forma de silla (para fijar los asideros)
• (2) Ataduras para cables
• (1) Perno de tope de la rueda
(más largo para la rueda de la derecha)
• (1) Perno de tope de la rueda
(más corto para la rueda de la izquierda)
• (1) Espaciamiento para rueda (para rueda derecha)
• (1) Tornillo de bloqueo con cabeza hex
(para fijar el protector de la bordeadora)
ADVERTENCIA
Si se necesita ayuda o falta alguna pieza, LLAMAR
GRATUITAMENTE AL: 1-800-737-2112.
ENSAMBLAJE DE LA
CABEZA DE CORTE
Fig. 4Fig. 3
ASIDERO
INTERMEDIO
ASIDERO
SUPERIOR
Fig. 2
Fig. 1
Desempacado:
1. Retire los componentes de la caja.
2. Corte las ataduras de los cables blancos. No corte las
ataduras de los cables negros.
3. Retire la protección de espuma y la corrugada.
MANIJA
INTERMEDIA
ORIFICIO PARA
FIJAR LA MENOR
ALTURA DE
LA MANIJA
ORIFICIO PARA
FIJAR LA
MAYOR ALTURA
DE LA MANIJA
MANIJA INFERIOR
• Llave con dado o llave de tuercas -14 mm• Llave de 10 mm o llave ajustable
Page 37

¿Preguntas? Llamar gratuitamente al 1-800-737-2112 SP-7 Copyright © 2018 MAT Engine Technologies, LLC
Ensamblaje (Continuación)
• Guarde todas las instrucciones
Ensamblaje de las ruedas:
D
Almacenamiento del hilo:
E
1. Instale la rueda derecha en el marco con el tornillo de
paleta más largo y con un separador. Ajústela a 25
pies-libras. (34 N.m) Ajústelo de manera segura con
una llave de 14 mm. (Fig. 9 y 10)
2. Instale la rueda izquierda en la clavija del conjunto del
ajustador con el tornillo de paleta más corto. Ajústela a
25 pies-libras. (34 N.m) de torque. (Fig. 11 y 12)
3. Mueva la manija de bisel a la posición inferior para
ajustar el nivel de la siega.
1. Utilizando el orificio existente, instale con un clic el
sujetador inferior del tubo, sobre el asidero intermedio
izquierdo. (Fig. 12)
2. Utilizando el orificio existente, instale con un clic el
sujetador superior del tubo, sobre el asidero
intermedio izquierdo.
3. Instale el tubo transparente con la cadena adicional
que se proporciona en las tachuelas. (Fig. 13)
Protector contra los residuos:
C
1. Introduzca la pata del soporte metálico para montaje
dentro de la ranura del protector contra los residuos.
(Fig. 5-6)
2. Instale el tornillo de cabeza con hembra hexagonal a
través del soporte y en la inserción de metal del
protector de desechos. Ajústelo de manera segura
con una llave de 10 mm.
(Fig. 7-8)
El cuchillo para el hilo de la bordeadora, fijo sobre el
protector contra los residuos es afilado y podría cortarse.
Utilícelo cuidadosamente.
CUIDADO
SUJETADOR
SUJETADOR
CAPUCHÓN
Fig. 12
Fig. 13
RANURA
PAR A PATA D E
SOPORTE
PROTECTOR
CONTRA LOS
RESIDUOS
Fig. 5
Fig. 7
Fig. 6
Fig. 8
TORNILLO
CON TOPE
TORNILLO
CON TOPE
MONTAJE METÁLICO
SOPORTE
MONTAJE METÁLICO
SOPORTE
ESPACIADOR
Fig. 9
Fig. 11
Fig. 10
Fig. 12
TORNILLO DE
PALETA
(MÁS CORTO)
TORNILLO
DE PALETA
CONJUNTO DEL
REGULADOR
MANIJA DEL
BISEL DE LA
Page 38

¿Preguntas? Llamar gratuitamente al 1-800-737-2112 SP-8 Copyright © 2018 MAT Engine Technologies, LLC
Funcionamiento
• Guarde todas las instrucciones
Identificación y uso de los controles:
A
Verifique la zona de trabajo donde utilizará la bordeadora y asegúrese de quitar todos los objetos extraños. Este aparato
puede lanzar objetos pequeños a gran velocidad y causar lesiones y daños materiales.
Mantenga a los circunstantes a una distancia al menos de 15 m. Pare la maquina, si alguien ingresa al área.
ADVERTENCIA
1. Acelerador:
El acelerador se encuentra sobre la barra horizontal
del asidero superior. Bajando la palanca, la velocidad
del motor aumentará. En punto muerto, el embrague
está desenganchado y la cabeza de la bordeadora
no girará. Cuando la velocidad del motor aumenta, el
embrague automático se enganche y hace girar la
cabeza de la bordeadora. Cuando afloja la palanca
del acelerador equipado con un resorte, regresa en
punto muerto. (Fig. 14)
2. Gire para contrapesar el cabezal de la podadora:
La bordeadora de ruedas con hilo está diseñada con
la capacidad de descentrar la cabeza de la
bordeadora, desde una posición central hacia
una posición a la derecha. Puede hacerlo presionando
el control digital sobre el asidero superior derecho.
Al apretar el control manual, el cabezal se desbloquea
y puede rotarse a dos posiciones a la derecha.
Aflojando el control digital, una tija bloqueará la
cabeza de la bordeadora en la posición deseada.
Rotación el cabezal de la podadora permite sesgar
fácilmente y cortar alrededor de obstáculos, tales
como postes o árboles y cercados subterráneos.
(Fig. 15)
3. Ajuste para un corte biselado:
El hilo cortará normalmente a una altura de 50 mm
aproximadamente. Cuando se requiere un corte más
cercano del suelo, un corte biselado está disponible.
Hay una manija justo en frente de la rueda izquierda.
Esta manija puede desviarse hacia afuera y rotarse
a dos posiciones diferentes. Este procedimiento
colocará la cabeza de la bordeadora en in ángulo
y permitirá al hilo cortar más cercano del suelo. Esta
característica está particularmente práctica para cortar
cerca de aceras elevadas o cimientos de edificios.
(Fig. 16)
4. Interruptor encendido / apagado:
Un interruptor de encendido se encuentra sobre la
caja del filtro de aire del motor. El interruptor debe
ser en posición encendido (ON) para poner en marcha
el motor. Puede parar el motor desplazando el
interruptor en posición apagado (OFF). (Fig. 17)
Fig. 14
Fig. 16
Fig. 15
Fig. 17
Page 39

¿Preguntas? Llamar gratuitamente al 1-800-737-2112 SP-9 Copyright © 2018 MAT Engine Technologies, LLC
Funcionamiento (Continuación)
• Guarde todas las instrucciones
Primero, el motor de 2 tiempos de la bordeadora requiere
mezclar gasolina y aceite para motores de 2 tiempos antes de
añadir esta mezcla en el tanque de combustible de la unidad.
Para mezclar la gasolina con el aceite de 2 tiempos:
1. Utilice gasolina fresca sin plomo, con índice de octano
de 87 o más. No utilice gasolina que contenga más de
10% de etanol.
AVISO
El uso de gasolina con más de 10% de etanol puede dañar
la bordeadora. Se recomienda el uso de gasolina sin etanol.
Se recomienda el uso continuo de un aditivo/ estabilizador de
combustible para neutralizar los efectos de etanol. Estos aditivos
prolongan también la vida útil de la gasolina.
2. Siempre utilice aceite de 2 tiempos que cumpla o
exceda las especificaciones JASO - FC, previsto para
mezclar con gasolina en una proporción de 50:1.
3. No utilice aceite automotriz o para motores marinos
fuera de borda de 2 tiempos. El uso de éstos dañará
el motor de la bordeadora y anulará la garantía.
4. Siempre mezcle la gasolina y el aceite de 2 tiempos
en un contenedor aprobado para gasolina. Nunca
mezcle el combustible directamente en el tanque de la
bordeadora.
5. Siga las instrucciones en el contenedor de aceite de
2 tiempos para mezclarlo con el combustible. Mezcle
la gasolina y el aceite de 2 tiempos en una proporción
de 50:1. Para obtener una proporción 50:1,mezcle
4 litros de gasolina con 77 ml de aceite. Después
de añadir el aceite a la gasolina, agite el contenedor
momentáneamente para asegurar una mezcla
apropiada.
6. Mezcle únicamente suficiente combustible para las
necesidades inmediatas. No almacene
combustible premezclado.
7. Pare el motor y déjelo enfriar antes de rellenar de
combustible.
8. Para llenar el tanque de combustible de la bordeadora
con la mezcla de gasolina y aceite, coloque la
bordeadora en posición regular sobre el suelo o sobre
un banco firme y limpie toda suciedad alrededor de la
tapa del tanque de combustible.
9. Quite la tapa del tanque de combustible lentamente
y utilice un embudo para verter la mezcla en el
tanque; luego, vuelva a colocar la tapa del tanque de
combustible.
10. Evite los derrames de combustible o de aceite. Limpie
todo derrame de combustible.
11. Antes de arrancar el motor, mueva la bordeadora a un
mínimo de 3 m de distancia del sitio de abastecimiento
del combustible.
Antes de encender el motor:
A
Mezcla de gasolina / aceite de 2 tiempos:
No fume ni permita fumar cerca del combustible, ni de la bordeadora. Mezcle y vierta el combustible en exteriores DONDE
NO HAYA CHISPAS NI LLAMAS.
ADVERTENCIA
Recomendaciones:
B
1. La bordeadora ofrecerá un mejor rendimiento a una gran velocidad y los extremos del hilo cortarán
la vegetación. No intente forzar el hilo de la bordeadora sobre el pasto de una manera más rapida
que la velocidad de corte permisible del aparato.
2. Los extremos del hilo pueden dañar los árboles, arbustos y cercas. Para evitar los daños, puede elegir
utilizar el motor a velocidades menores. Debe verificar cuidadosamente la ubicación del hilo de corte.
3. Ya que la cabeza de corte puede pivotar hacia la derecha, planifique cortar alrededor de los objetos
(cercas, edificios, etc.) en el sentido del reloj.
4. Trabajando a proximidad de las cercas de mallas de eslabón, evite el contacto del hilo de corte con la
cerca. Al hacerlo provocaría un desgaste más rápido del hilo. Asimismo, un contacto con superficies de
concreto y ladrillos provocaría un desgaste más rápido del hilo.
5. No deje el protector metálico en forma de cuenco de la cabeza de la bordeadora tocar la parte superior de
las superficies de concreto y asfalto. Al hacerlo provocará un desgaste rápido de esta pieza protectora metálica.
Esta pieza ha sido diseñada para tocar las superficies de pasto.
6. Se recomienda un cambio cuando el hilo de la bordeadora se gasta a la mitad de la longitud original.
Este procedimiento ayudará a mantener una velocidad alta de los extremos y proporcionar un corte limpio. Se
recomienda encarecidamente limpiar la rejilla de entrada de aire para el enfriamiento del motor, en
cada cambio de hilo. Este procedimiento impedirá un sobrecalentamiento del motor.
Page 40

¿Preguntas? Llamar gratuitamente al 1-800-737-2112 SP-10 Copyright © 2018 MAT Engine Technologies, LLC
Funcionamiento (Continuación)
• Guarde todas las instrucciones
Arranque del motor:
C
Arranque del motor:
B
Mantenga todas las partes del cuerpo lejos de la zona de corte, de las líneas giratorias de la bordeadora y de las
superficies calientes.
NOTA: NO presione la palanca del acelerador, hasta que el motor arranque y funcione.
NOTA: Cuando hace frío, deje que el motor caliente en punto muerto durante un periodo de tiempo más prolongado, antes de
mover la palanca en la posición RUN/WARM START (MARCHA / ARRANQUE EN CALIENTE).
Arranque del motor en frío:
1. Coloque la bordeadora sobre una superficie plana.
2.
Mueva el interruptor de encendido en posición de
marcha (ON).
3. Mueva la palanca del estrangulador hacia arriba
hasta en la posición COLD START
(ARRANQUE EN FRÍO). (Fig. 18)
4. Presione el bulbo de cebado lentamente 6 veces.
(Fig. 20)
5. Jale firmemente la empuñadura del arrancador de
retroceso, hasta que el motor arranque y funcione.
(Fig. 21)
6. Después del arranque y del funcionamiento del
motor durante 10-15 segundos, mueva la palanca
del estrangulador en la posición RUN/WARM START
(MARCHA / ARRANQUE EN CALIENTE). (Fig. 19)
Arranque del motor en caliente:
1. Coloque la bordeadora sobre una superficie plana.
2.
Mueva el interruptor de encendido en posición de
marcha (ON).
3. Mueva la palanca del estrangulador en la posición
RUN/WARM START (MARCHA / ARRANQUE EN
CALIENTE).
(Fig. 19)
4. Jale firmemente la empuñadura del arrancador de
retroceso, hasta que el motor arranque y funcione.
(Fig. 21)
ADVERTENCIA
Fig. 18
Fig. 20
Fig. 19
Fig. 21
NOTA: Si el motor aún no arranca, refiérase a la sección DIAGNÓSTICO Y RESOLUCIÓN DE PROBLEMAS de este manual.
Arranque del motor ahogado:
1. Coloque el soplador sobre una superficie plana.
2. Mueva el interruptor de encendido en posición de
marcha (ON).
3. Mueva la palanca del estrangulador en la posición
RUN/WARM START (MARCHA / ARRANQUE EN
CALIENTE). (Fig. 19)
4. Baje la palanca del acelerador completamente y jale
la empuñadura del arrancador de retroceso
repetidamente, hasta que el motor arranque
y funcione. Es posible que sea necesario jalar
la empuñadura del arrancador muchas veces,
dependiendo de la severidad del ahogamiento del
motor. (Fig. 21)
5. Si el motor aún no arranca, deje que repose la unidad
durante 30 minutos aproximadamente y repita los
pasos del 1 al 3.
Page 41

¿Preguntas? Llamar gratuitamente al 1-800-737-2112 SP-11 Copyright © 2018 MAT Engine Technologies, LLC
Funcionamiento (Continuación)
• Guarde todas las instrucciones
Instalar el hilo de la bordeadora:
E
Con esta bordeadora, utilice un hilo flexible no metálico,
de 0.095 o 0.105 pulg. de diámetro. Nunca utilice otros
accesorios alternativos de corte como: como alambre o
cable metálico que pueden convertirse
en peligrosos proyectiles.
Para un hilo de 0.095 y 0.105 pulg. de diámetro:
(Fig. 22-25)
1. Pare el motor y quite la bujía.
2. Corte dos tramos de 42 cm del hilo nuevo. Refierase
a las instrucciones sobre el asidero izquierdo para
establecer la longitud apropiada del corte.
3. Introduzca un extremo del hilo en la abertura lateral y
diríjalo alrededor de la parte trasera y hacia fuera a
través de abertura del lado opuesto. (Fig 22)
4. Jale el hilo de tal manera que obtenga tramos iguales
en ambos lados.
5. Al presionar la pestaña hacia adentro, coloque
un extremo en la parte trasera a través del lado de la
apertura y fuera de la parte frontal del retenedor.
(Fig 23-24)
6. Asimismo, dirija el otro extremo a través de la
abertura lateral y hacia fuera a través de la parte
delantera de la fijación. (Fig 25)
7. Ajuste el hilo de tal manera que salgan tramos
iguales de la fijación.
8. Repita en otro lado.
.
ADVERTENCIA
Parar la bordeadora:
D
La cabeza de la bordeadora y el hilo de corte continuarán girar durante unos segundos, después que el motor está parado.
1. Suelte la palanca del acelerador y deje que el motor marche en punto muerto durante unos momentos.
2. Desplace el interruptor de encendido hacia la posición de apagado (OFF).
CUIDADO
Fig. 22
Fig. 24
Fig. 23
Fig. 25
Page 42

¿Preguntas? Llamar gratuitamente al 1-800-737-2112 SP-12 Copyright © 2018 MAT Engine Technologies, LLC
Mantenimiento
• Guarde todas las instrucciones
Filtro de aire:
A
La bordeadora está equipada con dos filtros de dentro de la caja. Una acumulación de partículas y polvo dentro de los
filtros de aire reducirá el rendimiento del motor, aumentará el consumo de combustible y el riesgo de dañar el motor.
Limpie los filtros de aireen cada periodo de 5 horas de utilización. Puede ser necesario limpiar los filtros de aire con
mayor frecuencia durante periodos secos, debido a una gran cantidad de partículas transportadas por el aire.
Desconecte la bujía, antes de dar mantenimiento.
Técnicas / Aplicaciones:
F
Verifique la zona de trabajo donde utilizará la bordeadora y asegúrese de quitar todos los objetos extraños. Este
aparato puede lanzar objetos pequeños a gran velocidad y causar lesiones y daños materiales.
La bordeadora será la más eficaz, siguiendo los consejos para el uso del hilo, para cortar pasto y otro tipo de
vegetación. No fuerce el hilo de la bordeadora sobre el pasto, ni otro tipo de vegetación de una manera más rapida que
la velocidad de corte permisible del aparato. Si se fuerza la podadora, esta tendrá un funcionamiento menos efectivo y
podría ocasionar que el dispositivo se recaliente.
Consejo práctico para cortar
Para extender la vida útil del hilo de la bordeadora, manténgalo húmedo. Si no se lo mantiene húmedo, el hilo de nilón
se resecará y será frágil. Mantenga un hilo adicional de la bordeadora, en una lata con agua. El hilo permanecerá
flexible y fácil de cambiar, de esa manera. Asimismo, un hilo flexible durará mucho más.
Se recomienda limpiar la rejilla de entrada de aire del motor en cada reemplazo del hilo de la bordeadora. Al no hacerlo,
podría causar un sobre calentamiento y dañar el motor. (Vea las instrucciones en la sección MANTENIMIENTO)
Funcionamiento (Continuación)
• Guarde todas las instrucciones
ADVERTENCIA
ADVERTENCIA
ADVERTENCIA
AVISO
1. Antes de retirar la cobertura del filtro de aire, elimine
cualquier suciedad o desecho suelto en el prefiltro, o
alrededor de él, que está ubicado en la carcasa del
filtro externo.
2. Quite los filtros de aire, destornillando la fijación.
(Fig. 28)
3. Quite y limpie los filtros de espuma. (Fig. 29-31)
•
El polvo ligero de la superficie puede quitarse,
golpeando ligeramente sobre los filtros.
• Cuando hay depósitos más pesados, debe limpiarlo
con agua jabonosa. Presione el resto de agua y
deje secar los filtros completamente.
Nunca limpie los filtros con gasolina u otros disolventes
inflamables.
4. Agregue cuatro gotas de aceite fino al filtro de
espuma, exprima el exceso y vuelva a colocarlo.
5. Quitar el elemento de filtro de aire de papel.
(Fig 31) Limpie el filtro golpeándolo suavemente
sobre una superficie plana. Si es más sucio,
reemplácelo con un filtro nuevo.
6. Vuelva a ensamblar el elemento del filtro de aire y la
cobertura del filtro de aire.
Fig. 28
Fig. 30
Fig. 29
Fig. 31
Page 43

¿Preguntas? Llamar gratuitamente al 1-800-737-2112 SP-13 Copyright © 2018 MAT Engine Technologies, LLC
Almacenamiento
• Guarde todas las instrucciones
AVISO
Para evitar que se formen depósitos gomosos de
combustible y que se corroa el carburador de la podadora,
es altamente recomendable utilizar un aditivo/estabilizador
para combustible formulado con combustibles de etanol.
Siga las instrucciones del fabricante del estabilizador.
Ponga en marcha el motor durante al menos 5 minutos,
después de añadir el estabilizador.
1.
Deje el motor enfriar y vacíe el tanque de combustible
antes de almacenar o transportarlo en un vehículo.
Arranque el motor y déjelo marchar hasta que pare,
para utilizar el combustible restante en el carburador.
Presione el bulbo de cebador varias veces para drenar
el combustible del carburador.
2. Cuando no utilice la podadora, guárdela bajo techo
en un lugar seco. Guarde la podadora en un lugar
bajo llave fuera del alcance de los niños.
3. Almacene la unidad y el combustible en un área
donde los vapores del combustible no puedan llegar a
las chispas o a las llamas abiertas de los calentadores
de agua, motores o interruptores eléctricos,
hornos, etc.
4. Preparando la bordeadora para el almacenamiento o
cuando no se va a usarlo durante 30 días o más:
a. Verifique y limpie la bordeadora completamente.
b. Añada un poco de aceite sobre todas las
superficies exteriores metálicas.
c. Quite la bujía, coloque unas gotas de aceite para
motores de 2 tiempos dentro del cilindro. Jale
varías veces la empuñadura del arrancador de
retroceso, para distribuir el aceite. Vuelva a
colocar la bujía.
d. Verifique y limpie los filtros de aire, si es
necesario.
Cabezal de la podadora:
D
1. Si las partes de retención de la cadena se llenan con
desechos, pueden eliminarse con una llave hexagonal
de 5 mm. Al realizar la reinstalación, solo ajuste
a 5 N.m y asegúrese de que la parte interior puede
moverse.
Bujía:
C
Verifique la bujía después de cada periodo de 10 a 5 horas de uso; ajuste la separación del electrodo de la bujía y si es
necesario, reemplace la bujía. Reemplace la bujía cada año para mantener el rendimiento del motor y un arranque fácil.
Para verificar o reemplazar la bujía:
1. Quite el capuchón aislado de la bujía.
2. Utilice la llave de bujía para quitar la bujía, girando la
llave en el sentido contrario del reloj.
3. Limpie y ajuste la separación del electrodo de la bujía
a un valor de 0.6 a 0.7 mm (de 0.024 a 0.028 pulg.).
4. Reemplace toda bujía gastada con un reemplazo
recomendado (vea ESPECIFICACIONES DEL
PRODUCTO). Limpie y ajuste la separación del
electrodo de la bujía a un valor de 0,6 a 0,7 mm (de
0.024 a 0.028 pulg.).
5. Instale la bujía en el cabezal del cilindro, apretándola
a mano; luego, apriétela con la llave de bujía.
6. Vuelva a colocar el capuchón aislado de la bujía.
Debe asegurarse que la rejilla de entrada de aire del motor esté libre de todas partículas, para mantener temperaturas
aceptables para el motor. Se recomienda limpiar la rejilla en cada reemplazo del hilo de la bordeadora.
El dispositivo y el sistema de escape podrían estar calientes y causar quemaduras en la piel. Deje que el dispositivo se
enfríe y tome sus precauciones cuando esté cerca de superficies calientes.
ADVERTENCIA
Rejilla de entrada de aire del motor
B
Mantenimiento (Continuación)
• Guarde todas las instrucciones
2. Si es necesario retirar el bol y el cabezal de la
podadora, tenga en cuenta que la tuerca de retención
grande tiene una rosca a la izquierda (por ejemplo,
retire la rosca girándola en el sentido horario).
1. Pare el motor y desconecte el cable de la bujía.
2. Deje enfriar la unidad.
3. Utilizando un trapo seco o un cepillo, quite lar
partículas de la rejilla. La rejilla se encuentra entre
el motor y el tanque de combustible y se puede
accederla desde todos lados.
4. Se puede desplazar el protector flexible delantero,
para acceder a la rejilla delantera.
AVISO
Page 44

¿Preguntas? Llamar gratuitamente al 1-800-737-2112 SP-14 Copyright © 2018 MAT Engine Technologies, LLC
PROBLEMA CAUSA/S POSIBLE/S SOLUCIÓN / SOLUCIONES
El motor no arranca. 1. Interruptor de encendido está en
posición apagada (OFF).
2. Motor ahogado.
3. Tanque de combustible vacío.
4. Bujía sin chispas.
5. Combustible no llega al
carburador.
6. Carburador necesita un ajuste.
1. Mueva el interruptor de encendido está en
posición encendida (ON).
2. Consulte el arranque de un motor
ahogado en la secció
FUNCIONAMIENTO.
3. Llene el tanque con la mezcla correcta de
combustible.
4. Reemplace la bujía.
5. Busque para detectar una línea de
combustible doblada o cortada; repárela
o reemplácela.
6. Contacte un centro de servicio calificado.
El motor no acelera, carece de
potencia o se apaga.
1. Vegetación alrededor de la
cabeza de la bordeadora.
2. Filtro de aire sucio.
3. Bujía sucia.
4. Carburador necesita un ajuste.
5. Acumulación de carbono sobre la
rejilla de salida del silenciador.
6. Compresión baja.
1. Quite las partículas y la vegetación de la
cabeza de la bordeadora.
2. Limpie el filtro de aire.
3. Limpie o reemplace la bujía.
4. Contacte un centro de servicio calificado.
5. Contacte un centro de servicio calificado.
6. Contacte un centro de servicio calificado.
El motor humea excesivamente. 1. Mezcla incorrecta de combustible.
2. Filtro de aire sucio.
3. Carburador necesita un ajuste.
1. Vacíe el tanque de combustible y llénelo
con la mezcla correcta de combustible.
2. Limpie o reemplace el filtro de aire.
3. Contacte un centro de servicio calificado.
El motor recalienta. 1. Mezcla incorrecta de combustible.
2. Bujía incorrecta.
3. Carburador necesita un ajuste.
4. Acumulación de carbono sobre la
rejilla de salida del silenciador.
5. Rejilla de entrada de aire del
motor recubierta con partículas.
1. Consulte la mezcla de gasolina / aceite
de 2 tiempos en la sección
FUNCIONAMIENTO.
2. Reemplace con una bujía apropiada.
3. Contacte un centro de servicio calificado.
4. Contacte un centro de servicio calificado.
5. Limpie la rejilla de entrada de aire para el
enfriamiento del motor.
El motor no marcha en punto
muerto adecuadamente.
1. Carburador necesita un ajuste.
2. Sellos de cigüeñal gastados.
3. Compresión baja.
1. Contacte un centro de servicio calificado.
2. Contacte un centro de servicio calificado.
3. Contacte un centro de servicio calificado.
Diagnóstico y resolución de problemas
• Guarde todas las instrucciones
Page 45

¿Preguntas? Llamar gratuitamente al 1-800-737-2112 SP-15 Copyright © 2018 MAT Engine Technologies, LLC
Garantía
• Guarde todas las instrucciones
Al contactar la fábrica, siempre especificar el número del modelo.
Nos reservamos el derecho de enmendar estas especificaciones en cualquier momento y sin aviso previo. La única
garantía pertinentees nuestra garantía estándar por escrito. No ofrecemos ninguna otra garantía, expresa o implícita.
Mat Engine Technologies, LLC garantiza que esta bordeadora y todas las piezas de la misma, estarán libres de defectos
en materiales y mano de obra durante un periodo de dos años (90 días para una unidad reacondicionada) a partir de la
fecha de compra original en un concesionario autorizado, siempre y cuando se haya dado mantenimiento adecuado al
producto y se lo haya operado de en conformidad con todas las instrucciones aplicables. Se extiende esta garantía úni
camente al comprador al por menor original. Se ha de presentar el contrato de venta o prueba de compra al efectuarse
una reclamación bajo esta garantía. Esta garantía no cubre el uso industrial o de alquiler, ni se aplica a las partes que no
están en condición original debido al desgaste normal por el uso, o piezas que fallen o se han dañado como resultado de
mal uso, accidente, falta de mantenimiento adecuado, manipulación o alteración. Excepciones al periodo regular de la
garantía pueden ser: artículos de desgaste normal como, hojas cortantes, cabezales de hilos, hojas para barrenas, filtros
de aire y bujías que están solamente cubiertos por 60 días contra defectos de materiales o de mano de obra. Entre las
excepciones del periodo de garantía estándar se encuentran los artículos de uso normal, tales como las hojas de corte,
el cabezal de corte, los filtros de aire y las bujías, los cuales tienen una cobertura de 60 días por defectos del material o
de fabricación. Los costos de viaje, manipulación, transporte e incidentales asociados con reparaciones bajo garantía no
son reembolsables bajo esta garantía y son responsabilidad del propietario. Hasta donde lo permita la ley de la jurisdicción que gobierne la venta de este producto, esta garantía expresa excluye cualesquier y toda otra garantía expresa y
limita la duración de cualesquier y toda garantías implícitas, incluyendo las garantías de comerciabilidad e idoneidad
para un propósito específico durante dos años a partir de la fecha de compra original, y por la presente, se limita la
responsabilidad de MAT Engine Technologies, LLC al precio de compra del producto y MAT Engine Technologies, LLC no
será responsable por ningún otro daño en lo absoluto, incluyendo daños incidentales o emergentes. Algunos estados no
permiten limitaciones sobre la duración de una garantía implícita, ni la exclusión o limitación de los daños emergentes,
por lo cual la limitación de daños anterior podría no ser pertinente en algunos casos. Esta garantía brinda al comprador
original derechos jurídicos específicos.
Para obtener información sobre esos derechos, por favor consultar las leyes estatales pertinentes.
Sede de METL - SÓLO CORRESPONDENCIA
Atención: Servicio Técnico - METL
6700 Wildlife Way
Long Grove, IL 60047
La garantía del sistema de control de emisiones contaminantes está proporcionada por el fabricante del motor y está incluida
con este producto y administrada por MAT Engine Technologies, LLC.
Garantía limitada de la BORDEADORA Powermate®
Es posible que se tengan preguntas adicionales sobre el montaje, la operación o el mantenimiento de esta motoazada. En
dicho caso, contáctese a nuestro Departamento de Servicio Técnico al 1-800-737-2112 (solo inglés).
También se puede enviar correspondencia a:
Oficina Corporativa METL; SOLO CORRESPONDENCIA
ATTN: Technical Service – METL
6700 Wildlife Way
Long Grove, IL 60047
Servicio técnico
• Guarde todas las instrucciones
Al contactarse al Departamento de Servicio Técnico, tener listos:
• Su nombre
• Su dirección
• Su número de teléfono
• Número de modelo del producto
• Fecha de compra (incluida una copia del recibo para solicitudes
por escrito)
Si se necesita ayuda o se tienen preguntas, LLAMAR
GRATUITAMENTE AL: 1-800-737-2112
Si se tiene alguna pregunta sobre la cobertura del propietario
al amparo de esta garantía, ponerse en contacto con Servicio
al cliente de METL:
Si se necesita ayuda o se tienen preguntas, LLAMAR
GRATUITAMENTE AL: 1-800-737-2112
 Loading...