

Page 1

OWNER’S MANUAL
Mobile Video System
Page 2

TABLE OF CONTENTS
Safety Information ….…………………………………………………………………….2
Features …………………………………………………………………………………...3
Accessories………………………………………………………………………………..4
Front Panel …………… ………………………………………………………………….5
Rear Panel …………… ………………………………………………………………… .5
Base Panel …………… ………………………………………………………………….5
Remote Control …………………………………………………………………………...6
Installation ……………………………………………………………………………… …8
Unit Removal ……………………………………………………………………………..11
Wire Connection …………………………………………………………………………12
Disc Notes ………………………………………………………………………………..13
Disc Operations ……………………………………………………………………… …. 14
Basic Operations …………………………………………………………………...……15
Radio Operations . ….. ...........................................................................................18
Clock Function …………………………………………………………………………...19
DVD Player Operations. ….. ...................................................................................20
SD/USB Operations. … ............................... ……....................................................21
IPOD Operations.….. ..............................................................................................22
AV IN Operations.….. ..............................................................................................22
Rear View Operations..........................................................................................…22
TV Operations.….. ..................................................................................................23
DVD Setup Menu…………………………………………………………………....…...24
Specifications ………………………………………………………………………..…...27
Trouble Shooting ………………………………………………………………….…......28
- 1 -
Page 3

SAFETY INFORMATION
Please read the manual carefully before operating this unit and keep it for
future reference.
CAUTION: This unit is a class 1 laser product. To prevent direct exposure to the
laser system, do not open the unit. The laser beam may hurt your eyes.
If the unit requires adjustments, contact an authorized service centre.
USE THIS PRODUCT SAFELY
Be sure you fully understand the following safety information:
When driving
Keep the unit at an appropriate sound level. Driving with the sound at a level
preventing you from hearing sounds outside and around the car may cause an
accident.
When cleaning
Do not expose the product to water or excessive moisture. This could cause short
circuit, fire or other severe damage.
When parked
Parking in direct sunlight can result in very high temperature levels inside your car.
Let the interior and unit cool down before switching the unit on.
NOTE:
Do not use and store the player in dusty, hot or humid environment.
FUSE REPLACEMENT – WARNING!
Never replace any fuse with one of a higher value than the fuse supplied
with your unit. Using a higher current rated fuse may cause damage to
your unit and/or electrical wiring.
- 2 -
Page 4

FEATURES
- ISO/1-DIN Size
- DVD/DVD-R/DVD-RW/VCD/CD/CD-R/CD-RW/MP3 Compatible
- 3.6" Wide-Screen TFT/LCD Display
- High Brightness: 300 cd/m
- Color, Contrast, Brightness, Tint controls
- Fully Motorized Slide Down Front Panel
- Motorized Viewing Angle Adjustment
- Last Angle Memory for Front Panel
- Car DVD Slot-in Mechanism
- Digital & Mechanical Anti-Shock with ESP Memory
- Built-In Dolby Digital Decoder
- Built-In MP4 Decoder
- Last Position Memory
- OSD (On Screen Display)
- NTSC/PAL Compatible
- Full Function Remote Control
- IR Repeater
- AM/FM PLL Synthesizer Tuner with 30 Memory Presets
- Auto Store Pre-set Scan
- Preset EQ (POP CLASSIC ROCK USER)
- Bass/Treble/Fader/Balance Controls
- Extending Amplifier Control
- Auto Antenna Control
- Telephone Mute Control
- Brake Reminder System
- Detachable Face
- Clock Function
- Hi Power 50W x 4
- 4 RCA Audio Outputs
- 1 RCA Video Output
- 1 RCA Sub-Woofer Output
- 1 RCA Audio Video Input
- 1 RCA Rear View Camera Input
- Mini USB / SD Card support JPG, MP3, AC3, DTS, MLP, WMA, WAV, MPEGA,
AAC, DSD, CDA, MPG, DAT, VOB, AVI, MP4, OGG, ASF
- iPod Input Connection (Cable not included)
NOTE:
This user's manual is only for reference.
Modifying rights are reserved.
Specifications are subject to change without notice.
2
- 3 -
Page 5
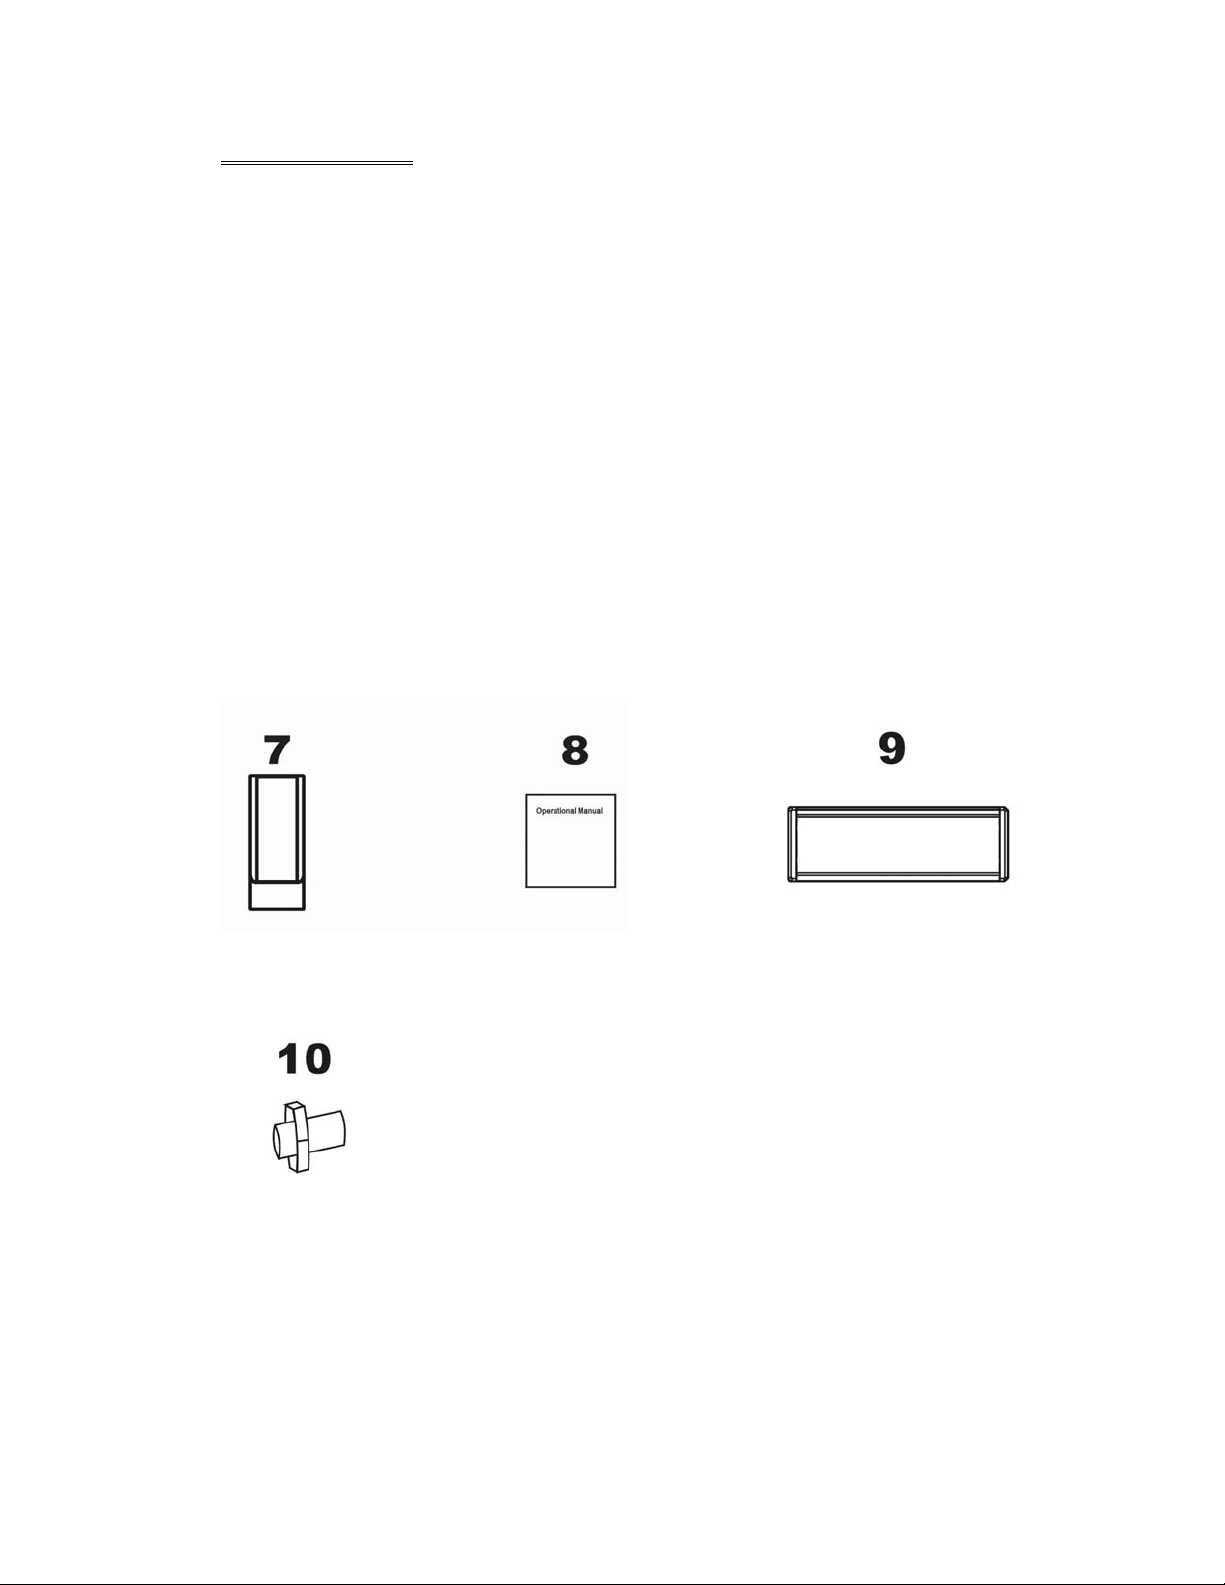
ACCESSORIES
Mounting Sleeve x 1 Back Strap x 1 5X5 Screws x 4
Keys x 2 Main Wire Harness x 1 Faceplate Case x 1
Remote Control x 1 Operational Manual x 1 Trim Bezel x 1
Rear Mounting Bolt x 1 USB Cable x 1 iPod Cable x 1
(option)
- 4 -
Page 6

FRONT PANEL
1. POWER / SOURCE 7. BAND / ENTER 13. F.FWD
2. VOLUME + 8. VOLUME - 14. NEXT
3. LEFT / RIGHT / UP / DOWN 9. PLAY / PAUSE 15. SEL / SETUP
4. MUTE / LOUD 10. STOP 16. MINI USB
5. DISP 11. PREVIOUS 17. REMOTE
6. EJECT / P.ANGLE 12. F.REW 18. REL
REAR PANEL
19. RADIO & TV ANTENNA, IPOD MINI DIN & IR REPEATER ADAPTER
20. 16PIN SOCKET 21. VIDEO AUDIO OUTPUT & INPUT
BASE PANEL
22. RESET
- 5 -
Page 7

REMOTE CONTROL
1. POWER/SOURCE 13. F.FWD 25. SUBTITLE
2. MUTE 14. SLOW 26. PREVIOUS
3. NUMBER BUTTONS 15. RANDOM 27. RIGHT(Seek up)
4. MENU 16. ZOOM 28. NEXT
5. AUDIO 17. SELECT 29. D.ANGLE
6. DISPLAY 18. EJECT / P.ANGLE 30. PLAY / PAUSE
7. UP (Tune up) 19. SETUP 31. STOP
8. LEFT (Seek Down) 20. VOLUME+ 32. A-B
9. ENTER / BAND 21. VOLUME- 33. REPEAT
10. PROGRAM 22. LOUD / EQ 34. PAL / NTSC
11. DOWN(Tune Down) 23. PBC / AST 35. STEREO
12. F.REW 24. TITLE
- 6 -
Page 8

Replacing the Batteries
If the remote control has no function or if the operating range is reduced, replace the
old battery with new one.
1. Remove the battery cover. Follow the arrow (1) slide the tab to the right
while pulling the cover away at the same time.
2. Place the new battery in the tray and slide the cover back into place.
3. Make sure the cover is locked into place.
- 7 -
Page 9

UNIT INSTALLATION
Installation Method 1: Din Front-Mount
Install the Mounting sleeve into the dashboard.
Bend as many claws outward for tight fit, to lock the sleeve into place.
- 8 -
Page 10

Install the trim bezel to the unit. (Arched surface toward the bottom).
Use the Rear Mounting Bolt to support the unit.
- 9 -
Page 11

Installation Method 2:
Using the screw holes at the sides of the unit (ISO Mount).
1. Remove the hooks on both sides.
2. Select a position where the screw holes of the mounting bracket supplied with the
car and the screw holes of the main unit become aligned, tighten the screws on each
side, and re-mount the brackets with the factory hardware in the original location.
NOTE:
1 and 10 are not used for installation method2.
- 10 -
Page 12

UNIT REMOVAL (when installed using the sleeve)
1. Detach the front panel.
2. Insert the keys supplied with the unit on both sides (as illustrated) as this will
release the internal locks so you can slide the unit out.
- 11 -
Page 13

WIRE CONNECTION
- 12 -
Page 14

DISC NOTES
■ Disc formats supported by this player
Handling and cleaning
• Dirty, dusty, scratched or warped discs may not play properly.
• Do not place stickers or make scratches on discs
• Do not warp discs.
• Store discs in their cases when not in use.
• Do not place discs in the following places:
1. Direct sunlight.
2. Dirty, dusty and damp areas.
3. High temperature places.
4. On the sets or dashboard.
Disc Cleaning
Use a dry soft cloth to wipe the surface. If the disc is quite dirty, use a soft cloth
slightly moist with isopropyl (rubbing) alcohol.
Never use solvent such as benzene, thinner or conventional record cleaners which
may mar the surface of the disc.
NOTE:
A disc may become somewhat scratched to a point which will skip excessively or not
play at all in your player. Have the disc resurfaced or polished to reduce the issue or
replace the disc with a new one.
- 13 -
Page 15

DISC OPERATIONS
Repairing New Discs with Rough Spots
A new disc may have rough edges on its inside and outside edges. If a disc with
rough edges is used, the proper setting will not be performed and the player will not
play the disc. Therefore, remove the rough edges in advance by using a ballpoint pen
or pencil. To remove the rough edges, press the side of the pen or pencil against the
inside and outside edges of the disc.
- 14 -
Page 16

BASIC OPERATIONS
Power:
Press the [POWER/SOURCE] button to turn the unit ON;
Hold on pressing the button to turn the unit OFF.
Switching Sources:
When the unit in turned ON, press the [POWER/SOURCE] button to toggle between
the different modes as following:
RADIO - DVD – SD – USB – TV – IPOD – AV IN - RADIO
NOTE:
The unit could be switched to DVD Mode if disc inside;
The unit could be switched to SD Mode if SD / MMC Card connected;
The unit could be switched to USB Mode if Mini USB connected;
The unit could be switched to IPOD Mode if IPOD connected;
Mute:
Press the [MUTE/LOUD] button to switch off the sound; press it again to resume to
the previous volume level.
Loud:
Hold on pressing the [MUTE/LOUD] button to activate on / off the loudness feature.
Volume Control:
Press the [VOL +] button to increase the volume.
Press the [VOL -] button to decrease the volume.
EQ:
Press the [LOUD/EQ] button of remote control to access the preset EQ settings or
the user settings to adjust the audio output to your preference.
Press the [SEL/SETUP] button to enter the Sound Parameter Setup to access the
preset EQ settings or the user settings to adjust the audio output to your preference.
(See SEL function)
RESET:
If the unit ever needs to be reset, you can do so by removing the face plate to gain
access to the reset button.
Press and hold this button to switch back to all the original factory settings.
Keep in mind this will erase all your preset radio stations and any EQ settings you
may have made and saved.
SEL:
Press the [SEL] button to enter the Sound Parameter Setup, Picture Parameter
Setup & Tuner Parameter Setup.
Press the
Press the [<] / [>] buttons to adjust the parameter value.
[∨] / [∧]] buttons to move the cursor down / up on the adjustable items.
- 15 -
Page 17

Press the [SEL] button once to enter the Sound Parameter Setup:
FADER: F07 – CENT – R07
BALANCE: L07 – CENT – R07
BASS: -07 – 00 – +07
TREBLE: -07 – 00 – +07
LOUDNESS: ON / OFF
EQ: USER – POP – CLASSIC – ROCK – USER
In all modes except Radio Mode, press the [SEL] button twice to enter the Picture
Parameter Setup:
NTSC/PAL: AUTO – PAL – NTSC – ATUO
COLOR: 00 – 30
BRIGHT: 00 – 30
CONTRAST: 00 – 30
TINT: 00 – 30
RESET: press the [<] / [>] buttons to restore the default parameters of Picture.
In the Radio mode, press the [SEL] button twice to enter the Tuner Parameter Setup:
LOCAL: ON / OFF
When you are using the local searching function of LOCAL, you can only receive the
radio station with strong enough signals and fine state.
STEREO: ON / OFF
AREA: EUROPE - ASIA - USA – JAPAN - OIRT
This tuner can be switched to work in different countries. Choose the area that works
best for you.
- 16 -
Page 18

Viewing Angle Adjustment:
Press and hold the [P.ANGLE] button to adjust the angle of the face.
Angle 1 - Angle 2 - Angle 3 - Angle 4 - Angle 1
Angle 1 Angle 2 Angle 3 Angle 4
NOTE:
You can also make the same adjustments with the remote control.
Simply press and hold the [P.ANGLE] button to adjust according to your preference.
Restore Default Angle
Turn OFF the unit; then press preset buttons 1,2 3,4,5,6 and turn the unit ON again.
The monitor should display ‘START MOTOR ALGN”.
Then, the monitor should display ‘MOTOR ALGN OK”.
The motor and gear drives are now back to their factory positions.
Brake Control
It is necessary to connect the Brake Control wire to the Hand-brake switch of the car.
While driving, the TFT monitor will display the alarm picture (see as follows) in order
to ensure the safety.
Under the Rear View Mode, the Brake Control function is no effective.
Telephone Mute Control
Connect the telephone mute control wire TEL_MUTE (see Wiring Diagram). If there
is a vehicle call comes in, the sound volume will mute off automatically, and TFT
monitor shows: PHONE…; when call finished, the sound volume will recover to
former volume, and the words PHONE… disappear.
Auto Antenna Control
Connect the auto antenna control wire AUTO_ANT (see Wiring Diagram); the
antenna will lift when the unit startup; it will descend when the unit turnoff.
- 17 -
Page 19

RADIO OPERATIONS
Press the [POWER/SOURCE] button to switch to Radio Mode.
1, BAND 2, VOLUME 3, LOCAL
4, EQ 5~10, STORED CHANNEL
11, FREQUENCY 12, DISC STATUS 13, STEREO
Switch FM/AM Wave Band
Press the [BAND/ENTER] button on the panel or the remote control to switch the
wave band as following: FM1-FM2-FM3-AM1-AM2
Automatic Tuning
Hold on pressing [>] / [<] buttons to seek the next available channel by increasing /
decreasing the tuning frequency; press any button to stop seeking.
Automatic Tuning will stop automatically when seek an available channel then play
this station.
The unit will stop on the beginning frequency if no available station after seeking one
cycle.
Step Frequency Adjustment
Press the [>] / [<] buttons to adjust the frequency upward / downward by step
increasing / decreasing.
Preset Stations
Seeking and store the stations.
1. Hold on pressing the [PBC/AST] button of the remote control, to seek stations
with the strongest signal from the lowest frequency point in the entire wave bands;
press any button to stop seeking.
2. Store the received effective radio frequency to the six stored channels M1~M6.
3. The unit will play the stations one by one for few seconds; press any button to
stop playing.
4. It is independent for FM & AM frequency. There are 3 wave bands of FM1-FM2FM3 & 2 wave bands of AM1-AM2; each can store 6 radio stations, totally 30
radio stations.
NOTE:
The unit will stop on the beginning frequency if no available station after seeking one
cycle.
After Preset Stations, the former stored stations will be instead.
- 18 -
Page 20

Manual Store Radio Station
Hold on pressing the number buttons on the panel or the remote control, you can
store current radio frequency to the stored channel. For example, current frequency
is 98.5MHZ, by hold on pressing button 2; you can store the radio station of 98.5MHZ
to the channel 2.
NOTE:
-After manual store radio station, the former stored stations will be instead.
-In each wave band, the number buttons [1] to [6] represent the stored radio stations.
Recall a Preset Station
Press the number buttons [1] ~ [6] to recall the corresponding stored station in M1M6 channels.
CLOCK FUNCTION
Clock Adjustment Method
1. press any button except the[POWER/SOURCE], [EJECT/P.ANGLE] and [REL]
buttons only under the Power Off Mode, the unit will display the time on the
monitor, and disappear automatically 5 seconds later if no any operation.
2. adjust time only under the Power Off Mode.
Press the [SEL/SETUP] button to select items as following:
PM/AM – HOUR – MINUTE
Press the [VOL+] / [VOL-] buttons to adjust the item selected.
3. under ‘ASIA’ radio area, press the [MUTE/LOUD] button to change the 12 hours &
24 hours format.
under ‘USA’ radio area, the default hours format is 12 hours.
under ‘EUROPE’ radio area, the default hours format is 24 hours.
Clock Priority Method
The unit will display the time on the monitor under the RADIO Mode only. Press the
[DISP] button to display the time, and it will disappear automatically 5 seconds later;
holding on pressing the [DISP] button, the unit will display the time until press any
button again.
- 19 -
Page 21

DVD PLAYER OPERATIONS
1, Press the [POWER/SOURCE] button to switch to DVD Mode if disc inside.
2, When disc loading, the unit will switch to DVD Mode automatically.
Inserting Disc
Press [EJECT] button, the front panel will slide down to
Position 1; then insert a disc into the Disc Loading Slot;
the panel will slide back automatically.
Ejecting Disc
Press [EJECT] button, the front panel will slide down to Position 1; then eject a disc;
the panel will slide back automatically after 30 seconds, if no action is taken.
NOTE:
The [EJECT] button on the remote control will perform the same functions.
Play/Pause
Press the [PLAY/PAUSE] button to play or pause the disc.
Stop
During movie playback, press the [STOP] button once; the DVD player memorizes
the location where you stopped (press PLAY button to resume playing from the
memorized location).
If you press the [STOP] button twice, the playback will start from the beginning of the
disc when you press again on the [PLAY] button.
F.FWD/F.REV
Press the [F.FWD] / [F.REV] buttons to select fast forward / reverse search. Press the
buttons on the remote control performs the same operation. Press the [PLAY/PAUSE]
button to resume to normal playback.
Previous/Next
Press the [Previous/Next] button to go to the pervious / next chapter, track or song.
Setup
Press the [SETUP] button to enter the setup menu.
Enter
In DVD mode, press the [ENTER] button to confirm the Setup Menu.
Direction
Press the direction buttons (UP / DOWN / LEFT / RIGHT arrow) to move the cursor
to the selected item.
Display
Press the [DISPLAY] button to display the current playback information on the
screen.
Zoom
Press the [Zoom] button during normal playback to zoom a picture. Press it
repeatedly to switch between the zoom levels.
- 20 -
Page 22

Repeat
Press the [REPEAT] button to repeat the same track, press it twice to repeat all
tracks. When playing a DVD movie, pressing once will repeat the same chapter but
pressing twice will repeat the entire title.
Angle
Press the [D.ANGLE] button during playback to select different viewing angles with
interactive DVD media.
PBC
PBC is available in VCD mode as playback control switch.
Menu
Menu is available in DVD mode as playback control panel.
Audio
When playing a DVD disc, press the [AUDIO] button to select one of the available
languages.
Subtitle
For DVD disc, press the [SUBTITLE] button to select one of the available languages.
Program
When playing a VCD disc (PCB off) or CD disc, press the [PROGRAM] button to
enter the program status; Press the number buttons to enter the number of the track
you want to play. If you want to exit, press the [PROGRAM] button again.
Slow
Press the [SLOW] button to activate the playback in slow motion (DVD mode only.)
P/N
Press the [P/N] button to select the video output format (PAL/NTSC).
Number Buttons
Press the number buttons to play your favourite track. For example: to play track 8,
press the button 8. To play track 68, press the buttons 6 and 8 etc.
Random
Press the [RDM] button to shuffle all tracks. Press it again to return to the normal
playback mode from the first track (CD mode only.)
SD / USB OPERATIONS
1, Press the [POWER/SOURCE] button to switch to SD or USB Mode if SD / MMC
Card or Mini USB connected.
2, the unit will switch to SD or USB Mode automatically if SD / MMC Card or Mini
USB connected.
3, the unit will switch to RADIO Mode automatically when SD / MMC Card or Mini
USB disconnected if there is no disc in the unit; the unit will switch to DVD Mode
automatically when SD / MMC Card or Mini USB disconnected if there is a disc in the
unit.
4, Under the SD or USB Mode, all operations are same as DVD Mode.
- 21 -
Page 23

IPOD OPERATIONS
NOTE: It is available for iPod operations with an additional iPod cable which is
optional accessory.
1, The Number of Playing Song; 2, The Total Songs in Play List;
3, The Name of Playing Song; 4, The Playing Time;
5, The Total Time of Playing Song;
1, Press the [POWER/SOURCE] button to switch to IPOD Mode if iPod connected.
2, the unit will switch to IPOD Mode automatically if iPod connected.
3, the unit will switch to RADIO Mode automatically if iPod disconnected.
Music:
Under the IPOD Mode, it is not effective for the controller of iPod itself, use the keys
of unit to control the operation and all operations are same as DVD Mode.
Picture & Video:
Hold on pressing the [STOP] button to switch the operation control to iPod itself. To
use the controller of iPod itself to control all operations of iPod including play music,
videos and view pictures.
Hold on pressing the [STOP] button again to switch to play the music of iPod.
NOTE:
The TV Output in iPod SETUP should be effective, and the pictures & videos could
be displayed on the TFT monitor of unit.
AV IN OPERATON
Press the [POWER/SROUCE] button to switch to AV IN Mode.
There are 2 RCA Audio Inputs & 1 RCA Video Input for unit.
REAR VIEW OPERATIONS
1, when car backup, the unit will switch to REAR VIEW Mode automatically if backup
camera connected.
2, the monitor will display the picture taken by the backup camera.
3, the unit will return to the former working Mode when backup finished.
4, under car ACC ON and the unit Power OFF, the unit will Power On automatically
and switch to REAR VIEW Mode when car backup. The unit will Power OFF
automatically when backup finished.
NOTE:
Under the Rear View Mode, there are Power OFF, monitor angle adjustment,
telephone mute, volume adjustment functions on working ONLY.
Under the Rear View Mode, the Brake Control function is no effective.
- 22 -
Page 24

TV OPERATIONS
Press the [POWER/SOURCE] button to switch to TV Mode.
1, TV CHANNEL 2, AUDIO FORMAT
Select the Station Directly
Press the number buttons of remote control to select the station directly.
For example, press 2 to select station 2; press 1 & 2 to select station 12.
Automatic Tuning
Hold on Pressing the
increasing / decreasing the tuning frequency.
Automatic Tuning will stop automatically when seek an available channel then play
this station.
Press any button to stop seeking.
The unit will stop on the beginning frequency if no available channel after seeking
one cycle.
AST
Press the [AST] button to seek all available stations from lowest frequency.
After seeking, press the
Press any button to stop seeking.
The unit will stop on the beginning frequency if no available channel after seeking
one cycle.
Preset Stations
Hold on pressing the number buttons 1 to 6 on the panel to store the current channel
into stored station.
Recall a Preset Station
Press the number buttons 1 to 6 on the panel to recall the corresponding stored
station in 1~6 channels.
Change Audio Format
In different countries, the TV has the corresponding Audio Format; it will cause
cacophony if use wrong Audio Format.
Press the [BAND] button to switch the audio format as the following:
PAL-BG→PAL-I→PAL-DK→NTSC→PAL-BG
[>] / [<] buttons to seek the next available channel by
[∧] / [∨] buttons to select the stations upward / downward.
- 23 -
Page 25

Change Audio Format
In different countries, the TV has the corresponding Audio Format; it will cause
cacophony if use wrong Audio Format.
Press the [BAND] button to switch the audio format as the following:
PAL-BG→PAL-I→PAL-DK→NTSC→PAL-BG
Change TV AREA
This tuner can be switched to work in different countries. Choose the area that works
best for you.
In the Radio mode, press the [SEL] button to enter the Tuner Parameter Setup.
Switch the TV AREA as the following:
US – CCIR – IT – AUS – NZ – US
- 24 -
Page 26

DVD SETUP MENU
SETUP MENU OPERATION
Press the [SETUP] button of Remote Control to enter the SETUP Menu.
Press the [<] / [>] buttons to switch the main menus as following:
General – Speaker – Dolby Digital - Preference
Press the [ENTER] or [∨] buttons to enter the submenus from main menus.
Press the [<] button to exit the submenus to main menus.
Press the [∨] / [∧] buttons to select the submenus as your need.
Press the [>] button to enter the items of submenus.
Press the [<] button to exit the items of submenus.
Press the [∨] / [∧] buttons to select the item you want to change.
Press the [ENTER] button to confirm the item you have selected.
Press the [SETUP] button to exit the SETUP Menu and save all settings.
NOTE:
Effective only DVD, SD & USB Mode.
General Setup Page
TV Display
Following options are available for the TV Display:
Normal / PS Normal / LB Wide
Angle Mark
Select ON or OFF.
OSD Language
Following options are available for the OSD Language:
English French German
Spanish Italian Portuguese
SPDIF Output
Following options are available for the SPDIF Output:
SPDIF Off SPDIF / RAW SPDIF / PCM
- 25 -
Page 27

Captions
Select ON or OFF.
Screen Saver
Select ON or OFF.
Last Memory
Select ON or OFF.
Speaker Setup Page
Downmix
Following options are available for the Downmix:
LT / RT Stereo
Dolby Digital Setup
Dynamic
Choose arrangement is from FULL to OFF.
- 26 -
Page 28

Preference Page
TV Type
Following options are available for TV Type:
PAL Auto NTSC
Audio
Following options are available for the Audio Language:
English French German
Spanish Italian Portuguese
Subtitle
Following options are available for the Subtitle Language:
English French German
Spanish Italian Portuguese
Disc Menu
Following options are available for the Disc Menu Language:
English French German
Spanish Italian Portuguese
Parental
Following options are available for the Parental Ratings:
1 KID SAF 2 G 3 PG
4 PG 13 5 PGR 6 R
7 NC 17 8 ADULT 9 Off
The Parental Ratings could be changed after the correct password input.
Password
Setup the password for Parental Ratings change. The default password is 0000.
Default
The unit will restore all default settings by selecting this option.
- 27 -
Page 29

SPECIFICATIONS
GENERAL
Supply Voltage : 14.4V DC (11-16V allowed)
Load Impedance : 4Ω per channel
Max Power Output : 50W x 4
Bass 100Hz : ≥ 10dB
Treble 10KHz : ≥ 10dB
Dimensions (approx.) : 188x183x58mm (d/w/h)
Mounting (approx.) : 350x235x105mm (d/w/h)
Weight (approx.) : 1.8Kg
FM TUNER
Frequency Range : 87.5 – 108 MHz (Europe/Asia)
87.5 – 107.9 MHz (USA)
IF : 10.7 MHz
Usable Sensitivity : ≤ 15dBuV
Stereo Separation : ≥ 26dB (1 KHz)
Frequency Response : 100-20000Hz
AM TUNER
Frequency Range : 531 - 1602 KHz (Asia)
522 - 1620 KHz (Europe)
530 - 1710 KHz (USA)
IF : 450 KHz
Usable Sensitivity : ≤ 40dBuV
TV TUNER
Frequency Range NTSC : 55.25 MHz~855.25MHz
PAL : 48.25 MHz~855.25MHz
DVD PLAYER
Signal-to-noise Ratio : ≥ 85dB (1 KHz)
Distortion : ≤ 0.5%
NOTE:
Specifications and design are subject to change without notice.
- 28 -
Page 30

TROUBLE SHOOTING
y
SYMPTOM CAUSE / SOLUTION
No sound Cancel the mute function.
Adjust the volume.
The memory contents are lost Disconnect the power wire or battery.
Press the reset button.
The disc does not play The disc might be dirty or damaged.
The disc comes out
automaticall
The disc can not be inserted Push the disc while pressing the EJECT button.
The function buttons do not
work
Audio skipping The disc might be dirty or damaged.
No picture Open the monitor.
Picture stops (pauses) The disc might be dirty or damaged.
Poor radio reception Antenna may not have the proper length. Be sure
NOTE:
If any problem persists after checking the above list, please consult your nearest
service dealer.
Never attempt to dissemble the unit by yourself!
The temperature is outside the range of the
operating temperature.
A disc is loaded in the mechanism.
Press the RESET button.
Press the RESET button.
Choose the video input on the TV to receive the
picture from the unit.
The colour system setup is incorrect.
Adjust to PAL or NTSC according to the TV.
the antenna is fully extended and properly
connected.
If broken replace the antenna with a new one.
The antenna is poorly grounded. Check again the
antenna connection.
- 29 -
 Loading...