

Porter-Cable 370 Instruction Manual

GENERAL SAFETY INSTRUCTIONS
Read all instructions Failure to follow all instructions listed below may result in electric
shock, fire and/or serious injury. The term "power tool" in all of the warnings listed below refers to
your mains-operated (corded) power tool or battery-operated (cordless) power tool.
SAVE THESE INSTRUCTIONS
1) Work area safety
a) Keep work area clean and well lit. Cluttered or dark areas invite accidents.
b) Do not operate power tools in explosive atmospheres, such as in the presence of
flammable liquids, gases or dust. Power tools create sparks which may ignite the dust or
fumes.
c) Keep children and bystanders away while operating a power tool. Distractions can
cause you to lose control.
2) Electrical safety
a) Power tool plugs must match the outlet. Never modify the plug in any way. Do not
use any adapter plugs with earthed (grounded) power tools. Unmodified plugs and
matching outlets will reduce risk of electric shock.
b) Avoid body contact with earthed or grounded surfaces such as pipes, radiators,
ranges, and refrigerators. There is an increased risk of electric shock if your body is
earthed or grounded.
c) Do not expose power tools to rain or wet conditions. Water entering a power tool will
increase the risk of electric shock.
d) Do not abuse the cord. Never use the cord for carrying, pulling or unplugging the
power tool. Keep cord away from heat, oil, sharp edges or moving parts. Damaged
or entangled cords increase the risk of electric shock. Use only 3-wire extension cords that
have 3-prong grounding-type plugs and 3-pole receptacles that accept the tool's plug.
e) When operating a power tool outdoors, use an extension cord suitable for outdoor
use. Use of a cord suitable for outdoor use reduces the risk of electric shock. When using
an extension cord, be sure to use one heavy enough to carry the current your product will
draw. An undersized cord will cause a drop in line voltage resulting in loss of power and
overheating. The following table shows the correct size to use depending on cord length
and nameplate ampere rating. If in doubt, use the next heavier gauge. The smaller the
gauge number, the heavier the cord.
Minimum Gauge for Cord Sets
Volts Total Length of Cord in Feet
120V 0-25 26-50 51-100 101-150
240V 0-50 51-100 101-200 201-300
Ampere Rating
More Not more AWG
Than Than
0 - 6 18 16 16 14
6 - 10 18 16 14 12
10 - 12 16 16 14 12
12 - 16 14 12 Not Recommended
3) Personal safety
a) Stay alert, watch what you are doing and use common sense when operating a
power tool. Do not use a power tool while you are tired or under the influence of
drugs, alcohol or medication. A moment of inattention while operating power tools may
result in serious personal injury.
b) Use safety equipment. Always wear eye protection. Safety equipment such as
dust mask, non-skid safety shoes, hard hat, or hearing protection used for appropriate
conditions will reduce personal injuries.
c) Avoid accidental starting. Ensure the switch is in the off-position before plugging in.
Carrying power tools with your finger on the switch or plugging in power tools that have the
switch on invites accidents.
d) Remove any adjusting key or wrench before turning the power tool on. A wrench or a
key left attached to a rotating part of the power tool may result in personal injury.
e) Do not overreach. Keep proper footing and balance at all times. This enables better
control of the power tool in unexpected situations.
f) Dress properly. Do not wear loose clothing or jewelry. Keep your hair, clothing and
gloves away from moving parts. Loose clothes, jewelry or long hair can be caught in
moving parts.
g) If devices are provided for the connection of dust extraction and collection facilities,
ensure these are connected and properly used. Use of these devices can reduce dust-
related hazards.Accessories that may be suitable for one tool, may become hazardous
when used on another tool.
4) Power tool use and care
a) Do not force the power tool. Use the correct power tool for your application. The
correct power tool will do the job better and safer at the rate for which it was designed.
b) Do not use the power tool if the switch does not turn it on and off. Any power tool that
cannot be controlled with the switch is dangerous and must be repaired.
c) Disconnect the plug from the power source before making any adjustments,
changing accessories, or storing power tools. Such preventive safety measures reduce
the risk of starting the power tool accidentally.
d) Store idle power tools out of the reach of children and do not allow persons
unfamiliar with the power tool or these instructions to operate the power tool. Power
tools are dangerous in the hands of untrained users.
e) Maintain power tools. Check for misalignment or binding of moving parts, breakage
of parts and any other condition that may affect the power tools operation. If
damaged, have the power tool repaired before use. Many accidents are caused by
poorly maintained power tools.
f) Keep cutting tools sharp and clean. Properly maintained cutting tools with sharp cutting
edges are less likely to bind and are easier to control.
g) Use the power tool, accessories and tool bits etc., in accordance with these
instructions and in the manner intended for the particular type of power tool, taking
into account the working conditions and the work to be performed. Use of the power
tool for operations different from those intended could result in a hazardous situation.
5)
Service
a) Have your power tool serviced by a qualified repair person using only identical
replacement parts. This will ensure that the safety of the power tool is maintained.
ADDITIONAL SAFETY INSTRUCTIONS FOR SANDERS
• Accessories must be rated for at least the speed recom mended on the tool warning label.
Wheels and other accessories running over rated speed can fly apart and cause injury. Accessory
ratings must be above listed minimum wheel speed as shown on tool nameplate.
• Hold tool by insulated gripping surfaces when performing an operation where the cutting
tool may contact hidden wiring or its own cord. Contact with a “live” wire will make exposed
metal parts of the tool “live” and shock the operator.
• Always wear eye protection and a respirator when sanding.
• Sanding of lead-based paint is not recommended. See "PRECAUTIONS TO TAKE WHEN
SANDING PAINT" for additional information before sanding paint.
• Do not operate the unit without the dust collection bag.
• Clean your tool out periodically.
• Empty the dust bag frequently, especially when sanding resin coated surfaces such as
polyurethane, varnish, shellac, etc. Dispose of coated dust particles according to the finish
manufacturer’s guidelines, or place in a metal can with a tight-fitting metal lid. Remove coated dust
particles from the premises daily. The accumulation of fine sanding dust particles may self ignite
and cause fire.
Some dust created by power sanding, sawing, grinding, drilling, and other construction
activities contains chemicals known to cause cancer, birth defects or other reproductive harm.
Some examples of these chemicals are:
• lead from lead-based paints,
• crystalline silica from bricks and cement and other masonry products, and
• arsenic and chromium from chemically-treated lumber (CCA).
Your risk from these exposures varies, depending on how often you do this type of work. To reduce
your exposure to these chemicals: work in a well ventilated area, and work with approved safety
equipment, such as those dust masks that are specially designed to filter out microscopic particles.
• Avoid prolonged contact with dust from power sanding, sawing, grinding, drilling, and other
construction activities. Wear protective clothing and wash exposed areas with soap and
water. Allowing dust to get into your mouth, eyes, or lay on the skin may promote absorption of
harmful chemicals.
Use of this tool can generate and/or disburse dust, which may cause serious and permanent respiratory or other injury. Always use NIOSH/OSHA approved respiratory protection appropriate for the dust exposure. Direct particles away from face and body.
Wear appropriate hearing protection during use. Under some conditions and duration of use, noise from this product may contribute to hearing loss. The label on your tool may include
the following symbols.
V .................volts A ................. amperes
Hz ...............hertz W ................ watts
min .............minutes
........... alternating current
...........Direct current
n
o ...............no load speed
...............Class II Construction ................ ear thing terminal
...............safety aler t symbol .../min ..........revolutions per minute.
SAVE THESE INSTRUCTIONS
MOTOR
Many Porter-Cable tools will operate on either D.C., or single phase 25 to 60 cycle A.C. current
and voltage within plus or minus 5 percent of that shown on the specification plate on the tool.
Several models, however, are designed for A.C. current only. Refer to the specification plate on
your tool for proper voltage and current rating.
Do not operate your tool on a current on which the voltage is not within correct limits.
Do not operate tools rated A.C. only on D.C. current. To do so may seriously damage the tool.
ATTACHING ABRASIVE PAPER (FIG. 3)
Turn off and unplug the tool before making any adjustments or removing or
installing attachments or accessories. Be sure the switch is in the "OFF" position.
Your sander is designed to use 1/4 sized sanding sheets. You can size this paper by
a. cutting full sized (9" x 11") sandpaper into 1/4 sheets of 4-1/2" x 5-1/2".
b. cutting 1/2 sheet sandpaper into two 4-1/2" x 5 1/2" sheets. Pre-cut 4-1/2" x 5-1/2" sandpaper is
available at extra cost.
For normal operations, to attach the abrasive paper to your unit
1. soften the stiff sandpaper by pulling it over the 90° edge of a table or other straight edge (Fig. 1).
Concentrate on softening the edges that will be clamped.
2. release the clamp by pulling up on the clamp lever (B) Fig. 3 and disengaging it from the tab on the
base plate.
3. insert the 4-1/2" edge of the abrasive paper (A) under the front paper clamp (Fig. 3) until it contacts
the paper-limiting ribs. Close the front paper clamp (C) Fig. 2 and hook it into the lock position
behind the tab on the base plate.
4. stretch the paper over the sanding pad and insert it under the opposite clamp in the same way.
5. if you are using the dust extraction feature, perforate the sandpaper with the provided paper punch
(Fig. 5).
SWITCH (FIG. 4)
To turn the unit on, depress the side of the dust protected switch (D) Fig. 4 that corresponds to the
symbol “I”. To turn the tool off, depress the side of the switch that corresponds to the symbol “O”.
PAPER PUNCH (FIG. 5)
Turn off and unplug the tool before making any adjustments or removing or
installing attachments or accessories. Be sure the switch is in the "OFF" position.
A paper punch is provided with your sander to let you perforate regular sandpaper to make dust
collection possible.
To perforate your sandpaper, install the sandpaper on the tool as instructed in this manual. With the
sander turned off and unplugged, place the paper punch on the paper so that the tabs at the edges
of the punch are against any two adjacent sides of the sanding pad. Press the punch against the
pad so that the 8 points penetrate the paper (Fig. 5). Press the punch into the pad as far as it will go.
Remove the paper punch. An alternate method of perforating the paper is to fasten the punch to a
suitable work surface with #8 flathead screws. Two holes are provided in the punch for this purpose.
Press the sander (with the paper attached) on the punch.
DUST COLLECTION (FIGS. 7 & 11)
Never operate this tool with perforated paper unless the dust collection system
is in place.
To use the dust collecting system, lower the plastic end of the collection bag (F) Fig. 7 , or the vacuum
adapter (H) Fig. 11 over the flange and push it down as far as it will go. (Attach your shop vac to the
adapter.)
To empty the dust collection bag, lift the bag off the sander and empty into a trash receptacle.
OPERATION (FIG. 8)
To operate your sander, grasp it as shown in Fig. 8 and turn it on. Move it in long, sweeping strokes
along the surface, letting it do the work. Pushing down on the tool while sanding actually slows the
removal rate and produces an inferior quality surface. Be sure to check your work often. This sander is
capable of removing material rapidly, especially with coarse paper.
Your sander is designed to sand flush on three sides (four sides without the dust collection bag) for
sanding in corners. Its small size and light weight make it ideal for overhead work.
On the final sanding steps, a better finish will result if you sand only with the grain.
To produce the best finish possible, start with coarse grit sandpaper and change gradually to finer
and finer paper. A final sanding with a piece of well-worn fine sandpaper will produce a professional
looking finish that in many cases will need no hand sanding. The rate at which the dust collection bag
will fill up will vary with the type of workpiece and the coarseness of the sandpaper.
For best results, empty the bag frequently and check the opening for debris.
When sanding painted surfaces, you may find that the sandpaper loads up and clogs with paint. A heat
gun will work much better to remove paint before sanding. FOLLOW ALL SAFETY INSTRUCTIONS
IN THE HEAT GUN INSTRUCTION MANUAL.
PRECAUTIONS TO TAKE WHEN SANDING PAINT
1. Sanding of lead based paint is NOT RECOMMENDED due to the difficulty of controlling
the contaminated dust. The greatest danger of lead poisoning is to children and pregnant
women.
2. Since it is difficult to identify whether or not a paint contains lead without a chemical analysis,
we recommend the following precautions when sanding any paint:
Part No. 635830-00 - 02-22-06 - Rev.A
MODEL 370
Copyright © 2006 Porter-Cable
www.porter-cable.com
Instructivo de operacion,
centros de servicio y poliza de garantia.
ADVERTENCIA: Lease este instructivo antes de usarel producto.
Instruction Manual
Manuel d’utilisation
Manual de Instrucciones
®
1/4 Sheet Sander
Poncueses
À
1/4 Feuille
Lijadoras de 1/4 de Hoja
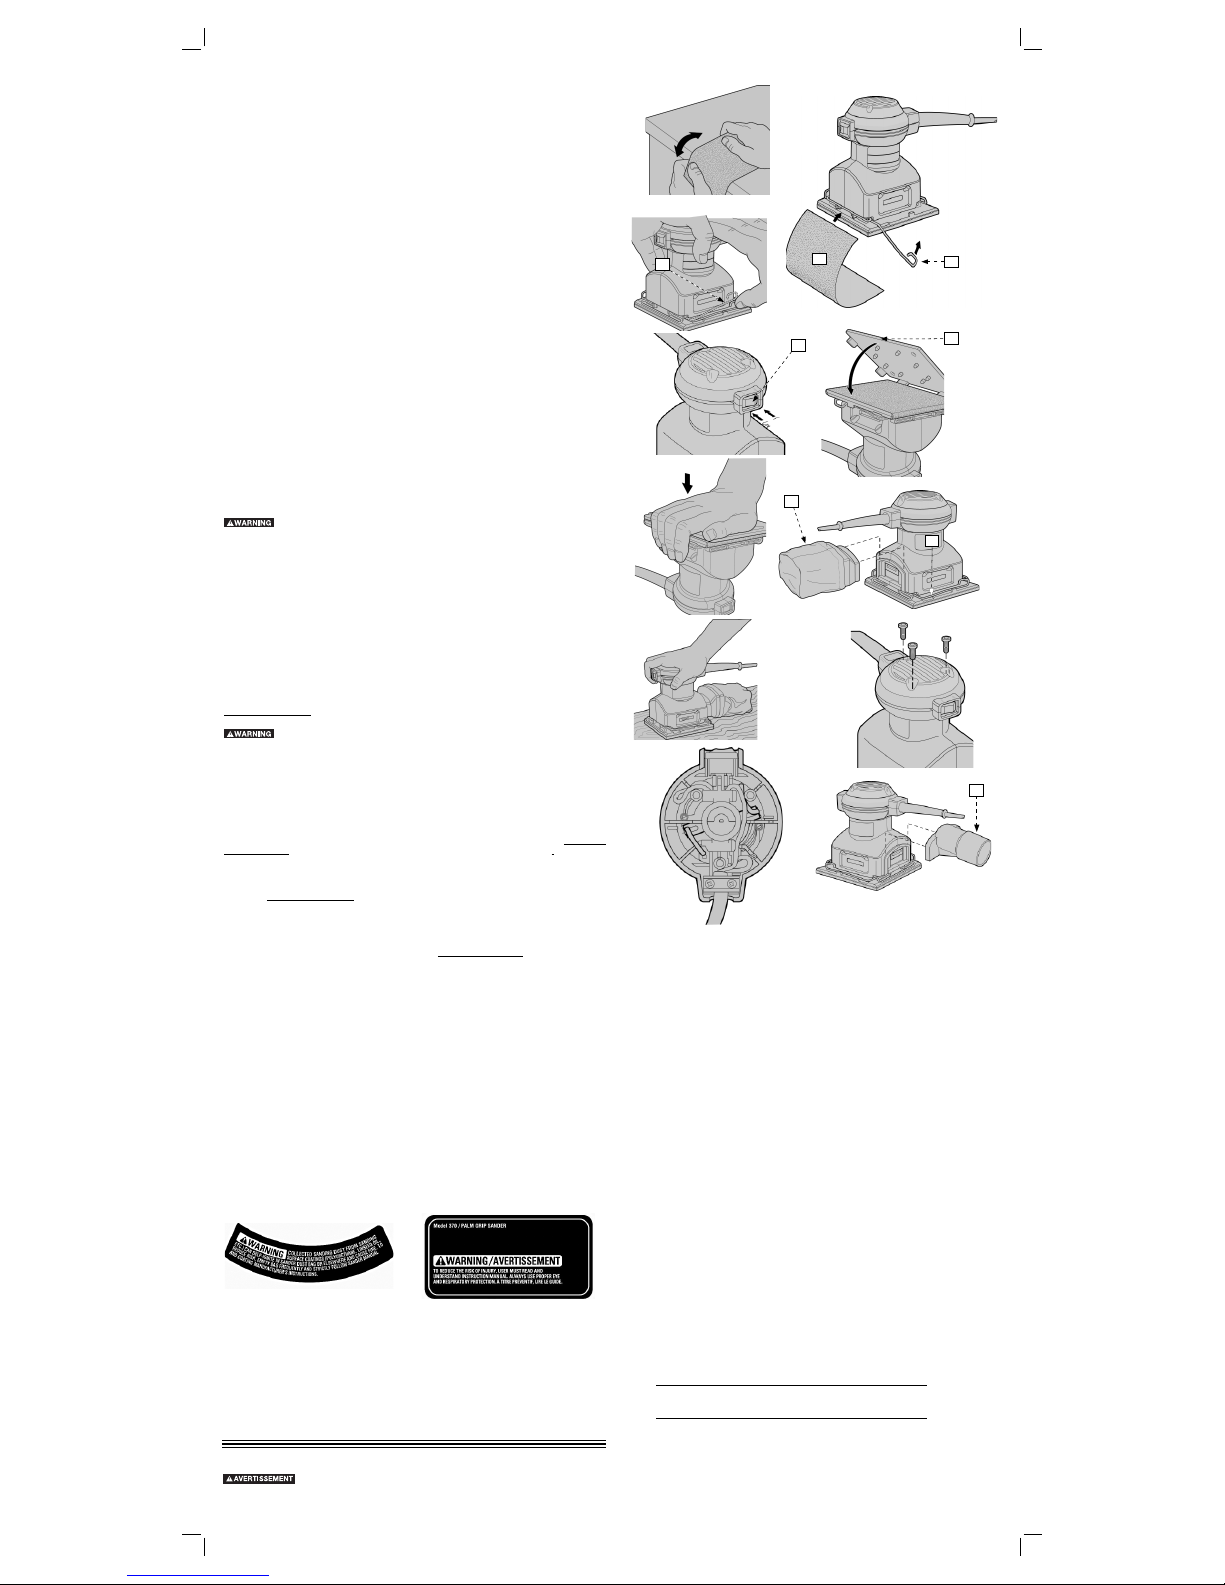
FIG. 10
FIG. 4
FIG. 5
FIG. 6
FIG. 1
FIG. 2
FIG. 3
FIG. 7
FIG. 8
FIG. 11
O
I
PERSONAL SAFETY
1. No children or pregnant women should enter the work area where the paint sanding is
being done until all clean up is completed.
2. A dust mask or respirator should be worn by all persons entering the work area. The filter
should be replaced daily or whenever the wearer has difficulty breathing. See your local
hardware store for the proper N.I.O.S.H. approved dust mask.
3. NO EATING, DRINKING or SMOKING should be done in the work area to prevent
ingesting contaminated paint particles. Workers should wash and clean up BEFORE
eating, drinking or smoking. Articles of food, drink, or smoking should not be left in the
work area where dust would settle on them.
ENVIRONMENTAL SAFETY
1. Paint should be removed in such a manner as to minimize the amount of dust generated.
2. Areas where paint removal is occurring should be sealed with plastic sheeting of 4 mils
thickness.
3. Sanding should be done in a manner to reduce tracking of paint dust outside the work
area.
CLEANING AND DISPOSAL
1. All surfaces in the work area should be vacuumed and thoroughly cleaned daily for the
duration of the sanding project. Vacuum filter bags should be changed frequently.
2. Plastic drop cloths should be gathered up and disposed of along with any dust chips or
other removal debris. They should be placed in sealed refuse receptacles and disposed
of through regular trash pick-up procedures. During clean up, children and pregnant
women should be kept away from the immediate work area.
3. All toys, washable furniture and utensils used by children should be washed thoroughly
before being used again.
TOOL CARE
Keep your machine as clean as possible by wiping with a clean cloth and blowing through it with air
after every 5 hours of use.
Do not use harsh chemicals or solvents to clean the tool. These chemicals could seriously damage
the plastic.
Avoid overloading your sander. Overloading will result in a considerable reduction in speed and
efficiency and the unit will become hot. In this event, run sander at a “no load” condition for a minute
or two.
BRUSH REPLACEMENT (FIGS. 9 & 10)
Turn off and unplug the tool before making any adjustments or removing or
installing attachments or accessories. Be sure the switch is in the "OFF" position.
To replace the brushes, remove the three screws located in the top cap (Fig. 9).
Remove the top cap. Observe the brush holders, as shown in Fig. 10 and the wires leading from the
brushes to the motor field.
Pull the wires from the motor field. Lift and hold out of the way one of the brush springs. Remove the
old brush from the brush holder and discard the brush/wire assembly. Still holding the brush spring
out of the way, insert the new brush, release the spring against the back of the brush, and plug the
wire into the motor field. Repeat the procedure for the second brush.
Replace the top cap and tighten the three screws that hold it in place. (Always replace both
brushes.)
ACCESSORIES
A complete line of accessories is available from your Porter-Cable•Delta Supplier, Porter-Cable•Delta
Factory Service Centers, and Porter-Cable Authorized Service Stations. Please visit our Web Site
www.porter-cable. com for a catalog or for the name of your nearest supplier.
Since accessories other than those offered by Porter-Cable•Delta have not been
tested with this product, use of such accessories could be hazardous. For safest operation, only
Porter-Cable•Delta recommended accessories should be used with this product.
LUBRICATION
Self-lubricating bearings are used in the tool, and periodic relubrication is not required. However, we
recommend that, once a year, you take or send the tool to a service center for a thorough cleaning
and inspection.
REPAIRS
Use only identical replacement parts. For a parts list or to order parts, visit our website at servicenet.
porter-cable.com. You can also order parts from your nearest factory-owned branch, or by calling
our Customer Care Center at (888) 848-5175 to receive personalized support from highly-trained
technicians.
All quality tools will eventually require servicing and/or replacement of parts. For information about
Porter-Cable, its factory-owned branches, or an Authorized Warranty Service Center, visit our
website at www.porter-cable. com or call our Customer Care Center at (888) 848-5175. All repairs
made by our service centers are fully guaranteed against defective material and workmanship. We
cannot guarantee repairs made or attempted by others.
You can also write to us for information at PORTER-CABLE, 4825 Highway 45 North, Jackson,
Tennessee 38305 - Attention: Product Service. Be sure to include all of the information shown on the
nameplate of your tool (model number, type, serial number, etc.).
To register your tool for warranty service visit our website at
www.porter-cable.com
PORTER-CABLE LIMITED ONE YEAR WARRANTY
Porter-Cable warrants its Professional Power Tools for a period of one year from the date of original
purchase. We will repair or replace at our option, any part or parts of the product and accessories
covered under this warranty which, after examination, proves to be defective in workmanship or
material during the warranty period. For repair or replacement return the complete tool or accessory,
transportation prepaid, to your nearest Porter-Cable Service Center or Authorized Service Station. Proof
of purchase may be required. This warranty does not apply to repair or replacement required due to
misuse, abuse, normal wear and tear or repairs attempted or made by other than our Service Centers or
Authorized Service Stations.
ANY IMPLIED WARRANTY, INCLUDING THE IMPLIED WARRANTIES OF MERCHANTABILITY AND
FITNESS FOR A PARTICULAR PURPOSE, WILL LAST ONLY FOR ONE (1) YEAR FROM THE DATE
OF PURCHASE.
To obtain information on warranty performance please write to: PORTER-CABLE, 4825 Highway
45 North, Jackson, Tennessee 38305; Attention: Product Service. THE FOREGOING OBLIGATION
IS PORTER-CABLE’S SOLE LIABILITY UNDER THIS OR ANY IMPLIED WARRANTY AND
UNDER NO CIRCUMSTANCES SHALL PORTER-CABLE BE LIABLE FOR ANY INCIDENTAL OR
CONSEQUENTIAL DAMAGES. Some states do not allow limitations on how long an implied warranty
lasts or the exclusion or limitation of incidental or consequential damages, so the above limitation or
exclusion may not apply to you.
This warranty gives you specific legal rights and you may also have other legal rights which vary
from
state to state.
WARNING LABEL REPLACEMENT
If your warning labels become illegible or are missing, call (888) 848-5175 for a free replacement.
CONSERVER CES MESURES
1) La sécurité de votre espace de travail
a) Veillez à ce que votre espace de travail reste propre et bien éclairé. Les espaces de
travail encombrés ou mal éclairés sont des invites aux accidents.
b) Ne faites pas fonctionner vos outils électriques dans des atmosphères explosives,
par exemple en présence de liquides, de gaz ou de poussières inflammables. Les
outils électriques créent des étincelles qui peuvent mettre le feu à ces poussières ou à ces
vapeurs.
c) Gardez les enfants et les observateurs à distance pendant que vous faites
fonctionner un outil électrique. Les distractions peuvent vous faire perdre le contrôle de
votre outil.
2) La sécurité électrique
a) La fiche de l'outil électrique doit être compatible avec la prise de courant. Ne
modifiez jamais la fiche de quelque façon que ce soit. N'utilisez jamais d'adaptateurs
de fiches avec des outils électriques mis à la terre. Le risque de choc électrique sera
réduit par l'utilisation de fiches non modifiées et de prises de courant compatibles.
b) Évitez tout contact corporel avec des surfaces mises à la terre ou à la masse, telles
que des conduits, des radiateurs, des cuisinières ou des réfrigérateurs. Il existe un
risque de choc électrique accru quand votre corps est relié à la terre.
c) N'exposez pas des outils électriques à la pluie ou à des environnements humides.
L'infiltration d'eau dans un appareil électrique augmentera le risque de choc électrique.
d) Ne maltraitez pas le cordon, et ne vous en servez jamais pour soulever l'outil
électrique ou le traîner ; ne tirez pas non plus sur le cordon afin de le débrancher.
Gardez le cordon à distance de la chaleur, de l'huile, de bords tranchants ou de
pièces mobiles. Les cordons endommagés ou emmêlés augmentent le risque de choc
électrique. Les cordons endommagés ou emmêlés augmentent les risques de choc
électrique. Remplacer ou faire réparer tout cordonendommagé. S’assurer que la rallonge
est en bon état. N’utiliser que des rallonges trifilaires munies de fiches tripolaires et des
prises tripolaires acceptant la fiche de l’outil.
e) Lorsque vous faites fonctionner un outil électrique en plein air, utilisez une rallonge
classifiée pour un usage en plein air. En utilisant une rallonge de classification plein air,
vous réduisez le risque de choc électrique. En cas d’utilisation d’une rallonge, s’assurer que
les valeurs nominales de la rallonge utilisée correspondent bien à celles de l’outil alimenté.
L’usage d’une rallonge de calibre insuffisant causera une chute de tension entraînant perte
de puissance et surchauffe. Le tableau ci-dessous illustre les calibres à utiliser selon la
longueur de rallonge et l’intensité nominale indiquée sur la plaque signalétique. En cas de
doutes, utiliser le calibre suivant. Plus le calibre est petit, plus la rallonge peut supporter de
courant.
Calibre minimal des cordons de rallonge
Tension Longueur totale du cordon en mètres
120 V De 0 à 7 De 7 à 15 De 15 à 30 De 30 à 45
240 V De 0 à 7 De 7 à 15 De 15 à 39 De 30 à 45
Intensité (A)
Au Au Calibre moyen de fi l
moins plus
0 - 6 18 16 16 14
6 - 10 18 16 14 12
10 - 12 16 16 14 12
12 - 16 14 12 Non recommandé
FIG. 9
A
B
C
D
E
F
G
H
IMPORTANTES MESURES DE SÉCURITÉ
: Lire toutes ces directives. Tout manquement aux directives suivantes pose des
risques de choc électrique, d’incendie et/ou de blessure grave. Le terme « outil électrique » dans tous
les avertissements ci-après se rapporte à votre outil électrique à alimentation sur secteur (avec fil) ou
par piles (sans fil).
 Loading...