

Porsche Turbo 2007 Driver Manual

Porsche, the Porsche Crest, Cayenne, Tiptronic
and Tequipment are registered trademarks of
Dr. Ing. h.c. F. Porsche AG.
Printed in Germany.
Reprinting, even of excerpts, or duplication of any
type is only permissible with the written authorisation of Dr. Ing. h.c. F. Porsche AG.
© Dr. Ing. h.c. F. Porsche AG
Porscheplatz 1
D-70435 Stuttgart
48268
On-board literature
Please always keep this literature in the vehicle
and please hand it over to the new owner if you
sell your vehicle.
Suggestions
Do you have any questions, suggestions or ideas
for your vehicle or for the on-board literature?
Please write to us:
Dr. Ing. h.c. F. Porsche AG
Vertrieb Customer Relations
Porschestraße 15–19
71634 Ludwigsburg
Equipment
Because our vehicles undergo continuous development, equipment and specification may not be
as illustrated or described in this Driver's Manual.
Items of equipment are sometimes optional or
vary depending on legal requirements or on the
country in which the vehicle is sold. Your Porsche
partner will be pleased to advise you on retrofitting such equipment.
Should your Porsche be fitted with any equipment
not described in this Manual, your Porsche partner
will be glad to provide information concerning
correct operation and care of the items
concerned.
Because of different legal requirements in
individual countries, the equipment in your vehicle
may vary slightly from that described in this
Driver's Manual.
WKD 948 820 08 08/07

Table of contents 1
Table of contents
Overview Illustrations........................... 4
Driver's cockpit .............................................. 5
Steering wheel and instrument cluster ..............6
Centre console, front ...................................... 7
Opening and Locking ........................... 8
Brief overview – opening and locking
from outside................................................... 9
Opening and locking from outside ..................10
Opening and locking from inside .................... 19
Opening and closing
the engine compartment lid ...........................21
Malfunctions when opening and locking .........22
Notes on the key and central locking system ..24
Seats, Mirrors and Steering Wheel ..... 26
Front seats................................................... 27
Front seats with memory ............................... 28
Easy Entry function .......................................30
Headrests .................................................... 31
Fire extinguisher ........................................... 32
Seat heating at front and rear ........................ 32
Seat belts ................................................... 34
Airbag systems............................................. 37
Child restraint system ................................... 39
Door mirrors ................................................ 44
Interior mirror ............................................... 46
Automatic anti-dazzle interior mirror ...............46
Steering wheel.............................................. 47
Steering wheel heating ..................................47
Steering wheel adjustment.............................48
Multi-functional steering wheel ........................49
Sun visors .................................................... 52
Make-up mirror ............................................. 52
Sun blinds, rear side windows ........................ 52
Air Conditioning, Parking Heater
and Rear Window Heating .................. 53
Opening the cover flap ..................................54
Overview of air-conditioning systems ..............54
Valid for every air-conditioning system ............55
Brief overview – manually controlled
air-conditioning system..................................56
Manually controlled air-conditioning system .....57
Brief overview – automatically controlled
2-zone air-conditioning system .......................59
Automatically controlled
2-zone air-conditioning system .......................60
Brief overview – automatically controlled
4-zone air-conditioning system,
front control panel ........................................63
Brief overview – automatically controlled
4-zone air-conditioning system,
rear control panel ......................................... 64
Automatically controlled
4-zone air-conditioning system .......................65
Vents ...........................................................69
Heated rear window ......................................70
Parking heater .............................................. 71
Windows and Sliding Roofs ................ 76
Power windows.............................................77
Brief overview – sliding/lifting roof ...............80
Sliding/lifting roof .........................................81
Brief overview – Panorama roof system .......85
Panorama roof system ..................................86
Emergency operation
of the Panorama roof system........................ 90
Lights, Direction Indicators
and Windscreen Wipers ..................... 92
Light switch ..................................................93
Instrument illumination...................................94
Manual headlight beam adjustment .................95
Automatic headlight beam adjustment ............95
Direction indicator/high beam/
headlight flasher stalk ...................................95
Hazard warning lights ....................................96
Interior lighting..............................................96
Comfort lighting ............................................98
Coming Home function (off delay) ...................98
Door-surrounding lighting...............................99
Emergency-call button ...................................99
Brief overview – windscreen wipers............100
Windscreen wiper/washer stalk ....................101

2 Table of contents
Multi-Purpose Display
and Instruments...............................105
Instrument panel ......................................... 107
Oil temperature gauge ................................ 108
Tachometer................................................ 108
Clock......................................................... 108
Fuel gauge ................................................. 108
Speedometer ............................................. 108
Odometer .................................................. 109
Voltmeter ................................................... 109
Cooling system........................................... 110
Intelligent maintenance computer
for the Cayenne (V6) ................................... 111
Emission control ......................................... 111
Operating the multi-purpose display
on the instrument panel............................... 112
Opening the main menu............................... 113
Operating example:
Displaying average consumption ................. 113
Displaying/resetting average speed ............. 115
Displaying range on remaining fuel ............... 115
Displaying tyre pressure.............................. 115
Displaying compass .................................... 115
Displaying navigation information ................. 115
Operating the telephone
via the multi-purpose display ........................ 116
Setting speed limit
on the multi-purpose display ........................ 117
Displaying warning messages ...................... 118
Displaying status of level control .................. 119
Displaying status of locks/reduction ............. 119
Displaying average consumption .................. 120
Setting Tyre Pressure Monitoring .................120
Switching off passenger compartment
monitoring and inclination sensor
on the multi-purpose display ........................129
Synchronous adjustment of door mirrors ......129
Changing settings for opening
and locking the vehicle ................................130
Setting off delay .........................................132
Setting the clock.........................................132
Setting compass.........................................133
Changing language for displays....................134
Changing units for displays .......................... 134
Resetting display to factory settings .............134
Overview of warning messages ............... 135
Driving and Driving Safety ................144
Before driving off ........................................145
Tips for running in .......................................145
Recycling .................................................. 146
Technical modifications ...............................146
Ignition lock/steering lock............................147
Starting and stopping the engine................. 149
Mobile phones and 2-way radios...................150
Porsche Communication Management
(PCM)......................................................... 150
Radio ......................................................... 150
Parking brake .............................................151
Footbrake .................................................. 151
Cruise control............................................. 153
Manual transmission, clutch .........................156
Tiptronic S .................................................157
Selector lever positions ............................... 158
Driving programmes for on-road
and off-road driving .....................................164
Power-transmission and
running-gear control systems .......................168
Air suspension with level control
and height adjustment .................................178
Porsche Active Suspension Management
(PASM) .......................................................181
Porsche Dynamic Chassis
Control (PDCC)............................................182
Off-road driving ...........................................183
Driving systems for off-road driving ............. 184
Uphill driving ...............................................185
Downhill driving...........................................186
Water crossing ...........................................187
Crossing obstacles .....................................189
Luggage Compartment,
Loadspace and Storage ....................191
Folding rear seats forward and
returning to upright position .........................192
Loadspace .................................................195
Cargo management system .........................196
Stowing load...............................................199
Luggage compartment cover .......................200
Luggage safety net .....................................201
Ski bag ......................................................203
Roof Transport System................................205
Storage......................................................206
Cupholder...................................................209
DVD player under the right front seat ............211
Ashtray, front..............................................211
Cigarette lighter ..........................................212

Table of contents 3
Trailer Hitch .................................... 213
Trailer coupling........................................... 214
Trailer coupling with removable ball hitch ...... 216
Electrically folding trailer coupling ................221
Parking ........................................... 223
ParkAssist.................................................. 224
Swivelling down mirror glass
as parking aid.............................................228
Garage door opener.................................... 228
Alarm System and Theft Protection .. 231
Alarm system ............................................. 232
Immobiliser ................................................234
Steering column lock .................................. 234
Theft protection ..........................................234
Maintenance and Car Care............... 235
Notes on maintenance ................................ 236
Checking the engine oil level ....................... 237
Topping up engine oil ................................. 238
Checking the coolant level
and adding coolant ..................................... 240
Checking brake fluid level
and changing brake fluid ............................. 242
Adding washer fluid.................................... 243
Changing air cleaner ................................... 244
Changing particle filter ................................ 244
Power steering ........................................... 244
Wiper blades ..............................................245
Emission control system ............................. 248
Fuel can ..................................................... 248
Filling with fuel ............................................249
Car care instructions ...................................251
Minor Repairs.................................. 258
Notes on minor repairs................................259
Tyres and wheels ........................................260
Jack...........................................................266
Tool kit.......................................................266
Compressor ...............................................267
Spacers .....................................................267
Wheel bolts ................................................268
Flat tyre .....................................................269
Inflating tyres on vehicles
without level control ....................................279
Inflating tyres on vehicles
with level control.........................................280
Electrical system ........................................285
Battery.......................................................293
Replacing the remote control battery ............296
External power supply, jump lead starting .....297
Replacing bulbs ..........................................299
Headlights ..................................................300
Tail light .....................................................310
Number plate lights .....................................312
Headlight adjustment...................................313
Changing headlights
from left to right-hand traffic ........................313
Bulb chart ..................................................314
Towing and tow-starting...............................315
Tyre Pressure and Technical Data .... 319
Vehicle identification data............................ 320
Engine data ............................................... 321
Transmission ............................................. 322
Fuel consumption ....................................... 322
Tyres, wheels, tracks ................................. 323
Tyre pressures, cold .................................. 326
Weights ..................................................... 328
Ground clearance....................................... 329
Capacities ................................................. 331
Dimensions................................................ 332
Driving performance ................................... 333
Index .............................................. 334

4 Overview Illustrations
Overview Illustrations
Driver's cockpit .............................................. 5
Steering wheel and instrument cluster ..............6
Centre console, front ...................................... 7
Overview Illustrations 5
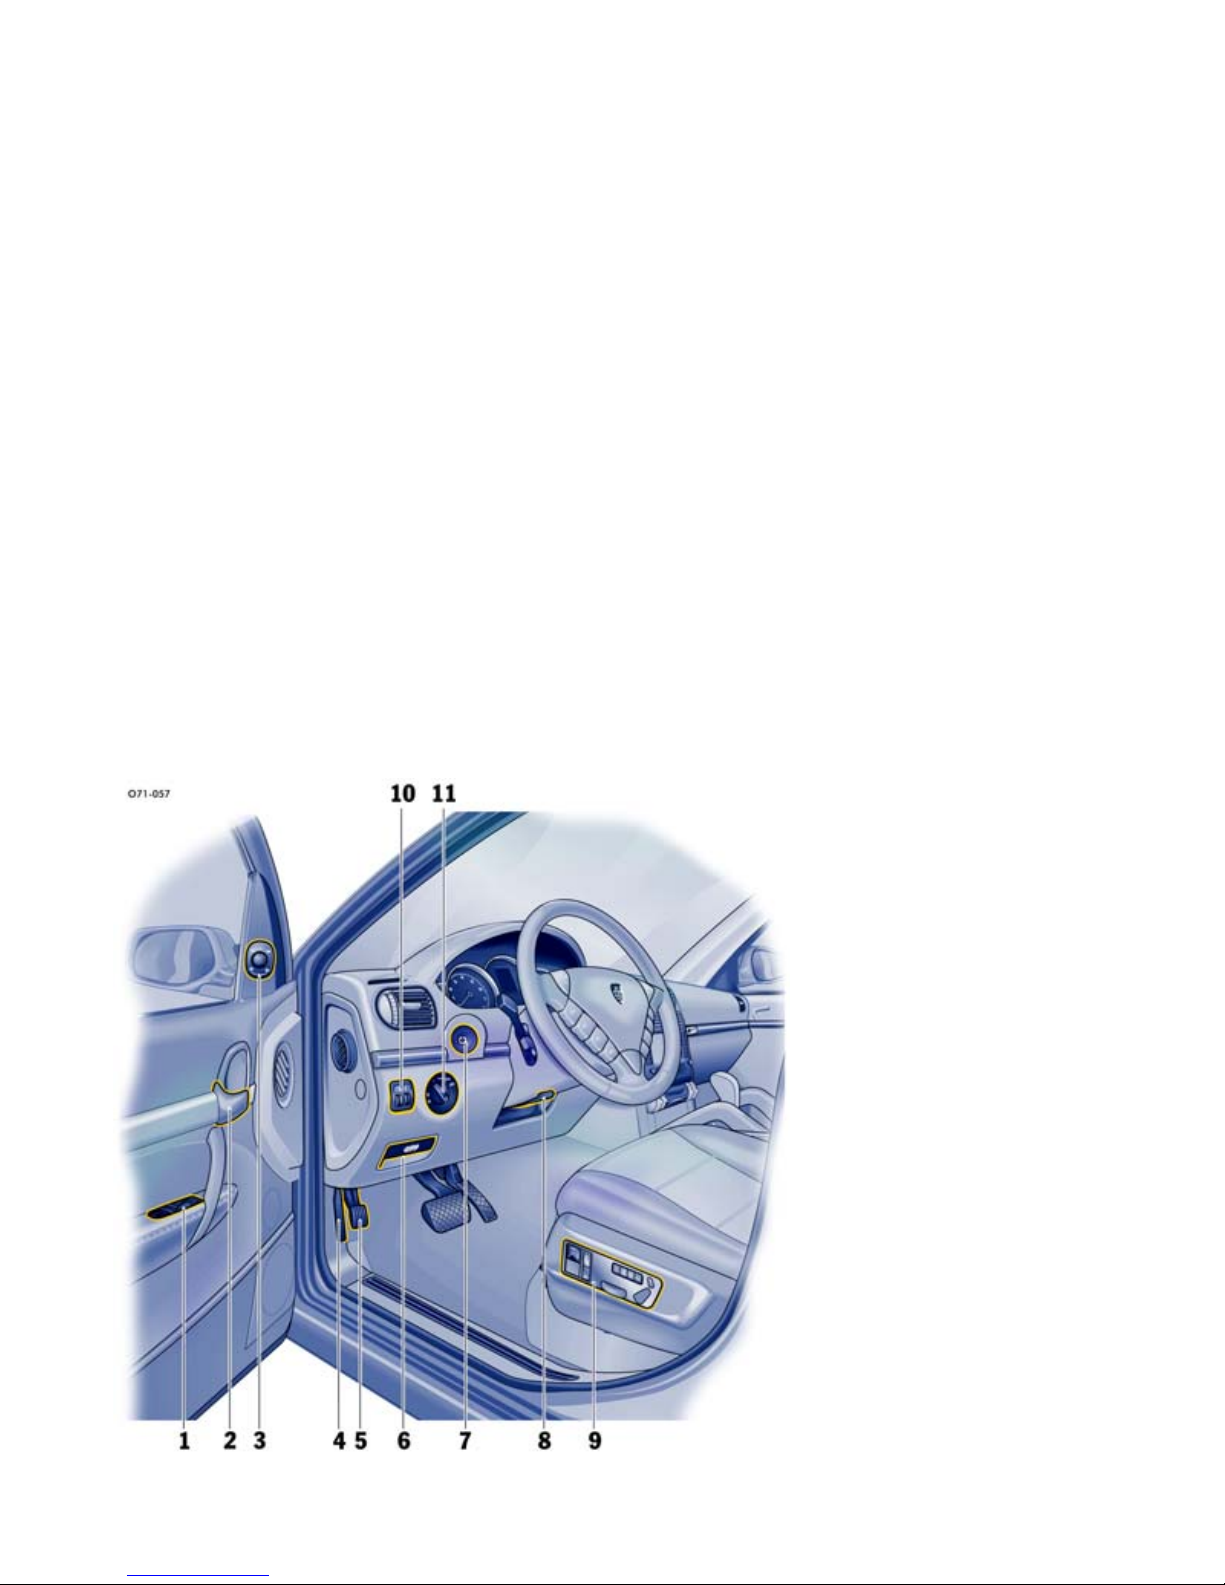
Driver's cockpit
1.Power windows
See Page 77.
2.Inner door handle
See Page 20.
3.Door mirror adjustment
See Page 44.
4.Engine compartment lid release
See Page 21.
5.Parking brake
See Page 151.
6.Parking brake release
See Page 151.
7.Ignition lock/steering lock
See Page 147.
8.Steering wheel adjustment (manual)
See Page 48.
9.Seat adjustment
See Page 27.
10.Dimming of instrument illumination
See Page 94.
11.Light switch
See Page 93.

6 Overview Illustrations
Steering wheel and instrument
cluster
1.Tiptronic rocker switches
See Page 47.
2.Direction indicator
See Page 95.
3.Cruise control
See Page 153.
4.Function keys
See Page 49.
5.Horn
See Page 47.
6.Windscreen wipers
See Page 100.
7.Tachometer
See Page 108.
8.Clock
See Page 108.
9.Cooling system temperature gauge
See Page 110.
10.Multi-purpose display
See Page 112.
11.Fuel gauge
See Page 108.
12.Odometer
See Page 109.

Overview Illustrations 7
Centre console, front
1.Porsche Communication Management (PCM)
See separate operating instructions.
2.Air conditioner
See Page 54.
3.Ashtray/cigarette lighter
See Page 211.
4.Cupholder
See Page 209.
5.Reduction (Low Range), differential locks
See Page 164.
6.Sport mode
See Page 166.
7.Porsche Active Suspension Management
(PASM) – running-gear setup
See Page 181.
8.Height adjustment, air suspension
See Page 178.
9.Armrest, oddments trays
See Page 207.
10.ParkAssist warning indicator
See Page 226.
11.Vents
See Page 69.
12.Glove compartment
See Page 207.

8 Opening and Locking
Opening and Locking
Brief overview – opening and locking
from outside................................................... 9
Opening and locking from outside ..................10
Opening and locking from inside .................... 19
Opening and closing
the engine compartment lid ...........................21
Malfunctions when opening and locking .........22
Notes on the key and central locking system ..24
Opening and Locking 9
Brief overview – opening and
locking from outside
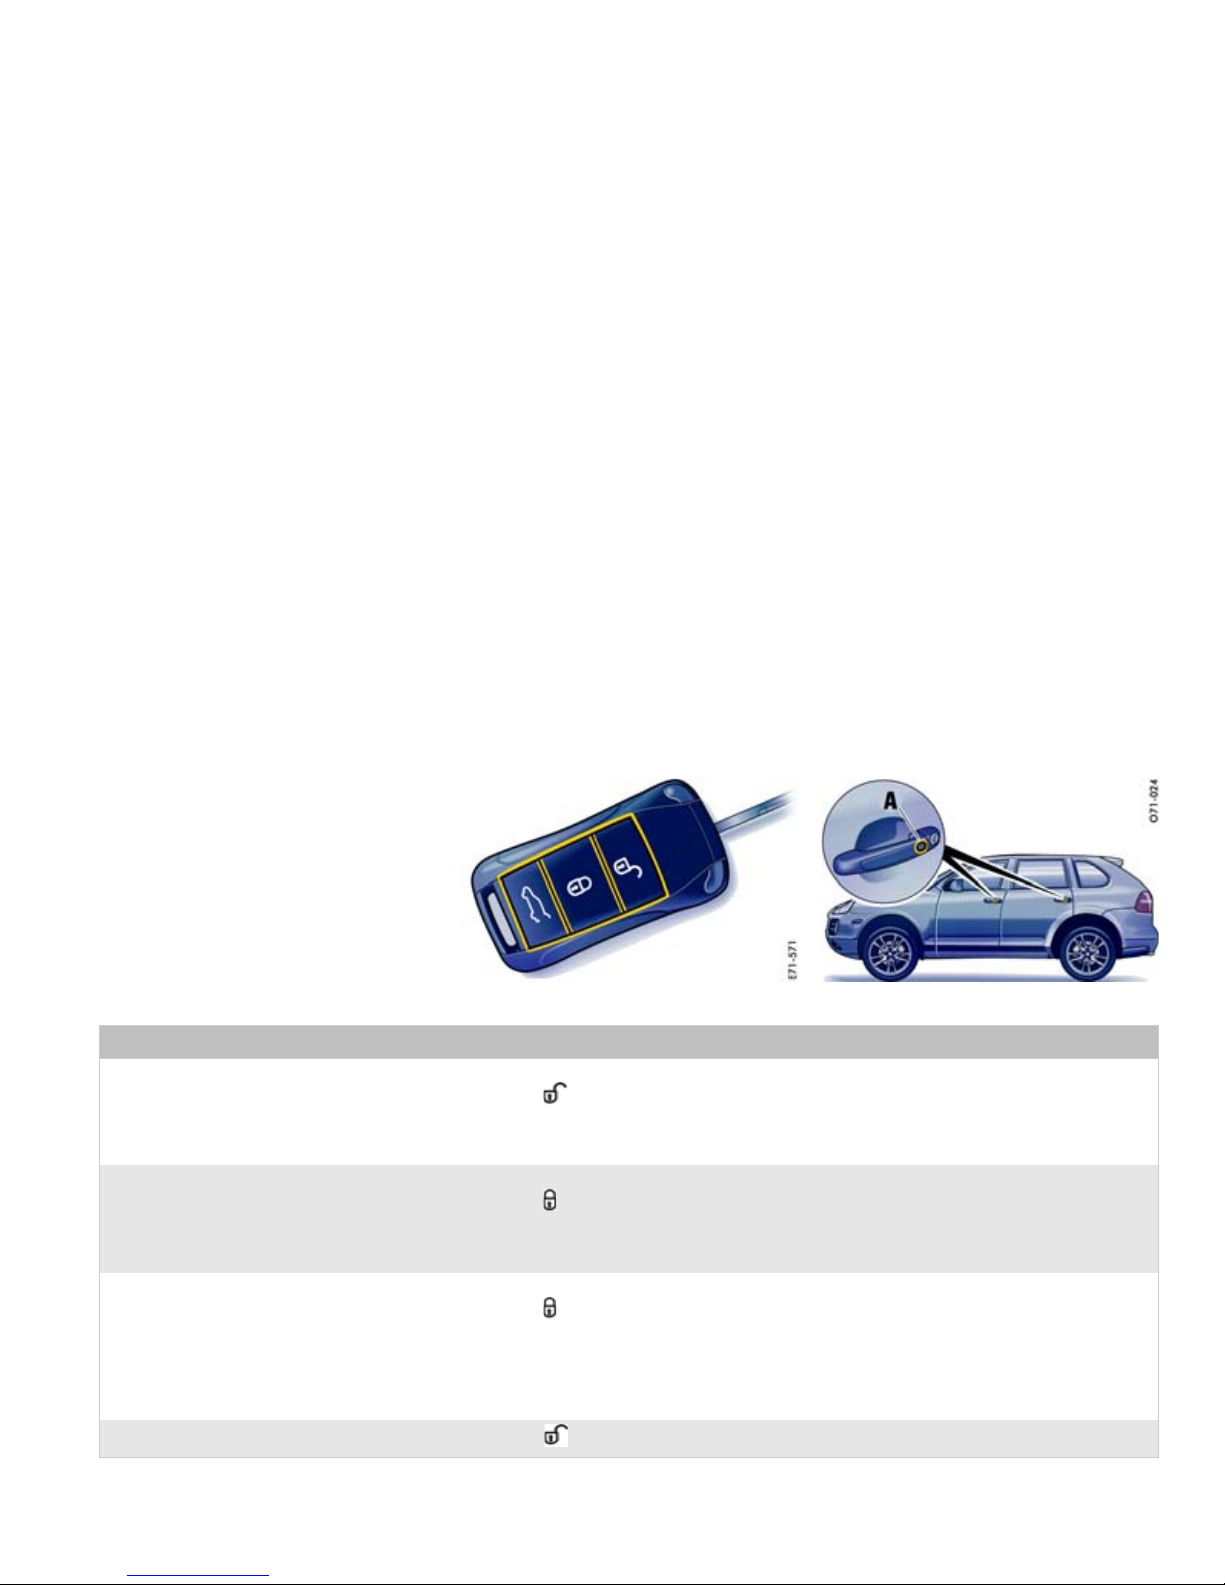
The Porsche Entry & Drive option can be recognised by the buttons A in the door handles.
This brief overview does not replace the information provided in the chapter “Opening and locking
from outside”. In particular, warnings are not
replaced by this brief overview.
Key Porsche Entry & Drive
What do I want to do? What do I have to do? What happens?
Unlock
Using the key:
Press button on the key.
With Porsche Entry & Drive:
Grip door handle fully.
Using the key: The hazard warning lights flash once.
The doors can be opened.
With Porsche Entry & Drive:
The doors can be opened.
Lock
Using the key:
Press button on the key.
With Porsche Entry & Drive:
Press the button A in the handle.
The hazard warning lights flash twice.
The doors are locked.
Lock if persons/animals are remaining
in vehicle
(switch off passenger compartment monitoring
of the alarm system)
Using the key:
Press button on the key twice
(within 2 seconds).
With Porsche Entry & Drive:
Press the button A in the handle twice
(within 2 seconds).
The hazard warning lights flash four times.
The doors are locked, but can be opened from inside
by pulling the inner door handle twice.
Switch off alarm
Press button on the key.

10 Opening and Locking
Opening and locking from outside
Depending on your vehicle equipment, you can
either unlock and lock the vehicle with the
vehicle key or without a key by means of
Porsche Entry & Drive.
With the key
Use the buttons on the key to unlock and lock the
vehicle.
With Porsche Entry & Drive
On vehicles with Porsche Entry & Drive, you can
unlock, lock and start the vehicle without using the
key.
You simply have to carry the key with you, e.g. in
your trouser pocket.
f Do not expose the vehicle key to a high level of
electromagnetic radiation, as this could
adversely affect Porsche Entry & Drive.
Note on operation
The factory settings of the vehicle are described
in this chapter.
You can change the settings and store them on
the respective key on the multi-purpose display of
the instrument panel.
f For further information on the possible settings
on the multi-purpose display:
Please observe the chapter “CHANGING
SETTINGS FOR OPENING AND LOCKING THE
VEHICLE” on Page 130.

Opening and Locking 11
Unlocking and opening doors
Unlocking with the key
1. Briefly press button on the key. The
hazard warning lights flash once. The doors
are now unlocked.
2. Pull the door handle.
Unlocking with Porsche Entry & Drive
(keyless)
The vehicle can be unlocked if you are in the area
of the driver's door with the key.
f Grip door handle fully. The doors are now
unlocked.
f Pull the door handle.
Note on operation
The vehicle doors are locked automatically after
30 seconds if they are not opened.
If the passenger compartment monitoring system
and inclination sensor have been switched off
(restricted theft protection), this also remains the
case after automatic relocking.
As a result, the doors can be opened from inside
by pulling the inner door handle twice.
When locked again, the passenger compartment
monitoring system and inclination sensor are
activated once more.
12 Opening and Locking
Locking doors
Locking with the key
f Close the door.
f Briefly press button on the key once.
The hazard warning lights flash twice.
The doors cannot be opened, either from
outside or from inside.
OR
If persons or animals are remaining in the
vehicle, briefly press button twice.
The hazard warning lights flash four times.
The doors can be opened from inside by
pulling the inner door handle twice.
f Inform any persons remaining in the vehicle
that the alarm system will be triggered if the
door is opened.
Note on operation for locking the doors with
the key
The vehicle cannot be locked if the driver’s door is
not completely closed.
Locking with Porsche Entry & Drive (keyless)
You must carry the key with you.
f Close the door.
f Briefly press the Porsche Entry & Drive locking
button A in the door handle.
The hazard warning lights flash twice. The
doors cannot be opened, either from outside
or from inside.
OR
If persons or animals are remaining in the
vehicle, briefly press the Porsche Entry & Drive
locking button A in the door handle twice.
The hazard warning lights flash four times.
The doors can be opened from inside by
pulling the inner door handle twice.
f Inform any persons remaining in the vehicle
that the alarm system will be triggered if the
door is opened.
Note on operation for locking with Porsche
Entry & Drive (keyless)
– The vehicle cannot be locked if the driver’s
door is not completely closed.
– The key must be outside of the vehicle when
locking the vehicle doors, otherwise the
vehicle doors cannot be locked.
– If the vehicle key with remote control is out of
range, the vehicle doors can no longer be
opened after they are locked.

Opening and Locking 13
Unlocking and opening rear lid
On vehicles with spare wheel bracket, this must be
swung to the side before opening the rear lid.
For further information on opening the spare
wheel bracket:
Please observe the chapter “OPENING SPARE
WHEEL BRACKET” on Page 283.
The vehicle doors remain locked after unlocking
the rear lid.
The rear lid is locked automatically after
30 seconds if it is not opened.
Unlocking with the key
f Press button on the key.
f Press the release handle (arrow) on the rear
lid and open the rear lid.
Unlocking with Porsche Entry & Drive
(keyless)
d Warning!
Risk of being locked out of vehicles with
Porsche Entry & Drive.
f Do not leave the key in the vehicle if the vehicle
is locked and access is gained through the
rear lid. The vehicle is automatically locked
when the rear lid is closed.
If the key has been left in the vehicle, the
hazard warning lights flash twice and a
warning signal sounds. The rear lid can be
opened again within approx. 30 seconds.
After 30 seconds have elapsed, the vehicle
can be unlocked again only with the second
key.
d Danger!
Risk of poisoning! Exhaust gases can enter
the passenger compartment when the rear
lid is open.
f Always keep the rear lid closed when the
engine is running.
f Always keep the rear lid closed while driving.
The rear lid is unlocked if you are in the rear area
of the vehicle with the key.
f Press the release handle (arrow) on the rear
lid and open the rear lid.

14 Opening and Locking
Locking the rear lid
The rear lid has a power closing mechanism.
1. Pull down the rear lid by means of the closing
handle (arrow), and press it gently into the
lock.
The rear lid is automatically pulled closed and
locked (only if rear lid is unlocked).
2. Lock the vehicle.
d Warning!
Danger of crushing. The rear lid is
automatically pulled closed and locked.
f Make sure that your fingers are not under the
rear lid.
f Keep foreign objects or limbs away from
moving parts (latch striker) of the power
closing mechanism.
f Do not leave children in the vehicle unattended.
Note on operation
On vehicles with Porsche Entry & Drive, the rear
lid, rear window and spare wheel bracket can no
longer be opened when the vehicle key with
remote control is out of range.
Automatic rear lid
Opening and closing rear lid automatically
d Warning!
Danger of injury and damage if the rear lid is
automatically opened or closed in an uncontrolled way!
f Open or close the rear lid only when the vehicle
is stationary.
f Never drive with the rear window or rear lid
open.
Exhaust gases can enter the passenger
compartment.
f Open or close the rear lid only when there are
no persons, animals or objects within its
movement range.
f Always observe the opening and closing opera-
tion so that movement can be stopped at any
time in the event of danger.
f Make sure that there is sufficient clearance
behind or above the vehicle (e.g. Roof
Transport Systems, garage ceiling).
f Remove rear rack systems before opening the
rear lid automatically.

Opening and Locking 15
Risk of being locked out of vehicles with
Porsche Entry & Drive.
f Do not leave the key in the vehicle if the vehicle
is locked and access is gained through the
rear window. The vehicle is automatically
locked when the rear lid is closed.
If the key has been left in the vehicle, the
hazard warning lights flash twice and a
warning signal sounds. The rear lid can be
opened again within approx. 30 seconds.
After 30 seconds have elapsed, the vehicle
can be unlocked again only with the second
key.
Opening the rear lid automatically
The rear lid can be opened only with the release
button on the rear lid when the vehicle is operated
with a trailer.
There are three ways of opening the rear lid:
Option 1
f Briefly press the release handle on the rear lid.
The vehicle must be unlocked for this.
The vehicle need not be unlocked on vehicles
with Porsche Entry & Drive. You simply have to
carry the vehicle key with you, e.g. in your
trouser pocket.
Option 2
f Press the button on the key for
approx. 1 second.
If the vehicle is locked, the vehicle doors
remain locked when the rear lid is opened.

16 Opening and Locking
Option 3
f Pull and hold the button in the driver’s door with
the ignition switched on until the rear lid has
opened fully.
Opening is interrupted if the button is released
prematurely.
Automatically closing the rear lid
Make sure that the load is not in the area of the
rear lid when the lid is closed, otherwise the
closing operation will be interrupted after contact
with the load, and the rear lid will open again by a
few centimetres.
f Briefly press the button in the rear lid trim
panel.
Interrupting the opening or closing operation
in the event of danger
The opening or closing operation is interrupted
immediately if one of the following buttons is
pressed:
f Press the button on the key
or
Release the button in the driver’s door
or
Briefly press the button in the rear lid trim
panel
or
Briefly press the release button on the rear lid.
Automatic operation can be continued again at
any time. To do this, press the corresponding
button.
Detection of obstacles during opening
The rear lid will stop moving if opening is blocked
by an obstacle. A warning signal then sounds.
When the obstacle has been removed, the rear lid
can be opened by pressing
the button on the key
or
the button in the driver’s door
or
the release button on the rear lid.

Opening and Locking 17
Detection of obstacles during closing
The closing operation is interrupted if closing of
the rear lid is blocked by an obstacle.
A warning signal sounds and the rear lid opens
again by a few centimetres.
When the obstacle has been removed, the rear lid
can be closed by pressing the button in the rear lid
trim panel.
Adjusting the opening height of the rear lid
The opening height of the rear lid can be individually adjusted so that the rear lid does not collide
with the garage ceiling, for example.
On vehicles with level control, the vehicle height
changes depending on the setting of the level
control system. For this reason, always adjust the
opening height with the vehicle at the highest level
setting so that the rear lid cannot accidentally
collide with the garage ceiling, for example.
1. Stand behind the vehicle and open the rear lid.
2. Press the button on the key to stop the
automatic opening operation at around 2/3 of
the opening height.
3. Now move the rear lid up by hand until the
desired opening height is reached. Make sure
that there is a sufficient minimum clearance
from any obstacle.
4. Press and hold the button in the rear lid trim
panel for approx. 3 seconds.
An acknowledgement signal sounds, and the
direction indicators light up once.
The opening height of the rear lid has now
been programmed.
The rear lid can now be closed by briefly
pressing the button.
This setting cannot be deleted. If a different
setting is required, repeat steps 1 to 4.
Malfunctions of the rear lid drive
The automatic function is not active if the battery
voltage is too low.
If a button is pressed, the rear lid lock is unlocked
and a warning signal sounds for 3 seconds. The
rear lid can now be opened by hand.
f Charge the vehicle battery.
Emergency operation of the rear lid
A warning signal sounds for approx. 3 seconds if
the automatic opening or closing operation is
interrupted by a fault.
f Open or close the rear lid by hand.

18 Opening and Locking
Unlocking and opening rear window
The vehicle doors remain locked after unlocking
the rear lid.
The rear window is locked automatically after
30 seconds if it is not opened.
Unlocking with the key
(only on vehicles without automatic rear lid)
f Press button on the key for approx.
2seconds.
The rear window pops open.
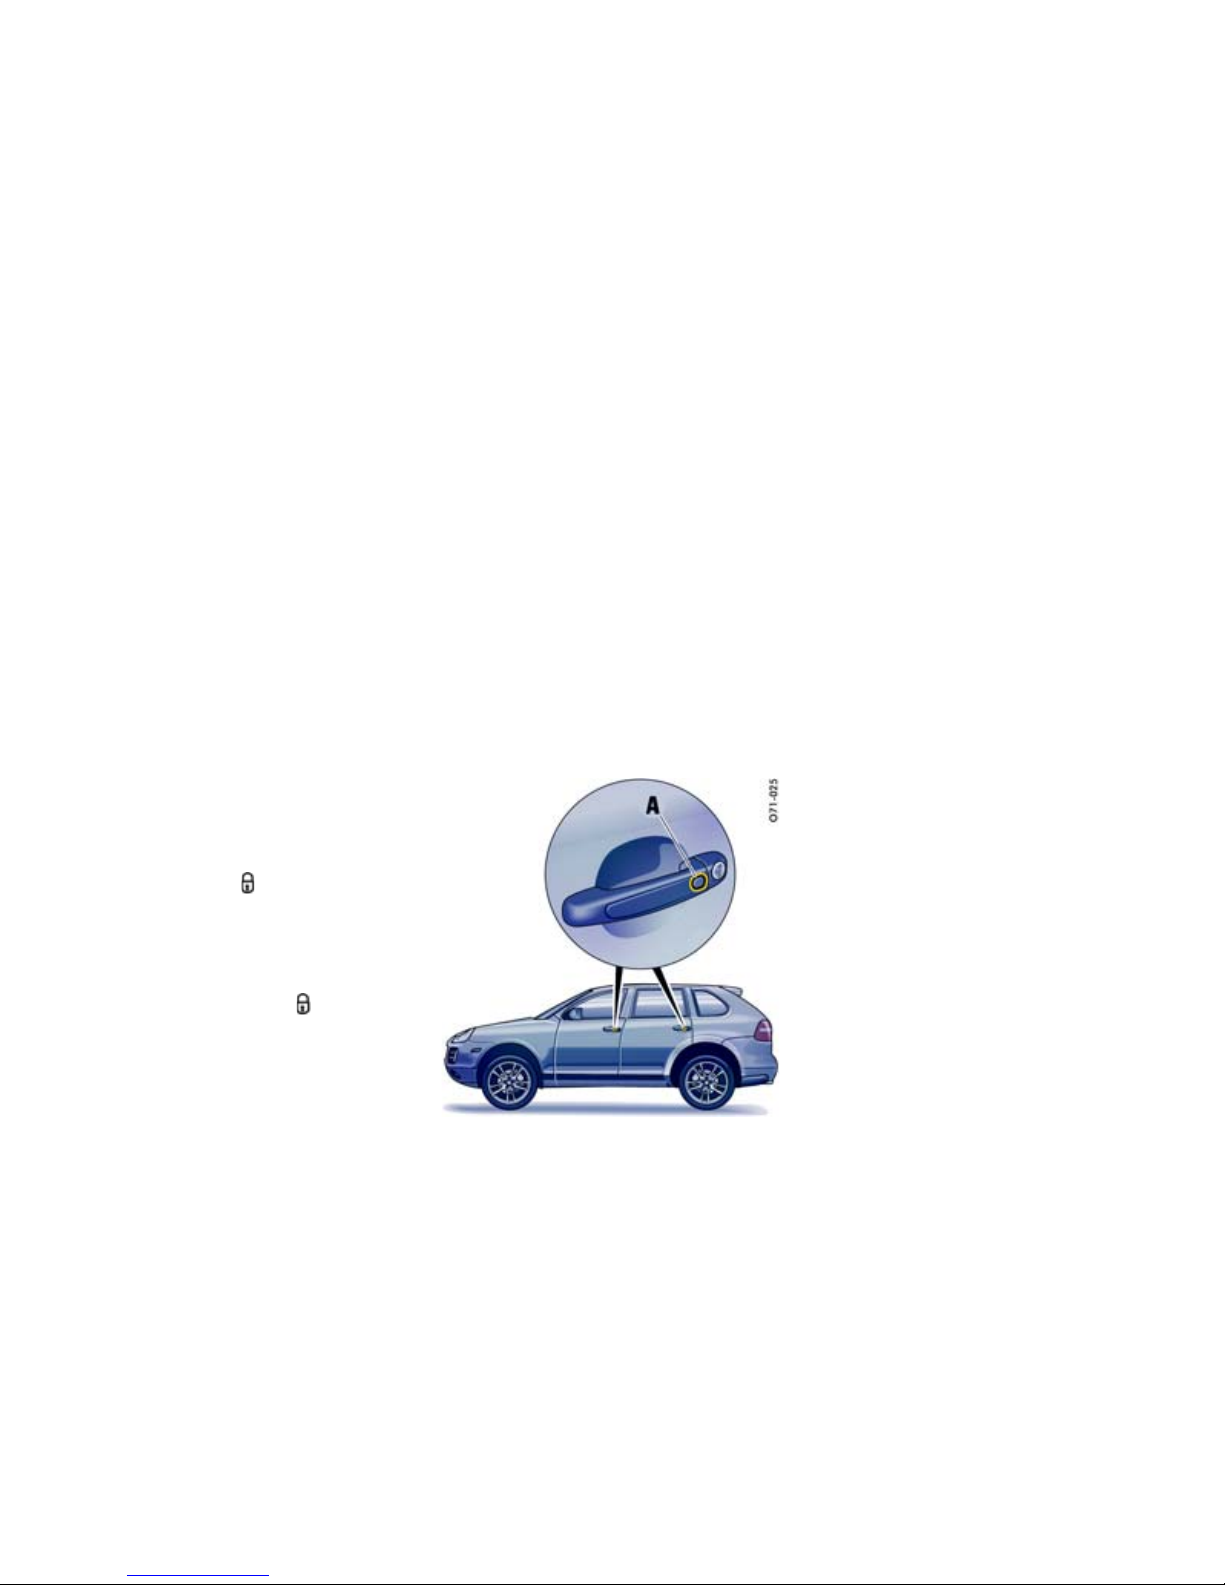
Unlocking with the key
1. Press button on the key.
2. Press the release button A and open the
window.
Unlocking with Porsche Entry & Drive
(keyless)
d Warning!
Risk of being locked out of vehicles with
Porsche Entry & Drive.
f Do not leave the key in the vehicle if the vehicle
is locked and access is gained through the
rear window. The vehicle is automatically
locked when the rear window is closed.
If the key has been left in the vehicle, the
hazard warning lights flash twice and a
warning signal sounds. The rear window can
be opened again within approx. 30 seconds.
After 30 seconds have elapsed, the vehicle
can be unlocked again only with the second
key.
d Danger!
Risk of poisoning! Exhaust gases can enter
the passenger compartment when the rear
window is open.
f Always keep the rear window closed when the
engine is running.
f Always keep the rear window closed while
driving.
The rear window is unlocked if you are in the rear
area of the vehicle with the key.
f Press the release button A and open the
window.
Closing the rear window
f Close the rear window and press it into the lock
until it can be felt to engage.
Note on operation
On vehicles with Porsche Entry & Drive, the rear
lid, rear window and spare wheel bracket can no
longer be opened when the vehicle key with
remote control is out of range.

Opening and Locking 19
Opening and locking from inside
The factory settings of the vehicle are described
in this chapter.
You can change the settings and store them on
the respective key on the multi-purpose display of
the instrument panel.
f For further information on the possible settings
(e.g. Auto Lock and Auto Unlock) on the multipurpose display:
Please observe the chapter “CHANGING
SETTINGS FOR OPENING AND LOCKING THE
VEHICLE” on Page 130.
Locking doors
f Press the right half of the button in the door
panel.
All vehicle doors will be locked.
The doors can be opened by pulling the inner
door handle twice.
Automatic with Auto Lock
The vehicle is locked automatically when a speed
of 6 km/h (4 mph) is exceeded.
Unlocking doors
f Press the left half of the button in the door
panel.
If pressed on the rear doors, only the relevant
door will be unlocked.
Automatic with Auto Unlock
The vehicle is automatically unlocked when the
ignition key is withdrawn or the ignition is
switched off.
Note on operation
If the vehicle was locked by remote control or with
the key, it cannot be unlocked with the central
locking button.
Button in the armrest
Button in the armrest

20 Opening and Locking
Opening doors
Opening unlocked doors
f Pull inner door handle once.
Opening locked doors
(Not if the vehicle was locked by pressing the
button once. The doors cannot be opened in this
case.)
f Pull inner door handle twice.
Securing rear doors
You can secure the rear doors to prevent unintentional opening when driving.
Switching child lock on and off
The child locks are fitted in the lock area of the
rear doors.
The doors cannot be opened from inside when the
child locks are engaged.
f To engage: Turn child lock to position A.
f To disengage: Turn child lock to position B.
The power windows, central locking buttons on
the rear doors and the rear control panel for the
air conditioning can be disabled by means of the
safety button in the armrest of the driver’s door.
f Press the safety button to switch child
protection on and off.
The symbol in the safety button lights up if
child protection is active.
Switching child protection on/off
Opening and Locking 21
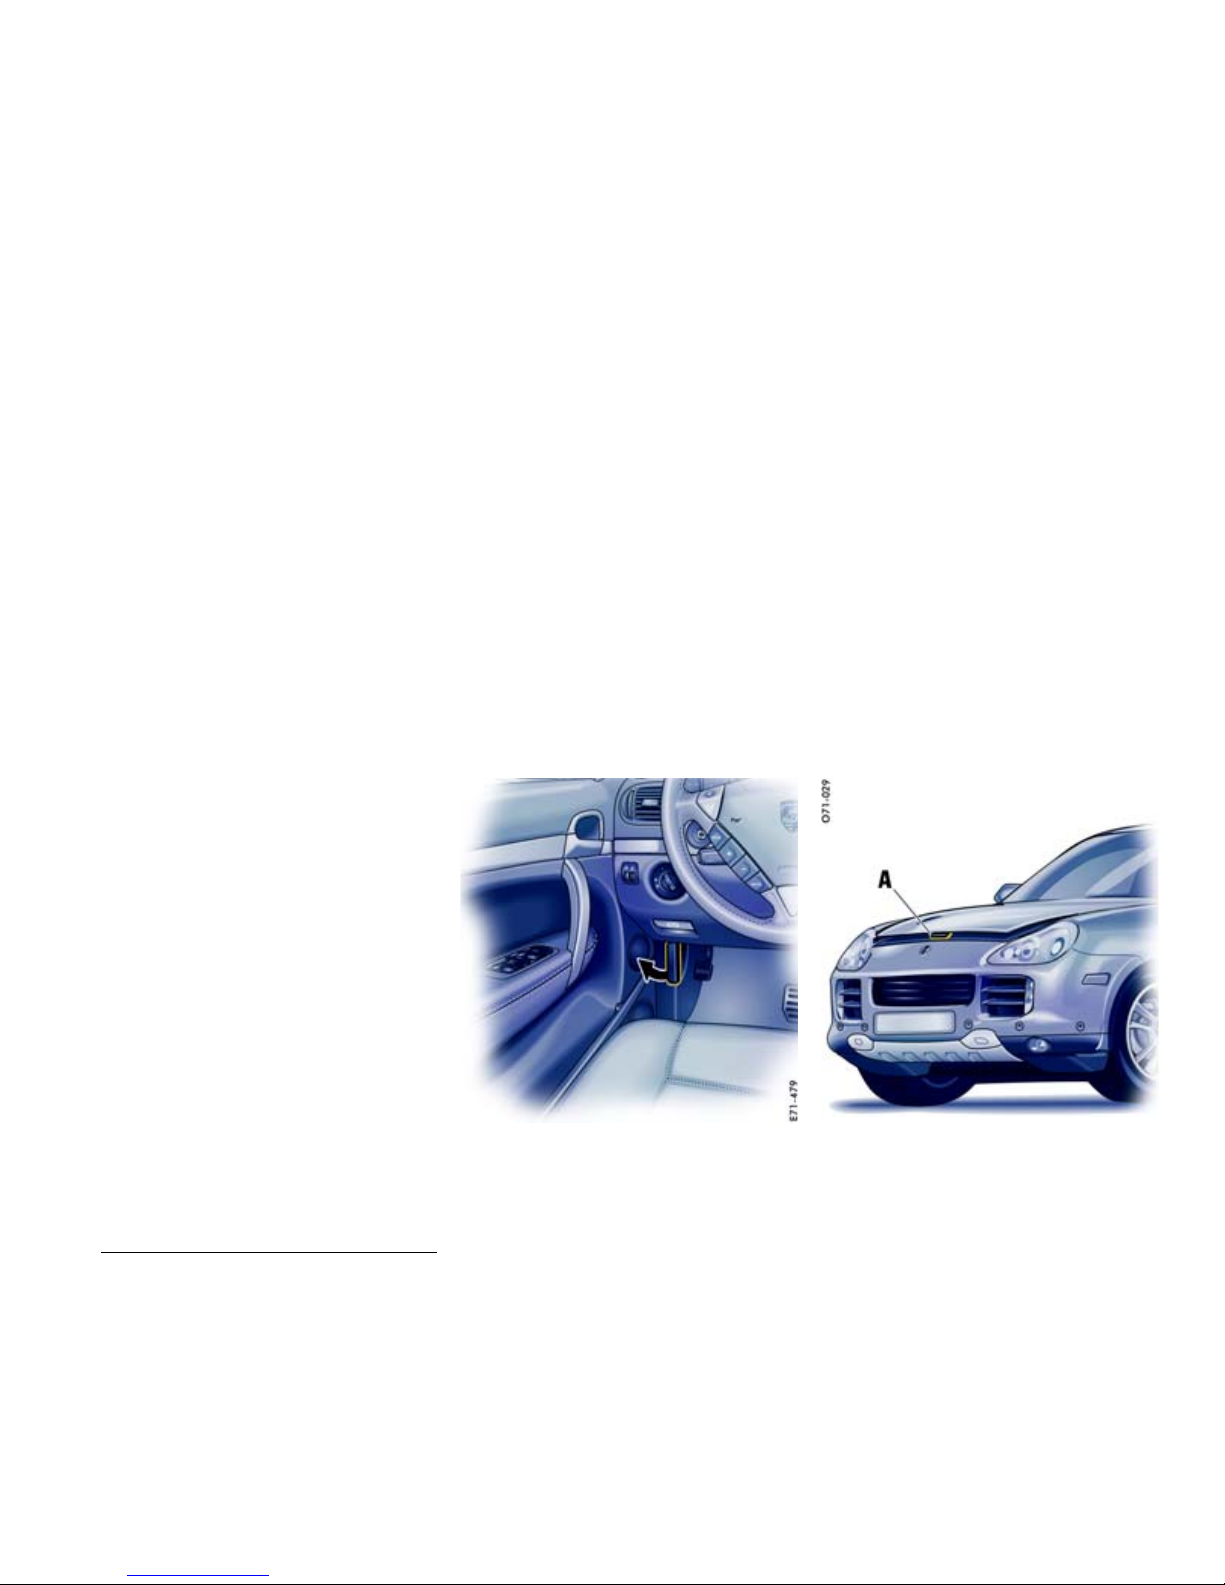
Opening and closing the engine
compartment lid
Opening
d Caution!
Risk of damage to engine compartment lid or
windscreen wipers.
f Make sure that the windscreen wipers are not
pulled out forwards when opening the engine
compartment lid.
f Always switch off windscreen wipers before
opening the engine compartment lid (wiper
switch in position 0).
If the wiper arms are not in their final position,
they will automatically move to this position
when the engine compartment lid is opened,
even if the ignition is switched off. The wiper
arms remain in this position until the lid is
closed and the wiper system is switched off
and then on again.
1. Pull the release lever (arrow).
The engine compartment lid is now unlocked.
2. Unlatch safety catch A.
3. Open the lid completely.
Closing
1. Lower lid and let it fall into the lock. If necessary, push the lid closed with the palm of your
hand in the area of the lock.
2. Check that the lid has correctly engaged in the
lock.
When the vehicle is in motion, a message will be
displayed on the multi-purpose display of the
instrument panel if the lid is not closed properly.

22 Opening and Locking
Malfunctions when opening and
locking
Emergency operation of rear lid
If the rear lid cannot be opened with the radio
remote control (e.g. if the battery of the remote
control is dead), the emergency operation must
be performed:
1. Unlock and open the driver's door with the
vehicle key.
2. Switch on the ignition so that the alarm system
will not be triggered.
3. Check if the TAILGATE function is activated in
the multi-purpose display of the instrument
panel.
Please observe the chapter “SETTING REAR
LID LOCKING” on Page 131.
4. Press the central locking button in the armrest.
The rear lid is now unlocked and can be
opened with the unlocking handle.
Only one door is unlocked
The setting for locking and unlocking the doors
and rear lid has been changed on the multipurpose display of the instrument panel. You can
open all doors irrespective of the setting made.
f Press button on the key twice within
2seconds.
The vehicle cannot be unlocked
The remote control of the key may
– not function correctly due to radio waves
(also radio contact between remote control
and vehicle in the case of Porsche Entry &
Drive),
– fail due to a fault,
– fail due to an exhausted battery.
f Unlock the vehicle with the unfolded key in the
key lock.
f If you unlock the vehicle with the key at the
door lock, only the driver’s door can be
opened.
In order to prevent the alarm system from
being triggered, you must switch the ignition
on within 15 seconds of opening the door.
The vehicle cannot be locked
This is recognisable by the fact that the hazard
warning lights do not flash and there is no locking
noise.
The remote control of the key may
– not function correctly due to radio waves
(also radio contact between remote control
and vehicle in the case of Porsche Entry &
Drive),
– fail due to a fault,
– fail due to an exhausted battery.
f Lock the vehicle with the unfolded key in the
key lock.
If there is a defect in the central locking system,
operating the lock barrel in the driver's door will
lock all functioning locking elements of the central
locking system.
f For information on locking the doors by means
of the emergency operation:
Please observe the chapter “NOT ALL VEHICLE
DOORS ARE LOCKED” on Page 23.
f Have faults in the central locking system
remedied.
Consult a qualified specialist workshop. We
recommend that you use a Porsche partner for
this work since these are staffed with trained
personnel and have the necessary parts and
tools.

Opening and Locking 23
Not all vehicle doors are locked
The central locking system has failed. The doors
must be locked with the emergency locking
operation.
1. Open the passenger's door.
2. Remove cover A.
3. Press red slide B with the key bit in the
direction of the arrow.
For information on folding out the key bit:
Please observe the chapter “FOLDING OUT
THE KEY BIT” on Page 24.
4. Fit cover A again.
5. Repeat procedure at the rear doors.
6. Close all doors.
7. Lock the driver’s door with the key in the door
lock.

24 Opening and Locking
Notes on the key and central
locking system
Keys
Two fold-out vehicle keys are supplied with your
vehicle. These keys operate all the locks on your
vehicle.
f Be careful with your vehicle keys: do not part
with them except under exceptional circumstances.
f Remove the ignition key, even if leaving the
vehicle only briefly.
f Inform your insurance company of any loss or
theft of car keys or if extra or if replacement
keys have been made.
f Third parties can still operate the mechanical
locks with a lost key.
Note on operation
The air conditioner settings are stored on the
respective key when switching off the ignition and
locking the vehicle.
Folding out the key bit
f Press release button.
The key bit folds out.
Folding in the key bit
f Press release button and fold in the key bit.
Replacement keys
Car keys can only be ordered from a Porsche
partner. Sometimes, this may take a long time.
You should therefore always have a replacement
key available. Keep it in a safe place, but under no
circumstances in or on the vehicle.
The key codes of new keys have to be “reported”
to the vehicle control module by a Porsche
partner. All keys belonging to the vehicle must also
be taught again for this purpose.

Opening and Locking 25
Central locking
Your vehicle is equipped with a central locking
system. The following are unlocked or locked
together:
– Doors
– Rear lid/rear window
– Filler flap
The central locking system is always activated
when the vehicle is unlocked and locked.
On the multi-purpose display of the instrument
panel, you can set different variants for locking
and unlocking the doors and rear lid. You can open
all doors irrespective of the setting made.
f Press button on the key twice within
2seconds.
Switch-off of readiness for operation
(for vehicles with Porsche Entry & Drive)
If the vehicle is not unlocked within 3days,
Porsche Entry & Drive readiness for operation is
switched off.
f Pull the door handle once to reactivate the
system.
f Pull the door handle again to open the door.

26 Seats, Mirrors and Steering Wheel
Seats, Mirrors and Steering Wheel
Front seats................................................... 27
Front seats with memory ............................... 28
Easy Entry function .......................................30
Headrests .................................................... 31
Fire extinguisher ........................................... 32
Seat heating at front and rear ........................ 32
Seat belts ................................................... 34
Airbag systems............................................. 37
Child restraint system ................................... 39
Door mirrors ................................................ 44
Interior mirror ............................................... 46
Automatic anti-dazzle interior mirror ...............46
Steering wheel.............................................. 47
Steering wheel heating .................................. 47
Steering wheel adjustment............................. 48
Multi-functional steering wheel........................ 49
Sun visors .................................................... 52
Make-up mirror ............................................. 52
Sun blinds, rear side windows ........................ 52

Seats, Mirrors and Steering Wheel 27
Front seats
Seat position
A correct sitting position is important for safe and
fatigue-free driving. We recommend the following
procedure for adjusting the driver’s seat to suit
individual requirements:
1. Adjust the seat height to give yourself enough
headroom and a good overview of the vehicle.
2. Adjust the seat in fore-and-aft direction until,
with the accelerator pedal fully depressed,
your leg is straight but your entire foot still
rests on the accelerator pedal.
3. Grip the top half of the steering wheel. Set the
backrest angle and the steering wheel position
so that your arms are almost outstretched.
However, your shoulders must still rest on the
backrest.
4. If necessary, correct the seat fore-and-aft
adjustment.
5. Adjust the height of the headrest so that the
upper edge is at eye level or higher.
Adjusting the seat
d Warning!
Risk of accident. The seat may move further
than desired if you attempt to adjust it whilst
driving. You can lose control of the vehicle.
f Do not adjust the seat whilst driving.
A Seat height adjustment at front.
B Seat height adjustment at rear.
C Fore and aft adjustment.
D Backrest angle adjustment.
E Lumbar support adjustment.
To permit a relaxed sitting posture, the
backrest curvature is continuously adjustable
in vertical and horizontal directions for
individual pelvis and spinal column support.
f Press the switch in the direction indicated by
the arrows until the desired setting is reached.
28 Seats, Mirrors and Steering Wheel
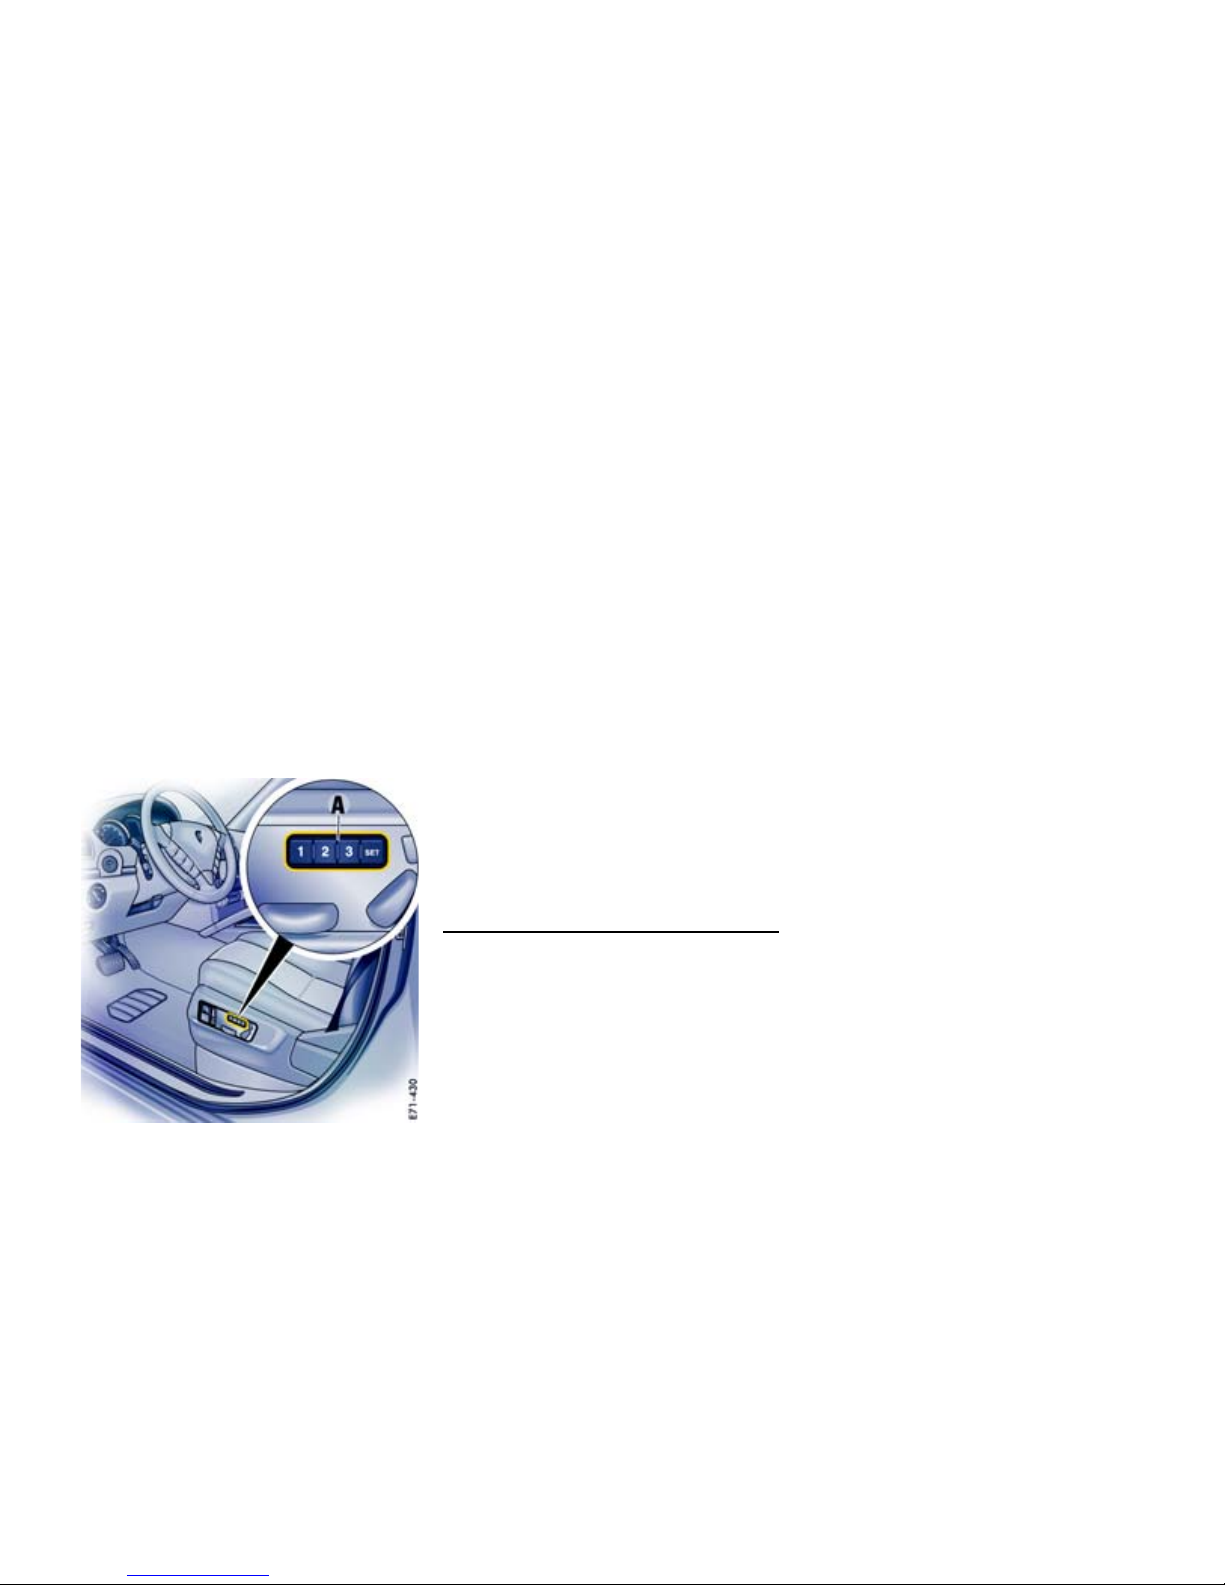
Front seats with memory
Personal seat, door mirror, steering wheel and
seat belt height adjustments can be stored on the
person buttons A and vehicle keys and recalled
with these.
d Warning!
Risk of crushing due to uncontrolled recall of
settings.
f Cancel automatic adjustment by pressing any
of the seat adjustment buttons.
f Do not leave children in the vehicle unattended.
Memory options
– Seat adjustment
– Door mirror adjustment
Comfort memory options
– Seat adjustment
– Door mirror adjustment
– Steering wheel and seat belt height adjustment
Recalling the settings using the
vehicle key or in vehicles that have
Porsche Entry & Drive
f Open the driver’s door.
The stored settings of the driver’s seat are
recalled automatically.
Cancelling setting
Automatic settings can be cancelled immediately
by pressing any driver’s seat adjustment button.
Recalling the settings with person buttons
1–3 (driver’s and passenger’s seat)
1. Unlock the vehicle.
2. Press the relevant person button until the
stored positions have been reached
or
Briefly touch the person button if the ignition
key is inserted or if the ignition is switched on
(in vehicles that have Porsche Entry & Drive).
The stored positions for each seat are recalled
automatically.
Cancelling setting
Automatic settings can be cancelled immediately
by pressing any seat adjustment button.

Seats, Mirrors and Steering Wheel 29
Storing driver’s seat settings
Storing settings on a person button and a
vehicle key
1. Apply the parking brake.
2. Switch ignition on.
3. Make the required adjustments to the seat,
mirror, steering wheel and seat belt.
4. Briefly press the SET memory button and,
within 10 seconds, hold down one of the
person buttons 1, 2 or 3 until an acknowledge
tone is obtained.
The settings are now stored on the desired
person button.
5. Withdraw vehicle key or switch ignition off in
vehicles that have Porsche Entry & Drive.
6. Press the SET memory button within
10 seconds and keep the button depressed
until an acknowledge tone is obtained.
The settings are now assigned to the vehicle
key.
A - Mirror adjustment
C - Passenger mirror adjustment
Storing passenger mirror setting as a
parking aid
If it is wished that the passenger mirror should
swivel downwards when reversing, this can also
be stored in addition to the driver’s seat setting.
1. Apply the parking brake.
2. Switch ignition on.
3. Press the relevant person button.
4. Engage reverse gear.
5. Set the control switch A for the mirror setting
to the passenger’s side C.
The passenger’s door mirror swivels
downwards.
6. Adjust the passenger mirror to the required
setting.
7. Briefly press the SET memory button and,
within 10 seconds, hold down the person
button on which the setting is to be stored until
an acknowledge tone is obtained.
Storing passenger’s seat settings
1. Apply the parking brake.
2. Switch ignition on.
3. Adjust seat position and belt height.
4. Briefly press the SET memory button and,
within 10 seconds, hold down one of the
person buttons 1, 2 or 3 until an acknowledge
tone is obtained.
Automatic storage of driver’s seat
settings
If settings were changed after the driver’s door
was opened, these new settings are temporarily
stored when the vehicle is locked.
This stored setting is deleted if the vehicle is
unlocked with a programmed key and the driver’s
door is opened. Then the settings of the key used
are recalled.
 Loading...