

Page 1
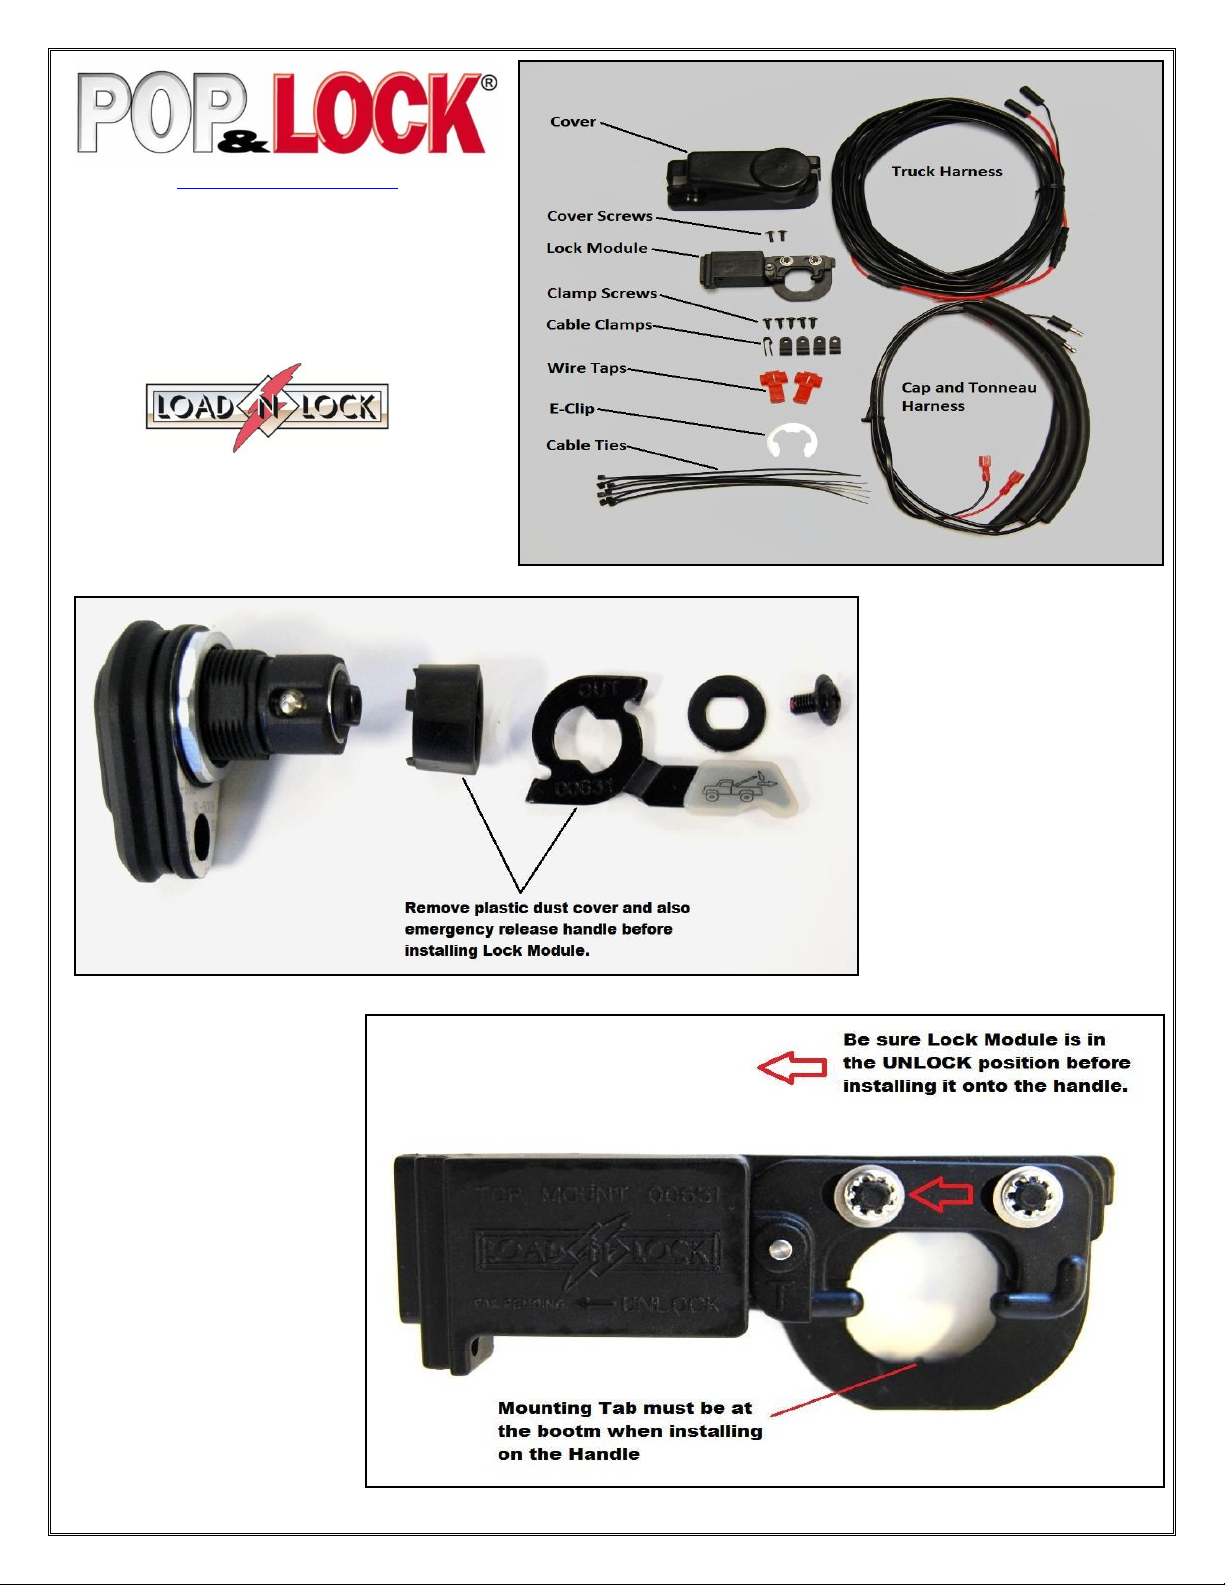
1) Locate and remove the Emergency
Release Handle with Phillips screw.
2) Locate and remove
the black plastic
Dust Cover if one is
installed. May need
to cut it off if
necessary.
3) Install the Lock
Module by sliding it
over the handle, be
sure the mounting
tab is at the bottom
and lines up with the
notch in the handle
when sliding it on.
POWERED BY:
www.popandlock.net
(800) 342-5911
PL9555 (and PL9772)
Power Lock
Installation Instructions
Page 2
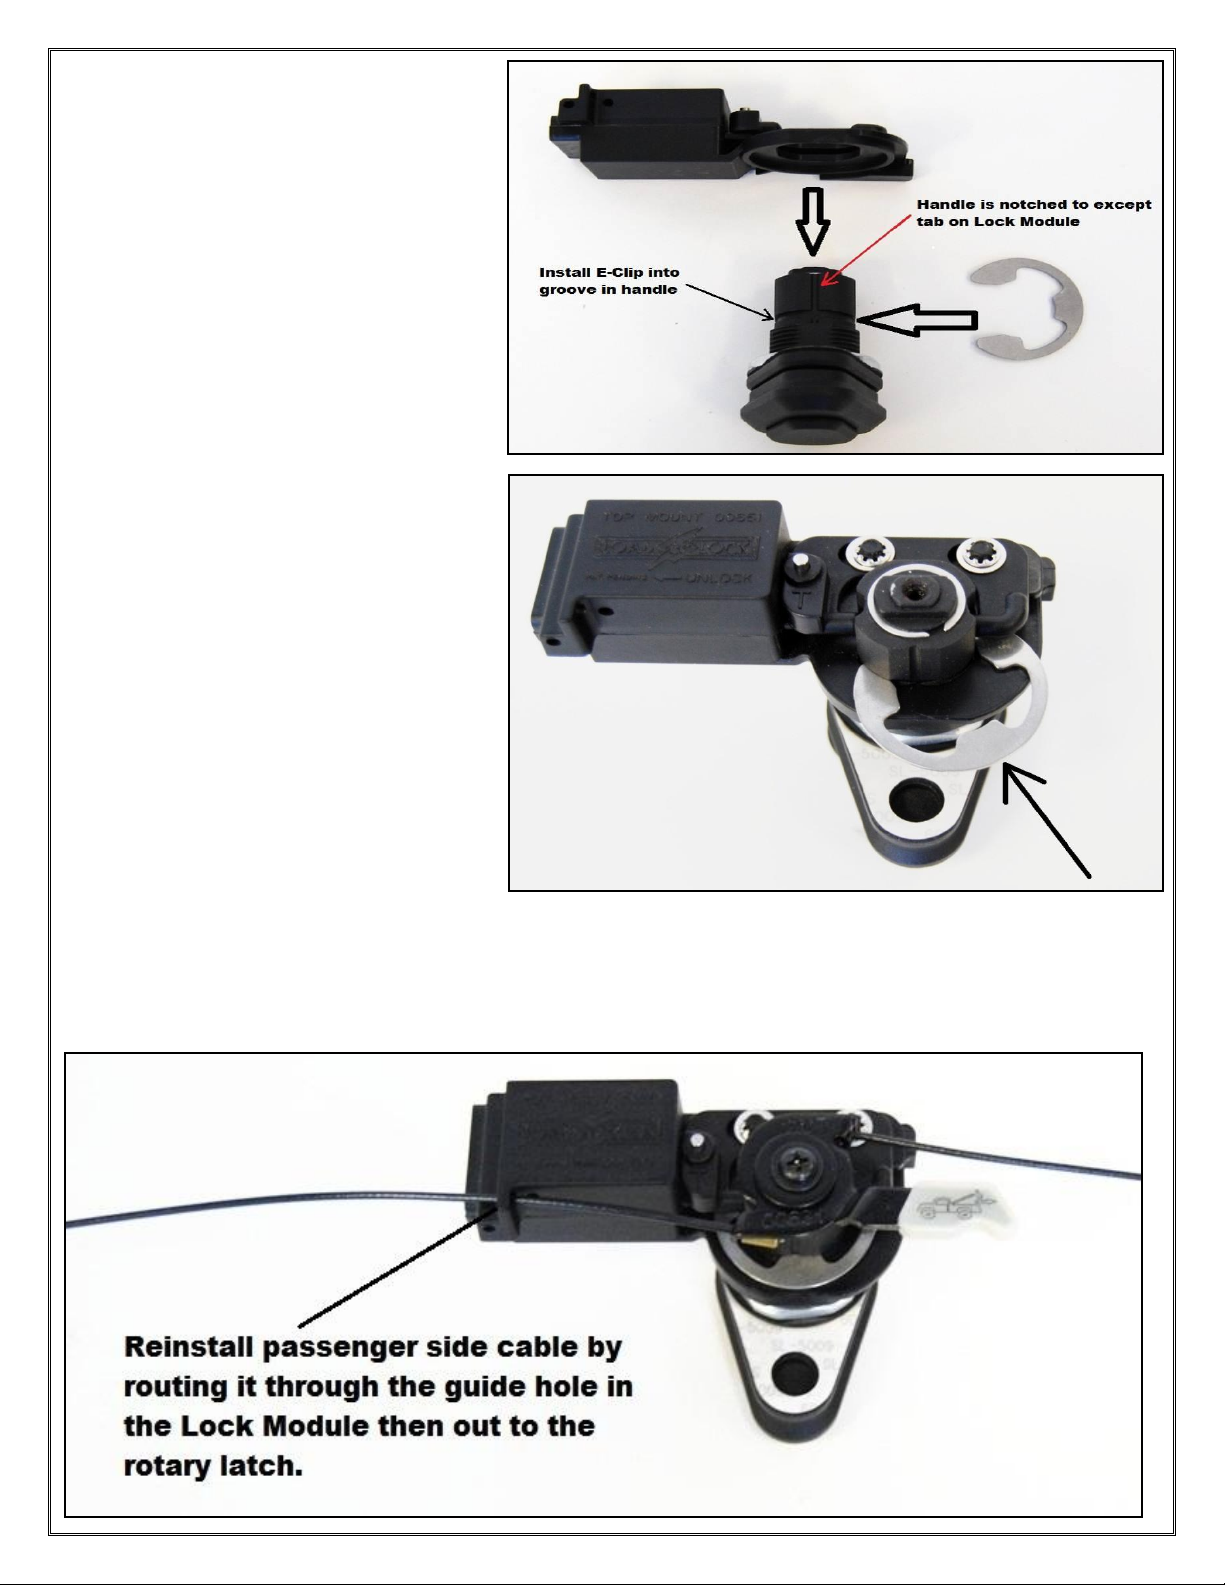
4) Install the Stainless Steel E-clip
into the groove in the handle to hold
the Lock Module in place.
5) Reinstall the Emergency Handle and cables to the rotary latch, route the passenger side cable through the
cable guide hole on the Lock Module the out to the rotary latch.
Page 3
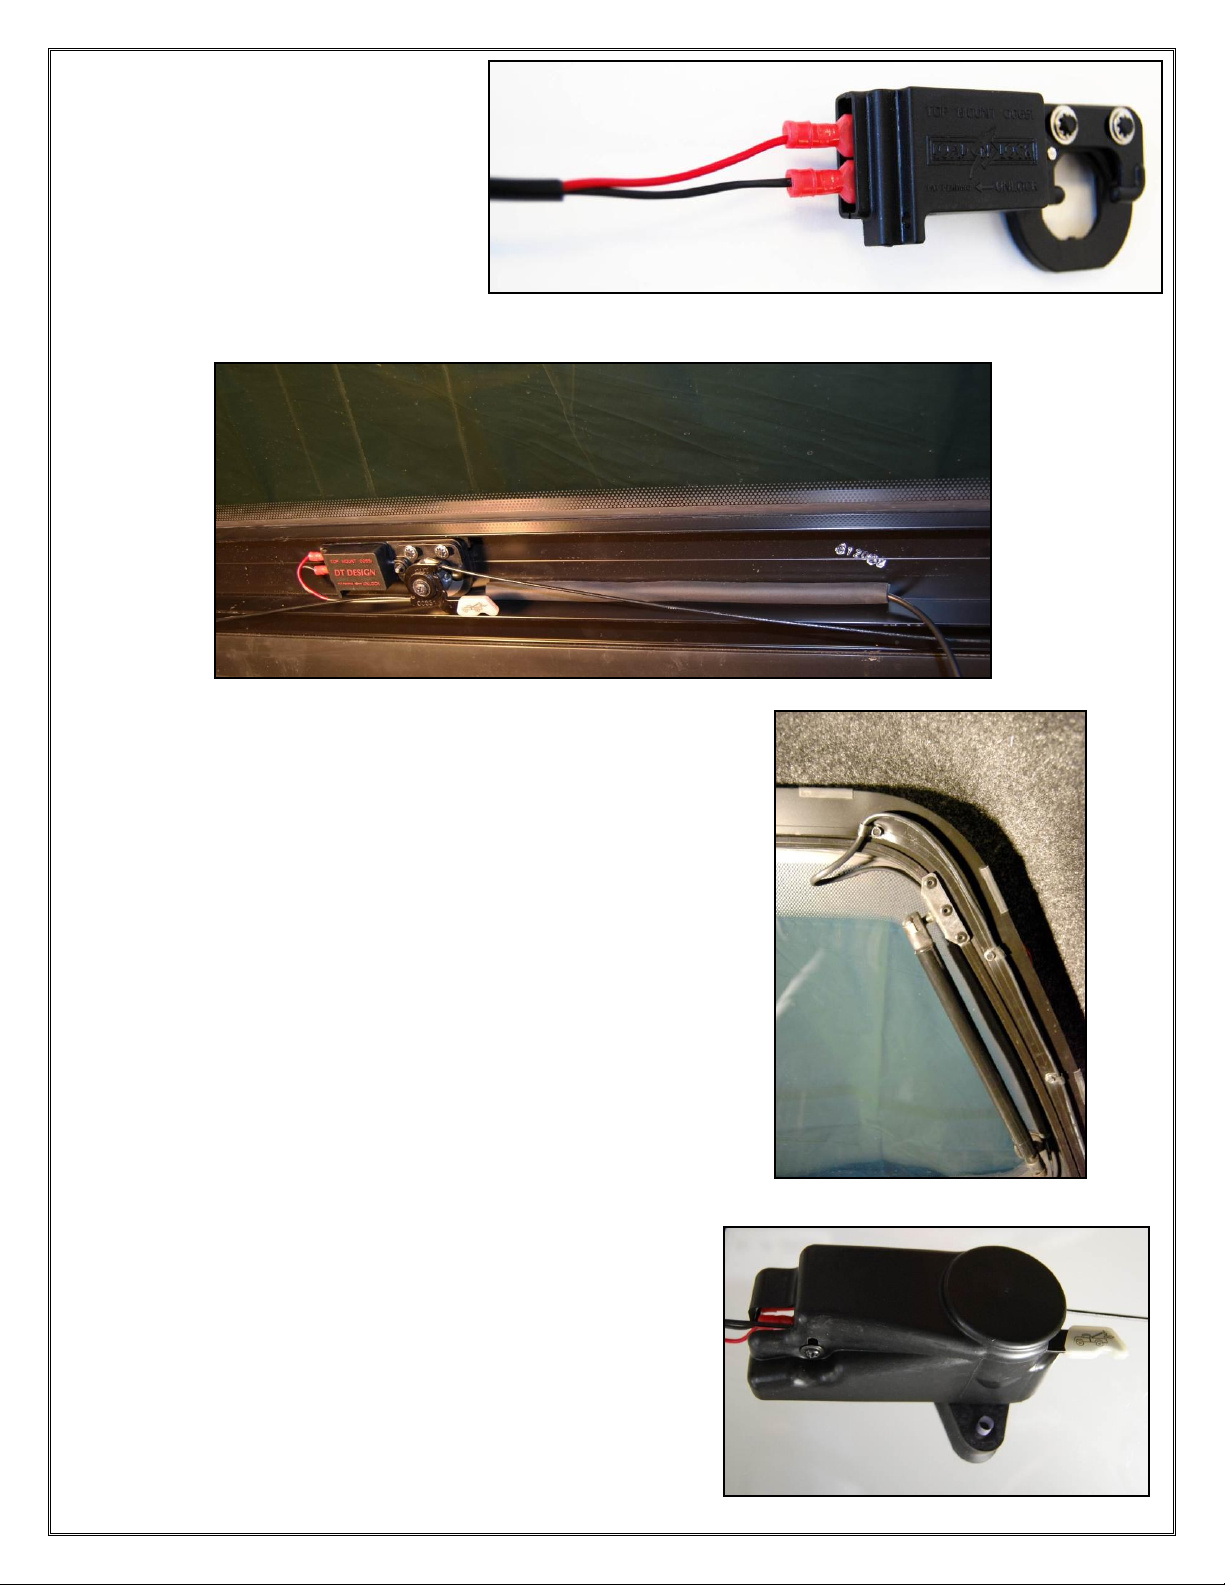
6) Install the Cap and Tonneau
Harness; insert the red female
spade ends of the harness into the
Lock Module with the red wire on
top.
7) For Cap installations fasten the Cap Harness to the
rear door glass using supplied adhesive backed foam
tubes installed on the harness. Be sure that the glass is
clean and dry then remove the adhesive backing and
stick it to the glass. Route the harness down along the
bottom and over to the driver’s side of the door then up
to the top corner making sure that it stays in the blacked
out area of the glass when possible. Leave a small loop at
the top to allow the door to fully open then route the
harness down the inside of the door frame using supplied
Cable Clamps and Clamp Screws.
8) For Tonneau installations route the Tonneau Harness
from the Lock Module over to the driver’s side Gas Prop
or Lift Arm using supplied Cable Clamps and Clamp
Screws (be sure not to screw into a thin portion of the
tonneau or the screws could penetrate the outer surface).
Fasten the Tonneau harness down the gas prop or lift arm
using the supplied foam tubes with adhesive baking, be
sure the surface is clean and dry before applying the foam
tubes. Install black cover with the two supplied screws,
one on the driver side and one in the bottom.
Page 4
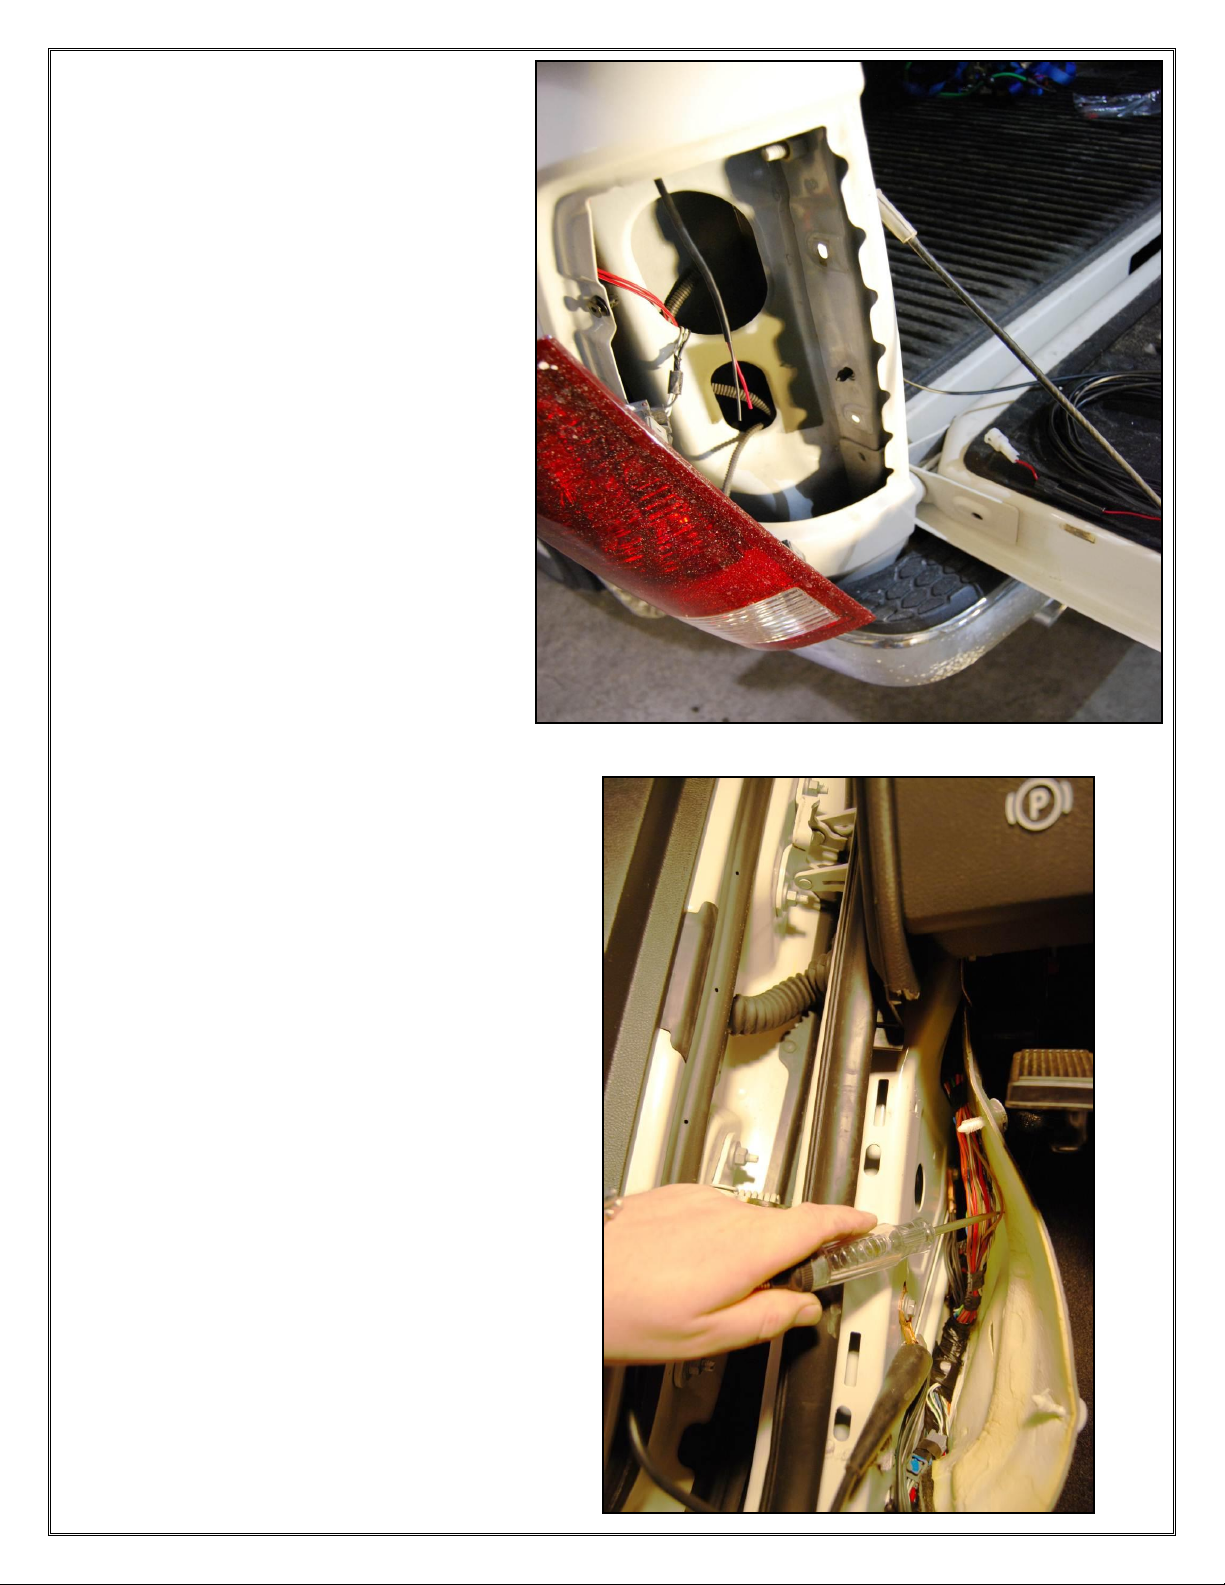
9) Install the Truck Harness by removing
the driver’s side tail light then running the
non fused end of the harness up under the
bed rail, through the back of the tail light
compartment, down to the truck frame
following the factory wiring harness to the
front of the truck. Run the harness up from
the frame, through the firewall and into the
driver’s side kick panel. Fasten the harness
to the truck securely using the supplied
Cable Ties as needed.
10) Using the supplied Vehicle Wiring
Chart locate your make and model to
determine which two wires to tie into.
Confirm the wires with a test light by
grounding the test light, probing each wire
and push lock and unlock on the driver’s
side door. The lock wire should light the
test light when lock is pushed on the door
lock switch and the unlock wire should
light the test light when unlock is pushed
on the door lock switch. On most models
you can also locate the lock and unlock
wire in the rubber boot that runs in
between the driver’s side door and the cab
of the truck, slide the boot back from the
truck and test the wires. Once the wires are
located tap the red wire to the lock wire
and the black wire to the unlock wire using
supplied red Wire Taps. Test the lock, if
the lock works opposite of the truck switch
the red and black wires around, this will
change the polarity.
Page 5
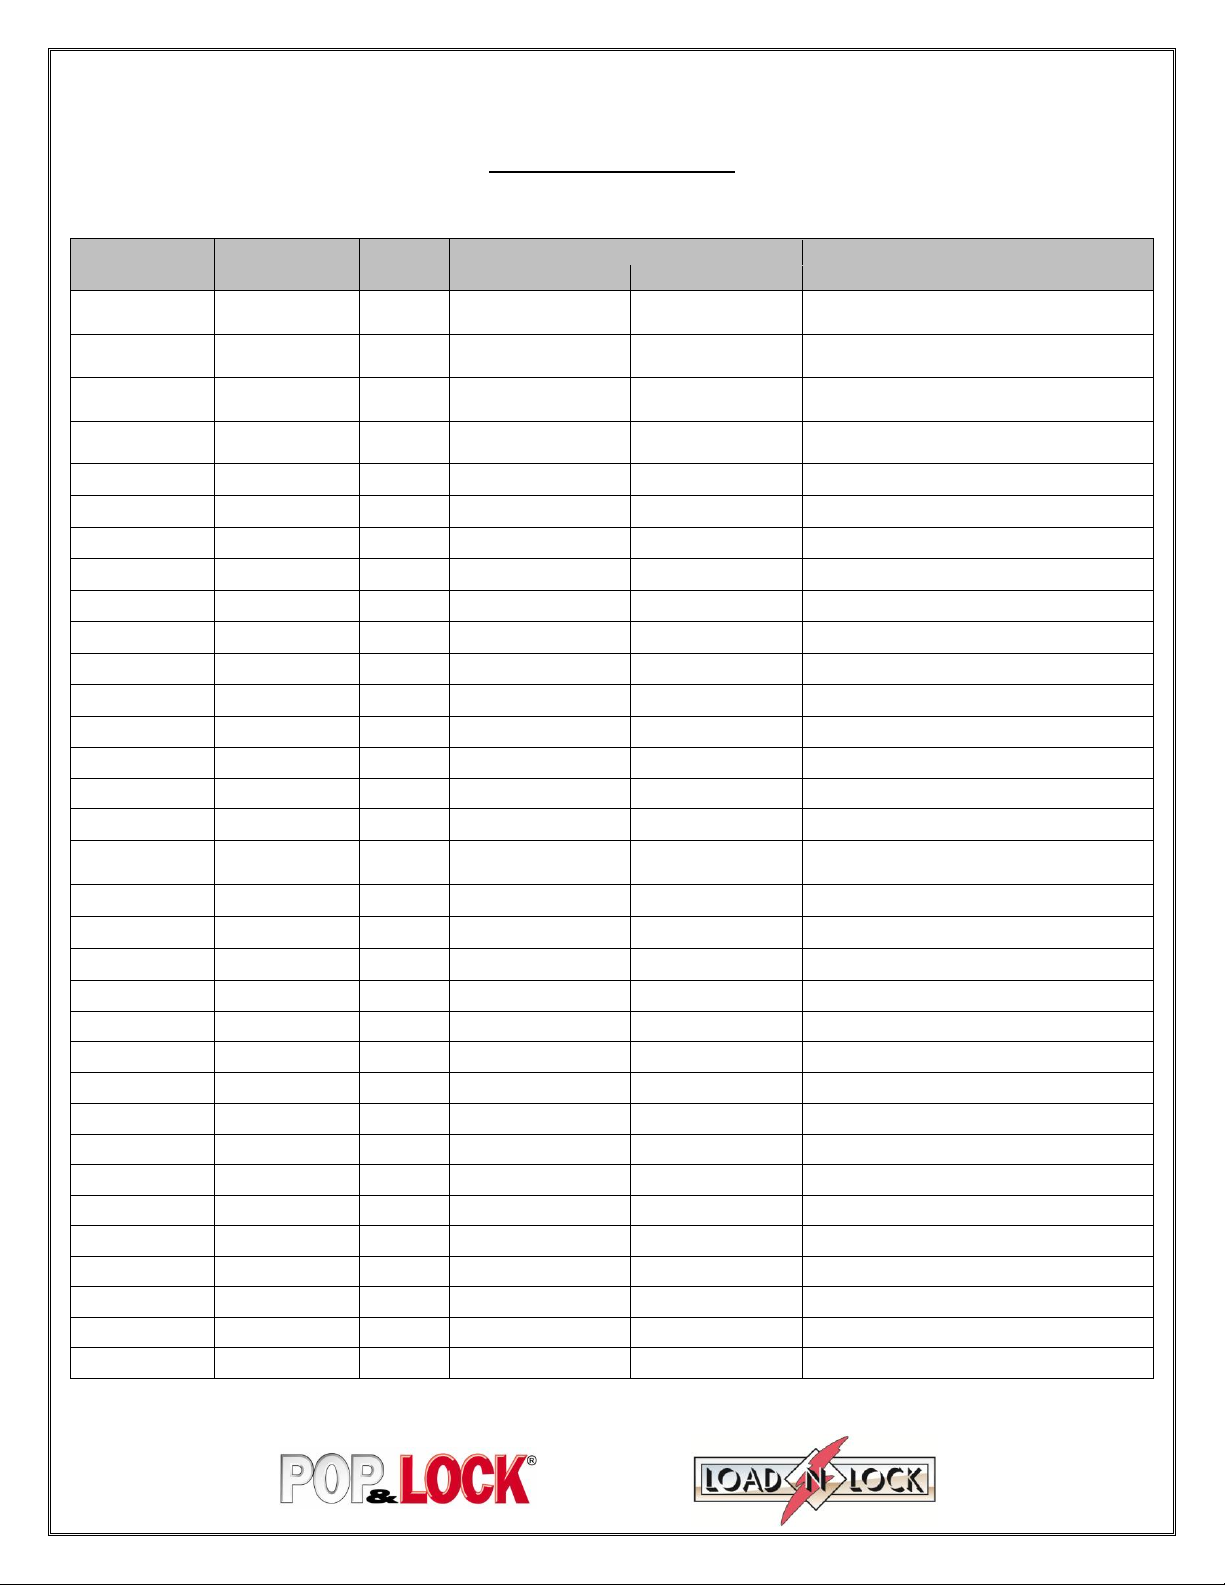
VEHICLE WIRING CHART
MAKE
MODEL
YEARS
WIRE COLOR
WIRE LOCATION
LOCK
UNLOCK
(*Note 1)
Chevy/GMC
Silverado/Sierra
99-02
Tan
Gray
Driver Side Kick Panel
Or
Just Below Driver Side Fuse Block
Chevy/GMC
Silverado/Sierra
S-10/Sonoma
Colorado/Canyon
03-06
Tan
Gray
Driver Side Door Between Switch and Lock Actuator (*Note 2)
Chevy/GMC
Silverado/Sierra
S-10/Sonoma
Colorado/Canyon
07+
Tan
Blue
Driver Side Door Between Switch and Lock Actuator (*Note 2)
Chevy/GMC
Crew Cab
Silverado/Sierra
S-10/Sonoma
Colorado/Canyon
03+
Tan
Gray
Under the sill plate in the wiring harness that goes under the driver’s
side seat.
Chevy/GMC
Full Size
88-98
Tan
Gray
Driver Side Kick Panel
Chevy/GMC
S-10
94-02
Tan
Gray
Driver Side Kick Panel
Ford
Sport Trac
01-06
Pink
Pink/Black
Passenger Kick Panel (*Note 5)
Ford
Sport Trac
07+
Gray/Brown
Purple/Gray
Passenger Kick Panel (*Note 5)
Ford
F-150 / F-250 / F-350
97-03
Red/Green
Pink/Orange or
Red/Orange
Above Steering Column or
Driver Side Kick Panel (*Note 5)
Ford
F-150 / F-250 /F-350
04-07
Pink/Black
Pink/Orange or
Red/Orange
Above Steering Column or
Drivers Side Kick Panel (*Note 5)
Ford
F-150/F-250/F-350
08
Gray or
Gray/Tan
Purple or
Purple/Gray
Above Steering Column or
Drivers Side Kick Panel (*Note 5)
Ford
F-150/F-250/F-350
09+
Gray/Brown
Purple/gray or
Lt. Blue/Lt Green
Above Steering Column or
Drivers Side Kick Panel (*Note 5)
Ford
Crew Cab
F-150/F-250/F-350
09+
Gray/Brown
Purple/gray or
Lt. Blue/Lt Green
Drivers side Sill Plate (*Note 8)
Ford
Ranger
99-07
Pink/Black
Pink/Orange
Passenger Side Kick Panel (*Note 5)
Ford
Ranger
08+
Blue/Green or
White/Purple
Gray/Black or
Gray/Purple
Passenger Side Kick Panel (*Note 5)
Dodge
Dakota
97-04
Orange/Black
Blue
Driver Side Kick Panel (*Note 5)
Dodge
Dakota
05+
Lt .Green/Blue
Purple/Black
Driver Side Kick Panel
Or
Passenger Side Kick Panel (*Note 5)
Dodge
Ram 1500
94-03
Tan/Pink
Blue
Driver Side Kick Panel (*Note 5)
Dodge
Ram 1500/2500
3500
04-08
Brown/Orange or
Tan/Green
Lime Green
Driver Side Kick Panel (*Note 5)
Dodge
Ram 1500/2500
3500
09+
Orange/Gray or
Tan/Green
Lime Green or
Tan/White
Driver Side Kick Panel (*Note 5)
Dodge
Ram 2500 / 3500
94-03
Orange/Black
Pink/Violet
Driver Side Kick Panel (*Note 5)
Honda
Ridgeline
06+
Yellow/black
Yellow/green
Driver’s Side Kick Panel(*Note 6 & 9)
Mazda
B–Series
99+
Pink/Black
Pink/Orange
Passenger Side Kick Panel (*Note 5 & 9)
Nissan
Titan
04+
Brown or
Green/Yellow
Green/Red or
Purple
Driver Side Kick Panel (*Note 5 & 9)
Nissan
Frontier
95-04
Brown
Green/Red
Driver Side Kick Panel (*Note 5 & 9)
Nissan
Frontier
05+
Purple
Green
Driver Side Kick Panel (*Note 5 & 9)
Toyota
Tacoma/Regular cab
Access cab
98-06
Blue
Blue/White
Driver Side Kick Panel(*Note 4 & 9)
Toyota
Tacoma/Double cab
98-06
Blue/Pink
Blue
Driver Side Kick Panel(*Note 4 & 9)
Toyota
Tacoma/Double cab
Access Cab
07+
Blue/Black
Blue/Red
Driver Side Kick Panel(*Note 7 & 9)
Toyota
Tundra
99-03
Pink/Black
Red/Orange
Driver Side Kick Panel (*Note 5 & 9)
Toyota
Tundra
04+
Pink/Black or Blue/White
Red/Orange or
Black/Yellow
Driver Side Kick Panel(*Note 3 & 9)
Toyota
Tundra/Crew Max
Double Cab
07+
White
Blue
Diver Side Kick Panel –Top Blue Plug (*Note 5 & 9)
Toyota
Tundra/Double cab
04+
Blue/Red
Blue/Black
Diver Side Kick Panel (*Note 5 & 9)
Pop N Lock/ Load N Lock
(All wire color information is for reference only and may vary by vehicle)
Please verify with a test light
If you have trouble locating the lock and unlock wires, test all the wires with a test light that are inside the rubber boot that runs
between the door and the cab of the truck to find correct wire colors.
*See Notes following page
Page 6
VEHICLE WIRING CHART
Pop N Lock/ Load N Lock
(All wire color information is for reference only and may vary by vehicle)
If you have trouble locating the lock and unlock wires, test all the wires with a test light that are inside the rubber boot that runs between the
Please verify with a test light
door and the cab of the truck to find correct wire colors.
To Test With a Test Light: Ground the test light to good conducting ground and probe the wire to be tested by
piercing the wire case to connect to the copper wire inside. Hit the lock button to see if the test light lights up. If so
this is the lock wire. Do the same with the unlock wire to verify the correct wire.
Note 1:
If the wiring is connected in the driver's side kick panel, the Handle will lock/unlock with the driver's door. If you
prefer the Handle to lock/unlock with the passenger door, on some models the wiring may be connected into the
passenger side kick panel using the same color wiring. If the same colors can’t be found, use a test light to find the
passenger side colors.
Note 2:
On the CHEVY/GMC 03+ Two door or Extended Cab Models (if not using a relay harness) it is necessary to
remove the driver’s side door panel and attach the lock and unlock wires directly to the wires of the door lock
actuator inside the door.
Once the door panel is removed, you will need to remove the driver’s side kick panel and fish the harness wires
through the rubber boot that runs between the door and the cab of the truck and into the door. Use the supplied Wire
Taps to attach to the specified wires directly under the truck’s door lock switch and test the locks. If the truck locks
operate opposite the lid lock, reverse the leads connected.
Note 3:
Some 04 Toyota Tundra models used blue/white instead of pink/black for the lock wire and black/yellow instead of
red/orange for the unlock wire.
Note 4:
Make sure the key is out of the ignition when testing this model; as the doors will automatically unlock when trying
to lock.
Note 5:
If you have trouble locating the lock and unlock wires, test all the wires that are inside the rubber boot that runs
between the door and the cab of the truck. Once you locate them you can follow them to a location that makes
tapping to the wires easier. This works on most models except 03+ G.M.
Note 6:
On the Honda Ridgeline the lock and unlock wires are located in the fuse panel down by the driver’s side kick panel.
The yellow/black(lock) and the yellow/green(unlock) wires are in the small green plug that is located at the bottom
front side of the fuse box. A small hole may need to be drilled in the side of the bed rail near the top rear on the
driver’s side of the bed to access the rear tail light compartment to attach the brake light and power lock wiring.
Note 7:
On the 07+ Double Cab Tacoma the lock wire is located in the 10 pin plug, pin#9, Blue/Black wire. The unlock wire
is located in the 12 pin plug, pin#10, Blue/Red wire; both plugs are hanging loose in the driver side kick panel.
Note 8:
On the Ford 09+ crew cabs the lock/unlock wires are located under the drivers side sill plate (the plate you step on
when getting in and out of the truck). The wires run from the driver’s side front door to the driver’s side rear door.
Gray/Brown for Lock and Purple/Gray for unlock, there are multiple and different size purple /gray wires – use the
largest gauge.
Note 9:
On some models the factory keyless system may be programmed to re-lock the truck doors after 1 or 5 minutes if the
truck is unlocked and the door are not physically opened. Please refer to the user’s manual or contact your local
dealer if you require a change to the factory programming.
Please visit www.PopandLock.net for the latest wiring Info.
For Technical Support, Monday–Friday, 8:00 am to 5:00 pm CST:
1-800-342-5911
Page 7

POP & LOCK™ LIMITED WARRANTY FORM
Please complete and mail this form to record your warranty with the manufacturer.
NAME _______________________________________
ADDRESS_____________________________________
CITY_________________________________________
STATE________ZIP_________________
TELEPHONE #_________________________________
EMAIL ADDRESS ______________________________
POP & LOCK™ MODEL ________________________
VEHICLE YEAR ____________
VEHICLE MAKE/MODEL _______________________
REASON FOR RETURN (continue on other side):
Please Mail Completed Warranty Form (below) In Self Addressed Envelope To:
POP & LOCK LLC 1271 CONTRACT DRIVE GREEN BAY, WI USA 54304
Additional Install Instructions and answers to technical questions can be found on our website at www.popnlock.net or by calling
Technical Support 1-800-342-5911
Monday – Friday 8am to 5pm CST
LIMITED WARRANTY TERMS AND CONDITIONS
(1) Installation. Pop & Lock™, LLC (and Pop & Lock™ Corporation) is not responsible for installing the Pop & Lock™ or for the
harm suffered by any person as a result installing it.
(2) Warranties.
a. Customer acknowledges that it is unreasonable to believe that any device whatever will prevent a theft in the case
of every attempt and that the most that can be expected from a so-called anti-theft or security device is that it will
deter many thieves.
b. POP & LOCK™ LLC. (and Pop & Lock™ Corporation) MAKES, AND CUSTOMER RECEIVES, NO WARRANTY,
EXPRESSED OR IMPLIED, EXCEPT THE WARRANTIES OF TITLE TO THE POP & LOCK™ AND THEIR
MERCHANTABILITY, PARTICULARILY NO WARRANTY OF FITNESS FOR A PARTICULAR USE OR PURPOSE OR
AGAINST INFRINGEMENT.
c. As Customer’s only remedy, Pop & Lock™, LLC (and Pop & Lock™ Corporation) will repair or replace, at its option
and without charge, any lock that is defective in material or workmanship when received by Customer and is
returned to Pop & Lock™ LLC (and Pop & Lock™ Corporation), FOB Pop & Lock™ Corporation’s offices, within one
(1) year after it’s receipt by the Customer. Pop & Lock LLC will ship all replacement, or repaired, Locks to
Customer, FOB Pop & Lock™’s shipping point.
d. Factory support is only available for Pop & Lock™ products purchased as new through an Authorized Pop & Lock™
dealer.
Please Note: Pop & Lock™ Products purchased on auction sites such as Ebay, Amazon and Craigslist, to name a
few, will not be covered under factory warranty under any circumstance. Pop & Lock™, LLC (and Pop & Lock™
Corporation) is unable to verify whether products sold through Auction Sites are new, used, or refurbished, and
as such, Pop & Lock, LLC (and Pop & Lock™ Corporation) is unable to warranty such purchases. Pop & Lock, LLC
advises using extreme caution when buying through auction sites as you'll be doing so at your own risk.
(3) No Liability. Pop & Lock™ Corporation is not liable for any loss or damage claimed by Customer or any third person to have
been suffered or incurred as a result or, or related to, the Locks purchased under this Agreement, regardless of the
circumstances or form of action, except any bodily injury or death for which Pop & Lock™ is liable under products-liability
law. Without limiting the generality of the foregoing, in no event will Pop & Lock™ LLC be liable to Customer for any
indirect, special, or consequential damages, regardless of the circumstances or the cause of action, particularly not for the
value of a vehicle, or any other money damages in the event that a tailgate is stolen either notwithstanding the use of a Pop
& Lock™ or when it has been returned for repair or replacement.
END OF TERMS AND CONDITIONS
 Loading...