

Page 1

the speaker specialists
®
TC60i
the speaker specialists
®
TC80i
TC65i
TC265i
TCi SERIES
TIMORE, MAR
BAL
800-377-7655, F
RM0566-2
5601 METRO DRIVE,
YLAND 21215, USA,
AX: 410-764-5266
www.polkaudio.com
Owner’s
Manual
High
Performance
In-Wall
Speakers
Page 2
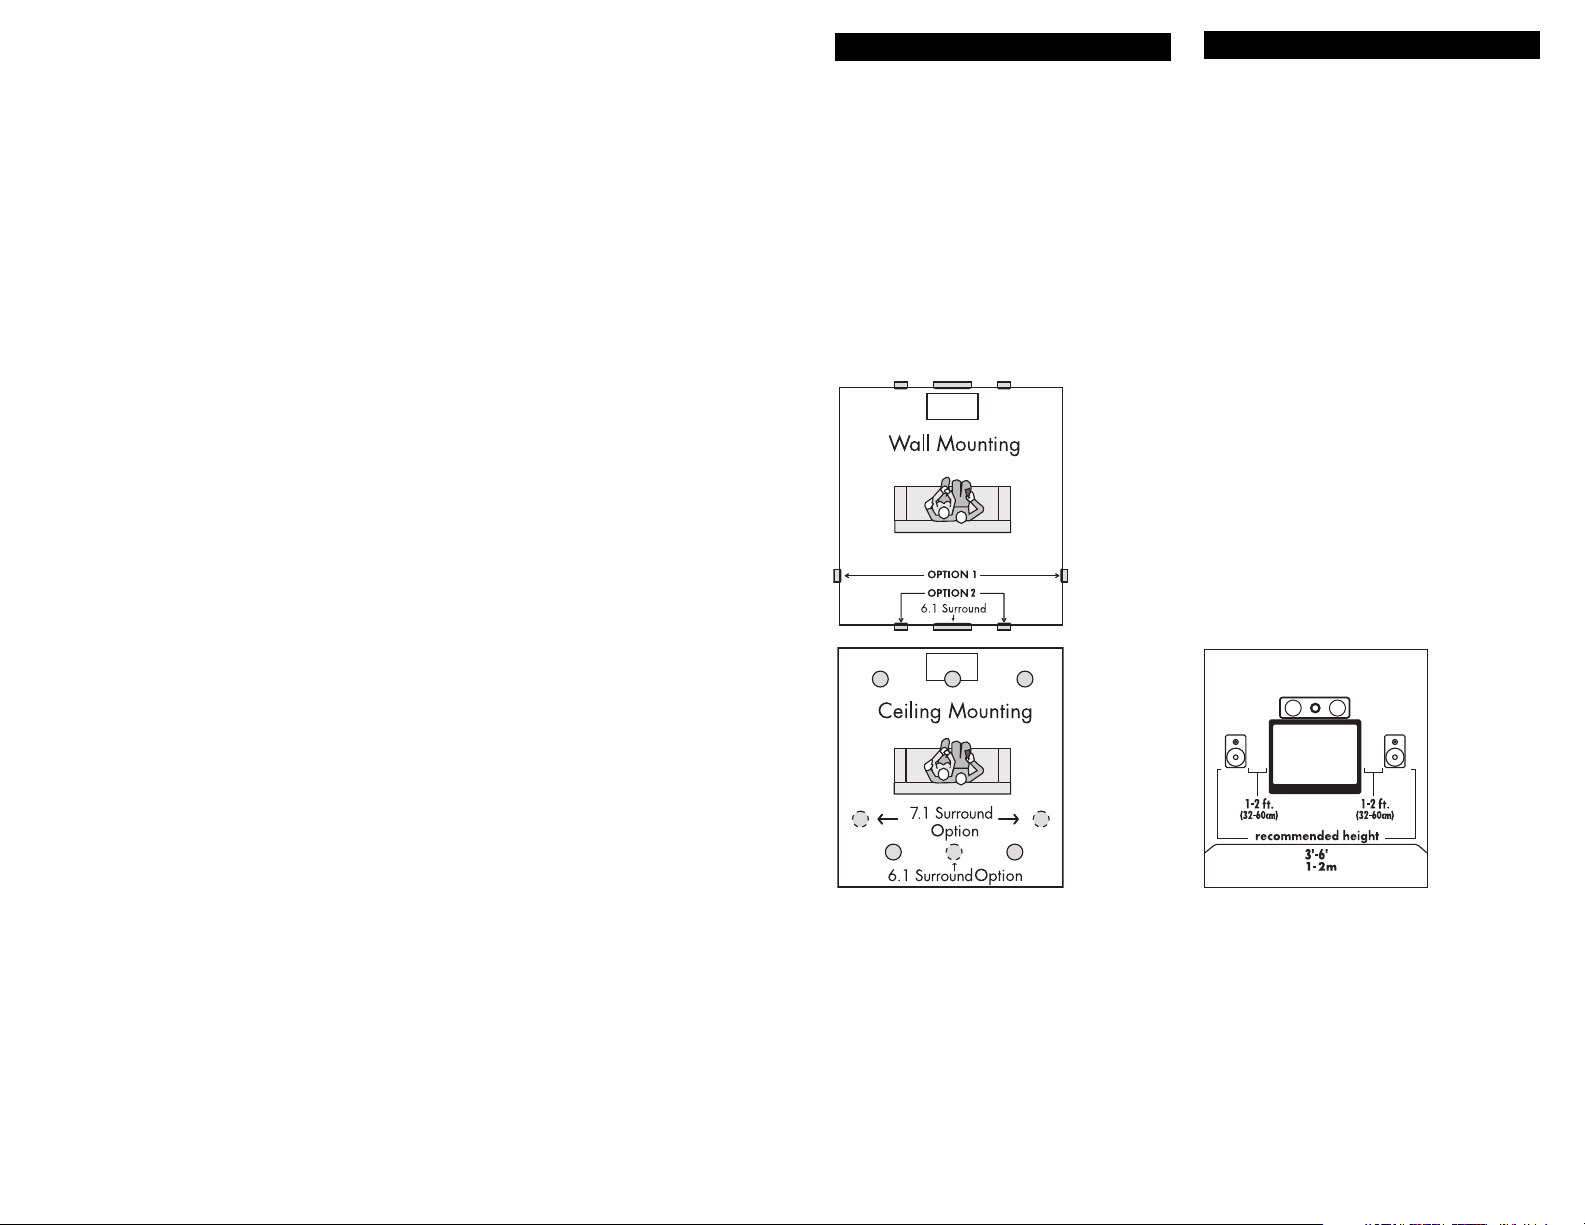
PLACEMENT OPTIONS
Polk Audio TCi Series In-Wall Loudspeakers
give you nearly endless placement options.
But remember that placement choice for your
in-wall speakers bears careful consideration,
as installation requires that you cut a hole in
your wall or ceiling!
Fill a room with sound by installing in-wall
speakers in nearly any wall or ceiling
location [
figure 1]. Polk TCi Series In-Wall
Loudspeakers have a wide dispersion pattern
and aimable tweeters that allow you to focus
their sound.
ADJUSTING THE TWEETER
Aiming the tweeter toward your listening
position improves imaging and detail. When
using TC
front/main home theater speakers
i Series In-Wall Loudspeakers as
[figure 2],
aim the tweeter toward your listening position. For rear/surround speakers installed in
walls or ceilings [figure 3], aim the tweeter
toward the nearest reflecting surface (an
adjacent wall or ceiling) for a more diffuse
sound field (if you so desire; for more
direct sound, aim the tweeters at your
listening position).
FIGURE 1
TCi Series audio and A/V placement
options, in wall or ceiling.
Opciones de ubicación al ras de la pared o del cielorraso para equipo
audiovisual y de audio de la Serie RC.
Recommended measurements for HT front stage placement.
Platzierungsmöglichkeiten für RC-Systeme in Wand oder Zimmerdecke
(Audio und kombinier
tes Audio/Video)
FIGURE 2
Recommended measurements
for HT front stage placement.
Medidas recomendadas para la ubicación
en el escenario del cine en casa.
Mesures recommandées pour l'installation
des haut-parleurs avant.
Empfohlene Abmessungen für die Platzierung
in Heimtheatern (Frontbeschallung).
For Customer Service, call 800-377-7655.
2
Page 3
Performance enclosures are available for all
models. These are engineered enclosures that
mount in the wall or ceiling to maximize the
bass and midrange performance of your TCi
Speakers. They are typically installed prior to
drywalling in new construction, but can be
retrofitted if desired.
Get more information about performance
enclosures: polkaudio.com/catalog/technology.
Note: TC
i Series In-Wall Loudspeakers are
not magnetically shielded and should not
be placed closer than 1’ (30cm) from a
direct view television or video monitor. Test
your distance BEFORE INSTALLATION by
simply holding the speaker in the place you
plan to install it, and seeing how it affects
any TVs or video monitors nearby. If your
monitor experiences discoloration or distortion, immediately move the speaker a little
farther away.
DIRECTING THE DRIVER (TC60i & TC80i)
The fixed 15° angled driver in the ceiling
speaker allows you to direct the midrange
towards your listening area when used for
front stage (left–center–right). When used as
rear surrounds or 6.1 or 7.1 back speakers,
direct the driver towards the listening area
for a more direct sound field or toward a
wall for a more diffuse soundfield.
AIMING THE TWEETER
TCi models feature a swiveling Dome Tweeter
for better directionality. The “sweet spot” is
within a 30º cone of sound coming from the
aimed speaker. [figure 4]
MAKING
ADJUSTMENTS
The TCi Series features technology that can
tailor the sound for performance in difficult
or unusual placement situtations.
TC265i, TC65i, TC80i & TC60i MODEL
ADJUSTMENTS:
Wall Distance Toggle — In-wall loudspeakers excel when placed more than 2’
(60cm) from side walls [figure 5]. If position
limitations demand that in-wall loudspeakers
be installed closer than 2’(60cm) from side
walls, the proximity of the surface can result
in a response “bump” between 50 and 200Hz.
This can cause in-wall speakers to sound
“boomy.” The Distance Toggle Switch flattens
response and tunes out “boominess” without
sacrificing deep bass response, for more lifelike sound.
FIGURE 3
Examples of in-wall and in-ceiling placement. When used as rear/surrounds, aim
tweeter toward the nearest reflecting sur
more diffuse sound field.
Ejemplos de ubicación al ras de la pared o del cielorraso. Cuando se use como
altavoz posterior o surround, oriente el tweeter hacia la superficie reflectora
más cercana (pared o cielorraso adyacente) para producir un campo de sonido
más difuso.
Exemples d'installations au mur et au plafond. Pour usage arrière-ambio
phonique, dirigez les tweeters vers la surface réfléchissante la plus proche (mur
ou plafond) si vous
désirez une image sonore plus diffuse.
Beispiele zur Platzierung in Wand und Zimmerdecke. Bei Verwendung als
Hintergrund-/Surround-System sollten die Hochtonlautsprecher zur besseren
Zerstreuung des Schallfelds
in Richtung der nächstliegenden reflektierenden Flächen
positioniert werden (Wand oder Zimmerdecke).
Get more information and exclusive accessories, visit www
3
face (an adjacent wall or ceiling) for a
FIGURE 4
To aim the TCi Tweeter, use your fingers to gently manipulate the outer ring of
the tweeter cup, pushing lightly one way or the other to tilt the tweeter, until it is
aimed in the direction of your listening position.
Para apuntar el T
exterior del tweeter empujando ligeramente hacia uno y otro lado hasta que el
tweeter apunte hacia la posición del oyente.
Pour orienter le haut-parleur d’aigus à TCi, manipuler doucement avec les
doigts l’anneau externe du haut-parleur d’aigus en poussant légèrement dans
-
un sens ou dans l’autre pour incliner le haut-parleur, jusqu’à ce qu’il soit orienté
vers la position
d’écoute.
Um den TCi T
Tweeters vorsichtig mit Ihren Fingern. Drücken Sie zur Schrägstellung des
weeters leicht auf die eine oder andere Seite, bis er auf Ihre Hörposition aus
T
gerichtet ist.
weeter TCi, manipule cuidadosamente con los dedos el anillo
weeter auszurichten, manipulieren Sie den äußeren Ring des
.polkaudio.com
FIGURE 5
If placement is closer than 2' to a wall, engage the W
Dist.”) to match the <2' setting.
En cas de positionnement à moins de 5 cm (2 pouces) du mur, mettre le commutateur de distance par rappor
Si el altavoz queda a menos de 61 cm (2 pies) de la pared, fije el interruptor
basculante de distancia a la pared (“W
Wenn der Wandabstand weniger als 60 cm (2 Fuß) beträgt, schalten Sie den
Wandabstandsschalter (“Wall Dist.”) ein, um mit der Einstellung <2’. übereinzustimmen.
-
t au mur (“Wall Dist.”) dans la position < 2’.
all Dist.”) en la posición <2’.
all Distance T
oggle (“W
all
For Customer Service, call 800-377-7655.
4
Page 4

-3dB Tweeter Attenuation — If your
listening room is very reflective, with
smooth sheetrock walls, hardwood floors,
and non-cushioned furniture, the sound will
be overly “bright” and unnatural.
Engaging the TC
i Tweeter Attenuation feature
(by selecting the “Cut” setting) compensates
for the effect of reflectivity in a hard room.
Tweeter Attenuation flattens room response
without hindering higher frequency response,
for warmer, more realistic sound and more
accurate imaging.
AINTING YOUR TCI SERIES IN-WALL
P
LOUDSPEAKERS
You will need:
• Paint of your choice (to make the job
easier, we recommend spray painting
the grille).
• A paperclip or corkscrew (for removing the
paintable grille, corkscrew can also be used
to open the wine when you relax with your
newly painted TC
i speakers, see page 10).
• Masking tape.
• Paint mask (to cover unpaintable
parts, supplied!).
ARING TO PAINT:
PREP
1. Separate the parts of the speaker. If the
speaker is not yet installed, the grille can
be removed simply by pushing the clamp
screws forward to push the grille off the
speaker from the inside. If the speaker is
already in the wall, carefully hook the
grille with a bent paper clip and pull it
gently away from the frame
[figure 6].
2. Remove the cloth scrim from the inside of
the grille. Replace after paint dries.
3. When painting the frame of the speaker,
use the supplied paint masks to carefully
mask off the front of the speakers to protect the drivers and baffles while painting.
You can do this while the speaker is
already installed in the wall (if, for
instance, you’re repainting the room). If
you do not have the paint masks, carefully
mask the speaker components using paper
and masking tape.
Get more information and exclusive accessories, visit www
5
.polkaudio.com
FIGURE 6
Use a paperclip to remove grille.
Use un sujetapapeles para quitar la rejilla.
Utilisez un trombone pour retirer la grille.
Entfernen Sie den Gitteraufsatz mit einer Büroklammer.
FIGURE 7
Mask the drivers and baffles, then spray paint in thin coats.
Enmascare los excitadores y los bafles, luego
aplique manos delgadas de pintura aerosol.
Masquez les haut-parleurs et les écrans acoustiques
puis vaporisez la peinture en couches minces
Decken Sie die T
Spritzen Sie dann den Lack in dünnen Schichten auf.
For Customer Service, call 800-377-7655.
reiber und Resonanzwände ab.
6
Page 5

AINTING THE FRAME:
P
1. Apply paint to exposed unmasked parts.
Use two or more thin coats. Spray painting
is recommended
[figure 7].
2. When the paint is completely dry, remove
the masking material.
PAINTING THE GRILLE:
1. The grille of the TCi Series speaker features an even, protective paint. This paint
is an ideal primer.
2. Grilles must be spray painted. Do not use
a brush and paint. Thick, brushed paint
may clog the grille holes.
3. After removing the grille by carefully hooking it with a bent paper clip and pulling it
gently away from the frame, remove the
cloth scrim and spray on two thin coats of
finish color. If you’re using a compressor
and spray gun, use the finest, most diffuse
setting. Be careful not to fill the holes in
the grille with paint
[figure 8].
4. When the paint is completely dry, reinstall
scrim carefully, then reinstall the grille by
fitting it into its recess so that it is just
resting on the frame. Starting with one
corner, go around the speaker and push
the grille into the grille notch a little bit at
a time. Be gentle; the grille may be easily
bent out of shape by rough handling. You
will feel a positive “snap” when it is fully
in place.
ALLATION
INST
Out of the box and into the wall, that’s how
easy it is to install Polk TC
i Series In-Wall
Loudspeakers.
If you intend to do the installation yourself
we recommend that you possess some skill
in the proper use of hand and power tools.
You should have a thorough understanding of
local building and fire codes and a familiarity
with the area behind the wall or ceiling into
which you plan to install your speakers.
Install speaker wires before installing speakers. Wire meeting appropriate building and
fire codes must be used. Use at least 18
gauge wire or heavier for the utmost in sound
quality. Wiring is best performed by an experienced professional. If you are in doubt that
you possess the necessary skills or tools,
consult your Polk Audio dealer, or a professional installer.
YOU WILL NEED:
• Pencil for marking the location
of installation.
• Keyhole saw, utility knife or materialappropriate incising implement for
cutting drywall or other wall material.
• Level.
• Screwdriver, preferably powered,
with Phillips head bit.
• Power drill with appropriate bit
(optional, for starting wall cut).
FIGURE 9b
Rectangular Template: Trace around the template.
Plantilla rectangular: Marque alrededor de la plantilla.
Gabarit rectangulaire: Tracez autour du gabarit.
Rechteckige Vorlage: Umranden Sie den äußeren
Rand der Vorlage mit einem
FIGURE 8
Paint the grille. Use thin coats of spray paint.
Do not block grille holes with paint.
Pinte la rejilla. Aplique manos delgadas de pintura aerosol. No bloquee con
pintura los agujeros de la rejilla.
Peinturez la grille. Appliquez des couches minces de peinture aérosol.
N'obstruez pas les trous de la grille de peinture.
Streichen Sie den Gitteraufsatz. V
Spritzlackschichten. Die Öf
bzw. Lack blockiert werden.
Get more information and exclusive accessories, visit www
7
wenden Sie dazu dünne
er
fnungen des Gitteraufsatzes dür
.polkaudio.com
fen nicht mit Farbe
a
FIGURE 9
Round Template: Trace within the pop-out area.
Plantilla redonda: Marque dentro del área que
se va a desechar
Gabarit rond: Tracez à l'intérieur du gabarit.
Runde V
gestanzten T
.
orlage: Umranden Sie den inneren,
eil der Vorlage.
FIGURE 10
Cut the hole with the appropriate tool.
Haga el corte con la herramienta apropiada.
ture avec l'outil approprié
aillez l'ouver
T
Schneiden Sie die Öffnung mit dem
entsprechenden W
For Customer Service, call 800-377-7655.
erkzeug aus.
8
Page 6

FOLLOW THESE EASY STEPS:
• Make sure the material into which you plan
to mount the speakers (plaster, drywall,
paneling, stone, etc.) can support the
weight of the speakers (see specification
page for the weight of your model).
• Make sure the locations you select do not
conceal studs, electrical wiring or plumbing. Prior to installation, hold the speaker
in your chosen location to make sure it
safely clears obstacles such as studs, corners, beams, lighting fixtures and door/window frames. Your cutout must be at least
1" (25mm) from adjoining walls or ceiling,
internal studs or plumbing.
• Using the template, trace the installation
location with a pencil. You can do this by
holding the template in your preferred
location and tracing around it. Use a level
to make certain the template is straight and
plumb. This is the exact cutout size.
[figures 9a & 9b]
• Carefully cut the hole with the appropriate
cutting tool for your wall or ceiling material.
Start the hole by drilling a hole on the inside
of the tracing (with the drill bit touching the
line). Use this hole to insert the saw or knife
and begin cutting
[figure 10].
• Once you have cut the hole, fish your previously positioned wiring out of the hole and
connect the speaker. Follow the hookup
directions included with your receiver. Strip
2
inch (12 mm) of insulation from each of
the two conductors of the wire to expose
the bare metal and twist each of the conductors into a single unfrayed strand (so
you have two unfrayed strands). Note that
one of the terminals on the rear of each
speaker is red (+) and the other is black
(-). Make certain that you connect the wire
from the red terminal (+) of your amplifier
or receiver to the red terminal (+) on your
speaker and the wire from the black terminal (-) of your amplifier or receiver to the
black terminal (-) on your speaker. Most
wire has some indicator (such as colorcoding, ribbing or writing) on one of the
two conductors to help you maintain
consistency
[figure 11].
• To install the speaker, first carefully remove
the grille using a straightened paperclip or
other pointed metal tool. Insert the point
into one of the grille perforations near a
corner and lift the grille free. Never use
a knife or screwdriver to pry between the
grille and the speaker frame. This will
damage your speaker.
• Loosen the rotating wall clamps by
unscrewing them. Make sure that the
rotating wall clamps are flipped inwards
so that your speaker fits into your cutout
without nicking your wall. Then place the
speaker carefully into the cutout
[figure
12]. If you have a level, use it to help you
correctly align the speaker. Tighten the
wall clamp screws with a screwdriver. This
will rotate the wall clamps and secure the
speaker to the wall.
Hint—on the TC265i
and TC65i models, tighten the center
screws before tightening the corners for
the most flush fit to your wall.
Do not over-
tighten the wall clamp screws [figure 13].
• Carefully reinstall the grille by fitting it into
its recess so that it is just resting on the
frame. Starting with one corner, go around
the speaker and push the grille into the
grille notch a little bit at a time. Be gentle;
the grille may be easily bent out of shape
by rough handling. You will feel a positive
“snap” when it is fully in place. (Where’s
the corkscrew?)
Get more information and exclusive accessories, visit www
9
FIGURE 11
Hook up the speaker wires.
Conecte los cables de los altavoces.
Branchez les fils de haut-parleur.
Schließen Sie die Lautsprecherkabel an.
.polkaudio.com
FIGURE 12
Place the speaker carefully into the cutout.
Coloque cuidadosamente el altavoz en el agujero.
Placez délicatement le haut-parleur dans l'ouver
Platzieren Sie die Lautsprecher vorsichtig in der
ausgeschnittenen Öf
fnung.
ture.
FIGURE 13
Tighten retaining wall clamps to engage wall. Use a
#2 Phillips head screwdriver or a powered screwdriver
Apriete las prensas de retención de la pared para
enganchar el altavoz a la pared. Use un destornillador
Phillips No. 2 o un destornillador eléctrico.
Reserrez les attaches murales pour fixer solidement l'unité au mur. Utilisez un
nevis ou une perceuse à tête Phillips no 2.
tour
Ziehen Sie die Wandklemmen fest, um das System an der Wand zu befestigen. Verwenden Sie dazu einen Kreuzschlitzschraubendreher (Nr. 2) oder
einen Schraubendreher mit Motorantrieb.
For Customer Service, call 800-377-7655.
.
10
Page 7

SAFETY FIRST
When installing your TCi Series In-Wall
Loudspeakers, be aware of the weight of your
particular model (see specification page for
the weight of your model) and the sturdiness
of the material into which you are installing
the speaker. Also be aware of any concealed
studs, electrical wiring or plumbing in the
wall or ceiling into which you are installing
the speakers. If you are not sure of a safe
way to install these speakers, consult a
professional installer, your authorized Polk
Audio dealer, or a building contractor.
If you plan to install your TCi Series speakers
where water will directly contact them, it is
advisable to use a silicone sealant or caulk
between the frame of the speaker and the
wall surface. This seal should prevent water
from getting behind the loudspeaker and
possibly damaging the wall surface. Do not
position the speaker where water can pool
on the surface of the woofer cone or tweeter
dome, as this will greatly decrease the
speaker’s useful life (and everything will
glub! glub!—like it’s coming from
sound—
under water!).
SPECIFICA
Frequency Response 32Hz-27kHz 32Hz-27kHz
Fr
eq. Response -3dB Limit
Recommended Power 10-125Wrms 10-125Wrms
Impedance Compatible with 8 Ω outputs Compatible with 8 Ω outputs
Efficiency (dB 1W/1m) 90db 90db
Drive Unit Complement
Mid-Bass 1–6
Tweeter 1" (25mm) cloth dome 1" (25mm) cloth dome
Outside Diameter 9
Cutout Dimensions 8
Mounting Depth 3
with
Shipping Weight
Frequency Response 32Hz-27kHz 30Hz-27kHz
Freq. Response -3dB Limits 50Hz-25kHz 45Hz-25kHz
Recommended Power 10-125Wrms 10-200Wrms
Impedance Compatible with 8 Ω outputs Compatible with 8 Ω outputs
Efficiency (dB 1W/1m) 90db 91db
Drive Unit Complement
Mid-Bass 1–6
Woofer n/a 1–6
Tweeter 1" (25mm) cloth dome 1" (25mm) cloth dome
Outside Dimensions (W x H) 8
Cutout Dimensions (W x H) 7
Depth with
Shipping Weight 11 LBS (4.99kg)/pair 11 LBS (4.99kg)/each
TIONS
TC60
i TC80i
50Hz-25kHz 45Hz-25kHz
2
" (16.5cm) 1–8" (20.3cm)
polypropylene mineral filled
cone, rubber suspension polypropylene cone,
in swivel mount in swivel mount
c
" (23.65cm) 10w" (27.15cm)
x
" (20.65cm) 9v" (23.83cm)
,
2
" drywall
2
" drywall 2w" (6.99cm) 3" (7.62cm)
" (9.86cm) 42" (11.43cm)
10 LBS (4.54kg)/pair 11 LBS (4.99kg)/pair
TC65i TC265i
2
" (16.5cm) 1–62" (16.5cm)
polypropylene cone, polypropylene cone,
rubber suspension rubber suspension
in ball and socket in ball and socket
2
" x 14c" 82" x 20d"
21.59cm x 36.35cm 21.59cm x 53.04cm
4
" x 12w"7
18.42cm x 32.39cm 18.42cm x 48.90cm
rubber suspension
2
" (16.5cm) mineral
polypropylene cone,
rubber suspension
4
" x 194"
Get more information and exclusive accessories, visit www
11
.polkaudio.com
For Customer Service, call 800-377-7655.
12
Page 8

POLK AUDIO LIMITED WARRANTY
Polk Audio, Inc., warrants to the original retail
purchaser only. This warranty will terminate
automatically prior to its stated expiration if the
original retail purchaser sells or transfers the
Product to any other party.
Polk Audio, Inc., warrants, to the original retail
purchaser only, that the LOUDSPEAKER(S),
PASSIVE CROSSOVER COMPONENT(S) and
ENCLOSURE on this Polk Audio Loudspeaker
Product will be free from defects in material and
workmanship for a period of five (5) years from
the date of original retail purchase from a Polk
Audio Authorized Dealer.
Furthermore, Polk Audio, Inc., warrants, to the
original retail purchaser only, that any AMPLIFIER OR OTHER ELECTRONIC COMPONENT that
may be included in this Polk Audio Loudspeaker
Product will be free from defects in material and
workmanship for a period of three (3) years from
the date of original retail purchase from a Polk
Audio Authorized Dealer.
To allow Polk Audio to offer the best possible
warranty service, please register your new
product online at: www.polkaudio.com/registration or call Polk customer service 800-377-7655
in the USA and Canada (outside the USA: 410358-3600) within ten (10) days of the date of
original purchase. Be sure to keep your original
purchase receipt.
Defective Products must be shipped, together
with proof of purchase, prepaid insured to the
Polk Audio Authorized Dealer from whom you
purchased the Product, or to the Factory at 2550
Britannia Boulevard, Suite A, San Diego,
California 92154. Products must be shipped in
the original shipping container or its equivalent;
in any case the risk of loss or damage in transit
is to be borne by you. If upon examination at the
Factory or Polk Audio Authorized Dealer it is
determined that the unit was defective in materials or workmanship at any time during this
Warranty period, Polk Audio or the Polk Audio
Authorized Dealer will, at its option, repair or
replace this Product at no additional charge,
except as set forth below. All replaced parts and
Products become the property of Polk Audio.
Products replaced or repaired under this
warranty will be returned to you, within a
reasonable time, freight prepaid.
This warranty does not include service or parts
to repair damage caused by accident, disaster,
misuse, abuse, negligence, inadequate packing or
shipping procedures, commercial use, voltage
inputs in excess of the rated maximum of the
unit, cosmetic appearance of cabinetry not
directly attributable to defect in materials or
workmanship, or service, repair, or modification
of the Product which has not been authorized or
approved by Polk Audio. This warranty shall terminate if the Serial number on the Product has
been removed, tampered with or defaced.
This warranty is in lieu of all other expressed
Warranties. If this Product is defective in materials or workmanship as warranted above, your
sole remedy shall be repair or replacement as
provided above. In no event will Polk Audio, Inc.
be liable to you for any incidental or consequential damages arising out of the use or inability to
use the Product, even if Polk Audio, Inc. or a Polk
Audio Authorized Dealer has been advised of the
possibility of such damages, or for any claim by
any other party. Some states do not allow the
exclusion or limitation of consequential damages,
so the above limitation and exclusion may not
apply to you.
All implied warranties on this Product are limited
to the duration of this expressed Warranty. Some
states do not allow limitation on how long an
implied Warranty lasts, so the above limitations
may not apply to you. This Warranty gives you
specific legal rights, and you also may have other
rights which vary from state to state.
This Warranty applies only to Products purchased in Canada, the United States of America,
its possessions, and U.S. and NATO armed forces
exchanges and audio clubs.
arranty terms and conditions applicable to
The W
Products purchased in other countries are avail
able from the Polk Audio Authorized Distributors
in such countries.
-
“Polk Audio,” “Polk,” “The Speaker Specialists,” “Power Port” and “Dynamic Balance” are trademarks of Britannia
Get more information and exclusive accessories, visit www
13
Investment Corporation used under license by Polk Audio Incorporated.
.polkaudio.com
 Loading...