

Page 1
PRC200BC Marine Remote Control
Installation and Operation Guide
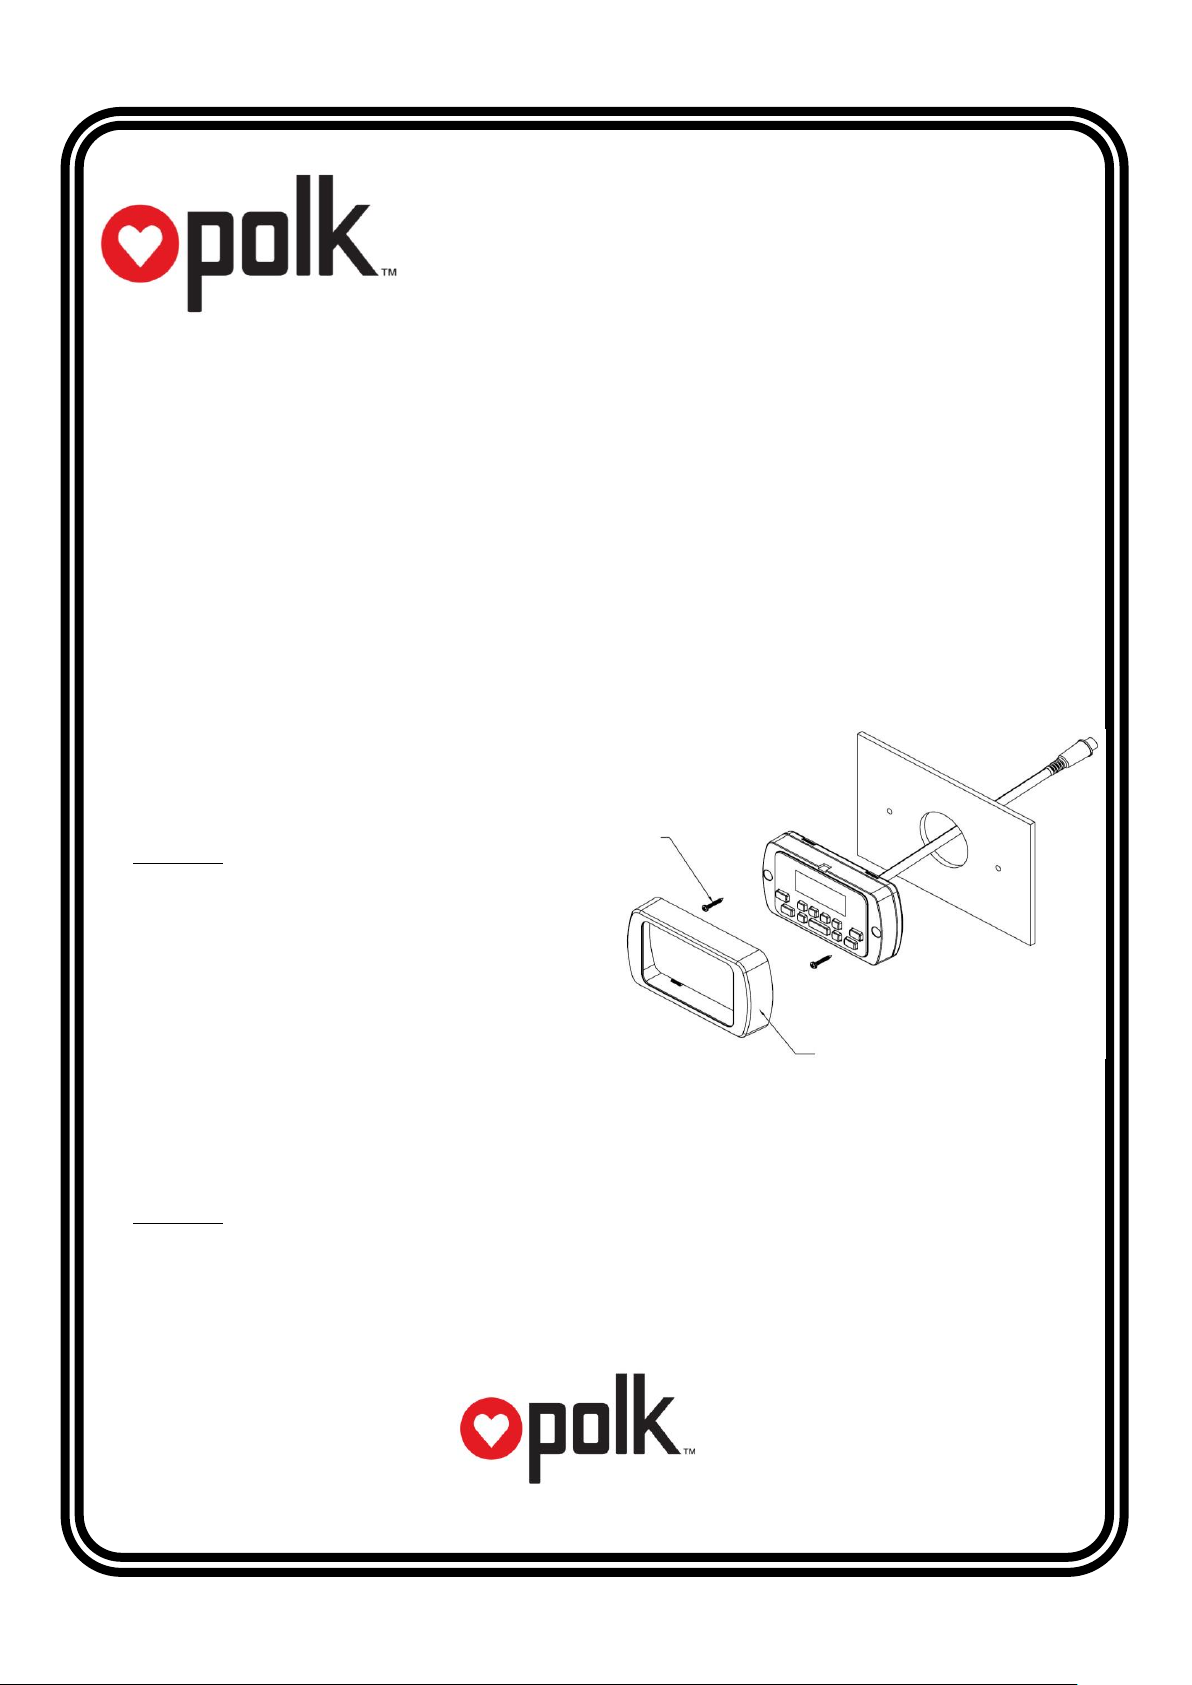
Trim Ring
Figure A - Installation
#6 Pan Head Screw
3/4” Min. Length
www.asaelectronics.com
©2013
Introduction
Thank you for choosing a Polk product. The PRC200BC marine remote control allows convenient operation of
compatible Polk marine source units. Operation includes power on/off, volume adjustment, mode selection,
and basic functions of available sources such as AM/FM tuner, Weather Band, Bluetooth, USB, iPod/iPhone,
and SiriusXM satellite radio.
Up to three Polk marine remote controls (PRC100BC and/or PRC200BC) can be connected to a compatible
Polk marine source unit by using a remote control Y-cable (Part #: PRCYC1, sold separately). One Y-cable is
required for each additional remote control (e.g.: One Y-cable for two remote controls total, two Y-cables for
three remote controls total.)
Installation
1. Choose a smooth, flat, sturdy mounting location
that has been verified safe. Also verify there is
enough room to route the connection cable to
the source unit.
Important: Do not choose a mounting location
where remote control can become submerged.
2. Carefully cut a 1.63” diameter hole in the chosen
mounting surface. A mounting template is
supplied on the last page.
3. Route the supplied 18’ extension cable from
remote control to source unit making sure the
correct sex of plugs are in the correct direction.
Connect the extension cable to source unit and remote control.
If a longer cable length is needed or additional remote controls are added, up to two additional 18’
extension cables (Part #: PRCEC18, sold separately) can be connected for a total of 54’.
Important: Ensure that the route between source unit and remote control does not have any sharp,
abrasive edges, excessively tight bends or areas that can pinch the extension cable as this can negatively
affect performance and/or cause damage to connected devices.
4. Insert the remote control into the hole from the front of the mounting surface, align face to desired position
and secure to the mounting surface using #6 stainless steel pan head screws with minimum length of 3/4”
(not included) as detailed in Figure A.
Page 2
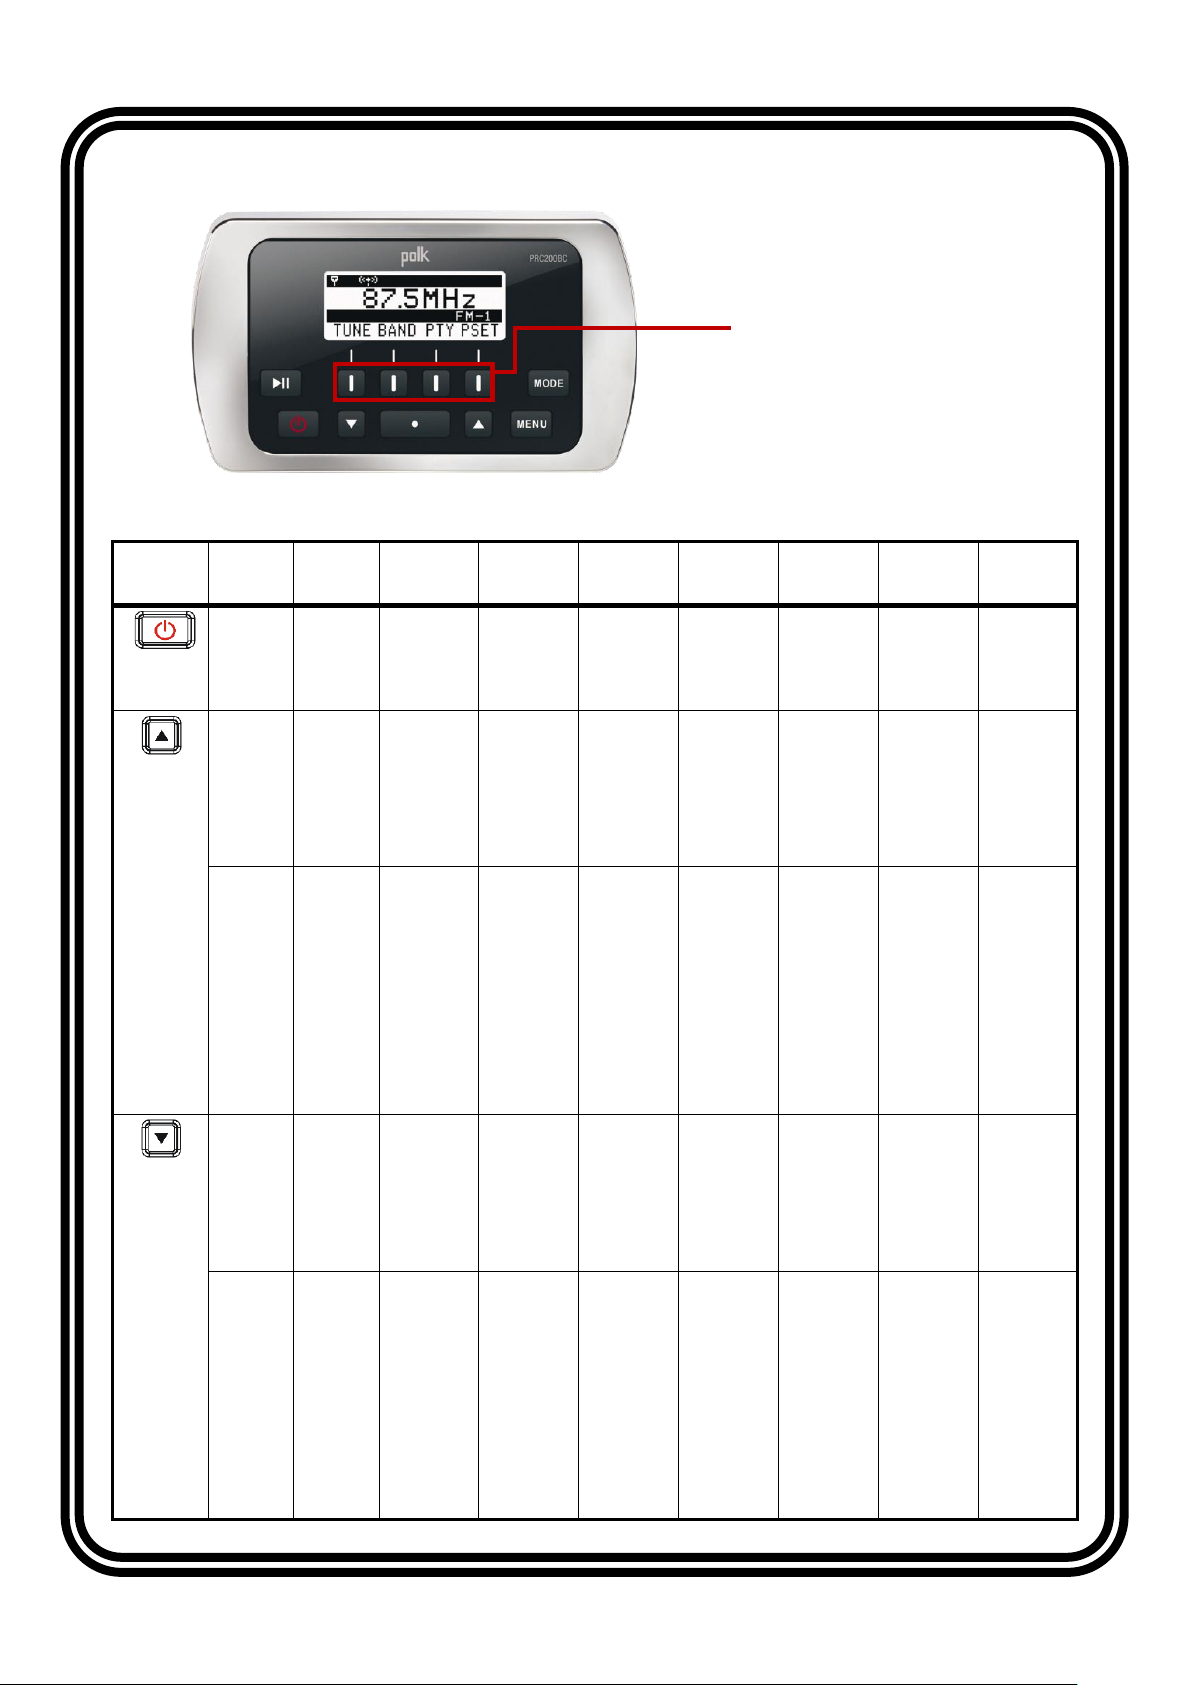
Control
Action
Standby
Radio
USB
iPod
AUX
Bluetooth
SiriusXM
Weather
Band
Power
Press
Turn
System
On
Turn
System to
Standby
mode
Turn
System to
Standby
mode
Turn
System to
Standby
mode
Turn
System to
Standby
mode
Turn
System to
Standby
mode
Turn
System to
Standby
mode
Turn
System to
Standby
mode
VOL+
UP
Press
─
Volume
Increase
Volume
Increase.
Directory
search
mode:
navigate
up the list.
Volume
Increase.
Directory
search
mode:
navigate
up the list.
Volume
Increase
Volume
Increase
Volume
Increase
Volume
Increase
Hold
─
MENU State
▲: Select
UP items.
Press
ENTER
button to
select a
different
item. Press
ENTER
again to
make
selection.
MENU State
▲: Select
UP items.
Press
ENTER
button to
select a
different
item. Press
ENTER
again to
make
selection.
MENU State
▲: Select
UP items.
Press
ENTER
button to
select a
different
item. Press
ENTER
again to
make
selection.
MENU State
▲: Select
UP items.
Press
ENTER
button to
select a
different
item. Press
ENTER
again to
make
selection.
MENU State
▲: Select
UP items.
Press
ENTER
button to
select a
different
item. Press
ENTER
again to
make
selection.
MENU State
▲: Select
UP items.
Press
ENTER
button to
select a
different
item. Press
ENTER
again to
make
selection.
MENU State
▲: Select
UP items.
Press
ENTER
button to
select a
different
item. Press
ENTER
again to
make
selection.
VOL-
DN
Press
─
Volume
Decrease
Volume
Decrease.
Directory
search
mode:
navigate
down the
list.
Volume
Decrease.
Directory
search
mode:
navigate
down the
list.
Volume
Decrease
Volume
Decrease
Volume
Decrease
Volume
Decrease
Hold
─
MENU State
▼: Select
DOWN
items. Press
ENTER
button to
select a
different
item. Press
ENTER
again to
make
selection.
MENU State
▼: Select
DOWN
items. Press
ENTER
button to
select a
different
item. Press
ENTER
again to
make
selection.
MENU State
▼: Select
DOWN
items. Press
ENTER
button to
select a
different
item. Press
ENTER
again to
make
selection.
MENU State
▼: Select
DOWN
items. Press
ENTER
button to
select a
different
item. Press
ENTER
again to
make
selection.
MENU State
▼: Select
DOWN
items. Press
ENTER
button to
select a
different
item. Press
ENTER
again to
make
selection.
MENU State
▼: Select
DOWN
items. Press
ENTER
button to
select a
different
item. Press
ENTER
again to
make
selection.
MENU State
▼: Select
DOWN
items. Press
ENTER
button to
select a
different
item. Press
ENTER
again to
make
selection.
Soft Buttons
(Key 1 to Key 4, from left to right)
Operation
Main Buttons
Page 3

Control
Action
Standby
Radio
USB
iPod
AUX
Bluetooth
SiriusXM
Weather
Band
Play /
Pause
Press
─
Mute
Play /
Pause
Play /
Pause
Mute
Play /
Pause
Mute
Mute
Enter
Press
─
Enter
Enter
Enter
Enter
Enter
Enter
Enter
Menu
Press
─
AUDIO
MENU:
Press the
▲/▼ button
to change
the
displayed
information:
Bass >
Treble >
Balance >
Fader. Then
press
ENTER to
make a
selection.
AUDIO
MENU:
Press the
▲/▼ button
to change
the
displayed
information:
Bass >
Treble >
Balance >
Fader. Then
press
ENTER to
make a
selection.
AUDIO
MENU:
Press the
▲/▼ button
to change
the
displayed
information:
Bass >
Treble >
Balance >
Fader. Then
press
ENTER to
make a
selection.
AUDIO
MENU:
Press the
▲/▼ button
to change
the
displayed
information:
Bass >
Treble >
Balance >
Fader. Then
press
ENTER to
make a
selection.
AUDIO
MENU:
Press the
▲/▼ button
to change
the
displayed
information:
Bass >
Treble >
Balance >
Fader. Then
press
ENTER to
make a
selection.
AUDIO
MENU:
Press the
▲/▼ button
to change
the
displayed
information:
Bass >
Treble >
Balance >
Fader. Then
press
ENTER to
make a
selection.
AUDIO
MENU:
Press the
▲/▼ button
to change
the
displayed
information:
Bass >
Treble >
Balance >
Fader. Then
press
ENTER to
make a
selection.
Hold ─ Enters the System Menu.
Mode
Press
─
Press the MODE button to display available modes including Radio, iPod, USB,
BT, SiriusXM (SXM), Auxiliary (Aux), and Weather Band (WB)
─
Mode
User Interface
Page
Key 1
Key 2
Key 3
Key 4
Radio
Default
Tune
Enter tune page
Band
Toggle between
AM/FM (RBDS)
PSET
Enter preset page
Return
Return to the
default page
Tune
|<<
Press: tune down
Hold: tune seek down
>>l
Press: tune up
Hold: tune seek up
─
Return
Return to the
default page
PSET AS
Auto-scan and store
strongest stations in
preset list
PS
Scan stations stored
in current preset list
LIST
Display the preset list
Return
Return to the
default page
PSET List
SAVE
Save currently tuned
station to highlighted
preset location
─
─
Return
Return to the
default page
PTY ─ ─ ─ Return
Return to the
default page
Soft Buttons
Page 4

Mode
User Interface
Page
Key 1
Key 2
Key 3
Key 4
USB / iPod
Default
|<<
Press: previous track
Hold: Rewind
>>l
Press: next track
Hold: Fast-forward
RRI
Enter RRI (Repeat,
Random, Intro) page
LIST
Browse files/folders in
the device
RRI
RPT
Toggle repeat
function
RND
Toggle random
function
INT
Toggle intro function
(USB only)
Return
Return to the
default page
LIST ─ ─
BACK
Reverse navigate to
previous level
directory
Return
Return to the
default page
Bluetooth
Default
|<<
Previous track
>>l
Next track
|<>|
Connect / disconnect
device
INFO
Display device name
SiriusXM
Default
|<<
Press: tune down
Hold: fast tune down
>>l
Press: tune up
Hold: fast tune up
PSET
Enter preset page
INFO
Display information:
NAME (artist) >
SONG (title) > INFO
(content, if available)
> CAT (Category)
PSET
PS
Scan stations stored
in preset list
─
LIST
Display the preset list
Return
Return to the
default page
PSET List
SAVE
Save currently tuned
station to highlighted
preset location
─
INFO
Display information:
NAME (artist) >
SONG (title) > INFO
(content, if available)
> CAT (Category)
Return
Return to the
default page
Weather
Band
Default
|<<
Tune to previous
station
>>l
Tune to next
station
─
─
www.asaelectronics.com
v. 062713
©2013
Page 5

 Loading...