

Page 1

Digital Photo Picture Frame
User’s Manual
20071002
Questions? Need some help?
This manual should help you understand your new product. If you have
questions, call our toll-free number found on the insert with this icon:
Or visit www.polaroid.com.
Page 2
Controls and Basic Instructions
Set Up and Navigation
CONGRATULATIONS on your purchase of a Polaroid digital photo frame. Please read carefully
and follow all instructions in the manual and those marked on the product before fi rst use. Failing
to follow these warnings could result in personal injury or damage to the device. Also, remember to
keep this User’s Manual in a convenient location for future reference.
Important: Save the original box and all packing material for future shipping needs.
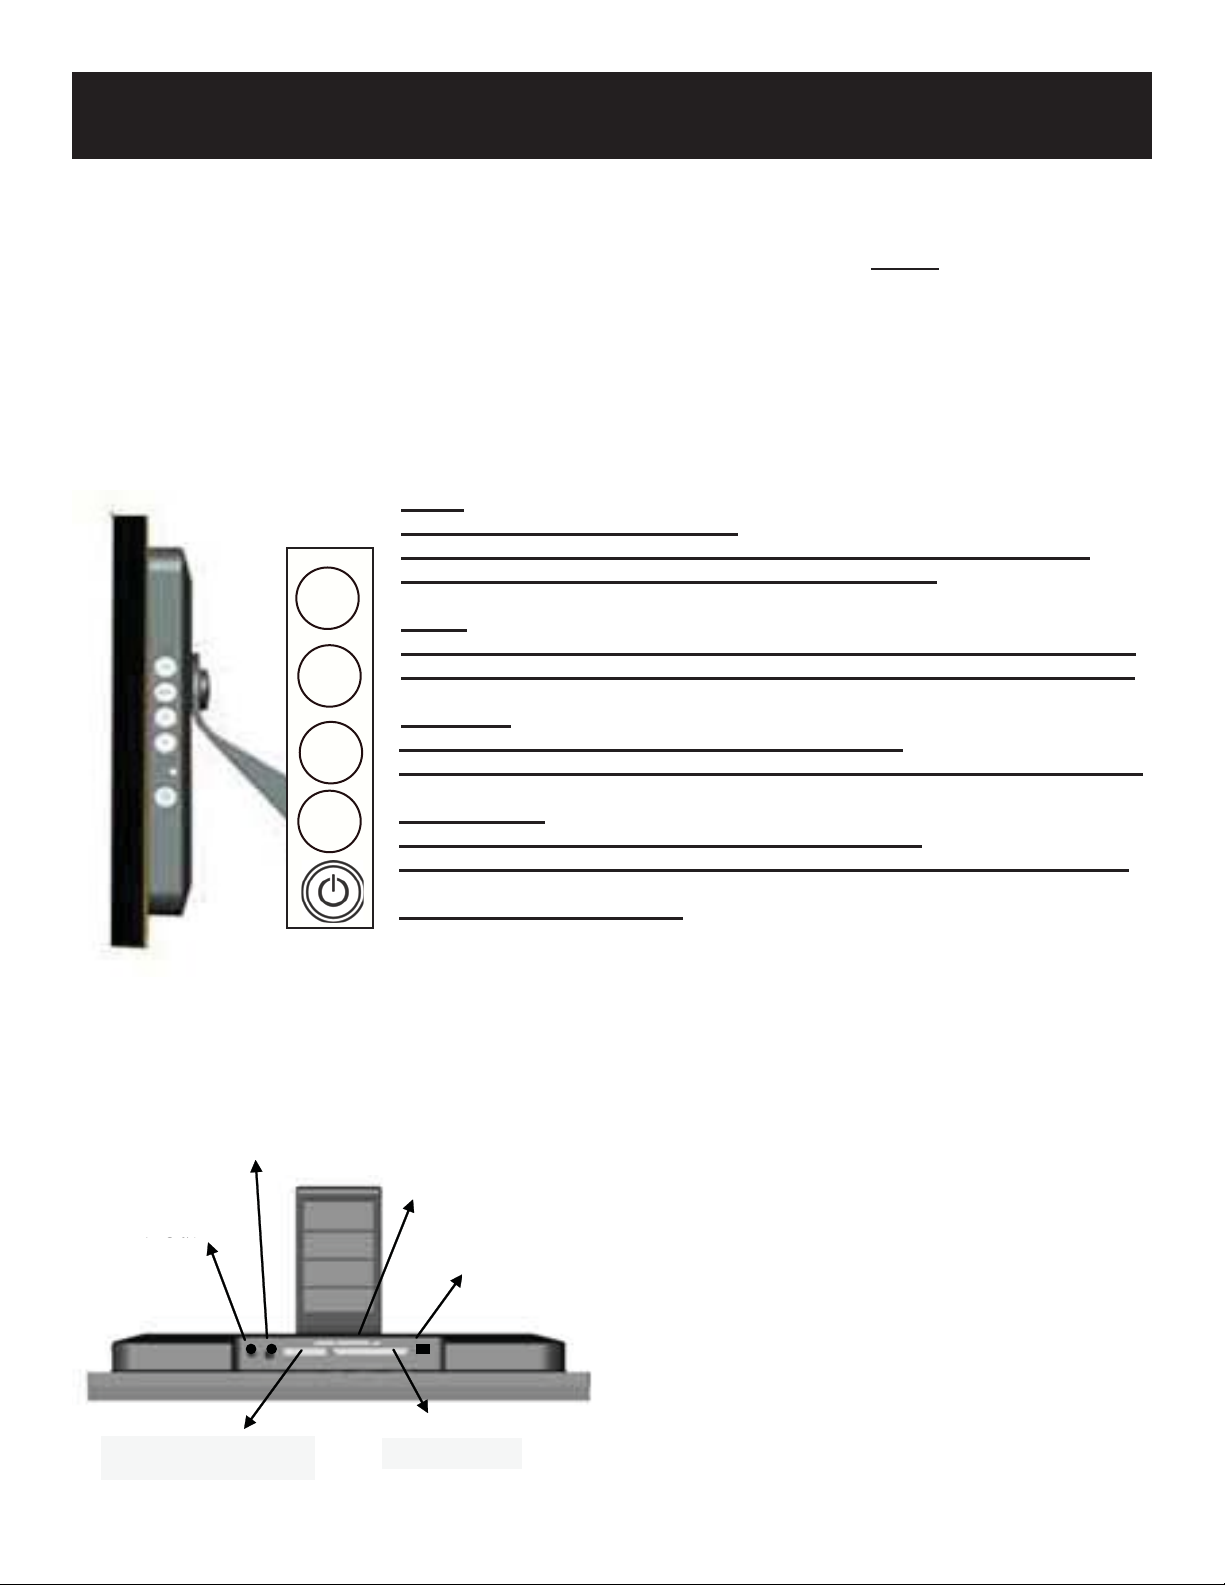
Controls
AUTO:
Press & Hold (under normal mode):
Automatically adjusts the position of the display area of the LCD screen.
Press (under “Display Screen Adjustment Menu”): Exit.
AUTO
MENU:
Press (under normal mode): Enter into “Display Screen Adjustment Menu”.
MENU
Press (under “Display Screen Adjustment Menu”): Select items in the menu.
UP ARROW
V
Press (under normal mode): Increase music volume
Press (under “Display Screen Adjustment Menu”): Move up or go to previous
DOWN ARROW
V
Press (under normal mode): Decreases music volume
Press (under “Display Screen Adjustment Menu”): Move down or go to next
POWER: Turns power on/off
Installing a Flash Media Card
AV Out
AV Out
Power
Power
SM Card
SM Card
USB Port
USB
1. Find the slot that fi ts your fl ash media card.
2. Insert the card in the correct slot.
3. To remove the card, simply push it in slightly
until it springs back out. Remove.
MS/SD/MMC Card
CF/MD Card
CF/MD Card MS/SD/MMC Card
Page 3

Controls and Basic Instructions
Replacing the Remote Control Battery
1. Remove the battery compartment by pulling the cover in the direction
of the arrow.
2. Remove old battery and dispose of correctly.
3. Insert new battery taking note of correct polarity (+/-).
4. Replace cover.
Caution:
1.Only use a 3V CR2025 battery.
2.Dispose of used batteries according to local ordinance regulations.
3.Remove the battery when not using the Flash Player for prolonged periods.
Buttons on the Remote Control
POWER button Press to turn player on or off.
SETUP button Press to open menu for changing settings.
CARD SELECTION button Press to choose a different memory card.
MUSIC button Press to go to and display music fi les.
PHOTO
ROTATE
ZOOM button Press to zoom up to 4x (on photos only)
SLIDESHOW button Press to start/stop a photo slideshow
+ VOLUME button Press to increase volume
- VOLUME button Press to decrease volume
MUTE button Press to instantly mute volume
↑ button Press to move up when selecting fi les on your screen.
button Press to go to and display photo fi les.
button Press to rotate photos 90 degrees clockwise on screen
button Press to move left when selecting fi les on your screen.
←
►║ PLAY/PAUSE
screen.
→ button Press to move right when selecting fi les on your screen.
↓
button Press to move down when selecting fi les on your screen.
STOP
button Press to stop the selected fi le/action.
button Press to play/pause or confi rm selections on your
Page 4

Set Up and Connecting to the Digital Picture Frame
Setting up the Digital Picture Frame
1. Plug the appropriate end of the AC adapter into a power outlet and the other end into the Digital Picture Frame.
2. After you’ve stored content on a fl ash media card (not included), insert the card into the proper slot.
3. Turn the power switch to “ON”. As a default the fi rst fi le of the card will be displayed fi rst. Play sequences are
automatically sorted alphabetically by fi le name, regardless of fi le type.
Connecting a USB Device to the Digital Picture Frame
1. The Digital Picture Frame has a built-in mini-USB port. If the USB device (such as a USB fl ash drive or
digital camera) you would like to connect to the Digital Picture Frame has a full-size port, use the
“USB Connection Cable” included with the digital picture frame.
This included cable has a male mini-size USB port and a female full-size USB port.
2. It is recommended that you turn off your USB device and the Digital Picture Frame before connecting the
USB device.
3. This Digital Picture Frame cannot be connected to a computer.
Questions? Need some help?
Call our toll-free number found on the insert with this icon:
Or visit www.polaroid.com.
WEEE:
This product contains electrical or electronic materials. The presence of these materials may, if not disposed of properly,
have potential adverse effects on the environment and human health. Presence of this label on the product means it
should not be disposed of as unsorted waste and must be collected separately. As a consumer, you are responsible for
ensuring that this product is disposed of properly. To fi nd out how to properly dispose of this product, please go to
www.polaroid.com and click on “Company“ or call the customer service number for your country listed in the
instruction manual.
“Polaroid” and “Polaroid and Pixel” are trademarks of Polaroid Corporation.
For service, support and warranty information, visit www.polaroid.com.
 Loading...