

Page 1

Digital Photo Frame
User’s Manual
Questions?
Need Some Help?
This manual should help you
understand your new product.
If you still have questions, call
our help line found on the
insert with this icon:
or visit
www.polaroid.com/support.
20080418
Page 2

2
Important Safety Instructions
caution: These servicing instructions are for use by qualied service personnel only. To
reduce the risk of electric shock, do not perform any servicing other than that contained in the
operating instructions unless you are qualied to do so.
Note: Do not touch the color TFT LCD screen.
Proper Handling of the Digital Photo Picture Frame
Always handle the Digital Photo Picture Frame carefully. Avoid touching the LCD screen as
natural skin oils are very difcult to remove.
Always position the Digital Photo Picture Frame on a stable and level surface. Unstable
surfaces can cause the Digital Photo Picture Frame to topple and fall, resulting in possible
damage or injury.
Avoid exposing the Digital Photo Picture Frame to direct sunlight or high temperatures, which
can damage or shorten its life. Do not place the unit near heat sources such as radiators, heat
registers, or other appliances that generate heat. Orient the Digital Photo Picture Frame away
from direct sunlight to reduce glare.
Avoid exposing the Digital Photo Picture Frame to rain, water, moisture or high humidity. Do not
place it in a bathroom or kitchen near a sink or where it may come in contact with water.
Never place heavy or sharp objects on the LCD panel, frame, or power cord.
Overloading Outlets
Do not overload electrical power sources when using the Digital Photo Picture Frame.
Overloading wall outlets, circuits, or extension cords can result in overheating, re, or electric
shock. Use only grounded or polarized outlets.
Power Cord Protection
To minimize wear on the power supply cord, the power supply cord should be routed away
from foot trafc and contact with other objects. Do not route the power cord under rugs or
carpeting. The cord should never be severely bent, pinched, or twisted. Periodically inspect
the power cord and each end of the cord for wear or damage. Unplug and replace the cord if
it is damaged.
Ventilation
Slots and openings on the Digital Photo Picture Frame are provided for ventilation purposes.
To ensure proper ventilation and reliable operation of the product do not place Digital Photo
Picture Frame on a bed, sofa, rug or similar surface. Do not place it in an enclosed space such
as a bookcase, unless proper ventilation is provided.
Page 3
Controls and Basic Instructions
CONGRATULATIONS on your purchase of your Polaroid Digital Photo Picture Frame. Please
read carefully and follow all instructions in the manual and those marked on the product before
rst use. Failing to follow these warnings could result in personal injury or damage to the
device. Remember to keep this User’s Manual in a convenient location for future reference.
Important: Save the original box and all packing material for future shipping needs.
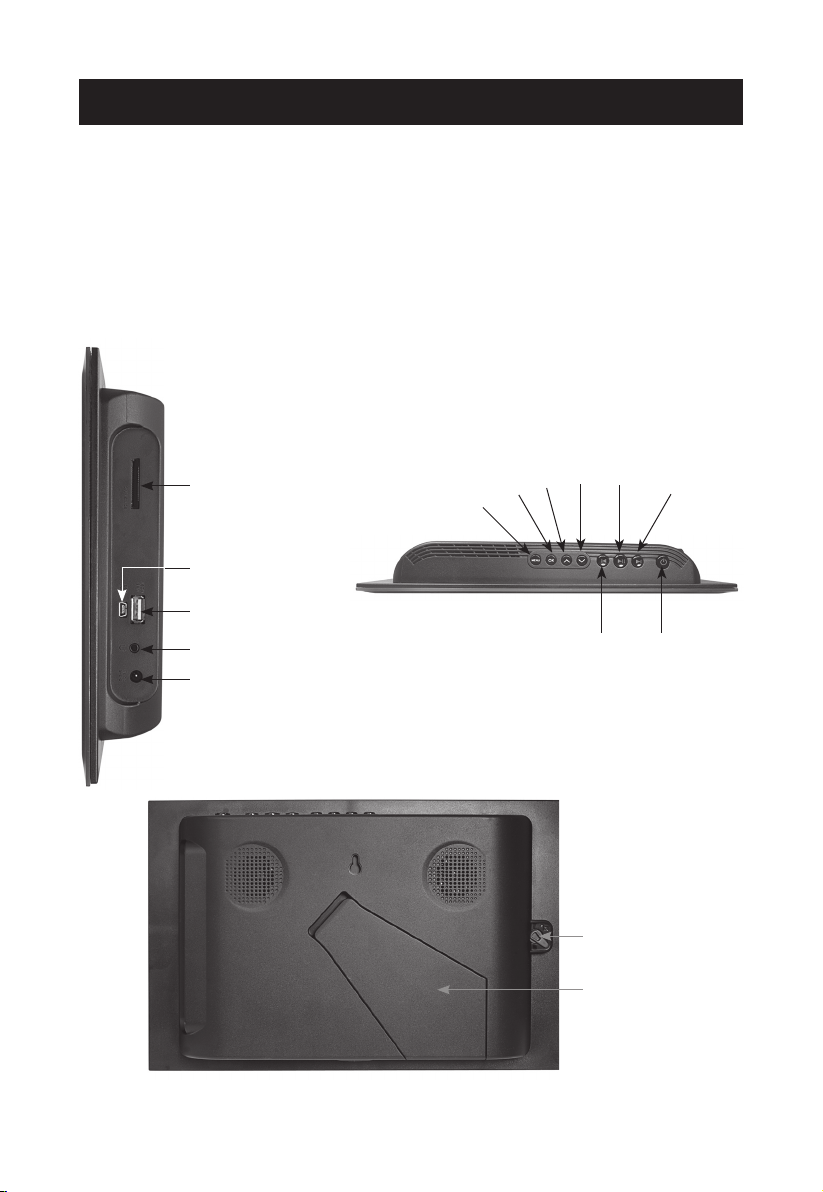
Controls
Secure Digital™,
Multi Media Card™,
Memory Stick™,
Memory Stick Duo™
Mini USB Port
USB Host Port
for USB Flash Drives
Audio Out Port
AC Power Input
Menu
OK
Up
Play /
Pause
Down
Backward
Lock
Adjustable Base
Forward
Power
3
Page 4
4
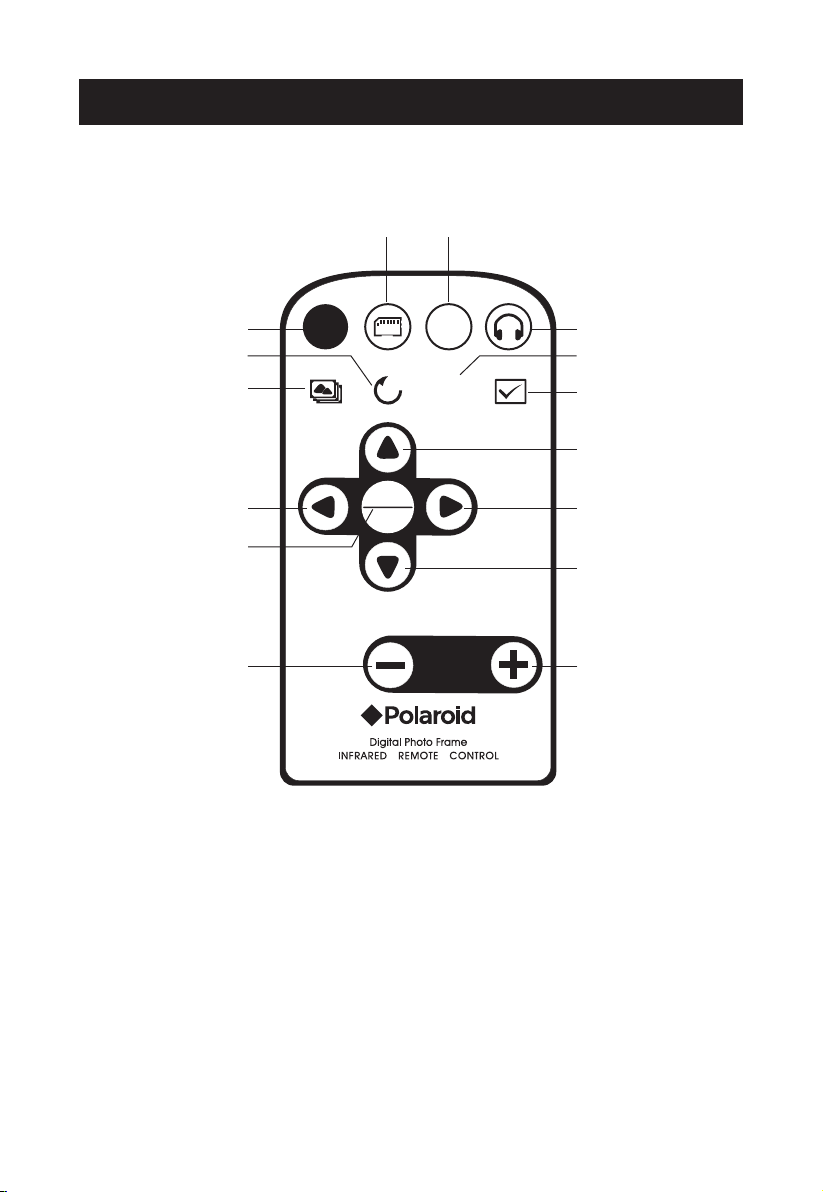
Remote Control
Remote Control
Card Select Exit
Setup
Rotate
Slide Show
Left Arrow
Zoom / Enter
Volume Down
SETUP
ZOOM
ENTER
EXIT
16:9
4:3
VOL
Music
Display Type
Mark
Up Arrow
Right Arrow
Down Arrow
Volume Up
Page 5

SET UP
Controls and Basic Instructions
Press to enter the Setup mode
SET UP
Press to enter the Source mode
EXI T
Press to exit a photo slide show or video / music
16: 9
4:3
EXI T
le playing
Press to enter Music mode
ZOOM
ENTER
Press to start a photo slideshow
Press to rotate photos 90 degrees clockwise on
screen. Non-functional in slideshow mode.
VOL
Press to toggle from 4:3 to 16:9 aspect ratio. Non-
16: 9
4:3
functional in slideshow mode.
Press to mark your favorite pictures for your
favorite slide show
Press to move up when selecting les on your
screen
Press to move down when selecting les on your
screen
Press to move left when selecting les on your
screen
Press to move right when selecting les on your
screen
ZOOM: Press to increase zoom up to 4x
ZOOM
ENTER
ENTER: Press to conrm your selection and play
still images
Press to increase volume when playing music or
video les.
Press to decrease volume when playing music or
video les.
5
Page 6

6
Quick Start Instructions
Using the Control Buttons on Digital Picture Frame:
1. Plug the AC adapter into the Digital Photo Picture Frame and plug it into a wall outlet.
2. Insert a memory card into the slot or insert peripheral USB equipment into USB host:
Memory Card Slot: Secure Digital™, MultiMedia Card™, Memory Stick™, Memory Stick
Duo™ and Memory Stick Pro™
3. Press POWER button to power on the device.
4. Once the Digital Photo Picture Frame has been turned on, the unit will enter the Source
Mode automatically.
MS Card
SD / MMC Card
5. Press the
access it. The DPF will show all the available photo, music and video les on it.
6. Press the or button to select a mode. Press the Menu button to exit.
7. Follow Step 6 to enter the Photo mode and press the or button to select a picture.
Press the ▶II button to view it in full screen. Press the button to go to the next picture
or press the button to go back to the previous picture.
8. Follow Step 6 to enter the Video mode and press the or button to select a video le.
Press the ▶II button to play the selected video le. Press the ▶II button to pause, and
press it again to resume.
9. Follow Step 6 to enter the Music mode and press the or button to select a mp3 le.
Press the ▶II button to play the selected music. Press the ▶II button to pause and press
it again to resume.
or button to select one type of storage media and press the ▶II button to
USB Flash Drive
Internal Memory
Page 7

10. Follow Step 6 to enter the Setup mode and press the or button to choose a selection
such as “LANGUAGE”. Press the ▶II button to enter. Press the or button to select
a language you prefer and press the ▶II button to conrm your choice.
11. When viewing a picture, press the Play ▶II button again to enlarge the current picture.
With the picture zoomed, press the , , or button to move the picture around.
12. After selecting Photo, Video or Music mode, press and hold the MENU button for one
second to access the COPY or Delete function. Press the or button to select COPY
or DELETE, press the ▶II button to enter. Press the or button to choose an option
and press the ▶II button to conrm your choice.
7
Page 8

8
Using the Remote Control:
1. Following the steps 1~4 on page 5 to access Source Mode.
2. Press the or button to select one type of storage media and press the
to access it. The DPF will show all the available photo, music and video les on it.
3. Press the or button to select a mode. Press the button to exit.
ZOOM
ENTER
button
4. Follow Step 3 to enter the Photo mode and press the or button to select a picture.
Press the
ZOOM
button to view on the screen. Press the button to go to the next picture
ENTER
or press the button to go back to the previous picture.
5. Follow Step 3 to enter the Video mode and press the or button to select a video
le. Press the
ZOOM
button to play the selected video le. Press the
ENTER
and press it again to resume. Press the
EXI T
to stop. Press the or button to adjust
ZOOM
button to pause,
ENTER
the volume.
6. Follow Step 3 to enter the Music mode and press the or button to select a mp3
le. Press the
ZOOM
button to play the selected music. Press the
ENTER
press it again to resume. Press the
EXI T
to stop. Press the or button to adjust the
ZOOM
ENTER
button to pause, and
volume. You can press the button to access Music mode from the Main menu.
7. Follow Step 3 to enter the Setup mode and press the or button to choose a
selection such as “LANGUAGE”. Press the
button to select a language you prefer and press the
You can press the
8. When viewing a picture, press the
SET UP
button to access Setup mode directly.
ZOOM
ENTER
ZOOM
button to enter. Press the or
ENTER
ZOOM
button to conrm your choice.
ENTER
button again to enlarge the current picture. With the
picture zoomed, press the , , or button to move the picture around. In the
full screen state, press the button to rotate the picture.
9. In Photo mode, press the button to start slide show and press the
16: 9
the
button to toggle from 4:3 to 16:9 aspect ratio.
4:3
EXI T
to stop. Press
Note:
When there is no memory card in the unit, pressing the slideshow button will play the
demonstration images. For more details, please refer to “Demo Slide Show” on page 9.
Page 9

Controls and Basic Instructions
Control Button Functions
All function settings for your Digital Photo Picture Frame can be achieved in the setup menu by
navigating with the buttons located on the top of the device.
OSD Menus Sub-Menus Description
Full Screen On Pictures display in full screen or not
Off
Slide Show Effect Off
Slide Show Speed Fast Speed of slide show
Slide Show Shufe On
Music Repeat One
Reset Settings Are you sure?
Language English
Brightness Adjusting picture brightness
Contrast Adjusting picture contrast
Auto Slide Set Off
Random
Fade
Shutter
Cross Comb
Mask
Brick
Dissolve
Bar
Normal
Slow
Off
All
Off
Yes
No
Italian
German
French
Spanish
Portuguese
Dutch
Polish
Russian
30 Seconds
60 Seconds
5 Minutes
15 Minutes
Select style of transition
Picture display order is random in slide
show mode
The times for the selected music repeat
Reset to default settings
Multiple languages
The slide show will run automatically after
the time is selected.
9
Page 10

10
Controls and Basic Instructions
Control Button Functions - continued (OSD Functions)
How to access to the Setup Mode
Button Command
Up
Down
▶II Enter or Conrm
Viewing Pictures Individually
Button Command
▶I
Previous Picture
▶II Zoom in the Select Picture
▶I Next Picture
Select Mode Page / Select Card Page
Button Command
▶I
Left
▶II Select
▶I Right
Playing musics or videos Individually
Button Command
Previous Music or Video le
▶II Play or pause
Next Music or Video le
Demo Slide Show
Some demo pictures have been loaded into the Digital Photo Picture Frame. These pictures
can be viewed without inserting any memory cards. Power on the Digital Photo Picture Frame,
wait for a while, the demo slide show will run automatically.
Setting Your Favorite Slide Show
In Photo Mode, press the or button to select a favorite picture and press the OK button
to view it. Press the button to select it as a favorite. When you have selected all your favotie
images for your custom slideshow, press the button to playback.
Connecting a USB Device to the Digital Photo Frame
Your Digital Photo Picture Frame has a built-in USB port. Using a USB cable and your digital
camera or a USB ash drive, you have the ability to view images directly from the USB
source.
1. Connect the AC adapter to the Digital Photo Picture Frame and press the power button to
power on.
2. Connect one end of a USB cord to a PC or a USB device such as a digital camera or USB
ash drive, and the other end to the Digital Photo Picture Frame.
3. Once the Digital Photo Picture Frame has recognized the USB source, you will be able to
view all the pictures on the camera’s internal memory, its memory card, a USB ash drive.
Please consult your camera’s user guide for more assistance.
Page 11

Connecting your Digital Photo Frame to a computer
Using the supplied USB cable, you can connect your digital picture frame to a computer to
transfer les between the two devices.
With the frame turned off, connect the small end of the cable to the frame and the large end
to your computer. Turn the frame on and allow the computer a few moments to recognize the
device. The frame’s internal memory and any memory cards inserted in the frame will appear
as external storage devices on the computer. Click on “Open folder to view les”. You may add
or delete any photos from the internal memory of the device or memory cards from here.
Frequently Asked Questions
Frequently Asked Questions(FAQ)
Q : What other media formats can the Digital Photo Picture Frame support? Why will it not play
all images?
A : The Digital Photo Picture Frame will support JPEGs taken from a digital camera. The
Digital Photo Picture Frame may not read all images.
Q : I have a memory card in the Digital Photo Picture Frame, but it’s not reading the card. What
should I do?
A : First, make sure that you are using a memory card that is supported by the Digital Photo
Picture Frame. Second, ensure that the memory card is inserted all the way into the correct
slot. Third, press the EXIT button until you reach the “Select Card” page. If the memory
card is properly inserted into the slot, that memory card icon will be highlighted.
Note: Some digital cameras save images into non-standard formats. Please refer to your
camera’s operating manual for specics.
Q : Why do some pictures load faster than others?
A : Higher resolution pictures load slower. Using a lower resolution when taking pictures
speeds loading time.
11
Page 12

Technical Specications and Recycling
Technical Specications
Product: 10.2” LCD Screen Digital Photo Picture Frame
Resolution: 1024 x 600 pixels
Input Formats: Secure Digital™, Multi Media Card™, Memory Stick™,
Memory Stick Duo™, Memory Stick Pro™
Contrast Ratio: 400:1
Horizontal viewing angle: 120 degrees
Vertical viewing angle: 110 degrees
Questions? Need some help?
This manual should help you understand your new product. If you have
questions, please call our toll-free number found on the insert with this icon:
Or visit www.polaroid.com.
WEEE:
This product contains electrical or electronic materials.
The presence of these materials may, if not disposed of
properly, have potential adverse effects on the environment
and human health. Presence of this label on the product
means it should not be disposed of as unsorted waste
and must be collected separately. As a consumer, you
are responsible for ensuring that this product is disposed
of properly. To nd out how to properly dispose of this
product, please go to www.polaroid.com and click on
“Company“ or call the customer service number for your
country listed in the instruction manual.
“Polaroid” and “Polaroid and Pixel” are trademarks of Polaroid Corporation.
For service, support and warranty information, visit www.polaroid.com.
12
RoHS
Page 13

Part No.:OM6100US001
Printed in China
 Loading...