

Page 1
Polaroid
HD
ACTION
CAMERA
Camera
Action
HD
Telecamera
HD
per
Sport
Estremi
HD
Action-Kamera
Camara HD
HD??~
:3
/fJ:I-7
XS9
www.
polaroidaction.com
Page 2
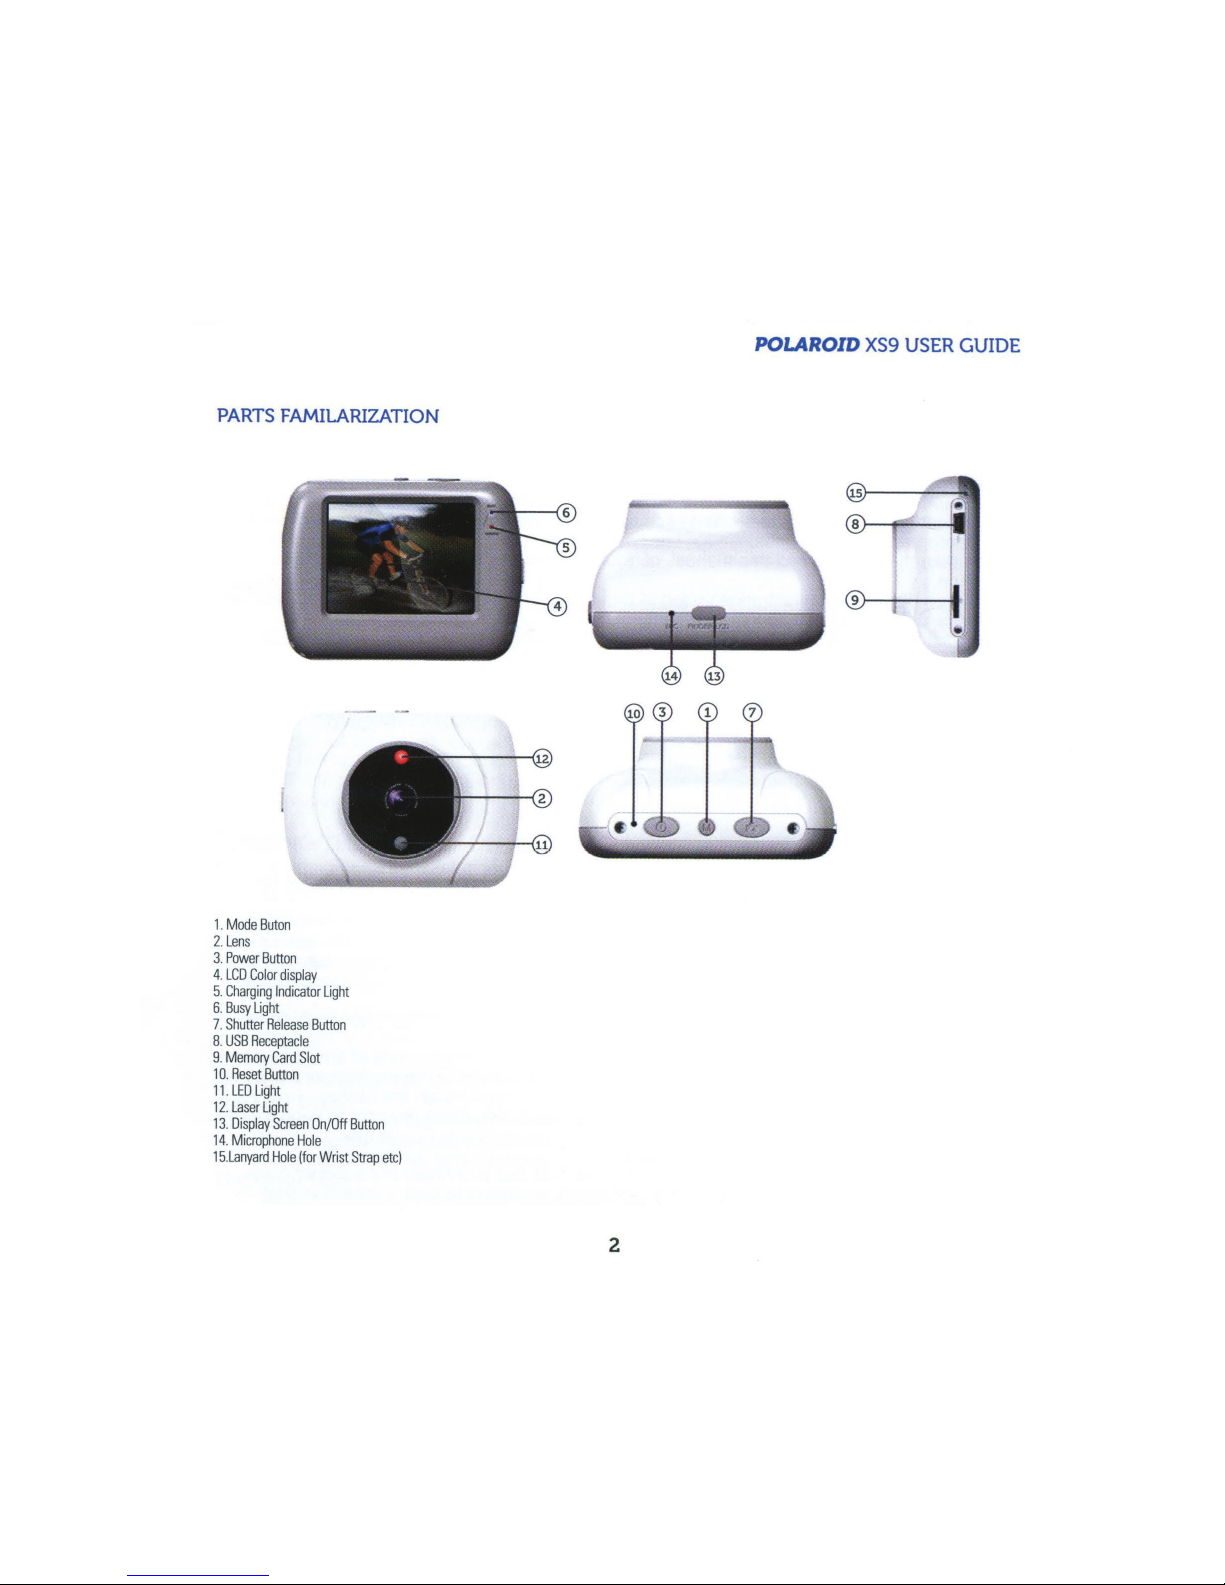
PARTS
FAMILARIZATION
1.
Mode
Buton
2.
Lens
3.
Power
Button
4.
LCD
Color
display
5.
Charging
Indicator
Light
6.
Busy
Light
7.
Shutter
Release
Button
8.
USB
Receptacle
9.
Memory
Card
Slot
1 0.
Reset
Button
11
.
LED
Light
12
.
Laser
Light
13.
Display
Screen
On/Off
Button
14
.
Microphone
Hole
15
.
Lanyard
Hole
(for
Wrist
Strap
etc)
POLAROID
XS9
USER
GUIDE
2
Page 3
POLAROID
XS9
USER
GUIDE
WELCOME
Thank you for purchasing the Polaroid
XS9
H D Action Camera. This
is
one
of
our smallest
cameras capable of recording 720p high definition video clips and
5MP
still images.
With
proper use and care, your camera will provide many years of service, allowing you
to
photograph life, both on land and
in
the water while standing still or moving. Its small size,
light
weight
and waterproof capabilities add up to one unique camera to help you expand
your photographic experiences.
Please take the time
to
read this manual carefully and keep it
in
a safe place for future
reference.
The screen displays and illustrations used
in
this manual may not be
an
exact representation
of your camera and
can
be
slightly different.
When using the touch screen
to
select your options please apply gently your finger direct
over the objects.
WHAT'S
INCLUDED
IN
THE
BOX?
•
XS9
camera
• Waterproof case
• Bike
mount
• Helmet
mount
• USB cable
• Manual
PRECAUTIONS
1.
Do
not expose the video camera to direct sunlight
by
pointing its lens directly at the sun.
The
image sensor of the video camera may
be
damaged.
2.
Take
good
care
of the video camera
and
prevent water or
sand
particles from entering the
camera; it's only waterproof when it's sealed
in
its waterproof
case.
When it
is
used
on
the
beach
near or
in
the water,
be
sure the camera
is
enclosed
in
its waterproof housing.
The
housing will protect the camera from getting
wet
and
will prevent sand particles
and
salt
vapor damage.
3.
Do
not store the camera
in
an
environment with excess heat, humidity, dust or chemical
materials.
4.
Battery life will
be
shortened if the camera
is
left unused for long periods of time
(in
excess
of three months). It
is
recommended that
you
turn the camera
on
for a minute or more
during long storage times to allow
an
electric current to
run
through the battery.
5.
If dirt accumulates
on
the camera and/or its lens, use a soft, clean, dry cloth to wipe it away
gently.
6.
Do
not touch the lens surface with fingers.
7.
This
camera uses a MicroSD flash
card.
You
may find that your finger alone cannot press
the
card
into its slot far enough for the
card
to lock
in
place or to push it inward enough to
3
Page 4

POLAROID
XS9
USER
GUIDE
release
it.
Try
nudging the
card
with a fingernail or a miniature flat
blade
screwdriver.
8.
Protect
the memory
card
from electromagnet fields
and
do
not remove the
card
from its
socket if the camera or computer
is
reading
information from
it.
9.
Your
camera does not
have
a built-in memory.
Be
sure to install
a
MicroSD
or
MicroSDHC
(high
capacity)
card
in
the
card
slot.
10.
To
protect the camera from accidental
falls,
push
one
end
of a wrist/neck strap into the
lanyard
hole then feed it through the other
end
and
pull
securely.
CHARGING
THE
BATTERY
1.
Connect
the
small plug
of the
USB
cable
into the
USB
Receptacle
on
the bottom of
the camera; connect the opposite end into
an
available
USB
port of your computer.
2.
While
the computer
is
on,
the battery
will
charge
as
indicated
by
the Charging Indicator
Light.
3.
The
light
will
remain
on
during the entire charge
cycle
and
will
extinguish when
charging
is
complete.
4.
Typical charge times
is
artound 2 hours, depending upon the amount of pictures
and
length of time of
all
videos that
have
been recorded.
NOTE:
It
is
not necessary to
run
the battery down
completely before recharging.
The
built-in Lithium-ion battery
will
charge to its
full
working capacity regardless of it state of depletion. This
will
considerably reduce recharge time.
TURNING
THE
CAMERA
ON
AND
OFF
1.
On the camera's top-left control panel, locate the Power
Button and press it until you
feel
the vibration and the
II
Polaroid"
screen
will
appear.
2.
After 2 seconds, the
II
Poalroid
II
screen will
disappear, and the camera
will
display
live
video.
3.
To
power the camera off, press the Power
Button until
you
feel
the vibration and the
II
Polaroid"
screen
will
appear.
4.
A
Power-Saving
Button can be found
on
the right side
of
the camera which,
when
pressed, will
turn off the viewing display
while
leaving the camera on.
OTHER
FUNCTIONS
OF
THE
POWER
BUTTON
The
LED
Light
1.
Turn
on the camera so that a
live picture is displayed.
2.
Pressing
the
Power
Button quickly
will
turn
on
an
LED
light which
will light up the
area
in
front of the lens;
this
will
come
in
handy
in
very poorly
lit scenes.
The Laser Light
1.
With
the LED light
on, quickly press the Power
Button, and a red
laser light
provides
4
Page 5

POLAROID
XS9
USER
GUIDE
a
small red dot
on
the subject.
2.
The purpose of the
laser
pointer
is
to
let
you see where the lens
is
pointed.
CAUTION!
Do
not
look directly
at
the laser source. Do
not
point the laser beam at anyone's face
and do
not
point the light beam at any shiny surface which may reflect the laser light
back into someone's eyes.
3.
The Power Button
can
be pressed
quickly
to loop
through the
following
events:
LED
light
on, Laser Light on, both turn on, both turn off.
RECORDING
VIDEOS
1.
Insert
a flash
memory
card into the
Memory
Card
Slot.
2.
Press the Power Button.
3.
Press the Mode Switch
until
the video recording icon
is
displayed
in
the upper-left
corner of the
display.
4.
Press the Shutter
Release
Button once or press the center of the
LCD
Color Display
once to begin recording a video
clip.
Press either shutter button once again to
stop recording.
NOTE:
The camera
will also
stop recording
automatically
when the
memory
card becomes
full
or the battery runs down
while
recording.
ICONS
ON
THE VIEWING
SCREEN IN THE VIDEO MODE
1
This
timer
shows that recording can continue
for 8 minutes and
51
seconds.
2The
camera is
in
the
video recording mode.
3 Video
quality
is
set
to
high definition
720p.
4
The
memory
card
is
inserted.
5
Digital zoom
IN
6
Digital
zoom
OUT
7 Touch-sensitive shutter
release
8 The battery icon
displays
the power
left
in
the
battery.
9 Zoom value,
1
=
wide
angle,
4=telephoto
10
Press this icon
to
switch
to
the
playback
mode.
11
Set Date and Time
fJ
fJ
m
5
.••
HO
r
a
CIIJ
[EJ
m
~
00:08:51
D
•
D
•
a
g
1.00
m
a
m
Page 6

POLAROID
XS9
USER
GUIDE
TAKING
PHOTOS
1.
Turn
on
the camera.
2.
Press the Mode Button until
the icon of a camera
is
showing
in
the
top-left
corner of
the
display
screen.
3.
Aim the camera at your subject.
4.
Using the touch-screen, adjust the zoom
level
and
take a picture either by pressing the
center of the viewing screen or
by
pressing the Shutter Release
Button
located
on
the
top-tight
of
the camera body.
ICONS
ON
THE VIEWING SCREEN IN
PHOTO
MODE
1
The number to the
left
of
the
slash
counts the
total
pictures taken. The number
to
the right of
the
slash displays
the
total
number of pictures
that
can
fit on your
memory
card.
2 The camera
is
ready to take
still photos.
3 Press to
select
picture
size:
1
M/3M/5M.
4
The
memory
card
is
inserted.
5 Digital
zoom
IN
6
Digital
zoom
OUT
7
Touch-sensitive shutter
release
8
The battery icon
displays
the present power
available from the battery.
9
Zoom
value,
1
=
wide
angle,
4=
telephoto
10
Press this icon to switch to the
playback
mode.
11
Set
the date and
time
0~
6
mJ
m
c.
m
VEHICLE MOUNTED MODE (LOOP
RECORDING)
01074G
D
•
D
•
~
g
..J
m
1.0C
lB
a
m
~
1.
To
activate the
loop recording mode, press the mode switch
until
the loop
icon
displays
at the top
left
corner
2.
This mode
allows
you to mount the camera
on
a moving
vehicle,
bike
helmet,
snowboard, etc. During use, you
probably
won't
be
in
a position to access the
camera's control
buttons.
So,
while driving down the road or
in
the woods, the camera
will
take 5-minute video
clips,
save
the
clip,
then
immediately record another 5-minute
clip. This will
continue
until
such time
as
the Power Button
is
pressed to turn off the
recording.
NOTE:
If allowed
to continue
without
being turned off, the video
clips will fill
the
6
Page 7

POLAROID
X$9
USER
GUIDE
memory
card and go into a
"recording l
oop"
erasing
previously recorded
files
as
it
continues.
In
the
loop
mode, recording
won't
stop
until the battery
is
exhausted or
the
power button
is
pressed.
3.
To
start recording, press the Shutter
Release
on the
top
of
the camera or press the
center
of
the viewing screen.
4.
Press either shutter
release
or the center
of
the viewing screen
to
stop recording.
ICONS
ON
THE
VIEWING
SCREEN
IN
VEHICLE
MOUNTED
MODE
1
Timer shows that recording can continue
for 8 minutes and 3 seconds.
2 The camera is in the
Vehicle-Mounted
Mode.
3
Video
quality
is
set
to
high definition
720p.
4
The
memory
card
is
inserted.
5
digital
zoom
IN
6
digital
zoom
OUT
f.j\
"'
411
7
touch-sensitive shutter
release
@{0
ET
8
The battery icon displays
the power
left .. ..
in
the battery.
9
zoom
value,
1 = wide
angle,
4=
telephoto
10
Press this icon
to
switch
to
the
playback
mode.
11
Set date and ti
me
PLAYING
BACK
RECORDED
VIDEOS
AND
PHOTOS
1.
Turn
on the camera using the Power Button.
2.
Press the
Play
icon at the bottom-center
of
the
display.
3.
To
review the video
clips
and images,
press
the
play
icon at the bottom center
of
the
screen.
4.
The Browsing Arrows shown
in
Figure
C below will
advance one
file forward or
backward.
NOTE:
While
browsing
in
this mode,
still photo images
will also
appear for
reviewing and the letters
"JPG"
will appear
in
the
top-left
corner
of
the
LCD
Color
DisplayThe file
extension "AVI" will
appear if
the
image represents a video
file.
5.
When a video frame
is
displayed
that you
want
to
review, press the
Play
Button, and
the
clip will
play.
6. While
a
clip
is
playing,
you may pause the
clip, play
it at normal
speed,
play
it faster or
slower
than
normal
speed
(See Figures A and B below}.
7
Page 8

POLAROID
XS9
USER
GUIDE
VI
212
Figure
A
rM
ecr
Figure
B
7
ra~se
<
Play
Slower Faster
ICONS
ON
THE
PLAYBACK
SCREEN
1 Indicates you are reviewing a video
AVI
file.
2
You
are viewing clip#1 of 1 clip.
3 current folder name (such
as:
I:\DCIM\100MEDI
A)
4 Press this
to
browse video clips forward.
5 Press this
to
browse video clips backwards.
6 Press
the
trash icon
to
delete video clips.
7 Press
to
play the current video clip.
8 Press
the
movie camera icon
to
switch
to
previous
mode.
9 The battery icon displays the power left
in
the
battery
DELETING
FILES
1.
The screen shots shown
in
the last
two
sections
on
playing back files feature icons
of
a garbage
can
in the upper center
of
the display screen.
2.
If you wish
to
delete either a still image file or a video clip, press the garbage
can
icon.
3.
After pressing the garbage can icon, you will
see "Delete This File?."
4.
Press "Yes"
to
delete the file; press
"No"
to
keep it.
Transferring Files From
The
memory
chip To Your Computer
1.
Connect a compatible USB cable
from
the camera's
USB
Receptacle
to
your personal
computer.
2.
The camera
is
a plug and pl
ay
device which will
be
recognized immediately by your
8
Page 9

POLAROID
XS9
USER
GUIDE
computer.
3.
Your
computer
will
treat the camera
as
a removable
disk
and
will appear
as
such under
"My
Computer."
4.
Photos
and
videos you've taken
are
stored
in
I:\DCIM\100MEDIA
("I"
is
the drive
letter
assigned to the camera
by
your computer.).
5.
Vehicle-Mounted mode clips
are
saved
in
1:\DCIM\RECORDER.
("I"
is
the drive
letter
assigned to the camera by your computer.)
6.
Files
can
be accessed
by
photo
and
video editing programs
directly
from the camera
as
a removable
disk.
7.
It
is
recommended that you
save
all
TRANSFERRING
FILES
FROM
THE
CAMERA
TO
YOUR
COMPUTER
1.
Remove the microSD memory card from the camera's
Memory
Card
Slot.
2.
Insert
the card
in
your computer's media card reader and
follow the instruction steps
3-7
in
the previous section
"TRANSFERRING
FILES
FROM
THE
CAMERA
TO
YOUR
COMPUTER."
TURNING
THE
CAMERA
OFF
MANUALLY
You
can
turn the camera off at any time
by
pressing the
Power
Button.
AUTOMATICALLY
The
camera
will shutdown
by
itself
if
no
button
has
been pressed for 5 continuous minutes.
WEAK
BATTERY,
WITH
USER NOTIFICATION
When the battery becomes sufficiently discharged, the battery icon
located
in
the
lower-left
corner, which
is
displayed
during the video or picture-taking mode,
will
turn
red
and
begin
to blink. The camera will
then shut
itself
off.
9
Page 10

USING
THE
INCLUDED
ACCESSORIES
Waterproof
Case
1
Clamp
2
Shutter Release
3 Power Button
POLAROID
X$9
USER
GUIDE
1.
Insert a finger at the
half circle
of
the
Clamp by prying the
clamp
up away from the
case.
2.
Before sealing
the case, inspect the water
sealing
gasket
to
be sure it's
in
good
condition.
You
can
test
the gasket by closing
the case
without
inserting the camera.
Submerse the case
completely
in
a
bowl
of
water for about a minute. Remove the
case from the water, dry off its exterior
with
a
towel, then open the case.
If
the entire
interior
is
dry,
the
case and gasket are safe for use under water.
3. There are
just
two
buttons required for recording video and images: the Shutter
Release,
and the Power Button.
4. Remember
to
put
the
Mode
Switch
in
your desired recording position before inserting
the camera
in
the waterproof case. There
is
no
external
button for the Mode Switch.
HandleBar Clamp
1
%20
Screw
2 Locking
Wheel
3 Bar
clamp bolt
4 bar
clamp
5
tilt
knob
1.
The camera does not have a standard tripod mount.
For
all
the accessories w ith a
%-20
screw, the camera
must
be
enclosed
in
with the waterproof case.
10
Page 11

POLAROID
XS9
USER
GUIDE
2.
Turn
the waterproof case
clockwise
onto the
~-20
screw
of
the
handlebar clamp until
secure
3.
Turn
the Locking
Wheel
so
it
applies
pressure
to
the case
to
keep the connection
secure.
4.
Loosen the Bar
Clamp Bolt until
the
bolt
and screw comes
loose.
5.
The Bar
Clamp
can be opened
to
allow
you
to
wrap the
Handlebar
6.
After positioning the
Handlebar Clamp where you
want
it, reattach the
bolt clamp and
tighten.
7.
Loosen the
Tilt
Knob,
to
adjust for the proper aiming
angle;
then tighten the knob.
Helmet
Mounting
System
1 Helmet belt
2
Helmet
mount
3
%-20
screw
4 Locking
wheel
5
Tilt
knob
6
3M
Adhesive
To
use
helmet
mount
with
a vented helmet
1.
Insert
the free end
of
the
Helmet Belt
through one
of
the
slots
in
the base
of
the
Helmet
Mount.
2.
Thread the same end
in
to
the
helmet vent and then back up
to
the
Helmet
Mount
through another vent. Then insert the
belt through the other side
of
the
Helmet
mount. Then insert the belt
back through the
helmet vent.
3.
You
should
have
now
both ends
of
the
belt
inside the
helmet.
Take
both ends
of
the
Belt and pull
to
tighten and then attach together
with
the
Velcro
strap .
4.
Turn
the Waterproof case onto the
~
-20
screw
of
the
Helmet
Mount
until
secured
5.
Turn
the Locking
Wheel
so
it
applies
pressure
to
the case
to
keep the connection
secure .
6.
Loosen the
Tilt
Knob,
to
adjust for the proper aiming
angle;
then tighten
the
knob.
7.
Please
note this
helmet
mount
will only
work
with
vented
helmets
To
use
helmet
mount
with
a Non-vented
helmet
1.
Clean thoroughly
the
helmet
mount
and the
helmet
surface you wish
to
apply
the
11
Page 12

POLAROID
XS9
USER
GUIDE
mount
2.
Apply the adhesive firmly to the helmet mount
3.
Apply the other side of the adhesive firmly to the surface of the helmet
4.
it
is
best for it to remain unused overnight. The dry time allows the adhesive to create
a stronger bond
5.
Adhesives
can
be
removed when heat
is
applied
(eg.
A hairdryer)
12
Page 13

POLAROID
XS9
USER
GUIDE
SPECIFICATIONS
I
mages sensor:
Photo:
Video:
Photo
Format:
Video Format:
3 Modes:
LCD Display:
FOV:
Digital
Zoom:
Battery
Capacity:
Recording time:
Charge time:
LED
Light
Laser
Light
Power
Saving Button:
USB:
1.3MP CMOS
Sensor
5MP
(2592x1944L
3MP
(2048X1536).
1
MP
(1280X720)
720p (1280X720p
FPS
30
or VGA
(640X480)
FPS
60
JPG
AVI
HD
Video
Photo Car
mounted
mode
2"
full color touch screen
4X 850mah
3 hr (without LED/Laser Functions On)
2
hr LED
Yes
Yes
Yes
USB 2.0
Shutter: Electronic
White
balance.
scenes. sensitivity: Auto
Memory
Card:
Micro
SO
Memory
capacity: 1-32GB
Water depth
With
Case:
10
meters
Weight: 1.89oz
Dimensions:
68.5mm
x 51.6mm x
32.5mm
13
Page 14

POLAROID
XS9
USER
GUIDE
PLR
IP
Holdings, LLC, its licensees and affiliates,
fully
support
all
electronic waste initiatives. As responsible
stewards
of
the environment, and
to
avoid violating established laws, you should properly dispose
of
this
product
in
compliance
with
all
applicable regulations, directives or other governances
in
the area where you
reside.
Please
check
with
local authorities or the retailer where you purchased this product
to
determine a
location
where
you can appropriately dispose
of
the product.
You
may also go
to
www.polaroid.com
to
learn more about the specific laws
in
your area
to
locate a
collection facility near your home.
If
your electronic device has internal
memory
on
which personal or other confidential data may be stored,
you may
want
to
perform a data sanitizati
on
process before you dispose of your device
to
assure another
party cannot access you personal data. Data sanitization varies by the type
of
product and its software, and
you may
want
to
research the best sanitization process for your device before disposal.
You
may also check
with
your local recycling facility
to
determine their data sanitization procedures during the recycling process.
Polaroid, Polaroid
&
Pixel, and Polaroid Classic
Border Logo are trademarks of
PLR
IP
Holdings,
LLC,
used
under license.
All
other trademarks are the property of the respective owner,
who
has not sponsored,
endorsed or approved this product.
PLR
IP
Holdings, LLC does not manufacture this product or provide any
Manufacturer's Warranty or support.
Distributed by: C&A Licensing
LLC,
2 Bergen Turnpike, Ridgefield
Park,
NJ
07660
© 2013
All
Rights Reserved
MADE IN CHINA
Product features, specifications and appearances are subject to change
without
notice.
www.polaroidaction.com
r-------,
....
D
Instantly recognizable. Instantly
reassuring.
The
Polaroid Classic Border
lets you
know
you'
ve
purchased a product
that exemplifies the best qualities
of
our
brand and that contributes to
our
rich
heritage
of
quality and innovation.
14
Page 15

Page 16

·:~·Polaroid
WARRANTY
GARANTIE I GARANZIA I GARANTIE I GARANTiA
LIMITED
WARRANTY
TO
ORIGINAL
CONSUMER
This Pr
oduct
(including any accessories included in
the
original packaging) as supplied and
distr
ibuted new
by
an
authori
zed
retailer
is
warranted
by
the
Distributor
to
the original
consumer
purchaser
against
defects
in material and
workmanship
("Warranty" ) as
follows
:
Product Territory
Porto WoiT8nty
Labor
Warranty
Camera
~orth
America
1
Year
1
Year
Camera Central and South America
1
Year
1
Year
Camera Asia, Africa, Australia ,
New
Zealand 1
Year
1
Year
Camera Europe
2Years
2Years
Camera
Russia
2Years 2Years
To
obtain Warranty Service and Troubleshooting contact lnfonnetion: Visit
our
website
at
www.polaroid.com. #
To
receive Warranty service,
the
original
consume
r purchaser
must
contact
the
Distributor.
or
an authorized
service provider
of
the
Distributor, for
problem
determination and service procedures. Proof
of
purchase in
the
form
of
a bill
of sale
or
receipted invoic
e,
evidencing that
the
Product is
within
the
applicable Warranty
periodfsl,
MU
ST
be
presented
to
Distributor, or
an
authorized service provider
of
the
Distributor, in order
to
obtain
the
requested service.
Shipping expenses
to
the
Distributor's service center or Return Facility are
not
covered by
this warranty, and
must
be
paid
by
the
consumer.
Exclusions and Umitatlons
This
Warranty
covers manufacturing
defects
in materials and
workmanship
encountered
in
the
normal,
noncomme
rcial use of the Product. and does
not
cover
consumer
instruction, delivery, installation, set-up,
adjustments,
cosmetic
damage or damage
due
to
acts of nature, accident,
misuse
, abuse. negligence,
commercial
use
or
modification of,
or
to
any part
of
the
Product. In addition. this Warr
anty
does
not
cover
images "burnt"
into
the
screen.
This Warranty applies
to
the
orig
inal
consumer
only and
does
not
cover products sold /lS
IS
or
WITH
ALL
FAULTS,
sold as Reconditioned, Refurbished
or
Remanufactured,
or
consumables {e.g., fuses, batteries.
bulbs etc.). The Warranty is invalid if
the
factory-applied serial
number
has been altered or removed
from
the
Product. This Warranty is valid only in
the
country
whe
re the cons
umer
purdlased
the
product. and only
applies
to products
purdlased
and serviced in
that
country
.
NO
WARRANTIES,
WHETHER
EXPRESS
OR
IMPLIED, INCLUDING,
BUT
NOT
LIMITED
TO.
ANY IMPLIED
WARRANTIES
OF
MERCHANTABILilY
OR
FITNESS
FOR A PARTICULAR
PURPOSE, OTHER
THAN
THOSE
EXPRESSLY
DESCRIBED
ABOVE
SHALL
APPLY.
DISTRIBUTOR
FURTHER
DISCLAIMS
ALL
WARRANTIES
AFTER
THE
EXPRESS
WARRANlY
PERIOD
STATED
ABOVE.
NO
OTHER
EXPRESS
WARRANlY
OR
GUARANlY
GIVEN
BY
ANY
PERSON,
FIRM
OR
ENTilY
WITH RESPECT
TO
THE
PRODUCT SHALL
BE
BINDING
ON
DISTRIBUTOR.
REPAIR,
REPLACEMENT.
OR
REFUND
OFTHE
ORIGINAL
PURCHASE
PRICE
-AT
DISTRIBUTOR
'S
SOLE
DISCRETION -ARE
THE
EXCLUSIVE
REMEDIES
OF THE
CONSUMER.
IN
NO
EVENT
WILL
DISTRIBUTOR, IT
S MA
NUFACTURERS, OR
PLR
IP
HOLDINGS,
LLC
BE
LIABLE
FOR
ANY
INCIDENTAL, DIRECT.
INDIRECT.
SPECIAL,
PUNITIVE
OR
CONSEQUENTIAL
DAMAGES
!SUCH
AS,
BUT
NOT
LIMI
TED
TO,
DAMAG
ES
FOR
LOSS
OF
PROFITS.
BUSINESS, SAVINGS,
DATA
OR
RECORDS)
CAUSED
BY
THE
USE, MISUSE
OR
INABILilYTO
USE
THE
PRODUCT.
EXCEPT
AS
STATED
HEREIN,
NO
OTHER
WARRANTIES
SHALL
APPLY.
NOTWITHSTANDING
THE
FOREGOING. CONSUMER'S
RECOVERY
AGAINST
DISTRIBUTOR
SHALL
NOT
EXCEED
THE
PURCHASE
PRICE
OF
THE
PRODUCT SOLD
BY
DISTRIBUTOR. THIS
WARRANlY
SHALL
NOT
EXTEND
TO
ANYONE
OTHER
THAN
THE
ORIGINAL
CONSUMER
WHO
PURCHASED
THE
PRODUCT
AND
IS
NOTTRANSFERABLE
.
Some
countries, states
or
provinces
do
not
allow
the
exclusion or limitation
of
incidental
or
consequential
damages
or
allow limitations on warranties.
so
limitation
or
exclusions may
not
apply
to
you. This warranty
gives you spec ific
legal rights. and you may have
other
rights t hat vary
from
state
to
state
or
province
to
province.
Contact
your
authorized
retailer
to
cletennine
if
another
waiT8nty
applies.
Po
laroid and Polaroid & Pixel are trademarks
of
PLR IP Holdings, LLC, used under license. PLR
IP
Holdings,
LLC
does
not
manufacture this product or provide any Manufacturer's Warranty
or
support.
GARANTIE
LIMITEE A L'ACHETEUR
ORIGINAL
Ce produit
(y
compris
tousles
accessoires inc/us dans l'
emba11age
d'orig
ine), ayant ate fourni
et
distribue a
/'&tat
de
neuf par un revendeur autoris
e.
beneficie
d'une
garantie de
Ia
part du distributeur au
ben~fice
du
premier acheteur
cont
ra
tout
d8faut
materiel
et
de
fabrication ( « Garantie ») salon les conditions suivantes :
l'tpe
dt
produh
Territoire
Garantie
s..-les
pilcn
Garantiesur
le
meia
l'mm:e
Appare
il
photo
Amerique
du
Nord
lan lan
Appar
eil
photo
Amerique
centrale
et
du
Sud
lan lan
Appare
il
photo
Asie, Afrique
. A
ustralia. Nouvelle
Zelande
lan lan
Appareil
pho
to
Europe
2ans 2ans
Appare
i/
photo
Aussie
2ans 2ans
Pour ben8ficier
d'un
service
de
garantfe ou obtenlr
des
coordonnHs
en
cas de problema : visltez
notre site
Web
sur
www.polaro1d.com.
Pour beneficier d'une reparation sous garantie,
l'adleteur
original doit contacter le distribute
ur
ou un
prestataire
autoris& pa r lui af in de
determine
r le problema ainsi
que
les p rocedures de reparation .
Une
preuve d'achat consistant en un acte
de
vente ou une facture acquittee.
mettant
en e vidence
que
la/les
periode(s)
de
garantie relative(s) au produit est/sont toujours en cours, DOlT
~tre
presentee
au
distributeur
ou
a son prestataire autorise afin
de
beneticier
de
Ia
reparation.
Les frais
d'
envoi vers le ce
ntre
de servi
ce
apr8s-vente
du
distributeur
ou
celui des retours ne
sont
pas
couverts par
cette
garantie
et
doivent
ll:
tre payes par l'acheteur.
Exclusions
et
limitations
Cette garantie couvre les
defauts
de
production tant materiels
que
de
fabrication, dans le cadre · d'une
utilisation normale
et
non-comme
rciale du produit et ne
comprend
pas les instructions a l'acheteur,
Ia
livraison. !'installation,
Ia
configuration. les r8glages. les
dommages
esthetiques
ou ceux resultant
de cas
de
force majeure, d'accident.
de
mauvaise utilisation, d'utilisation abusive,
de
negligence. d'utilisation
commer-
cials
ou
de
modification
de
tout
ou
partie du produit. De plus, cette garantie ne couvre pas les situations ou
une i
mage
reste figee
sur
l'ecran eteint.
Seull'acheteur
original
peut
bEmE!ficier
de
cette garantie
et
celle-d ne couvre pas les produits vendus TELS
OUEL ou AVEC TOUS
LES
DEFAUTS,
ceux
vendus apr8s avoir
eta
reconditionnes,
remis
a neuf
ou
refabriques.
de
mt!me
que
les consommables
(pa
r ex . : fusibles, piles, ampoules,
etc
.).
La
garantie sera
annul&e si le
numero
de
s&rie
imprime
en usine a
ate
altere
ou
supprime
du produit. Cette garantie e
st
uniquement
valide dans le pays
oU
l'acheteur a acquis le produit
et
s'applique
uniquement
aux produi
ts
achetes
et
entretenus
dans celui-ci.
AUCUNE
GARANTIE, EXPRESSE
OUTACITE
, Y
COMPRIS
ET
SANS
LIMITATIONTOUTE
GARANTIETACITE
DE
QUALITI~
MARCHANDE
OU
D:ADEQUATION A UN
USAGE
PARTICULIER
AUTRE
QUE
CELLE
EXPRE5-
SEMENT
DECRITE
CI-DESSUS
NE
S:APPLIQUERA.
EN
OUTRE, LE
DISTRIBUTEUR
DECLINE
TOUTE
GARANTIE
APRES
~EXPIRATION
DU
DELAI
DE
GARANTIE
FIGURANT
EXPRESSEMENT
CI-DESSUS.
AUCUNE
AUTRE
GARANTIE
EXPRESSE
ACCORDEE
PAR
TOUTE
PERSONNE,
SOCIETE
OU
ENTITE
N'ENGAGERA
LE
DISTRIBUTEUR.
LA
REPARATION,
LE
REMPLACEMENT
OU
LE
REMBOURSEMENT
DU
PRIX
D:ACHAT
ORIGINAL- A
LA
SEULE
DISCRETION
DU
DISTRIBUTEUR -CONSTITUENT
LES
SEULS
RECOURS
EXCLUSIFS
DONT
POURRA
BENEFICIER
l.:ACHETEUR.
EN
AUCUN
CAS,
LE
DISTRIBUTEUR,
LES
FABRICANT$
OU
PLR
IP
HOLDINGS,
LLC
NE
SERONTTENUS
POUR
RESPONSABLE
EN
CAS
DE
DOMMAGE
ACCESSOIRE, DIRECT.
INDIRECT.
SPECIA
L,
PUNITIF
OU
CONSECUTIF
ITELS
QUE
ET
SANS
LIMITATION
DES
DOMMAGES
POUR
PEATE
DE
PROFITS,
D:ACTIVITE, D'EPARGNE, DE
DONNEES
OU
D'
ENREGISTREMENTS)
RESULTANT
DE
~UTILISATION,
DE
LA
MAUVAISE
UTILISATION
OU
DE
~IMPOSSIBILITE
D'UTILISATION
DU
PRODUIT.
SAUF
DANS
LES
CAS
EXPRESSEMENT
PREVUS
CI-DESSUS,
AUCUNE
AUTRE
GARANTIE
NE
S:APPLIQUERA.
NONOBSTANT
CE
QUI
PRECEDE,
LES
RECOURS
DONT
DISPOSERA
I:ACHETEUR
VIs-A-VIS
DU
DISTRIBUTEUR
NE
POURRONT
DONNER
LIEU
AU
VERSEMENT
D'UNE
SOMME
DEPASSANT
LE
PRIX
D:ACHAT
DU
PRODUITVENDU
PARLE
DISTRIBU-
TEUR. CETIE
GARANTIE
BENEFICIERA
UNIQUEMENT A l.:ACHETEUR
ORIGINAL
AYANT
ACQUIS
LE
PRODUIT
ET
NE
POURRA
~TRE
ETENDUE A UN
TIERS, Nl
TRANSFEREE
D:AUCUNE
MAN I ERE
.
Certains pays, E.tats ou provinces n'autorisent pas !'exclusion
ou
Ia limitation
des
dommages
accessoires ou
consecutifs, ou
les
limitations
de
garantie,
c'est
pourquoi les
limitat
ions
ou
exclusi
ons
sont susceptibles
de
ne pas s'appliquer a vous. Cette garantie vous procure des droits juridiques sp8cifiques
et
vous ates suscep-
tible
de
beneticier
d'autres
droits
qui variant seton les juridictions. Contactez votre revendeur agree pour
eavolr
ei
une
autre garantie s'appllque.
Pola
roid
et
Polaroid & Pixel
sont
des marques commerciales
de
PLR
IP
Holdings, LLC qui sont utilisees
sou
s
licence.
PLR
IP
Holdings, LLC
n'est
pas le fabricant de
ce
produit et ne procure pas d'assistance
ou
de
garantie du fabricant.
Page 17

GARANZIA
LIMITATA
PER
IL
CONSUMATORE ORIGINALE
Questa prodotto
(incluso
qualsiasi
accessorio presente
nella
confezione origi
nale).
fornito e
di
stribuito come
nuevo
da
un rivenditore autorizzato,
e
garantito
dal
distributore per l'acquirente
or
igi
na
le con
tr
a
i
difetti
di
lavorazione
e del materiale
("Gar·anzia")
come
segue:
Tipo
di
prodotto
Territory
Pans
Warranty
labor
Warranty
fotocamera
Nord
America
1
Anno
1
Anno
Fotocamera
Centro-Sud
America
1
Anno
1
Anno
Fotocamera
As
ia
,
Africa,
Australia.
N
uova
Zelanda
1
Anno
1
Anno
Fotocamera
Europa
2Anni
2Anni
Fotocamera
R
uss
ia
2Anni
2Anni
Per
ottenere
i
contattl della manutenzlone
In
garanzla
e
Ia
risoluzione dei problemi: Visita
il
nostro
sito
web
www.polaroid.com.
Per ricevere
Ia
manutenzione in garanzia,
l'acquiren
te
originale deve contattare il distributors o un forni
to
re
di manutenzione autorizzato del di
str
i
bu
tors, p
er
Ia
determ
inaz
ione
de
i problemi e
le
procedure di manuten-
zione.
DEVE
essere presentata al distributors o a un fornutore di manutenzione autori
zz
ato del distributors,
una prova d'acquisto, in forma di ricevuta fiscale o fattura, che attesti che il prod
otto
rientra nel(i) periodo(i) di
garanzia applicabili, per ottenere
Ia
manutenzione richiesta.
Le spese di spedizione
al
centro di manutenzione del distributors o
Ia
restituzione non sono coperte da
questa garanzia e devono essere pagate dal consumatore.
Esdusioni
e
limitazlonl
Questa garanz
ia
co
pre i difetti
di
produzione
de
i materiali e
della
manodopera
ri
sco
ntr
ati nel'uso normale,
non commercial
de
l prodotto e non copre l'istruzione del consumatore,
Ia
consegna,
l'
installazione,
Ia
config
ur
azione, le regolazion
i,
il danno all'aspetto o il danno dovuto ad agenti
at
mosferici, incidenti, cattivo
utilizzo, abuso, negligenza, usa commerciale o a modifiche in tutto o parte
de
l prodotto. lnoltre, questa
garanz
ia
non copre le immagini
"bruciate" sullo
sdlermo.
Questa garanzia si applica solo
all'acquirente
originals e non copre i prodotti-
ve
nd
ut
i
COME SOO
o
CON
TlfiTI
I
GUASTI, venduti come riparati, ri
me
ssi a
nuevo o rilavorati o utilizzabili
(ad
es. fusibili, batterie, bulbi
ecc.).
La
garanzia non
e
valida
se
il numero seriale di fabbrica attribuito
e
state al
te
rate o
ri
mosso dal
prodotto. Questa garanzia
e
valida solo nel paese in cui il consumatore ha acquistato il prodotto e si
applica
solo su prodotti acquista
ti
e riparati in quel paese.
N
ON
Sl
APPLICA
A
LCUNA
GARANZIA.
SIA
ESPLICITA
0 IM
PLIC
IT
A,
INC
L
UDE
MA
NON
LIMITATA
A,
QUALSIAS
I
GARANZIA
IM
PLICI
TA
Dl
COMME
RCIABILITA
0
ID
ONEI
TA
PER
U
NO
SCOPO
PARTICOLARE,
DIVERSO
DA
QUELLI
ESPRESSAMEN
TE
DESCRITII IN
ALTO
. IL
DISTRI
BVT
ORE
INOLTRE
NEGA
TUITE
LE
GARA
N
ZIE
DOPO
IL
PERIODO
Dl
GARA
NZIA
ESPLIC
I
TO
DIC
HI
ARATO
IN ALT
O.
NESSUN
ALTRA
GARA
NZIA
ESPLICITA
0
FOR
NIT
A
DA
QUALUNQUE
PERSO
NA,
AZ
IE
ND
A 0 ENTI
TA
RISPETIO
AL
PRODOTIO
DEVE
ESSERE
LEGATA
AL
DIST
RIB
LJTORE.
LA
RIPARAZIONE,
LA
SOS
TITU
Z
IONE
0 IL
RI
MBORSO
DEL
PREZZO
Dl
ACQU
I
STO
ORIG
INA
LE
-A
SOLA DI
SCREZIONE
DE
L
DISTRIBLJTORE
-
SONO
RIMEDI E
SC
LUSIVI
DEL
CONSUMATORE.
IN
NESSUN
CASO
IL
DISTRIBLJTORE,
I
SUO
I
AGENTI
Dl
MANLJTENZ
I
ONE
0 IP
PLR
HOLDING
, L
LC
SARAN
NO
RESPONSAB
I
LI
Dl
QUALS
I
AS
I
DANNO
ACCIDEN-
TALE
,
DI
RETIO,
INDIRETIO.
SPECIALE,
PU
N
ITIVO
0
CONSEQUENZIALE
(COM
E,
MA
NON
LIMITATO
A,
DANNI
PER
LA
PERDIT
A
Dl
PRO
FI
TII
,
AFFAR
I.
RISP
ARMI.
DATI
0
REG
I
STRAZ
I
ON
II
CAUSAT
I
DALL:LJTILIZZO,
DAL
CATIIVO
LJT
ILI
ZZO
0 DA
LL:I
NCAPAC
I
TA
01
USARE
IL
PR
ODOTIO.
TRAN
NE
PER
Cl6
CHE
E
QUI
S
TABILITO
,
NESSUN
ALTRA
GARAN
ZIA
E
A
PPLI
CABILE
. TUTIAVIA IL
LA
SUDDETIA
RIVALSA
DEL
CLIEN
TE
SUL
DISTRIBLJTORE
NON
DOVRA
SUPERARE
IL
PRE
ZZO
Dl
ACQU
I
STO
DEL
PRODOTIO
·
VENDLJTO
DAL
DISTRIBUTORE.
QU
E
STA
GARANZ
IA
NON
SARA
ESTESA
A
NESSUN
ALT
RO
OLTRE
LACQUIRENTE
ORIGINALE
CHE
HAACQUISTATO
IL
PRODOTIO
E
NON
ETRASFER
IBILE.
Alcuni paesi, stati o province non permetto
no
l'es
cl
usione o
Ia
limitazione
di
inci
de
nti o danni successivi o
non permettono limitazioni
su
lle
garanzie,
perciO
in questa caso
Ia
limitazione o le esclusioni non possono
essere a te applicate. Questa garanzia
ti
da diritti
legali specifiche puoi avere a
ltr
i diri
tt
i che
va
riano da
state
a state o da provincia a provincia.
Contatta
il
tuo
rivenditore
organizzato
per
determinara
se
si
applica
un'altra
garanzia.
Polaroid e Polaroid
&
Pixel sono marchi di fabbrica di
PLA
IP
Holdings.
LLC,
usati sotto licenza.
PLR
IP
Holdings, LLC
non produce questa prodotto
ne
fornisce alcuna garanzia del produttore a
supporto.
BESCHRANKTE GARANTIE
FOR
DEN
ORIGINALKUNDEN
Dieses Produkt (einschlieBiid1 aller ZubehOrteile
a
us
der
Originalverpackung)
enthi:i
lt
, so wie es geliefert und
als
Ne
uw
a
re
durch einen autorisierten Vertriebspartner verkau
ft
wi
rd
. eine Garantie des Vertriebspartners.
Sie
gi
lt
ausschlieBiich
fUr
den Origi na!kunden,
der
das Produkt er
wo
rben h
at
und bezieht si
ch
a
uf
Defekte
des
Mat
erials und aufVerarbeitungsfehler
(
.,
Garantie
")
.
Die Details
Iau
ten
wie
folgt:
Produktart
Gebiet Materialgarantie
Verarbeitu•gsgarantie
Kam
era
No
rdamerika
l J
ahr
1
Jahr
Kame
ra
Mi
ttel·
und
SOdame
ri
ka
1 J
ahr
1
Jahr
Kame
ra
Asien,
Afrika
, A
us
tra
li
en
,
Neus
eela
nd
1 J
ahr
1Jahr
Kam
era
Euro
pa
2Jahre 2Jahre
K
amera
Ru
ss
!
and
1Ja
hre
2Jahre
PBitte
besuchen
Sie
unsera Websei
te
,
um
lnformatJonen
zur
lnanspruchnahme
der
Garantie
und
eine
Kontaktadresse
im
Faile
von
Problemen
zu
erflalten
:
UnsereWebseite
lautetwww
.
polaroid.com
.
Um die Garantie in Anspruch
zu
nehmen, muss der
Or
iginalkunde den Vertriebspa
rt
ner
oder einen seiner
autorisierten Serviceanbieter
kontaktieren, darriit
die Probl
ema
ermi
tt
elt und das weitere Verfahren
veranlasst werden
!<Onnen
.
Als Kaufnachweis dient der Beleg des Einka
uf
s oder die erhaltene Aechnung, a us
denen hervorgehen muss. dass d
as
Produkt sich innerhalb
der
gU
itigen
Ga
rantiezeit(en)
be
findet. Dieser
MU
SS
dem
Vertriebspart
ne
r oder einem seiner autorisierten
Se
rviceanbieter vorgelegt werden, um
fU
r
die
benOtigte
Dienstleistung berechti
gt
zu sein.
Die Garantie umfasst nicht die
Ve
r
sa
ndkosten an das
Se
rv
icezen
tr
um des Vertriebspartners ode r
an
ein
RUckse
ndezentru
m.
Diese
mU
ssen
vom Konsumenten beglichen wa
rd
en.
Ausschliisse
und
Beschrinkungen
Diese Garantie umfasst Herstellungsfehler beim
Mater
ia
l und der Verarbeitung, die beim normale
n,
nichtkommerziellen Einsatz des Produ
kt
es auftreten.
Sie
umfasst nicht die
Einweisung, Lieferung,
Installa-
ti
on
. Aufbau,
Ei
nstellung, optische
Schaden
oder Schaden
aufgrund von Naturkatastrophen,
Unf811e
n.
uns
achgema~er
Verwendung,
Missbraucll, Fahrlassigk.eit,
kommerzieller Einsatz oder
Mo
difikation des
Produkts oder einer seinerTeile. Des
We
iteren umfasst diese
Ga
rantie
ke
1ne
..
Sch
imme
rbilder',' die sich auf
dem
Bildschirm einpragen.
Diese Garantie gilt nur
fUr
den Originalkunden u
nd
bezie
ht
sich nicht auf Produk
te
.
di
e WIE
GES
EH
EN
oder
MIT
FEHLERN verkauft wurden oder nicht
auf
Uber
ho
lte,
instand gesetzte, wiederaufgearbei
tete
Pr
odukte
oder VerbrauchsgGter
(z
.
B.
Sicherun
ge
n. Batteri
en
,
GIUhbirnen,
etc.
).
Die Garantie
erlisch t,
we
nn die
Se
riennummer des Werks geandert oder vom Produ
k.
t entfe
rn
t w ird. Diese Garantie ist nur in dem Land
gU
iti
g,
in
dem
d
er
Kunde das
Pro
dukt gekauft hat und bezi
eht
sich nur auf
Produlcte,
die in diesem Land
gekauft oder gewa
rt
et wurden.
KE
INE
GARANT
IEN.
EGA
L DB
AUSD
R
UCKLIC
H
ODER
IM
P
LI
ZI
T,
EI
NS
CHLIESSUC
H. J
EDOCH
NI
CHT
BE
SCHRA
NKT
AU
F A
LL
E
IMPUZI
TEN
GA
RANTIEN
DER
MARKTGANG
I
GK
EIT
DOER
EIGNUN
G F
UR
EINEN
BEST
IMMTEN
ZWECK
.
AUSSER
DEM
OBEN
AUSD
RUCKU
CH
GE
NAN
NTEN,
SIND GULTI
G.
DER
H
ERSTELLER
UBERNIMMT
KE
I
NE
GA
RANT
I
EN.
D
IE
U
BE
R
DIE
DA
U
ER
DER
OBEN
GE
NANN
TE
N
AU
SDRUCKLIC
HEN
GARANT
IE HI
NAUSG
EHEN
.
KE
I
NE
WEI
TERE
AU
SDRUCKLICH
E
GEWAH
RL
EISTU
NG
DO
ER
GARANTIE,
DIE
VON
EINER
PERSO
N,
FIRMA
DOER
RECHTSE
I
NH
E
IT
FUR
OAS
PRO
DUK
T
AU
SG
ES
PROCHE
N
WURDE,
1
ST
FUR
DE
NV
ERTRIEB
SPARTNER
VE
RB
INDLICH.
REPARAT
UR
EN.
ERSATZ
DOE
R
ERSTATIUNG
DES
ORIGINAL-KAU
FPREI
SES -
1M
A
LL
E
IN
I
GEN
ER
ME
SSE
N DES
VERTR
I
EBSPAR
T-
NERS
-
S
IND
DIE
EI
NZ
IGEN
ANSP
RUC
HE
DES
KONSUMENTEN
.
DER
H
ERSTE
LL
ER
.
SE
I
NE
PROD
UZENTEN
DO
ER
PLR
IP
HOLDINGS,
LLC
SIND
UN
TE
R
K
EINE
N
UMST
ANDEN
HAFTBA
R FUR
ALLE
V
ERS
EHENTLICHEN
,
DIREK
TE
N, I
ND
I
REKTEN,
SPEZ
I
ELLEN
,
S
TR
AF
-
DOE
R
FOLGESC
HADEN IZ.B
..
J
EDOCH
NICHT
BESCHRANK
T
AU
F
SCHADE
N
AUFGRUND
V
ON
GEW
IN
NAU
SFALL.
GES
CHAFTSA
US
-
FAL
L,
GUTHABEN-
DAT
EN-
DOER
AUF
ZE
ICHNUN
GSV
E
RL
UST
ENI
, DIE
DU
RCH
DIE
VERWEND
UNG
,
MI
SSBRAUCH
DOER
UN
SACHGEMASSE
N EI
NSATZ
DES
PRODUKTS
AUFTR
ETEN.
MIT
AUSNAHME
DER
BESC
HR
IE
BENEN
GARAN
TIE
B
EDIN
GUNGEN
WERDEN
K
EI
NE W
ElT
ER
EN
GARA
NTIEN
UB
ERNO
MMEN.
UNGEAC
HTET
OBIGEM
DURFEN
DIE
FO
RDERUNGEN
DES
KUNDEN
GEGEN
DEN
VER
T
RIEBSPARTNER
N
ICHT
DEN
KA
U
FPRE
IS
DES
PROD
UK
TS
UBERSTEIGEN
,
DAS
VOM
V
ER
TRIEB
SPAR
TNER
V
ER
KAUFT
WURDE
.
D
IESE
GARANTIE
1
ST
NUR
FUR
DEN
OR
IG
INALKONSUME
NTEN
.
DER
DAS
PRODUKT
GE
KAUFT
HAT,
GU
LT
IG
UNO
FUR K
EINE
ANDERE
PERSON.
S
IE
1ST
NI
CHT
U
BERTRAGBA
R.
Einige
Lander,
Staaten oder Provinzen erlauben keinen Ausschluss oder keine
Einsch
rBn
kung
von Folge-
oder
sonstigen
SchBden
oder Garantieeinschr8nkungen. Die
Einschri:inkung
oder der Aussch luss
kOnnte
si
dl
daher nicht auf
Sie
beziehen. Diese
Ga
ran
tie
ge
wi:ihrt Ihnen
bestimmte Rechtsan
sp
rUch
e
und Sie
kOnnten
andere Rechte haben, die von
La
nd
zu
Land oder Provinz
zu
Provinz unterschi
ed
lich sein
kOnnen.
Bitte
kontaktieren
Sie
lhren
autorislerten
Einzelhindler,
um
in
Erfahrung
zu
bringen,
ob
as
zusitzllche
Garantien
fUr S
le
glbt
.
Polaroid und Polaroid
&
Pixel si
ndWa
renzeichen
vo
n
PLR
IP
Holdings,
LL
C.
und warden
unter
Uzenz
genutzt.
PLR
IP
Holdings,
LLC,
stellt dieses Pr
od
ukt
nidlt
her und bietet
keine
Herstellergarantie oder
Se
rvic
e.
GARANTiA
LIMITADA
PARA
EL
CONSUMIDOR ORIGINAL
E
ste
Produc
to
(incluyendo cual
qu
ier accesorio in
cl
uido en
el
embalaje original) suminis
tr
ado y di
st
ribuido
nue
vo par un minorista aut
or
izado se garantiza par el Distribuidor p
ara
el comprador
·co
ns
um
idor original
contra defectos en los material
es
yen
Ia
mana de obra
("Garantia")
como
sigue:
Tipo
de
producto
Territorio
Garantia de l
as
piezas
Garantia
de
mano
de
obra
Cama
ra
Norteam
er
ica
1a
flo
1
alio
Camara
Ame
ri
ca
Cent
ral
v
de
l
Su
r 1
ano
1
a
fio
Cama
ra
Asia. Africa. Aus
tralia
.
Nueva
Zela
nda
1a
fi
o
1a
fi
o
Ctimara
E
ur
opa
2afi
os
2
a
fl
os
Ctimara
Rus
ia
2anos 2
a
Fio
s
Para
obtener
Ia
informac
i
On
de
contacto
del
servicio
de
Ia
Ga
rantia
y Resoluci6n
de
proble
ma
s:
vi
site
nuestra
p8gina
web
en
www.polaroid.com.
Para
re
cibir el servicio de
Gara
ntfa, el comprador
or
iginal debe ponerse en contacto con el Distribuid
or
a
co
n
un servicio au
tor
i
za
do del Distribuidor para determiner el problema y l
os
procedimien
tos
del
servicio.
Pa
ra
obtener el
se
rvicio
so
licitado
se
DEBE presentar al Dis
tr
ibui
do
r o a un proveedor del servi
ci
o auto
ri
zado
de
l
Di
str
ibui
do
r prueba de
co
mpra en
for
ma de
una
fa
ct
ura
de
venta o un recibo, evidencia
ndo
asf que el
Produc
to
se encu
ent
ra de
ntro
del
pe
riodo/s de
ga
rantfa aplicable.
L
os
gastos de envro al centro de servicio del Di
st
ribui
do
r o a las lnstalaciones de
devoluciOn
no
estan
cubiertos par esta garantfa, y deben ser p
agad
os p
ar
el consumidor.
Exclusiones
y
limitac
l
ones
Esta
Ga
rantfa cubre los
de
fectos
de
fabricaci6n en los materiales y
Ia
mana de obra encontrados en un uso
normal y
no
comercial del Producto. y no cubre
Ia
fo
rmaci6n del
co
n
sum
i
do
r,
ent
rega, instalaci6n, confi
gu
ra-
ci6n, ajustes,
danos
cosmeticos o
daflos
debido a aetas
de
Ia
natural
eza
, accide
nt
es, m al uso,
abuse,
negligencia
, usa comercial o m
od
ificaci6n
de
l
Pr
oducto a de cualqui
er
pa
rte de este.
Ademtis,
esta Garant!a
no
cubre las imagenes "quem adas·
en
Ia
pa
ntalla.
Esta
Ga
rantla se aplica sola
men
te al consumi
do
r
original
y
no
cubre productos vendidos TAL
CU
AL
o
CON
TODOS LOS
POS
IBL
ES
FA
LLOS,
vendidos como repa
rad
os
, restaurados o refabricados. o
co
nsumibles (p.
ej. fusibles, baterfas,
bombillas, etc.). La
Ga
ra
nt
ia n
oe
s
v
~
l
id
a
si el
nUmero
de serie aplicado
de
f8bri
ca
ha
si
do
a
lt
erado o eliminado
de
l Producto. Esta
Ga
rantia es
v8
1i
da
solamente en el pais
do
nde el consumi
dor
adquiri6 el produ
cto
, y sola men
te
se
aplica
a los productos adquirid
os
y distribui
do
s en ese pais.
NOSE AP
LICARAN
GARA
NTIAS
.
TAN
TO
EX
PR
ESAS
COMO IMPLiCIT
AS
.
I
NC
L
UY
END
O, PE
RO
NO
LI
MI
TA
-
DAS
A.
CUALQ
UI
ER GA
RA
NTIA IMPLICI
TA
DE
COM
ERC
IABI
LI
DAD
0
IDONE
I
DAD
PARA
UN
PROP
6 S
ITO
EN
CONCRE
TO
,
APA
RT
E
DE
AQUELLAS
DESCR
I
TAS
E
XPRE
S
AM
ENTE
ARR
IB
A.
EL
DISTRIBUI
DOR
RE
NU
NC
IA
ADEMAS A
TODAS
LAS
GARA
NTiAS
TR
AS
EL
PER
IO
DO
EX
P
RE
SO
DE
GARAN
TIA
ES
TA
B-
LE
CI
DO
ARR
I
BA.
NI
NG
UNA O
TRA
GAR
AN
TI
A
EXPRESA
DADA
POR
CUA
LQUI
ER
P
ER
SONA, FIRMA 0
ENT
I
DAD
CON
RES
PECTO
AL
P
RODUCTO
SE
RA
VI
NC
U
LAN
TE
PAR
A
EL
DISTRI
BUIDOR.
LA
RE
PA
RA
-
CI6
N,
REEMPLAZO
0 R
EEMBOLS
O
DEL
P
REC
IO
DE
ADQUISIC
I6
N
OR
I
GINAL
-
A LA
SO
LA DISC
RE-
C
16
N
DEL
DIS
TR
IB
UI
DOR
-
SON
LOS
RECURSOS
E
XC
LUSIVOS
DEL
CONSUM
I
DOR
. EN
NINGUN
CA
SO
,
EL
DIS
TRI
BU
I
DOR
,
SUS
FA
BRI
CANTES
0
PLR
IP
HO
LD
IN
G
S.
LLC
SER
AN
RESP
ONSA
BL
ES
P
OR
NI
NG
UN
DAN
O I
NC
I
DENTAL
, DIRECTO,
IN
D
IREC
TO
,
ESPE
CIAL. PUNI
TI
VO
0
RES
UL
TANTE
(COMO
POR
EJEMP
LO.
PER
O
NO
LI
MITADOA,
DANOS
POR
PERD
I
DA
DE
BENEFICIOS,
N
EGO
CIO,
AHO
RRO
S.
DATO
S
0 R
EG
I
STROS
)
CAUSADO
PO
R
EL
U
SO
.
MAL
U
SO
0 I
NC
AP
ACI
DA
D
DE
USAR
EL P
RODU
C
TO
. EX
CE
PTO
COMO
SE
ES
T
AB
L
ECE
EN
LA
PRESE
N
TE
,
NO
SE
AP
LI
CARA
NI
NGU
NA
OTRA
GARANTI
A.
NO O
BS
TA
NTE
LO
ANTERI
OR
.
EL
RESARC
IMI
EN
TO
DEL
DI
STR
I
BUID
OR
CON
RESP
EC
TO
AL
CO
NS
UMI
DO
R
NO
E
XCED
-
ER
A EL
P
REC
IO
DE
ADQUISICI6N
DE
L
PRODUC
TO V
END
I
DO
POR
EL
DI
ST
RI
BU
I
DOR
.
ES
TA G
AR
ANTIA
NOSE
EXT
ENDERA A
NINGUN O
TRO
QU
E EL
CO
NS
UMI
DOR
ORIGINAL
QUE
ADQ
UIR
I6
EL
PR
OD
UCTO
Y
NO
ES
TRANSFER
IBLE.
Algunos paises, estados o provincias no permi
ten
Ia
exclusi6n o li mita
ci
6n de darios incide
nt
ales o
resul
tant
es o perm iten l
im
itaciones en las
gai"
antias.
par lo
que
a usted se le podria aplicar limitaciones a
exclusiones. Esta garantia le otorga a usted derechos legales
especlfico
s,
y usted puede tener otr
os
de
rechos que var
fa
n de estado a estado
ode
provincia a pr
ov
incia.
Contacte
con
su
minorista
auto
riz
ado
para
determinar
sl
se aplica
otra
garant
i
a.
Po
laroid y
Po
laroid
&
Pixel
so
n marcas comerciales de PLR
IP
Holdings,
LLC.
u
sa
d
as
bajo
licencia.
PLR
IP
Holdings.
LLC
no fabrica este produc
to
ni proporciona ninguna asistencia o
Ga
ra
nt
la del
fa
brican
te
 Loading...