

Page 1

• Polaroid
HD
Camera Action HD Professionnelle I Telecamera Professionale HD per Sport Estremi I
Professional Action
Cam
era
Professionelle HD Action-Kamera I Camara HD
XS100i
profesionall
~M~Ji.::Z;f-'Y
t:'-T'/ffJ
j.
7
www.polaroidactlon.com
Page 2
POLAROID XS1
00i
USER GUIDE
PARTS FAMILARIZJ\
1.
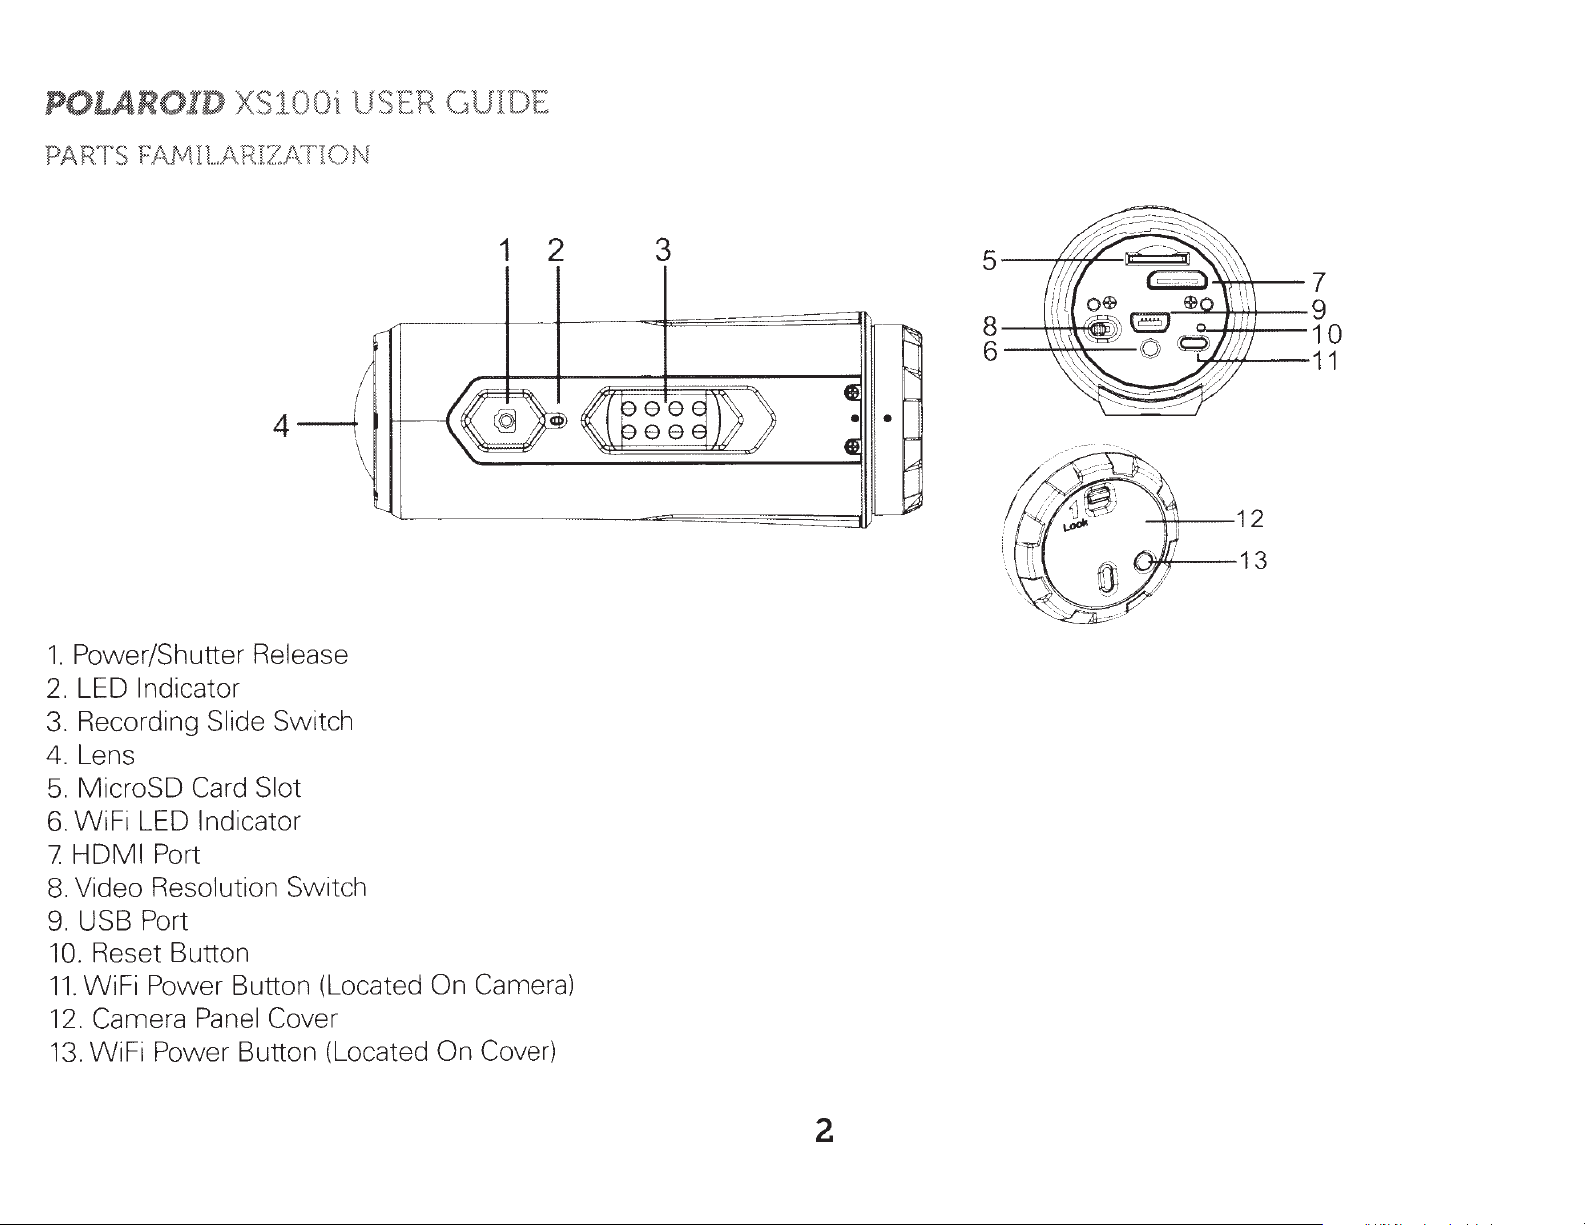
Power/Shutter Release
2.
LED Indicator
3.
Recording Slide Switch
4.
Lens
5.
MicroSD Card Slot
6.
WiFi LED Indicator
HDMI
7
8.
Video Resolution Switch
9.
USB Port
10.
Reset Button
11.
WiFi Power Button (Located On Camera)
12.
Camera Panel Cover
13.
WiFi Power Button (Located On Cover)
Port
T10N
1 2
3
5
s~Lll..L
6~~:::...._
'1]7'
I/
B ,o
I
'1_..;;;;,.;:""--J'..-i+J---
I
2=
7
9
10
'7"7'+"'~----11
12
13
2
Page 3

Welcorne
Thank you for your purchase
helmets
mounting
cups and board
and any
parts, USB cable,
type
mounts
of
handlebar
will soon be available
of
the
Polaroid XS100i camera. As supplied herein,
or
software
pipe
and,
between
of
course,
at
polaroidaction.com. Check
POLAROID XS100i USER GUIDE
the
XS100i can be
. 75 and
the
1.4
inches
camera are included. Additional exciting
in
diameter. All
the
site
the
frequently
mounted
necessary straps, interlocking
mounts
for
new
accessories.
on all kinds
like suction
of
What's
• Camera
•
•
• Secure String
• Mount-Lock
• Mount-Lock Key
• Manual
• Carrying pouch
•
• Handlebar
• Assorted mounting hardware
Included
Mini
HDMI
Helmet
USB
to
Cable
mounts
mounts
in
the
Box?
USB cable
with
with
(all
quick
belt hook
helmet
(all
disconnect
types)
bars measuring .75-in to 1.4-in)
PRECAUTIONS
1.
2.
3.
4.
5.
6.
7.
Make
enter
If
permanent
There are
surfaces. This may cause
customer
A camera is a precision instrument. Do
so may render
Do
temperatures
Before you move
This is
sure
the
the
camera has been dropped or its case has been damaged, turn
not
the
XS100i's back cover is
camera, turn
damage and/or personal injury.
no
user serviceable parts
service information.
the
leave
an
the
camera
may adversely affect
the
extreme
the
the
camera inoperative.
in
camera,
sports video product. Please be careful
power
places
off. Continued use may cause
camera
disconnect
twisted
in
the camera: DO NOT DISASSEMBLE! Do
to
fall or
not
where
the
case or internal parts
on and
tilt
drop, strike, or use excessive force
the
temperature
cords and cables. Failure
completely
over, causing damage. For repair, visit polaroidaction.com for
may rise significantly such
that
sealed before use.
an
injury.
the
of
the
camera.
to
do
you
don't
If
foreign objects or
power
so may damage
mount
off. Continued use may cause
not
place
when
the
handling
as
camera in a fixed position
the
camera on unstable
the
inside a
the
cords and cables.
water
camera. Doing
car.
High
3
Page 4
POLAROID
X
S10
0i USER
GUI DE
where, in
Charging
1.
2. Connect
3. The Red LED remains on
4. The Red LED
5. Charge
6.
the
Connect
It
takes about 3 hours to
the
event
of
an
Battery
the
USB
the
cable's
the
battery before using
cable's
USB plug
will turn
off
accident, you subject yourself
mini USB plug
into a USB port
while
when
initially
the battery is charging.
the
the
charge the camera. Subsequent charges w
into the camera's mini USB port.
battery is
camera for
Additional Information
When
The camera
file
DO NOT
camera.
Insert
The XS100i supports MicroSD cards up to 32GB .
definition (FHD) video for approximately
camera,
the
battery
and then
attempt
Micro
the
power
w i
ll
vibrate
shut
SD
Red
down.
to
remove
Card
and Green LED
is
low,
the
camera will
two
seconds to indicate i
the
internal
@will flash alternately
vibrate three
battery. Doing so
4-hours
of
any computer. Verify that
fully
t's
out
At
the rate
(1080p@30
charged.
the
very first time.
of
will void the warranty coverage and can
and
to
bodily contact
times
power. If
of
fps or 720p@60 fps).
continuously.
to indicate a
the
4GB per
came ra is recor
half-hour,
with
low
the camera.
the
computer
il
l
take 3 hours or less.
battery.
di
ng, it
a 32GB card
If
there
is
is
w
w
no MicroSD card
on.
ill
automati
possibly
ill
record
ca
lly
save the
damage the
full
high
in
the
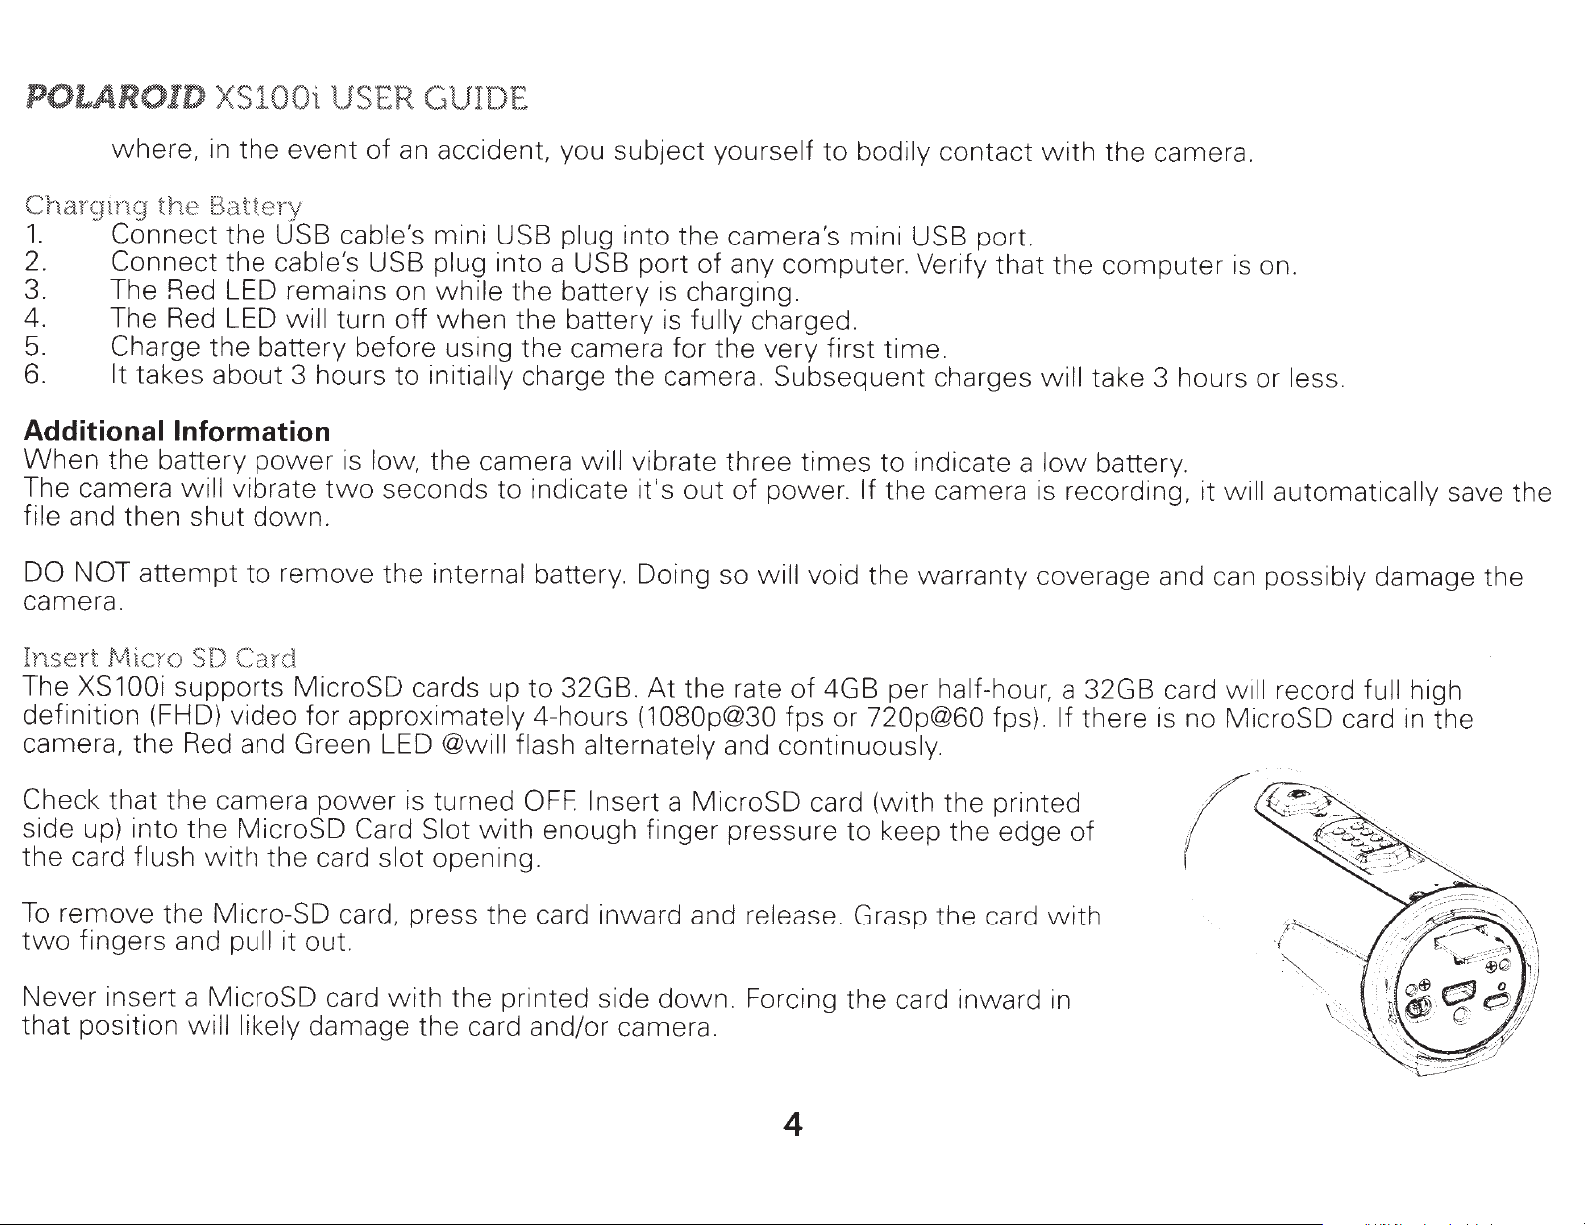
Check that the camera
side up) into
the
card flush
To
remove the Micro-SO card, press the card inward and
two
fingers and
Never insert a MicroSD card
that
position
the
MicroSD
with
pull it out.
will likely
power
the card slot
damage
is turned
Card Slot
with
OFF Insert
with
opening.
the printed side down. Forcing the card inward in
the
card and/or camera.
enough finger pressure to keep the edge
a MicroSD card (with the
release.
Grasp the card w ith
4
p
ri
nted
of
(
I
Page 5
A
new
MicroSD
"Connecting
te
Da
ng
Setti
set
can
You
camera's
the
in
the
up
set
To
1.
2.
Insert
Connect
3. Press
4. Using
be 2
will
Mac
for
open it.
the
5.
6.
7
8.
Find
Enter
clock (Check
PC
Click "Ok"
Then
time
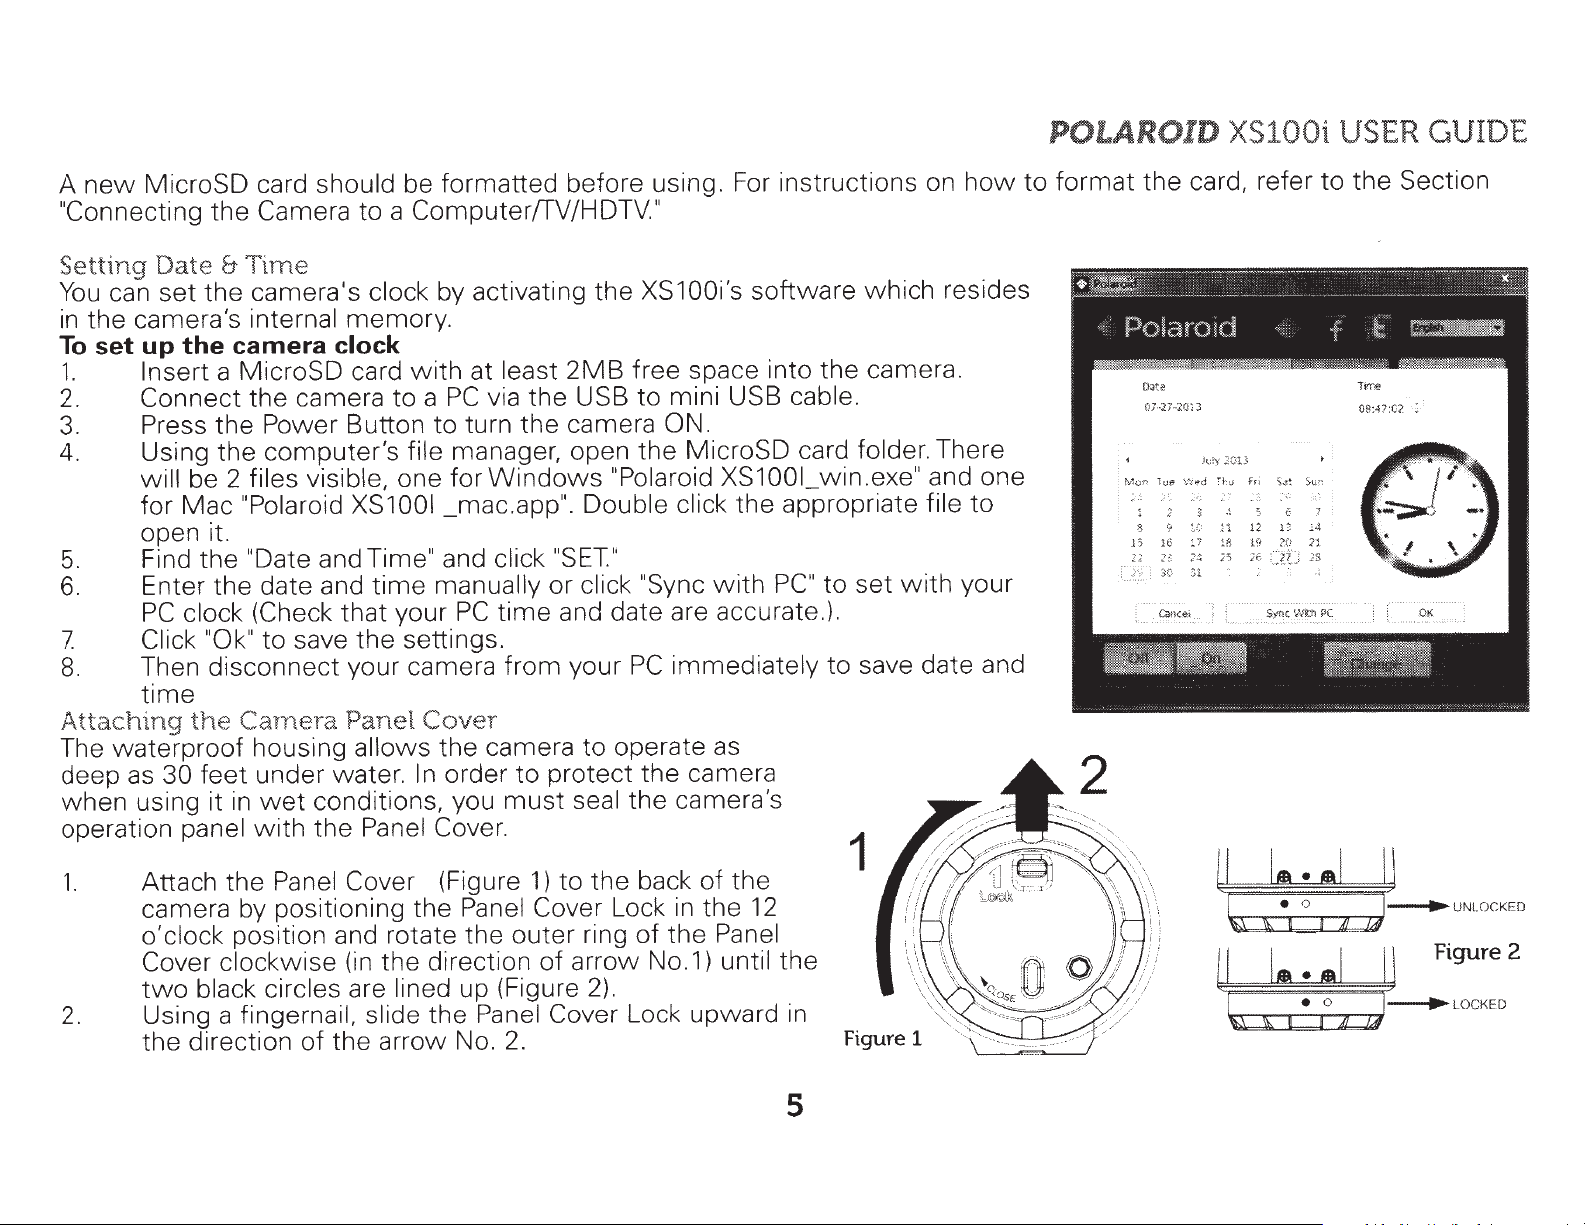
Attaching
waterproof
The
deep
as
when
operation
1.
the
feet
30
using it in
panel
Attach
camera by posi
lock
o'c
Cover
black circles are
two
2.
Using a fingernail, slide
direction
the
should
card
Camera
the
Time
&
camera's
the
internal
camera
MicroSD
a
the
Power
the
computer's
the
clock
camera
files visible, one
"Polaroid
date
and
and
"Date
the
that
save
to
disconnect
Carnera
housing
under
wet
with
the
position and
clockwise
water
condit
the
Panel Cover
tioning
th
of
formatted
be
Computer!fV/HDTV."
a
to
clock
by activating
memory.
at
with
card
PC
a
to
turn
Button
to
manager
file
for
XS1001
_mac.app".
Time" and
time
the
manually
your
PC
settings
your camera
Panel
allows
Cover
the
order
In
.
camera
ions, you
Panel Cover.
(Figure
Panel Cove r
the
the
direction
up
Panel Cover Loc k
the
No
(in
e
rotate
the
lined
arrow
before
the
the
the
2MB
USB
camera
open
,
least
via
Windows
Double
click "SET''
click "Sync
or
time
and
.
from
your
to
protect
to
1)
of
seal
the
to
ring
arrow
2)
must
outer
(Figure
. 2.
using. For ins tructions on
XS100i's
space i
free
mini USB
to
software
the
nto
cable.
ON.
folder.
MicroSD
the
"Polaroid
click
are accurate.
date
immediately
PC
operate
camera
the
camera's
the
XS1001
the
with
as
card
win
appropriate
set
to
PC"
).
save
to
1
the
back
Lock in
of
.
of
the
No.1)
upward
the
Panel
until
12
the
in
Figure 1
which
resides
camera.
There
.exe" and
file
your
with
date
how
one
to
and
POLAROID
format
to
the
O
()
!uf') Toe'
...
r.
1
'
~
t
a
27
··
7
16
:>
S(
XS
card, refer
3
i
(J
2
..
2(:.13
1y
:
c.
.l
h ; f 1l
!'
d
~
,
...
;,,
·'
'
-~
l
2
~
:~
:
~
l7
?~
J1
c
~
"
12
1
8
3
I • ,
\\
t!
00i
1
!
;~~
f.:
·
1:
$1
•••
I
USER GUIDE
Section
the
to
rr<>
T
08:-l?:C?.
Su'~
111_
)3
I
..
Figure 2
II
UNLOCKED
5
Page 6
POLAROID
XS100i USER GUIDE
remove the
3.
*Failure to
cover
*The rubber seal on the Panel Cover forms the
conditions.
camera.
*After
Failure to rinse
Powering
To
1.
2. The camera will
To
1.
2.
To
properly
water
every
damage resulting from
must
You
use in salt water, you
off
On/Off
camera
turn
turn
the
Press and hold the Power Button
camera
the
Press and hold the Power Button .
The camera
Panel Cover,
your
seal
keep this seal clean; a single strand
water
salt
ON:
vibrate, and the Green LED will turn on.
OFF:
vibrate
ll
wi
camera can result in leaks
can cause corrosion
simply reverse the procedure
user
will
seconds, and the Green LED
two
neglect.
need
to rinse the outside
that
waterproof
of
within
the camera and, in turn, damage
steps 1 and
in
may
barrier to
hair
damage
a single grain
or
the
of
will
or
protect
product
turn off.
2.
destroy
the camera in
and
your
sand can cause
of
the seal
camera.
and
wet
with
result.
will
Your
non-salt water, then
warranty does
underwater
water
to leak into the
not
dry.
Recording
Before you start recording, select the video resolution by switching the Video Resolution Switch There are
options
resolution by changing the settings
There are
vibration indicates recording has started. The LED indicator illuminates
Method
recording.
Method
Button
Videos
select from : HD
to
methods available for starting the video record function. Recording is delayed
two
Whether
1:
When
2:
turn the camera
to
your camera
(720p 60fps
the camera
is
ON,
or 720p 30fps)
XS100i
with
power
OFF and
and it will start recording.
the
is
ON
the
OFF,
or
Recordi
and FHD
software.
simply
ng
1080p 30fps
HD
(Full
RED
ide the Recording
sl
Slide Switch is at the
throughout the recording.
960p 30fps).
or
ide Switchfrom
Sl
REC
location, press and hold the Power
seconds
1-2
You
STOP
6
two
can
a short
as
RECto
to
HD
change the
start
Page 7

To
stop recording, move the Recording Slide Switch
to
will illuminate GREEN
is
option
and
*A smaller video file
an HD/FHD video file. The smaller video file size
email
*Changing video resolution is disabled during video recording.
*Check
5-seconds,
flashes continuously.
T
aking Photos
The XS100i camera allows you to take
To
capture a still image
1.
2. If
3.
to hold
the
Red
.
that
and
Turn on
the
After the camera
of
the
the
LED light will turn off.
the MicroSD card has sufficient space to capture your video. The card
the Green LED
the
camera by pressing the Power Button .
camera
Green LED indicate a still photo has been recorded.
indicate
Power Button
of
432x240
is
in
the
power
the
recording has stopped. The camera will
to
stop
the
recording and turn
(w/1080p/720p)
16MP,
video recording mode, move
has been turned on, press the Power Button
5MP,
from
or
320x240
allows
3MP,
REC
for
more
VGA
the
PO
LAROID
to
STOP The camera will vibrate and the LED Indicator
then
the
camera off. The camera will vibrate
(w/960p)
efficient
high-quality still images .
Recording Slide Switch
will
be created simultaneously
uploading
to
enter
is
take a photo. A short vibration and a flash
of
content
full
to
the
Standby mode. An additional
when
STOP
XS100 i USER GUIDE
two
when
to social media sites
the camera vibrates for
seconds,
recording
and
*The still
*The default
"can't miss"
change the mode, please
*When
continuously.
photo
the
function
photo
moment.
memory card
mode
Time Lapse
is
disabled during video recording.
is "single photo."
mode
refer
becomes
to the section "Changing the camera settings"
full, the camera
Burst
can be utilized to take a series
mode
will
gives you a series
vibrate for five seconds
of
of
photos
10
7
photo
and
shots
at
5, 10,
the Green LED
30
per
second
or
60-second intervals.
to capture that
will
flash
To
Page 8
POLAROID XS100i USER GUIDE
Reset
Resetting
Press the Reset Button
the
Camera
with
a thin and blunt object
to
reset
the
camera
to
the factory default
sett
ings.
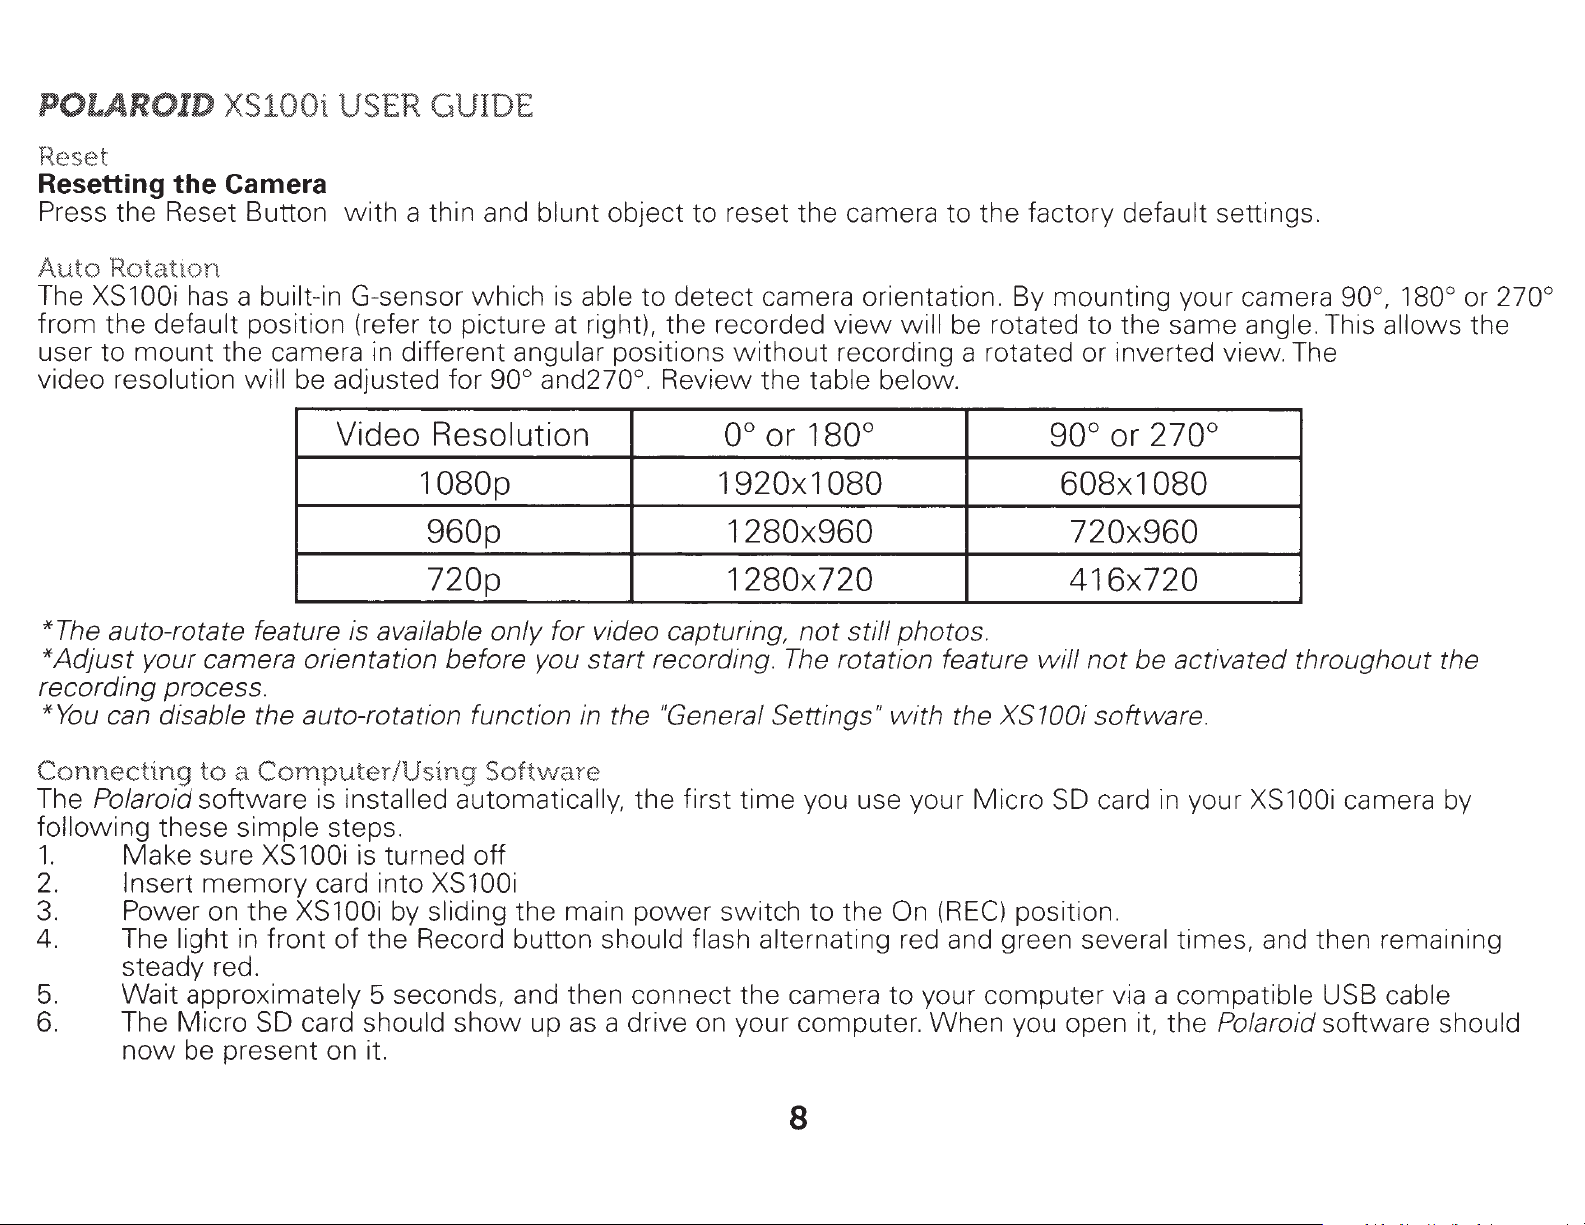
Auto
The
from
user
video resolution
Rotation
XS 1 OOi
the
default position (refer
to
mount
has a built-in G-sensor which
to
picture at right), the recorded
the camera in different angular positions
will
be adjusted
Video
for
goo
Resolution
is
able
and270°. Review
to
detect
without
oo
camera orientation. By mounting your camera
view
recording a rotated or inverted view. The
the
table below.
or 180°
1080p 1920x1080
960p 1280x960 720x960
720p
*The auto-rotate feature is available only for video capturing,
*Adjust
recording process.
*You can disable the auto-rotation function in the "General Settings"
Connecting
The Polaroid software is installed automatically, the first
following
1.
2.
3. Power on
4. The light in front
5.
6. The
your camera orientation
to a Computer/Using
these
Make sure
Insert
steady red.
Wait
Micro
now
simple steps.
XS 1 OOi
memory
the
XS100i by sliding
approximately 5 seconds, and then connect
SD
be present on it.
is turned off
card into XS100i
of
the Record button should flash alternating red and green several times, and then remaining
card should
before
Softv-Iare
the
show
you
start
main
up as a drive on your computer.
recording.
power
1280x720 416x720
not
still
The
rotation feature
time
switch
the
you use your
to
the On
camera
will
be rotated
photos
with
to
the XS100i software.
(REC)
your
When
goo.
180° or 270°
to
the same angle. This allows the
90°
or
270°
608x1080
.
will
not
be activated throughout the
Micro
compute
SD
card
position.
r via a compatible USB cable
you open it, the Polaroid software should
in
your XS100i camera by
8
Page 9

POLAROID
XS100i
USER
GUIDE
TROUBLESHOOTING: If
time
Browsing Files
1.
2.
3.
*The FHD!HD video files
be saved as ACTP0001 thm.mov.
NOTE: Due to that
it
Link
You
the
TWITIER pages.
Chaging
The XS100i camera settings can be changed by utilizing the video camera's
software. Simply click on the options
menus.
after powering on camera before connecting
and
Click the "Browse Files" icon, and the file folder will pop up; the saved photo and video files will be displayed on
browser.
Double click a photo or video file
Copy or Move
websites or
will
play
in
Ouicktime, Real and
to
PolaroidWebsites:
can access more Polaroid Action information by clicking the icons at
top
of
software. Links will take you
Camera
in
it
Settings
the
Polaroid software does
Transferring
the
files
to
email.
will
be saved as
records in
.mov
not
to
computer.
Them
your
most
to a PC
to
preview
PC
hard drive
ACTPOOOJ.mov.
format the videos recorded
other
to
in
the
players.
our website, FACEBOOK and
Photo, Video or General
the
to
store them
appear on the card, repeat steps from the beginning. Allow more
content.
in
your computer or share them on social media
The
432x240
won't
or
be able to play back
320x240 video recorded
in
Windows Media Player
at
the same time
the
will
but
9
Page 10

POLAROID
Set
up on Photo Menu
Click "Photo"
to
XS100i
select the desired photo resolution and mode. The active mode
USER
GliDE
will
become highlighted.
Setting
Click
the "Video"
the
Video
Resolution
menu to select
Mode
Photo Resolution
Photo
Mode
Time Lapse
the desired video resolution. The active mode
Options
16MP, 5MP, 3MP, VGA
Single
Shot, Burst
(1
0-frames/sec),
Time Lapse
5,1
0, 30, 60 seconds
will
be
highlighted.
10
Page 11

Video Resolution Values
POLAROID
XS100i USER
GJIDE
Scttlng
Click
the
the
(Jcneral
"General"
Mode
FH
D
HD
Mc11'
menu to
t
Resolution
Resolution
select
various operational
Options
1
080p: 1920x1
30
fps
(default) 960p: 1280x960 pixels
(4:3),
30
fps
720p: 1280x720
60
fps
(default) 720p: 1280x720 pixels
(16.9),
settings for the camera. The active mode
30
fps
080
p1xels
pixels
(16:9),
(16:9),
will
be
highlighted.
11
Page 12

POLAROID XS100i USER
QJIDE
User
To
Connecting
Connect
TV
*In
*Be
*No
Taking Photos
1.
2.
3.
4.
5.
Selectable
reset the camera
to
your
menu
order
sure there is a
files
Press and hold the Power
Press
Slide
Press
Press
XS100i
will
pop up.
to turn
will
be
the
the Recording Slide Switch
the
the
Options
Mode
TV
Type
Auto
Auto
Date
to
the default settings,
an
HDTV
camera
You
off
the camera, you
MicroSD
displayed on the
with
TV
Power
Power
Power
Button briefly to select the
Button
Button
to
can preview, playback, and delete files or format
card
Power
I
mage Rotation
&
Time
an
in
TV
Button until
twice
to
take photos.
Off
cl
ick
HDTV
the camera
screen
with
will
first
need
if
you
the
to
STOP
to enter Photo Previ
Options
PAL, NTSC
Off, 1-min, 3-min
On,
Off
Date, Time, Sync
"Reset
the
HOM
to disconnect the camera from the HDTV
or
no card
don't
TV menu appears.
Preview
All."
I
to
will
have
mode.
ew
mini
be
any
mode.
HDMI
displayed on the TV screen.
files in the MicroSD card
cable.
the
When
MicroSD
with
you are successfully connected, the
PC
card through your TV screen
Recording Video
1.
2.
3.
4.
Press
Press
Slide
Press
and hold the
the
the Recording
the
with
Power
Power Button
TV
Power
Button briefly to select
Slide Switch
Button until the TV menu appears.
the
twice
to
REC
to
enter Video
Preview
.
Preview mode.
mode.
12
Page 13

POLAROID
XS100i
USER
GJIDE
5.
Hint:
Playing
1. Press and hold the Power Button until the TV menu appears.
2.
3. Press the Power Button
4.
5.
6. Press and hold the Power Button
Playing
1.
2.
3. Press the Power Button
4. Select the desired video file you
5. Press the Power Button
6.
7.
Press the Power Button
Switch
You
can use the Recording
to
STOP
The camera
Back Photo Files
Press the Power Button briefly
Select the desired photo file you
a)
Move the Recording
b)
Move the Recording Slide Switch
Press the Power Button
Back Video
Press and hold the Power Button until the TV menu appears.
Press the Power Button briefly
a)
Slide
b)
Slide
When
continue.
Press and hold the Power Button
the Recording
the Recording Slide Switch
the video is
Files
w
playing,
to
start recording; press it again
will
Slide Switch
w
/TV
twice
Slide Switch
twice
/TV
twice
Slide Switch
twice
press the Power Button briefly one
then enter the Photo mode.
to
change
to
select the Play Photo mode .
to enter the Play Photo mode.
want
to start the slide
to
select the Play Video mode.
to
enter
want
to
start playing
to
to
view:
to
REC
to
to
enter
the Play Video mode.
to
to
REC
to
STOP
enter
and press the Power Button briefly
STOP
to
view
and press Power Button briefly
and press the Power Button briefly
the
between
and press Power Button briefly
show
Edit menu.
:
the
Edit menu
and press it again
video.
to
stop recording videos,
Video and Photo Preview mode .
to
to
stop.
to
view
time
to
pause and press the
or
slide the Record
to
view
view
the previous file.
to
the prev ious file.
the next file.
view
the
next f
Po
wer
in
g
il
e.
Button
Sl
tw
ide
ice
to
Deleting Photo
You
can delete a single file or
To
delete the files:
1. Press and hold
2.
3. Press the Power Button
Press the Power Button briefly
and/or
the
Video
Power Button until the
Files
all
twice
w/TV
photo and video files
to
select Play Photo or Video mode.
to
enter the Photo
on
the
TV
menu appears.
or
Video Playback mode.
13
MicroSD
card.
Page 14

POLAROID
4.
5.
6.
7 Press
8.
9.
Select the desired
Press and
Press the Power
the the
Press
Press
the
the
XS100i USER GJIDE
or video
Button
twice
to
twice
to
to
the
hold
Power
Power
Power
photo
Power Button
Button briefly
Button briefly
Button
be deleted.
to
file
enter
to
select
select "Delete
to
select,
confirm.
to
"Delete
"Yes."
Edit menu.
the
This
lmageNideo
This
lmageNideo"
"
or
"All."
All".
or
Formatting a MicroSD Card
hold
1.
2.
3.
4.
5.
6.
7
Using
There are Two Apps available
1.
2.
Notes:
1)
resume these functions when your camera
2)
3)
4)When recording
set up
5)
Press
Press
Press the
Press
Press
Press
Press
MicroSD will be formatted.
The
Remote
change and
device
File
mobile device.
on
When you start video recording, the
With
When using the G
You
Live Streaming it
in
can best control your camera
and
Power
the
Power
hold
and
Power
the
Power
the
Power
the
WiFi
App-
a viewfinder
as
APP-
the
the settings (1080p, 960p, 720p)
Allows you
social
the
Button briefly
Button
the
Button briefly
Button
Button briefly
Offers you
view
via
your camera settings, start and stop video recording, take photos
can
You
media such
is
Sensor
App only
w/TV
Power
Power Button
with
to
normal if there
feature it may not
Button 0 until
to
twice
twice
the
full
preview during recording (Live Steaming).
to
browse the
download the photos and videos to your smart device and
as
one file will
to
to
to
to
PolaroidXS100i
control
Tube,
You
live streaming and
the App at a distance of 25 ' (8M) with no interference
via
menu
TV
the
select Play Photo
enter
to
select "Format"
enter
select
is
either
enter
"Format" interface.
"YES"
the camera
of
saved
files
Facebook
standby status.
in
is
1-2
a
show
be created
the
tthe Edit
and press
Action
your camera and
in
second
up on the
your memory card and not Dual F
in
play
delay.
appears.
or Video
Photo or Video
menu
Camera.
wirelessly
back and transfer functions
live
mode
Playback
.
Power
the
using your iOS
view
view
but it
will be recorded with the G
Button
the photos and videos
mode
or Andriod
.
confirm formatting. The
twice
to
mobile
your smart device or use the smart
via
select the file(s) you
be temporarily disabled.
will
file
The
es.
il
between devices.
in
device or tablet.
or Android
iOS
your
on
would like
Sensor
created
position set
be the size
ill
w
You
to
You
can
share
can
14
Page 15

6}
Sound
will
be recorded
to
video file
but when recording video or viewing
playback
POLAROID
via
App there
XS
l
OO
i USER GJIDE
will
be no sound heard
Tum
2.
1.
On/Off
Press and
Your
Wi-Fi
hold
Press the Wi-Fi power button either on the camera body or on the back cover to turn on yourWi-Fi. Subsequent
vibration, the blue LED
warm up and become connectable. The LED
3.
Note: Wi-Fi will
Connect
1.
To
turn off Wi-Fi, press the Wi-Fi power button either on the camera body or on the back cover. The camera
and Wi-Fi will
be turned off.
drain your camera battery more
the
Camera to your
Search
Polaroid XS100i
are Two Apps to download, Remote and
2.
3.
4.
5.
6.
Connect
1.
2.
Download
Turn
on yourWi-Fi.
and
Go to network setting
"PolaroidXS
1001
Enter password
Open
Turn
Go
up your Apps and you
the
Camera
on yourWi-Fi.
to the network setting
3. Enter password
4. Open
your
Internet browser and input
and you can see
the Power button
to
turn on your camera
lights up to indicate the Wi-Fi is warming
Smart
will flash
rapidly
Device Via Apps
when
when the Wi-Fi function
activated.
Action app at the App store. Android and iOS Apps are
File.
You
can visit Polaroidaction.com
install the apps to your smart device (Phone or
of
your mobile device or
II
11
123456789"
to
your Computer Via WiFi
11
123456789
live
view
and you
now
have
of
your
PC
11
and you can connect to your camera.
from your camera.
can
full control
and choose Wi-Fi setting. Search the network, find and
"192.168.1.2
tablet
now
and choose Wi-Fi setting. Search the network, find and
connect
of
your XS100i
11
or
"Polaroid.action"
to
your camera.
up.
It will take around 15-20 seconds for the Wi-Fi to
Turn
the Wi-Fi off if you are not using it.
Tablet}
Action Camera
.You
is
available
as
well
can
now
active or connected.
on
Google
Play
for directions to
view
click "
the
PolaroidXS1001"
files stored
to
will
vibrate
or !tunes. There
download.
click
in
your camera
a short
Connect
1.
2.
Turn
Go
"PolaroidX
3.
Enter password
the
Camera
to
on yourWi-Fi.
to
the network setting
S1001"
" 123456789
your
Smart
of
your
II
Device (Browser)
mobile
device and choose Wi-Fi setting. Search the network, find and
and you can connect
to
your camera.
15
click
Page 16

POLAROID
XS100i USER
QJIDE
4.
Mounting
Open
your
your
camera and you can see
Accessories
Internet
browser
and input "192.168.1.2"
live
view
from
your camera.
or
"Polaroid.action".
You
can
view
the
photos and videos stored in
~
1.
Long
4.
7.
Adhesive Mount (for Fitting
10.
13.
Mount Strap
Ball
Joint
Mount-Lock
Bike Mount
Key
· t;,.
~
Piece)
@
2. Helmet
5.
Ball
Joint
8. Secure String
11.
Ball
Joint Nut
@
Mount
(L)
16
3. Short Mount
6. Adhesive Mount (for
9. Fitting
12
. Mount-Lock
Piece
Strap
Helmet)
Page 17

thods
Camera
The
included
motorcycle, ski, skydive,
well as Ski poles. The Mount-Lock
for additional exciting
Mounting
XS100i
helmet
versatile Mount-Lock
Me
and handlebar
white
mounting
mounting
water
systems.
Mounting
systems
rafting etc. or
system
System allows you
allows you
it
mount
allows you
to
on
easily remove and
use your
to
attach
to
a handlebar
to
100i
XS
types
all
to
of
remount
POLAROID
types
ll
a
in
me
hel
of
ski, 4x4
a bike,
jet
camera. Visit
the
os .
ri
Motor
aroidac
Pol
USER
th the
Wi
cycles as
tio
XS100i
scena
of
ts like bike (vented),
ATV,
GJIDE
com
n.
Secure String
more
feel
to
1.
2. Attach the
3. Clip
Loop one end
the
with
secure, a Secure String
hole .
both ends
Attaching Mount-Lock
1.
2. Turn the Mount-Lock
Fit the
with
screw
the Mount-Lock key;
Quick Disconnect
the
of
other
half
when
to
the
of
included.
is
secure strap through the strap hole
You
the
can
Arms
mount
the
to
camera is
XS100i
the
Mount-Lock
screw
until
Mount-Lock Release
the
you are us ing in
mounted
to
in
is tightened.
it
.
tripod socket
the
may use a pin to help thread
to
You
any o
ther
camera.
the
of
ap hole or
tr
s
camera.
the
of
it by hand using the built-in t
do
should now be facing the fr
secure
ont
ace .
pl
angular wi
ri
of the
ca
re
me
ra
wr
.
th rough
it
ench or
Installing
1.
Choose
helmets
the
Helmet
the
and
Straps into
suitable strap
the
medium
the
mount
to
mount
Helmet
on different types
strap for motorcycle hel
Mount
of
17
mets
hel
mets.
r example, use the short
Fo
.
mount
rap for bike
st
Page 18

POL
AROID
XS100i USER
GJIDE
2.
3.
4. Loop
5.
6.
7.
Remove
There are three vents
center)
Loop
Loop
Tighten
Mounting
1.
2.
3.
4.
5.
6.
7.
8.
9.
Choose
Adhere
to
permanently
Loosen and detach
Insert
then
Loop
Fasten
Repeat on
Attach
tightened
The
ball
Simply
nut.
the
from
the
strap
the
strap
the
strap
the
Helmet
the
the
the
Ball
tighten
the
strap
the
strap.
the
the
Mount-Lock
securely.
joint
loosen
two
strap
the
bottom
through
through
through
strap and r
Mount
Helmet
single-sided adhesive
secure
Joint
the
Ball
of
the
opposite
system
the
clips
at
each side
. (Step
the
strap
middle
the
outer
epeat
on a Vented
Mount
the
through
Joint
helmet
allows
nut
, adjust
with
the
mount
ball
joint
Nut.
end
and camera
from
1)
vent
Steps 1-4 on
nut
the
Ball
mount
of
the
you
to
the
the
strap .
of
the
clip
from
from
vent
from
Helmet
the
suitable
mount
to
the
from
Joint
through
strap
into
change
camera
Helmet
the
the
top. (Step
the
the
length
to
the
helmet.
the
helmet
Nut
the
until
the
the
Ball
the
angle
Mount.
top. (Step
bottom
other
and then into the
angle
si
of
base
vents
Helmet
Joint
of
and re-tighten
Loop
2)
3)
(Step
de
.
st
rap.
of
the
mount.
of
Socket. Assure
the
4)
h
elmet
the
bike
Mount
camera.
the
the
strap through
mou
nt. Use
Mount
helmet
is
firm
that
Socket,
ly
the
inner
the
double-sided adhesive
an
d you
and back through the strap
attached to the
the
Mount-
Lock
sho
hel
vent
ul
d
met.
Ball
(closest
hear a
Joint
to
the
mou
loud click.
c
li
p.
Nut
is
nt
Mounting
1.
2.
3. Loosen and detach
4.
Helmet
Adhere
3M®
Mount
to
Select
Insert
Helmet
adhesive
the
mounting
the
Mount
the
Helmet
mount
and fitting piece
system.
the
Helmet
Ball
Joint
Mount
Socket, and you should
on a Non-Vented
Mount
. By utilizing a combination
Mount
the
through
with
with
ball
to
the
straps;
joint
the
helmet
a
suitable length
nut
Ball
Helmet
it
w i
from
Joint
hear a
by applying a double-sided
ll
the
(Motorcycle)
of
the
Helmet
provide additional
of
strap.
Helmet
Nut
and
loud click,
Mou
then
nt.
into
then
18
sec urity
the
tighten
(111
L_
~---
__
tJ-V
~~
V&
+
0
Page 19

the Ball Joint Nut.
5.
6.
7.
8.
9.
10
11.
Tips for Achieving a Secure Mounting
•
•
•
Adhere the double-sided adhesive
Mount
Attach
Loop
fitting piece, and back
Fasten
Repeat on the opposite end
firmly
.
Attach the Mount-Lock and camera into the
that the Mount-Lock
The
Simply loosen
When
to
don't
quite easily
For best
by first
attached.
a stronger bond.
For
and fitting piece.
the
Helmet
the
strap to the other side
the
strap
attached to the
ball
joint system
straps are
attach the mount
worry
ultimate
about the adhesive ruining
when
results,
cleaning
Apply
with
the
nut, adjust the camera
not
heat is applied (eg. a hairdryer).
maximum adhesion
the
the pad
camera support, use the straps and the
Mount
Ball Joint
allows
practical,
to
helmet surface
at one side
of
to
the original side of the
a Strap
helmet.
smooth surfaces
firmly
Clip.
of
the
Nut
you
the
and
to
mount
the
strap
is tightened
change
3M®
of
thoroughly
allow
to
the
of
the helmet.
helmet,
until the
Ball Joint Socket. Assure
the
angle and re-tighten
adhes ive pads can be used
like
a
the
helmet; they're removed
the
adhesive pad is achieved
it
to
base
through
helmet.
securely.
angle
motorcycle helmet.
where
remain unused overnight. The
of
the
Helmet
of
the camera.
the
3M®
the
Hel
met
vent
Mount
pad
adhes ive pads .
of
is
the
will
nut.
And
be
POLAROID
•.
i_ •
~,.
:
J~
. ;
~·::.
~
dry
time
allows
XSlOOi USER
~
;
"
~~~
"",,
-"";";:::::-
the adhesive
GliDE
I.
·='_'\
L
i
.
~
. .
-,
!:(
~J~j
f
I
.
::-
:::
-
-
~
to
create
Mounting on a Handlebar
1.
2.
3. Loosen and detach
4.
5.
Loosen both bike
Attach the bike
- Insert
click, then tighten the
Attach the Mount-Lock and camera into the
tightened
the
Ball Joint through
securely.
mount
mount
the
or
Pole
to
ball
Ball Joint Nut.
(.75
screws.
the
handlebar
joint
the
nut from
Ball Joint
to
1.4-inch diameter)
or pole and tighten
the
bike mount.
Nut
and then into
Ball
Joint Socket. Assure that
19
the
the
screws
Bike
Mount
until
the
the
mount
Socket, and you
Mount-Lock
is
firmly
Ba
secured.
should hear a
ll
Jo
i
nt
Nut
is
loud
Page 20

POLAROID
XS
100i
USER
OJI
DE
6. The ball
and re-tighten
Troubles
h
ooting
joint
system
the
allows
nut.
PROBLEMS
1
LED
camera turns
2
Cannot
camera
Red LED
during recording
Cannot take photos or
video (Green LED
flashes
Cannot
video Green and Red not inserted
LED
flashes
you
to
change
flashes
turn on the
flashes
take photos or
and Battery is Recharge
off
the
angle
CAUSES SOLUTIONS
exhausted
Low
Memory
1
MicroSD card
2
Card
of
the
camera .
battery Recharge
is
full
is
is not fo r
matted
Simply
Replace
card
1 Insert MicroSD
2 Format the card
loosen
with
the
the
battery
the
battery
memory
a
new
nut,
one
card
adjust
the
came
ra
angle
Cannot find
removable
connecting the
camera
computer
to
disk
the
after
Connection Failure
20
1
Make sure
connections are
secure and restart
the
computer
necessary.
2 Try a different USB
port on
cable
the
computer
if
Page 21

POLAROID
XS100i U
SER
QJIDE
Spec
1f1cat1orts
Optics
1
/2.5"
5MP
CMOS
F2.8 Fixed Focus Ultra Sharp Glass Lens
Light Sensitivity: >
Dynam1c Range:
White
Exposure
170 Degree Ultra
File Format: VideoVideo (NTSC/PAL)
HD
* 1080p 1920x1080p
*960p:
*720p:
*720p:
Balance, ISO, Scene:
Auto
Resolutions
1280X960P
1280x720
1280x720
Image
1.4
V/lux-sec
>65db
Control:
Wide
H.264
/30FPS
/30FPS
/60FPS
/30FPS/16:9
Sensor
Auto
Auto
Angle
Lens
MPEG4, PHOTO- JPEG
/16
9
/4:3
(Slow
Motion)
Photo:
Resolutions 16MP, 5MP, 3MP, VGA
Photo
Mode:
S1ngle I Burst
(x10)
/T1111e
WiFi
Built In:
iOS & Android
IEEE802.11
Yes
Apps
b/g/r
Available
Yes
Microphone I Audio
Mono.
Aud1o Format
Storage/Recording
32MB
M1cro
48
KHZ, AGC Cornpressior1,
ADPCM
Time
mternal
SD-
Memorv
Up
To
32GB
auto
Battery/Charging
1200MAH
Built
In
Battery (Approx 2.5 hrs
Other
G-Sensor (Auto Rotation):
Ye~
/16:9
Lapse
gam c
of
(5,
10,30,60)
ontrol
Use)
21
Page 22

POLAROID
Auto
Power Off:
Dual File
Vibrates:
Anti-Shake:
Inputs/Outputs
USB
Housing
IPXB:
Metallic
High
Operating
Windows
Size:
Weight: 4.8oz
Recording:
Yes
Yes
2.0,
HDMI
Waterproof Up
&
Crystal Clear
Impact
108*42*42.4mm
&
Shock
System
7/XP SP3
XS
100i
off/1 min
Yes
To
10Meter
Proof
Nista
USER
I
3min
Finishing
and
later,
GJIDE
Mac
10
.5 or above
FCC
This
(1)
(2)
This
the
St
at
en1ent
device
This
This
device
device
equipment
FCC
rules.
installation.
accordance
guarantee
radio
to
Re-orient
Increase
Connect
Consult
Use
or
television
correct
the
of
shielded
the
or
the
the
complies
may
must
has
These
This
that
equipment
with
the
interference
interference
relocate
separation
equipment
dealer
cable
with
not
Part
cause
accept
been
tested
limits
instructions,
reception,
by
the
receiving
between
into
or
an
experienced
1s
required
15
of
harmful
any
interference
and
are
designed
generates
may
will
not
occur
which
one
can
or
antenna.
the
an
outlet
to
comply
the
FCC
Rules.
Operation
interference.
received,
found
uses
cause
more
equipment
on
to
comply
to
provide
and
harmful
in a
particular
be
determined
of
the
a
circuit
reasonable
can radiate radio
interference
followmg
and
receive
different
radio(TV techn1cian
with
Class
including
with
the
installation
by
turn
measures
r.
from
for
help.
B l
imits
22
is
sub
j
ect
interference
lim
i
ts
for
protect
ion
frequency
to
radio
. If
this
ing
the
equipmem
:
that
to
1n
Subpart
to
the
that
Class
against
energy
commun
equipment
whi
ch
the
fo
may
B
digital
off
r
l
low
1ng
cause
harmfu
and
, if n
i
cations.
does
and o
ece
1ver
two
cond
undes
devices
l
interference
ot
,
inst
However
cause
n,
the
is conn e
itions:
ired
purs
al
har
u
ser
ct
operation.
u
ant
in a r
l
ed
and u
,
there
mf
ul in
is
enco
ed.
to
Pa
rt
15
es
i
dent
sed
in
is
no
te
rference
uraged to try
of
ial
to
Page 23

B
of
Part
15
of
the
FCC
Do
not
make any changes
modifications should be made, you could be required
Notice
If static electricity or
disconnect and
connect
rules.
or
modifications
electromagnetism
the
communication cable (USB, etc.) again.
to
the
equipment
causes data transfer
to
stop
unless
operation
to
otherwise
discontinue
of
the
POLAROID
specified
equipment.
midway
(fail
XS100
in
the manual. If such changes
),
restart the application or
1 USER GUIDE
or
Lega
l N
otlce
Trademark Information
Microsoft®
Corporation.
Pentium®
iPhone®, iPad®, and
MicroSD™
Other
names and products may be trademarks
and
Windows®
is
a registered trademark
Macintosh®
is
a trademark maintained by
are U.
S.
registered trademarks
of
Intel Corporation.
are trademarks
SD
Card Association.
of
or
registered trademarks
of
Apple Inc.
Microsoft
Product Information
Product design and specifications are subject
software, and instruction manual. This manual is a general reference gui
that
The product and accessories
is
due
to
the
fact
that
This
market requirements,
especially
support. Occasionally, a retailer
product definition and included accessories.
The illustrations in this manual are for
The manufacturer assumes no liability for any errors
with
accessories such
different retailers often specify slightly different product inclus ions and accessories
customer
come
demographics, and geographical preferences. Products very often vary
as
will
with
chargers,
specify a unique product color and appearance. Con tact your dealer for prec ise
the
to
change
your
memory
purpose
without
XS
100i camera may be different
cards, cables, pouches,
of
explanation and may differ
or
discrepancies
notice. This includes primary pr
in
of
their
de
for
this manual.
respective
the
product.
from
mo
unting accessories and language
from
owners
those
the
actual design
oduct
desc
.
specif
ribed in this manual.
ications,
to
suit thei r
bet
ween retailers ,
of
your camera.
23
Page 24

POLAROID
XS100i USER
WIDE
PLR IP Holdings, LLC, its licensees and affiliates.
to
avoid violating established
governances
location
You
may also
specific
If
your electronic device has internal
sanitization process
type
of
product
with
your
Polaroid, Polaroid
All
other
does
not
in
the
area
where
laws
you can appropriately dispose of
go
to
www.polaroid.com
in
your area and to locate a collection fac
before
and its
software,
local recycling facility
&
Pix
el,
trademarks are
manufacture this product or provide any Manufacturer's Warranty or support.
laws, you should properly dispose
where
you reside.
Please
and reference Social Responsibility http://www.polarold.com/social-responsibility
memory
you dispose
ot
your device
and you may
to
determ1ne
Polaroid
the
property
Classic
of
the
Border
fully
the
on
which
wan
t
th eir data sanitization procedures during
Log
respective owner,
Distributed by:
C&A
Licensing
2 Bergen
Ridgefield
©
2013
All
MADE
IN CHINA
Turnp1ke
LLC
Park, NJ
Rights
07660
Re
se
rv
ed
Product features, specifications and appearances are
supports
check
prod
uct
il
ity
personal or
to
to
research
o,
and
subject
all electronic
of
with
local
near your
assure an
the
this product
authorities or
home
other
ot
her party cannot access your personal data. Data saniti
best
was
.
confidential data may be stored , you may want
sanitization process for your device before disposa
Polaroid Color Spectrum
who
has
not
sponsored,
to change
without
te
initiatives . As responsib
in
comp
the
li
ance
wit
h all applicable
retailer
the
where
recycling process.
are trademarks
endorsed or approved
notice.
le
stewards
regulations,
of
the en
directives or other
you purchased this product
to
learn more about
to
perform a data
za
l.
You
of
PLR I P Holdings, LLC,
this
product.
used under license.
PLR
vi
ronment. and
to
determine
a
th
tion varies by the
may also check
IP
Holdings, LLC
e
www.polaroidaction.com
TM
Instantly
r
eas
lets
that
brand
heritage
recognizable.
suring
.
The
you
know
exemplifies
and
that
of
quality
you
contributes
Polaroid
've
purchased
the
best
and
Instantly
Classic
qualities
to
our
innovation.
Border
a
product
of
our
rich
24
Page 25

LIMITED
WARRANTY
TO
ORIGINAL CONSUMER
GARANTIE
LIMITEE A L'ACHETEUR
ORIGINAL
·:::·Polaroid
WARRANTY
GARANTIE I GARANZIA I GARANTIE I GARANTfA
This Product (including any accessories inc luded
by
an
authorized retailer is warranted by the Distributor
in
material and workmanship ("Warranty")
Product
Came
Came
Came
Came
Came
To
www.polarold.com.
To
service provide r
the
period(s). MUST
obtain the requested
Shipping expenses to the Distribu
must
Exclusions and
This Warranty covers manufacturing
noncommercial use of the Product. and
adjustments.
com
images
Th
is Warranty applies
FAULTS
bulbs etc.). The Warr
Product. This Warranty is valid only
applies
NO
WARRANTIES
EXPR
AFTER
GUARANTY
BINDING
-AT
EVENT
INCIDENTAL, DIRECl;
NOT
CAUSED
OTHER
AGAINST
DISTRIBUTOR. THIS
CONSUMER
Some
da
mages or allow
gives you spec ific legal rights. and you may have other rights that
province
Polaroid and Polaroid & Pixel are trademarks of PLR
LLC does
Territory
ra
North America 1
Central and South America 1
ra
ra
Asia, Africa, Australia,
ra
Europe
ra
Russia
obtain Warranty Service and Troubleshooting contact informatio
receive Warranty service, the original
of
form of a bill of sale
mercia l use or
WARRANTIES,
DISTRIBUTOR'S
the Distributor, for
or
receipted invoice, evidencing that the Product is within
be presented
to
Distributor,
serv
ice.
to
be pa1d by the
ESSLY
LIMITED TO,
count
consume
limitations
cosmetic
modi
"bu
rnt"
into the screen.
. sold as Reconditioned, Refurbished
an
to
products purchased and serviced in that
WHETHER
OF MERCHANTABILITY
DESCRIBED
THE
EXPRESS
GIVEN
BY
ON
DISTRIBUTOR. REPAIR. REPLA
WILL
WARRANTIES SHALL
SOLE
DISTRIBUTOR,
DAMAGES
BYTHE
USE, MISUSE
DISTRIBUTOR
WHO
PURCHASED THE
ries, stat
es
limitat
Contact your authorized retailer to determine if another warranty applies.
not
manufactu
r's service
r
damage
or
fication of.
or
to
the original
ty
is invalid if the factory-applied serial
EXPRESS
ABOVE SHALL APPLY DISTRIBUTOR
WARRANTY
ANY
PERSON,
DISCRETION-
ITS MANU
INDIRECT
SPECIAL, PUNITIVE
FOR
OR INA
APPLY
SHALL
NOT
WARRANTY
or provinces
ions
on
warranties. so limitation or exclusions may
re
this product or provide any Manufacturer 's Warranty or su
in
the original packaging)
to
the
as
follows:
New
Zealand 1
consume
problem
determination and service procedures_ Proof of purchase in
or
an authorized service provider
center
defects
in
does
not
damage due
to
any part
consumer
only and
or
in
the
country
OR
IMPLIED,
OR
FITNESS
PERIOD
STATED
FIRM
OR
CEMENT
ARE
THE
FACTURERS,
LOSS
OF
BILITYTO USE
NOTWITHSTANDING
EXCEED
SHA
LL
NOT
PRODUCT
do
not
allow the exclusion
original
Parts
Warranty
Year
Year
Year
2Years
2
Years
r purchaser
must
or
Return Facili
mate
rials and workmanship
cover
consume
to
of
the Product. In add1tion, this Warranty does
Remanufactured, or consumables (e.g., fuses, batteries,
whe
country
ENTITY
PROFITS,
THE
EXTEND
AND
IP
r instructio
acts
of
nature. accident. misuse. abuse. negligence.
does
not
number
re the
consumer
INCLUDING,
FOR A PARTICULAR
FURTHER
ABOVE.
NO
WITH
RESPECTTO
OR
REFUND
EXCLUSIVE
REMEDIES
OR PLR
IP
OR
CONSEQUENTIAL
BUSINESS,
THE
PRODUCT
THE
FOREGOING,
PURCHASE
TO
ANYONE OTHER
IS
NOTTRANSFERABLE
or
Holdings, L
LC,
as
supplied and distributed
consumer
purchaser against
labor
1
1
Year
1
2Years
2Years
n:
Visit our website at
contact
the
Distributor. or an authorized
the
applicable Warranty
of
the
Distributor. in order
ty
are
not
covered by this warranty, and
encountered
n. delivery. installation. set-up,
cover
products
sold
AS
has been altered or removed
purchased
the
product, and only
BUT
NOT
LIMITED
PURPOSE, OTHER THAN
OTHER
OF
THE
HOLDINGS, LLC
SAVINGS,
EXCEPT
PRICE
limitation
va
ry
from
used under license.
TO,
DISCLAIMS
ALL
EXPRESS
THE
PRODUCT
ORIGINAL
PURCHASE
OFTHE
CONSUMER. IN
BE
LIABLE
DAMAGES (SUCH AS,
DATA
AS
STATED
CONSUMER'S
OF
THE
PRODUCT
THAN
.
of
incidental or consequential
not
apply
to
you_ This wa rranty
state to state
pport
Warranty
Yea
r
Year
in the normal.
not
IS
or
WITH ALL
from
ANY
IMPLIED
WARRANTIES
WARRANTY
SHALL
FOR
OR
RECORDS)
HEREIN,
RECOVERY
SOLD
THE
ORIGINAL
or
province to
PLR
IP
Holdings,
new
defects
cover
the
THOSE
OR
BE
PRICE
NO
ANY
BLJT
NO
BY
Ce
produit (y
compris
taus les
l'€tat
de
neuf
premier acheteur
Type
Appareil photo
Appareil
Appareil photo
Apparei
Appareil photo
Pour b8n8ficier d 'un service
notre site Web sur www.polaroid.com.
Pour beneficier
to
prestataire autorise par
preuve d'achat
pEir
ou a son prestataire autorisS afin
Les frais d'envoi vers le
couverts par cette garantie
Exclusions
Cette garantie couvre l
utilisation norm ale
livraison. !'installation, Ia configuration. les r8glages, les
force majeure, d'a ccident,
ciale
une image reste tig9e
Seul l'acheteur original
OUEL au AVEC TOUS
refabriqu8s. de
annulee si le
uniquement valide dans le pays
achetes et
AUCUNE
DE
SEMENT
GARANTIE
AUCUNE
N'ENGAGERA
PRIX
RECOURS
LES
DOMMAGE
LIMITATION
D'
c
CI-DESSUS,
RECOURS
AU
TEUR
PRODUIT
Certains pays, Etats ou provinces n'au torisent pas
cons8cutifs. ou les limitations
ne pas s'appliquer a vous. Cette garantie vous procure des droits juridiques sp9cifiques
tible
savoir
Polaroid
licence.
garantie du fabricant.
par un revendeur autorise. b€net1cie d
de
produit
Territoire
AmE!riqueduNord
pho
to
Amer
Asie, Afrique. Australie,
l p
hoto
Europe
Russie
d'une
consistant
iode(s)
de
garantie relative (
et
limitations
ou
de
modi
fication de
meme
numero
entretenus
GARANTIE,
QUALITE
MARCHANDE
DEC
RITE CI-
APRES
ALJTRE
LE
DACHAT
ORIGINAL- A LA
EXCLUSIFS
FABRICANT$
ACCESSOIRE, DIRE
DES DOMMAGES
ENREGISTREMENTSI
iMPOSSIBILITE
AUCUNE
DONT
VERSEMENT
CETIE
GARANTIE
ET
NE
de
benefic1er d'autres droits qui varient selon les juridictions. Contactez votre revendeur agree pour
si
une autre garantie s'applique.
et
Polaroid & Pixel
PLR
IP Holdings, LLC n'
accessoires 1nclus dans l'emballage d'origine). ayant
contre
tout
defaut materiel et de fabrication
iquecentraleetduSud
et
EXPRESSE
cEXPIRATION
GARANTIE
DISTRIBUTEUR.
OU
D'UTILISATION
DISPOSERA
D'UNE SOMME
POURRA
Nouvelle
de
garantie ou obtenir des coordonnees en
reparation sous garantle, l'ach
lui af10
de
determiner
en un acte
de
s)
au produit est/sont toujours en cours. DOlT
de
beneficier de
centre
de
service apres-
et
doivent
etre payes par l'acheteur
es
dE!fauts
de
non-commerciale du produit
de
mauvai
se
tout
ou
part1e
sur 1'8cran 8teint.
peut
b8n8ficier
LES
DEFAUTS. ceux vendus apres avoir 9t8 reconditionnes. remis a neuf ou
que
les
consommables
de
serie
imprime
oO
dans celui-ci
DESSUS
PLR
AUTRE
l'acheteur a acquis le produit
OU
TACITE, Y COMPRIS
OU
DADEOUATION A UN
NE
SAPPLIOUERA.
DU DEL
EXPRESSE ACCORDEE
LA
SEULE
DONT
POURRA
IP HOLDINGS, LLC
CT
INDIRECT,
POUR PEATE
RESULTANT
DU
GARANT
ll'\CHETEUR
DEPASSANT
BENEFICIERA
ETRE
ETENDUE A UN TIERS,
de
garan
sont
des marques
est
pas le fabricant
REPARATION,
tie
'une
garantie de
Ia part
(<•
Garantie
Ga
rantie
sur
les
la
la
Z€dande
la
2ans
2a
eteur
le probleme
vente au une facture acquittee,
Ia
reparation.
vente
production tant materiels que de fabrication, dans le cadre
de
et
utilisation.
d'util
isation abusive,
du produit. De plus. cette garantie ne couvre pas les Situati ons
cette garantie
(par ex
en usine a
. : fusibles. piles.
ere
USAGE
AI
DE
GARANTIE
LE
DISCRETION
BENEFICIER
DE
PRODUIT SAUF
IE
ll'\CHETEUR. EN
NE
SERONTTENUS
SPECIAL,
DE
PROFITS, D'ACTIVITE,
cUTILISATION,
NE
SAPPLIOUERA.
VIS-A-VIS
DU
LE PRIX
UNIOUEMENT A
I'
exclusion
, c'est pourquoi les limitations ou exclusions
commer
ciales de
de
pieces
n lan
n lan
n
ns 2ans
original
doit
ainsi que les procedures
du
distributeur au celui des retours ne
ne
comprend
dommages
esthE!tiques ou ceux resultant de cas
et celle-ci
ne couvre pas l
altere ou supprime
et
ET
SANS
LIMITATIONTOUTE
PARTICULIER
EN
OUTRE.
LE
FIGURANT
PAR
TOUTE
REM
PLACEMENT
DU
DISTR
IBUTEUR-
PUNITIF
OU
DE
LA
DANS
LES
NONOBSTANT
DISTRIBLJTEUR
DACHAT
DU
ll'\CHETEUR
NITRANSFEREE
ou
Ia
limitati
PLR
IP Holdings, LLC qui son! utili sees sous
ce
produit
et
ete
fourni
et
du
distributeur
»)
selon l
es
Garant
lan
2ans
cas
contacter le
metta
nt en evi
etre
presentee
pas les instructions a l'acheteur.
de
neg ligence. d'utilisation
es
ampou
les. etc.).
du
produit. Cette garantie est
s'applique
uniquement
AUTRE
DISTRIBUTEUR
EXPRESSEMENT
PERSONNE,
OU
LE
CONSTITUENT LES
AUCUN
CAS,
POUR
RESPONSABLE
CONSECUTIF
D'E
PARGN
MAUVAISE
CAS
EXPRESSEMENT
CE
NE
POURRONT
PRODU
ITVENDU PARLE
ORIGINAL AYANT
DAUCUNE
on
des
dommages
ne
procure pas d'assistance au de
distribue a
au
benefice du
conditions
suivantes:
ie
sur
Ia main
d'reuvre
de
probleme : visitez
distribute
ur
de
reparation . Une
dence
que la/les
au
distributeur
sont
commer-
produits vendus TELS
La
garantie sera
aux produits
GARANTIETACITE
QUE CEL
LE
EXPRES
DECLINE
CI-DESSUS
SOCIE
TE
OU
REMBOURSEMENT
LE DISTRIBUTEUR,
EN
CAS
ITELS
OUE
ET
E,
DE
DONNEES
UTILISATION
QUI
PRECEDE.
MANIERE
sont
et
vous
OU
PREVUS
DONNER
DISTRIBU-
ACQUIS
.
accessoires ou
susceptibles
etes
suscep-
au
pas
d'une
TOUTE
ENTITE
DU
SEULS
DE
SANS
OU
DE
LES
LIEU
un
Ia
de
oO
.
LE
de
Page 26

GARANZIA LIMITATA
Questa prodono (incluso qualsiasi accessorio presente
nuovo
da
un
rivenditore autorizzato,
lavorazione e del materiale
lipo
di
prodotto
TerTitory
No
rd
Fotocamera
Fotocamera
Fotocarne1a
Fotocamera
Fotocamera
Per
ottenere
sito
web
Per
ricevere
di manutenzione autorizzato
zione. DEVE essere present ala
una prova d'acquisto,
garanzia applicabili,
Le
spese di spedizione
questa garanzia e devono essere pagate dal
Esclusioni e
Questa garanzia
non
commerc
configurazione.
utilizzo. abuso. negligenza. usa
garanzia non copre
Questa garanzia si
TUTTI I GUASTI.
ecc.l.
prodotto. Questa garanzia
solo
su
NON
Sl
OUALSIASI
DIVERSO
LE
GARANZIE
GARA
N
PRODOTTO
RIMBORSO
SONO
MANUTENZIONE
TALE
, D
DANNI
DALLUTILIZZO,
CHE
t
DEL
CLIENTE
VENDUTO
LACOUIRENTE
Alcuni
non
permettono
essere a te applica
a
state
un'altra
Polaroid
Holdings,
America
Cent
ro-
SudAmerica
Asia,
Af
r
ica.
Austral
Europa
Russ
ia
i
contatti
www.polaroid.com.
La
garar>zia
prodotti acquistati e riparati in
APPLICA
DA
ZIA
RIMED
IR
ETTO,
PER
QUI
paes1,
o
da
garanzia.
e
Polaroid
LLC
della
Ia
manutenzione
in
forma di ricevuta fiscale o fanura,
per ottenere
al
limitazioni
cop
re i difetti
1
al
del
prodotto e non copre
le
regolazioni,
le
immagini
app!ica solo all'acquirente
venduti
come
non
e
ALCUNA
GARANZIA
IM
OUELLI
ESPR
DOPO
IL
ESPLIC
I
TA
0 FO
DEVE
E
SSERE
DEL
PREZZO
I
ESCLUSIVI
0 IP
PLR
I
NDIRETTO
LA
PERDITA
DAL
CATTIVO
STABILITO,
NESSUN
SUL
DIS
T
RIBUTORE
DAL
DISTRIBUTOR
ORIGINALE
stat
io
province non
limitazioni
te
. Questa garanzia ti
provincia a provincia
&
P1xe
non produce
PER
IL
e
garantito
("Garanzia")
i
a,
Nu
manutenzione
in
garanzia, l'acquirente originale deve contattare
del
distributore, per
al
distributore o a un fornutore di manutenzione autorizzato
Ia
manu
centro di manutenzione
d1
produzione dei materiali
il
danno
commercia
"bruciate"
riparati. rimessi a nuovo o rilavorati o utilizzabili (ad
va
!
!d~
se
e
va
l
ida
GARANZIA,
P
LIC
ITA
ESSA
ME
PER
I
ODO
RN
ITA
LEGATA
01
ACOUISTO
DEL
CONSUMATORE.
HOLDING.
.
SPECIALE.
01
PROFITT
UTI
LIZZO
ALTRA
E.
CHE
HA
permettono
sulle
garanzie, perciO
Contatta
l
sono marchi
questa
dal
come
segue·
ova
Zelanda
in
garanzia e
Ia
determ
te
nzione richiesta
consumatore
l'istruzione del
all'aspetto o
le o a modifiche in
sullo
schermo.
originale
!!
n:..:merc ser1olc di
solo nel
paese in cui
quel
paese.
SIA
ESPLIC
01
COMMERCIABILITA
NTE
DESCRITII
01
GARA
N
ZIA
DA
OUALUNOUE
AL
DI
STRI
B
O
RIG
I
NALE
IN
LLC
SARANNO
PUNITIVO
!,
AFFAR
0 DALLINCAPACIM
GARANZIA
NON
DOVRA
QUESTA
ACOU
prodott
SUPERAR
GARANZ
I
STATO
IL
l'esclus1one
in
da
diritti
legah
il
tuo rivenditore organizzato per detenninare
d1
fabbrica di
o ne
fornisce
CONSUMATORE ORIGINALE
nella
confezione originale), torn ito e
di
stributore per l'acquirente originalc contra
Parts
Warranty
1
Anno
1
Anno
1
Anno
2Anni
2Anni
Ia
risoluzione dei problemi: Visita
inazione dei problemi e
che anesti che
del
distributore o
e
il
danno dovuto
e
non copre i prodotti venduti
bbbrica
il
consumatore
I
TA
0
IN
ALTO
ESPLICITO
PERSONA,
UTORE.
-A
NESSU
RESPONSABILI
0
CONSEOUENZIALE
I, RI
SPARM
E
APPLICABILE.
IA
NON
PRODO
questa
specifiche puoi avere
PLR
ale
il
prodono
Ia
restituzione non sono
della
manodopera riscontrati nel'uso
consumatore,
IMPLIC
0
IDONEI
LA
SOLA
N
01
E IL
TT
o
Ia
caso
IP
una garanzia
Ia
ad
agenti atmosferici, incidenti, cattivo
tutto
o parte
ottnb:..:i
to
e
ha
acquistato
ITA
INCLUDE
TA
PER
IL
DISTRIBUTOR
DICHIARATO
AZIENDA
RIPARAZIONE,
DISCREZIONE
CASO
IL
DISTR
01
OUALSIAS
!COME,
I,
DATI
0
USARE
IL
PRODOTTO.
TUTTAVIA
PREZZO
01
SARA
ESTESA
O
E
NON
ET
RASFERIBILE
limitazione di incidenti o danni
Ia
limitazione o
al
Holdings.
LLC,
del
produnore o supporto.
distr
i
buito
labor
Warr
a
nty
1
Anoo
1
Anno
1
Anno
2
Anni
2
Anni
il
distributore o un fornitore
le procedure di
del
distributore.
rientra nel(i) periodo(i) di
coperte
consegna.
!'installazione,
del
prodotto.
lnoltre,
COME
SOO
es
. fusibili, batterie,
state
oiterato
o ri
il
prodotto
e si a
MA
NON
UNO
IN
0
I
BU
REGISTRAZIONII
IL
ACOUISTO
A
le
t
ri
usati sotto 1icenza .
LIMITATA
SCOPO
PART
E
INOLTRE
NEGA
AlTO.
NESSUN
ENTITA
RISPETTO
LA
SOSTI
T
UZIONE
DEL
DISTRIBUTORE
T
ORE.
I
SUO
I
OANNO
MANON
LIMITATO
TRANNE
LA
SUDDETTA
DEL
NESSUN
ALTRO
success1vi
esclusioni
no
diritti che variano
se
I
PRQDQTTO
i
difetti
il
nostro
manuten-
normale,
questa
o
mosso
I
COLARE.
ALTRA
AGENTI
ACCIDEN-
CAUSATI
PER
RIVALSA
OLTRE
n possono
da
si
applica
PLR IP
come
CON
bu
pp
lica
TUDE
0 IL
CIO
state
BESCHRANKTE GARANTIE FOR
Dieses
Produkt
(e1nsch
l
ief.!.lich
a!ler
als
di
da
Ia
lbi
da:
A,
AL
-
01
A.
o
Neuware durch einen autorisierten Vertriebspartner verkauft wird, eine Garantie des Vertriebspartners.
Sie
gilt
ausschlief.!.lich
des Materials und aufVerarbeitungsfehler (..Garantie").
Produktart
Kamera
Kamera
Kamera
Kamera
K
amera
PBitte besuchen Sie unsere Webseite, um lnformationen zur
Kontaktadresse im
Um
autorisierten Serviceanbieter kontaktieren. damit die Probleme
veranlasst
denen
MUSS
ben6tigte
Die Garantie
RUcksendezentrum.
AusschiOsse
Diese Garantie
nichtkommerzie
tion, Aufbau,
unsachgema!1er
Produkts
dem
Dicac
MIT
oder
Seriennummer
gUitig,
gekauft oder
KEINE
BESCHRANKT
BEST
HERSTELL
AUS
ODER
AUSGESPROCHEN
ODER
NERS
PRODUZENTEN
VERSEHENTLICHEN.
JEDOCH
FALL,
MISSBRAUC
BESCHRIEBENEN
U
NGEACHTET
NICHT
WURDE.
HAT,
Ein1ge
sonstigen
daher nicht auf
andere
kontaktieren Sie
Garantien
Polaro1d
PLR
Gebiet
NOI'damerika
MittelAs
i
en
,
Europa
Russland
Faile
die Garantie
in
Anspruch
werden
k6nnen.
hervorgehen
muss. dass das
dem
Vertriebspartner
Dienstleistung
um
fasst nicht die Versandkosten
Diese
und Beschr8nkungen
umfasst
ll
en
Einsatz des Produktes auftreten.
Einstellung,
Verwendung, Missbrauch, Fahrlassigkeit.
oder
einer
Bildschirm einpragen
G.-Jmnt
FEHLERN verkauft
Verbraud"lsgUter
IMM
D
RUCKLICHEN
GULTIG
Lander, Staat
IP
se
ie gilt nur
des
Werks
in
dem
der Kunde das
gewartet
GARANTIEN,
AUF
ALLE
TEN
ZWECK,
ER
UBERNIMMT
GARANTIE
GARANTIE,
DIE
WURDE.
ERSTATTUNG
-
SIND
DIE
ODER
NI
CHT
BESCHRANKT
GUTHABEN-
DATEN
H
ODER
GARANTIEBEDINGUNGEN
OBIGEM
DE
N
KAUF
P
REIS
DI
ESE
GARANTI
UNO
FUR
en oder
Schaden oder Garantieeinschrankungen. Die
Sie
beziehen. Diese
Red"lte
haben, die
lhren
fUr
Sie
gibt.
und Polaroid &
Holdings,
LLC. stellt
Zubeh6rteile
fUr
den Originalkunden, der das
undSUdamerika
Afrika.
Austral
i
en
,
Neuseeland
von Problemen
Als
ode
bered1tigt
mUssen
Herstellungsfehler
optische
inerTeile. Des
fU
r don
wurden
(z.B_
Sicherungen, Batterien,
geandert
wurden
EGAL
OB
IMPLIZI
AUSSER
VON
1ST
DES
ORIGINALEINZIGEN
PLR
IP
DIRE
K
TEN.
-
UNSACHGEMASSEN
DURFE
DES
E
1ST
KEINE
Provmzen
von
autorisierten
P1xel
sind Warenze1chen von
dieses Produkt
zu
erhalten: Unsere Webseite
zu
nehmen,
muss
Kaufnachweis
Originalkundon und
Produkt gekauft hat und bezieht sich nur auf Produkte, die in
KEINE
EINER
HOLDINGS,
ODER
ANDERE
dient
Produkt
sich innerhalb der
r
einem
semer autoris1erten Serviceanb1eter
zu
sein
vom
Konsumenten
beim
Schaden
oder
Weite
ren
umfasst
oder
nicht auf
Ube
oder
vom
Produkt
AUSDRUCKLICH
TEN
GARANT!
OEM
OBEN
GARANTIEN.
HI
NAUSGEHEN
P
ERSON
FUR
DEN
VERTRIEBSPARTNERVERBINDLICH
K
AUFPREISES-
ANSPRUCHE
LLC
INO
IR
EKTEN.
AUF
SCHADEN
AUFZEICHNUNGSVERLUSTENI.
E
IN
N
PRODUKTS
NUR
Land
WERDE
DIE
FORDERUNGEN
UBERSTEIGEN.
FUR
DE
N
ORIGINALKONSUMENTEN.
PERSON
erlauben
ke1nen
Ga
rantie
gewahrt Ihnen
zu
Land oder
Einzelhiindler,
nicht her und bietet keine Herstellergarantie oder Service .
DEN
ORIGINALKUNDEN
a us
de
r
Or
iginalverpackung)
Produkt
Die Details
Materialgarantia
1
Jah
r 1
lJahr
1
Jahr
2Jahre
2Jahre
der Originalkunde den Vertriebspartner oder einen seiner
der
Be
l
eg
des Einkaufs oder die erhaltene Rechnung, aus
an
das Servicezentrum des Vertriebspartners oder
beglichen
Mater
i
al
und der Verarbeitung , die beim normalen,
Sie
umfasst
Schaden
kommerzieller
diese Garantie keine
boz1
eht
sich nicht auf
rholte,
instand gesetzte,
GIUhbirnen, etc .
entfernt
ODER
I
MPLIZI
ENDER
MARKTGANGIGKEIT
AUSDRUCKLICH
DIE
UBER
. KE
INE
WEITERE
.
FIRMA
ODER
IM
ALLEINIGEN
DES
KONSUM
SIND
UNTER
SPEZIELLEN.
AL!FGRUND
SATZ
DES
PRODUKTS
N
KEINE
DES
KUNDEN
DAS
SIF 1
ST
NICHT
Aussd"lluss
Einschr.3nkung
bestimmte
Provinz
zu
um in Erfahruog
PLR
IP
Holdings,
enthalt,
so
wie
es
geliefert und
erworben
hat und bezieht sich auf Defekte
Iauten
wie
folgt:
Verarbeitungsgarantie
Jahr
1
Jahr
1
Jahr
2J
ahre
lnanspruchnahme
gUitigen
werden.
aufgrund von Naturkatastrophen,
wird. Diese Garantie i
DIE
KEINEN
VON
WEITEREN
Provinz unterschiedlich sein k6nnen_
2Jahre
der Garantie und eine
lautet
www.polaroid.com.
ermittelt
und das
Garantiezeit(en) befindet. Dieser
vorgelegt
n1d"lt
die Einweisung, Lieferung,
Einsatz
oder
.,Schimmerbilder','
Produkte, d1e
).
T,
EINSCHLIESSLICH,
GENANNTEN.
DAUER
AUSDRUCKLICHE
RECHTSEINHEIT
ERMESSEN
ENTEN
UMSTANDEN
STRAF-
GEW
DIE
AUFTRETEN.
GEGEN
VOM
VERTRIEBSPARTNER
UBERTRAGBAR
oder
keme Emschr.3nkung
oder
RechtsansprUche und
LLC,
WIE
wiederaufgearbeitete
Die
Garantie
ODER
EIGNU
SIND
D
ER
OBEN
GEWAHRLEISTUNG
FUR
REPARATUREN,
DES
DER
HERSTELLER,
HAFTBAR
ODER
FOLGESCHADEN
I
NNAUSFALL,
DURCH
DIE
MIT
GARANT!
EN
DEN
VERTRIEBSPARTNER
DER
DAS
PRODUKT
der Ausschluss k6nn
zu
bringen, ob
und
werden
unter
we1tere
werden,
Mod
1fikation
GESEHEN
erlischt.
st
nur in
diesem
JEDOCH
NG
GULTIG
GENANNTEN
DAS
VERTRIEBSPART
GESCHAFTSAUS-
VERWENDUNG,
AUSNAHME
UBERNOMMEN.
von Folge- oder
Sie
es
zusatzliche
L1zenz
Verfahren
um
fUr
an
Installa-
Unfa!len,
die sich auf
Produkte
wenn
dem
NI
FUR
EIN
PRODUKT
ERSATZ
SE
FUR
VERKAUFT
GEKAUFT
te
k6nnten
genutzt
des
oder
Land
Land
CHT
DER
I
ALLE
IZ.B.
DER
sich
Bitte
die
ein
die
EN
NE
GARANTiA
Es
te
Producto (incluyendo
nuevo par un minorista autorizado se garantiza par
contra
defectos
Tipo
de
producto
Cilmara
Camara
Camara
Camara
Camara
Para
obtener
nuestra
p8gina
Para
recibir
un servicio autorizado
obtener
el
OIStflbUidor
Producto
Los gast os
cubiertos par esta garantia, y deben ser pagados par
Exclusiones y limitaciones
Esta Garantia cubre
normal y no comercial
ciOn,
ajustes.
negligencia,
no cubre
l
Esta Garamfa se aplica sol
TO
DOS LOS POSIBLES
ej.
fusibles,
sido alterado o eliminado
adquiri6
el
NOSE
APLICARAN
DAS
A.
CUALOUIER
EN
CONCRETO,
RENUNCIA
LECIDO
ARRIBA
ENTIDAD
CION.
RE
CION
DEL
EL
DISTRIBU
DANO
-
INCIDENTAL
EJEMPLO,
0
REG
I
STROSI
COMO
SE
LO
ANTER
ERA
EL
PRECIO
NOSE
EXTENDERA
Y
NO
ESTRANSFERIBL
Algunos paises. estados o
resultantes o
exclusiones Esta garantia le otorga a
derechos que varian
para determinar
Polaroid
y Polaroid &
Holdings,
LIMITADA
cual
quier
en
los
materiales
Territorio
Norteamerica
Amer
icaCentralydel
Asia.
Africa.
Austra
Europa
Rusia
Ia
informaciOn
de
web
el
servicio de Garantfa.
servicio so
prueba de compra en forma
se
encuentra
de
envfo
danos
uso
comercial o modificaci6n
as
im.3genes
baterias,
producto, y sola
APARTE
ADEMAS
NINGUNA
CON
RESP
EM
PLAZO
DISTRIBU
I
DOR.
SUS
PERO
NO
CAUSADO
ESTABLECE
I
OR
,
EL
RESARCIMIENTO
DE
permiten
si
LLC
no
fabri
contacto
en
www.polaroid.com.
ael
Distnbuidor para
li
citado se DEBE presentar
dentro
del
al
centro
de
los
defectos
de
de
l Producto. y
cosmeticos
"quemadas
amente
FALL
OS,
bombitlas.
etc.). La Garantfa
del Product
mente
GARANTiAS.
TANTO
GARANTiA
IMPL
DE
AOUELLAS
A
TODAS
LAS
OTRA
E
CTO
AL
PRODUCTO
0
REEMBOLSO
I
DOR-
SON
FABRICANTES
,
DIRECTO,
LIMITADOA
POR
EL
EN
LA
PR
ADOUISICION
A
NINGUN
OTRO
E.
prov1ncia s
limitaciones
de
estado
a
est
sea
plica
otra garantia.
Pixel
son marcas comerciales
ca
este pr
oduct
PARA
EL
CONSUMIDOR
accesorio incluido en
yen
Ia
mana de obra
Sur
l
ia.
Nueva
Zelanda
del
el
comprador
determinar
de
periodo/s
de
servicio
del
fabricaci6n en
no
cubre
o
danos
debido a aetas de
del Producto
'
en
Ia
pantalla
al
consumidor original y no cubre productos vendidosTAL
vendidos
como
a. Esta
Gmantia
se a
plica
a los productos adquiridos y distribuidos
EXPRESAS
iC
ITA
DE
DESCRITAS
GARANTiAS
GARANTIA
SERA
DEL
PRECIO
LOS
RECURSOS
0
PLR
INDIRECTO.
DANOS
POR
USO,
MAL
ESENTE.
NOSE
DEL
DI
STRIBUIDOR
DE
L
PRODUCTOVENDIDO
QUE
EL
no
permiten
en
las
garantias, par
usted
ado
ode
provincia a provincia
a
ni
proporciona n1nguna
el
embalaje
original)
el
Oistribuidor para
("Garantia")
Garantia
de
las
lalio
lalio
laiio
2aiios
2alios
servicio
de
Ia
Garantia y
original debe ponerse en
el
problema y
al Distribuidor o
una tactura de venta o un recibo, evidenciando
garantia
Distribuidor o
los matenales
Ia
formaci6n
reparados. restaurados o refabricados, o
noes
COMERCIAB
TRAS
EXPRESA
VI
EXCLUSIVOS
IP
HOLDINGS,
ESP
PERDIDA
USO
APLICARA
CONSUMIDOR
derechos
a un proveedor
aplicable
a
las
el
consumidor.
y
Ia
del
consumidor, entrega, insta1aci6n, configuraIa
naturaleza, accidentes.
ode
cualquier parte
valida
si el nUmero
es
v<ilida
sola
COMO
IMPLiCITAS,
I
LIDAD
EXPRESAMENTE
EL
PERIODO
DADA
POR
NCULANTE
PARA
DE
ADOUISICION
DEL
LLC
,
PUNITIVO
DE
BENEF
INCAPACIDAD
NI
NGUNA
CON
RESPECTO
POR
ORIGINAL
Ia
exclusiOn
Ia
que
a
legales
especificos. y
PLR
IP
Holdings,
asistenc1a
SERAN
usted
Contacte con
ECIAL
0
de
suministrado
el
comprador-consumidor origina l
como
sigue·
piezas
Garantia
l
alio
lafio
l
afio
2afios
2afios
Resoluci6n
contacto
l
os
procedimientos
del
lnstalaciones
mana
de
obra encont rados en un usa
de
este. Ademas. esta Garantia
de serie aplicado
mente
en
el
pa
I
NC
L
UYENDO,
0 I
DONEIDAD
ARRIBA
EXPRESO
CUALOUIER
EL
DISTRIBUIDOR.
OR
I
GINAL-
CONSUMIDOR.
RESPONSABLES
0
RESULTANTE
I
CIOS,
NEGOCIO
DE
USAR
EL
OTRA
GARANTiA
AL
CONSUMIDOR
EL
DISTRIBUIDOR.
OUE
ADOUIRIO
o limitaci6n
de
se
le
podria aplicar limitaciones o
usted
su
LLC,
usa
da
o Garantia
ORIGINAL
y distribuido
de
mano
de
obra
de
problemas:
con
el
Distribuidor o con
del
servicio
servicio autorizado
as
i
que
de
devoluci6n no
mal usa,
abuso.
CUAL o
co
nsumibles
de
is donde
DE
PRODUCTO.
f.3brica
el
consumidor
en
ese pais.
PERO
NO
UN
PROPOS
EL
DISTRIBUIDOR
GARANTiA
FIRMA
LA
REPARA-
A LA
SOLA
DISCRE-
EN
NINGUN
POR
NINGUN
!COMO
,
AHORROS,
EXCEPTO
NO
OBSTANTE
NO
ESTA
GARANTiA
EL
PRODUCTO
incidentales o
puede tener otros
ba
jo hcencia.
fabricante
-CA
M
-W
C-
LIMI
ESTAB-
CASO,
DATOS
EXCED-
PLR
201
PARA
PERSONA,
dai'ios
minorista autorizado
s
del
AG
visite
Para
estan
CON
TA-
ITO
POR
2-
de
l
el
(p.
ha
0
IP
Rl
 Loading...