

Page 1
Important Safety Precautions
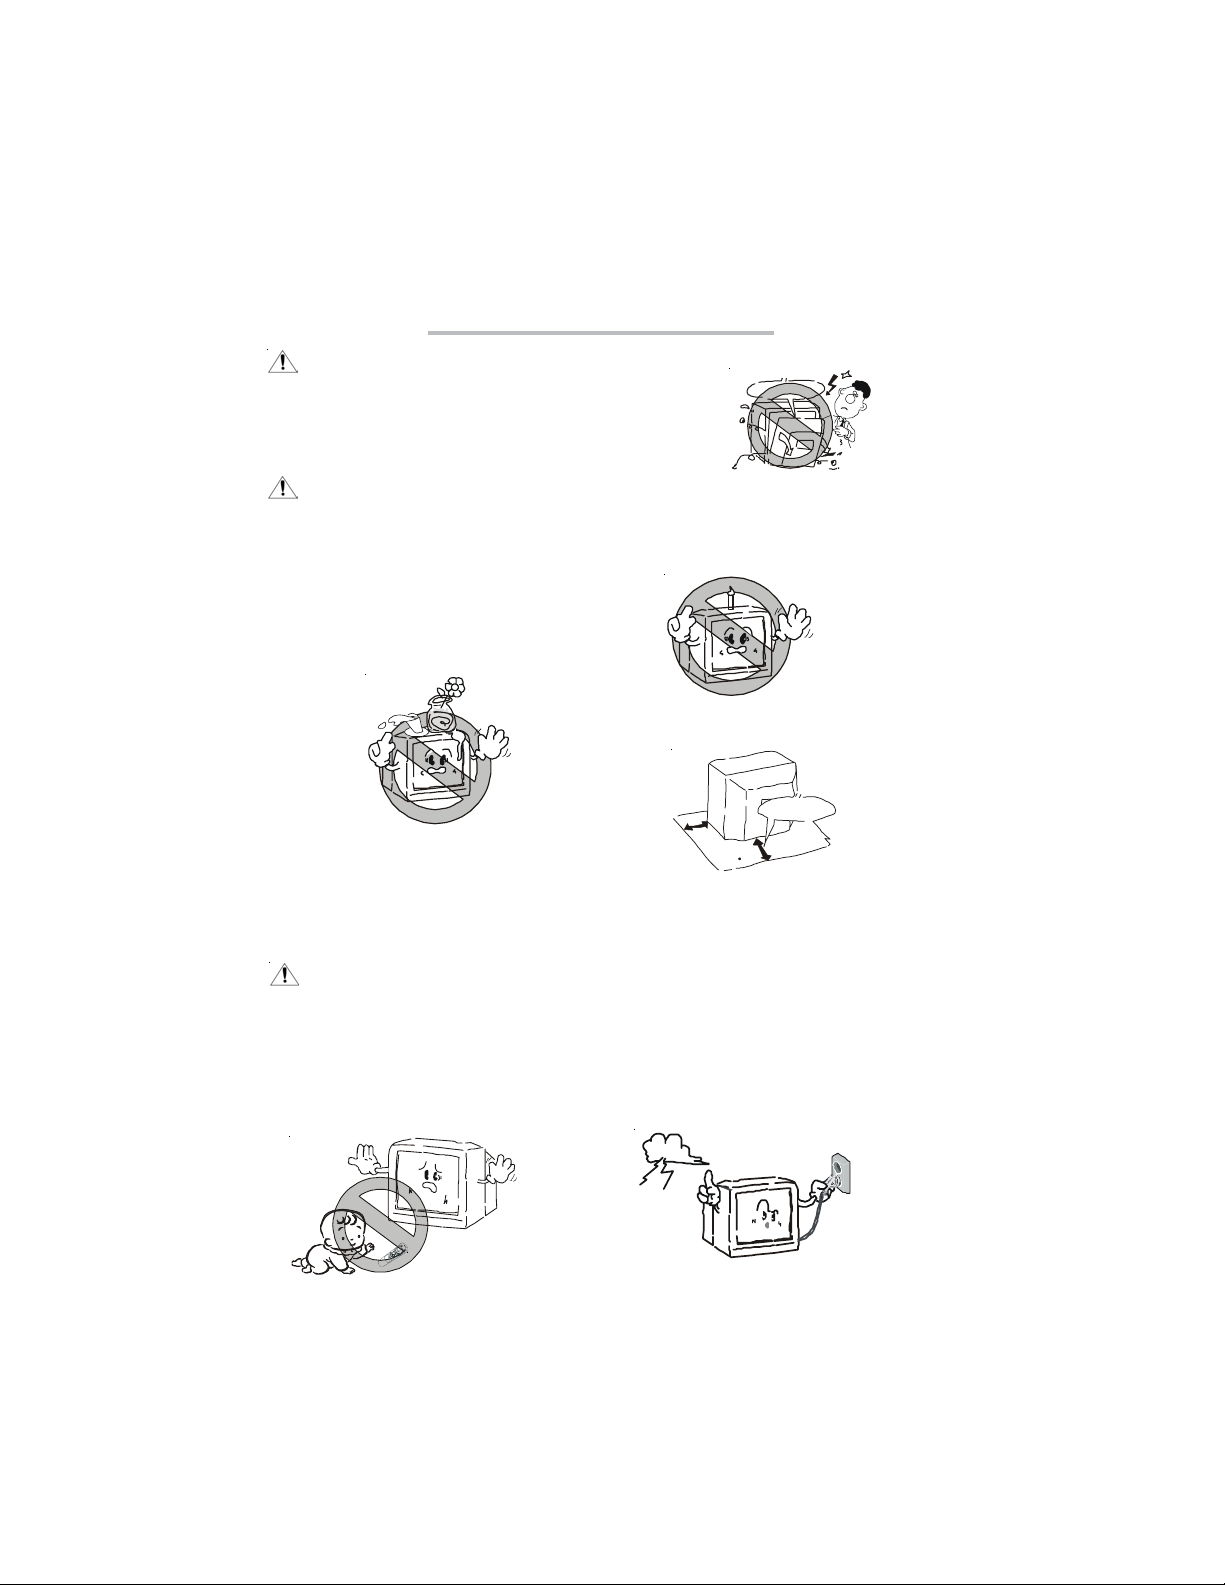
CAUTION
Risk of electric shock, do not open.
Do not attempt to service this product yourself as opening or
removing covers may expose you to dangerous voltage or other
hazards. Refer all servicing to qualified service personnel;
WARNING
1. To reduce the risk of fire or electric
shock, do not expose this product to
rain or moisture.
The apparatus shall not be exposed
to dripping or splashing and that no
objects filled with liquids, such as
vases, shall be placed on the apparatus;
4. The ventilation should not be impeded
by covering the ventilation opening
with items, such as newspapers,
table-cloths, curtains, etc.
NOTE
2. To avoid the fire, no naked flame
source, such as lighted candles,
should be placed on the apparatus;
3. At least 10 cm space should be left
around the apparatus for sufficient
ventilation;
5. In case of smoke, strange noise or
strange smell from the unit, switch it
off, unplug it from the wall outlet and
contact your dealer or service center.
High Voltage, Do not ope n.
10cm
1. For your protection, please read this
instruction completely, and keep this
manual for future reference;
3. The apparatus is not suitable for children under 3-year to operate.
2. Unplug the apparatus from the AC
outlet when it will not be used for a
long period of time. And when there
is a lightning, unplug the unit from the
AC outlet immediately. Never touch
the antenna wire during lightning.
i
Page 2
Important Safety Precautions
4. Do not push objects of any kind
into this apparatus through cabinet
slots as they could touch current
carrying parts or short-circuit parts
resulting in fire, electric shock or
damage to the unit. Never spill liquid of any kind on the apparatus.
6. Keep the apparatus away from radiators and other heat sources.
8. Power supply cords should be
routed safety to prevent life and
property from dangerous with
damaged cord.
5. Do not place this apparatus near water,
for example, near a bath tub, wash bowl,
kitchen sink, or laundry tub, in a wet
basement, a swimming pool, and the
like.
7. Unplug this apparatus from the AC outlet before cleaning. Do not use liquid
cleaners or aerosol cleaners. Use a
damp cloth for cleaning;
9. Place the apparatus in such a position
that the screen is not exposed to direct
sunlight. It is best to have soft indirect
lighting while watching and avoid complete dark environment and reflection
from the screen as these may cause
eye fatigue
Keep in order
11. When the TV being moved in from
cold place, it needs some right time
for dew inside unit evaporating fully
before turn on the unit.
13. To protect our living environment, please send waste batteries and waste product to
legal agents for proper disposal.
ii
2
10. Keep TV set away from high magnetic
field (i.e. power-amplified power
speaker) to avoid affecting the tint.
12. Use an isolated power transformer in
maintenance as the chassis of the apparatus may be electrified.
Page 3

Contents
Polaroid. Add a little color to your life.
Since 1937, America has turned to Polaroid for their photography needs. Today, families look to Polaroid
for consumer electronics that define the digital age: plasma and LCD TVs, portable and standard DVD
players, digital cameras. And while our selection has changed, you’ll still receive the same friendly, helpful
service that made Polaroid an American icon. Congratulations on your new Polaroid TV purchase. To
ensure your new TV provides you with years of enjoyment, please read this guide carefully.
Overview 4
External connection 6
Remote control 8
Basic operation 10
Menu Basic operation 12
Using the PICTURE menu 12
Using the SOUND menu 13
Using the PRESET menu 14
Using the FUNCTION menu 15
Picture defects and countermeasures (AIR reception) 18
Troubleshooting 19
Note: Please read the carton or name plate on the TV back cabinet to sure which
model you have purchased before you read this manual.
3
Page 4
Overview
Overview of the function keys
Please observe the function keys on the TV and refer to the
following diagram to learn every function key.
POWER SWITCH
Note: Buttons for SA-U series TV may have different position for different
models, but the same button has same function. Figure mentioned
above is for model TTM-2420.
4
IR RECEIVER WINDOW
POWER INDICATOR
Page 5
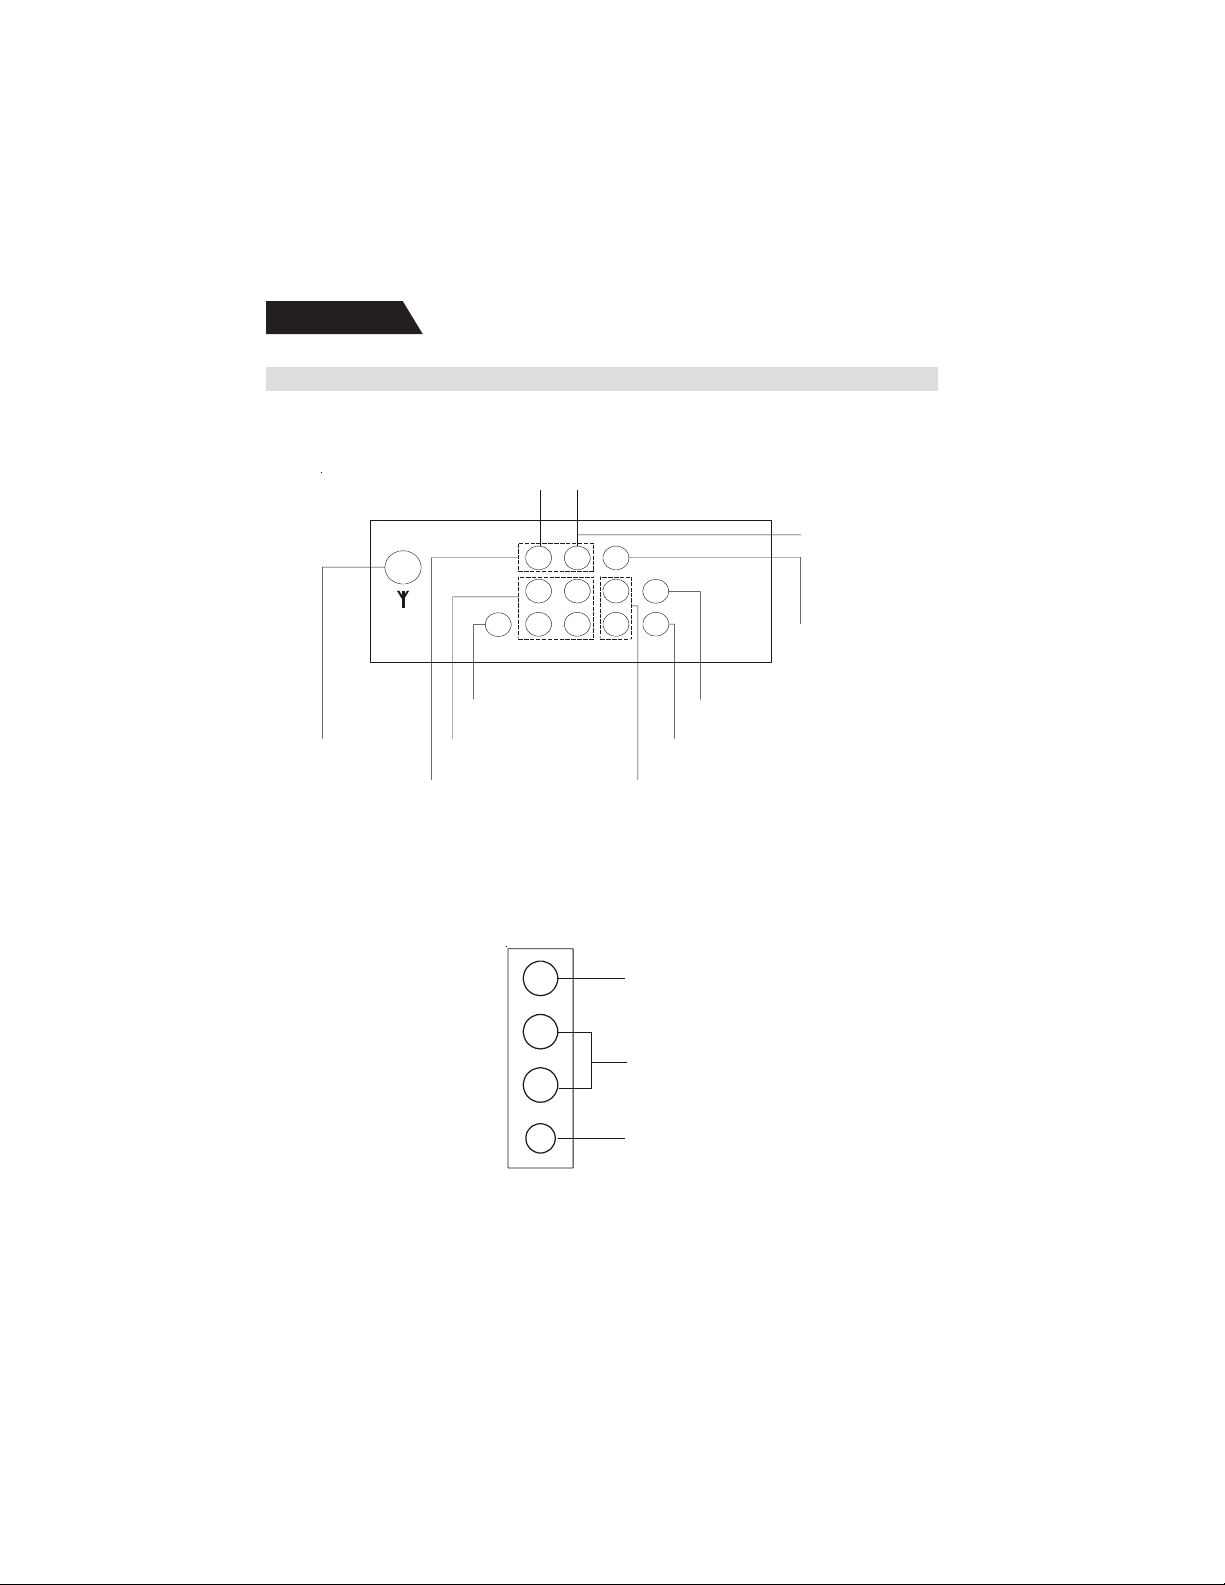
Overview
Overview of the back AV jacks
Please observe the AV jacks on the back of TV, and refer to the following
diagram to learn the function of every jack.
AV1 AV2
Y Input Jack
Video
Output Jack
C
b
Input Jack
r
C
Input Jack
Antenna Jack
SVHS
Input Jack
Audio
Input Jack
Video
Input Jack
Audio
Output Jack
Note: Different model may have different jack. Please refer to¡°SA-U series
color TV Functions table¡±in page 21 for your model.
Side AV and Headphone Jacks
Make sure your TV has side AV and headphone jacks. If it does, please
refer to the following diagram to learn the function of every side jack.
VIDEO INPUT
L
AUDIO INPUT
R
HEADPHONE OUTPUT JACK
Note: Side AV and headphone jacks may have different position for different
models,but the same jack has same function. Figure mentioned
above is for model TTM-2420.
5
Page 6
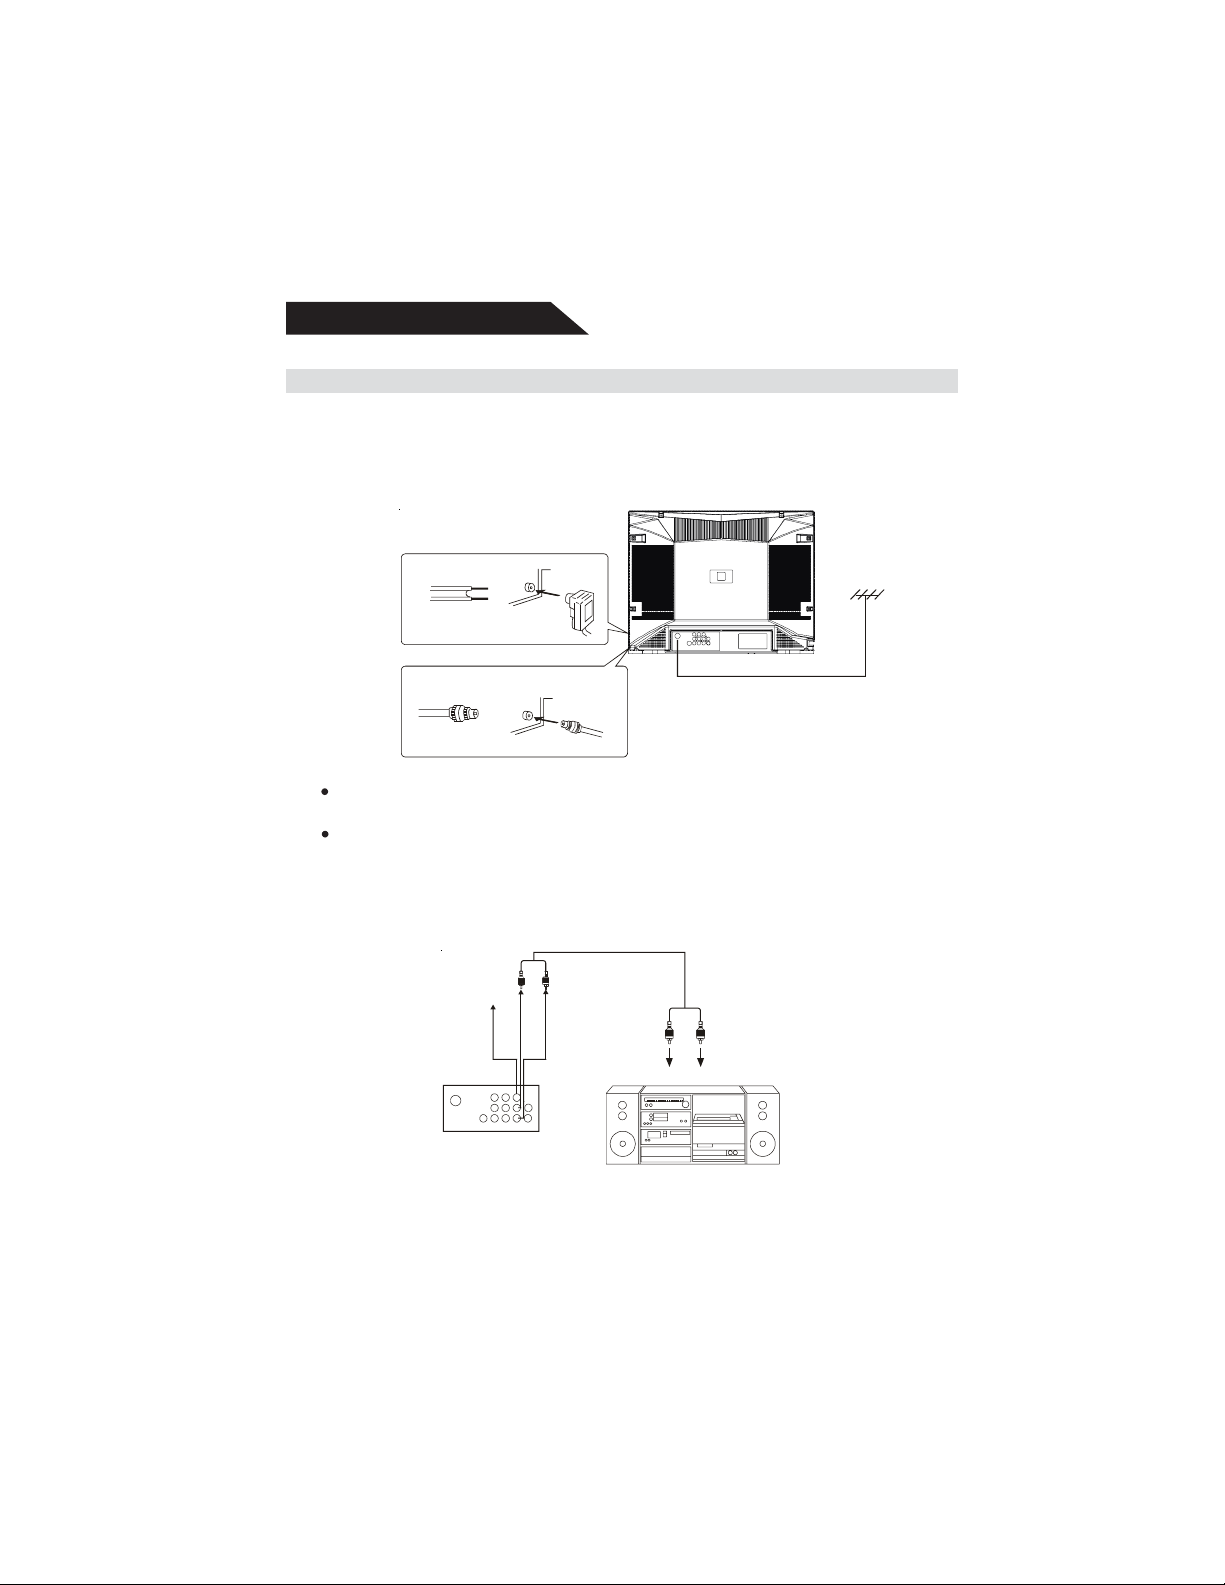
External connection
Antenna connection
The antenna input impedance used in this model is 75ohm, just connect 75ohm
coaxial cable of VHF/UHF antenna to the antenna jack on the back of TV directely. If
you use 300 flat feeder, you need connect it with one 300 /75ohm converter first, then
connect the converter into the antenna jack.
Note:
It is recommended to use 75ohm coaxial cable to eliminate interference and
noise caused by radio wave.
Do not bind the antenna cable and power cord together.
Connect to Audio equipment
Connect this unit with the audio input terminal (pinhole) of a stereo system, then
you may enjoy quality sound at the same time of enjoying quality picture.
(White) (Red)
£¨
White) (Red)
VIDEO OUTPUT
R AUDIO OUTPUT
L AUDIO OUTPUT
To external equipment input
Stereo System
6
Page 7
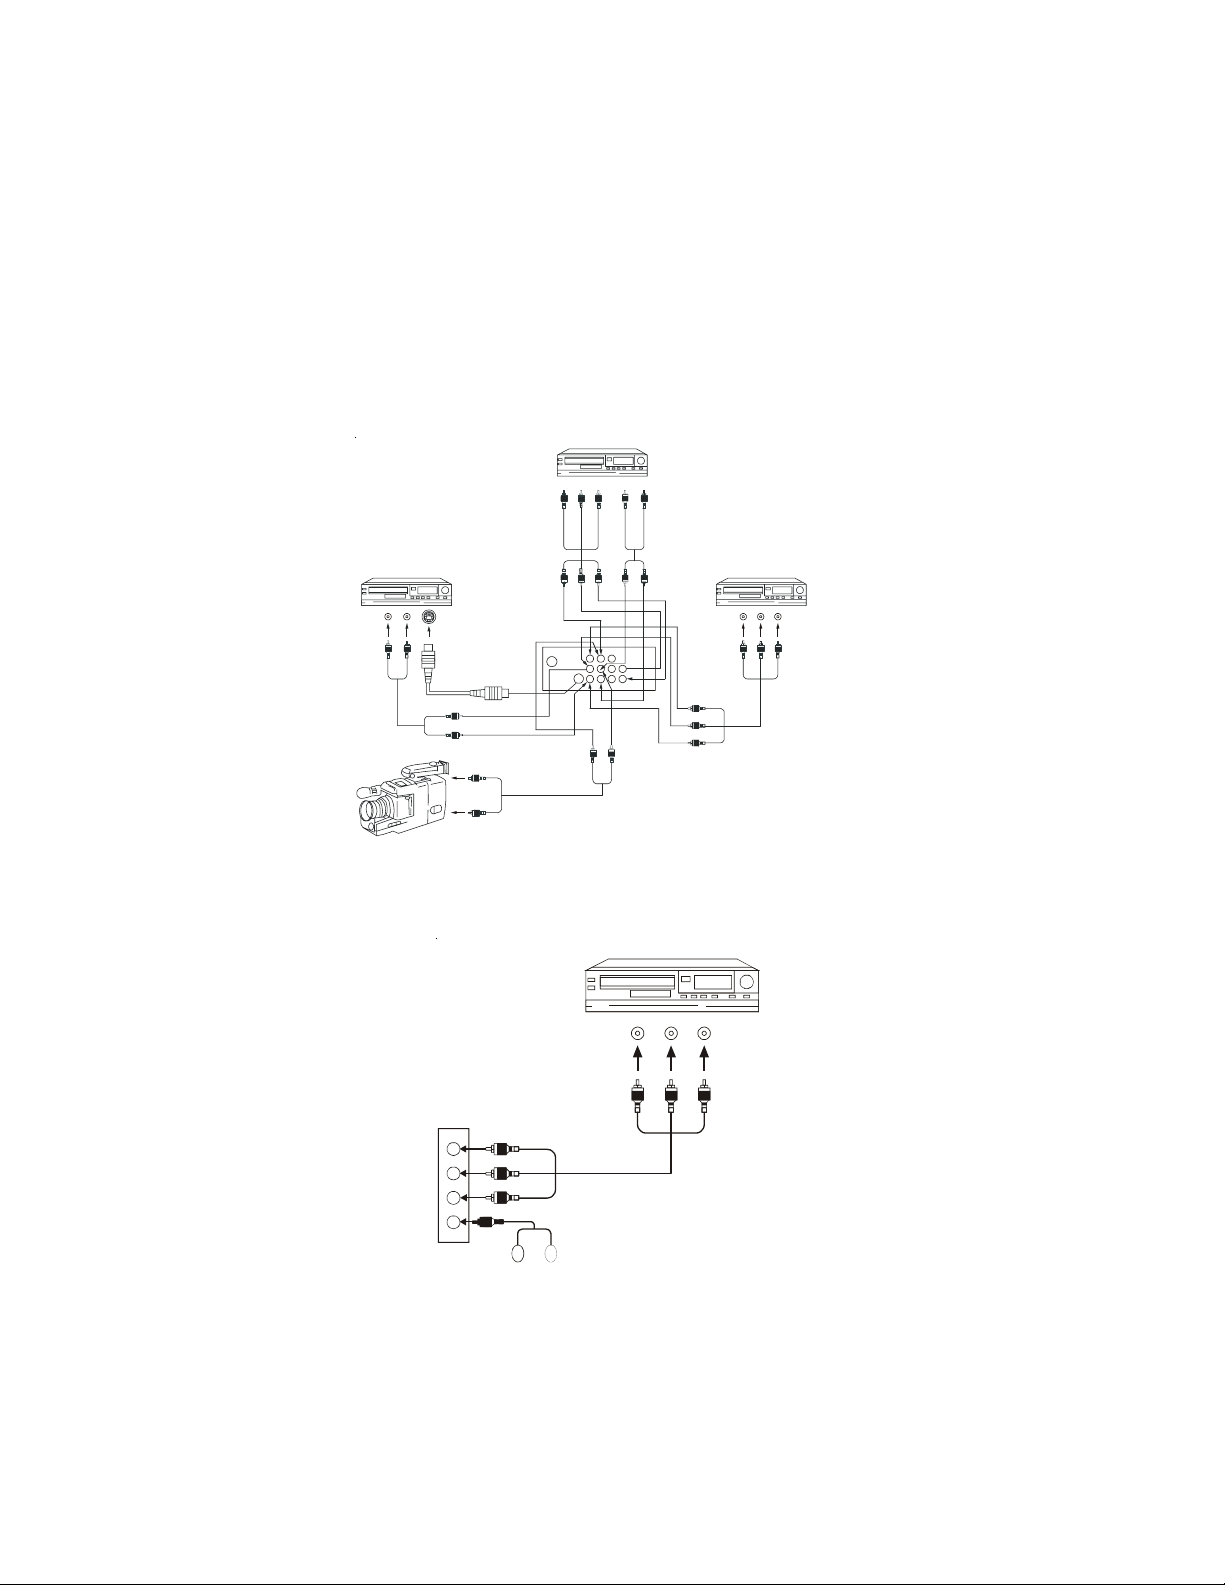
Connect to video equipment (VCD, DVD) and headphone jack
Connect back AV jacks as the following figure shown:
S-terminal has the same AUDIO IN jack as AV1, but you can not input AV signal
from these two terminals at the same time. YUV has the same AUDIO IN jack as
AV2, but you can not input AV signal from these two terminals at the same time.
VTR with Y Cb Cr terminal
¡¢¡¢
(Green) To Y output
(blue) To Cb output
VTR with S-VIDEO termin al
(red) To Cr output
(Green)
(blue)
(red)
To Audio output ( red)
(white)
(red)
(white)
VTR without S-VIDEO terminal
(yellow)
(white)
(red)
(white)
To Video output (yellow)
To Audio output(red)
(white)
To Audio output(red)
To S-VIDEO output
TO SVHS socket
(white)
(red)
(yellow) To Video output
(white) To Audio output
(yellow)
(white)
Note: Different model may have different jack. Please refer to¡°SA-U series
color TV Functions table¡±in page 21 for your model.
.If your model has side AV jacks or headphone jack, please connect as the
following figure shown:
(Yellow)
(White)
(Red)
VTR without S-VIDEO
(White)
To VIDEO output (Yellow)
To AUDIO output (Red)
Headphone
7
Page 8

Remote Control
Remote Control
MUTE
DIGITAL, LETTER
INPUT BUTTONS
DISPLAY
SLEEP
BROWES
CLEAR
PROGRAM UP/
MENU SELECT
VOLUME DOWN/MENU
VAL UE DOW N
SOUND
CCD
MUTE ON/OFF
PROG.
VOL
MENU
VOL
PROG.
POWER ON/STANDBY
PRE.CH
PIC
TV/AV
MAIN MENU
VOLUME UP/MENU VALUE UP
PROGRAM DOWN/MENU SELECT
STEREO
GAME
CALENDAR
Mute button Lowers the volume to its minimum level. Press again to
restore volume.
ON/OFF Turns the TV on and off.
0-9(Number buttons) Enter channel numbers and time settings directly
through the remote control.
To enter a two-digit channel, press the two digits.To enter a
three-digit channel, press and hold the first digit for two
seconds until two dashes appear to the right of the
number, then add the second two. Example: to tune a
channel 123, press and hold 1 for two seconds, press
2, then press 3.
8
Page 9

Remote Control
Remote control
DISPLAY Displays channel information.
PRE.CH Returns you to the previous channel.If the user is in the
menu system,Go Back will take the user to the previous
menu screen.
BROWSE “Browse”feature.Pressing the button twice will begin
channel scan,again will stop at current channel.
SLEEP Set the sleep timer.
PIC Steps through picture presets
MEMORY,STANDARD,DYNAMIC and MILD.
CLEAR Remove any menu or display form the screen and
returns you to TV reviewing.For menu with digit inputs
pressing CLEAR button will clear the last number
entered.
TV/AV Toggles the set between available AV inputs and RF
input.
MENU Displays the TV’s Main menu.
VOL (left and right)buttons Decrease or increase the TV’s volume,or
move through the on-screen menu system.
PROG.(up and down)buttons Scan up or down through the current channel
list. Press once to change the channel up or down; press
and hold to continue changing channels,or move through
the on-screen menu system.
SOUND Four preset audio settings for you to select (MEMORY/
STANDARD/NEWS/MUSIC).
STEREO Four available audio modes (AUTO/MONO/STEREO/
Note: For models without AV STEREO or BTSC,SOUND or STEREO button on the
CCD Turns on or turns off the colsed caption.
Loading batteries:
AAA batteries with the polarities as indicated inside the compartment then replace
the lid.
SAP)
remote control is not activated,Please refer to “SA-U” series
colour television Functions table in page 21 for your model.
Remove the lid of the battery compartment, insert 2 size
Note:
1. One loading of batteries will last 1 year under normal use.
2. If you do not intend to use the remote control for a long period of time, remove
the batteries to avoid damage due to leakage.
9
Page 10

Basic Operation
Overview
Connect to the Mains
Insert the mains wire plug of the unit into AC 120V mains outlet.
Power on/off
When you press the POWER switch button to standby or turn on TV.
Note: The power indicator will turn into red when TV is under standby state.
The power indicator will die when TV is under turn on state.
Non-signal power-off in 5 minutes
In case the unit under blue screen or non-signal screen saver state, TV will be
standby state automatically 5 minutes later, to turn it on, please press POWER
button on TV.
Change channels
You can change channels by using the PROG
PROG / button on the remote control).
Volume UP/DOWN
You can adjust the sound by using VOL / button in front of the TV (or the VOL /
button on the remote control).
/ button in front of the TV(or the
Sleep function
1. Press down SLEEP button on the remote control to display the preset time
120 minutes, 90 minutes, 60 minutes, 30, minutes, the unit will be automatically turned off when the set time has elapsed.
2. To cancel the time-off function, press the SLEEP button consecutively until
display changes to SLEEP OFF state.
Picture modes
Press P.STD button on the remote control to select picture modes (MEMORY—STANDARD—DYNAMIC—MILD), MEMORY status is the picture mode you have adjusted.
10
Page 11

Basic Operation
Overview
Sound modes
Press S.STD button on the remote control to select sound modes (MEMORY—STANDARD—NEWS—MUSIC), MEMORY status is the sound mode you have adjusted.
Calendar
Press CALENDAR button to display the screen as the figure shown:
The calendar of these series models provide you searching the solar calendar and
current week from January 1, 1900 to December 31, 2049. Press PROG
to move to the year, month, date, then Use VOL
year, month, date. Press CALENDAR button to exit. The date inquiry is the same
steps as above.
/ buttons to adjust the data of the
/ buttons
GAME
You and TV place black and white stones on a large ruled board alternatively. If a
black or white stone is put between black stones or white stones, then white stones
or black stones located between the same color stones will be taken away. When
one player gets all stones, or fills in all eyes, the game is end. If you get more stones
than TV’s, you win. Press GAME button to display the screen as the figure shown:
Use PROG
right, then press MENU button to confirm. Press GAME button to exit.
/ buttons to move upward or downward and VOL / buttons to left or
11
Page 12

Menu Basic Operation
Menu Basic Operation
1. To enter the menu, press MENU button in front of the TV (or on the remote control),
press MENU button in front of TV (or on the remote control) again to select the
icon.
2. Press PROG
/ button in front of TV (or on the remote control) to select the item
you want to change.
3. Use VOL / button in front of TV (or on the remote control) to change the setting.
4. To exit the menu, press MENU button in front of TV (or on the remote control) to
cycle all of icons one time in the previous menu. You can press menu button on
the remote control to exit the menu operation directly.
Using the PICTURE Menu
Using the PICTURE Menu
PICTURE
BRI GHTNESS
SHARPNESS
COLOR TEMP NORMAL
COMB FILTER ON
CONTRAST Adjust the difference between the light and dark areas of the
picture. Adjust range: (00~63).
BRIGHTNESS Adjust left/right to darken/brighten the picture. Adjust range:
(00~63).
COLOR Adjust left/right to decrease/increase color intensity or satura-
tion. Adjust range: (00~63).
12
Page 13

Using the PICTURE
menu
Using the PICTURE Menu
SHARPNESS Adjust left/right to soften/sharpen the picture detail. Adjust range:
(00~63).
TINT Adjust the balance between the red and green levels. Adjust
range: (-31~+31).
COLOR TEMP Automatic color adjustments. Provide three states: (NORMAL,
WARM, COLD).
COMB FILTER Adjust the comb filter on or off.(Optional item,please check your
television has this function.)Provide two states:(ON,OFF)
Using the SOUND Menu
Using the SOUND Menu
SOUND
VOLUME Adjust left/right to change small/large sound. Adjust range: (00~63).
TREBLE Adjust left/right to decease/increase high pitched sound. Adjust
range:(00~63).
13
Page 14

Using the SOUND
menu
Using the SOUND Menu
BASS Adjust left/right to decease/increase low pitched sound. Adjust range:
(00~63).
BALANCE Adjust left/right to emphasize left/right speaker balances. Adjust range:
(-31~+31).
SURROUND Adjust different kinds of the surround sound effect. Provide two
states(OFF, ON).
STEREO Adjust different kinds of the stereo sound effect. Provide three states:
(PASS, PSEU, MONO ).
Using the PRESET Menu
Using the PRESET Menu
TUNI NG
DELETE CH NO
SOURCE AIR
BTSC STEREO
AUTO S EARC H
CHANNEL Use VOL / button in front of TV (or on the remote control) to select
channels, or enter the channel number directly using the number
buttons.
DELETE CH Select Yes to skip the channels above .Select NO to go into the
channel above.Provide two states:(YES,NO).
14
Page 15

Using the PRESET Menu
Using the PRESET menu
SOURCE Let you select AIR or CABLE. Select AIR to receive radio broadcast
signal. Select CABLE to receive CATV signal.
provide two states:(AIR,CABLE)
BTSC Available audio modes, provide four states:
(AUTO, MONO, STEREO, SAP).
Optional item. Check your television to see if it has this function.
AUTO SEARCH Press VOL button in front of TV (or VOL button on the remote
control) to start channel searching and store automatically.
Using the FUNCTION Menu
Using the FUNCTION Menu
FUNCTION
LANGUAGE ENGLI SH
SCREEN SAVER
CHILD LOCK
CCD OFF
V- CHI P
LANGUAGE Select from available language to display all menus.
SCREEN Turn on or off the background function when no signal is received.
Provide three states: (OFF, BLUE BACK, SAVER).
CHILD LOCK Input four digital number on the remote control,you may change the
child lock states(ON or OFF), if input the right password,the child lock
will take effect when the TV turns on next time.
The initial password is MUTE+999.
15
Page 16

Using the FUNCTION Menu
CCD Eight closed captioned modes including four text modes. Provide
nine states: (OFF,C1,C2,C3,C4,T1.T2,T3,T4).
V-CHIP Press VOL button in front of TV (or VOL button on the remote control)
to see the figure below.
Figure
CONFIRM PASSWORD: Press four digital buttons on the remote control. V-CHIP
menu can not be displayed without inputting the right password. The initial pass-
word is 0358.
Figure
16
Page 17

V-CHIP Adjust V-CHIP funtion on or off,Provide two states: (ON, OFF).
No Rating Provided
Directed at Older Children
MPAA Press VOL or VOL buttons on the remote control to Select the
MPAA ratings. When you select a movie rating, the system will auto-
matically block all movies with higher ratings.
TVPG SETTING Press VOL or VOL button on the remote control to go to the
TVPG setting.
Hierarchy of Age-Based Ratings
TV-Y
TV-Y7
TV-G
TV-PG
TV-14
TV-MA
All Children
Directed to Children 7 years and older
General Audience
Parental Guidance Suggested
Parents Strongly Cautioned
Mature Audience Only
RETURN Come back the higher menu.
table 2
17
Page 18

Using the FUNCTION Menu
CCD Eight closed captioned modes including four text modes. Provide
nine states: (OFF,C1,C2,C3,C4,T1.T2,T3,T4).
V-CHIP Press VOL button in front of TV (or VOL button on the remote control)
to see the figure below.
Figure
CONFIRM PASSWORD: Press four digital buttons on the remote control. V-CHIP
menu can not be displayed without inputting the right password. The initial pass-
word is 0358.
Figure
16
Page 19

Troubleshooting
If you have any problem, check the countermeasures for each symptom listed below.
The following symptoms may have been caused by inappropriate adjustments rather
than actual malfunction of the unit.
If the trouble persists, contact the service center.
19
Page 20

604-L20H33-02
Printed on
Recycled Paper
PRINTED IN
RECYCLED PAPER
Page 21

20051212
24" Pure Flat Tube Stereo TV
TTM-2420
 Loading...