

Page 1
24” Color Television
TTM-2401
Operating Manual
20050503
Page 2

Contents
Congratulations on your purchase of this color television.
We recommend that you thoroughly read this manual before use to fully enjoy the many functions and excellent
features of this equipment.
Retain this manual in an easily accessible location forfuture reference.
* Screen displays and illustrations inthis manual may differ from the actualones for better visibility.
Contents
Important Safety Instructions ................................................................................2
Identification of Controls .......................................................................................4
Antenna connection ...............................................................................................6
Preparing the remote control.................................................................................7
External equipment connections............................................................................8
Power On/Off .........................................................................................................10
Selecting input signal ...........................................................................................11
Tuning In ................................................................................................................12
Channel Selection .................................................................................................1
Picture adjustment................................................................................................1
Sound controls .....................................................................................................1
Timer Setting 7
System Settings ....................................................................................................19
Closed Captions ....................................................................................................20
Setting Parental Control .....................................................................................21
Troubleshooting Guide.........................................................................................25
.........................................................................................................1
4
5
6
1
Page 3
Important safety instructions
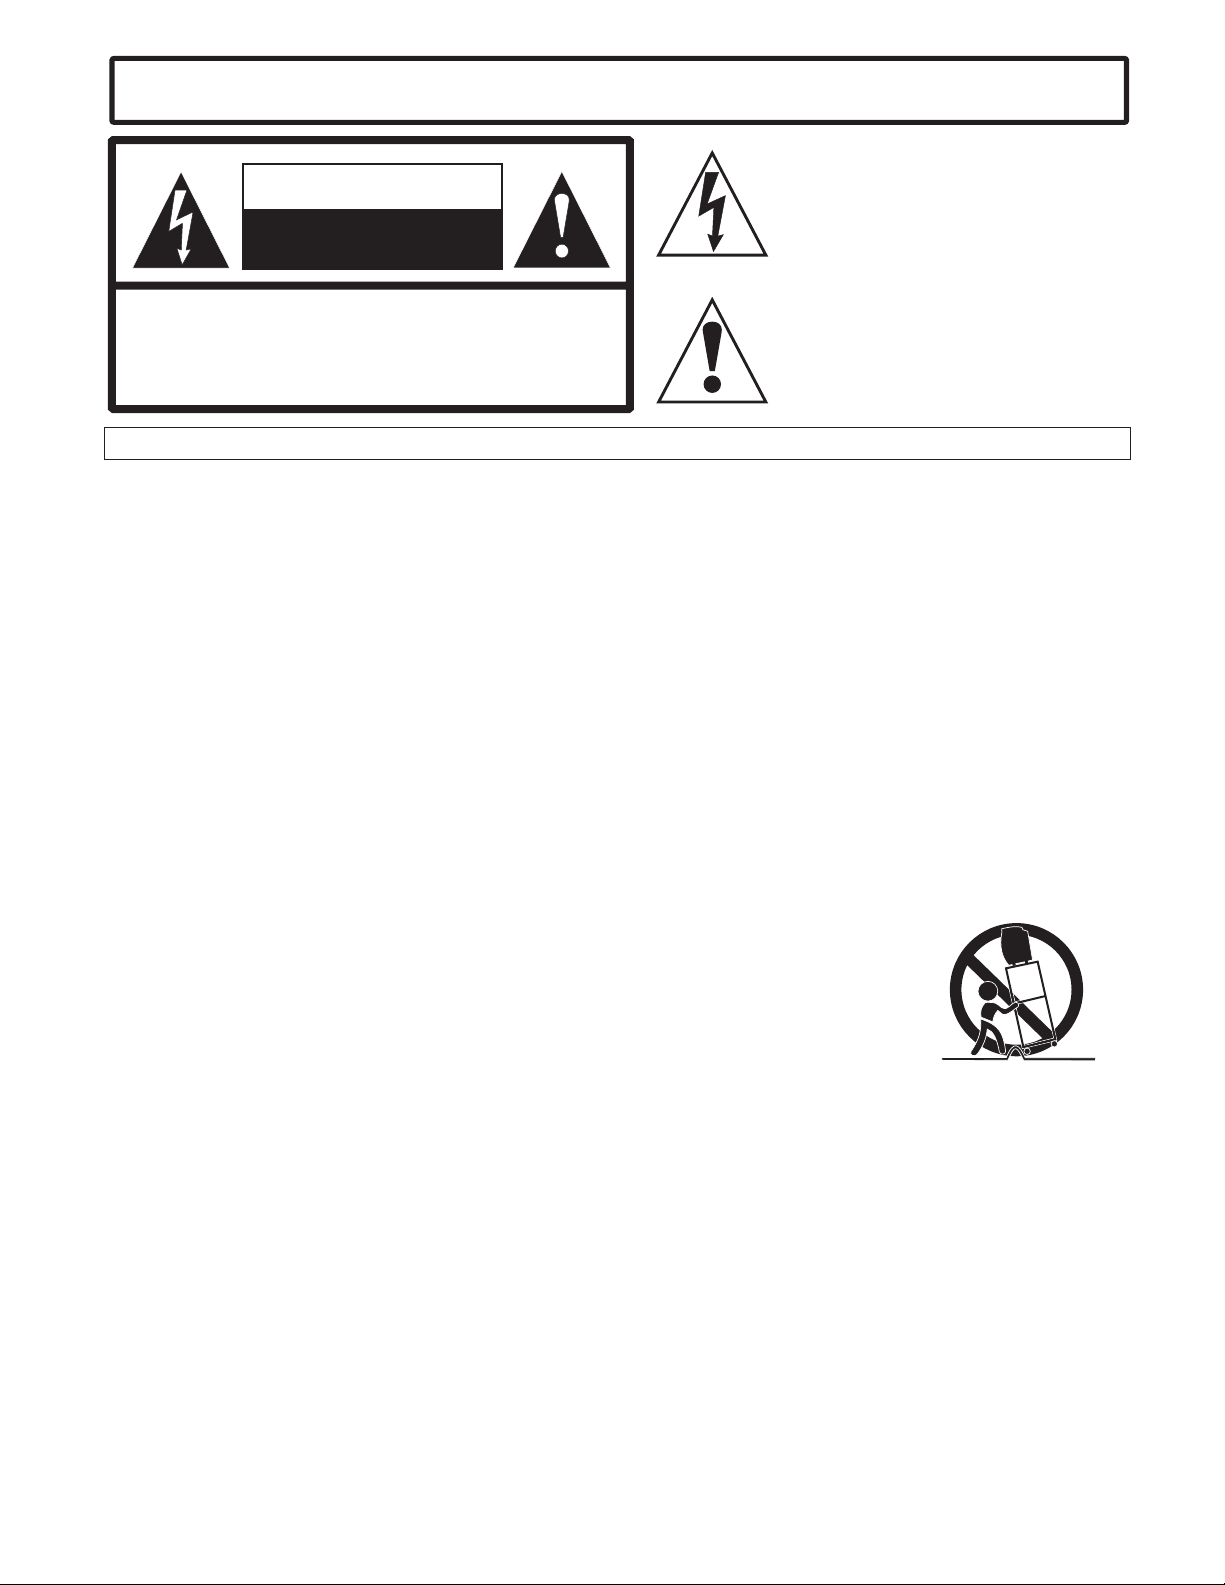
The lightning flash with arrowhead symbol,
within an equilateral triangle is intended to
CAUTION
RISK OF ELECTRIC SHOCK
DO NOT OPEN
alert the user to the presence of uninsulated
dangerous voltage within the product's
enclosure that may be of sufficient magnitude
to constitute a risk of electric shock to persons
.
CAUTION: TO REDUCE THE RISK OF ELECTRIC SHOCK,
DO NOT REMOVE COVER(OR BACK). NO
USER-SERVICEABLE PARTS INSIDE.
REFER SERVICING TO QUALIFIED SERVICE
PERSONNEL.
WARNING: TO REDUCE THE RISK OF FIRE OR ELECTRIC SHOCK, DO NOT EXPOSE THIS APPLIANCE TO RAIN OR MOISTURE.
Before using the unit, be sure to read all operating instructions carefully. Please note that these are general
precautions and may not pertain to your particular unit. For example, this unit may not have the capability
to be connected to an outdoor antenna.
The exclamation point within an equilateral
triangle is intended to alert the user to the
presence of important operating and
maintenance (servicing) instructions in the
literature accompanying the appliance.
1. READ INSTRUCTIONS
All the safety and operating instructions should be read before the product is operated
.
2. RETAIN INSTRUCTIONS
The safety and operating instructions should be retained for future reference.
3. HEED WARNINGS
All warnings on the product and in the operating instructions should be adhered to.
4. FOLLOW INSTRUCTIONS
All operating and use instructions should be followed.
5. CLEANING
Unplug this product from the wall outlet before cleaning. Do not use liquid cleaners or aerosol cleaners. Use a
damp cloth for cleaning.
6. ATTACHMENTS
Do not use attachments not recommended by the product's manufacturer as they may cause hazards.
7. WATER AND MOISTURE
Do not use this product near water (a bathtub, washbowl, kitchen sink, laundry tub, wet
basement, or swimming pool for example)
8. ACCESSORIES
Do not place this product on an unstable cart, stand, tripod, bracket, or table. The
product may fall, causing serious injury and serious damage to the product. Use only
with a cart, stand, tripod, bracket, or table recommended by the manufacturer or sold
with the product. Any mounting of the product should follow the manufacturer' s
instructions and should use a mounting accessory recommended by the manufacturer.
8A.
An appliance and cart combination should be moved with care. Quick stops, excessive
force, and uneven surfaces may cause the appliance and cart combination to overturn.
PORTABLE CART WARNING
(symbol provided by RETAC)
S3126A
9. VENTILATION
S
lots and openings in the cabinet and in the back or bottom are provided for ventilation to ensure reliable operation of
the product and to protect it from overheating. These openings must not be blocked or covered. The openings should
never be blocked by placing the product on a bed, sofa, rug, or other similar surface. This product should never be
placed near or over a radiator or heat source. This product should not be placed in a built-in installation such as a
bookcase or rack unless properventilation is provided orthe manufacturer's instructions have been adhered to.
10. POWER SOURCES
This product should be operated only from the type of power source indicated on the marking label. If you are not
sure of the type of power supply to your home, consult your appliance dealer or local power company. For products
intended to operate from batterypower, or other sources, refer to theoperating instructions.
11.GROUNDING OR POLARIZATION
This product is equipped with a polarized alternating current line plug (a plug having one blade wider than the other).
This plug will fit into thepower outlet only one way.This is a safety feature. If you areunable to insert the plug fully into
the outlet, try reversing the plug. If the plug should still fail to fit, contact your electrician to replace your obsolete
outlet. Do not defeat thesafety purpose of thepolarized plug.
12. POWER-CORD PROTECTION
Power-supply cords should be routed so that they are not likely to be walked on or pinched by items placed upon or
against them, paying particular attention to cords at plugs, convenience receptacles, and the point w
from the appliance.
2
here they exit
Page 4
Important safety instructions
13. LIGHTNING
To protect your product from a lightning storm, or when it is left unattended and unused for long periods of time,
unplug it from the wall outlet and disconnect the antenna or cable system. This will prevent damage to the product
due to lightning and power-linesurges.
14. POWER LINES
An outside antenna system should not be located in the vicinity of overhead power lines or other electric light or
power circuits, or where it can fall into such power lines or circuits. When installing an outside antenna system,
extreme care should be takento keep from touchingpower lines or circuits as contact with them might be fatal.
15. OVERLOADING
Do not overload wall outlets and extension cords as this can result in a risk of fire or electric shock.
16. OBJECT AND LIQUIDENTRY
Never push objects of any kind through openings in the product as they may touch dangerous voltage points or short
out parts that could resultin fire or electricshock. Never spill or spray any type of liquid on theproduct.
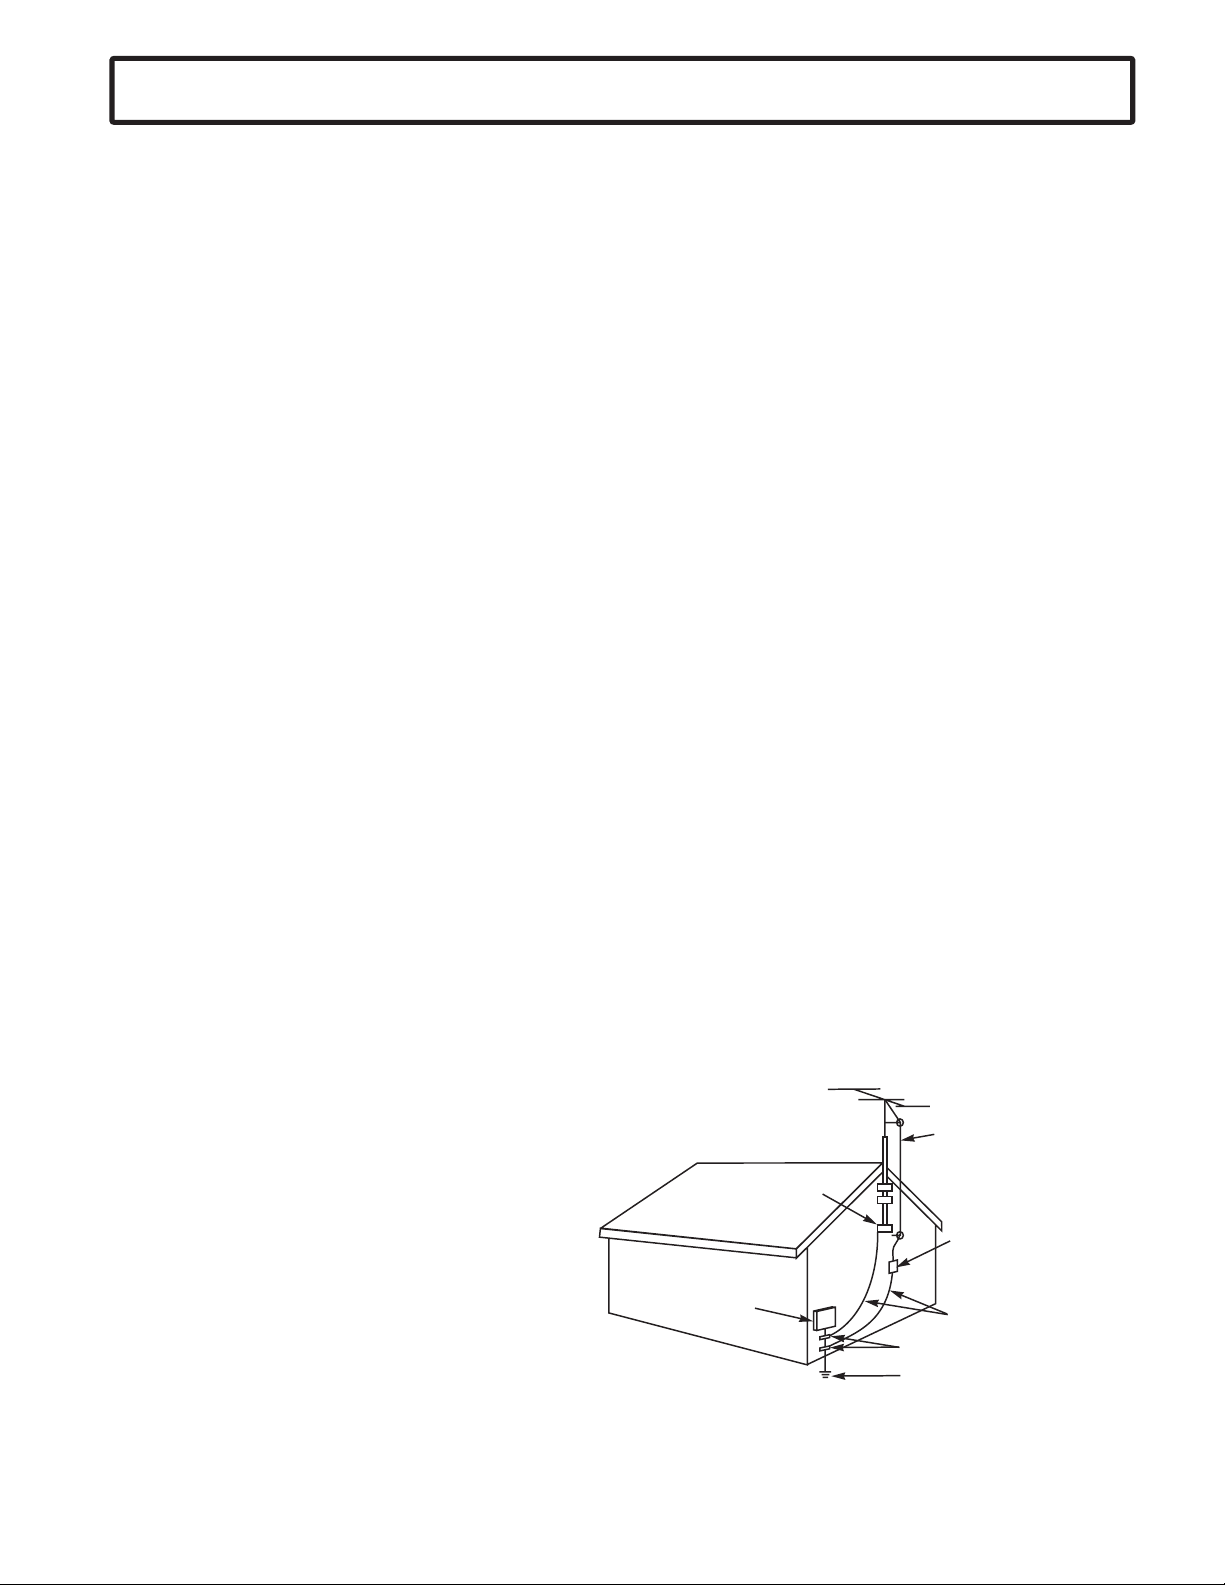
17. OUTDOOR ANTENNA GROUNDING
If an outside antenna is connected to the product, be sure the antenna system is grounded so as to provide some
protection against voltage surges and built-up static charges. Section 810 of the National Electric Code, ANSI/NFPA
70, provides information with respect to proper grounding of the mast and supporting structure, grounding of the
lead-in wire to an antenna discharge product, size of grounding conductors, location of antenna discharge product,
connection to grounding electrodes, andrequirements for grounding electrodes.
18. SERVICING
Do not attempt to service this product yourself as opening or removing covers may expose you to dangerous voltage
or other hazards. Refer allservicing to qualified servicepersonnel.
19. REPLACEMENT PARTS
When replacement parts are required, be sure the service technician uses replacement parts specified by the
manufacturer or those that have the same characteristics as the original part. Unauthorized substitutions may result
in fire, electric shock orother hazards.
20. SAFETY CHECK
Upon completion of any service or repairs to this product, ask the service technician to perform safety checks to
determine that the product isin proper operating condition.
21. WALL OR CEILING MOUNTING
The product should be mounted to a wall or ceiling only as recommended by the manufacturer.
22. DAMAGE REQUIRING SERVICE
Unplug the product from the wall outlet and refer servicing to qualified service personnel under the following
conditions:
a. When the power-supply cord or plug is damaged.
b. If liquid has been spilled, or objects have fallen into the product.
c. If the product has been exposed to rain or water.
d. If the product does not operate normally after installation by following the operating instructions. Adjust only those
controls that are covered by the operating instructions, as adjustment of other controls may result in damage and
will often require extensive workby a qualified technicianto restore the product to its normal operation.
e. If the product has been dropped or the cabinet has been damaged.
f. When the product exhibits a distinct change in performance.
23. HEAT
The product should be situated away from heat
sources such as radiators, heat registers, stoves,
or other products (including amplifiers) that
produce heat.
24. NOTE TO CATV SYSTEM INSTALLER
This reminder is provided to call the CATV system
installer's attention to Article 820-40 of the NEC
that provides guidelines for proper grounding
and, in particular, specifies that the cable ground
shall be connected to the grounding system of the
building, as close to the point of cable entry as
S2898A
practical.
GROUND
CLAMP
ELECTRIC
SERVICE
EQUIPMENT
NEC-NATIONAL ELECTRICALCODE
EXAMPLE OF ANTENNA GROUNDING AS PER
NATIONAL ELECTRICAL CODE
ANTENNA
LEAD IN
WIRE
ANTENNA
DISCHARGE UNIT
(NEC SECTION 810-20)
GROUNDING CONDUCTORS
(NEC SECTION 810-21)
GROUND CLAMPS
POWER SERVICE GROUNDING
ELECTRODE SYSTEM
(NEC ART 250, PART H)
WARNING: FOR CONTINUED SAFETY, REPLACE SAFETY CRITICAL COMPONENTS
ONLY WITH MANUFACTURER'S RECOMMENDED PARTS (REFER TO SERVICE
LITERATURE).
3
Page 5
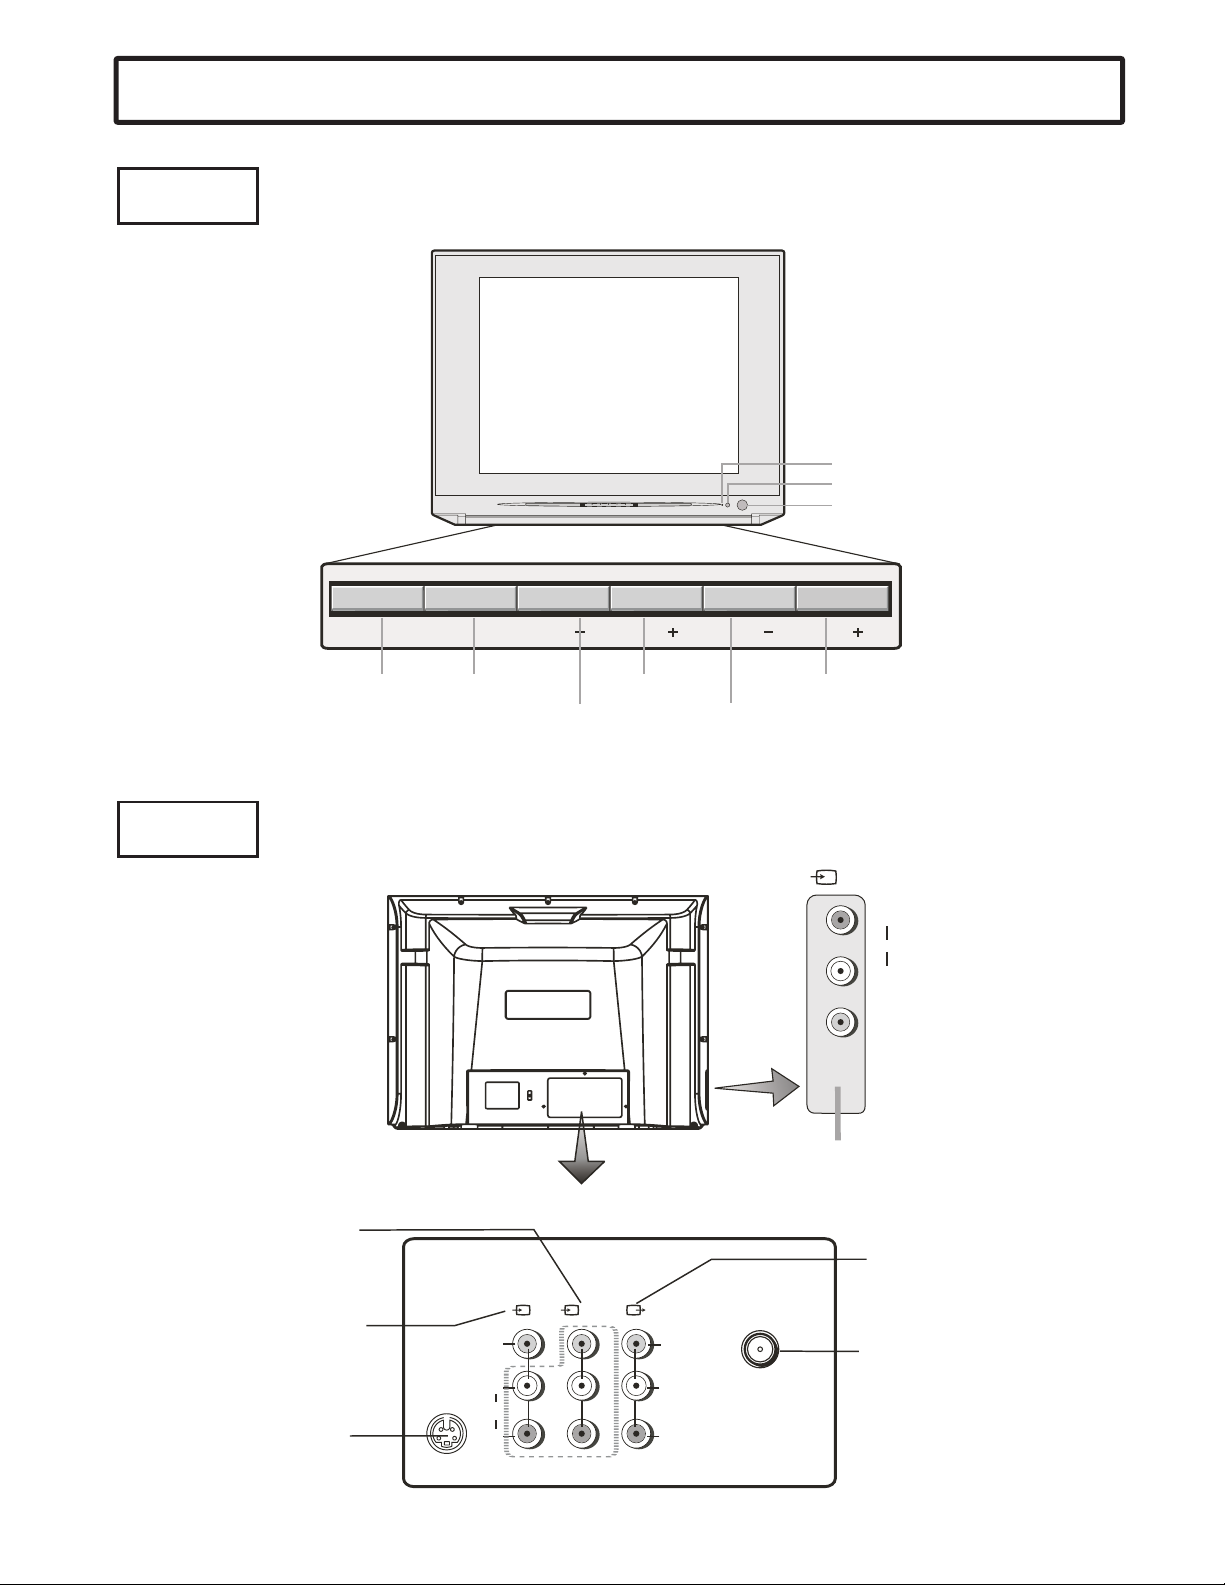
Front
Identification of Controls
Indicator
Remote sensor
Power button
Back
Back
MENU
MENU
TV/AV
TV/AV
CH CH
Channel up
Channel down
VOL VOL
Volume up
Volume down
AV2 input
(VIDEO, AUDIO: L/MONO,R)
()
2
R
AUDIO
L
(
MONO
VIDEO
)
DVD input
(VIDEO: Y,C,C,
BR
AUDIO:L/MONO,R)
S-VIDEO input
-
SVIDEO
VIDEO
L/MONO
AUDIO
R
()
1
YUV
AV output
(VIDEO, AUDIO: L,R)
RF
VIDEO
Y
C
C
L
B
AUDIO
R
R
Antenna input
4
Page 6
Identification of Controls
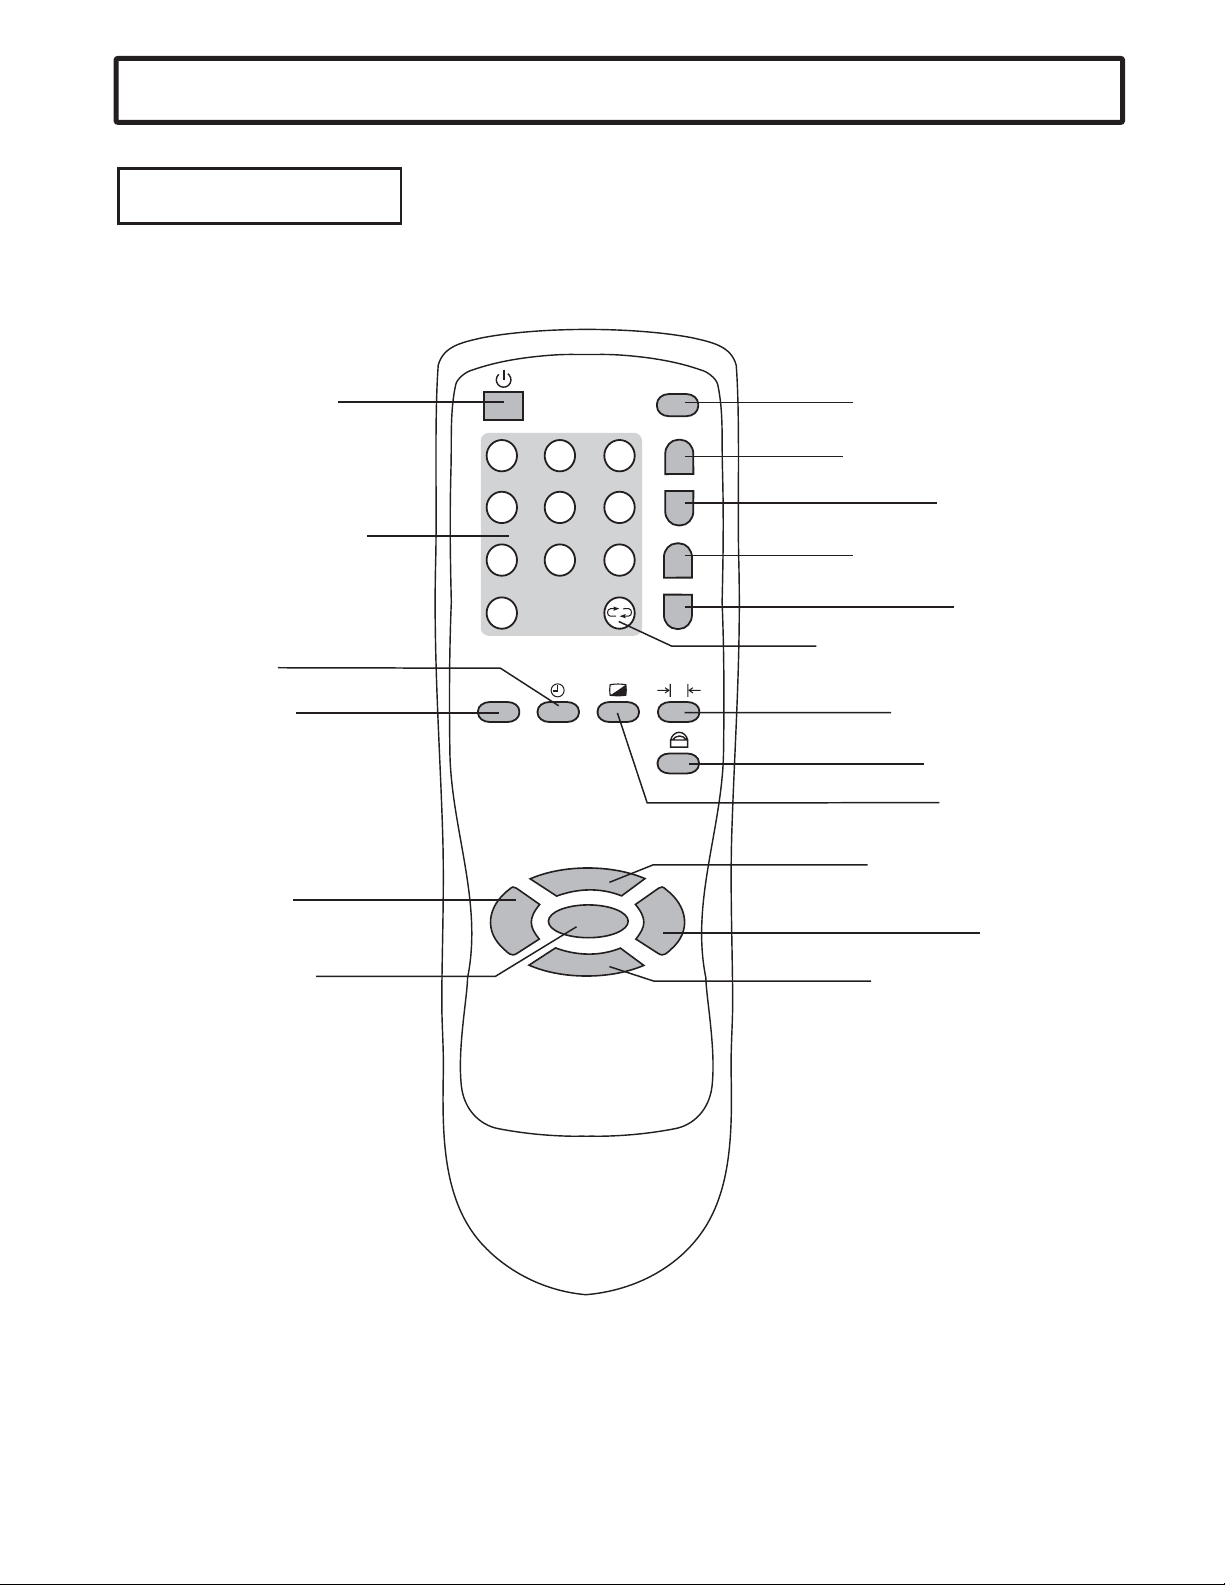
Remote control
Power on/Standby
Direct channel select
Sleep timer
Program scan
Volume down
Open the menu
123
456
789
0
SCAN
CH+
V- V+
MENU
CH-
TV/AV
STEREO
CCD
DSP
MUTE
P
TV/VIDEO input select
To switch between
STEREO, SAP or MONO
Closed Caption
decoder channel select
Recall on-screen display
Sound mute
Return to previous channel
Picture mode select
Parental Control
Picture adjust
Select higher program
Volume up
Select lower program
5
Page 7
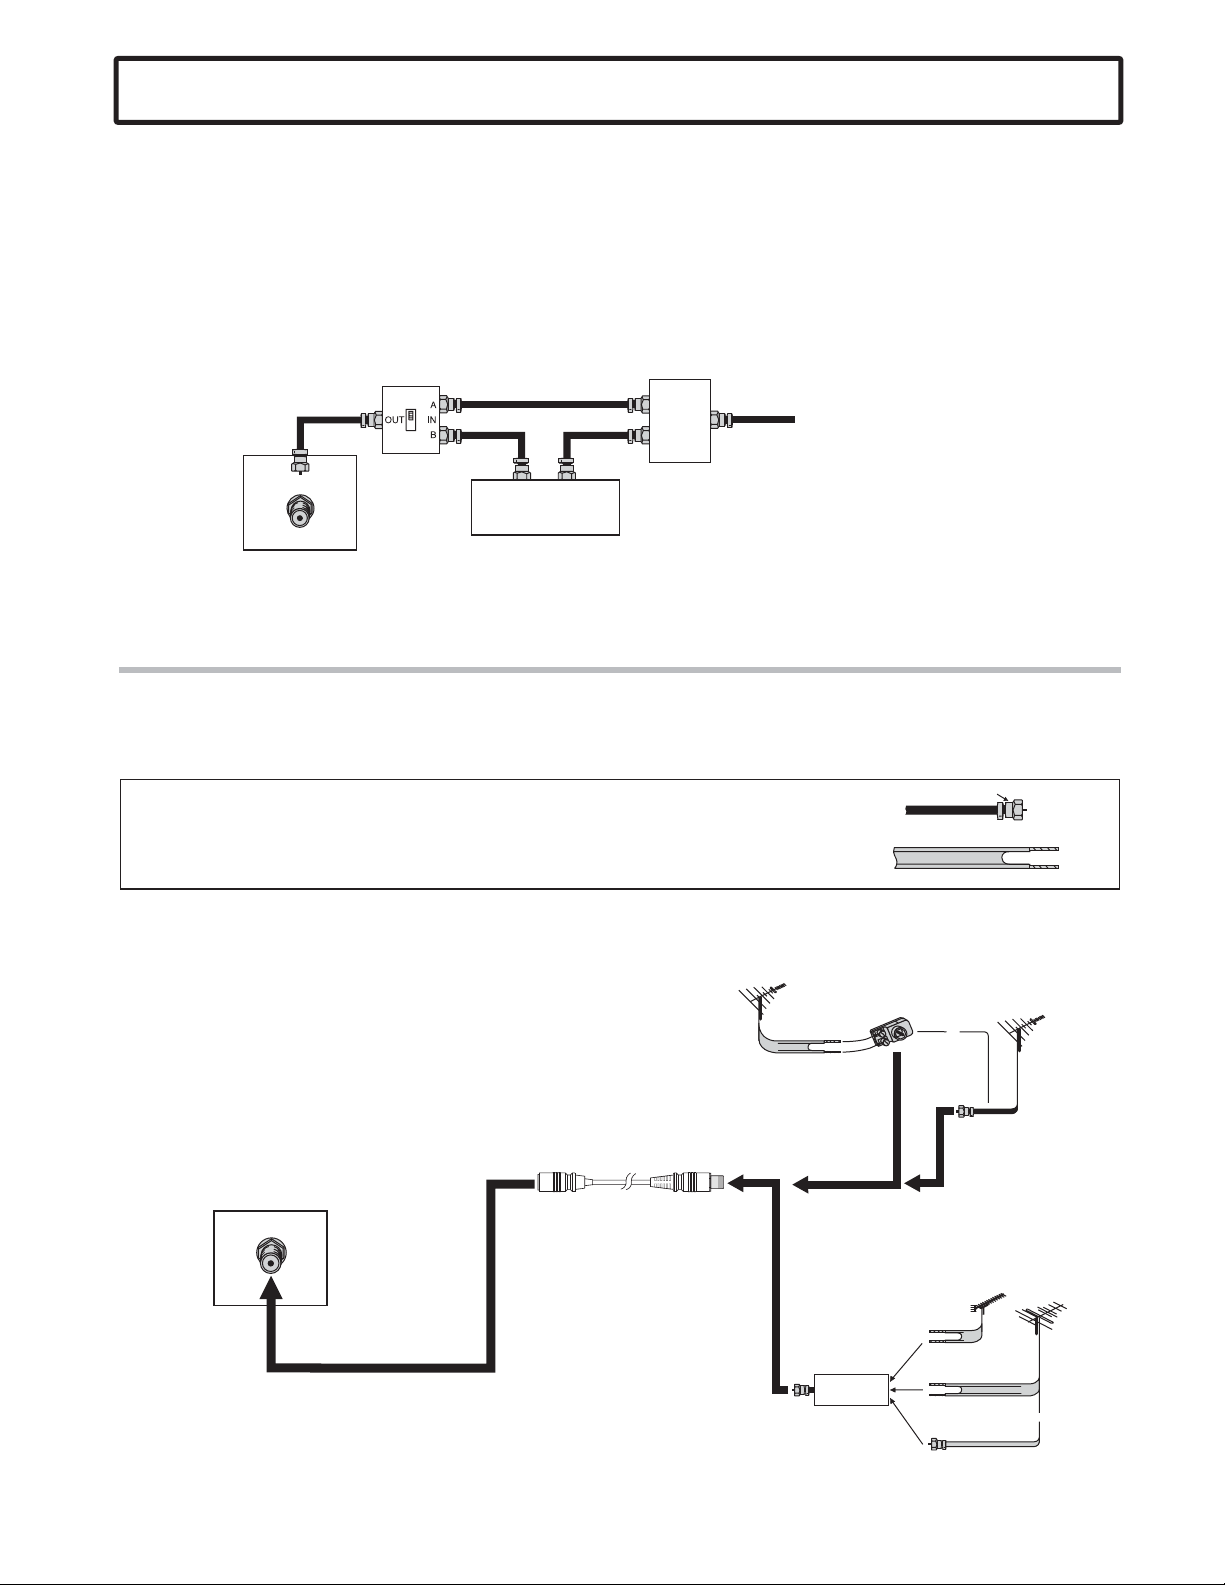
Antenna connection
CABLE TV (CATV) CONNECTION
A 75-ohm coaxial cable connector is built into the set for easy hookup. When connecting the 75- ohm coaxial cable to
the set, screw the 75-ohmcable to the ANT. Terminal.
Some cable TV companies offer "premium pay channels". Since the signals of these premium pay channels are
scrambled, a cable TV converter/descrambler is generally provided tothe subscriber by thecable TV company.
This converter/descrambler is necessary for normal viewing of the scrambled channels. For more specific
instructions on installing cable TV, consult your cable TV company. One way to utilize the converter/descrambler
provided by your cable TV company is explained below. Please note: An RF switch provided withtwo inputs (Aand B)
is required (not supplied).
RF switch (not supplied)
IN
TV REAR
RF
OUT
Cable TV converter/
descrambler
(not supplied)
"A" position on the RFswitch (not supplied) :You can view all unscrambled channels by using the TV's channel keys.
"B" position on the RF switch (not supplied) : You can view the scrambled channels via the converter/descrambler by
using the converter's channel keys.
Note: Consult your Dealer orService Center for thetype of splitter, RF switch or combiner that mightbe required.
Two-set
signal
splitter
(not
supplied)
Cable TV Line
ANTENNAS
The antenna requirements for good color television reception are more important than those for black & white
television reception. For this reason,a good quality outdoorantenna is strongly recommended.
The following is a briefexplanation of the typeof connections that are provided with the various antenna systems.
1.A75-ohm system is generallya round cable with F-typeconnector that can easily
be attached to a terminalwithout tools (not supplied).
2. A 300-ohm system is a flat "twin-lead" cable that can be attached to a 75-ohm
terminal through a 300-75-ohm adapter(not supplied).
OUTDOOR ANTENNA CONNECTION
Use one of the following two diagrams if you connect an outdoor
antenna.
A: Using a VHF/UHF combinationoutdoor antenna.
B: Using separate VHF and/orUHF outdoor antennas.
Connect the outdoor antenna cable lead-in to the ANT. terminal
on the rear of theTV set.
TV REAR
RF
Antenna cable
VHF/UHF
antenna
A. Combination VHF/UHF Antenna
300-ohm
twin-lead
(not supplied)
Combiner
(not supplied)
OUT IN
F-type connector
75-ohm coaxial cable (round)
300-ohm twin-lead cable (flat)
300/75-ohm
adapter
B. Separate VHF and/or
UHF Antennas
300-ohm
twin-lead
300-ohm
twin-lead
75-ohm
coaxial cable
VHF/UHF
antenna
or
75-ohm
coaxial cable
UHF
antenna
VHF
antenna
or
6
Page 8

Preparing the remote control
Installing batteries
1
Open the battery cover.
2
Install two "AA” batteries
matching the +/- polarities
of the battery to the +/marks inside the battery
compartment.
3
Effective range of the Remote
O
O
30
30
5m
Replace the battery cover.
Notes:
/
Do not recharge batteries that are not intended
to be recharged.
/
Use only the size and type of batteries specified.
Do not mix different types of batteries together
or old batteries with fresh ones.
/
When the remote control will not be used for a
long period of time or when the batteries are
worn out, remove the batteries.
/
Do not throw the batteries into a fire. Recycle
used batteries in the specified manner.
/
Do not drop,dampen or disassemble the remote
control.
Notes:
/
When there is an obstacle between the TV
and the transmitter, the transmitter may not
operate.
/
When direct sunlight, and incandescent lamp,
fluorescent lamp or any other strong light
shines on the REMOTE SENSOR of the TV,
the remote operation may be unstable.
7
Page 9
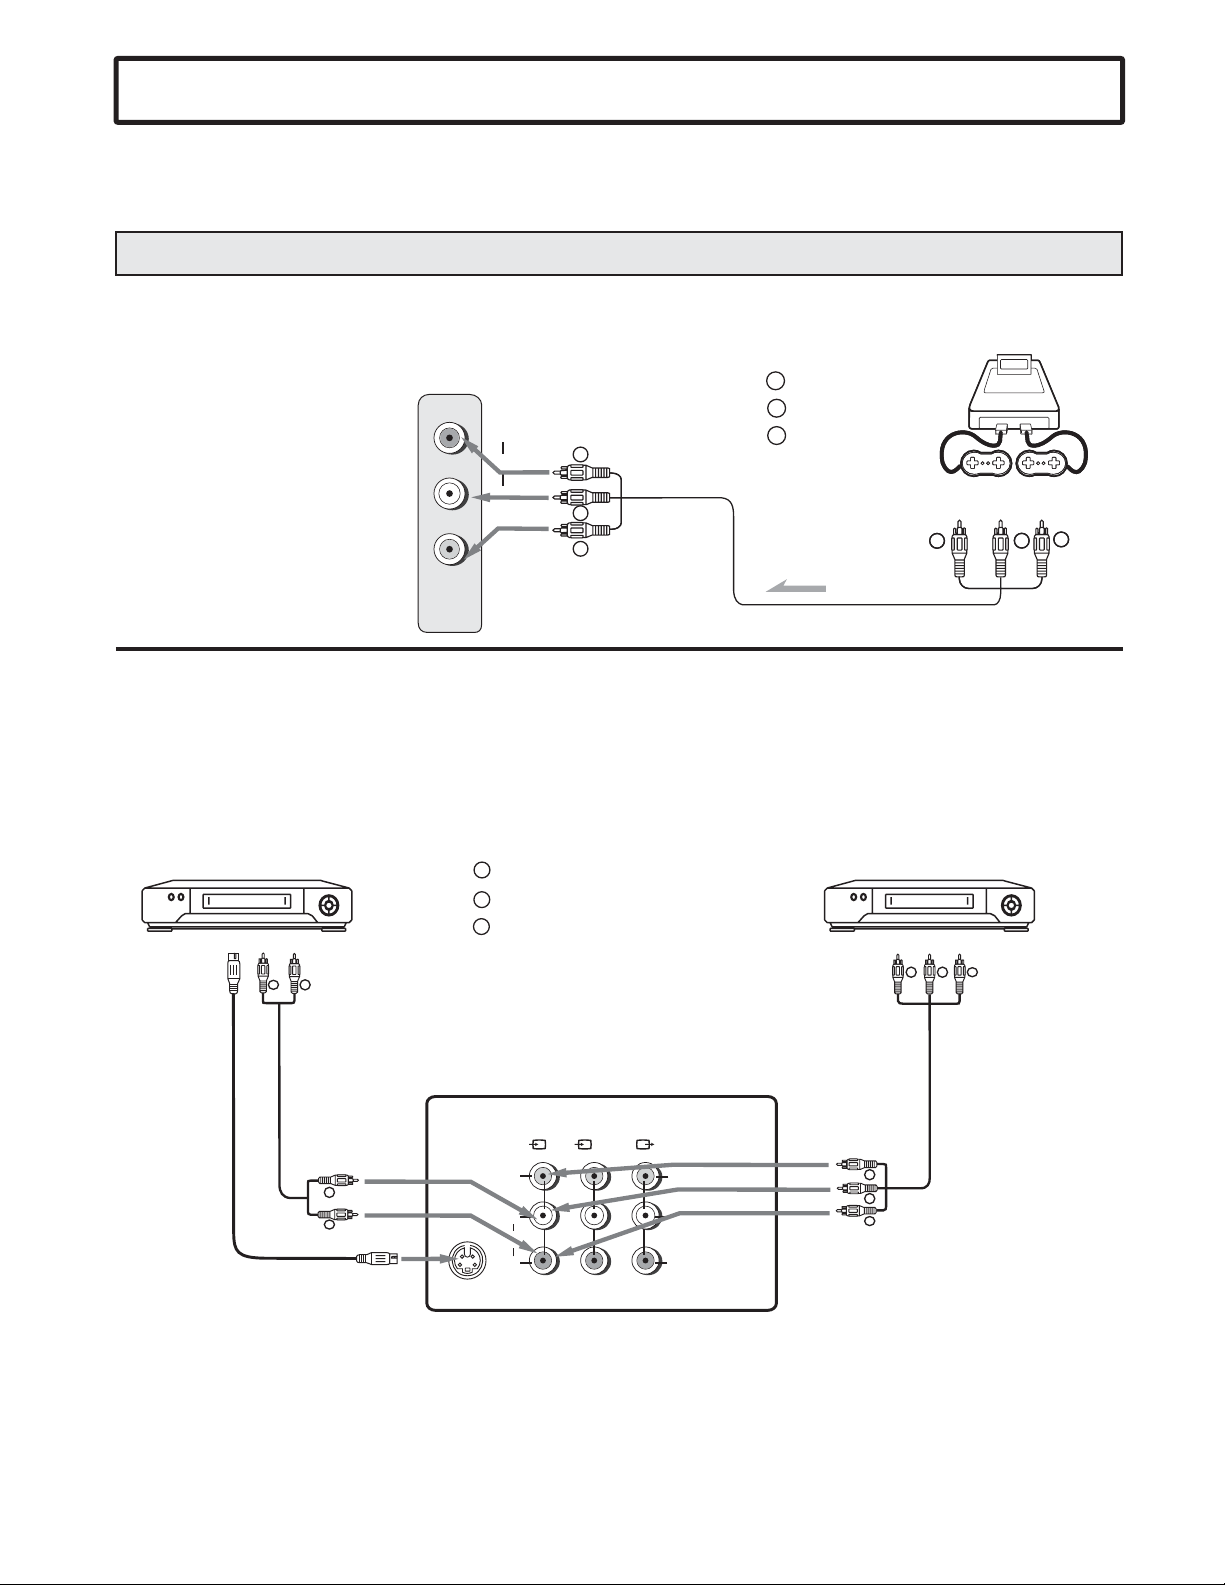
External equipment connections
The following steps describe how to use and connect the TV with other AV equipment (for example, VTR,
Video Camera, DVD, Video game, etc.) Please refer to the owner's manual of the equipment to be
connected before proceeding.
To connect AV input terminals
Connect side AV inputs
IIIIIIIIIIIII
IIIIIIIIIIIII
IIIIIIIIIIIII
IIIIIIIIIIIII
IIIIIIIIIIIII
IIIIIIIIIIIII
IIIIIIIIIIIII
IIIIIIIIIIIII
Video game
W
To audio
outputs
R
To access the unit connected
to these jacks, press
button until appears on
AV2
TV/AV
the screen.
TV SET SIDE
R
AUDIO
L
(MONO)
VIDEO
Yellow (video)
Y
White (audio L/MONO)
W
Red (audio R )
Y
W
R
R
Signal
Y
To video
output
Connect rear AV inputs
If your video equipment has a S-VIDEO output terminal, connect it to the S-VIDEO input terminal on the
unit. If not, connect it to the VIDEO terminal (RCA ).
The S-VIDEO and AV1 use the same group of audio input terminals.
VTR with
S-VIDEO terminal
To S-VIDEO
output terminal
R
To audio
w
outputs
w
R
Y
: Yellow (video)
W
: White (audio L/MONO)
R
: Red (audio R)
TV SET REAR
(1)
VIDEO
L/MONO
S-VIDEO
AUDIO
R
YUV
Back
To video
output
VIDEO
Y
L
C
B
AUDIO
R
C
R
VTR without
S-VIDEO terminal
w
Y
R
To audio
outputs
Y
w
R
To access the unitconnected to these jacks, press button until appears on the screen.TV/AV AV1 or SVHS
8
Page 10

External equipment connections
To connect DVD input terminals
The figure below shows how to connect the DVD input terminals of the TV set to the DVD Player, Laser Disk
Player, etc.
The TV set rear
DVD Player,
Laser Disk Player etc.
w
R
RBG
C
C
Y
B
R
L
R
S-VIDEO
VIDEO
L/MONO
AUDIO
R
(1)
YUV
VIDEO
Y
L
C
B
AUDIO
R
C
R
w
R
RBG
:Direction of the signal
:White (audio L/MONO)
:Red (audio R, C )R
:Green (Y)
:Blue (C )
B
Signals
To access the unitconnected to these jacks, press button until appears on thescreen.TV/AV YUV
Notes:
1. Both the C terminal and the audio R terminal are red for easy identification. Make sure they are
correctly connected.
2. DVD and AV1 use the same group of audio input terminals.
R
To connect the AV Outputs
You can connect an audio system to the AV output jacks on the TV set rear to enjoy high-quality sound from
the audio system,or you can connect theAV outputjacks to the VTR to record programing.
The TV set rear
To external input
(1)
S-VIDEO
VIDEO
L/MONO
AUDIO
R
YUV
VIDEO
Y
w
L
C
B
AUDIO
C
R
L
R
R
R
Yellow (video)
Y
White (audio L)
W
Red (audio R )
R
Signal
Signal
Y Y
To video input
To audio inputs
ww
RR
w
R
Audio System
Another VTR for
recording
VHS
9
Page 11

TV/AV
Power on/off
Turning on
Insert the AC plug (with the 2 blades) into a
1
conveniently located AC outlet.
123
456
789
0
SCAN
CH+
V- V+
MENU
CH-
STEREO
CCD
DSP
MUTE
P
If no pictureappears on the screen and the standbyindicator
lights up, the TV set is in STANDBY mode. Now please
follow step 2.
In STANDBY mode, press Power ( ) button on
2
the remote controller or on the TV set and the
TV set is turned on.
Turning off
If you want to turn off the TV set temporarily,
1
press the Power ( ) button.
Unplug the power cord from the AC outlet if you
2
want to cut off the power completely.
Special indication:
Auto-Power-Off function: there are three kinds of Auto-
Power-Off function:
. If a vacant channel is tuned or TV broadcast for a day is
1
finished, the TV will automatically turn off after a period of
time.
Sleep-timer function
2.
. OFF timer function.
3
10
Page 12

Selecting input signal
Watching AV program
This TV set provides AV input terminals for convenient
TV/AV
TV/AV
connection to VCR,DVD or other video equipment.
123
456
789
0
SCAN
CH+
V- V+
MENU
CH-
STEREO
CCD
DSP
MUTE
P
To watch video program from AV inputs, press
1
TV/AV button repeatedly until you see the
AV1
AV2
SVHS
DVD
NOTE:
AV1: Select AV1 when viewing the signals from the video
equipment connected totheAV1 IN terminals.
: Select AV2 when viewing the signals from the video
AV2
equipment connected totheAV 2 IN terminals.
: Select SVHS when viewing the signals from the
SVHS
video equipment connectedto the S-VIDEO IN terminals.
: Select DVD when viewing the signals from the
DVD
video equipment connectedto the DVD IN terminals.
12
Switching from AV to TV
When the TV set is inAV mode, you can do the following to switch
back to TV mode.
Press TV/AV button repeatedly until the TV
program appears.
11
Page 13

123
456
789
0
SCAN
TV/AV
STEREO
CCD
DSP
MUTE
P
DSP
Tuning in
TV/CATV selection
Before your TV can memorize the available channels, you must
specify the type of signal source that is connected to the unit.
(i.e., an antenna or cable system)
Press repeatedly to displayMENU Search menu.
1
Press CH- CH+
2
Signal Input
Press V- V+ Air
3
CATV(STD) CATV(HRC)
CATV(IRC)
Select if using VHF/UHF antenna, select if using
Cable TV.
Select one of CATV(STD)/CATV(HRC)/CATV(IRC) according
to your local area’s cable system if using CableTV.
Press button to clear themenu screen.DSP
4
or to select
.
or to select or
or or
.
Air CATV
Signal Input
Channel
Skip
Auto Search
Fine tune
Search
Air
28
Off
Press V+
0
CH+
V- V+
MENU
CH-
This TV is equipped with a channel memory feature which
allows channels to skip up or down to the next channel recorded
Menu control buttons
in memory, omitting unwanted channels. Before selecting any
channels, they must be programmed into the TV’s memory.
1
2
3
4
Setting the channels into memory
Press repeatedly to
display
Press CH- CH+ Auto
Search
Press to start the search.
The TV will begin memorizing all
the channels available in your
area.
Press button to clear the
menu screen.
MENU
Search
.
V+
DSP
menu.
or to select
Signal Input
Channel
Skip
Auto Search
Fine tune
Signal Input
Channel
Skip
Auto Search
Fine tune
Search
Air
12
Off
Press V+
0
Search
Air
12
Off
Busy
0
12
Page 14

123
456
789
0
SCAN
TV/AV
STEREO
CCD
DSP
MUTE
P
Tuning in
Direct channel
select buttons
DSP
To skip unwanted channel
After presetting the channels, you can skip unwanted channels
so that only the channels you want to watch are selected with
Channel up/down buttons.
Select the unwanted channel with channelselect buttons.
1
Or press button
repeatedly to display
menu, press
select menu item,
ress
p or to select the
unwanted channel.
Press
2
p or to select .
Thus, after exiting the menu, the channel will then be skipped
when you select programs withthe Channel up/down button.
If you want to skip other unwanted channels, repeat steps
above to change the channelnumber.
Note: you can select the skipped channel by pressing the
direct channel select buttons.
V-
CH- CH+ Skip
ress V-
MENU
Search
or to
CH-
Channel
V+
or to select ,
V+ Skip ON
CH+
Signal Input
Channel
Skip
Auto Search
Fine tune
Search
Air
28
On
Press V+
0
CH+
V- V+
* To exit the menu, press button or
repeatedly press button.
MENU
CH-
MENU
Menu control buttons
DSP
Auto Fine Tuning (AFT)
To restore a skipped channel
Use direct channel select buttons (0-9) to select the channel
or
you want to restore. Enter into menu, press
to select , p or to select
Skip V+ Skip Off.
ress
V-
Search CH-
CH+
Manual Fine Tuning
Fine tuning is not necessary under normal conditions. However,
in some areas where there is interference, some adjustment
may be necessary for better picture and sound. To fine tune a
channel:
Select the channel you want to fine-tune.
1
Enter into menu, pSearch
2
or to select ,
CH-
then p or to
fine tune the channel until the
best possible picture and sound
are achieved.
(Press to fine-tune
upward. The function will be set to mode
automatically)
CH+ Fine Tune
ress and hold
V- to fine-tune downward and
AFT OFF
V-
V+
ress
Signal Input
Channel
Skip
Auto Search
Fine tune
V+
Search
Air
28
Off
Press V+
-5
If Fine Tuning makes the pictureand sound of a channel poor, you can correctthis by using AFT.
Enter into menu, press to select .Search CH- AFT
1
P or to selectV+ AFT On.ress V-
2
Channel
Skip
Auto Search
Fine tune
AFT On
13
Search
28
Off
Press V+
-5
Page 15

123
456
789
0
SCAN
TV/AV
STEREO
CCD
DSP
MUTE
P
Channel selection
You can select desired TV programs by one of the following
methods.
Use Direct Channel Select buttons
?AIR Mode Direct Channel Selection
Direct channel
select buttons
DSP
When the menu option in menu is in the
Air
the channel number.
?CATV Mode Direct Channel Selection
When the menu option in menu is in the
CATV
Method 1:
Directly enter the channel number and wait for a few
moments.
Method 2:
1-9: Press “0” twice, then 1-9 as needed. For example, to
10-99: Press “0”, then the remaining 2 digits. For example, to
100-125: Press the 3 digits in order. For example, to select
Signal Input Search
position, all channels can be selected by directly entering
Signal Input Search
position, channels can be selected asfollows:
select channel 2, press “002”.
select channel 12, press “012”.
channel 120, press “120”.
CH+
V- V+
MENU
CH-
CH+
CH-
Use Channel up/down buttons
Press
CH+ button, the channel number increases;
, the channel number decreases.
Press
buttonCH-
Use previous channel button
Press button to switch between the current channel and
the previous one.
Notes:
Use DSP button to know the current channel number
DSP
Press button to display the
current state of the TV. If the TV is
in program viewing mode, it will
display the current channel
number, sound mode and
remaining sleep time (if set).
12 ST SAP
Sleep 22
To scan programs
Press button and the TV will scan the channels from the
SCAN
current channel to higher channels one by one. Every program
will be displayed for about one second and then the TV will
continue scanning.
Press button again and the TV will stop at the displayed
SCAN
program.
14
Page 16

TV/AV
Picture adjustment
To select the picture mode
You can select the picture quality
instantly among three preset
modes and one user-set mode.
Standard
123
456
789
0
SCAN
CH+
V- V+
MENU
CH-
STEREO
CCD
DSP
MUTE
P
DSP
P
Menu control buttons
Press button to select the
desired picture quality.
Dynamic, Mild User
can be selected cyclically.
P
Standard,
and (user-set)
Mode Picture quality
Standard
Dynamic
Mild
User
Display normal pictures
Display dynamic pictures
Display soft pictures
The picture quality you set
Picture adjustment
1 Press button to display
the menu.
MENU
Picture
2 Press CH+ CH-or to select item.
3 Press V+ V-or to adjust the level.
Dynamic
Mild
User
Picture
Brightness
Contrast
Color
Sharpness
Tint
* To exit the menu, press button or
repeatedly press button.
MENU
DSP
Or you can also make use of button to adjust picture. Every
time you press button, one picture adjustment menu bar will
appear.Then make use of or button to adjust the level.V+ V-
Item
Brightness
Contrast
Color
Sharpness
*Tint
Notes:
The adjusted level is stored in the User position.
V- V+
darker
weaker
paler deeper
softer
purplish
lighter
stronger
sharper
greenish
15
Page 17

TV/AV
STEREO
123
456
789
0
CCD
DSP
MUTE
Sound controls
Adjusting volume
Use Volume up/down button
1
STEREO
MUTE
Press button, the volume
decreases;
Press button, the volume
increases.
Make use of Sound menu to adjust volume
2
Press twice to displayMENU
Sound
V-
V+
menu, then make use of
button to adjust the level.V+/-
Volume
Volume
50
Sound
SCAN
CH+
V- V+
MENU
CH-
P
Use MUTE button.
3
V-
V+
If you want to mute the sound,
press button on the
remote.
To resume the sound, press the
button again.
MUTE
Mute
To select MTS (Multi-channel TV Sound)(option)
Mono Stereo
Mono SAP
Mono Stereo SAP
(If the program is )STEREO
(If the program is )SAP
(If the program is )STEREO & SAP
SAP: second audio program
STEREO: stereo audio
MONO: monophonic audio
Note MTS stereo: function is an optional function. It is only
available on certain versions.
16
Page 18

TV/AV
STEREO
123
456
789
0
CCD
DSP
MUTE
Timer setting
Setting clock time
This function sets the current time for the TV.
DSP
Press repeatedly to
1
display the menu.
Press
2
ress to set the hour (0-23), pressV-
P to set the minute
3
(00-59).
Note:
Before using the ON timer and OFF timer, set the Clock item
first.
MENU
CH- CH+ Clockor to select .
Timer
Clock
On Time
On Program
Off Time
Repeat
V+
Timer
10:05
- -:- 32
- -:- -
Once
SCAN
CH+
V- V+
MENU
CH-
P
Menu control buttons
Setting ON timer/ON program
With the ON timer, the TV will automatically turn on to a preset
channel at a preset time.
Timer
In menu, press
Timer CH-
1
to select .
ress to set the hour (0-23),
P
press
59).
Press
2
P to set the TV ON
ress orV-
program number.
Press
3
P to select or
ress orV-
Everyday
On Time
V-
to set the minute (00-
V+
CH- On Program
to select .
V+
to select .
CH- Repeat
V+ Once
.
or
CH+
Clock
On Time
On Program
Off Time
Repeat
Clock
On Time
On Program
Off Time
Repeat
Clock
On Time
On Program
Off Time
Repeat
10:07
18:00
32
- -:- -
Once
Timer
10:07
18:00
32
- -:- -
Once
Timer
10:07
18:00
32
- -:- -
Once
Press button to switch the TV to standby mode.
4
At the preset time, the TV will turn on automatically to the
preset channel.
If you set the item to this function operates
only once; If set to , this function operates
everyday.
Repeat Once,
Everyday
17
Page 19

123
456
789
0
SCAN
TV/AV
STEREO
CCD
DSP
MUTE
P
Timer setting
Setting OFF timer
With the OFF timer, the TV will automatically switch to standby
mode at a preset time.
In menu, press
Timer CH-
to select .
CH+ Off Time
ress to set the hour (0-23),
P
press
V-
to set the minute (00-
V+
59).
Press to select .CH- Repeat
P to select or .V+ Once Everyday
ress orV-
Once the preset time has elapsed, the TV will automatically
go into standby mode.
If you set the item to this function operates
only once; If set to , this function operates
everyday.
DSP
1
2
or
Repeat Once,
Everyday
Clock
On Time
On Program
Off Time
Repeat
Timer
10:08
18:00
32
13:30
Once
CH+
V- V+
* To exit the menu, press button or
repeatedly press button.
MENU
CH-
MENU
Menu control buttons
DSP
Setting sleep timer
Making use of the Sleep timer function allows you to have the
set automatically turn off after a preset time, and bring the TV
to standby mode.
With every press of button the sleep time changes in the
sequence of 120 90 60 50 40 30 20
15 10 5 0 120 (minutes) -- -.
For example, if you would like the TV
to auto turn off in 60 minutes, you can
press button repeatedly until the
screen displays thedesired amount of
time. If you want to cancel the sleep
timer, you can press
repeatedly until displays on the
0
button
screen.
Sleep 60
18
Page 20

System Settings
To select OSD language
123
456
789
0
SCAN
CH+
TV/AV
STEREO
CCD
DSP
MUTE
P
DSP
There are several OSD ( languages to
choose from.
Press MENU
1
display menu.Settings
Press CH+/- Languageto select .
2
ress orV+ V-
P to select a proper OSD language.
3
repeatedly to
on-screen display)
Language
Blue Screen
Picture Enhance
Caption Mode
Game
Settings
English
On
Off
CC1
Setting Blue Screen
Enter into menu.Settings
1
Press CH- CH+ Blue
2
Screen
P to turn on/off blue
ress orV+ V-
3
screen.
If the Blue Screen function isturned on, the TV will display a
blue screen when there is no input signal.
or to select
.
Language
Blue Screen
Picture Enhance
Caption Mode
Game
Settings
English
On
Off
CC1
V- V+
* To exit the menu, press button or
repeatedly press button.
MENU
CH-
MENU
Menu control buttons
DSP
Picture Enhance setup
Enter into menu.Settings
1
Press CH- CH+
2
Picture Enhance
P to turn on/off
ress orV+ V-
3
Turning on Picture Enhance can enhance the picture
quality.
or to select
.
.Picture Enhance
Language
Blue Screen
Picture Enhance
Caption Mode
Game
Settings
English
On
On
CC1
19
Page 21

123
456
789
0
SCAN
TV/AV
STEREO
CCD
DSP
MUTE
P
Closed Captions
The unit decodes and displays the closed captions that are
broadcast with certain TV shows. These captions are usually
subtitles for the hearing impaired or foreign language
translations. All VCRs record the closed caption signal from
television programs, so home-recorded video tapes also
provide closed captions. Most prerecorded commercial video
tapes provide closed captions as well. Check for the closed
caption symbol in your television schedule and on the tape’s
packaging: .
CCD
Note:
Not all the programs and videos will offer closed captioning.
Turning Closed Caption On or Off
Press button on the remote control to turn on/off Closed
CCD
Caption.
CCD On CCD Off
CH+
V- V+
* To exit the menu, press button or
repeatedly press button.
MENU
CH-
Menu control buttons
DSP
MENU
Setting Closed Caption
Press MENU repeatedly to
1
display menu.Settings
Press CH+/- Caption
2
Mode
.
Press V+/- to select Closed Caption setting.
3
You may select between CC1, CC2, T1, T2,CC3, CC4, T3
and T4.
The Closed Caption broadcasts can be viewed in two
modes: CAPTION and TEXT. For each mode, four
channels are available.
The [CAPTION] mode shows subscripts of dialogues and
commentaries of TV dramas and news programs while
allowing a clear view of the picture.
The [TEXT] mode displays various information over the
picture (such as TV program schedule, weather forecast,
etc.) that is independent of the TV programs.
to select
Language
Blue Screen
Picture Enhance
Caption Mode
Game
Settings
English
On
Off
CC1
20
Page 22

123
456
789
0
SCAN
Setting Parental Control
Parental Control enables parents to prevent their children from
watching inappropriate material on TV. Parental Control reads
the ratings for programming (except for news, sports, unedited
movies on premium cable and Emergency System signals)
and denies access to programming if the program's rating
TV/AV
STEREO
CCD
DSP
MUTE
P
0-9 digit
buttons
DSP
meets the limitations you select. In this case, the program will
be blocked.
To use the Parental Control function, you first need to set your
password.
To set a password
Press to display
1
Control
menu. Now a
password is required to input.
Parental
Parental Control
Password:
U.S. TV Rating
MPAA Rating
CANADA English
CANADA French
Change Password
______
CH+
V- V+
MENU
CH-
Menu control buttons
* To return to upper-level menu, press
button.
Press digit buttons to input the
2
password (six-digit, the default
password is 000000 and you
should change it) to enter into
t menu.Paren al Control
P to select
3
Password
P or button to enter
CH Change
ress -
item.
V+ V-ress
into the sub-menu.
Enter a new password and
4
confirm again.
Now the password has been
modified successfully.
Parental Control
Password:
U.S. TV Rating
MPAA Rating
CANADA English
CANADA French
Change Password
Password:
U.S. TV Rating
MPAA Rating
CANADA English
CANADA French
Change Password
Change Password
Password:
Confirm:
******
Parental Control
****
**
****
**
______
To clear the menu screen, press
* DSP
button.
If you forget the password, you may use the master
password to enter into Parental Control menu.
The master password is 410000. Make sure children do
not know any passwords.
21
Page 23

Setting Parental Control
U.S. TV Rating Set-up
TV Parental Guidelines may have one or more letters added to
the basic rating to let parents know when a show contains higher
TV/AV
levels of violence, sex, adultlanguage or suggestive dialogue.
123
456
789
0
SCAN
CH+
V- V+
MENU
CH-
STEREO
CCD
DSP
MUTE
P
0-9 digit
buttons
DSP
Menu control buttons
Press button and then inputthe correct password to enter
1
into menu.Parental Control
Press or button to
2
select item.
Press or button to enterinto
CH- CH+
U.S. TV Rating
V+ V-
Parental Control
Password:
U.S. TV Rating
MPAA Rating
CANADA English
CANADA French
Change Password
*
*****
the sub-menu.
U.S. TV Rating
Status FV V S L D
In sub-menu,
3
U.S. TV Rating
use to select the desired
CH+/-
rating, use to toggle
between and .
MENU
Block View
Age
TV-Y
TV-Y7
TV-G
TV-PG
TV-14
TV-MA
View
View
View
View
View
Block
_____
____
V
_____
_
VVVV
_
VVVV
_
BBB
* Y and Above (all children) (individual content categories do
not apply)
* Y7 (7 yearsand up)
* G and above (general audience) (individual categories do
not apply)
* PG and Above (parental guidance suggested)
* 14 and above (14years and up)
* MA (mature audience)
_
You can also block the criteria for each level for FV, V, S, L,
D. The steps are below:
Select the desired rating with , press to select
, then make use of to select the desired criteria,
View V+/-
then press to either block the rating ( ” will appear)
or unblock ( ” will appear).
MENU B“
“V
CH+/- MENU
* FV: fantasy violence (applies only to TV-Y7)
* V: violence (applies to TV-PG and above, TV- 14
andAbove, TV-MA)
* S: sexual situations
(applies to TV-PG and above, TV-14
andAbove, TV-MA)
* L: adult language
(applies to TV-PG and above, TV-14
andAbove, TV-MA)
* D: sexual dialogue (applies to TV-PG and Above, TV-14)
To return to upper-levelmenu, press button.
4
To clear the menuscreen, press button.DSP
22
Page 24

TV/AV
STEREO
123
456
789
0
Setting Parental Control
Movie Rating Set-up
Rating guidelines are provided by broadcast stations. Most
television programs and television movies can be blocked by
TV Rating and/or Individual Categories. Movies that have
been shown at the theaters or direct-to-video movies use the
Movie Rating System (MPAA) only.
0-9 digit
buttons
CCD
DSP
DSP
MUTE
Press button and then input the correct password to
1
enter into menu.Parental Control
Press or button to
2
select item.
Press or button to enter
into the sub-menu.
CH- CH+
MPAA Rating
V+ V-
Parental Control
Password:
U.S. TV Rating
MPAA Rating
CANADA English
CANADA French
Change Password
*
*****
SCAN
CH+
V- V+
MENU
CH-
P
G
PG
PG-13
R
NC-17
X
Menu control buttons
In sub-menu, use
MPAA Rating
3
CH+/-
rating, use to toggle
between and .
Movie Ratings:
* G and Above (general audience)
* PG and Above (parental guidance suggested)
* PG-13 and Above (13 years and up)
* R and Above (restricted)
* NC-17 and Above (18 years and up)
* X (adult)
To return to upper-levelmenu, press button.
4
To clear the menuscreen, press button.DSP
to select the desired
V+/-
Block View
MPAA
View
View
View
Block
Block
Block
23
Page 25

Setting Parental Control
CANADA English Rating Set-up
123
456
789
0
SCAN
CH+
TV/AV
STEREO
CCD
DSP
MUTE
P
0-9 digit
buttons
DSP
Enter into
1
menu, press or button
to select
Parental Control
CH- CH+
CANADA English
menu item.
Press or button to enter
V+ V-
into the sub-menu.
In sub-menu,
CANADA English
2
use to select the desired
CH+/-
rating, use to toggle
between and .
V+/-
Block View
Canadian English Language Ratings:
* E: Exempt.
* C: Children.
* C8+: Children 8 years and older.
* G: General programming, suitable for all
audiences.
* PG: Parental guidance.
* 14+: Viewers 14 yearsand older.
* 18+: Adult programming.
Parental Control
Password:
U.S. TV Rating
MPAA Rating
CANADA English
CANADA French
Change Password
E
C
C8+
G
PG
14+
18+
*
*****
CANADA English
View
View
View
Block
Block
Block
Block
V- V+
MENU
CH-
Menu control buttons
CANADA French Rating Set-up
Enter into
1
menu, press or button
to select
menu item.
Press or button to enter
into the sub-menu.
In sub-menu,
CANADA French
2
use to select the desired
CH+/-
rating, use to toggle
between and .
Canadian French Language Ratings:
* E: Exempt.
* G: Children.
* 8 ans+: Children 8 years and older.
* 13 ans+: Children
* 16 ans+:
* 18 ans+: Adult programming.
Parental Control
CH- CH+
CANADA French
V+ V-
V+/-
Block View
13 years and older.
Viewers 16 years and older.
Password:
U.S. TV Rating
MPAA Rating
CANADA English
CANADA French
Change Password
E
G
8 ans+
13 ans+
16 ans+
18 ans+
Parental Control
*
*****
CANADA French
View
View
View
Block
Block
Block
To return to upper-levelmenu, press button.
To clear the menuscreen, press button.DSP
24
Page 26

Troubleshooting Guide
Before calling service personnel, please check the following chart for a possible cause to the trouble you are
experiencing.
SYMPTOM
No power
Power
Poor or no picture.
Picture wobbles
or drifts.
No CATV reception.
No reception above
CH13.
TV broadcast reception
Poor or no sound.
POSSIBLE CAUSE POSSIBLE SOLUTION
The AC power cord is not connected.
TV station experiencing problems. Try another channel.
Picture control is not adjusted.
Possible local interference.
Antenna/CATV connector is not connected. Check CATV connection or VHF/UHF ant.
TV station experiencing problems. Try another channel.
Cable TV channel is scrambled.
Possible local interference.
CATV connected or not connected. Check all CATV connections.
TV/CATV set to TV. Set TV/CATV to CATV
Cable TV service interrupted.
TV/CATV set to TV. Set TV/CATV to CATV.
TV station experiencing problems. Try another channel.
MUTE button is pressed.
Possible local interference.
Connect the AC power cord
to the AC outlet
Check picture control adjustments.
Check for source of reception disturbance.
A Cable box needs to be used (if desired).
Check for source of reception disturbance.
Contact your Cable TV company.
Press MUTE button again.
Check for source of reception disturbance.
TV Shuts off.
Closed Captioning
not working.
Remote control
does not operate.
Remote Control
Parental Control not
Working properly.
V-CHIP
Antenna/CATV connector is not connected. Check CATV connection or VHF/UHF ant.
Volume is set to minimum. Increase volume.
Sleep Timer is set.
Off Timer is set. Clear Off Timer.
TV Signal is weak.
TV station experiencing problems or
program tuned is not closed captioned.
Closed Captioning not turned on.
The remote control is not aimed at the
sensor.
Distance is too far or too much light in the
room.
There is an obstacle in the path of the beam. Clear the path of the beam.
The batteries are weak.
The batteries are not inserted correctly. Insert correctly.
News or sports event being broadcast.
Ratings not set.
Set Sleep Timer to "0”.
Check CATV or VHF/UHF antenna.
Try another channel.
Press the CCD button.
Aim the remote control at the Remote
sensor.
Operate within 23 feet or reduce the
light in the room.
Replace the batteries.
Parental Control does not work with
News or sporting events.
Set ratings as desired.
25
Page 27

Troubleshooting Guide
Reception disturbances
Most types of television interference can be remedied by adjusting the height and position of the VHF/UHF antenna.
Outdoor antennas are recommended for best results if not using cable. The most common types of
television interference are shown below. If one of these symptoms appear when the TV is connected to a Cable TV
system, the disturbance may becaused by the localcable company broadcast.
IGNITION:
Black spots or horizontal streaks may appear, picture may flutter or drift.
Usually caused by interference from automobile ignition systems, neon
lamps, electric drills and other electric appliances.
GHOSTS:
Ghosts are caused by the television signal following two paths. One is
the direct path and the other is reflected from tall buildings, hills or
other objects. Changing the direction or position of the antenna may
improve the reception.
SNOW:
If your receiver is located in the fringe area of a television station
where the signal is weak, your picture may be marred by the
appearance of small dots. When the signal is extremely weak, it
maybe necessary to install an external antenna to improve the
picture.
RADIO FREQUENCY INTERFERENCE:
This interference produces moving ripples or diagonal streaks, and in
some cases, causes loss ofcontrast in the picture.
PICTURE SIZE VARIATION:
A slight picture size variation is quite normal when you adjust the
CONTRAST or BRIGHTNESS setting.
CARE AND MAINTENANCE
To prevent fire or shock hazard, disconnect your TV from the AC power source when cleaning. The finish on the
cabinet may be cleaned with a dust cloth and cared for as with furniture. Use caution when cleaning and wiping
the plastic parts. Mild soapand a soft, dampcloth may be used.
26
Page 28

Specifications
Power Supply
Power Consumption
Dimensions(inch)
Weight(lbs)
CRT(inch)
Sound output
Color System
Accessory
AC 120V 60Hz
140W (Max.)
27.2(W) x 20.6(H) x 19.2(D)
80
24”
4W+4W
NTSC-M
Remote control x 1
Receiving channel:
VHF 2-13
UHF 14-69
CATV 2-69, (A-6)-(A-1), A-W, (W+1)-(W+28)
Total 181 channels
Note: Design and specifications are subjectto change without notice.
For service, support and warranty information, visit or call 1-866-396-6322.
“Polaroid” is a registered trademark of Polaroid Corporation of Waltham, MA USA and licensed for use on the TTM-2401
to Petters Consumer Brands, LLC.
www.pwwservice.com
27
 Loading...