

Page 1
20” Color T elevision TTM-2004
Page 2
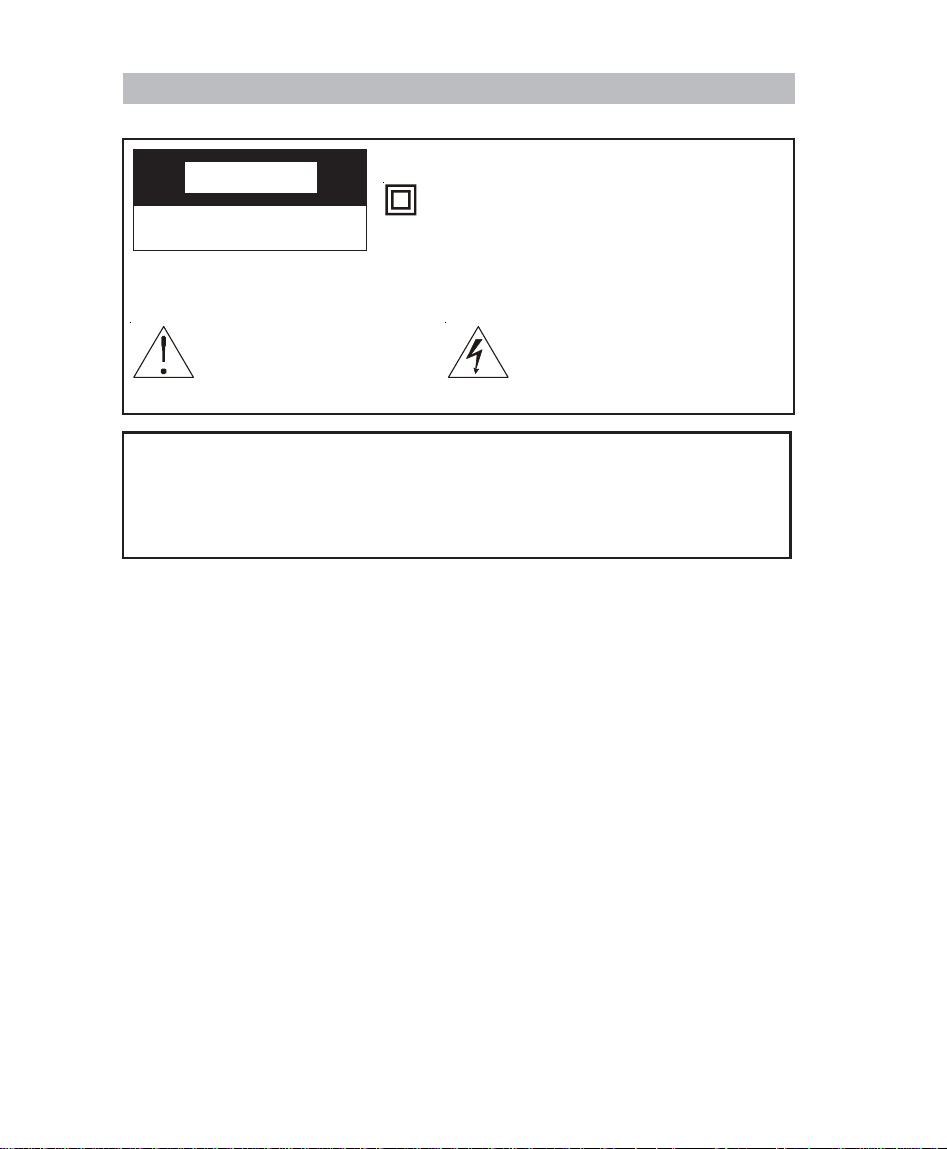
Important Safeguards
CACA
UTIONUTION
CA
UTION
CACA
UTIONUTION
RISK OF ELECTRIC SHOCK
DO NOT OPEN
Caution: To reduce the risk of electric shock, do not remove cover (or back). No
user serviceable parts inside. Refer servicing to qualified service personnel.
This symbol indicates important instructions accompanying the product.
This symbol indicates that this product incorporates double insulation between hazardous mains voltage and user accessible parts.
When servicing use only identical replacement parts.
This symbol indicates “dangerous voltage” inside the product
that presents a risk of electric
shock or personal injury.
WARNING
To reduce the risk of fire or electric shock, do not expose this product to rain or
moisture.
The apparatus must not be exposed to dripping or splashing. Objects filled with
liquids, such vases or drinking glasses, must never be placed on the apparatus.
IMPORT ANT SAFETY INSTRUCTIONS
1. Read these instructions.
2. Keep these instructions.
3. Heed all warnings.
4. Follow all instructions.
5. Do not use this apparatus near water.
6. Clean only with dry cloth.
7. Do not block any ventilation openings. Install in accordance with the
manufacturer’s instructions.
8. Do not install near any heat sources such as radiators, heat registers, stoves, or
other apparatus (including amplifiers) that produce heat.
9. Do not defeat the safety purpose of the polarized or grouding-type plug. A polarized plug has two blades with one wider than the other. A grounding type plug
has two blades and a third grounding prong. The wide blade or the third prong is
provided for your safety. If the provided plug does not fit into your outlet, consult
an electrician for replacement of the obsolete outlet.
10. Protect the power cord from being walked on or pinched particularly at plugs,
convenience receptacles, and the point where they exit from the apparatus.
11. Only use attachments/accessories specified by the manufacturer.
1
Page 3

Important safeguards
12. Use only with the cart, stand, tripod, bracket, or table
specified by the manufacturer, or sold with the apparatus. When a cart is used, use caution when moving the carts/apparatus combination to avoid injury
from tip-over.
13. Unplug this apparatus during lightning storms or
when unused for long periods of time.
14. Refer all servicing to qualified service personnel.
Servicing is required when the apparatus has been damaged in any way, such
as power-supply cord or plug is damaged, liquid has been spilled or objects
have fallen into the apparatus, the apparatus has been exposed to rain or moisture, do not operate normally, or has been dropped.
15. If an outside antenna or cable system is connected to the product, be sure the
antenna or cable system is grounded so as to provide some protection against
voltage surges and built-up static charges. Section 810 of the National Electrical
Code, ANSI/NFPA No. 70-1984 (Section 54 of Canadian Electrical Code, Part 1)
provides information with respect to proper grounding of the mast and supporting structure, grounding of the lead-in wire to an antenna-discharge unit, size of
grounding conductors, location of antenna-discharge unit, connection to grounding electrode. See following example.
2
Page 4

Contents
Overview 4
Remote control 5
Basic operation 6
Menu overview 7
External connection 8
Using the PICTURE menu 10
Using the P.LOCK menu 11
Using the TIMER menu 13
Using the PRESET menu 14
Using the EXTRA menu 15
Picture defects and countermeasures (VHF/UHF reception) 16
Troubleshooting 17
Specifications 18
3
Page 5
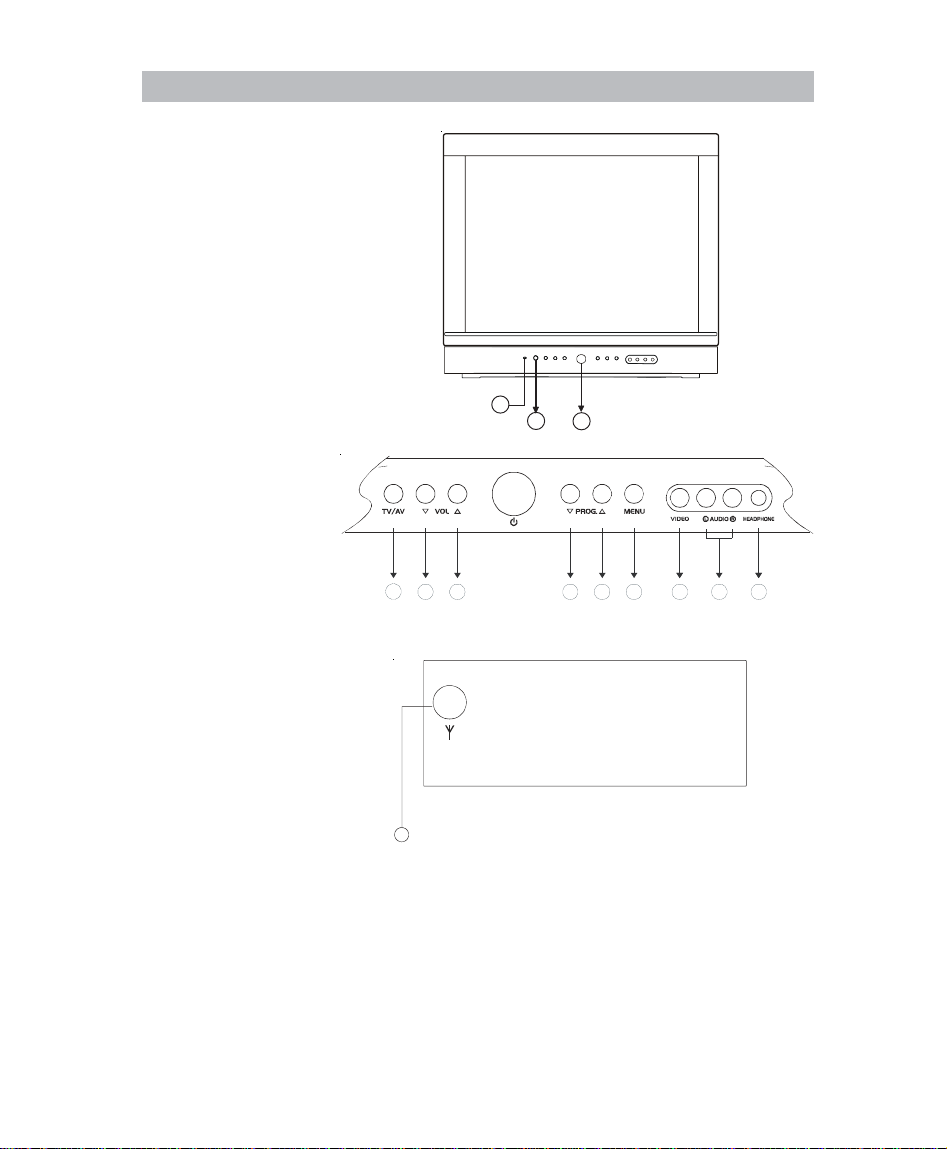
Overview
1. Power Button
2. Remote Sensor
3. Power Indicator
4. TV/A V Selection Button
5. Volume Down Button
6. Volume Up Button
7. Program Down Button
8. Program Up Button
9. Menu Button
10. Video Input Jack
11. Audio Input Jack
12. Headphone
13. Antenna Jack
Remote control
3
2
1
6
5 7 1110498 12
13
4
Page 6
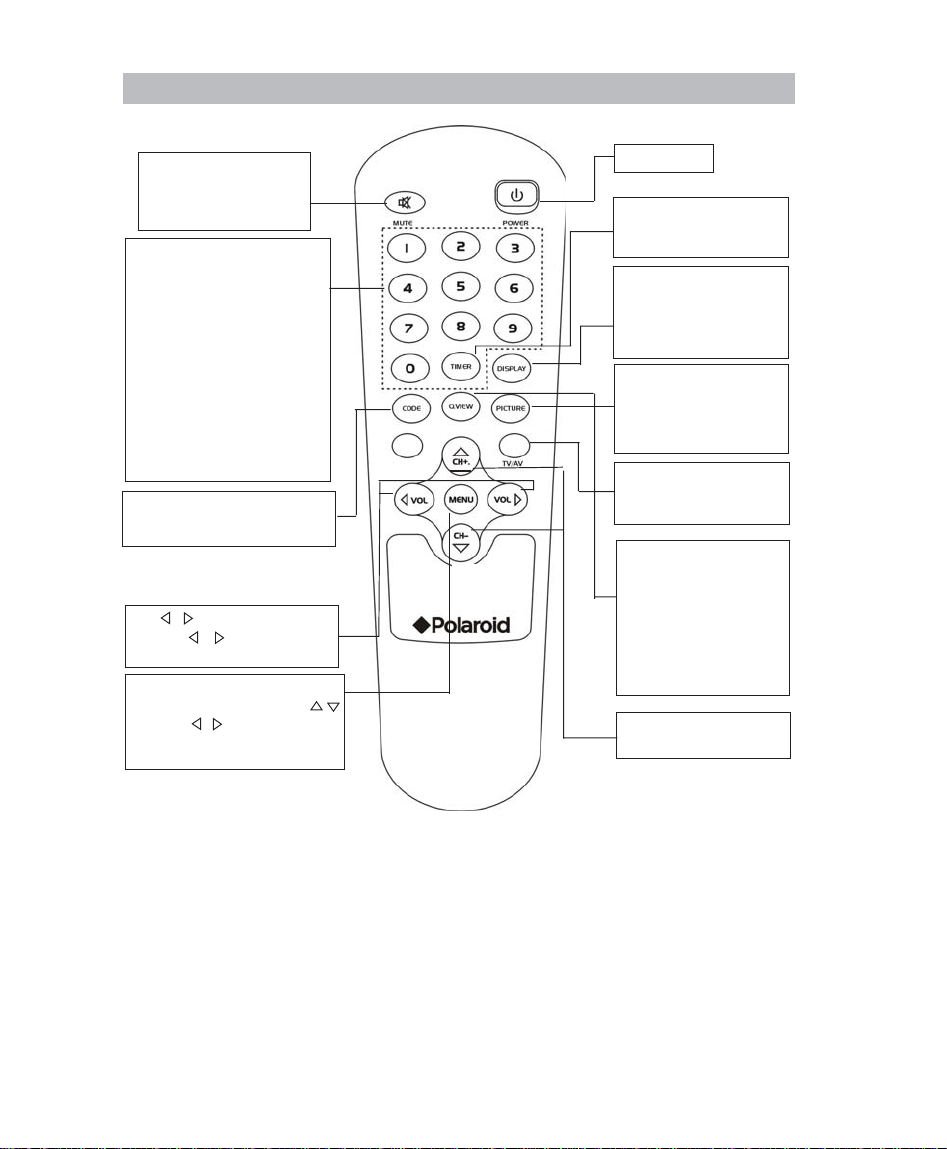
Remote control
Mute Key
Press once to turn off the
volume
Press again to restore
Number Keys
Two keys must be pressed to
select a channel when when
ANTENNA is se to AIR. For
channels 2 through 9, press 0
first,then the channel number
(for example, 02,12). Three keys
must be pressed when you select a channel under 20 when
ANTENNA is set to CABLE. For
channels above 19, you can
press their digit number directly.
For example, 001, 019, 20, 100.
Code Key
Modify the password for entering
P.LOCK. (Please see page 11)
VOL / Key
Use VOL / key to increase/
decrease the volume.
Menu Key
Use this key with the PROG. /
and VOL / keys to adjust features of the on-screen menu system.
Power key
Timer Key
Use this key to select the
sleep timer
Display Key
Use this key to display the
current channel information
(such as channel, time, etc.),
press it again to exit.
Picture Key
Press this key to cycle
the following states:
DYNAMIC, SOFT,
STANDARD, PERSONAL.
TV/AV Key
TV/AV( swap between TV
and AV .)
Q.View Key
Use this key to shift between two channels. When
you use number keys to
select the first channel,
then the second channel,
you can press Q.VIEW to
switch between these two
channels.
Program UP/DOWN
Key
Loading batteries: Remove the lid of the battery compartment, insert 2 size AAA
batteries with the polarities as indicated inside the compartment and replace the
lid.
Note:
1. Batteries will last typically last about 1 year under normal use.
2. If you do not intend to use the remote control for a long period of time,
remove the batteries to avoid damage due to leakage.
5
Page 7

Basic operation
Connect to AC outlet
Insert the mains wire plug of the unit into 120V AC outlet, unplug the AC cord when the
unit will not be used for a long period time.
How to power on/off
You can turn on the power by using the POWER button at TV front panel (or the
POWER button on the remote control).
Non-signal power-off in 10 minutes
If the unit doesn’t receive a signal state, the TV will enter standby mode automatically
in 10 minutes. To turn it on, press the POWER button on the remote control.
Note: Under A V mode, this function only activates when you set BLUE BACKGROUND.
Change channels
Y ou can change channels by using the PROG.
PROG. / button on the remote control). When ANTENNA is set as AIR, you can also
access the channel by using a 2-digit number button combination on the remote
control. When ANTENNA is set as CABLE, use a three-digit number button combination on the remote control to select the channel. For channels between 20 and 99,
input a two-digit number button to select the channel you want to watch.
Volume UP/DOWN
You can adjust the sound by using VOL / button on the front of the TV (or the VOL
/ button on the remote control).
/ button on the front of the TV (or the
Sleep function
1. Press TIMER button on the remote control to display the set 120,90,60,30,0
minutes to play until shut off. The unit will be automatically turn off when the sleep
time has elapsed.
2. To cancel the TIMER function, press the TIMER button repeatedly until display
changes to 0.
6
Page 8

Menu overview
The PICTURE menu will allow you
to make adjustments to your picture settings.
You can set P.LOCK and V-CHIP in
this menu.
The TIMER menu sets the clock on
your TV and allows you to program
your TV for scheduled viewing by
using the ON/OFF timer.
The PRESET menu provides several options for your channel settings.
G
Set CCD, LANGUAGE and BLUE
BACKGROUND in this menu.
Menu basic operation
1. To enter a menu, press the menu button on the TV (or on the remote control),
then use the PROG. / buttons on the TV (or on the remote control) to select
the desired mode.
2. Press VOL
3. Use the PROG. / button on the TV (or on the remote control) to select within
the sub-menu.
4.Use the VOL
5. Press MENU button to return the last menu.
/ button to select the mode you want to change.
/ button to change the setting.
7
Page 9

External connection
A
CONNECTING TO AC POWER SUPPL Y
Use the AC polarized line cord provided for operation on AC. Insert the AC cord plug into a polarized AC outlet.
C Outlet
Polarized AC Plug
Connecting Antenna to TV
Choose the type of antenna hook-up style (A,B,C or D) that resembles your antenna.
Connect directly to the TV’s 75
NOTE:
If the polarized AC plug does not fit into a nonpolarized AC outlet, do not attempt to fix or cut the
blade of the plug. It is the user’s responsibility to
have an electrician replace the obsolete outlet.
Input terminal as shown in the style you selected.
Ω
Style A
UHF/VHF OUTDOOR
300 TO 75
MIXER/ ADAPTER
(Not supplied)
75 TERMINAL
Ω
BACK OF TV
Style B
COMBINATION
UHF/VHF OUTDOOR
300 TO 75 ADAPTER
(Not supplie d)
Ω
75 TERMINAL
BACK OF TV
Style C
COMBINATION
UHF/VHF OUTDOOR
75 ANTENNA
LEAD IN CABLE
Ω
75 TERMINAL
BACK OF TV
Style D
TELESCOPIC INDOOR
ANTENNA AND
ADAPTER
75 TERMINAL
Ω
BACK OF TV
NOTE: TV will enter standby mode automatically after 10 minutes if a signal is not
being received.
Connecting Cable (CATV ) to TV
Cable Service
Connect Cable directly to the TV's 75 input
terminal
CABLE
Ω
75 INPUT TERMINAL
Ω
BACK OF TV
Using a Cabl e Box
Connect Cable to Cable Box "In" terminal,
then connect the Cable Box "Out" terminal
directly to the 75 input terminal on your TV.
NOTE: Tune your TV to match the output
channel of the box (such as channel 3 or 4).
IN OUT
CABLE BO X
Ω
75 INPUT TERMINAL
Ω
BACK OF TV
8
Page 10

External connection
Connecting an Antenna or Cable System to VCR and TV Antenna
Choose your antenna hook-up style A, B or C and connect to “IN FROM ANT.” on
the VCR.
Connect cable from “OUT TO TV” on VCR directly to the 75 Ωinput terminal on
your TV .
STYLE A STYLE B STYLE C
Ω
75 TERMINAL
BACK OF VCR
IN
OUT
BACK TV PANEL
Cable Service
Connect cable directly to “IN FROM ANT” on VCR
. (If using a cable box, connect
cable to input on box. Connect cable from output on box to “IN FROM ANT” on VCR
.) Connect cable from “OUT TO TV” on VCR directly to the 75Ωinput terminal on
your TV .
NOTE: Tune your TV to match the output channel on the cable box and VCR (such
as Channel 3 or 4).
CABLE
BACK OF CABLE BOX
IN OUT
75 TERMINAL
Ω
BACK OF VCR
IN
OUT
BACK TV PANEL
9
Page 11

Using the PICTURE menu
Using the SETUP menu
CONTRAST
BRIGHT
COLOR
TINT
SHARPNESS
Adjust left to decrease picture contrast.
Adjust right to increase picture contrast.
Adjust left to darken the picture.
Adjust right to brighten the picture.
Adjust left to decrease color intensity or saturation.
Adjust right to increase color intensity or saturation.
Adjust left to decrease the red tone.
Adjust right to increase the red tone.
Adjust left to soften the picture detail.
Adjust right to sharpen the picture detail.
10
Page 12

Using the P.LOCK menu
Using the SETUP menu (continued)
Figure 1
Note:
1. When you enter P .LOCK submenu first time, red “NEW CODE” will display on the
menu, input four-digit numbers as your password by pressing 0-9 buttons. After
you input the numbers, blue “ENTER CODE” will display on the menu, input
again the password you have set to enter P.LOCK submenu, the submenu will
display as the following:
Figure 2
2. If you have set your password, when you want to enter P.LOCK submenu, the
menu will display blue “ENTER CODE” shown as figure 1, input your password
to enter the submenu shown as figure 2.
3. If you need to modify your password, first enter the submenu shown as figure 1,
then press CODE button on the remote control, the “OLD CODE” will display in
red on the menu; Input your old password, then “NEW CODE” will display in red
on the menu, input four-digit numbers as your new password. “ENTER CODE”
will display in blue on the menu, input your new password to enter the submenu
shown as figure 2. If you forget your password, input 4769 to enter the submenu
and renew your password.
CH LOCK
Select this item to enter CH LOCK submenu (as shown). You can set to lock one channel in
this submenu.
LOCK ON: Turn on CH LOCK.
OFF: Turn off CH LOCK.
CH AIR: Select the channel you want
to lock, you can use
or number buttons to input channel number.
Note: “CH CABLE ***” will be displayed under CABLE mode.
CH LOCK ON: The selected channel in the CH LOCK menu cannot be viewed.
OFF: LOCK is deactivated and any selected channel for CH LOCK, can be viewed.
VOL button
11
Page 13

Using the P.LOCK menu
Using the V-CHIP menu
V-CHIP
Select this item to enter V-CHIP submenu.
V-CHIP ON: Turn on V -CHIP function.
OFF: T urn off V -CHIP function.
MPAA RA TING: Set MPAA rating. “BLOCK” prohibits watching the BLOCK
channels, VIEW permits watching all channels. If ab
high rating is set as “VIEW”, lower ratings will be set to
VIEW mode. If a low rating is set to “BLOCK”, higher
ratings will be set to BLOCK mode.
G: For all children.
PG: Directed to old children.
PG-13: General Audience.
R: Parental Guidance suggested.
NC-17: No one under 17 admitted.
X: For Adults.
TV RATING: Set MPAA rating. “BLOCK” prohibits watching the
BLOCK channels, VIEW permits watching all channels.
If ab high rating is set as “VIEW”, lower ratings will be
set to VIEW mode. If a low rating is set to “BLOCK”,
higher ratings will be set to BLOCK mode.
Y: All children.
Y7: Directed to old children, following items can be set
in this rate.
FV: Fant asy violence
G: General Audience.
PG: Parental Guidance suggested, following items
can be set in this rating.
D: Suggestive Dialogue.
L: Strong language.
S: Sexual situation.
V: Violence.
14: Parents strongly cautioned, following items can
be set in this rating.
D: Suggestive Dialogue.
L: Strong language.
S: Sexual situation.
V: Violence.
MA: Mature Audience only, following items can be set
in this rating.
L: Strong language.
S: Sextual situation.
V: Violence.
12
Page 14

Using the TIMER menu
CLOCK
TIMER
ON TIME
ON CH.
OFF TIME
Note:
When you unplug the power cord, the clock is reset to zero. You will need to set the
clock again if you need the timer functions.
Press number buttons to set HOUR and MINUTE.
Press VOL
ON: Set the timer to be active.
OFF: T urn off the timer .
Note:
Clock must be programmed before you can use the timer.
Press number buttons to set HOUR and MINUTE.
Press VOL
Note:
ON-TIME will turn on the TV automatically at preset time, and this function activates only when you set TIMER ON.
You can press 0-9 number buttons or PROG.
desired channel.
Note:
Set ON CH. to go into your desired channel directly when TV turns on
automatically.
Press number buttons to set HOUR and MINUTE.
Press VOL
Note:
OFF-TIME will turn off the TV automatically at preset time, and
this function activates only when you set TIMER OFF.
button to circles between AM and PM.
button to set AM or PM.
/ button to select your
button to set AM or PM.
13
Page 15

Using the PRESET menu
G
CH NO.
Press number buttons or VOL / button to select your
desired channel.
CH
ANTENNA
AUTO
PROGRAM
ADDED: Select to add the channel that you selected in CH NO.
DELETED: Select to delete the channel that you selected in CH NO.
AIR: Select to receive television broadcast signal.
CABLE: Select to receive cable signal.
Select to start automatic channel search and store.
Note: TIMER, ON TIME, ON CH, OFF TIME items in TIMER submenu will be reset
when changing between AIR and CABLE modes. These functions must be
reset before using them again.
14
Page 16

Using the EXTRA menu
CC
LANGUAGE
BACKGROUND
C1: Select to display Caption 1.
C2: Select to display Caption 2.
C MUTE: Only after pressing MUTE button, CAPTION will be
displayed on the screen.
TEXT1: Select it to display TEXT 1.
TEXT2: Select it to display TEXT 2.
OFF: Turn off the Caption.
Tips:
CAPTION prepared for TV programs can be pre-recorded
(movies, daytime dramas etc.)
This type of CAPTION is normally 1 or 2 lines of text.
TEXT can include: Captioned program listing, farm news, sports
report and news reports for hearing inpaired persons or
general wire-service news. This type of caption does not
generally relate to the program. The displays may be
several lines of text information at a time.
Select from available language to display the menu.
(Y ou can select ENGLISH, SPANISH, FRENCH)
If this item is selected, the screen will turn blue when there is
no signal input
15
Page 17

Troubleshooting VHF/UHF reception
The most common types of television interference are as follows:
SNOWY PICTURE
Snowy picture is usually due to weak signal. Adjust
antenna or install an antenna amplifier.
DOUBLE IMAGE OR “GHOSTS”
Double images are usually caused by reflections from
tall buildings. Adjust the direction of the antenna or
raise it.
RADIO WA VE INTERFERENCE
Wavy patterns are moving on the screen, which are
usually caused by nearby radio transmitters or shortwave receiving equipment.
HIGH TEMPERATURE ELECTROTHERMAL INTERFERENCE
Diagonal or herringbone patterns appear on the
screen or part of picture is missing. This is probably
caused by high temperature electrothermal equipment
in a nearby hospital.
NOTE:If one of these symptoms appears on the screen
when input from a local cable TV company is
connected, this may be due to the local cable
company broadcast.
16
Page 18

Troubleshooting
If you have any problem, check the countermeasures for each symptom listed below.
The following symptoms may have been caused by inappropriate adjustments rather
than actual malfunction of the unit.
If the trouble persists, contact the service center.
SYMPTOMS POSSIBLE SOLUTIONS
TV does not operate
Poor sound or no sound
Poor picture or no picture
Poor reception on some
channels
Poor color or no color
Picture wobbles or drifts
No CATV reception
Horizontal or diagonal bars
on screen
No remote operation
TV shuts off
No reception above
channel 13
Make sure the power cord is plugged in.
Try another AC outlet.
Power is off ; check fuse or circuit breaker.
Station or CATV experiencing problems; tune to another station.
Check sound adjustments (Volume and Mute).
Check for source of possible interference.
Station or CATV experiencing problems; tune to another station.
Check antenna or CATV connections; reorient antenna.
Check for source of possible interference.
Check picture adjustments.
Station or CATV experiencing problems; tune to another station.
Station signal is weak; reorient antenna to receive weaker
station.
Check for sources of possible interference.
Station or CATV experiencing problems; tune to another station.
Check picture adjustments.
Make sure Antenna Mode is correct.
Check antenna or CATV connections; reorient antenna.
Check for sources of possible interference.
Station or CATV experiencing problems; tune to another station.
CATV company is scrambling signal.
Check antenna orientation.
Check CATVconnections.
Make sure Antenna Mode is correct.
Station or CATV system problems; try another station.
Check antenna connections and reorient antenna.
Make sure Antenna Mode is correct.
Check for source of possible interference.
Batteries are weak, dead or inserted improperly.
Remote is out of range; move closer to TV.
Make sure remote is aimed at sensor.
Confirm no obstructions between remote and TV.
Make sure power cord is plugged in.
Sleep Timer is set.
Power interrupted.
Make sure Antenna Mode is correct.
If using UHF antenna, check connections.
17
Page 19

Specifications
TUBE/POWER SUPPL Y
SIZE 20”
ASPECT RA TIO 4:3
POWER SUPPLY 120V~60Hz
TUNER
# OF CHANNELS 181
PICTURE
CONTROLS TINT, COLOR, BRIGHTNESS, CONTRAST ,
SHARPNESS
PICTURE SETTINGS PERSONAL, DYNAMIC, ST ANDARD, SOFT
OSD LANGUAGES ENGLISH, FRENCH, SPANISH
SOUND
SPEAKER QUANTITY 2
AUDIO OUTPUT POWER 2W*2
CONNECTORS
CABLE/ANTENNA INPUT 1 REAR
AV INPUT 1FRONT
HEADPHONE OUTPUT 1FRONT
DIMENSIONS (INCH, WxDxH) 19.7 X 18.4 X 17.4
WEIGHT (LBS) 48.4
For service, support and warranty information, visit www.polaroidelectronics.com or in the US call 1-866-289-5168
and in Canada call 1-866-301-7922.
“Polaroid” and “Polaroid Pixel” are registered trademarks of Polaroid Corporation of Waltham, MA USA.
18
 Loading...