

Page 1

Polaroid
SONAR
OneStep
SX-70
Land
Camera
Page 2

Polaroid introduces sonar
focusing-the
ultimate
in
one-step photography
That unexpected moment, that
periect smile,
will
never again be
lost whi
Ie
you pause
to
set the lens.
The instant you see you r picture,
just aim and shoot. With sonar
focusing, the camera sets the
lens
instantly, automatically.
Now, nothing interieres with seeing
the
shot and taking
it.
(See "How sonar focusing works "
inside this foldout.)
2
Page 3
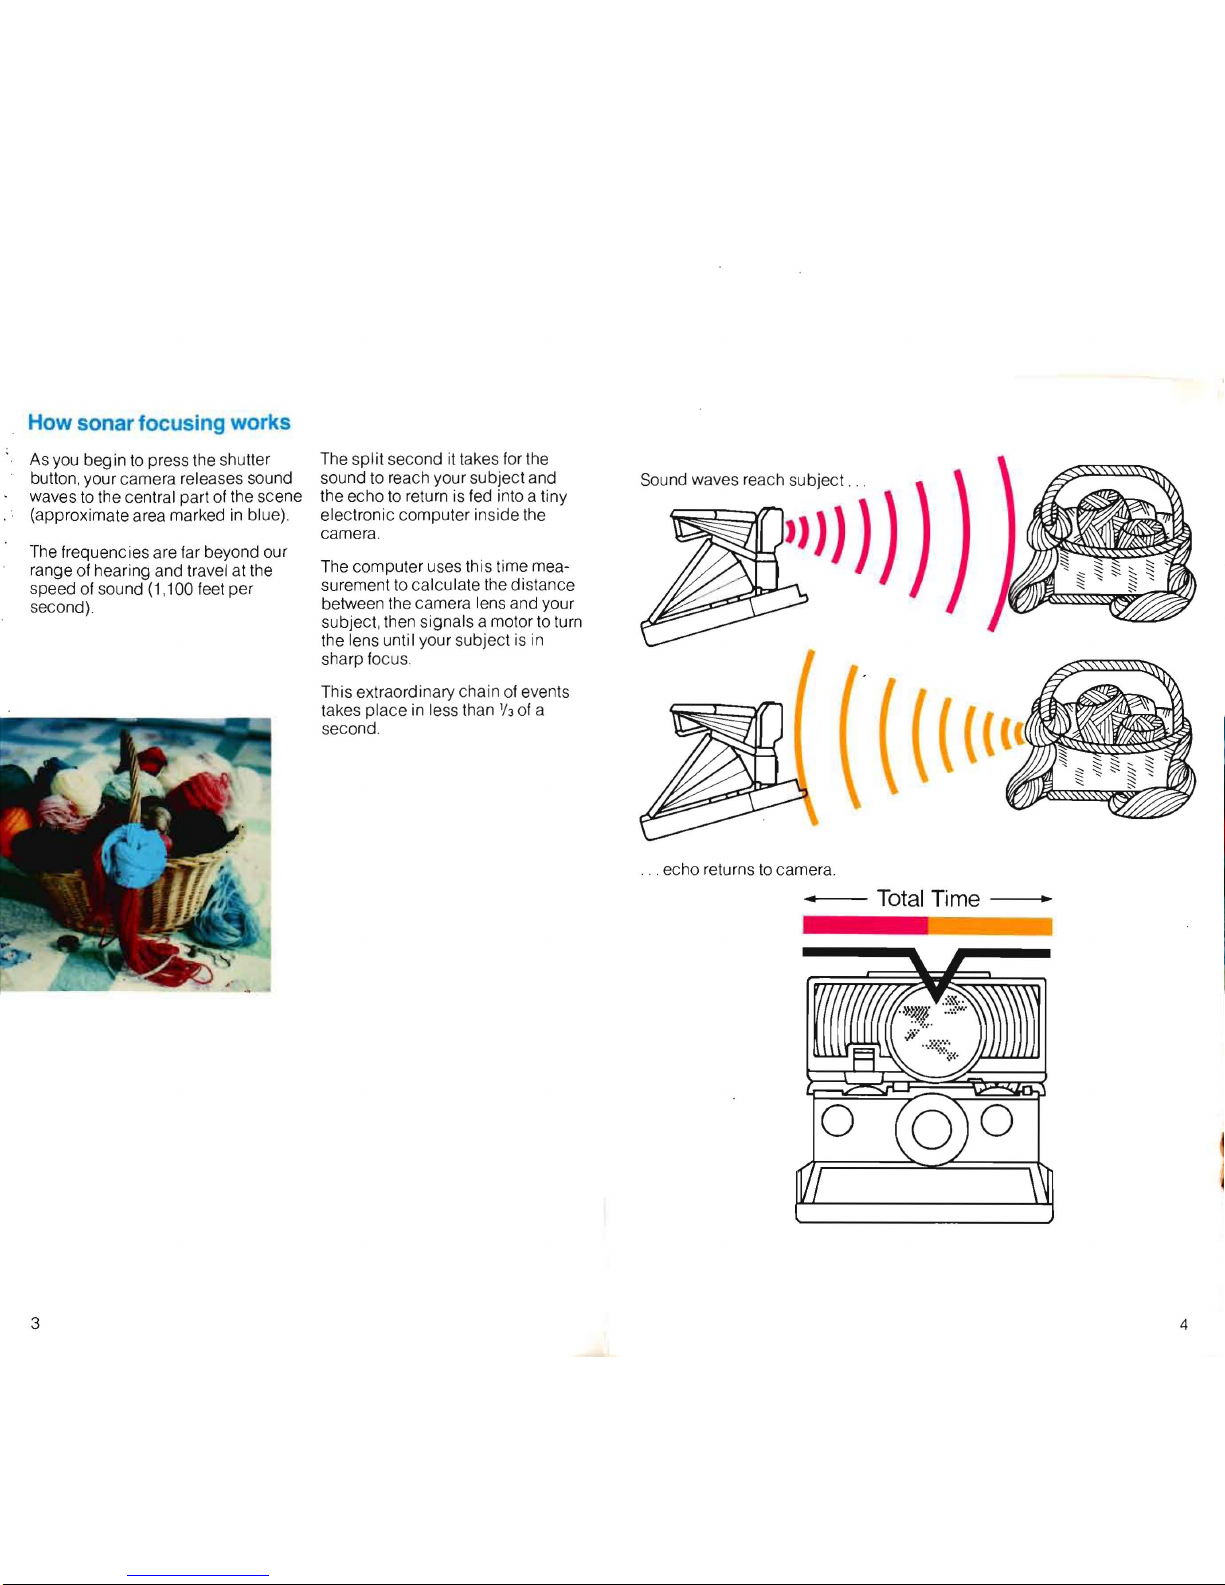
How
sonar
focusing
works
As you beg
in
to
press the shutter
button, your camera releases sound
waves
to
the central part of the scene
(approximate area marked
in
blue).
The frequencies are far beyond our
range of hearing and travel at the
speed of sou nd
(1
,100 feet per
second).
The split second
it
takes for the
sound to reach your subject and
the echo
to
return
is
fed into a tiny
electronic computer inside the
camera.
The computer uses this time measurement to calculate the distance
between the camera lens and your
subject, then signals a motor to turn
the lens until your subject
is
in
sharp focus.
This extraordinary chain of events
takes
place
in less than
113
of a
second.
.
..
echo returns
to
camera .
.....
--
Total
Time
3
4
Page 4

Contents
Please spend a few minutes
reading this·booklet.
It
could mean
the difference between taking
consistently good pictures or
disappointing ones.
3 How sonar focusing works
6
Film and flash
6 Features
7
To
open and close the camera
8 Camera parts
10
To
load the film
11
To
hold the camera
12 How sonar focusing lets you
"preview" the picture
13
To
aim and shoot
14
Use flash for most
indoor pictures
15 Watch for your camera's "use
flash or tripod" indicator
16
You
can use flash
in
daylight
18 Indoor flash hints
20
Daylight picture hints
24 Close-ups
25 Time exposures
26 Tips
on
outdoor lighting
28
To
set the lens manually
31
Need help? Call Customer
SeNice
32 Troubleshooting
38
Care of your system
39
Electronic flash
40
Accessories
40
Copies and enlargements
41
Full warranty
Call us, free
If you ever have a question about
your camera or your pictures, call
us toll free .
800-225-1384
from anywhere
in
the continental
U.
S.A.
except Massachusetts and
Alaska. From those states, call col-
lect-
(617) 864-4568.
In
Canada,
call toll free-800-261-6970. Our
Customer
SeNice
representatives
can be reached every weekday
from 8 a.
m.
to
5 p.m
.,
your local time.
5
Page 5

--.
POLAROID SX·70 LAND
FILM
Film and flash
Your camera uses Polaroid SX-70
Land film and FlashBars. Each film
pack provides ten color pictures
and contains a battery that powers
the camera. Each FlashBar has
ten bulbs.
You'll never waste a flash or film
with this camera.
It
will not let a
bulb
fire when a film
pack
is empty
and will not take a picture when
all the bulbs on one side of the
FlashBar have been fired. Your
camera also finds the next good
bulb
in
a partly used FlashBar.
Please read the important electronic flash statement
on
page
39.
Features
New
with sonar focusing:
• Automatic and precise focusing
in
any light, even total darkness.
• Can "preview" before you shoot
to
see what you'll get
in
the
finished picture.
• Built-in "use flash
ortripod"
indicator.
Standard with SX-70:
• Through-the-Iens viewing.
• Automatic exposure control for
daylight and flash pictures.
• Pictures from
10.4
inches
to
infinity (flash to
20
feet).
• Can shoot as fast as every
1.5
seconds.
• 4-element,
116mm,
precision
glass lens.
• Variable aperture from f/8 to f/74.
• Variable shutter speed from 1/180
second to
14
seconds or more.
• Flash
in
daylight
to
eliminate
shadows.
• Automatic time exposures
to
14
seconds or more.
6
Page 6
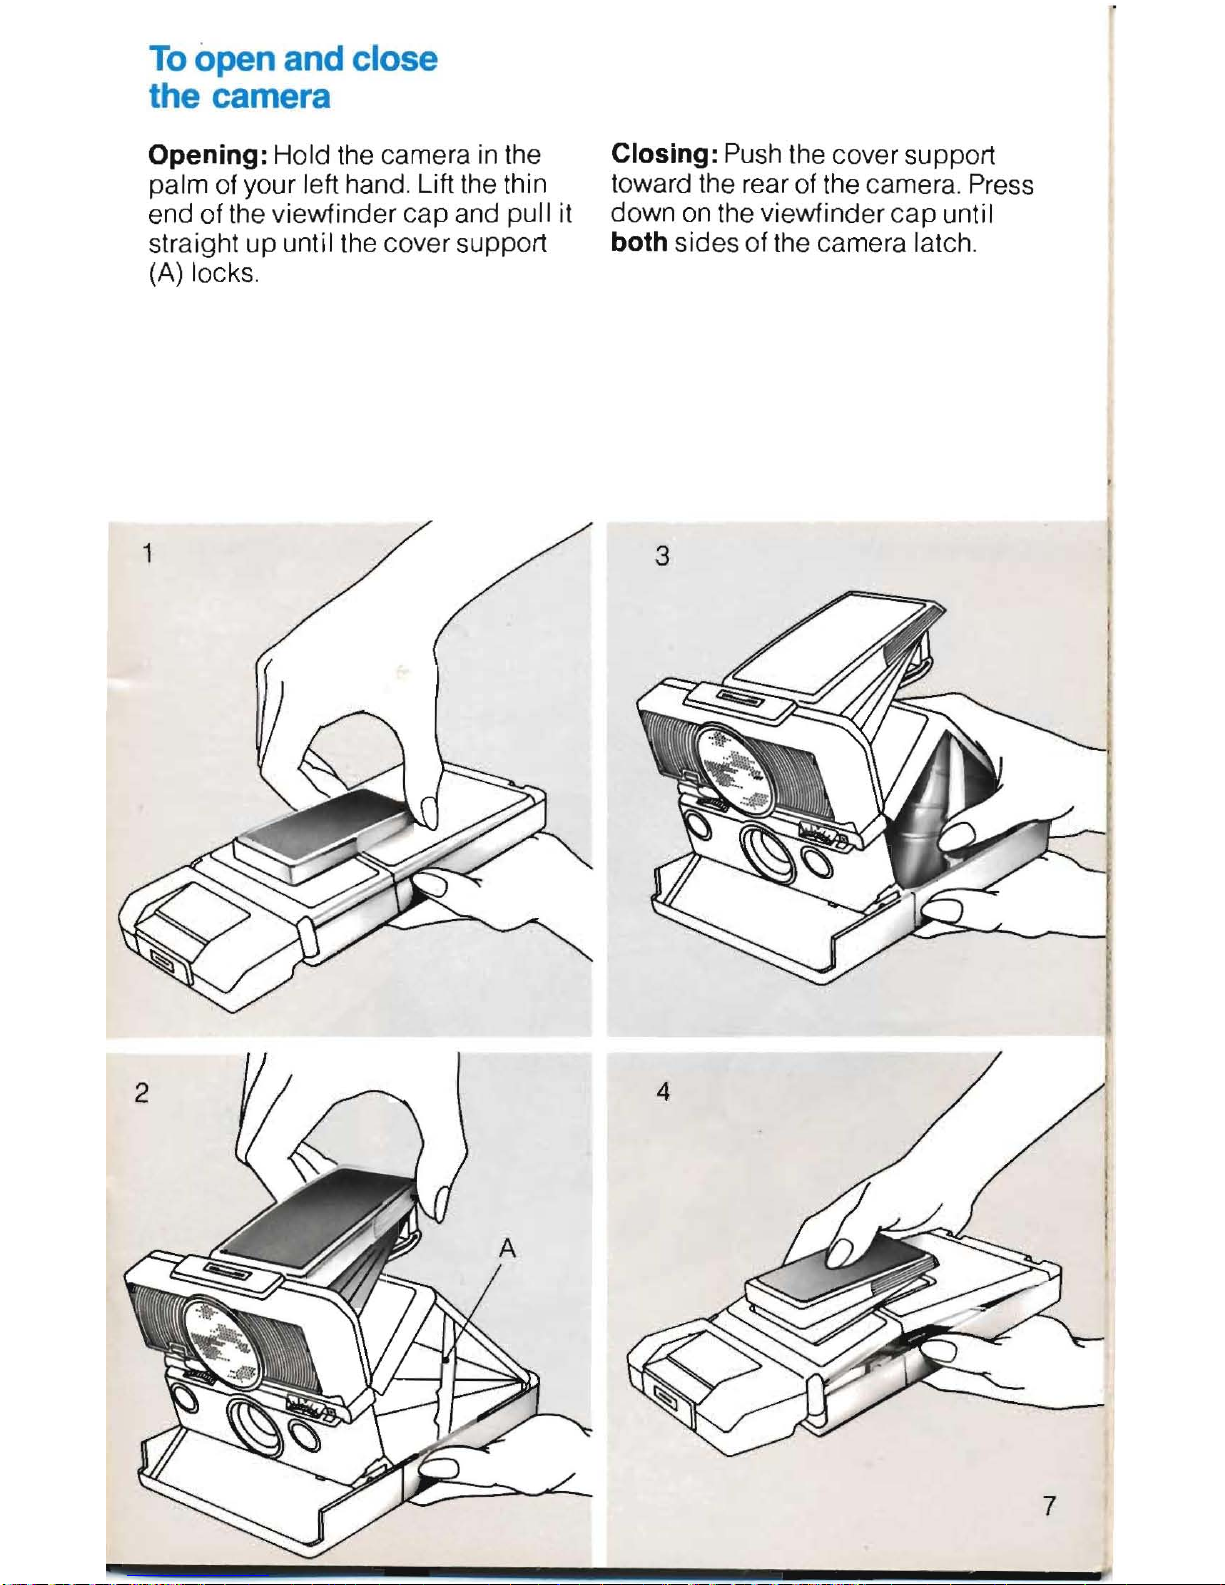
To
open
and
close
the
camera
Opening: Hold the camera in the
palm of your left hand . Lift the thin
end of the viewfinder cap and pull it
straight up until the cover support
(A) locks.
Closing: Push the cover support
toward the rear of the camera. Press
down
on
the viewfinder
cap
until
both sides of the camera latch.
3
7
Page 7
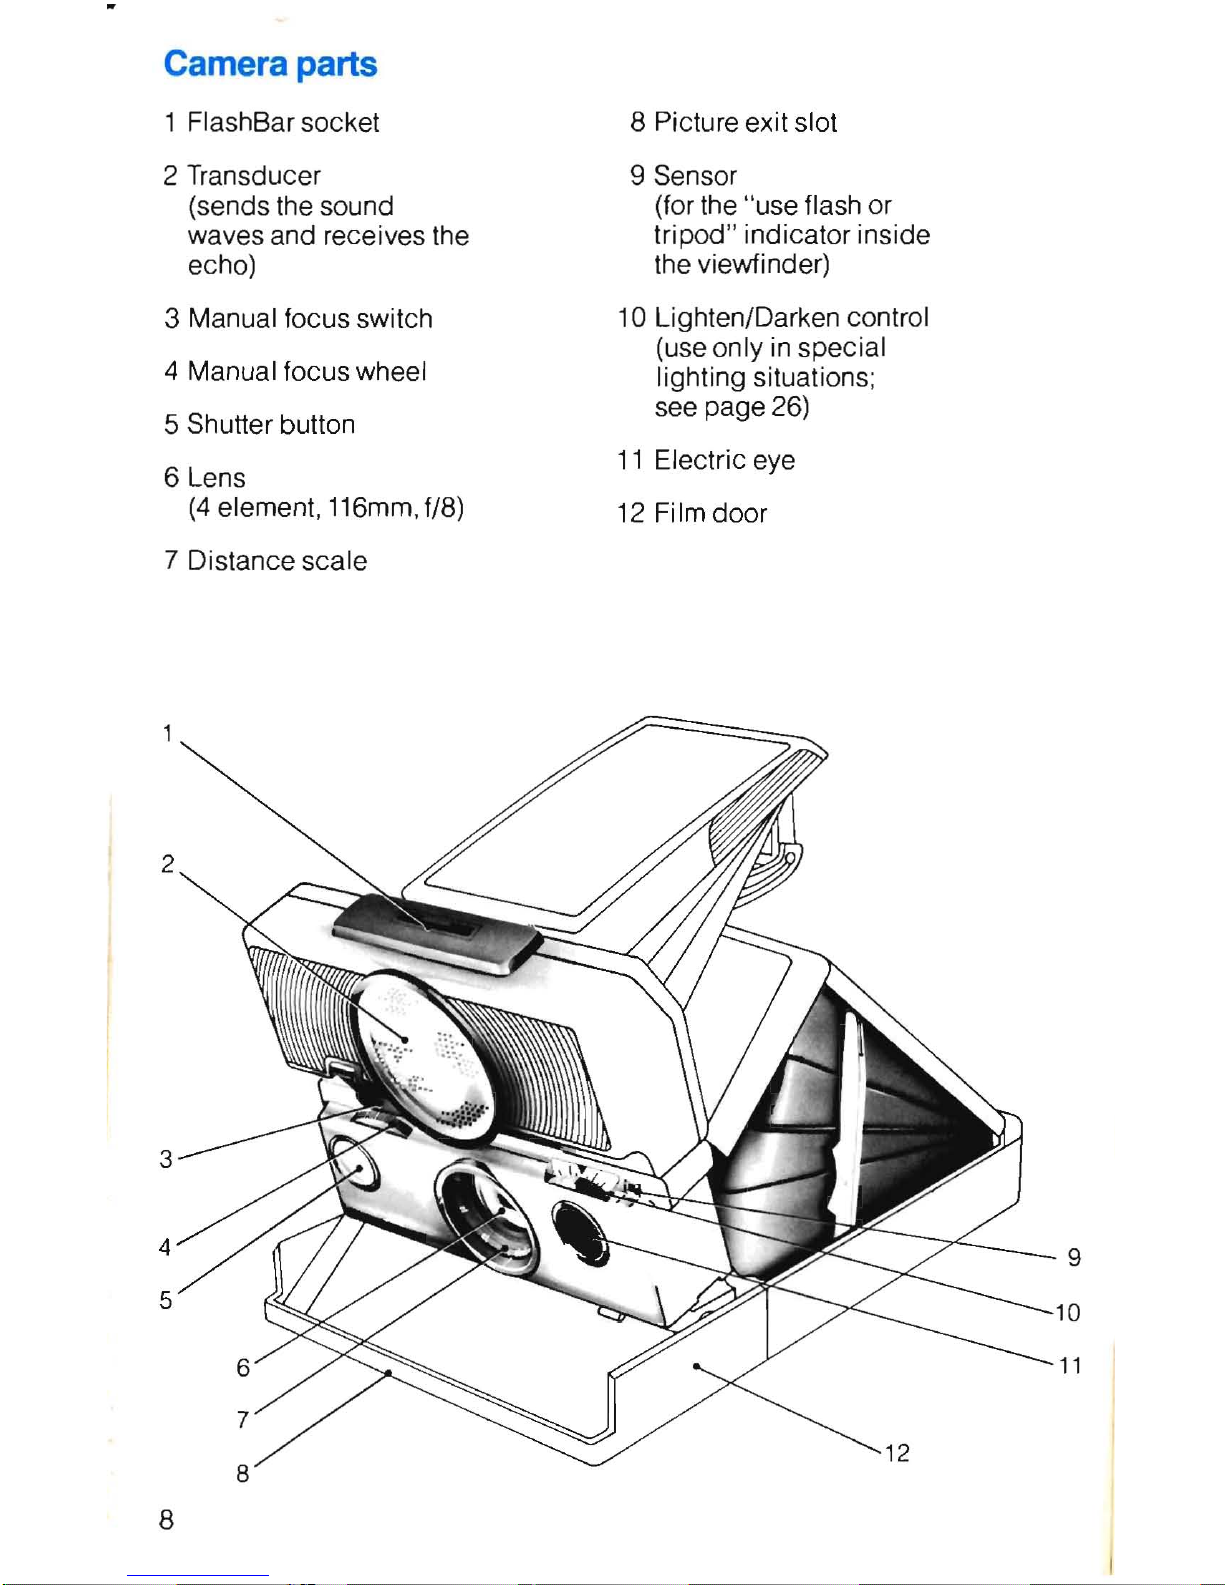
Camera
parts
1 FlashBar socket 8 Picture exit slot
2 Transducer 9 Sensor
(sends the sound
(for the "use flash or
waves and receives the
tripod" indicator inside
echo)
the viewfinder)
3
Manual focus switch
10 Lighten/Darken control
(use only
in
special
4 Manual focus wheel
lighting situations;
see page 26)
5 Shutter button
11
Electric eye
6 Lens
(4
element, 116mm, f/8)
12
Film door
7 Distance scale
2
3
4
5
9
10
11
8
8
Page 8

13 Viewfinder
cap
17 Remote shutter
button connector
14 Viewfinder eyepiece
18 Yellow bar
15 Neckstrap connec-
(opens film door)
tors (follow the
instructions on the
19 Tripod socket
neckstrap sleeve)
(is on the bottom of
the camera; accepts
16 Picture counter
a standard tripod
(goes to
10when
screw)
you load a new or
partly used film
pack into the camera;
counts down to show
how many pictures
are left)
17
18
19
9
Page 9

To
load
the
film
Push down on the yellow bar
(A).
The film door will
drop
open.
Hold the film pack by its edges
only. (Gripping the pack above and
below the yellow tab may damage
the film.)
Push the film pack into the camera
until the narrow strip (8) snaps
open. Close the film door. The
camera will eject the film cover.
To
remove
an
empty pack . pull
the yellow tab.
8
Page 10
To
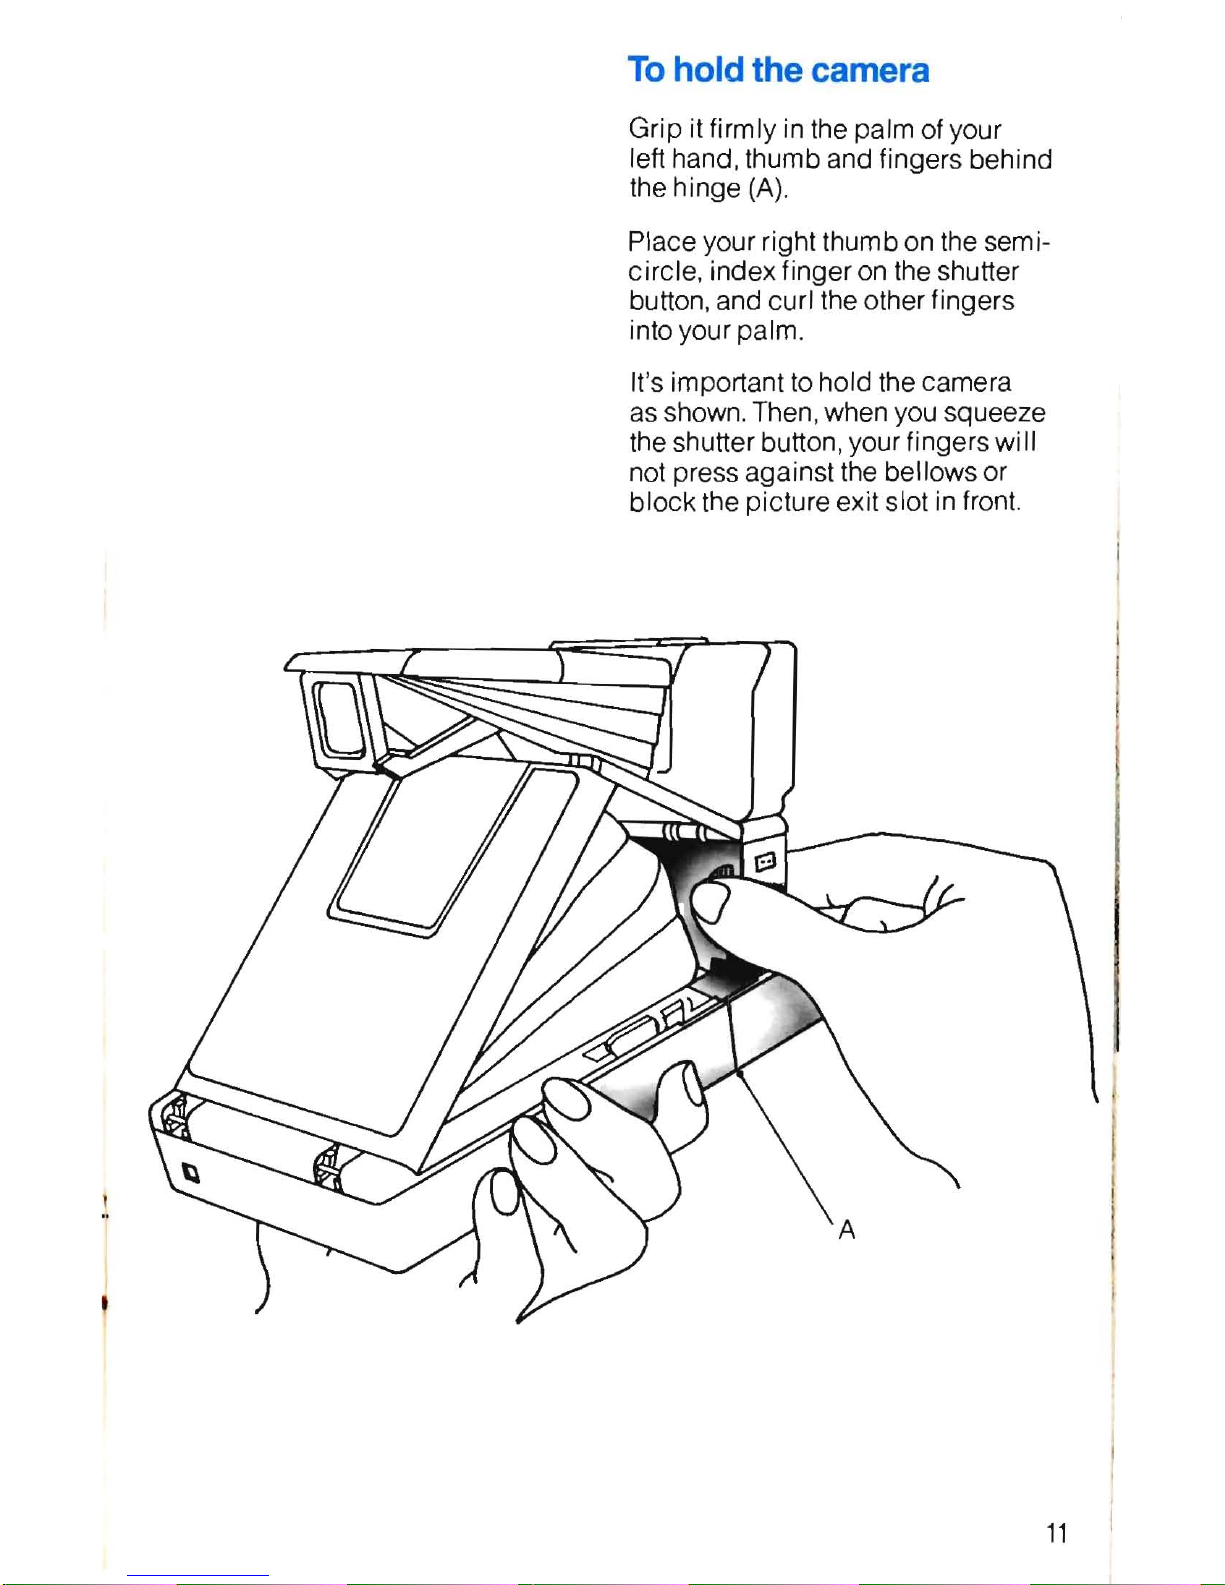
hold
the camera
Grip it firmly in the palm of your
left hand. thumb and fingers behind
the hinge
(A).
Place your right thumb on the semicircle. index finger on the shutter
button . and curl the other fingers
into your palm.
It's important
to
hold the camera
as shown. Then. when you squeeze
the shutter button, your fingers wi
II
not press against the bellows or
block
the picture exit slot in front.
11
Page 11

How sonar focusing lets
you "preview" the picture
To
familiarize yourself with sonar What you now see
in
the viewfinder
focusing and "previewing," stand
is a "preview" of what the finished
a few feet from your subject. Then
picture will look like.
If
it
isn't exactly
look through the viewfinder. Notice
what you want, release the button,
that the scene appears unsharp.
change position
or
camera angle,
then
lightly
press again for another
Lightly
press the shutter button part-
"
preview"
When you're ready
to
way and hold it there. You'll hear a
shoot, hold steady and squeeze
brief whirring sound
as
the
lens
the button all the way.
brings your subject into sharp view.
(If film is ejected, you pressed too
"Previewing" helps you
to
plan a
hard and accidentally took a picture.)
picture carefully.
For
qu ick snap-
shots, however, there's no need
to
hesitate. Just aim and shoot as described
on
the opposite page.
12
Page 12

To
aim
and
shoot
Bring your eye close
to
the view-
finder eyepiece
so
you can see all
four corners
of
the black frame
inside.
Squeeze the shutter button
all
the way. Hold the camera steady
until the film is ejected.
Remove and handle the developing
picture by its wide white border.
13
Page 13
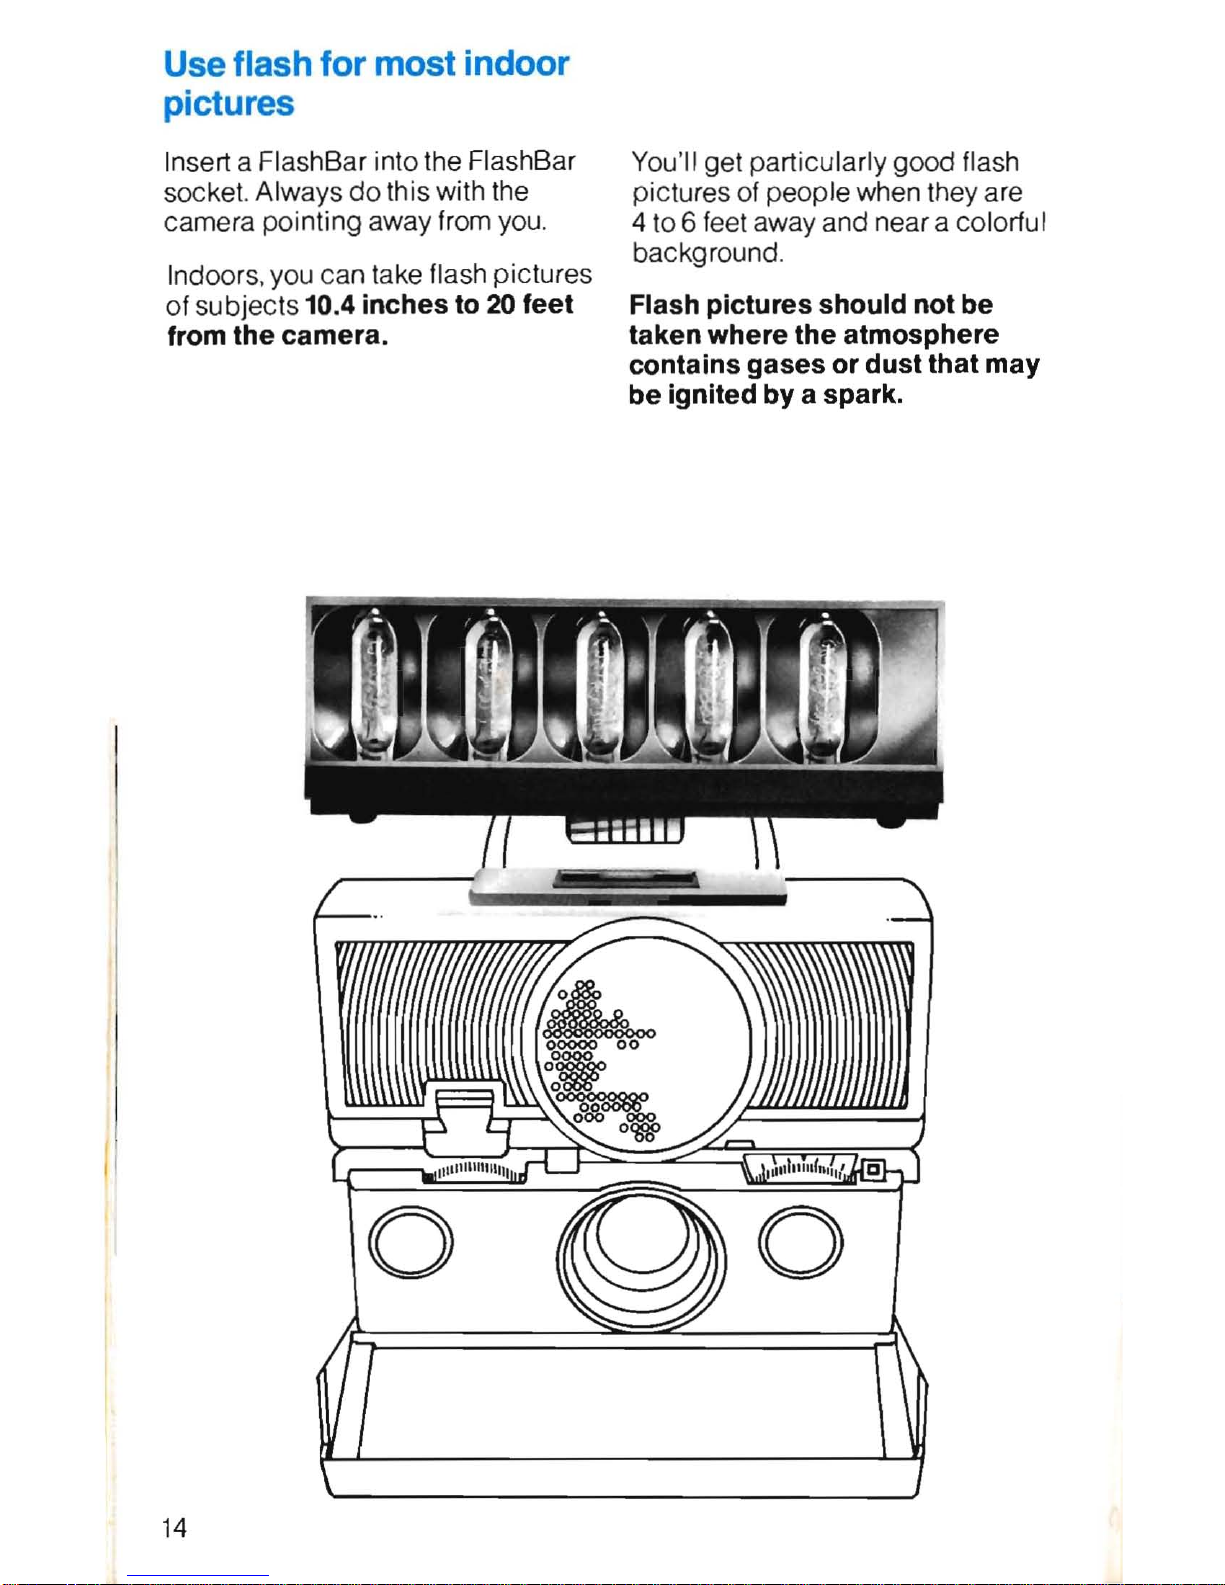
Use
flash
for
most
indoor
pictures
Insert a FlashBar into the FlashBar You'll get particularly good flash
socket. Always
do
this with the pictures of people when they are
camera pointing away from you.
4 to 6 feet away and near a colorful
background .
Indoors, you can take flash pictures
of subjects 10.4 inches to 20 feet
Flash pictures should not be
from the camera.
taken where the atmosphere
contains gases or dust that may
be
ignited by a spark.
14
Page 14

Watch
for your camera's
"use flash or tripod" indicator
When you're not using flash , a red
light may appear
in
the right side of
the viewfinder
as
you beg
in
to
press
the shutter button.
It
warns that the lighting
on
the
scene
is
not bright enough for
hand-held
pi
cture taking. Outdoors,
the
red
light will most likely appear
when
it
is heavily overcast. at dusk
or when you're shooting
in
a shaded
area.
It
will also appear indoors
in
most room lighting
If
you see the red light. release the
shutter button . Then use flash or
pla ce the camera
on
a tripod for a
time exposure.
15
Page 15

You
can
use
flash
in
daylight
This exciting feature, called
Here are the typical ways "fill-flash"
"fill-flash," can correct lighting
can help
in
daylight:
situations that might otherwise have
produced disappointing results.
Strong sunlight can create harsh
facial shadows. Flash can fill in the
shadowed areas with even, flat-
Although you can use "fill-flash"
when your subjects are
4 to 12 feet
tering light.
from the camera,
you'll get particularly good results when they
are 4 to 6 feet away.
Your subject may be forced to
squint when facing bright sunlight.
To
get the natural expression you
want, take your subject out of direct
sunlight and use "fill-flash."
When the sun is behind your subject (but not shining directly into
the lens), your subject usually will
be too dark in the picture. "Fill-flash"
can provide the added light your
subject needs.
16
Page 16

Page 17

Indoor flash hints
Watch the background
To
assure that it
will
be well lit
by the flash, the background should
be colorful and near your subject.
When the background
is
dark, or
far behind your subject, or beyond
the flash range, it will be too dark
in
the picture
18
Page 18

Arrange groups carefully
All the people in a group should be
about the same distance from the
camera. Then everyone will be lit
evenly by the flash.
To
avoid a flash reflection
When shooting toward a reflective
object or background (mirror. window, eyeglasses, etc.). stand
to
one side of your subject and shoot
from
an
angle
to
avoid a flash
reflection
in
the picture (see below) .
However, when the reflective surface
is
smooth and flat and is the
central part of your main subject
(glass enclosed art, wall hanging.
etc.), shooting at
an
angle may
cause the sound waves
to
reflect
away
from
the camera.
If
this hap pens, the lens will be set incorrectly
and your picture may be unsharp .
To
avoid this, you can set the lens
manually (see page
28)
19
Page 19

Daylight picture hints
It's easy
to
take beautiful daylight
pictures. Just keep these points
in
mind :
•
In
bright sunlight, stand
so
the
sun
is
behind you or
to
the side.
• Move
in
close. You'll get particularly good results when your
subject is about 4
to
5 feet from
the
camera. Then important details
fill the picture and backgrounds
are less distracting.
• Don 'l just wait for a special
occasion. Photograph your subjects when they least expect
it.
Your ca mera is perfect for
th
is
type of
shot-
just aim and shoot.
20
Page 20

,
• Save action pictures for bright.
sunl it days Then your camera 's
shutter will work at top speed . And
for best results, have your subjects move toward you rather than
across the picture
• Give your subjects something
to
do. Then they'll feel relaxed, not
stiff or posed.
21
Page 21

Daylight picture hints continued
•
You
don't always need direct
• Include color. Use props. Ask .
sunlight to get great results. This
your subjects to wear bold , solid
portrait was taken
on
a bright
colors or pose them near a color-
overcast day. Since the light is
ful background.
diffused, shadows are soft, making
it a
flattering light for close-ups.
• When shooting scenics, include
• Watch the background. It should
something
in
the foreground to
complement your subjects, not
serve
as
a natural frame
orto
show
distract from them. Keep it simple.
depth or scale .
22
Page 22

Page 23

Close-ups
Your camera
is
designed
to
open
a new world of beautiful , exciting
close-up pictures .
You
can take
them
in
daylight
or with flash and no
other camera does it so easi
Iy.
With no accessories, you can come
as
close as
10.4
inches. Pictures
taken at that distance
wi
II
show your
subject
at
half its actual size.
For medium close-ups (pets,
children,
etc),
look through the
viewfinder and
as
you move
in
close, lightly press the shutler
button partway several times
to
"preview" the picture at various dis-
tances. When you see
the
picture
you want, just press the button all
the way.
To
shoot at the closest possible dis-
tance, look through
the
viewfinder
and come closer
to
your subject than
10.4
inches. Lightly press the shut-
ter button partway and hold
it
there.
You 'll
hear the camera set the lens
for
10.4
inches.
Move the camera back and forth
unti l your subject
is
as
sharp and
clear
as
possible. When
it
is,
press
the button all the way
to
take
the
picture.
To
avoid possible discomfort from
the flash , extreme close-ups of
people should be made
in
natural
light rather than with flash.
24
Page 24

Time exposures
Your camera can make automatic
time exposures up to
14
seconds
or more.
Keep the camera steady by
placing
it
on a firm
support-a
tripod is best
-and
use the Polaroid Remote
Shutter Button #112. The tripod
socket is
on
the bottom of the camera.
To
take the picture, press the shutter
button for at least a second ; then
release i
t.
The camera
will
do
the
rest.
For best
results indoors, stand
so
bright I
ig
hts are beh ind you or
to
the side.
Although pictures taken indoo rs
without fla
sh
may not faithfully
reprodu
ce
the colors of the subject,
they often have a charm and beauty
all their own .
25
Page 25

Tips on outdoor lighting
Outdoors, your camera's electric
eye controls the lens opening and
shutter speed
to
let just the right
amount of I ight reach the
fi 1m.
The electric eye works best when
the scene is evenly lit.
It
can be
"fooled" by uneven lighting as
described below.
Bright backgrounds:
Wh ite wall ,
sw
imming poo
l,
beach or snow
scenes, etc.
When a bright background
is
a
large part of the scene and reflects
more I ight than your subject. the
electric eye sets the camera for the
background causing your subject
to
appear too dark
in
the picture
(top right)
You
can
do
one of two things before
taking the picture :
• move closer
to
your subject
to re-
duce
the effect of the background
(bottom right)
• turn the Lighten/Darken control
toward Lighten (shown below)
to
lighten your subject.
\)
'''i'
l
(Sett ing : 1 mark toward Lighten)
26
Page 26

Dark backgrounds: Green foliage,
dark wall . etc.
When a dark background
is
a large
part of the scene and reflects less
light than your subject, the electric
eye will again set
the
camera for
the
background. Now. your subject
may appear too light (top right).
(Setting: 1 mark toward Darken)
Page 27

To
set
the
lens
manually
A few special situations call for subject appears unsharp
in
the
setting the lens manually: viewfinder, set the lens manually .
• When shooting straight
on
through
To
set the lens manually: Press
glass,
it
will block the sound
the bottom of the manual focus
waves from reaching your subject. switch (A) Then use the manual
The lens will focus on the glass
focus wheel (B)
as
described
on
and your subject may appear
the opposite page.
fuzzy. Screens or bars could
cause the same result.
The red bar
on
top of the switch
signals that you've disconnected
• When shooting at an angle
the sonar focusing system.
To
toward a flat, smooth surface
reactivate it, press the top of the
(glass enclosed art, wall hanging,
switch or close the camera. The
etc.), the sound waves may reflect
lens
will
reset itself for sonar
away from the camera causing
focusing .
the lens to be set incorrectly.
Before shooting
in
these situations,
lightly squeeze the shutter button
partway and hold
it
there.
If
your
000
000000
000000
°o~o~o:?ooooooooo
0
.,
A--~:::::iiiiiiiiiiI
B
---=r:::::::::~~_1IiII
000000000000
00000000000
0000000
00000000
00000
000000
000
000
0000
00000
00000
28
Page 28

To
use the focus wheel: Look
at
the
most important part of the scene.
Roll the focus wheel all the way
in
one direction, then all the way
in
the other. Notice that the image
changes from fuzzy
to
sharp and
back
to
fuzzy.
Return the wheel
to
the point where
your subject began to look sharp
and clear. Now roll
it
a bit
in
each
direction until you're sure your
subject is
as
sharp and clear
as
possible.
You
can check your ability
to
focus accurately by comparing
the setting
on
the distance scale
around the lens with the actual
camera-to-subject distance.
29
Page 29

30
Page 30

Need help? Call Customer
Service
II
you ever have a question about
your camera or your pictures, call
us
toll Iree .
..
800-225-1384
Irom anywhere in the continental
U.
S.A.
except Massachusetts and
Alaska. From those states, call col-
lect- (617) 864-4568.
In
Canada,
call toll
Iree-800
-261-6970. Our
Customer Service representatives
can be reached every weekday
Irom 8 a.m.
to
5 p.m
.,
your local time.
Or,
write
to
Polaroid Corporation,
Customer Service , Cambridge,
Mass. 02139, or
to
Customer Service
at any
01
the locations I isted on
the
back
cover. Include your ad-
dress, phone number and camera
model.
All our Service Centers offer walk-in
service, too, including while-you-
wait repairs
in
most cases. II you
can
get
to us easily, bring your
camera and pictures in.
31
Page 31

Troubleshooting
Repeated spots: If a repeated
spot or
bar
pattern
appears
on the
picture, the rollers
inside
the camera
need
cleaning.
It's best to
check
the rollers each
time
you load film.
To
clean the rollers: In
dim
light,
open the film
door
and depress the
light
shield
(A). Rotate the rollers
(8). Remove any specks of
dirt
with
a clean, lint-free cloth, moistened
with water if necessary.
Check
the
raised ends (C) on the top roller;
dirt
can
collect
there too.
Should you need to clean the
picture exit slot (0), insert a stiff
piece
of
paper
(like the
fi
1m
cover)
in front of the rollers and
under
the
light shield. Push, until it comes out
the picture exit slot.
o 8
A
32
Page 32

Part of the picture
is
missing:
This happens when you damage
the film by squeezing the pack
above and below the yellow tab. As
you load t
he
camera, remember
to
hold the
fi
lm pack by its edges
Part of the picture
is
fogged:
If
you press again
st
the bellows while
taking a pictur
e, you may block the
movement of parts inside the
camera. The next picture you take
could be partially or totally
wh ite
or
could have streaky light patterns.
Hold the came
ra
as
shown
on
page
11.
33
Page 33

Fuzzy pictures can
be
caused by
...
Moving the camera during
pic
-
ture taking .
It
is
important to hold
the camera steady until the film
is ejected from the camera.
2 Shooting through glass. The
glass will block the sound waves
from reaching your subject and
the lens will focus
on
the glass.
Set the lens manually (see
page 28) .
3 The sound waves striking a fore-
ground
object
and noi reaching
your subject. As you press the
shutter button, the sound waves
travel
to
the central part of the
scene (see page
3). Be
sure they
have a clear path
to
your subject.
4 Taking a picture
in
dim
light.
When the red light appears
in
the right side of the viewfinder,
remember
to
use flash or take a
time exposure (see page
15).
5 Your subject moving during
picture taking. You'll get the best
action pictures when your subject is moving toward you, rather
than across the picture.
6 Shooting at an angle toward a
smooth, flat surface. The sound
waves have reflected away from
the camera. Set the lens manually (see
page
28).
34
Page 34

Page 35

If
the camera doesn't eject the
film cover or film
• The battery
in
your film
pack
may
be
dead
or
weak. Try
a fresh
pack. If the film
cover
doesn't
come
out
of
the
second
pack, the
camera
may
need
repair
. See the
next
page.
• If you press the shutter button for
a flash
picture
and nothing
hap-
pens, all the
bulbs
on the front
side
of
the FlashBar may have
been fired.
Change
the FlashBar.
If the
camera
doesn 't work when
an
unused
side
faces front, turn
the FlashBar around
or
insert a
new
one. If it works then, one
side
of
the FlashBar
was
defective. If
you
have
any
questions.
please
call
Customer
Service (see
page
31).
•
If
the
camera
sets the lens but the
film
does
not
come
out; or if the
camera
does
not reset the lens
past
infinity
(00)
when you release
the shutter button.
close
the
camera
then reopen
it.
The jam
should
clear
.
If the camera stops during a cycle
In
rare cases, the camera
may
stop in the
middle
of an
operating
cycle. When this happens, you
may
not be
able
to
close
the camera
fully.
Never
try to force it shut.
There
are
two reasons
why
the
camera
may
stop.
One
is
jabbing
at the shutter button instead
of
holding
it
until
the film
comes
out.
The remedy is
simple-squeeze
the button
again
and hold
it.
If the
camera
still
doesn't
complete
its
cycle,
open
the film
door
in
dim
I ight.
pull
the
pack
out
about
an
inch, push it
in
again
and
close
the
door
. The
counter
will
reset to
10. The
camera
should
complete
its
cycle.
ejecting
the top
piece
of
film,
which
will
have been
exposed
.
The other reason is that the battery
in the
fi
1m
pack
is weak. Test this by
inserting an
empty
pack
if possible.
ora
new one .
If you insert a fresh pack, the film
cover
may
be partly
ejected
pre-
venting the
door
from
closing
. Re-
move
it and
close
the door. If you
can
close
the
door
but
the
cover
is
ejected
part way.
open
the
door
and
remove the
cover
by
turning the
rollers forward.
Never
try to force
the
cover
through the rollers without
first
opening
the door.
36
Page 36

If your camera needs repair
If
you believe your camera needs
repair,
before you send it to
us
please call Customer
SeNice
(see
page
31)
and explain the problem.
We
just may be
able
to
save you the
time and trouble of returning
it.
Your Polaroid Land camera dealer
wi
II
be
happy
to
return your camera
for repair . Or
if
you prefer, you may
bring the camera to a Polaroid
SeNice
Center, which offers walk-in
seNice
. Many repairs can be made
while you wait.
You
can also talk
to
our representatives about any
pic-
ture problems you may have.
Or,
you may mail the camera to
Polaroid for repairs. Pack it carefully. Address it to the nearest
Polaroid
SeNice
Center (see back
cover). Send it by
insured parcel
post.
To
make it easier we
will
, at
your request, send a sturdy preaddressed shipping carton to you
anywhere
in
the
U.SA
When returning your camera, be
sure to include a note clearly
describing the camera problem
and, if you can, sample pictures
which illustrate
it.
Polaroid
SeNice
Centers try
to
give
the fastest possible
seNice
and
highest
quality
workmanship. The
goal is to repair and
ship
all comeras within five working days.
Depending on distance and
mail
seNice
, you can expect to have
your camera back
in
10
to
14
days .
Film replacement
Return any film pack that has a
dead or weak battery
to
Polaroid or
to
your dealer, and we will replace
it- provided the
fi
1m
has not passed
the expiration date on its box.
If you're taking your camera
outside the U.S.A.
Try
to
anticipate your needs and
take along an adequate supply of
SX-70 film and FlashBars. Or, before
leaving, check with the nearest
Polaroid Customer
SeNice
office
for places of
supply
in other
countries.
37
Page 37

Care
of
your system
The camera
Treat your camera with care. Rough
handling may damage delicate
parts. Keep the camera closed when
not
in
use. The lens and viewfinder
will seldom need cleaning.
If
they
do, blow off any dust, then
wipe
them gently with a clean, lint-free
cloth. From time to time, clean the
rollers inside the film door with a
similar cloth, moistened with water
if necessary (see page 32).
The film
Polaroid SX-70 Land film, like all
film, should be kept cool. If possible,
store below 75°F (24"C).
For
longer
storage, keep below 65°F (18"C).
In
its sealed box, the film can be
refrigerated (not frozen). Let it
reach room temperature before
using
it.
This will take at least
an
hour.
To
preserve its freshness, keep the
film sealed
in
its protective box
until ready for use. Then, take the
same care of a loaded camera as
you
do
your film. Keep the camera
in
a cool place (but not
in
a
refrigerator).
The pictures
When your developing picture
comes out of the camera, handle it
by its
wide
white border. Don't
bend, crush or fold the picture.
Don't cut the picture's borders, this
can ruin the picture.
The brilliant pictures made with
your SX-70 system are among the
most stable and resistant to fading
ever known
in
photography.
Fingerprints
on
your pictures can
be easily removed. Simply "mist"
the surface with your breath, then
polish lightly with a tissue or a soft
clean cloth.
38
Page 38

Electronic flash
Your camera was designed to use
FlashBars and with a FlashBar it
will
produce well exposed pictures over
the full flash range from about
10
in.
to
20
ft
.
Because of the special electronic
circuitry
in
SONAR OneStep cameras,
an electronic flash unit must have
matching electronic characteristics
in
order
to
give
good picture results
with this camera.
As
of August, 1978, such electronic
flash units were not available.
However, it is expected that units
designed to
give
excellent results
with SONAR OneStep cameras (over
a shorter flash range) wi
II
be mar-
keted
in
the near future.
Polaroid Customer Service
will
have a I ist of electronic flash
un
its
designed to work with SONAR OneStep cameras and you can get this
information by
calling
toll free (see
page
31)
.
Electronic flash units other than
those listed by Customer Service
may not
give
consistently
good
results and may cause SONAR
OneStep cameras to malfunction.
There is a general rule that
applies
to
any electronic flash unit. If you
get
poor picture results with it, try a
FlashBar. If you get
good
pictures
with a FlashBar, but not with elec-
tronic flash, the cause
of
the problem
is
the electronic flash, not the camera
or the film.
39
Page 39

Accessories
Picture taking can be even more
fun
with the accesso ries listed
below, available from your camera
dealer.
• Polaroid Remote Shutter Button
#112
• Polaroid #119A
Tele
1.5
Lens
• Polaroid #132 Self-Timer
• Polaroid #2323 Carrying Case
Copies and enlargements
High-quality copies and enlarge-
ments may be ordered through
your camera dealer or directly from
Polaroid Copy Service (the order
form is
on
the back
of
the film cover)
40
Page 40

Full one-year warranty
If
your camera proves to be defec-
tive within the warranty period we
wi
II
repair it or at our option replace
it
with a similar camera without
charge. The warranty
applies
whether you do or
do
not return a
registration card to
us.
The warranty period is one year
from the original date of purchase.
To
verify the warranty period, you
should keep the sales slip or
other proof of the purchase date.
Without this information. the war-
ranty period
is
two years from the
manufacturing date on the camera.
If.
within the warranty period. your
camera is mailed
to
us for service
from
inside the U.
SA.
it will be
returned with a postal refund approximately equal to the cost of
insured parcel post.
We
will also
give you a free pack of
fi
1m.
This warranty does not cover damage caused by accident. misuse.
or tampering with the camera. and
a charge wi
II
be made for such
repairs
For warranty service: The camera
must be returned
to
and repaired
by a Polaroid Service Center or
Authorized Service Center.
You
can
return the camera through your
Polaroid camera dealer.
If
that
is
not convenient. see page 37 for
information on how to return the
camera. or call Customer Service
toll-free at 800-225-1384 (from
Massachusetts and Alaska. call
617
-864-4568 collect. From Canada .
call toll free-800-261-6970)
This warranty gives you specific
legal rights. and you may also have
other rights which vary from state
to state.
This warranty excludes all consequential damages.
Some
states
do not allow the exclusion or limitation of incidental or consequential damages, so the foregoing limitation or exclusion
may
not apply to you.
41
Page 41

Polaroid
service centers
and offices
California
Polaroid Corporation
2040
E.
Maple Avenue
E I Segundo 90245
Telephone : (2t3) 322-6206
Georgia
Polaroid Corporation
5601
Fulton Industrial Blvd
.SW
Atlanta 30336
Telephone:
(404)
346-t 7t 7
HawaII
Polaroid Corporation
Suite t53
84
t Bishop Street
Honolulu
968t3
Telephone : (808) 524-39t t
Illinois
Polaroid Corporalion
2020 Swill Drive
Oak Brook 6052t
Telephone.
(312)
654-5252
Massachusetts
Polaroid Corporal ion
784 Memorial Drive
Cambridge. Mass. 02139
Telephone:
Wilhin Massachusens.
ca
II
co lIect
864
-4
568.
Out of slate.
toiliree
800-225-1384
New
Jersey
Polaroid Corporation
p.o. Bo
x 607
W -95 Century Road
Paramus 07652
Telephone'
(2
01)
265-6900
Ohio
Polaroid Corporation
4640 Manufacluring Road
C leveland
44
135
Telephone: (216) 267 -7600
Texas
Polaroid Corporalion
9029 Governors Row
Dallas 75247
Telephone: (214) 63t-95oo
Puerto Rico
Polaroid Caribbean
Corp
.
Charlyn Industrial Park
Road 190. Km
1.7
Carolina 00630
Telephone: (809)
768-1119
Mailing
address:
P.O.
Box 2032
Carolina 00630
Additional Service Centenl:
Besides Polaroid's own Service
Centers listed here.lhere are
many other authorized Service
Centers in Ihe
U.SA
To
locale
Ihe one closesl to you. ca ll
Customer Service (see
page3t)
.
Australia
Po
laroid Australia
Pty
. Ltd.
E
den
Park Eslale
3t
Waterloo Road
North Ryde. N
.SW 2113
Mailing address:
PO
Box t63
North Ryde. N
.SW 2113
Austria
Polaroid
Ges.mbH
Kege Igasse 27
1031
Wien.
Pos~a
ch
349
Belgium
Polaro id (Belgium) S
A-NV
113
Rue Colonel Bourg
Kolonel Bourgstraat 1
13
1140
Bruxelles-Brussel
Brazil
Polaroid
do
BraSil Ltda.
Rua Almiranle Marques Leao 408
Sao Paulo 01330.
S.P.
M
ai
ling address.
Cai
xa
Postal 2908
Sao Paulo 01000
Canada
Polaroid Corporalion
of
Canada. Limited
350 Carlmgview Drive
Rexdale. Ontario M9W 5G6
Telephone:
(416)
675-3680
Polaroid Service Centre
8449 Main Street
Vancouver . B
.C.
V5X
3M8
Te
lephone:
(604)
324-5150
Denmark
Polaroid
AS
Blokken
75
3460 Birkertx1
France
Polaroid (France)
SA
Office:
57. rue de Villiers
92202 Neui
lI
y
Repairs:
1. (ue
AmblOise
Crolzal
951oo-1.I. Argenleu
il
Gennany
Polaroid GmbH
Sprend lin
ger
Landstrasse 109
6050 O
l1
enbach
Great Britain
Po
laroid (U.K.) Ltd.
Ashley Road
SI.
Albans
Hertfordshire AL I 5PA
Hong Kong
Polaroid (Far East) limited
10th FI Block
"B"
Watson
'S
Estate
8 Watson Road. North
Poi
nt
Hong Kong
Italy
Polaroid (lialla)
S.pA
ViaPiave I I
21051 -Arcisale (Varese)
Japan
Nippon
Polar
oid
Kabushikl Kaisha
Mori
Bldg. No.30
3-2-2. Toranomon
Minato-ku
Tokyo (105)
Mexico
Michelmex
SA'
Apanado
Pos
tal #6-952
Mexic06D
F.
The Netherlands
Polaroid (Europa)
BV
DeBoeIelaan 32
1083
t-U
Amsterdam
Postbus 7949
1008 AC Amsterdam
Repairs:
Para lie lweg 37b
7511
EE
Enschede
New Zealand
Polaroid New Zealand Ltd.
Augustus House
15
Augustus Terrace
Parnell. Auckland I
Mailing address:
P
.O.
Box 37 -
046
Parnell.
AUCkla
nd I
NorWay
Polaroid (Norge) AlS
Induslriveien
8B
Postboks80
1473
Skarer
Panama
Polaroid Interamerican.
SA
P.O. B
ox
2167
Colon Free Zone
Singapore
Polaroid Singapore (Pte) Ltd.
M-4 The Orchard
290 Orchard Road
Singapore 9
Mailing address:
Box22
Pasi r Panjang Post
O~ice
Singapore 5
Sweden
Polaroid
AS
Ekholmsvagen
34
1
2724
SkM10lmen
Switzerland
Polaroid AG.
Hardlurmstrasse .
175
8037 Zurich
Venezuela
Micron
CA'
Apartado 70250
Ed. America. 4A
Transversal. Urb.
Horizonte
Caracas 107
. Authorized Service Centers
 Loading...