

Page 1
7” Portable DVD Player PDM-2727
1
Page 2
Important Safety
Instructions
CAUTION: TO REDUCE THE RISK OF ELECTRIC SHOCK, DO NOT REMOVE
COVER (OR BACK). NO USE-SERVICEABLE PARTS INSIDE. REFER
SERVICING TO QUALIFIED SERVICE PERSONNEL.
CAUTION: USE OF ANY CONTROLS, ADJUSTMENTS, OR PROCEDURES OTHER
THAN THOSE SPECIFIED HEREIN MAY RESULT IN HAZARDOUS RADIATION
EXPOSURE.
POWER SUPPLY:
Connect the supplied adapter to the side of the DVD player in the slot marked “Power In”.
Plug the two-prong end of the power cord to an AC100-120V outlet. If you have difficulty
inserting the plug, turn it over and reinsert it, if the unit will not the used for a long time,
disconnect the plug from the outlet.
NOTE:
Before plugging the power cord into an AC outlet, make sure that all the connections have
been made.
The lightning flash with arrowhead symbol, within an equilateral triangle, is
intended to alert the user to the presence of uninsulated “dangerous
voltage” within the product’s enclosure that may be of sufficient magnitude
to constitute a risk of electric to
The exclamation point within an equilateral triangle is intended to alert the
user to the presence of important operating and maintenance (servicing)
instructions in the literature accom
WARNING: TO REDUCE THE RISK OF FIRE OR ELECTRIC SHOCK, DO NOT
EXPOSE THIS APPLIANCE TO RAIN OR MOISTURE.
CAUTION: Laser radiation when open. Do not stare into beam.
persons.
panying the appliance.
2
Page 3
CAUTION: These servicing instructions are for use by qualified service personnel only. To
reduce the risk of electric shock, do not perform any servicing other than that contained in
the operating instructions unless you are qualified to do so.
Refer to service manual for servicing instructions.
1) Read these instructions.
2) Keep these instructions.
3) Heed all warnings.
4) Follow all instructions.
5) Do not use near water.
6) Clean only with dry cloth.
7) Do not block any ventilation openings. Maintain well ventilated conditions around the
product, Do not put product on bed, sofa or anything that blocks ventilation. Install in
accordance with the manufacturer’s instructions.
8) Do not install near any heat sources such as radiators, heat registers, stoves, or other
apparatus (including amplifiers) that produce heat.
9) Do not defeat the safety purpose of the polarized or grounding-type plug. A polarized
plug has two blades with one wider than the other. A grounding type plug has two
blades and a third grounding prong. The wide blade or the third prong is provided for
your safety. If the provided plug does not fit into your outlet, consult an electrician for
replacement of the obsolete outlet.
10) Protect the power cord from being walked on or pinched particularly at plugs,
convenience receptacles, and the point where they exit from the apparatus.
11) Only use attachments/accessories specified by the manufacturer.
12) Use only with the cart, stand, tripod, bracket, or table specified by the
manufacturer, or sold with the apparatus. When a cart is used, use
caution when moving the cart/apparatus combination to avoid injury
from tip-over.
13) Unplug this apparatus during lightning storms or when unused for
long periods of time.
14) Refer all servicing to qualified service personnel. Servicing is required when the
apparatus has been damaged in any way, such as power-supply cord or plug is
damaged, liquid has been spilled or objects have fallen into the apparatus, the
apparatus has been exposed to rain or moisture, does not operate normally, or has
been dropped.
15) Apparatus shall not be exposed to dripping or splashing and no objects filled with
liquids, such as vases, shall be placed on the apparatus.
Note: Do not touch the color TFT LCD screen by hand directly.
Important Safety
Instructions
3
Page 4

IMPORTANT FOR LASER PRODUCTS
This product incorporates copyright protection technology that is protected by U.S.
patents and other intellectual property rights. Use of this copyright protection technology
must be authorized by Macrovision, and is intended for home and other limited viewing
uses only unless otherwise authorized by Macrovision. Reverse engineering or
disassembly is prohibited.
Region code information: DVD players and discs are coded by region. If the Region
number described on the DVD disc does not correspond to the Region number of this
product, this product cannot play the disc. The region code of this unit is 1.
1. CLASS 1 LASER PRODUCT
2. DANGER: Visible laser radiation when open and interlock
failed or defeated. Avoid direct exposure to beam.
3. CAUTION: Do not open the top cover. There are no user
serviceable parts inside the unit. Leave all servicing to
qualified service personnel.
This unit complies with FDA regulation for radiation control of
laser products.
Copyright Protection
Important Safety
Instructions
4
Page 5
Advanced Playing Functions
Compatibility: Compatible with
DVD, CD and Picture CD.
On-screen Display: Choose from
English, Spanish, French, German
or Italian for the On-screen Display
language.
Search by Time: Search for a
certain track of a disk by selected
time.
Other Special Functions
High Resolution: MPEG-2
decoding format achieves more
than 500 lines of horizontal
resolution.
Features
Performance: Multi-speed, fast
forward, fast backward and slow
forward.
Last Memory Playback: This unit
will memorize where you stopped
playback and continue playing the
disk from that spot when power is
restored (as long as the disc tray is
not opened).
Special Functions: Change
screen aspect ratio, languages,
and multi-angles.
Power Adapter Switch:
Automatically adapts to voltage
requirements in U.S.
5
Page 6
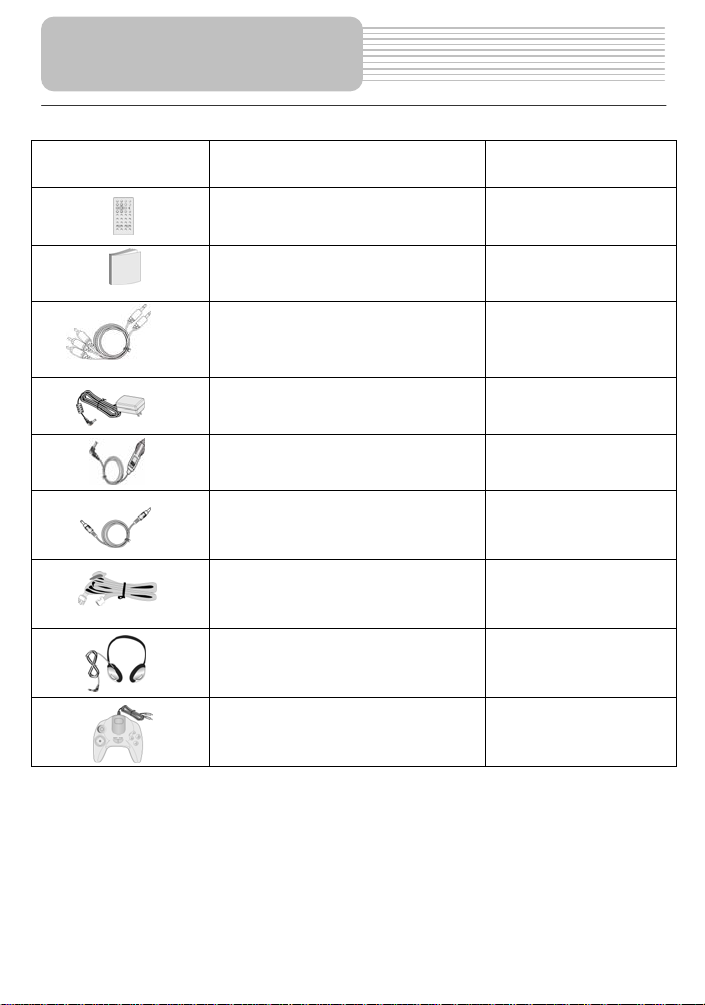
Accessories
ITEM
NAME
Remote Control (& battery)
QTY
1
Audio/Video Cable
Power Supply Cord
Owner’s Manual
Power Adapter
Car Adapter
Strap
Earphone
Game Controller
1
2
1
1
1
4
2
1
NOTE
Accessories and their parts numbers are subject to modification without prior notice due
to improvements.
6
Page 7
Safety Instructions
Features
Accessories
View of Front Panel
View of Side Panels
View of Main Unit Bottom
Remote Control
System Connections
Power Supply Preparation
Notes on Discs
Playback Operation
System Setup
Use of Straps
Definitions
Troubleshooting
Specifications
DVD Playback
CD Playback
Picture CD Playback
Contents
…………………………………………..2
…………………………………………...5
…………………………………………...6
…………………………………………...8
……………………………………….…..10
…………………………………………..12
…………………………………………..13
…………………………………………..16
…………………………………………..18
…………………………………………..19
…………………………………………..20
…………………………………………..21
…………………………………………..25
…………………………………………..27
…………………………………………..29
…………………………………………..33
…………………………………………..35
…………………………………………..36
…………………………………………..38
7
Page 8
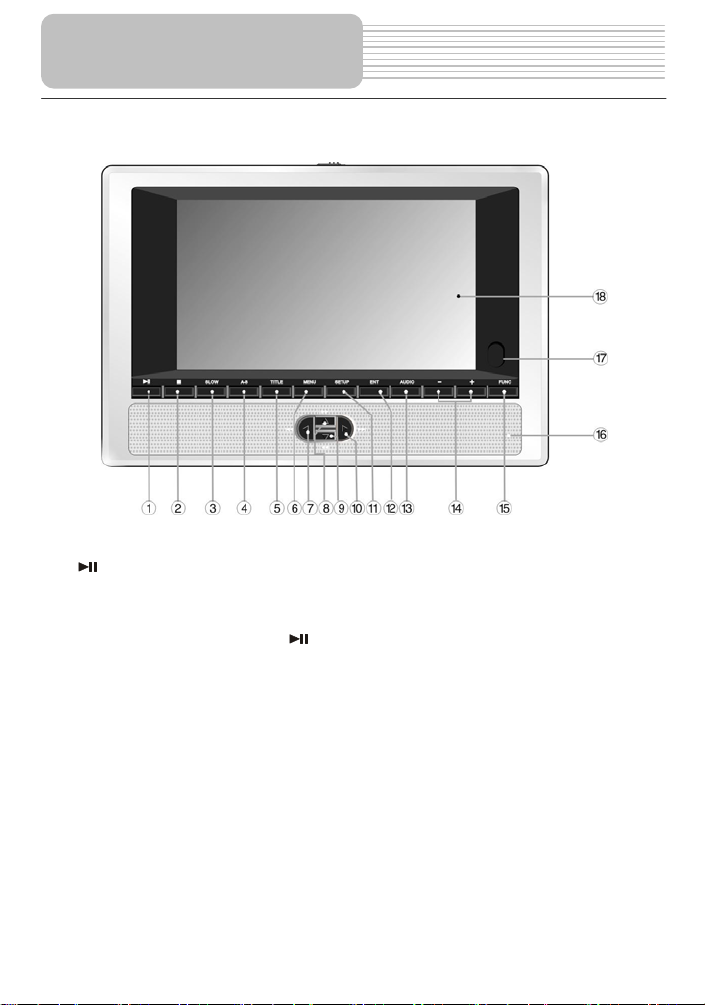
View of Front Panel
(PLAY/PAUSE) button
1.
Press once to pause playback; press again to resume the playback.
2. ■ (Stop) button
Press to stop playback. Press
Press twice to stop playback completely.
3. SLOW button
Press to activate slow playback function.
4. A-B Repeat button
Press to play a certain selected segment repeatedly.
5. TITLE button
Press to display the title menu if it exists in the disc.
6. MENU button
Press to display or cancel the menu.
button to resume playback from the stopped spot.
8
Page 9

7. ◄/ button
Press to select different options, or to return to the previous list or the previous track
or chapter.
8. ▲/ button
Press to select different options, or to search forward fast.
9. ▼/ button
Press to select different options, or to search backward fast.
10. ►/ button
Press to select different options, or to skip to the next list, track or chapter.
11. Setup button
Press to enter the player’s system setup.
12. ENT button
Press to access playback, or confirm your selection.
13. AUDIO button
Press to select different language (depends on availability on your disc). Press to
select different audio track when a CD disc is played.
14. -/+ button
Press to adjust the value of brightness and color.
15. FUNC button
Press to change the brightness and color level; press and hold for 1-2 seconds to
change the aspect ratio.
16. Speaker
17. Remote Control Sensor
18. LCD Screen
View of Front Panel
9
Page 10
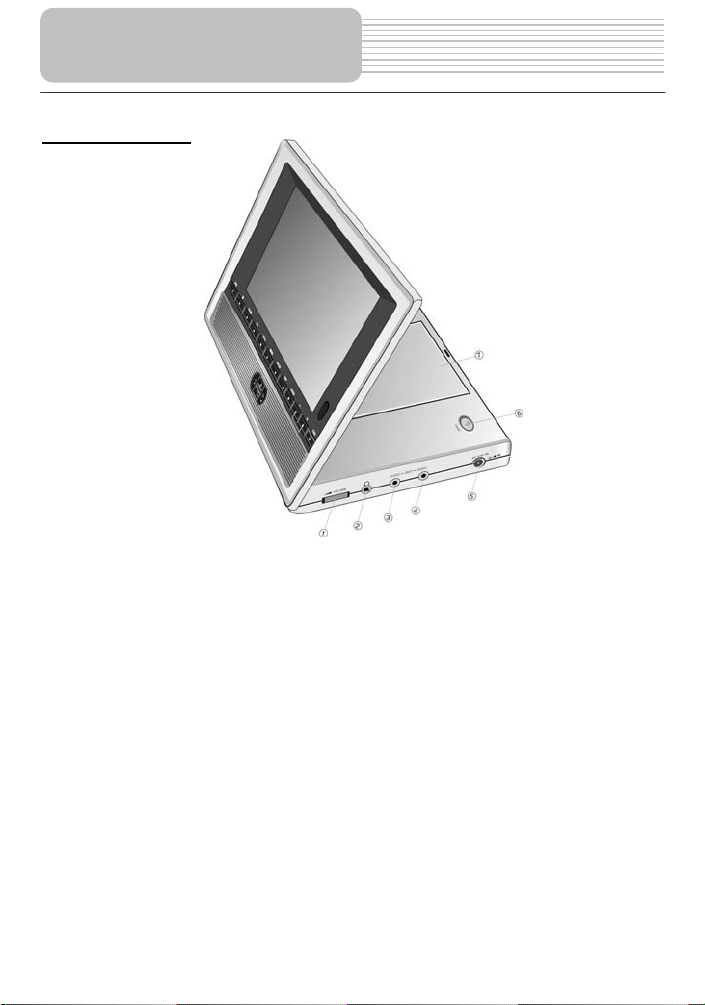
View of Side Panels
Right Side View
1. Volume Control
Use to adjust the volume of the headphone and speaker.
2. Headphone Jack
Use to connect headphones for private listening. When headphones are connected
to this jack, the speaker will be turned off automatically.
3. Audio Output Jack
Used for audio output.
4. Video Output Jack
Use for connecting to an external monitor.
5. DC 9.5V Input Jack
Used to connect the power adapter, including the car adapter.
6. OPEN Switch
Push to open the disc tray cover.
7. Disc tray cover
When the disc is loaded gently press the cover to close it.
10
Page 11
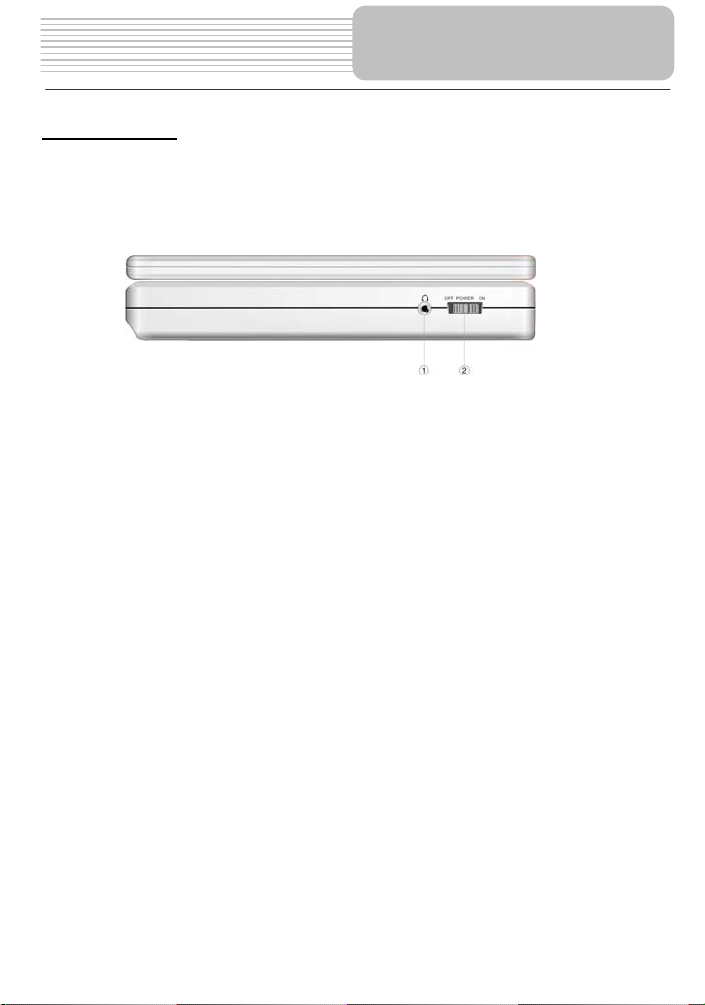
View of Side Panels
Left Side View
1. Headphone Jack
Use to connect headphones for private listening. When headphones are connected
to this jack, the speaker will be turned off automatically.
2. Power Switch
Used to turn power on or off.
11
Page 12

View of Main Unit Bottom
1. Rechargeable Battery Contacts
For connecting the rechargeable battery pack.
12
Page 13

1. MUTE Button
Press to turn on/off the speaker output.
2. INFO Button
Press to display the detailed information of the disc during playing. Press this
button again to exit from the information display..
3. TITLE Button
Press to display title menu if it exists in the disc.
4. Direction Button
Press to select different options.
5. ENTER Button
Press to access playback, or confirm your selection.
6. SETUP Button
Press to enter the player’s system setup.
Remote Control
13
Page 14

7. 0-9 Number Buttons
Press to select an option in the menu.
8. PREV Button
Press to return to the previous list or the previous track or chapter. If it is a DVD
disc, it needs to press this button twice to return to the previous track.
9. NEXT Button
Press to skip to the next list, track or chapter.
10. SUBT Button
Press to select different subtitle languages if there are multiple subtitle languages
existing in the disc.
11. ANGLE Button
Press to access various camera angles if the DVD disc contains multiple camera
angles.
12. A-B Button
Press to play a section of the disc from point A to point B. Press once to select the
starting point (A), press again to select the end point (B). In A-B repeat playback,
press this button to stop the repeat.
13. ZOOM Button
Press to enter and cycle through zoom functions, use the direction buttons
() to move around the screen.
14. REP Button
Press to repeat a chapter, track, title, or the entire disc.
15. MENU Button
Display the actual DVD Disc Menu on screen in play mode.
16. PAUSE Button
Press to pause playback.
17. STOP Button
Press to stop playback. Then press the PLAY button to resume playback from the
stopped spot. Press this button twice to stop playback completely.
18. PLAY Button
Press to begin to play.
19. GOTO Button
Press to select the desired disc starting time, track or title.
20. +10 Button
Press this button and the additional number buttons to select item numbers which
are greater than 9.
21. FWD SCAN Button
Press to search forward fast.
22. REV SCAN Button
Press to search backward fast.
23. SLOW Button
Press to activate slow playback function.
24. AUDIO Button
Press to select different languages when a DVD disc which contains multiple audio
languages is played. Press to select different audio track when a CD disc is played.
Remote Control
14
Page 15
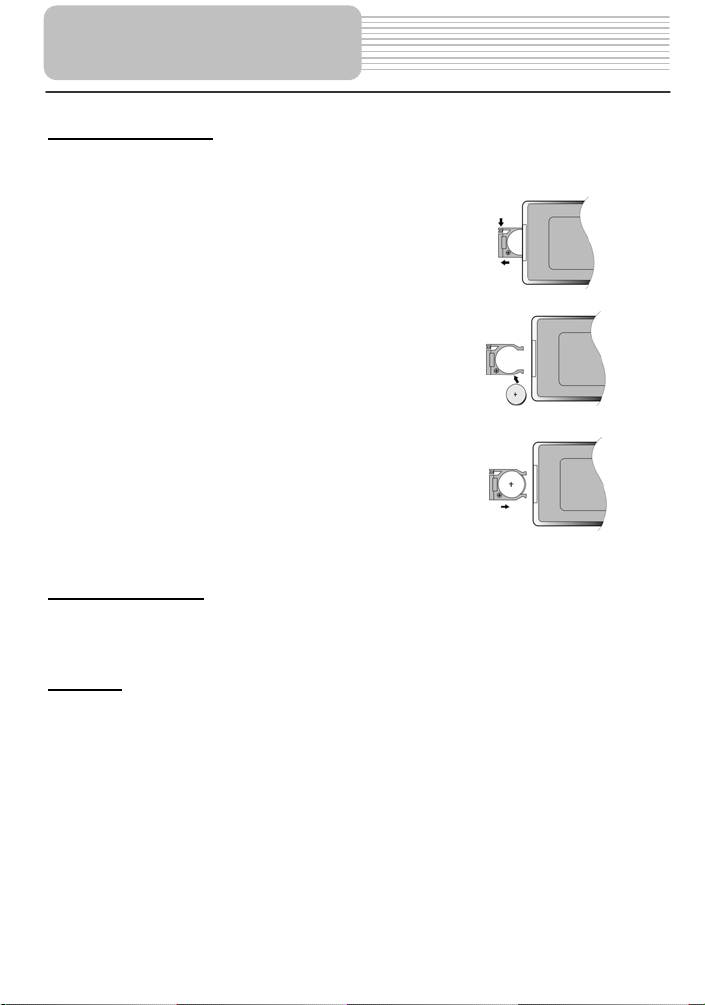
Remote Control
Installation Steps
Follow the steps below to install the battery.
Step1: Pull the battery holder out from the remote
control in the direction of the arrow.
Step 2: Load a new battery properly with
the (+) sided up.
Step3: Insert the battery holder back into
the original position.
Battery Property
Battery Type: CR2025 3V
Battery Life: Approximately 1 year under normal use (at room temperature).
Caution
1. Improper use of the battery may cause overheating, explosion or ignition, which can
result in an injury or a fire. Battery leakage may damage the remote control.
2. Do not expose the remote control unit to direct sunlight.
3. Do not recharge, disassemble, deform or heat the battery.
4. Do not put the battery in fire or water.
5. Replace an exhausted battery immediately.
15
Page 16
z Always ensure that the DVD player, TV and any other electrical equipment to be
connected with are switched off and unplugged from the power supply.
z Ensure that you observe the color coding when connecting audio and video
cables.
System Connections
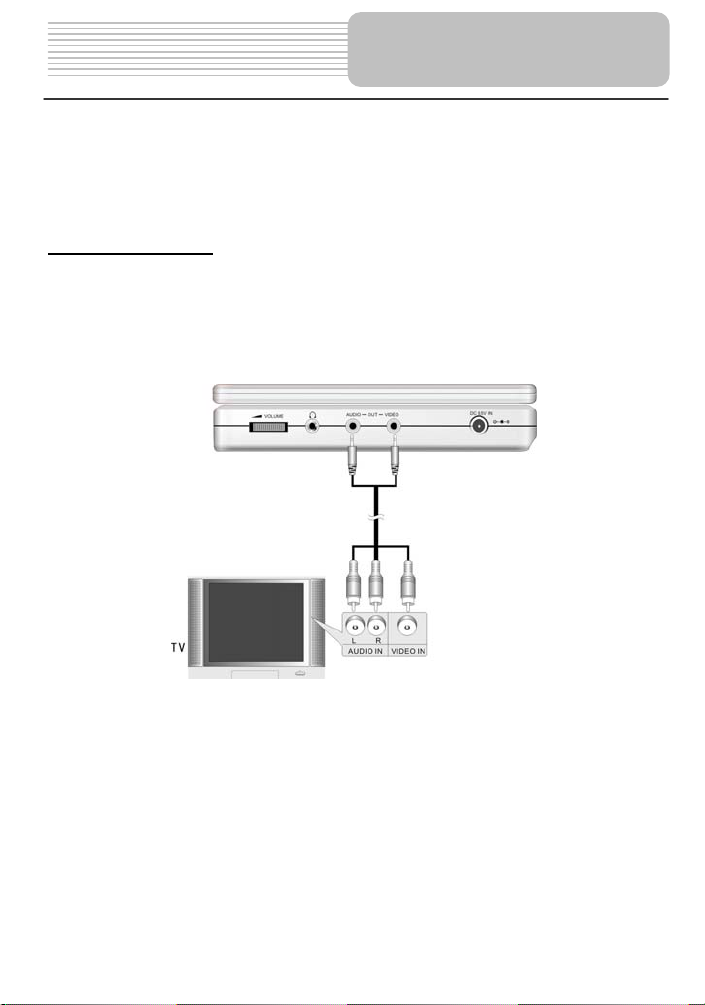
Connecting to TV
Audio/Video connections
Follow the drawings below to connect the DVD player to TV's Audio/Video inputs with
Audio/Video cables.
16
Page 17
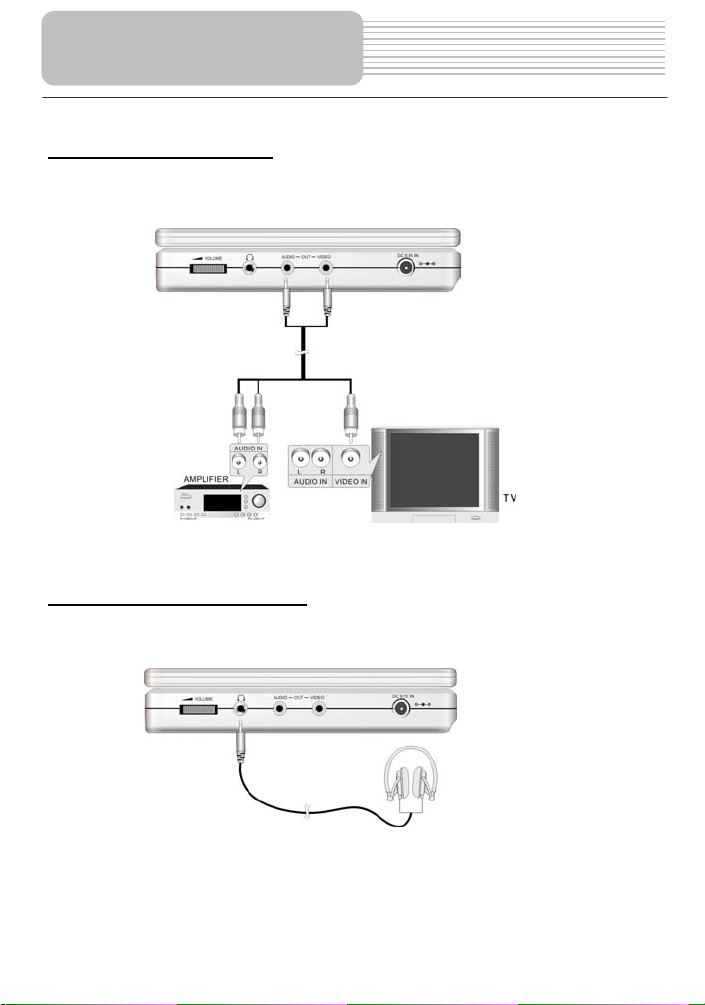
System Connections
Connecting to Amplifier
Refer to your Audio equipment's manual before connection.
Follow the drawings below to connect the DVD player to AV amplifier.
Connecting to Headphones
Connect the headphones to the right side of the player for private listening.
When headphone is connected, the speakers will automatically turn off.
17
Page 18

Power Supply Preparation
Using the AC Adapter
The player is supplied with an AC adapter for powering the unit and charging the battery.
1. Connect AC adapter to the right side
of the DVD player in the jack marked
DC 9.5V IN, as shown on the right.
2. Plug the two-prong end of the power
cord into a grounded electrical
outlet.
Note: Turn player's power off before unplugging.
Using of Car Adapter
The player is supplied with a Car Adapter for powering the unit while in a vehicle.
Connect the Car Adapter Power Plug to
the unit’s power jack and plug the other
end to the vehicle’s cigarette socket, as
shown on the right figure.
Attention
¾ Do not operate the unit or view video software while driving a vehicle.
¾ Place the unit in a proper position for viewing.
¾ Disconnect the player from the Car Adapter when starting the vehicle.
18
Page 19
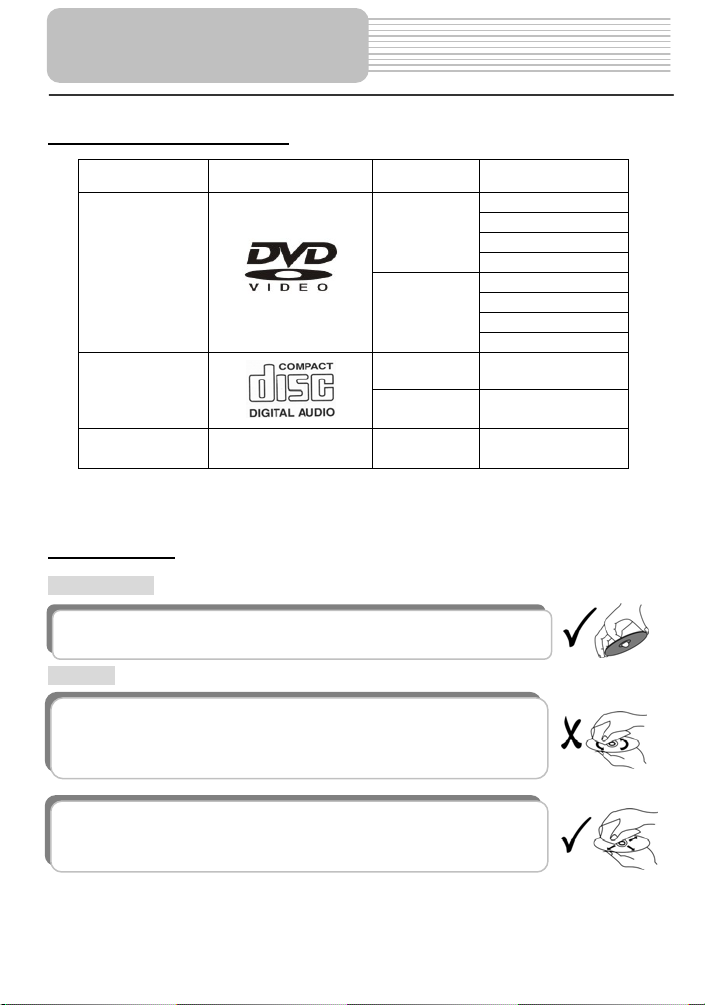
Notes on Discs
Compatible Disc Formats
DISC LOGO DIAMETER
DVD
CD
PLAYBACK TIME/
PLAYABLE SIDES
133 min (SS-SL)
12cm
8cm
12cm 74 min
8cm 20 min
242 min (SS-DL)
266 min (DS-SL)
484 min (DS-DL)
41 min (SS-SL)
75 min (SS-DL)
82 min (DS-SL)
150 min (DS-DL)
JPEG
12cm
Operation methods of some DVD discs are specified by the software manufacturer.
Please follow the instructions of those discs.
Care of Discs
Holding Discs
When loading or removing discs, do not touch their playing surfaces
as the right figure.
Cleaning
Fingerprints or stain on the disc may affect the quality of sound and
picture. To clean your discs, use a soft clean cloth to wipe them. If
necessary, moisten a soft cloth with diluted neutral detergent to remove
heave dirt or fingerprints.
Do not wipe in a circular direction as the figure in the right middle
(concentric scratches on the disc groove tend to cause noise). Gently
wipe from the center of the disc to the outer edge as the right figure.
19
Page 20

READ THE FOLLOWING INSTRUCTIONS CAREFULLY BEFORE USING YOUR DVD
PLAYER FOR THE FIRST TIME.
WARNING: Do not play poor-quality discs to avoid damaging the lens.
Playback Operation
Pre-operation
1. Connect the unit to power supply through the provided AC adaptor.
2. Switch “POWER ON/OFF” to “ON” on the left panel to turn on the DVD player.
3. Press OPEN button on the unit to open the disc tray cover, put a disc in the disc tray
with printed side facing up. Close the disc cover. (See below)
4. The player will search disc and play it automatically.
5. Adjust the volume with the VOLUME control on the right panel to the desired level.
6. To turn the player off, switch the “POWER ON/OFF” on the left panel to “OFF”.
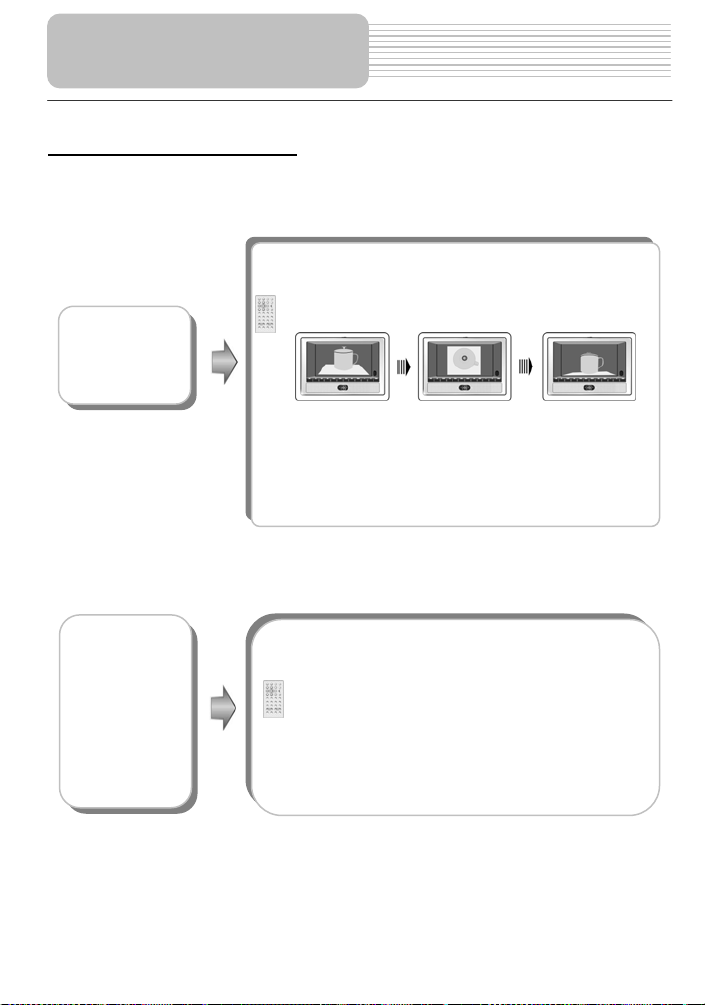
Using of General Button
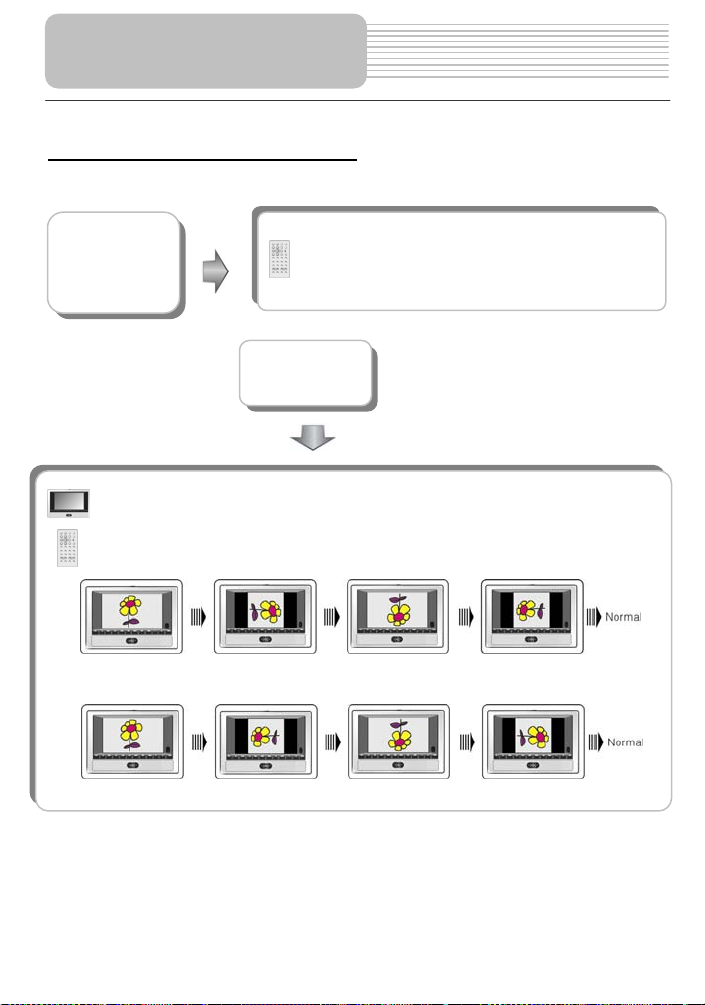
FUNC
button
Press the FUNC button to change the brightness and
color level. Adjust these values with + and - buttons on
the front panel. Press and hold the FUNC button for
about 1 or 2 seconds to change the aspect ration
between 16:9 and 4:3. See below for details:
20
Page 21
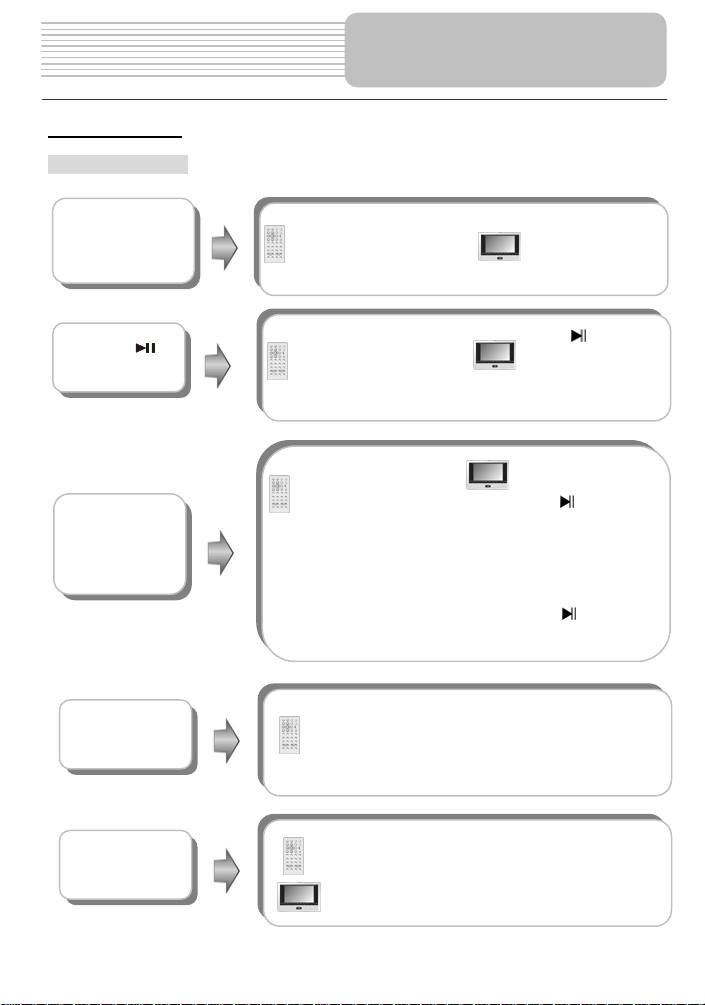
DVD Playback
Buttons Operation
ENTER/ENT
button
Pause/
button
Stop/ button
Zoom button
A-B Button
Playback Operation
Press ENTER button to
start playing, or
(Direction buttons) or
0-9 buttons to select a
Title and Chapter directly.
Press PAUSE button
to pause during playback,
then press PLAY button to
resume normal playback.
During playback, press
STOP button once to
stop playing, then
press PLAY button to
resume normal playback
from the stopped point.
Press STOP button twice
repeatedly to stop
playback completely. Then
when you press PLAY
button, the player will play
from the beginning.
Press ZOOM button repeatedly to shift among 1X,
2X, 3X, 4X zooming effect and normal playback.
Press A-B button once to set the starting point A,
press it again to set the end point B. Then the
player will play the segment between A and B
continuously. Press this button a third time to stop
the A-B repeat.
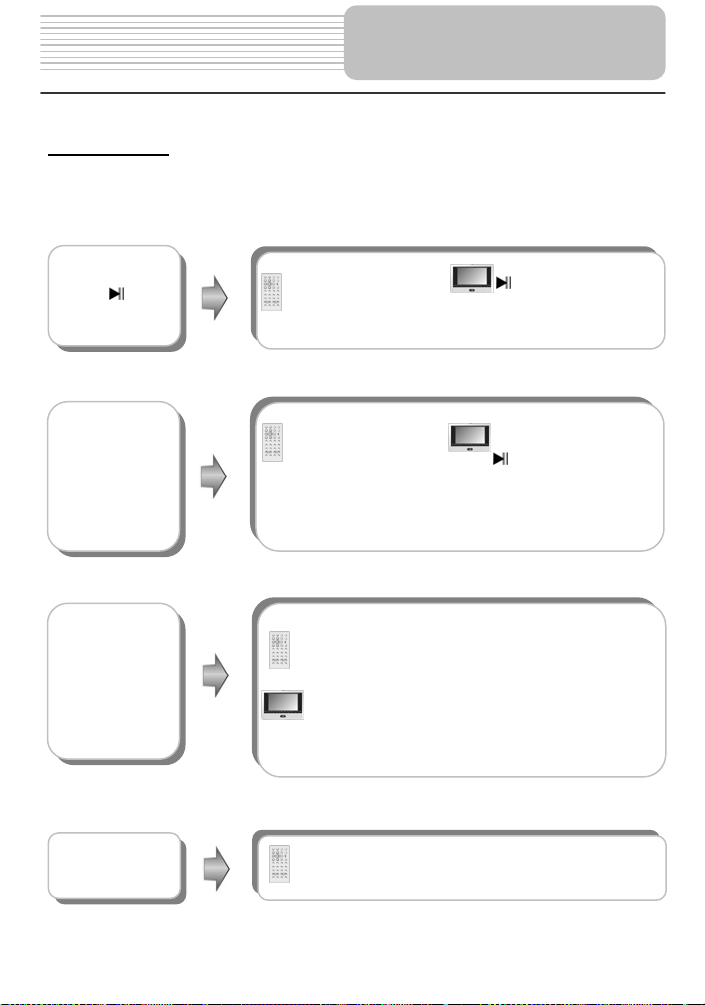
Press ENT button
to start playing.
Press button to
pause during play,
then press it again to
resume normal play.
During playback,
pressbutton once
to stop playing, then
press button to
resume normal
playback from the
stopped point. Press
it twice repeatedly
to stop playback
completely. Then
press button, the
player will play from
the beginning.
21
Page 22
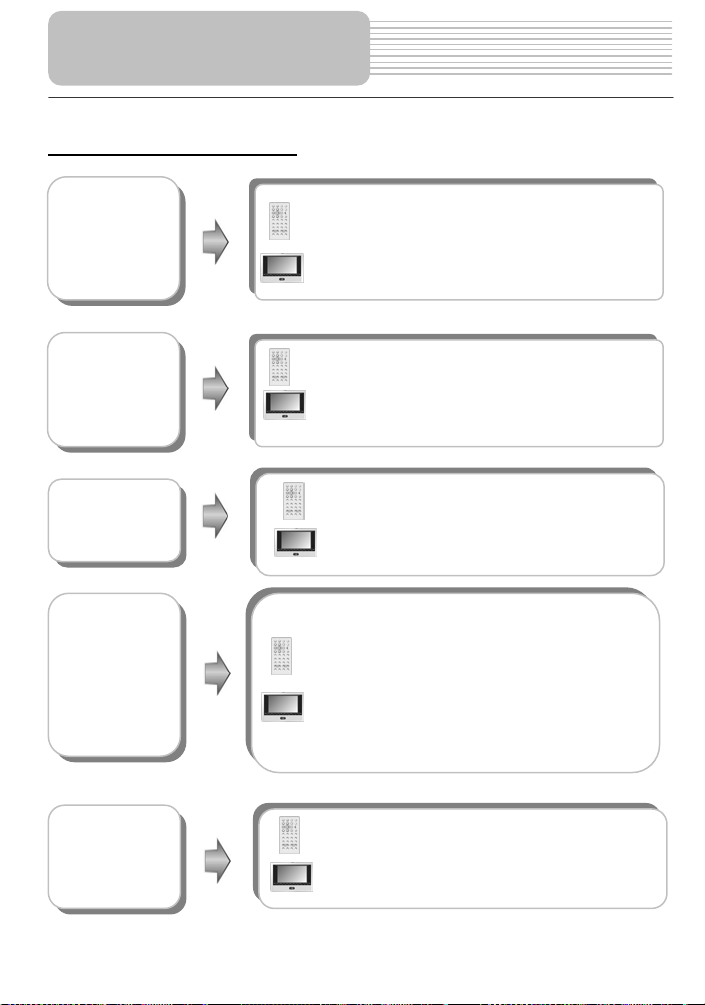
Playback Operation
DVD Playback (continued)
TITLE button
MENU button
& buttons
& buttons
SLOW button
Press TITLE button during play. The title menu will
appear on the screen.
Press (direction buttons) to select the title
or disc menu item you wish to play, then press
ENTER button to confirm your selection. Or press 0-9
buttons to select the item you prefer directly.
Press MENU button during play. The root menu will
appear on the screen.
Press (direction buttons) to select the item
you wish to play, then press ENTER button to confirm
your selection. Or press 0-9 buttons to select the item
you prefer directly.
Press button to go to the beginning of the
previous chapter.
Press button to play the next chapter.
Press thebutton to start fast forward playback.
Press it repeatedly to fast forward at the speed of
2X, 4X, 8X, 16X and normal playback in
sequence. Press the button to fast reverse.
Press it repeatedly to fast reverse at the speed of
2X, 4X, 8X, 16X and normal playback in
sequence.
Press the PLAY button to resume normal
playback.
Press SLOW button repeatedly, the slow playback
will be under going at the speed of 1/2, 1/4, 1/8,
1/16 and normal playback in sequence. Press the
PLAY button to resume normal playback.
22
Page 23
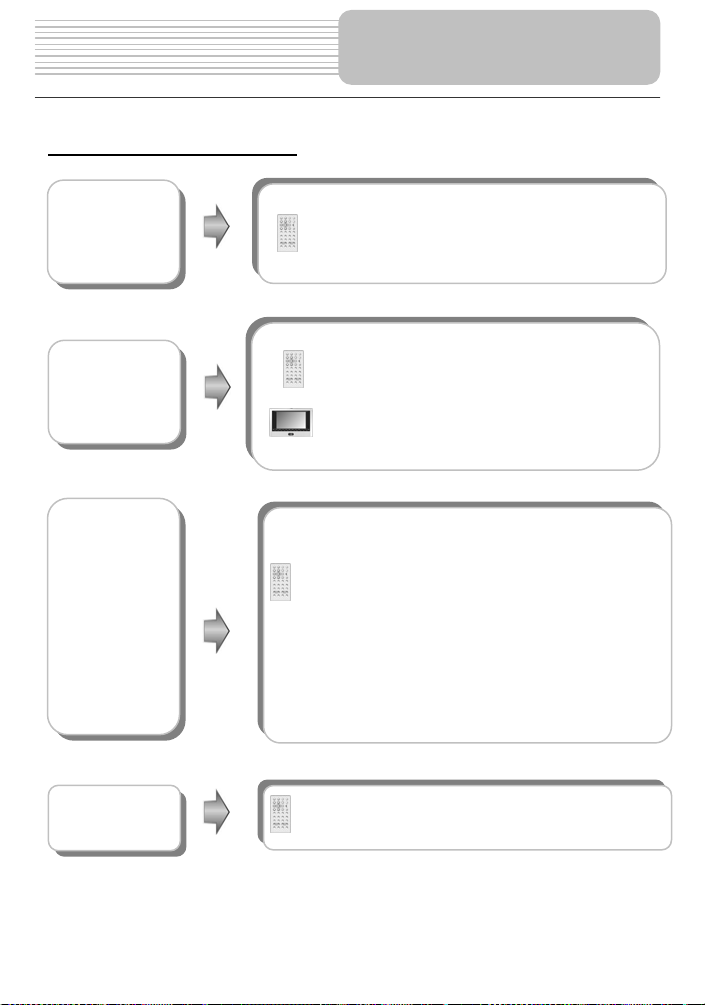
DVD Playback (continued)
INFO button
AUDIO button
SUBT button
REP button
Playback Operation
Press INFO button repeatedly for different detailed
information about the disc during the disc playback
and to cancel the information.
DVD discs can contain up to 8 audio bit streams.
For example: English, French etc.
To select the audio bit stream you prefer, press
AUDIO button during playback. The DVD player
will play the next audio bit stream if exists every
time you press AUDIO button in succession.
NOTE: This function is available for DVD discs
recorded with multi-audio languages.
When a DVD disc is playing, press SUBT button to
select a subtitle language or to turn the subtitle off. A
DVD disc can be recorded with up to 32 subtitles.
Press SUBT button repeatedly, the mode of subtitles
will recycle as follows:
SUBTITLE 1/N: Subtitle 1 appears on the screen.
SUBTITLE 2/N: Subtitle 2 appears on the screen.
SUBTITLE */N: Subtitle * appears on the screen
SUBTITLE OFF: No subtitle.
“N” refers to the total number of subtitles that the current
disc contains.
NOTE: This function is available for DVD discs
recorded with multi-subtitles
Press REP button to repeat a Chapter, Title or
cancel the repeat in sequence.
23
Page 24
Playback Operation
DVD Playback (continued)
ANGLE
button
GOTO button
Press ANGLE button to play the disc in multi-angle.
Multi-angle means that a scene is shot from different
angle so that audience can watch from any angle, like
the drawings below:
If there are multiple angles in a scene, you can use the
ANGLE button to select the angle you like to enjoy.
Press the ANGLE button repeatedly to view from
different angle.
NOTE: This function is only available for the DVD disc
that coded with multi-angles.
Press GOTO button to select desired disc title,
chapter or time.
Use or direction button to move the blue bar to
TITLE, CHAPTER or TIME.
Use 0-9 number buttons to enter the desired title,
chapter or time directly. And press ENTER button to
confirm. Then the player will begin playing from the
selected title, chapter or time.
Press it repeatedly to cancel the item.
24
Page 25
Playback Operation
button
During playback, press
PAU SE button to pause
the playback, then press
PLAY button to resume
playback.
During playback, press
the STOP button once
to stop playback. Then
press PLAY button, the
player will resume
playback from the
stopped point. Press
this button twice to stop
playback completely.
Press the button to start fast forward playback.
Press it repeatedly to fast forward at the speed of 2X,
4X, 8X, 16X and normal playback in sequence. Press
the button to fast reverse. Press it repeatedly to
fast reverse at the speed of 2X, 4X, 8X, 16X and
normal playback in sequence.
Press the PLAY button on the remote control to
resume normal playback.
Press REP button repeatedly to repeat a Track, All
or cancel the repeat.
25
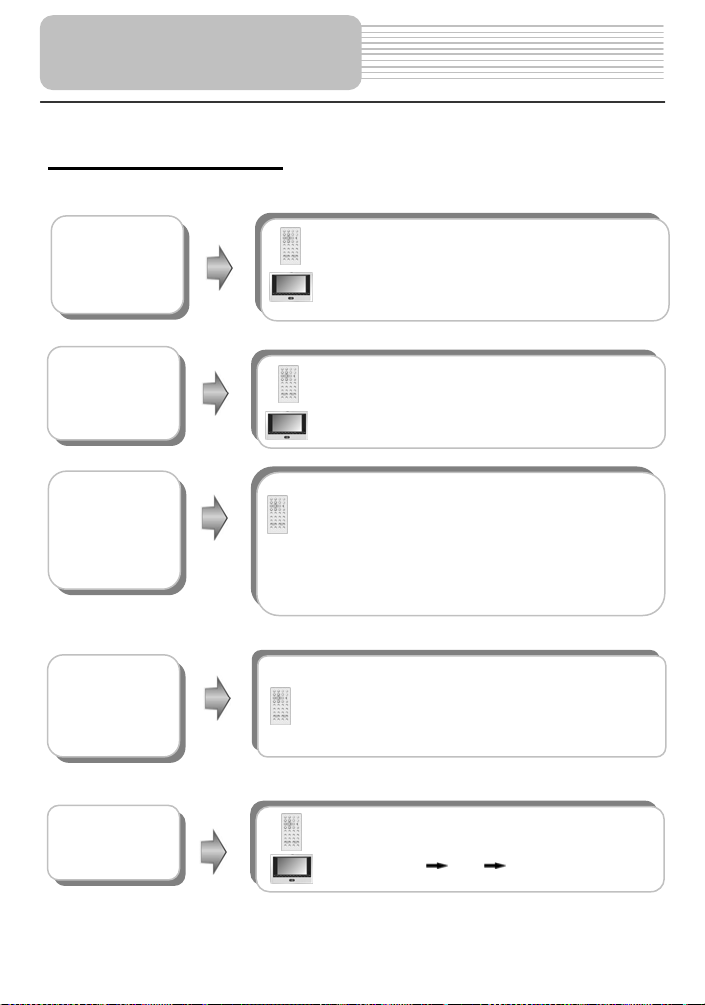
During playback, press
button once to pause
the playback, then press
it again to resume
playback.
During playback, press
button once to stop
playback. Then press
button, the player will
resume playback from
the stopped point. Press
button twice to stop
playback completely.
CD Playback
When a CD disc is loaded, the player will play it automatically by the default sequence of
the disc. You can use , or number buttons to select a certain track to play.
Pause/
STOP/ button
& buttons
REP button
Page 26
Playback Operation
CD Playback (continued)
A-B button
&buttons
GOTO button
INFO button
AUDIO button
Press A-B button once to set the starting point A,
press it again to set the end point B. Then the
player will play the segment between A and B
continuously. Press this button a third time to stop
the A-B repeat.
Press button to play the previous track.
Press button to play the next track.
Press GOTO button to select desired track, track time
or disc time.
Use or direction button to move the blue bar to
track time, track or disc time
Use 0-9 buttons on the remote control to enter the
desired time and press ENTER button to confirm.
Press it repeatedly to cancel the item.
Press INFO button for detailed information about the
disc during playback. Press it again to cancel the
information.
Press AUDIO button to select desired sound effect.
Press it repeatedly, the display will be as follows:
STEREO LEFT RIGHT
26
Page 27
Playback Operation
Picture CD Playback
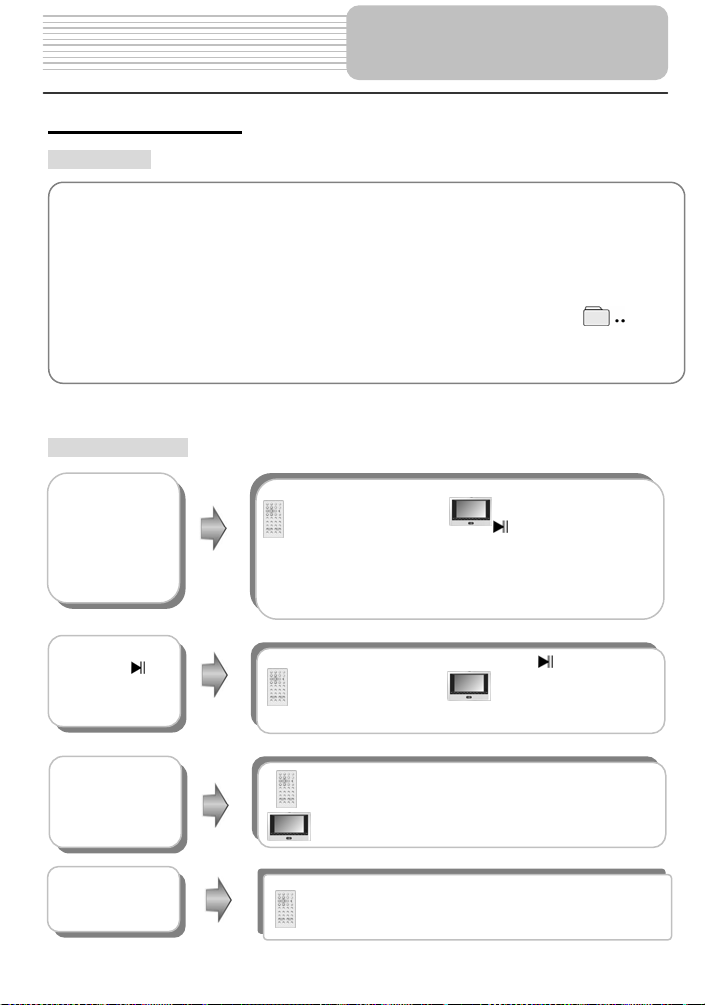
Pre-operation
1. Load a Picture CD in the disc tray, the player will search for disc automatically.
2.The screen displays the Root Folder with several subdirectories/subfolders. Use,
buttons to select a desired folder. Then press ENTER button on remote control or front
panel to confirm your selection.
3.The screen enters the selected subfolder with several pictures. Use, buttons to select
the desired picture. Then press ENTER button on remote control or front panel to confirm
your selection.
4.Pressbutton to return to last folder or directory. Or move the yellow bar to , then
press ENTER button on remote control or front panel to return to the last folder or
directory.
Note: Many discs have other items besides pictures.
Buttons Operation
STOP/
button
PAUSE/
button
& buttons
REP button
During playback, press
the STOP button once
to stop playback. Then
press PLAY button, the
player will resume
playback from the
stopped point. Press
this button twice to stop
playback completely.
Press PAUSE button to
pause during playback.
Press PLAY button to
resume normal playback.
During playback, press the PREV button to go to
the previous picture. Press NEXT button to go to
the next picture.
Press REP button to repeat a track, all or cancel the
repeat.
27
During playback, press
button once to stop
playback. Then press
button, the player will
resume playback from
the stopped point. Press
button twice to stop
playback completely.
Press button to
pause during playback.
Press it again to
resume normal playback.
Page 28
Playback Operation
Picture CD Playback (continued)
GOTO button
While browsing a picture, you can use direction , buttons to rotate the current
picture.
Press button to rotate the current picture clockwise, as following drawings:
Press button to rotate the current picture anti-clockwise, as following drawings:
Picture Rotate
Press GOTO button to select the desired folder or
picture.
Press 0-9 buttons to select your favorite folder or
picture directly.
28
Page 29
You can change the default settings of this unit to customize its performance to your own
preference. Read this section to learn how to set up the system.
Note: the system should only be set up in the state that no disc (the disc tray should be
closed) is in the DVD drive or the unit is in the completely stop mode.
Follow the steps below to set up your system:
1.Press the SETUP button.
The setup menu will appear on the screen. It includes language setup and preferences.
You can exit from the setup menu by pressing SETUP button again at any time during the
setting.
2.Press or button to select a sub-menu that you want to set up.
3.Press or button to select the item that you want to set up in the sub-menu.
System Setup
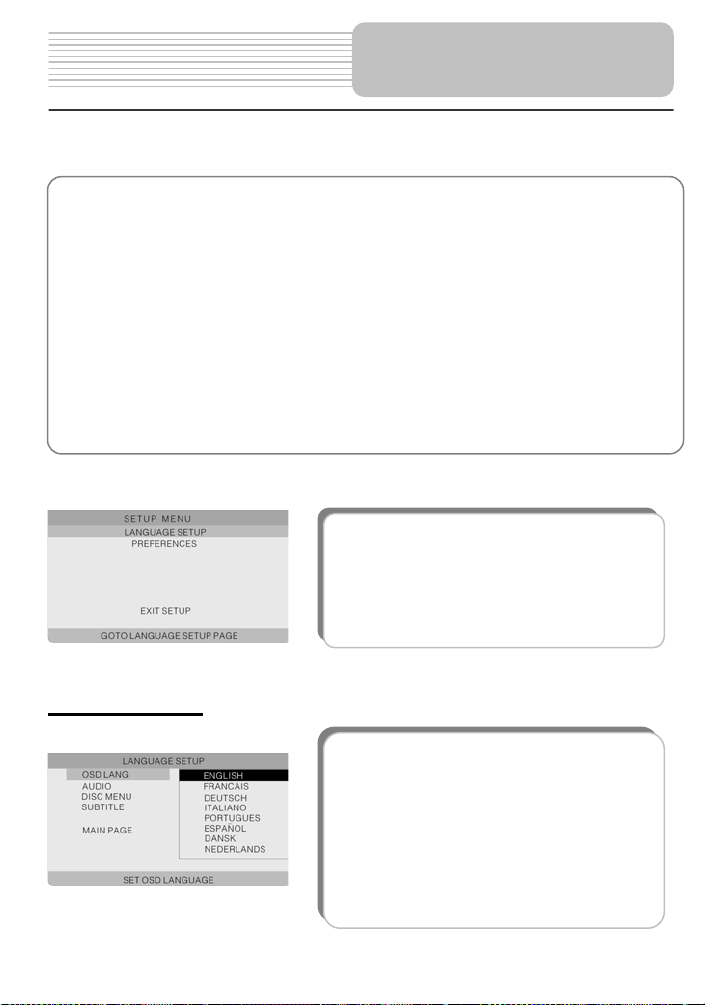
Press SETUP button, then the screen will display as
the left.
Language Setup
1. OSD LANG
This item is used to set the OSD (on-screen display)
language. Press to enter the setup of this item.
There are eight languages for you to choose.
English by default.
Press or button to choose the proper one.
Press ENT button to confirm your selection.
Press to exit from this item.
29
Page 30
System Setup
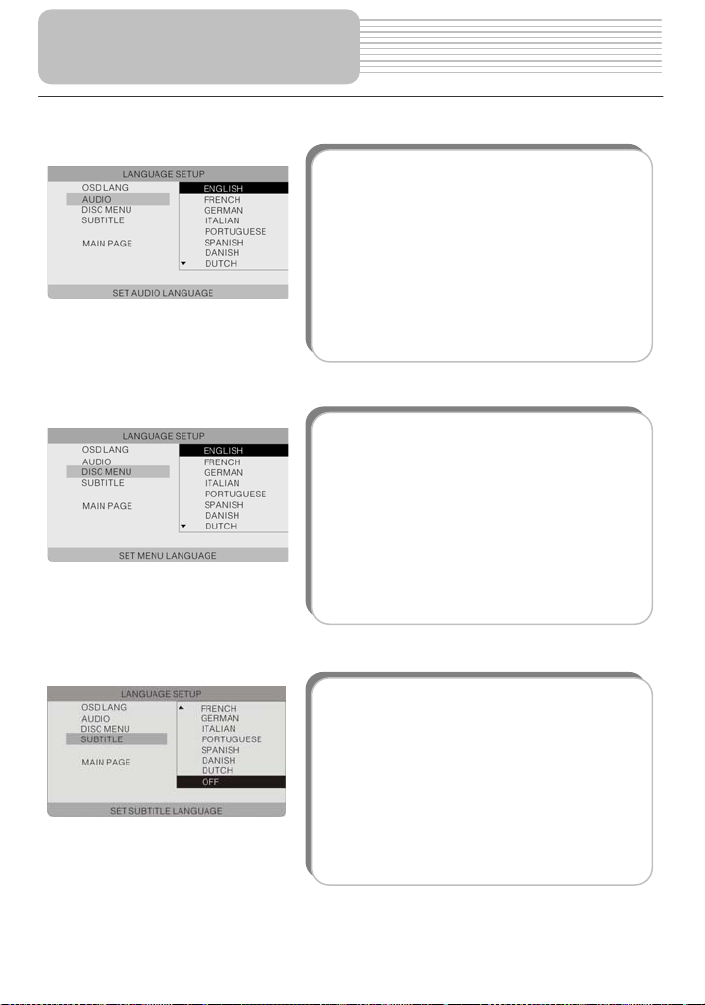
2. AUDIO
This item is used to set the audio output
language.
Press or button to highlight this item.
Pressto enter the setup of this item.
There are several languages for you to choose.
English by default.
Press or button to choose the preferred
Language.
Press ENT button to confirm your selection.
Press to exit from this item.
3. DISC MENU
This item is used to set the menu language.
Press or button to highlight this item.
Pressto enter the setup of this item.
There are several languages for you to choose.
English by default.
Press or button to choose the preferred
Language.
Press ENT button to confirm your selection.
Press to exit from this item.
4. SUBTITLE
This item is used to set the subtitle language.
Press or button to highlight this item.
Pressto enter the setup of this item.
There are several languages for you to choose.
Off by default.
Press or button to choose the preferred
Language.
Press ENT button to confirm your selection.
Press to exit from this item.
30
Page 31

Preferences
System Setup
1.TV DISPLAY
This item is used to set TV display mode.
Pressbutton to enter the setup of this item.
It includes 4:3 PS (default), 4:3 LB and 16:9,.
Press or button to choose the proper one.
Press ENT button to confirm your selection.
Pressto exit from this item.
Note: Select 4:3 PS or 4:3 LB when a 4:3 TV is
connected.
Select 16:9 when a 16:9 wide screen TV is
connected.
2. ANGLE MARK
If the scene was shot from multiple angles, you
can change the camera angle of the scene you
are watching. Not all DVD discs have this
feature.
Press or button to highlight this item.
Pressbutton to enter the setup of this item.
On (default): Select on, an angle icon will appear
on the screen. You will be notified if alternative
viewing angles are available.
Off: There will no angle icon appear on the
screen.
Press or button to select on or off. Press
ENT button to confirm your selection. Pressto
exit from this item.
31
Page 32

System Setup
3. RESUME
This item is used to set last memory state.
Note: The last memory is referred to the state
that if you press PWR button, or open the disc
tray cover by accident but still keep the disc in
during playback, then when you start playback
again, the player will begin playing from where
you are left off.
Press or button to highlight this item.
Press to enter the setup of this item.
The default setting of this item is ON.
Press or button to choose on or off.
Press ENT button to confirm your selection.
Press to exit from this item.
4. DEFAULTS
This item is used to reset the unit.
Press or button to highlight this item.
Press to enter this item.
Press ENT button to reset.
Then all the settings of your unit are back to the
original state.
32
Page 33

Use of Straps
Follow the steps below to fix the DVD Player onto the back of a car seat headrest.
1. Place the DVD player on a soft and smooth surface with the bottom facing up.
2. Loosen the strap and remove the buckle from the strap.
3. Insert the strap through the holes as in Fig.1. Make sure the inside of the strap
faces up.
4. Thread the strap into the buckle as in Fig.2 and Fig.3. After threading, make sure
the outside of the buckle faces up.
33
Page 34

5. Repeat these steps for the other strap.
6. Adjust the length of the straps according to the car seat.
7. Fasten the straps on the headrest of the seat as in Fig. 4. Make sure the two straps
are between the headrest support rods (if your car has them).
NOTE: The drawings show the outside and the inside of the buckle and the strap.
Use of Straps
Outside
Inside
Outside
Inside
34
Page 35

Letterbox screen
This refers to a screen on which the playback picture of wide-screen DVDs appears with black
bands running along the top and bottom.
Pan & Scan screen
This refers to a screen on which the playback picture of wide-screen DVDs is cut off at the left and right
sides.
Title, Chapter (DVD)
DVDs are divided into some large sections (titles) or some small sections (chapters). Each
section is numbered: these numbers are called "Title number" or "Chapter number".
Title 1 Title 2
Chapter1 Chapter 1
Chapter2
…… ……
Track (CD)
CDs are divided into some sections (tracks). Each section is numbered; these numbers are
called "Track number".
Track 1 Track 2 Track 3 ……
JPEG
JPEG is a common picture format that has
small file size and low quality loss rate of
picture. Hundreds of pictures can be stored
in a disc in this format. In order to utilize real
digital album, use film to make a "PICTURE CD"
in JPEG format.
35
Definitions
Page 36

Troubleshooting
Take steps described in the tables below to solve simple problems before contacting
after-sales service.
If You Suspect Something Wrong, immediately turn the power off.
Disconnect the power connector and check that there is neither smoke nor heat from the unit
before asking for repairs. Never try to repair the unit by yourself because it is dangerous to do
so.
PROBLEM
The player cannot
play.
There is no sound
POSSIBLE CAUSE
The disc cover may not be
closed.
There may not be any discs
in the DVD drive.
The disc may not be put in
with the right way.
The disc may be dirty or
warped.
The player's region code
may not as the same as the
region code of DVD disc.
There may be water on the
lens.
The system connection may
be not correct.
The speaker may not be
turned on.
The sound setup of the DVD
disc may be not correct.
The disc may be dirty or
warped.
36
POSSIBLE SOLUTION
Close the disc cover.
Put a disc in to the DVD drive.
Put the disc in with the label
side up.
Clean or change the disc.
Make sure the player's
region code is the same as
the region code of DVD disc.
Remove the disc and keep
the player being powered off
for at least two hours.
Connect the system
correctly.
Turn on the speaker.
Setup the sound of the DVD
correctly.
Clean or change the disc.
Page 37

PROBLEM
There is no picture.
Poor AV performance.
The remote control
does not work
POSSIBLE CAUSE
The LCD may be off or not
be in correct video mode.
The system connection may
be not correct.
The unit may be not in AV
out mode.
The disc may be dirty or
warped.
There may be some
obstructions between the
remote control and the
player.
The remote control may not
be pointed at the player.
The batteries of remote
control may not be inserted
correctly.
The batteries of remote
control may be out of power
or weak.
Other possibilities:
Static or other external interference may cause the player function abnormally. In order to
recover normal status, unplug the power-supply cord and then plug it into the outlet again to
reset the player. If the problems still exist, cut off the power supply and consult your service
center or the qualified technician.
Troubleshooting
Turn on the LCD and choose
the correct video mode.
Connect the system
correctly.
Switch AV tab on the bottom
of the unit to out.
Clean or change the disc.
Remove the obstruction
between the remote control
and the player.
Point the remote control at
the player directly.
Make sure the polarity of
each battery is correct.
POSSIBLE SOLUTION
Replace the batteries.
37
Page 38

Specifications
TFT screen size 7 inches
Laser Wavelength 780/650 nm
Video System NTSC
Frequency Response 20Hz-20kHz ±2.5dB
Audio Signal-to-noise Rate ≥85dB
Audio distortion+noise ≤-70dB (1kHz)
Channel Separation ≥70dB (1kHz)
Dynamic Range ≥80dB (1kHz)
Audio Out
Video Out Video Out
Power AC 120V ~ 50Hz
Analog Audio
Out
Output Level: 1.5V±
Output Level:1V
Unbalanced Negative
0.2
, Load: 10KΩ
1.0
±0.2, Load: 75Ω
P-P
Power Consumption < 25W
Dimensions 230mmX154mmX40mm (L*W*D)
Weight About 0.85kg
DESIGN AND SPECIFICATIONS ARE SUBJECT TO CHANGE WITHOUT NOTICE
“Dolby” and the double-D symbol are trademarks of Dolby Laboratories.
Confidential unpublished works. © 1992 -1997 Dolby Laboratories, Inc.
Manufactured under license from Dolby Laboratories.
All rights reserved.
38
Page 39

For service, support and warranty information, visit www.Polaroidelectronics.com
or in the US call 1-886-289-5168, in Canada call 1-886-301-7922 and in Mexico call
01-800-400-2443.
“Polaroid” is a registered trademark of Polaroid Corporation of Waltham, MA USA.
39
Page 40

7”
Portable DVD Player PDM-2727
Extra
Screen
1
Page 41

Contents
Contents
Safety Instructions
View of Front Panel
View of Side Panel
System Connection
Power Supply Preparation
Troubleshooting
Specifications
………………………………………………………..2
………………...…………………………………….3
…………………………………...………………….4
……...……………………………………………….5
……...……………………………………………….6
……………………………………………………….7
……………………………………………………….8
……………………………………………………….9
2
Page 42

Safety Instructions
The lighting flash with arrowhead symbol, within a triangle, alerts the user
to “dangerous voltage” which could cause electric shock.
The exclamation point within a triangle is indicates to the user to read
important operating and maintenance instructions in the manual.
Notes
1) Read these instructions.
2) Keep these instructions.
3) Heed all warnings.
4) Follow all instructions.
5) Do not use near water.
6) Clean only with dry cloth.
Do not block any ventilation openings. Maintain well-ventilated conditions around the
7)
product. Do not put product on bed, sofa or anything that blocks ventilation. Install in
accordance with the manufacturer’s instructions.
8) Do not install near any heat sources such as radiators, heat registers, stoves, or other
apparatus (including amplifiers) that produce heat.
9) This unit is equipped with a polarized plug. A polarized plug has two blades with one
wider
than the other. A grounding type plug has two blades and a third grounding
prong. The wide blade or the third prong is provided for your safety. If the plug
provided doesn’t fit in your outlet, consult an electrician for replacement of the
obsolete outlet. Removal of the polarized plug will diminish the plugs level of safety.
10) Protect the power cord from being walked on or pinched particularly at plugs,
convenience receptacles, and the point where they exit from the apparatus.
11) Only use attachments/accessories specified by the manufacturer.
12) Use only with the cart, stand, tripod, bracket, or table specified by the manufacturer , or
sold with the apparatus. When a cart is used, use caution when
moving the cart/apparatus combination to avoid injury from tip-over.
13) Unplug this apparatus during lightning storms or when unused for long periods of
time.
14) Refer all servicing to qualified service personnel. Servicing is required when the
apparatus has been damaged in any way, for example, power-supply cord or plug is
damaged, liquid has been spilled or objects have fallen into the apparatus, the
apparatus has been exposed to rain or moisture, does not operate normally, or has
been dropped.
15) Apparatus should not be exposed to dripping or splashing and no objects filled with
liquids, such as vases, should be placed on the apparatus.
Note: Do not touch the color TFT LCD screen by hand directly.
3
Page 43

View of Front Panel
1. POWER button
Press to access to or exit from the standby mode.
2. -/+ button
Press to adjust the value of brightness and color
3. MODE button
Press to change the brightness and color level, press and hold for 1-2 seconds to
change the aspect ratio.
4. Speaker
5. Power Indicator
In normal playback status, it doesn’t indicate and it turns red in standby mode.
6. LCD Screen
4
Page 44

View of Side Panel
1. Volume Control
Used to adjust the volume of the headphone and speaker.
2. Headphone Jack
Used to connect headphones for private listening. When the headphones are
connected to this jack, the speaker will be turned off automatically.
3. Audio Input Jack
Used for audio input.
4. Video Input Jack
Use for video input.
5. DC 9.5V Output Jack
Used for output power to the master DVD player.
6. DC 9.5V Input Jack
Used to connect the power adapter, including the car adapter.
5
Page 45

System Connections
Connect to Master DVD player
1. Make sure that the master DVD player, slave LCD screen and any other electrical
equipment are off before connection.
2. Connect the AC adapter to the slave LCD screen and connect the slave LCD screen
with the master DVD player using power supply cord to supply power to the master
DVD player.
3. Use audio and video cables t o connect the slave LCD screen with the master DV D
player so that the master DVD player can input audio and video to the slave LCD
screen.
Please see the figure below for details.
Note: The AC adapter must connect to the slave LCD screen, or the slave screen will
have no power supply.
Connecting to Headphones
Connect the headphones to the right side of the player for private listening.
When headphone is connected, the speakers will automatically turn off.
6
Page 46

Power Supply Preparation
Using the AC Adapter
1. Connect AC adapter to the jack marked DC IN on the right side of the slave LCD
screen in, as shown below.
2. Plug the two-prong end of the power cord into a grounded electrical outlet.
Note: Turn player's power off before unplugging.
Using of Car Adapter
Connect the Car Adapter Power Plug to the slave LCD screen’s power jack and plug the
other end to the vehicle’s cigarette socket as the figure shows below.
Attention
¾
Do not operate the unit or view video software while driving a vehicle.
¾
Place the unit in a proper position for viewing.
¾
Disconnect the player from the Car Adapter when starting the vehicle.
7
Page 47

Troubleshooting
SYMPTOM HOW TO CHECK
- Make sure system connection is correct.
There is no sound.
There is no picture.
Others possibilities:
Static or other external interference may cause the unit display abnormally. In order to recover
normal status, unplug the power-supply cord and then plug it in to reset the unit. If the problems
still exist, disconnect the power and consult your service center or a qualified technician.
- Make sure the speakers are turned on.
- Make sure the audio source is correct.
- Make sure LCD screen is on and in c orrect v ideo m ode.
- Make sure your system connection is correct.
- Make sure the video source is correct.
8
Page 48

Specifications
TFT screen size 7 inches
Video System NTSC
Frequency Response 20Hz-20kHz ±2.5dB
Power DC 120V~50/Hz
Power Consumption <25W
Dimensions 230mm x 154mm x 22mm (L*W*D)
Weight 0.37kg
DESIGN AND SPECIFICA TIONS ARE SUBJECT T O CHANGE WITHOUT NOTICE
For service, support and warranty information, visit www.Polaroidelectronics.com
or in the US call 1-886-289-5168, in Canada call 1-886-301-7922 and in Mexico call
01-800-400-2443.
“Polaroid” is a registered trademark of Polaroid Corporation of Waltham, MA USA.
9
Page 49

Reproductor
portátil de DVDs de 7” PDM-2727
1
Page 50

Instrucciones de
seguridad Importantes
RIESGO DE DESCARGAS ELÉCTRICAS
PRECAUCIÓN
NO LO ABRA
ELÉCTRICAS
PRECAUCIÓN: PARA REDUCIR EL RIESGO DE DESCARGA ELÉCTRICA, NO
QUITE LA CUBIERTA NI LA PARTE TRASERA. EL INTERIOR NO CONTIENE
PARTES QUE EL USUARIO PUEDA REPARAR. ENCARGUE LAS
REPARACIONES A PERSONAL CUALIFICADO.
El símbolo en forma de rayo con punta de flecha en el interior de un triángulo
equilátero tiene la función de alertar al usuario de la presencia de “voltaje
peligroso” no aislado en el interior del producto, el cual puede tener la magnitud
suficiente para constituir un riesgo de descarga eléctrica.
El signo de exclamación en el interior de un triángulo equilátero tiene la
intención de alertar al usuario de la existencia de importantes instrucciones de
mantenimiento y operación en la documentación que acompaña al aparato.
ADVERTENCIA: PARA REDUCIR EL RIESGO DE INCENDIO O DE DESCARGA
ELÉCTRICA, NO EXPONGA ESTE APARATO A LA LLUVIA NI A LA HUMEDAD.
PRECAUCIÓN: Radiación de laser. No mire fijamente el laser
procedimientos otro que ésos especificados puede dar lugar a la exposición de radiación
peligrosa.
SUMINISTRO DE CORRIENTE:
Conecte el adaptador incluido en la ranura marcada “Power In” al costado del reproductor de DVD.
Enchufe el extremo con dos clavijas del cable de alimentación a un tomacorriente de CA de 100120 V. Si tiene problemas para introducir el enchufe, dele la vuelta e introdúzcalo otra vez. Si la unidad
no va a ser utilizada por un largo período de tiempo, desenchúfela del tomacorriente.
NOTA:
Antes de enchufar el cable de alimentación a un tomacorriente de CA, verifique que se han efectuado
todas las conexiones.
PRECAUCIÓN: El uso de los controles, de los ajustes, o de los
2
Page 51

Instrucciones de
seguridad Importantes
PRECAUCIÓN: Estas instrucciones para efectuar reparaciones están destinadas solamente a
personal cualificado para ello. Con el fin de reducir el riesgo de descargas eléctricas, debe efectuar
exclusivamente el mantenimiento explicado en las instrucciones de funcionamiento, a menos que
esté cualificado para efectuar mantenimientos de otro tipo.
Para obtener instrucciones relativas a la realización del mantenimiento, consulte el manual para
ello.
1. Lea estas instrucciones.
2. Guarde estas instrucciones.
3. Respete todas las advertencias.
4. Siga todas las instrucciones.
5. No lo use cerca del agua.
6. Límpielo solamente con un paño seco.
7. No bloquee ninguna de las aberturas de ventilación. Mantenga el producto en condiciones que
permitan una buena ventilación a su alrededor. No lo ponga sobre una cama, sofá o nada que
bloquee su ventilación. Instálelo siguiendo las instrucciones del fabricante.
8. No lo instale en las proximidades de fuentes de calor, tales como radiadores, rejillas de
calefacción, estufas u otros aparatos (incluyendo amplificadores) que producen calor.
9. No soslaye el propósito de seguridad del enchufe polarizado o con conexión a tierra. Los
enchufes polarizados tienen dos clavijas planas, una más ancha que la otra. Los enchufes con
conexión a tierra tienen dos clavijas planas y una tercera clavija de conexión a tierra. La clavija
plana ancha o la tercera clavija se proporcionan por su seguridad. Consulte a un electricista para
que reemplace y actualice el tomacorriente si el enchufe que se proporciona no puede entrar en
él.
10. Proteja el cable para que no se pise, ni se contraiga, en particular a la altura de los enchufes, la
toma de corriente y el punto en el que sale del aparato.
11. Use solamente aditamentos/accesorios especificados por el fabricante.
12. Úselo solamente con el carrito, la mesita, el trípode, el soporte o la mesa especificados por el
fabricante o que se venden con el aparato. Al usar un carrito, tenga cuidado cuando
mueva la combinación de carrito/aparato para impedir que se vuelque y cause
lesiones.
13. Desenchufe este aparato cuando haya tormenta eléctrica o cuando no se use por
largos períodos de tiempo.
14. Remita la reparación a personal cualificado. Es necesario reparar el aparato cuando haya sido
dañado de cualquier manera como, por ejemplo, si el cable de alimentación o el enchufe se
encuentran dañados, si se derramó líquido o han caído objetos dentro del aparato, si éste estuvo
expuesto a la lluvia o a la humedad, si no funciona normalmente o si se cayó.
15. El aparato no debe estar expuesto a goteos ni salpicaduras y no se deben colocar sobre él
objetos que contengan líquido, como jarrones.
Nota: No toque con las manos o los dedos la pantalla de cristal líquido TFT a color
3
Page 52

n
t
Instrucciones de
seguridad Importantes
Protección de copyright
Se prohíbe la copia, difusión, muestra pública, y empréstito no autorizados de los discos. Este
producto incorpora tecnología para la protección del copyright que se encuentra protegida por
exigencias de ciertas patentes estadounidenses y otros derechos de la propiedad intelectual que son
propiedad de Macrovision Corporation y otros propietarios de derechos. El uso de esta tecnología de
protección del copyright debe ser autorizado por Macrovision Corporation y está indicado solamente
para su uso en el hogar y en otros casos de exhibición limitada, a menos que Macrovision Corporation
autorice un uso diferente. Se prohíbe la ingeniería reversa o el desmontaje del aparato.
Información sobre el código de región: Los reproductores y discos de DVD están codificados por
regiones. Si el número de región indicado en el DVD no corresponde al código de región de este
producto, no se podrá reproducir el disco. El código de región de este aparato es el 1.
DE IMPORTANCIA PARA LOS PRODUCTOS DE RAYOS
LÁSER
1. PRODUCTO DE RAYOS LÁSER CLASE 1
2. PELIGRO: Cuando está abierto y el sistema de intertraba
se aplica o falla, ocurre radiación láser visible. Se debe evi
exponerse directamente al rayo.
3. PRECAUCIÓN: No abra la cubierta superior. Dentro de la
unidad no hay piezas a ser reparadas por el usuario.
Todas las reparaciones deben ser realizadas por personal
cualificado.
Esta unidad se conforma con la regulación del FDA para el
control de la radiación de los productos del laser.
4
Page 53

Características
Funciones de reproducción avanzadas
Compatibilidad: compatible con DVD,
CD y CD de imágenes.
Visualización en pantalla: escoja el
idioma de la visualización en pantalla:
inglés, español, francés, alemán o
italiano.
Funciones: varias velocidades, avance
rápido, rebobinado rápido y avance
lento.
Reproducción de la última memoria:
esta unidad memorizará el sitio en
donde la reproducción se detuvo y, una
vez que la energía sea restablecida, la
continuará a partir del mismo sitio
(siempre y cuando la bandeja del disco
no esté abierta).
Búsqueda por tiempo: busque una
pista determinada del disco
seleccionando el tiempo
correspondiente.
Funciones especiales: cambio de la
relación de aspecto de la pantalla,
diversos ángulos e idiomas.
Alta resolución: el formato de
descodificación MPEG-2 obtiene una
resolución horizontal de más de
500 líneas.
Interruptor adaptador de voltaje: se
adapta automáticamente a los
requisitos de voltaje de EE.UU.
5
Page 54

Accesorios
ARTÍCULO
NOMBRE
CANTIDAD
Control remoto (con baterías)
1
Instrucciones de uso
Cable de audio / video
Adaptador de voltaje
Adaptador para vehículo
Cable de alimentación
Consola de juegos
Cinta
Audífono
1
2
1
1
1
4
2
1
NOTA
Debido a la constante incorporación de mejoras, los accesorios y sus números de
referencia pueden cambiar sin previo aviso.
6
Page 55

Vista de l
Control
Instrucciones de seguridad
Características
Accesorios
Vista del panel delantero
Vista de los paneles laterales
a parte inferior del
aparato principal
remoto
Conexiones del sistema
Preparación del suministro de corriente
Información sobre los discos
Reproducción de discos
Reproducción de DVD
Reproducción de CD
Reproducción de CD
de imágenes
Configuración del sistema
Uso de las correas
Definiciones
Resolución de problemas
Especificaciones
Índice
…………………………………….……..2
…………………………………………...5
…………………………………………...6
…………………………………………...8
……………………………………….…..10
…………………………………………..12
…………………………………………..13
…………………………………………..16
…………………………………………..18
…………………………………………..19
…………………………………………..20
…………………………………………..21
…………………………………………..25
…………………………………………..27
…………………………………………..29
…………………………………………..33
…………………………………………..35
…………………………………………..36
…………………………………………..38
7
Page 56

Vista del panel delantero
Botón PLAY/PAUSE (Reproducción/Pausa)
1.
2. Botón ■ (Stop)
3. Botón SLOW (Lento)
4. Botón A-B Repeat (Repetir A-B)
5. Botón TITLE (Título)
6. Botón MENU (Menú)
Púlselo una vez para pausar la reproducción; púlselo nuevamente para reanudarla.
Púlselo para detener la reproducción. Seguidamente, pulse el botón
reanudar la reproducción desde el punto de parada. Púlselo dos veces para detener
completamente la reproducción.
Púlselo para activar la función de reproducción lenta.
Púlselo para reproducir repetidamente un segmento seleccionado.
Púlselo para ver el menú de títulos del disco (si existe).
Púlselo para visualizar o anular el menú.
para
8
Page 57

7. Botón ◄/
Púlselo para seleccionar diferentes opciones o para regresar a la lista, pista o
capítulo anteriores.
8. Botón ▲/
Púlselo para seleccionar diferentes opciones o para búsquedas de avance rápido.
9. Botón ▼/
Púlselo para seleccionar diferentes opciones o para búsquedas de retroceso rápido.
10. Botón ►/
Púlselo para seleccionar diferentes opciones o para pasar a la lista, pista o capítulo
siguientes.
11. Botón Setup (Configuración)
Púlselo para entrar en la configuración del sistema del reproductor.
12. Botón ENT
Púlselo para acceder a la reproducción o para confirmar su selección.
13. Botón AUDIO (Señal sonora)
Púlselo para seleccionar diversos idiomas (dependiendo de los que estén
disponibles en el disco en cuestión) Púlselo para seleccionar una pista de audio
diferente al reproducir un CD.
14. Botón -/+
Púlselo para ajustar el nivel de brillo y el color.
15. Botón FUNC (Función)
Púlselo para cambiar los niveles de brillo y color; púlselo durante 1-2 segundos para
modificar las proporciones de la pantalla.
16. Bocina
17. Sensor del control remoto
18. Pantalla de cristal líquido (LCD)
Vista del panel delantero
9
Page 58

Vista de los paneles
laterales
Vista lateral derecha
1. Control de Volumen
Sirve para ajustar el volumen del audífono y de la bocina.
2. Toma para audífonos
Permite conectar audífonos para audición privada. La conexión de los audífonos a
esta toma desactiva la bocina automáticamente.
3. Toma de salida de audio
Sirve para la salida de audio.
4. Toma de salida de la señal de video
Sirve para la conexión con un monitor externo.
5. Toma para entrada de 9,5 V de CC
Sirve para conectar el adaptador de voltaje, incluido el del vehículo.
6. Interruptor OPEN (Abrir)
Presiónelo para abrir la cubierta de la bandeja de discos.
7. Cubierta de la bandeja de discos
Una vez cargado el disco, presione la cubierta suavemente para cerrarla.
10
Page 59

Vista de los paneles
laterales
Vista lateral izquierda
1. Toma para audífonos
Permite conectar audífonos para audición privada. La conexión de los audífonos a
esta toma desactiva la bocina automáticamente.
2. Interruptor de alimentación
Sirve para encender y apagar el aparato.
11
Page 60

Vista de la parte inferior
del aparato principal
1. Contactos de la batería recargable
Para conectar el paquete de la batería recargable.
12
Page 61

1. Botón MUTE (Anulación del sonido)
Baja el volumen a su nivel mínimo. Presiónelo nuevamente para restablecer el volumen.
2. Botón INFO (Información)
Presiónelo para exhibir la información detallada del disco durante la reproducción. Presiónelo
nuevamente para salir de la pantalla de información.
3. Botón TITLE (Títulos)
Presiónelo para mostrar el menú de títulos del disco (si existe).
4. Botón de dirección
Presiónelo para seleccionar diferentes opciones.
5. Botón ENTER (Ingresar)
Presiónelo para acceder a la reproducción o para confirmar su selección.
6. Botón SETUP (Configuración)
Presiónelo para ingresar al sistema de configuraciones del reproductor.
Control remoto
13
Page 62

7. Botones de dígitos 0-9
Presiónelos para seleccionar las opciones en el menú.
8. Botón PREV (Anter ior)
Presiónelo para regresar a la lista, pista o capítulo previo. Si es un disco DVD, necesita
presionar este botón dos veces para regresar a la pista anterior.
9. Botón NEXT (Siguiente)
Presiónelo para saltar a la lista, pista o capítulo siguiente.
10. Botón SUBT (Subtítulos)
Presiónelo para seleccionar los diferentes idiomas de subtítulos, si el disco cuenta con
idiomas de subtítulo múltiples.
11. Botón ANGLE (Ángulo)
Presiónelo para acceder a varios ángulos de la cámara (si el disco de DVD los incluye).
12. Botón A-B
Presiónelo para reproducir una sección del disco desde el punto A al B. Presiónelo una vez
para seleccionar el punto de comienzo (A) y presiónelo nuevamente para seleccionar el
punto de salida (B). En una reproducción repetida de A-B, presione este botón para detener
la repetición.
13. Botón ZOOM
Presiónelo para acceder y alternar entre las funciones de zoom y utilice los botones de
dirección () para moverse en la pantalla.
14. Botón REP (Repetición)
Presiónelo para repetir un capítulo, una pista, un título o el disco completo.
15. Botón MENU
Exhibe en la pantalla el menú del disco de DVD actual en modo de reproducción.
16. Botón PAUSE (Pausa)
Presiónelo para pausar la reproducción.
17. Botón STOP (Parada)
Presiónelo para detener la reproducción. Luego, presione el botón PLAY para reanudar la
reproducción desde el punto de parada. Presione este botón dos veces para detener la
reproducción completamente.
18. Botón PLAY (Reproducción)
Presiónelo para iniciar la reproducción.
19. Botón GOTO (Ir a)
Presiónelo para seleccionar el tiempo de inicio, la pista o el título del disco que se desea
reproducir.
20. Botón 10+
Presione este botón y los botones de dígitos adicionales para seleccionar los números de las
opciones mayores al 9.
21. Botón FWD SCAN (Avance y búsqueda)
Presiónelo para una búsqueda avanzada rápida.
22. Botón REV SCAN (Rebobinado y búsqueda)
Presiónelo para buscar mediante rebobinado rápido.
23. Botón SLOW (Cámara lenta)
Presiónelo para activar la función de reproducción lenta.
24. Botón AUDIO
Presiónelo para seleccionar los diferentes idiomas al reproducir un disco DVD que contenga
múltiples idiomas de audio. Presiónelo para seleccionar una pista de audio diferente al
reproducir un disco CD.
Control remoto
14
Page 63

Procedimiento de instalación
Sigas las instrucciones a continuación para instalar la batería.
Paso 1: Jale del soporte de batería del control remoto
en el sentido de la flecha.
Paso 2: Cargue adecuadamente una nueva batería
con el (+) hacia arriba.
Paso 3: Coloque nuevamente el soporte de batería
en la posición original.
Propiedades de la batería
Tipo de batería: CR2025 3V
Vida útil de la batería: Aproximadamente 1 año en uso normal (a temperatura
ambiente).
Precaución
1. El uso incorrecto de la batería puede causar recalentamiento, explosión o
inflamación, lo que puede causar alguna lesión o provocar un incendio. Un derrame de
la batería puede dañar el control remoto.
2. No exponga la unidad de control remoto a la luz directa del sol.
3. No recargue, desarme, deforme ni caliente la batería.
4. No coloque la batería al fuego o en agua.
5. Reemplace inmediatamente la batería agotada.
Control remoto
15
Page 64

z Asegúrese siempre de que el reproductor de DVD, el televisor y cualquier otro
equipo eléctrico al que se vaya a conectar el producto, esté apagado y
desenchufado de la red eléctrica.
z Asegúrese de respetar el código de colores al conectar los cables de audio y
video.
Conexiones del sistema
Conexión a un televisor
Conexiones de audio / video
Guíese por las ilustraciones siguientes para conectar el reproductor de DVD a las
entradas de audio y video del televisor mediante los cables correspondientes.
16
Page 65

Conexiones del sistema
Conexión a un amplificador
Consulte el manual de su equipo de audio, antes de conectarlo.
Guíese por las ilustraciones siguientes para conectar el reproductor de DVD a un
amplificador de audio y video.
AMPLIFICADOR
Conexión a los audífonos
Conecte los audífonos al lado derecho del reproductor para audición privada.
La conexión de los audífonos desactiva las bocinas automáticamente.
17
Page 66

Preparación del suministro
de corriente
Uso del adaptador de CA
El reproductor cuenta con un adaptador de CA que alimenta el aparato y carga la
batería.
1. Conecte el adaptador de CA al lado
derecho del reproductor de DVD, en
la toma identificada como DC 9.5 V
IN (entrada de 9,5 V de CC), según
se muestra a la derecha.
2. Enchufe el extremo de doble clavija
del cable de alimentación a un
tomacorriente conectado a tierra.
Nota: apague el reproductor antes de desenchufarlo.
Uso del adaptador para vehículo
El reproductor cuenta con un adaptador que alimenta el aparato cuando se utiliza en un
vehículo.
Conecte el enchufe de alimentación del
adaptador a la toma de alimentación del
aparato, y el otro extremo a la toma del
encendedor, como en la figura de la
derecha.
Toma del
encendedor
Atención
¾ No utilice el aparato ni vea videos si está conduciendo un vehículo.
¾ Coloque el aparato en una posición adecuada para su visualización.
¾ Antes de arrancar el motor del vehículo, desconecte el aparato del adaptador
para vehículo.
18
Page 67

Información sobre
los discos
Formatos de disco compatibles
DVD
CD
LOGOTIPO DEL
DISCO
DIÁMETRO
12 cm
8 cm
12 cm 74 min
8 cm 20 min
DURACIÓN /
CARAS
REPRODUCIBLES
133 min (SS-SL)
242 min (SS-DL)
266 min (DS-SL)
484 min (DS-DL)
41 min (SS-SL)
75 min (SS-DL)
82 min (DS-SL)
150 min (DS-DL)
JPEG
Los fabricantes de software especifican el modo de uso de algunos DVD. Siga las
instrucciones indicadas en esos discos.
12 cm
Cuidado de los discos
Sujeción de los discos
Cuando cargue o retire los discos, no toque sus superficies de
reproducción (vea la figura a la derecha).
Limpieza
Las huellas digitales o las manchas en el disco pueden perjudicar la
calidad del sonido y la imagen. Para eliminar la suciedad de los discos,
páseles un paño suave y limpio. Si es necesario, humedezca un paño
suave con detergente neutro diluido para eliminar las manchas o las
huellas rebeldes.
No los limpie con un movimiento circular, como en la figura central de la
derecha (las rayaduras concéntricas de los surcos tienden a producir
ruidos). Pase el paño con suavidad desde el centro del disco hacia el
borde exterior, como en la figura de la derecha.
19
Page 68

LEA ATENTAMENTE LAS INSTRUCCIONES SIGUIENTES, ANTES DE UTILIZAR SU
REPRODUCTOR DE DVD POR PRIMERA VEZ.
ADVERTENCIA: la reproducción de discos en mal estado puede dañar la lente.
Reproducción de
discos
Antes de la utilización
1. Conecte el aparato a la toma de corriente con el adaptador de CA que se acompaña.
2. Coloque el interruptor de encendido / apagado (ON/OFF) del panel izquierdo en la
posición “ON” (encendido) para encender el reproductor de DVD.
3. Pulse el botón OPEN del aparato para abrir la cubierta de la bandeja de discos e
Introduzca un disco con la cara impresa hacia arriba. Cierre la cubierta.
(Vea a continuación.)
4. El reproductor explorará el disco y lo reproducirá automáticamente.
5. Ajuste el volumen al nivel deseado mediante el control VOLUME del panel derecho.
6. Para apagar el reproductor, coloque el interruptor de encendido / apagado
(ON/OFF)del panel izquierdo en la posición “OFF” (apagado).
Utilización del botón General
Botón
FUNC
Normal ANCHA 16:9
Pulse el botón FUNC para cambiar el nivel de brillo y
color. Ajuste estos valores con los botones + y – del
panel delantero. Pulse el botón FUNC durante
1-2 segundos para cambiar las proporciones de la
pantalla, entre 16:9 y 4:3. Vea más detalles a
continuación:
Normal LB/4:3 Normal ANCHA 16:9
20
Page 69

Reproducción de DVD
Funcionamiento de los botones
Botón
ENTER/ENT
Botón de
pausa
Botón de
parada
Botón ZOOM
Botón A-B
Reproducción de discos
Pulse el botón ENTER para
iniciar la reproducción o
(botones directos) o los
botones 0-9 para seleccionar
directamente el título o el
capítulo.
Pulse el botón PAUSE para
hacer una pausa durante la
reproducción y pulse luego el
botón PLAY para reanudar la
reproducción normal.
Durante la reproducción, pulse el
botón STOP una vez para parar
la reproducción y pulse luego el
botón PLAY para reanudar la
reproducción normal desde el
punto donde se interrumpió.
Pulse el botón STOP dos veces
seguidas para parar la
reproducción completamente.
Luego, cuando pulse el botón
PLAY, el reproductor reproducirá
desde el principio.
Pulse el botón ZOOM seguidamente para cambiar entre el efecto
de enfocar 1X, 2X, 3X, 4X y la reproducción normal.
Pulse una vez el botón A-B para fijar el punto de inicio A y vuelva
a pulsar para fijar el punto de finalización B. Ahora, el reproductor
reproducirá ininterrumpidamente el segmento comprendido
entre A y B. Pulse este botón por tercera vez para detener la
repetición A-B.
21
Pulse el botón ENT
para iniciar la
reproducción.
Pulse el botón para
interrumpir la reproducción
y vuelva a pulsarlo para
reanudar la reproducción
normal.
Durante la reproducción,
pulse el botón una vez
para parar la reproducción y
luego pulse el botón para
reanudar la reproducción
normal desde el punto donde
se interrumpió. Presiónelo dos
veces seguidas para detener
completamente la
reproducción. Pulse
seguidamente el botón y el
aparato reproducirá desde el
principio.
Page 70

Reproducción de discos
Reproducción de DVD (Continuación)
Botón TITLE
(Título)
Touche MENU
botones
&
Botones
&
Botón SLOW
(Lento)
Pulse el botón TITLE durante la reproducción. El menú de títulos
aparecerá en la pantalla.
Pulse (botones de dirección) para seleccionar la parte
que desea reproducir, luego pulse el botón ENTER para confirmar
su selección. O pulse los botones del 0-9 para seleccionar
directamente la parte que desea.
Appuyer sur la touche MENU au cours de la lecture. Le menu
principal s'affiche à l'écran.
Appuyer sur les touches directionnelles pour
sélectionner l’élément du menu du disque à lire, puis appuyer sur
la touche ENTER (Entrée) pour confirmer la sélection ainsi faite.
Ou appuyer sur les touches numériques 0-9 pour sélectionner
directement l'élément souhaité.
Pulse el botón para ir al principio del capítulo anterior.
Pulse el botón para reproducir el siguiente capítulo.
Pulse el botón para comenzar la reproducción en avance
rápido. Púlselo repetidamente para reproducir a velocidad de
2X, 4X, 8X, 16X y normal en secuencia. Pulse el botón para
el retroceso rápido. Púlselo repetidamente para la
reproducción en retroceso rápido a velocidad de 2X, 4X, 8X,
16X y normal, en secuencia.
Pulse el botón PLAY para volver a la reproducción normal.
Pulse varias veces el botón SLOW (lento) y la reproducción se
realizará en la secuencia de velocidades 1/2, 1/4, 1/8, 1/16 y
normal. Pulse el botón PLAY para volver a la reproducción
normal.
22
Page 71

(
Reproducción de DVD (Continuación)
Botón INFO
Botón AUDIO
Señal sonora)
Botón SUBT
(Subtítulos
ocultos)
Botón REP
(Repetición)
Mientras se reproduce un DVD, pulse el botón SUBT para seleccionar
el idioma de los subtítulos o desactivarlos. Se puede grabar un disco
de DVD con hasta 32 subtítulos.
Presione repetidamente el botón SUBT y el modo de subtítulos
reciclará como se muestra:
SUBTITLE 1/N: El subtítulo 1 aparece en la pantalla.
SUBTITLE 2/N: El subtítulo 2 aparece en la pantalla.
SUBTITLE */N: El subtítulo * aparece en la pantalla.
SUBTITLE OFF (SUBTÍTULOS DESACTIVADOS): No hay
subtítulos.
“N” se refiere al número total de subtítulos que contiene el disco
actual.
NOTA: Esta función está disponible para discos DVD que se hayan
grabado con varios subtítulos.
Reproducción de discos
Pulse el botón INFO varias veces seguidas para obtener
información detallada sobre el disco durante la reproducción del
mismo y para cancelar la información.
Los DVD pueden contener hasta 8 secuencias de bits de
señal sonora. Por ejemplo: Inglés, español, francés, etc.
Para seleccionar la secuencia de bits de audio de su
preferencia, pulse el botón AUDIO durante la reproducción.
El aparato de DVD reproducirá la siguiente secuencia de bits
de señal sonora, si existe, cada vez que pulse el botón
AUDIO secuencialmente. NOTA: Esta función se reserva a
los DVD grabados en varios idiomas.
Pulse el botón REP para alternar de manera secuencial entre
repetir un capítulo, un título, o cancelar la repetición.
23
Page 72

Reproducción de discos
Reproducción de DVD (Continuación)
Botón
ANGLE
(Ángulo)
Botón GOTO
(Ir a)
Presione el botón ANGLE para reproducir el disco en modo de
múltiples ángulos. Ángulos múltiples se refiere a una escena que ha
sido filmada desde varios ángulos, de manera que la audiencia la
pueda ver desde diversas perspectivas, como se ilustra a
continuación:
Si una escena contiene varios ángulos, mediante el botón ángulo
usted puede seleccionar el ángulo que más le plazca. Para verla
desde otra perspectiva, pulse repetidamente el botón ANGLE.
NOTA: Esta función está disponible sólo en discos DVD que
contengan material codificado con múltiples ángulos.
Pulse el botón GOTO para seleccionar el título del disco, el
capítulo o el tiempo de inicio deseados.
Use los botones direccionales o para trasladar la barra azul
a TITLE (título), CHAPTER (capítulo) o TIME (tiempo).
Use los botones numéricos 0-9 para introducir directamente el
título, capítulo o tiempo deseados. Pulse entonces el botón
ENTER para confirmar la selección. La unidad comenzará
entonces a reproducir a partir del título, capítulo o tiempo
seleccionado.
Púlselo repetidamente para borrar la función en cuestión.
24
Page 73

Reproducción de discos
Reproducción de CD
Cuando se carga un CD, el aparato lo reproduce automáticamente en el orden
preestablecido del disco. Puede usar los botones , o de números para seleccionar
determinada pista para reproducirla.
Botón de
pausa
Botón STOP
(Parada)
Botones
Botón REP
(Repetición)
&
Durante la reproducción, pulse
el botón PAUSE para hacer una
pausa y pulse luego el botón
PLAY para reanudar la
reproducción normal.
Durante la reproducción, pulse
una vez el botón STOP para
parar la reproducción. Luego,
pulse el botón PLAY y el
reproductor reanudará la
reproducción desde el punto
donde se interrumpió. Pulse
este botón dos veces para
detener la reproducción
completamente.
Pulse el botón para iniciar la reproducción rápida. Púlselo
repetidamente para reproducir a velocidad de 2X, 4X, 8X, 16X y
normal en secuencia. Pulse el botón para la reproducción en
retroceso rápido. Púlselo repetidamente para la reproducción en
retroceso rápido a velocidad de 2X, 4X, 8X, 16X y normal, en
secuencia.
Pulse el botón PLAY del control remoto para volver a la
reproducción normal.
Pulse repetidamente el botón REP para repetir una pista, todas o
cancelar la repetición.
25
Durante la reproducción,
pulse el botón una vez
para interrumpirla y vuelva a
pulsarlo para reanudarla.
Durante la reproducción pulse
el botón una vez para
detenerla. Luego, pulse botón
y la unidad reanudará la
reproducción desde el punto
donde se interrumpió. Pulse
este botón dos veces para
parar la reproducción
completamente.
Page 74

Reproducción de discos
Reproducción de CD (continuación)
Botón A-B
Botones
&
Botón GOTO
(Ir a)
Botón
INFO
Botón AUDIO
(Señal sonora)
Pulse una vez el botón A-B para fijar el punto de inicio A y vuelva
a pulsar para fijar el punto de finalización B. Ahora, el reproductor
reproducirá ininterrumpidamente el segmento comprendido entre
A y B. Pulse este botón por tercera vez para detener la repetición
A-B.
Pulse el botón para reproducir la pista anterior.
Pulse el botón para reproducir la siguiente pista.
Pulse el botón GOTO para seleccionar la pista deseada o el tiempo
de inicio de la misma, así como el tiempo preferido para el inicio del
disco.
Use los botones direccionales o para trasladar la barra azul al
tiempo de inicio de la pista, a la pista misma o al tiempo de inicio del
disco.
Use los botones 0-9 del control remoto para introducir el tiempo de
inicio deseado y pulse el botón ENTER para confirmar su selección.
Púlselo repetidamente para borrar la función en cuestión.
Pulse el botón INFO para obtener información detallada acerca del
disco mientras se reproduce. Púlselo nuevamente para borrar la
información.
Pulse el botón AUDIO para seleccionar el efecto sonoro que
prefiera.
Presiónelo repetidamente y la pantalla mostrará lo siguiente:
STEREO LEFT RIGHT
26
Page 75

Reproducción de discos
Reproducción de CD de imágenes
Antes de la utilización
1. Coloque un CD de imágenes en la bandeja y el aparato lo explorará y reproducirá
automáticamente.
2. La pantalla muestra la carpeta raíz con varios subdirectorios o subcarpetas. Use los
botones , para seleccionar una carpeta deseada. Luego pulse el botón ENTER en el control
remoto o panel frontal para confirmar su selección.
3. La pantalla abre la carpeta seleccionada con varias fotos. Use los botones , para
seleccionar la foto deseada. Luego pulse el botón ENTER en el control remoto o panel frontal
para confirmar su selección.
4. Pulse el botón para regresar a la última carpeta o directorio. O bien, desplace la barra
amarilla hasta y pulse el botón ENT para volver a la última carpeta o directorio.
Nota: Muchos discos tienen otros elementos, además de las imágenes.
Funcionamiento de los botones
Botón
STOP
(Parada)
Botón
PAUSE
(Pausa)
&
botones
Botón REP
(Repetición)
Durante la reproducción, pulse
una vez el botón STOP para parar
la reproducción. Luego, pulse el
botón PLAY y el reproductor
reanudará la reproducción
desde el punto donde se
interrumpió. Pulse este botón
dos veces para detener la
reproducción completamente.
Pulse el botón PAUSE para
hacer una pausa durante la
reproducción. Pulse el
botón PLAY para volver a la
reproducción normal.
Durante la reproducción, pulse el botón PREV para ir a la
imagen anterior. Pulse Pulse el botón NEXT para ir a la
imagen siguiente.
Pulse el botón REP para repetir una pista, repetirlas todas o
cancelar la repetición.
Durante la reproducción, pulse
una vez el botón para parar la
reproducción. Luego, pulse el
botón y la unidad reanudará
la reproducción desde el punto
donde se interrumpió. Pulse este
botón dos veces para parar la
reproducción completamente.
Pulse el botón para hacer
una pausa durante la
reproducción. Púlselo de nuevo
para reanudar la reproducción
normal.
27
Page 76

Reproducción de discos
Reproducción de CD de imágenes (Continuación)
Botón
GOTO (Ir a)
Puede utilizar los botones , para hacer rotar la imagen que esté explorando.
Pulse el botón para hacer rotar la imagen actual en sentido horario, como en las
siguientes ilustraciones:
Pulse el botón para hacer rotar la imagen actual en sentido antihorario, como en las
siguientes ilustraciones:
Use el botón GOTO para seleccionar la carpeta o archivo
deseado.
Pulse los botones GOTO para seleccionar directamente su
carpeta o archivo preferido.
Rotación de
imagen
28
Page 77
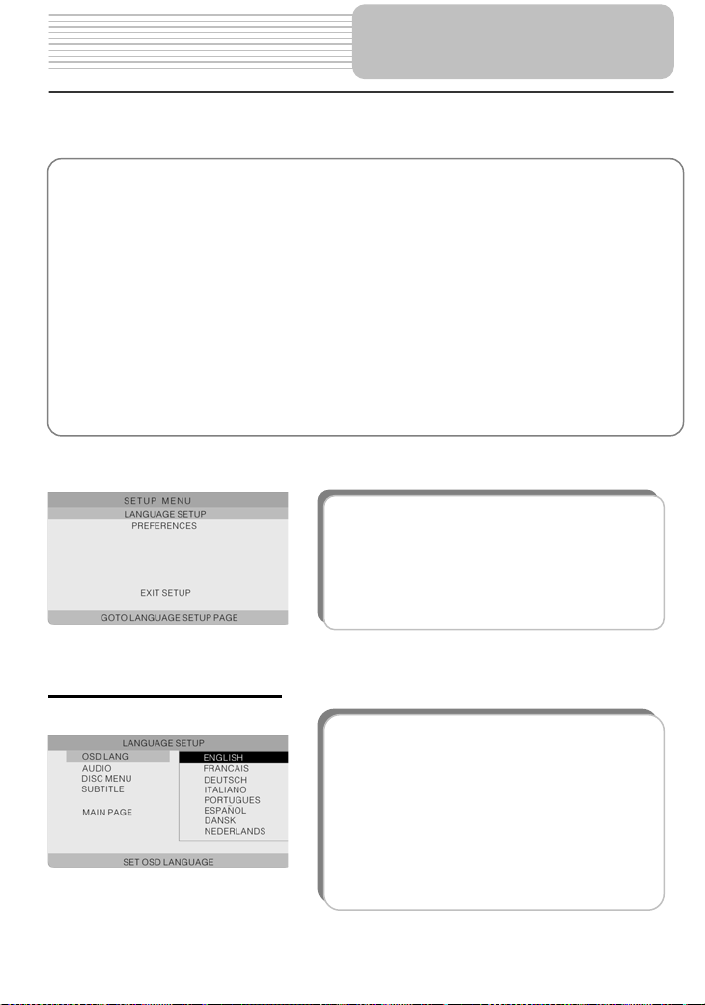
Puede cambiar los ajustes predeterminados de este aparato para adaptar su funcionamiento
a sus preferencias personales. En esta sección se explica la forma de configurar el sistema.
Nota: el sistema sólo debe configurarse sin disco (con la bandeja de discos cerrada) en el
aparato o con éste completamente parado.
Configure su sistema como sigue:
1. Pulse el botón SETUP (Configuración).
Aparecerá el menú Setup (configuración) en la pantalla. Incluye la configuración de idioma
y preferencias. Puede abandonar este menú pulsando de nuevo el botón SETUP en
cualquier momento de la configuración.
2. Pulse o para seleccionar el submenú que desee configurar.
3. Pulse o para seleccionar la opción del submenú que desee configurar.
Configuración del
sistema
Pulse el botón SETUP y la pantalla aparecerá
como se muestra a la izquierda.
Configuración de idioma
1. OSD LANG (Idioma de los mensajes en
pantalla)
Esta función se usa para fijar el idioma de los
mensajes en pantalla. Pulse para entrar en la
configuración de esta función.
Tiene ocho idiomas para escoger. El inglés es el
idioma predeterminado.
Pulse o para escoger el que corresponda.
Confirme su selección pulsando el botón ENT.
Pulse para salir de esta función.
29
Page 78

p
Configuración del
sistema
2. AUDIO (Señal sonora)
Esta función se usa para fijar el idioma de salida
de audio.
Pulse o para resaltar esta función.
Pulse para entrar en la configuración de esta
función.
Tiene varios idiomas para escoger. El inglés es
el idioma predeterminado.
Pulse o para escoger el idioma de su
preferencia.
Confirme su selección pulsando el botón ENT.
Pulse para salir de esta función.
3. DISC MENU (Menú del disco)
Esta función se usa para fijar el idioma del menú.
Pulse o para resaltar esta función.
Pulse para entrar en la configuración de esta
función.
Tiene varios idiomas para escoger. El inglés es el
idioma predeterminado.
Pulse o para escoger el idioma de su
preferencia.
Confirme su selección pulsando el botón ENT.
Pulse para salir de esta opción.
4. SUBTITLE (Subtítulo)
Esta función se usa para fijar el idioma de los
subtítulos.
Pulse o para resaltar esta función.
Pulse para entrar en la configuración de esta
función.
Tiene varios idiomas para escoger. Desactivado
(Off) es la configuración predeterminada.
Pulse o para escoger el idioma de su
preferencia.
Confirme su selección pulsando el botón ENT.
Pulse
ara salir de esta opción.
30
Page 79
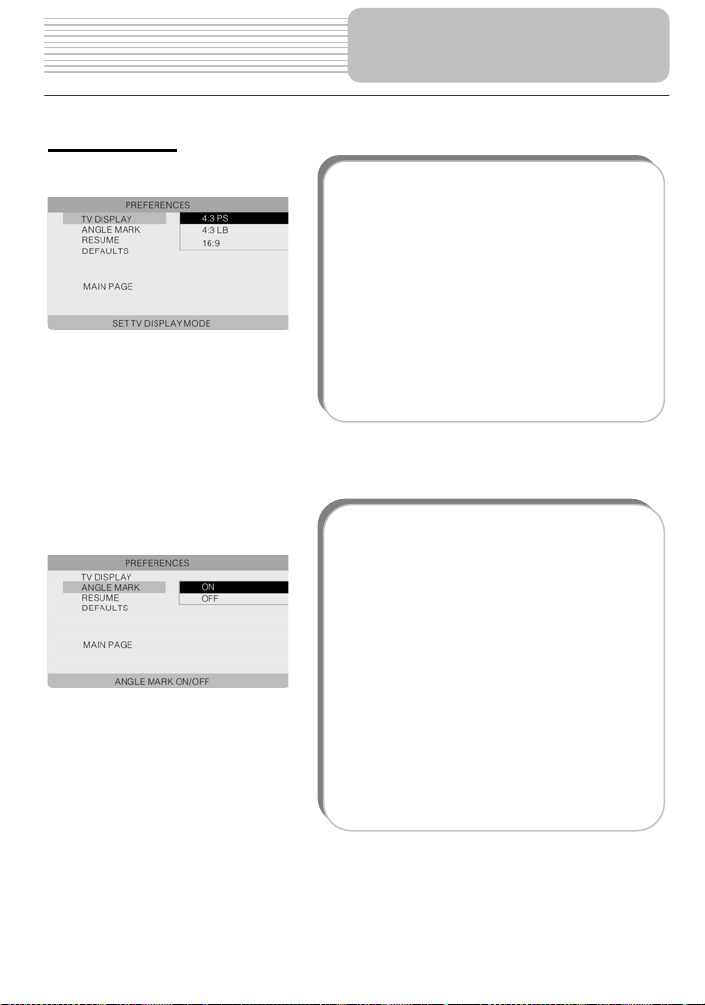
Preferencias
Configuración del
sistema
1. TV DISPLAY (Visualización del televisor)
Esta función se usa para fijar el modo de
visualización del televisor.
Pulse para entrar en la configuración de esta
función.
Las opciones son 4:3 PS (predeterminada), 4:3
LB y 16:9. Pulse o para escoger la que
corresponda. Confirme su selección pulsando el
botón ENT.
Pulse para salir de esta opción.
Nota: seleccione 4:3 PS o 4:3 LB si se ha
conectado un televisor de 4:3.
Seleccione 16:9 si se ha conectado un televisor
de pantalla ancha (16:9).
2.ANGLE MARK (Marca de ángulo)
Si la escena se filmó desde diferentes ángulos,
puede cambiar fácilmente el ángulo de la
cámara en la escena que está viendo. No todos
los discos DVD tienen esta característica.
Pulse o para resaltar esta función.
Pulse para entrar en la configuración de esta
función.
Activado (On) (opción predeterminada):
Seleccione On y aparecerá un icono de ángulo
en la pantalla. Si están disponibles, se le
informará de otros ángulos de visualización.
Desactivado (Off): No aparecerá ningún icono
de ángulo en la pantalla.
Pulse o para seleccionar On (Activado) u
Off (Desactivado). Confirme su selección
pulsando el botón ENT. Pulse para salir de
esta opción.
31
Page 80

Configuración del
sistema
3. RESUME (Reanudar)
Esta función se usa para fijar el estado de la
última memoria.
Nota: “Última memoria” es el estado en que, si
durante la reproducción se pulsa el botón de
encendido PWR o se abre accidentalmente la
cubierta de la bandeja de los discos, pero el
disco sigue introducido, la reproducción se
reanuda a partir del punto en que se había
interrumpido.
Pulse o para resaltar esta función.
Pulse para entrar en la configuración de esta
función.
Esta función está activada (ON) por defecto.
Pulse o para escoger ON (Activada) u
OFF (Desactivada).
Confirme su selección pulsando el botón ENT.
Pulse para salir de esta opción.
4. DEFAULTS (Valores predeterminados)
Esta función reconfigura el aparato en sus
valores predeterminados.
Pulse o para resaltar esta función.
Pulse para introducir la configuración de esta
función.
Pulse el botón ENT para reconfigurar el aparato
en sus valores predeterminados.
Todos los ajustes del aparato regresarán a su
estado original.
32
Page 81

Uso de las correas
Siga los pasos que se mencionan a continuación para colocar el Reproductor de DVD
en la parte posterior del apoya-cabeza del asiento de un automóvil.
1. Coloque el reproductor de DVD en una superficie lisa y blanda, con la parte inferior
hacia arriba.
2. Afloje la correa y quítele la hebilla.
3. Coloque la correa a través de los orificios tal como se muestra en la Figura 1.
Asegúrese de que la parte interna de la correa está mirando hacia arriba.
4. Pase la correa por la hebilla tal como se muestra en las Figuras 2 y 3. Una vez que
pasó la correa por la hebilla, asegúrese de que la parte de afuera de la hebilla esté
mirando hacia arriba.
33
Page 82

5. Repita estos pasos para la otra correa.
6. Ajuste la longitud de las correas de acuerdo con el asiento del automóvil.
7. Ajuste las correas en el apoya-cabeza del asiento tal como se muestra en la
Figura 4. Asegúrese de que las dos correas estén ubicadas entre las barras de
apoyo del apoya-cabeza (si su automóvil las tiene).
NOTA: Los dibujos muestran la parte de adentro y de afuera de la hebilla y de la
correa.
Uso de las correas
Afuera
Adentro
Afuera
Adentro
34
Page 83

Pantalla con formato de buzón
Se refiere a una pantalla en que la imagen de DVD de pantalla ancha se reproduce con
barras negras en su parte superior e inferior.
Pantalla con formato Pan & Scan
Se refiere a una pantalla en que la imagen de DVD de pantalla ancha aparece recortada por
los lados derecho e izquierdo.
Título, Capítulo (DVD)
Los DVD se dividen en secciones grandes (títulos) o en secciones pequeñas (capítulos). Los
números asignados a estas secciones se llaman “Nº de título” o “Nº de capítulo”.
Título 1 Título 2
Capítulo 1 Capítulo 1
Capítulo 2
…… ……
Pista (CD)
Los CD se dividen en secciones (pistas). Los números asignados a estas secciones se
llaman “Nº de pista”.
Pista 1 Pista 2 Pista 3 ……
JPEG
JPEG es un formato de imagen muy común que
permite archivos de poco tamaño y bajos índices de
pérdida de calidad de imagen. Pueden almacenarse
cientos de imágenes en un disco de este formato. Si
desea utilizar un álbum digital real, use película para
hacer un “CD DE IMÁGENES” en formato JPEG.
35
Definiciones
Carpeta raíz (directorio raíz)
Carpeta
Archivo JPEG
Carpeta
Archivo JPEG
Carpeta
Carpeta
Archivo JPEG
Carpeta
Carpeta
Archivo JPEG
Archivo JPEG
Page 84

p
Resolución de
roblemas
Antes de consultar al servicio técnico, pruebe las recomendaciones de esta tabla para
resolver pequeños problemas.
Si sospecha que algo no funciona bien, desactive el aparato inmediatamente.
Antes de solicitar asistencia, desactive la alimentación y compruebe que el aparato no echa
humo ni se ha calentado demasiado. No trate nunca de reparar el aparato por sus propios
medios, porque es peligroso.
El aparato no
reproduce.
No hay sonido.
PROBLEMA
CAUSA POSIBLE
Quizá esté abierta la
cubierta del disco.
Quizá esté vacía la unidad
de disco.
Quizá el disco no esté en la
posición correcta.
Quizá el disco esté sucio o
combado.
Quizá el código regional del
reproductor no coincida con
el del disco DVD.
Quizá esté mojada la lente.
Quizá no esté bien hecha la
conexión del sistema.
Quizá no está activada la
bocina.
Quizá no se haya configurado
correctamente el sonido del
disco DVD.
Quizá el disco esté sucio o
combado.
SOLUCIÓN POSIBLE
Ciérrela.
Coloque un disco.
Coloque el disco con la
etiqueta hacia arriba.
Límpielo o cámbielo.
Verifique que el código
regional del reproductor
coincida con el del disco DVD.
Quite el disco y mantenga
apagado el reproductor
durante al menos dos horas.
Conecte bien el sistema.
Actívela.
Configúrelo correctamente.
Límpielo o cámbielo.
36
Page 85

PROBLEMA
CAUSA POSIBLE
No hay imagen.
Quizá la pantalla de cristal
líquido esté desactivada o
no esté en el modo de video
correcto.
Quizá no esté bien hecha la
conexión del sistema.
Quizá la unidad no esté en
el modo de salida AV.
Mal funcionamiento
audiovisual.
Quizá el disco esté sucio o
combado.
Puede haber obstrucciones
entre el control remoto y el
reproductor.
El control remoto no
funciona
Puede que el control remoto
no esté apuntando al
reproductor.
Las baterías del control
remoto pueden estar mal
colocadas.
Las baterías del control
remoto pueden estar sin
energía o sin fuerza.
Otras posibilidades:
La electricidad estática u otras interferencias externas pueden hacer que el reproductor
funcione de modo anormal. Para restablecer el funcionamiento normal, desenchufe el cable
de alimentación y vuélvalo a enchufar en el tomacorriente a fin de reiniciar el reproductor. Si
persisten los problemas, desactive la alimentación eléctrica y consulte a su centro de servicio
o a un técnico cualificado.
Resolución de
problemas
SOLUCIÓN POSIBLE
Active la pantalla de cristal
líquido y escoja el modo de
video correcto.
Conéctelo bien.
Coloque la lengüeta AV de
la parte inferior del aparato
en la posición de salida.
Límpielo o cámbielo.
Quite las obstrucciones
entre el control remoto y el
reproductor.
Apunte el control remoto
directamente al reproductor.
Asegúrese de que la
polaridad de cada batería
esté correcta.
Cambie las baterías.
37
Page 86

Especificaciones
Tamaño de la pantalla TFT 7”
Longitud de onda del láser 780/650 nm
Sistema de video NTSC
Respuesta de frecuencia
Índice de señal de audio a ruido ≥ 85 dB
Distorsión acústica + ruido
Separación de canales ≥70 dB (1 kHz)
Rango dinámico ≥80 dB (1 kHz)
Salida de audio
Salida de video Salida de video
Alimentación
Consumo < 25 W
Dimensiones 230 x 154 x 40 mm (L*A*P)
Peso Aproximadamente 0,85 Kg
Salida
analógica de
audio
20 Hz-20 kHz ±2,5 dB
≤-70 dB (1 kHz)
Nivel de salida: 1,5 V±
Carga: 10 K Ω
Nivel de salida
Carga: 75 Ω
Negativa desbalanceada
120 V CA ~ 50 Hz
:1 V
±0,2,
P-P
0,2
1,0
EL DISEÑO Y LAS ESPECIFICACIONES ESTÁN SUJETOS A CAMBIOS SIN
PREVIO AVISO
“Dolby” y el símbolo de la doble D son marcas registradas de Dolby Laboratories.
Obras inéditas confidenciales. © 1992 -1997 Dolby Laboratories, Inc.
Fabricado bajo licencia de Dolby Laboratories.
Reservados todos los derechos.
38
Page 87

Si necesita información sobre reparaciones, asistencia y garantías, visite
www.Polaroidelectronics.com
1-886-301-7922 (Canadá) y 01-800-400-2443 (México).
“Polaroid” es una marca registrada de Polaro id Corporation de Wa ltham, MA EE.UU.
o llame a los teléfonos 1-886-289-5168 (E E.UU.),
39
Page 88

Reproductor portátil de DVDs de 7”
PDM-2727
Pantalla LCD auxiliar
1
Page 89

Índice
Índice
Instrucciones de seguridad
Vista del panel delantero
Vista del panel lateral
Conexiones del sistema
Preparación del suministro
de corriente
Resolución de problemas
Especificaciones
…………………………………………………..……2
………………...…………………………………….3
…………………………………...………………….4
……...……………………………………………….5
……...……………………………………………….6
………………………………………………….…….7
………………………………………………………..8
………………………………………………………..9
2
Page 90

El símbolo de un rayo con punta de flecha dentro de un triángulo sirve para
alertar al usuario de la existencia de un “voltaje peligroso” que podría
causar descargas eléctricas.
El signo de admiración dentro de un triángulo indica al usuario que debe
leer en el manual instrucciones importantes relativas al funcionamiento y
el mantenimiento.
Instrucciones de seguridad
Notas
1) Lea estas instrucciones.
2) Guarde estas instrucciones.
3) Respete todas las advertencias.
4) Siga todas las instrucciones.
5) No lo use cerca del agua.
6) Límpielo solamente con un paño seco.
No bloquee ninguna de las aberturas de ventilación. Mantenga una buena ventilación
7)
alrededor del producto. No coloque el producto en una cama, sofá o sobre cualquier
cosa que bloquee la ventilación. Instálelo siguiendo las instrucciones del fabricante.
8) No lo instale cerca de fuentes de calor, p. ej., radiadores, rejillas de calefacción,
estufas u otros aparatos que generen calor (incluyendo amplificadores).
9) Esta unidad está equipada con un enchufe polarizado Los enchufes polarizados
tienen dos clavijas planas, una más ancha que la otra. Los enchufes con conexión a
tierra tienen dos clavijas planas y una tercera de conexión a tierra. La clavija plana
ancha, o la tercera clavija, se proporciona por su seguridad. Si el enchufe que se
proporciona no entra en su tomacorrientes, haga que un electricista lo reemplace. La
extracción del enchufe polarizado disminuirá el nivel de seguridad del enchufe.
10) Proteja el cable para que no pueda pisarse ni estrangularse, en particular a la altura
de los enchufes, del tomacorriente y del punto por el que sale del aparato.
11) Use solamente aditamentos/accesorios especificados por el fabricante.
12) Úselo solamente con el carrito, la mesita, el trípode o el soporte especificados por
el fabricante o que se venden con el aparato. Al utilizar un carrito, tenga
cuidado cuando mueva la combinación de carrito y aparato para impedir
que se vuelque y cause lesiones.
13) Desenchufe este aparato cuando haya tormenta eléctrica o cuando no vaya a usarse
por largos períodos de tiempo.
14) Confíe la reparación al personal técnico cualificado. Es necesario reparar el aparato si
ha sufrido cualquier tipo de daño; por ejemplo, si el cable de alimentación o el enchufe
se encuentran dañados, si se derramó líquido o han caído objetos dentro del aparato,
si éste estuvo expuesto a la lluvia o a la humedad, si no funciona normalmente o si se
cayó.
15) El aparato no debe estar expuesto a goteos ni salpicaduras y no se deben colocar
sobre él objetos que contengan líquido, como jarrones.
Nota: No toque la pantalla LCD TFT directamente con la mano.
3
Page 91

Vista del panel delantero
1. Botón POWER (Encendido)
Presiónelo para acceder o salir del modo de espera (standby).
2. Botón -/+
Presiónelo para ajustar el nivel de brillo y el color.
3. Botón MODE (Modo)
Presiónelo para cambiar el nivel del brillo y el color. Presiónelo durante 1-2 segundos
para cambiar la relación de aspecto de la pantalla.
4. Bocina
5. Indicador de alimentación
No se enciende mientras está en el modo de reproducción normal; en el modo de
espera (standby) se torna de color rojo.
6. Pantalla LCD
4
Page 92

Vista del panel lateral
1. Control del volumen
Se utiliza para ajustar el volumen de los audífonos y la bocina.
2. Toma para audífonos
Se utiliza para conectar los audífonos y escuchar privadamente. Cuando los
audífonos se conectan a esta toma, la bocina se silenciará automáticamente.
3. Toma para la entrada de audio
Se utiliza para la entrada de audio.
4. Toma para la entrada de video
Se utiliza para la entrada de video.
5. Toma de salida de 9.5 V de CC
Se utiliza como una fuente externa de potencia para el reproductor principal de
DVDs.
6. Toma de entrada de 9,5 V de CC
Se utiliza para conectar el adaptador de corriente, incluyendo el adaptador del
automóvil.
5
Page 93

Conexiones del sistema
Conexión al reproductor principal de DVDs
1. Verifique que se han desconectado todo los aparatos eléctricos, incluyendo el
reproductor principal de DVDs y la pantalla LCD auxiliar.
2. Conecte el adaptador de corriente alterna a la pantalla LCD auxiliar y conecte esta
última al reproductor principal de DVDs mediante el cable de corriente para alimentar
de esa manera a dicho reproductor.
3. Utilice cables de audio y video para conectar la pantalla LCD auxiliar al reproductor
principal de DVDs, de modo que este último suministre a la pantalla LCD auxiliar las
señales de audio y video.
Consulte la siguiente figura para obtener más detalles.
DVD portátil
Nota: El adaptador de corriente alterna debe conectarse a la pantalla LCD auxiliar; de
otra manera, dicha pantalla no recibirá corriente.
Conexión a los audífonos
Conecte los audífonos al costado derecho del reproductor para escuchar privadamente.
Una vez que los audífonos han sido conectados, las bocinas se apagan
automáticamente.
6
Page 94

Preparación del suministro
de corriente
Uso del adaptador de corriente alterna (CA)
1. Conecte el adaptador de corriente alterna a la entrada identificada con “DC IN” al
costado derecho de la pantalla LCD auxiliar, tal y como se muestra más abajo.
2. Enchufe el extremo con dos clavijas del cable de alimentación a un tomacorriente
conectado a tierra.
Nota: Apague el reproductor antes de desenchufarlo.
Uso del adaptador para automóvil
Conecte el enchufe de alimentación del adaptador para automóvil a la toma de
alimentación de la pantalla LCD auxiliar y conecte el otro extremo al enchufe del
encendedor del automóvil, como se muestra en la siguiente figura.
Enchufe del
encendedor
Atención
¾
Mientras una persona conduce un vehículo, no debe utilizar la unidad ni ver
programas de video.
¾
Coloque la unidad en una posición adecuada para su visualización.
¾
Al encender el vehículo, desconecte el reproductor del adaptador para vehículo.
7
Page 95

Resolución de problemas
SÍNTOMA QUÉ REVISAR
- Asegúrese de que la conexión del sistema sea
No hay sonido.
No hay imagen.
Otras posibilidades:
Es posible que la electricidad estática u otras interferencias externas hagan que la imagen
mostrada por la unidad sea anormal. Para restablecer el modo de funcionamiento normal,
reinicie la unidad desenchufando el cable de alimentación y volviéndolo a enchufar. Si el
problema persiste, desconect e la aliment ación y consulte a un centro de servicio o a un técnico
cualificado.
correcta.
- Asegúrese de que las bocinas están encendidas.
- Asegúrese de que la fuente de la señal de audio sea
adecuada.
- Asegúrese de que la pantalla LCD está encendida y en
el modo de video correcto.
- Asegúrese de que la conexión del sistema sea
correcta.
- Asegúrese de que la fuente de la señal de video sea
adecuada.
8
Page 96

Especificaciones
Tamaño de la pantalla TFT 7”
Sistema de video NTSC
Respuesta de frecuencia 20Hz-20kHz ±2,5dB
Alimentación 120 V CC~50/Hz
Consumo de corriente <25W
Dimensiones 230 mm x 154 mm x 22 mm (L*W*D)
Peso 0,37kg
EL DISEÑO Y LAS ESPECIFICACIONES ESTÁN SUJETOS A CAMBIOS
SIN PREVIO A VISO
Si necesita información sobre reparaciones, asistencia y garantías, visite
www.Polaroidelectronics.com
1-886-301-7922 (Canadá) y 01-800-400-2443 (México).
“Polaroid” es una marca registrada de Polaro id Corporation de Wa ltham, MA EE.UU.
o llame a los teléfonos 1-886-289-5168 (E E.UU.),
9
Page 97

Lecture de DVD portable de 7”
PDM-2727
1
Page 98

Instructions De Sûreté
Importantes
PRUDENCE
RISQUE D'ÉLECTROCUTION
NE PAS OUVRIR
PRUDENCE: POUR RÉDUIRE LE RISQUE D'ÉLECTROCUTION, NE PAS
RETIRER LE COUVERCLE (NI LE PANNEAU ARRIÈRE). CET APPAREIL NE
CONTIENT AUCUNE PIÈCE RÉPARABLE PAR L'UTILISATEUR. CONTACTER UN
TECHNICIEN AGRÉÉ POUR TOUTE RÉPARATION.
Le symbole de l'éclair avec pointe de flèche, dans un triangle équilatéral, a pour objet
d'avertir l'utilisateur de la présence d'une «tension dangereuse» non isolée dans le
boîtier de l'appareil dont la valeur peut être suffisante pour constituer un risque
d'électrocution.
Le point d'exclamation dans un triangle équilatéral a pour objet d'avertir l'utilisateur de
la présence d'instructions d'entretien et de fonctionnement importantes dans la
AVERTISSEMENT: POUR RÉDUIRE LE RISQUE D'ÉLECTROCUTION OU D'INCENDIE, NE
PAS EXPOSER CE PRODUIT À LA PLUIE OU À L'HUMIDITÉ.
documentation jointe au produit.
PRUDENCE: Rayonnement de laser. Ne regardez pas fixement
le laser.
PRUDENCE: L'utilisation des commandes, des ajustements, ou
des procédures autre que ceux indiqués peut avoir comme conséquence l'exposition de
la radiation dangereuse.
ALIMENTATION:
Connecter l'adaptateur fourni au côté du lecteur de DVD dans la fente marquée «Power In»
(alimentation). Brancher l'extrémité à deux broches du cordon d'alimentation dans une prise de 100 –
120 V c.a. En cas d’insertion difficile de la prise, la retourner et la réinsérer; si l’unité n’est pas utilisée
pendant une longue période, débrancher la prise.
REMARQUE:
Avant de brancher le cordon d’alimentation dans une prise c.a., s’assurer que toutes les connexions
ont été effectuées.
2
Page 99

Instructions De Sûreté
Importantes
PRUDENCE: Ces instructions d’entretien sont destinées à un personnel d'entretien
qualifié uniquement. Pour réduire le risque de chocs électriques, n’effectuer aucun
entretien autre que celui décrit dans les instructions de fonctionnement à moins d’être
qualifié pour le faire.
Voir le manuel d’entretien pour les instructions d’entretien.
1.
Lire ces instructions.
2. Conserver ces instructions.
3. Respecter tous les avertissements.
4. Suivre toutes les instructions.
5. Ne pas utiliser à proximité d'eau.
6. Nettoyer avec un chiffon sec uniquement.
7. Ne pas bloquer les orifices d’aération. Maintenir une bonne ventilation autour du produit, ne pas
poser le produit sur un lit, un sofa ou quoi que ce soit qui peut bloquer la ventilation du produit.
Installer en respectant les instructions du fabricant.
8. Ne pas installer près d’une source de chaleur telle que radiateurs, registres de chaleurs,
fourneaux et autres appareils (y compris amplificateurs) produisant de la chaleur.
9. Ne pas neutraliser la sécurité de la prise de terre ou polarisée. Une prise polarisée comporte deux
lames, une plus large que l’autre. Une prise de terre a deux lames et une troisième broche de
mise à la terre. La lame la plus large ou la troisième broche est fournie pour la sécurité de
l’opérateur. Si la prise fournie ne s’adapte pas à la prise de courant, consulter un électricien pour
le remplacement de la prise de courant obsolète.
10. Protéger le cordon d’alimentation pour qu’il ne soit pas piétiné ou pincé, en particulier au niveau
des prises, des réceptacles utilitaires et du point de sortie de l'appareil.
11. N’utiliser que des outils et des accessoires spécifiés par le fabricant.
12. N’utiliser qu’avec le chariot, le pied, le trépied, le support ou la table spécifiés par le fabricant ou
vendus avec l'appareil. Lorsqu’un chariot est utilisé, faire preuve de précaution en
déplaçant l’ensemble appareil/chariot pour éviter les blessures pouvant être
provoquées par le basculement.
13. Débrancher l’appareil durant les tempêtes avec risques de foudre ou lorsqu’il n’est
pas utilisé durant de longues périodes.
14. Confier tous les travaux d’entretien à un personnel qualifié. Un entretien est requis lorsque
l’appareil a subi des dommages, tels que des dommages du cordon d’alimentation ou de la prise,
lorsque du liquide a été renversé ou que des objets sont tombés dans l’appareil, en cas
d’exposition aux intempéries et à l’humidité, en cas de dysfonctionnement ou de chute de
l’appareil.
15. L’appareil ne doit pas être exposé à des éclaboussures ou des gouttes d’eau et aucun objet rempli
de liquide, tel qu’un vase, ne doit être posé sur l’appareil.
Ne pas toucher l'écran à matrice active main nue.
3
Page 100

Protection des droits d’auteur
Tout prêt, copie, diffusion et représentation publique non autorisés des disques sont interdits. Ce
produit bénéficie d’une technologie de protection de droits d’auteurs protégée par des
revendications de procédé de certains brevets américains et d’autres droits de propriété
intellectuelle de Macrovision Corporation et d’autres propriétaires de droits. L’utilisation de cette
technologie de protection de droits d’auteur doit être autorisée par Macrovision Corporation et est
destinée à un usage domestique et limité, sauf en cas d’autorisation spéciale de Macrovision
Corporation. L’ingénierie inverse et le désassemblage sont interdits.
Informations sur les codes de région: Si le code de région inscrit sur le disque de DVD ne
correspond pas au numéro de région de cet appareil, celui-ci ne peut pas lire le disque. Le code de
région de cette appareil est 1.
REMARQUES IMPORTANTES CONCERNANT LES PRODUITS À
LASER
1. PRODUIT À LASER DE CLASSE 1
2. DANGER: Radiation au laser visible en cas d'ouverture et lorsque le
système de sécurité est défectueux ou neutralisé. Éviter de s'exposer
au rayon.
3. PRUDENCE: Ne pas ouvrir le couvercle supérieur. Aucune pièce
interne de l'unité ne peut être réparée par l'utilisateur. Confier tous les
travaux d’entretien à un personnel qualifié.
Cette unité est conforme au règlement de FDA pour la commande de
rayonnement des produits de laser.
Instructions De Sûreté
Importantes
4
 Loading...