

Page 1

7” Portable DVD Player
PDM-0732
Operation Manual
20060823
Page 2
p
panying
Important Safety
Instructions
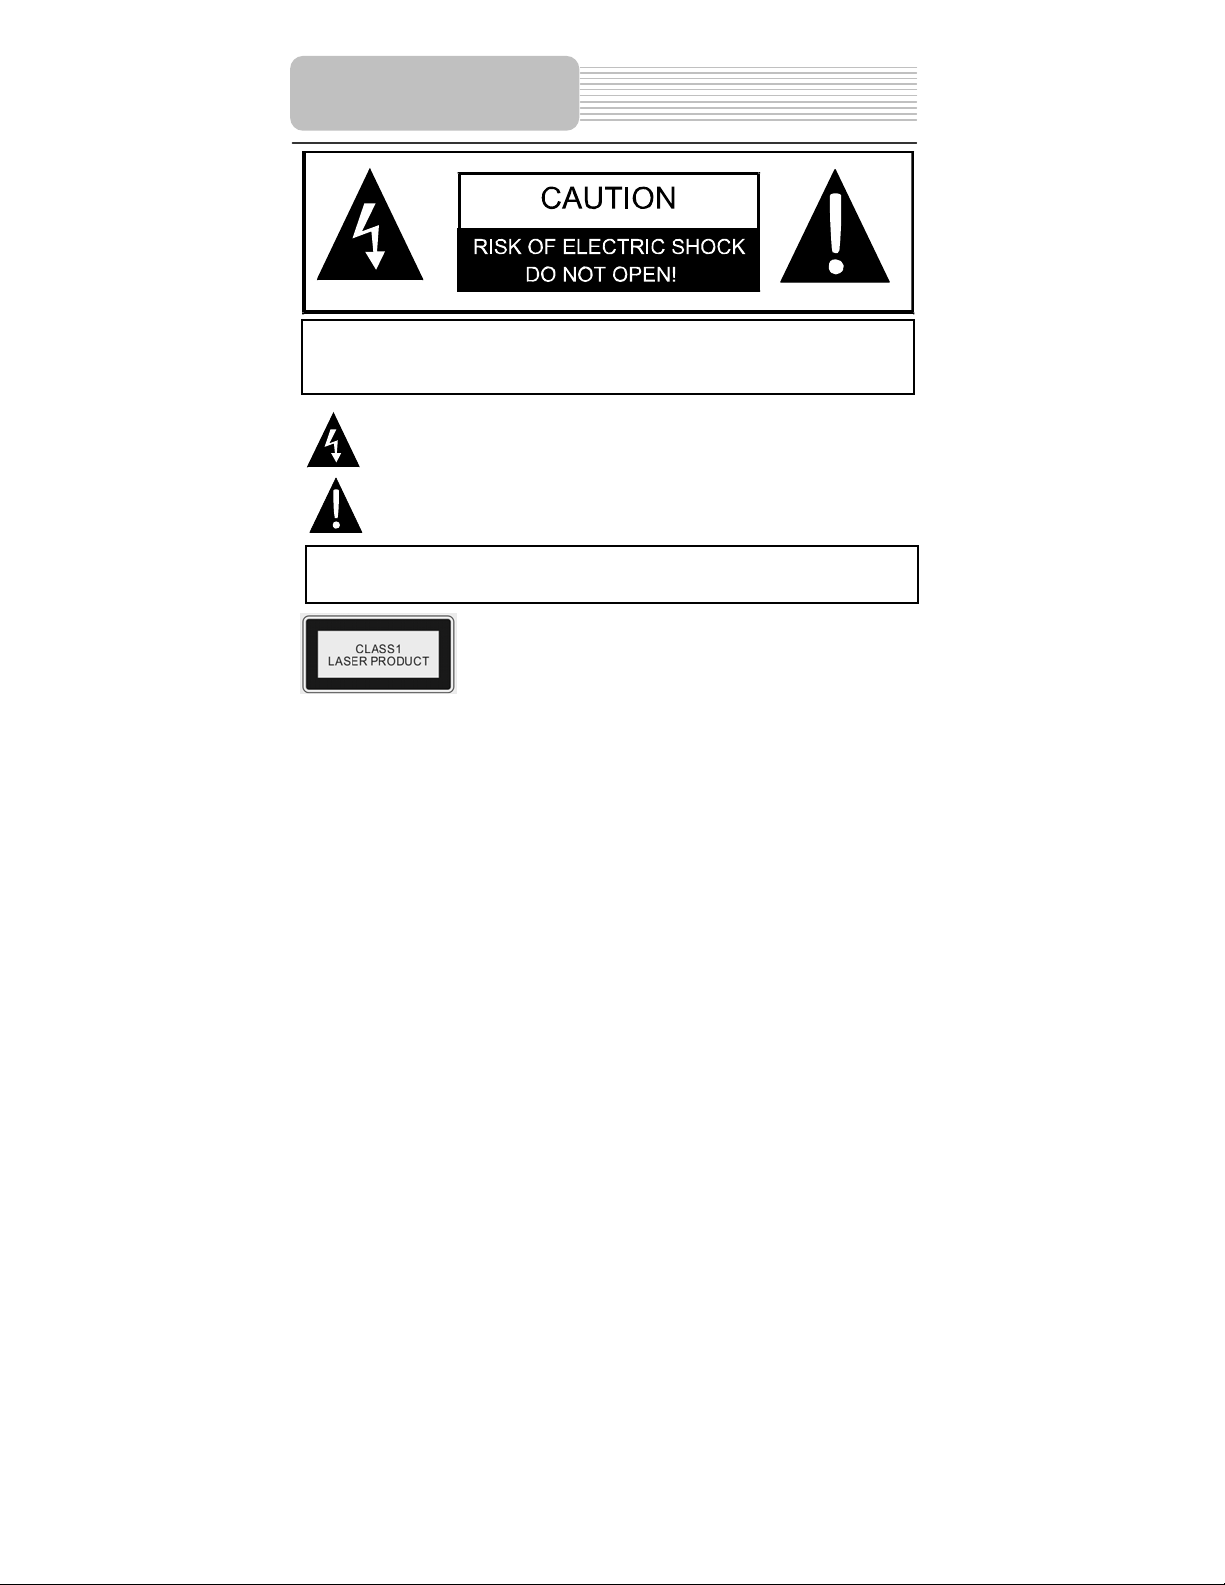
CAUTION: TO REDUCE THE RISK OF ELECTRIC SHOCK, DO NOT
REMOVE COVER (OR BACK). NO USE-SERVICEABLE PARTS
INSIDE. REFER SERVICING TO QUALIFIED SERVICE PERSONNEL.
POWER SUPPLY:
Connect the supplied adapter to the side of the DVD player in the slot marked “Power In”.
Plug the two-prong end of the power cord to an AC100-120V outlet. If you have difficulty
inserting the plug, turn it over and reinsert it, if the unit will not the used for a long time,
disconnect the plug from the outlet.
NOTE:
Before plugging the power cord into an AC outlet, make sure that all the connections
have been made.
CAUTION: These servicing instructions are for use by qualified service personnel only.
To reduce the risk of electric shock, do not perform any servicing other than that
contained in the operating instructions unless you are qualified to do so.
Refer to service manual for servicing instructions.
The lightning flash with arrowhead symbol, within an equilateral triangle, is
intended to alert the user to the presence of uninsulated “dangerous
voltage” within the product’s enclosure that may be of sufficient magnitude
to constitute a risk of electric to
The exclamation point within an equilateral triangle is intended to alert the
user to the presence of important operating and maintenance (servicing)
instructions in the literature accom
ersons.
the appliance.
WARNING: TO REDUCE THE RISK OF FIRE OR ELECTRIC SHOCK,
DO NOT EXPOSE THIS APPLIANCE TO RAIN OF MOISTURE.
CAUTION: Laser radiation when open. Do not stare into beam.
2
Page 3

1) Read these instructions.
2) Keep these instructions.
3) Heed all warnings.
4) Follow all instructions.
5) Do not use near water.
6) Clean only with dry cloth.
7) Do not block any ventilation openings. Maintain well ventilated conditions around
the product, Do not put product on bed, sofa or anything that blocks ventilation.
Install in accordance with the manufacturer’s instructions.
8) Do not install near any heat sources such as radiators, heat registers, stoves, or
other apparatus (including amplifiers) that produce heat.
9) Do not defeat the safety purpose of the polarized or grounding-type plug. A
polarized plug has two blades with one wider than the other. A grounding type plug
has two blades and a third grounding prong. The wide blade or the third prong is
provided for your safety. If the provided plug does not fit into your outlet, consult an
electrician for replacement of the obsolete outlet.
10) Protect the power cord from being walked on or pinched particularly at plugs,
convenience receptacles, and the point where they exit from the apparatus.
11) Only use attachments/accessories specified by the manufacturer.
12) Use only with the cart, stand, tripod, bracket, or table specified by
the manufacturer, or sold with the apparatus. When a cart is used,
use caution when moving the cart/apparatus combination to avoid
injury from tip-over.
13) Unplug this apparatus during lightning storms or when unused for long periods of
time.
14) Refer all servicing to qualified service personnel. Servicing is required when the
apparatus has been damaged in any way, such as power-supply cord or plug is
damaged, liquid has been spilled or objects have fallen into the apparatus, the
apparatus has been exposed to rain or moisture, does not operate normally, or has
been dropped.
15) Apparatus shall not be exposed to dripping or splashing and no objects filled with
liquids, such as vases, shall be placed on the apparatus.
Note: Do not touch the color TFT LCD screen by hand directly.
Important Safety
Instructions
3
Page 4

S
Important Safety
CAUTION: USE OF ANY CONTROLS, ADJUSTMENTS, OR PROCEDURES OTHER
THAN THOSE SPECIFIED HEREIN MAY RESULT IN HAZARDOUS RADIATION
EXPOSURE.
This product incorporates copyright protection technology that is protected by U.S.
patents and other intellectual property rights. Use of this copyright protection technology
must be authorized by Macrovision, and is intended for home and other limited viewing
uses only unless otherwise authorized by Macrovision. Reverse engineering or
disassembly is prohibited.
Region code information
DVD players and discs are coded by region. If the region number described on the DVD
disc does not correspond to the region number of this product, this product cannot play
the disc. The region code of this unit is 1.
Instructions
Copyright Protection
IMPORTANT FOR LASER PRODUCT
1. CLASS 1 LASER PRODUCT
2. DANGER: Visible laser radiation when open and interlock
failed or defeated. Avoid direct exposure to beam.
3. CAUTION: Do not open the top cover. There are no user
serviceable parts inside the unit. Leave all servicing to
qualified service personnel.
4
Page 5
p
High-quality audio and video
Excellent sound: Dolby Digital Decoder
delivers great sound.
Advanced Playing Functions
Compatibility: Compatible with DVD,
CD and Picture CD disks.
Particular Performance: Multi-speed,
fast forward, fast backward and slow
forward, slow backward.
Last Memory Playback: Memorize the
stopped playback track and continue playing
disk from this spot on power on status or
without opening the disc tray cover.
Other Special Functions
High Resolution: MPEG-2 decoding
format achieves more than 500 lines of
horizontal resolution.
Features
AV In: External Audio, Video input can be
connected to most external AV sources.
AV Out: Analog Audio output and video
ut.
out
On-screen Display: You can choose from
English, Spanish, French, German or
Italian for On-screen Display language
Search by Time: Search for a certain
track of a disk by selected time.
Special Functions: Supports screen aspect
ratio changing, zooming in or out pictures,
multi-language caption, multi-angle.
Power Adapter Switch: Automatically
adapts to voltage requirements in U.S and
other countries.
5
.
Page 6
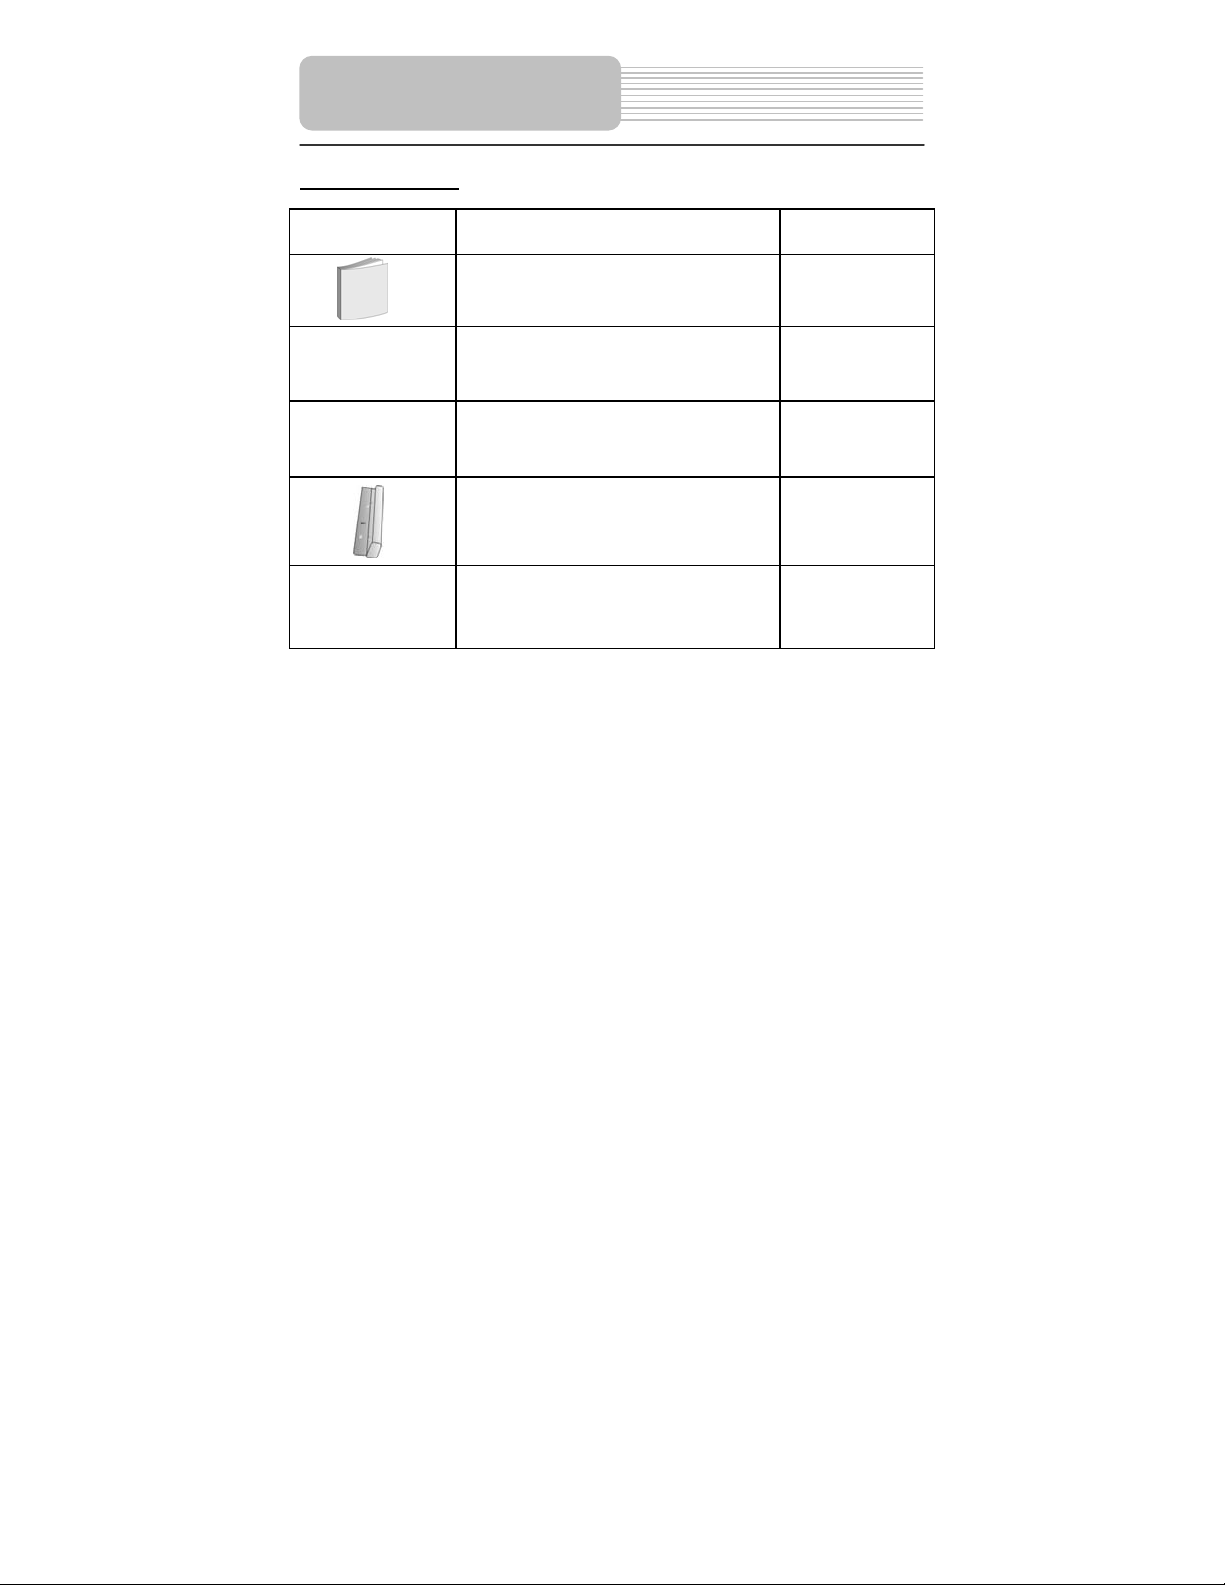
Accessories
Accessories List
ITEM NAME QTY
Owner’s Manual 1
AC adapter 1
Audio/Video Cable 1
Rechargeable battery pack 1
DC Adapter (Car Adapter) 1
NOTE
Accessories and their parts numbers are subject to modification without prior notice due
to improvements.
6
Page 7

Important Safety Instructions
Features
Accessories
View of Main Unit
View of Side Panels
View of Main Unit Bottom
System Connections
Power Supply Preparation
Rechargeable Battery
Notes on Discs
Playback Operation
DVD Playback
CD Playback
…………………………………………..2
…………………………………………...3
…………………………………………...6
…………………………………………...8
………………………………….……….10
…………………………………………..11
…………………………………………..12
…………………………………………..14
…………………………………………..15
…………………………………………..18
…………………………………………..19
…………………………………………..20
…………………………………………..23
Picture CD Playback
System Setup
Definitions
Troubleshooting
Specifications
…………………………………………..26
…………………………………………..32
…………………………………………..33
…………………………………………..35
7
Contents
……………………………………..24
Page 8

View of Main Unit
Front View
1. TFT LCD
7” color TFT screen presents high resolution picture.
2. Speakers
Two speakers output high quality sound.
3. TITLE button
Press to display the disc title menu if the titles are coded in the disc
4. MENU button
Press to enter to the disc menu
5. /,/ button
/ :press the direction buttons to select items.
/: press to fast search backward and forward during disc playback.
8
Page 9

V
6. /,/ button
/: press the direction button to select items.
/: press to play the previous track or the next track.
7. ENT button
Press to confirm your selection.
8. MODE button
Press to change the aspect ratio or change the brightness, contrast and color level.
9. PLAY/PAUSE button
Press to start playback or pause the playback.
10. STOP button
Press to stop playback. Press the button to resume playback.
11. ZOOM button
Press to activate the zoom function to zoom in or out the current image.
12. Main unit Power indicator
Light turns green when the unit is under operation; turns red in standby mode.
13. Battery charge indicator
Light turns red when the battery is in charging; turns green when the battery is fully
charged.
14. SETUP button
Press to access the DVD setup menu.
15. Remote sensor
Receive the signal from the remote control for operation. (Remote control not
included in all models.)
16. A-B button
Press to mark a segment to repeat between A and B.
17. SLOW
Press to activate slow playback.
18. +/- button
Press to increase/decrease the level of the selected item.
19. Disc Tray Cover
20. OPEN button
Press to open disc tray cover.
iew of Main Unit
9
Page 10

View of Side Panels
Right Side View
1. VOLUME Control
For regulating the sound level of Speakers or Headphones.
2. Headphone Jack
When headphones are plugged into the unit, the speakers will automatically turn
off.
3. AUDIO input/output Jack
For connecting to an external amplifier or audio source
4. VIDEO input/output Jack
For connecting to an external monitor or video source
5. DVD/AV IN Switch
Switch to AV IN to input the external AV source; switch to DVD to playback the disc
6. DC 9.5V IN Jack
For connecting to power supply, including Car Adapter.
Left Side View
1. POWER ON/OFF Switch
Switch the power on or off.
10
Page 11
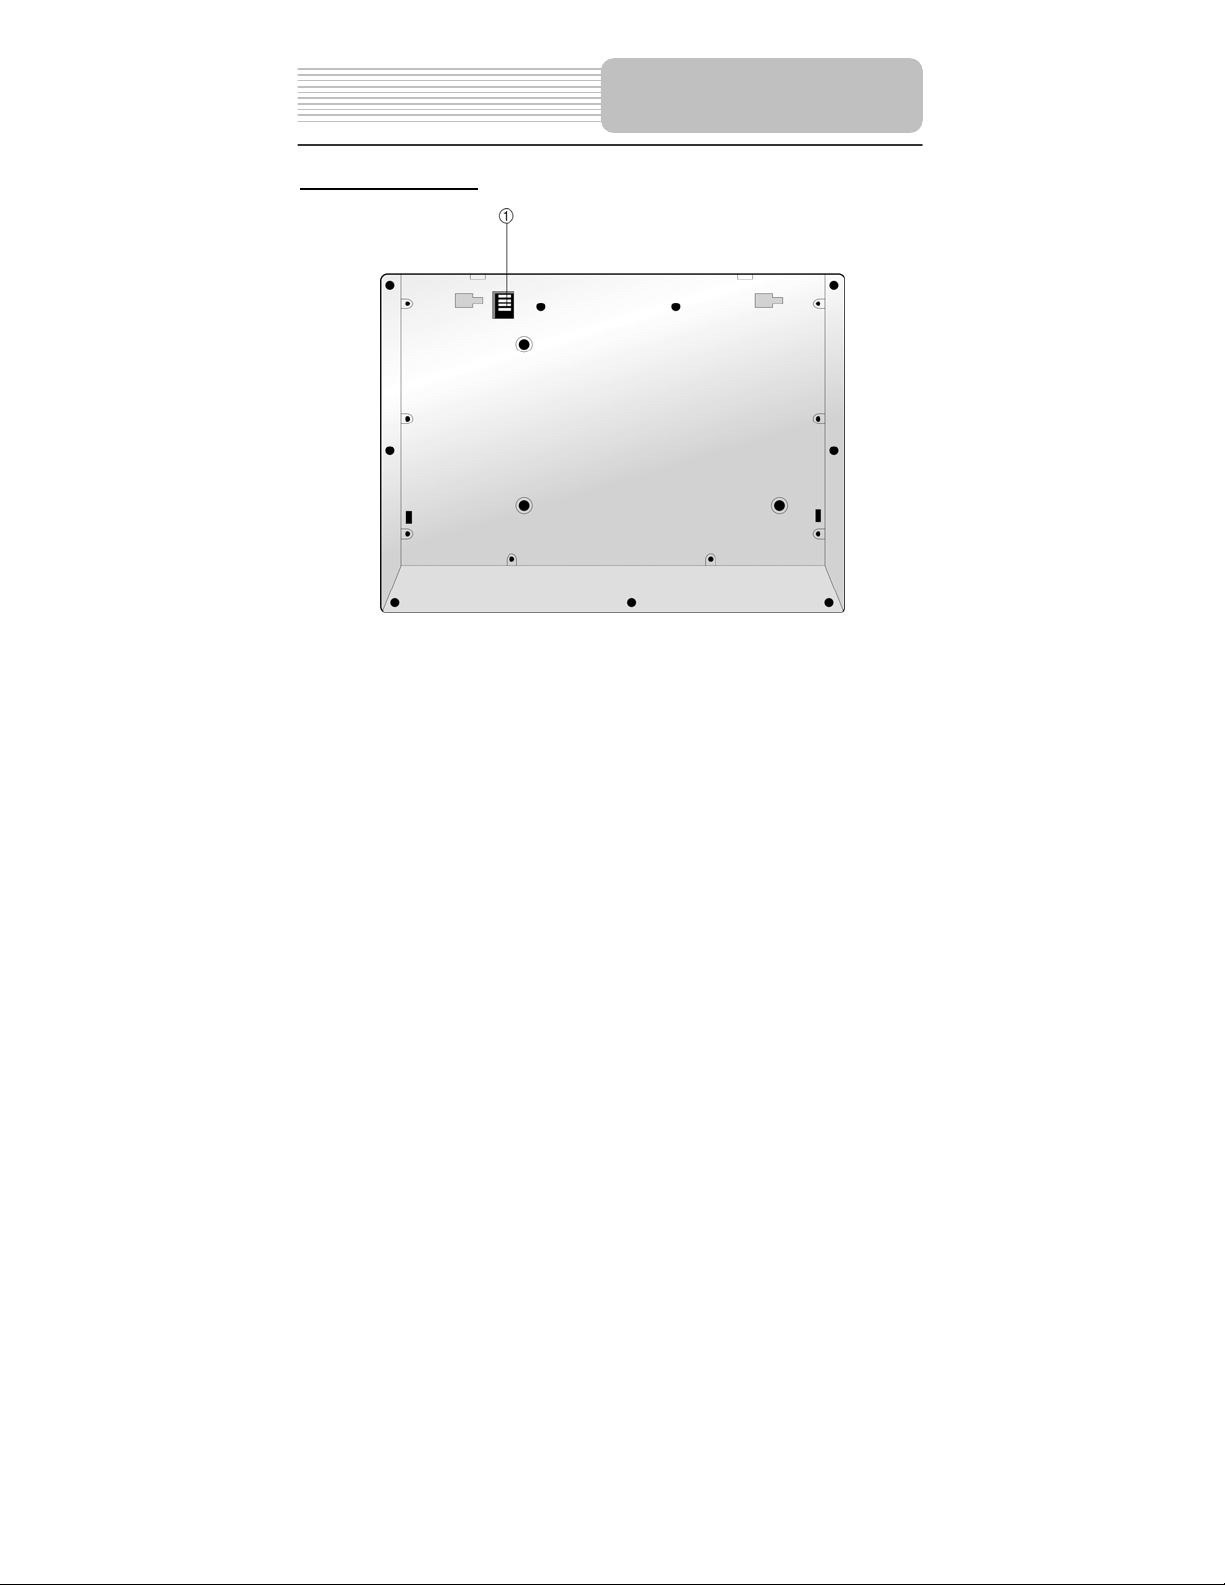
View of Main Unit Bottom
View of the bottom
1. Rechargeable Battery Contacting Point
For connecting with the rechargeable battery pack.
11
Page 12

System Connections
z Always ensure that the DVD player, TV and any other electrical equipment that
connecting with DVD player is switched off and unplugged from the power supply.
z Ensure that you observe the color coding when connecting audio and video cables.
Connecting to TV
Audio/Video connections
Please follow the drawings below to connect the DVD player to TV's Audio/Video inputs
with Audio/Video cables.
Connecting to Amplifier
Please refer to your Audio equipment's manual before connection.
Please follow the drawings below to connect the DVD player to AV amplifier.
12
Page 13

System Connections
Connecting to External AV Source
The unit supports AV signal input function. Please use the audio/video cable to connect
the unit to the external AV signal source such as a DVD, VCR etc. after connecting ,
switch the DVD/AV IN to AV IN.
Note: Noise may occur in speakers when there is an external audio signal input while
playing a DVD disc. Unplug the audio cable to clear the noise.
Connecting to Headphone
Connect the headphone to the headphone jack on the right side of the unit.
When headphone is connected, the speaker will automatically turn off.
13
Page 14

p
Power Supply
Pre
aration
Using of AC Adapter
The player is supplied with an adapter. Take the following steps to use the adapter.
1. Connect AC adapter to the right side
Of the DVD player in the slot marked
DC 9.5V IN (as the right figure).
2. Plug the two-prong end of the power
cord to a grounded electrical socket,
then the power indicator lights red.
Note: Please turn player's power off before unplugging.
Note:In the case of using the adapter, the LCD screen will be l ighter than wit h the
rechargeable battery.
Using of Car Adapter
You can use Car Adapter while in a vehicle, take the following steps to using the car
adapter.
Connect the Car Adapter Power Plug to
the unit's Power Jack and the other end
to the Vehicle’s 12V accessory/ Cigarette
Lighter Socket, as shown on the right
figure.
Attention
¾ Do not operate the unit or view video software while driving a vehicle.
¾ Place the unit in a proper position for viewing.
¾ Please detach battery pack when using car adapter as power source.
¾ We advise you to disconnect the player from the Cigarette Lighter at the instant of
car start-up.
14
Page 15

Rechargeable Battery
About Rechargeable Battery Pack
Your portable DVD player comes with a lithium ion rechargeable battery that attaches to
the rear of the DVD player. Charge the battery fully before initial use. Charging time is
normally about 5 hours. A fully charged battery delivers about 3 hours of use, but playing
time varies from disc to disc. If the battery will not be used for a long period of time, fully
charge the battery prior to storage.
Working conditions and precautions of the battery
¾ New batteries should be fully charged before initial use.
¾ Battery should only be used and charged when temperatures are between 32 -
100F.
¾ Never put the battery in fire or water.
¾ Do not expose the battery to high temperatures or store in hot, sunny places.
¾ Maintain well-ventilated conditions around the product to avoid overheating. Don’t
put the product on bed, sofa or anything that may block ventilation to the product.
¾ Do not short the battery terminals.
¾ Do not open the battery.
¾ Detach the battery after charging is complete. When charging the battery pack, the
charge light will turn red, when the charging is complete, the light will turn green.
¾ Detach the battery when not in use.
¾ When the battery is weak, “ ” will appear on the LCD screen and about five
minute later, the player will power OFF automatically.
Warning:
Do not touch any metal objects to the battery connectors, as it will put the battery in
standby mode. To exit the standby mode, connect the battery and DVD player to AC or
DC power
15
Page 16

Rechargeable Battery
Attaching the Battery Pack
Refer to the following steps for attaching the Battery Pack:
1. Make sure the DVD player is power off and the AC or car adapter is disconnected.
2. Place the DVD player on a soft and smooth surface.
2. With one hand on the DVD player to prevent it from moving, take the battery and
align the plastic tabs on the battery pack with holes on the player, and push the
battery pack into the DVD player.
3. The battery pack will click into place.
Charging the Battery Pack
The battery pack must be attached to the DVD player to charge it using the supplied AC
Power Adapter.
1. Attach the battery pack to the DVD player, as shown above.
2. Plug the supplied AC Power Adapter into the player’s power jack marked “DC
9.5V IN”, located on the right side of the DVD Player.
3. Plug the other end of the AC Power Adapter Cord into a household AC Outlet as
shown below.
16
Page 17

Rechargeable Battery
Detaching the Battery Pack
If the DVD Player is not going to be used for long periods of time, the battery pack should
first be fully charged and then detached. When the DVD Player is turned OFF, the DVD
Player is still consuming some power in STANDBY mode. This will eventually discharge
the battery.
Make sure the power is turned OFF and the AC or car adapter is disconnected before
detaching the Battery Pack.
Refer to the following steps for detaching the Battery Pack:
1. Push the battery pack latch toward the rear of the player and slide the rechargeable
battery from the main unit (see drawings below).
2. Store the rechargeable battery in a safe place.
17
Page 18

Notes on Discs
Compatible Disc Formats
DISC LOGO DIAMETER
DVD
CD
PLAYBACK TIME/
PLAYABLE SIDES
133 min (SS-SL)
12cm
8cm
12cm 74 min
8cm 20 min
242 min (SS-DL)
266 min (DS-SL)
484 min (DS-DL)
41 min (SS-SL)
75 min (SS-DL)
82 min (DS-SL)
150 min (DS-DL)
JPEG
Operation methods of some DVD discs are specified by the software manufacturer.
Please follow the instructions of the disc.
12cm
Care of Discs
Holding Discs
When loading or removing discs, try not to touch their playing
surfaces as the right figure.
Cleaning
Fingerprints or stain on the disc may affect the quality of sound and
picture. To clean your discs, use a soft clean cloth to wipe them. If
necessary , moi sten a sof t clot h w ith dilu ted ne utral d etergen t to rem ov e
heave dirt or fingerprints.
Do not wipe in a circular direction as the figure in the right middle
(concentric scratches on the disc groove tend to cause noise). Gently
wipe from the center of the disc to the outer edge as the right figure.
18
Page 19

PLEASE READ THE FOLLOWING INSTRUCTIONS CAREFULLY BEFORE USING
YOUR DVD PLAYER FOR THE FIRST TIME.
WARNING: Do not play poor-quality discs to avoid damaging the lens.
Playback Operation
Pre-operation
1. Connect the unit to power supply through the provided AC adaptor.
2. Switch “POWER ON/OFF” to “ON” on the left panel turn on the DVD player. The
main unit power indicator lights green and screen displays logo.
3. Press the OPEN button on the unit, put a disc in the disc tray with printed side
facing up, then close the disc cover. (See the figure below)
4. The player will search disc and play it automatically.
5. Adjust the volume with VOLUME control on the right panel to proper level.
6. To turn the player off, switch the “POWER ON/OFF” on the left panel to “OFF”.
Using of Some General Buttons
MODE
button
Press the MODE button to change the level of
brightness, contrast and color. Please adjust these
items with + and – buttons. P re ss the MODE button
for 1~2 seconds to change the aspect ration
between 16:9 and 4:3. See the below figure for
details:
19
Page 20

Playback Operation
Use of Some General Buttons (continued)
ZOOM
button
A-B
button
For DVD disc, press the ZOOM butt on to di splay
the image as 2x-3x-4x-1/2-1/3-1/4-normal size
in sequence.
For JPEG disc, press ZOOM button first, then
press the button to enlarge the picture as
follows: 125%-150%-200 %-normal size ; press
the button to reduce the picture as
follows:75%-50%-normal size.
This function is not available for CD disc.
During normal playback, press the A-B button
to select the segment that you want to play
repeatedly.
Press once to select the beginning point “A”,
press again to select the ending point “B” and
play the segment repeatedly. Press A-B button
again to cancel the repeat segment.
This function is not available for JPEG disc.
DVD Playback
Buttons Operation
Start Playing
Play/Pause
Stop
Load a disc in, the player will search the disc and play
it automatically, press the direction buttons to
highlight the item that you prefer and press the ENT
button to start playback.
Press the button to pause playback, and
press it again to resume normal playback.
During playback, press the button once to stop
playback, then press the button to resume
normal playback from the place where it was
stopped. Press it twice repeatedly to stop playback
completely.
20
Page 21

DVD Playback (continued)
MENU button
TITLE button
& buttons
In general, the c onten t o f a DV D dis c can be div ided
Playback Operation
Press the MENU button during playback to display
the menu on the screen. Press the MENU again to
resume the normal playback.
Press the (direction buttons) to select the
desired title or disc menu item, and press the ENT
button to confirm. Or press the 0-9 buttons to select
the item you prefer directly, then press the ENT
button to confirm.
In root menu, press the MENU button again to
resume the normal playback . Menu function is only
available for DVD discs.
into several titles, and also there are several menus
in a title.
Press the TITLE button during playback. The title
menu will appear on the screen. Press the direction
buttons to select the desired title or disc
menu item, and then press the ENT button to
confirm.
Press thebutton to start fast forward playback.
Press it repeatedly to fast forw ard at the sp eed of 2X,
4X, 8X, 16X, 32X in sequence. Pre s s th e b utton to
start fast reverse playbac k. Pres s it repeate dly to fa st
reverse at the speed of 2X, 4X, 8X, 16X, 32X in
sequence.
Press the button to resume normal playback.
21
Page 22

Playback Operation
DVD Playback (continued)
& buttons
SLOW button
Press the button once to go to the beginning of
current chapter . Press it twice repeatedly to go to the
beginning of previous chapter.
Press the button to go to the next chapter.
Press the SLOW button to start slow forward and
slow rewind playback as following: s.f.1/2 – s.f.1/4 –
s.f.1/8 – s.f.1/16 – s.r.1/2 - s.r.1/4 - s.r.1/8 - s.r.1/16
(s.f.:slow forward, s.r.: slow rewind).Press the
button to resume normal playback.
22
Page 23

CD Playback
Buttons Operation
Play/Pause
button
STOP
& buttons
&buttons
Playback Operation
Press the button to pause during playback,
press it again to resume normal playback.
During playback, press the but ton once to stop
playback, then press the button to resume
normal playback from the place where it was
stopped. Press it twice repeatedly to stop playback
completely.
Press the button to start fast forward playback.
Press it repeatedly to fast forw ard at the sp eed of 2X,
4X, 8X, 16X, 32X in sequence. Pre s s th e b utton to
start fast reverse playbac k. Pres s it repeate dly to fa st
reverse at the speed of 2X, 4X, 8X, 16X, 32X in
sequence.
Press the button to resume normal playback.
Press the button to go to the previous chapter.
Press the button to go to the next chapter.
23
Page 24

Playback Operation
Picture CD Playback
Pre-operation
1. Load a Picture CD in the disc tray, the player will search and play disc automatically.
2. The screen displays the Root Folder with several subdirectories/subfolders. Use
Buttons Operation
playP
the, buttons l to select desired folder. Then you can press any of the buttons
below to confirm your selection: , ENT button on the front panel.
3. The screen enters the selected subfolder with several files. Use the , buttons to
select desired file. Then press the ENT or button to confirm your selection.
4. Press thebutton to return to last folder or directory. Or move the yellow light bar
to , then press the ENT or button to confirm.
Note: Many discs have other items besides pictures.
STOP
button
Play/Pause
button
MENU button
Press the button to preview the pictures after
currently -playing picture in the way of small
pictures.
Press the button to resume normal playback.
Press the button to pause playback.
Press it again to resume normal playback.
Press the MENU button during playback to return to
root folder. Press the to resume normal
playback.
24
Page 25

Playback Operation
Picture CD Playback (continued)
During browsing a picture, you can press direction buttons ,,, to rotate the
current picture.
Press thebutton to rotate the current picture clockwise, as follow ing dr a wings:
Press thebutton to rotate the current picture anti-clockwise, as following drawings:
Press the button to rotate the current picture fli p horiz ontal, as following drawings:
Press the button to rotate the current picture fli p v ertical, as following drawings:
Picture Rotate
25
Page 26

System Setup
You can change the default settings of this unit to customize its performance to your own
preference. Read this section to learn how to set up the system.
Note: the system should better be set up in the state that no disc is in the DVD drive or the
unit is on the stop mode.
Follow the steps below to set up your system:
1. Press the SETUP button.
2. The setup menu will appear on the screen. It includes General Setup Page, Speaker
setup page, Dolby digital setup, Video setup page and Preference page. You can exit
the setup menu by pressing the SETUP button again at any time during setting.
3. Press the or (direction buttons) to select a sub-menu that you want to set up.
4. Press the or button to select the item that you want to set up in the sub-menu.
General Setup Page
The items included in this sub-menu are shown as
the left.
1.TV Display
This item is used to set TV display mode.
Press the or button to highlight this item.
Press the ENT orbutton to enter the item.
It includes Normal/PS, Normal/LB and Wide, Wide
by default. Press the or button to choose the
proper one. Press the ENT button to confirm your
selection. Press the direction button to exit from
this item.
Note: Select Normal/PS or Normal/LB when a 4:3
TV is connected.
Select Wide when a 16:9 wide screen TV is
connected.
26
Page 27

General Setup Page
System Setup
2.Angle Mark
This item is used to turn the Angle Mark on or off.
Press the or button to highlight this item.
Press the ENT or to enter the item.
Press the or button to choose angle mark on
or off.
Press the ENT button to confirm your selection.
Press the direction to exit this item.
3.OSD Language
This item is used to set the OSD (on-screen
display) language. Press the or button to
highlight this item. Press the ENT or to enter the
setup of this item.
It includes English, French, Spanish, German and
Italian, English by Default.
Press the or button to choose the proper one .
Press the ENT button to confirm selection. Press
the direction button to exit this item.
4.Screen Saver
This item is used to turn the screen saver on or off.
Press the or button to highlight this item.
Press the ENT or to enter the setup of this item.
The default setting of this item is on.
Press the or button to choose on or off.
Press the ENT button to confirm selection.
Press the direction button to exit this item.
5. Last Memory
This item is used to set last memory state.
Note: The last memory refers to resume playback
from the point that you stopped last time.
Press the or button to highlight this item.
Press the ENT or to enter the item.
The default setting of this item is on.
Press the or button to choose on or off.
Press the ENT button to confirm selection.
Press the direction button to exit this item.
27
Page 28

System Setup
Speaker Setup Page
Dolby Digital Setup
The item included in this sub-menu is shown as the
left.
1.Downmix
This item is used to set downmix mode.
Press the or button to highlight this item.
Press the ENT or to enter the item.
It includes Lt/Rt and stereo, stereo by default.
Note: The function of Lt/Rt is to output mixed audio
in the format provided by Dolby. The function of
stereo is to output stereo signal.
Press the or button to choose the proper one .
Press the ENT button to confirm your selection.
Press the direction button to exit this item.
The items included in this sub-menu are shown as
the left.
1. Dual Mono
This item is used to set the channel output mode.
Press the or button to highlight this item.
Press the ENTE or to enter the item.
It includes stereo, L-Mono, R-Mono and Mix-Mono,
Stereo by default.
Press the or button to choose the proper one .
Press the ENT button to confirm your selection.
Press the direction button to exit this item.
28
Page 29

Dolby Digital Setup
Video Setup Page
System Setup
2.Dynamic
This item is used to adjust linear dynamic
compression rate to get different signal
compression Effects.
Press the or button to highlight this item.
Press the ENT or to enter the setup of this item.
Then the item will show as the left.
Press the or to choose the proper level.
Press the ENT button to confirm your selection.
Press the direction button to exit this item.
The items included in this sub-menu are shown as
the left.
1.Sharpness
This item is used to adjust the sharpness of the
Screen.
Press the or button to highlight this item.
Press the ENT or to enter the item.
It included High, Medium and Low, Low by default.
Press or button to choose the proper one.
Press ENT button to confirm your selection.
Press direction button to exit this item.
2. Brightness
This item is used to adjust brightness level of the
Screen.
Press the or button to highlight this item.
Press the ENT or to enter the item.
Press the or button to adjust to desired level.
The default level is 00.
Press the ENT button to confirm your selection.
29
Page 30

System Setup
Video Setup Page
Preference page
3. Contrast
This item is used to adjust contrast level of the
Screen.
Press the or button to highlight this item.
Press the ENT or to enter the item.
Press the or button to adjust to desired level.
The default level is 00.
Press the ENT button to confirm your selection.
The items included in this sub-menu are
Shown as the left.
Note: This sub-title can only appear in the state
that no disc is in the DVD drive.
1. Audio
This item is used to set the audio output language.
Press or button to highlight this item.
Press the ENT or button to enter the item.
The available languages are English, French,
Spanish, Chinese, Japanese, Korean, Russian and
Thai, English by default.
Press the or button to choose the preferred
Language.
Press the ENT button to confirm selection.
Press thebutton to exit this item.
30
Page 31

Preference page
System Setup
2. Subtitle
This item is used to set the subtitle language.
Press the or button to highlight this item.
Press the ENT or button to enter the item.
The available languages are English, French,
Spanish, Chinese, Japanese, Korean, Russian and
Thai. Off by default.
Press the or button to choose the preferred
Language.
Press the ENT button to confirm selection.
Press the direction button to exit this item.
3. Disc Menu
This item is used to set the language of disc menu.
Press the or button to highlight this item.
Press the ENT orbutton to enter the item.
The available languages are English, French,
Spanish, Chinese, Japanese, Korean, Russian and
Thai, English by default.
Press the or button to choose the preferred
Language.
Press the ENT button to confirm selection.
Press the direction button to exit this item.
4. Default
This item is used to reset the unit.
Press the or button to highlight this item.
Press the ENT button to reset.
Then all the settings of your unit will return to the
Original status.
31
Page 32

Definitions
Letterbox screen
This refers to a screen on which the playback picture of wide-screen DVDs appears with black
bands running along the top and bottom.
Pan & Scan screen
This refers to a screen on which the playback picture of wide-screen DVDs is cut off at the left
and right sides.
Title, Chapter (DVD)
DVDs are divided into some large sections (titles) or some small sections (chapters). Each
section is numbered: these numbers are called "Title number" or "Chapter number".
Title 1 Title 2
Chapter1 Chapter 1
Chapter2
…… ……
Track (CD)
CDs are divided into some sections (tracks). Each section is numbered; these numbers are
called "Track number".
Track 1 Track 2 Track 3 ……
JPEG
JPEG is a common picture format that
has small file size and low quality loss
rate of picture. Hundreds of pictures can
be stored in a disc in this format. In order
to utilize real digital album, use film to
make a "PICTURE CD" in JPEG format.
The figure on the right displays the root
folder, folders an d files of a ty pical pictu re
CD.
32
Page 33

Take steps described in the tables below to solve simple problems before contacting
after-sales service.
If You Suspect Something Wrong, immediately turn the power off.
Disconnect the power connector and check that there is neither smoke nor heat from the unit
before asking for repairs. Ne ver tr y to re pair the un it by your se lf beca use i t is da ngerou s to do
so.
PROBLEM
The player cannot
play.
There is no sound.
POSSIBLE CAUSE
The disc cover may not be
closed.
There may not be any discs
in the DVD drive.
The disc may not be put in
with the right way.
The disc may be dirty or
warped.
The player's region code
may not as the same as the
region code of DVD disc.
There may be water on the
lens.
The system connection may
be not correct.
The speaker volume may be
turned down.
The sound setup of the DVD
disc may be not correct.
The disc may be dirty or
warped.
Troubleshooting
POSSIBLE SOLUTION
Close the disc cover.
Put a disc in to the DVD drive.
Put the disc in with the label
side up.
Clean or change the disc.
Make sure the player's
region code is the same as
the region code of DVD
disc.
Remove the disc and keep
the player being powered off
for at least two hours.
Connect the system
correctly.
Turn on the speaker.
Setup the sound of the DVD
correctly.
Clean or change the disc.
33
Page 34

Troubleshooting
PROBLEM
There is no picture.
Poor AV performance.
POSSIBLE CAUSE
The LCD may be off or not
be in correct video mode.
The system connection may
be not correct.
The unit may be not in AV
out mode.
The disc may be dirty or
warped.
POSSIBLE SOLUTION
Turn on the LCD and choose
the correct video mode.
Connect the system
correctly.
Switch AV tab on the bottom
of the unit to out.
Clean or change the disc.
Other possibilities:
Static or other external interference may cause the player function abnormally. In order to
recover normal status, please unplug the power-supply cord and then plug it into the outlet
again to reset the player. If the problems still exist, please cut off the power supply and consult
your service center or the qualified technician.
34
Page 35

TFT screen size 7 inches
Laser Wavelength 780/650 nm
Video System NTSC
Specifications
Frequency Response
Audio Signal-to-noise Rate
Audio distortion+noise
Channel Separation
Dynamic Range
Audio Out Analog Audio Out
Video Out Video Out
Power
Power Consumption < 25W
Dimensions 195mmX149mmX38.5mm (L*W*D)
Weight About 1.2 kg
AC 100-120V ~ 50/60Hz
20Hz~20kHz ±2.5dB
≥85dB
≤-70dB (1kHz)
≥70dB (1kHz)
≥80dB (1kHz)
Out Level: 1.5V±
Out Level: 1V
Unbalanced Negative
0.2
, Load: 10KΩ
1.0
±0.1, Load: 75Ω
P-P
DESIGN AND SPECIFICATIONS ARE SUBJECT TO CHANGE WITHOUT NOTICE
“Dolby” and the double-D symbol are trademarks of Dolby Laboratories.
Confidential unpublished works. © 1992 -1997 Dolby Laboratories, Inc.
Manufactured under license from Dolby Laboratories.
All rights reserved.
For service, support and warranty information, visit www.polaroid.com.
"Polaroid" and “Polaroid and Pixel” are trademarks of Polaroid Corporation, Waltham,
MA, USA.
35
 Loading...