

Page 1
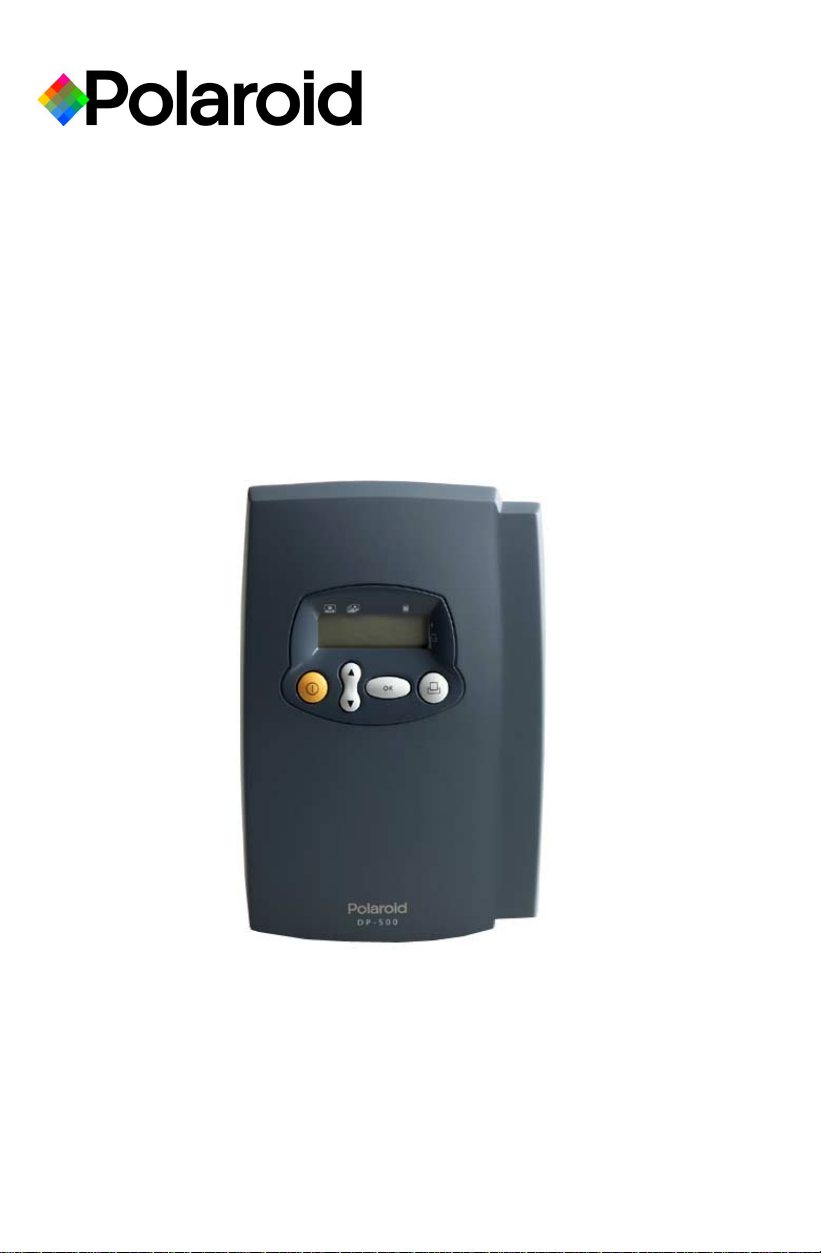
P-500 Digital Photo Printer
User Guide
Page 2
Table of Contents
Kit Contents 1
Things You Should Know 2
Printer Features 3
Control buttons 3
Display panel 3
Side panel 3
Inserting the Shoulder Strap 4
Loading the Film Pack 4
Printing Digital Photos 6
Inserting the memory card 6
Setting the Print Queue 6
Tagging Images 8
Editing the Print Queue 10
Clearing the Print Queue 10
Troubleshooting 11
Printer does not function at all 11
Printer does not print when I press Print 11
Some images printed, but then the
printer stopped 11
There is a problem with the memory card 12
There is a problem with the print queue 12
The printer is inoperable 12
Display Panel Messages 13
General 13
Memory Card 13
Film Errors 14
FCC Notice 15
Precautions 16
Printer Precautions 16
Film Precautions 16
Polaroid Customer Support 17
One Year Limited Warranty 17
EMC Statement (Europe) 17
Specifications 18
Table of Contents
User’s Guide
P–500
i
Page 3
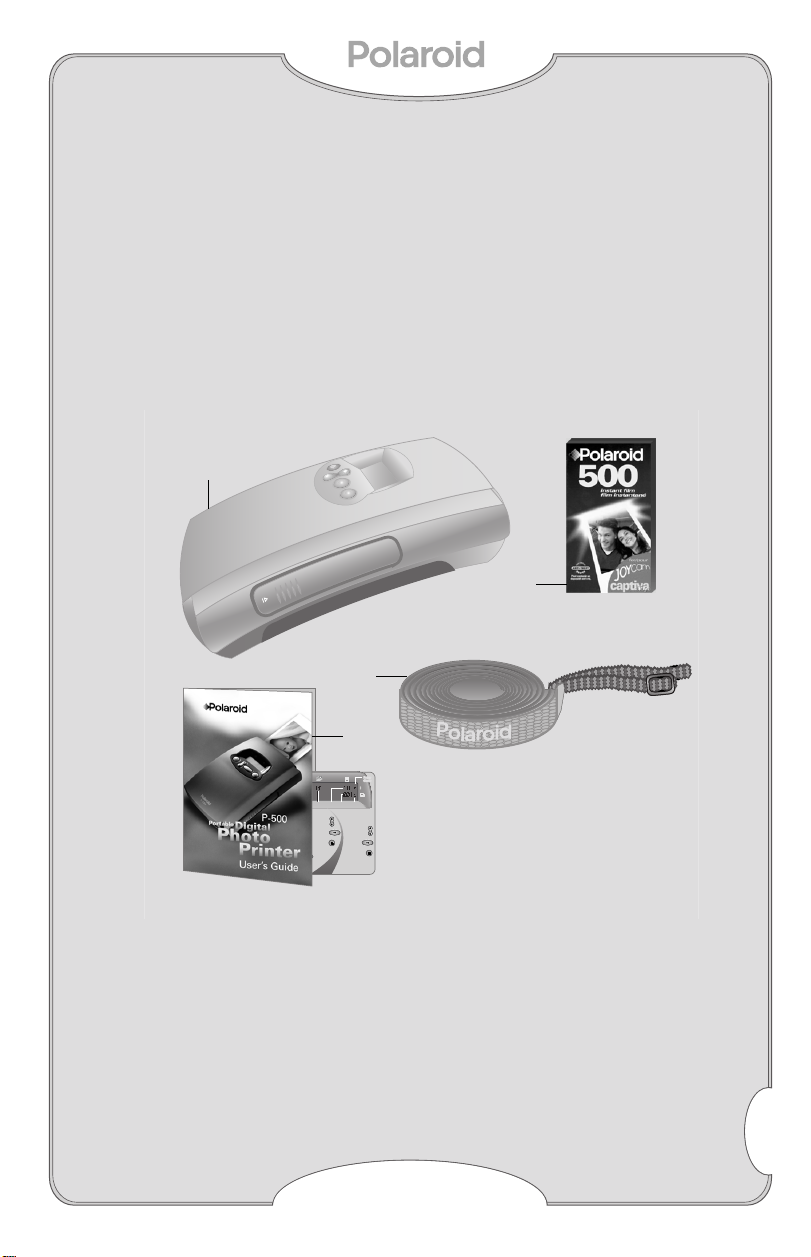
Kit Contents
The
Polaroid P-500 Digital Photo Printer
prints photos taken with your digital camera.
a
P-500
Digital Photo Printer
b Shoulder Strap
c User’s Guide, Quick Reference/Label,
Registration Card
d Polaroid 500 Instant Film
a
Kit Contents
d
c
Select
Select
Film
Print
Activity
image
copies
count
queue
To Select Images and Copies To Print Tagged Images
1
Insert
memory
card.
2
printer.
3
image
number
4
OK to
move to
copies field.
indicator
(when printer asks:
5
Select
"Print tagged Files?")
copy
1
Select
count
continue.
6
Press
Turn on
Cancel
Select
OK.
to ignore.
7
Print.
Select
2
Press OK
Press
to confirm.
print.
3
Press Print
Press
to print all.
Note: DPOF and Lock
tags are removed
after printing.
User’s Guide
b
Power
Status
Print
to
1
P–500
Page 4
Things You Should Know
Things You Should Know
•
About removable memory cards
prints photos taken with most digital cameras
using CompactFlash Type I & II or SmartMedia memory cards. The P-500 supports JPEG
image files created by most digital cameras.
•
About the print queue
sequence of images you select for printing.
•
About DPOF
advanced feature that allows you to tag
selected images for printing. When you transfer the memory card to the P-500, you can print
the tagged images without having to set the
print queue. This guide refers to this feature as
DPOF
(digital print order format). Your camera
manual may use another term such as
or
direct print select
on (page 8).
•
About Lock.
lock feature that allows you to protect images
from being deleted. When using
such as a key or check mark identifies these
images. You may use the lock feature to tag
images for printing with the P-500. If both DPOF
and locked images are on the memory card,
locked tags are ignored. See
Images
• For best quality photos, set your camera to the
highest resolution when taking pictures.
• For best results, use the printer at temperatures above 55°
• Fill out and mail in your registration card. Sign
up for a free online account to create and store
images at:
. The P-500
.The print queue is the
. Your digital camera may have an
. See
Your digital camera may have a
on (page 8).
F (13°C)
Tagging Images
Lock
Tagging
.
www.PolaroidDigital.com.
print set
, an icon
2
User’s Guide
P–500
Page 5
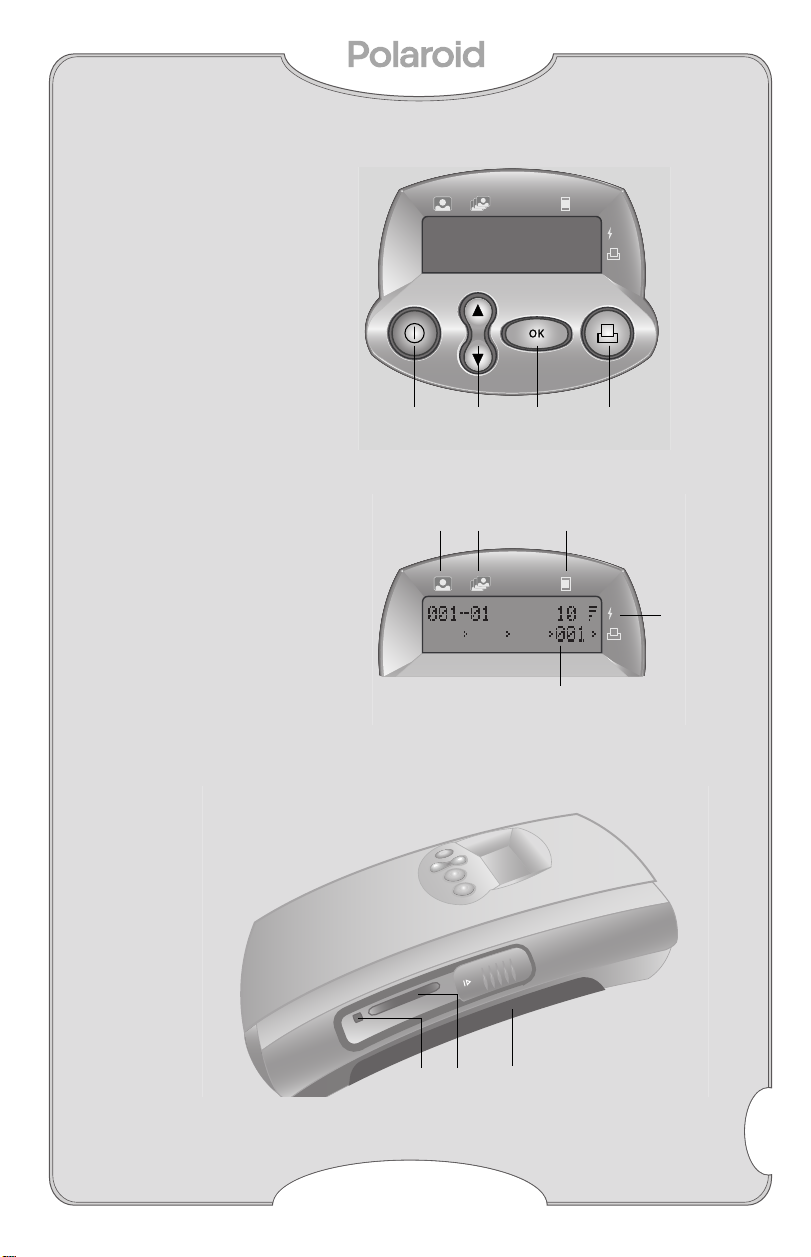
Printer Features
Control buttons
a On/Off
b Arrows/Select
c OK/Confirm
d Print
Printer Features
Display panel
The display panel
indicates printer status.
e Image number
f Copy count
g Film count
h Power indicator
i Print queue
Side panel
j Card eject button
k Memory card slot
l Film compartment door
abc d
feg
h
i
klj
User’s Guide
P–500
3
Page 6
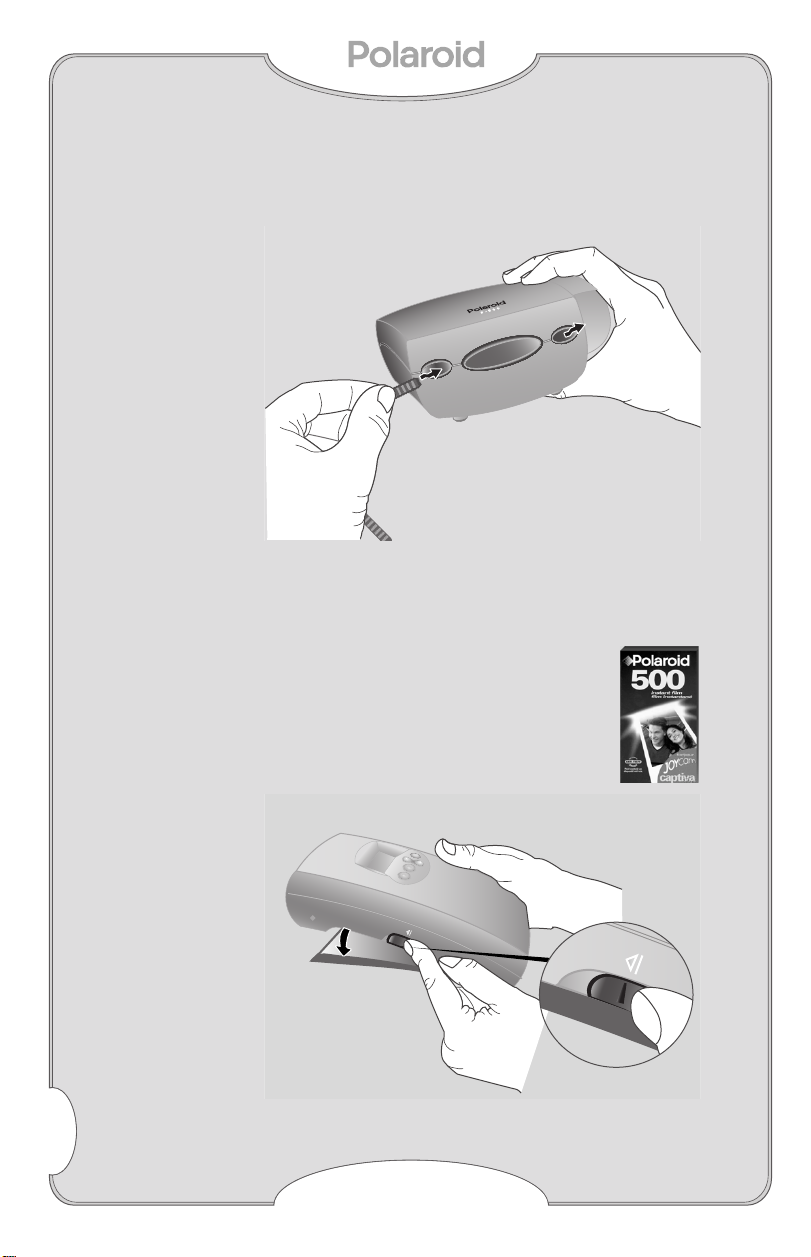
Inserting the Shoulder Strap
Inserting the Shoulder Strap
1
Insert strap as shown.
Push through and attach to other end.
2
Loading the Film Pack
Your printer uses Polaroid 500 instant
film. The film pack contains the battery power for the printer.
Open the film compartment as
1
shown.
4
User’s Guide
P–500
Page 7
Slide the film pack carefully, film-side up,
2
within the metal guides as shown.
Close the film compartment door.
3
4
Press and hold . The film cover ejects.
Each time the film door opens, the film
count resets to 10. If you insert a partially used film pack, the count will be
inaccurate.
You should have enough battery power to print a
full film pack. When the power level shows only
the two smallest bars you have a limited time
to print your images.
Loading the Film Pack
To conserve battery life, the printer shuts down
after several seconds of inactivity. To reactivate
the printer press and hold . The printer
retains your selections.
User’s Guide
P–500
5
Page 8

Printing Digital Photos
Printing Digital Photos
Inserting the memory card
Use the printer display panel to select images
and that you want to print before or after inserting the memory card.
Slide open the memory card slot door. Insert
1
the card, label-side up, into the slot.
: SmartMedia requires an adapter. Insert
Note
the card into the adapter, and then the
adapter into the printer
.
Setting the Print Queue
Press and hold .
1
: The printer detects DPOF or Locked
Note
images, if any are present, and sets the
print queue. To ignore this feature
select
Cancel
see
Tagging Images on page 8
The Image Number (a) displays
. For more information
a b
000
.
.
6
User’s Guide
P–500
Page 9

The film count (b) displays the frames available. You can program as many images as
there are frames.
2
Select the image number you want.
3
Press .
The Copies (c) field becomes active.
c
Choose the number of copies you want.
4
The default number is 1.
Press .
5
The print queue (d) displays the image number. As you select more images, the film count
shows the remaining frames available. You can
queue more than four images, however the
print queue displays the last images entered.
Printing Digital Photos
d
6
Press .
Each photo prints in several seconds.
Printing continues until the queue or the film
pack is empty.
User’s Guide
P–500
7
Page 10

Printing Digital Photos
Tagging Images
You can select images for printing without setting the print queue using your digital camera’s
DPOF or Lock feature. Refer to your camera
manual for details.
: If you want multiple copies of a locked
Note
Using your camera’s LCD (liquid crystal dis-
1
play), tag the images you want to print with
either the DPOF or Lock feature.
2
Remove the memory card from your camera.
3
Slide open the memory card slot door. Insert
the card, label-side up, into the slot.
Note
:
4
Press and hold .
The printer detects tagged image files.
The P-500 alerts you that it detects DPOF or
Locked images. You may continue with, or
ignore, this method of printing. The default
setting is to continue to print tagged images.
image, set the print queue.
SmartMedia requires an adapter. Insert
the card into the adapter, and then the
adapter into the printer
.
8
User’s Guide
P–500
Page 11

To print, press .
5
A message
Printing (#) of (#)
appears. Each
photo prints in several seconds.
If the number of tagged files exceeds the
number of frames available, a message such
as:
Print 10 of 15?
indicates the total number
of frames available (10) and the number of
tagged files detected on your memory card
(15).
Press to continue.
6
Note
: To ignore, select
cancel, press
the Print Queue
and see
(page 10)
Cancel
. If you
Editing
.
All tags are removed after printing.
Printing Digital Photos
User’s Guide
P–500
9
Page 12

Editing the Print Queue
Editing the Print Queue
If you are not printing tagged images you can
edit the print queue before you press print to
adjust your selections.
1
Select the image number requiring
adjustment.
2
Press .
The copies field becomes active and indicates
the current number of selected copies.
3
Adjust the number of copies.
4
Press
Note
: To clear an image number from
Clearing the Print Queue
You can clear the queue any time. If you have
pressed Print, the current photo will finish printing before the P-500 shuts down.
• Press .
the print queue, set the copy count
to zero and press .
10
User’s Guide
P–500
Page 13

Troubleshooting
Printer does not function at all.
The film pack is not in the printer.
• Load the film pack into the printer.
The battery in the film pack is too low or
dead.
• Replace the film pack.
Environment is very cold, causing reduced
performance.
• If using the printer at temperatures below
55°F(13°C)
just before use.
Printer does not print when I press Print .
The default image number is “000.”
• Select an image to print.
The film pack is jammed.
• Open the film compartment, clear the jam, and
turn the printer on. The exposed frame ejects.
The film pack is empty.
• Insert a new film pack.
The battery in the film pack is too low or
dead.
• Replace the film pack.
, keep film packs warm, then load
Troubleshooting
Some images printed, but then the printer stopped.
A partially used film pack was loaded which
defaults the film count to 10. Although the
printer allowed you to program 10 images,
the film ran out.
• Insert a new film pack.
The battery in the film pack is too low.
• Replace the film pack.
User’s Guide
P–500
11
Page 14

Troubleshooting
12
There is a problem with the memory card.
The card is in the printer, but it still will not print.
• The printer is compatible with Type I and II CompactFlash and SmartMedia cards only. Check your
memory card for compatibility.
• Remove the memory card, and check the images in
your camera. Reinsert the card into the printer if the
image files you want to print are on the card.
The card is unreadable.
• Stored images may have been corrupted. Remove
the card and reformat it, or use another card.
• Images may not be in JPEG format. Check the
file format.
There is a problem with the print queue.
The print queue displays a number of frames
remaining, however, the photos will not print.
• The default setting for all film-packs loaded into the
camera is 10. It’s possible that a partially used film
pack was inserted into the printer and less than 10
frames were available. Insert a new film pack.
The print queue will not accept all my images.
• The printer will allow you to queue as many images
as there is film available. Insert a new film pack.
The wrong print came out.
• Recheck the image number using your camera’s
LCD. Certain digital cameras create image files in a
method not supported by the P-500. If you encounter a conflict, go to online support at PolaroidDigi-
tal.com; or call Polaroid Customer Support at
1.800.897.0356.
The printer is inoperable .
• If you encounter problems operating the printer,
open the film door and restart the printer. For help go
to online support at PolaroidDigital.com; or call
Polaroid Customer Support at 1.800.897.0356 for
further assistance.
User’s Guide
P–500
Page 15

Display Panel Messages
To clear any message on the display, Press OK to continue.
General
Message Explanation Resolution
Display Panel Messages
The printer detects
Locked or DPOF
files when you turn
on the printer. The
default selection is
Print.
Press Print Queue is full. You
can print as many
photos as there is
film available up to a
maximum of 10.
Select Image # Default image num-
ber is 0, printer
needs information.
Temp error Printer operates
best at temperatures above 55
°F.
To Print, press OK;
to ignore and
manually set the
print queue, select
Cancel, then press
OK.
To continue, press
Print.
Select image
numbers then press
Print.
Warm film.
Memory Card
Message Explanation Resolution
No card Memory card has
not been transferred to the printer.
Insert memory card.
User’s Guide
P–500
13
Page 16

Display Panel Messages
Memory Card (continued)
Message Explanation Resolution
Card error An unrecognized
memory card has
been inserted into
the printer.
### invalid Queue entry for
image number not
found.
Q #__ Bad
fread error???
jbuffer overflow
Unreadable files
(corrupted, nonJPEG format), prevent the printer
from operating.
There may be a discrepenacy between
image numbering in
your camera and the
P-500.
Film Errors
Use only CompactFlash Type I & II (2128 megabyte) or
SmartMedia removable memory cards
with this printer.
Printer will skip
invalid image # and
move on to next
image in queue.
Remove the card
and if possible, view
the contents in your
computer. Remove
non-JPEG files and
try printing again. If
the problem continues, try using
another card. If
problem continues,
contact customer
service.
14
Message Explanation Resolution
Insert Film All available frames
have been printed.
Insert new film pack
User’s Guide
P–500
Page 17

FCC Notice
This equipment has been tested and found to
comply with the limits for a Class B digital
device, pursuant to part 15 of the FCC Rules.
WARNING: Changes or modifications to this
unit not expressly approved by the party responsible for compliance could void the user's authority to operate the equipment. Note: This
equipment has been tested and found to comply
with the limits for a Class B digital device, pursuant to Part 15 of the FCC rules. These limits are
designed to provide reasonable protection
against harmful interference when the equipment is operated in a residential installation. This
equipment generates, uses, and can radiate
radio frequency energy and, if not installed and
used in accordance with the instruction manual,
may cause harmful interference to radio communications. However, there is no guarantee that
interference will not occur in a particular installation. If this equipment does cause harmful interference to radio of television reception, which
can be determined by turning the equipment off
and on, the user is encouraged to try to correct
the interference by one or more of the following
measures:
• Reorient or relocate the receiving antenna.
• Increase the separation between the equip-
ment and receiver.
• Connect the equipment into an outlet on a circuit different from that to which the receiver is
connected.
• Consult the dealer or an experienced radio TV
technician for help.
FCC Notice
User’s Guide
P–500
15
Page 18

Precautions
Precautions
Printer Precautions
Observe the following precautions when using
the Polaroid Digital Photo Printer:
• Do not open the printer case or attempt your
own repairs. High-voltage internal components
create the risk of electrical shock when
exposed. Contact Polaroid Customer Service
for repair information.
Film Precautions
This printer is powered by batteries contained
within the film pack. Supervise children when
printer is operated by them or used in their presence. To avoid electrical shock, do not expose to
or immerse in water or other fluids, disassemble, or operate if dropped or damaged. Contact
Polaroid Customer Service for repair information.
This film uses a caustic paste. Avoid contacting
skin, eyes, or mouth with the paste. If you get
some paste on your skin, eyes, or mouth,
wipe it off immediately, wash with water to
avoid an alkali burn and consult a doctor. Do
not cut or take apart photos or battery. Do not
burn battery or allow metal to touch its terminals. Keep discarded materials, or paste away
from children, animals, clothing, and furniture.
16
User’s Guide
P–500
Page 19

Polaroid Customer Support
Internet: www.PolaroidDigital.com
Telephone: 1-800-897-0356, (U.S.A.)
You can call Polaroid toll-free within the U.S.A., 7
days a week, 8 A.M. to 8 P.M. Eastern Standard
Time. Please identify the Polaroid product and if
possible, its serial number.
We offer a variety of Customer Support Services. Call us for details and applicable fees.
Outside the U.S.A., contact the Polaroid office
nearest you.
One Year Limited Warranty
Polaroid will, at our option, repair or replace any
unit found defective in manufacture within the
warranty period. The warranty period is determined by the date of purchase. Keep the receipt
as proof of purchase. Otherwise, the warranty
period is determined by the date of manufacture.
This warranty does not apply to damage
caused by accident, misuse or tampering,
and excludes all consequential damages
except in jurisdictions not allowing such
exclusions or limitations.
Polaroid Customer Support
EMC Statement (Europe)
Polaroid Corporation certifies that this product
conforms to the following standards:
EMC
89/336/EEC EMC Directive
EN 55022, Class B
EN 50082-1
User’s Guide
P–500
17
Page 20

Specifications
Specifications
• No PC required
• No batteries required
• No cables required
• Image format: JPEG
• On-board alpha-numeric and text (English only)
status display
• Supports DPOF and image lock
• Print quality: Full color continuous tone prints
• Automatic image enhancement
• Film type: Polaroid 500 Instant film
• Image size: 2.15” x 2.86” (54.6mm x 72.6mm)
• Print time: < 20 seconds
• Prints multiple copies of
a single image
• Compatibility: all digital cameras using CompactFlash Association (CFA) certified TYPE I &
II (2-128 megabyte) or SmartMedia (requires
adapter) removable memory cards.
• Size: 4.75” x 7.25”H x 2.35”H (121mm x
184mm x 60mm)
• Weight: 18 oz. (.55kg)
• Optimal operating temperature range: 55°F to
104°F
18
User’s Guide
P–500
Page 21

©2000 Polaroid Corporation, Cambridge, MA 02139, U.S.A., owner of
the trademark “Polaroid”. All other product names may be the property
of their respective owners. All rights reserved.
Printed in the U.S.A. PU-21674M-0
User’s Guide
P–500
19
 Loading...