

Page 1

Polaroid ID Systems Weblink
Configurator Utility Guide
Polaroid ID Systems
4650 Executive Blvd
Fort Wayne, IN 46808
260.484.0611
Toll-free 1.866.ID Photo
Fax 260.483 4287
Page 2

The design and information contained in these materials is protected by US and international copyright law.
Polaroid and Polaroid & Pixel are trademarks of Polaroid Corporation. 9007685 0764-1-06-1 12/05
This guide may not be copied, photocopied, reproduced, translated, or reduced to machine readable form
without the express written permission of Polaroid Corporation. No copies of this guide or of the
accompanying software may be sold or given to any other person or entity.
Information in this guide is subject to change without notice. Polaroid Corporation assumes no
responsibility for any errors that may appear in this guide.
All drawings and information herein are the property of Polaroid Corporation. All unauthorized use and
reproduction is prohibited.
All other product names are trademarks of their respective owners.
Page 3

Table of Contents
Configurator Utility Overview............................................................................................ 1
Configurator Installation Options .............................................................................. 2
What You Will Need.................................................................................................... 2
Using this Guide ......................................................................................................... 3
Weblink Configurator Modes............................................................................................. 4
Using Configurator in Tab Mode ............................................................................... 4
Using Configurator in Wizard Mode.......................................................................... 5
Application Definition........................................................................................................ 6
Group Definition................................................................................................................. 8
Table Definition................................................................................................................ 10
ODBC Connection.................................................................................................... 11
LDAP Connection..................................................................................................... 13
Drop-Down List Definition (Optional)............................................................................. 14
Values Stored in the Weblink Configuration ............................................................ 15
Values Stored in a Look-up Table............................................................................. 16
Search Definition.............................................................................................................. 19
Search Table Definition............................................................................................ 20
Search Field Definition............................................................................................. 21
List Field Definition.................................................................................................. 22
Data View Definition........................................................................................................ 24
Data View Pages Definition...................................................................................... 26
Data View Image Definition ..................................................................................... 33
Data View Header Definition ................................................................................... 35
Menu Item Definition ....................................................................................................... 37
Window Location Definition............................................................................................ 39
After Each Configuration Change .................................................................................... 41
Appendix A – Weblink Software License ........................................................................ 42
Appendix B - End-user License Agreement for Microsoft Software ............................... 43
Page 4

1
Configurator Utility Overview
The Weblink Configurator utility is used to configure the Weblink application to meet your
particular needs. You may modify applications, as well as user accessibility to those applications.
You may also modify the way screens are presented to users. Seven components of the sample
application may be configured. Each is briefly described below:
Applications are sets of pages that allow a user to search for, display, and edit records in a
database. Each Weblink application has its own Virtual Directory (Web site) in Internet
Information Server. Therefore, an application is equivalent to a Weblink site.
Groups control user access to various features of Weblink. Groups must first be defined in the
initial security setup and then in the Configurator utility.
Tables are the database tables to be used with Weblink.
Drop-down List Boxes refer to preset list boxes that can be placed in Search or Data View
screens and can be pre-populated from Weblink or external databases.
Searches define how Weblink searches records. A search definition contains table names, list
fields, and search fields.
List Views define the fields to be displayed in a list when more than one matching record is
found. The user selects records from this list to view.
Data Views define what the user sees after a record is located. This includes page fields, images,
and ActiveX components.
Menu Items relate searches and data views. A menu item may have multiple searches.
Window Locations are screen positions for certain items such as the menu and toolbar.
Polaroid Commercial ID Systems
Weblink Configurator Utility Guide
Page 5

2
Configurator Installation Options
You may choose to configure Weblink off site or on a workstation other than the server. To do
so, select the “Configurator Only” option during the Weblink installation. Once you have
configured your application, copy the workstation version of IDCardMakerWeblink.mdb (usually
in the Program Files\Polaroid\IDCardMakerWeblink\Design folder) to the appropriate folder on
the Web server (usually the Program Files\Polaroid\IDCardMakerWeblink\Design folder).
Your configured application is stored in several tables of the Microsoft® Access™ 97 database,
named “IDCardMakerWeblink.mdb.” It has an ODBC data source entry of “Weblink.” Never
edit this file directly, unless directed to do so by Polaroid personnel. Configuring Weblink on a
server or workstation that has an ODBC connection to the database is highly recommended. The
user may then take advantage of drop-down edit boxes and test connection buttons to verify that
the database columns are entered correctly.
What You Will Need
You will need to know the following items before configuring your application:
Database table schema including all field names, types, and keys.
Group names defined in the User Manager that identify Weblink functions.
Fields to search including which fields are required and their particular case.
Fields to display in a list.
Fields to display in data views grouped in logical subsets. You should decide which
fields are editable.
Images to display.
Polaroid Commercial ID Systems
Weblink Configurator Utility Guide
Page 6
3
Using this Guide
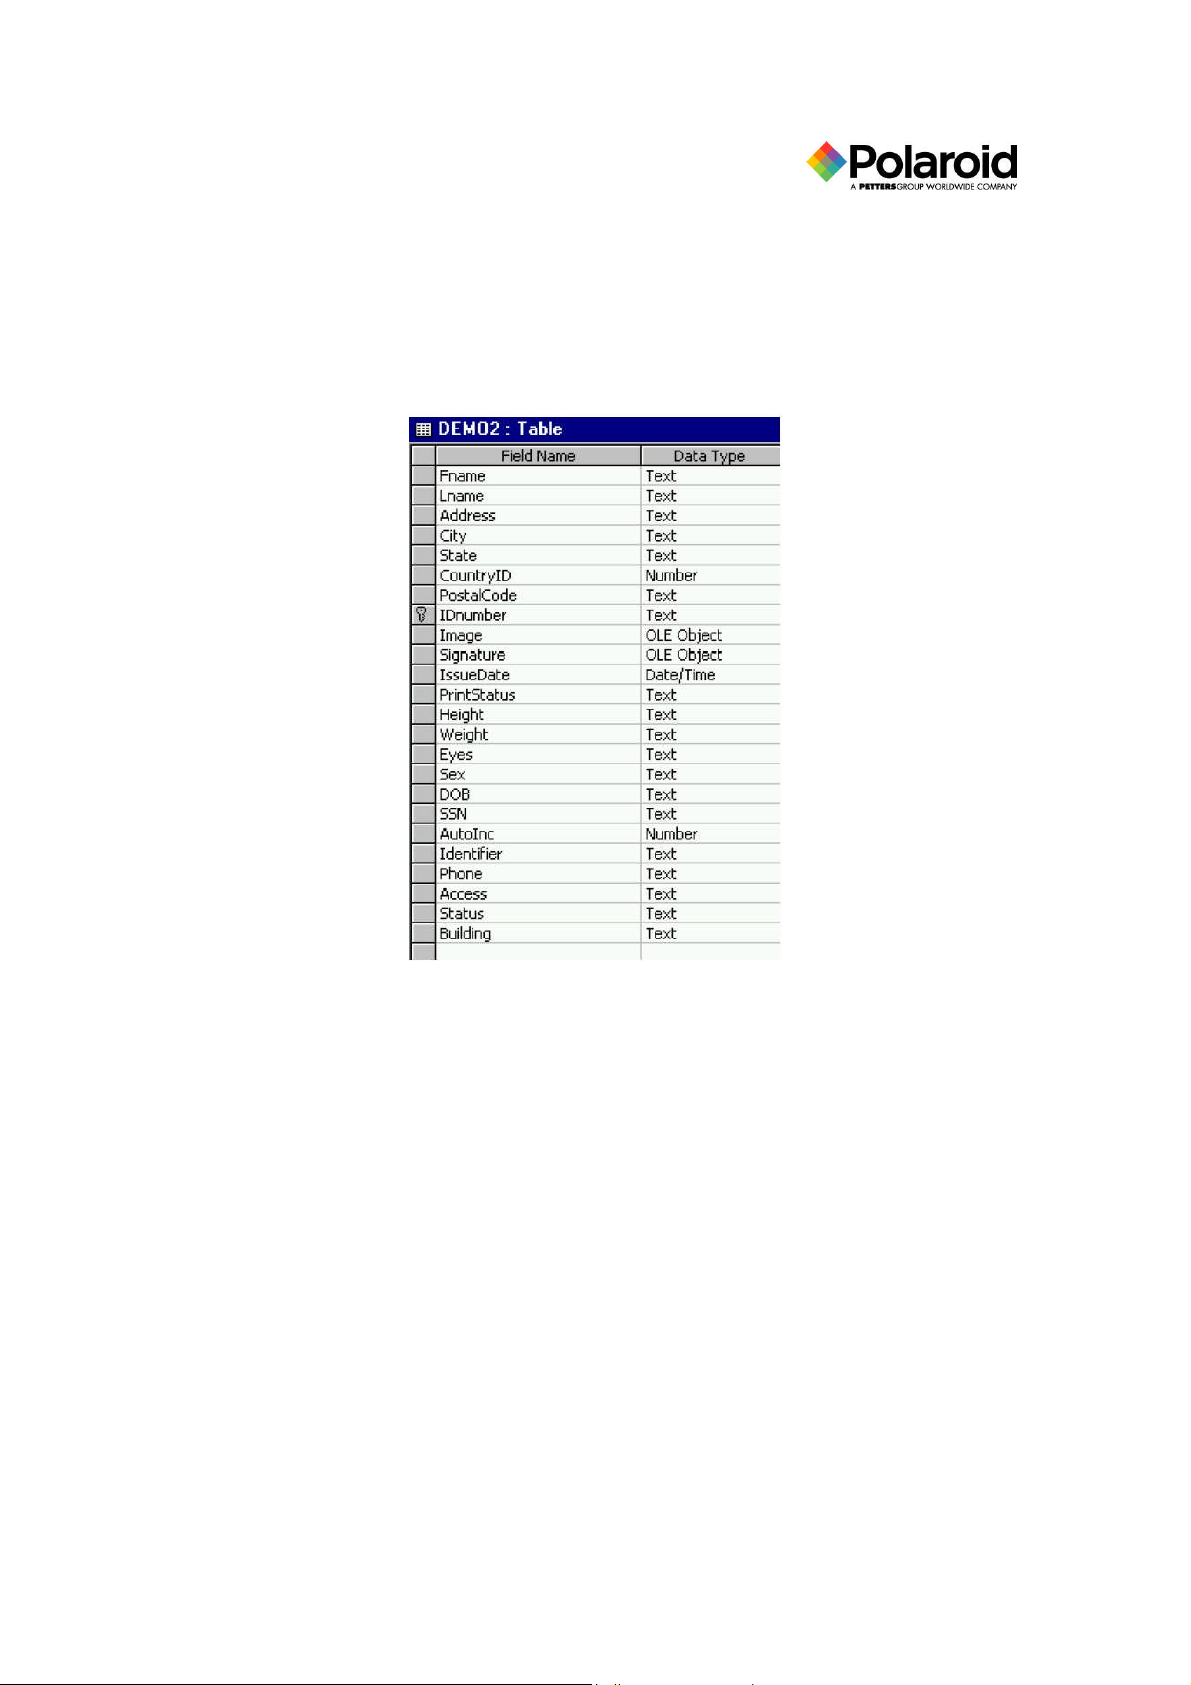
The Weblink Demo Microsoft Access database installed during setup is provided as a sample
application. You may refer to this information as necessary to observe how information in dialog
boxes is to be completed. The name of the demo database is DEMO32BLOB.MDB. A table
from the database is shown below. This demo database should not be edited.
The steps in this guide instruct you on how to add information to your application. Use the Add
button, as directed throughout this guide, to build a new application. Use the Edit button to
modify information in an existing application. The text boxes in the Add and Edit dialog boxes
are identical, although the Edit dialog boxes automatically display previously entered
information. A Copy button is also provided for use in copying a selected item. By clicking the
Copy button, you copy the selected item, add it to the list, and label it “Copy of <item>.” You
may also select an existing entry and then select the Delete button to delete the entry. Upon
deleting an entry, you are presented with a confirmation dialog box. If you still wish to delete,
click the Yes button.
Polaroid Commercial ID Systems
Weblink Configurator Utility Guide
Page 7
4
Weblink Configurator Modes
The Configurator utility is available in three modes: the Configurator Tab mode; the Configurator
Wizard mode; and the Configurator EZ Wizard mode.
Using Configurator in Tab Mode
The Configurator utility Tab mode is used for fast editing once you are familiar with Weblink.
The Tab mode allows you to tab through each of the eight components in any order you choose.
Use the following procedure to use the utility in the Tab mode:
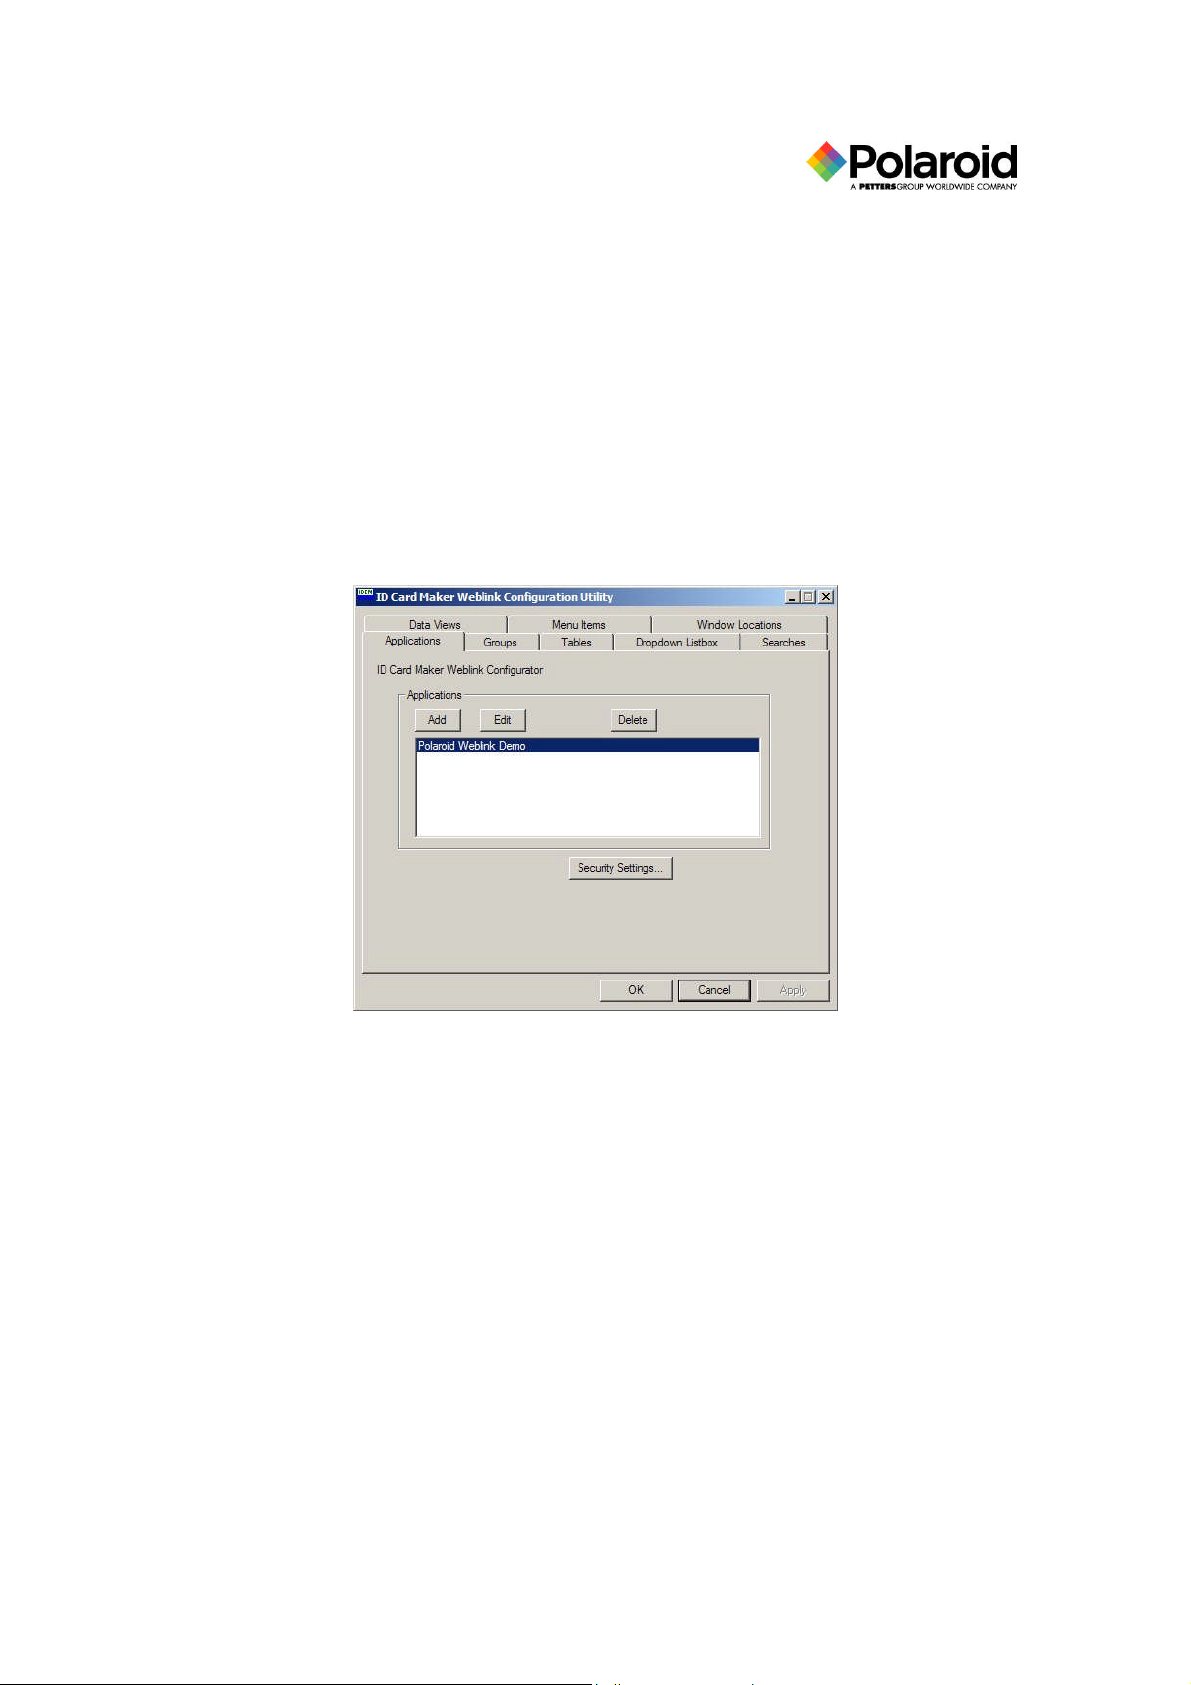
1. From the Start menu select >Programs >Polaroid > IDCardMakerWeblink >
Configurator. The Weblink Configurator utility is displayed in Tab mode.
Polaroid Commercial ID Systems
Weblink Configurator Utility Guide
Page 8
5
Using Configurator in Wizard Mode
The Wizard mode is recommended for familiarizing yourself with the Configurator utility. The
Wizard mode prompts you through each step of the application and is used as examples in this
guide to take you through each available function. The Next button takes you to the next
Weblink component. The Back button returns to the previous component. The Cancel button
exits the Weblink application.
To start the Configurator utility in Wizard mode:
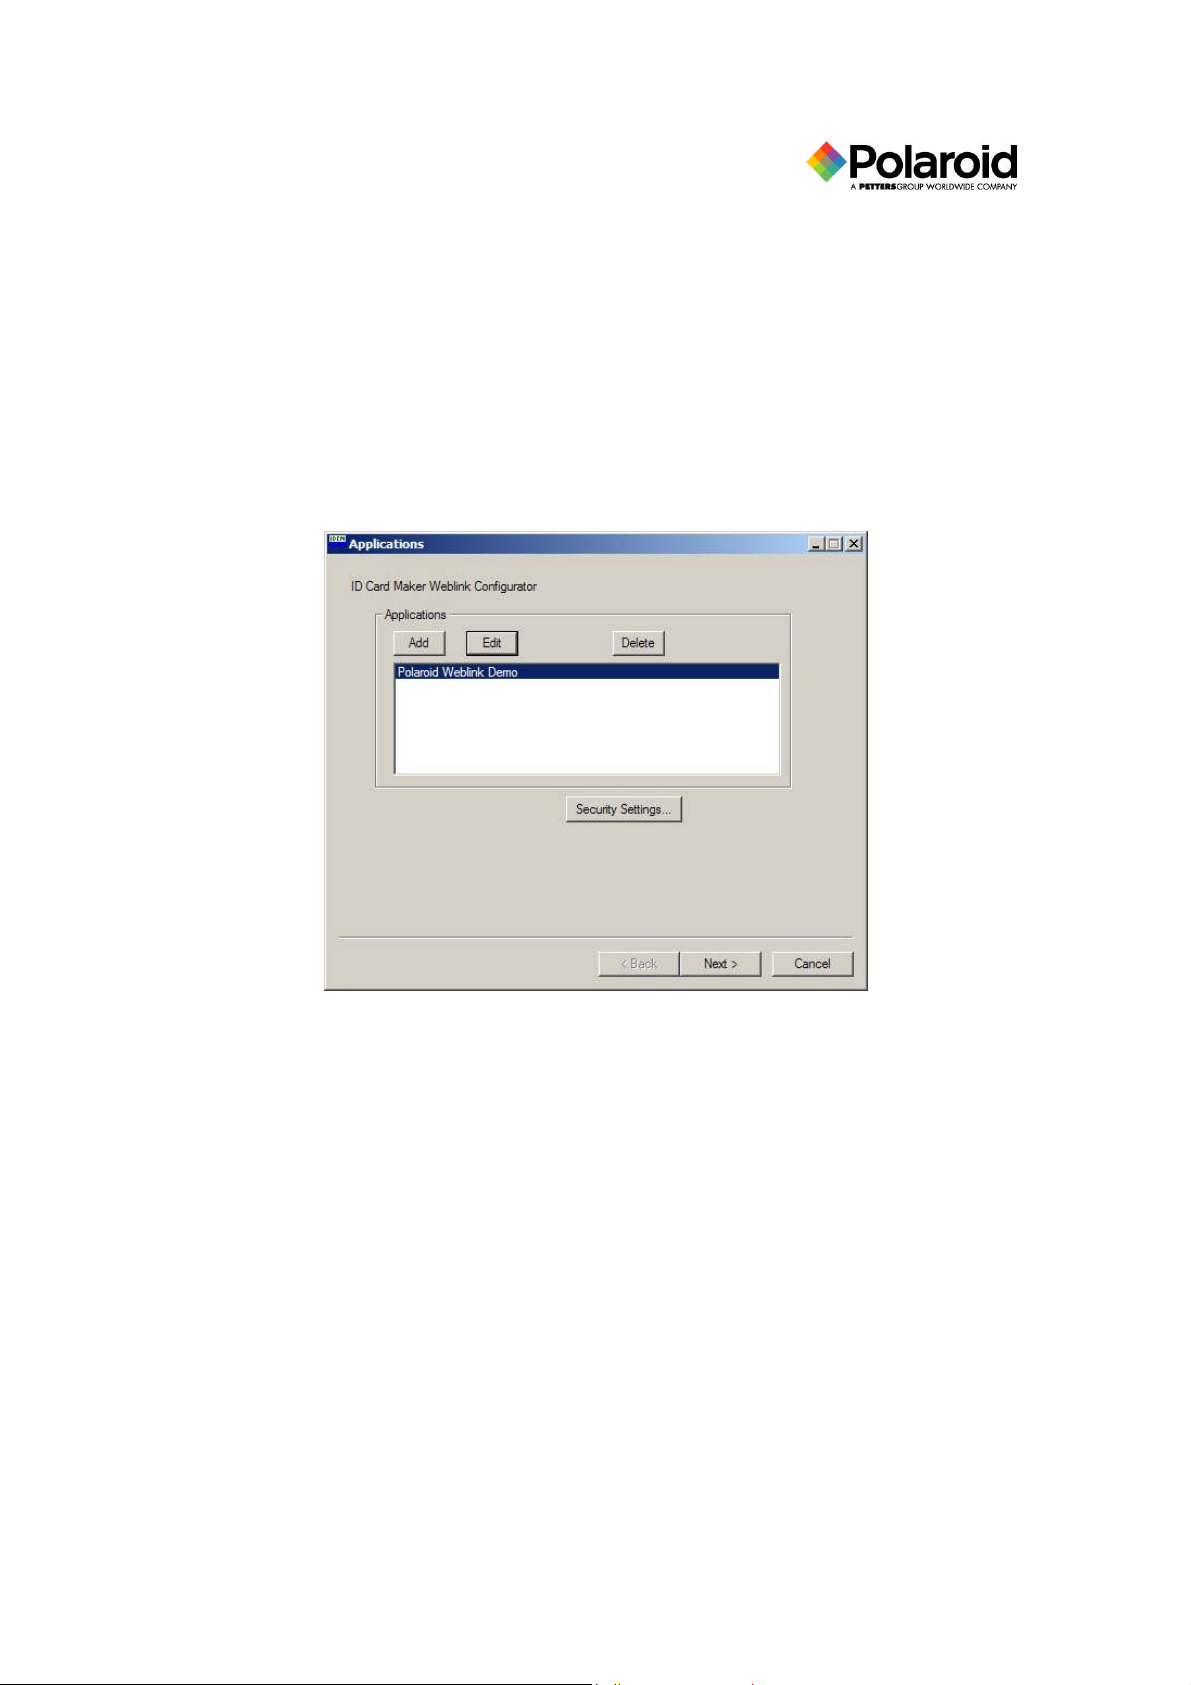
1. From the Start menu, select Programs > Polaroid > IDCardMakerWeblink > Configurator
Wizard . The Applications dialog box is displayed.
Polaroid Commercial ID Systems
Weblink Configurator Utility Guide
Page 9
6
Application Definition
The application definition feature allows you to enter the application name, script source, and
logo information. You may also add hypertext information. Use the following procedure to add
an application:
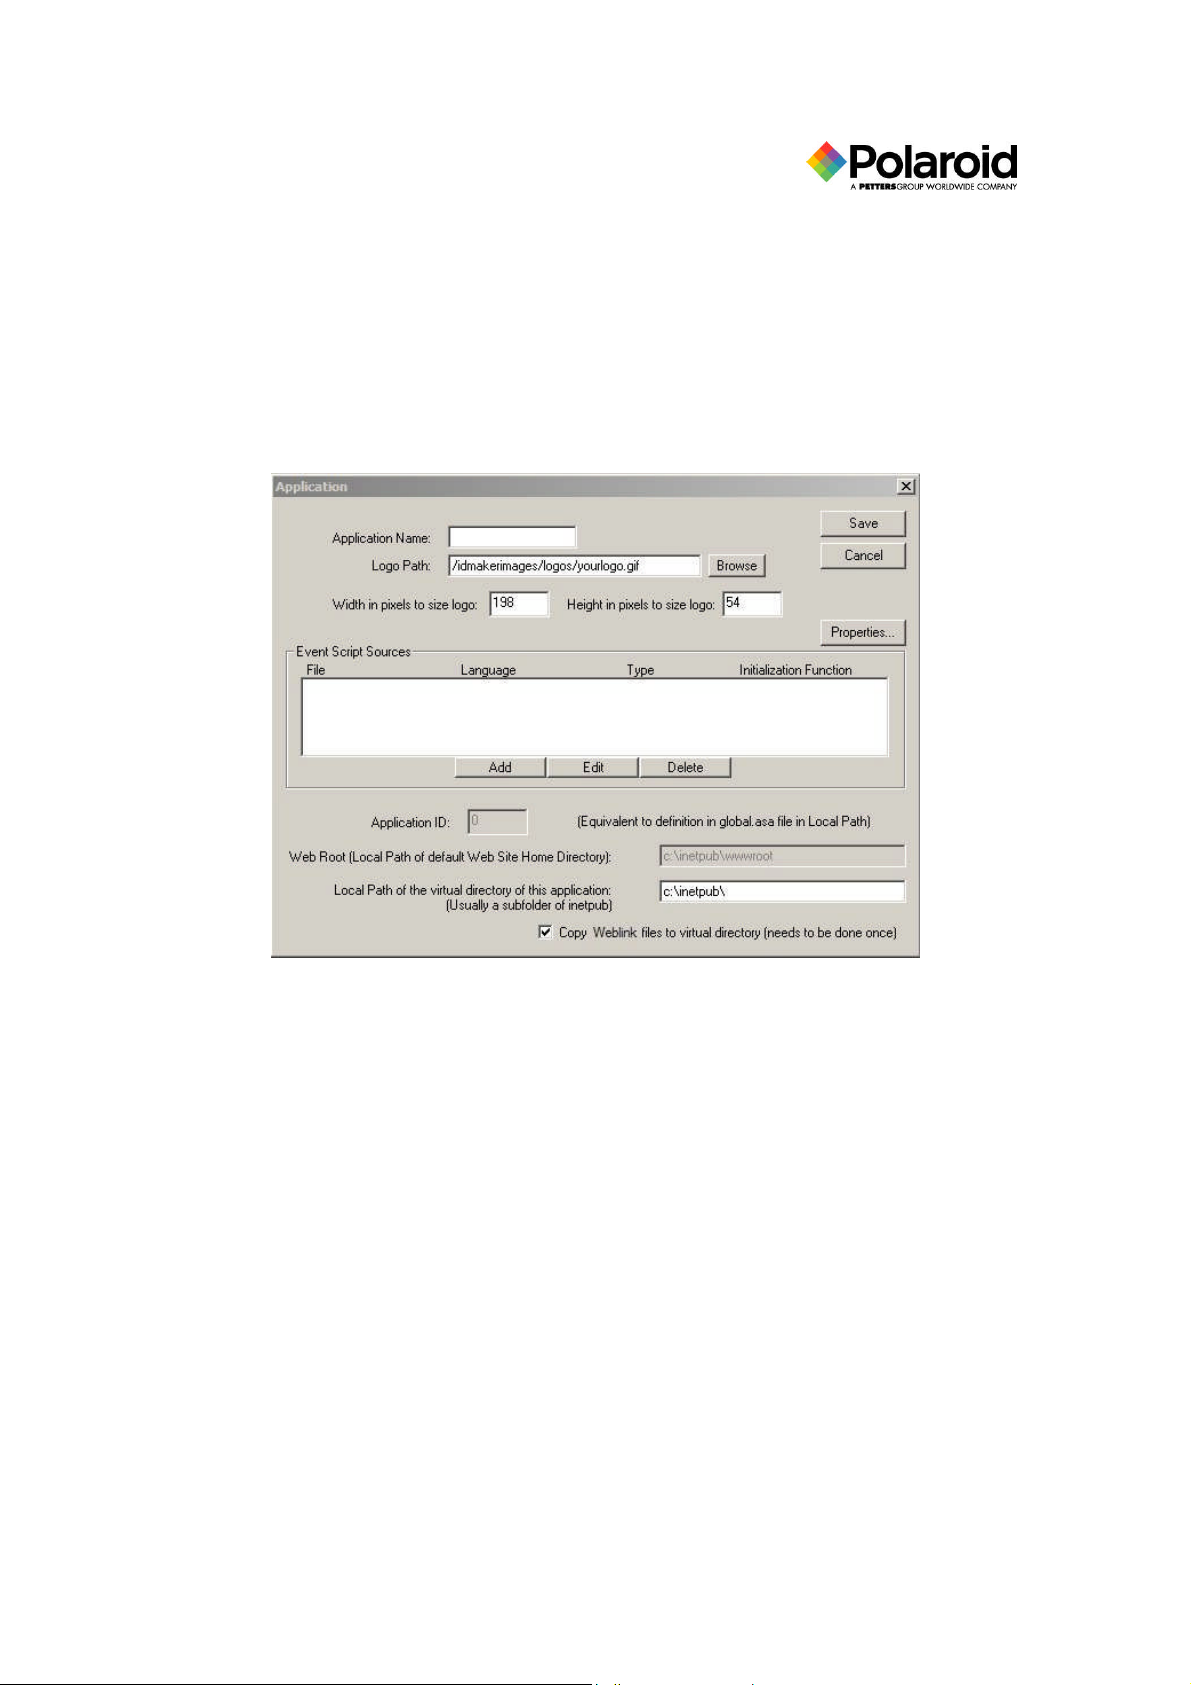
1. In Configurator Wizard mode, click the Add button in the Applications dialog box. The
Application dialog box is displayed.
2. Enter the Application Name. This will be displayed in the Web browser title bar.
3. In the Event’s Script Source text box enter “capture.js” only if using Image Capture.
This file is located in the virtual directory of the application and can be optionally used
for other events defined in the Events dialog box. You may also select the Browse button
to the right of the text box to search for a file.
4. Enter the logo path from the Inetpub\wwwroot folder. This is the logo to be placed in the
upper right corner of each screen. You may also select the Browse button to the right of
the text box to search for a logo.
5. Enter the logo width and height in pixels. This sets the lower left position of the logo on
the browser, not the size of the logo. Use an image editing application to determine your
logo size.
6. The internal application ID is shown for information purposes only. The global.asa
function in your Web site folder, under the inetpub folder, should reference this ID.
7. The Web Root is shown for informational purposes only. This lists the web root defined
by the Internet Information Server.
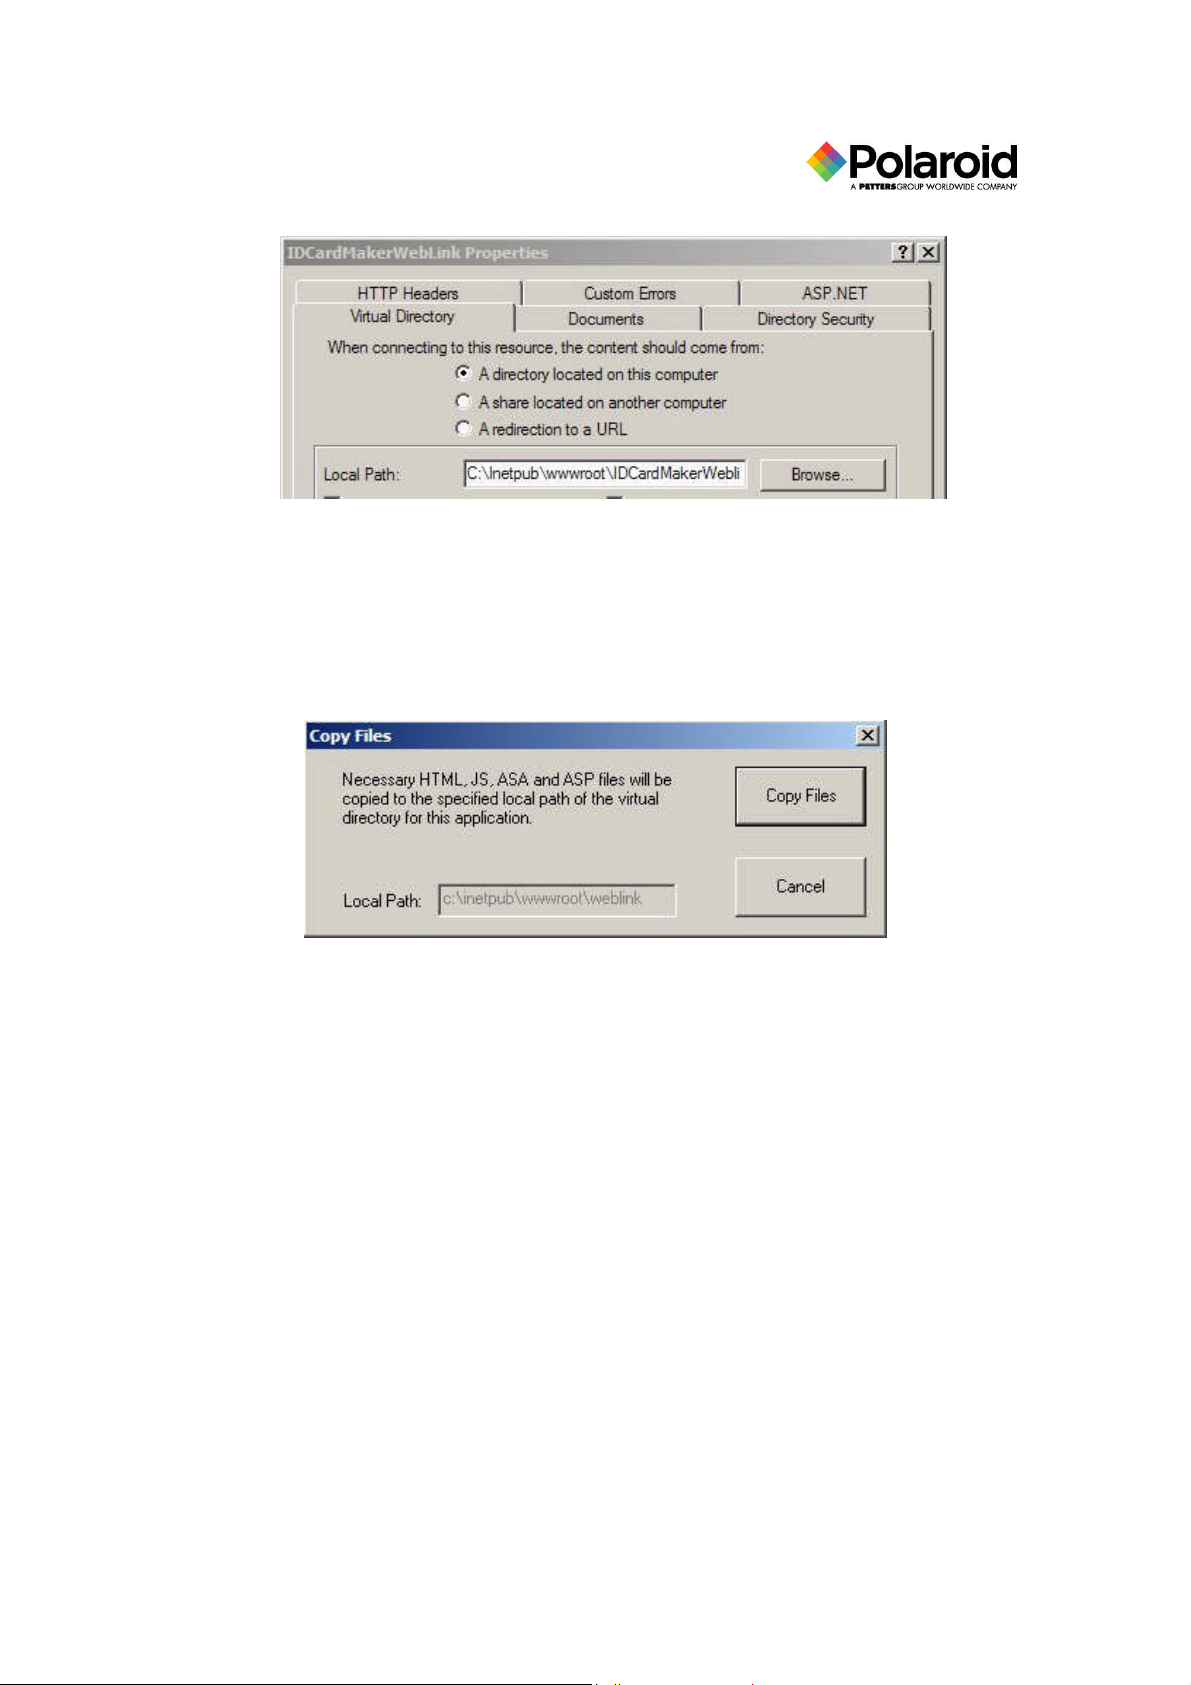
8. Enter the Local Path of the Virtual Directory of this application. This is the Physical
Local Path specified in Internet Server Manager or Personal Server Manager, and it is
usually a subfolder of inetpub. The following example is from the Internet Server
Manager:
Polaroid Commercial ID Systems
Weblink Configurator Utility Guide
Page 10
7
9. Click the OK button.
10. Click the Save button.
For each application created with Weblink, certain .asp (Active Server Page) files must be stored
in a separate physical folder. This is the physical folder of the virtual directory that you set up in
the Microsoft Internet Information Server. See the Getting Started Guide for details. If these
files are not up-to-date, the Copy Files dialog box appears.
11. If you click the Copy Files button, the files are copied and a global.asa file is created in
your specified folder containing the line: ApplicationValue ( “AppID” ) = <the
application ID of your app>. You may also click the Cancel button to avoid copying the
files.
IMPORTANT: You must set up a new Web site (Virtual Directory) for each site that
you create. Refer to the Getting Started Guide, the “Setting up the Internet
Information Server” section.
12. Click the Next button. You are ready to configure groups.
Polaroid Commercial ID Systems
Weblink Configurator Utility Guide
Page 11
8
Group Definition
You may add, edit, or delete groups created for the Weblink application to provide or restrict user
access to features. Refer to the Getting Started Guide for additional information.
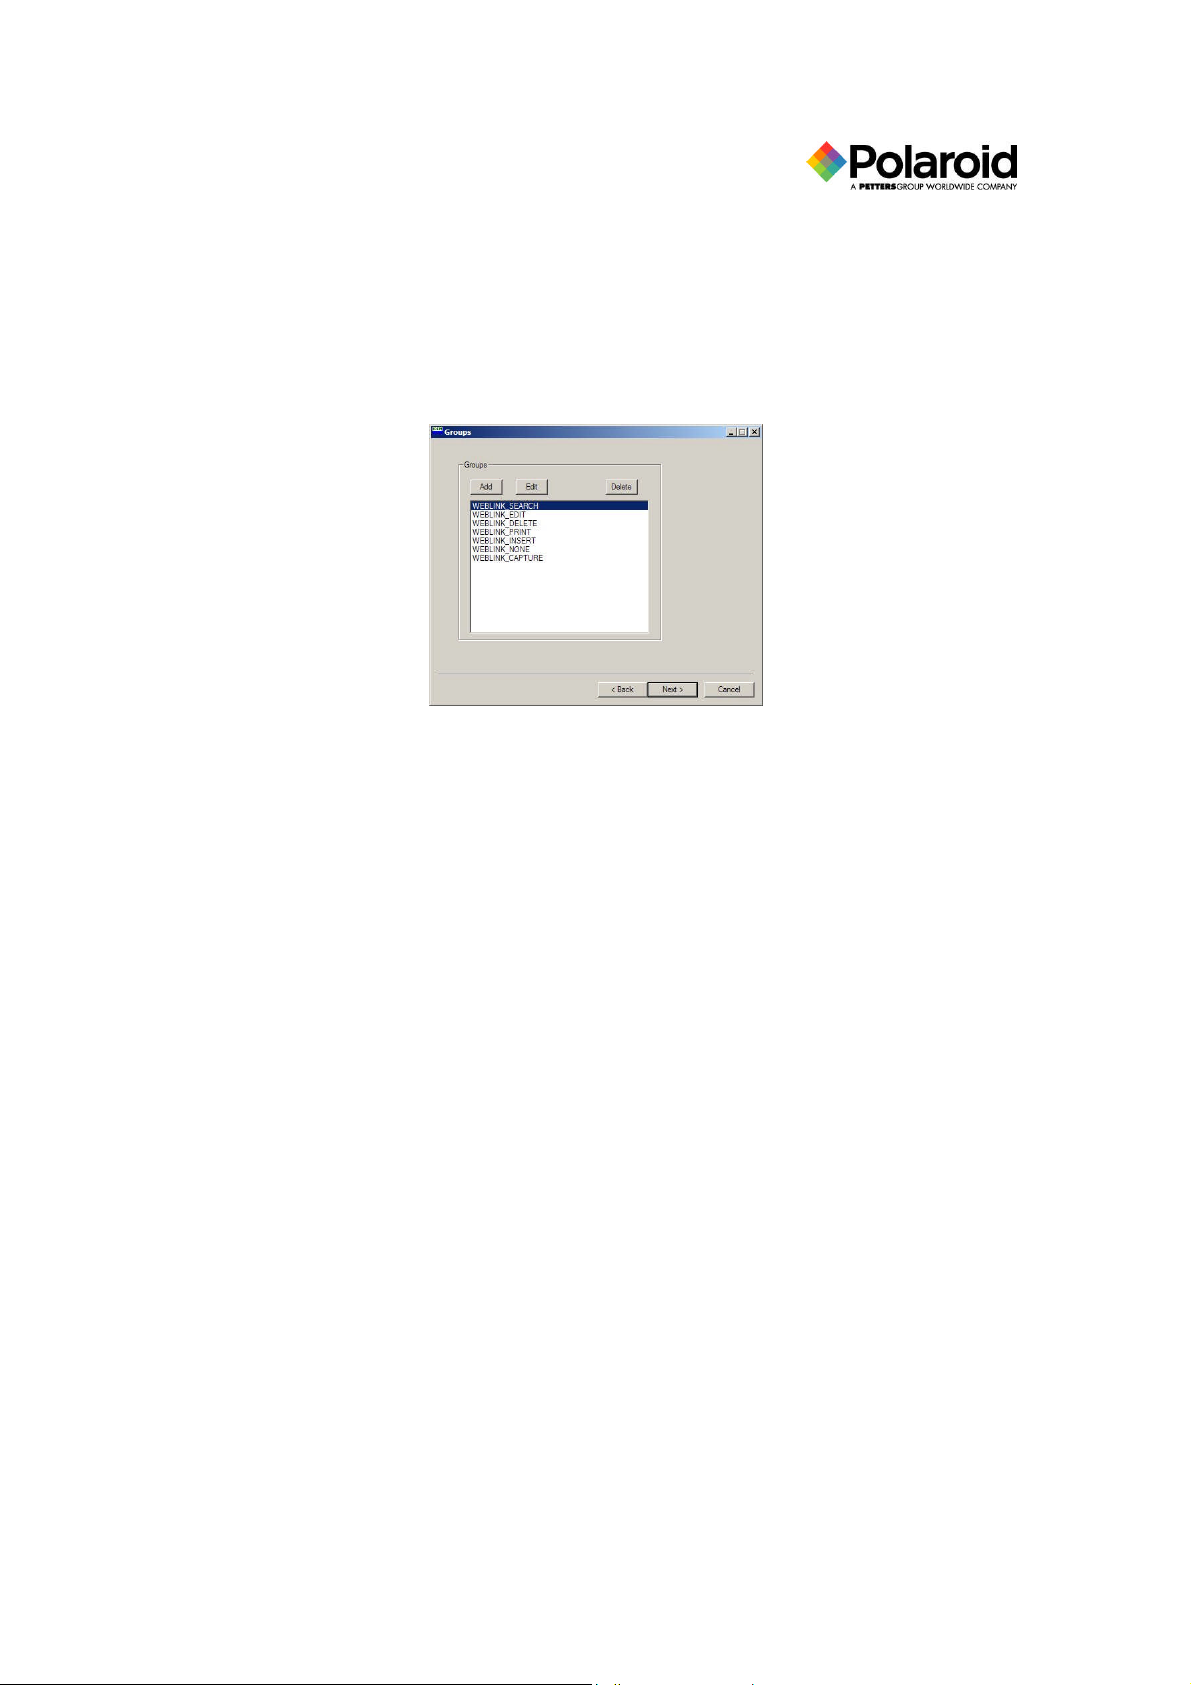
Click the Next button to display the Groups dialog box.
Notice how the groups in the Configurator utility match the groups defined in the NT User
Manager, or in the Windows 95/98 Security Manager, during the Getting Started process. In
Configurator, you may accept the defaults.
The suggested groups are:
WEBLINK_SEARCH: Defined in User Manager and assigned to users with data viewing
privileges.
WEBLINK_EDIT: Defined in User Manager and assigned to users who require data edit
privileges.
WEBLINK_DELETE: Defined in User Manager and assigned to users who require data
delete privileges.
WEBLINK_PRINT: Defined in User Manager and assigned to users who require print
privileges. This group requires Weblink Card Issuance.
WEBLINK_INSERT: Defined in User Manager and assigned to users who require data insert
privileges.
WEBLINK_NONE: Should not be defined in User Manager. Assign functions to this group
if you don’t want them to be viewable or editable. Users should not be assigned to this
group.
WEBLINK_CAPTURE: Defined in User Manager and assigned to users who require capture
privileges. This group requires Weblink Image Capture.
Polaroid Commercial ID Systems
Weblink Configurator Utility Guide
Page 12

9
To add a group:
1. Click the Add button in the Groups dialog box. A Group dialog box with edit capability
is displayed.
2. Enter the Group Name.
3. Click the Save button.
4. Click the Next button in the Groups dialog box.
Polaroid Commercial ID Systems
Weblink Configurator Utility Guide
Page 13
10
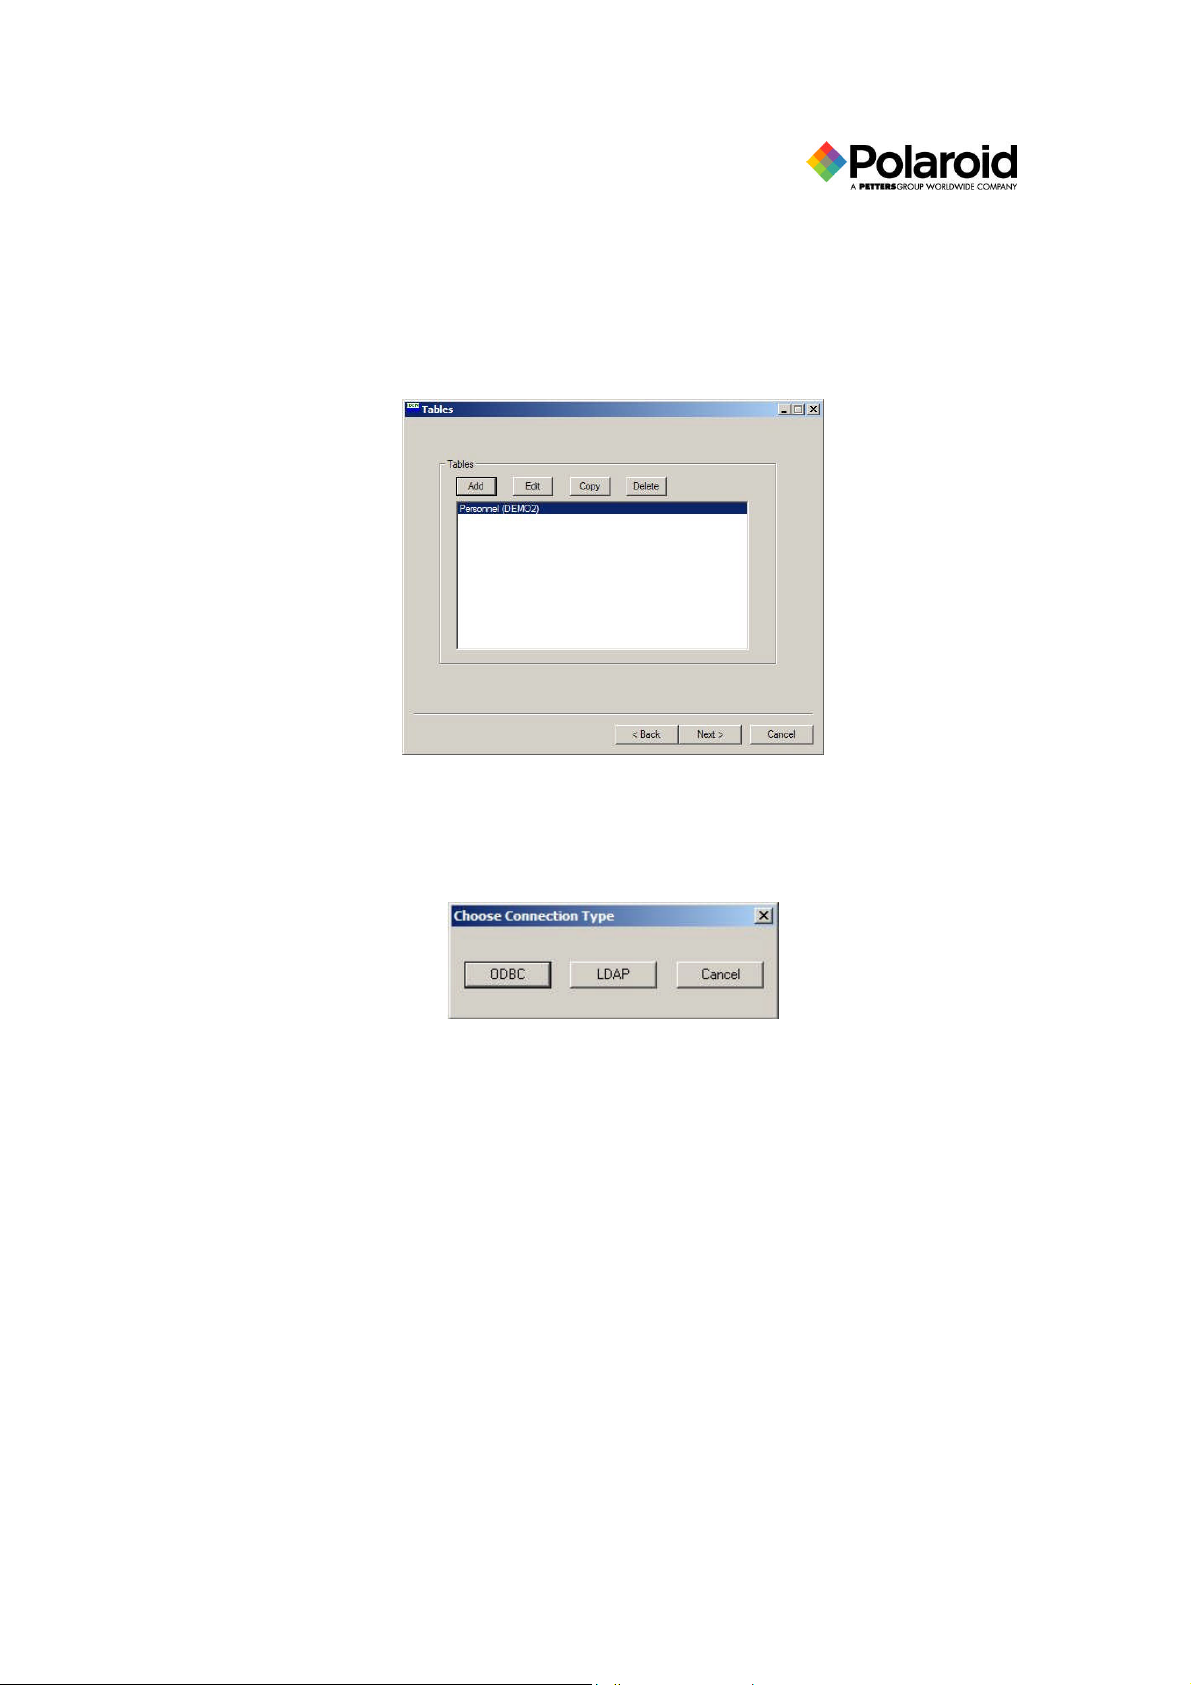
Table Definition
You may add, edit, copy, or delete database table connections. This is where you define the
database tables to connect to Weblink. When you click the Next button in the Groups dialog box,
the Tables dialog box is displayed.
Use the following procedure to add tables:
1. Click the Add button. The Choose Connection Type dialog box appears.
2. Click either the ODBC button to connect to an ODBC database connection or the LDAP
button to connect to a Novell Directory Services data source. Both types of connections
are discussed in the following sections. You may also click the Cancel button to return to
the Tables dialog box.
Polaroid Commercial ID Systems
Weblink Configurator Utility Guide
Page 14
11
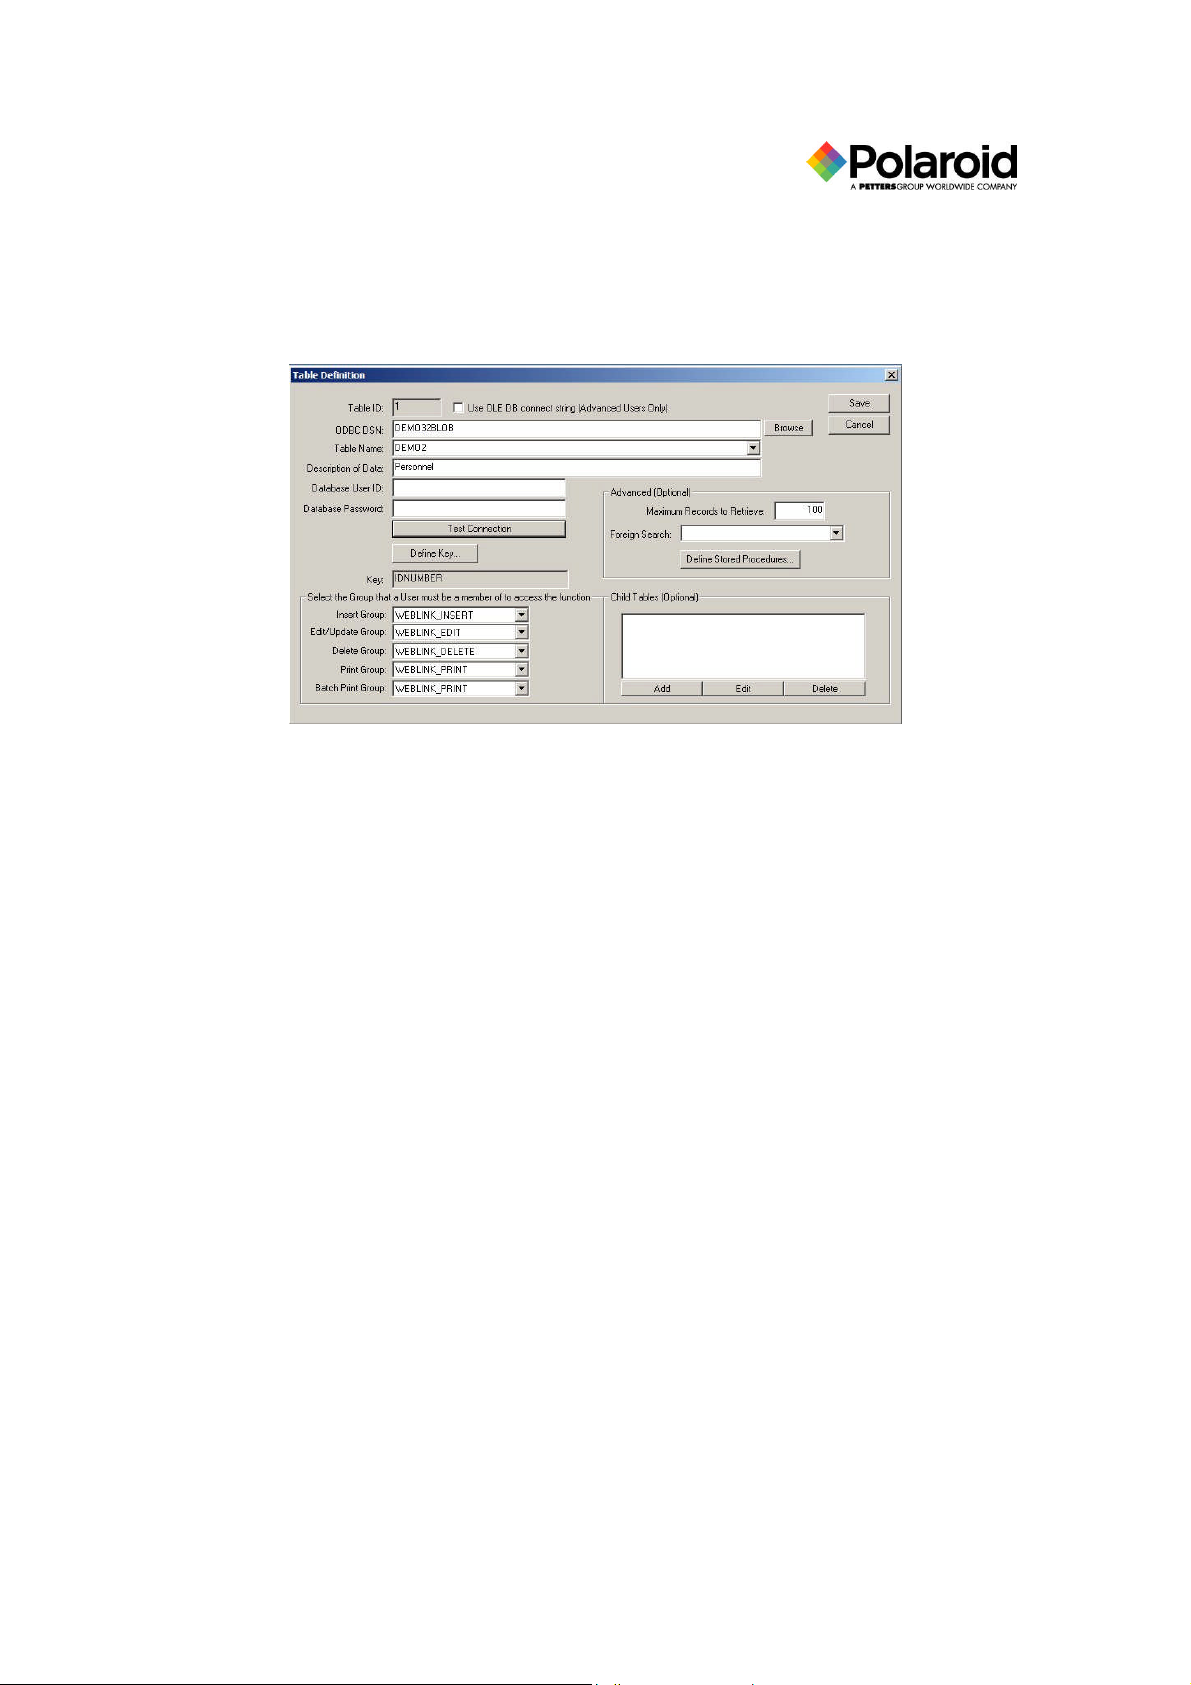
ODBC Connection
Click the ODBC button on the Choose Connection Type dialog box to display the Table
Definition dialog box.
1. Enter the 32-bit ODCB Data Source Name (DSN). You may click the Browse button to
the right of the text box to select an ODBC DSN from a list. You must choose a system
DSN.
2. Select or enter a name from the Table Name drop-down list. The name may be the
schema if necessary, such as “DEMO2” for an Access database such as DEMO32BLOB,
or “SCHEMA.TABLE” for Oracle.
3. Enter the Description of Data, such as personnel, employee, or auto. This is displayed in
the Data Retrieval Menu dialog box as “NEW <description of data>.”
4. If necessary, enter the Database User ID. This is the user ID whose permissions will be
used to access the database for each search, update, insert, and delete.
5. If necessary, enter the Database Password for the user.
6. Click the Test Connection button to verify that the connection to the database is
successful. If not, refer to the Weblink Troubleshooting Guide included on the Weblink
CD-ROM.
7. Select the primary Key Column Name of the database from the drop-down list.
8. Select the primary Key Column Type from the drop-down list. The options in this field
include Text, Number, or Date.
9. Enter the maximum number of records to retrieve on a search.
10. Select the Group that the user must be a member of to access the function from the dropdown list for each function.
11. Click the Save button. The Tables Definition dialog box is displayed.
12. Repeat steps 1 to 12 for each table.
If required, Weblink will retrieve data from both the parent and child tables. A table must already
be defined before adding it as a child table.
Polaroid Commercial ID Systems
Weblink Configurator Utility Guide
Page 15

12
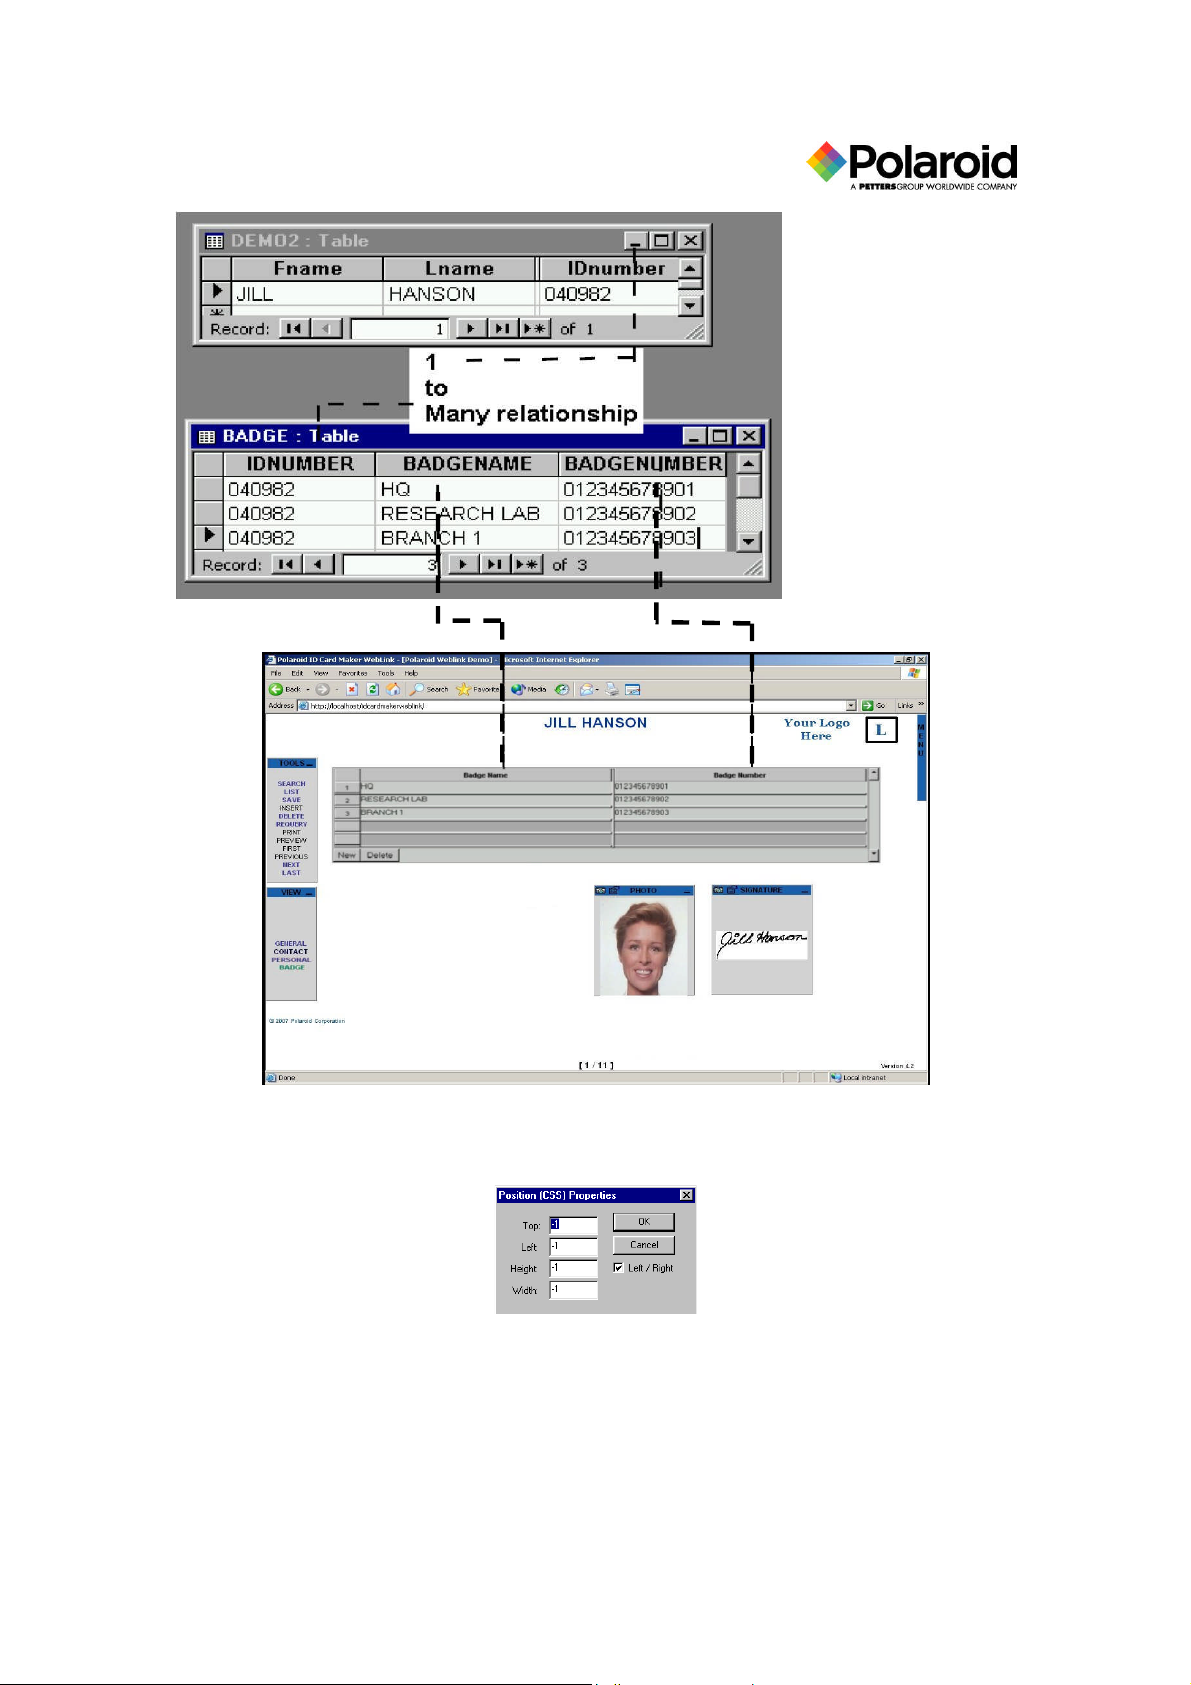
The following example shows the relationships of the parent table (DEMO2) and the child tables
(Badge and Country) in an Access database. This database can be found on the install CD under
misc\Weblink Data Retrieval Advanced Configuration.
1. If you require access to multiple tables, you may optionally add Child Tables by clicking
the Add button in the Child Tables area of the Tables Definition dialog box. The Define
Child Table dialog box appears.
2 Select the Child Table, Child Column Name, and Parent Column Name from the drop-
down lists.
3 Click the OK button. You are returned to the Tables Definition dialog box. You may
also click the Cancel button to avoid saving a child table.
4 Repeat steps 1 through 3 for each child table.
Polaroid Commercial ID Systems
Weblink Configurator Utility Guide
Page 16

13
LDAP Connection
Click the LDAP button on the Choose Connection Type dialog box to display the LDAP
Definition dialog box.
1. Enter the Description of the records in the table such as personnel, employees, or auto.
2. Enter host server.
3. Enter LDAP user ID.
4. Enter LDAP password.
5. Enter search base.
6. Enter search scope.
7. Enter object class.
8. Repeat steps 1 to 7 for each table.
9. Click the Next button. You are ready to configure drop-down list boxes.
Polaroid Commercial ID Systems
Weblink Configurator Utility Guide
Page 17

14
Drop-Down List Definition (Optional)
Preset list boxes can be placed in Search or Data View screens. These list boxes can be prepopulated from Weblink or an external database. The following is a sample drop-down list box:
Use the following procedures to create drop-down lists:
1. Click the Next button from the Tables dialog box to display the Dropdown Listbox dialog
box.
2. Click the Add button. The Define Dropdown List dialog box appears.
Polaroid Commercial ID Systems
Weblink Configurator Utility Guide
Page 18

15
3. From the Type drop-down list, select whether values are stored in Weblink’s
configuration or a look-up table.
4. Enter the List Name. This is for internal use only.
5. Click the Values Setup button. Depending on which selection you chose for storing
values, use one of the following sets of procedures.
Values Stored in the Weblink Configuration
1. Upon clicking the Values Setup button, the following dialog box is displayed:
2. Click the Add button. The Define Dropdown Listbox Item dialog box is displayed.
3. In the Data Value text box, enter the content in this database field. These values must
exactly match all possible content for this database field. For example, for an
ACCESSLEVEL field that must be GRANTED or DENIED, you must add both fields to
the select list.
4. In the Display Value field, enter the text that is to be displayed in the select box, rather
than the actual value. If saved, the Data Value is stored, not the Display Value. For
Polaroid Commercial ID Systems
Weblink Configurator Utility Guide
Page 19

16
example, if a database field stores only a 0 or 1, you can provide more information to the
user by adding a display value “True” when the data value is set to 1, and “False” when
the data value is set to 0.
5. When the current user has read-only rights on the field, you can define the text display
color. For example, you may want to display Granted in green and Denied in red. To
select a color, either type the color name or click the ellipsis button to the right of the text
box to display a color chart.
6. Click the OK button. You may also click the Cancel button to cancel adding a listbox
item.
7. Click the OK button on the Define Dropdown Listbox values stored in Weblink’s
configuration dialog box.
8. Click the OK button on the Define Dropdown Listbox dialog box.
9. Click the Next button. You are ready to configure searches.
Values Stored in a Look-up Table
If you define the drop-down type as values stored in a look-up table, you have the ability to
populate the list box from a look-up table defined in table setup. For example, if DEMO2 stores
the CountryID instead of CountryName in its table, but has a relationship to a look-up table
COUNTRY, Weblink can display the CountryName in the list box.
Polaroid Commercial ID Systems
Weblink Configurator Utility Guide
Page 20

17
1. Click the Values Setup button to display the following dialog box:
2. Select the look-up table name from the Table drop-down list.
3. Optionally enter a Where Clause. This is used to restrict the values in the value column
selected. For example, if you wanted to display only countries that begin with the letter A in
the list box, you would set the Where Clause = COUNTRY=’A%’.
4. Check Cache Database Results to base a drop-down list on variable results. This is most
efficient and recommended. If the box is not checked, this field is required for the data each
time the Data View is loaded, resulting in new rows appearing in the drop-down list.
5. From the Value Column drop-down list, select the database column name of data in the list
box. This is usually the foreign key to the parent table.
6. In the Display Column(s) area, click the Add button to add a database column to retrieve data
for display in the list box representing the Value Column. The Define Dropdown Display
Listbox dialog box is displayed.
Multiple columns can make up the display text, although usually only one is entered. For
example, CountryID is the value represented in the DEMO2 table; however, since it is
numerical, the user will not understand what the value means. Therefore, you want to
display the COUNTRY database in the list box. Set the Value Column = COUNTRYID
and the Display Column = COUNTRY.
Polaroid Commercial ID Systems
Weblink Configurator Utility Guide
Page 21

18
7. Select the Column Name from the drop-down list.
8. Enter text to display before or after the data.
9. Click the OK button. You are returned to the previous dialog box. You may also click
the Cancel button to cancel the drop-down listbox display definition.
10. Click the OK button. The Define Drop-Down Listbox dialog box is displayed.
11. Click the OK button.
The following look-up table example shows the referenced Table, Value Column, and Display
Column:
Table
Value Column
Display Column
Polaroid Commercial ID Systems
Weblink Configurator Utility Guide
Page 22

19
Search Definition
The Search Definition feature allows you to add, edit, copy, or delete a search definition. A
search definition contains tables, list fields, and search fields. In SQL terms, this sets up your
WHERE clause.
The following shows an example of the Weblink search screen that you will be configuring.
Click the Next button from the Dropdown Listbox dialog box to display the Searches dialog box.
Polaroid Commercial ID Systems
Weblink Configurator Utility Guide
Page 23
20
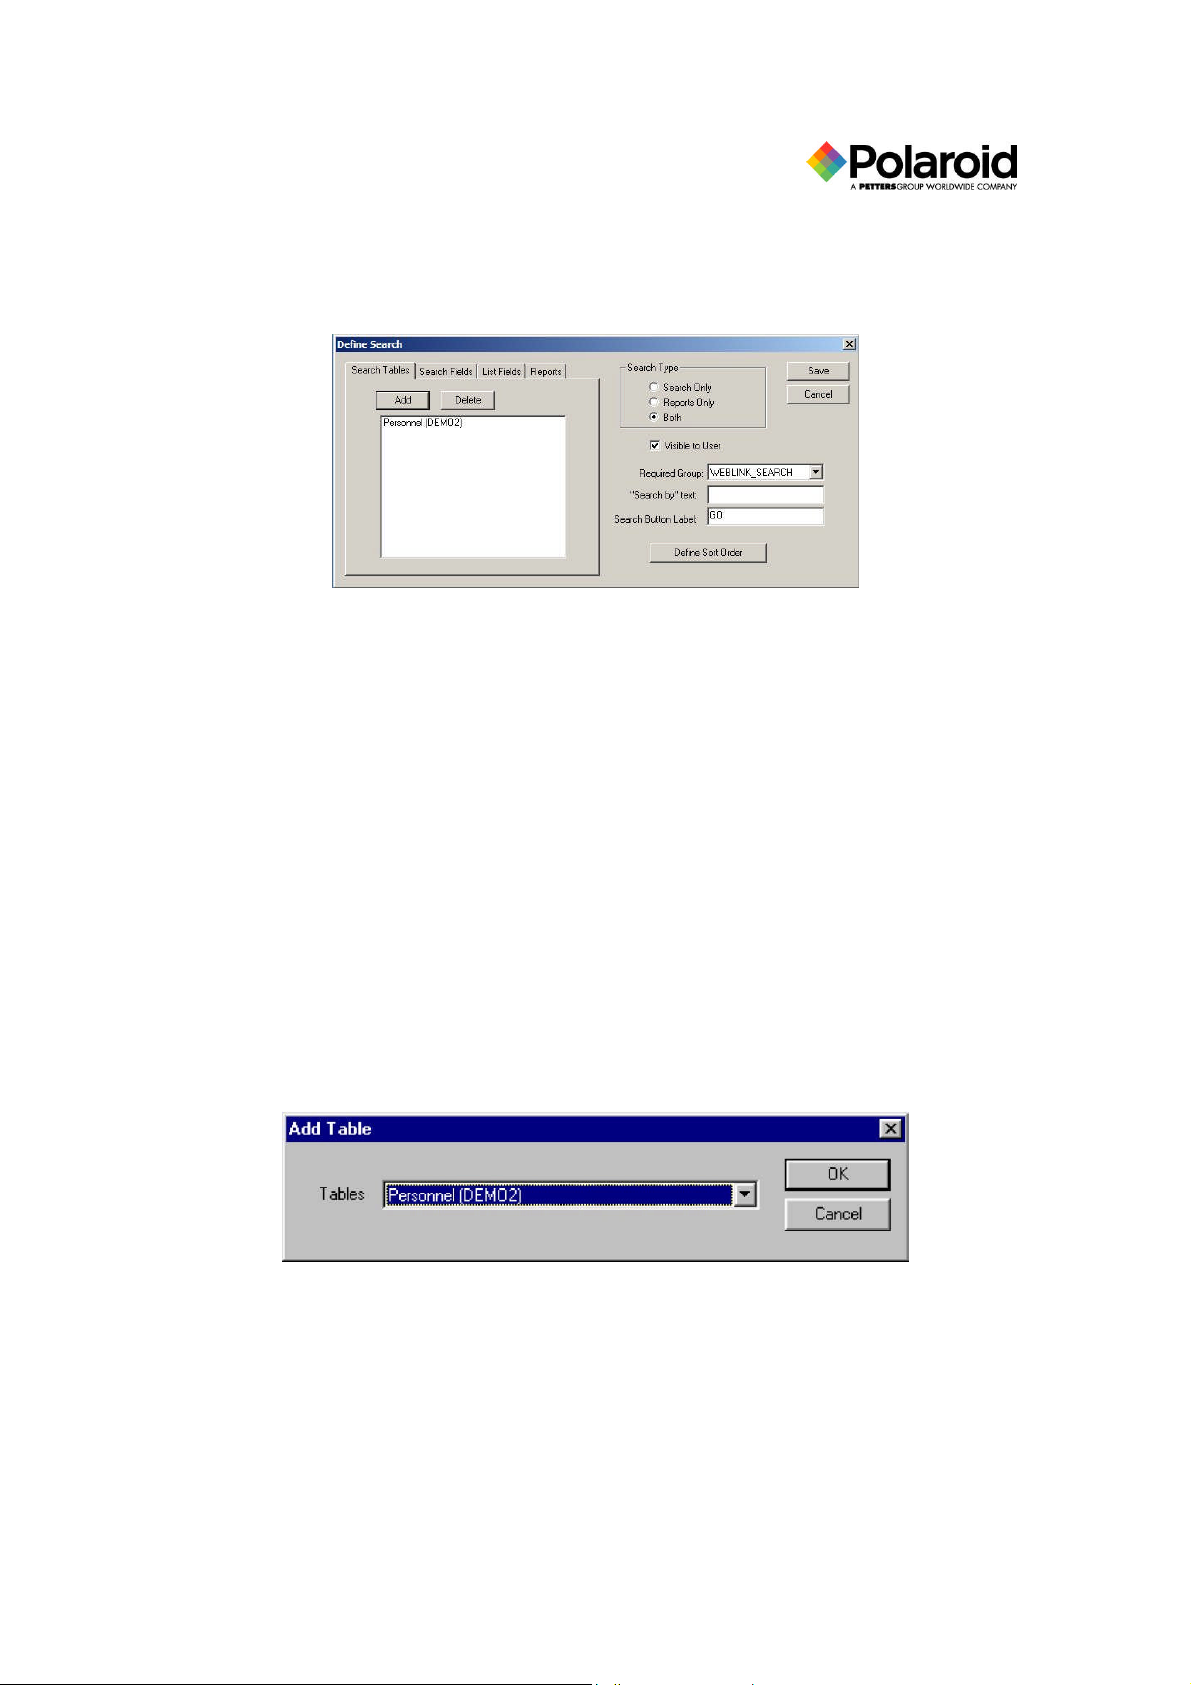
To define a search:
1. Click on the name of a search in the Searches dialog box.
2. Click the Add button. The Define Search dialog box appears.
3. From the Required Group drop-down list, select the group for search capability.
4. In the “Search by” text box, enter a descriptive name for the search criteria. For example,
entering “Personnel” would result in a search by personnel.
5. In the Search Button Label text box, enter the text to be displayed on the button that activates
the search.
6. Click the OK button. The Define Search dialog box is displayed.
Search Table Definition
Search Tables allows you to define the tables that are to be searched. More than one table can be
specified; however, it is assumed that all column names used for search and list fields are
common to the search table. For example, if LASTNAME and FIRSTNAME are used as column
names in either list fields or search fields, those columns must exist in each table declared as a
search table.
The Search Tables tab is displayed by default when the Define Search dialog box is opened.
1. To add search tables, click the Add button in the Define Search dialog box. The Add
Table dialog box appears.
2. Select a table from the Tables drop-down list. The selection must be from one of the
tables you set up in the table definition.
3. Click the OK button.
Polaroid Commercial ID Systems
Weblink Configurator Utility Guide
Page 24
21
Search Field Definition
Search fields are fields that the user may search on. In SQL command language, they specify the
WHERE clause.
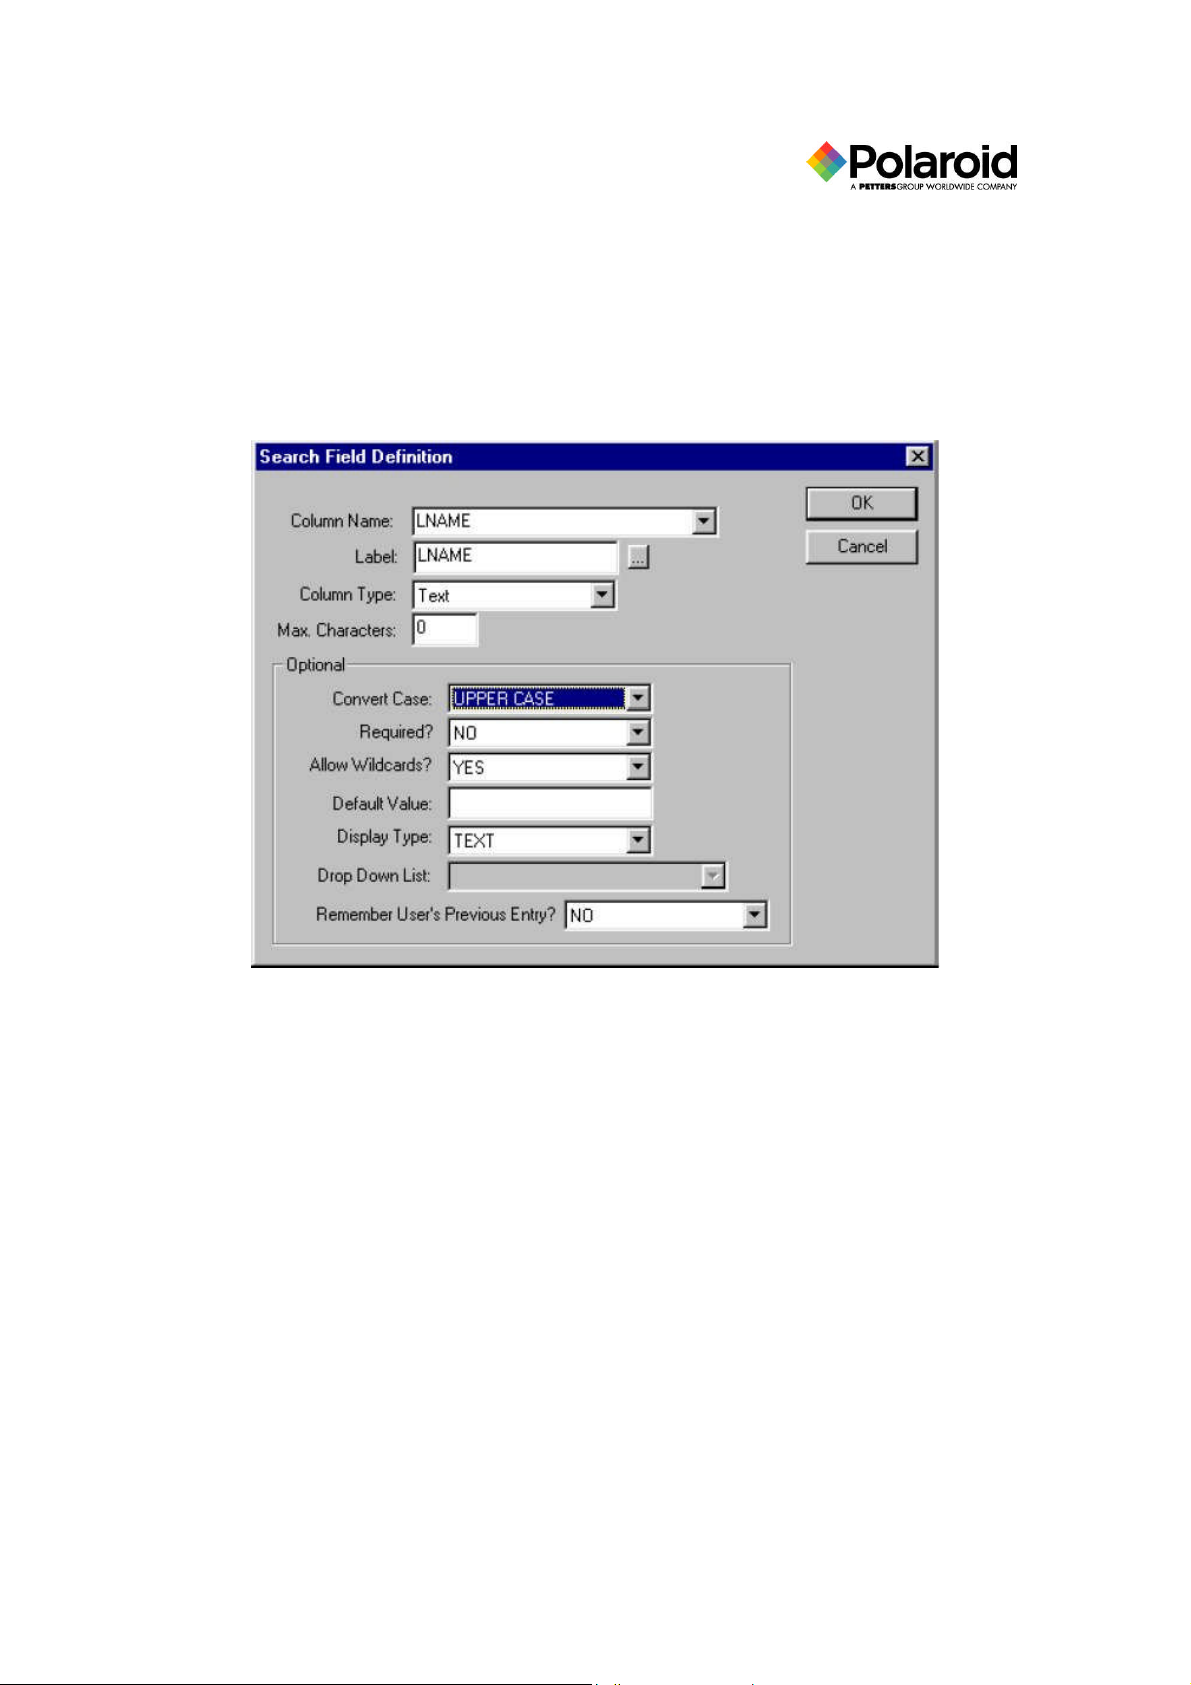
1. Select the Search Fields tab on the Define Search dialog box.
2. Click the Add button. The Search Field Definition dialog box is displayed.
3. From the Column Name drop-down list, select the database column to search. This is the
column in the SQL WHERE clause.
4. In the Label box, enter the text label for the field (the label is automatically displayed if
you are connected to the database).
5. Select Text, Number, or Date from the Column Type drop-down list (the column type is
automatically displayed if you are connected to the database).
6. In the Max. Characters box, enter the maximum number of characters allowed in the
field. This is usually the database field data length (the maximum characters field is
automatically displayed if you are connected to the database).
You may also complete the following optional functions:
7. Select the appropriate choice from the Convert Case drop-down list. If you know that the
field data is stored in a specific case, (such as UPPERCASE) and you want to display in
another case, you can set Weblink to convert search criteria for this field to a specific
case. You may also select Never, so search criteria is never converted.
8. Select YES or NO from the Required drop-down list. YES requires that search criteria be
entered for this field before a search is initiated.
Polaroid Commercial ID Systems
Weblink Configurator Utility Guide
Page 25
22
9. Select YES or NO from the Allow Wildcards drop-down list. YES allows wildcards to
be used for the search criteria.
10. In the Default Value text box, enter the value to place initially in the edit box. (The
default value can be used with Display Type = READ ONLY to set a search field always
with a particular value.)
11. Select the text option from the Display Type drop-down list. The following are
explanations of the text options:
TEXT: this selection creates a text box and is the most common selection.
READ ONLY: this selection is for a read-only field for all users. You may also specify a
field as read-only by assigning its Edit Group to a Group with no members, such as
WEBLINK_NONE.
SELECT: this selection allows you to choose a drop-down list for controlling field input.
PASSWORD: text entered displays as asterisks.
12. If SELECT is chosen as the Display Type, Drop Down List is enabled. Choose a
previously configured drop-down list.
13. Select YES or NO from the Remember User’s Previous Entry drop-down list.
14. Click the OK button. The Define Search dialog box is displayed. You may change the
order of the search fields by clicking the up or down arrows to the right of the search
fields list.
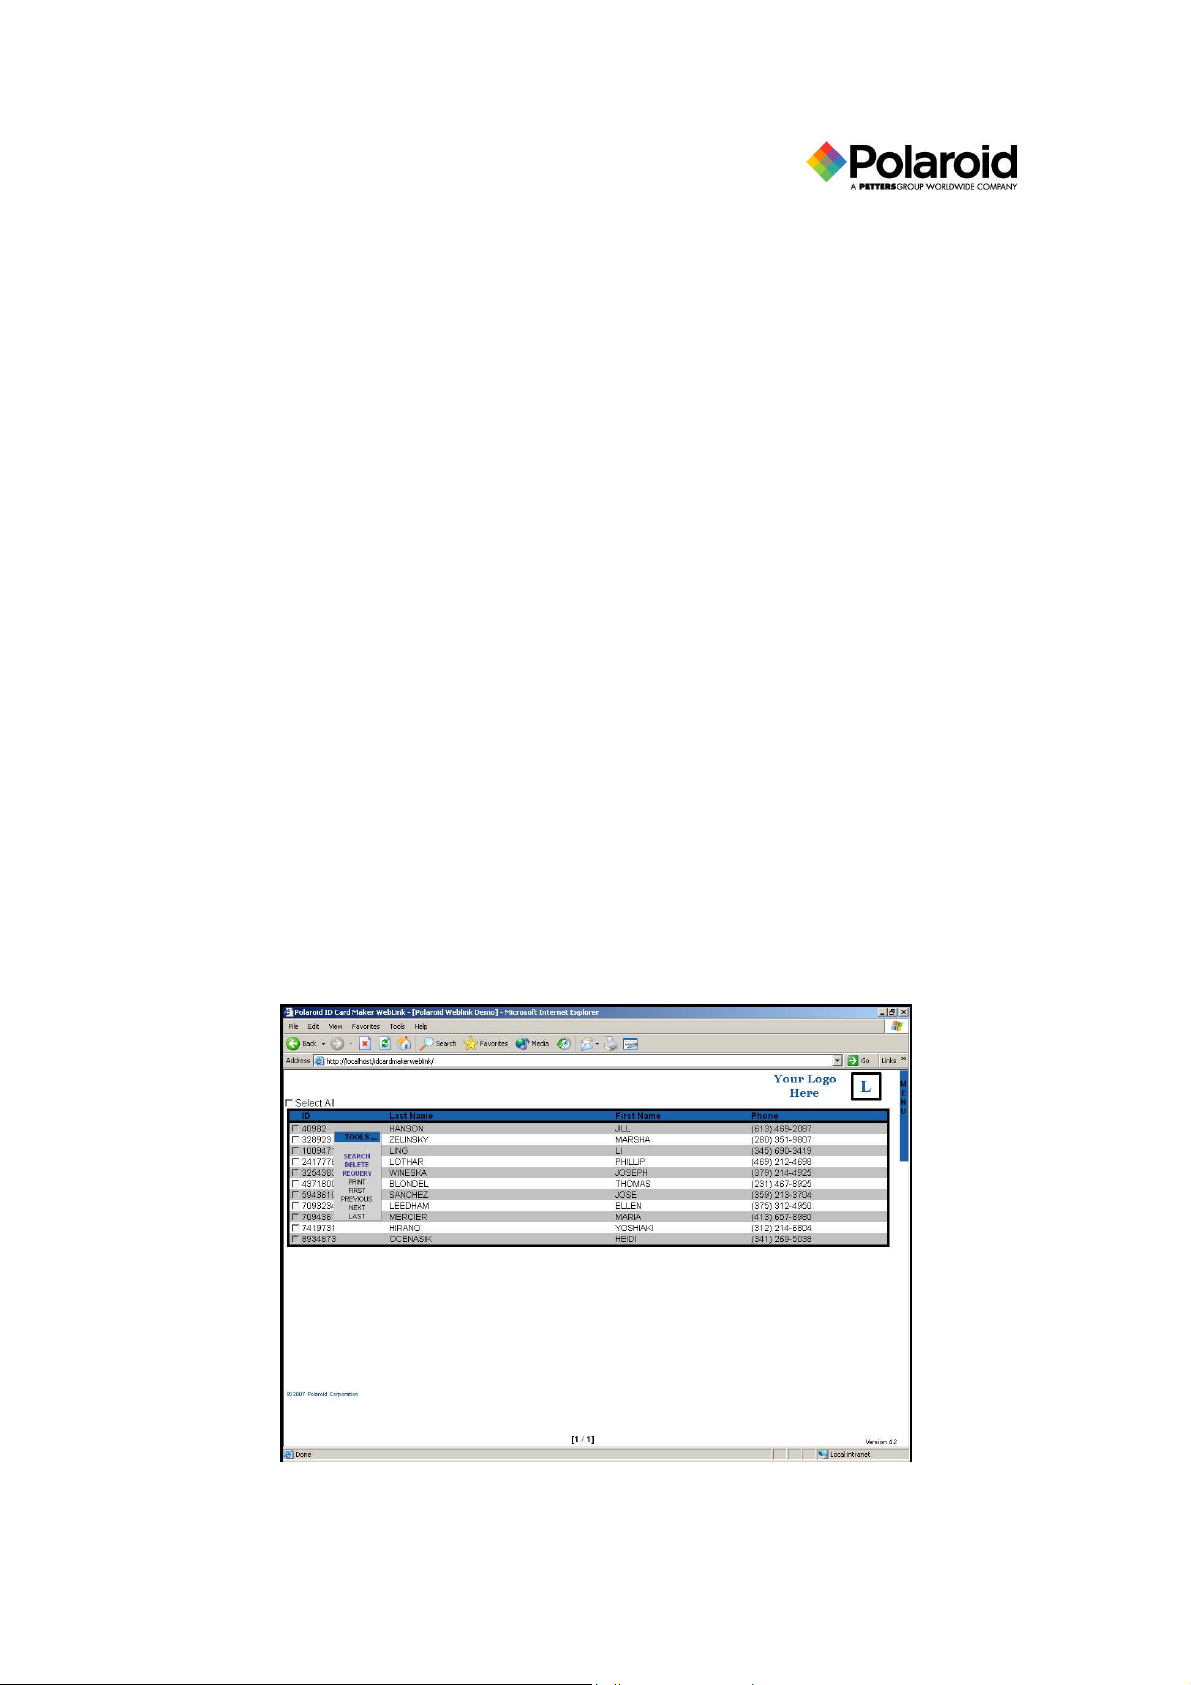
List Field Definition
You will now configure the Weblink List View window. This defines what information is
presented to the user when more than one matching record is found. The user may then use this
list to select a record. If Print or Delete is enabled for the user, batch Print or batch Delete can be
accomplished by checking the boxes to the left of the appropriate records and clicking Print or
Delete. The following shows an example Weblink List View window.
Polaroid Commercial ID Systems
Weblink Configurator Utility Guide
Page 26

23
1. Click on the List Fields tab from the Define Search dialog box.
2. Click the Add button. The List Field Definition dialog box is displayed.
3. From the Column Name drop-down list, select the database column to display. This is
the column in the SQL WHERE clause.
4. In the Label box, enter the text label for the field. (The label is automatically enetered if
you are connected to the database.)
5. In the Max. Characters text box, enter the maximum number of characters to display in
the list column. (The maximum characters field is automatically displayed if you are
connected to the database.)
NOTE: The columns are sized by calculating percentages to fill 100% of the area
based on the maximum characters for each column. Excess column data will be
truncated.
6. Click the OK button. The Define Search dialog box is displayed. You may change the
order of the list fields by clicking the up or down arrows to the right of the list fields.
7. Click the Save button. The Searches dialog box is displayed.
8. Repeat steps 3 through 7 for each column to be defined.
9. Click the Next button. You are ready to configure data views.
Polaroid Commercial ID Systems
Weblink Configurator Utility Guide
Page 27

24
Data View Definition
Data Views display the detailed data contained in a record. For each card format, you must have
a separate Data View. A data view consists of pages, headers, and images. You may add, edit,
copy, or delete a data view.
The following is an example of the Weblink data view screen you will be configuring.
Click the Next button in the Searches dialog box to display the Data Views dialog box.
Polaroid Commercial ID Systems
Weblink Configurator Utility Guide
Page 28

25
1. Click the Add button. The Data View Definition dialog box is displayed.
2. In the Description box enter a description of the data, such as personnel, employees,
children, etc.
3. Select from the Table Name drop-down list the table used to display data.
4. In the Data View Type area, select Update if the Data View is for updating records only,
Insert if the Data View is for inserting records only, or Both for full functionality.
Complete the Advanced Options if you want this data view to display for certain kinds of
records. Otherwise, skip to step 8.
5. Select from the Bind to Column Name drop-down list.
6. Enter criteria in the Criteria equal to box. For example, the entry
“Employee” would display only employee records in this data view.
NOTE: At least one data view without criteria must exist per search so that a default
data view can be used to display data. If no criteria exists, some records will not
display even though they appear in list view.
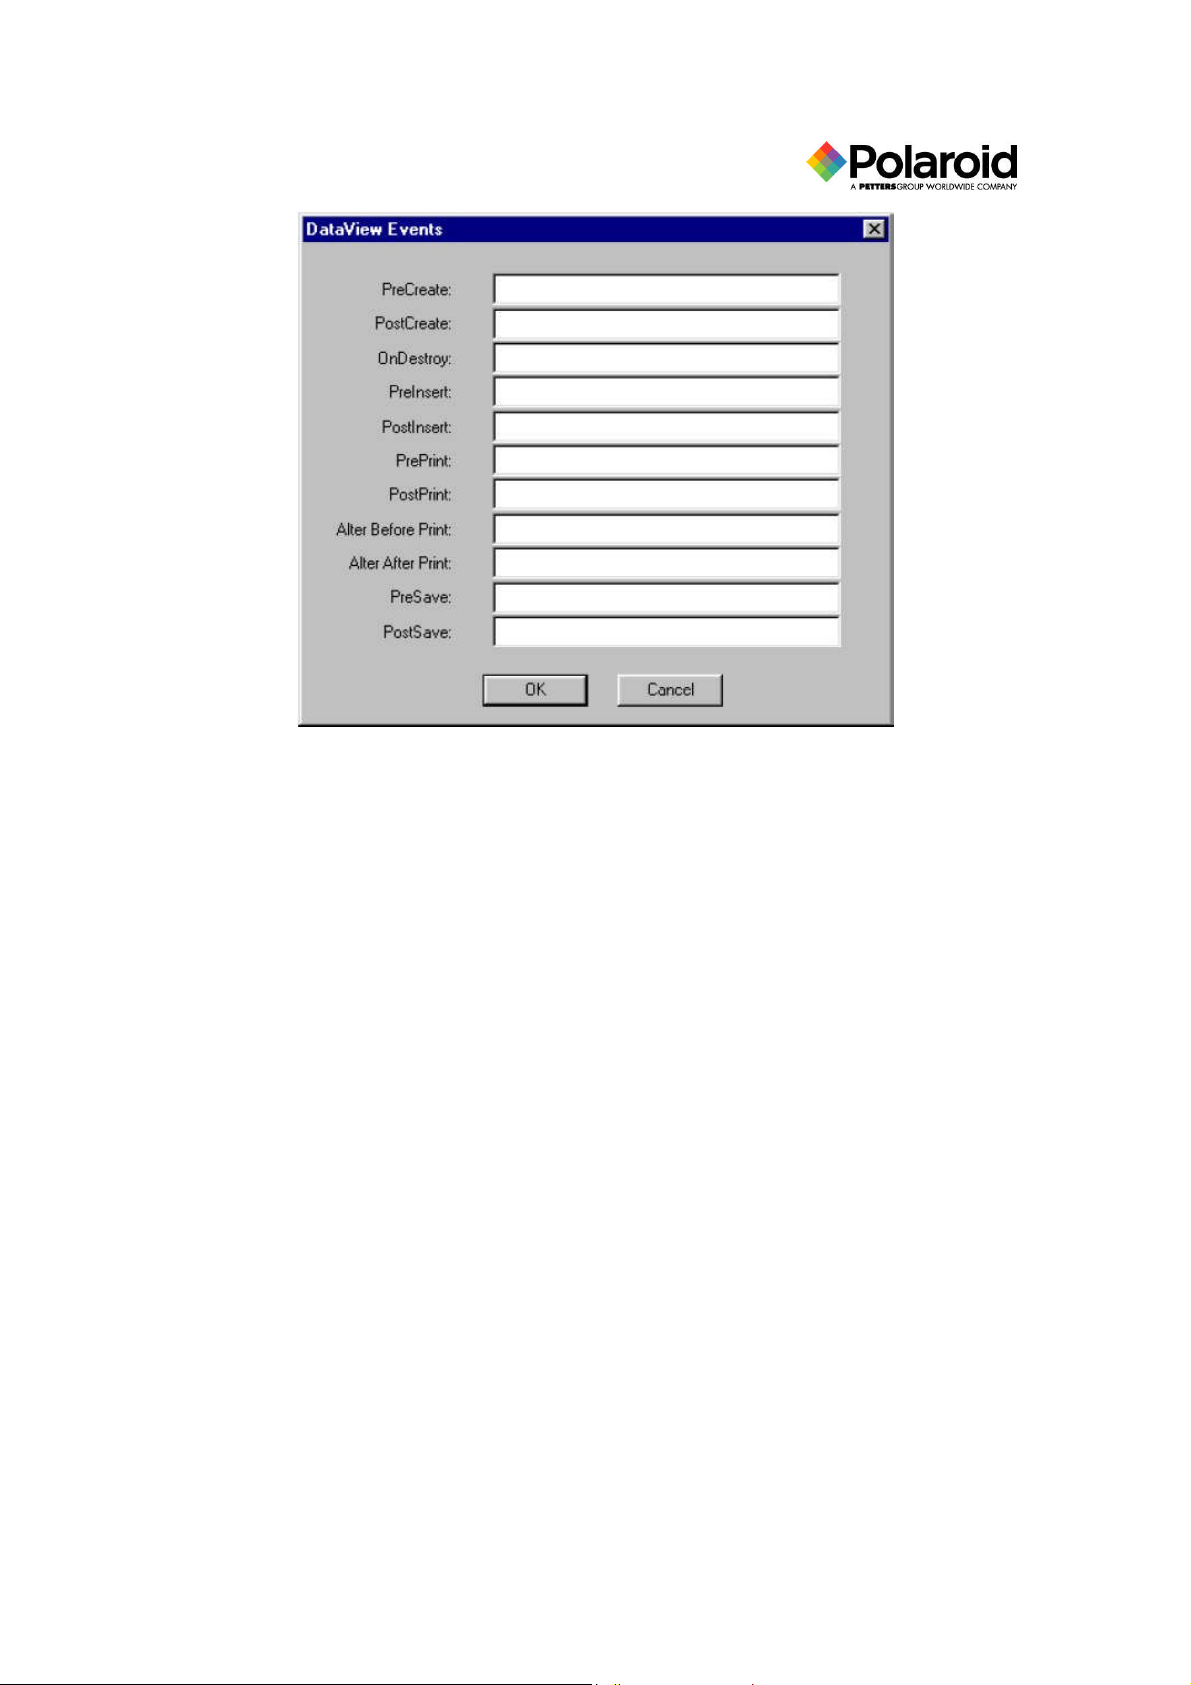
7. Click the Events button to set up JavaScript or VBScript events. The DataView Events
dialog box is displayed.
Polaroid Commercial ID Systems
Weblink Configurator Utility Guide
Page 29
26
Programming is required for customer defined events. Examples of customer defined events
include inserting an audit date and updating a card revision field. The functions written in
JavaScript or VBScript must be defined in the script source file defined in the Application
dialog box. The following events can be defined for a Data View:
PreCreate: fires before creation of the Data View.
PostCreate: fires after creation of the Data View.
PreInsert: fires before an insert command.
PostInsert: fires after an insert command.
PrePrint: fires before a print command.
PostPrint: fires after a print command.
Alter Before Print: fires before a print command to save data if necessary.
Alter After Print: fires if a record is changed. Does not fire during batch print.
PreSave: fires before a save command.
PostSave: fires after a save command.
8. Enter the name of the link file in the Link File Name or Project/Card Name box only if
using Weblink Card Issuance. This is the link (.lnk) file to use when printing from this
data view.
9. Click the OK button. The Data View Definition dialog box is displayed.
Data View Pages Definition
The Data View Pages Definition allows you to specify fields, images, and ActiveX controls for
display on the page. You may add, edit, or delete a data view page. Use the following procedure
to configure a data view page:
Polaroid Commercial ID Systems
Weblink Configurator Utility Guide
Page 30

27
1. Click the Add button on the Data View Definition dialog box. The Data View Pages
Definition dialog box is displayed.
2. In the Label text box, enter the name of the view, such as General or Security.
3. Select YES or NO from the View Editable drop-down list. YES displays the page for
edit enabled users who are members of the WEBLINK_EDIT or equivalent Group.NO
displays the page for edit disabled users who are members of the WEBLINK_SEARCH
or equivalent Group, but not the WEBLINK_EDIT or equivalent Group.
HINTS:
It is recommended that you give all defined pages the same editable value:
YES or NO. If you do combine editable values for pages that all users are to
view, define editable and non-editable pages for each page with combined
values.
If all pages are defined as editable, users who have search privileges are
allowed to view the pagesonly , but not edit them.
You can still control viewing and editing of fields in editable pages via the Page
Field definition tab.
4. From the Page Type drop-down list, select either Default or GRID. Default is
recommended. GRID is used for a one-to-many data relationship. For example, a record
in the DEMO2 table corresponds to multiple records in the child table, Badge. The
following page displays an example of how the parent table (DEMO2) and child table
(Badge) are displayed in Weblink.
For Weblink applications with the grid type, it is recommended that PCs use Internet
Explorer v5.0 or greater and 96MB or more of memory. This greatly improves
performance.
All grid fields must be from the same database table. The foreign key of the child table to the
parent table should not be allowed to be editable in the grid. This field should be entered on a
standard data view containing parent table fields.
Polaroid Commercial ID Systems
Weblink Configurator Utility Guide
Page 31
28
5. Click the Position button on the Data View Pages Definition dialog box to specify the
position of page fields as a group. The Position (CSS) Properties dialog box is displayed.
6. Position the group by entering the number of pixels from the top and from the left side of
the screen. You may also specify the number of pixels from the right side of the screen
by clicking on the Left/Right check box.
7. Enter the height and width of the group.
Polaroid Commercial ID Systems
Weblink Configurator Utility Guide
Page 32

29
If you specify -1 from the top, the page fields are centered vertically, ignoring height. If
you specify -1 from the left, the page fields are centered horizontally, ignoring width. To
position from the right side of the screen, set the width for the page. A height or width
set to -1 will auto-size the page.
8. Click the OK button. The Data View Pages Definition dialog box is displayed.
You are now ready to define the page fields.
1. Click the Add button in the Data View Pages Definition dialog box. The Page Field
Definition dialog box is displayed.
2. Select a table from the Table drop-down list.
3. In the Column Name drop-down list, select the table column name for the page field.
The Text Properties button allows you to modify the fonts for the displayed data. Use
this button the same way as the ellipsis button.
4. In the Label text box, enter the label for the field. (The field is automatically entered if
you are connected to the database.)
5. Enter the maximum number of characters allowed for the field. (Thefield is
automatically entered if you are connected to the database.)
6. Click the OK button to close the Define Events dialog box.
7. Click the OK button on the Page Field Definition dialog box. The Data View Pages
Definition dialog box is displayed. When all of the page fields are added, you may use
the up and down arrows to the right of the list to reorder the page fields.
You may also complete the following optional fields:
As a mask, enter symbols for the number of characters required. Symbols may
be # = numeric; & = alpha; and * = alphanumeric. For example: SSN ###-###### requires 9 digits and PHONE (###)-###-#### requires ten digits.
Polaroid Commercial ID Systems
Weblink Configurator Utility Guide
Page 33

30
Select the Convert Case option from the drop-down list.
Either leave the Validation field blank or choose from the drop-down list.
TODAY automatically enters the day’s date upon insert or save. USERAUDIT
automatically enters the logged in user’s name upon insert or save. DATE is for
a date validation. A valid date includes any combination of date literals, numbers
or strings that look like dates, and dates returned from functions. A date can
range from January 1, 100 through December 31, 9999.
Select the appropriate option from the Display Type drop-down list. The
following are explanations of the options:
TEXT: this selection, the most common, creates a text box.
READ ONLY: this selection is for a read-only field for all users. You may also
specify a field as read-only by assigning its Edit Group to a Group with no
members, such as WEBLINK_NONE.
TEXT AREA: This selection creates a multi-line text input box.
SELECT: this selection allows you to choose a drop-down list for controlling
field input.
PASSWORD: text entered displays as asterisks.
BUTTON: this selection creates a button.
CHECK BOX: this selection creates a check box.
If Select is chosen as the Display Type, then Drop Down List is enabled. Choose
a drop-down list from those configured earlier.
Select YES or NO from the Required drop-down list. Select YES if the field
must contain data before the record is saved. You should always set the primary
key of your database to YES.
From the Edit Group drop-down list, select the group whose users can edit this
field. Leave the field blank for no restrictions.
From the Visible Group drop-down list, select the group whose users can view
this field. Leave the field blank for no restrictions.
In the Width text box, enter the size of the control for display types of text,
password, and select. For text area, width specifies the number of columns. A
width of 0 will auto-size.
In the Height text box, enter the number of rows for the text area. A height of 0
will auto-size.
For advanced users, click the Events button. The Define Events dialog box is displayed.
Polaroid Commercial ID Systems
Weblink Configurator Utility Guide
Page 34

31
The following events can be defined for page field controls: SELECT, TEXT, TEXT AREA, and
PASSWORD. Programming is required. The functions must be defined in the Script Source file
defined for the Application tab. For example, use On Change in a drop-down list to update the
selections in a different drop-down list. Another example would be to validate the range or
contents of a TEXT control.
• On Mouse Over: Occurs as the mouse passes over the field.
• On Click: Occurs when the Photo icon on an image is selected.
• On Change: Occurs immediately before the On Blur event.
• On Blur: Occurs when a control loses focus.
• On Focus: Occurs when a control focuses.
You are now ready to define the data view image for a particular page. The following steps are
identical to those outlined for the Data View Image Definition, which defines the data view image
for all pages. The following procedure uses the same steps.
NOTE: Define a specific image only once per Data View.
1. Click on the Images tab within the Data View Pages Definition dialog box.
2. Click the Add button. The Image Definition dialog box is displayed.
3. Select the table name from the Table Name drop-down list.
4. From the Image Column drop-down list, select the table column name for the image field.
5. In the Label text box, enter the label for the Image window header.
6. In the Width and Height text boxes, enter the width and height of the image. These
values will affect the aspect ratio of the image displayed in Weblink, but not how it is
stored or printed.
7. In the Mark Text dialog box, enter the string that you want displayed over the image to
protect it from unauthorized screen captures.
8. Select the Mime Type from the drop-down list. This is the image type, usually specified
as IMAGE/JPEG.
Polaroid Commercial ID Systems
Weblink Configurator Utility Guide
Page 35

32
NOTE: The browser must support the image type stored in the database to display
the image. Standard JPEG and GIF image formats are the most common. Plug-ins
and controls for browsers can be used to support additional image formats.
9. From the Edit Group drop-down list, select the NT group whose users can edit this field.
Leave the field blank for no restrictions.
10. From the Visible Group drop-down list, select the NT group whose users can view this
field. Leave the field blank for no restrictions.
11. If using Weblink Card Issuance, enter the ID Card Maker field name associated with this
field in the Link Field Name text box.
12. Select YES or NO from the Editable drop-down list. This specifies whether the image
may be edited by authorized users. If capturing a photo, this must be set to YES.
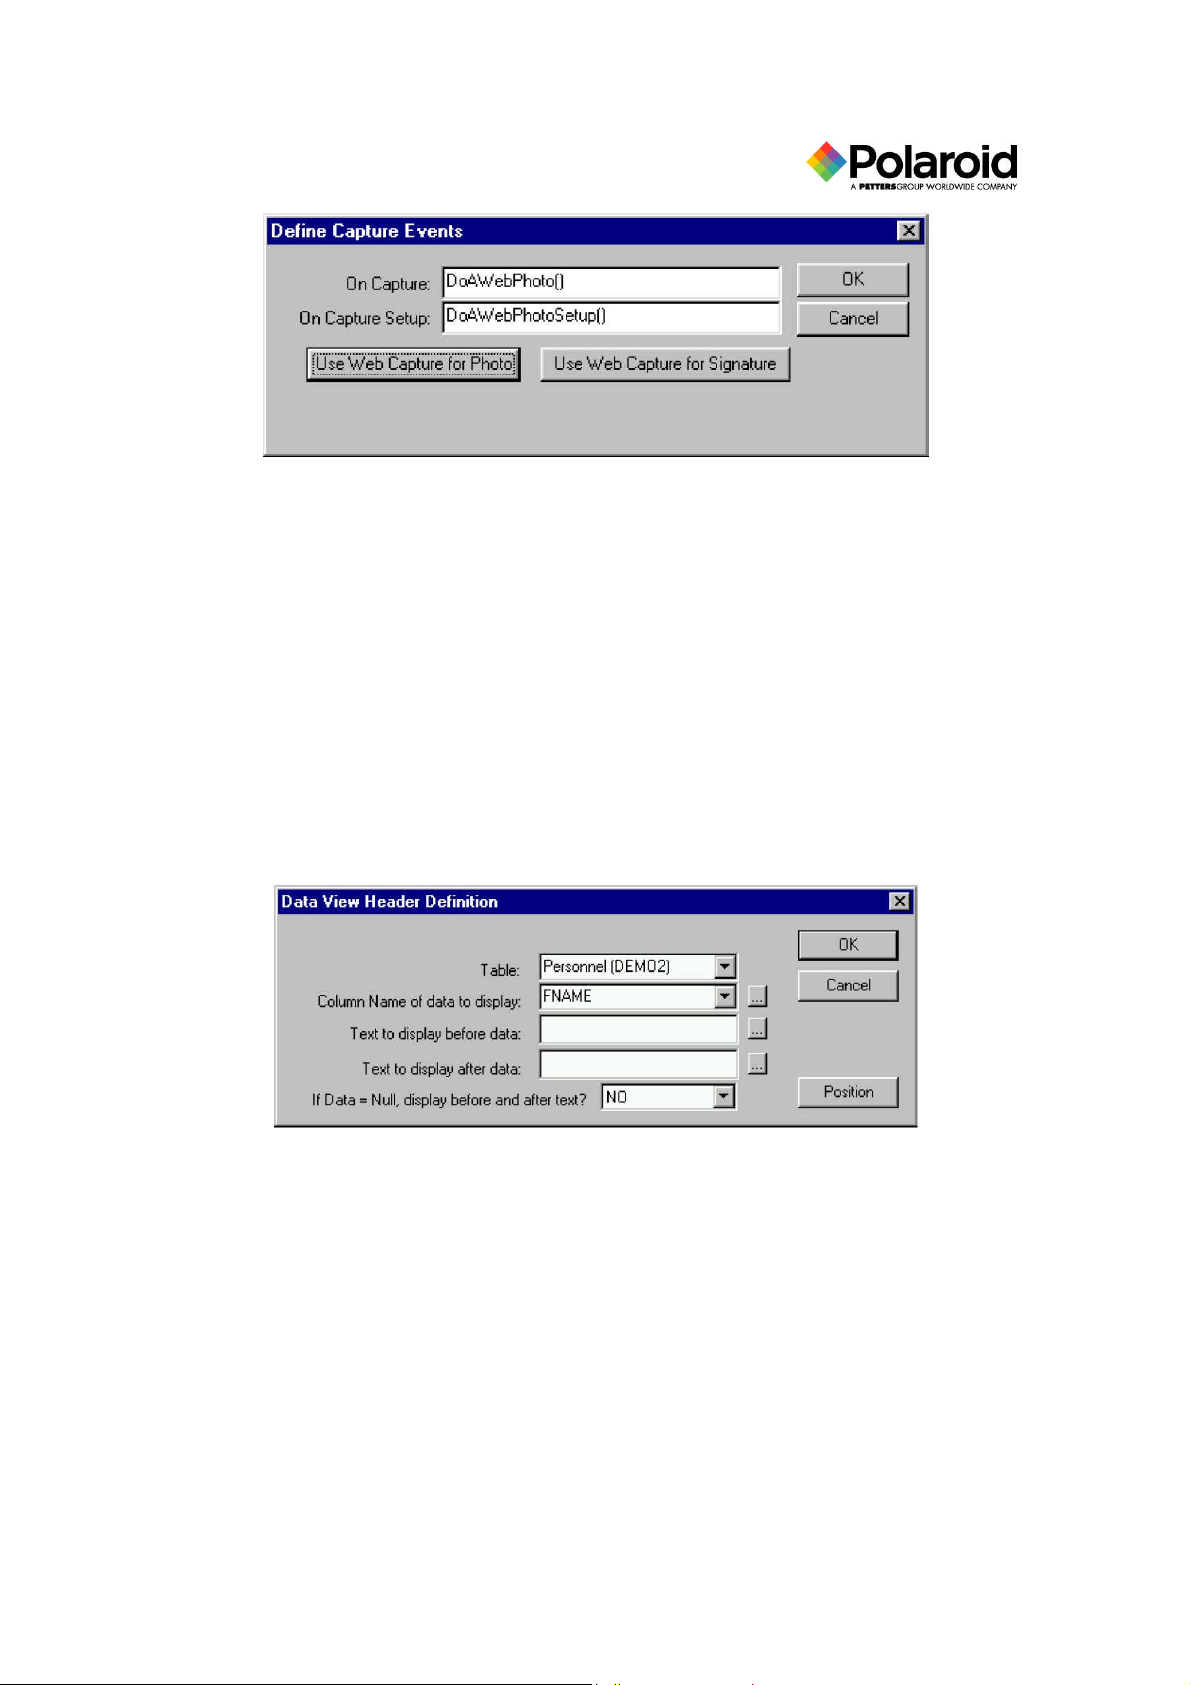
13. Click the Events button if you would like to trigger calls to the defined script source. The
Define Capture Events dialog box appears.
14. Click either the Use Web Capture for Photo button or the Use Web Capture for Signature
button. The On Capture and On Capture Setup text boxes are automatically displayed.
The On Capture Setup text box corresponds to the capture.js file in the virtual directory
c:\inetpub\<your app>.
15. Click the OK button. The Image Definition dialog box is displayed.
16. Click the OK button. The Data View Pages Definition dialog box is displayed.
You are now ready to define the ActiveX control. The ActiveX control must be defined on the
first page in every data view with image capture capability; however, it does not need to be
defined for every page.
1. Click on the ActiveX tab.
2. If using Weblink Image Capture, click the Add button. The Define ActiveX Control
dialog box is displayed.
Polaroid Commercial ID Systems
Weblink Configurator Utility Guide
Page 36

33
3. Click the Use Web Capture button. The dialog box is automatically filled in.
NOTE: Advanced users may call a control defined here by setting up an event, writing a
script to call the control in JavaScript, and identifying it in Script Source in the
Application tab.
4. Click the OK button. The Data View Pages Definition dialog box is displayed.
5. Click the OK button. The Data View Definition dialog box is displayed.
Data View Image Definition
Data view images are used to define the image fields to display on a page. These are taken from
a “BLOB” column in a database. You may also set up the events definition to trigger calls in the
script source for use with Weblink Image Capture.
The following procedure is identical to the steps outlined for the Image Definition within Data
View Pages Definition. That procedure defines the image for a particular page. The following
steps, however, define the image for all data view pages.
NOTE: Define a specific image only once per Data View.
1. Click on the Images tab within the Data View Definition dialog box.
2. Click the Add button. The Image Definition dialog box is displayed.
Polaroid Commercial ID Systems
Weblink Configurator Utility Guide
Page 37

34
3. Select the table name from the Table Name drop-down list.
4. From the Image Column drop-down list, select the table column name for the image field.
5. In the Label text box, enter the label for the Image window header.
6. In the Width and Height text boxes, enter the width and height of the image. These
values will affect the aspect ratio of the image displayed in Weblink, but not how it is
stored or printed.
7. In the Mark Text dialog box, enter the string that you want displayed over the image to
protect it from unauthorized screen captures.
8. Select the Mime Type from the drop-down list. This is the image type, usually specified
as IMAGE/JPEG.
NOTE: The browser must support the image type stored in the database to display the
image. Standard JPEG and GIF image formats are the most common. Plug-ins and
controls for browsers can be used to support additional image formats.
9. From the Edit Group drop-down list, select the NT group whose users can edit this field.
Leave the field blank for no restrictions.
10. From the Visible Group drop-down list, select the NT group whose users can view this
field. Leave the field blank for no restrictions.
11. If using Weblink Card Issuance, enter the ID Card Maker field name associated with this
field in the Link Field Name text box.
12. Select YES or NO from the Editable drop-down list. This specifies whether the image
may be edited by authorized users. If capturing a photo, this must be set to YES.
13. Click the Events button if you would like to trigger calls to the defined script source. The
Define Capture Events dialog box appears.
Polaroid Commercial ID Systems
Weblink Configurator Utility Guide
Page 38
35
14. Click either the Use Web Capture for Photo button or the Use Web Capture for Signature
button. The On Capture and On Capture Setup text boxes are automatically displayed.
The On Capture Setup text box corresponds to the capture.js file in the virtual directory
c:\inetpub\<your app>.
15. Click the OK button. The Image Definition dialog box is displayed.
16. Click the OK button.
Data View Header Definition
The data view header is the data at the top of every view. On the sample data view screen, the
header is “Jill Hanson.” First and Last name columns are defined as headers. To configure the
data view header:
1. Click on the Headers tab within the Data View Definition dialog box.
2. Click the Add button. The Data View Header Definition dialog box is displayed.
3. Select a table from the Table drop-down list.
4. Select the Column Name from the drop-down list.
5. In the Text to display before data field, enter any static text to display before the field
data.
6. In the Text to display after data text box, enter any static text to display after the field
data. Examples for this field would be a space or comma.
7. Select YES or NO from the Display Null drop-down list. YES will display the text
before and after data even if the column is empty.
8. Click the Position button to display the Position (CSS) Properties dialog box.
Polaroid Commercial ID Systems
Weblink Configurator Utility Guide
Page 39

36
9. Position the header by entering the number of pixels from the top and from the left side
of the screen. You may also specify the number of pixels from the right side of the
screen by clicking on the Left/Right check box.
10. Enter the height and width of the header.
Enter the number of pixels to position the header from the upper right corner. If you
specify -1 from the top, the header is centered vertically, ignoring height. If you specify 1 from the left, the header is centered horizontally, ignoring width. To position from the
right side of the screen, set the width for the page. A height or width set to -1 will autosize the page.
11. Click the OK button.
12. Click the OK button on the Data View Header Definition dialog box.
13. Click the Save button on the Data View Definition dialog box.
14. Click the Next button on the Data Views dialog box. You are now ready to define menu
items.
Polaroid Commercial ID Systems
Weblink Configurator Utility Guide
Page 40

37
Menu Item Definition
The menu items component is used to relate searches to data views. A menu item may have
multiple searches. Searches in a menu item determine how to search for records. Data views
determine how the records are displayed. The data view displayed is determined by the search
used. If a search has more than one associated data view, the data view criteria determines which
data view is used.
Click the Next button in the Data Views dialog box to display the Menu Items dialog box.
1. Select an application from the Application Name drop-down list.
2. Click the Add button. The Menu Item Definition dialog box is displayed.
Polaroid Commercial ID Systems
Weblink Configurator Utility Guide
Page 41

38
3. In the Text to display in Menu box text box, enter the heading that will appear on the
Menu window.
4. Select the group required to access the function from the drop-down list.
5. Click the Add button in the Link Searches area to select a search function. The Add
Search dialog box is displayed.
6. Select a search from the Searches drop-down list.
7. Click the OK button.
8. In the Menu Item Definition dialog box, highlight the search you added.
9. Click the Add button in the to Data Views area. The Add Data View dialog box is
displayed.
10. Select a data view from the Data drop-down list. More than one data view may be
selected per search. One of the data views must be the default and have no criteria. The
others should have criteria.
11. Click the OK button.
12. Click the Save button in the Menu Item Definition dialog box.
13. Click the Next button. You are ready to define window locations.
Polaroid Commercial ID Systems
Weblink Configurator Utility Guide
Page 42
39
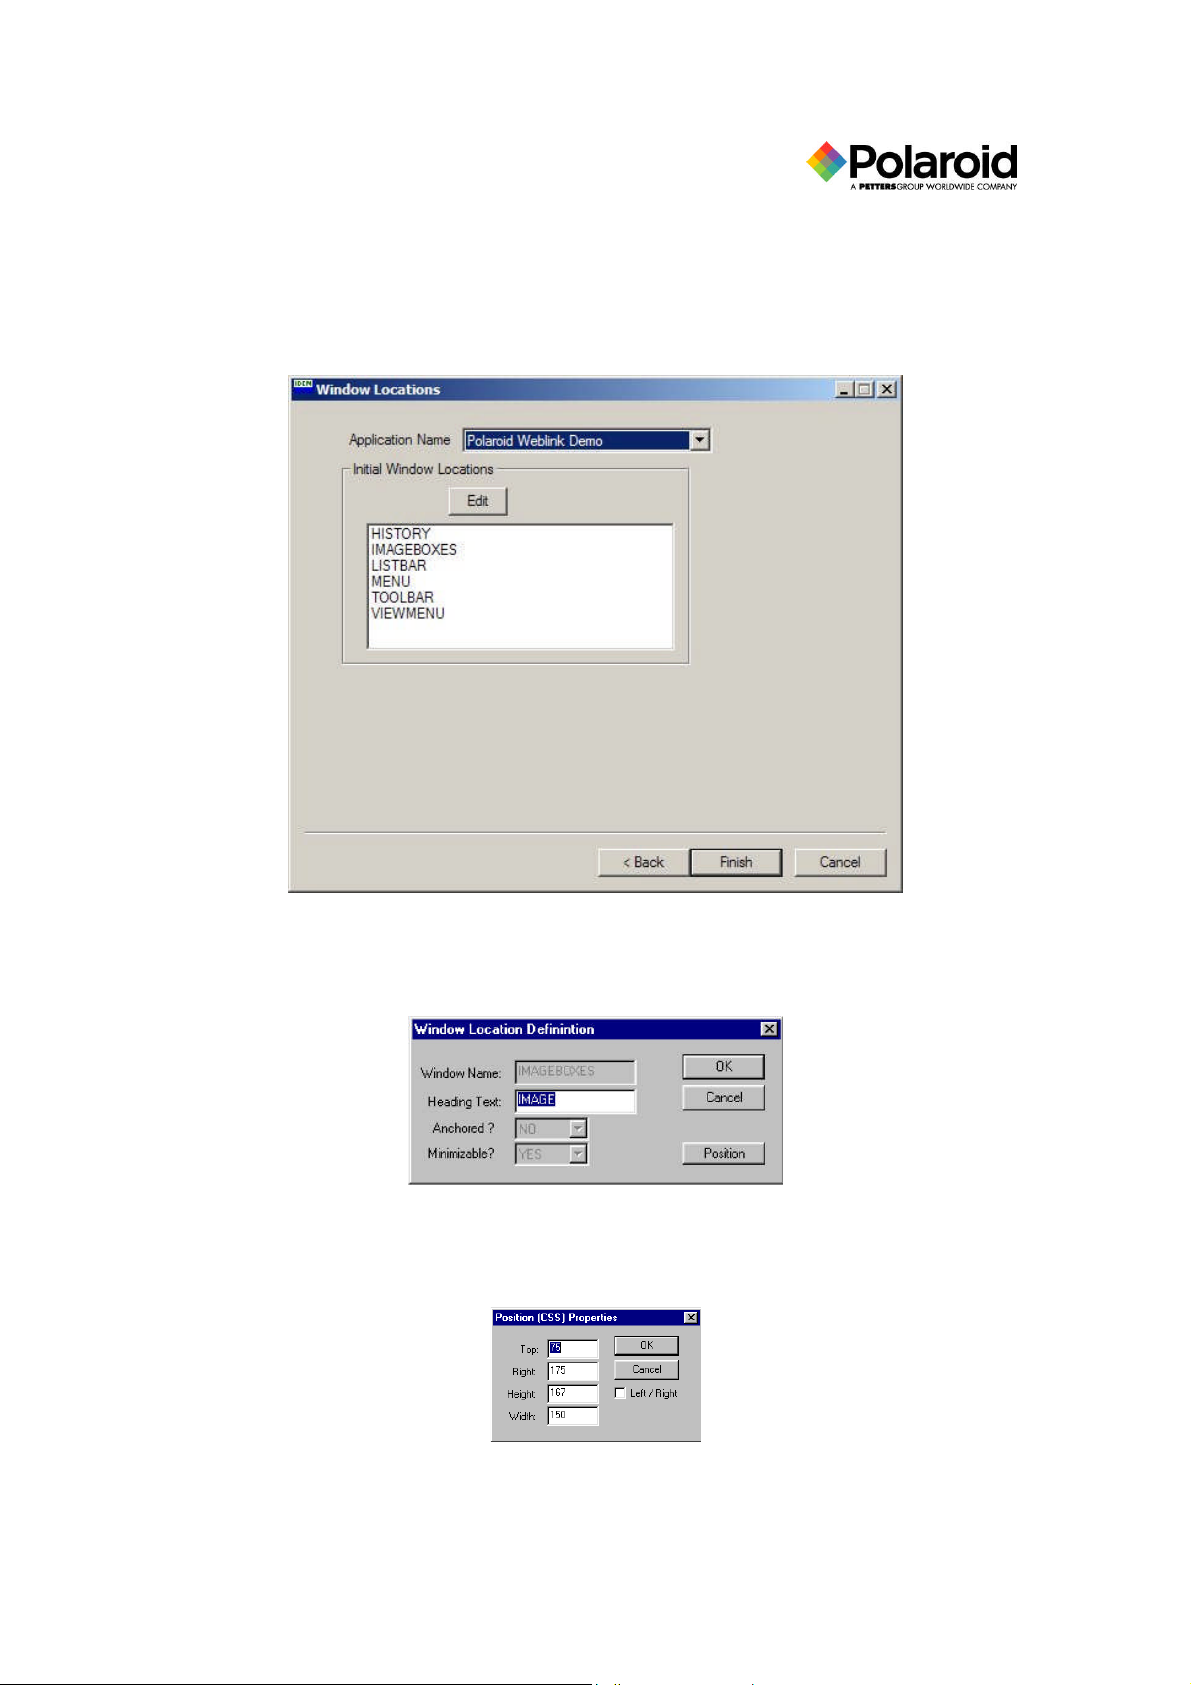
Window Location Definition
The windows locations feature is used to set up windows on Weblink screens. When you click
the Next button in the Menu Items dialog box, the Window Locations dialog box is displayed.
Select the application from the Application Name drop-down list.
2. Click on the name of a window to select it.
3. Click the Edit button. The Window Location Definition dialog box is displayed.
4. In the Heading Text box, enter the text header for the window name.
5. Click the Position button to change the default position. The Position (CSS) Properties
dialog box is displayed.
Polaroid Commercial ID Systems
Weblink Configurator Utility Guide
Page 43

40
6. Position the window by entering the number of pixels from the top and from the left side
of the screen. You may also specify the number of pixels from the right side of the
screen by unchecking the Left/Right check box.
7. Enter the height and width of the window.
If you specify -1 from the top, the window is centered vertically, ignoring height. If you
specify -1 from the left, the window is centered horizontally, ignoring width. To position
from the right side of the screen, set the width for the page. A height or width set to -1
will auto-size the page.
8. Click the OK button.
9. Click the OK button in the Window Location Definition dialog box.
10. Click the Finish button in the Window Locations dialog box. You have completed the
Configurator Utility wizard.
Polaroid Commercial ID Systems
Weblink Configurator Utility Guide
Page 44

41
After Each Configuration Change
After each configuration change, you must either start and stop the Web services or unload the
Weblink Web site. To unload the Weblink Web site, refer to the “Setting Up the Internet
Information Server” section in the Getting Started Guide. Follow the directions for display of the
Weblink Properties dialog box, and click the Unload, Apply, and OK buttons. All client users
should close and restart their browsers to access Weblink and view the configuration changes. If
setting up a new Weblink application, set up a new Web site by following the instructions also
located in the same section.
The following figure is the Weblink Properties dialog box.
Polaroid Commercial ID Systems
Weblink Configurator Utility Guide
Page 45

42
Appendix A – Weblink Software License
READ THIS LICENSE BEFORE USING THE ACCOMPANYING WEBLINK™
SOFTWARE.
THIS SOFTWARE LICENSE is a contract between you, the end-user, and Polaroid Corporation (“Licensor”) and
governs your use of the Polaroid Weblink software supplied herewith and the firmware in the Polaroid equipment with
which the software is intended for use (“Software”). Use of the Software indicates your acceptance of this Agreement.
If you do not agree to the terms of this Agreement, you must immediately return the Software to the Licensor. If you
have any questions concerning this Agreement, please contact Licensor.
LICENSE. The Software that is being licensed to you is comprised of multiple components. Some of the components
are designed to be installed on a server, whereas other components are designed to be installed on a workstation. For
the workstation components, Licensor grants you the right to install and use one (1) copy of the Software on a single
user workstation. For the server components, Licensor grants you the right to install and use one (1) copy of the
Software on one (1) server and allow workstation access to the number of users defined in the parties’ purchase
agreement. For both versions of the Software, Licensor grants to you a perpetual nonexclusive license to use the
licensed Software solely for your internal data processing operations. You may not make copies, modify, distribute, or
prepare derivative works based on the Software. Further, you may not sublicense, rent or lease the Software, but you
may permanently transfer your license to use the Software and accompanying materials by delivering to another party
the original media the Software was contained on or in and materials comprising the Software package and by
simultaneously destroying any remaining materials in your possession. Such transfer terminates your license to use the
Software. The new recipient of the Software and accompanying materials accepts this Agreement and is licensed under
the terms of this Agreement upon the recipient’s initial use of the Software. In addition, the recipient of the Software
agrees to use the Software only with the equipment with which it was originally intended for use. Licensor further
grants you the right to make a single backup copy of the Software provided that you keep the original Software intact.
You may not decompile, disassemble or reverse engineer the Software. Finally, you agree to be bound by the terms of
Microsoft Corporation’s end user license for redistributable components embedded in the Software. A copy of
Microsoft’s end user license is contained in the purchase agreement documentation.
LIMITED WARRANTY/LIMITATIONS OF REMEDIES. Licensor will replace, at no charge, defective Software
that is returned within ninety (90) days of the original date of purchase. Licensor warrants that the Software will
perform in substantial compliance with written material accompanying the Software or Licensor’s specifications for
such Software in effect at the time of purchase. If the defect resides in firmware or software programs contained in the
equipment with which the Software was intended for use, the warranty accompanying the equipment shall govern.
THE ABOVE WARRANTY IS IN LIEU OF ALL OTHER WARRANTIES, EXPRESS AND IMPLIED,
INCLUDING, BUT NOT LIMITED TO, THE IMPLIED WARRANTIES OF MERCHANTABILITY AND FITNESS
FOR A PARTICULAR PURPOSE WITH REGARD TO THE SOFTWARE AND ANY ACCOMPANYING
WRITTEN MATERIALS. IN NO EVENT WILL LICENSOR BE LIABLE TO YOU FOR INDIRECT DAMAGES,
INCLUDING LOST PROFITS, OR SPECIAL, INCIDENTAL OR CONSEQUENTIAL DAMAGES ARISING OUT
OF YOUR USE OR INABILITY TO USE THE SOFTWARE, EVEN IF LICENSOR HAS BEEN ADVISED OF THE
POSSIBILITY OF SUCH DAMAGES.
GENERAL. If any provision of this Agreement shall be unlawful, void or for any reason unenforceable, then that
provision shall be deemed severable from this Agreement and shall not affect the validity and enforceability of the
remaining provisions of this Agreement. This Agreement shall be governed by the laws of the State of Minnesota,
USA. In the event this Agreement is translated to a language other than English, the English language version shall
prevail in any interpretation. You agree that the Software and accompanying documentation are subject to export
controls imposed by the U.S. Export Administration Act of 1979 and accompanying regulations. You further agree to
comply with such laws and regulations and to obtain any required U.S. Government export licenses prior to any export,
re-export or sale of any of the Software or documentation. You further certify that neither the Software nor
accompanying documentation is intended to be used for any purposes prohibited by the above-referenced regulations
and neither the technical data nor its current product will be shipped or exported either directly or indirectly to any
country to which the United States has prohibited shipment.
© 1998 Polaroid Corporation; © 1998 Microsoft Corporation (Redistributable
Components)
Polaroid Commercial ID Systems
Weblink Configurator Utility Guide
Page 46

43
Appendix B - End-user License Agreement for Microsoft
Software
END USER LICENSE AGREEMENT
IMPORTANT: THIS SOFTWARE LICENSE (“AGREEMENT”) IS A LEGAL CONTRACT BETWEEN YOU AND
POLAROID CORPORATION (“POLAROID”), POLAROID’S LICENSORS OR A PARTY IN POLAROID’S
AUTHORIZEDCHANNEL OF DISTRIBUTION (“LICENSOR”) AND GOVERNS YOUR USE OF THE SOFTWARE
REFERENCED BELOW. INSTALLATION, USE, DOWNLOADING, OR COPYING OF THE SOFTWARE BY YOU OR
BY A THIRD PARTY ON YOUR BEHALF DEMONSTRATES YOUR ACCEPTANCE OF THE TERMS AND
CONDITIONS CONTAINED IN THIS AGREEMENT. IF YOU DO NOT AGREE TO THE TERMS OF THIS
AGREEMENT YOU MUST IMMEDIATELY RETURN THE SOFTWARE TO THE LICENSOR. THIS AGREEMENT
SHALL SUPERCEDE ALL PREVIOUS AGREEMENTS.
LICENSE. Licensor hereby grants You, a personal, non-exclusive, non-transferable license to use the Polaroid software
accompanying this Agreement including any incorporated third party software (“Software”), on a single computer solely for Your
internal data processing and personalization operations.
PROHIBITED ACTIONS. You may not copy, modify, distribute, or prepare derivative works based on the Software or the
accompanying documentation (“Documentation”). You may not decompile, disassemble or reverse engineer the Software or
Documentation. You may not assign, sublicense, sell, rent, lease, send, or otherwise transfer the Software or Documentation to any
third party.
Polaroid Commercial ID Systems
Weblink Configurator Utility Guide
 Loading...