

Page 1

ID Card Maker version 4 1
Page 2

2 ID Card Maker version 4
Page 3

Contents
CHAPTER 1 Introduction 3
What is ID Card Maker? 3
Minimum Requirements 5
What’s On the CD 6
What’s New In Version 4 7
Year 2000 Compliance 11
CHAPTER 2 Installation 13
CHAPTER 3 Setting Up IDCM (Tools Form) 17
User Accounts 21
User Permissions and Passwords 21
Configuring IDCM 27
Preferences 28
IDServer Setup 41
ID Card Maker version 4 i
Page 4

Contents
Capture Devices 45
Printers 52
Encoding 56
Database Management 59
Database Options 60
Database Tables and Forms 60
Modifying Tables and Forms 61
Edit Field Definitions Window 64
Database Management window 72
Attaching to Another Database 79
Added Security with Field Definition files 81
Importing 83
Importing 83
Advanced Import 85
Exporting 95
Exporting the Entire Database 95
Badge Design 97
Menu Commands 98
Badge Objects 104
Using the “Insert Image” Command 120
Bar Encoding 121
Magnetic and Smart Chip Encoding 125
Reports 129
Search Criteria 131
Fields to Show in Report 132
Data History 135
Add-ins 139
Image Export 140
Selected Export 141
Repairing and Compacting 145
CHAPTER 4 Search Form 147
Searching for Records 149
ii ID Card Maker version 4
Page 5

Contents
CHAPTER 5 Creating Badges (Personal Data Form) 155
Create and Edit 158
Capture 158
Printing 161
Batch Printing 164
History 167
Appendix A Navigating ID Card Maker 171
Appendix B Graphic File Formats 175
Appendix C Hardware Setup 177
PDC 2150 Camera 177
Signature Tablet 177
Fingerprint Capture Device 178
Appendix D SQL and Boolean Operators 179
Appendix E IIF Statements 183
Appendix F Input Masks & Field Formatting 187
Input Masks 187
Field Formatting 190
Appendix G Best Practices 193
INDEX 197
ID Card Maker version 4 iii
Page 6

Contents
iv ID Card Maker version 4
Page 7

ID Card Maker
Polaroid Corporation
Commercial ID Systems & Solutions
4650 Executive Blvd.
Ft. Wayne, Indiana 46808
ID Card Maker version 4 1
Page 8

Information in this document is subject to change without notice. No part of this document
may be reproduced or transmitted in any form or by any means, electronic or mechanical,
for any purpose, without the express written permission of Polaroid.
ID Card Maker™ is a registered trademark of Polaroid Corporation.
Copyright © 1994-2004 ImageWare Systems, Inc. All Rights Reserved.
IDServer™ is a registered trademark of ImageWare Systems, Inc.
Microsoft, MS, MS-DOS, Microsoft Access, Windows, Windows NT 2000, Windows 98
and Windows XP are registered trademarks of Microsoft Corporation.
TrueType™ is a registered trademark of Apple Corporation.
FlashBus™ is a registered trademark of Integral Technologies, Inc.
SecurCode™ is a registered trademark of CMI.
2D Superscript™ is a registered trademark of Datastrip Corporation.
2 ID Card Maker version 4
Page 9

CHAPTER 1 Introduction
What is ID Card Maker?
Welcome to ID Card Maker, the world’s leading software for the creation of digital
photo ID badges! ID Card Maker combines database, badge design, image capture,
point-and-click hardware setup, and badge printing all from within one userfriendly interface.
ID Card Maker comes in three versions: Level I, Level II, Level III. The difference
between them is the absence or presence of "features”, which add functionality to
ID Card Maker versions. Level I is the lowest and level III is the version with the
most features.
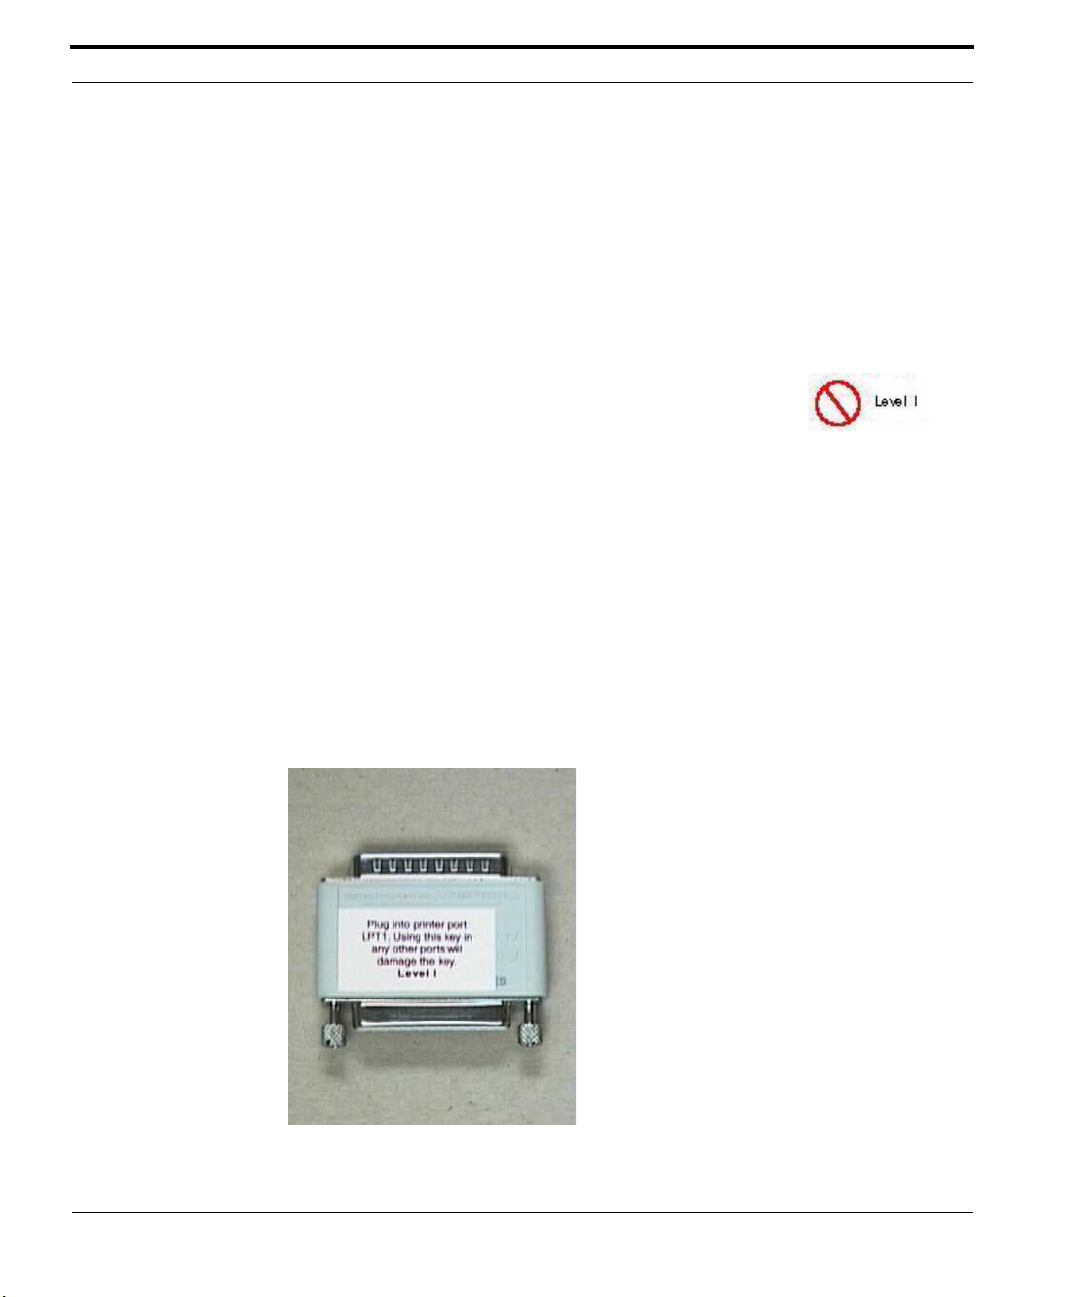
The features are controlled by the "security key" or "dongle" that comes with your
software. The dongle plugs into the printer port on your computer, and a USB version is also available. The software will not work without it. The keys are clearly
marked "Level I", "Level II", and "Level III".
As you read this manual, you may see screenshots or read about features of ID Card
Maker that are different from what you see on your own monitor. That is because
you are running a different level key with features that are not present. We have
tried to indicate clearly through use of icons in the margins of this manual which
application features are associated with which "levels." ”
ID Card Maker version 4 3
Page 10

Introduction
Here is a brief description of what this software package has to offer:
Database
• Based on Microsoft Access 2000, ID Card Maker can store up to 100,000,000
records
• Attach to ODBC databases
• Personal information is entered in standard text fields using Windows’ “point and
click” interface
• User-definable database fields
• Perform searches for single records or groups of records
• Create completely customized reports of your data
• Import and export data to and from another database file
• “Repair and compact” utilities included for database integrity
• User accounts and passwords for database security
• More...
Badge Design
• Design badges in a “What You See Is What You Get” (WYSIWYG) window
• Badges are printed exactly the way they appear in the design window
• A “Toolbar” for quick access to commonly used commands
• Image “ghosting” and “see through”
• Unlimited badge designs
• Export card layouts
• PDF417 2D bar code
• Datastrip Superscript 2D bar code
• Single- or double-sided badge design
• Rotation of text, images, bar codes, and badge
• Up to 300% ZOOM in the design window
• Create Rosters with text, photos, headers and footers
• More...
4 ID Card Maker version 4
Page 11

Minimum Requirements
Image Capture and Display
• Capture portraits, fingerprints, and/or signatures
• Import images
• Images are immediately available for preview and printing
• Images accessible to other applications
• Up to 30 images per record, and use all images in badges and rosters
Hardware Setup
• Use any TWAIN or Video for Windows input device
• Use any PVC card or Sheet printer, which uses a Windows printer driver
• Point and click configuration of hardware options
Badge Printing
• Print badges at the click of a button
• One-at-a-time or Batch printing
• Sheet printing
Optional add-on modules
• Expert Image Export (export select images)
• Expert Data Export (export data from select fields and for selected records)
Minimum Requirements
Please verify that your computer meets the following requirements before installing ID
Card Maker:
Operating System: You must be running Windows 98/2000/XP, or NT 4.0 (does not
support USB).
ID Card Maker version 4 5
Page 12

Introduction
CPU (central processing unit): You must have a Pentium-level CPU running at
400 MHz or higher (for 2000/XP Operating Systems).
RAM (random access memory): You must have a minimum of 128 megabytes of
RAM. Best results are obtained with 256 megabytes or more.
Hard Disk Space: You must have up to 90 megabytes of free hard disk space depending on which installation options you choose.
• ID Card Maker requires approximately 45 megabytes of disk space. In addition,
extra disk space is required to store individuals’ images. Typically, a single portrait
is 10K-12K. Therefore, if you have 500 individuals, you will need an additional
5,000K-6,000K of disk space—or 5-6 megabytes—to store their portraits. Storing
fingerprint and signature images requires additional disk space.
• ID Card Maker uses a “runtime” version of Microsoft Access 2000 as its database
engine. If you do not already have the “runtime” version of Access, the installation
wizard will install this 43 megabyte application. Backup your database regularly.
• ID Card Maker on-line User Manual (in PDF format) requires approximately 2
megabytes of disk space.
Video Capture Card: While some cameras connect to your computer through a serial
or Universal Serial Bus (USB) port, others require you to install a separate video capture
card. Consult your camera’s documentation.
CD ROM: ID Card Maker only installs from a CD. Your PC must have a CD ROM drive.
Keyboard and Mouse
What’s On the CD
The ID Card Maker CD contains:
• The ID Card Maker application and Access Runtime files. Installing this applica-
tion will copy all the files needed to run our photo ID badging system.
• On-line User Manual. This manual has been converted to a Portable Document File
(PDF). Once installed onto your computer, you can read the “electronic” version of
this manual. If you do not have Adobe’s free Acrobat Reader, you may also install
this from the CD.
6 ID Card Maker version 4
Page 13

What’s New In Version 4
• The ID Card Maker What’s New document.
When you run ID Card Maker’s Setup Wizard on the CD, you will be presented with the
option to install any or all of these components.
What’s New In Version 4
Security
History Included On Every Version. When given permission to view badge history, all
levels of users can now see when badges were issued and badge status. Users can also
view and print all badge history.
When viewing data history or record events, customers can now view and print out the
date an event occurred, the workstation that was used, who the operator was, the operation
he/she performed and a description of the operation.
Viewing Image History. In the IDServer setup window there is a box that allows the user
to enter, between 0 and 9, the number of old history images to keep. Users can then view
them on the personal data form by right clicking a displayed image that has a history.
Installing Wasp Barcode Fonts. Wasp barcode fonts can now be installed and are automatically activated after the initial install.
Wasp Codabar/Mod 10 for Barcode Encoding. In the barcode properties of IDLayout,
the Wasp Codabar/Mod 10 is added to the dropdown encoding selection.
Mod 10 Check Digit for Barcode Encoding. In the barcode properties of IDLayout, the
Mod 10 check digit is added to the dropdown encoding selection.
Database
Keyless Demo. IDCM demos are now available without a key. Once installed, users can
run IDCM in a keyless demo mode. In demo mode, all badges will have a watermark with
the word "demo" written across them.
ID Card Maker version 4 7
Page 14

Introduction
Text Data Now allowed In Importing. Users can now import/export from both .csv and
.txt extension files.
Default Database. IDCM now has an updated simple default database that allows users to
quickly install a working application with sample layouts, enrollment fields and reports.
Sample Databases and Card Layouts. There are now multiple application-specific and
vertical application sample databases and card layouts available. These files are located in
a separate folder on the CD and are not automatically installed with the application.
Modifying Database Structure over the Network. When creating a new database over
the network, an error 'file in use' would appear. This happened only over the network and
it is now fixed.
IDNumber in Advanced Imports. Previously, advanced import into SQL or other
ODBC databases required an IDNumber whereas the equivalent MS Access did not. This
restriction has been removed and the import automatically assigns the appropriate values
for the IDNumber.
IDServer Box. The IDServer box no longer will pop up in front of the User Interface window.
IDSetup Changed in IDServer. IDSetup.exe has been changed to fix the problems created when a directory or database name contained spaces.
Messages Changed To Be More User Friendly. The language in the database management form is less technical, making it easier to understand and more user-friendly.
Imaging
Automatically Display Images. The 'automatically display images' check box is now
enabled for level I and II users, giving small to medium businesses the option to display
the images they acquired.
Select Different Images. Users can now select different image sources on the fly to speed
the enrollment process. Simply hold down the 'Alt' key and simultaneously select the primary image source on the capture instance form. This will enable the user to switch to
get-from-file without having to go through the IDServer setup.
8 ID Card Maker version 4
Page 15

What’s New In Version 4
Direct Interface with Polaroid 2150 Digital and Logitech QuickCam Cameras. This
feature allows the camera to be controlled via the software, enabling the user to speed
enrollment, while saving time and money.
Polaroid Olympus Camera Capture Interface. A DDIShell.exe capture interface was
written specifically to work with IDCM. This capture interface is automatically installed
and ready to use with the Polaroid Olympus camera.
Flashpoint Capture Routines. A flashpoint capture routine now allow images up to 640
x 480 to be captured and provides a greater range for panning. This allows the frame grabber camera to move the interface to all sections of the captured image for better selection.
Flashbus90 Interface. The flashbus90 interface allows the frame grabber camera to be
mounted on its side to capture an image 480 wide x 640 tall instead, enabling a higher resolution portrait picture. This also allows greater vertical panning instead of the horizontal
default.
Crop Current Image Interface . When acquiring an image in IDServer there is now a
"crop current image" interface window that allows the captured image to be cropped and
enhanced.
Cropping Mode When Capturing Image. Each time an image is captured, the image
cropping box will open to modify that image. This feature was previously set to 'automatic' which would bypass the cropping window if the image had the correct aspect ratio.
The cropping box will no longer be bypassed; it will always open.
Image Capture of Small Image. If an acquired image's natural size is less than half the
height of the screen, the cropping window will zoom the image 2 to 1 or 3 to 1 if necessary.
Rotate Image in Cropping Window. When acquiring an image via TWAIN, Video for
Windows, direct scan or 'get from file', there are now two buttons in the cropping window
that allow rotation of the image either clockwise or counter clockwise.
Reducing Resolution in Cropping Window. When acquiring an image, cropping will
also reduce the resolution to avoid creating an image with a higher resolution than
requested in IDSetup.
Newly Supported Image Files in IDServer. When acquiring images in 'get from file',
PIC and PCT image files are now supported.
ID Card Maker version 4 9
Page 16

Introduction
Badge Layout
Barcode Field In IDLayout. When selecting a barcode in IDLayout, an 'IDLayout-New
badge Object' window opens. Inside this window is a dropdown box called 'Name of Database Field containing the Barcode Text'. The 'Barcode' option has been added back to the
dropdown box as a field selection.
Test Print In IDLayout. When creating new card formats or modifying existing ones,
users may test print card layouts. This enables users to ensure that the background, text,
and image boxes are accurately placed.
Solid Box feature In IDLayout. The solid box feature can be added behind an existing
object or text on a card design and will wrap itself around the object or design like a picture frame. Or, the box can be created first so the added text will automatically adjust to
fit inside the box. This feature is now available on all levels of IDCM.
New Apply Button in IDLayout. The image and text dialog boxes in IDLayout now
have an 'apply' button to allow the customer to save changes without the dialog box closing.
IDLayout Expression Builder. When selecting a new image or text badge object in
IDLayout, there is a dropdown box that allows users to select name of the database field
containing the image or text file name. If selecting the equal sign (=), a button with an
arrow appears on the right hand side of the box. This will open an edit expression window.
When adding expression editing options to the expression box located at the top of the
window, the expression builder used to fail to display in this box using Windows XP. The
expression box has now been modified and will display under all windows platforms.
More Seamless Software Installation
Software Installation. To make it easier for users to install IDCM, there is now an auto-
matic install of the Access 2000 runtime and USB hardware key driver.
Camera/Printer/Settings Defaults On Setup. When IDCM is being installed, the customer can select a printer and/or camera configuration.
Install Process For USB Key. The option to use a USB key instead of a parallel key is
now integrated with the install process.
10 ID Card Maker version 4
Page 17

Year 2000 Compliance
New Default Install Path. The default install path has now been changed from C:\ITC to
C:\IDCM for new installations.
Other Features
IDCM Includes Education Functionality. Education level I functionality is now in
IDCM level II. Education level II is now in IDCM level III.
Shortcut From Personal Data Form. When right clicking on the back button in the personal data form, a short cut window opens. This window allows users to go directly to and
from the IDLayout screen, IDSetup window or the configuration form. Previously, if the
database had been recently modified and the shortcut to IDLayout was selected, the field
list was not updated. This has now been fixed to reflect the current field list.
Release Notes Available. Polaroid Commercial ID Systems will place updated release
notes on the Polaroid-ID.com website when available to help end users better understand
new and existing features.
Compatibility List. A compatibility list for all databases and drivers that have been tested
with IDCM v4.02M is available.
Larger Control Window. Since the trend is toward longer field names, the control window has been stretched from 1 to 2 inches long.
IUpdated Topaz Driver. There is now an updated driver, SigPlus.exe, in the installation
process for the Topaz signature pad. The previous driver TopazSetup.exe is now obsolete.
Updated Acrobat Reader. Acrobat version 5 will be installed if there are no applications
associated with the .pdf extension.
Updated Rainbow Driver. The install process now includes an updated version for the
Rainbow Key USB driver (version 4.51).
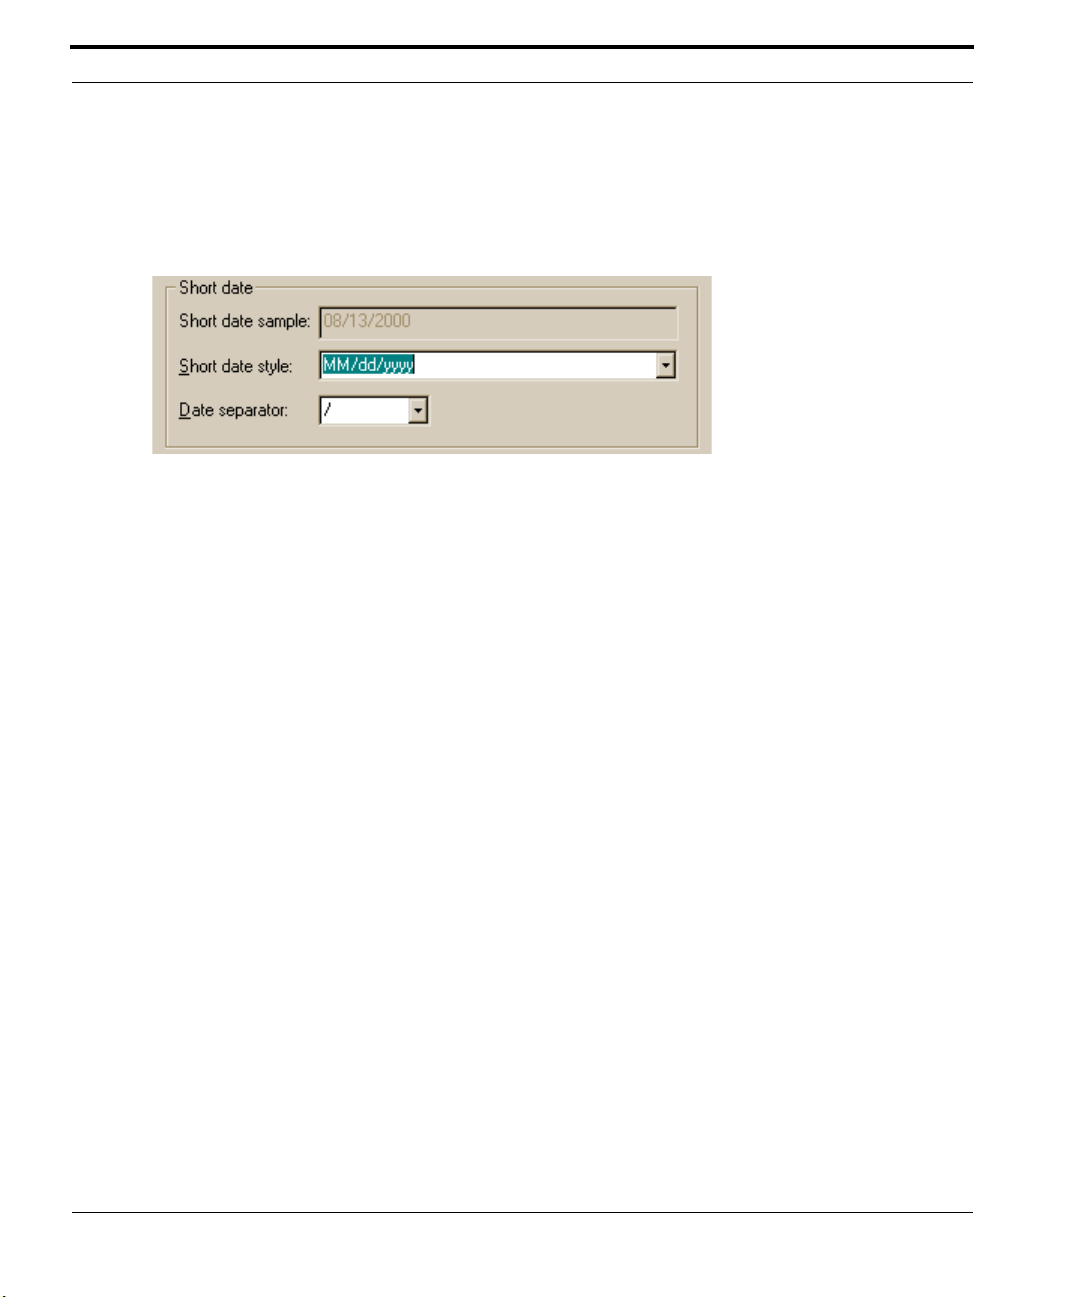
Year 2000 Compliance
ID Card Maker is Year 2000 compliant, but only if the following setting has been made:
ID Card Maker version 4 11
Page 18
Introduction
Go to Windows Control Panel folder (StartSettingsControl Panel) and double-click
Regional Settings. Click the Date tab. Select MM/dd/yyyy for the Short date style. You
must now use four-digit year dates in all ID Card Maker date fields.
12 ID Card Maker version 4
Page 19

CHAPTER 2 Installation
ID Card Maker uses a “wizard” to guide you through the steps for installing the
software. Note: If you intend to install ID Card Maker in a networked environment,
each computer must “map” the shared network drive onto which certain files must
be copied before installation. (Your Network Administrator must create a network
directory which will contain the database and image files, and assign full Read,
Write, and Delete privileges to it. Though the Administrator may name this directory anything, for simplicity’s sake, we suggest you name it “IDCM”.)
To “map” the drive, perform these steps:
1. Double-click the “Network Neighborhood” icon on your desktop. All available
network resources are displayed.
2. Double-click the workstation/file server where your Network Administrator
created the shared directory, then right click on the folder representing the hard
disk.
3. Choose “Map Network Drive” from the pop-out menu. Allow Windows to
assign a drive letter, and ensure that “Reconnect at logon” is checked.
Note to Windows NT, 2000, and XP users: Before you install ID Card Maker, you
must log on to Windows with full Administrator privileges. If you do not log on with
Administrator privileges, required software keys will not be written to Windows’
registry and ID Card Maker will not operate properly.
ID Card Maker version 4 13
Page 20
Installation
To install ID Card Maker, perform these steps:
1. Insert the ID Card Maker CD in your CD ROM drive. If “auto insert notification” is
enabled in the Device Manager tab of your System control panel, ID Card Maker’s
installation wizard will automatically begin. If the installation wizard does not begin
automatically, open Windows Explorer and browse the ID Card Maker CD. Doubleclick on the file named “Setup.exe.”
2. Follow the on screen prompts.
3. You will be prompted to select a “Network” check box if you wish to install ID Card
Maker in a networked environment. If you check that option, enter the drive letter and
path to the directory your network administrator created earlier.
4. A Select Printer dialog box appears. Select from the options. If your printer will not be
connected to LPT1, select the option None of the above. Click Next.
5. A Select Camera dialog box appears. The default is PDC2150. Click Next.
6. Repeat steps 1-3 at every workstation on which you will run ID Card Maker. At subse-
quent workstations, the setup wizard will detect that the ID Card Maker database has
already been installed on the network drive. You will be prompted to overwrite the
database. Click “No” at that prompt—do not overwrite the database. Proceed as usual.
7. You received a “security key” with your software - either a USB key or a parallel port
key. Follow the installation instructions below for your specific key:
• USB - Attach a USB key to any available USB port on each computer running ID Card
Maker.
• Parallel Port - Attach a parallel port key to the LPT1 parallel printer port for each
computer running ID Card Maker.
14 ID Card Maker version 4
Page 21

If your printer is currently connected to your computer's LPT1 port, unplug the
printer’s cable and attach the security key in its place. The security key has a female
connector at one end and a male connector at the other. It will only attach to your computer one way. The printer’s cable may now be reattached to the back of the security
key. (Note: ID Card Maker also may not work if your printer is plugged into the secu-
rity key and the printer’s power is OFF. Either attach your printer to another parallel
port, or always keep your printer’s power ON when using the ID Card Maker software.)
Note: Each “security key” has a unique serial number. After you install ID Card
Maker, the serial number of the key can be displayed by pulling down the H
in any application window and selecting A
BOUT.)
ELP menu
The setup wizard will create a program folder and program icons for ID Card Maker in the
Programs section of Windows’ S
TART button.
While you are now ready to begin using ID Card Maker, it will not be optimized for use
until you have set some program preferences and instructed the program to use your specific cameras and printers. Therefore, first-time users should carefully read the next chapter, “Tools,” before continuing.
Note: When you launch ID Card Maker, you are presented with an initial Logon window.
The User Name and Password fields are disabled; a short message in the body of the
Logon window explains that “logon” is disabled until a user account with “System
Administrative” privileges is created. See “User Accounts” on page 21.
ID Card Maker version 4 15
Page 22

Installation
16 ID Card Maker version 4
Page 23
CHAPTER 3 Setting Up IDCM (Tools
Form)
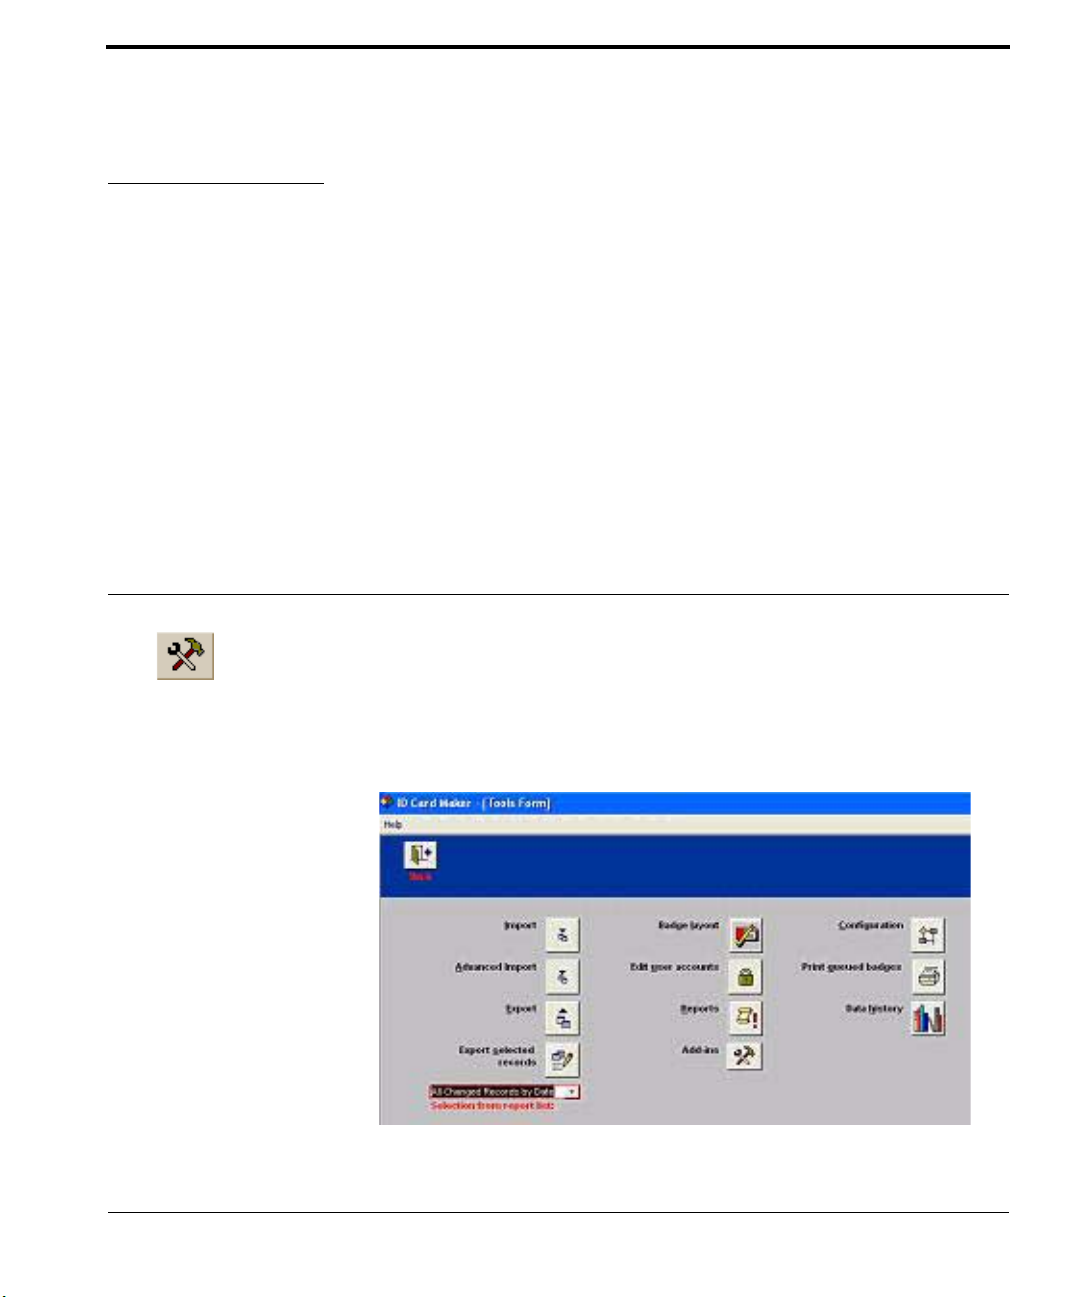
You arrive at the Tools window by clicking TOOLS in the Search window.
The Tools window is where ID Card Maker’s “tools” are located, e.g., importing
and exporting databases, designing badge layouts, setting application preferences,
etc. The following window appears allowing access to different application functions:
Tools Window
ID Card Maker version 4 17
Page 24
Setting Up IDCM (Tools Form)
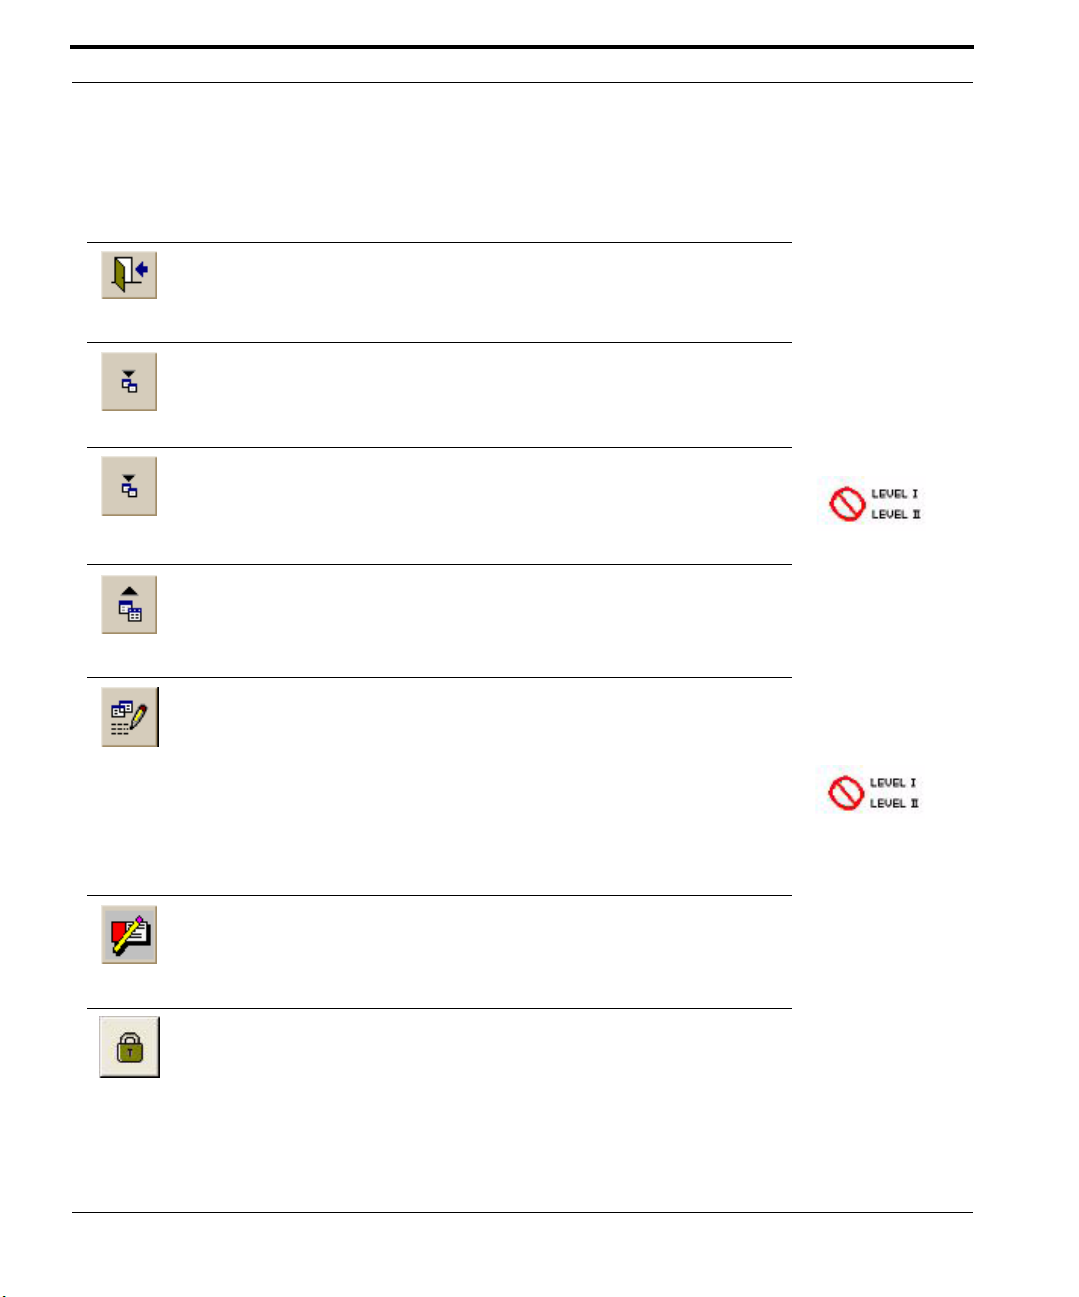
BACK
IMPORT
ADVANCED IMPORT
EXPORT
EXPORT SELECTED
RECORDS
Returns you to ID Card Maker’s “home” page.
Opens a standard Windows Open dialog to navigate to a text file
containing data exported from another database. ID Card Maker
will import all the data. (See “Importing” on page 83.)
Takes you to an Advanced Import window in which you have a
variety of options for importing or updating data in your database.
You may import from either a text file or directly from a Microsoft
Access database. Text and/or Images. (See “Advanced Import” on
page 85.)
Will export the entire database (text only) to a comma-delimited
ASCII text file. (See “Exporting” on page 95.)
Allows you to export a specified set of records to a comma delimited ASCII text file. The
disabled until you tell ID Card Maker which records you want to
export. Use the
ately below to do this.
Selection specification is a “pick list” displaying the names of your
Reports. (See “Exporting a Group of Records” on page 96.) Selecting a Report from this list will use its query to specify which
records will be exported.
Opens a “badge design” window in which you may create your ID
badges in a graphical window. (See “Badge Design” on page 97.)
SELECTION FROM REPORT LIST BUTTON immedi-
EXPORT DELIMITED TEXT file button is
BADGE LAYOUT
Takes you to a User Permission window in which you create “user
accounts”—user names, passwords, and application privileges.
(See “User Accounts” on page 21.)
EDIT USER ACCOUNTS
18 ID Card Maker version 4
Page 25
EPORTS
R
CONFIGURATION
PRINT QUEUED
BADGES
DATA HISTORY
ADD-INS
Takes you to a Reports window in which you may create, edit, and
print reports. (See “Reports” on page 129.)
Takes you to a Configuration window where you may configure
your application options. (See “Configuring IDCM” on page 27.)
Will immediately print the contents of the “print queue.” (If you
selected “Batch print” and “Always queue” in the Printer Options
Dialog of ID Server Setup, clicking a record’s
the badge to the print queue instead of to the card printer. See
“Printers” on page 52.)
Takes you to a Data History window where you may view a log of
record and application events. (See “Data History” on page 135.)
Opens a selection window allowing you to launch custom “miniapplications” which add functionality to ID Card Maker. (Add-ins
may be present in the higher versions of our software, and may be
purchased and installed separately for the lower versions.)
PRINT button sends
Though you may access and use any of the tools at any time, you will want to visit several
areas first in order to optimize ID Card Maker for your personal use:
• User Permissions (to create “user accounts” and set application “permissions”)
• Configuration (to set program preferences)
• ID Server Setup (for camera and printer setup)
• Database Management (to modify database fields)
• IDLayout (to design badges)
The chapter sections which follow will describe each of these program areas.
ID Card Maker version 4 19
Page 26

Setting Up IDCM (Tools Form)
20 ID Card Maker version 4
Page 27
Section 3.1 User Accounts
You arrive at the User Permissions window by clicking TOOLSEDIT USER ACCOUNTS.
User Permissions and Passwords
Through its use of a secure logon, ID Card Maker allows you to have control over who is able
to access the ID Card Maker application. This prevents unauthorized users from creating, editing or printing badges and reports. The following is intended for those few individuals who
will have permission to create “user accounts.”
A record is created in a hidden table for each authorized “user” of ID Card Maker; a “user
name,” initial “password,” and “access options” are entered into each record. Only someone
with permission to access specific application functions (e.g., create, delete, print, etc.) is
allowed to use them. The application administrator may assign an initial password for each
user, but users may change their passwords at any time thereafter. Though the application
administrator can never “read” a user’s password (passwords always appear as asterisks), he or
she may over-write or delete a user’s password at any time, or delete the “user account”
(record) entirely, thereby denying that individual access to the application.
When you log on to ID Card Maker for the first time, the User Name and Password fields in
the Logon window are disabled, indicating that a “System Administrator” has not yet been created. To “secure” the application, that is, force the initial Logon window to require user names
and passwords, at least one user account with “System administrator” privileges must be created (see below). If all “user accounts” with “System administrator” permission are deleted,
the logon window will stop forcing the use of user names and passwords. This is a visible
ID Card Maker version 4 21
Page 28
reminder that at least one “user account” must be created which has over-all access to the
database.
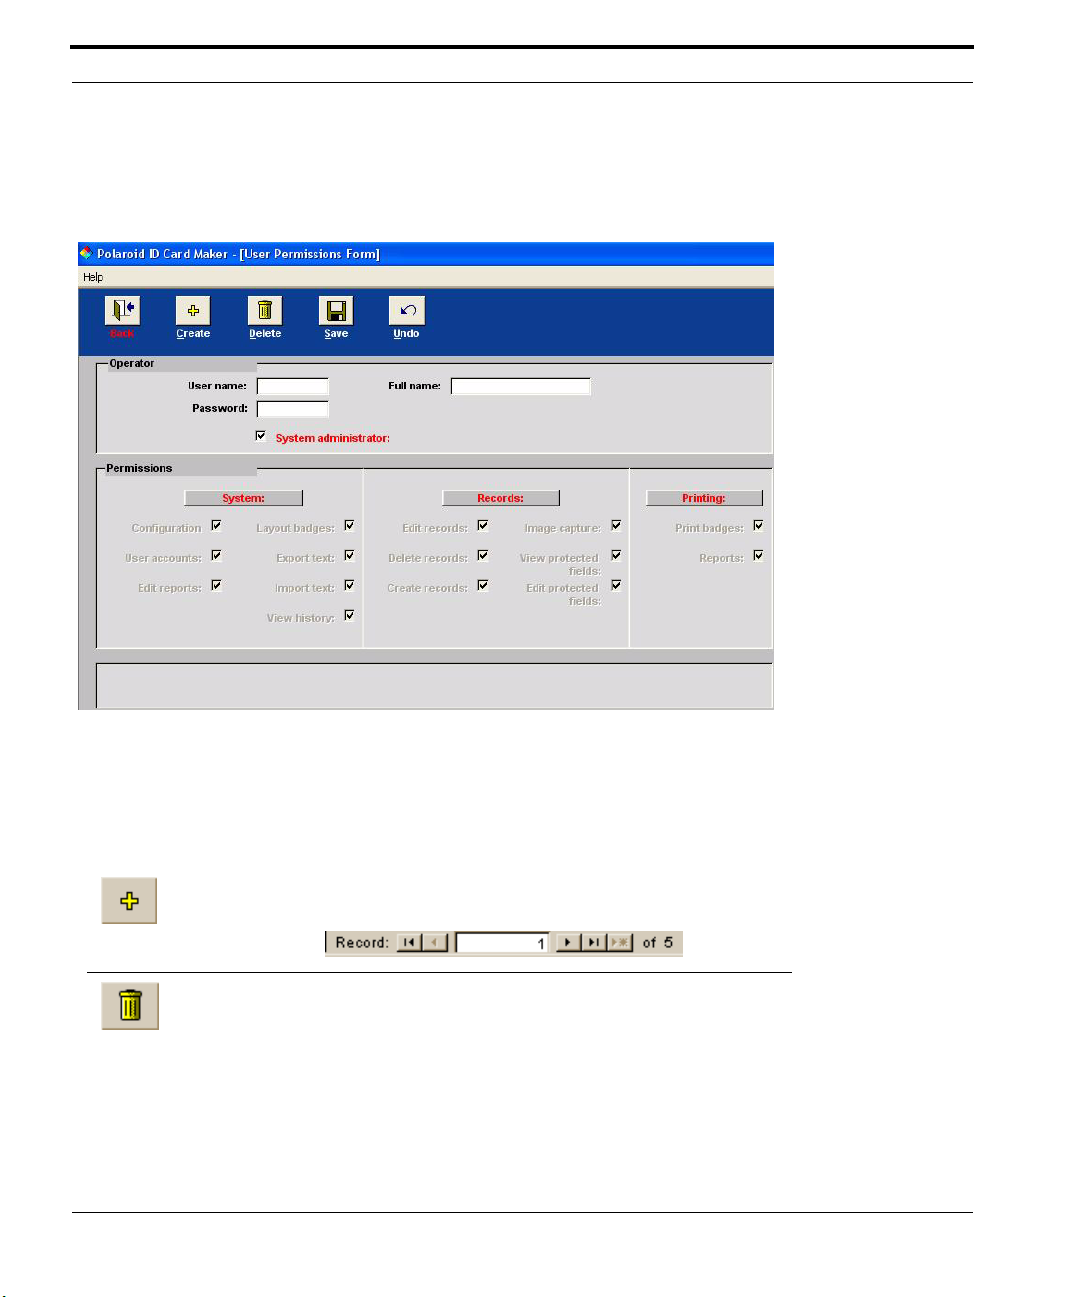
Create a User Account
The first time you click the EDIT USER ACCOUNTS button, an empty User Permissions window appears. C
REATE, DELETE, SAVE, and UNDO buttons are located at the top.
Creates a new “user account.” Each “user account” is denoted by a
“record number” at the bottom left of the User permissions window.
C
REATE
Deletes the current “user account.”
D
ELETE
22 ID Card Maker version 4
Page 29
User Permissions and Passwords
When a “user account” has been created or edited, the SAVE button
saves the changes.
S
AVE
This button undoes the actions taken since the last “save” in a “user
account.”
NDO
U
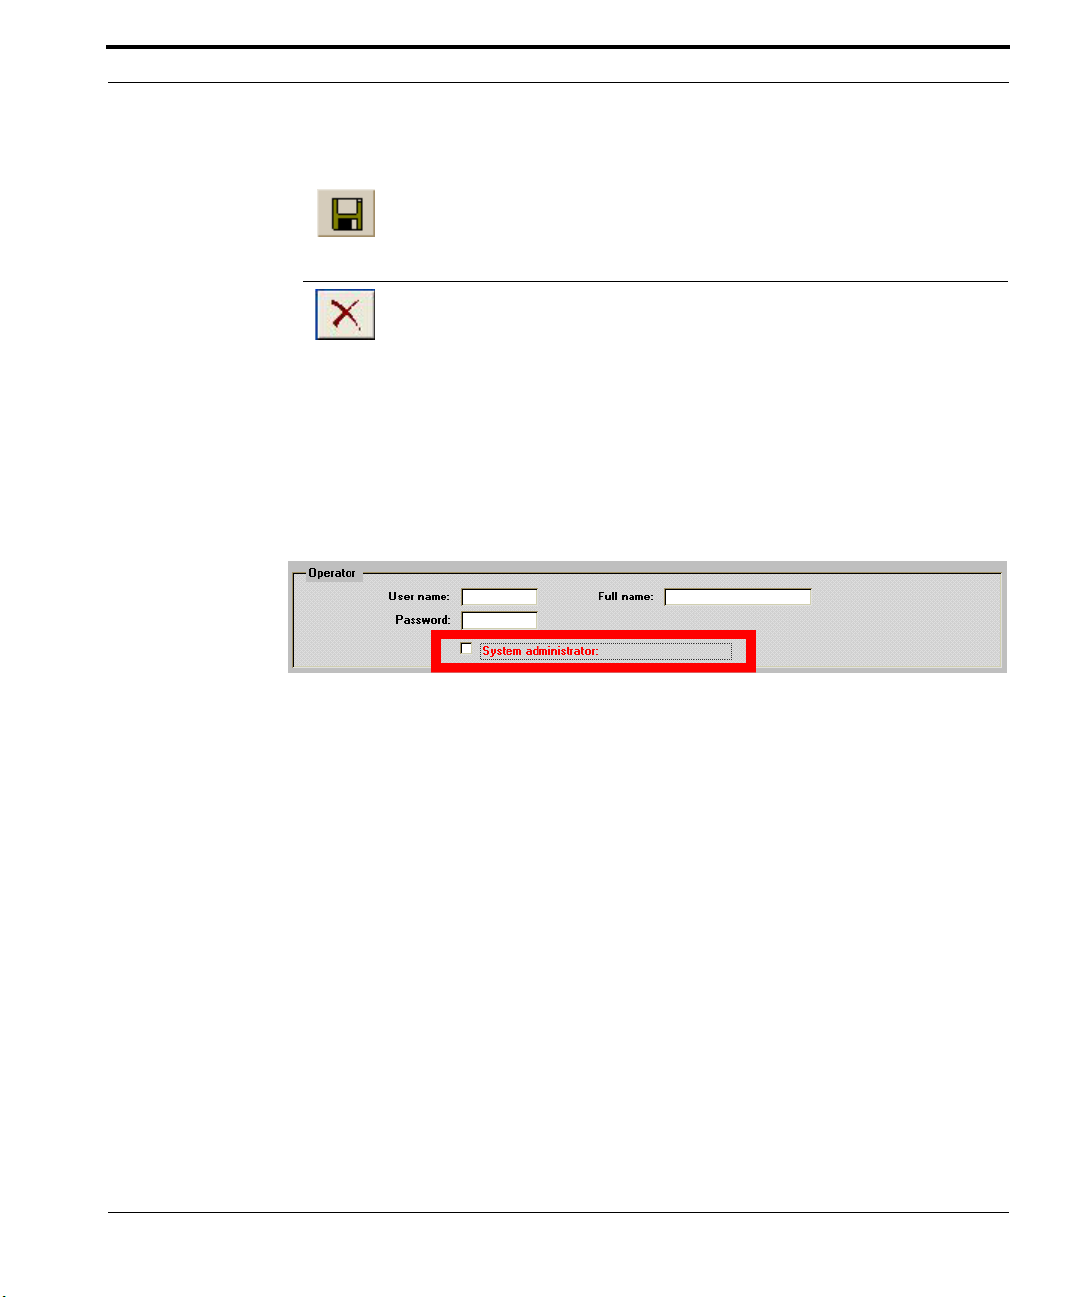
Click the CREATE button to create a record for yourself. An “Operator” box in this window
contains text fields. Enter a “user name” up to 8 characters in the User Name field. This is
the name you will enter when you logon to ID Card Maker. Enter a descriptive name for
the user in the Full Name field (e.g., first and last names, or employee ID, etc.), up to 50
characters long. Enter a password, up to 15 characters, in the Password field. Passwords
may be alphanumeric and are case sensitive!
There is a “System administrator” check box labeled in red. At least one person must have
this option checked. It forces the use of User Names and Passwords at the initial Logon
window. Until a System Administrator for ID Card Maker is assigned, anyone may launch
ID Card Maker to create records and print badges. Important! Only someone with System
Administration permission is able to access the Database Management portion of ID Card
Maker. Database Management is where the System Administrator may modify database
fields, and create, copy or attach to Microsoft Access or ODBC databases. (See “Database Management” on page 59.)
Below “Operator” is a “Permissions” box. This section contains check boxes to enable or
disable access to application functions. A function is enabled for a user when its box is
ID Card Maker version 4 23
Page 30
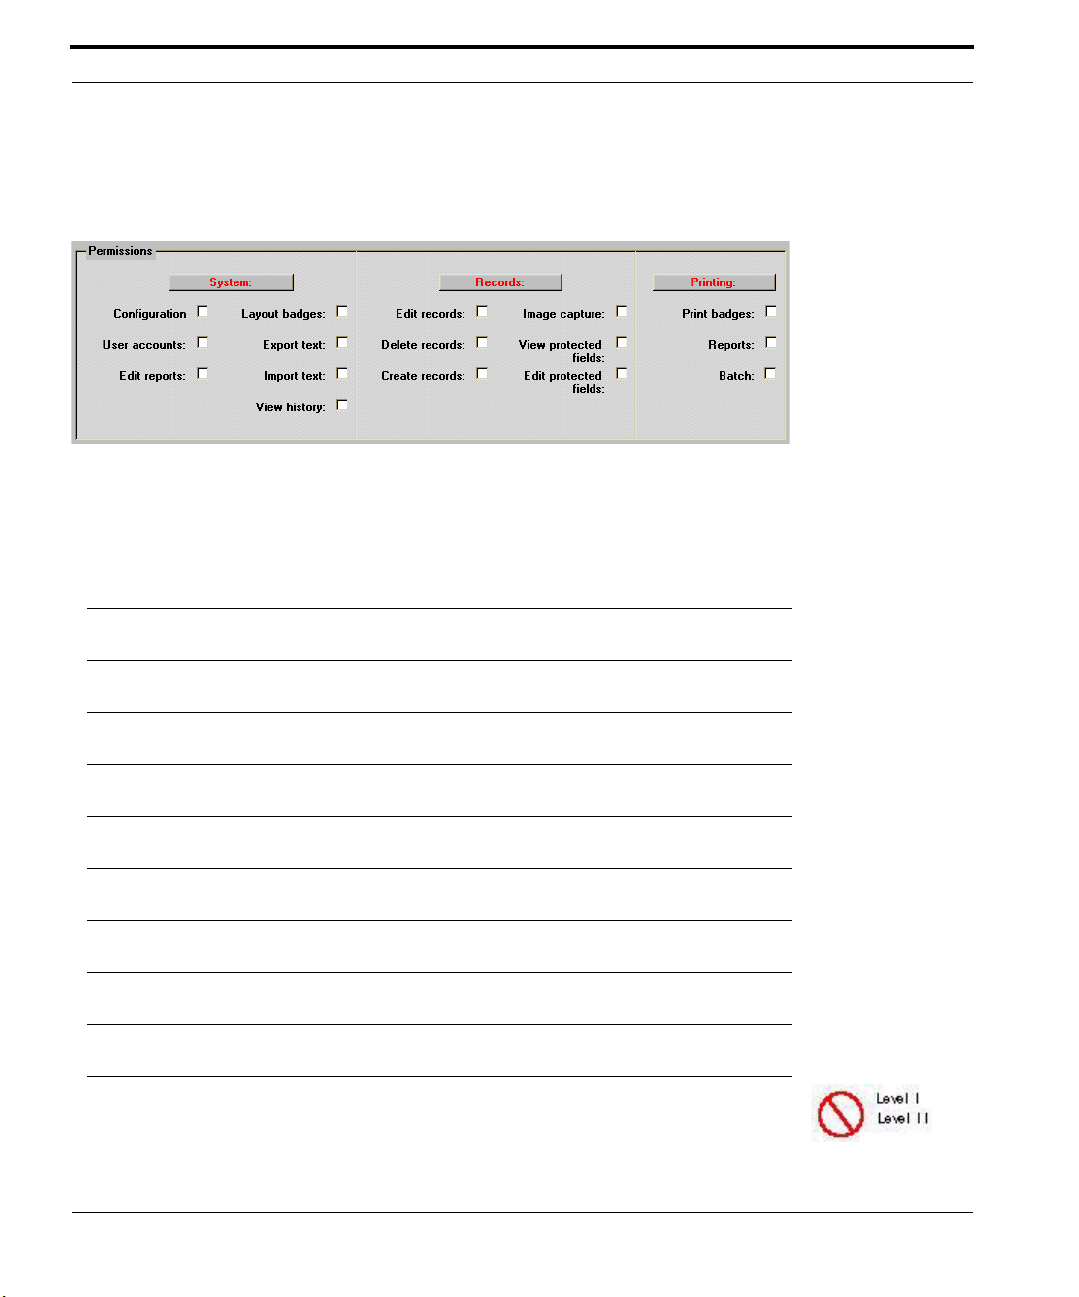
checked. (Click the SYSTEM, RECORD, or PRINT buttons to enable or disable all the options
below them.)
The individual permissions are:
Configuration This permission allows you to use all the tools in the Configuration
window (e.g., Program Preferences, Database management, ID
Server Setup, etc.).
User accounts This permission allows the user to create, edit and delete user
accounts.
Edit reports This permission allows users to create and edit the queries upon
which reports are based.
Layout badges This permission allows the user to open and use the IDLayout
badge design utility.
Export text This permission allows users to export data in the ID Card Maker
database to an export text file.
Import text This permission allows users to import data from another database
into the ID Card Maker database.
View history This permission allows users to view the Badge History, Record
History and Program History if they were enabled.
Edit records This permission allows users to edit data in the ID Card Maker
database.
Delete records This permission allows users to delete records and their images in
the ID Card Maker database.
Create records This permission allows users to create records in the ID Card
Maker database.
Edit protected fields If you marked specific database fields as “protected,” only some-
one with this permission may edit them. The fields are otherwise
un-editable. (See “Edit Field Definitions Window” on page 64.)
24 ID Card Maker version 4
Page 31

User Permissions and Passwords
View protected fields If you marked specific database fields as “protected,” only some-
one with this permission may view them. The fields are otherwise
invisible. (See “Edit Field Definitions Window” on page 64.)
Image capture This permission allows users to capture images.
Print badges This permission allows users to print badges.
Reports This permission allows users to print reports.
Batch This permission allows users to perform “batch” operations (i.e.
apply actions to groups of records).
At the bottom of the User Permissions window is a text field for creating a “Search Filter”
using a standard SQL Where clause. (See “Searching with SQL” on page 152.) For each
user, you may elect to apply a filter that restricts the records a user may browse. For example, if you want to restrict a user to viewing only records belonging to the Engineering
Department, you would enter: Department = “Engineering.” That user will only be able to
view records where the word “Engineering” is entered in the Department field. Add additional fields as needed providing authorized users a range of records to browse. Alternately, select a query from a report using the S
ELECT FILTER FROM REPORT LIST pick list. The
SQL from the selected report will act as the “filter” for the user account.
Create as many “user accounts” as you need. You may assign temporary passwords that
the users may later change.
Users may change their passwords as soon as they logon to ID Card Maker. At the opening “home page,” clicking the P
ASSWORD button opens a small window in which the user
ID Card Maker version 4 25
Page 32

enters their old, then a new, password. . (The PASSWORD button does not appear until at
least one “System administrator” user account is created.)
26 ID Card Maker version 4
Page 33

Section 3.2 Configuring IDCM
You arrive at the Configuration window by clicking TOOLS CONFIGURATION.
A number of application preferences are set in an area of the program known as Configuration.
Three buttons at the top of the Configuration window perform functions that require special
user input.
ID Card Maker version 4 27
Page 34

ID Server is the portion of ID Card Maker that is responsible for
image capture and badge printing. This button takes you to a Setup
window in which you set your preferences for “input” and “out-
IDS
ERVER SETUP
DATABASE MANAGE-
MENT
put” devices (e.g., cameras and printers), as well as other options.
(See ID Server Setup).
ID Card Maker has a number of “management” functions: creating, copying and saving databases, attaching to alternate Microsoft
Access or ODBC databases, “importing” database fields from
another database, as well as adding, deleting and editing individual
fields. Only someone with “System administrative” privileges may
access Database Management. (See “Database Management” on
page 59)
The main body of the Configuration window contains three tabbed properties sheets:
W
ORKSTATION PREFERENCES (options applying just to the particular workstation), SYSTEM
PREFERENCES (options applying to both a stand-alone system, and to all workstations in a
networked environment), and E
NCODING FORMULAS (text and data strings used for bar
and magnetic encoding, as well as for other uses). (In a networked system, the System and
Encoding formula preferences need only be set once.) Clicking on the “tab name” opens
that property sheet.
Preferences
Workstation Preferences
Five non-editable text fields display useful information about the ID Card Maker application:
Database name This field shows the name and “path” of the database file to
which you are currently “attached.” That is, this is the file that
contains the actual data in your database.
Application home
directory
Current working
directory
This field shows where the ID Card Maker application is
installed.
This field shows where the IDServer components are
installed.
28 ID Card Maker version 4
Page 35

Preferences
IDServer INI file This field shows the name and “path” of the file that stores
IDServer settings. (IDServer is the portion of ID Card Maker
which manages image capture, image retrieval and badge
printing.)
IDServer data path This field shows the “path” where IDServer will save and
retrieve badge layout and image files used in a badge design.
Five preferences may be set to offer workstation-specific features and functionality. These
options must be configured at each workstation running ID Card Maker.
Default badge layout
The Default badge layout preference allows you to simplify data entry by establishing a
default badge type whenever a record is created. Select from the pick list the badge you
wish to use as the default. The list displays any “.bdg” (badge layout) files found in the
folder you specified in the “Server data path.” (See IDServer Setup) When you create your
own badge layouts, ensure that they are saved to the folder you specified in the “Server
data path” field. (Until you create your own badge layouts, only the “default” badge will
appear in this list. After you have created your badge layouts, you may wish to return to
this Configuration window to specify a new default badge.)
In addition to listing all your existing badges, there are the following items in the Default
badge layout pick list: [Expression1], [Expression2], and [Expression3]. Selecting any of
these items allows you to use the “expression” in that field to determine which badge is
assigned to the individual. (The Expression fields appear on the Encoding formula property sheet in this Configuration window.)
While the Configuration window doesn’t offer the ability to automatically insert “functions” the way you can in IDLayout’s Expression Builder (See “Expression Builder” on
page 114), you may manually enter functions, operators and text. Note that all expressions
must begin with an equal sign (=).
ID Card Maker version 4 29
Page 36

You may use any function and operator that is supported by Microsoft Access 2000. However, Polaroid Commercial ID Systems only supports and warrants the following expressions:
Expression1:
This expression uses “nested if” statements. An “if” statement follows this syntax: iif
(argument, result1, result2). In plain English, that means: “If such and such a condition is
true, then make a certain result apply. Otherwise, if the condition is not true, apply a different result.”
The “argument” typically compares whatever is entered in a specified database field to a
“value” (text, date or number) which you provide here. The syntax of the argument typically is: [database field]-[Boolean operator]-[“literal text”]. (Note: literal text must be
enclosed within quotation marks.) In the example in the graphic above, Department=“technical” is the argument. That is, our program will look at every database record
and see if the Department field contains the word “technical.” If “technical” does, indeed,
appear in this field, then this expression will make the word “tech” appear in the Badge
layout pick list in the Personal Data window. (This example assumes that 1) you have a
badge designed specifically for individuals belonging to the Technical department, and 2)
that badge is, in fact, named “tech.”)
If you only have two badge designs, “tech” and “default,” this expression would be easily
written. “Tech” would be result1 and “default” (or the name of your other badge design)
would be result2. The expression would be entered as follows:
=iif (Department=“technical”, “tech”, “default”)
However, if you have numerous badges associated with specific database fields, then you
would use nested iif statements. The example in the graphic above inserts a second iif
statement in place of result2. This second iif statement may contain yet a third iif statement in the location of its result2, and so on. The only difficulty in using nested iif statements is keeping track of the parentheses...each iif statement must have an opening and
closing parenthesis. In the example in the graphic above, you can see there are only two iif
statements. While the expression begins with just one opening parenthesis, it ends with
two closing parentheses.
30 ID Card Maker version 4
Page 37

Preferences
Expression2:
This expression uses the Microsoft Access “Choose” function. The Choose function will
look for a number—1, 2, 3 and so on—in the specified database field, and enter the word
you supply in quotes according to which order it appears in the expression. For example,
in the graphic above, three words follow the database field “Department”: “technical”,
“tech”, and “default.” “Technical” is the first word, “tech” is the second, and “default” is
the third. If a record contains the number 2 in the Department field, then the word “tech”
will be entered in the Badge layout pick list of the Personal Data window. If a record contains the number 3 in the Department field, then the word “default” would be displayed in
the Badge layout pick list.
This approach simply associates a specific number with a specific badge design. Use any
field you wish to enter individuals’ badge design number.
Expression3:
This last example is perhaps the easiest to use. If you have badge designs specifically
associated with individual Departments, then use the =Department (or other database
field) expression. This expression assumes two things: 1) you have a different badge
design associated with each Department, and 2) the badge designs have the identical name
as the actual Department (e.g., the Accounting department is issued a badge named
“Accounting.bdg” and the Engineering department is issued a badge named “Engineering.bdg”). Therefore, this expression will automatically insert into the Badge layout pick
list the word entered in their Department field. Since that word is the appropriate badge
name, the correct badge will be issued to him or her.
Automatically display images
The automatic image display preference allows you to have captured images automatically display when opening a database record. If this option is not enabled, the image is
not displayed until you click D
ISPLAY in the Personal Data window. The default setting is
disabled. This option may be toggled on or off as often as you wish.
ID Card Maker version 4 31
Page 38

Enable data history
This preference “turns on” a history of “application events” as well as changes made to
specific records. When E
NABLE DATA HISTORY is “on,” a HISTORY button is displayed in the
Tools window. Clicking H
ISTORY presents a log of events at both the application and
record level. At the application level, it records when users log on and off the system,
which ones accessed specific portions of the application and from which workstation, and
more. At the record level, it records every event occurring in a record: image capture,
badge printing, database field edits, and more. ID Card Maker does not begin creating a
“history” until this option is checked.
Enable badge history
This preference “turns on” a history of badge issues. When enabled, a HISTORY button
appears in the Personal Data window. When clicked, it displays a “snapshot” of the data-
base as it was each time a badge was printed. It allows you to “look back in time” at the
data recorded in the various database fields at the time each badge was issued.
Enable Capture Selection Form
This preference turns on a pop up form when you want to capture a new graphic in a
record. During IDServer setup you decide how many portrait, fingerprints, and signatures
to capture, this form will allow to select all or one of the choices to save going through
ALL screens to capture.
32 ID Card Maker version 4
Page 39

Preferences
Enable SQL in Search Form
Selecting this option inserts two new search fields in the “home page” of ID Card Maker:
“SQL WHERE clause” and “SQL ORDER BY clause.”
The “SQL WHERE clause” field allows you to create very customized searches of your
database using common “SQL” (Structured Query Language) commands. The “SQL
ORDER BY clause” allows you to custom-sort the results of a query. (See “Sorting with
SQL SORT BY” on page 153)
Display Personal Data Form as a list
Selecting this option changes your first “view” of database information from an ID Card
Maker Personal Data form to a more conventional “table” displaying records in columns
and rows. The view may be toggled between “form” and “table.”
Convert searches to upper case (for Oracle ODBC)
This option will automatically convert text you enter in a search field to upper case. While
searches in a Microsoft Access database are case-insensitive, Oracle and some other
ODBC databases require text to be in all uppercase letters.
System preferences
Click the System preference tab to view and set these options. System preferences are
“global.” (In a stand-alone system, these settings control ID Card Maker on the local
workstation; in a networked environment, these settings apply to every workstation running ID Card Maker and only have to be set once.)
ID Card Maker version 4 33
Page 40

Document Name for Print Manager
The Document name for Print Manager preference allows you to associate a dynamic
database field with a print job. That is, whenever you send a badge to the printer, that print
job’s “name” will appear in the Print Manager window with the contents of the field you
enter here. For example, if you enter “LastName” (one of ID Card Maker’s fields) in this
preference field and send John Baker’s card to the printer, Windows’ Print Manager will
report that “Baker” is queued for printing.
Alternate field for ImageID
ID Card Maker automatically “names” each image with a serial number when it is captured and saved (e.g., 255.jpg), and inserts the “number-name” in the database field
“ImageID.” There may be times when you will want to name the captured image with the
contents of another database field, such as a person’s Social Security number. In such a
scenario, if a database record contains a Social Security number, that number will become
the “name” of the portrait image file (e.g., 261-21-8273.jpg) when it is captured and
saved, and that number will be inserted in ID Card Maker’s ImageID field. Once ID Card
Maker names a captured image, it uses that “name” in the ImageID field until the record is
deleted from the database. There are some inherent dangers in using an alternate field:
• The alternate field must be set to “Unique Index” in the Edit Field Definitions win-
dow. (See “Edit Field Definitions Window” on page 64.) If a field, such as “LastName,” is not set to Unique Index, ID Card Maker will not know which
“Baker.jpg” to display if there is more than one Baker in the database.
• Use of any field that does not consist of sequential numbers GREATLY reduces the
functionality of ID Card Maker’s “Directory Tree” structure. The “Directory Tree”
is hardly noticed, but enhances the speed of image retrieval and display. ID Card
Maker automatically creates subdirectories within the Portrait, Fingerprint, and
Signature directories for every 1,000 images captured. The program was developed
in such a way that, through the use of serial numbers and these subdirectories,
images can be “found” extremely quickly—virtually instantly. If image names are
not serial numbers, it may take a long time for ID Card Maker to “find” an image
and display it on screen or print on a badge.
Note: The database must be empty before this option can be enabled.
34 ID Card Maker version 4
Page 41

Preferences
Require images to print
The REQUIRE IMAGES TO PRINT preference allows you to choose between making portraits
optional or required when printing badges. If you leave this check box empty, cards may
be printed even though an individual’s picture has not been taken. If you place a check in
this box, ID Card Maker will not print an individual’s badge until his or her picture has
been taken.
Below the System preferences are some additional non-editable fields. These are for information only. Depending on whether or not you are attached to an ODBC data source, and
other additional database configurations, these fields will display useful information.
Encoding Formulas
Click the Encoding formula tab to view and edit these options. There are eight text fields
for entering a variety of “encoding formulas” or “expressions” which dynamically combine data from database fields and/or literal text strings.
Mag Track 1, 2, and 3
: In the Magnetic Encoding dialog of ID Setup (see “Encoding” on
page 56), you will enter prefixes and suffixes for the magnetic encoding fields instructing
your printer when to start and stop encoding data. The Mag track fields here are where you
tell ID Card Maker what to encode. You must know what data your access control software is looking for. (Note: if your data string is very long, it may not all appear in the mag
track field window. Use the left and right arrow keys on your keyboard to “scroll” through
the data string.) If you enter expressions containing “syntax” errors, Microsoft Access
may not allow you to “leave the field” until the error is corrected. If you do not know how
to correct the error, simply delete the contents of the field and try starting over.
ID Card Maker version 4 35
Page 42

Create the encoding formulas and expressions using the ADD FIELD and ADD TEXT buttons:
click in an encoding field or on its corresponding radio button to select it. Then click the
A
DD FIELD down arrow to display a list of all the database fields. Click the field you want
to include in the formula. That field is inserted into the encoding formula. An ampersand
(which links multiple values) is automatically supplied, allowing for placement of the next
value. Add as many fields as your access control system requires. (You do not have to
delete the last ampersand in the expression.) To insert static or “literal” text in the expression, click A
DD TEXT. A small window appears allowing you to type the exact text required
by your access control system. You do not need to enclose text in quotation marks in this
window; ID Card Maker supplies them automatically. (However, if you are inserting only
blank spaces with no additional characters, the space characters must be enclosed within
quotation marks.) Enter the fields and literal text in the order your access control system
requires them. Each time you use A
DD FIELD and ADD TEXT, the new values are inserted at
the end of the data string. If you accidentally insert the values in the incorrect order, use
cut and paste to rearrange the data string.
To manually create the encoding formulas: click in the encoding field or on its corresponding radio button to select it. Begin the expression with an equal sign (=). Type in
field names or literal text in the required card reader order. Enclose literal text (that is,
static text appearing on every card’s mag track) within quotation marks (“ ”); if the contents of specific fields are required, type the field names exactly as they appear in the database; use ampersands (&) between fields and literal text to link multiple values. In
addition, you may use TRIM, LEFT, RIGHT and other Microsoft Access formatting features to select portions of a database field (such as the first three letters of a last name, or
the year of a date of birth). (See “Field Formatting” on page 190.)
Repeat these steps for each of the mag track fields your access control system require.
Bar Code
: Follow the procedures above to encode data in the bar code field. Note, however, that like magnetic encoding, bar codes also require “prefixes” and “suffixes.” Bar
code prefixes and suffixes are specified within IDLayout (“Bar Encoding” on page 121).
36 ID Card Maker version 4
Page 43

Preferences
If your bar code font does not appear in the Encoding list in the Properties of Bar Code
dialog of IDLayout, you must manually add the prefix and suffix characters to the Bar
Code expression here. Insert the encoding characters as literal text (enclosed within quotation marks) at the beginning and end of your Bar Code expression.
Both Names
: ID Card Maker offers a database field called “BothNames” which links an
individual’s first, middle and last names. You may customize how the BothNames field
displays people’s names.
If you want: You must type: Explanation
Robert Smith FirstName & “ ” &
LastName
R. Smith Left [FirstName,
1] & “. ” & LastName
Smith, Robert LastName & “, ”
& FirstName
The quotation marks contain literal text—
in this case, a space to separate the two
names.
Left [fieldname, 1] is a formatting command that instructs ID Card Maker to
extract the first letter of the database field
“FirstName.” The quotation marks
enclose a period and space after the first
letter of the first name.
Enter the fields in the order you wish them
to appear. The comma and space enclosed
in quotes separate the two names.
ID Card Maker version 4 37
Page 44

If you want: You must type: Explanation
If you want to use a nickname, if present, instead of a first name, use a conditional “if”
statement like the following:
Bobby Smith
or
Robert Smith
= iif (NickName =
NOT NULL,
NickName & “ ”
& LastName,
FirstName & “ ”
LastName)
The “iif” statement presents an “argument.” If the argument is true, “result1”
will occur; if the argument is false,
“result2” will occur. The syntax is as follows:
iif (argument, result1, result2)
The expression in this example is interpreted in plain English as follows: If the
NickName field is not empty (i.e., contains data), then add the contents of NickName, plus a space, plus the contents of
LastName; otherwise, use the contents of
FirstName, plus a space, plus the contents
of LastName. (Of course, you must have a
“NickName” field in the database for this
expression to work.)
Expression 1, 2 and 3: ID Card Maker provides three additional fields called Expression 1,
2 and 3 which you may use in your badge layouts or as the basis for selecting a default
badge type each time a record is created. You may create expressions in the same manner
as mag track and bar code encoding fields. Use A
DD FIELD and ADD TEXT or type the data
strings to create custom strings of information.
When you finish entering all your formulas and expressions, click T
EST FORMULAS. ID
Card Maker verifies the syntax and integrity of each of the formulas, presents a window
confirming the results, and displays a sample of each formula (extracted from the first
record in the database).
In addition, you may save your formulas to a text file by clicking the S
AVE FORMULA but-
ton. A standard Windows Save dialog opens allowing you to name and save the formulas.
To use formulas that you previously saved, click R
ESTORE FORMULAS. A standard Win-
dows Open dialog allows you to navigate to the encoding formulas file you previously
saved. Note: If you change the names of database fields in the Edit Field Definitions win-
dow and rebuild the User Field table( See “Modifying Tables and Forms” on page 61,)
your formulas here may no longer “match” the field names in the database. Always verify
38 ID Card Maker version 4
Page 45

Preferences
that the field names used here in the Encoding Formulas of Configuration match the
actual field names used in the database.
ID Card Maker version 4 39
Page 46

40 ID Card Maker version 4
Page 47

Section 3.3 IDServer Setup
You arrive at ID Setup by clicking TOOLSCONFIGURATIONIDSERVER SETUP.
ID Server is a utility that configures your image capture and printer settings. You may not capture or view images until you have run the ID Server setup program. When you click IDS
S
ETUP an ID Setup window appears.
ERVER
ID Card Maker version 4 41
Page 48

1) The path and name of the SETUP FILE is identified at the top: C:\IDCM\dat.INI. (The
path may differ if you did not accept the default installation directory.) Any changes
you make here in ID Setup will be written to this file. The ini file name follows the
"dat" MDB file name SO if the file is in the \IDCM\ directory and is named IDCMDAT.MDB it will be in " C:\IDCM\IDCMDAT.ini ".
2) The ID Server
DATA PATH is where ID Card Maker stores and retrieves images, badge
and sheet layout files, and “field definition” files. (See “Database Management” on
page 59.) However, you must tell ID Card Maker where on your disk or network you
want these images and badge files to be stored. Ordinarily, the
Server data path
defaults to the directory where ID Card Maker was installed. ID Card Maker will
automatically create separate Portrait, Fingerprint and Signature directories to store
your portrait, fingerprint and signature images inside this directory, though you may
elect to store them elsewhere on your hard disk or network. (See “Graphics Definition
dialog” on page 45) If you specify a different directory as your
Server data path, you
must enter that path on each computer in the network running ID Card Maker.
3) The U
NITS: (Inches vs. Millimeters) radio buttons allow you to specify whether mea-
surements related to captured images and badge size default to metric or English standard.
4) The U
SE DIRECTORY TREE for image storage check box allows you to improve the
speed and performance of image retrieval. Many operating systems handle file systems (storage and retrieval) inefficiently; they begin to experience sluggishness if
they have to search for a specific file (in this case, the individual’s portrait, fingerprint
or signature) within a directory or subdirectory containing more than 2,000 files.
Checking this box instructs ID Card Maker to automatically create additional subdirectories as needed for every 1000 image files that are created. (These subdirectories
will be located inside the Portrait, Fingerprint, and Signature folders, which are created automatically when you mark the check box to capture their images.) In this way
ID Card Maker will be able to search more quickly for and retrieve images.
5) If you use CMI’s
checking the E
SecurCode bar code reader and bar code fonts, turn them “on” by
NABLE CMI SECURCODE BAR CODES check box. SecurCode bar code
fonts offer increased security by appending to the database’s bar code field an additional set of SecurCode characters encoded and read by the card reader using this system. Enter the additional characters (text or numbers) to be appended to the bar code
field in the “Customer Code” field which appears immediately to the right when the
box is checked. That “string” will now be added to the contents of the bar code field,
and will display in the SecurCode font.
42 ID Card Maker version 4
Page 49

6) The SEND PREVIEW DATA TO IDLAYOUT option allows you to view actual data from the
database (i.e., images and text) when you place text and image objects on a badge layout as you design badges. When you check this option, an alert window informs you
that the data (text and images) from the next record whose badge you preview in the
Personal Data window will be used for display purposes in the badge design program. ID Card Maker will “read” the data in that record and write it to a text file
(“Lpreview.txt”) in the ID Server data path; when you select the “Preview” option in
IDLayout, the application will “read” Lpreview.txt and use its information to “fill in”
the badge objects. To later change the “sample” record, return to ID Setup and place a
new “check” in this option. You will be prompted again that the next record you preview will be used in IDLayout. Use caution when selecting a record for badge preview; that record is “unsecured” in that anyone with permission to edit badge designs
may view the contents of any database field placed, even temporarily, on the badge.
Note: This feature allows you to keep up to 9 images. The 10th image will overwrite
the older files.
In addition to the settings and options that are configured directly within the ID Server
Setup window, there are four additional “dialogs” or windows from which you may configure various hardware and software features:
Graphics Definition dialog
Encoding dialog
Printer Options dialog
ID Card Maker version 4 43
Page 50

Graphics Definition
dialog
The Graphics Definition dialog is used to select:
• which method you wish to use for either portrait,
signature or fingerprint capture
• image size
• graphic file format
• hardware options
• software options
• the number of images you wish to capture
Printer Options dialog The Printer Options dialog is used to select:
• PVC card and sheet/paper printers
• print offset values
• print queue options
• enable Sheet printing
Encoding dialog The Encoding dialog is used to select the “start” and “stop”
commands which instruct the magnetic encoder on your
card printer when to start and stop encoding data, and to
select a Smart Chip protocol for Smart Card encoding.
Sheet Layout dialog While not a “hardware setup” dialog, the Sheet Layout dia-
log is used to design the number and positions of multiple
badges on a single sheet of material. You access the Sheet
Layout dialog from within the Printer Options dialog. If
you check the “Use Batch printing option” check box and
the “Use Sheet formatting option,” a new
button appears.
SHEET LAYOUT
44 ID Card Maker version 4
Page 51

Capture Devices
Capture Devices
Graphics Definition dialog
Open the Graphics Definition dialog by clicking a check box for the image-type you wish
to capture (e.g., Portrait, Signature, or Fingerprint), then clicking the M
it.
ORE button beside
1
2
3
4
5
6
7
8
The Graphics Definition dialog offers the following options:
ORTRAIT / SIGNATURE / FINGERPRINT DIRECTORY This path points to your image files.
1) P
If you entered a new path in the S
ERVER DATA PATH field in the opening ID Server
Setup window and allowed ID Card Maker to automatically write the paths to your
images files, that path was automatically entered here. Otherwise, enter an alternate
path to your Portrait, Signature and Fingerprint image directories.
2) I
NSTANCES The “Instances” field allows you to capture multiple images for each
image type (Portrait, Signature or Fingerprint). Enter the number you wish to capture
(from 1-10). If, for example, you enter “3” in the Graphics Definition dialog for Portraits, you will be prompted to take three portraits before you are prompted to capture
signatures and/or fingerprints. (For example, you may take a picture of a student, his
ID Card Maker version 4 45
Page 52

or her parent or guardian, and homeroom teacher. Any or all of the images may be
used on badges and rosters.)
3) C
APTURE WIDTH AND CAPTURE HEIGHT Enter width and height parameters in these
fields. We recommend a width of 300 and height of 375 for portraits (yielding a one
inch by 1 1/4 inch image), width of 400 and height of 400 for fingerprints (yielding
almost a 1 1/2 inch square image), and width of 900 and height of 300 for signatures.
4) I
MAGE FORMAT You may select from the pick list the file format in which the image
will be saved. We recommend that you save portraits as “JPEG,” fingerprints as
“BMP(8bpp GRAY),” and signatures as “TIFF mono.” (See “Graphic File Formats”
on page 175 at the end of this manual for a table describing the characteristics of the
graphic file formats ID Card Maker supports.)
5) I
MAGE QUALITY This option, only appearing if you selected JPEG as the file format,
sets the balance between the image’s compression and image quality. (A lower number offers greater image compression at the expense of image quality. A higher number offers greater image quality, but a larger file.) We recommend that you accept the
default value of 70 which produces image files in the range of 10k-12k for 300 x 375
pixel images.
6) C
APTURE DEVICE The CAPTURE DEVICE list allows you to select the device you are
using to capture the image.
7) C
APTURE OPTIONS The CAPTURE OPTIONS button in each of the Graphic Definitions
dialogs offers options for cropping and enabling adjustment of image brightness and
contrast.
46 ID Card Maker version 4
Page 53

Capture Devices
a. Cropping:
i) A
UTOMATIC If you capture an image at the same pixel size you established in
the Capture Width and Capture Height fields above, the image will automatically be “cropped”—the entire image will be brought into ID Card Maker at
that size. If the image is larger or smaller than specified in the width and height
fields above, a cropping window will allow you to select a portion of the
image.
ii)A
LWAYS A cropping window will always appear allowing you to select a spe-
cific portion of the image to be used. The portion you crop is saved to the pixel
width and height you set above.
iii)N
EVER A cropping window will never be presented. The entire image will be
saved.
b. Brightness/Contrast: If enabled, the cropping window will also contain slide bars
for adjusting the image’s brightness and contrast. Dragging the slide bars left or
right changes the brightness and contrast in “real time.” Clicking on the brightness or contrast buttons to the left of these slide bars will revert the image to its
original capture attributes.
ID Card Maker version 4 47
Page 54

7) CAPTURE DEVICE AND DEVICE SETUP There are eight methods for capturing images:
Polaroid PDC 2150 Camera, Video for Windows, TWAIN, Topaz Sig Tablet, Penware Sig Tablet or Capture from File. For each image you intend to capture (portrait,
fingerprint and signature), select your capture method from the Capture Device pick
list. The input device you use (video camera, scanner, signature tablet, etc.) will have
required you to install one of the driver-types listed here; the Get from File option
allows you to import images previously captured and saved to disk. Each capture
method offers its own Device Setup options when you click the D
EVICE SETUP button.
The PDC2150 Setup Dialog allows you to enable or disable the Flash, and to set
options for the image Resolution and White Balance.
APTURE FROM FILE When clicking ID Card Maker’s CAPTURE button to take a pic-
a.C
48 ID Card Maker version 4
Page 55

Capture Devices
ture, a standard Windows “open dialog” box appears in which you navigate to the
image you wish to use in the database. No device setup options are available.
b. T
OPAZ SIG TABLET The DEVICE SETUP button for this type of capture brings up a
small window allowing you to specify the type of tablet you have, the Com Port
the tablet is attached to, and set the thickness of the “pen.” A smaller number
yields a thinner “line,” while a larger number yields a slightly thicker signature
(like the difference between a fine point and felt-tip pen). “10-15” is a medium
thickness; select a number between 1-25. Enter the Com Port number to which
the SigGem signature tablet is physically connected. (The PenWare Sig Tablet’s
pen “thickness” setting is 1-5, with “3” being an average thickness.)
ID Card Maker version 4 49
Page 56

c. TWAIN When you select TWAIN as the capture method, the Device Setup
options presents you with a list of all TWAIN drivers installed on your computer.
At the top of the list is the option Always Ask. If you select Always Ask, a selection window showing all available TWAIN drivers will appear every time you
begin capturing an image. Otherwise, select the TWAIN driver for your camera
or scanner from the list; this driver will always be used. Capture options, such as
color, hue and saturation, are configured directly from your TWAIN hardware
drivers at the time of capture instead of from ID Setup. The options differ from
device to device.
d. V
IDEO FOR WINDOWS The DEVICE SETUP button brings up a window displaying
V
IDEO DISPLAY, VIDEO SOURCE and VIDEO FORMAT buttons. The options avail-
able to you through these buttons are hardware dependent—each device driver
will present its own windows and feature options. When setting the Video Display options, however, select “Full,” “Full Screen,” or “640 x 480” (this window
may offer choices like 1/4, 1/2, or Full, referring to how large the image will be
50 ID Card Maker version 4
Page 57

Capture Devices
displayed on screen). This ensures the highest image quality when the image is
brought into ID Card Maker.
Click OK in each Graphics Definition dialog when you are done.
ID Card Maker version 4 51
Page 58

Printers
Clicking the PRINTER OPTIONS button brings up the Printer Options dialog for specifying
your printer settings. (Your printers’ “printer drivers” must already be installed for them to
be available in this dialog.)
Printer Options Dialog - Level II and Level III
Note: for instructions on printing options for IDCM Level I version, refer to “Printer
Options Dialog - Level I” on page 54.
1) There are two boxes at the top of the dialog: “Badge Printer selection” and “Sheet
Printer selection.” One is for selecting your card printer; the other is for selecting a
printer for paper or sheet output. Click the down arrow in each box to select your card
and sheet printer from the list of installed printers. Note: ID Card Maker will always
default to the Badge printer unless the badge’s width or height is greater than four
inches, or the U
2) In both the Badge and Sheet printer selection areas of the Printer Options dialog are
fields for entering X and Y values for “Origin offset.” This allows you to adjust how
closely to the edges of the card or page your printer will print. The offset values are
set to the upper left-hand corner of the card or page, and are measured in hundredths
of an inch/millimeter. Leave these values set to “0” for now; you may adjust them
SE SHEET FORMATTING OPTION has been selected.
52 ID Card Maker version 4
Page 59

Printers
later if your printed output is not satisfactory. To make the badge print more to the
right, set the X Offset to a positive number (e.g., 5, 10, 15); to make the badge print
lower on the card or page, set the Y Offset to a positive number. (Use negative numbers—such as -5—to make the badge print higher or more to the left.) Additionally,
the “Alternate Resolution” fields in this portion of the window allow you to manually
adjust the speed and memory requirements of the print process. A “0” in this field
instructs ID Card Maker to use the printer’s default resolution when rendering
images. If your printer is able to print at extremely high resolution (1200 dpi, for
instance), setting the “Alternate Resolution” to 300 or less will improve print speed
and performance. Any value other than “0” overrides the printer’s default value.
3) Several more options are available at the bottom of the Printer Options dialog.
a. Checking the U
SE BATCH PRINTING OPTION enables batch printing and makes
three new radio buttons immediately appear in the Printer Options window under
the heading B
i) the A
P
RINT button asking if you want to print a badge now or queue it for later;
ii)the A
printer. If U
ATCH QUEUE MODE. These radio buttons refer to queuing options:
LWAYS ASK option will present a user-input prompt each time you click a
UTO PRINT option is used primarily when printing exclusively to a paper
SE SHEET FORMATTING is selected (see “b.” below), cards automati-
cally bypass the selected PVC card printer and are sent to the sheet printer;
printing does not begin, however, until enough cards have been queued to fill a
sheet. If U
SE SHEET FORMATTING is not selected, the badge will be printed on the
PVC card printer immediately.
iii)the A
LWAYS QUEUE option will queue all badge print requests until you decide
to print the contents of the queue.
If you do not select U
immediately after you click a P
SE BATCH PRINTING, an individual’s badge will be printed
RINT button. If you check USE BATCH PRINTING, ID
Card Maker will create a subdirectory named “C:\IDCM\Queue” on the local
workstation. If you wish to change the directory for where the queue will be
stored, use the B
ROWSE button to enter an alternate path in the DIRECTORY
field at the bottom of this window. You may change these options at any time by
returning to this window.
b. Check U
SE SHEET FORMATTING when you want to bypass the card printer and print
your badges on preprinted badge forms or create and print rosters. With this
ID Card Maker version 4 53
Page 60

option checked, ID Card Maker sends the badge print request directly to the sheet
printer you selected in Sheet Printer Selection (see above). This option may be
checked and unchecked as often as your needs require. When you check this
option, a new L
when you deselect this option. (See “Layout Sheet dialog” on page 56) Note that
if you try to print a badge whose height or width is greater than four inches, ID
Card Maker will automatically bypass your card printer and send the badge
print request directly to the paper printer you selected in the Printer Options dialog.
AYOUT SHEET button appears. The LAYOUT SHEET button disappears
Printer Options Dialog - Level I
The following instructions are for the Printer Options dialog in IDCM Level I version.
1) At the top of the dialog, click the down arrow in the“Badge Printer selection” box to
select your card printer.
2) Enter the X and Y values for “Origin offset.” This allows you to adjust how closely to
the edges of the card or page your printer will print. The offset values are set to the
upper left-hand corner of the card or page, and are measured in hundredths of an inch/
millimeter. Leave these values set to “0” for now; you may adjust them later if your
printed output is not satisfactory. To make the badge print more to the right, set the X
Offset to a positive number (e.g., 5, 10, 15); to make the badge print lower on the card
54 ID Card Maker version 4
Page 61

Printers
or page, set the Y Offset to a positive number. (Use negative numbers—such as -5—
to make the badge print higher or more to the left.) Additionally, the “Alternate Resolution” field in this portion of the window allow you to manually adjust the speed and
memory requirements of the print process. A “0” in this field instructs ID Card Maker
to use the printer’s default resolution when rendering images. If your printer is able to
print at extremely high resolution (1200 dpi, for instance), setting the “Alternate Resolution” to 300 or less will improve print speed and performance. Any value other
than “0” overrides the printer’s default value.
3) If you do not select U
diately after you click a P
SE BATCH PRINTING, an individual’s badge will be printed imme-
RINT button. If you check USE BATCH PRINTING, ID Card
Maker will create a subdirectory named “C:\IDCM\Queue” on the local workstation.
If you wish to change the directory for where the queue will be stored, use the
B
ROWSE button to enter an alternate path in the DIRECTORY field at the bottom
of this window. You may change these options at any time by returning to this window.
It is important to verify printer driver settings in Windows’ Printers folder. The printer
driver is a software utility provided by your printer manufacturer that allows it to operate
in the Windows environment, but also allows you to set various options and preferences
for how the printer functions (e.g., selecting either 300 dpi or 600 dpi output resolution).
Go to StartSettingsPrinters. The Printers folder opens, displaying all the printers
whose drivers have been installed on your computer. Right-click on your PVC card printer
in this window and select Properties from the context menu to open the Properties sheet.
There is no single standard for how the printers’ properties are presented to you. The Properties sheet may be “tabbed” offering easy access to configuration options; however it
may be slightly different on older printer drivers, you may have to look for a reference to
S
ETUP.
Note that the printer settings are where you will specify how many color panels your
printer ribbon contains, and whether or not you using an overlay panel or protective laminate. Some printer drivers allow you to adjust temperature settings of the card printer’s
print head and lamination station. You should familiarize yourself with this property
sheet. Because PVC card printers are so mechanical, they are the most likely source of
problems in producing high quality photo ID badges. The printer driver is the first place to
turn when trying to troubleshoot printing problems.
ID Card Maker version 4 55
Page 62

Encoding
When you click the ENCODING button, the Encoding dialog appears. If your card printer
supports writing to a magnetic strip, you must specify “start” and “stop” characters
instructing the printer when to start and stop magnetically encoding data. ID Card Maker
has pre-configured the prefixes (“start”) and suffixes (“stop”) for common card printers.
Select your printer from the pick list; the correct prefix and suffix is supplied. If your
printer requires characters other than those supplied by ID Card Maker, enter the correct
prefixes or suffixes for any of the three magnetic “tracks” your card reader uses. (Refer to
your card printer’s documentation to determine whether other prefixes or suffixes are
required.).
Layout Sheet dialog
The LAYOUT SHEET button is only available if you selected USE SHEET FORMATTING in the
Printer Options dialog. The purpose of the L
more than one card on a pre-printed badge form or to create rosters. The left side of the
Sheet Layout window shows a graphical representation of the sheet layout; the right side
of the window contains fields for changing the layout.
Note: Sheet Layout uses considerably more computer resources than printing a single
badge on a PVC card printer. For example, a single badge containing a number of
graphic images might result in a 1.5M print file. If a sheet layout contains 8 badges, the
AYOUT SHEET option is to allow you to print
56 ID Card Maker version 4
Page 63

Encoding
size of the print file jumps to 12M! Therefore, sheet printing is sent in bands so that you do
not experience any memory problems.
1. The INCHES and MM radio buttons allow you to select which unit of measurement to
use when defining your badges on the sheet layout.
2. The WIDTH and HEIGHT values are derived from the printer driver of the printer selected
in the Printer options dialog of ID Server Setup, and refer to the total printable area of
the sheet printer.
3. Identifies the name of the sheet printer.
4. The USE BACKGROUND LAYOUT check box allows you to add graphics and text in the
Header and Footer area of the sheet layout. The first time you check this box, a Save
As...dialog opens prompting you to provide a name for the Sheet Background Layout
file you are about to create. Then IDLayout launches, displaying the sheet layout currently configured in the Sheet Layout dialog. Thereafter, use the E
DIT or LOAD buttons
to launch IDLayout and open the current or alternate background layout. (See “Badge
Design” on page 97) Within IDLayout, you may insert Text or Images anywhere on
the “background” of the sheet. (The gray rectangles on the sheet represent the “badge”
you selected for inclusion on the sheet layout.) Click the S
AVE button to save your
changes. To create a new Sheet background layout, open an existing background file
and edit it as desired. Click the S
DER button to change the order in which the badges print on the sheet. (Each badge on
AVE button but provide a new name. Click the REOR-
the sheet is “numbered.” The badges print from 1 to 2 to 3...When there is more than
one column of badges, the print order can change from left to right or top to bottom.)
5. Enter BADGE WIDTH and HEIGHT values. Though the numbers do not have to match the
exact actual dimensions of the badge you designed in IDLayout, all badge elements
may not display properly if you enter values smaller than the badge’s actual size. (To
check the actual badge size, launch IDLayout and open the badges you will be printing.
Right-click on the badge background to open the Properties of Badge Background dialog. The badge’s width and height dimensions are recorded there.)
6. Enter numbers representing how many COLUMNS and ROWS you want on the sheet
layout.
7. Enter numbers in the HORIZONTAL and VERTICAL SPACING fields to set how close or far
apart the badges are from each other. H
ORIZONTAL SPACING refers to the distance, in
hundredths of an inch, from the top left corner of the first badge in row one to the top
left corner of the second badge in row one. Similarly, V
ERTICAL SPACING refers to the
distance, in hundredths of an inch, from the top left corner of the first badge in row one
to the top left corner of the first badge in row two. Decreasing these values will bring
the badges closer together on the layout. Increasing these numbers will spread the
badges farther apart.
ID Card Maker version 4 57
Page 64

8. Enter numbers in the FIRST BADGE X & Y fields to set where, on the sheet layout, the
first badge will print. The X & Y fields refer to the distance, in hundredths of an inch,
of the top left corner of the first badge in row one to the top left corner of the printer’s
printable area. Reducing the First Badge X number brings the first column of badges
closer to the left edge of the page. Reducing the First Badge Y number brings the first
row of badges closer to the top edge of the page.
9. Check the OVERRIDE BADGE DESIGN check box if you want to print a badge other than
the one currently assigned to the individual(s). An Open dialog appears allowing you
to select an alternate badge to print. Using the O
VERRIDE BADGE DESIGN option allows
you to create rosters. To do so, launch IDLayout and create a “badge” containing the
information you want displayed on the roster. Create one design for Varsity Football
players, another design for each school bus and route, etc. Select each of those
“badges” as desired for the alternate. The end result is your roster.
58 ID Card Maker version 4
Page 65

Section 3.4 Database Management
You arrive at the Database Management window by clicking TOOLSCONFIGURATION
D
ATABASE MANAGEMENT.
The ability to store and retrieve records in a database is one of the reasons that make ID Card
Maker such a powerful tool. You may create a record for each individual in your organization,
and enter as much information as you need such as: name, address, employee ID, position in
the organization, as a few examples. You may instantly retrieve the record to review or edit the
information, view the person's portrait or assigned badge, capture their image or print their
badge. The following pages will provide information about databases in general, and how ID
Card Maker's database functionality works. Only the System Administrator may access Database Management. (The Database management button is disabled for all other users.) Our program offers a variety of database options:
• allow end users to add, delete, or modify individual database fields
• specify whether the database tables are stored in a Microsoft Access or ODBC database
• attach to external databases
• more…
While selecting and implementing any of these options is a simple “point and click” operation,
database subject matter, by its very nature, is complex and requires considerable explanation
and consideration. Therefore, review this entire chapter thoroughly before performing any of
the “database management” functions.
ID Card Maker version 4 59
Page 66

Database Options
You have a variety of database options:
• Use the built-in Microsoft Access database “as is.” (When you first install ID Card
Maker, we automatically create all the database tables and forms that allow our program to be fully functional.)
• Make minor modifications to the way the built-in database fields look, such as
applying field formatting, input masks, new field labels, etc. (Minor modifications
such as these only effect the Microsoft Access forms, which are the “windows”
through which you look at the data contained in the underlying table.
• Make major modifications to the built-in User Field table that stores your actual
data, such as deleting fields, or changing a field's name or size.
• You may attach to external database tables, whether generated by our application or
another, and whether in a Microsoft Access or ODBC database. Depending on
which table you attach to, you may or may not have the ability to modify all the
fields and field properties of that table. If attached to a User Field table created by
ID Card Maker, whether in a Microsoft Access or ODBC database, you have the
ability to edit any of the fields and field properties. If attached to a database table
created by any other application, you may only edit how the database fields display
in our Search and Personal Data forms.
The options described above essentially relate to two areas of a database: its tables, and its
forms.
Database Tables and Forms
Tab le s
Every database uses tables to store its data. Tables are similar to spreadsheets in that data
is physically and logically arranged in columns and rows. Columns represent individual
database fields (such as First Name, Middle Name, Last Name, etc.), while rows represent
individual records.
60 ID Card Maker version 4
Page 67

Modifying Tables and Forms
When you install our application, it automatically creates a table called “User Fields” to
store all the data that you enter into the database. If you wish to record an individual’s
address, employee ID number, social security number, date of birth, etc., all that data will
be stored in the User Field table. It is called the “User Field” table because you have the
ability to modify or “define” not only what fields are in this table, but the various field
properties themselves, such as field size, type, visibility, indexing, etc. If you are attached
to any other database table, you may view and edit the data contained within the table, but
you cannot modify the table itself (its fields and field properties).
Forms
Since tables are like spreadsheets, the information is presented logically in rows and columns. However, rows and columns are often an inconvenient way to view your data.
Therefore, Microsoft Access, upon which our program is based, uses forms as an alternate
way of viewing the data stored in its tables. Forms are “graphical.” Instead of viewing
table data in rows and columns, forms may display data in almost any layout. Forms may
be colorful, contain pictures and buttons, and allow database fields to be arranged anywhere in the window. When you are looking at ID Card Maker’s Search and Personal Data
windows, you are looking at the forms…the tables that contain the actual data are hidden
from view.
Just as you may modify the User Field table, you may also modify the forms used to display that table’s data. There may be a variety of reasons why you will consider modifying
the forms:
• you want your forms to exactly represent the fields in the User Field table
• you do not want your forms to exactly represent the fields in the User Field table
Modifying Tables and Forms
When using commercially available database applications such as FoxPro, FileMaker Pro,
or Microsoft Access, these applications provide a functional and intuitive way to look at
and work with your database fields. They provide tools for adding, deleting and editing
the properties of your database fields. ID Card Maker also provides a tool for editing the
database fields, whether in the User Field table or the way they display in the Search and
Personal Data forms. This tool is the Edit Field Definitions window.
ID Card Maker version 4 61
Page 68

The Edit Field Definitions window is simply a list of database fields—a window or “interface”—allowing you to add, delete, or modify a variety of field properties. The list of
fields in this window is called “the current Field Definitions.” It is not the User Field table,
but it is used to create or modify the User Field table. The “current Field Definitions” in
the Edit Field Definitions window may describe how a field is supposed to look in the
Search and Personal Data forms. But until you rebuild the forms to “reflect” the way the
Edit Field Definitions window describes them, ID Card Maker will only show the default
forms when the database was first installed. To make your changes apply to the User Field
table or Search and Personal Data forms, you must click either a M
DATABASE ACCORDING TO THE CURRENT FIELD DEFINITIONS button or REBUILD THE FORMS
FROM THE CURRENT FIELD DEFINITIONS button.
ODIFY THE CURRENT
There is an important difference between the User Field table and the Microsoft Access
forms that display its data. The User Field table is the actual “storage receptacle” for the
data that you enter and save in the database. The table, for all intents and purposes, is hidden from your view—it is virtually invisible. You can create Search and Personal Data
forms on which you place individual User Field fields for viewing and editing. The User
Field table contains all the data. The Search and Personal Data forms only display the data
that you instruct them to display. You may elect to have the Search and Personal Data
forms display all the data in the User Field table, or display only some of the data.
Before you begin editing fields, please understand the following critical issue: If you edit
fields for display purposes in the Search and Personal Data forms, you can add or delete
62 ID Card Maker version 4
Page 69

Modifying Tables and Forms
the fields and their order of appearance, within the confines of our program. However, if
you edit fields for the purpose of changing the User Field table, the User Field table must
be empty. (If the User Field table is not empty, unpredictable results may occur.)
When you view the field properties in the Edit Field Definitions window, you see a total of
12 editable field properties for each field. The field properties, however, are broken into
two categories: those that affect the User Field table, and those that affect the display of
fields in the Search and Personal Data forms.
The five field properties that directly affect the User Field table are: Name, Type, Size,
Index, and Required. These field properties are visually distinguished from the other properties by their placement together on the first row of the list of field properties They have a
darker gray background than the other field properties. The remaining field properties are
listed in the two rows below. .
Note: If you are attached to any other database table, you may edit the five field properties
relating to the User Field table (Name, Type, Size, Index, Required) in the Edit Field Definitions window, ONLY if you have permissions to edit from the Administrator of the
external database.
ID Card Maker version 4 63
Page 70

Edit Field Definitions Window
The Edit Field Definitions window is the tool or “interface” by which you “describe” or
“define” a database the way you want it to be. You use the Edit Field Definitions window
to define the characteristics of your User Field table (the presence or absence of individual
fields, as well as field properties, such as name, type, and indexing, etc). You also use the
Edit Field Definitions window to describe or define the way you want the database fields
to display in the Search and Personal Data forms, such as special formatting, order, default
values, etc. The fields and field properties that currently display in Edit Field Definitions
window are the “current Field Definitions” referred to in the Database Management window. A variety of buttons there enable you to modify the User Field table or Search and
Personal Data forms based on the current Field Definitions.
You can access the Edit Field Definitions window by clicking F
Database management window.
Note: You can change, save and create field definitions at any time to create definitions
for a custom database. There is no change to the actual database until you Create,
Rebuild, or Modify the database from the controls on the Database Management Form.
IELD DEFINITIONS in the
64 ID Card Maker version 4
Edit Field Definitions window
Page 71

Edit Field Definitions Window
The following buttons appear at the top of the window:
MOVE UP makes the currently selected database field move up the
order it appears in the Search and Personal Data windows. TAB
OVE UP
M
MOVE DOWN
CREATE
DELETE
GENERATE FROM TXT
ORDER (A “record selector” arrow— —appears beside the
currently selected field in the left margin of the window.)
MOVE DOWN makes the currently selected database field move
down the order it appears in the Search and Personal Data windows. TAB ORDER (You can change the selected record by leftclicking in the the selection column on the left.)
CREATE makes a new database field appear at the end of the
scrolling list of fields.
DELETE deletes the currently selected field. (You can change the
selected record by left-clicking in the the slection column on the
left.)
If you exported data from another database and want to use that
data and its fields in ID Card Maker, click
A standard Windows Open dialog box appears. Navigate to and
select the database text file you want to import. An alert window
asks you to confirm your decision. If you click OK in this window,
ID Card Maker will read and import the first line of the import text
file which identifies all the database fields being used. Note: the
first line of the import text file must contain the actual field names.
Field names in this file must be one word and separated from each
other by commas. Note also: good practice suggests that your
external database’s “export routine” enclose field data within quotation marks so that commas appearing within, for example, a
“Company” database field (e.g., “The Gap, Ltd.”) will not be construed as a field delimiter. (See “Export File” on page 95 for an
example of the required “first row” in an import text file.) After
generating the fields and field properties from the import text file,
view each field in this window to confirm that the field properties
meet your needs.
GENERATE FROM TXT.
ID Card Maker version 4 65
Page 72

G
ENERATE FROM
MDB
ARCHIVE
RESTORE
If you wish to use the “fields” and “field properties” of an existing
Microsoft Access database, click
standard Windows “open dialog” appears in which you navigate to
and select an Access 2000 only “.mdb” database file. Once you
have selected the Access database file, a second window appears
in which you may select the specific table containing the database
fields you wish to use. After generating the fields and field properties from the database file, view each field in this window to confirm that the field properties meet your needs.
This button will create a “Field Definition” file—a text file containing all the information about every database fields displayed in
this window. That is, it will identify each field and its “label,”
“size,” “input mask,” and other properties and write it to a text file
with “.fdf” file extension.
If you edited the Field Definition in this window and want to return
to the Field Definition currently in use by your database, simply
re-attach to that database file using the
DATABASE button in the Database Management window.
If you want to access ID Card Maker on one or more PC’s use the
database fields stored in an archived Field Definition file, click
GENERATE FROM MDB. A
ATTACH TO AN EXISTING
RESTORE to bring up a standard Windows open dialog in which
you navigate to an archived Field Definition file. Restoring field
definitions is like importing records: you are importing “fields”
and “field properties” into the User Field table which is shared by
one or more PC’s. After restoring or “importing” the fields defini-
tions, you must rebuild your ID Card Maker database on each PC
attached to that database to display those new fields.
If you are attached to a non-ID Card Maker-generated database,
you may use
Then rebuild the forms to display of data in ID Card Maker’s
forms.
RESTORE to load the parameters to the definition.
In the main body of the Edit Field Definitions window, a scrolling list of every field currently being used by the database is displayed. You may modify the individual field properties for each field. However, before you begin, please understand the following critical
issue: If you edit fields for the purpose of changing the User Field table, the database must
be empty. There are five fields’ properties that directly affect the User Field table: Name,
Type, Size, Index/Search, Required. These field properties are visually distinguished from
the other properties in the Edit Field Definitions window by their placement together on
66 ID Card Maker version 4
Page 73

Edit Field Definitions Window
the first row of the list of field properties. They have a darker gray background than the
other field properties.
The following table describes the field properties that may be modified:
Property Description
Name This is the name of the field used by the database. The field name
must be one word. To use multiple words for the field’s name,
either delete the space between them (e.g., “multiplewords”), or
separate the words with an underscore character (e.g.,
“multiple_words”). A field name may be up to 20 characters long.
Field names must use alphanumeric characters; the only special
character allowed is the underscore ( _ ) character.
Label The field’s label is a friendly version of the actual field name.
Sometimes a field’s name as used by the database needs to be
abbreviated. But when that field is placed on a database form, it
can be given a label that makes it easily identified. The field’s label
can be more than one word and may contain spaces. If you do not
specify a label, the field’s “field name” will be used by default.
Visible This property makes the field visible or hidden on a workstation.
(Removal of the check mark makes the field hidden.) For example,
one workstation can have a field “unchecked” and therefore hidden, while another workstation can have the same field “checked”
and thus visible.
Type The field may be of five types: Te xt , Number, Date, Te x t L i s t or
Text (limited to list). A Te xt field allows the entry of any keyboard
character. A Number field allows only numbers. A Date field
allows alphanumeric entry, but treats the data as a date. A Text l i s t
is a “pick list” in which you may either select from a predefined
value or enter your own values. A Text (limited to list) is a “pick
list” in which you may only select a value from a predefined list of
values.
ID Card Maker version 4 67
Page 74

Property Description
Size Typing a number in the size property field lets you to set the maxi-
mum number of characters the field allows. When setting the size
for telephone, social security and zip code fields, remember to
allow extra characters for the hyphens and parentheses between
numbers. In addition, try to anticipate the longest entry that a certain field might contain (for example, a lengthy, hyphenated last
name). The physical dimension of the field in the Personal Data
and Search window shrinks or expands depending on the size you
enter here.
Attention to future importing and exporting needs should also be
considered. If you have a 75-character “address” field in your database, and use all available characters, exporting that data to a database whose “address field” is restricted to 15 characters will result
in truncated or lost data.
Required This property makes a field “required.” That is, when you check
this option, a user must enter data in this field. Note: If you make a
field “Required” and import data containing records in which this
field is empty, those records will not import.
68 ID Card Maker version 4
Page 75

Edit Field Definitions Window
Property Description
Index/search When you select a field to be indexed, the database builds an invis-
ible “list” of the contents of that field for every record. When performing a search in that field, the database first looks through its
“list” before actually searching through the database itself; doing
so greatly improves the speed of your database queries. Also consider indexing fields you intend to use in reports; even if you don’t
anticipate using the field in a typical database search, doing so will
speed up the creation of reports. The speed of searches and performance of other database functions, such as the creation of new
records, is slower with more indices, which also increases the size
of the database. Fields that are indexed are automatically placed in
ID Card Maker’s Search window. There are four index options.
• No Index: Does not build an index for that field.
• Index (non unique): Builds an index for that field and
allows duplicate entries in the database’s records (more
than one “Smith” in a last name field).
• Unique Index: Builds an index for that field, but requires
that no two records have the same value. (It would be permissible for a last name field to contain duplicate values,
such as “Smith,” but not permissible for an “Employee
Number” field to contain duplicates.)
• Unique Index (nulls OK): Builds a unique index (prohibit-
ing data entry into a field if the value is already used in
another record), but allows that field to be empty.
Field format This field property allows you to apply Microsoft Access format-
ting to control how data in that field is displayed. For example:
• To make text appear in a color, type (without quotes)
“@[red]” (you may substitute any other RGB color in place
of “red.”)
• To force text to upper case, type “>”
• To force text to lower case, type “<”
• To combine lower case with a color, type “<[red]”
• To add a prefix of 3 leading zeros, type “!000”
ID Card Maker version 4 69
Page 76

Property Description
Protected
Input mask
Default value
Text list values For text lists and limited lists, type the values you want to appear
Individual database fields may be view- or edit-protected on a
user-by-user basis. If a field’s protected property is checked, and a
user is restricted from viewing or editing protected fields in the
User Permission window of ID Card Maker, that field will be protected accordingly.
You may automatically insert characters such as dashes and parentheses in fields with an input mask. For example, you can force the
inclusion of dashes or parentheses in telephone and social security
numbers.
Note: Use the Input Mask property to display literal display characters in the field with blanks to fill in. For example, if all phone
numbers have the same format, you can create an input mask,
which automatically supplies the parentheses and dashes. If you
define both a display format and an input mask for a field,
Microsoft Access uses the input mask when you are adding or editing data, and the Format setting determines how the data is displayed when the record is saved. When using both Format and
Input Mask properties, be careful that their results don’t conflict
with each other. (See “Input Masks & Field Formatting” on
page 187.)
You may enter a default value (such as the word “NONE”) in a
field. Until the user over-writes the word “NONE” with other data,
the default value remains visible in the field. You must enclose the
value within quotes.
in the list box. Separate values with semi-colons. To add a blank
line in the list, type two semi-colons with nothing between them
(;;).
When creating new fields, ensure that you do not use our program's reserved field names.
Use of these fields will produce unexpected results. Our program uses the following field
names:
Reserved field names
IDNumber
BadgeNumber
BadgeVersion
Badgelayout
CreateDate
PrintDate
70 ID Card Maker version 4
Page 77

Edit Field Definitions Window
ImageDate
ImageID
ChangeDate
Operator
PrintCount
BadgeStatus
BadgeNo
MagTrack1
MagTrack2
MagTrack3
Expression1
Expression2
Expression3
BothNames
Barcode
IDNo
IDYes
When you add or delete fields, or modify the field properties in the Edit Field Definitions
window, absolutely nothing is affected until you either click one of the “database management” buttons in the Database Management window.
The following buttons affect the User Field table or the Field Definition file:
Clicking this button will rebuild the Search and Personal Data
forms based on the data displayed in the Edit Field Definitions win-
R
EBUILD THE FORMS
FROM THE CURRENT
FIELD DEFINITIONS
dow. “Forms” are a graphical alternative to viewing data in the
rows and columns of database tables. If you edited database field
properties that affect the forms, the forms must be rebuilt before
your changes can be viewed. Rebuilding the forms has no affect on
the actual data or database tables.
ID Card Maker version 4 71
Page 78

If you 1) edited database field properties (such as deleting a field or
changing a field’s name, size, type, or index) in the Edit Field Defi-
M
ODIFY THE CURRENT
DATABASE ACCORD-
ING TO THE CURRENT
F
IELD DEFINITIONS
nitions window, or 2) used the “Restore” button to import a new set
of Field Definitions from an archived Field Definition file, you
must rebuild the database tables and forms before the changes are
visible. This button is not available if you attach to a non-IDCMgenerated database (e.g., a pre-existing Human Resources database).
This will create an exact copy of the existing database, complete
with the database fields in the User Field table, and all the existing
data.
CREATE A NEW COPY
OF THE CURRENT DATA-
BASE
Database Management window
At the top of the Database Management window is a non-editable “Current database” text
field identifying the path and name of the database to which you are currently attached.
Below “Current database” are two S
These S
ET buttons may be used to over-ride ID Card Maker’s use of incremental serial
ET buttons: NEXT RECORD ID and NEXT IMAGE ID.
numbers when creating “names” for images that are saved to disk or for “primary key”
numbers to uniquely identify each database record. These buttons might be useful for
organizations that have remote worksites where a mobile badge issuing system is used to
capture images and print badges. Using the Set options to start numbering records with a
higher number, the mobile system can create records and capture images remotely without
fear of duplicating existing image or record ID’s.
Click the S
ET buttons on the workstation for which you wish to over-ride the automatic
serial numbering of image and record ID's. A dialog appears in which you may enter a
72 ID Card Maker version 4
Page 79

Database Management window
new starting number for the image or record ID. The dialog informs you of the last (highest) number currently used in the database. Enter a new starting number sufficiently high
enough that it is unlikely the central database will ever use it. Do this for both image ID
and record ID.
Two radio buttons offer the selection of either Microsoft Access or ODBC database management functions. The database options change somewhat depending on whether MS
Access or ODBC is selected. If ODBC is selected, the buttons appearing below will effectan ODBC data source. If MS Access is selected, the buttons appearing below will effect a
Microsoft Access database.
Note that ODBC is only available in Level III..
ID Card Maker version 4 73
Page 80

The following buttons are present in the Database Management window when MS Access
is selected:
Click this to access data from another Microsoft Access 2000 database. The database may be an existing ID Card Maker or ID Card
Maker database or any other Microsoft Access database. Clicking
TTACH TO AN EXIST-
A
ING DATABASE
this button opens a standard Windows “Open dialog” to navigate to
a Microsoft Access database. If you attach to a non-ID Card
Maker-generated database, you will be prompted to select the specific table containing the data you wish to access, and the primary
key for that table.
If you are attaching to a non-ID Card Maker-generated database,
and its “primary key” field is not numeric, you are neither allowed
to edit data in the field designated as the “key field” nor create or
delete records.
When attaching to another database, always answer YES to the
prompt to rebuild the Search and Personal Data forms. If you do
not rebuild these forms, some of the data may not display.
Please note: If the database to which you wish to attach has been
“secured” or “password-protected” in any way, our application
may not be able to attach to it. Our application will attempt to
detect if a password and/or user name is required in order to gain
access, and present a Password Dialog allowing the user to enter
the required information. However, the developer of the third-party
database may be required to modify the user permissions or application code itself to allow our application to attach to it.
74 ID Card Maker version 4
Page 81

Database Management window
CREATE NEW DATA-
BASE FROM THE CUR-
RENT FIELD
D
EFINITIONS
C
REATE A NEW COPY
OF THE CURRENT
DATABASE
Clicking this button will create an empty database based
upon the current Field Definitions. The current Field Definitions are the fields and field properties, which are displayed
when you open the Edit Field Definitions window. Clicking
this button will rebuild the User Field table and re-generate
the Personal Data and Search forms to reflect the fields and
field properties in the Edit Field Definitions window.
If you accidentally modify the Field Definitions and after
rebuilding the forms experience undesirable results, you
may restore the original Field Definitions by re-attaching to
the database (table).
Make a copy of the current database, including all its records. This
is an ideal way to backup or archive your database. For example,
you may create a copy of your database named “db_2000.mdb” at
the end of the year, then delete all the “history” and/or old records
in your current database. If you ever need to review the “old information,” you simply attach to the copy to see the data as it existed
in 2000.
ID Card Maker version 4 75
Page 82

MODIFY THE CUR-
RENT DATABASE
ACCORDING TO THE
CURRENT FIELD DEFI-
NITIONS
Clicking this button will rebuild the User Field table and the
Search and Personal Data forms based on the Field Definitions in the Edit Field Definitions window if your database
is currently empty. If your database is not empty, our pro-
gram will offer you several options:
Rebuild only the forms
: The Search and Personal Data forms
can always be rebuilt and re-drawn to reflect your current
Field Definitions without affecting the underlying data in
the User Field table. An alert message will offer this option
if your database contains even a single record.
Delete existing data and Rebuild the User Field table and
forms: If your database contains even a single record and the
modified field properties affect the underlying User Field
table, you will be prompted to create a new database. This
means that the User Field table will be rebuilt to reflect your
changes, but first, the data in the User Field table must be
deleted. You will be prompted to confirm this in the next
prompt.
Rebuild the User Field table and forms without deleting
existing data: If your database contains even a single record
and one of your modifications in the Edit Field Definitions
window was to add a new field, you may partially rebuild
the User Field table to reflect the new field without implementing other field modifications which require that the
table be empty and without deleting your existing data.
This button is not available if you attach to a non-ID Card
Maker-generated database (e.g., a pre-existing Human
Resources database).
This takes you to an Edit Field Definitions window where
you have a variety of options for setting the field properties
of database fields. (See “Attaching to Another Database” on
E
DIT FIELD DEFINITIONS
page 79.)
76 ID Card Maker version 4
Page 83

Database Management window
EBUILD THE FORMS
R
FROM THE CURRENT
FIELD DEFINITIONS
DELETE ALL RECORDS
IN THE CURRENT
DATABASE
CONVERT A REV 3
A
CCESS 97 DATA-
BASE TO THE CURRENT
VERSION
Clicking this button will rebuild the forms. “Forms” are a graphical
alternative to viewing data in the rows and columns of database
tables. If you edited database field properties, which affect the
forms, the forms must be rebuilt before your changes can be
viewed. Rebuilding the forms has no affect on the actual data or
database tables. (See “Modifying Tables and Forms” on page 61.)
If in the Edit Field Definitions window you delete a field, change a
field’s name, size, requirement status or index property, those modifications will not be implemented when you later rebuild the database tables and forms. To implement these kinds of changes, the
database must be empty, i.e., contain no records. Clicking this button deletes all the records in the database! Before deleting your
records, export your data to a text file using ID Card Maker’s
Export command (See “Exporting the Entire Database” on
page 95.)
If you add new fields to the Field Definition file and try to rebuild
the database tables and forms without first emptying your database, ID Card Maker will add the new fields to the table of User
Defined Fields. If you restore a previously created Field Definition
file and try to rebuild the tables and forms without first emptying
your database, the fields from the restored file will be added to the
existing list of database fields.
If you have databases created by ID Card Maker or ID Card Maker
version 3.xx, clicking this button will convert the database to version 4.
ODBC databases are inherently more complex than Microsoft Access databases, therefore
it is advised that an experienced Database Administrator perform these database functions.
Before you can attach to an ODBC data source, you must run the “ODBC Data Source
Administrator” (Control Panel
ODBC Data Sources (32bit) to create a user or system
Data Source (DSN). Ask your Database Administrator to verify that this has been done,
and to provide you with pertinent information.
ID Card Maker version 4 77
Page 84

Click the ODBC radio button in the Database Management window to display the Database management buttons pertaining to an ODBC database.
The following buttons are present in the Database Management window when ODBC is
selected:
Clicking this button opens an ODBC logon window in which you
enter the Server Name (the DSN, or Data Source Name), UserID,
and password for an ODBC database. Your Database Administra-
A
TTACH TO AN EXIST-
ING DATABASE
DELETE ALL RECORDS
AND REBUILD AN
ODBC
DATABASE
EDIT FIELD DEFINITIONS
tor must provide this information to you as it is generated outside
the ID Card Maker environment.
When attaching to another database, always answer YES to the
prompt to rebuild the Search and Personal Data forms. If you do
not rebuild these forms, some of the data may not display. (See
“Attaching to Another Database” on page 79.)
When attached to non-ID Card Maker-generated database, you are
not allowed to edit data in the field designated as the “key field” or
create or delete database fields.
ID Card Maker uses a variety of tables to record employees, authorized application users, history and audit logs, etc. To create an ID
Card Maker database identical to the Microsoft Access version in
an ODBC database, click this button.
You will be prompted to select the ODBC database in which ID
Card Maker will create all its tables.
ID Card Maker will delete any records that exist in the ODBC
database you specified.
This takes you to the Edit Field Definitions window where you
have a variety of options for setting the display of database fields.
(See “Attaching to Another Database” on page 79.) Note: modifying field properties only affects the way fields are displayed at
individual workstations; it does not affect the actual database
tables.
78 ID Card Maker version 4
Page 85

Attaching to Another Database
R
EBUILD THE FORMS
FROM THE CURRENT
FIELD DEFINITIONS
DELETE ALL RECORDS
IN THE CURRENT
DATABASE
CONVERT A REV 3
A
CCESS 97 DATA-
BASE TO THE CURRENT
VERSION
Clicking this button will rebuild the Search and Personal Data
forms to reflect the “current Field Definitions” (the database field
information that currently displays in the Edit Field Definitions
window). “Forms” are a graphical alternative to viewing data in
the rows and columns of database tables. If you edited database
field properties that affect the forms, the forms must be rebuilt
before your changes can be viewed.
If you are attached to the User Field table created by ID Card
Maker on an ODBC database, you may not add or delete database
fields, nor edit certain field properties, if the User Field table contains records. This button will delete your records allowing you to
change database field properties such as “field name,” “field size,”
“field indexing,” etc.
If you have databases created by ID Card Maker or ID Card Maker
version 3.xx, clicking this button will convert the database to version 4.
Attaching to Another Database
There are several basic types of Database Management Systems (this is the formal name
for database applications), or DBMS for short. Typical commercial DBMS’s are
Microsoft Access, FoxPro, FileMaker Pro, SQL Server, and Oracle. In general, they all
store and manipulate the data that users need to manage and work with. Each DBMS has
its own “database engine” and “working environment” that enable users to edit, save and
view data, as well as perform typical database functions such as running queries, creating
reports, establishing “relationships” between different data sources, and modifying the
display of data.
While there are any number of DBMS’s, there are two types; Work stati on DBMS’s and
Server DBMS’s. Workstation DBMS’s are designed to handle small- to moderately-sized
databases. Individuals and small businesses are adequately served with these systems: a
typical desktop computer is powerful enough to run the software, and the program will
probably perform most of the database functions that a small organization might need.
Server DBMS’s, however, are much more powerful and complex. They typically require
ID Card Maker version 4 79
Page 86

the raw processing power of an application server (a special computer with extremely
powerful, if not multiple, microprocessors, extra RAM, and multiple fixed disks). These
programs are so complex that they normally require a “Database Administrator” to create,
maintain, and supervise database activity and functionality.
“Out-of-the-box,” ID Card Maker, by default, creates a database in Microsoft Access, a
Workstation DBMS. Maintaining a Microsoft Access database is relatively easy for anyone with general computing knowledge.
ID Card Maker also has the ability to create a database in a Server DBMS. In this case, our
program will still use Microsoft Access as the “front end” (what the user experiences at
his or her workstation), but communicate with the Server DBMS through an industry standard Open Database Connectivity (ODBC) driver. If you wish to use an ODBC database
(that is, a Server DBMS created either by ID Card Maker or another application), your
Database Administrator must perform all the ODBC database setup before ID Card Maker
can begin functioning with it.
ID Card Maker has the ability to “attach” to database tables, whether created by ID Card
Maker or not. “Attaching” or “linking” means that you can view the data from another
table within our program. (ID Card Maker and its run-time version of Microsoft Access is
the “front end”—it displays the data regardless of the type of application that created it at
the “back end.”) If ID Card Maker created the table, after you are attached, you may modify the database fields in the User Field table. If the table was not created by ID Card
Maker, you may only view and edit the data contained within that table; you may not edit
the data contained in the database field used as the table’s “key field.”
If you selected the MS Access radio button in the Database Management window, clicking
A
TTACH TO AN EXISTING DATABASE opens a standard Windows Open dialog allowing you
to select a Microsoft Access database. (Microsoft Access databases have an “.mdb” file
extension.) Once selected, a second window appears in which you select the individual
table within the database to which you wish to attach. (Note: If you are attaching to
another ID Card Maker database, you are attached as soon as you specify the “*.mdb” file;
ID Card Maker automatically knows to attach to the User Field table.) When attaching to
any database, always answer YES to the prompt to rebuild the Search and Personal Data
forms. If you do not rebuild these forms, some of the data may not display.
80 ID Card Maker version 4
Page 87

Added Security with Field Definition files
Please note: If the database to which you wish to attach has been “secured” or “password-protected” in any way, ID Card Maker may not be able to attach to it. ID Card
Maker will attempt to detect if a password and/or user name is required in order to gain
access, and present a Password Dialog allowing the user to enter the required information. However, the developer of the third-party database may be required to modify the
user permissions or application code itself to allow our application to attach to it.
If you selected the ODBC radio button in the Database Management window, clicking
A
TTACH TO AN EXISTING DATABASE opens an ODBC logon window in which you enter the
Server Name (the DSN or Data Source Name), UserID, and Password of the ODBC data-
base. (Your Database Administrator must provide this information to you as it is generated
outside our program environment.) After successfully logging on to the ODBC database, a
second window appears in which you select the individual table within the ODBC database to which you wish to attach. When attaching to another database, always answer YES
to the prompt to rebuild the Search and Personal Data forms. If you do not rebuild these
forms, some of the data may not display.
Added Security with Field Definition files
The ability to rebuild the forms without modifying the database tables adds a new level of
security to ID Card Maker. Thus, there are three approaches to protecting your data from
view by unauthorized users:
User level security: In the User Permissions window, deselect “View protected fields” and
“Edit protected fields” for specific users. In the Edit Field Definitions window, check the
“Protected” field property for fields you wish to protect from specific users.
Workstation level security: At specific workstations, uncheck the “Visible” property of
specific database fields from the Field Definitions Edit window. Then rebuild the forms at
that workstation using the R
ton. Those fields will not be visible to anyone, regardless of the user’s application permissions.
ID Card Maker version 4 81
EBUILD THE FORMS FROM THE CURRENT FIELD DEFINITIONS but-
Page 88

Multiple field definitions files security: In a large network running a variety of configurations of our program, create specific Field Definition files for each configuration.
Customizing database fields for a networked environment takes careful planning. You
must know which fields must be visible or hidden at specific workstations, and if specific
field formatting is required at different sites. For example, if several “guard verification
stations” are to be restricted from viewing certain information in the database, then a Field
Definition file needs to be created which hides that data. Or if a number of “data entry stations” need to have certain fields color coded to ease data entry, then a Field Definition
file must be created specifically for them. A Field Definition file is a text file containing a
list of database fields, plus each field’s “properties,” created when you click the A
RCHIVE
button in the Edit Field Definitions window. (See below.) You may create as many Field
Definition files as your needs require. You will then restore or “import” these Field Definition files at the appropriate workstations; the workstation-specific modifications will
now be displayed on those PC’s after you rebuild the database.
From any workstation, click T
D
EFINITIONS. Make any changes you require for your “master” database (that is, create,
delete, or modify the fields that you want to use for your database) and click A
OOLSCONFIGURATIONDATABASE MANAGEMENTFIELD
RCHIVE. A
standard Windows “Save dialog” appears in which you enter a name and directory for this
master Field Definition file. Modify the field definitions again for a workstation whose
view of the data will be different in some manner (hidden/visible fields, colored text, input
masks, etc.) and again click A
RCHIVE to save this modified Field Definition file. Continue
to create additional Field Definition files for as many workstations as your needs require.
Then, at each workstation, restore or “import” the appropriate Field Definition file using
the R
ESTORE button and rebuild the database by clicking the REBUILD THE FORMS FROM THE
CURRENT FIELD DEFINITIONS button.
If you are running ID Card Maker in a “stand alone” environment, you do not need to create Field Definition files. Simply change the existing fields and their properties to suit
your needs and rebuild the database and forms using the M
ACCORDING TO THE CURRENT FIELD DEFINITIONS button.
ODIFY THE CURRENT DATABASE
82 ID Card Maker version 4
Page 89

Section 3.5 Importing
ID Card Maker offers two types of importing: “simple” and “advanced.” A “simple” import
will append, if possible, data from an ASCII text file to the ID Card Maker database. Advanced
import, on the other hand, offers you control over whether you will add or update records,
whether the data resides in a text file or within a database table, plus the ability to “map” fields
between the source and destination files. You arrive at both import options by clicking
T
OOLSIMPORT or TOOLSADVANCED IMPORT.
Importing
ID Card Maker imports data from any comma-delimited ASCII text file. There are only two
requirements of the file to be imported: 1) the text file must be comma-delimited, and 2) the
field names in the text file must exactly match the field names ID Card Maker uses.
Comma-Delimited:
There are a variety of export formats (e.g., “dbf,” “tab-delimited,” “SYLK,” etc.). “Commadelimited” means that the contents of the database are “dumped” in a text file, logically
arranged in columns and rows. The database fields represent the “columns” and are separated
from each other by commas; the “rows” represent each record in the database. You can see in
Figure 1 on page 95, though the data does not line up perfectly with the names of the fields on
the first line, ID Card Maker keeps track of the commas separating the field names and content
of the fields from each other.
It is advisable that the application exporting the data encloses the data within quotation marks
(“”). Otherwise, commas appearing within the data itself (e.g., “The Gap, Ltd.”) might be mistakenly construed as field delimiters.
ID Card Maker version 4 83
Page 90

Field Names Must Match:
If the field names (columns) of the export text file exactly match the field names used in
ID Card Maker, ID Card Maker extracts the textual data from all the records in that column and inserts it into the corresponding field in the ID Card Maker database. The order
in which the fields appear (from left to right) do not have to match; ID Card Maker will
recognize the fields as valid and correctly import them into its own corresponding fields.
The comma-delimited text file must contain a “header” or “first row” identifying the
names of each field. Before you try to import the data from the export text file, open the
text file in a text editor and 1) verify that the first line of the text file contains the names of
the database fields, 2) verify (and edit if necessary) that the field names exactly match ID
Card Maker’s equivalent fields, and 3) you may optionally enclose each field name in
quotation marks. Each field name must be separated from the others by a comma, with the
comma falling outside the quotation marks. Depending on the text editor you use, all the
field names may not physically fit on one line. In that case, allow your word processor’s
automatic text wrap to continue your field names on the second and third lines, with you
entering a carriage return (Enter key) only when you finish all field name entries. When
you finish editing the export text file, save it as a plain ASCII text file. ID Card Maker’s
I
MPORT function only imports ASCII text files. If a field name in the export text file does
not match exactly, then ID Card Maker assumes that all the data for that column in the
rows below do not belong in the ID Card Maker database; the data in that field will not be
imported.
If you do not want to import data from a field whose name exactly matches a field used in
ID Card Maker, rename the field in the export file to one not used by ID Card Maker (e.g.,
“not_used,” or “skip”). Because the field names will not match, ID Card Maker ignores
the data in those fields.
Important! The Import button uses the field “IDNumber” in our application as the key
field to compare records between two databases. Therefore, the source data file must also
contain a field named “IDNumber” which stores a unique number for every record. (If the
source file uses a differently-named field (e.g., EmployeeID), rename it in a text editor to
“IDNumber.”) If the source data file contains records whose value in the IDNumber field
is already in use by some of our application's records, those records will not be imported.
Importing a File
Click IMPORT in the Tools window. A Windows Open dialog allows you to navigate to the
text file containing the import data. Select the file and click OK. ID Card Maker prompts
84 ID Card Maker version 4
Page 91

Advanced Import
you to confirm the action, then imports the data. It is now viewable in the Personal Data
window.
Advanced Import
The Import button in the Tools window only imports data that resides in a commadelimited ASCII text file. While 100% effective as an import procedure, an ASCII text
import requires numerous, and sometimes tedious, steps, such as exporting data from the
source database, verifying or editing data for commas, quotation marks, and field names,
etc. On the other hand, the Advanced Import allows you to open the source database
directly and “map” the fields between ID Card Maker and the source file.
Launch Advanced Import by clicking Advanced Import in the Tools window. The
Advanced Import window opens.
Advanced Import window
The Import text button launches a series of prompts in which you will specify the type of
file containing the data you wish to import, and whether you are adding, updating, or adding AND updating existing records. The Merge images button launches a series of
prompts allowing you to import images associated with the records you imported.
ID Card Maker version 4 85
Page 92

The text fields in the lower portion of the Advanced Import window display information
about your previous import.
The process of importing or updating records requires you to select a field for use as a
comparator. Sometimes called a “primary key” or simply “key field,” this field is used to
compare records between two databases. If the data in this field is the same, it is assumed
the records in each database refer to the same individual. If the data does not match, it is
assumed that the records refer to different individuals. Before you proceed, therefore, you
must determine the following critical information: is the data in the “key field” in the
import file the same as data in the equivalent field in the existing database? In order to
update records that already exist, the data in the “key field” must be identical. In order to
add new records to the database, the data in the “key field” must NOT be identical.
Depending on which type of import you perform, you may overwrite data in the database
with information in the import file.
Import Text
Click the Import text button to open the File Select window. There are four options.
Compatible IDCM text file This is a comma-delimited text file exported from an
ID Card Maker database. When this is selected, a
Windows Open dialog looks specifically for a text
(*.txt) or comma-delimited (.csv) file. Use this option
ONLY if you have verified that the field names and
field properties in the import file exactly match the
fields in the existing database. ID Card Maker will
automatically use the “IDNumber” field as the “key
field” to compare records in both databases.
Text file This is a comma-delimited text file exported from any
other database. When this is selected, a Windows
Open dialog looks specifically for a text (*.txt) file.
With this option, a “field mapping” window will open
allowing you to “map” fields from the import file to
the ID Card Maker database. You will have an opportunity to specify the “key field” for use as a database
comparator.
86 ID Card Maker version 4
Page 93

Advanced Import
Compatible IDCM database This is the “*dat.mdb” file of an ID Card Maker data-
base. When this is selected, a Windows Open dialog
looks specifically for a Microsoft Access 2000
(*.mdb) file. Use this option ONLY if you have verified that the field names and field properties in the
import file exactly match the fields in the existing
database. (Unless you copy or rename your database,
the name of this file is “IDCMR4DAT.mdb.”) ID
Card Maker will automatically use the “IDNumber”
field as the “key field” to compare records in both
databases.
MS Access database This is the “*.mdb” file of any other Microsoft Access
2000 database. When this is selected, a Windows
Open dialog looks specifically for a Microsoft Access
2000 (*.mdb) file. Using this option, you may select
the specific table within the database whose data you
wish to import, as well as “map” the fields from the
import file to the ID Card Maker database. You will
have an opportunity to specify the “key field” for use
as a database comparator.
After selecting a file type in the File Select window, an Add/Update Select window opens.
The three choices are:
ID Card Maker version 4 87
Page 94

Add new records ID Card Maker will use a “key field” to compare
the records in the import file to the records in the ID
Card Maker database. If the data in the “key field”
of any records of the import file are not identical to
data in ID Card Maker’s “key field”, ID Card
Maker assumes that those individuals do not exist
in the ID Card Maker database; those records will
be imported. All other records will be ignored.
Update existing records ID Card Maker will use a “key field” to compare
the records in the import file to the records in the ID
Card Maker database. If the data in the “key field”
of any records of the import file are identical to
data in ID Card Maker’s “key field,” it is assumed
those records refer to the same individual and those
records will be updated. That is, those records in the
ID Card Maker database will be over-written with
data in the import file. All other records will be
ignored.
Add or Update ID Card Maker will use a “key field” to compare
the records in the import file to the records in the ID
Card Maker database. If the data in the “key field”
of any records of the import file are identical to
data in ID Card Maker’s “key field,” ID Card
Maker will overwrite those records with the data
from the import file. If the data in the “key” field is
not identical, ID Card Maker will add those records
to the database.
If you are not importing a “compatible IDCM text file or database,” after selecting an
option in the Add/Update Select window, a Field Name Mapping window appears displaying two “panes:” left of the arrow buttons are the names of fields in the Source
(import) file and Destination (ID Card Maker) database; right of the arrow buttons are the
mapped fields.
88 ID Card Maker version 4
Page 95

Advanced Import
If fields in the source are not the same as the fields in the destination, yet contain equivalent data, you may “map” them. You may instruct ID Card Maker to insert data from a
field in your database into any specified field in ID Card Maker’s database. Click once on
the field name in the Source column and click on its equivalent in the Destination column.
After clicking the button, those two fields will display side-by-side in the right
pane.
If you double-click on a field in either the Source or Destination column, ID Card Maker
will automatically search for an identically- or similarly-named field in the other column.
If an identically- or similarly-named field exists, ID Card Maker assumes they each contain equivalent data and maps them. (For example, if our program uses the field named
ID Card Maker version 4 89
Page 96

“LastName,” it will automatically map “lastname,” “Last Name,” or “Last_Name.”) Sin-
gle-clicking a field and clicking the button performs the same action.
If you click the button, ID Card Maker searches all fields in both the Source and
Destination files and maps those that are spelled identically or similarly. The mapped
fields are displayed in the right pane.
To “un-map” fields, select the mapped fields in the right pane and click the but-
ton, or click the button to un-map all fields.
When satisfied that the fields are correctly mapped, click the button. Click
to cancel the import.
90 ID Card Maker version 4
Page 97

Advanced Import
If you are not importing a compatible IDCM text file or database, a Select Key Field window appears next. You must specify the unique field to be used as the “comparator” for
the two databases.
The Select Key Field window displays all the fields in the Source (import) file. Select the
field which corresponds to ID Card Maker’s “IDNumber” field. The field you select must
contain unique numbers. Click the button to continue. ID Card Maker calculates
how many records may be added, updated, or added and updated, and prompts you to continue. You are notified if the import was successful or unsuccessful.
Merge Images
Click Merge images at the top of the Advanced Import window to import the images
associated with records you have imported. In the Select file type window that appears,
ID Card Maker version 4 91
Page 98

select the correct file type: Compatible IFW text file, Text file, Compatible IFW database,
or other Microsoft Access database.
Select the correct file in the following Windows Open dialog.
If you did not choose an IDCM compatible text file or database in the previous window,
two Select Key Field windows appears in which you first specify the “key field” in the
Source (import) file, and second, specify the corresponding field in the ID Card Maker
(destination) database.
92 ID Card Maker version 4
Page 99

Advanced Import
Next, you are presented with a window displaying all your Source (import) file’s fields.
You must select the field that contains the identifying name or number of the images. (For
example, ID Card Maker stores the image names in the “ImageID” field.)
Lastly, in the following dialog, enter the path to the folder where your import file’s image
files are stored. ID Card Maker reports that the images were successfully or unsuccessfully imported.
ID Card Maker version 4 93
Page 100

94 ID Card Maker version 4
 Loading...