

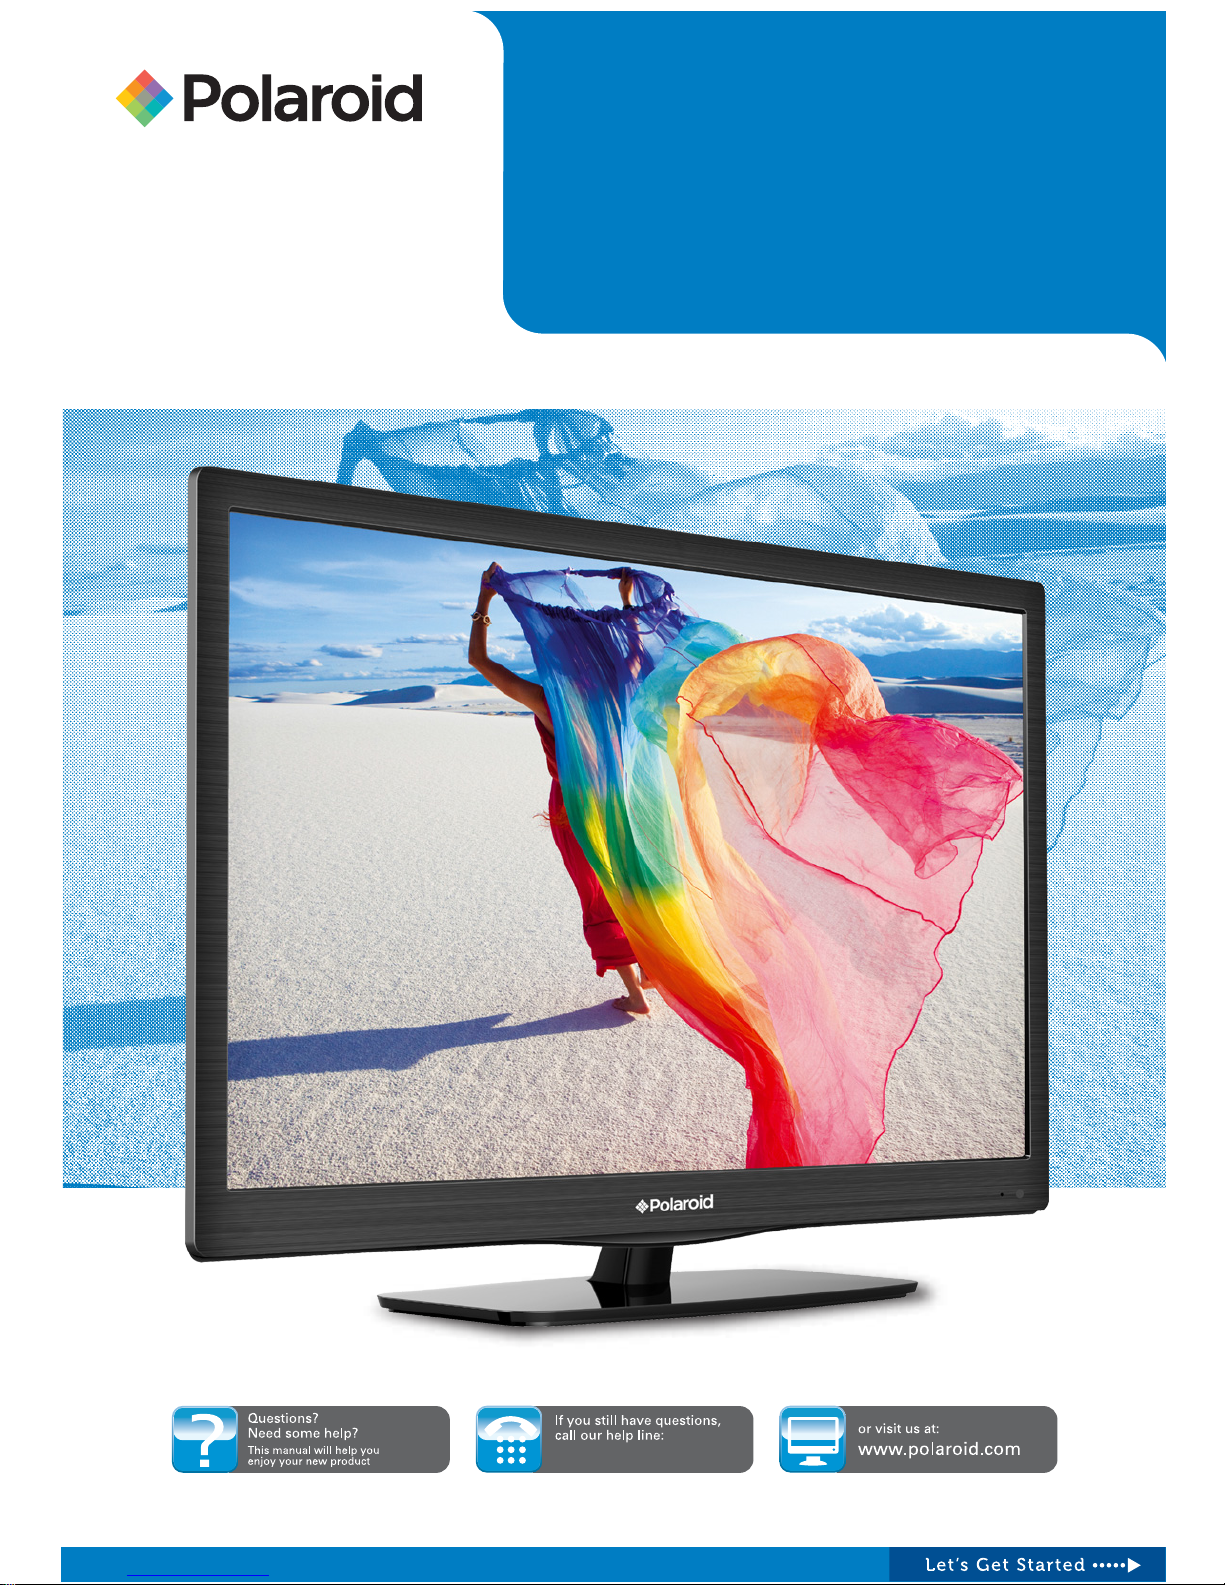
Page 1
1300 366 144
USER MANUAL
Full HD LED TV
Page 2

Contents
INTRODUCTION..............................................................................1
SAFETY AND WARNINGS............................................................. 2-4
INSTALLATION.............................................................................5-8
BASE STAND ASSEMBLY INSTRUCTION.........................................5
REMOTE CONTROL.........................................................................9
OPERATION..............................................................................10-19
TROUBLE SHOOTING....................................................................20
TECHNICAL SPECIFICATIONS......................................................21
-1-
Page 3
SAFETY AND WARNINGS
IMPORTANT SAFETY INSTRUCTIONS
TO REDUCE THE RISK OF ELECTRIC SHOCK, DO
NOT REMOVE COVER (OR BACK). NO USER
SERVICEABLE PARTS INSIDE. REFER SERVICING
TO QUALIFIED SERVICE PERSONNEL.
RISK OF ELECTRIC SHOCK
DO NOT OPEN!
CAUTION
CAUTION
This symbol indicates that dangerous
voltages, constituting a risk of electric
shock are present within this unit.
This symbol indicates that there are
important operating and maintenance
instructions in the literature accompanying
this unit.
To reduce the risk of fire or electric
shock, do not expose this product to rain
or moisture.
WARNING:
1) Read these instructions.
2) Keep these instructions.
3) Heed all warnings.
4) Follow all instructions.
5) Do not use this Television near water.
6) Clean only with a dry cloth.
7) Do not block any ventilation openings,
install in accordance with the instructions.
8) Do not install near any heat sources such
as radiators, air conditioners, stoves or
other devices (including amplifiers) that
produce heat.
9) Protect the power cord from being
walked on or pinched particularly at plugs,
convenience receptacles, and the point
where they exit from the product.
10) Only use attachments/accessories
specified by the manufacturer.
11) Unplug the Television before lightning
storms or when unused for long periods of
time.
12) Refer all servicing to qualified service
personnel. Servicing is required when the
product has been damaged in any way,
such as when the power-supply cord or plug
is damaged, liquid has been spilled or
objects have fallen into the Television,
exposed to rain or moisture, does not
operate normally, or has been dropped.
13) The Mains plug is used as the power
disconnect device, and should remain
readily accessible and operable.
14) The ventilation should not be impeded
by covering the ventilation openings with
items such as newspapers, table-cloth,
curtains, etc.
15) No naked flame sources, such as
lighted candles, should be placed on or
near the device.
16) This device is not warranted for use in
unreasonably hot, cold, or humid
environments.
17) The Television shall not be exposed to
dripping or splashing and no objects filled
with liquids, such as vases, shall be placed
on or near the product.
This symbol indicates that this product
incorporates double insulation between
hazardous mains voltage and user
accessible parts. When servicing use only
identical replacement parts.
The batteries shall not be exposed to
excessive heat such as sunshine, fire or
the like.
WARNING:
Polaroid • I0315/I0316/I0317
-2-
Page 4

High voltage is used in the operation of this
television. Do not remove the rear cabinet
cover from your television set. Refer all
servicing to qualified service personnel.
To prevent fire or electrical shock hazard, do not
expose the television to rain or moisture.
Do not drop or push objects into the television
cabinet slots or openings. Never spill any kind
of liquid on the television.
Do not block the ventilation holes in the back
cover.
Adequate ventilation is essential to prevent
failure of electrical components.
Do not trap the power supply cord under the
television.
Never stand on, lean on, or suddenly push the
television or its stand. You should pay special
attention to children. Serious injury may result if it
falls.
Do not place your television on an unstable cart,
stand, shelf or table. Serious injury to an individual,
and damage to the television may result if it falls.
When the television is not used for an
extended period of time, it is advisable to
disconnect the from theAC outlet.AC power cord
Avoid exposing the television to direct sunlight
and other sources of heat. Do not stand the television
directly on other products which give off heat, e.g. video
cassette players and audio amplifiers. Do not place naked
flame sources, such as lighted candles on the television.
Dim:515*320mm()
SAFETY AND WARNINGS
If the television is to be housed in a cabinet or similar
enclosure, the minimum distances in the above
picture must be maintained. Heat build-up can reduce
the service life of your television, and can also be
dangerous.
Polaroid • I0315/I0316/I0317
-3-
Page 5

SAFETY AND WARNINGS
Polaroid • I0315/I0316/I0317
CAUTION:
WARNING:
CAUTION:
NOTE:
pictures. Occasionally, a few non-active pixels may appear on the screen as a fixed point of
CAUTION:
permanent after-image to remain on the screen.
The display panel is a very sensitive high technology product, giving you finely detailed
black, blue, green or red. Please note that this does not affect the performance of your product.
Examples of still pictures include logos,
video games, computer images, teletext and images displayed in 4:3 mode.
Important Information Regarding Use of Video Games, Computers, Captions or Other Fixed
Image Displays
Do not allow a still picture to be displayed for an extended period, as this can cause a
Never tamper with any components inside the TV, or any other adjustment controls not
mentioned in this manual.
All LCD-TVs are high voltage instruments. When you clean up dust or water drops on the
LCD PANEL or CABINET, the power cord should be physically removed from the mains outlet.
You may then wipe the TV with a dry soft cloth. In the event of thunder and lightning storms,
unplug the power cord and antenna cord to prevent damage to your television. Any repairs to
this TV should only be performed by qualified TV service personnel.
Any change or modifications to this unit carried out by a non-licensed repair centre could
void the user's warranty.
The permanent after-image on the screen resulting from fixed image use is not an
operating defect.This product is not designed to display fixed images for extended
periods of time.
-4-
Page 6
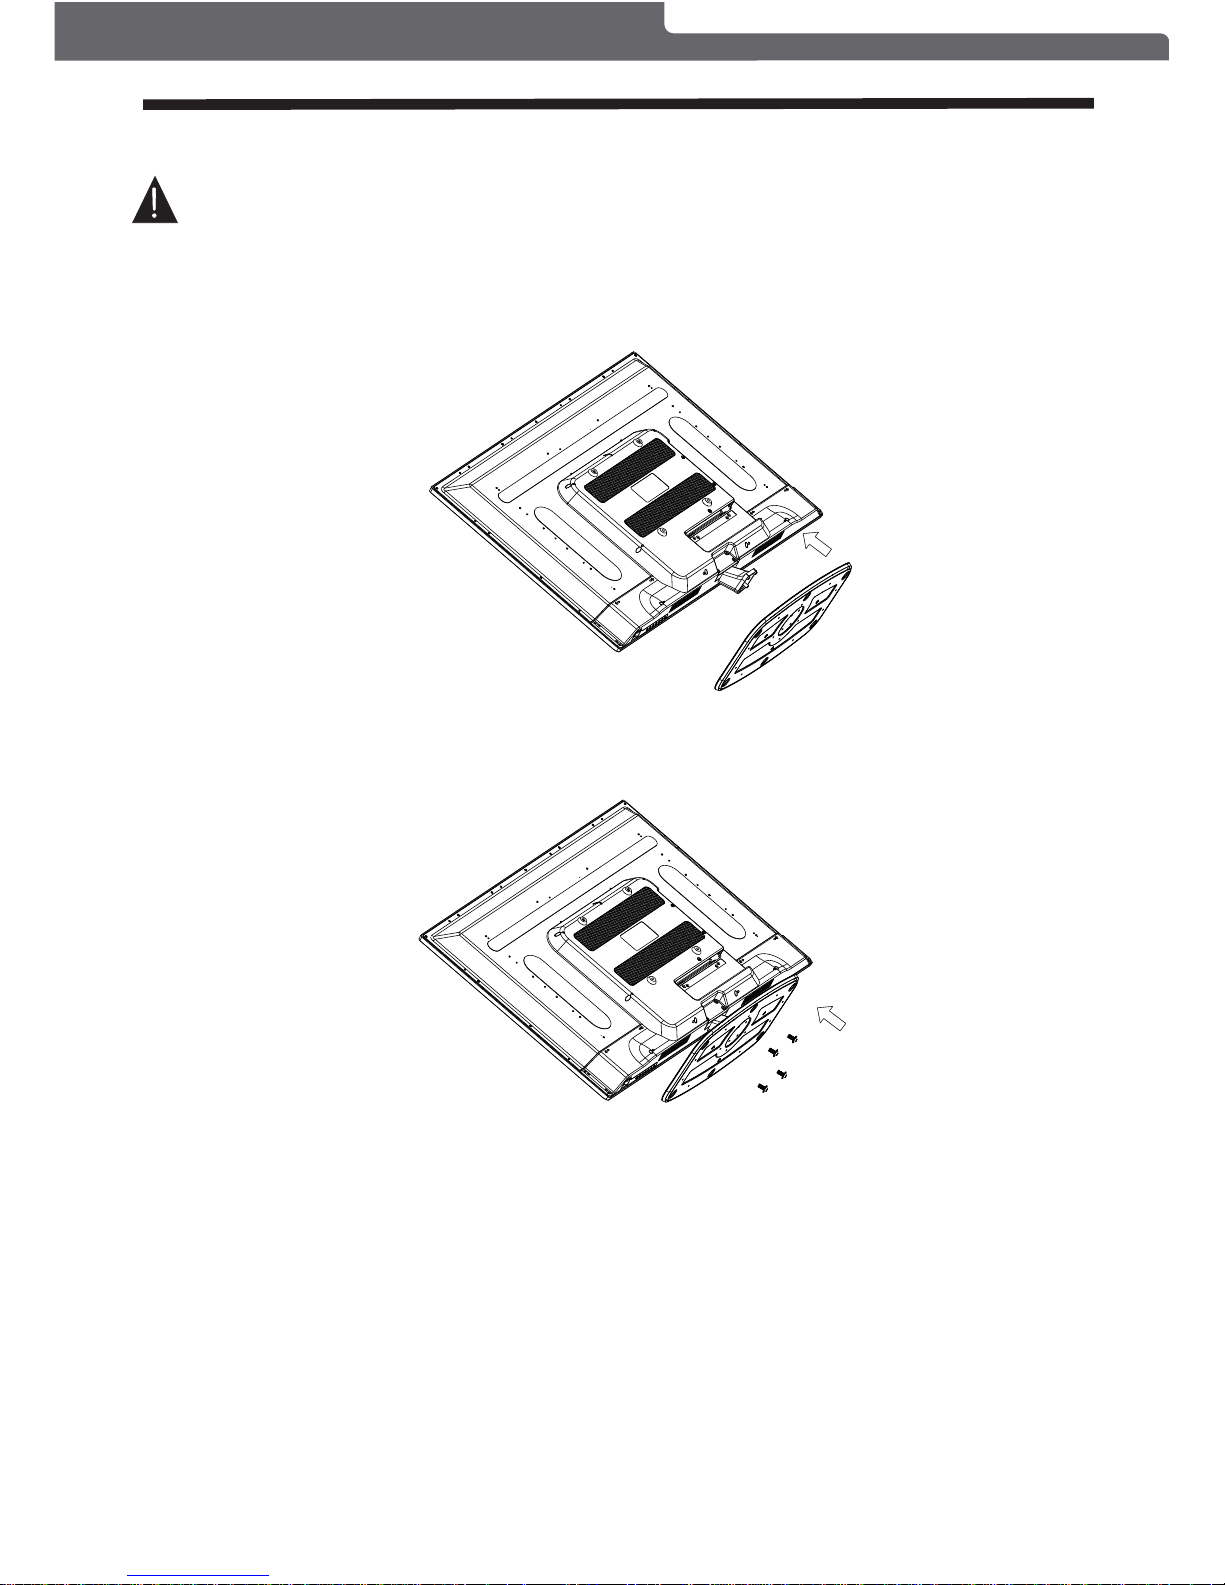
INSTALLATION
Base Stand Assembly Instruction
Place the TV with the display side down on a flat surface. Ensure the table or desk you use provides
a flat, totally clean surface.
Use a cloth between the face of the TV and the table to protect the TV' s sc re en.
2. Attach the base stand to the stand neck firmly tightening the supplied screws.
4 x screws
Polaroid • I0315/I0316/I0317
CAUTION:
This stand is not a swivel stand. Do not attempt to rotate the TV.
-5-
Position the base stand onto the bottom of the stand neck.
1.
Page 7

INSTALLATION
Front panel
1.SOURCE:
Displays the input source Menu.
2.MENU:
Displays the main MENU.
3.CH+/CH-
In TV mode, press "CH+" or "CH-" to change the
channel up or down.
In MENU mode, press "CH+" or "CH-" to select items.
4.VOL+/VOL-
Adjusts the sound level.
In MENU mode, press "VOL+" or "VOL-" to adjust
the item that you have selected.
5. STANDBY
Once the TV's main power switch has been activated,
press this button to turn the unit ON from STANDBY mode.
Press it again to return the set back to STANDBY.
1: Remote control sensor.
2: Indicator LED:
BLUE = POWER ON.
RED = Stand-by.
4: Main power switch (on bottom
p a n e l of TV)
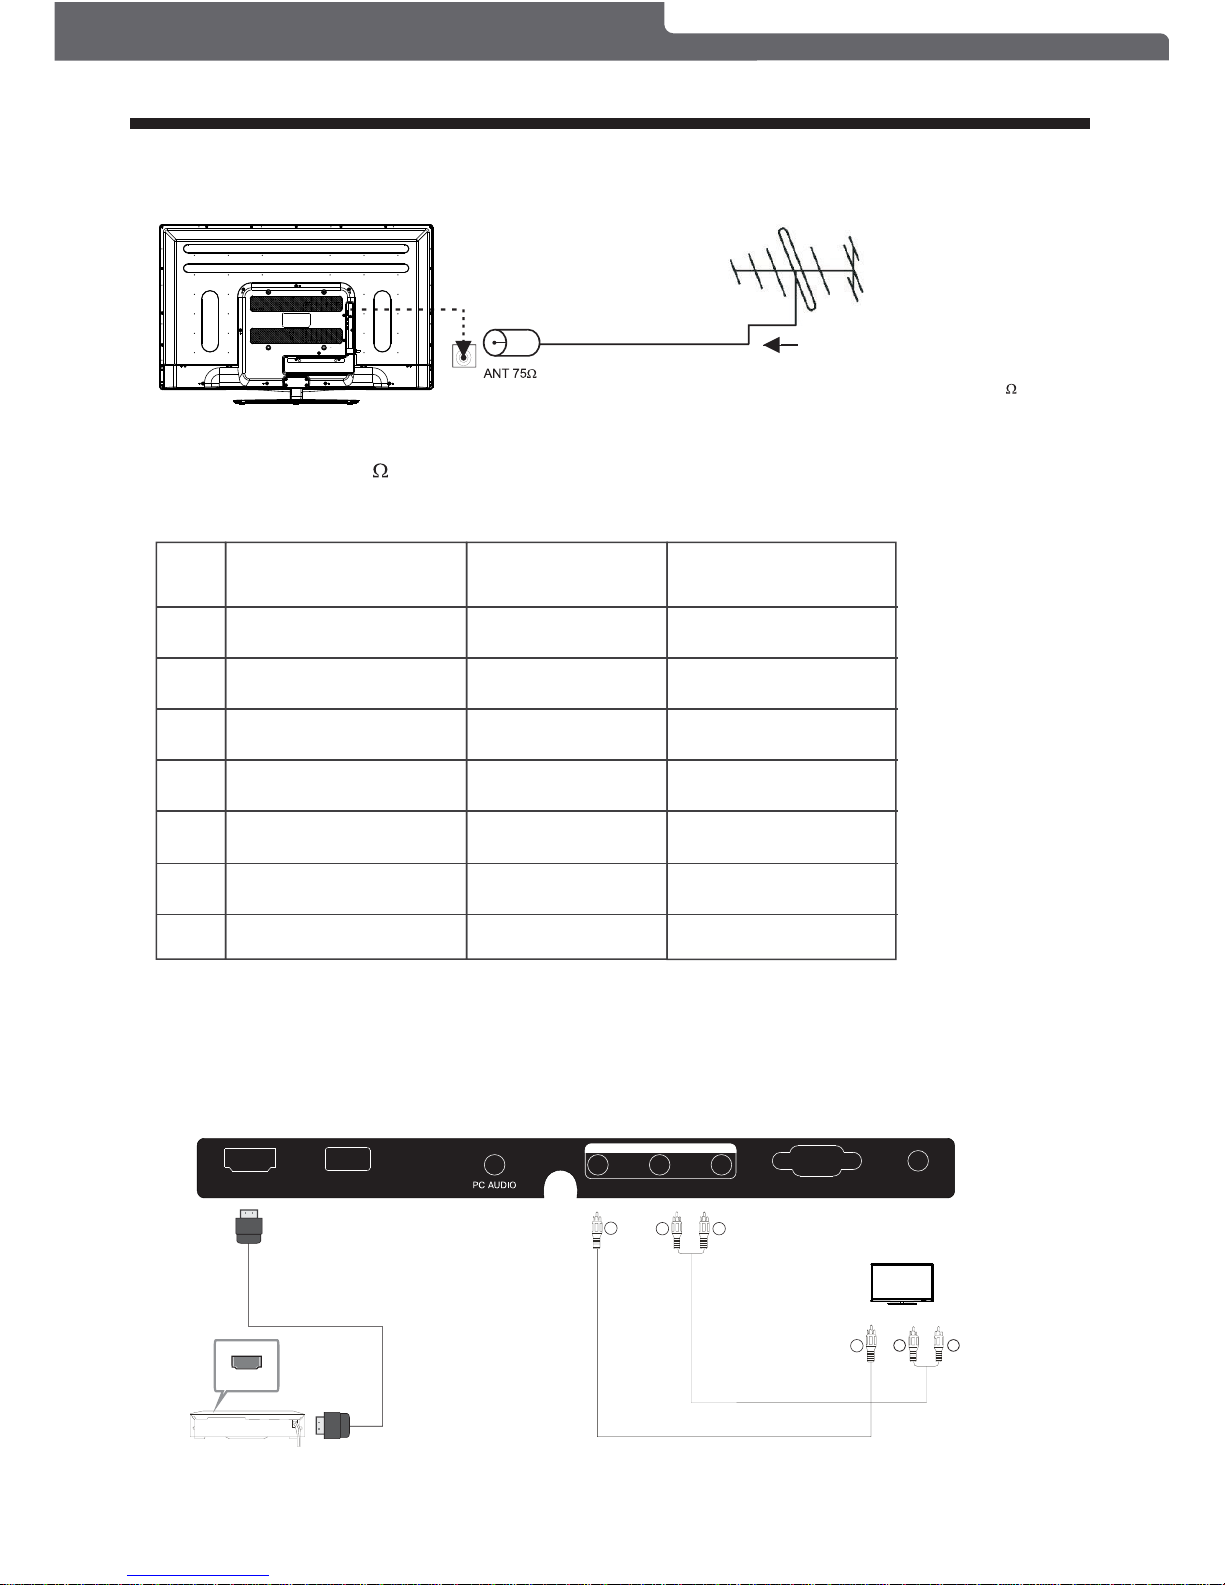
REAR AV Connections
All the terminals are (from left to right):
, L+R Audio inputs,
YPbPr (component video) inputs, HDMI2 input.
: 1. The VIDEO and YPbPr inputs share the same L+R audio in puts.
2. When the HDMI2 port receives a DVI signal, the matching audio signal is received
by the YPbPr/AV Audio input.
AC POWER INPUT, AV composite video input
SIDE AV Connections
All the terminals are (from left to right):
HDMI1 input, USB, PC Audio input, (composite video and L+R audio), VGA input,
: 1. When the HDMI1 input receives a DVI signal, the matching audio signal is received
by the PC Audio input.
2. The AV output sockets are only functional during TV reception and USB playback.
AV output
Antenna socket.
AC-INPUT
100-240V~50/60Hz
Y
Pb
Pr
VIDEO L R
HDMI2
USB
HDMI1
VGA RF
VIDEO
LR
VIDEO OUT PUT
Note
3: (on bottom panel of TV).
Keypad
Polaroid • I0315/I0316/I0317
Note
-6-
Keypad Control Panel
Page 8
PRESET MODE
1
2
3
4
5
6
7
720*400
640*480
800*600
800*600
800*600
1024*768
1024*768
70
60
56
60
72
60
70
31.47
31.47
35.156
37.88
48.08
48.36
56.48
RESOLUTION V.Freq.(Hz) H.Freq.(kHz)
INSTALLATION
ANTENNA
Note:
Aerial connections: IEC (PAL-type, female).
Input impedance: 75 unbalanced.
Plug (not supplied)
Outdo or ante nna (no t sup plied )
For opt imum di gital TV rec eptio n,
the use o f high qu ality s hie lded 75
coax cable is recommended.
Polaroid • I0315/I0316/I0317
-7-
AV EQUIPMENT
You can use the input and output terminals on the TV set as follows.
HDMI
W
R
W R
TO AUDIO INPUTS
VIDEO EQUIPMENT (Composite video input)
TO VIDEO
INPUT
Y
Y
USB
HDMI1
VGA RFVIDEO
LR
VID EO OUT PUT
be selected at a time.
NOTE:
Only one HDMI input can
Page 9

INSTALLATION
W R
Yellow (Composite video)
White (audio L)
Red (audio R or Pr)
Y
W
R
Blue (Pb)
Green (Y)
B
G
VIDEO EQUIPMENT with YPbPr output (Component video output)
G B R
W
R
W R
TO AUDIO OUTPUTS
VIDEO EQUIPMENT
TO VI DEO
OUTPUT
Y
Y
W R
Audio
G
B
R
Component video
VIDEO EQUIPMENT (Composite video output)
AC-INPUT
100-240V~50/60Hz
Y
Pb
Pr
VIDEO L R
HDMI2
Polaroid • I0315/I0316/I0317
-8-
PC
STEPS:
Be sure both the TV and computer are set to Power off.
1.Connect a VGA a nd audio cable.
2.Connect the power cord.
3.Power on the TV, switch to PC mode.
4.Power on the PC.
This connection and power-up sequence is very important.
USB
HDMI1
VGA RFVIDEO
LR
VIDEO O UT PUT
The following devices can be connected to your TV: VCR, Media Player, DVD Player,
Camcorder, Video Game Console, Stereo System etc.
YPbPr (component video) can support these video formats: 480i, 576i, 480p, 576p, 720p.
Use an HDMI connection to view 1080i material.
Page 10

REMOTE CONTROLREMOTE CONTROL
REMOTE CONTROL
Polaroid • I0315/I0316/I0317
-9-
1: :To set the TV to sta nd by or power on.
2: :In USB mode, used as reverse key.
3: : In USB mode, used as forward key.
4: :
5: :
6: : Used to store channels and delete
channels (explained on page 11-12).
7: : To turn on subtitles, press the subtitle button in DTV mode.
9 : : To move within the menu.
10: : Confirms selection.
11: : The Electronic Program Guide lists all programming
information in DTV mode.
12: : To access your favourite channels list in TV or DTV mode.
13: : To adjust sound level.
14: : For direct access to channels, press the number
corresponding to the channel.
15: : To select the available audio language of TV programs .
16: : To disable or enable the sound output.
17: : In USB mode, used as next key.
18: : In USB mode, used as previous key.
20: : Press to stop play in U SB m ode.
21: : To display the program information of the show you
are watching, press the info button.
22: Press to freeze the picture you are watching.
23: : Enables you to view and s el ect the various
devices hooked up to the television. Please note the device will only
be accessible if it is turned on.
24: : To return to the previous menu or exit menu.
25: : To access the next or previous channels.
26: :
27: : DTV Mode: Jumps to last channel viewed.
POWER
Coloured Mode Buttons
SUBTITLE
CURSOR
OK
EPG
FAV
VOL+/NUMERIC KEYS
AUDIO
MUTE
INFO
FREEZE:
(SOURCE BUTTON)
EXIT
CH+/CHREC
RECALL
Press the Play Button in USB Mode to begin or continue Playback.
Press the Pause Button to pause play in USB Mode.
Press to record the TV program you are watching in DTV
mode. (Please refer to the PVR Function section found on page 16-17
of this manual for further instructions on how to record).
1
2
3
4
5
6
7
8
9
10
11
13
12
14
15
16
17
18
19
20
21
22
23
24
25
26
27
VOL
CH
REC
FREEZE
Remote Control Battery Installation
The remote control requires twoAAA batteries. Below are
steps to assist you with replacing the batteries.
1.Open the back cover of the battery compartment.
2.Install the batteries into the battery tray. There are +/polarity markings in the battery compartment. Please
ensure the battery polarity is correct.
3.Close the battery cover.
There are two battery cover types that may be used.
Please refer to picture 1 or picture 2 as applicable to the
Remote Control supplied with your TV.
Picture 1:
Picture 2:
8 : (MENU): Displays the main on-screen menu.
NOTE:
program or channel.
19: (ANGLE BUTTON): Allows you to sort recorded files by time,
Page 11

OPERATION
TV Setup Guide
This screen only appears when the TV is turned on for the first time, or after a reset to default factory settings.
You can choose language, country and auto tuning programs. After tuning, the screen will skip to the first DTV
program.
1.CHANNEL MENU
The first item found in the MENU is CHANNEL MENU (for ATV or DTV source only). ATV = Analogue TV,
DTV = Digital TV.
ATV Manual Tuning
Programme Edit
Signal Information
< >
CHANNEL
Auto Tuning
DTV Manual Tuning
Software Update(USB)
Software Update(OAD)Off
Dansk
Deutsch
Hrvatski
Italiano
Please select an OSD Language
OK
Magyar
Nederlands
Norsk
PolskiEnglish
Cesky
E ka
Espanol
~
Fran ais
Portugues
Pycck
Austria
Belgium
Country
OK
Australia
Croatia Finland Greece
Luxembourg
Czech France Hungary
Netherlands
Bulgaria Denmark Germany Italy
To select the MENU mode, press the menu button on the side control panel of the TV, or press the Menu button
on the remote control.
Press to select search type, then press to select country (eg. Australia), then press the OK
button to start auto tuning.
You can search channels and edit programs here.
1).Auto Tuning:
Search all the channels automatically (you can select ATV, DTV, or DTV+ATV searching).
Tun e Type DT V+AT V
MENU
Austria
Belgium
Australia
Croatia
Czech
Bulgaria
Finland
France
Denmark
NOTE:
All the channels including ATV, DTV and Radio can be tuned at once, if the Tune Type is set to DTV+ATV.
Any previously stored channels will be deleted after auto tuning is carried out.
After auto tuning, the receiver will skip to the first DTV channel.
The radio channels are the ones provided by some TV stations. This unit does not receive
DAB+Digital Radio broadcasts.
Channel Tuning
TV : 0 Prog ram me( s)
DTV : 0 Pro gra mme (s)
Radio : 0 Programme(s)
96% UHF C H 68 DT V
Polaroid • I0315/I0316/I0317
-10-
Page 12

2).DTV Manual tuning:
You can select a DTV channel then find the program in this channel menu section.
Press to select the channel, then press OK to search the programs .
OPERATION
NOTE:
The Reception Quality Meter (Bad/Normal/Good Graph) on this screen shows signal intensity during DTV
reception only.
To fine tune the current channel you are watching, select MENU, then CHANNEL, scroll
throu
gh by using and then press
O
K to tune. Please note you need to select theTV Channe
l
(be watching it) first to ensure this is the channel that will be fine tuned.
3). ATV Manual tuning :
You can change the BG System selection, search the Analog TV channels and fine tune them, then store
the channels you selected in this menu.
In Australia ensure the System BG pre-set is selected (row 5) to maximise picture quality.
To fine tune the next or previous channel select the "CURRENT CH1" option (row 3) - use the
buttons to manually tune.
Select "FINE-TUNE" option (row 5) and use buttons to manually tune.
ATV Manual Tuning
Storage To 1
System BG
Current CH 1
Search
Fine-Tune
Frequency 255.25 MHz
Sav e MENU
_
+
DTV Manual Tuning
VHF CH 5
_
+
Bad Nomal
Good
Press OK to search
NOTE:
Press the Red Coloured Mode Button at the top of your remote to store the channels after manual tuning.
4).
You can Delete, Rename, Move, Skip, or FAV most TV programs.
Program edit:
Rename:
You can only rename ATV programs.
Move the cursor to the program, press the Green Coloured Mode Button to rename the program.
Press to choose the character. Press to move the cursor .
Press MENU button to exit edit, Press EXIT to exit the menu.
Note: ATV program names can only be 5 characters long, DTV program names can be up to 25 characters.
Delete
Press t h e Red Coloured Mode Button, the program in the cursor will be deleted.
Move
You can move the programs.
Press the Yellow Coloured Mode Button, then press to choose the program you prefer and press OK.
through by using and then press OK to tune. Please note you need to select the TV Channel
Polaroid • I0315/I0316/I0317
-11-
Page 13

OPERATION
Displays the signal information in DTV (digital TV) mode only.
Please note Software Updates are only to be performed when instructed by a qualified service technician
and an updated USB Flash Drive has been supplied and is connected to the television. Please remove the
antenna cable from theTVRF port, go to the channel Menu, select "Software Update (USB)" and press OK
to run the software update.
5). Signal Information:
6). Software Update:
WARNING:
The second item found in the MENU is the PICTURE MENU. You can adjust picture effects here, such as
contrast, brightness, etc.
Press to move, press OK to adjust.
2. PICTURE MENU
Color Temperature
Aspect Ratio
Noise Reduction
Screen
Picture Mode Standard
< >
PICTURE
MENU
Picture Mode Standard
Contrast 50
Brightness 50
Color 50
Sharpness 50
Tint 50
Color Temperature Medium
Red 50
Green 50
Blue 30
MENU
NOTE:
1).Tint is available in NTSC system only.
2).There are four colour temperature modes that can be selected: medium, warm, cool, user.
3).The Screen opti on is only available once the Input Source is set to PC , which allows you to adjust
Horizontal position, vertical position, size and phase or select an Auto Adjust mode.
TV default mode setting is standard mode and it is recommended for use at home..
""
""
3.SOUND MENU
The third item found in the MENU is the SOUND MENU.
You can adjust the sound effect here such as treble, bass, balance etc.
Press to move, press OK to adjust.
< >
Balance
Auto Volume
Sound Setting Standard
SOUND
Favourite
Use the to select a program, then press the FAV button. This will bring up the on the right hand
side of the program. To remove a program from FAV list, select the program, then press the FAV button,
the will then disappear.
Once your favorite group is created, you can press the FAV key to quickly access your favourite channels.
Press to choose the program, press the Blue Coloured Mode Button at the top of your remote to skip this
program, the symbol will show on the right side of the program.
Choose the skipped program, press the blue button again, you can cancel the skip and the symbol will
disappear.
Polaroid • I0315/I0316/I0317
-12-
Page 14

NOTE:
Auto volume: only available when the input signal volume is too high or there is distortion.
4.TIME MENU
The fourth item found in the MENU is the TIME MENU. You can adjust the clock, power on/off time, sleep
time etc Press to move, press OK to adjust.
Off Time
On Time
Sleep Timer
Auto Sleep
Time Zone
Clock -- -- -- --
TIME
< >
NOTE:
The clock time is automatically set by the Digital TV transmission.
OPERATION
< >
PVR File System
OSD Language English
OPTION
Audio Languages
Subtitle Language
Country
Australia
Restore Factory Default
Check PVR File System Start
USB Disk
Format
Time Shift Size
Speed
Free Reco rd Limit 6 Hr.
Select Disk C:
In PVR File System Sub-menu you will be asked to format your USB 2.0 Flash Drive or Hard Drive for
PVR Operation. If you are not familiar with the various drive or Flash drive or Hard Drive, start this process
using a blank device (ie. unused storage device), or one which does not hold sensitive or required data.
To view and select the USB file or the allocated space on your Hard Drive that you would like to record to,
press OK button to enter the Select Disk sub-menu and then press or buttons on your remote control
to select the particular partition/file for recording.
Press the Menu Button to return to the Main Menu.
Press the OK Button to start checking the file system of your USB Flash Drive or Hard Drive. Once
SUCCESS is shown after checking, you will then be able to begin recording or use the Time Shift function.
If FAIL is shown after checking, you then need to format your USB Flash Drive or Hard Drive before being
able to record or use Time Shift feature.
When you format your USB Flash or Hard Drive any saved data will be lost. Please ensure that you
start with a blank partition on your Hard Drive to ensure you don't lose any data.
the
Drive
5.OPTION MENU
The fifth item found in the MENU is the OPTION MENU. You can adjust the languages and restore factory
defaults in this menu. Press MENU button and then press or buttons to select the Option Menu.
Once in Option Menu, press or buttons to select the settings you wish to adjust. Press MENU button
to return to the Main Menu.
Restore Factory Default will clear all the programs and password.
NOTE:
Select Disc
Check PVR File System
Format
Polaroid • I0315/I0316/I0317
-13-
Page 15

OPERATION
6.LOCK MENU
This sixth item found in the MENU is the LOCK MENU. To enter the LOCK Menu, press MENU button
and then press or buttons to select the LOCK Menu.
The default password is 6666.
Please set a new password so it is easy to remember. Follow the on screen steps to set your new
password.
Set Password
Lock System
LOCK
< >
Block Program
Parental Guidance No Block
7. APPLICATIONS MENU
The seventh item found in the MENU is the APPLICATIONS MENU. To enter the Applications Menu, press
MENU button and then press or buttons to select the Applications Menu. This is where you will be
able to view and play various low data-rate USB media files or DTV programs recorded using your TV.
< >
APPLICATIONS
DMP
Once the Parental Guidance mode is turned on, you can set viewing restrictions during DTV TV reception
based on the programs classification (eg. G, PG, M, MA etc).
The viewing restrictions do not apply to the DVD player or ATV reception.
FACTORY RESET NOTE:
If you wish to reset your TV, please select the Restore Factory Default option, this will clear all settings.
File System Size
PVR Fil e Sys tem Ty pe FAT32
MENU
PVR File System Size All
SD 13 Mins
HD 3 Mins
There are two types of supported formats: FAT32 and Hi Speed Format. You can press or buttons to
choose the type of formatting. If FAT32 is selected, you will have to format the whole size of your USB
Flash Drive or the allocated partition for recording. If Hi Speed Format is selected, you will then be able
to press or buttons to select the size you wish to use (for example 1G, 10G, 20G... or All). Once a
particular size is booked for recording, you will be able to use the remaining space of your USB Flash
Drive or Hard Drive for other data storage.
Hard Drive will be lost after formatting.
This will show the supported speed of recording, and whether your storage device can support HD DTV
recording.
This will show the approximate time you will be able to record on to your USB Flash Drive or Hard Drive.
PVR File System Type
Please note no matter what size is booked for recording, all the data in the allocated partition of the
WARNING:
Speed
Record Limit
NOTE:
Polaroid • I0315/I0316/I0317
-14-
Page 16

Press the OK button to enter the basic DMP (Digital Media Player) Menu and then use the or buttons
on the remote control to select the file playback type (eg. Photo, Music, Movie, Text), then press OK. You
can preview a selected file by highlighting it using the cursor arrows and pressing OK. Press the Play
button on the Remote Control to show it in full-screen size. Press the MENU/INFO button to bring up a
controls tab at the bottom of the screen, allowing easier control of play, pause, stop and repeat modes.
Press the EXIT button repeatedly to progressively return back to the DMP menu.
PHO TO MUSI C MOVI E TE XT
The supported formats are as below:
Photo: JPEG (Press Play to start slideshow. For best results use 1920 x 1080 pixel images).
Music: MP3
Movie: SmallAVI files (Not all .AVI formats are supported).
Text: TXT (eg. Windows Notepad).
OPERATION
8.EPG Menu (Electronic Program Guide).
The EPG Menu is used to look at what is being broadcast by DTV stations. After you turn the TV on
and select the DTV input, your TV will commence receiving EPG data progressively over a period of
time (typically up to half an hour, depending on the number of stations being received). Press the
EPG Button to access the EPG Menu. You will receive detailed program information of the channel
you are currently watching as well as programs in the near future. Press the cursor to move to the
top of the EPG screen to the Programme Guide tab, then press the cursor to select either Time or
Channel listings, depending on if you wish to list information for all the channels or just the selected
channel.
In the Time mode, move the highlighted tab down to the date line using the cursor keys, then press
the cursor keys to select the desired reception date. Use the down cursor to move through
the available programs for the selected date and time.
In the Channel mode, use the cursor keys to select the desired DTV channel, then scroll through
the upcoming scheduled programs. Once the highlighted program is chosen you can select to tag it
for either Reminder or Record activity using the Blue or Red buttons on the bottom of the display
and then view the planned activity in the Schedule List.
1.
Use to select a program and then press the Green Coloured Mode Button at the top of your remote or
the INFO key on the remote to display the highlighted program's information (if transmitted by the TV station).
INFO
28 Apr
04:39
800 SZTVM01 No Information
801 SZTVM02
802 SZTVM03
803 SZTVM04
804 Date
No Information
No Information
No Information
No Information
PROGRAMME GUIDE TIME
Schedule
INFO
Remind
OK
INDEX
Record
Polaroid • I0315/I0316/I0317
-15-
Page 17

OPERATION
Schedule List 04:55 28thApr Delete
Time Date
Programme Title
Channel Name
3.
Press the Blue Coloured Mode Button at the top of the remote to book a DTV program for future viewing
and add to the Schedule List. Ensure that the program is highlighted in yellow first, then press the BLUE
Coloured Mode Button. The CHANNEL button will assist you in recording programs on the specific channel
that you are watching, in the future. Please note that a USB Flash Drive or other storage device needs to be
attached to use the recording function. Please see next page for formatting information.
Remind
802 SZTVM03
08 Minute
05 Hour
Apr Month
28 Date
Once Mode
Reminder setting
BACK
OK
__
++
4.
Press the Red Coloured Mode Button at the top of your remote or Round Record button on the remote to
book a DTV program for future recording and add it to the scheduled list.
Record
9. PVR function
1). Prepare to record the program
From OPTION found in the MENU display, enter into the PVR File System and choose "check PVR File
System". Click "OK", and wait until "checking" changes into "Success".
Note: please check the result marked "Speed". If it is "HD support", that means the speed of your USB
device is suitable for time shift and record functions. If not, please format the device, to make sure the USB
device is capable of handling the recording functions. The default "Free Record Limit" is 6 hours, if the
space on the disk is big enough. If the space is not big enough, the record time will be shorter, depending on
the capacity of the device. During the "check PVR File System" checking, please do not request any other
operations until it is finished.
The recording has to be executed from within the TV PVR system, and can only be played on the same
TV, and not on any other devices (Computer, DVD etc) which are not compatible with the .TS file format.
In order to carry out any kind of recording, the TV will request you to format the connected USB device
to store the recording. The High Speed format option is recommended for better HDTV recording results.
From the OPTION MENU, enter into the PVR File System as below:
<< >>
PVR File System
OSD Language English
OPTION
Audio Languages
Subtitle Language
Country
Australia
Restore Factory Default
MENU
Check PVR File System Start
USB Disk
Format
Time Shift Size
Speed
Free Re cor d Lim it 6 Hr.
Select Disk C:
2.
Press the Yellow Coloured Mode Button at the top of the remote to view the stored reminder schedule,
press to select a program from the list, press red key to delete the schedule list, Press EPG
to return to EPG menu.
Schedule
DELETE
WARNING:
When you format the external USB device, you will lose all the files and information stored on the device.
Polaroid • I0315/I0316/I0317
-16-
Page 18

Select Disk
USB 0
Disk C:
Select Disk: select which drive to save the record file onto, then press OK to return to the PVR menu.
Check PVR File System: check if the PVR File System set up will work with your USB device or not.
Format: Refer to the details on formatting on page 13 before using this option for the first
time. Once you have selected the type of formatting of your USB storage device, your TV
will show various progress screens (see next page).
OPERATION
When the Format process has finished, you can then run the “Check PVR File System” option to show the
speed ability of your USB storage device. Press EXIT to return to TV mode.
If you selected the "Hi Speed FS" format mode, you can then change the time shift memory size:
When viewing a DTV program, click the "record" button on the remote control and the record control tab will
pop up and the PVR will commence recording. Click the "record" button again and the record control tab will
disappear while the "REC" icon will remain on the top left of the screen. It will disappear when you click "stop",
and the PVR will finish recording.
PVR recording of DTV programs can also be accessed through the EPG, and future recordings can be
accessed using the Schedule List option. Refer to the EPG Menu section on page 15.
2). Recording a DTV program
Warning! All data will be lost.
Start Exit
Format disk
Format disk
Do not unplug USB device.
Formatting,please wait
Format disk
MENU
Check PVR File System Checking
Free Re cor d Lim it 6 Hr.
Select Disk C:
USB Dis k Pas s
Forma t Pas s
Time Shift Size All
Speed Checking
MENU
Check PVR File System SUCCESS
Free Re cor d Lim it 6 Hr.
Select Disk C:
USB Dis k Pas s
Forma t Pas s
Time Shift Size All
Speed HD support 2048 KB/s
Time Shift Size
Tim e Shi ft Di sk Size 512 MB
SB 14 Min s
HD 4 Mins
A USB Flash Drive or other storage device needs to be connected to use the recording function.
NOTE:
Polaroid • I0315/I0316/I0317
-17-
Page 19

OPERATION
FF Prev. NextFB
Pause
00:00:33/00:04:22
Play Stop
Record a paused DTV program to USB storage device
PAUSE
STOP
NOTE:
1. While in the DTV input source, insert USB storage device to the USB port on the side of your TV.
2. Select a DTV channel, then press to start the Time Shift function. The TV program will be
paused on screen; the Time Shift OSD appears and recording commences. Press play to playback the
time-paused material.
3. Press to stop the Time Shift function and stop recording program.
Please do not unplug the USB storage device when the Time Shift function is activated, as damage to the
recorded file or the USB storage device may occur.
Approximately 4GB of memory buffers about 30-40 minutes of DTV material.
10. Timeshift function
Prepare to record the program
NOTE:
USB Drive Storage Format
NOTE:
This TV allows you to pause and record the currently watched digital TV program to a USB storage device,
and to resume viewing at the point where it was paused.
Formatting a USB 2.0 storage device will be needed. Save the original data on your USB device before
formatting. All the data stored in the USB device will be erased after formatting.
Follow the Format instructions on page 17 of this Manual to format the USB device and allocate the
amount of space for the Time Shift function.
The format process will take at least 2 minutes depending on the capacity of your USB device. Please do
not turn off the power or remove the USB device during formatting. The High Speed format option is
recommended for better HDTV recording results.
During formatting, a speed test will be done on the USB device. If it fails, it means the USB device may
not support the Time Shift function.
In the USB drive, the recorded program will be saved in the folder "_MSTPVR" on the device. To play back
the.TS format files, use the DMP (Digital Media Player) function found in "Applications" in the MAIN MENU
as shown on page 14, and select Movie as the type of file to play back. Alternatively, press the " "
1. Video may become pixelated if the video bit rate is too high for the USB drive. If this occurs, try using a
This may make the drive un-readable in other USB devices.
2. The USB PVR function relies on the use of high quality USB drives, and as such may not be compatible with
some specific USB devices.
3). Playing back the recording:
(Angle Button) repeatedly on the Remote Control to display the saved Recorded List in either Program,
Channel or Time order.
faster USB drive, or re-format it using the High Speed Format option.
NOTE:
Polaroid • I0315/I0316/I0317
-18-
Page 20

OPERATION
Select the media file by pressing or , then press and the preview frame will pop up if the file
is playable. Press the play button to play the media file in full screen mode. When the media file
(Photo, Music, Movie, or Text type) is playing, press the or Info button to display the control bar at the
bottom of the screen.
OK
OK
Pause FF Prev. NextFB Stop
Repeat ALL
00:00:33/00:04:22
Set A
AB
In the control bar, press to select the function icon, then press the OK button to confirm the function.
Press or EXIT button to exit the control bar.
OKPress the cursor buttons to select the correct disk and press to display the media files and folder
list or press EXIT to return to the media type selection menu. Once you have selected the required media
type and drive details, you can view the various files and folders on screen.
Ret urn C
1/1
Sample1.ts Sample2.ts
Return
Movies
1/1
Sample3.ts Sample4.ts
Resolution: 688x412
AudioTrack: 1/2
Subti tle : 1/1
Progr am: 1 /5
Size: 511457 KBytes
Sample1.ts
PHO TO MUSI C MOVI E TE XT
USB 2.0
Firstly, make sure that the USB device is plugged in the slot. There are four media types that can be
selected: Photo; Music; Movie and Text. such as Photo, Music, Movie, and Text. Select the type of
media by pressing , press button to enter the disk selection menu.OK
11. Digital Media Player (DMP)
To play and view low data-rate USB media files as well as DTV recordings made using this TV, use the
DMP function that is accessible from the Applications Menu. For playback of high data-rate media files
the use of an external Media Player is recommended.
Polaroid • I0315/I0316/I0317
-19-
Page 21

TROUBLE SHOOTING
Picture Audio
Snow Noise
Antenna position, direction
or connection
Inspection Check
Interference
Noise
Electronic equipment, car/
motorcycle, fluorescent lights
Normal Picture
Mute
Volume (check if mute is
activated or if the audio system
connections are not correct)
No picture Mute
Mains Power cord is not inserted
Mains Power switch is not
activated
Contrast and brightness/volume
setup
Press Power/Stand-by key on the
remote control
No colour Normal audio
Colour control
Picture
breaking up
Normal audio
or weak
Retune channel
No colour
Noise
TV system
Normal audio
Antenna position, direction
or connection
Troubleshooting Symptoms
Ghost
Mosaic
Antenna Loose
Please turn on the main power switch at the bottom right-hand side of the TV
before attempting to turn on the TV via the Standby button or the Remote
Control.
Noise
Polaroid • I0315/I0316/I0317
-20-
Page 22

Resolution
Aspect Ratio
HDMI
Inputs
Composite Video Input (RCA)
1
(L+R)
2
Composite Video Output (RCA)
1
1
USB (media play, HDTV record/play) input
1
1
1
LED :
Display colours
Brightness
Contrast ratio
Response time
View angle (max)
TV:
DVB-T decode
DVB-T de-modulation
Terminals:
Others:
TV system
Y PbPr (Component video) Input
VGA Input (15 pin D-type)
Audio Input (RCA sockets)
Digital TV: DVB-T
Analog TV: PAL
Audio: MPEG2 Audio Layer I&II
Video: MPEG2 Transport MP@HL
Demodulator : COFDM
OFDM Mod.: 2K, 8K FFT, SFN and MFN
Packed Carriers: 2K/8K
Guard Interval: 1/4, 1/8, 1/16, 1/32
Viewing Picture Size (diagonal)
Input Power Voltage
100V-240V~ 50/60Hz
Audio Output Power (THD 7%)
PC Audio Input (3.5mm socket)
1
Audio Output
(RCA sockets)
1 (L+R)
Power consumption
SPECIFICATIONS
160(H)/150(V)
42" (106cm)
1920x1080
4000:1
5.5ms
16.7M
300 cd/m
2
16:9
2 x 8W
80 W
2 x 8W
98 W
2 x 8W
120 W
46" (116cm)
1920x1080
1200:1
8ms
16.7M
380 cd/m
16:9
2
50" (127cm)
1920x1080
1200:1
8ms
16.7M
380 cd/m
16:9
2
Polaroid • I0315/I0316/I0317
-21-
Page 23

Copyright
For Customer Service and Technical Support, please email
or telephone Australia on 1300 366 144.
– Copyright © 2013 All Rights Reserved
This product is manufactured, distributed and sold by:
POLAROID AUTHORIZED LICENSEE:
ATICO AUSTRALIA PTY. LTD.
UNIT 1, NO. 4 JABEZ ST.
MARRICKVILLE, NSW 2204
AUSTRALIA
Polaroid, Polaroid & Pixel and Polaroid Classic Border Logo are trademarks of PLR
IP Holdings, LLC, used under license. All other trademarks are the property of the
respective owner, who has not sponsored, endorsed or approved this product. PLR
IP Holding, LLC does not manufacture this product or provide any Manufacturer's
Warranty or support.
Disclaimer - Product features, specifications, and appearances are subject to
change without notice.
PLR IP Holdings, LLC, its licensees and affiliates, fully supports all electronic waste
initiatives. As responsible stewards of the environment, and to avoid violating established
laws, you should properly dispose of this product in compliance with all applicable regulations,
directives or other governances in the area where you reside. Please check with local
authorities or the retailer where you purchased this product to determine a location where you
can appropriately dispose of the product.
You may also go to and reference Social Responsibility
to learn more about the specific laws in your area and to locate a collection facility near your
home.
If your electronic device has internal memory on which personal or other confidential data may
be stored, you may want to perform a data sanitization process before you dispose of your
device to assure another party cannot access your personal data. Data sanitization varies by
the type of product and its software, and you may want to research the best sanitization
process for your device before disposal. You may also check with your local recycling facility
to determine their data sanitization procedures during the recycling process.”
www.polaroid.com
http://www.polaroid.com/social-responsiblity
polaroid@aticoau.com
Model No.
:
I0315 / I0316 / I0317
-22-
Page 24

1300 366 144
Made in China
Polaroid Authorized Licensee
Atico Australia Pty Ltd
Unit 1, 4 Jabez Street
Marrickville, NSW 2204
Australia
Model No.:
I0315 / I0316 / I0317
 Loading...