

Page 1

FUN! FLASH 820
Digital Camera
Rev. 1, June 10, 2002
Put QuickStart Booklet Title Here 1
Quickstart Guide
Page 2

Contents
Welcome to Polaroid PhotoMAX FUN! . . . . . . . . . . . . . . . . . . . . . . . 1
The PhotoMAX FUN! FLASH 820 Creative Kit . . . . . . . . . . . . . . . . 2
Taking Photos . . . . . . . . . . . . . . . . . . . . . . . . . . . . . . . . . . . . . . . . . . 12
Transferring Photos to Your Computer. . . . . . . . . . . . . . . . . . . . . . . 28
Working with Images . . . . . . . . . . . . . . . . . . . . . . . . . . . . . . . . . . . . 40
Need Help? . . . . . . . . . . . . . . . . . . . . . . . . . . . . . . . . . . . . . . . . . . . . 49
Product Limited Warranties . . . . . . . . . . . . . . . . . . . . . . . . . . . . . . . 50
Polaroid PhotoMAX FUN! FLASH 820 Quickstart i
Page 3

Welcome to Polaroid PhotoMAX FUN!
Thank you for purchasing the Polaroid PhotoMAX FUN! FLASH 820
Digital Camera Creative Kit. This kit contains everything you need to
enter the world of digital imaging. Just follow the simple instructions
in this Quickstart Guide and you’ll be working with digital images
quickly and easily.
Our goal at Polaroid is to make digital imaging easy and fun—right
from the moment you open the box.
If you get stuck or need help, please visit
www.polaroid.com
Please read this booklet
to learn how fun and easy
it is to use Polaroid
PhotoMAX FUN!
Polaroid PhotoMAX FUN! FLASH 820 Quickstart 1
Page 4

The PhotoMAX FUN! FLASH 820 Creative Kit
Your Polaroid PhotoMAX FUN! FLASH 820 Creative Kit contains
everything you need to take digital photos and save them to your
computer. Using the software in your kit you can correct, edit, and
play with your digital photos.
You can use your Polaroid PhotoMAX SE Image Maker SE 2.3 (or
later) software with other digital cameras and scanners if they are
TWAIN-compliant. Check the instructions that came with your device
to see if it is TWAIN-compliant.
2
Page 5

Kit Components
Make sure that your kit contains the following:
•
Polaroid FUN! FLASH 820 Digital Camera
•
AC power adapter
•
4 AA batteries
•
Camera-to-computer serial cable (RS-232C serial cable)
•
Polaroid PhotoMAX SE Image Maker software CD-ROM
•
Quickstart Guide
Polaroid PhotoMAX FUN! FLASH 820 Quickstart 3
Page 6
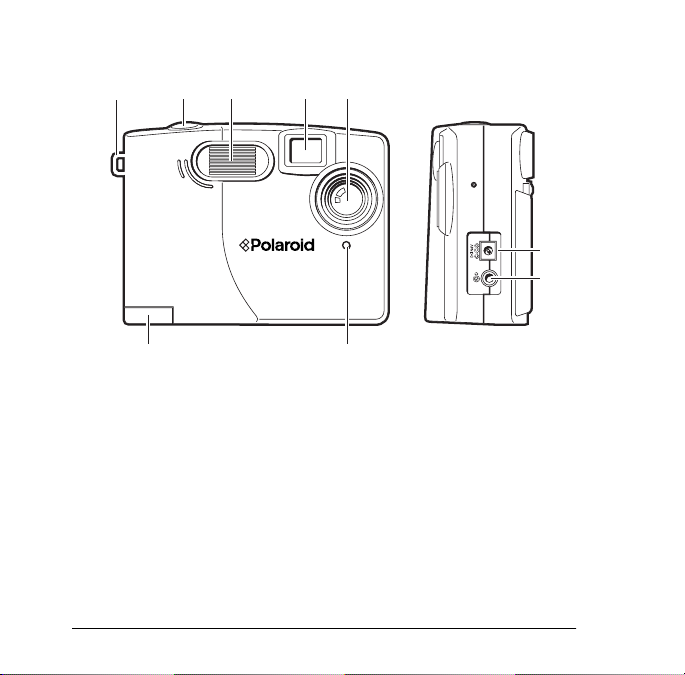
Camera Features
abc
i
i
a.
Wrist strap slot
b.
Shutter button
c.
Flash unit
d.
Viewfinder
e.
Lens
f.
AC adapter port
g.
Serial connector port
h.
Self-timer indicator
i.
Battery compartment
4
de
f
g
h
Page 7
jk
lm
n
z
y
FULL
x
w
v
u
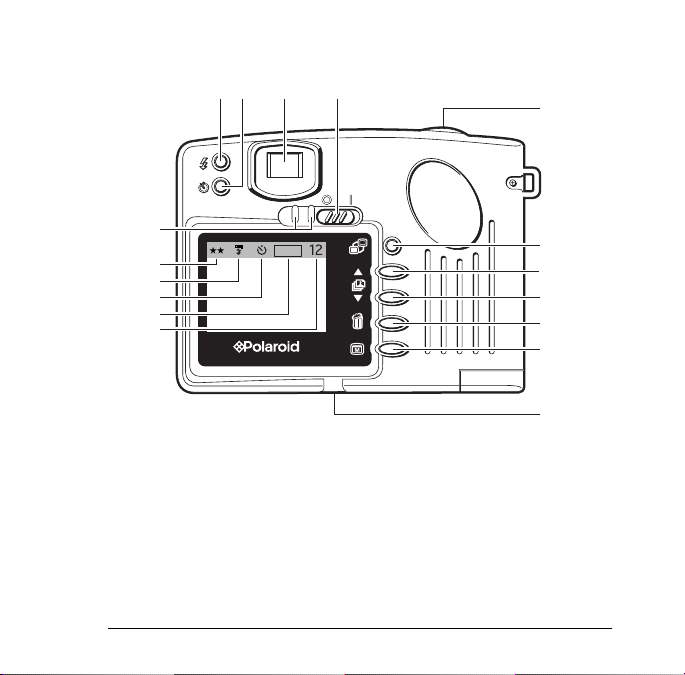
j.
Flash settings button
k.
Self-timer button
l.
Viewfinder
m.
On/off switch
n.
Shutter button
o.
LCD on/off button
Polaroid PhotoMAX FUN! FLASH 820 Quickstart 5
o
p
q
r
s
t
Page 8

p.
LCD scroll up button
q.
LCD scroll down button
r.
Delete photo button
s.
Menu on/off button
t.
Tripod mount (bottom of camera)
u.
Picture counter (LCD menu on)
v.
Memory full icon (LCD menu on)
w.
Self-timer icon (LCD menu on)
x.
Flash setting icon (LCD menu on)
y.
Resolution setting icon (LCD menu on)
z.
Camera power on/flash charge LED indicator lights
6
Page 9
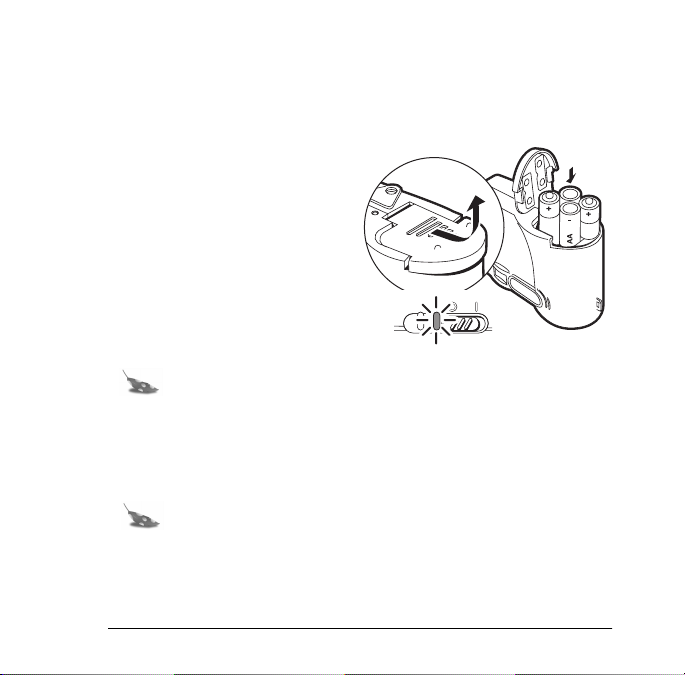
Inserting Batteries
Your kit includes four AA batteries. Use the AC adapter included
in your kit whenever possible to save battery power.
1. Open the battery door.
2. Insert four AA batteries.
Make sure that the battery
terminals (+ and -) are
properly positioned.
Note:
You can use AA disposable batteries (highcapacity super alkaline or lithium) or rechargeable
(NiMH or Nicad) batteries. Lithium batteries last much
longer than high-capacity super alkaline, but are
generally more expensive.
Note:
If you use rechargeable batteries, you will need to
purchase a battery charger.
Polaroid PhotoMAX FUN! FLASH 820 Quickstart 7
Page 10

Note:
Replace the batteries when the LED indicator light
blinks and the LCD does not turn on. Replace all four
batteries at the same time.
Battery precautions
•
Always remove batteries from the camera if you are not going to
use the camera for an extended period of time.
•
Do not leave dead batteries in the camera; they are susceptible to
leakage, which can cause significant damage to your camera.
•
You should never mix old and new batteries or different types of
batteries. If you use Nicad batteries, it is recommended that you
use a Nicad conditioning charger to extend the life of the batteries.
8
Page 11

Using the AC Adapter
•
Use only the AC adapter that came with your camera. Using
a different AC adapter may cause damage to your camera.
•
Turn the camera power off before connecting or disconnecting the
AC adapter.
•
Grasp the plug, not the cord, when you unplug the adapter from an
outlet. Avoid bending, pulling, or twisting the AC adapter cord.
Do not try to lengthen the cord by splicing it with another wire.
•
Replace a damaged power cord with a new one (to avoid electrical
shock).
Note:
The AC adapter may become warm to the touch
after extended periods of use. This is no cause for alarm.
1. Insert the AC adapter cord into the power connector on the
camera.
Polaroid PhotoMAX FUN! FLASH 820 Quickstart 9
Page 12
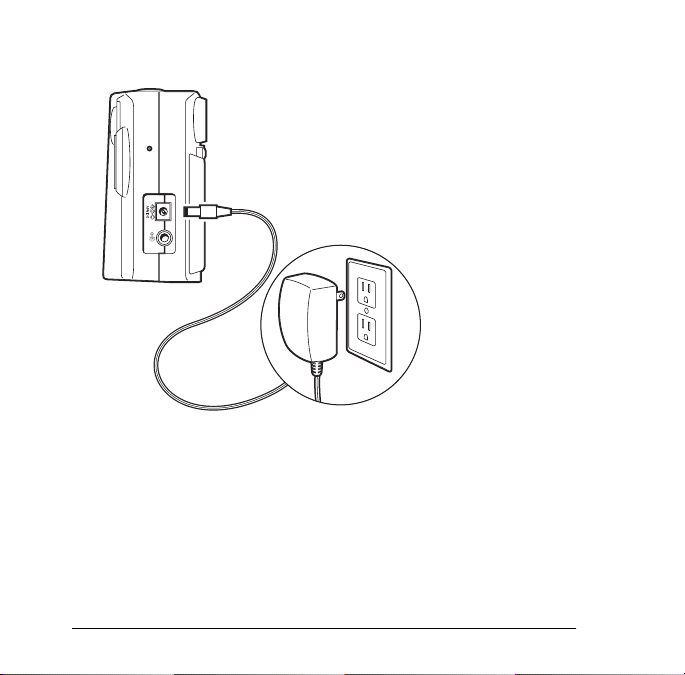
2. Plug the cord into a grounded electrical outlet.
10
Page 13

Connecting the Wrist Strap
You are now ready to take photos!
Polaroid PhotoMAX FUN! FLASH 820 Quickstart 11
Your kit also includes a convenient
wrist strap. Insert the wrist strap in
the slot on the camera as shown.
Page 14
Taking Photos
Your Polaroid PhotoMAX FUN! FLASH 820 Digital Camera
is perfect for taking digital photos both indoors and outdoors.
Some features of your digital camera include:
•
automatic flash settings
•
fixed-focus
•
self-timer
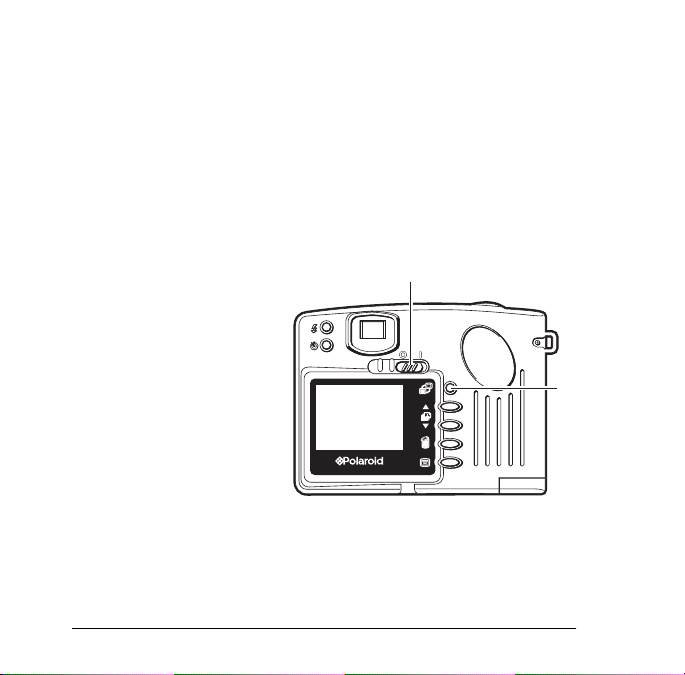
1. Turn on the camera (a).
The green power light
on the back of the
camera is lit.
If the green power light
is not lit, check to make
sure the batteries are
properly loaded.
2. Look through the
camera viewfinder
or turn on
the LCD (b).
12
a
b
Page 15

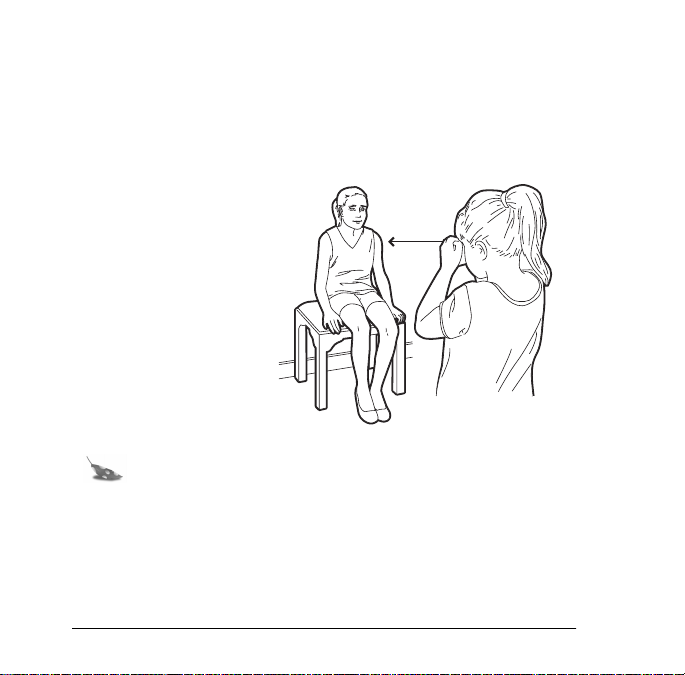
Frame your subject(s)
in the viewfinder or on
the LCD.
Note: When
you use the
LCD to
compose
photos, the
LCD menu is
always visible.
3. Hold the camera
steady and press the
shutter button (c).
Your photo displays
on the LCD.
Polaroid PhotoMAX FUN! FLASH 820 Quickstart 13
c
Page 16
Tips for Taking Great Photos
Follow these steps to take great photos with your Polaroid PhotoMAX
FUN! FLASH 820 Digital Camera.
Indoor photos
3-7 feet
•
Indoor photos are
3-7
feet
best taken in an
evenly lit room.
Use the
Autoflash
•
setting for best
results.
•
Be sure to keep your
subject(s) three to
seven feet from the
camera.
Note:
See “Using the Camera Flash” on page 18 to
learn how to change the flash settings on your digital
camera.
14
Page 17

Outdoor photos
3 feet to infinity
•
Avoid intense
sunlight that may
cause sun spots in
3ft - ∞
photos.
•
Always make sure
that the sun or other
light source is behind
the person taking the
photo.
•
Be sure to keep your
subject three to seven feet from the camera when using the flash.
Note:
See “Using the Camera Flash” on page 18 to
learn how to change the flash settings on your digital
camera.
Note:
For more tips on taking great photos with your
digital camera, visit
Polaroid PhotoMAX FUN! FLASH 820 Quickstart 15
www.polaroid.com
Page 18
Using Sleep Mode
To help save battery
b
power, your digital
camera automatically
shuts off after
approximately thirty
seconds of inactivity.
a
This is called sleep
mode.
In sleep mode, the
camera LCD turns off
and the power indicator
(a)
light
blinks every five
seconds.
Press the shutter button while the camera is in sleep mode to turn on
the camera. The LCD turns on and the power indicator light
(a)
displays green.
Note:
If you don’t use your digital camera after
approximately three minutes of sleep mode, all power is
shut off. Turn the power switch
(b)
off and then back to
the on position to restore power.
16
Page 19

Using the Picture Counter
The picture counter is found on the LCD menu. It tells you how many
digital photos are stored on the digital camera’s internal memory.
Yo u r FUN! FLASH 820 Digital Camera comes with 4 MB of internal
memory that stores up to 20 photos (800 x 600 pixel resolution) or up
to 80 photos (400 x 300 pixel resolution).
1. Turn on the camera
(a).
2. Press the LCD on/
off button (b). The
picture counter
displays in the LCD
menu (d).
Note:
Your digital camera does not have removable
memory. When the camera is full, download photos to
your computer and erase them from camera memory. For
more information, see “Transferring Photos to Your
Computer” on page 28, and “Reviewing and Deleting
Photos” on page 21.
Polaroid PhotoMAX FUN! FLASH 820 Quickstart 17
a
b
d
c
Page 20

Using the Camera Flash
Each time you turn on your digital camera, it automatically sets to the
Flash off
setting. You can change the flash setting at any time.
There are three different flash settings:
Icon Flash setting
Flash off
• The flash does not fire.
• Use in places where flash is prohibited or may be
distracting.
• Use when shooting toward a reflective
background, such as a window or a mirror.
Autoflash
• The flash fires automatically when needed.
• The autoexposure sensor in the camera
determines when the flash is necessary.
Force flash
• The flash fires for every photo.
18
Page 21

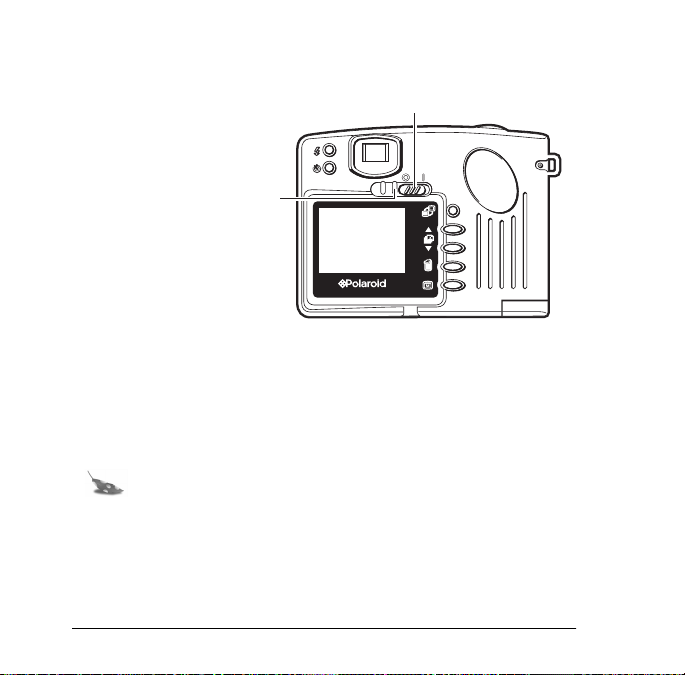
Changing the flash setting
1. Turn on the camera
(a)
.
f
a
2. Press the LCD on/
off button
current flash setting
(b)
. The
e
displays on the LCD
menu.
d
3. Press the flash
setting button
(f)
to
change the setting.
4. If you turn on the
Autoflash
charges for a few seconds. The flash indicator light
Force flash
or
setting, the flash
(e)
blinks
while the flash charges. Wait until the flash is ready (the indicator
light is steady green) before taking a photo.
Note: You can turn off the LCD after changing the flash
setting. Using the viewfinder to take a photo will help save
battery power.
Polaroid PhotoMAX FUN! FLASH 820 Quickstart 19
b
c
Page 22

Using the Self-timer
Your digital camera comes with a built-in self timer.
Note:
It is recommended that you use a tripod with the
self-timer. There is a tripod mount on the bottom of your
digital camera
(c)
.
1. Look through the
viewfinder or turn on
the LCD to compose
your photo.
a
2. Press the self-timer
(a)
button
timer icon appears
. The self-
d
on the LCD menu
(d)
.
3. Set the camera into
position to take a photo. When you are ready, press the shutter
(b)
button
to activate the self-timer countdown. A red light on the
front of the camera (below the lens) blinks for ten seconds.
4. After ten seconds, the digital camera takes the photo.
To turn off the self-timer while the red light is blinking, press the
self-timer button.
20
b
c
Page 23

Reviewing and Deleting Photos
You can review the photos stored on your digital camera at any time.
You can also delete photos that you don’t want to keep. Remember
that your digital camera can only store a certain number of photos
before the memory is full. When the memory is full, you have to put
the photos on your computer or delete them from memory to free up
space. After you free up space, you can begin taking more photos.
Note:
When reviewing your photos, you can turn the
LCD menu on or off by pressing the menu button (d).
Keep in mind, however, that the LCD menu is always
visible while composing photos in the LCD.
Note:
The memory on your digital camera is full when
Full
a
message displays on the LCD menu and the flash
and power indicator lights blink. You cannot take any
more digital photos until you delete some or all of them
from memory.
Polaroid PhotoMAX FUN! FLASH 820 Quickstart 21
Page 24

Reviewing photos
1. Turn on the digital
camera.
2. Turn on the LCD
(a)
.
3. Press the up arrow
(b)
or down arrow
(c)
. Your photos
e
display on the screen.
4. Press the menu button
(d) to turn the LCD
menu if it is not visible. The menu displays information about
your photo (number in sequence, flash, and resolution settings).
(To turn off the LCD menu, press the menu button again.)
22
a
b
c
d
Page 25

Deleting photos
It is necessary to delete photos from your digital camera when a
Full
message displays on the LCD menu and the flash and power indicator
lights blink. You can also delete photos from your camera with the
software included in your kit.
1. Turn on the camera.
2. Turn on the LCD
(a)
.
3. Press the up
(c)
down
arrow
button to review
your photos.
(b)
or
a
b
c
d
e
4. Press the menu
button (d) to turn the LCD menu if it is not visible. The menu
displays the number of your photo.
(To turn off the LCD menu, press the menu button again.)
5. You can only delete the last photo in sequence (photo with highest
number) from your camera. Press the delete photo (garbage can)
(d)
button
to delete the last photo. A message appears.
Polaroid PhotoMAX FUN! FLASH 820 Quickstart 23
Page 26

6. Press the up arrow
last photo, press the down arrow
(b)
to delete the last photo. To not delete the
(c)
. Remember that you are
deleting the last photo from your camera.
7. Press and hold the delete photo (garbage can) button for three
seconds and release to delete all the photos from your camera.
When you release the delete photo button, a confirmation message
displays. Press the up arrow to delete all photos.
24
Page 27

Changing the Resolution Setting
You can change the resolution setting on your camera between two
different options:
•
800 x 600 pixel resolution
•
400 x 300 pixel resolution
The resolution setting refers to the number of pixels in your digital
photo. The higher the pixel resolution, the more pixels that are
contained in your photo. A higher pixel resolution means that the
quality of the digital photo is higher when it is put on your computer
and either viewed on your computer screen or printed.
Your camera automatically sets to 800 x 600 pixel resolution. It is
recommended that you keep these resolution settings. The 400 x 300
resolution setting should be used for photos that will only be displayed
online (digitally), such as on a Web site or an email attachment.
Printing images at 400 x 300 resolution may result in enlarged pixels
appearing on your photo.
Polaroid PhotoMAX FUN! FLASH 820 Quickstart 25
Page 28

Changing resolution settings
1. While pressing the self-timer button
(a)
, turn on the camera
power.
2. To check that the
resolution settings have
changed, turn on the
LCD and press the
a
Menu button. The
resolution setting
b
appears on the LCD
(b)
menu
. One star
represents 400 x 300
resolution. Two stars
represents 800 x 600
resolution.
3. To return the camera to the 800 x 600 resolution, turn the camera
power off and on.
Note:
Each time you turn the camera off and on, its
settings return to the default.
26
Page 29

Using the Power and Flash LEDs
Depending on what state the camera is in, the Power LED and Flash
LED lights can be on, off, or blinking. You can use the LEDs together
to determine what the camera is ready to do.
There are seven different possible states of the camera:
Flash LED Power LED State of camera
OFF OFF OFF
OFF ON ON, flash off
ON ON ON, flash ready
Blink ON ON, flash charging
OFF Blink (every 5 sec) ON, standby mode
OFF Blink (every 1 sec) ON, battery low
Blink Blink (every 3 sec) Memory full
Polaroid PhotoMAX FUN! FLASH 820 Quickstart 27
Page 30

Transferring Photos to Your Computer
After taking digital photos with your camera you need to transfer them
to your computer. First you must first install the Polaroid PhotoMAX
SE Image Maker software included in your kit. Your software
includes many fun and interesting features to use with your digital
photos. Included are:
•
A wide selection of digital special effects such as melting,
swirling, motion-blur and more.
•
Full preview of all your changes as you make them.
•
PhotoFantasy, which lets you put someone’s picture inside one of
the many supplied digital fantasies—such as a magazine cover or
a 50’s time warp.
Note:
Before installing the software make sure that your
computer meets the minimum system requirements
necessary for installing it. For more information, see the
next section.
28
Page 31

Minimum System Requirements
•
PC with Pentium class processor
•
Microsoft Windows 95 or Windows 98
•
36 MB of RAM
•
85 MB available hard drive space
•
Available COMM (serial) port
•
Display settings at 800 x 600 pixels
•
High Color display adapter (True Color display adapter
recommended)
•
Color monitor
•
2x or faster CD-ROM drive
•
Mouse
Note:
If you have any questions about the system
capabilities of your computer, please read the
documentation that came with your computer or contact
the computer manufacturer.
Polaroid PhotoMAX FUN! FLASH 820 Quickstart 29
Page 32

Installing PhotoMAX Software
1. Insert the PhotoMAX CD-ROM in your CD-ROM drive.
If the installation program does not start automatically:
a.
b.
c.
d.
e.
Run
Select
Browse
Click
Setup.exe
Select
Open
Click
Click OK.
from the Windows Start menu.
to locate your CD-ROM drive.
from the CD-ROM.
.
2. Follow the instructions on your computer screen.
Note:
Finish
Read the
to complete software installation.
ReadMe
file for any important last minute
3. Click
information about your software. You can access the ReadMe file
at Start\Programs\Polaroid\ReadMe.
30
Page 33

Connecting the Digital Camera to Your Computer
1. Turn off your computer and any peripheral devices attached
to it (scanner, printer).
2. Locate the serial cable from your kit.
3. Connect the serial cable to the serial port on your computer.
Note:
To get help finding the serial port on your
computer, read the instruction manual included with
your computer or contact the computer manufacturer.
4. Connect the other end to the serial port on the camera
Polaroid PhotoMAX FUN! FLASH 820 Quickstart 31
(b)
.
Page 34

5. Connect the AC adapter to the camera
a grounded electrical outlet.
c
b
6. Turn on the camera.
7. Turn on your computer.
8. Click the
Start
button on the Windows taskbar.
Note:
The Windows taskbar is usually found at the
bottom of your screen.
32
(c)
. Plug the cord into
Page 35

9. Select
Polaroid PhotoMAX 2.3 by ArcSoft
from the
Programs menu.
10. Select
PhotoMAX SE
. The software launches.
You also can open the Polaroid PhotoMAX Software by
double-clicking the Polaroid PhotoMAX icon on your desktop.
This icon is a shortcut to the Polaroid PhotoMAX application that
was created automatically at the end of the installation procedure.
Polaroid PhotoMAX FUN! FLASH 820 Quickstart 33
Page 36

Transferring Photos to Your Computer
1. Click the
Get
Photo
34
Get Photo
button.
Page 37

Get Photo
The
button lets you select a photo from a variety
of sources. You can select a photo from:
Selection Click it to
From File open an image file on your computer
Album or Camera • download photos from your
camera
• open an image file from a photo
album
Note: You can build
your own customized
photo albums.
Other Devices download directly from your
TWAIN-compliant digital camera or
scanner
Polaroid PhotoMAX FUN! FLASH 820 Quickstart 35
Page 38

2. Click
Album or Camera
. The Album manager window opens.
Acquire
button
Note:
the
description, if desired, in the
3. Click the
36
To create a new Album, select
Album:
pull-down menu. Type a new album
Description:
Acquire
button on the top menu bar.
New Album
field.
from
Page 39

Select Source
The
window appears.
4. Highlight
list of devices; click
Polaroid Fun! Flash 820 Digital Camera
Select
.
The Polaroid PhotoMAX FUN! FLASH 820 Digital Camera
TWAIN software opens. The TWAIN software is used to
download, delete, and save photos from your digital camera.
5. Click
Refresh Thumbnails
to load thumbnail images of your
photos from the camera.
Polaroid PhotoMAX FUN! FLASH 820 Quickstart 37
from the
Page 40

Thumbnail versions of your photos appear on the screen.
Note:
If your digital camera fails to connect to your
computer, close the Polaroid PhotoMAX SE Image
Maker software and restart it. If you continue having
problems connecting your digital camera to your
computer, please visit
38
www.polaroid.com.
Thumbnails
Page 41

6. Click on a single photo to put it in your photo album.
To put more than one photo in your photo album, press Control
(Ctrl)
on your keyboard while clicking on each thumbnail.
To put all photos in your photo album, click
Note:
The selected thumbnail images have a red border.
7. Click
Get Photos
. The selected photos appear in the active
Select All
photo album.
Note:
For help with photo albums see “Need Help?” on
page 49 learn how to open the Online User’s Guide.
Polaroid PhotoMAX FUN! FLASH 820 Quickstart 39
.
Get
photos
Page 42

Working with Images
With Polaroid PhotoMAX SE Image Maker software you can add
special effects, retouch colors, cut and paste selections between
photos, and much more.
40
Page 43

Opening an Image
To play with an image, first use your software to open it from an
Album.
1. Double-click on an Album thumbnail to open it in the software.
The image appears in the image tray.
Image
Tr ay
Polaroid PhotoMAX FUN! FLASH 820 Quickstart 41
Page 44

Applying a Special Effect
You can apply many different special effects to a selected part of your
image or to the entire image. For example, try making part of your
image look like an oil painting!
1. Click and drag the mouse cursor to select the area on your image
that you want to paint, or make sure no area is selected if you want
to paint the entire image.
2. Click
Special Effects
.
3. Click the down arrow on the tool palette until you see the
painting
special effect.
4. Drag the slider to the left to decrease the intensity of the effect or
to the right to increase the intensity of the effect. You also can
click the – or the + buttons to change the intensity.
5. Click
Click
painting
undo
Note:
to apply the effect to your image.
if you change your mind.
For information about using the image editing
tools and special effects, see “Need Help?” on page 49.
42
Page 45

Cropping an Image
Sometimes you need to cut out part of an image you scanned or took
with your digital camera. Use the Crop tool.
1. Select the area you want to keep in your image.
2. Click
3. Click
Setup Photo
Crop Image
.
.
4. Move the cursor over the selected area on your image.
The cursor changes to a pair of scissors.
5. Press the left mouse button.
The cropped image appears in the image tray. Click
undo
if you
change your mind.
Polaroid PhotoMAX FUN! FLASH 820 Quickstart 43
Page 46

Saving an Image
After you finish manipulating your image, you need to save
it to your computer.
To save an image. . . Description
With the same file name and
in the same file format
With a different file name or
in a different file format
44
1. Click
2. Click
1. Click
2. Click
Save It!
Quick Save
.
Save It!
Save Image as
.
The Save As dialog box
appears.
3. Select the folder where you
want to save the file.
4. Select a file format from the
Save as type list, if needed.
Page 47

To save an image. . . Description
Note:
JPG, a slider
appears to set the
amount of image
compression. A
higher setting saves
the file with less
compression and
higher image quality.
A lower setting saves
the file with more
compression and a
lower image quality.
Files with more
compression take up
less hard disk space.
5. Enter a different file name, if
needed.
6. Click
Polaroid PhotoMAX FUN! FLASH 820 Quickstart 45
Save
If you select
.
Page 48

To save an image. . . Description
As a screen saver 1. Click
2. Click
As wallpaper for your
desktop
46
1. Click
2. Click
Save It!
Make Screen Saver
Save It!
Make Wallpaper
.
.
Page 49

Printing an Image
After you have fun manipulating your digital image, you can print one
or more copies of it.
1. Click
2. Type a caption in the
Print Image
.
Description: field
to add a caption to your
printed image.
3. Enter the number of copies.
This option is not available if your printer driver does not support
multiple printing.
4. Click
Hori-Centered
Vert-Centered
and
to print the image in
the center of the page.
5. Drag the
Output:
slider to change the dot-per-inch (dpi)
resolution and the resulting image size on the page.
6. Click and drag the image to reposition it.
7. Click
8. Click
Printer Setup
Print
.
if needed.
Note:
paper
Print multiple copies on one sheet of
Click
to print up to 84 copies of your image on a single
page.
Polaroid PhotoMAX FUN! FLASH 820 Quickstart 47
Page 50

Sending an Image to Friends
You can also send your images to family and friends. A good way to
send images is to attach them to an email message.
1. Get the image file name.
Your photo album thumbnail display shows the file names for
each image.
2. Locate the image file on your computer.
You can find your downloaded images in the following folder
(if you chose the default options during software installation):
C:\Program Files\Polaroid\PhotoMAX SE\PhotoMAX\Photos\
3. Attach the image file to an email message.
Refer to your email system’s instructions on how to “attach”
a file to an email message.
4. Send the message, with the image file attached, to your relatives
and friends.
48
Page 51

Need Help?
Whenever you need help using Polaroid PhotoMAX SE Image Maker
software, click the ? button on the main window to open the Online
User’s Guide.
?
Button
The Online User’s Guide provides step-by-step instructions on using
your Software.
For help, visit
www.polaroid.com
Polaroid PhotoMAX FUN! FLASH 820 Quickstart 49
.
Page 52

Product Limited Warranties
One Year Limited Warranty
Polaroid PhotoMAX FUN! FLASH 820 Digital Camera
Polaroid will, at our option, repair or replace any unit found defective
in manufacture within the warranty period. The warranty period is
determined by the date of purchase. Keep the receipt as proof of
purchase. Otherwise, the warranty period is determined by the date of
manufacture.
accident, misuse or tampering, and excludes all consequential
damages except in jurisdictions not allowing such exclusions or
limitations
50
This warranty does not apply to damage caused by
.
Note: Polaroid Corporation provides technical support for
digital cameras at
photomaxhelp.com
calling 800-897-0356 from 8 A.M. to 8 P.M. EST, 7 days a week.
Please note that phone support and repair services are regional
and may not be available for a particular product outside the
country where it was purchased. To obtain parts and service for
cameras purchased in the United States, call 800-343-4846. A
list of Polaroid International sales and customer support offices
is available at
www.PolaroidDigital.com
, and within the United States by
www.polaroid.com/service/
or
phone.html
Page 53

Ninety Day Limited Warranty
Polaroid PhotoMAX SE Image Maker Software
Polaroid warrants that the software media will be free of defects in
materials and workmanship for a period of 90 days from the date of
purchase. Polaroid's entire liability and your exclusive remedy shall
be, at Polaroid's option, either (a) return of the price paid or (b) repair
or replacement of the software that does not meet Polaroid's Limited
Warranty and which is returned to Polaroid with a copy of your sales
receipt. This Limited Warranty is void if failure of the software has
resulted from accident, abuse, or misapplication. Any replacement
software will be warranted for the remainder of the original warranty
period or 30 days, whichever is longer.
Polaroid makes no other warranties with respect to the software, either
express or implied, including but not limited to implied warranties of
merchantability and fitness for a particular purpose.
countries do not allow the exclusion of implied warranties, so the
above exclusions may not apply to you.
Some states and
Thank you for purchasing this Polaroid Digital Product. For
more information on our other digital imaging products, please
www.PolaroidDigital.com
visit
Polaroid PhotoMAX FUN! FLASH 820 Quickstart 51
photomaxhelp.com
or
Page 54

FCC Notice
This equipment has been tested and found to comply with the limits
for a Class B digital device, pursuant to part 15 of the FCC Rules.
For detailed information about FCC compliance, see the Polaroid
PhotoMAX SE Image Maker Software Online User’s Guide accessed
from the software.
Camera precautions
Follow these guidelines when using your Polaroid PhotoMAX FUN!
FLASH 820 Digital Camera:
•
Do not open the camera case or attempt your own repairs. Highvoltage internal components create the risk of electrical shock
when exposed.
•
Supervise children when the camera is operated by them or used
in their presence.
•
Do not expose the camera to, or immerse it in, water or other
liquids. Turn off the camera and remove the batteries if the camera
is exposed to fluids. Using the camera under these conditions
creates the risk of electrical shock or fire.
•
Do not open the battery compartment or unplug the AC adapter
when the camera power is on.
•
Do not operate the camera if it is dropped or damaged.
52
Page 55

Note:
Polaroid Corporation provides technical support
for digital cameras at
photomaxhelp.com
www.PolaroidDigital.com
, and within the United States by
or
calling 800-897-0356 from 8 A.M. to 8 P.M. EST, 7 days
a week. Please note that phone support and repair
services are regional and may not be available for a
particular product outside the country where it was
purchased. To obtain parts and service for cameras
purchased in the United States, call 800-343-4846. A list
of Polaroid International sales and customer support
offices is available at
www.polaroid.com/service/
phone.html
Polaroid PhotoMAX FUN! FLASH 820 Quickstart 53
Page 56

FUN! FLASH 820
Digital Camera
Copyright 2000 Polaroid Corporation, Cambridge, MA
02139, U.S.A., owner of the trademarks “Polaroid”,
“Polaroid PhotoMax”. “MAX the Bird (and feather
design)” Copyright 1998-2000 Polaroid Corporation. All
other product names may be the property of their
respective owners. All rights reserved.
Printed in U.S.A.
PU-21621M-0 PU-21650M-0
Page 57

Fun! Flash 820
Technical Support Information
(This information replaces that found on Pages 50 and 53)
Polaroid Corporation provides technical support for digital cameras at
http://www.polaroid.com/
800-897-0356 from 10 A.M. to 7 P.M. EST, (Mon - Fri) and 10 A.M.
to 4 P.M. EST (Sat). Please note that phone support and repair services are
regional and may not be available for a particular product outside the
country where it was purchased. To obtain parts for cameras purchased in
the United States, call 800-343-4846 from 9 a.m. to 5 p.m. EST, Mon. - Fri.
(Note: No technical support is available at this number.) A list of Polaroid
international sales and customer support offices is available at
http://www.polaroid.com/service/phone.html
, and within the United States by calling
.
 Loading...