

Page 1
26” LCD Television FLM-2625
20051021
Page 2

Table of Contents
Important Information..........................................................................................................................................................1
Important Safety Precautions .............................................................................................................................................2
Preparations .......................................................................................................................................................................5
Using the Remote Control........................................................................................................................................5
Batteries for the Remote Control .............................................................................................................................5
Power Connection....................................................................................................................................................5
Antenna Connection ................................................................................................................................................6
Identification of Controls.....................................................................................................................................................7
Main Unit..................................................................................................................................................................7
Remote Control........................................................................................................................................................9
Connections......................................................................................................................................................................11
Cautions Before Connecting ..................................................................................................................................11
Connect a VCR ......................................................................................................................................................11
Connect a Camcorder ............................................................................................................................................12
Connect a DVD player............................................................................................................................................13
Connect a product to HDMI....................................................................................................................................14
Connect a PC.........................................................................................................................................................15
Connect a VCR for Recording...............................................................................................................................16
Turning the Unit On and Off..............................................................................................................................................17
Turning the Unit On and Off ...................................................................................................................................17
Viewing the Menus and Displays ...........................................................................................................................17
Memorizing the Channels.................................................................................................................................................18
Selecting the Signal Source ...................................................................................................................................18
Storing Channels in Memory Automatically............................................................................................................18
Adding and Erasing Channels................................................................................................................................19
Basic Operations ..............................................................................................................................................................20
Changing Channels................................................................................................................................................20
Adjusting the Volume..............................................................................................................................................20
Select Input Source Signal.....................................................................................................................................21
Selecting a Menu Language...................................................................................................................................21
Setting Picture ..................................................................................................................................................................22
Customizing the Picture .........................................................................................................................................22
Using the Preset Picture Mode...............................................................................................................................22
Adjusting Screen Aspect ........................................................................................................................................23
Reducing Picture Noise..........................................................................................................................................23
Freezing Picture .....................................................................................................................................................23
Setting Timer ....................................................................................................................................................................24
Setting Clock Time .................................................................................................................................................24
Setting ON timer.....................................................................................................................................................24
Setting OFF timer...................................................................................................................................................24
Setting Sleep Timer................................................................................................................................................25
Setting Sound ...................................................................................................................................................................26
Customizing the Sound ..........................................................................................................................................26
Using the Preset Sound Mode ...............................................................................................................................26
Selecting Stereo Mode...........................................................................................................................................27
Adjusting On-Screen Display ...........................................................................................................................................28
Adjusting OSD Position..........................................................................................................................................28
Adjusting OSD Transparency.................................................................................................................................28
Page 3

Table of Contents (continued)
Setting OSD Timeout .............................................................................................................................................28
PIP Operations ................................................................................................................................................................29
Viewing and Changing the Position of the PIP Frame ...........................................................................................29
Selecting the Signal Source for the PIP Frame......................................................................................................29
Selecting Sound Source for PIP Frame .................................................................................................................29
Viewing Closed Caption....................................................................................................................................................30
Selecting Closed Caption.......................................................................................................................................30
Adjustment in VGA Mode .................................................................................................................................................31
Adjusting the Picture ..............................................................................................................................................31
Adjusting Image Size..............................................................................................................................................31
Changing the Position of Image .............................................................................................................................32
Adjusting the CLOCK and PHASE.........................................................................................................................32
Adjusting the Picture Automatically........................................................................................................................32
Adjusting Parental Control Settings..................................................................................................................................33
Parental Control .....................................................................................................................................................33
Accessing PARENTAL CONTROL .........................................................................................................................34
Changing the Password .........................................................................................................................................35
Turning PARENTAL CONTROL ON or OFF...........................................................................................................35
Adjusting the TV RATING.......................................................................................................................................35
Adjusting the MOVIE RATING................................................................................................................................35
Adjusting ENGLISH RATING..................................................................................................................................36
Adjusting FRENCH RATING...................................................................................................................................36
Troubleshooting................................................................................................................................................................37
Specification .....................................................................................................................................................................38
Programming the Universal Remote Control....................................................................................................................39
Page 4
ImportantInformation
WARNING:
CAUTION-To reduce the risk of electric shock, do not perform any
"Note to CATV system installer: This reminder is provided to call the CATV system installer's attention to Article 820-40 of the National Electrical
Code that provides guidelines for proper grounding and, in particular, specifies that the cable ground shall be connected to the grounding system
of the building,as close tothe point ofcable entry aspractical.”
TO REDUCE THE RISK OF FIRE OR ELECTRIC SHOCK, DO NOT EXPOSE THIS APPARATUS TO RAIN OR
MOISTURE.
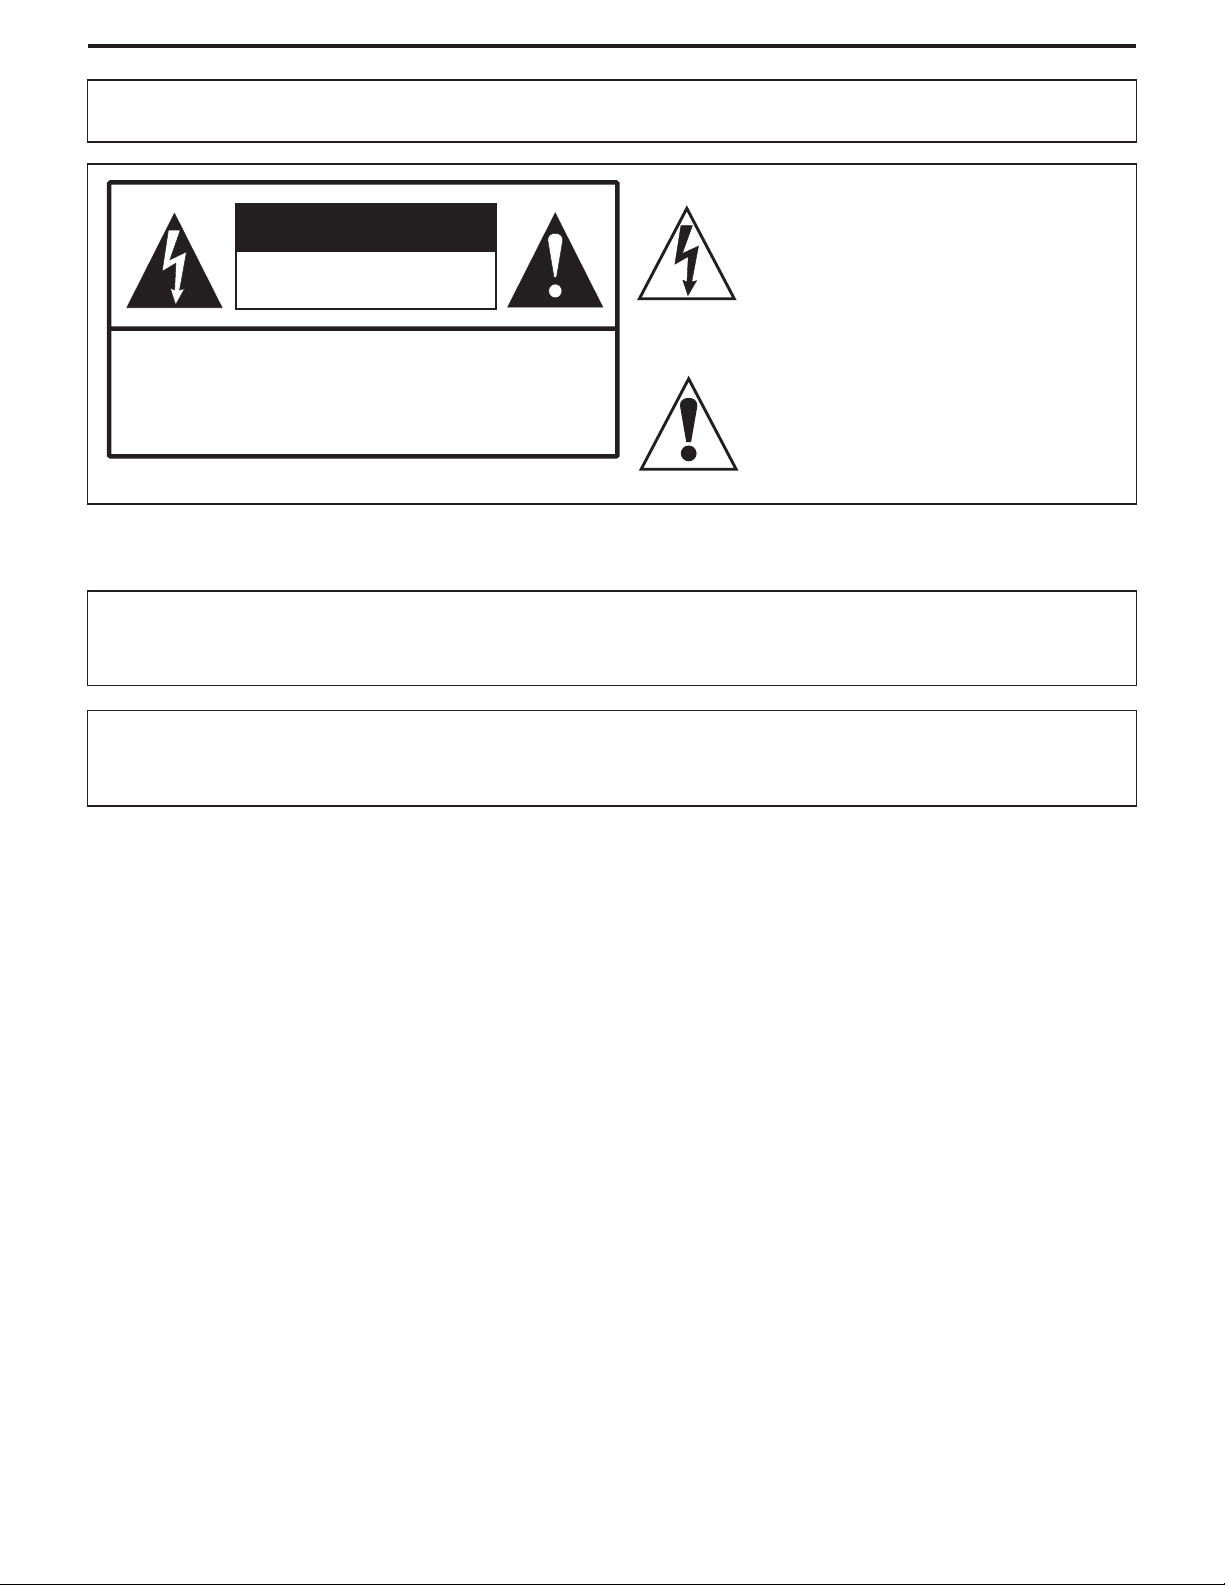
The lightning flash with arrowhead symbol,
CAUTION
RISK OF ELECTRIC SHOCK
DO NOT OPEN
servicing other than that contained in the operating
instructions unless youare qualified todo so.
within an equilateral triangle is intended to
alert the user to the presence of uninsulated
dangerous voltage within the product's
enclosure that may be of sufficient magnitude to
constitute a riskof electric shockto persons
The exclamation point within an equilateral
triangle is intended to alert the user to the
presence of important operating and
maintenance (servicing) instructions in the
literature accompanying theappliance.
.
This product utilizes tin-lead solder, and fluorescent lamp containing asmall amount of mercury.Disposal ofthese materials may be regulateddue
to environmental considerations. For disposal or recycling information, please contact your local authorities or the Electronic IndustriesAlliance:
www.eia.org
FCC STATEMENT
FCC Notice
LCD TV: A CLASS B digital device
This equipment has been testedand found to comply with thelimits for a Class B digitaldevice, pursuant to part 15 ofthe FCC Rules. These
limits are designed to provide reasonable protection against harmful interference when the equipment is operated in a commercial
environment.
This equipment generates, uses, and can radiate radio frequency energy and, if not installed and used in accordance with the instruction
manual, may cause harmful interference to radio communications. Operation of this equipment in a residential area is likely to cause
harmful interference inwhich case theuser will berequired to correctthe interference athis own expense.
FCC CAUTION:
Pursuant to 47CFR, Part 15.21 of the FCC rules, any changes or modifications to this monitor not expressly approved by the
manufacturer could causeharmful interference andwould void theuser's authority tooperate this device.
WARNING: This is a CLASS B product. In a domestic environment this product may cause radio interference in
which case the user may be required to take adequate measures to counter interference.
1
Page 5

ImportantSafety Precautions
Electrical energy can perform many useful functions, but it can also cause personal injuries and property damage if improperly handled.
This product has been engineered and manufactured with the highest priority on safety. But IMPROPER USE CAN RESULT IN
POTENTIAL ELECTRICAL SHOCK OR FIRE HAZARD. In order to prevent potential danger, please observe the following instructions
when installing, operating and cleaning the product. To ensure your safety and prolong the service lifeof yourLCD TVproduct, pleaseread
the following precautionscarefully before usingthe product.
1. Read theseinstructions---All operating instructionsmust be readand understood beforethe product isoperated.
2. Keep theseinstructions---These safety andoperating instructions mustbe kept ina safe placefor future reference.
3. Heed allwarnings---All warnings onthe product andin the instructionsmust be observedclosely.
4. Follow allinstructions---All operating instructionsmust be followed.
5. Do not use this apparatus near water---for example, near a bathtub, washbowl,
kitchen sink, orlaundry tub, ina wet basement,or near aswimming pool, andthe like.
Do not use immediately after moving from a low temperature to high temperature
environment, as this causes condensation, which may result in fire, electric shock, or
other hazards.
Apparatus shallnot be exposed to dripping orsplashing and no objects filled with liquids,
such as vases,shall be placedon the apparatus.
6. Clean only with dry cloth---Unplug this product from the wall outlet before cleaning.
Do not useliquid cleaners oraerosol cleaners. Usea damp clothfor cleaning ifrequired.
Ventilation---
7. Do not block any ventilation openings. Install in accordance with the
manufacturer instructions. The vents and other openings in the cabinet are designed for
ventilation. Do not cover or block these vents and openings since insufficient ventilation
can causeoverheating and/or shorten the life ofthe product. Do not place theproduct on
a bed, sofa, rug or other similar surface, since they can block ventilation openings. This
product is not designed for built-in installation; do not place the product in an enclosed
place such as a bookcase or rack, unless proper ventilation is provided or the
manufacturer’s instructions are followed.
8.Heat sources---Do not install near any heat sources such as radiators, heat registers,
stoves, or otherapparatus (including amplifiers)that produce heat.
9.Grounding or Polarization---Do not defeat the safety purpose of the polarized or grounding-type plug. A polarized plug has two blades
with one wider than the other. A grounding type plug has two blades and a third grounding prong. The wide blade or the third prong are
provided for yoursafety.If the providedplug does notfit into youroutlet, consult anelectrician for replacementof the obsoleteoutlet.
10.Power cord protection---Protect the power cord from being walked on or pinched particularly at plugs, convenience receptacles, and
the point wherethey exit fromthe apparatus.
11. Only use attachments/accessories specified by the manufacturer. Do not use attachments not recommended by the
Attachments---
manufacturer.Use of improperattachments can resultin accidents.
2
Page 6
ImportantSafety Precautions (continued)
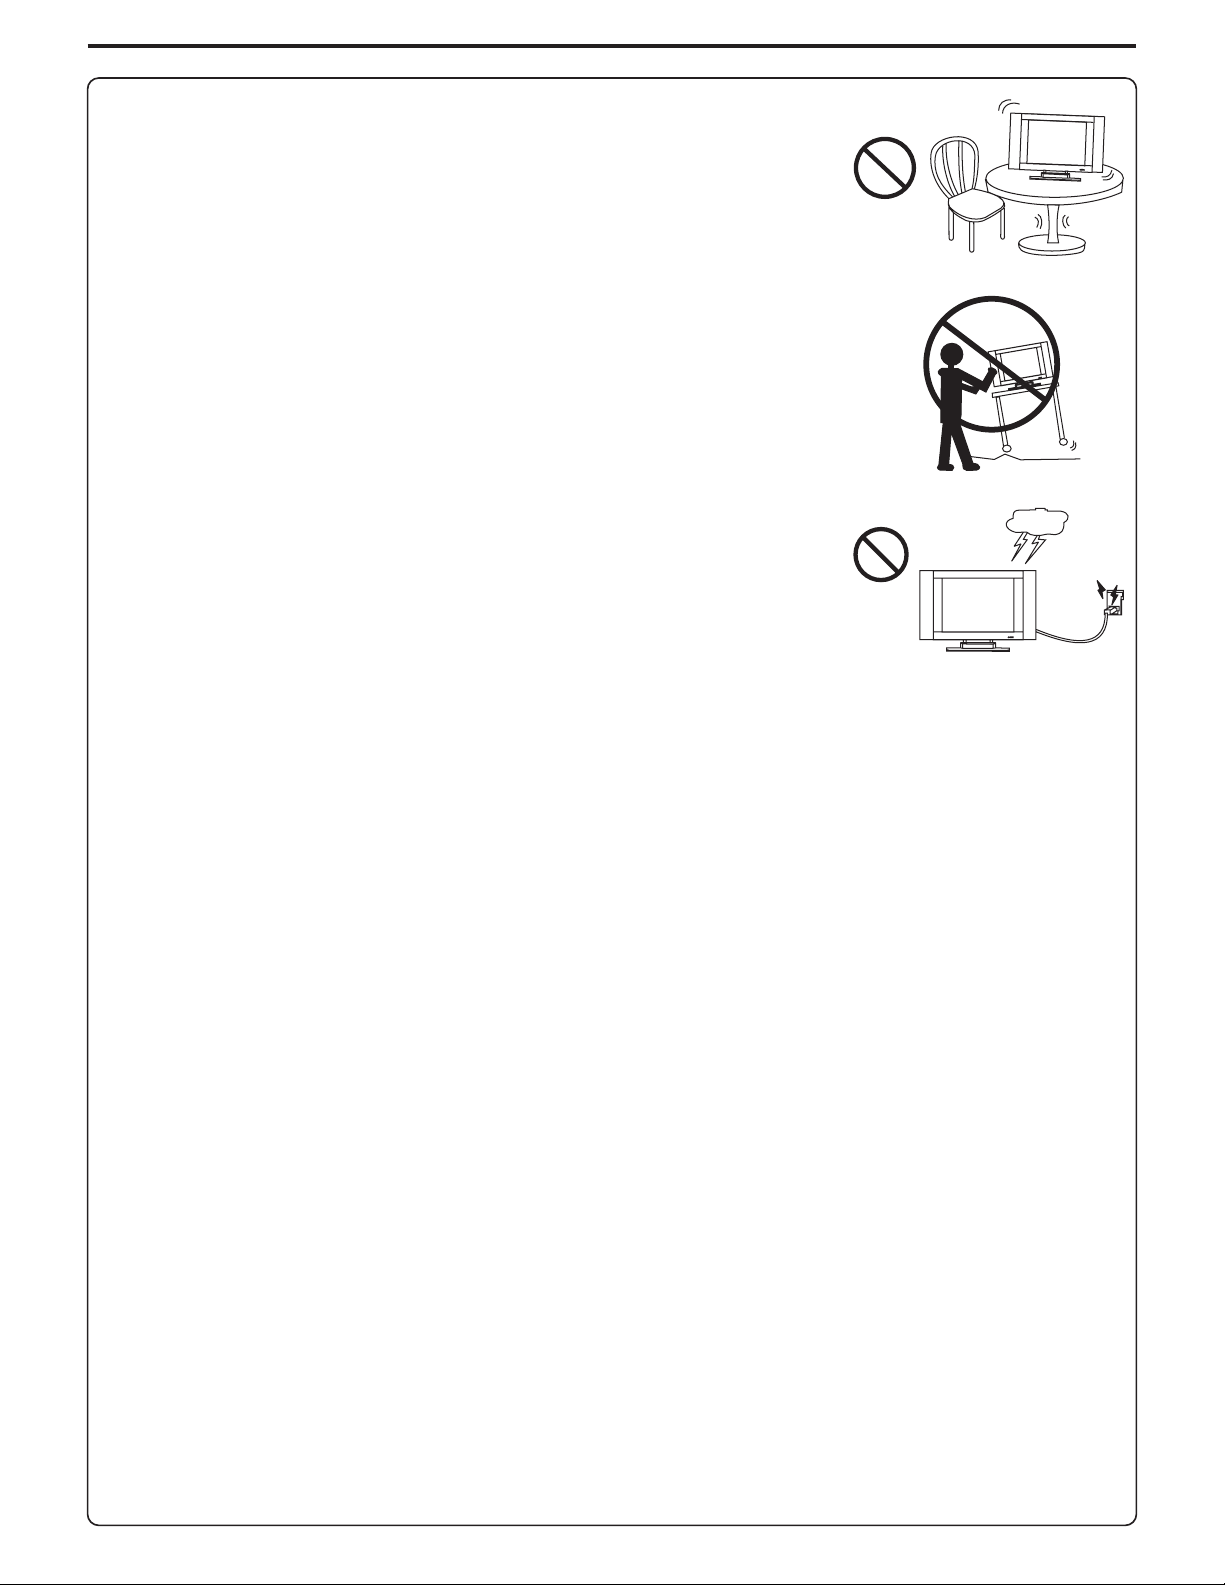
12. Stand Use only with the cart, stand, tripod, bracket, or table specified by the manufacturer,or
sold with the apparatus. Do not place the product on an unstable trolley, stand, tripod or table.
Placing theproduct on an unstable basecan cause the product tofall, resulting inserious personal
injuries as well as damage to the product. When mounting the product on a wall, be sure to follow
the manufacturer’s instructions. Use only the mounting hardware recommended by the
manufacturer.
13. When a cart is used, use caution when moving the cart/apparatus
combination to avoid injury fromtip-over. Sudden stops,excessive forceand uneven floor surfaces
can cause theproduct to fallfrom the trolley.
14. Lightning---Unplug this apparatus during lightning storms or when unused for long periods of
time.
For added protection for this television equipment during a lightning storm, or when it is left
unattended and unused for long periods of time, unplug it from the wall outlet and disconnect the
antenna. This willprevent damage tothe equipment dueto lightning andpower-line surges.
---
Move Carefully---
15. Servicing---Refer all servicingto qualifiedservice personnel.Servicing isrequired whenthe apparatus has been damaged in any way,
such as power-supply cord or plug is damaged, liquid has been spilled or objects have fallen into the apparatus, the apparatus has been
exposed to rainor moisture, doesnot operate normally, or hasbeen dropped.
16. Replacement parts---In case the product needs replacement parts, make sure that the service person uses
replacement parts specified by the manufacturer, or those with the same characteristics and performance as the
original parts. Useof unauthorized partscan result infire, electric shockand/or other danger.
17.Overloading---Do not overload wall outlets, extension cords, or convenience receptacles on other
equipment as thiscan result ina risk offire or electricshock.
18.Entering ofobjects and liquids---Never insert an objectinto the product through vents or openings. With high voltage in the product,
inserting an objectcan cause electricshock and/or shortinternal parts .For the same reason,do not spillwater or liquidon the product.
19.Damage requiring service---If any ofthe followingconditions occurs, unplug the powercord fromtheAC outlet,and request a qualified
service person toperform repairs.
a. When thepower cord orplug is damaged.
b. When aliquid is spilledon the productor when objectshave fallen intothe product.
c. When theproduct has beenexposed to rainor water.
d. When theproduct does notoperate properly asdescribed in theoperating instructions.
Do not touch the controls other than those described in the operating instructions. Improper adjustment of controls not described in the
instructions can causedamage, which oftenrequires extensive adjustmentwork by aqualified technician.
e. If theproduct has beendropped or thecabinet has beendamaged in anyway.
f. When the productdisplays anabnormal conditionor exhibitsa distinct change in performance. Any noticeable abnormality in the product
indicates that theproduct needs servicing.
20.Safety checks---Upon completion of service or repair work, request the service technician to perform safety
checks to ensurethat the productis in properoperating condition.
21.Wall or ceiling mounting---When mounting the product on a wall or ceiling, be sure to install the product according to the method
recommended by themanufacturer.This is asafety feature.
3
Page 7
ImportantSafety Precautions (continued)
22. Power source---Thisproduct is intendedto be suppliedby a listed powersupply indicated onthe marking label.If you are notsure of the
type of power supply to your home, consult your product dealer or local power company. For added protection for this product during a
lightning storm, or when it is left unattended and unused for long periods of time, unplug it from the wall outlet and disconnect the cable
system. This will prevent damage to the product due to lightning and power line surges. When the unit has to be used with another power
supply voltage, the power cable must be changed. Consult your product dealer. The socket outlet should be installed near the equipment
and easily accessible. Useonly thepower corddesignated byour dealerto ensuresafety andEMC. Whenconnecting otherproducts such
as VCRs andpersonal computers, youshould turn offthe power ofthe unit forprotection against electricshock.
23.Panel protection---The LCDpanel usedin this productis madeof glass. Therefore,it can break
when the product is dropped or impacted upon by other objects. Be careful not to be injured by
broken glass piecesin case theLCD panel breaks.
24.Pixel defect---The LCD panel is a very high technology product, giving you finely detailed pictures. Occasionally, a few non-active
pixels may appearon the screenas a fixedpoint of blue,green or red.Please note that thisdoes not affectthe performance ofyour product.
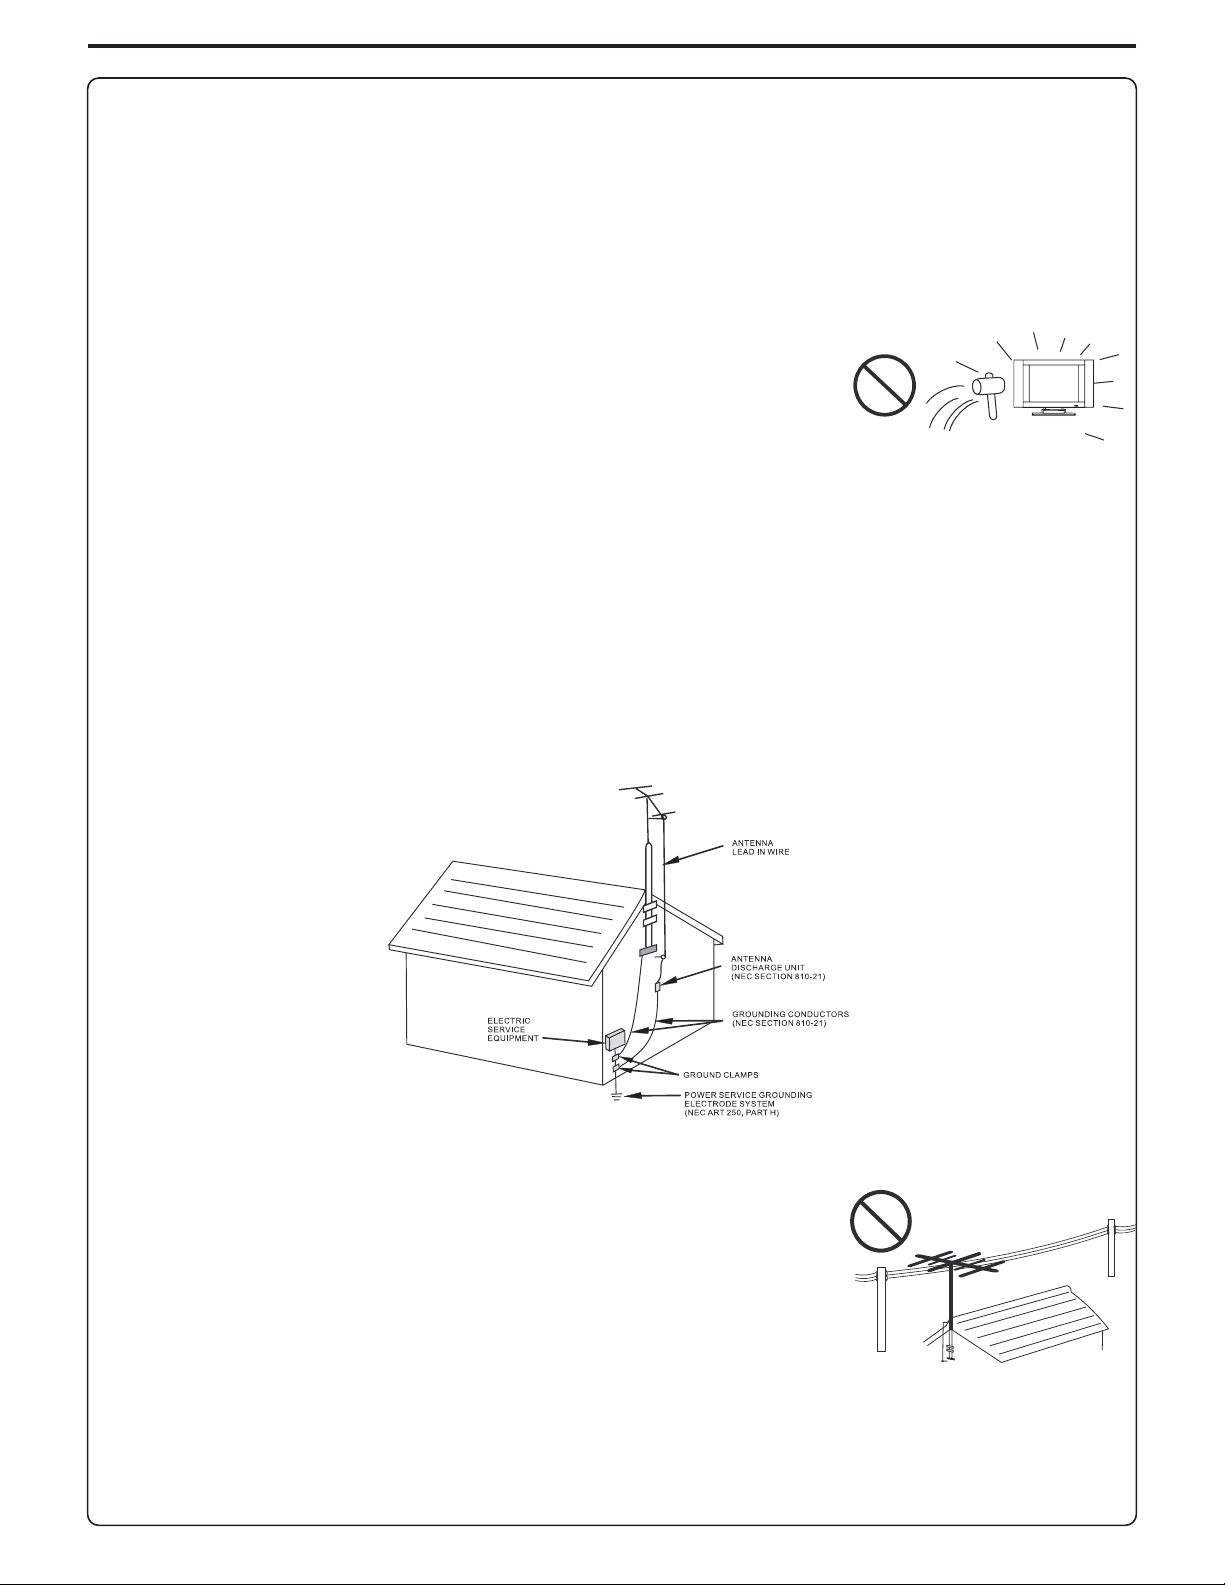
<If an outside antenna isconnected tothe television equipment, be sure the antennasystem isgrounded so as to provide some protection
against voltage surges and built-up static charges. Section 810 of the National Electrical Code provides information with respect to
proper grounding of the mast and supporting structure, grounding of the lead-in wire to an antenna discharge unit, size of grounding
conductors, location ofantenna-discharge unit, connectionto grounding electrodes,and requirements forthe grounding electrode.
EXAMPLE OF ANTENNA GROUNDING AS PER NATIONAL
ELECTRICAL CODE
NEC—NATIONAL ELECTRICAL CODE
<An outside antenna system should not be located in the vicinity of overheadpower linesor other
electric light or power circuits, or where it can collide with such power lines or circuits. When
installing anoutside antennasystem, extreme care should be taken to keep from touchingsuch
power lines orcircuits, as contactwith them mightbe fatal.
4
Page 8
Preparations
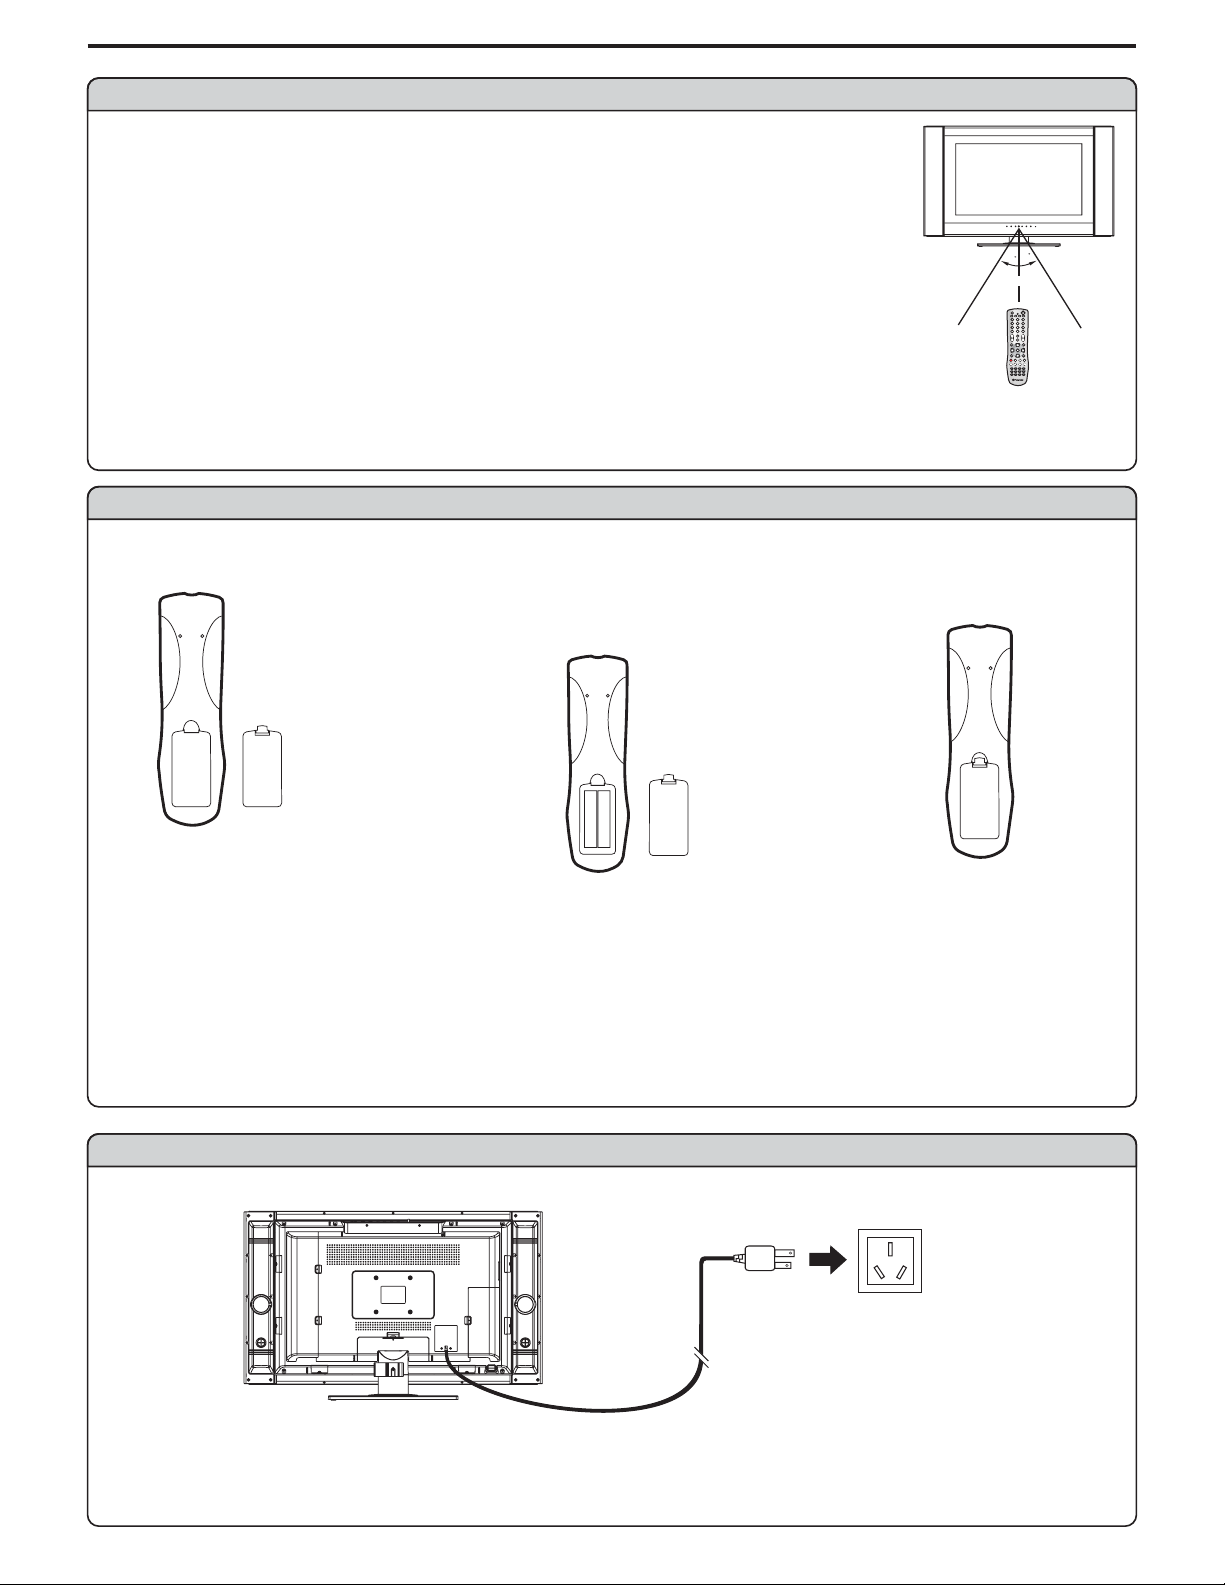
Using the Remote Control
<Use the remote control bypointing it towards the remotesensor window of theset. Objectsbetween
the remote controland sensor windowmay prevent properoperation.
Note: This illustration is for reference only. The remote sensor may be in different locations on
different models.
30
30
Cautions regarding use of remote control
<Do not expose the remotecontrol to shock. In addition, do not expose the remote control to liquids,
and do notplace in anarea with highhumidity.
<Do not installor place theremote control underdirect sunlight. Theheat may causedeformation of theunit.
<The remote control may notwork properly if the remote sensorwindow of the main unit isunder direct sunlight or strong lighting. Insuch a
case, change theangle of thelighting or LCDTV set, oroperate the remotecontrol closer tothe remote sensorwindow.
Batteries for the Remote Control
If the remotecontrol fails tooperate the LCDTV functions, replacethe batteries inthe remote control.
Open the batterycover.
1
Insert two size-AAbatteries.
2
<(Place the batteries with their terminals
corresponding to the (+) and(–) indicationsin
the battery compartment.)
Replace the cover.
3
5m
+
-
+
-
Precaution on battery use
Improper use ofbatteries can resultin a leakageof chemicals and/orexplosion. Be sure tofollow the instructionsbelow.
Place batteries withtheir terminals correspondingto the (+)and (–) indications.
<
Different types ofbatteries have different characteristics.Do not mixbatteries of differenttypes.
<
Do not mix old and new batteries. Mixing old and new batteries can shorten the life of new batteries and/or cause old batteries to leak
<
chemicals.
Remove batteries as soon as they are non-operable. Chemicals that leak from batteries can cause arash. If chemical leakage is found,
<
wipe with acloth.
The batteries suppliedwith the productmay have ashorter life expectancydue to storageconditions.
<
If the remotecontrol is notused for anextended period oftime, remove thebatteries from the remotecontrol.
<
Power Connection
Household
power outlet
Plug into AC outlet
AC cord
Note:
<
This product shouldbe operated onlyfrom the typeof power sourceindicated on themarking label.
<
Always unplug theAC cordfrom power outletwhen not usingfor a longperiod of time.
5
Page 9
Preparation (continued)
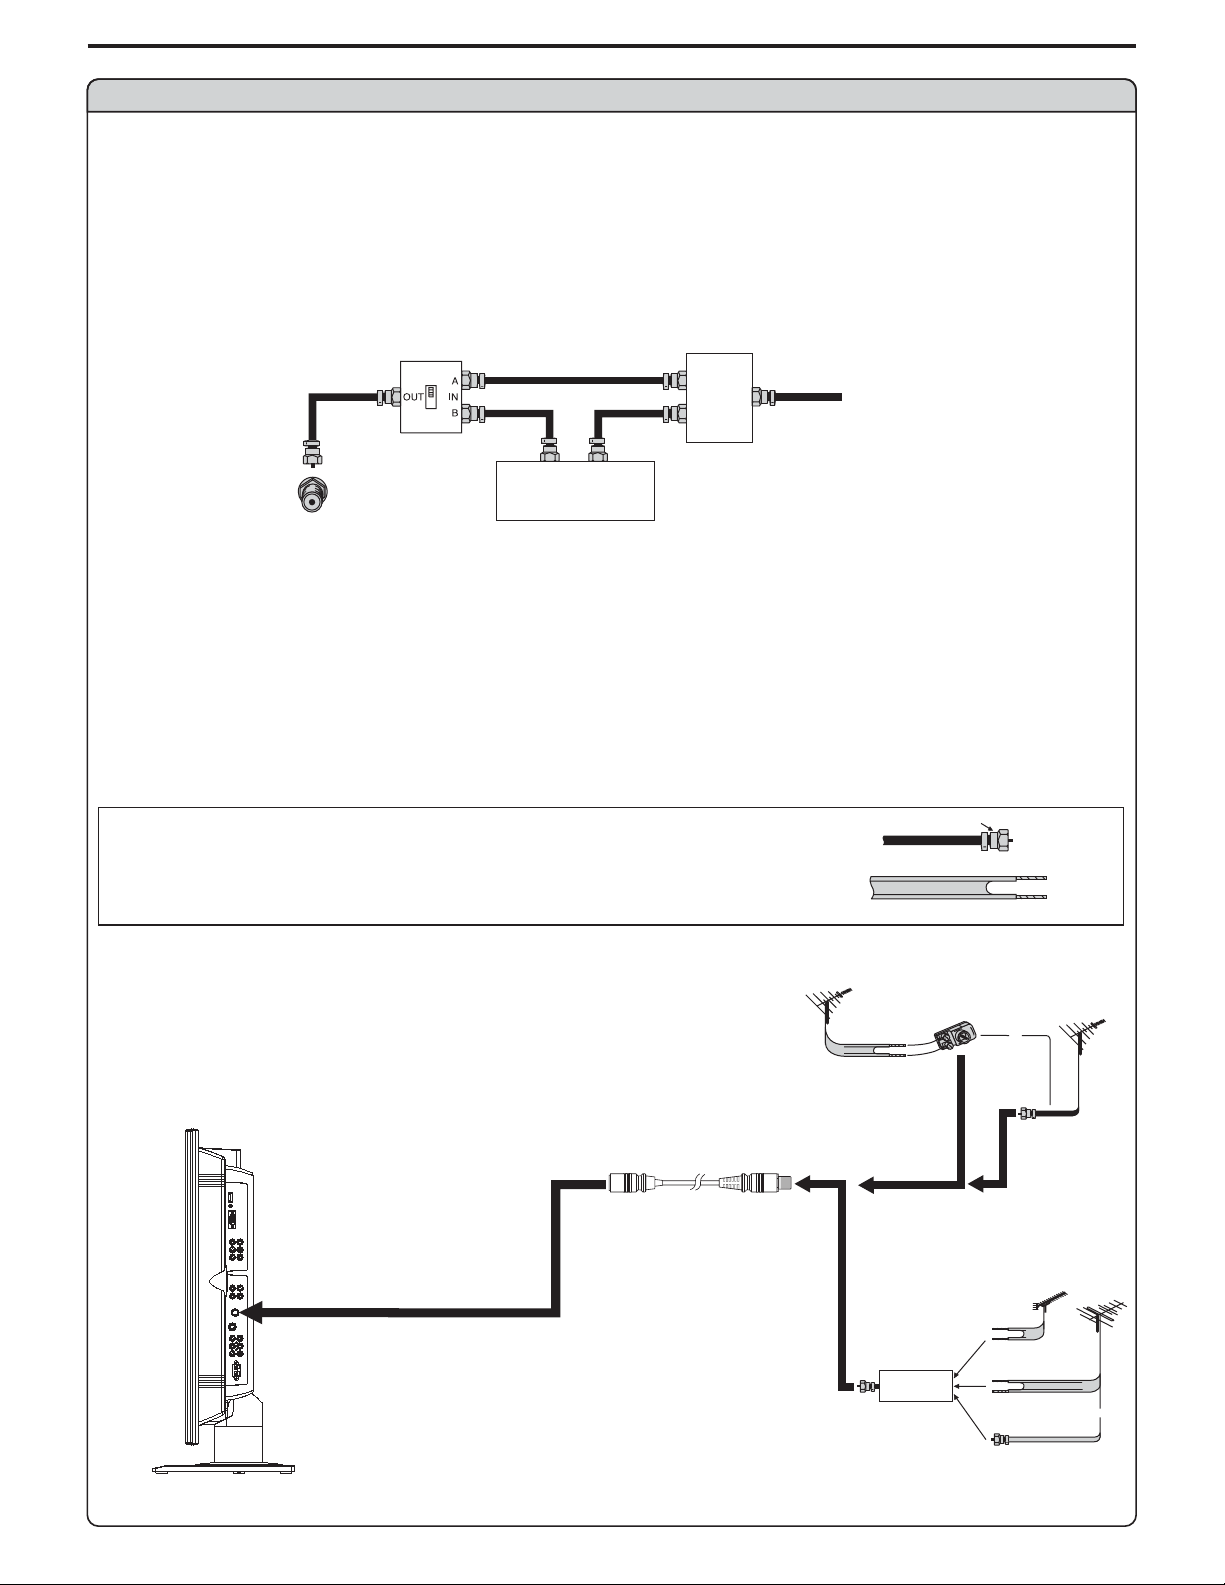
Antenna Connection
CABLE TV (CATV) CONNECTION
A75-ohm coaxialcable connector is built into the set for easy hookup. When connecting the 75- ohm coaxial cable to the set, screw the 75ohm cable totheANT. Terminal.
Some cable TV companies offer “premium pay channels”. Since the signals of these premium pay channels are scrambled, a cable TV
converter/descrambler is generallyprovided to thesubscriber by thecable TV company.
This converter/descrambler is necessary for normal viewing of the scrambled channels. For more specific instructions on installing cable
TV, consult your cable TV company. One possible method of utilizing the converter/descrambler provided by your cable TV company is
explained below. Please note:An RFswitch provided withtwo inputs (Aand B)is required (notsupplied).
RF switch (not supplied)
OUT
Cable TV converter/
descrambler
(not supplied)
IN
Two-set
signal
splitter
(not
supplied)
Cable TV Line
“A” position onthe RF switch(not supplied) :You can view allunscrambled channels byusing the TV’schannel keys.
“B” positionon the RF switch (notsupplied) : You can view the scrambledchannels via the converter/descrambler byusing the converter’s
channel keys.
Note:
Consult your Dealeror Service Centerfor the typeof splitter, RF switchor combiner thatmight be required.
ANTENNAS
The antennarequirements for good color television reception are moreimportant than those for black & white televisionreception. For this
reason, a goodquality outdoor antennais strongly recommended.
The following isa brief explanationof the typeof connections thatare provided withthe various antenna systems.
1. A 75-ohm system is generally a round cable with F-type connector that can
easily be attachedto a terminalwithout tools (notsupplied).
2. A 300-ohm system is a flat “twin-lead” cable that can be attached to a 75-ohm
terminal through a300-75-ohm adapter (notsupplied).
F-type connector
75-ohm coaxial cable (round)
300-ohm twin-lead cable (flat)
OUTDOOR ANTENNA CONNECTION
Use one ofthe following twodiagrams if youconnect an outdoorantenna.
A: Using aVHF/UHF combination outdoorantenna.
B: Using separateVHF and/or UHFoutdoor antennas.
Connect the outdoor antenna cable lead-in to theANT. terminal on the rear of the
TV set.
Antenna cable
VHF/UHF
antenna
A. Combination VHF/UHF Antenna
300/75-ohm
adapter
(not supplied)
or
300-ohm
twin-lead
75-ohm
coaxial cable
B. Separ ate VHF and/or
UHF Antennas
UHF
antenna
300-ohm
twin-lead
Combiner
(not supplied)
OUT IN
300-ohm
twin-lead
75-ohm
coaxial cable
VHF/UHF
antenna
VHF
antenna
or
6
Page 10
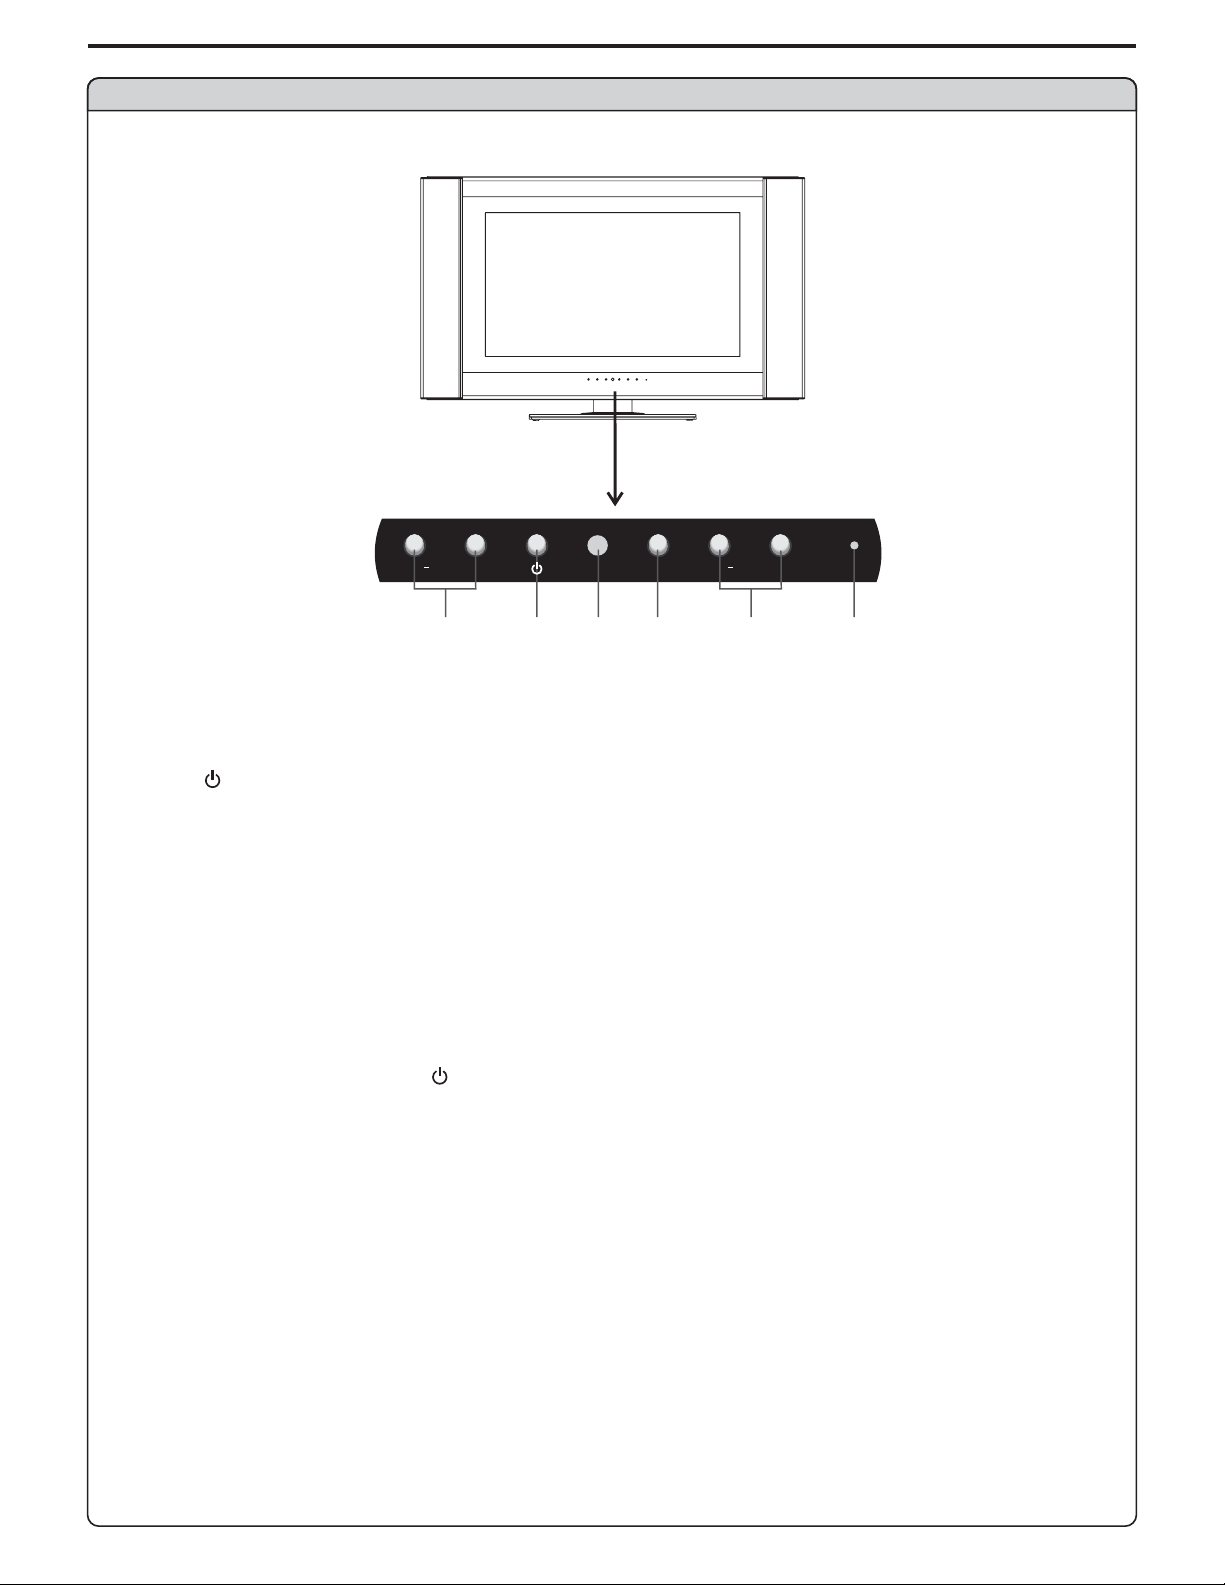
Main Unit
Identification of Controls
1.
VOL+/-
VOL
VOL
+
123
INPUT
4
CH
CH
+
5
6
VOL+ VOL-Press the or button to directly increase or decrease the sound volume level;
2. POWER
Press this button to turn the unit ON from STANDBY mode. Press it again to turn the set back to STANDBY.
3. Remote Sensor
4. INPUT
To access signal source select menu
5. CH+/-
Press these two buttons to directly change the TV channel;
6. Power Indicator
Note:
Functions of , , and are also provided to the remote control. This operation manual provides a
VOL+/- CH+/- POWER INPUT
description based onoperating functions withthe remote control.
7
Page 11
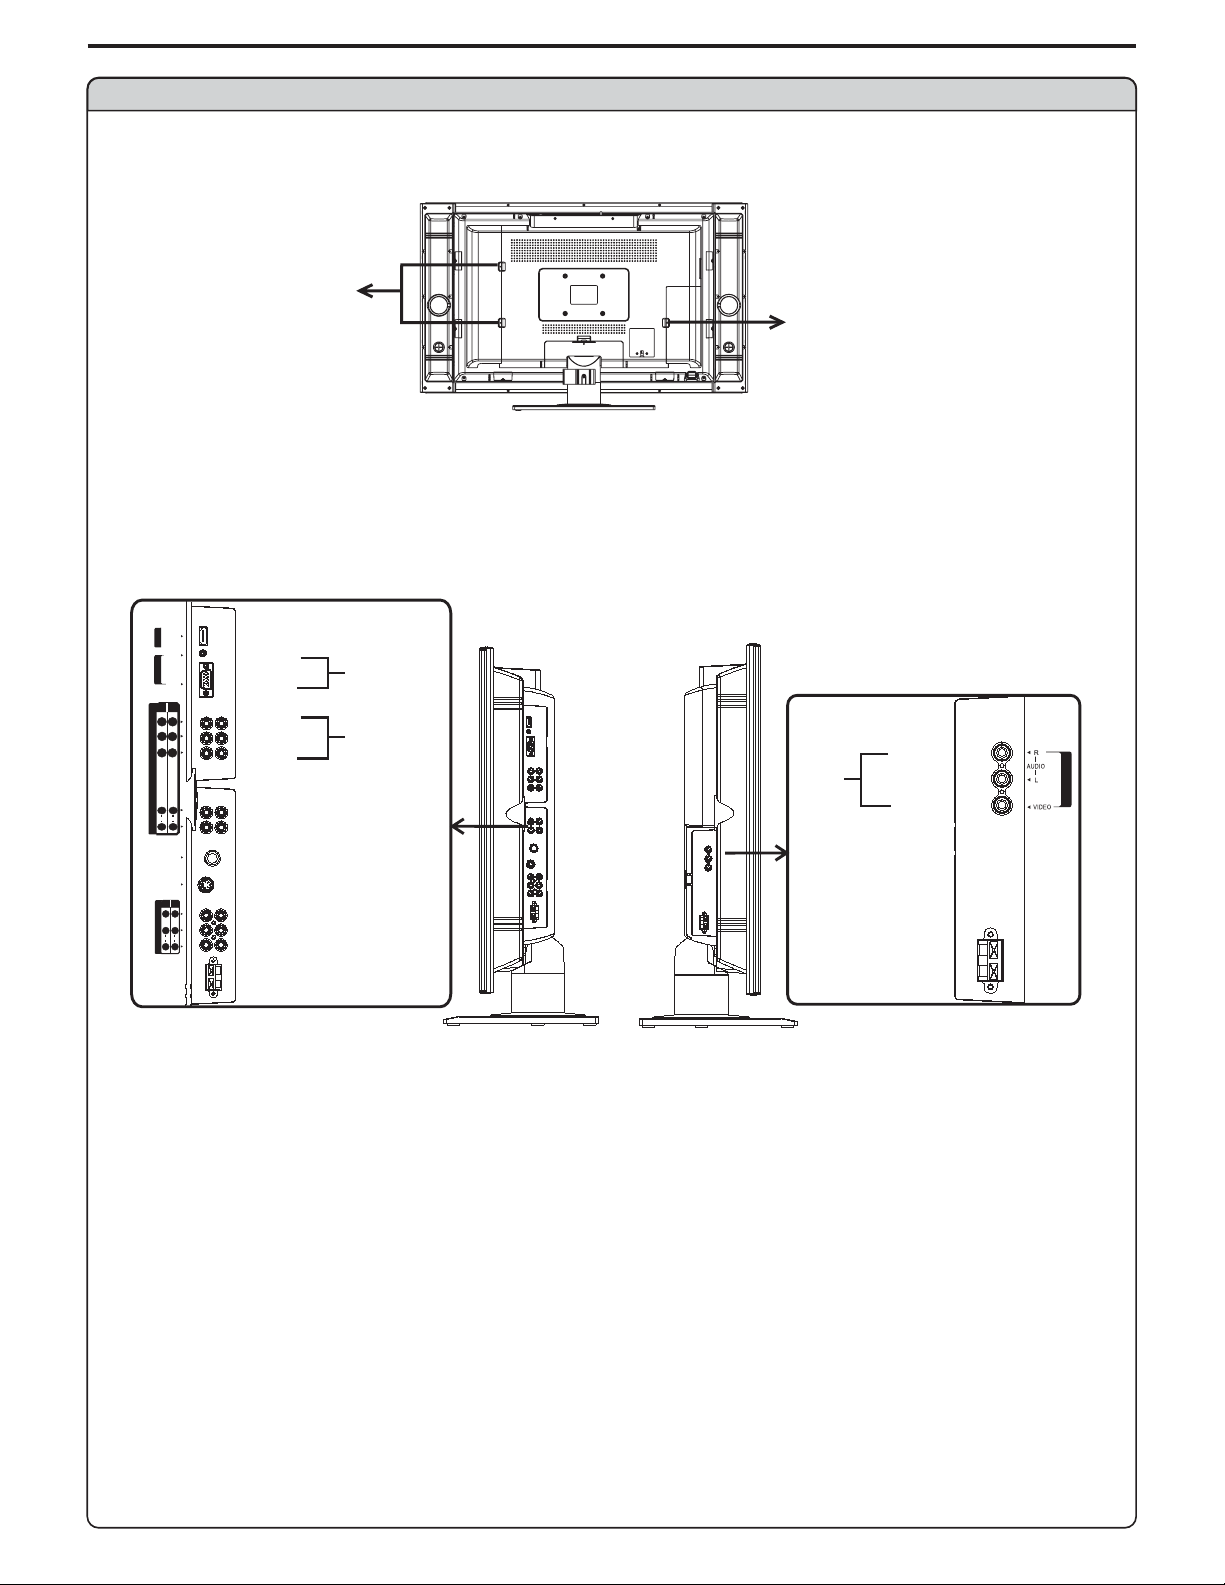
Main Unit
Press and pull out the Cover
carefully as the arrow shows
(press and pullthe twobuttons
at the same)
Identification of Controls (continued)
Press and pull out the Cover carefully
as the arrow shows
Before you connect external devices with the unit, please removing the
Back Cover. After finishing connecting, aim the insertion tabs toward
the locating groove,then carefullypush the Cover until the Cover locks
in place with a click.
AUDIO
VGA INHDMI
VGA
12
YY
PbP
//
b
CbC
b
COMPONENT IN
PrP
//
r
CrC
r
LL
AUDIO AUDIO
RR
RF
S-VIDEO
12
VIDEOVIDEO
AV IN
LL
AUDIO AUDIO
RR
HDMI
AUDIO
VGA
Y
Pb/Cb
Pr/Cr
AUDIO L
AUDIO R
ANTENNA INPUT
S-VIDEO INPUT
AV INPUT
SPEAKER JACK
VGA IN
COMPONENT IN
AV OUT
AUDIO R
AUDIO L
VIDEO
SPEAKER JACK
1. HDMI input jack
2. VGA input /AUDIO in
Connect to the VGA/audio output jacks on your equipment
3. COMPONENT input
(Y, Pb/Cb, Pr/Cr, Audio L, R)
Connect to the audio and component output jacks of a DVD player or Set-Top Box etc.
4. Antenna input
Allows you to connect cable or outdoor antenna
5. S-Video input
Receive a S-Video signal from external source such as VCR or DVD player.
6. AV inputs
(Video, Audio L, R)
Receive video/audio signals from external sources such as VCR or DVD player.
7. AV outputs
(Video, Audio L, R)
8. Speaker jack
Connect the speaker audio cable to the speaker output jack on the unit matching “+” and “-”
ends of the cable with color.(Before connecting, make sure to unplug the unit and all connected components)
AV OUT
8
Page 12
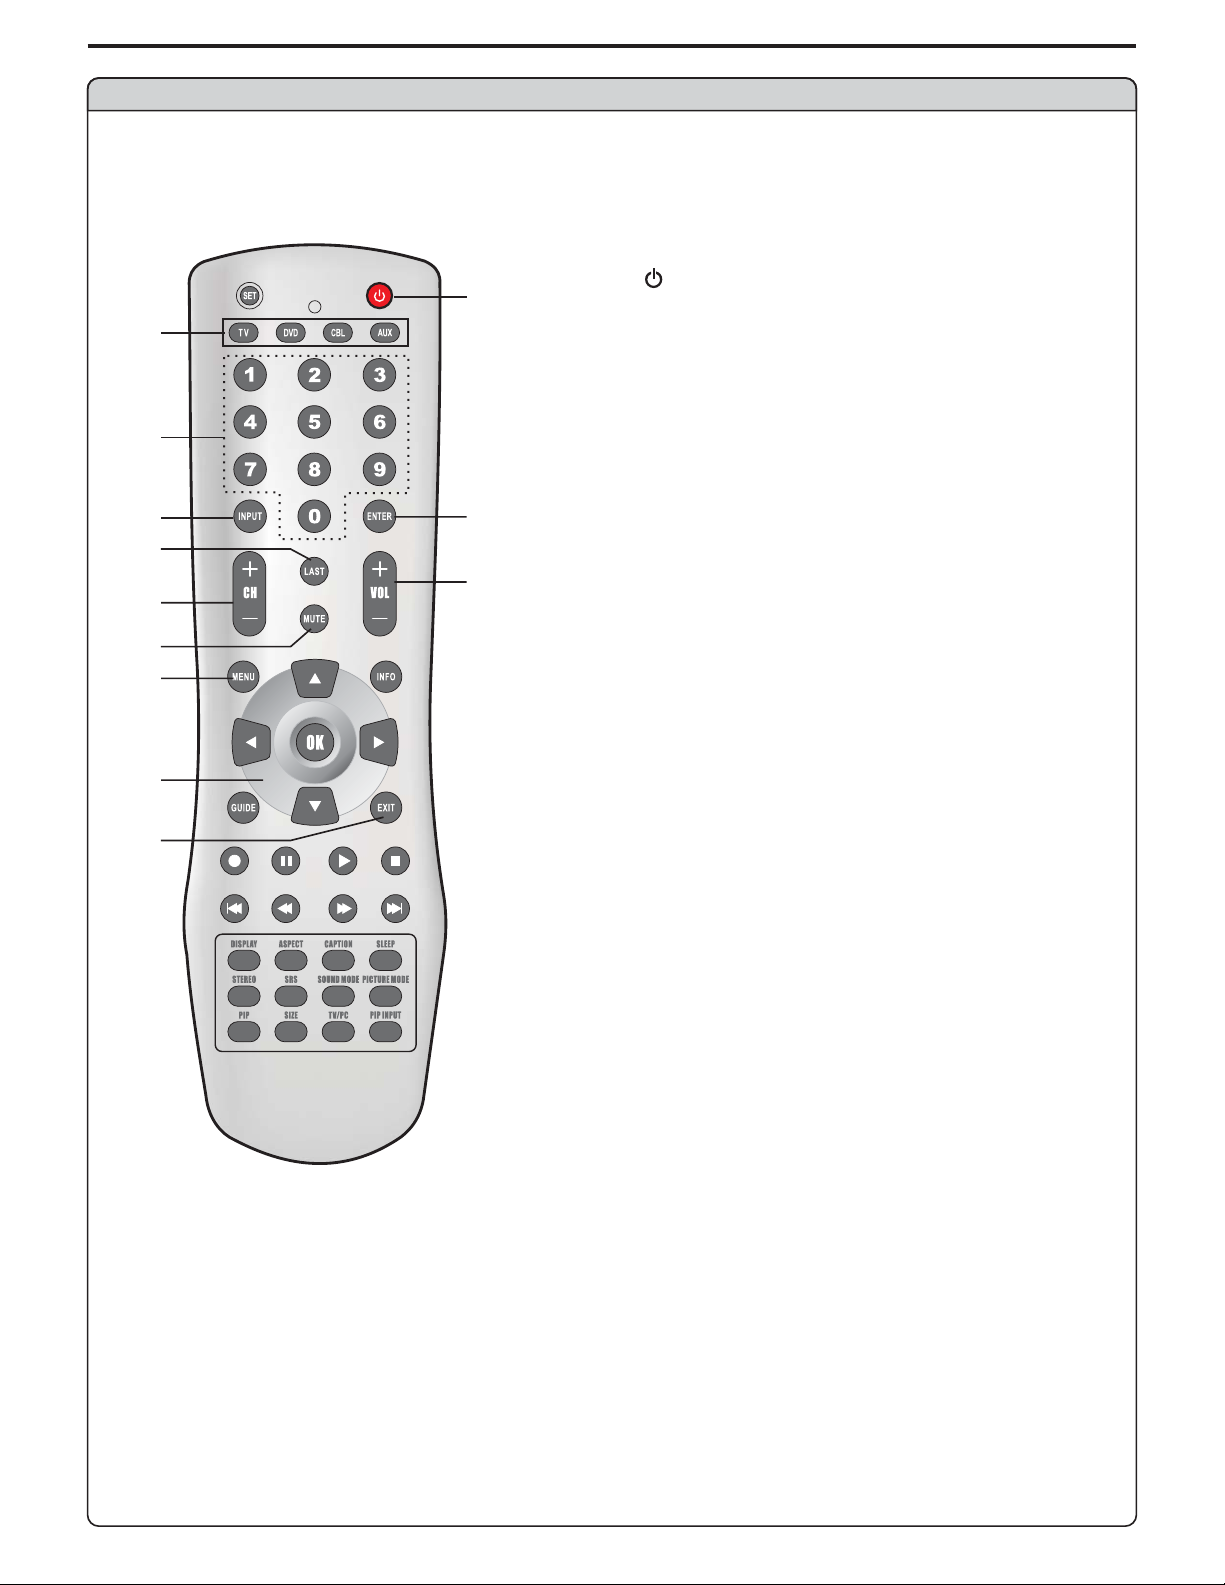
Remote Control
Identification of Controls (continued)
1 Toselect products tobe controlled with remotecontrol
.
Note: universal
This remote controlis an remote control. If yourremote
control does not work correctly when you operate the TV set, please try
to press button.
TV
11
12
1
3
5
6
8
9
10
2
4
7
2 POWER.
Turn the unit on or off
3 0~9 number buttons.
Direct channel select
4 ENTER button.
Channel enter button
5 INPUT.
To access source input select menu
6 LAST.
To quickly jump between current channel and last selected
channel
7. VOL+/Used to adjust volume
8 CH+/-.
dUse to switch channels
9 MUTE.
Sound mute
10 MENU.
To access the Menu main page or exit menu operation
11 Menu navigation button:.
In Menu operation, use / to select menu item;
Use / to adjust selected item;
34
OK button
To confirm or enter submenu
12 EXIT.
Used to exit menu completely
5634
56
9
Page 13
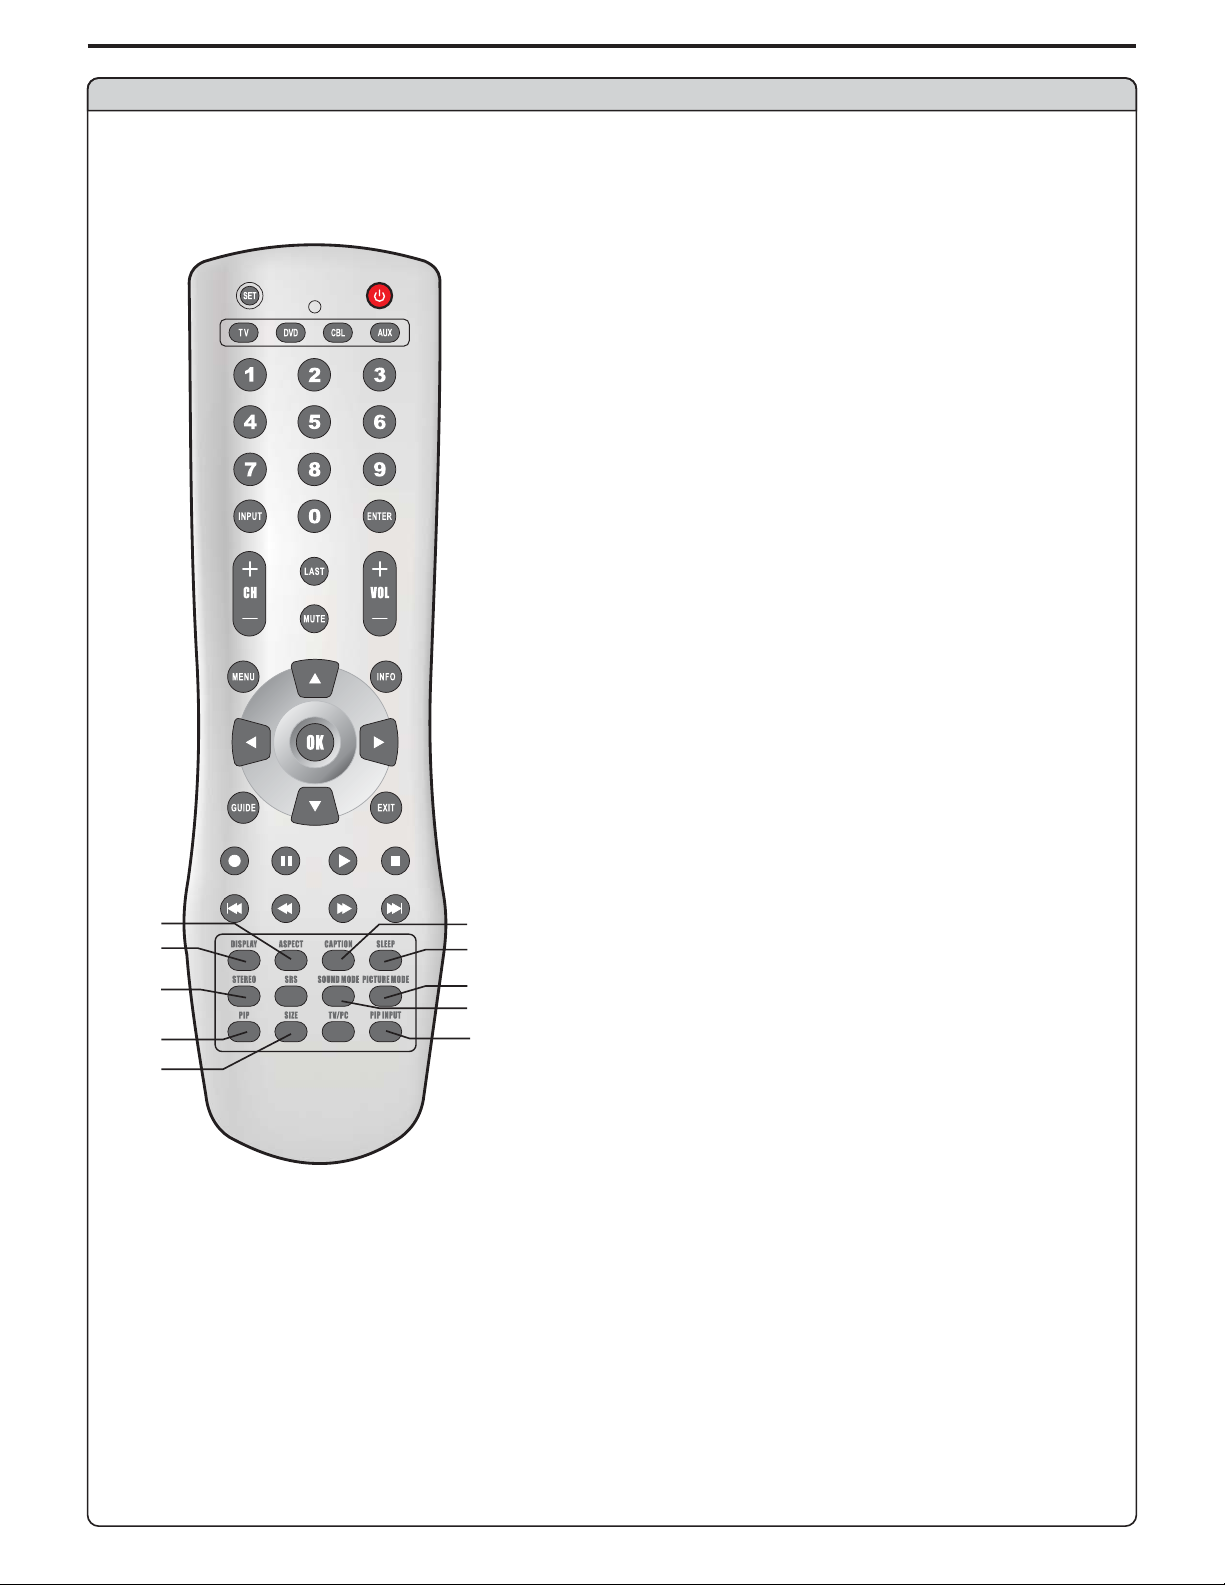
Remote Control
Identification of Controls (continued)
13 ASPECT.
To select screen aspect ratio
14 DISPLAY.
To display channel status or signal information
15 STEREO.
To select stereo mode
16 PIP.
To activate PIP function
17 SIZE.
To adjust PIP frame sizechange the position of the PIP frame and
18 CAPTION.
To select CCD on/off and CCD mode
13
14
15
16
17
18
19
20
21
22
19 SLEEP.
To set Sleep timer
20. PICTURE MODE
Picture mode select
21 SOUND MODE.
Sound mode select
22 PIP INPUT.
To select sound output from the main frame or the PIP frame when in
PIP mode
10
Page 14

Connections
Cautions Before Connecting
Carefully check theterminals for positionand type beforemaking any connections.
The illustration ofthe external equipmentmay be differentdepending on yourmodel.
Loose connectors canresult in imageor color problems.Make sure thatall connectors are securelyinserted into theirterminals.
Refer to theoperating manual ofthe external deviceas well.
When connecting anexternal device, turnthe power off to avoidany issues.
Connect a VCR
AUDIO
VGA INHDMI
VGA
12
YY
PbP
//
b
CbC
b
COMPONENT IN
PrP
//
r
CrC
r
LL
AUDIO AUDIO
RR
RF
S-VIDEO
12
VIDEOVIDEO
AV IN
LL
AUDIO AUDIO
RR
Y
W
R
S-video
cable
or
Audio
cable
Video
cable
Y
Yellow (VIDEO)
W
White (AUDIO L)
R
Red (AUDIO R )
VCR
How to connect:
Connect the / cables between the Audio (L/R)/Video jacks on the unit and VCR.Audio Video
Note:
For better video,you can usethe terminal ifyour source supportsit.
S-video
The unit choosesthe S-Video signalprior to theVideosignal.
The input terminal on the and the input terminal share the
Video AV IN(2) S-Video
same inputterminals.
Audio
To play VCR
1. Turn on your LCD TV , press button on the remote control.
2. Press . Note that the period of two-press
INPUT button repeatedly to select AV2/SV
should be within 2 seconds.
3. Turn on your VCR , insert a videotape and press the Play button.
INPUT
R
AV O UT
AUDIO
Rear of the VCR
SOURCE
AV1
TV
W
AV I N
AV2/SV
Y
AUDIO
VIDEO
S-VIDEO
RLVIDEO
RL
YPBPR1
ANT INANT OUT
YPBPR2
VGA
HDMI
11
Page 15

Connect a Camcorder
Y
Yellow (VIDEO)
W
White (AUDIO L)
R
Red (AUDIO R )
Connections (continued)
AUDIO
VGA INHDMI
VGA
12
YY
PbP
//
b
CbC
b
COMPONENT IN
PrP
//
r
CrC
AV IN
AUDIO AUDIO
S-VIDEO
AUDIO AUDIO
r
LL
RR
RF
12
VIDEOVIDEO
LL
RR
OUT
IN
Video
Y
cable
W
R
Audio
cable
W
R
AUDIO
RL
Y
VIDEO
How to connect:
Connect the / cables between the Audio (L/R)/Video jacks on the unit and camcorder.Audio Video
To playback Camcorder
1. Turn on your LCD TV , press button on the remote control.
2. Press to select .
3. Turn on your camcorder and set it to output mode. (For details, refer to your camcorder
owner's manual.)
4. Insert the tape into the camcorder and press Play button.
Note:
The operations of the camcorder may be different and is dependent onyour model.Please readthe owner'smanual ofyour camcorder
to confirm operation.
INPUT
AV1INPUT button repeatedly
SOURCE
AV1
TV
AV2/SV
YPBPR1
YPBPR2
VGA
HDMI
12
Page 16

Connect a DVD player
Audio
cable
Video
cable
Connections (continued)
AUDIO
G
B
R
W
R
VGA INHDMI
VGA
12
YY
PbP
//
b
CbC
b
COMPONENT IN
PrP
//
r
CrC
r
LL
AUDIO AUDIO
RR
RF
S-VIDEO
12
VIDEOVIDEO
AV IN
LL
AUDIO AUDIO
RR
W
R
AUDIO COMPONENT
AUDIO
LR
RLVIDEO
AV O UT
AUDIO
P
r
R GB
P
b
Y
S-VIDEO
DVD player
W
white (audio L)
R
red (audio R, P /C )
Green (Y)
G
B
Blue (P /C )
rbr
b
Rear of the DVD player
How to connect a DVD Player using Component Video Connections:
Connect the Video cable between the Y, Pb/Cb, Pr/Cr input jacks on the unit and DVD
player.
Connect the Audio cable between the AUDIO input jack on the unit and DVD player.
s AUDIO output jacks on the
Y, Pb, Pr ( or Y, Cb, Cr) output jacks on the
To play DVD
1. Turn on your LCD TV , press button on the remote control.
2. Press button repeatedly to selectINPUT YPBPR2.
3. Turn on your DVD player, insert a DVD disc and press the Play button.
INPUT
SOURCE
AV1
TV
AV2/SV
YPBPR1
YPBPR2
VGA
HDMI
Note:
If you connect your external device with terminals, please select correspondingly in sourceselect
COMPONENT IN (1) YPBPR1
menu.
13
Page 17

Connect a product to HDMI
HDMI cable
HDMI OUTPUT
Connections (continued)
AUDIO
VGA INHDMI
VGA
12
YY
PbP
//
b
CbC
b
COMPONENT IN
PrP
//
r
CrC
r
LL
AUDIO AUDIO
RR
RF
S-VIDEO
12
VIDEOVIDEO
AV IN
LL
AUDIO AUDIO
RR
Product with HDMI jack
How to connect:
Connect the HDMI cable between the HDMI input jacks on the unit and HDMI output jacks on the product.
Note:
The HDMI Sources are compatible with DVI displays through the use of a passive cable converter. So you may connect
product with DVI output jack to the unit.
Connect a passive cable converter between the HDMI input jack on the unit and DVI output jack on the product.
Connect an Audio cable between the AUDIO output on your product and AUDIO input jack of on the unit.
VGA IN
To Watch your Product
1. Turn on your LCD TV , press button on the remote control.INPUT
2. Press button repeatedly to select .INPUT HDMI
3. Turn on your Product.
SOURCE
AV1
TV
SOURCE
AV2/SV
TV
AV1
YPBPR1
AV2/SV
YPBPR2
YPBPR
VGA
HDMI
14
Page 18

Connect a PC
Connections (continued)
AUDIO
VGA INHDMI
VGA
12
YY
PbP
//
b
CbC
b
COMPONENT IN
PrP
//
r
CrC
r
Audio
cable
D-Sub
cable
AV IN
AUDIO AUDIO
S-VIDEO
AUDIO AUDIO
LL
RR
RF
12
VIDEOVIDEO
LL
RR
How to connect:
Connect a D-Sub cable between the on the PC and the VGA input on the unit.
Connect an Audio cable between the AUDIO output on the PC and
VGA interface
AUDIO input jack on the unit.
To Watch the PC screen
1. Turn on your LCD TV , press button on the remote control.
2. Press button repeatedly to select .INPUT VGA
3. Turn on your PC and check for PC system requirements.
4. Adjust the screen resolution and settings on your computer to the preferred settings.
INPUT
SOURCE
TV
15
AV1
SOURCE
AV2/SV
TV
AV1
YPBPR1
AV2/SV
YPBPR2
VGA
HDMI
Page 19

Connect a VCR for Recording
Connections (continued)
How to connect:
Y
Yellow (VIDEO)
W
White (AUDIO L)
R
Red (AUDIO R )
OUT
AV
R
W
Video
cable
Y
Audio
cable
Y
AV O UT
AV I N
W
AUDIO
AUDIO
R
S-VIDEO
RLVIDEO
RLVIDEO
ANT INANT OUT
Rear of the VCR
VCR for recording
Connect the / cables between the Audio (L/R)/Video jacks on the unit and VCR.Audio Video
To record program
1. Turn on your LCD TV, select a program you wish to record.
2. Turn on your VCR, insert a videotape for recording.
3. Press the Record button to begin recording.
Note:
TheAV output terminals outputthe audio/video signalfrom the Antenna inputorAV inputs.
16
Page 20

Turning the Unit On and Off
Turning the Unit On and Off
Turning On
Insert the powercord into thewall outlet.
Press the button on theremote control.
The unit willbe turned onand you willbe ready touse its features.
Turning Off
With the poweron, Press the button on theremote control toturn off.Power
Note:
You can alsouse the button on theControl panel onthe main unit.Power
Viewing the Menus and Displays
Your LCD TV hasa simple, easy-to-usemenu system thatappears on thescreen. This systemmakes it convenientand fast
To use featureson the unit.The unit alsolets you displaythe status ofmany of your LCDTV features.
Power
Viewing the Menus
With the power on, press the button on the remote control. The main
1
menu appears onthe screen.
Use the to select menu item. Use to adjust value of item, use
2
OK
you can pressthe buttonrepeatedly to exitthe menu operations.
56
to confirm or enter submenu.
MENU
MENU
34
Note:
To clearly introduce the menu operations , this operation manual provides a
description based onoperation with theremote control.
PICTURE
PICTURE MODE
CONTRAST
BRIGHTNESS
COLOR
TINT
SHARPNESS
NOISE REDUCE
SIZE MODE
MOVE
SELECT
NATURE
WEAK
FULL
MENU EXIT
Displaying Status Information
Press the button on the remote control, the unit will display current status information such as channel number, audio mode or
DISPLAY
signal source, etc.
17
Page 21

Memorizing the Channels
Your LCD TV can memorize and store all of the available channels for both air and cable channels. After the available channels are
memorized, use CH+/-to scan throughthe channels.
Selecting the Signal Source
Before your LCD TV can memorize the available channels, you must specify the type of signal source that is connected to the unit.
(i.e., an air or cable system)
Press to displaythe menu mainpage.MENU
1
Press repeatedly to select menu.SOURCE
2
3
56
Press to access the submenu.OK
PIP MODE
PICTURE SOURCE
SUB PICTURE
ADD/ERASE
ANTENNA
AUTO SEARCH
SOURCE
OFF
TV
VGA
ERASE
AIR
Press to6repeatedly select item.ANTENNA
4
Press to toggle between or .AIR CABLE
5
6
34
If you are connected to an antenna, please select . If you connect cable,
please select .
CABLE
AIR
Press repeatedly to exit.MENU
Storing Channels in Memory Automatically
Press to displaythe menu mainpage.MENU
1
Press repeatedly to select menu.SOURCE56
2
Press to access the submenu.OK
3
MOVE
PIP MODE
PICTURE SOURCE
SUB PICTURE
ADD/ERASE
ANTENNA
AUTO SEARCH
MOVE
PIP MODE
PICTURE SOURCE
SUB PICTURE
ADD/ERASE
ANTENNA
AUTO SEARCH
SELECT
SOURCE
SELECT
SOURCE
MENU EXIT
OFF
TV
VGA
ERASE
AIR
MENU EXIT
OFF
TV
VGA
ERASE
AIR
Press repeatedly to select item.AUTO SEARCH6
4
Press to store channels in memory automatically.
5
The unit will begin memorizing all of the available channels. During the process of the Auto
Search, you canpress toexit.MENU
18
MOVE
SELECT
MENU EXIT
SEARCH
AIR 8
Page 22

Memorizing the Channels (continued)
Adding and Erasing Channels
Use todirectly select a channel that youwant to addor erase.number buttons
1
Press to displaythe menu mainpage.MENU
2
Press repeatedly to select menu.SOURCE56
3
Press to access the submenu.OK
4
Press to select item.ADD/ERASE6repeatedly
5
Press to toggle between or .ADD ERASE
6
When the item is set to erase, the selected channel will be erased.
When the item is set to add, the selected channel will be added.
Press repeatedly to exit.MENU
7
PIP MODE
PICTURE SOURCE
SUB PICTURE
ADD/ERASE
ANTENNA
AUTO SEARCH
MOVE
SOURCE
SELECT
OFF
TV
VGA
ERASE
AIR
MENU EXIT
19
Page 23

Changing Channels
Using the Channel Buttons (CH+ or CH-)
Basic Operations
Press the or tochange channels.
When you pressthe
You will not seechannels that wereerased.
Direct Accessing Channels
Press the to go directlyto a channel.number buttons
To select a one-digit channel: press the to input the channel number, followed by ENTER button or wait for some
seconds, and theunit automatically goesto the selectedchannel
To select atwo-digit channel: pressthe to input thechannel number andthe unit goesto the selectedchannel .
To select a three-digit channel:press the to inputthe channel numberand the unit goesto the selected channel(Only
in CABLE mode
Note:
When you usethe number buttons,you can directlyselect channels that were erased.
Using the LAST button
Press this buttonto switch between the current channeland the previous channel.
CH+ CH-
CH+ CH-or , the unitchanges channels insequence. Youwill see all thechannels that theunit has memorized.
0-9 number buttons
.
0-9 number buttons
0-9 number buttons
).
Adjusting the Volume
Using the volume buttons (VOL+ and VOL-)
Press the or to or thevolume.VOL + VOL- increase decrease
Using the Mute
Using the MUTE button
At any time,you can temporarilycut off thesound using theMUTE button.
Press the MUTE button andthe sound cutsoff.
1
To turn muteoff, press theMUTE button again.
2
20
Page 24

Select Input Source Signal
Press to display themenu main page.MENU
11
Press repeatedly to select menu.SOURCE56
2
Press to access the submenu.OK
3
Press repeatedly to select item.PICTURE SOURCE6
4
Press to select.
5
Press repeatedlyto exit.MENU
6
TV
--------Select TV signal.
AV1
-------
Select signal from AV IN(1) terminals.
AV2/SV
-------S
elect signal fromAV IN (2)orS-video terminals.
YPBPR1
YPBPR2
VGA
HDMI
------Select signal fromYPbPr1 terminal
-------Select signal fromYPbPr2 terminal.
------Select signal fromVGAjack.
----Select signal fromHDMI jack.
Basic Operations (continued)
.
PIP MODE
PICTURE SOURCE
SUB PICTURE
ADD/ERASE
ANTENNA
AUTO SEARCH
MOVE
PIP MODE
PICTURE SOURCE
SUB PICTURE
ADD/ERASE
ANTENNA
AUTO SEARCH
MOVE
SOURCE
SELECT
SOURCE
SELECT
OFF
TV
VGA
ERASE
AIR
MENU EXIT
OFF
TV
VGA
ERASE
AIR
MENU EXIT
You can also usethe button to select inputsource signal.INPUT
Selecting a Menu Language
Press to displaythe menu mainpage.MENU
1
Press repeatedly to select menu.OSD56
2
Press to access the submenu.OK
3
The [LANGUAGE] item will be highlighted automatically.
Press to select a desired OSD language.
4
Press repeatedly to exit.MENU
5
SOURCE
TV
AV2/SV
LANGUAGE
H-POSITION
V-POSITION
DURATION
TRANSPARENCY
MOVE
OSD
SELECT
YPBPR HDMI
VGAAV 1
ENGLISH
MENU EXIT
21
Page 25

Setting Picture
Customizing the Picture
Press to displaythe menu mainpage.MENU
1
The picture menupage will bedisplayed automatically.
Press to accessthe submenu.OK PICTURE
2
Press toselect the itemyou wish tochange.56
3
Press toadjust the value ofthe item.
4
Press repeatedlyto exit.MENU
5
Using the Preset Picture Mode
Press to displaythe menu page.MENU PICTURE
1
Press to accessthe submenu.OK PICTURE
2
The [PICTURE MODE]will be highlightedautomatically.
Press toselect a desired picturemode.
3
Press repeatedlyto exit.MENU
4
There are three preset picture modes ( and ) and one user-set
picture mode ( ). Each presetmode has itsown picture settings.
BRIGHT
SOFT
NATURE
PERSONAL
: Select fora bright picture.
: Select fora finely detailedpicture.
: Select fora normal picture.
Adjusted settings arestoredin PERSONAL mode.
You may quickly use the button on the remote control to select picture
PICTURE MODE
mode.
BRIGHT, SOFT NATURE
PICTURE MODE
CONTRAST
BRIGHTNESS
COLOR
TINT
SHARPNESS
NOISE REDUCE
SIZE MODE
MOVE
PICTURE MODE
CONTRAST
BRIGHTNESS
COLOR
TINT
SHARPNESS
NOISE REDUCE
SIZE MODE
MOVE
PICTURE
SELECT
PICTURE
SELECT
NATURE
WEAK
FULL
MENU EXIT
NATURE
WEAK
FULL
MENU EXIT
22
Page 26

Setting Picture (continued)
Adjusting Screen Aspect
Press to displaythe menu mainpage.MENU
1
The picture menupage will bedisplayed automatically.
Press to access the submenu.OK
2
Press repeatedly to select item.SIZE MODE6
3
Press to select a desired aspect ratio.
4
You may also usethe button to select theaspect ratio between
FULL, ZOOM1, ZOOM2 NORMAL
ASPECT
and .
PICTURE MODE
CONTRAST
BRIGHTNESS
COLOR
TINT
SHARPNESS
NOISE REDUCE
SIZE MODE
MOVE
PICTURE
SELECT
NATURE
WEAK
FULL
MENU EXIT
FULL
ZOOM1
In this modethe picture isprogressively stretched towardeach side ofthe screen.
––
This feature is recommended for viewing "letter-box" movie(picture with a black bar on the top and bottom). If you
––
watch a 4:3picture in thismode, the picturewill be expandedand some informationat the top andbottom will belost.
––
ZOOM2
In this mode the pictureis verticallystretched toward up side ofthe screen so that when viewing programswith title at the
bottom, the bottomtitle can berevealed.
––
NORMAL
In this modethe picture isdisplayed without modification,in its nativeaspect ratio.
Reducing Picture Noise
Press to displaythe menu mainpage.MENU
1
The picture menupage will bedisplayed automatically.
Press to access the submenu.OK
2
Press repeatedly to select item.NOISE REDUCE6
3
Press to select , or .OFF WEAK STRONG
4
Sometimes a noisypicture may appearon the screenbecause of poorsignal.
This function helpsto enhance thepicture quality byreducing the noise.
PICTURE MODE
CONTRAST
BRIGHTNESS
COLOR
TINT
SHARPNESS
NOISE REDUCE
SIZE MODE
MOVE
PICTURE
SELECT
NATURE
WEAK
FULL
MENU EXIT
23
Page 27

Setting Timer
Setting Clock Time
Making use ofthis function canset the currenttime for theTV.
Press to displaythe menu mainpage.MENU
1
Press repeatedly to select menu.FUNCTION56
2
Press to access the submenu.OK
3
The [ ] item willbe highlighted automatically.CLOCK
Press to access.
4
UseOK56to set the hour (1-12) and the minute (00-59), use to switch between the hour
and minute.
Press repeatedly toexit.MENU
5
NOTE:
Before setting the and , pleaseset the item first.TIME ON TIMEOFF CLOCK
Setting ON timer
With the ONtimer,the TV willautomatically turn onat a presettime.
Press to displaythe menu mainpage.MENU
1
Press repeatedly to select .FUNCTION menu56
2
Press to access the submenu.OK
3
CLOCK
TIME ON
TIME OFF
SLEEP TIMER
CLOSED CAPTION
PARENTAL CONTROL
MOVE
CLOCK
TIME ON
TIME OFF
SLEEP TIMER
CLOSED CAPTION
PARENTAL CONTROL
FUNCTION
SELECT
FUNCTION
AM--:--
AM--:--
AM--:--
OFF
OFF
MENU EXIT
AM11:22
AM--:--
AM--:--
OFF
OFF
Press to select item.TIME ON6repeatedly
4
Press to access.
5
UseOK56to set the hour (1-12) and the minute (00-59), use to switch between the hour
and minute.
Press repeatedly toexit.MENU
6
MOVE
SELECT
MENU EXIT
Setting OFF timer
With the OFFtimer,the TV willautomatically turn offat a presettime.
Press to displaythe menu mainpage.MENU
1
Press repeatedly to select menu.FUNCTION56
2
Press to access the submenu.OK
3
Press repeatedly toselect item.TIME OFF6
4
Press to access.
5
UseOK56to set the hour (1-12) and the minute (00-59), use to switch between the hour
and minute.
Press repeatedly toexit.MENU
6
NOTE:
The timeinterval between CLOCK and TIME OFF should be above 1minute. When the last 1 minute comes, thereexit two situations.
The one is: the unit will show you after how many seconds the set willbe turned off. During this period if you do not want the unit to be
turned off, pressany button toexit before theunit turn off.
The other is: the OFF timer will be canceled automatically under certain conditions such as sound mute, picture freeze or other OSD
items adjustment etc.
CLOCK
TIME ON
TIME OFF
SLEEP TIMER
CLOSED CAPTION
PARENTAL CONTROL
MOVE
POWER DOWN:
FUNCTION
SELECT
58
AM11:22
AM--:--
AM--:--
OFF
OFF
MENU EXIT
24
Page 28

Setting Timer (continued)
Setting Sleep Timer
Making use ofthis function allowsyou to havethe set automaticallyturn off after apreset time.
Press to displaythe menu mainpage.MENU
1
Press repeatedly to select menu.FUNCTION56
2
Press to access the submenu.OK
3
Press repeatedly to highlight item.SLEEP TIMER6
4
CLOCK
FUNCTION
TIME ON
TIME OFF
SLEEP TIMER
CLOSED CAPTION
PARENTAL CONTROL
AM11:22
AM--:--
AM--:--
OFF
OFF
Press repeatedly to select .
5
Press repeatedly to exit.MENU
6
Note:
You may quickly setthe sleep timeby using the button onthe remote control.SLEEP
MOVE
SELECT
MENU EXIT
25
Page 29

Customizing the Sound
Press to displaythe menu mainpage.MENU
1
Press repeatedly to select menu.SOUND56
2
Press to access the submenu.OK
3
Press repeatedly toselect the optionitems you wantto adjust.6
4
Press to adjustthe value .
5
Using the Preset Sound Mode
Press to displaythe menu mainpage.MENU
1
Press repeatedly to select menu.SOUND56
2
Press to access the submenu.OK
3
Press repeatedly toselect item.SOUND MODE6
4
Setting Sound
SOUND SOURCE
SOUND MODE
BASS
TREBLE
BALANCE
MTS
MOVE
SOUND SOURCE
SOUND MODE
BASS
TREBLE
BALANCE
MTS
SOUND
SELECT
SOUND
MAIN
NORMAL
STEREO
MENU EXIT
MAIN
NORMAL
STEREO
Press to selecta desired soundmode.
5
There are three preset sound modes ( , and ) and one user-set sound
mode ( ). Each presetmode has itsown sound settings(Bass and Treble ).
PERSONAL
NORMAL
MUSIC
NEWS
Adjusted settings arestoredin mode.
You may directly use the button to quickly selectsound mode.SOUND MODE
: Set thevalue of Bassand Treble to middlelevel.
: Set thevalue of Bassand Treble to higherlevel.
: Set thevalue of Bassand Treble to lowerlevel.
PERSONAL
NORMAL MUSIC NEWS
MOVE
MOVE
SELECT
SELECT
MENU EXIT
MENU EXIT
26
Page 30

Selecting Stereo Mode
Press to displaythe menu mainpage.MENU
1
Press repeatedly to select menu.SOUND56
2
Press to access the submenu.OK
3
Press repeatedly toselect item.MTS6
4
Press to select adesired stereo mode.
5
Setting Sound(continued)
SOUND SOURCE
SOUND
SOUND MODE
BASS
TREBLE
BALANCE
MTS
MAIN
NORMAL
STEREO
The relationships betweenBroadcast signal, Usersetting and Outputare shown
as follows:
Broadcast signal
User setting
MONO
MONO
STEREO
SAP
MONO
STEREO
STEREO
SAP
MONO
SAP
STEREO
SAP
MONO
STEREO&SAP
STEREO
SAP
Output
MONO
MONO
MONO
MONO
STEREO
STEREO
MONO
MONO
SAP
MONO
STEREO
SAP
MOVE
SELECT
MENU EXIT
MONO: monophonic audio STEREO:stereo audio SAP: second audioprogram
NOTE:
You may directly use the button to quickly select stereo mode. With every press of
this button, thestereo mode changesas follows:
MONO STEREO
MONO SAP
MONO STEREO SAP
STEREO
(If the program is )STEREO
(If the program is )SAP
(If the program is )STEREO & SAP
27
Page 31

Adjusting OSD Position
Press to displaythe menu mainpage.MENU
1
Press repeatedly to select menu.OSD56
2
Press to access the submenu.OK
3
Press repeatedly to select or item.H-POSITION V-POSITION6
4
Press to adjust theOSD position.
5
Adjusting OSD Transparency
Press to displaythe menu mainpage.MENU
1
Press repeatedly to select menu.OSD56
2
Press to access the submenu.OK
3
Press repeatedly to select item.TRANSPARENCY6
4
Adjusting On-Screen Display
LANGUAGE
H-POSITION
V-POSITION
DURATION
TRANSPARENCY
MOVE
LANGUAGE
H-POSITION
V-POSITION
DURATION
TRANSPARENCY
OSD
SELECT
OSD
ENGLISH
MENU EXIT
ENGLISH
Press to adjust theOSD transparence.
5
Setting OSD Timeout
This setting allowsyou to setthe time forthe main OSDmenu to bedisplayed on screen.
Press to displaythe menu mainpage.MENU
1
Press repeatedly to select menu.OSD56
2
Press to access the submenu.OK
3
Press repeatedly to select item.DURATION6
4
Press to adjust the value.
5
MOVE
LANGUAGE
H-POSITION
V-POSITION
DURATION
TRANSPARENCY
MOVE
SELECT
OSD
SELECT
MENU EXIT
ENGLISH
MENU EXIT
28
Page 32

PIP Operations
Viewing and Changing the Position of the PIP Frame
Press to displaythe menu mainpage.MENU
1
Press repeatedly to select menu.SOURCE56
2
Press to access the submenu.OK
3
The [PIP MODE] item will be highlighted automatically.
Press repeatedly to select OFF, P1S1, P1S2, P2S1, P2S2, P3S1, P3S2,P4S1 or
4
P4S2.
Press to exit.MENU
5
NOTE:
You may quicklyopen or closePIP frame bydirectly using the button.
You may alsochange the positionof the PIP frameand adjust thesize
by using button.
SIZE
Selecting the Signal Source for the PIP Frame
PIP
Main frame
PIP frame
PIP MODE
PICTURE SOURCE
SUB PICTURE
ADD/ERASE
ANTENNA
AUTO SEARCH
MOVE
MOVE
SOURCE
SELECT
SELECT
P1S1
TV
VGA
ERASE
AIR
MENU EXIT
MENU EXIT
With the PIPworking, press to display themenu main page.MENU
1
Press repeatedly to select menu.SOURCE56
2
Press to access the submenu.OK
3
Press repeatedly to select item.SUB PICTURE6
4
Press to select signal source for the PIP frame.
5
The input signalsource are dividedinto two groups.One contains TV, AV1
andAV2/SV, theother contains YPBPR,VGAand HDMI.
If the input signal source selected for themain frame is one kind from one group, you mayonly
allows to select a kindof input signal sourcefor PIP framefrom the othergroup.
Selecting Sound Source for PIP Frame
With the PIPworking, press to display themenu main page.MENU
1
Press repeatedly to select menu.SOUND56
2
Press to access the submenu.OK
3
The [SOUND SOURCE] item will be highlighted automatically.
Press to select between or .MAIN SUB
4
PIP MODE
PICTURE SOURCE
SUB PICTURE
ADD/ERASE
ANTENNA
AUTO SEARCH
MOVE
MOVE
SOUND SOURCE
SOUND MODE
BASS
TREBLE
BALANCE
MTS
SOURCE
SELECT
SELECT
SOUND
P1S1
TV
VGA
ERASE
AIR
MENU EXIT
MENU EXIT
MAIN
NORMAL
STEREO
Press to exit.MENU
5
NOTE:
If you selectMAIN, the mainframe' sound willbe output;
If you selectSUB, the pipframe will behighlighted with ablue border andthe sound will beoutput.
You may directlyuse the button forselection.
PIP INPUT
29
MOVE
SELECT
MENU EXIT
Page 33

Viewing Closed Captions
The unit decodes and displays the closed captions that are broadcast with certain TV shows. These captions are usually subtitles for the
hearing impaired or foreign language translations. All VCRs record the closed caption signal from television programs, so home-recorded
video tapes also provide closed captions. Most prerecorded commercial video tapes provide closed captions as well. Check for the closed
caption symbol inyour television scheduleand on thetape’s packaging: .
Note:
Not all theprograms and videoswill offer closedcaptioning. Please lookfor the symbol toensure that captionswill be shown.
Setting Closed Caption
Press to displaythe menu mainpage.MENU
1
Press repeatedly to select FUNCTION menu.56
2
Press to access the submenu.OK
3
Press repeatedly to select item.CLOSED CAPTION6
4
CLOCK
TIME ON
TIME OFF
SLEEP TIMER
CLOSED CAPTION
PARENTAL CONTROL
FUNCTION
AM11:22
AM--:--
AM--:--
OFF
OFF
Press repeatedly to select a desired mode.
5
You may select betweenOFF, CC1, CC2, TEXT1, TEXT2,CC3, CC4, TEXT3,TEXT4 andON MUTE.
The Closed Captionbroadcasts can beviewed in twomodes: CAPTION andTEXT. For eachmode, four channelsare available.
The [CAPTION] mode shows subscripts of dialogues and commentaries ofTV dramas and news programs while allowing a clear view
of the picture.
The [TEXT] mode displays various information over the picture (such as TV program schedule, weather forecast, etc.) that is
independent of theTV programs.
If you selectON MUTE mode,when you pressthe button, CC1modecaption will bedisplayed on screen.MUTE
Note:
You may quicklyselect CCD modeby using the button directly.CAPTION
MOVE
SELECT
MENU EXIT
30
Page 34

Adjustment in VGA Mode
Adjusting the Picture
Press to displaythe menu mainpage.MENU
Press to displaythe menu mainpage.MENU
1
The [PICTURE] menu will be highlighted automatically.
Press to access the submenu.OK
2
Press repeatedly to select the item you wish to change.56
3
Press to adjust the value of the item.
4
Press repeatedly to exit.MENU
5
Adjusting Image Size
Press to displaythe menu mainpage.MENU
1
Press repeatedly to select menu.SCREEN56
2
Press to access the submenu.OK
3
The [SIZE MODE] item will be highlighted automatically.
PICTURE MODE
CONTRAST
BRIGHTNESS
COLOR TEMP.
COLOR-R
COLOR-G
COLOR-B
MOVE
SIZE MODE
H-POSITION
V-POSITION
CLOCK
PHASE
AUTO ADJUST
PICTURE
SELECT
SCREEN
NATURE
NORMAL
MENU EXIT
FULL
Press to select or .FULL ASPECT
4
Press repeatedly to exit.MENU
5
MOVE
SELECT
MENU EXIT
31
Page 35

Adjustment in VGA Mode(continued)
Changing the Position of Image
Press to displaythe menu mainpage.MENU
1
Press repeatedly to select menu.SCREEN56
2
Press to access the submenu.OK
3
Press repeatedly to select or item.H-POSITION V-POSITION6
4
Press toadjust the value ofthe item untilthe screen iswell-aligned.
5
Press repeatedly toexit.MENU
6
Adjusting the CLOCK and PHASE
Press to displaythe menu mainpage.MENU
1
Press repeatedly to select menu.SCREEN56
2
Press to access the submenu.OK
3
Press repeatedly to select or item.CLOCK PHASE6
4
SIZE MODE
H-POSITION
V-POSITION
CLOCK
PHASE
AUTO ADJUST
MOVE
SIZE MODE
H-POSITION
V-POSITION
CLOCK
PHASE
AUTO ADJUST
SCREEN
SELECT
SCREEN
FULL
MENU EXIT
FULL
Press toadjust the value ofthe item.
5
Press repeatedly toexit.MENU
6
You may find that images blur, depending on the clock phase of your PC's Processor. If you experience blurring, you can obtain a
clearer image byadjusting the phaseitem.
Adjust the clock frequency of the set's internal clock signal. If shimmering or rainbow-like noise is apparent in the image, try adjusting
the clock frequencyitem.
MOVE
SELECT
MENU EXIT
Adjusting the Picture Automatically
If you arenot satisfied withthe picture, youmay adjust thepicture by usingthis function.
Press to displaythe menu mainpage.MENU
1
Press repeatedly to select menu.SCREEN56
2
Press to access the submenu.OK
3
Press repeatedly to select item.AUTO ADJUST6
4
Press to start adjusting.OK
5
SIZE MODE
H-POSITION
V-POSITION
CLOCK
PHASE
AUTO ADJUST
MOVE
SCREEN
SELECT
FULL
MENU EXIT
32
Page 36

Adjusting ParentalControlSettings
Parental Control
This function allows TV programs to be restricted and TV usage to be controlled based on FCC data. It prevents children from watching
violent or sexualscenes that maybe harmful.
Restriction of TV programs includes two ratings that contain information about the program: the MPAA rating and the TV Parental
Guidelines. The MPAA rating is restrictedby age. TVParental Guidelines arerestricted by ageand content.
Since a TVprogram may useeither the MPAArating or theTV Guidelines, bothshould be adjustedfor complete control.
[1] TV RATING
Rating
content based
LD
S
TV-Y (All children)
TV-Y7 (Direct to Older Children)
age
based
TV-G (General Audience)
TV-PG (Parental Guidance Suggested)
TV-14 (Parents Strongly Cautioned)
TV-MA (Mature Audience Only)
Sexually Suggestive Dialog
Content Rating can be set but this Rating is not normally
broadcast by TVStation.
Content Rating canbe set.
D:
Adult Language
L:
Sexual Situation
S:
Violence
V:
Fantasy Violence
FV:
Note:
Age-based ratings canbe modified bythe content-based ratingsbut only inthe combinations indicatedby an in thetable above.
Choosing lower age-basedrating blocks thehigher age-based ratingsregardless of contentratings settings.
Example 1:
When TV-Y7 in the age-based rating is set to BLOCK, this will automatically block the higher
ratings: TV-G, TV-PG, TV-14 and TV-MA. In addition, D, L, S, V and FV in content are
automatically blocked.
TV-Y
TV-Y7
TV-G
TV-PG
TV-14
TV-MA
[B:BLOCK U:UNBLOCK]
MOVE
FUNCTION
All
U
U
B
B
B
B
B
USE PIP INPUT KEY TO
BLOCK/UNBLOCK
SELECT
S
FV
V
B
B
B
BB
B
B
B
MENU EXIT
Example 2:
FVV
D
L
B
B
B
B
When TV-14 in the age-based rating is set to BLOCK, this will automatically block the higher
ratings: TV-MA.
In addition, if you block “L” sub-rating in TV-PG, then the in
D, L, S, V and FV in content
TV-14and TV-MAwillautomatically be blocked.
33
FUNCTION
All
TV-Y
U
U
B
TV-Y7
B
TV-G
B
TV-PG
B
TV-14
TV-MA
B
[B:BLOCK U:UNBLOCK]
USE PIP INPUT KEY TO
BLOCK/UNBLOCK
MOVE
SELECT
S
FV
V
B
B
B
BB
B
B
B
D
L
B
B
B
B
MENU EXIT
Page 37

Adjusting ParentalControlSettings (continued)
[2] MOVIE RATING (MPAA)
Rating
GENERAL AUDIENCES. All ages admitted.
PARENTAL GUIDANCE SUGGESTED. Some material may not be suitable for children.
PARENTAL STRONGLY CAUTIONED. Some material may be inappropriate for children under 13.
RESTRICTED. Under 17 requires accompanying parent or adult guardian.
NO ONE 17 AND UNDER ADMITTED.
X Rating is an older rating that is unified with NC-17 but may be encoded in the data of older movies.
age
based
G
PG
PG-13
R
NC-17
X
Note:
The Movie ratingis only age-based.
Example 1:
“PG-13” in theage-based rating isblocked, this willautomatically block thehigher
ratings “R”, “NC-17”,“X” also.
Example 2:
G
PG
PG-13
R
NC-17
X
[B:BLOCK U:UNBLOCK]
MOVE
FUNCTION
USE PIP INPUT KEY TO
BLOCK/UNBLOCK
SELECT
U
U
B
B
B
B
MENU EXIT
“R” in theage-based rating isblocked, this willautomatically block thehigher
rating “NC-17”, “X”also.
Accessing PARENTAL CONTROL
Press the button to displaythe menu main page.;MENU
1
Press repeatedly to select menu.FUNCTION56
2
Press to accessthe submenu;OK
3
Press repeatedly to select item;PARENTAL CONTROL6
4
Press to accessand then theunit requires youto input password.OK
5
Directly use 0~9 to input password.
The default passwordis 0000, youcan change thepassword by yourself.
The unit allows you to access the item if you input the right
password, or you will bedenied.
number buttons
PARENTAL CONTROL
G
PG
PG-13
R
NC-17
X
[B:BLOCK U:UNBLOCK]
MOVE
CLOCK
TIME ON
TIME OFF
SLEEP TIMER
CLOSED CAPTION
PARENTAL CONTROL
MOVE
FUNCTION
USE PIP INPUT KEY TO
BLOCK/UNBLOCK
SELECT
FUNCTION
SELECT
U
U
U
B
B
B
MENU EXIT
AM--:--
AM--:--
AM--:--
OFF
OFF
MENU EXIT
34
Page 38

Adjusting ParentalControlSettings (continued)
Changing the Password
After accessing the menu, press repeatedly to select
1
CHANGE PASSWORD
Press to accessand then theunit requires youto input yournew password.
2
3
OK
Directly use 0~9number buttons toinput and thenconfirm again.
Press repeatedlyto exit.MENU
PARENTAL CONTROL
item.
6
Be sure towrite down yourpassword and retainit for futureuse.
Turning PARENTAL CONTROL ON or OFF
After accessing the menu, the [ ] item will be
1
highlighted automatically.
Press to select or .ON OFF
2
Press repeatedlyto exit.MENU
3
NOTE:
Only when youset this itemto does thesettings of works.ON PARENTALCONTROL
PARENTAL CONTROL CONTROL
Adjusting the TV RATING
CONTROL
TV RATING
MOVIE RATING
ENGLISH RATING
FRENCH RATING
CHANGE PASSWORD
MOVE
CONTROL
TV RATING
MOVIE RATING
ENGLISH RATING
FRENCH RATING
CHANGE PASSWORD
MOVE
FUNCTION
SELECT
FUNCTION
SELECT
OFF
MENU EXIT
ON
MENU EXIT
After accessing , press repeatedly toselect item.PARENTAL CONTROL TV RATING6
1
Press to accesssubmenu.OK
2
Press 56 repeatedly toselect a desiredrating you wantto set andpress
3
button to blockor unblock.PIPINPUT
This will automaticallyblock the higherage-based ratings. You may setthe
individual content-based ratingsas follow.
Press repeatedly to select a desired content rating.
4
Press button to block or unblock this rating.PIP INPUT
5
Press repeatedly to exit.MENU
6
Adjusting the MOVIE RATING
After accessing , press repeatedly toselect item.PARENTAL CONTROL MOVIE RATING6
1
Press to accesssubmenu.OK
2
Press repeatedly to select adesired rating youwant to set.56
3
Press button to block or unblock this rating.PIP INPUT
4
Press the repeatedly to exit.MENU
5
FUNCTION
All
TV-Y
U
U
B
TV-Y7
B
TV-G
B
TV-PG
B
TV-14
TV-MA
B
[B:BLOCK U:UNBLOCK]
USE PIP INPUT KEY TO
BLOCK/UNBLOCK
MOVE
G
PG
PG-13
R
NC-17
X
[B:BLOCK U:UNBLOCK]
MOVE
SELECT
FUNCTION
USE PIP INPUT KEY TO
BLOCK/UNBLOCK
SELECT
S
FV
V
B
B
B
BB
B
B
B
U
U
U
B
B
B
D
L
B
B
B
B
MENU EXIT
MENU EXIT
35
Page 39

Adjusting ParentalControlSettings (continued)
Adjusting ENGLISH RATING
After accessing , press repeatedly to
1
select item.
ENGLISH RATING
Press to accesssubmenu.OK
2
Press repeatedly to selecta desired ratingyou want toset.56
3
Press button to blockor unblock thisrating .PIP INPUT
4
Press the repeatedly to exit.MENU
5
PARENTAL CONTROL
6
ENGLISH RATING CHART
E
C
C8+
G
PG
14+
18+
Exempt - Exempt programming includes: news, sports, documentaries and other information programming, talk shows,
music videos, and variety programming.
Programming intended for children under age 8. No offensive language, nudity or sexual content.
Programming generally considered acceptable for children 8 years and over. No profanity, nudity or sexual content.
General programming, suitable for all audiences.
Parental Guidance suggested. Some material may not be suitable for children.
Programming contains themes or content which may not be suitable for viewers under the age of 14. Parents are
strongly cautioned to exercise discretion in permitting viewing by pre-teens and early teens.
Intended for viewers 18 years and older and might contain depictions of violence.
E
C
C8+
G
PG
14+
18+
[B:BLOCK U:UNBLOCK]
MOVE
FUNCTION
USE PIP INPUT KEY TO
BLOCK/UNBLOCK
SELECT
U
U
B
B
B
B
B
MENU EXIT
Adjusting FRENCH RATING
After accessing , press repeatedly to
1
select item.
FRENCH RATING
Press to accesssubmenu.OK
2
Press repeatedly to selecta desired ratingyou want toset.56
3
Press button to blockor unblock thisrating .PIP INPUT
4
Press the repeatedly to exit.MENU
5
FRENCH RATING CHART
E
G
8 ANS+
13 ANS+
16 ANS+
18 ANS+
PARENTAL CONTROL
6
Exempt - Exempt programming.
General - Programming intended for audience of all ages. Contains no violence, or the violence content is minimal
or is depicted appropriately.
8+ General - Not recommended for young children. Programming intended for a broad audience but contains light
or occasional violence. Adult supervision recommended.
Programming may not be suitable for children under the age of 13 - Contains either a few violent scenes or one or
more sufficiently violent scenes to affect them. Adult supervisionstrongly suggested.
Programming may not be suitable for children under the age of 16 - Contains frequent scenes of violence or
intense violence.
Only for adult viewing.Could contain frequent violent scenes and extreme violence.
E
G
8ANS+
13ANS+
16ANS+
18ANS+
[B:BLOCK U:UNBLOCK]
MOVE
FUNCTION
USE PIP INPUT KEY TO
BLOCK/UNBLOCK
SELECT
U
U
U
B
B
B
MENU EXIT
36
Page 40

Troubleshooting
Before calling for repair service, check the following items for possible remedies to an encountered
symptom.
Symptoms
“Ghost” or double images
No power
No picture
Good picture but no sound
Good sound but poor colour
Poor picture
Horizontal dotted line
Check item
=
This may be caused by obstruction to the aerial due to high rise buildings or hills.
Using a highlydirectional aerial mayimprove the picture.
=
Check that the AC powercord is pluggedinto the mainssocket.
=
Unplug the power cord, wait for 60 seconds. Then re-insert plug into the mains
socket and turnon the unitagain.
=
Check aerial connections at the rear of the unit to see if it is properly connected to
the unit.
=
Possible broadcast station trouble. Try another channel.
=
Adjust the contrast and brightness settings.
=
Select a correct input.
=
Is a non-compatible signal being input?
=
Increase the VOLUME.
=
Check that the unit is not muted.
=
Adjust the contrast, colour and brightness settings.
=
Sometimes, poor picture quality occurs when having activated an S-VHS camera or
camcorder connected and having connected another peripheral at the same time. In
this case, switchoff one ofthe other peripherals.
=
Check whether theroom is toobright
=
This may be caused by electrical interference (e.g. hairdryer, nearby neon lights,
etc.)
=
Turn off the equipment.
=
Television not responding to
remote control
Snowy picture and noise
No stable or not
synchronized D-Sub picture
No output from one of the speakers
Control buttons do not work
Check whether the batteries are working. Replace if necessary.
=
Clean the remote control sensor lens on the unit.
=
Do not use the remote control under strong or fluorescent lighting.
=
The batteries should be inserted with polarity (+, -) aligned.
=
Check the aerial connection.
=
Check if you have selected the correct D-Sub mode in your PC.
=
Adjust Balance in the menu.SOUND
=
Unplug the power cord, wait for some seconds. Then re-plug the power cord and
turn on the unit again.
+ Do notuse in hot andcold rooms (locations)
• When theunit isused in rooms(locations) with low temperature, the picturemay leavetrails or appearslightly delayed.This is not
a malfunction, andthe unit will recoverwhen the temperature returnsto normal.
• Do notleave theunit in a hot orcold location.Also, do not leave theunit ina location exposed todirect sunlightor near aheater, as
this may causethe cabinet to deformand the LCD panelto malfunction.
(Storage temperature: 0°C to +50°C Working )temperature: 5°C to+40°C
Note:
If your problem is not solved, restart your TV by turning it off and then on again once.
Never attempt to repair a defective TV yourself.
37
Page 41

Specification
Type: LCD TV
Display Size diagonal: 26”
Power Supply: AC100-240V 50/60Hz
Power Consumption: 140W
Dimensions(inch): 35.6 (W) X 21.8 (H) X 9.1 (D)
Unit Weight(lbs): 50.6 lb
Receiving channel:
VHF 2-13
UHF 14-69
CATV 2-69, (A-6)-(A-1), A-W, (W+1)-(W+28)
Total 181 channels
TV system: NTSC-M
Design and specifications are subject to change without notice.
For service, support and warranty information, visit or call 1-866-396-6322.
"Polaroid" and “Polaroid and Pixel” are trademarks of Polaroid Corporation, Waltham, MA, USA.
www.pwwservice.com
38
Page 42

PRINTED IN
RECYCLED PAPER
604-L26U253-00
Ver. 1.0
 Loading...