

Page 1

20” HD-Ready Widescreen LCD TV
Model: FLM-201TM
Read these instructions carefully before operating your LCD TV.
20060915
1
Page 2

Table of contents
1. General Information........................................................................................................... 3
2. Safety Precautions .............................................................................................................. 4
3. Features ............................................................................................................................... 6
4. Ports ..................................................................................................................................... 7
5. Control Buttons................................................................................................................... 8
6. Accessories........................................................................................................................... 9
7. Remote Control................................................................................................................... 10
8. Summary of Remote Control Functions........................................................................... 11
9. Connections & Applications................................................................................................ 12
10. Controls & Adjustments ................................................................................................. 15
A. General Adjustments........................................................................................................... 15
Turning the LCD TV On and Off....................................................................................... 15
Viewing the Menus and On-Screen Displays..................................................................... 15
Switching between PC/Composite/S-Video/TV/Component Modes................................. 16
Switching Language Modes................................................................................................ 16
Setting the Sleep Timer....................................................................................................... 17
Adjusting the Volume......................................................................................................... 17
B. PC mode Adjustments......................................................................................................... 18
Adjusting the Contrast and Backlight Settings................................................................... 18
Adjusting PC Settings......................................................................................................... 18
Adjusting Sound Settings ................................................................................................... 19
Adjusting Equalizer Setting................................................................................................ 20
C. General TV mode Adjustment ............................................................................................ 22
Adjusting the TV Settings................................................................................................... 22
Sound Options .................................................................................................................... 22
Adjusting Picture Settings .................................................................................................. 23
Memorizing Channels......................................................................................................... 25
Changing Channels............................................................................................................. 27
Using Parent Control .......................................................................................................... 28
Setting Up Your Personal ID Number (PIN)...................................................................... 30
Setting Up Restrictions Using the "BLOCKING MOVIE" function ................................. 34
Viewing Closed Captions ................................................................................................... 36
D. Other Functions.................................................................................................................. 37
11. Troubleshooting................................................................................................................. 38
Service Information............................................................................................................. 40
12. PC Input Preset Timing Table ........................................................................................ 41
13. Specifications ..................................................................................................................... 42
2
Page 3

General Information
This wide active matrix TFT (thin film transistor) liquid crystal monitor is designed for use as a
stand alone TV as well as a display device for video electronics appliances and personal computers.
Important Information
Warning: To reduce the risk of fire or electric shock, do not expose this product to rain
or moisture.
CAUTION
Risk of electric
shock. Do not open.
Caution: To reduce the risk of electric shock, do not attempt to disassemble or modify this
device. There are no user-serviceable parts inside. Refer any service issues to
qualified service personnel.
Caution: FCC/ CSA regulations state that any unauthorized changes or modifications to this
equipment may void the user's authority to operate it.
Important: One Federal Court has held that unauthorized recording of copyrighted TV programs is
an infringement of U.S. copyright laws. Certain Canadian programs may also be copyrighted and
any unauthorized recording in whole or in part may be in violation of these rights.
WARNING:
Do not leave stationary images, patterns, or letterbox images on the screen for prolonged
periods of time as this may result in permanent damage to the LCD panel. This type of damage
is not covered under warranty. The following are examples of, but not limited to, potentially
hazardous display output: side bar images, video game patterns, closed captioning, channel
logos and letterbox black bars. To prevent this type of damage, it is recommended to display
constantly moving images that fill the screen as often as possible.
According to industrial standards for LCD display technology; there are a certain number of
allowable defective pixels. Although we produce panels with more than 99.9% active cells, there
still may be some cells that do not produce light or remain constantly lit. For further information,
please contact sales or technical support.
Thank You for Choosing This Product
Your new LCD TV was built utilizing the latest advancements in television technology. We are
proud to offer you a product that will provide convenient, dependable service and enjoyment for
years to come.
3
Page 4
Safety Precautions
1. Cleaning: Unplug the power cord from the AC outlet before cleaning the product. Use a damp
cloth to clean the product. Do not use liquid cleaners or aerosol cleaners.
2. Water and moisture: Do not use the product near water or areas of high moisture content such
as swimming pools, bathtubs or wet basements.
3. Heat sources: Keep the product away from heat sources such as radiators, heaters, stoves and
other heat-generating products (including amplifiers).
4. For added protection during a lightning storm or for extended periods of non-use, unplug the
power cord from the wall outlet and disconnect the antenna (if used). This will prevent damage
to the product due to power line surges.
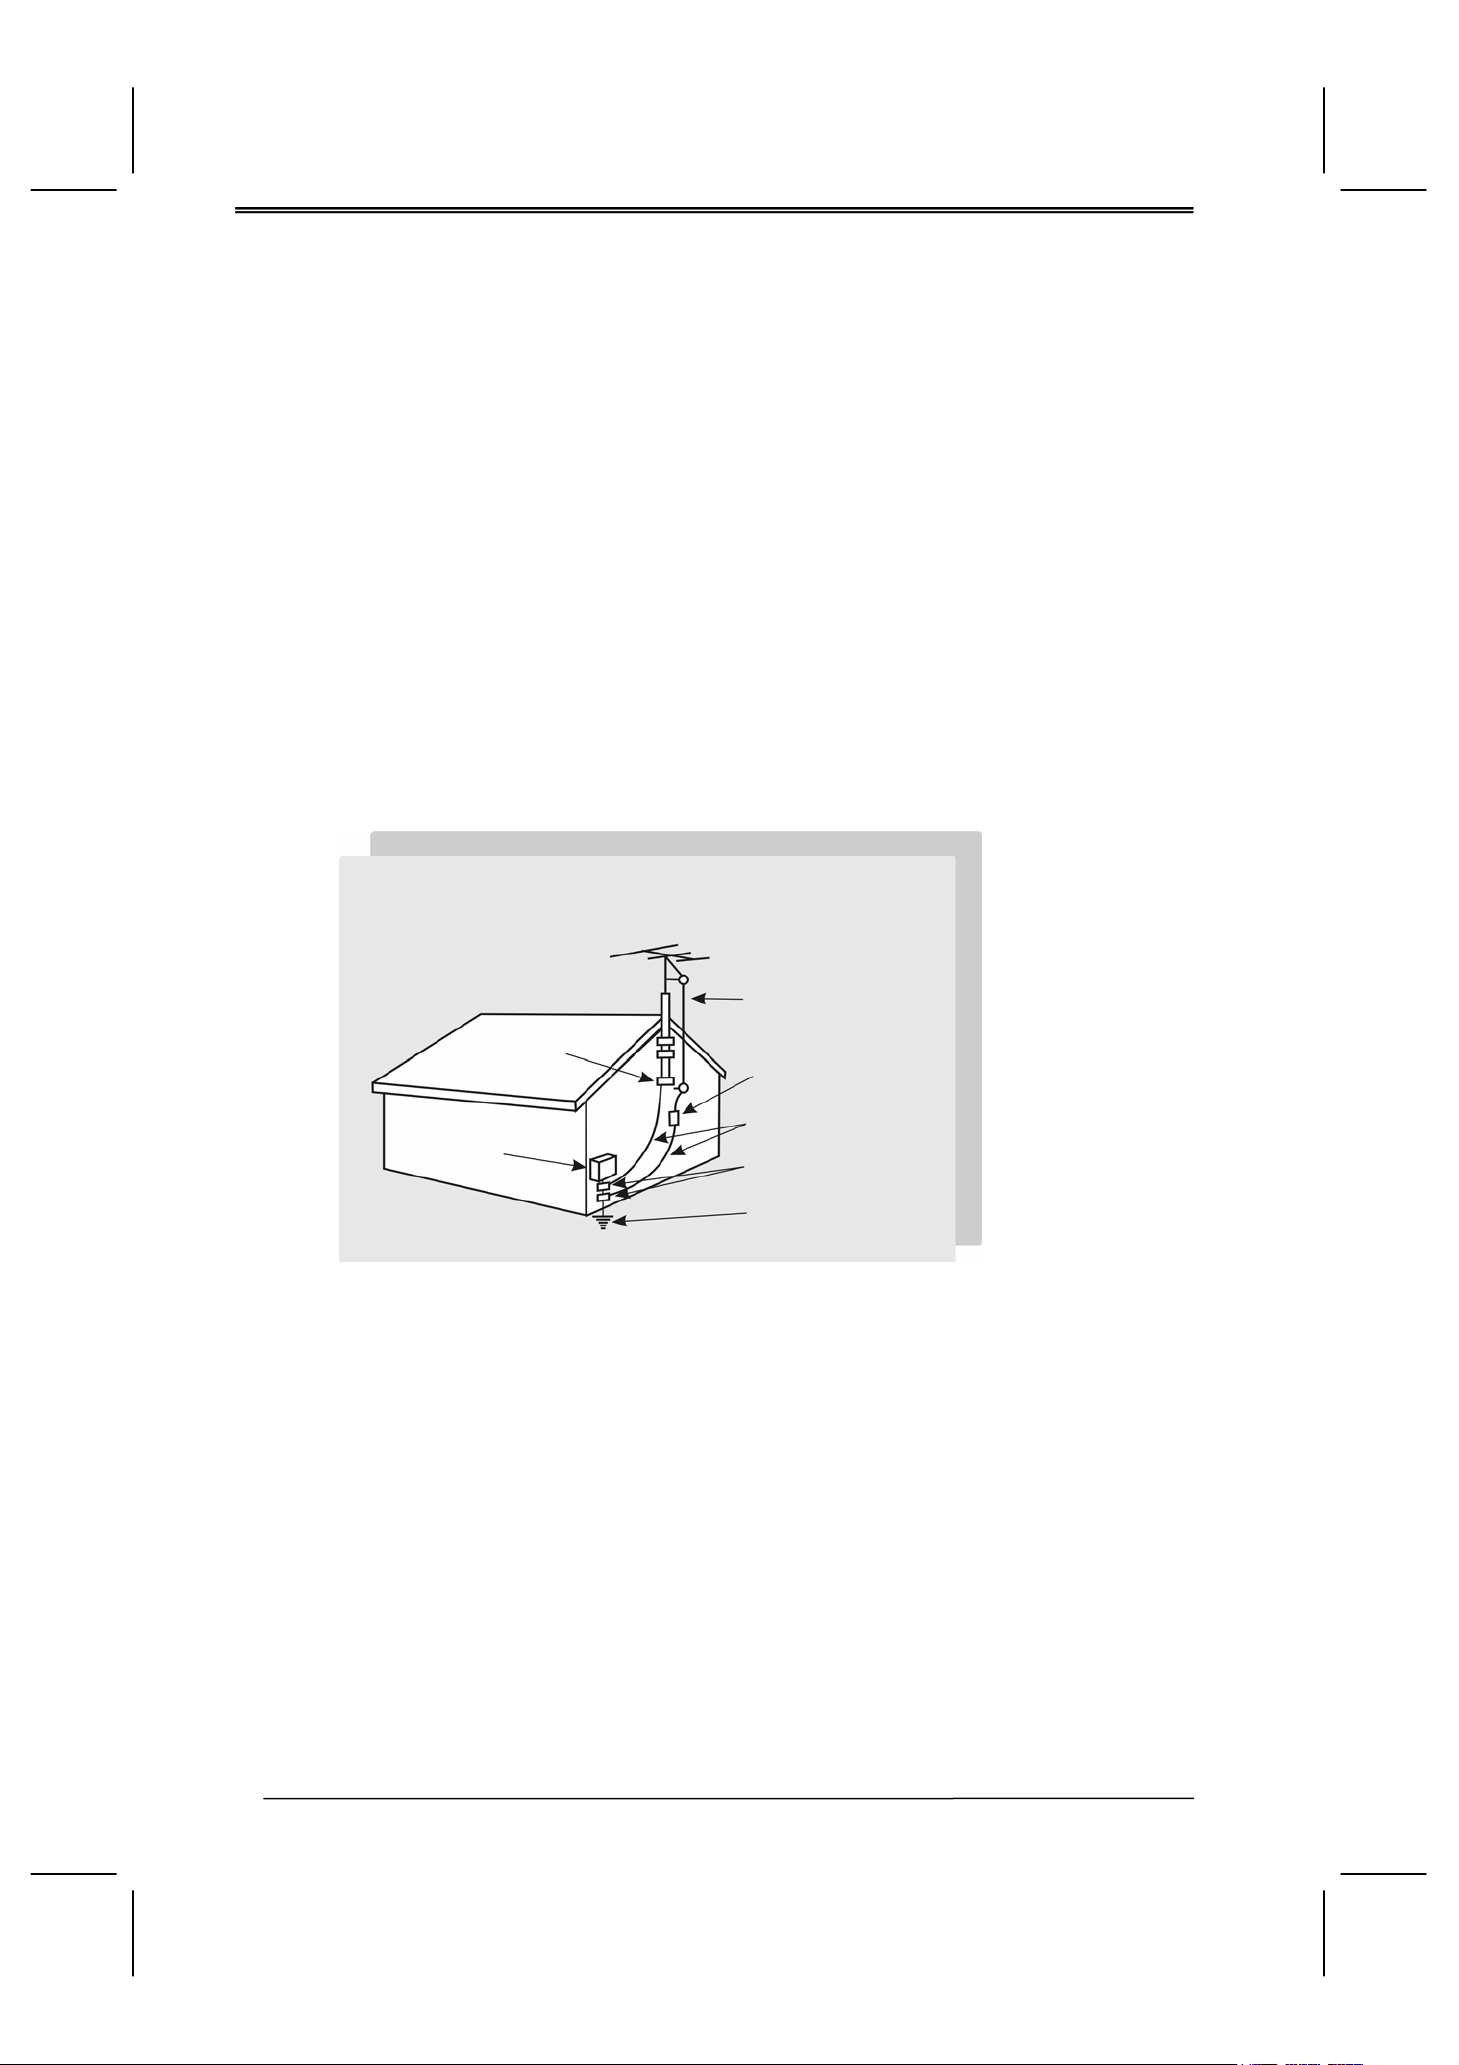
5. If an outside antenna is connected to the product, make sure the antenna is properly grounded so
as to provide some protection against voltage surges. (Coaxial connector shielding from cable
distribution system should be probably earthed.)
Example of antenna grounding
As per national electrical code
Ground clamp
Electric service
equipment
Antenna lead in wire
Antenna discharge
unit
Grounding conductors
Ground clamps
Power service
grounding
Electrode system
4
Page 5

6. Stand: Do not place the product on an unstable
cart, stand, tripod or table. Placing the product
on an unstable base can cause the product to
fall, resulting in serious personal injuries as
well as damage to the product. Use only a cart,
stand, tripod, bracket or table recommended by
the manufacturer or sold with the product. Use
only mounting hardware recommended by the
manufacturer.
7. Use care when moving the product on a rolling cart. Sudden stops, excessive force and uneven
floor surface can cause the product to fall from the cart.
8. Ventilation: The vents and other openings in the cabinet are designed for ventilation. Do not
cover or block these vents and openings as insufficient ventilation can cause overheating and/or
shorten the life of the product. Do not place the product on a bed, sofa, rug or other similar
surfaces since they can block ventilation openings. This product was not designed to operate in
an enclosed environment. Don't place the product in an enclosed space such as a bookcase or
rack, unless proper ventilation is provided or the manufacturer's instructions are followed.
9. The LCD panel used in this product is made of glass. Therefore, it can break if the product is
dropped or struck.
10. During the LCD panel lifespan it is normal for a few pixels to become defective. Non-active
pixels may appear on the screen as fixed points of red, blue or green. Refer pixel policy
questions to the reseller for further clarification on acceptable loss.
11. An outside antenna system should not be located in the vicinity of overhead power lines or other
electrical conduits. When installing an outside antenna, use extreme caution to prevent the
antenna from coming into contact with said items, as contact with them may be fatal.
5
Page 6

Features
List of Features
Your TV is designed with the latest technology and is a high-performance unit that includes the
following special features:
¾ Multiple input sources including Antenna terminal, D-SUB connector, DVI connector,
Composite, S-Video, and Component ports.
¾ Easy-to-use remote control and on-screen-display (OSD) menu system.
¾ Fine-tuning control for the sharpest picture possible.
¾ Built-in multi-channel sound decoder for stereo and bilingual broadcasts.
¾ Automatic channel program for up to 125 channels.
¾ Automatic sleep timer control from 10 to 120 minutes in 10-minute increments.
¾ Automatic Power Off feature after 10 minutes without a signal.
¾ Adjustable picture and sound settings that is stored in the TV's memory.
¾ Component video input for high definition TV programming (HDTV ready), resolution up to
720p, 1080i.
¾ 1680 x1050 (16:10) Panel Resolution to display two A4 pages of texts side by side.
¾ Automatic Picture Control (APC) and Aspect Ratio Control (ARC) functions for end user
customization of viewing preferences.
6
Page 7
Y
r
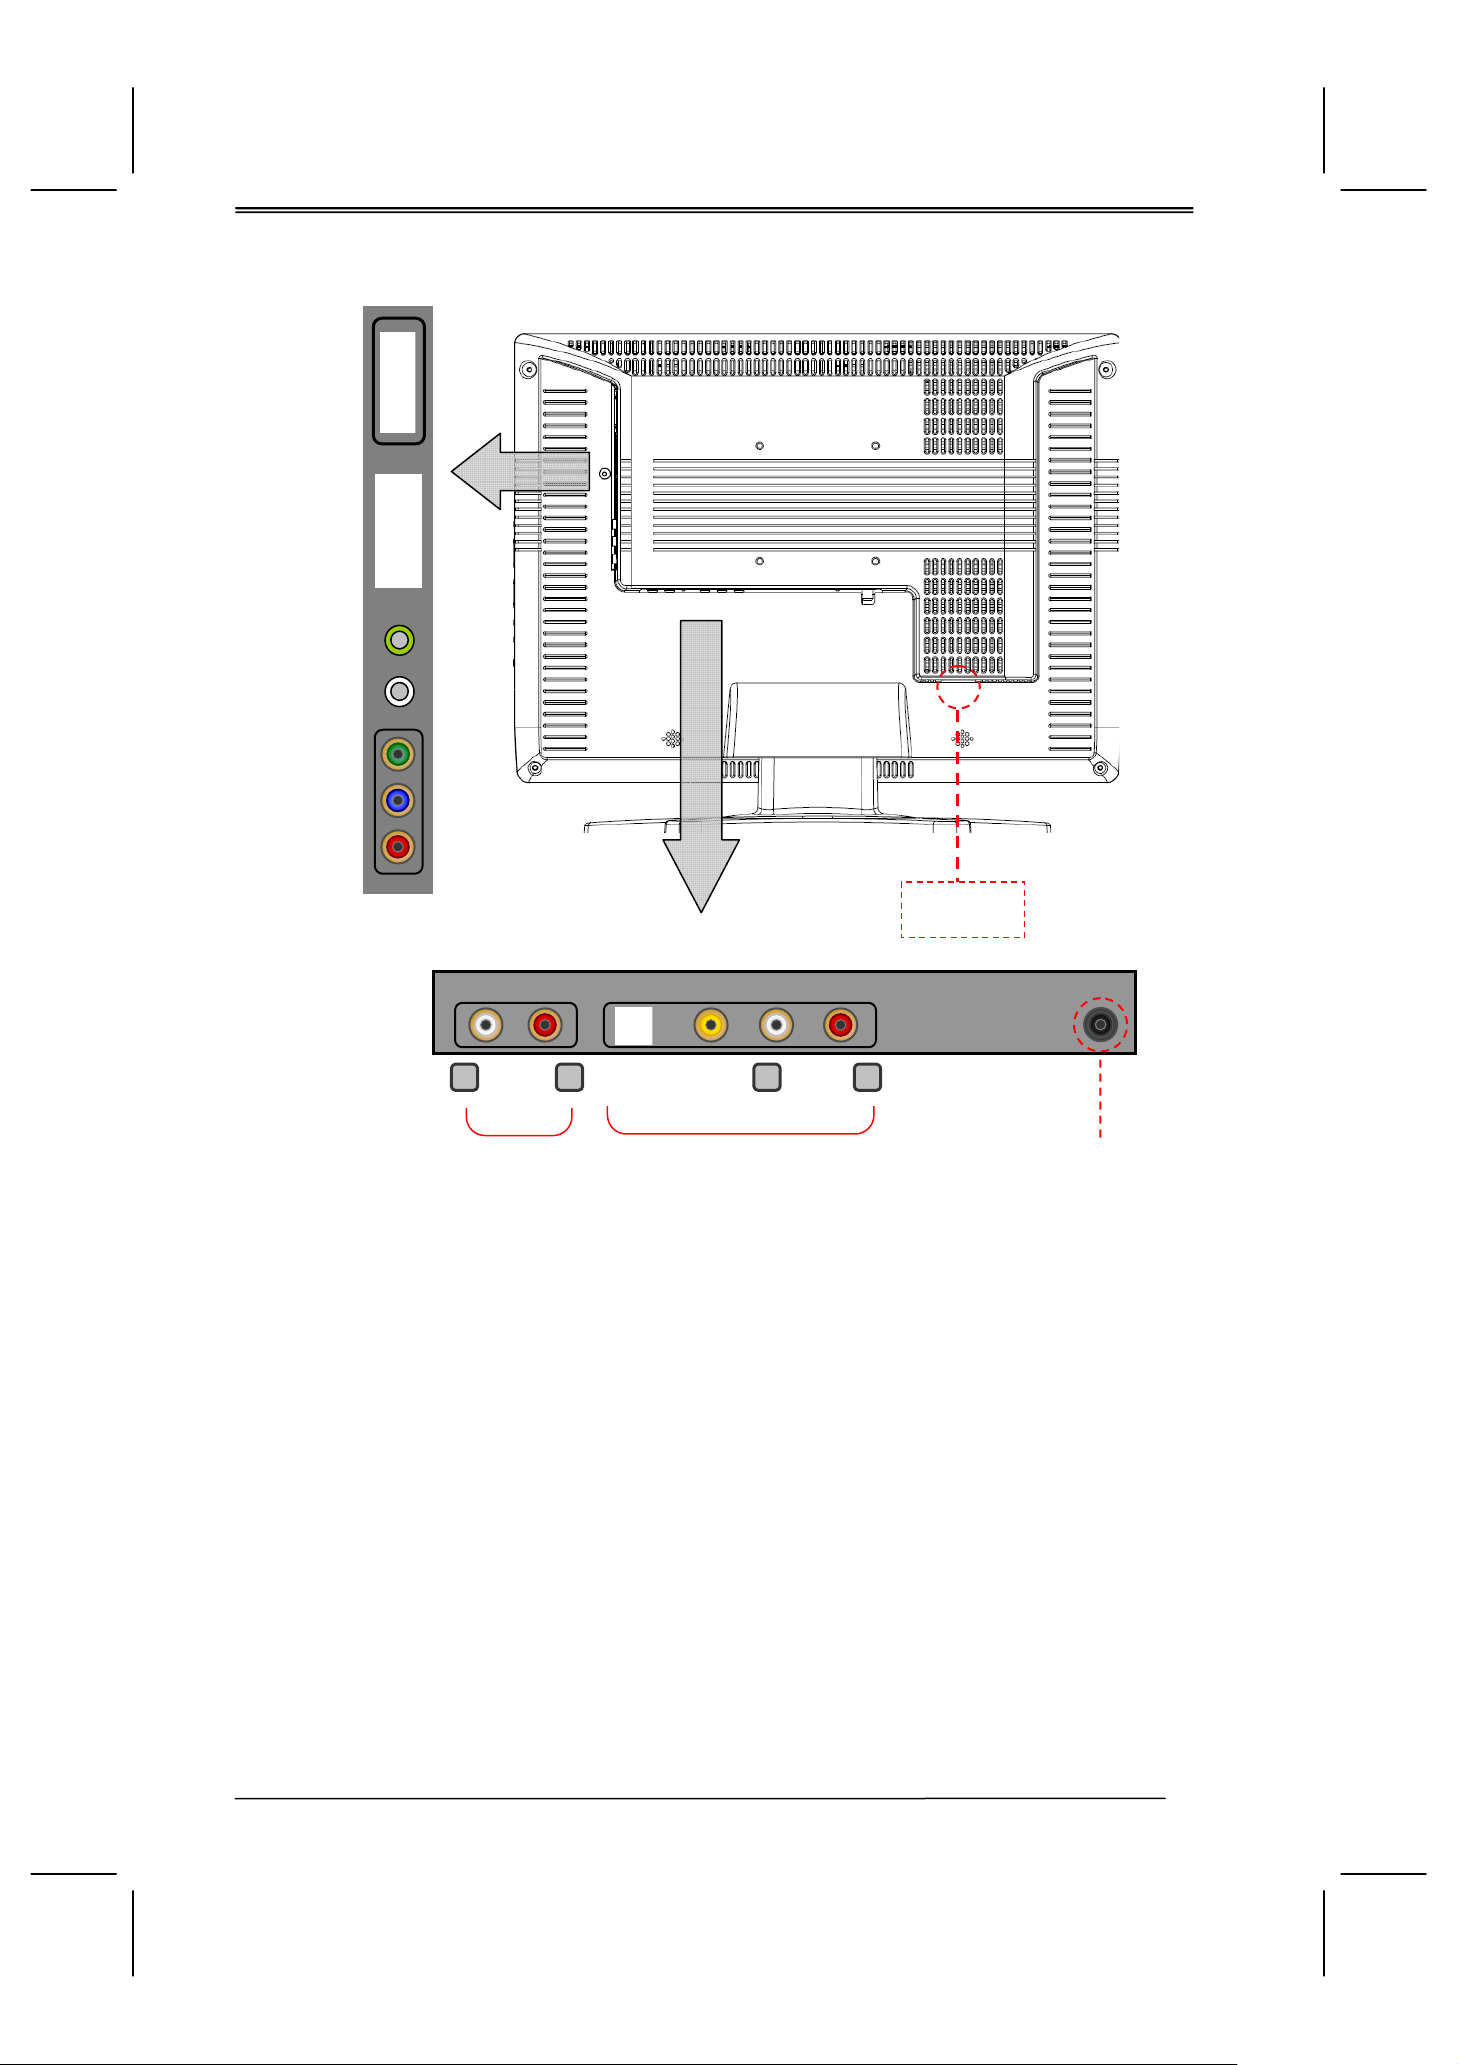
Ports
DVI
D-SUB
AUDIO IN
EARPHONE
Pb
P
AC POWE R
SOCKET
L R L R
AUDIO
S-VIDEO
VIDEO AUDIO
COMPONENT RF IN
COMPOSITE IN
7
Page 8
Control Buttons
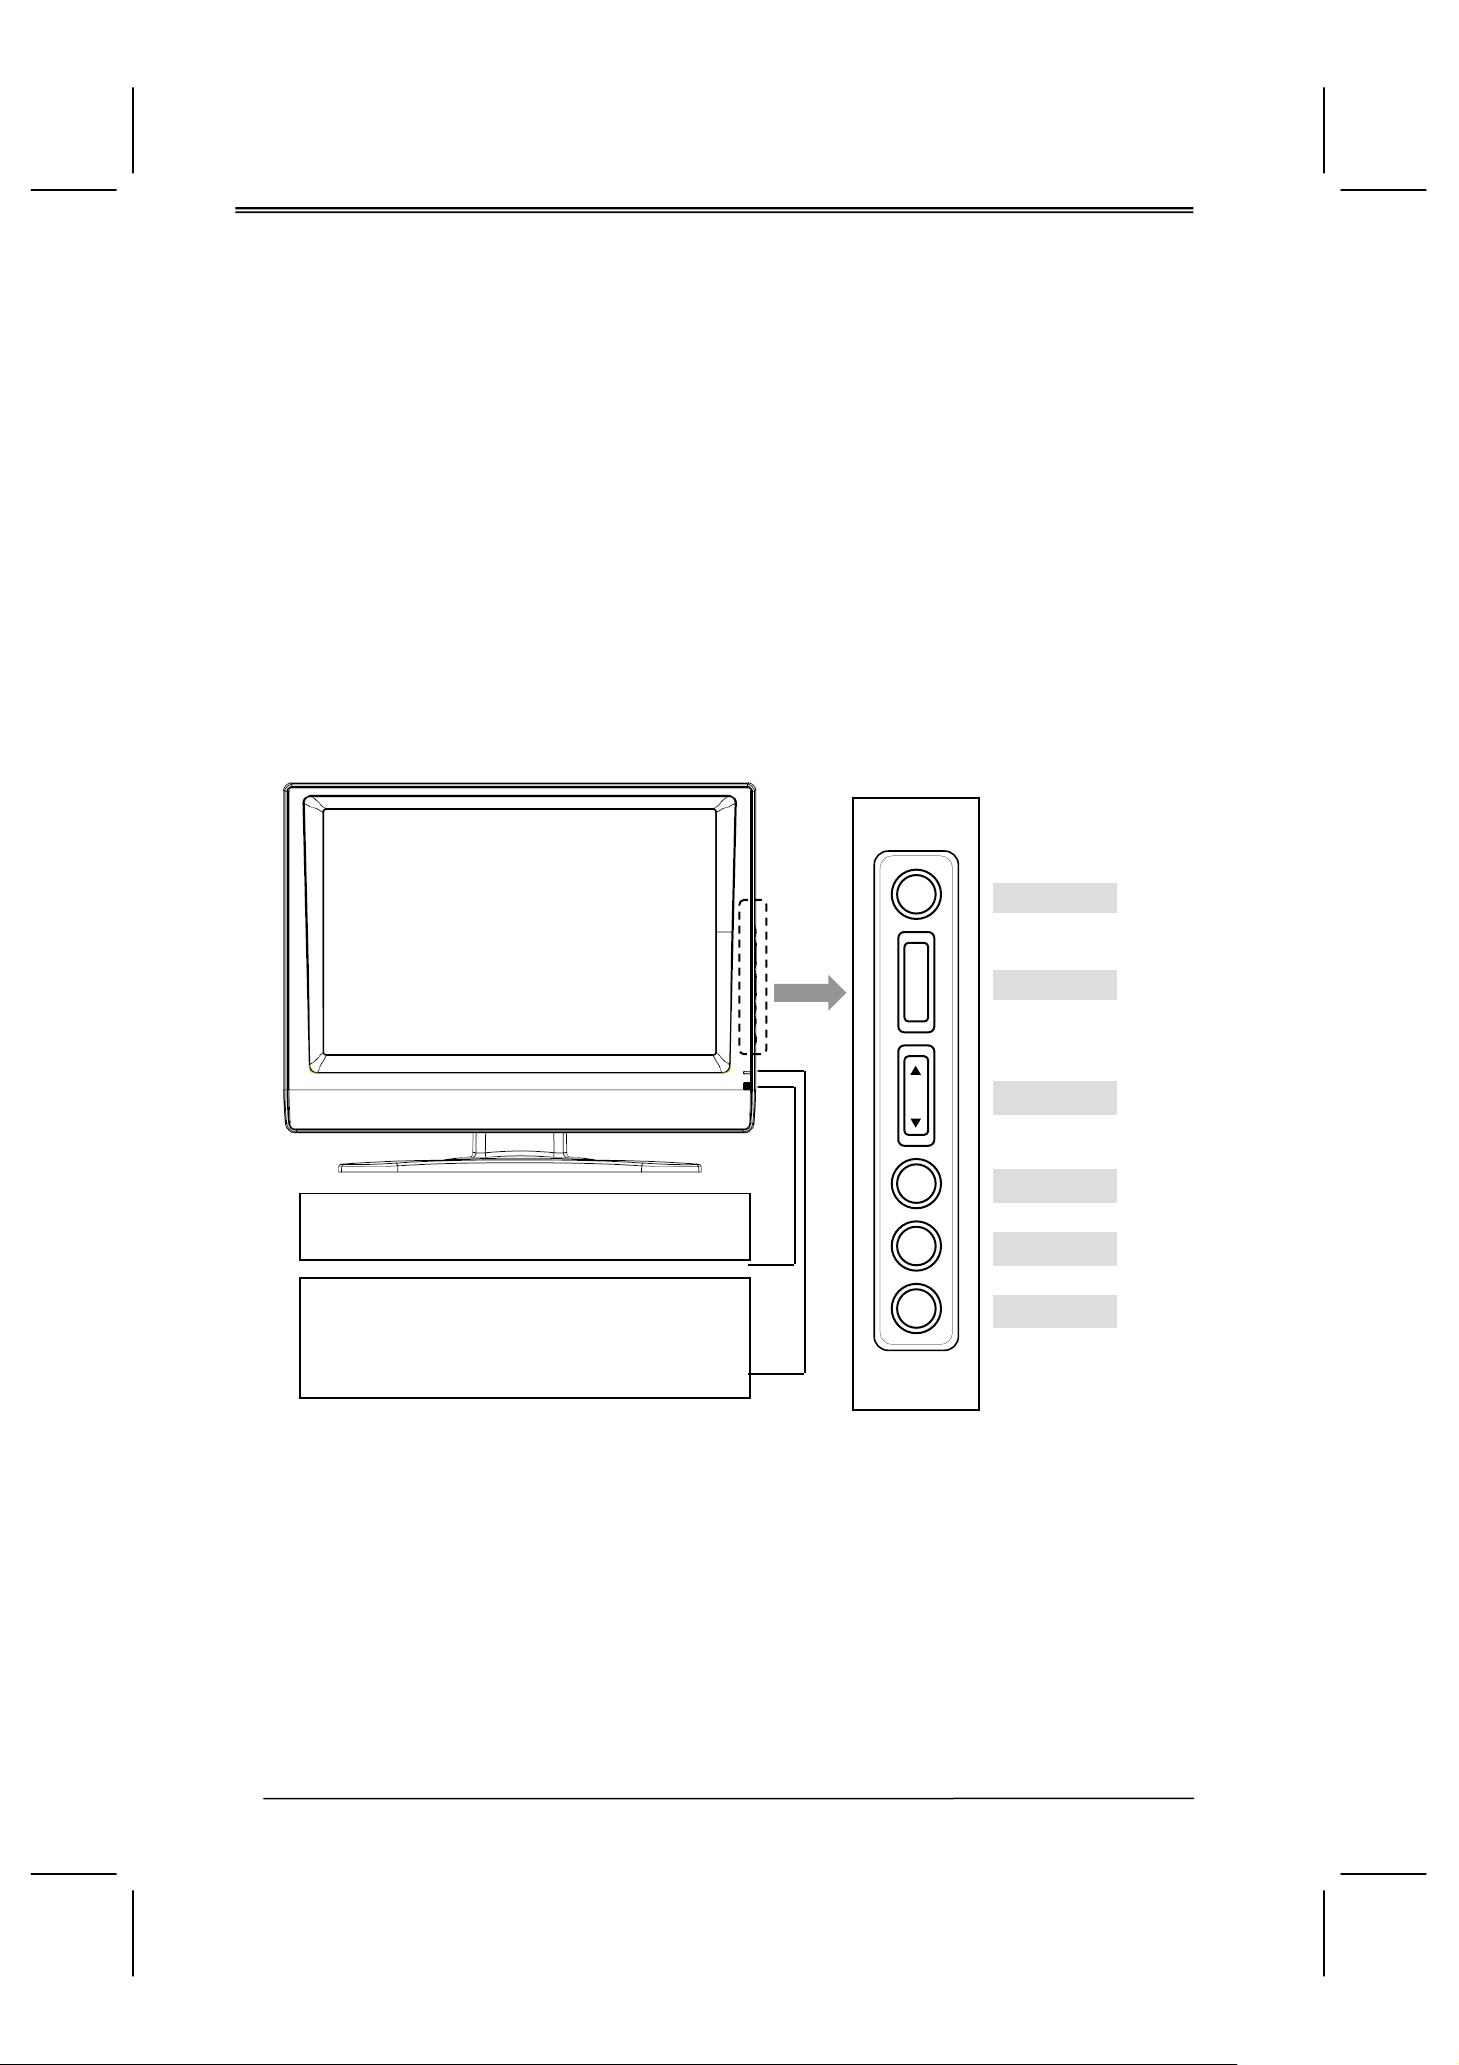
Function Key
These buttons control your TV’s basic features, including the on-screen menu. To use advanced
features, you must use the remote control.
POWER: turn the LCD-TV on or off.
SOURCE: select the input source (PC, DVI, AV, SV, YPBPR, TV).
MENU: display the main menu.
CHANNEL (down or up): change the channel.
VOLUME (+/-): increase or decrease the volume.
EXIT / ARC: sets up the aspect ratio of display (TV/Video source: Panoram a, Normal, Full, Zoom1,
Zoom2; PC/DVI source: Full, Normal) or as exit function if OSD menu appear.
Remote sensor window: Remote control sensor that
receives the remote control signals.
Power indicator:
A green indicator lights when the power is on and an amber
indicator lights when in the standby mode (PC source).
A red indicator lights when the power is off.
EXIT / ARC
+
VOLUME
_
CHANNEL
MENU
SOURCE
POWER
8
Page 9

Accessories
LCD TV
USER’S MANUAL
User’s manual
Remote control & Batteries (AAA x2)
Power Cord
9
Page 10

Remote Control
SLEEP TIMER
SELECT CHANNEL
AUTOMATIC PICTURE CONTROL
MENU SELECTION
ASPECT RATIO CONTROL
AUDIO SETTINGS
VOLUME +/-
POWER
RETURN TO PREVIOUS
PROGRAM
EXIT THE OSD/
SHOW TV INFORMATION
MUTE
CLOSED CAPTION
CHANNEL +/-
INPUT SOURCE SELECTION
10
Page 11

Summary of Remote Control Buttons
PPoowweerr ccoonnttrrooll
POWER button Turns the TV on or off.
Selecting the primary signal source
TV button Switches to TV mode.
AV button Switches to AV mode.
SV button
PC button
CV button
Menu Settings
MENU button Display the on-screen menu.
ARC button (Aspect Ratio Control)
APC button (Automatic Picture Control)
EXIT/INFO button Exit a menu or sub-menu if OSD appear.
MUTE button
Switches to S-Video mode.
Switches to PC or DVI mode.
Switches to CV (component) mode, i.e. YPBPR.
Toggle the picture mode between Full→ Zoom1→
Zoom2→Normal→Panorama.
In PC/DVI mode, only has Full and Normal.
Toggle screen luminosity between STANDARD,
BRIGHT, MOVIE, and MANUAL modes.
Temporarily turns off the sound.
Access menu items.
TV Changing Channels
CH
button Press Up/ Down to change the channel.
0~9 ; +100 button To manually select channels.
RTN button Return to the previous viewed channel.
Sound Control
VOL+ /- button Increase / Decrease volume level.
MTS button
Other Function
SLEEP button Select a preset time for automatic power down.
EXIT/INFO button
CC button
Cycle through Stereo, Mono or SAP (separate audio
program) multi-channel sound services.
Displays the current Channel/Input Source/Signal
format if OSD disappear.
Displays the Closed Caption text / Press CC button to
select TV Rating.
11
Page 12

Y
r
Connections & Applications
* How to connect the Power Cord
Household power outlet
Connect to the AC input
Terminal of the TV set.
Plug into AC outlet.
Power cord
Note: Always unplug the power cord from the TV set and power outlet when not using for a long period of time.
* How to connect to a PC via D-SUB & DVI
DVI Cable
VGA Cable
PC Audio Cable
Interface
DVI
D-SUB
12
PC
PC AUDIO IN
EARPHONE
Pb
P
Page 13
Y
r
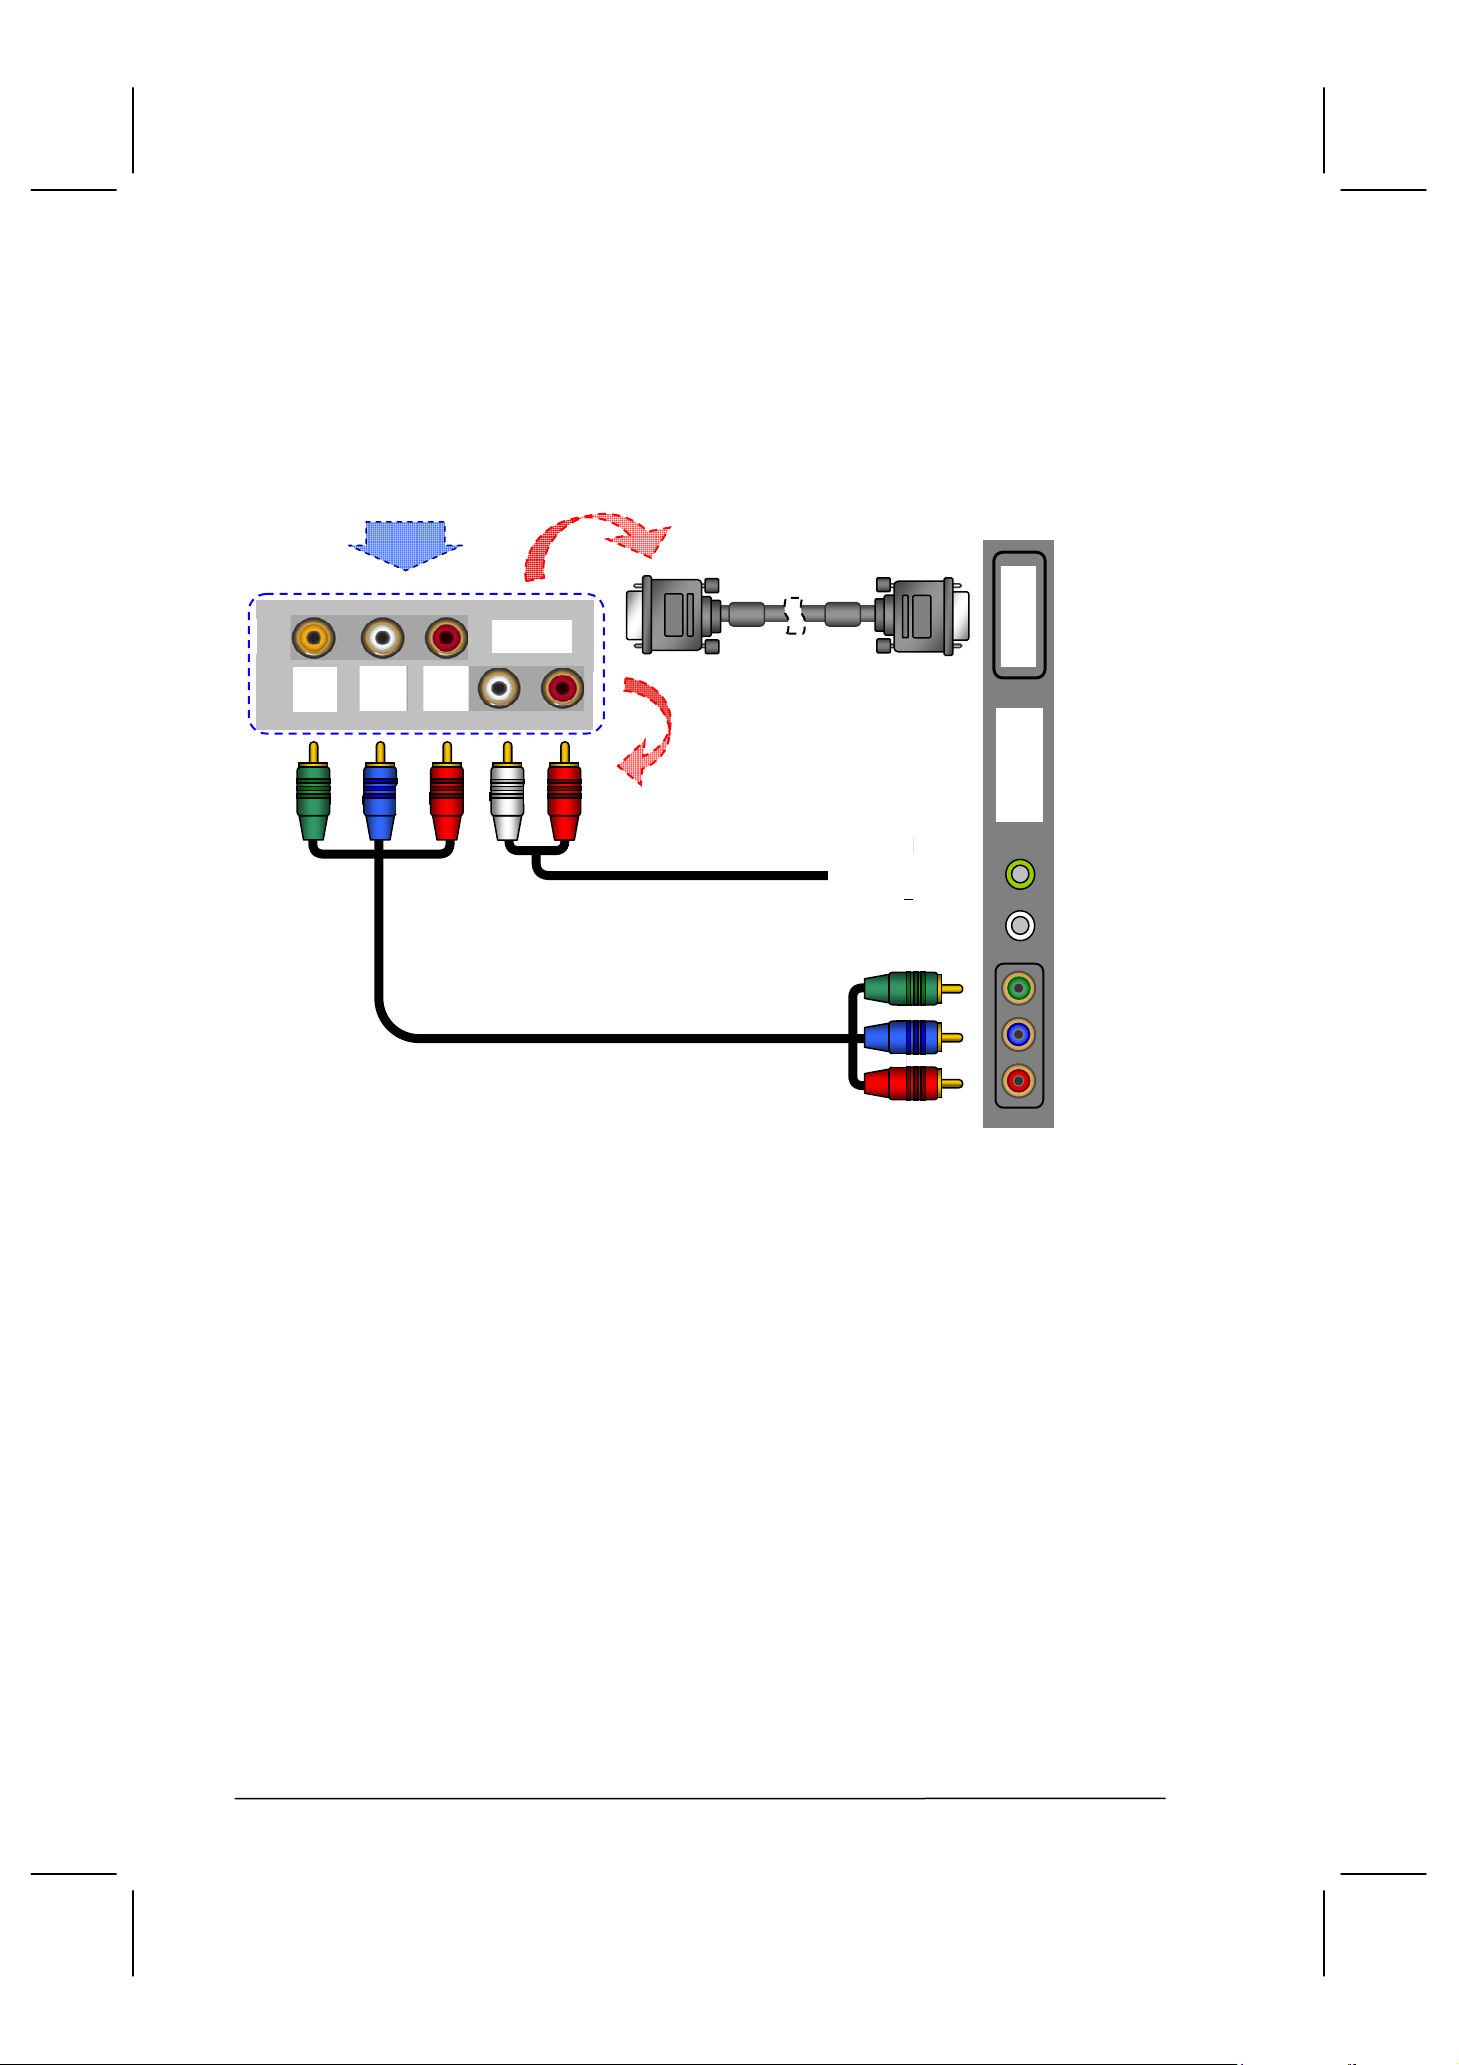
* How to connect to a Video Device via HDCP
This can be applied only if there is the HDCP (DVI) Output connector on the external device.
(ex. DVD Player or Set-top Box…)
VIDEO DEVICE
VIDEO L R DVI / HDCP
Y Pb Pr L R
1.
RCA to Earphone
Audio Cable
HDCP- HDCP Cable
or
DVI- DVI Cable
2.
Interface
DVI
D-SUB
PC AUDIO IN
EARPHONE
Pb
P
1. Connect a HDCP or DVI cable between the DVI connector on the TV and the HDCP/DVI
connector on the DVD player/ Set-top box.
2. Connect an audio cable between the PC AUDIO IN jack on the TV and AUDIO OUT jack
on the DVD player or Set-top box.
13
Page 14

* How to connect Video Device via general cable
COMPONENT COMPOSITE IN
L R L R
AUDIO
S-VIDEO
Interface
VIDEO AUDIO
RF IN
14
Page 15

Controls & Adjustment
A. General Adjustment
Turning the LCD TV On and Off
The power status light found in the lower right corner of the TV indicates the following:
Power On --- Green light
Power off --- Red light
Power Saving (PC mode) --- Amber light
Note: If “NO SIGNAL” appears for 10 minutes under TV or Video mode, the set will
automatically power off.
Viewing the Menus and On-Screen Displays
1. Press the MENU button.
The main menu appears on the screen.
POWER
2. Press the or button to select one of the menu options. Then
press the or button to access the sub-menu.
MENU
3. Press the or button to make adjustments.
4. Press the EXIT/INFO button to exit from the menu or Press the
MENU to return to the previous screen.
15
Page 16
Switching PC / Video / S-Video/ TV / Component Modes
1. Refer to page 13,14,15 and connect external devices.
2. Select an input source as described below:
button
TV
button
PC
button
AV
button
SV
button
CV
to switch to TV mode.
to switch to PC or DVI mode.
(Analog or Digital)
to switch to AV mode.
to switch to S-Video mode.
to switch to YPBPR mode (Component).
SOURCE
BUTTON
Switching Language Modes
1. Press the MENU button to display OSD from the main menu.
2. Press the or button to access LANGUAGE options.
CONTROL
BUTTON
16
3. Press the or button to select the desired language mode.
4. Press the EXIT/INFO button to exit from the menu or Press the
MENU to return to the previous screen.
Page 17

Setting the Sleep Timer
Y ou can set the Sleep T imer to autom atically turn off the LCD TV.
SLEEP
1. Press the SLEEP button to display the Sleep Timer screen.
2. Press the SLEEP button to set the sleep timer (in 10 minute
increments).
10 min →20 min → 30 min →40 min→ 50 min
→ 60 min →70 min →80min →90min →100min
→110min→120min→ OFF
Note:
1. The Sleep Timer screen automatically
disappears in 10 seconds.
2. The TV will automatically power off if no
signal is detected for 10 minutes.
Adjusting the Volume
Using Volume Control
Press the VOL (+) or VOL (-) button to increase or decrease the
volume level.
Using Mute
At any time, you can temporarily turn off the sound by using the
MUTE button.
MUTE
VOL+/-
1. Press the MUTE button and the sound turns off. A MUTE text
will appear on the screen denoting the sound is muted.
2. Press MUTE again or the VOL (+) or VOL (-) button to return
audio back to the previous level.
17
Page 18

B. PC Mode Adjustment
Adjusting the Contrast & Black light Settings
Each viewing mode supports separate adjustments for back light and contrast levels. PC mode is best
viewed with lower back light and contrast levels as compared to other modes.
Adjusting PC Settings
ANALOG INPUT
1. Press the PC button to set the main display to PC mode. Press
the MENU button to display PC from the main menu.
2. Press the or button to access PC sub-menu.
CONTROL
BUTTON
PC
3. Press the or button to select the settings for
adjustment.
4. Press the EXIT/INFO button to exit from the menu or Press
the MENU to return to the previous screen.
18
Page 19

Adjusting Sound Settings
1. Press the MENU button to display SOUND from the main
CONTROL
BUTTON
menu.
2. Press the or button to access SOUND sub-menu.
3. Press the or button to select the settings.
4. Press the EXIT/INFO button to exit from the menu or Press the
MENU to return to the previous screen.
AVC:
You can set AVC(Auto Volume Control ) options to ON or
OFF.
a. ON – For general use, like commercial
advertisment, AVC can avoid the sound turns up
or down suddenly.
b. OFF– For special sound effect, like opera or
symphony, volume can be performed in
accordance with the orginal sound level.
19
Page 20

Adjusting Equalizer setting
1. Press the MENU button to display SOUND from the main
menu.
2. Press the or buttons to select MODE and then press or
buttons to choose EQ.
3. Press the button to select EQUALIZER sub-menu, and then
press button to select modes (as below).
CONTROL
BUTTON
4. There are 6 EQUALIZER modes available:
MANUAL, POP, JAZZ, VOICE, ROCK, CLASSIC
EQUALIZER:
a. Selecting the MANUAL pre-set allows you to manually
adjust the frequency response.
b . Settings for POP , JAZZ , VOICE , ROCK and CLASSIC are
pre-configured, so you can’t change these settings.
The frequency response are as below:
20
Page 21

MANUAL: POP:
JAZZ: VOICE:
ROCK: CLASSIC:
21
Page 22

C. General TV Mode Adjustment
Adjusting the TV settings
1. Press the TV button to set the main display to TV mode. Press
the MENU button to display TV CHANNEL from the main
menu.
CONTROL
BUTTON
Sound Options
CONTROL
BUTTON
Choosing a Multi-Channel Sound (MTS) Soundtrack
Depending on the particular program being broadcast, you can
listen to Stereo, Mono or a Separate Audio Program. (SAP audio
is usually a foreign-language translation).
22
MTS
Page 23

Adjusting Picture Settings
CONTROL
BUTTON
1. Press the MENU button to display PICTURE from
the main menu. Then press the or button to select
PICTURE MODE option.
2. Press the or button to enter the USER menu.
3. Press the or button to select the desired item. Then press
the or button to adjust ranges from minimum to
maximum.
4. Press the EXIT/INFO button to exit from the menu or Press the
MENU to return to the previous screen.
23
Page 24

Memorizing Channels
Your TV can memorize and store all of the available channels for both standard broadcast (antenna)
and cable channels. After the available channels are memorized press the or button to view
stored channels. You can also view any channel (even non-memorized) by directly entering the
channel digits via the remote control.
There are three steps to memorizing channels:
1. Selecting a TV signal input source
2. Memorizing the available channels (automatically)
3. Adding/Erasing channels (manually)
Selecting the TV Signal Source
CONTROL
BUTTON
Before your television can begin to memorize available channels,
you must specify the type of signal source that is connected to the
TV (i.e., an antenna or a cable system).
1. Press the TV button to set the main display to TV mode. Press
the MENU button to display TV from the main menu.
2. Press the or button to select the SOURCE option.
3. Press the or button to select between Antenna, AIR,
CATV, HRC , IRC source signals.
24
Page 25

CONTROL
BUTTON
Storing Channels (Automatic Method)
1. Press the MENU bottom to display TV CHANNEL from the
main menu .Then press the button to select the AUTO
SCAN option.
2. Press the button to run through all of the available channels
and store them in memory.
It may take a few minutes to acquire the available channels .
25
Page 26

CONTROL
BUTTON
Adding and Erasing Channels (Manual Method)
1. Press the MENU bottom to display TV CHANNEL from the
main menu.
2. Press the or button to select the ADD/ERASE option.
26
Page 27
Changing Channels
This LCD TV tuner provides the ability to display up to 125 channels (1 to 125).
To select a channel, enter the channel number using 1 to 3 digit numbers.
Using the Channel Buttons
1. Press the CH or CH button to change channels.
When you press the CH or CH button, the channels move up
or down sequentially. You will see all the channels that have
been memorized, (the channels must be memorized). You will
CONTROL
BUTTON
CH+/-
NUMERIC
BUTTONS
CONTROL
BUTTON
not see channels that were either erased or not memorized.
Directly Accessing Channels
Enter the channel number using the numeric buttons to go
directly to the channel desired.
For example, to go to channel 27, press “2”then “7”. The TV
will change to channel 27.
Using the direct access method you can access any available
channel including non-memorized and erased channels. To
select a channel over 100, press the +100 button. (For example,
to go to channel 122, press “+100”, then “2”, and then “2”).
27
Page 28

Using Parent Control
The Parent Control feature allows you to block channels from being viewed unless an unlock PIN
code is correctly entered.
Before Parent Control restrictions can be utilized, you must first create a PIN number.
1. Press the TV button .
2. Press the MENU button to display FUNCTION from the main
menu.
NUMERIC
BUTTONS
CONTROL
BUTTON
3. Press the button to select the PARENT CONTROL option.
4. Press the button to enter the BLOCKING
PASSWORD menu.
28
Page 29

NUMERIC
BUTTONS
5. Enter your 4-digit PIN when you have finished entering the
PIN. If the PIN is not correct, main menu will appear again.
NOTE: The factory default PIN code is 0000.
6. After entering a valid PIN number, the all of Parental Control
CONTROL
BUTTON
sub options will appear. Press the or button to select the
sub-menu.
29
Page 30
Setting Up Your Personal ID Number (PIN)
1. Press the or button to select the CHANGE PASSWORD.
NUMERIC
BUTTONS
CONTROL
BUTTON
2. Press the button to enter the BLOCKING
PASSWORD menu.
3. Enter your new 4-digit PIN XXXX, and the BLOCKING
CONFIRM menu will be on the screen.
CONFIRM _ _ _ _
30
Page 31

4. Enter the 4-digit PIN the same as step3 XXXX again, if the
PIN is correct, “OK” will be on the screen.
If the PIN is not correct, main menu will appear again.
5. When you have finished entering the PIN, new
setting to be operation.
CONFIRM OK
31
Page 32

How to Enable / Disable Parent Control
Under the PARENT CONTROL sub-options:
1. Press the or button to select the V-CHIP.
CONTROL
BUTTON
2. Press the or button to select the V-CHIP
ON or OFF.
3. Press the or button to select TV-RATING.
CONTROL
BUTTON
32
Page 33

4. Press the button to enter the TV-RATING, Rating m enu will
appear.
TV-Y Young children
TV-Y7 Children 7 and over
--------------------------------------
TV-G General audience
TV-PG Parental guidance
TV-14 Viewers 14 and over
TV-MA Mature audience
ALL :
FV : Fantasy violence
V : Violence
S : Sexual situation
L : Adult language
D : Sexual suggestive dialog
CC KEY :
5. Press the CC key to select Content BLOCK or UNBLOCK.
6. Press the EXIT/INFO or MENU buttons to jump-out the setting
menu. TV-Rating function is operation.
If the channel is set to a restricted channel, the
parent control will automatically block it, and
the BLOCK menu will appear:
TV-RATING
TV-PG
PASSWORD _ _ _ _
33
Page 34

Setting up restrictions using the “BLOCKING MOVIE” function.
The MOVIE-RATING option utilizes the Motion Picture Association of America (MPAA) ratings
system for determining blocked programming. When the parent control lock is enabled, the TV will
automatically block any programs that are coded with objectionable ratings.
Under the PARENT CONTROL sub-options:
1. Press the or button to select MOVIE-RATING.
CONTROL
BUTTON
2. Press the
or buttons to select the rating level.
3. Press the EXIT/INFO or MENU buttons to jump-out the setting
menu. MOVIE-Rating function is operation.
If you want to disable the Parent Control , press
the or button to select the V-CHIP item to
OFF. All locked channels will be released
automatically.
34
Page 35

If the channel is set to a restricted channel, the
parent control will automatically block it, and
the BLOCK menu will appear:
MOVIE-RATINGR
PASSWORD _ _ _ _
G : General audience (no restrictions).
PG : Parental guidance suggested.
PG-13 : Parents strongly cautioned.
R : Restricted. Children under 17 should be accompanied
by an adult.
NC-17 : Adults only under 17.
X : No Children
35
Page 36

Viewing Closed Captions
This LCD TV has the ability to decode and display closed caption content if supported by the
program. These captions are usually used for the hearing impaired or for foreign language
translations. Most VCR's can record the closed caption signal from television programs. Most
pre-recorded commercial videotapes also provide closed captioning as well. Refer to the closed
caption symbol within your television programming guide and on the videotape packaging in
order to properly configure the closed captioning function:
Note: The Caption feature does not work with Component Video / PC / DVI input source.
1. Press the TV button to set the main display to TV mode. Press
the MENU button to display FUNCTION from the main menu.
2. Press the or button to select
CONTROL
BUTTON
CC BUTTON
You can press the CC button
on remote control to select
this function.
CLOSED CAPTION option.
3. Press the or button to select between closed
captioning modes CC1, CC2, CC3, CC4, TEXT1,
TEXT2, TEXT3, and TEXT4. If you don’t want to
display captions, set the caption mode to “OFF”.
36
4. Press the EXIT/INFO or MENU buttons to jump-out the setting
menu. Closed-Caption function is operation.
Page 37

D. Other Functions
1. CH / :
Under TV mode, “CH /”keys are for changing channels.
2. VOL +/ - :
Under any display mode, “VOL +/ -” are for adjusting sound volume.
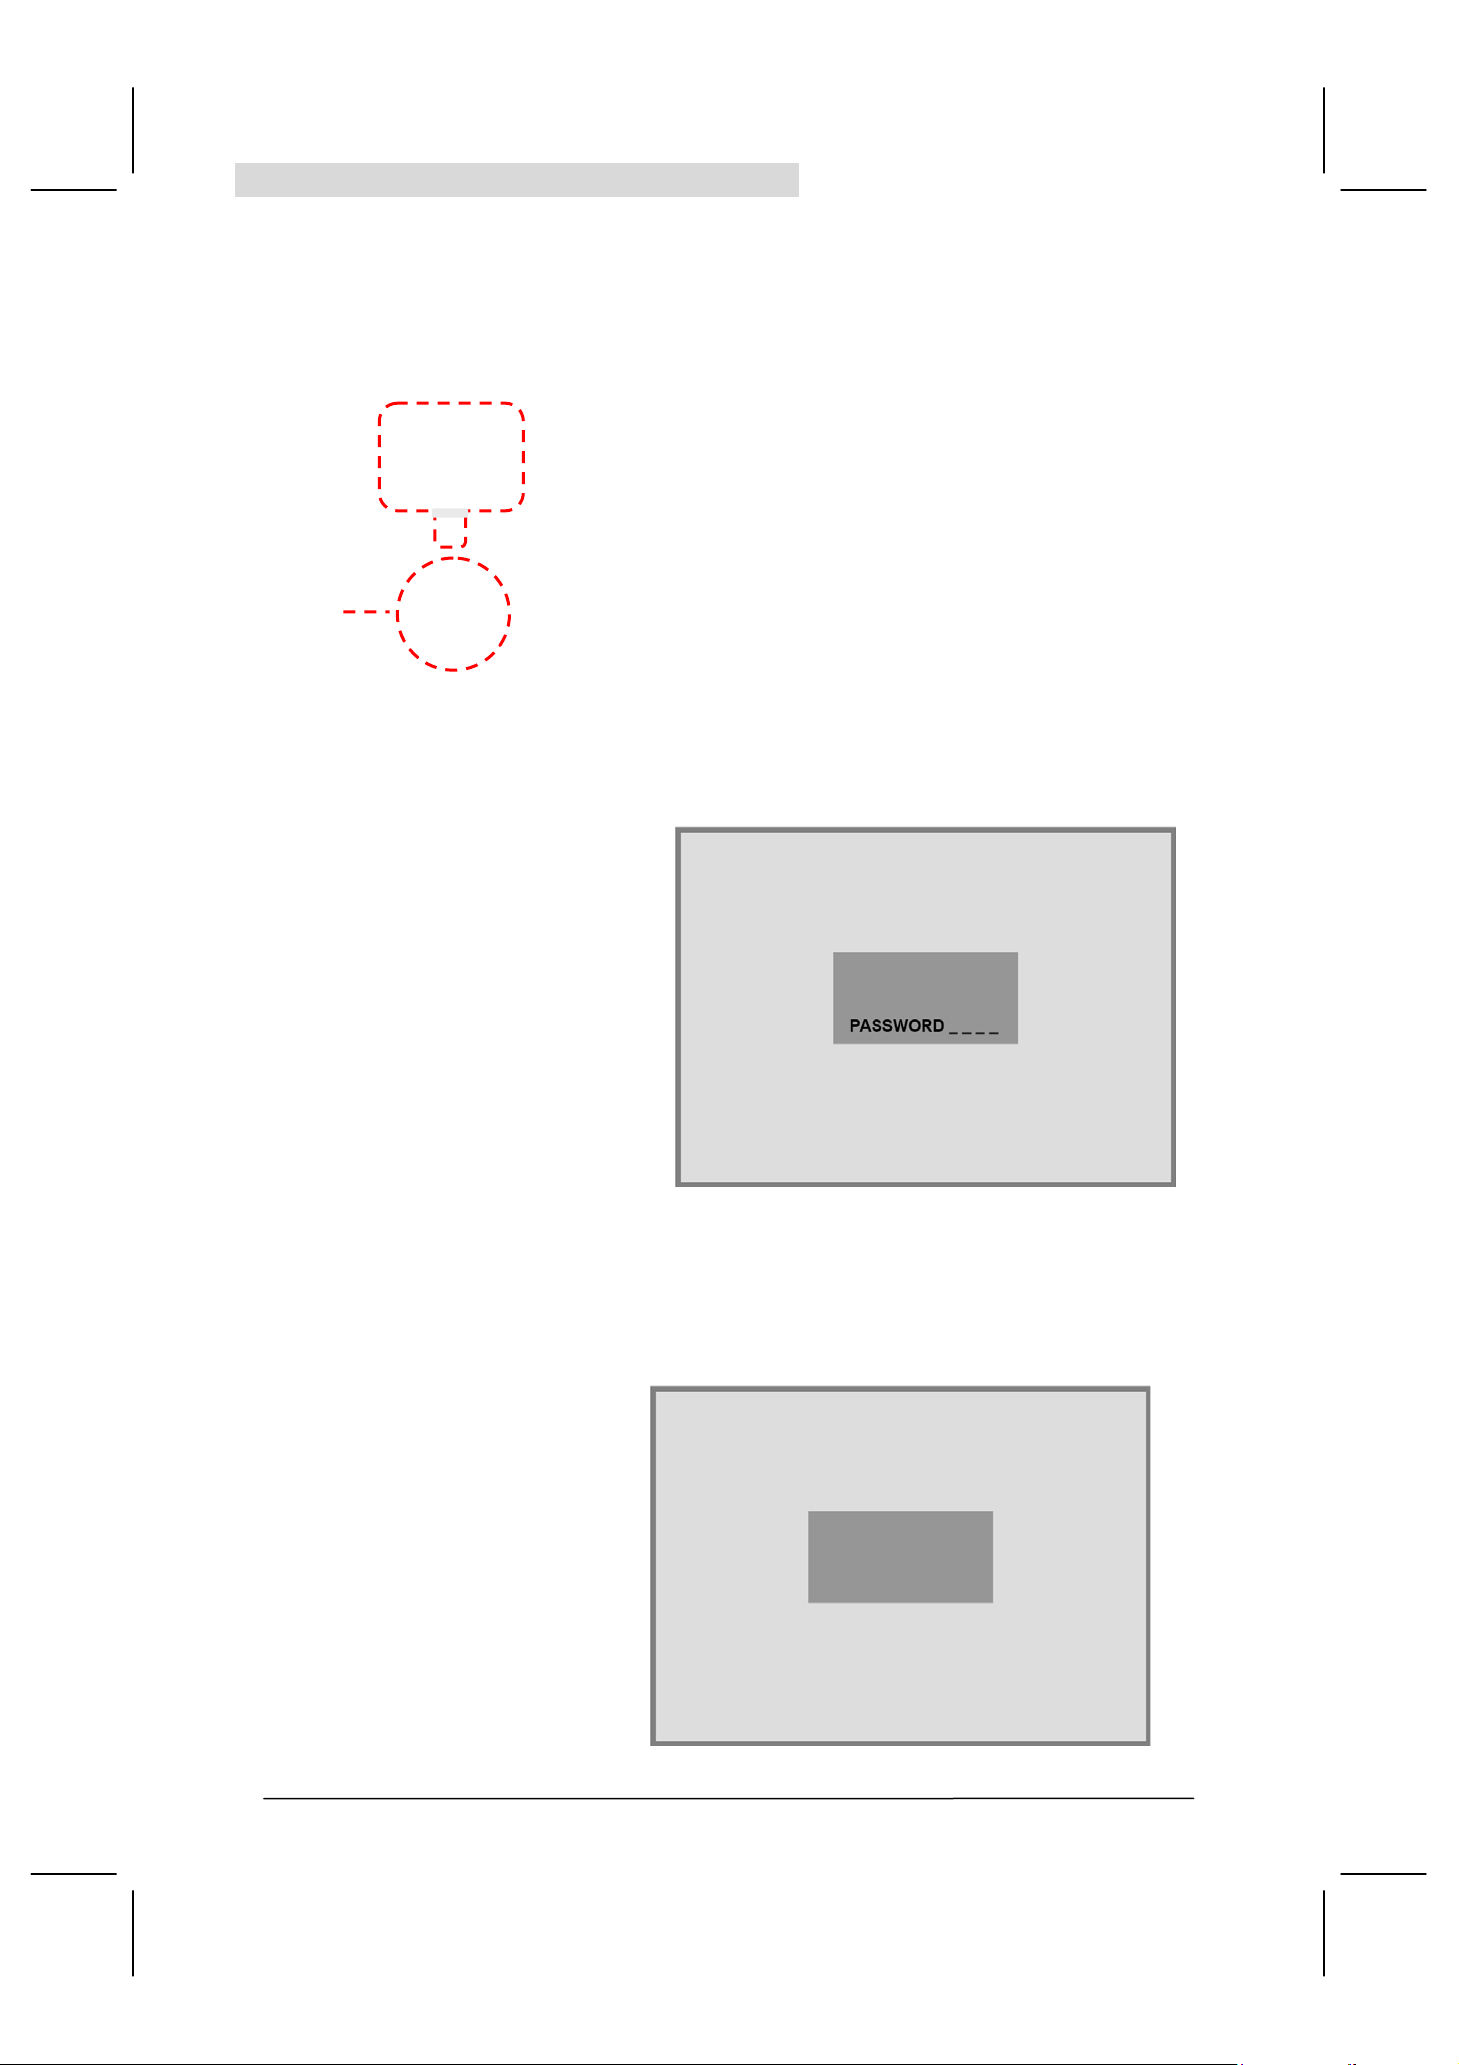
3. ARC (Aspect Ratio Control):
˙Full : Expands 4:3 video sources both vertically and horizontally to fill the entire screen while
keeping the original aspect ratio..
˙Normal : Sets the aspect ratio to 4:3. There will be black bars to the left and right sides of the
image.
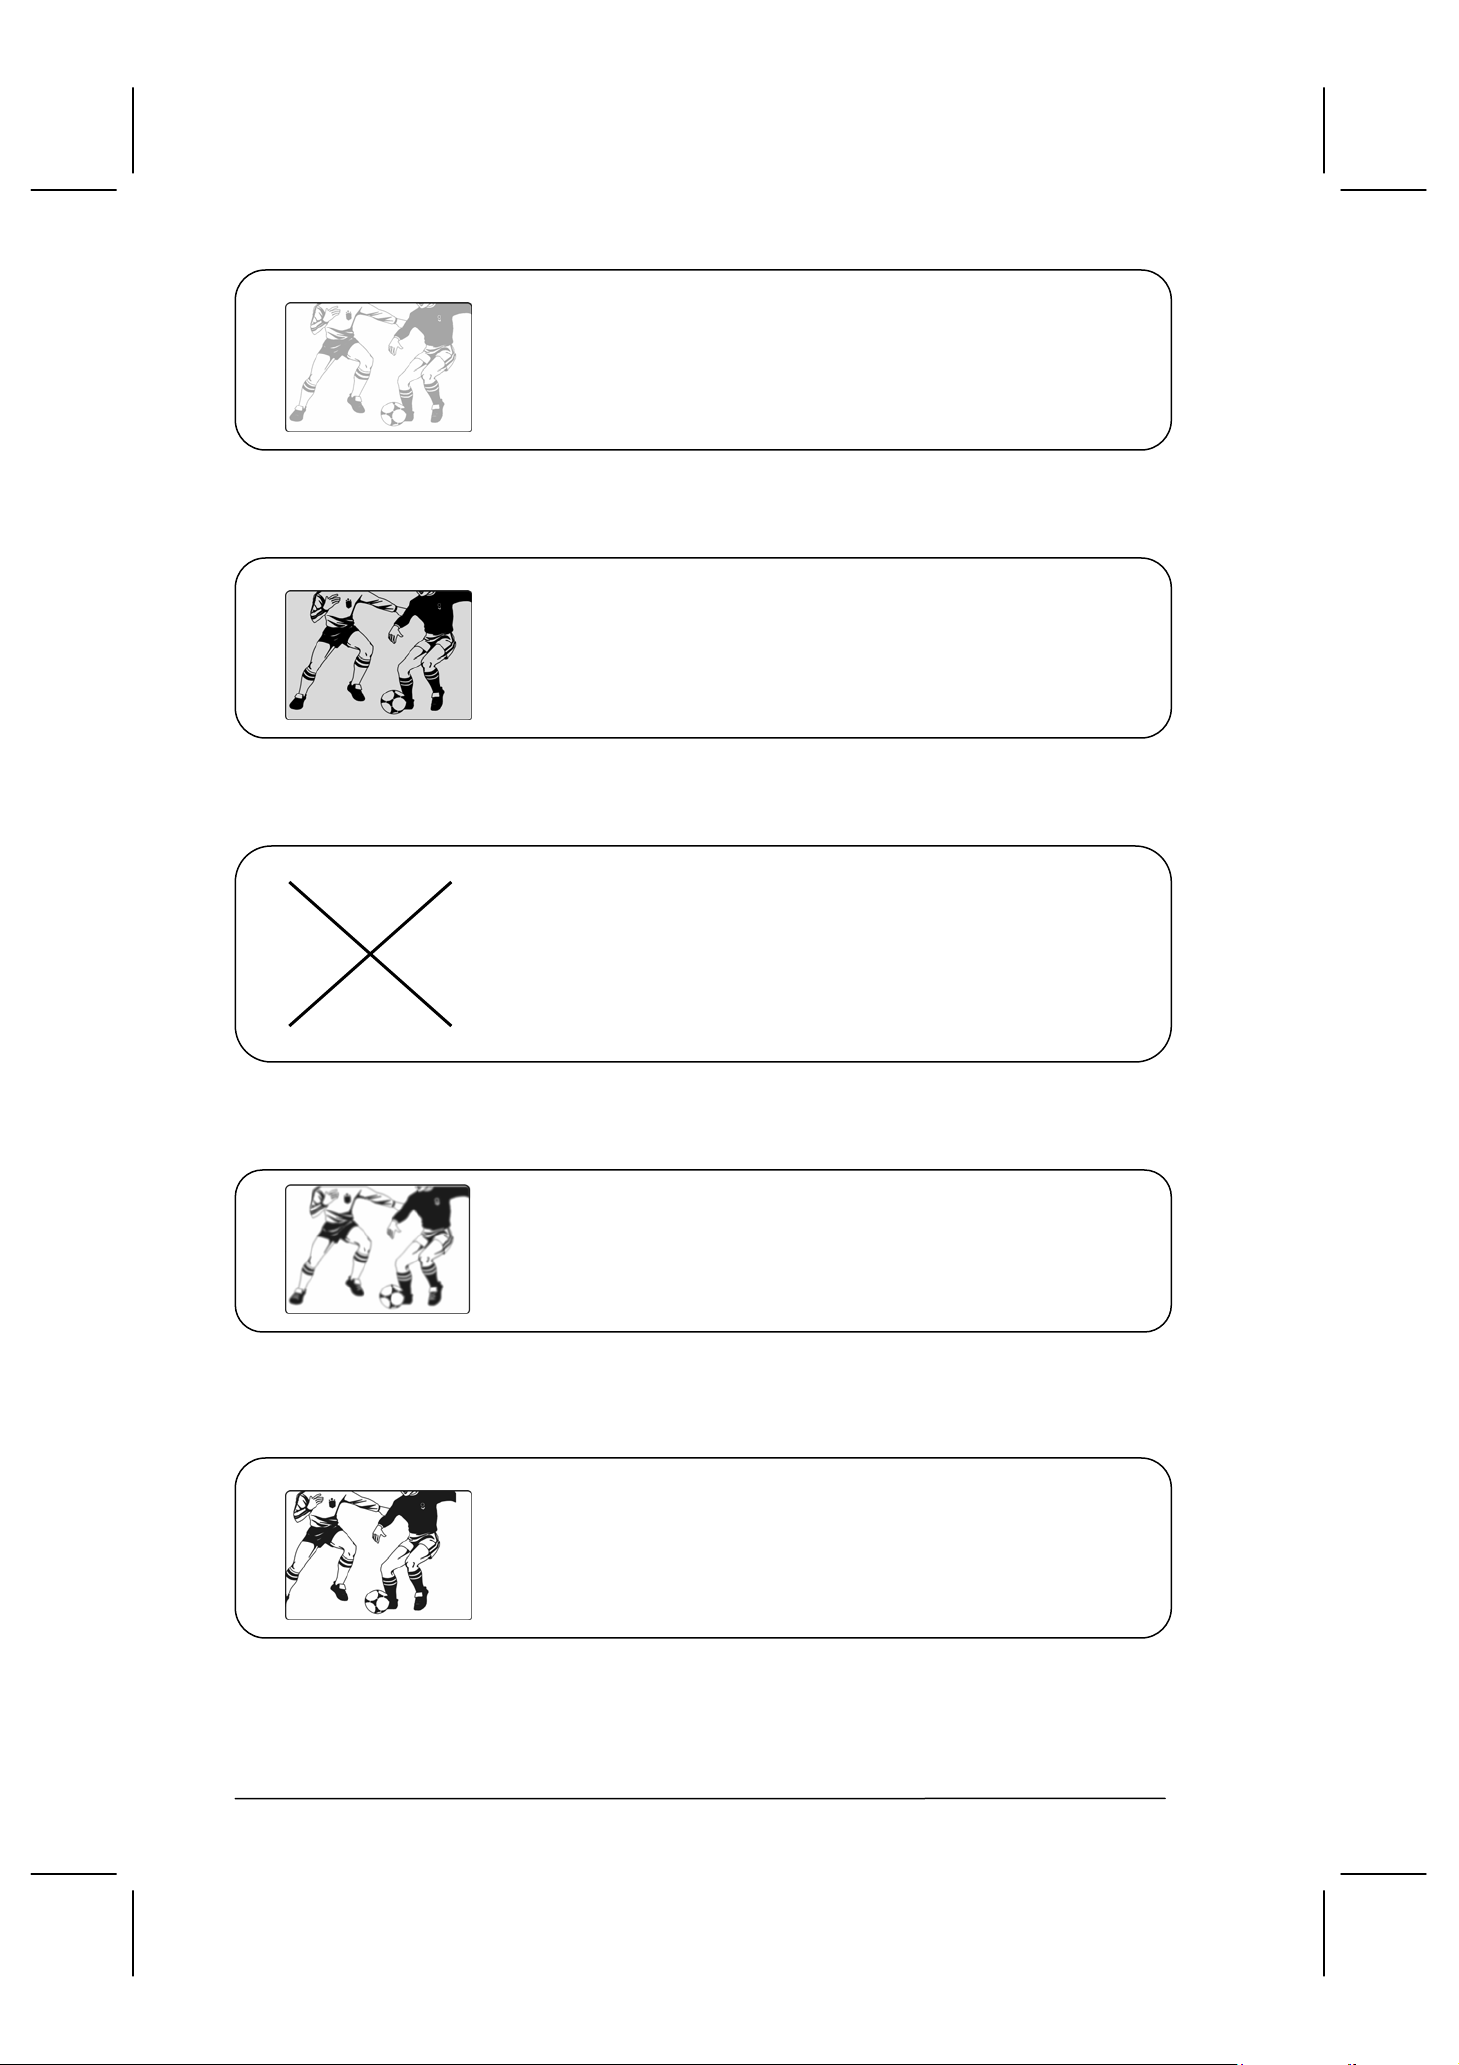
˙Panorama : This mode expands the width of 4:3 video sources evenly to fill the 16:9 s creen. There
will be distortion as all four edges of the image are stretched, creating less distortion at the center
of the screen.
˙Zoom 1: Extends the image height to fill the screen by stretching the image vertically.
˙Zoom 2: Same as”16:9 Zoom”, but the button edge of the screen pulls up a little for the subtitle
purpose.
(In PC mode, only has Full and Normal)
4. APC (Automatic Picture Control):
Automatic Picture Control allows you to easily set the screen luminosity based upon your
environment. If in a well lit vie wing ar ea it ma y be necessary to turn up the screen intensity via
the APC "BRIGHT" setting to make the image viewable. Likewise if in a dark viewing area it
may be necessary to turn down the screen intensity via the APC "MOVIE" setting. Toggle the
APC button to scroll through the four APC modes to select the mode that best suits your
situation.
5. MTS (Multi-Television-Sound):
˙There are three supported MTS modes: “Mono”, “Stereo” or “SAP” (Secondary Audio
Program).
˙This LCD TV has the ability to decode stereo or SAP broadcasts.
37
Page 38

Troubleshooting
There is no picture or sound.
Make sure the AC adapter is connected.
Verify that there is a valid source signal.
Make sure the correct input mode is selected.
Make sure the master power switch has been turned on.
There is no picture from AV.
Make sure the BRIGHTNESS is properly adjusted.
Make sure the video source is plugged into the composite
video-in port.
There is no sound.
Make sure the volume is not set to minimum.
Make sure the sound is not muted
There is no picture or sound, just noise.
Picture is not clear.
38
The source signal may be weak.
Your provider may be experiencing difficulties.
Check your input connections.
The source signal may be weak.
The provider may be experiencing difficulties.
Check input connections.
Page 39
Picture is light or improperly tinted.
Check the Hue, Saturation and Color adjustments.
Reset the TV to the factory default settings.
The picture is too dark.
Select a different APC mode.
Check the PICTURE and BRIGHTNESS adjustments.
The fluorescent lamp may have reached the end of its life.Contact an
authorized service center.
Remote control does not work.
Install new batteries.
Make sure the remote sensor window isn’t blocked.
The picture is not sharp.
The signal source may be weak.
The provider may be experiencing difficulties.
Check input connections.
The picture moves.
The source signal may be weak.
The provider may be experiencing difficulties.
Check input connections.
39
Page 40

The picture is doubled or tripled.
The source signal may be weak.
Check input connections.
The picture is spotted.
There may be interference from other appliances nearby or
around the LCD TV.
There may be interference between the source cable and the
power cable. Make sure they don’t touch.
There are stripes on the screen or colors fade.
There may be interference from other appliances.
There may be interference between the video source cable and the
power cable. Make sure the power and video cables are not touching.
Check the Hue, Saturation and Color adjustments.
"Polaroid" and “Polaroid and Pixel” are trademarks of Polaroid Corporation, Waltham, MA, USA.
For service, support and warranty information, visit www.polaroid.com
.
40
Page 41
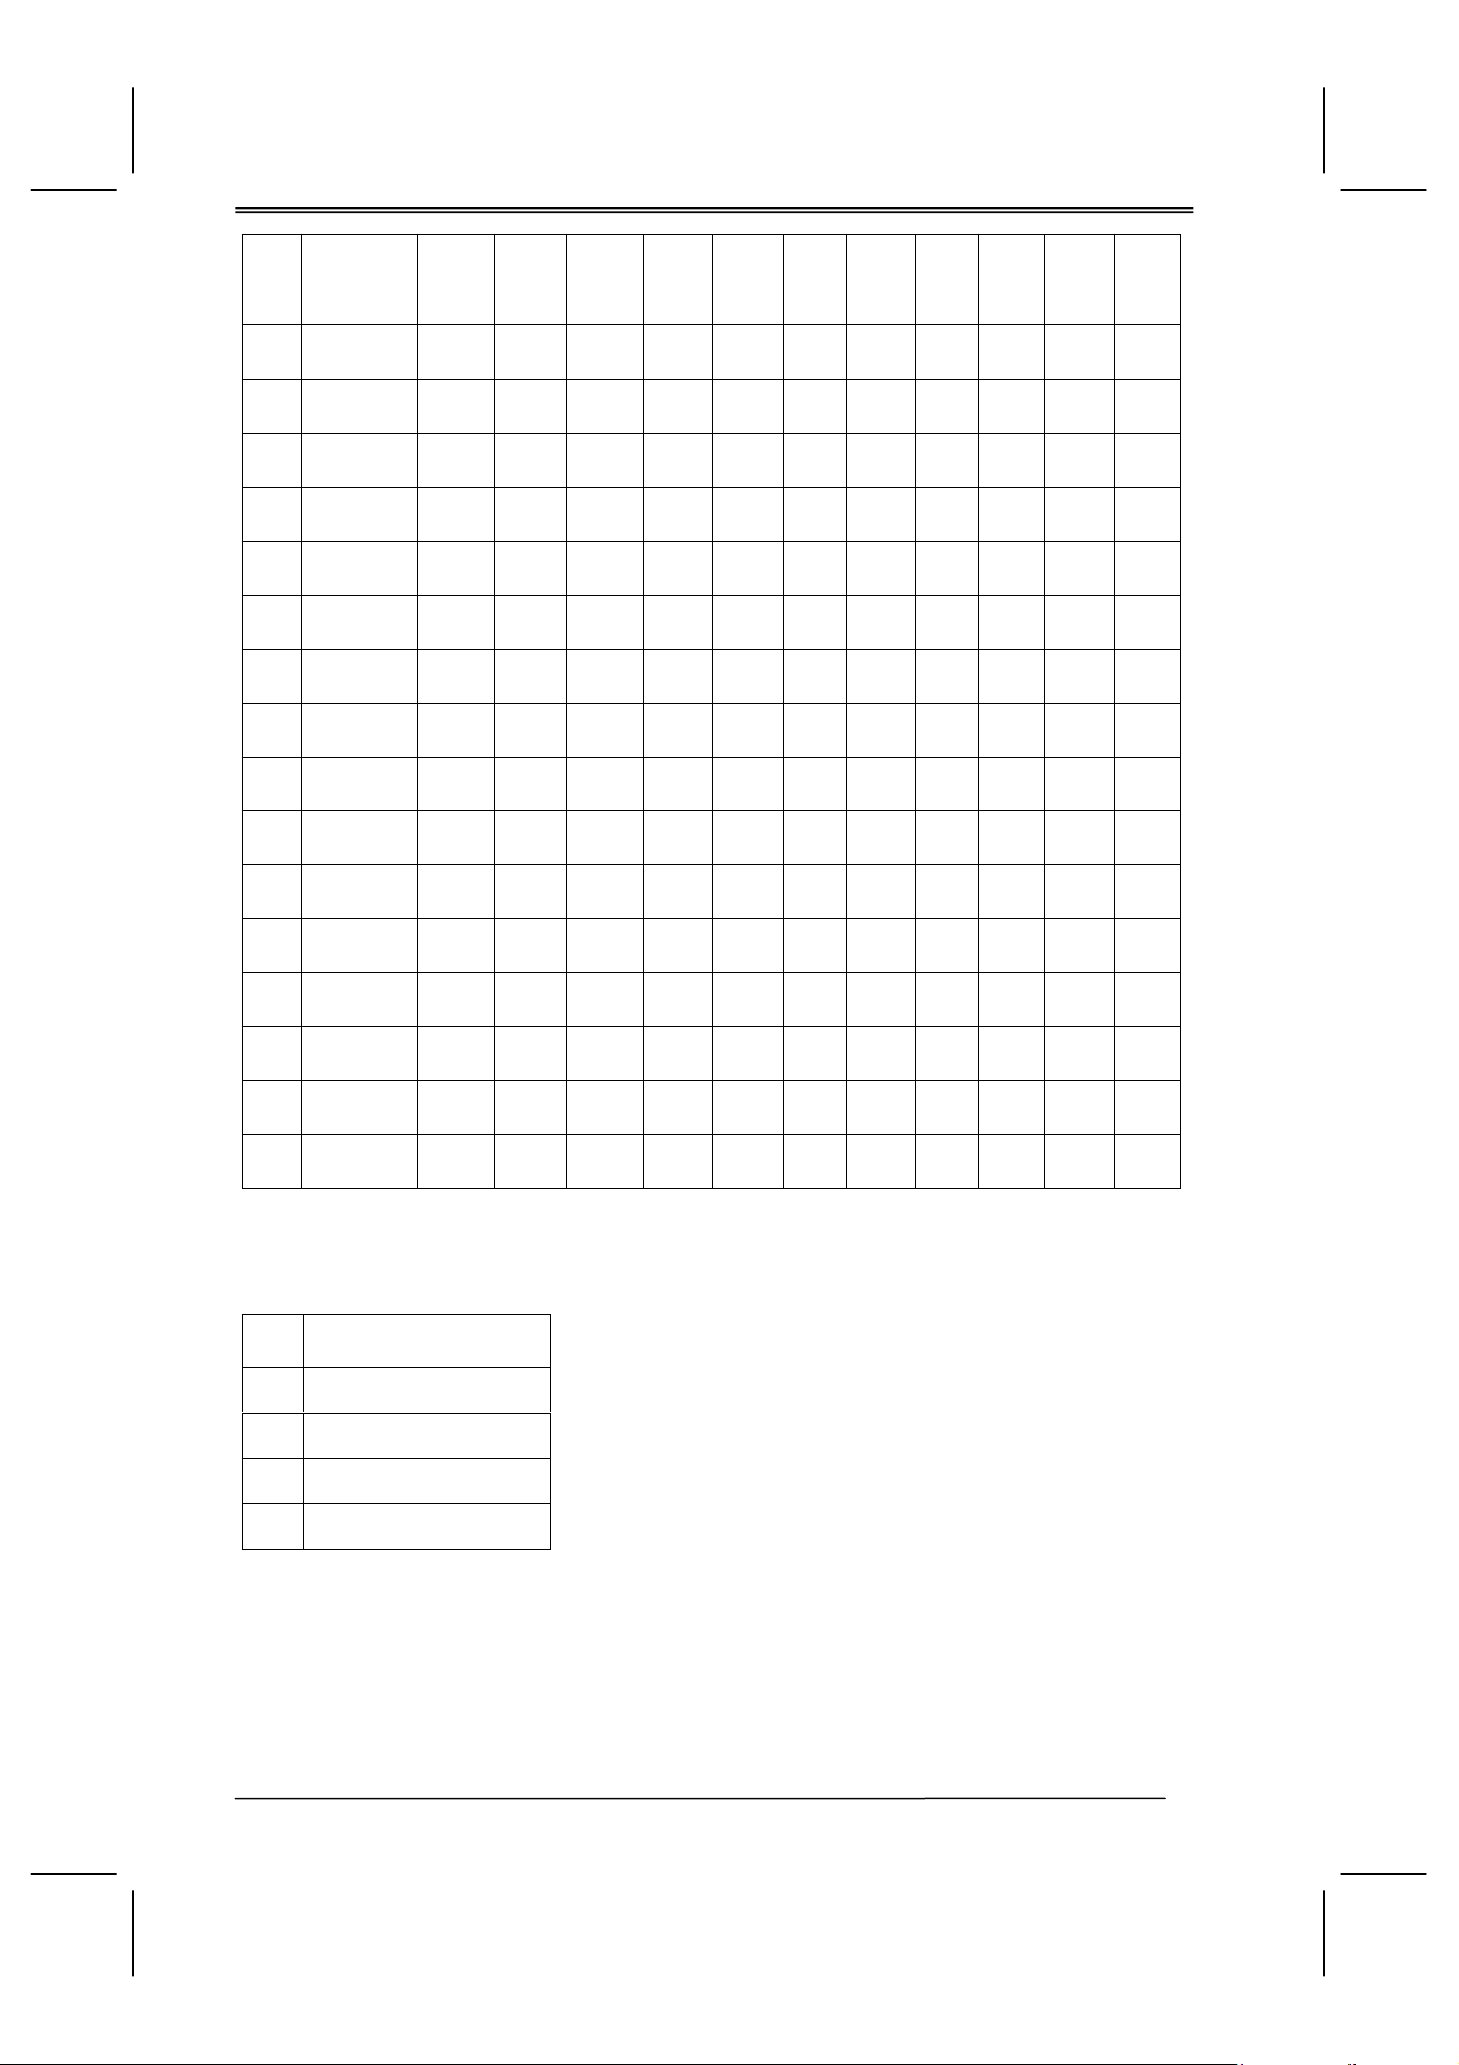
PC / DVI Timing Table
Mode
No.
1
2
3
4
5
6
7
8
9
10
11
12
13
14
15
16
Mode
Name
Resolution
VGA70HZ
640*350
VGA60HZ
640*480
VGA72HZ
640*480
VGA75HZ
640*480
SVGA60HZ
800*600
SVGA60HZ
800*600
SVGA72HZ
800*600
SVGA75HZ
800*600
XGA60HZ
1024*786
XGA70HZ
1024*786
XGA75HZ
1024*786
MAC VGA
640*480
WXGA
1280*768
WXGA
1280*1024
WXGA60HA
1280*1024
WXGA60HA
1280*1024
H. Freq
(KHZ)
V. Freq
(HZ)
31.469
70.087
31.469
59.941
37.804
72.81
37.5
75.0
31.156
56.25
37.879
60.317
48.077
72.188
46.875
75.0
48.363
60.004
56.476
70.069
60.023
75.029
35.0
66.667
47.73
60
47.7
60
63.98
60
79.976
75
H.
Polarity
V.
Polarity
Pixel
CLK
(MHZ)
25.175 800 640 48 96 449 350 60 2
25.175 800 640 48 96 525 480 33 2
31.5 832 640 128 40 520 480 28 3
31.5 840 640 120 64 500 480 16 3
30.6 1024 800 128 72 625 600 22 2
40.0 1056 800 88 128 628 600 23 4
50.0 1040 800 64 120 666 600 23 6
49.5 1056 800 160 80 625 600 21 3
65.0 1344 1024 160 136 806 768 29 6
75.0 1328 1024 144 136 806 768 29 6
78.75 1312 1024 176 96 800 768 28 3
30.24 864 640 96 64 525 480 39 3
80.0 1676 280 198 136 795 768 23 3
85.5 1792 1360 256 112 795 768 18 6
108.0 1688 1280 248 112 1066 1024 38 3
135.0 1688 1280 248 144 1066 1024 38 3
Hor.
Total
Hor.
Display
H.
Back
Porch
Hor.
Sync
Width
Ver..
Total
Ver.
Displa
y
V. Back
Porch
Ver.
Sync
Width
HDCP Timing
Mode
No.
1
2
3
4
Mode Name Resolution
480i
480p
720p
1080i
41
Page 42
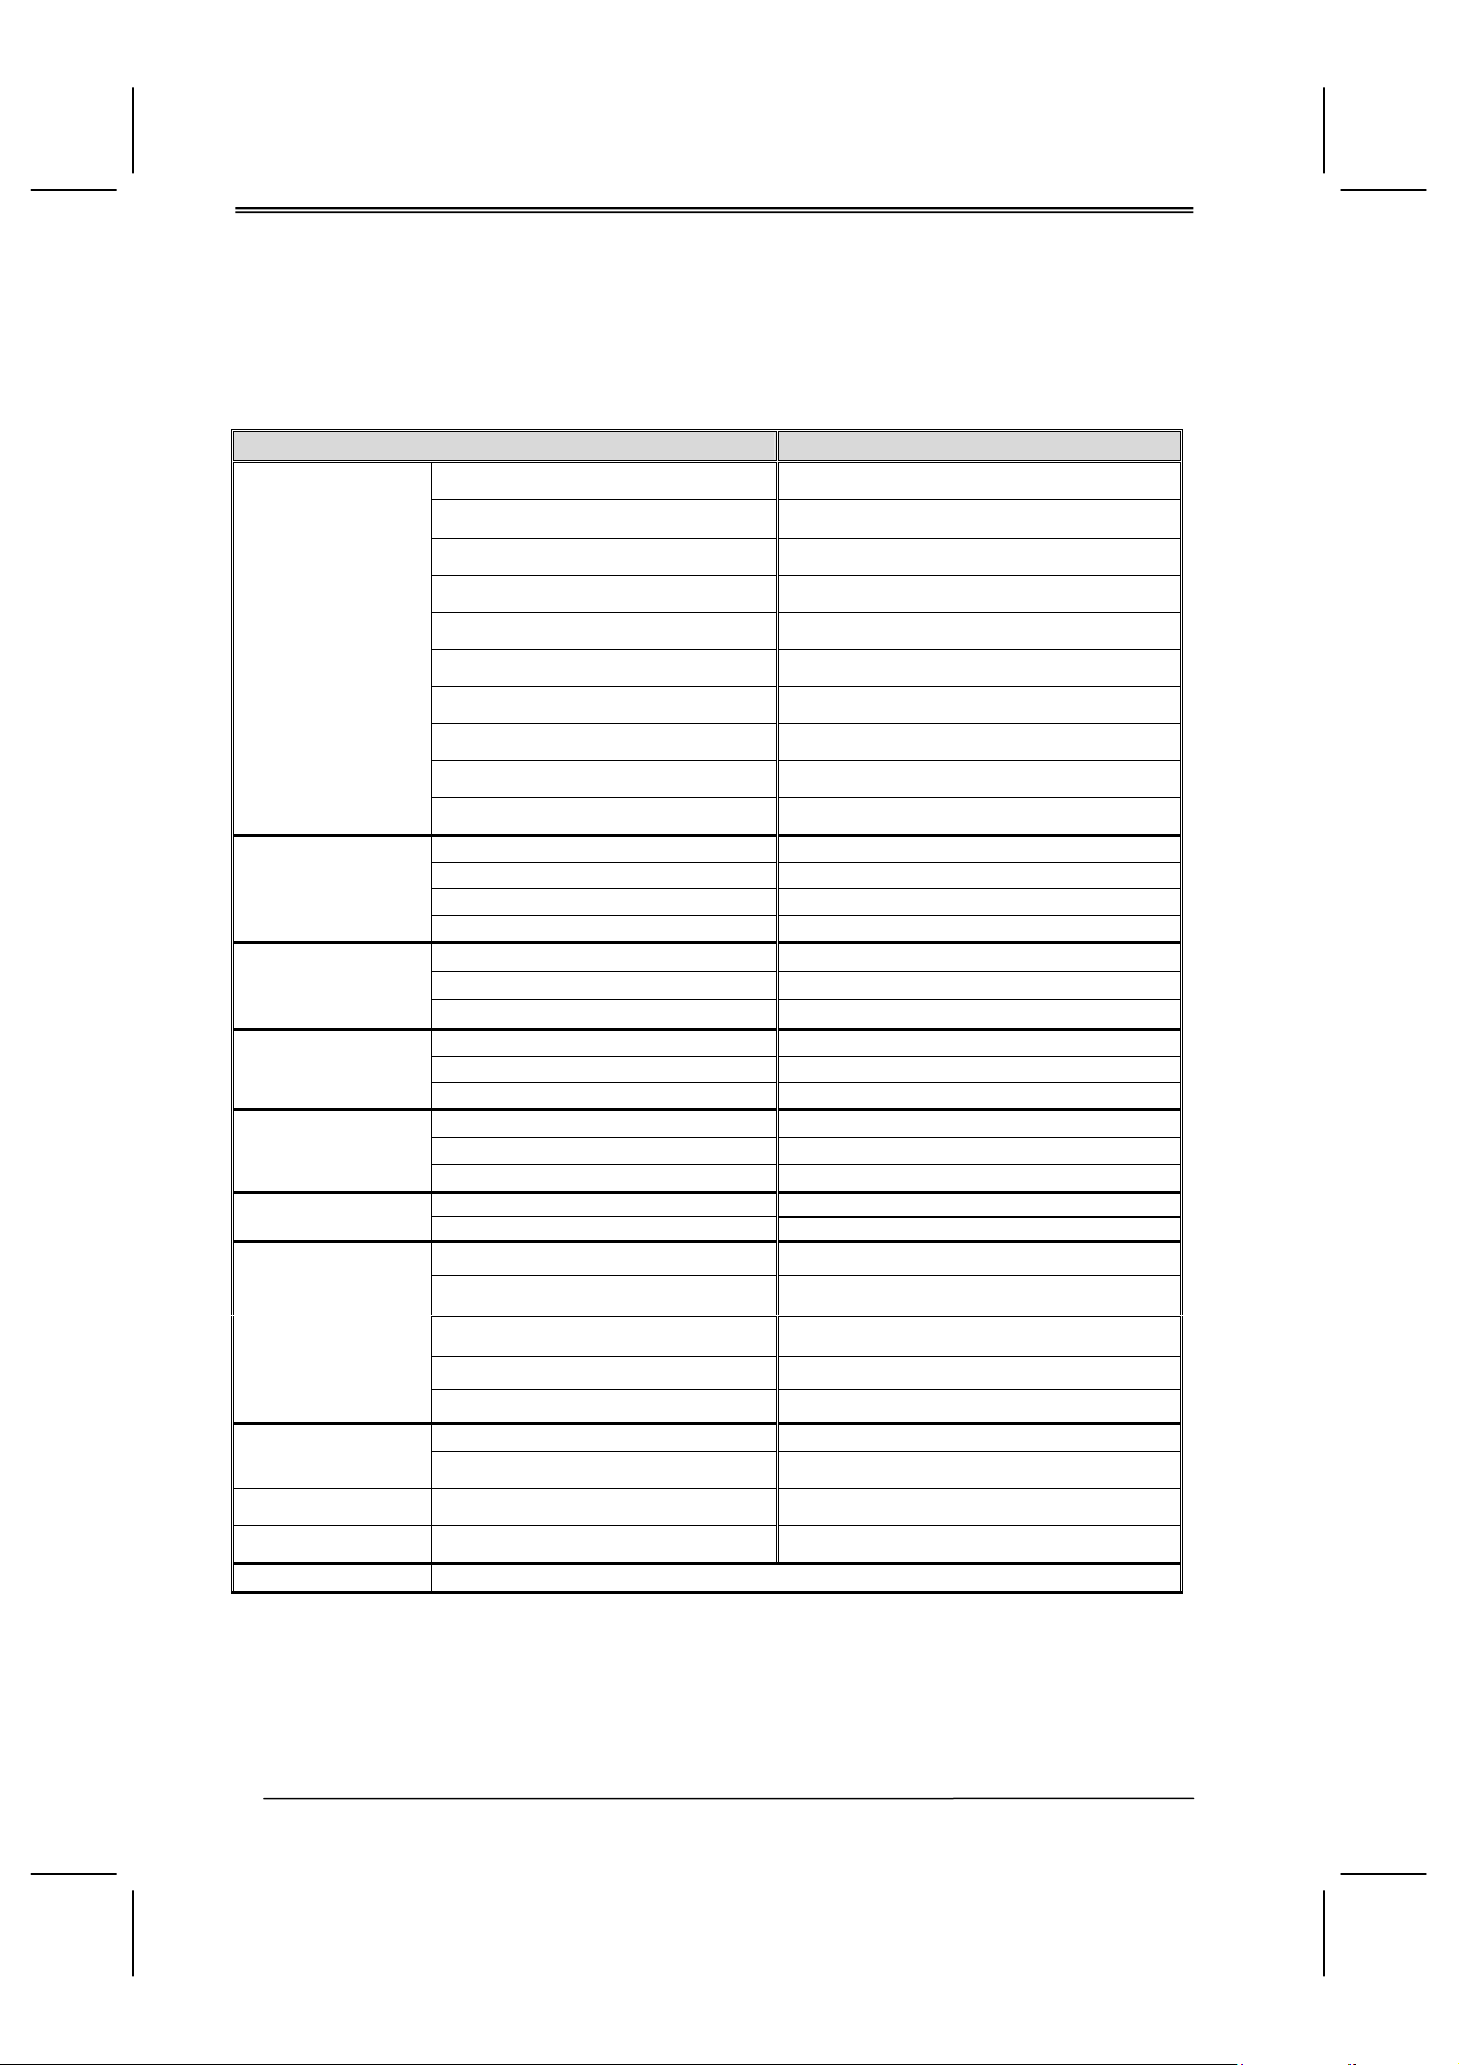
Specifications
ITEMS SPECIFICATION
Screen Size
20.1”/
50,8 cm TFT-LCD Panel
Panel
TV Function
Video Input
PC Input
Audio Input
Audio Output
Feature
Power
Aspect Ratio
Resolution
Display Area (opening) H x V
Pixel Pitch
Display colors
Contrast Ratio
Brightness (center)
Viewing Angle (CR>10)
Response Time (GTG)
Broadcasting System NTSC M / N
Receiving Channel PLL 181Ch., CATV 125Ch.
Sound System MTS+SAP
Data Broadcasting Close Caption , V - Chip
Composite Signal CVBS
Y, C Signal S-Video
Component Signal Y Pb Pr (1080i ,720p)
DVI / HDCP Connection DVI-D 24 pin x 1 (DVI 1.0 / HDCP 1.0)
VGA Connection D-Sub 15 pin x 1
Scanning Frequency f
Audio 1 CVBS & S-Video
Audio 2 Y Pb Pr
Audio 3 PC
Speaker ( build-in) 2.5W + 2.5W (rms) @THD < 10%
Headphone Headphone Mini-jack (3.5φ)
OSD Language English , French , Spanish , Portuguese , Chinese
Function Keys
Video Performance
Audio Performance Equalizer , Auto Volume Control (AVC)
Other Control Sleep Timer , Auto Power Off
Power Supply AC 100V ~ 240V , 50 / 60Hz
Power Consumption
16 : 9
1680 x 1050
433.44 mm x 270.9 mm
0.258 mm x 0.258 mm
16,777,216 colors
600 : 1 (typ.)
300 cd / m
140o Hor. / 125o Ver. (typ.)
8 ms (typ.)
H =
Power , Source , Menu , Up/Down(Channel) ,
+/-(Volume) , Exit/ARC
Comb-filter , De-interlace , Aspect Ratio Control
(ARC) , Auto Picture Control (APC) .
< 70 W
2
(typ.)
31.5 ~ 60KHz / fV = 56 ~ 75Hz
Dimension W x H x D
Weight (net) Without Accessories
Accessories Remote Control , Batteries , AC Power Cord .
42
523.5 x 433 x 212.5 (mm)
8.0 kg
 Loading...