

Page 1

43" 2160p (4K), LED Chromecast built-in TV
49" 2160p (4K), LED Chromecast built-in TV
55" 2160p (4K), LED Chromecast built-in TV
65" 2160p (4K), LED Chromecast built-in TV
75" 2160p (4K), LED Chromecast built-in TV
Page 2

Page 3

1
Contents
IMPORTANT SAFETY INSTRUCTIONS . . . . ... . . . . . . . . ... ..... ... ............. . 2
SAFETY INFORMATION . . . . ... . . . . . . . . ........... ....................... . . . 3
Front/Back View . . . . ... . . . . . . . . ...................................... 7
Button Functions . . . . ... . . . . . . . . ...................................... 8
REMOTE CONTROL ... . ... . . . . . . ............... . . . . . . . . . . . . . . . . . . . . . . . . . . . . 10
Install the Batteries . . . . ... . . . . . . . . .................................... 11
Connecting to External Devices ... . ... . . . . . . ............... . . . . . . . . . . . . . . . ..9
Connecting external devices to your LED TV . . . . ... . . . . . . . . ..............9
What is Included/TV Placement Setup . . . . ... . . . . . . . . ........... ............. 4
TV Stand Installation/Removal . . . . ... . . . . . . . . ... ..... ... ............... 4
Unit and Accessories
. . . . ... . . . . . . . . ... ..... ... ....................... 4
Wall Mounting . . ... . . ... .... . . ... ... ..... ...... . . . . . . . . . . . . . . . . . . . . . . 4
TROUBLESHOOTING . . . . . ... . . . . . . ................................... . . . . 39
SPECIFICATIONS ......
. . . . . . ....
......................................... 40
Google Cast ... .... . . . . . ............... .......... . . . . . . . . . . . . . . . . ......... . 12
TV Setting ... .... . . . . . ............... .......... . . . . . . . . . . . . . . . . ......... .24
29
Audio Menu ... . ... . . . . . . ............... . . . . . . . . . . . . . . . . . . . . . . . . .
Settings Menu ... . ... . . . . . . ............... . . . . . . . . . . . . . . . . . . . . . . .34
Settings Menu ... . ... . . . . . . ............... . . . . . . . . . . . . . . . . . . . . . . .38
12Turning on your TV for the first time . . . . ... . . . . . . . . ... ..... ... ..........
12Using an Android mobile device. . . . . . . . ... . . . . . . . . ... ..... ... ..........
18Casting a video, movie, or TV show. . . . . . . . ... . . . . . . . . ... ..... ... .......
18Using an iOS (Apple) mobile device. . . . . . . . ... . . . . . . . . ... ..... ... .......
24
SELECT INPUT SOURCE... . ... . . . . . . ............... . . . . . . . . . . . . . . . . .
30
Chromecast built-in ...............................................
30Lock Menu... . ... . . . . . . ............... . . . . . . . . . . . . . . . . . . . . .
. . . ..
24Main Menu Operation ..
. . ... . . . . . . ............... . . . . . . . . . . . . . . . . . . . .
27Picture Menu ... . ... . . . . . . ............... . . . . . . . . . . . . . . . . . . . . . . . .
33
Time Menu ... . ... . . . . . . ............... . . . . . . . . . . . . . . . . . . . . . . . . . .
25Channel Menu ... . ... . . . . . . ............... . . . . . . . . . . . . . . . . . . . . . . . .
Page 4
2
Important Safety Instructions
• Read these instructions – All the safety and operating instructions should be read
before this product is operated.
• Keep these instructions – The safety and operating instructions should be retained
for future reference.
• Heed all warnings – All warnings on the appliance and in the operating instructions
should be adhered to.
• Follow all instructions – All operating and use instructions should be followed.
• Do not use this apparatus near water – The appliance should not be used near water
or moisture – for example, in a wet basement or near a swimming pool, and the like.
• Clean only with dry cloth.
• Do not block any ventilation openings. Install in accordance with the manufacture’s
instructions.
• Do not install near any heat sources such as radiators, heat registers, stoves, or other
apparatus (including amplifiers) that produce heat.
• Do not defeat the safety purpose of the polarized or grounding plug. A polarized
plug has two blades with one wider than the other. A grounding plug has two blades
and a third grounding prong. The wide blade or the third prong is provided for your
safety. If the provided plug does not fit into your outlet, consult an electrician for
replacement of the obsolete outlet.
• Protect the power cord from being walked on or pinched particularly at the plugs,
convenience receptacles, and at the point where they exit from the apparatus.
• Only use attachments/accessories specified by the manufacturer.
• Use only with the cart, stand, tripod, bracket, or table specified
by the manufacturer, or sold with the apparatus. When a cart or
rack is used, use caution when moving the cart/apparatus
combination to avoid injury from tip-over.
• Unplug the apparatus during lightning storms or when unused for
long periods of time.
• Refer all servicing to qualified personnel. Servicing is required when the apparatus
has been damaged in any way, such as pow
er supply cor
d or plug is damaged, liquid
has been spilled or objects have fallen into the apparatus has been exposed to rain
or moisture, does not operate normally, or has been dropped.
• Please keep the unit in a well-ventilated environment.
• WARNING: To reduce the risk of fire or electric shock, do not expose this apparatus
to rain or moisture. The apparatus shall not be exposed to dripping or splashing and
that objects filled with liquids, such as vases, shall not be placed on apparatus.
• WARNING: The wall socket plug is used as disconnect device, the disconnect device
shall remain readily operable.
• WARNING: The batteries shall not be exposed to excessive heat such as sunshine,
fire or the like.
• This lightning flash with arrowhead symbol within an equilateral triangle is intended
to alert the user to the presence of non-insulated “dangerous voltage” within the
CAUTION
RISK OF ELECTRICAL S HOCK
DO NOT OPEN
product’s enclosure that may be of sufficient magnitude to constitute a risk of
electric shock.
• To reduce the risk of electric shock, do not remove cover (or back) as there are no
user-serviceable parts inside. Refer servicing to qualified personnel.
• The exclamation point within an equilateral triangle is intended to alert the user to
the presence of important operating and maintenance instructions in the literature
accompanying the appliance.
• This equipment is a Class II or double insulated electrical appliance. It does not
require a grounded connection.
Page 5

3
Safety Information
To ensure reliable and safe operation of this equipment, please read carefully all the
instructions in this user guide, especially the safety information below.
Electrical safety
• The TV set should only be connected to a main power supply with voltage that
matches the label at the rear of the product.
• To prevent overload, do not share the same power supply socket with too many
other electronic components.
• Do not place any connecting wires where they may be stepped on or tripped
over.
• Do not place heavy items on them, which may damage the leads.
• Hold the main plug, not the wires, when removing from a socket.
• During a thunderstorm or when not using the television for long periods, turn off
the power switch on the back of the television.
• Do not allow water or moisture to enter the TV or power adapter. Do not use in
wet, moist areas, such as bathrooms, steamy kitchens or near swimming pools.
• Pull the plug out immediately, and seek professional help if the main plug or
cable is damaged, liquid has spilt onto the set, if accidentally exposed to water
or moisture, if anything accidentally penetrates the ventilation slots or if the set
does not work normally.
• Do not remove the safety covers. There are no user serviceable parts inside.
Trying to service the unit yourself is dangerous and may invalidate the product’s
warranty.
Only qualified personnel should service this apparatus.
• To avoid battery leakage, remove exhausted batteries from the remote control, or
when not using for a long period.
• Do not break open or throw exhausted batteries in a fire.
Physical safety
• Do not block ventilation slots in the back cover. You may place the TV in a
cabinet, but ensure at least 5 cm (2”) clearance all around.
•
Do not tap or shake the TV screen, this may damage the internal circuits. Take
good care of the remote control.
• To clean the TV use a soft dry cloth. Do not use solvents or petroleum based
fluids.
• Do not install near any heat sources such as radiators, heat registers, stoves or
other apparatus (including amplifiers) that produce heat.
• Do not defeat the safety purpose of the polarized or grounding-type plug. A
polarized plug has two blades with one wider than the other. A grounding type
plug has two blades and a third grounding prong, the wide blade, or the third
prong is provided for your safety. If the provided plug does not fit into your
outlet, consult an electrician for replacement of the obsolete outlet.
• Protect the power cord from being walked on or pinched particularly at plugs.
• Unplug the apparatus during lightning storms or when unused for long periods.
• Refer all servicing to a qualified service personnel. Servicing is required when
the apparatus has been damaged in any way, such as power-supply cord or plug
is damaged, liquid has been spilled, or objects have fallen into the apparatus,
has been exposed to rain or moisture, does not operate normally, or has been
dropped.
Page 6
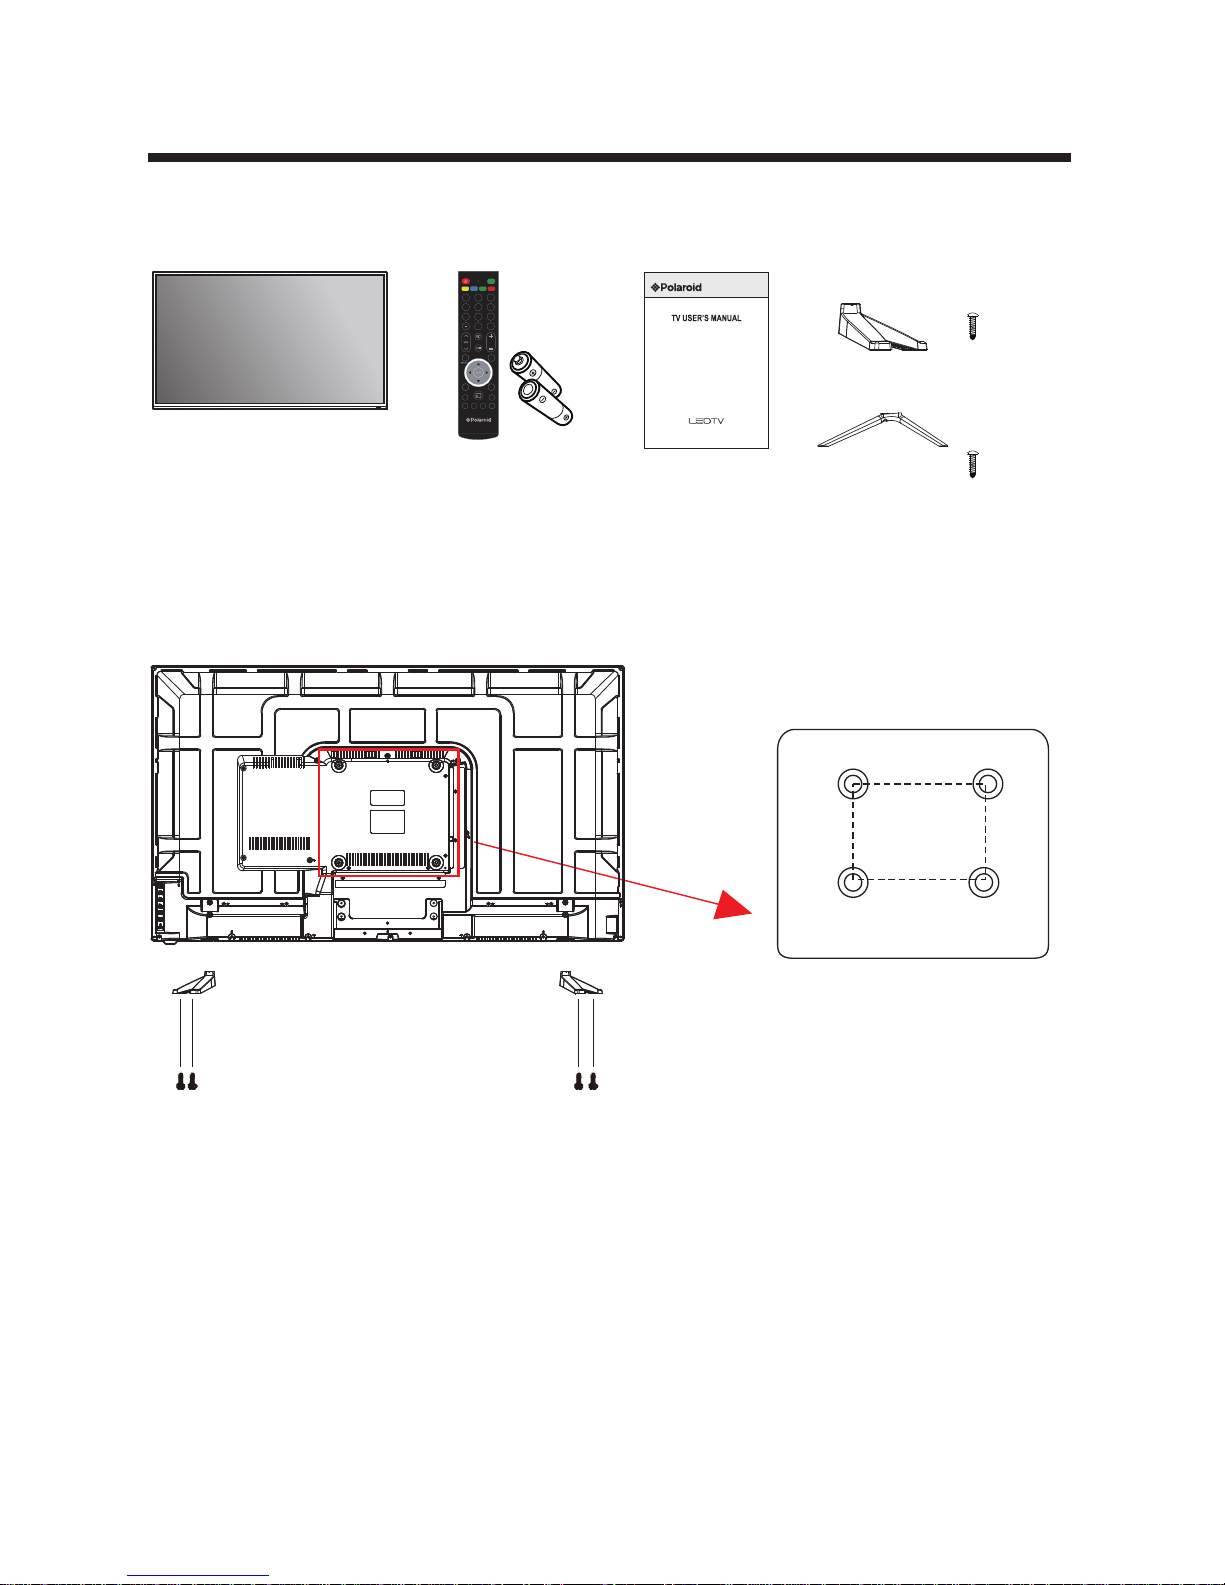
What is Included/TV Placement Setup
TV Stand Installation/Removal
Wall Mounting
The TV is provided with mounting holes for a VESA approved wall mounting bracket
(NOT SUPPLIED). The VESA mounting pattern is 200 x 200mm. Remove the screws
holding the base to the base bracket and lift the base away (do not remove the base
mounting brackets). Mount the VESA bracket using 4 x M6 x 10 isometric threaded
screws (not supplied). Do not use screws longer than 10 mm; damage will occur to
the internal components.
Caution: Your new TV is heavy; please consult with a professional wall mount installer
to perform this installation.
Unit and Accessories
User’s Manual
Four mounting holes
(size M6 screw)
200mm
200mm
TV Set Base Stand
6 Screws
Remote Control
with Batteries
123
456
789
0
SOURCE
TIXEUNEM
CH
.VAFCC
P.MODE S.MODE SLEEP ASPECT
MTS
RECALL
EPG
-VAF+VAF
ADD
Screws(2)
4*15BAH
Screws(2)
4*15BAH
4 Screws
43”
49” 55” 65” 75”
43GSR4100KN
4
43" 2160p (4K), 60Hz, LED Chromecast built-in TV
49" 2160p (4K), 60Hz, LED Chromecast built-in TV
55" 2160p (4K), 60Hz, LED Chromecast built-in TV
65" 2160p (4K), 60Hz, LED Chromecast built-in TV
75" 2160p (4K), 120Hz, LED Chromecast built-in TV
Page 7

5
Wall Mounting
The TV is provided with mounting holes for a VESA approved wall mounting bracket
(NOT SUPPLIED). The VESA mounting pattern is 200 x 200mm. Remove the screws
holding the base to the base bracket and lift the base away (do not remove the base
mounting brackets). Mount the VESA bracket using 4 x M6 x 10 isometric threaded
screws (not supplied). Do not use screws longer than 10 mm; damage will occur to
the internal components.
Caution: Your new TV is heavy; please consult with a professional wall mount installer
to perform this installation.
Four mounting holes
(size M6 screw)
200mm
200mm
49GSR4100KM
Screws(3)
4*23BMH
Screws(3)
4*23BMH
Four mounting holes
(size M6 screw)
400mm
200mm
55GSR4100KM
Screws(3)
4*23 BMH
Screws(3)
4*23 BMH
Page 8

6
Wall Mounting
The TV is provided with mounting holes for a VESA approved wall mounting bracket
(NOT SUPPLIED). The VESA mounting pattern is 200 x 200mm. Remove the screws
holding the base to the base bracket and lift the base away (do not remove the base
mounting brackets). Mount the VESA bracket using 4 x M6 x 10 isometric threaded
screws (not supplied). Do not use screws longer than 10 mm; damage will occur to
the internal components.
Caution: Your new TV is heavy; please consult with a professional wall mount installer
to perform this installation.
Four mounting holes
(size M6 screw)
400mm
400mm
65GSR4100KN
Screws(3)
4*20 BMH
Screws(3)
4*20 BMH
Wall Mounting
The TV is provided with mounting holes for a VESA approved wall mounting bracket
(NOT SUPPLIED). The VESA mounting pattern is 400 x 400mm. Remove the screws
holding the base to the base bracket and lift the base away (do not remove the base
mounting brackets). Mount the VESA bracket using 4 x M6 x 20 isometric threaded
screws (not supplied). Do not use screws longer than 20 mm; damage will occur to
the internal components.
Caution: Your new TV is heavy; please consult with a professional wall mount installer
to perform this installation.
Page 9

Wall Mounting
The TV is provided with mounting holes for a VESA approved wall mounting bracket
(NOT SUPPLIED). The VESA mounting pattern is 600 x 400mm. Remove the screws
holding the base to the base bracket and lift the base away (do not remove the base
mounting brackets). Mount the VESA bracket using 4 x M6 x 20 isometric threaded
screws (not supplied). Do not use screws longer than 20 mm; damage will occur to
the internal components.
Caution: Your new TV is heavy; please consult with a professional wall mount installer
to perform this installation.
Four mounting holes
(size M6 screw)
600mm
400mm
75GSR4100KL
7
Screws(3)
4*25 BMH
Screws(3)
4*25 BMH
43” 49” 55” 65”
Front/Back View
Page 10

CH+
VOL+
MENU
SOURCE
POWER
8
Button Functions
1. POWER: Turn on TV/Standby
2. SOURCE: Audio/Video input source selection
3. MENU: Open settings menu
4. VOL-: Decrease volume
5. VOL+: Increase volume
6. CH-: Previous channel
7. CH+: Next channel
8. IR RECEIVER: Receives infrared signals from the remote control
9. INDICATOR LED: Status indicator
75”
up
right
power
down
left
Page 11

9
LAN
HDMI3 HDMI2
(ARC)
HDMI1
(MHL)
RF OPTICAL
5V 0.5A
HeadphoneUSB
Connecting to External Devices
Connecting external devices to your LED TV
LAN:Network connection port.1.
5.
USB:Connect to a USB storage device to play compatible audio and photo files.
2. HDMI :Connect to High-Definition(HD) signal output device.(HDMI can
support 4K60Hz Signal)
6. HEADPHONES :Connect to the Headphones.
4. OPTICAL:Connect a digital sound system to this jack.
3. RF: Connect to the antenna(75ff VHF/UHF) socket with the RF coaxial cable.
Page 12

10
Remote Control
1. POWER Turns the LED TV on and off (standby mode).
2. MTS In NTSC receiving mode, press to select.
the audio modes to Mono, Stereo or SAP.
In ATSC Digital receiving mode, press to display
theaudio selection menu on the screen. Using the
Navigator▲,▼button to select the desire audio
mode.
3. S.MODE Sound Mode, press repeatedly to select
the presetting sound effect modes.
4. P.MODE Picture Mode, press repeatedly to select
the preset picture modes.
5. SLEEP Press repeatedly to activate and/or set the
sleep timer.
6. ASPECT Press repeatedly to select the aspect
ratio of screen as desired.
7. 0-9 Numeric buttons.
8. —.Select channel with two digits.
9. RECALL Recall Mode.
10. VOL+/VOL- Press to increase or decrease the
volume level.
11. CH+/CH- Press to increase or decrease the
channel number.
12. Turn off the sound temporary. Press again to
turn the sound back.
13. Play/Pause picture.
14. DISPLAY Press to display the information;
settings and the status of current mode/station
on the screen.
15. SOURCE Press to display the source menu on
the screen. Using the Navigator ▲ or ▼ buttons to
select the source as desire then press (ENTER) button
to confirm your selection.
16. ▲▼ ►◄/ ENTER Press to move the cursor within
the setting menu. ENTER Press the ENTER button to
confirm the selection. Press the "ENTER" button, the
check mark will appear to the channel , and the channel
is marked as channel list.
17. MENU Displays the setting menu on the screen.
18. EXIT Press to exit from the setting menu.
19. Chromecast built-in Enter cast connect surface
20. EPG Press to display the Electronic Program Guide in digital
TV channels(Operation in ATSC mode only functions on signals emitting from TV station) .
21. ADD In FAV display mode, press to increase or delete the highlighted channel.
123
456
789
0
SOURCE
TIXEUNEM
CH
.VAFCC
P.MODE S.MODE SLEEP ASPECT
MTS
RECALL
EPG
-VAF+VAF
ADD
6
4
3
1
7
8
10
13
14
16
17
19
20
23
22
5
9
11
15
18
21
24
25
12
2
Page 13

22. FAV+.Next favourite channel.
23. CC Press repeatedly to activate and/or set the CC (Closed Caption Display) modes.
24. FAV. Show the list of favorite channels.
25.FAV-.Previous favourite channel.
11
Install the Batteries
If the remote control fails to operate the TV functions, replace the batteries in the
remote control.
1. Open the battery cover.
2. Insert two size-AAA batteries. (Place the batteries with their terminals
corresponding to the (+) and (-) indications in the battery compartment.)
3. Replace the cover.
Initial Setup
1. Connecting your TV on the poweroutlet;
2. Press the POWER button on the remote to turn on the TV in green for the LED light.
CAUTION:Always disconnect the TV from the power outlet when the TV will
not be used for a long period of time. The POWER button on the front panel is only
used for switching the TV into standby, it does not disconnect the device from the
main voltage. To completely disconnect the main voltage, please remove the power
plug from the socket.
3. Press the key▼/▲/◄ / ►and following the picture as bellow to operate the subject.
NOTE:
The picture is for reference only.
Page 14

12
Chromecast built-in
Turning on your TV for the first time
The first time you turn on your TV, the initial setup wizard opens. The wizard guides
you through setting up your TV
including the Chromecast built-in setup, menu language, time zone, TV signal source,
and the channel list.
• If you are using an Android mobile device, go to Using an Android mobile device.
• If you are using an iOS (Apple) mobile device, go to Using an iOS (Apple) mobile device.
Using an Android mobile device
1 Make sure that you:
• Install the remote control batteries.
• If you plan to watch standard broadcast TV channels using a cable box, satellite box,
or external antenna, connect an antenna, cable TV, or satellite TV,please press SOURCE
to select TV.
• Connect the power cord.
• Know the Wifi network name and password if you are using a wireless network to set
up your TV.
Note
If you want to use a wired connection instead of Wifi to set up your TV, connect your
TV to an Internet router using the LAN jack. For more information, see Connecting a
network router on page 10.
2 Turn on Wifi on your mobile device and connect it to your home Wifi network.
3 Press (power) to turn on your TV. The Set me up screen opens.
Page 15

13
4 Type google.com/cast/setup in the search bar of your device’s browser.
5 Tap ACCEPT to agree to the Terms of Service and Privacy Policy.
Page 16

14
6 Touch DEVICES and choose the TV with Google Home you want to set up.
Touch SET UP.
7 Touch CONTINUE.
Page 17

15
8 Make sure the code on your device matches the code on your TV.
Touch I SEE THE CODE.
9 Optional: Change the name of your TV with Chromecast built-in to something distinct
by deleting the current name and typing in a new name.
Note: Guest mode and Send Chromecast built-in device usage data and crash reports
to Google are enabled by default. If you don't want to enable them, touch the
check marks next to their corresponding prompts. Touch CONTINE.
Page 18

16
10 Choose the Wi-Fi network you want to connect to your TV with Chromecast
built-in. Enter password.Touch CONTINUE.
11 If your TV with Chromecast built-in needs an update, it will
automatically update at this time and will let you know when the
update is complete.Touch CONTINUE.
Page 19

17
12 Touch SIGN IN. 13 Touch CONTINUE.
14 Touch LEARN HOW TO CAST.
15 Choose a sample clip to learn how to Cast.
Important Note:please make sure yourAndroid/IOS device is connected to the
same wifi network as the tv.
Page 20

18
Using an iOS (Apple) mobile device
1 Make sure that you:
• Install the remote control batteries.
• If you plan to watch standard broadcast TV channels using a cable box, satellite box,
or external antenna, connect an antenna, cable TV, or satellite TV.
• Connect the power cord.
• Know the Wifi network name and password if you are using a wireless network to
set up your TV.
Note
If you want to use a wired connection instead of Wifi to set up your TV, connect your
TV to an Internet router using the LAN jack. For more information, see Connecting a
network router on page10.
2 Turn on Wifi on your mobile device and connect it to your home Wifi network.
3 Press (power) to turn on your TV. The Set me up screen opens.
Casting a video, movie, or TV show
After you set up Chromecast built-in on your TV and mobile device, you are ready to
cast videos, movies and TV shows.
1 On your mobile device, make sure that Wifi is turned on.
2 Open a Chromecast built-in-enabled app.
3 Tap the video, movie, or TV program you want to cast, then tap
(Chromecast built-in button).
4 Tap the device you want to cast to.
5 To stop casting, tap , then tap Stop casting.
Page 21

19
4 Type google.com/cast/setup in the search bar of your device’s browser.
5 Open bluetooth,if you don’t want open bluetooth,pls skip to step 7.
Page 22

20
6 Touch DEVICES and choose the TV with Google Home you want to set up.
Touch SETUP,skip to step 8.
7 Connect the wifi which blongs to Chromecast built-in.
Page 23

21
8 Touch CONTINUE. 9 Touch I SEE THE CODE
10 Touch OK;
Optional: Change the name of your TV with Chromecast built-in to something distinct
by deleting the current name and typing in a new name.
Note: Guest mode and Send Chromecast built-in device usage data and crash reports
to Google are enabled by default. If you don't want to enable them, touch the check
marks next to their corresponding prompts. Touch CONTINUE.
Page 24

22
11 Choose the Wi-Fi network you want to connect to your TV with Chromecast
built-in. Enter password. Touch CONTINUE.
12 Touch SIGN IN.Touch CONTINUE.
Page 25

23
13 Touch LEARN HOW TO CAST
14 Choose a sample clip to learn how to Cast.
Or call our help line(USA):1-888-636-8599
If you still have questions,please visit www.polaroidhdtv.com or google.com/cast/help
Page 26

24
TV Setting
Input Channel
Google CastAudio
Picture
Lock
SettingsTime Help
Press INPUT button to display the input source list.
Press ▼ / ▲ button to select the input source you want.
Press ENTER button to enter the input source.
Press EXIT button to quit.
Press MENU to display the main menu or return to the previous menu or
close the main menu.
Press ◄ / ► to highlight the desired menu icon, and press ENTER to select.
If no buttons are pressed, the menu will close automatically after about 10 seconds.
Main Menu Operation
SELECT INPUT SOURCE
Page 27

25
Channel Menu
Press MENU to enter the main menu, Press ◄ / ► button to select.
Press ENTER / ▼ to enter.
Press MENU again to exit or back to parent menu.
Press ▼ / ▲ button to select among Air/Cable /
Auto Scan / Signal Information/Channel List .
Press ENTER to enter.
Press ◄ / ► button to adjust.
Press MENU again or back to parent menu.
Air/Cable
Select signal type.
Press ◄ / ► button to select(Air/Cable).
Auto Scan
Automatically search for channels.
Press ENTER button to enter.
Page 28

26
Channel List
Display your program list.
Press ENTER button to enter.
Only available when there is signal under DTV.
After finishing your adjustment, Press MENU button to return back to the
previous menu.
Page 29

27
Picture menu
picture mode
Adjust picture mode to change picture appearance.
Press ◄ / ► button to select(Standard / Dynamic / Mild / User/Power Saving).
Note:The brightness,contrast,color, tint and sharpness are only available in User
mode,you can adjust as you like.
Standard Produces a highly defined image in a normally lit room.
Dynamic Produces a highly defined image in a brightly lit room.
Mild Produces a highly defined image in a mild lit room.
Power Saving Saving Save energy.
User Select to customize picture settings.
Press MENU to enter the main menu, Press ◄ / ►button to select.
Press ENTER to enter.
Press MENU again to exit or back to parent menu.
Press ▼ / ▲ button to select among Picture Mode
/Brightness/ Contrast / Color/ Tint / Sharpness /
Color Temperature/Advanced Settings.
Press ENTER to enter.
Press ◄ / ► button to adjust.
Press MENU again or back to parent menu.
Brightness
Adjust the visual perception output of the entire picture, it will effect the
iuminousness of the picture.
Press ◄ / ► button to adjust.
Page 30

28
Contrast
Adjust the highlight intensity of the picture, but the shadow of the picture is invariable.
Press ◄ / ► button to adjust.
Color
Adjust the saturation of the color based on your own like.
Press ◄ / ► button to adjust.
Tint
Adjust the hue(Red,Green,Blue) of the picture.
Press ◄ / ►button to adjust .
Sharpness
Adjust the peaking in the detail of the picture.
Press ◄ / ► button to adjust.
Color Temperature
Increase or reduce warm color of the picture personally(red),and the cool color
personally(blue) according to your like.
Advance
Adjust advanced video features to fine tune the picture.
Press ► button to enter sub-menu.
Page 31

29
Audio Menu
Press MENU to enter the main menu, Press ◄ / ► button to select.
Press ENTER to enter.
Press MENU again to exit or back to parent menu.
Press ▼ / ▲ button to select among Sound Mode/
Sound EQ / Balance / Audio Language /Digital Audio
Output/AVL.
Press ENTER to enter.
Press ◄ / ► button to adjust.
Press MENU again or back to parent menu.
Sound Mode
Select a sound mode to achieve ideal sound.
Press ◄ / ► button to select(Standard/User/Movie/Sports/Music).
Note:The bass,treble and balance are only available in User mode,you can adjust as you like.
Standard Produces a balanced sound in all environments.
User Select to customize audio settings.
Movie Enhances treble and bass for a rich sound experience.
Sports Enhances vocals for TV audio.
Music Preserves the original sound.Good for musical programs.
Page 32

30
Audio Language
Select the language supported by the chosen digital channel. It is available Only in TV.
Press ◄ / ► button to select(English / French / Spanish).
Digital Audio Output
Send digital audio to external audio system.
Press ◄ / ► button to select.
PCM Select to output audio in 2-channel stereo.
off
Auto
AVL
Set the auto volume control.
Press ◄ / ► button to select(On/Off).
Balance
Adjust the balance between left and right speakers to adapt to your
listening position.
Press ◄ / ► button to adjust.
Page 33

Chromecast built-in
31
Lock menu
Press MENU to enter the main menu, Press ◄ / ► button to select.
Press ENTER to enter.
Press MENU again to exit or back to parent menu.
Press ▼ / ▲ button to select among Change Password/ System Lock
/ Input Block / US Rating / Canada Rating /RRT Setting / RRT Reset.
Press ENTER to enter.
Press ◄ / ► button to adjust.
Press MENU again or back to parent menu.
For detail please refer to page 12~23.
Press MENU to enter the main menu, Press ◄ / ► button to select.
Press ENTER to enter.
Press EXIT to exit or back to parent menu.
Page 34

32
Enter your 4- digital password. Default password is 1470 or 0000,and if forget what
you set, please call the service center.
Change Password
Enter a new 4-digital password then re-enter it to confirm.
Press ENTER button to enter.
Press ◄ button to clear.
Press ► button to cancel.
System Lock
Lock or unlock the buttons on the TV.
Press ◄ / ► button to select(Off / On).
Input Block
Block or unblock the input sources.
Press ENTER button to enter.
Press ◄ / ► button to select(Unblock / Block).
Page 35

33
US Rating
Restrict movie and TV programs by US Ratings.
Only available when "System Lock" is "on".
Press ENTER button to enter.
Press MENU button to back.
Canada Rating
Restrict movie and TV programs by Canadian
Ratings.
Only available when "System Lock" is "on".
Press ENTER button to enter.
Press MENU button to back.
For the United States, the rating setting basically
include the following options: TV, MPAA.
RRT Setting
Display an advance V-Chip rating table for digital channels.
The item is available only When current stream has downloadable rating data.
RRT Reset
Reset the RRT to default.
The item is available only When current stream has downloadable rating data.
Time Menu
Press MENU to enter the main menu, Press◄ / ► button to select .
Press ENTER to enter.
Press MENU again to exit or back to parent menu.
Page 36

34
Sleep Timer
Set a timer for the TV to turn off automatically.
Press ◄ / ► button to select(Off / 10min/20min /
30min / 60min / 90min / 120min/180min/240min).
Settings Menu
Press MENU to enter the main menu,Press ◄ / ► button to select.
Press ENTER to enter.
Press MENU again to exit or back to parent menu.
Press ▼ / ▲ button to select among Menu Language
/ OSD Timeout / Closed Caption /CEC/HDMI Color
Range /HDMI EDID/ Setup Wizard/Restore Default/
Active Standby Mode/TTS.
Press ENTER to enter.
Press ◄ / ► button to adjust.
Press MENU again or back to parent menu.
Page 37

35
Menu language
Select an OSD menu language can be displayed.Default English is selected as
menu language.
Press ◄ / ►button to select language.(English / Français / Español )
OSD Time out
Adjust the duration of the OSD (on screen display) menu.
Press ◄ / ► button to select.(Off/5 Sec./10Sec./15Sec./20Sec.)
Closed Caption
Adjust Closed Captioning settings. Only available under TV and AV source.
Press ENTER button to enter.
HDMI CEC
Press ► button to select HDMI CEC, then press Enter button to enter the sub-menu.
Page 38

36
Setup Wizard
Connect RF cable to your TV Aerial socket.
Select Language
Press ◄ / ► button to select the language to be used for menus and message.
Press ▼ / ▲ button to select and press ENTER button to enter the sub-menu.
Select Time
Press ▼ / ▲ button to select the time zone, daylight saving time and time
format you want.
Press ◄ / ► button on the remote control to adjust.
Press ▼ / ▲ button on the remote control to select and press ENTER button
to enter the sub-menu.
HDMI Color range
Press ◄ / ► button to select Auto/0-255/16-235.
HDMI EDID
Press ◄ / ► button to select defult/1.4/2.0.
Page 39

37
Auto Scan
Press ◄ / ► button to select the antenna type.
Press ▼ / ▲ button to select and press ENTER button to start auto scan.
Restore Default
Change power on options or reset TV to factory default.
Press ENTER button to enter.
Active standby mode
Press ◄ / ► button to select on/off
TTS
Press ► button to select TTS, then press Enter button to enter the sub-menu.
TTS
Press ◄ / ► button to select on/off.
verbosity
Press ◄ / ► button to select high/low.
rate support
Press ◄ / ► button to select mid/fast/slow.
Page 40

38
Press MENU to enter the main menu, Press ◄ / ► button to select.
Press ENTER to enter.
Press MENU again to exit or back to parent menu.
Press ▼ / ▲ button to select among Quick Setup Guide/
Wifi-Mac/WIFI-IP Addr/Ethemet-Mac/Ethemet-IP Addr/
Netifilx Esn/Software Version/Google Cast Version/Model
name/Serial Number.
Press ENTER to enter.
Press ► button to review Quick Setup Guide.
Press MENU again or back to parent menu.
Help menu
Page 41

39
Troubleshooting
If the device performance fails, check whether the detected problem is in the
following table. If your device still fails, contact customer service.
SYMPTOM POSSIBLE CAUSE REMEDY
TV – No signal input
connected, loose or
disconnected.
Signal cable is loose or not
connected.
Ensure signal cable is not loose
or disconnected. Reattach and try
again.
Remote Control
Distance is short,
no control.
Receiver of remote control
is covered.
Ensure the remote receiver is not
obstructed.
The battery energy of the
remote control is too low.
Change the batteries.
TV
Display is faint.
Adjustment is incorrect. Use auto-adjustment function.
Display mode is incorrect. Use recommended mode.
TV
Display image does
not fill the screen.
Adjustment is incorrect. Use auto-adjustment function.
Enter PICTURE to adjust the
horizontal and vertical position.
Display mode is incorrect. Use recommended mode.
TV
Unable to operate
the TV
Exterior influence, for
example lighting, static
electricity and so on, which
might disturb the
normal
operation of the TV.
Press the button to tum off
electrical source, then press the
button to turn on the TV again
after 1-2 minutes.
Static and sound
noise.
Antenna cable connector is
loose, cable is damaged.
Check the antenna cable
connector plug for secure
connection and any damage.
Antenna cable type is not
correct.
Check antenna cable type (VHF/
UHF).
Direction or position of
antenna is incorrect.
Adjust the direction or position of
antenna.
Signal is weak. Attempt to use signal amplifier.
TV image is better,
but has noise.
Antenna cable connector
is loose, cable is damaged.
Check the antenna cable
connector plug for secure
connection and any damage.
No image. No sound. Power plug is loose,
power cord does not
connect well.
Check to ensure power cord is
connected.
Press POWER on panel or
remote control.
Check if the
button is on.
TV image has
stripes.
Signal is exposed to
interference, such as a car,
neon light, electric blower,
etc.
Do not use an electric blower
around unit.
Adjust antenna cable direction
to reduce interference.
TV image has
shadows.
TV signal is reflected by
valley or building.
Use a high-directional antenna.
Direction of antenna is
incorrect.
Adjust direction of the antenna.
TV has no sound. Volume setting is too low. Adjust volume to proper level.
Sound is muted. Press MUTE to deactivate mute.
CAUTION: Do not allow your TV screen to display the same image for an extended
period of time. Please set up a screen protection procedure. If a high-contrast picture
remains on the TV screen for a long time, this picture could burn the image onto the
screen. Usually the burnt image will disappear gradually when you turn off the TV’s
power. However, this damage cannot be repaired.
Page 42

40
Specifications
Specifications
TV System
Mode
ATSC
43GSR4100KN
Maximum
3840x2160
Brightness
240 cd/m2
Static Contrast
3000:1
Response Time
8 ms
Consumption
150W
Power Supply
AC 100-120V- 50/60Hz
Connectivity
HDMl input x 3
RF Antenna Input
Headphones Output
LAN Output
OPTICAL Output
Google Cast
Data Interface
USB
Supported System Files
FAT32 and FAT16
TV System
Mode
ATSC
49GSR4100KM
Maximum
3840x2160
Brightness
280 cd/m2
Static Contrast
5000:1
Response Time
8 ms
Consumption
150W
Power Supply
AC 100-120V- 50/60Hz
Connectivity
HDMl input x 3
RF Antenna Input
Headphones Output
LAN Output
OPTICAL Output
Google Cast
Data Interface
USB
Supported System Files
FAT32 and FAT16
Page 43

41
TV System
Mode
ATSC
55GSR4100KM
Maximum
3840x2160
Brightness
300 cd/m2
Static Contrast
6000:1
Response Time
6 ms
Consumption
150W
Power Supply
AC 100-120V- 50/60Hz
Connectivity
HDMl input x 3
RF Antenna Input
Headphones Output
LAN Output
OPTICAL Output
Google Cast
Data Interface
USB
Supported System Files
FAT32 and FAT16
TV System
Mode
ATSC
65GSR4100KN
Maximum
3840x2160
Brightness
350 cd/m2
Static Contrast
6000:1
Response Time
6 ms
Consumption
250W
Power Supply
AC 100-120V- 50/60Hz
Connectivity
HDMl input x 3
RF Antenna Input
Headphones Output
LAN Output
OPTICAL Output
Google Cast
Data Interface
USB
Supported System Files
FAT32 and FAT16
Page 44

Remote Control
Signal Type
Infrared
Control Distance
8 meters
Control Angle
30° (Horizontal)
Power Supply
AAA 1.5V x 2
42
TV System
Mode
ATSC
75GSR4100KL
Maximum
3840x2160
Brightness
400 cd/m2
Static Contrast
5000:1
Response Time
6 ms
Consumption
300W
Power Supply
AC 100-120V- 50/60Hz
Connectivity
HDMl input x 3
RF Antenna Input
Headphones Output
LAN Output
OPTICAL Output
Chromecast built-in
Data Interface
USB
Supported System Files
FAT32 and FAT16
 Loading...