

Page 1

Page 2
Page 3
Page 4

CONTENTS
A) Introduction
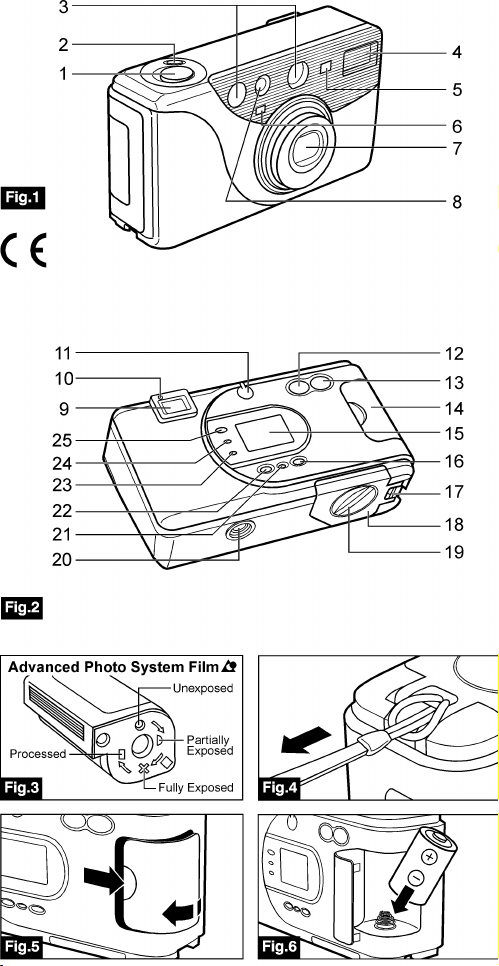
B) Parts Identification
C) Attaching Wrist Strap
D) Loading Batteries
E) Power Switch
F) LCD Panel
G) Loading Film
H) Film Speed Setting
I) Selecting Print Format
J) Mode Selection
K) Taking Pictures - Outdoors
INSTRUCTIONS
L) Auto Focus Lock
M) Infinity Focus
N) Flash Pictures
O) Self-Timer
P) Rewinding/Unloading Film
Q) Processing & Printing
R) Caring for Your Camera
S) Troubleshooting
T) Date and Time Imprinting
U) Battery Disposal
Page 5

Page 6

Page 7

N) FLASH PICTURES
• This camera is equipped with auto
conditions e.g. under dark or overcast sky or in shade.
• Ensure you are within flash range (fig 11) for picture taking.
• The
“Wait” Light
shutter will be inhibited while camera is charging to prevent wasted exposure. When
glows red (and flash symbol “ ” on LCD simultaneously stops blinking) depress the
to take the picture.
• After
if low battery symbol “ ” appears, replace battery.
FILL FLASH FEATURE
The camera also has a Fill Flash feature. Press the
sun. This can improve your picture if, for example, you are outside in bright sun but your subject’s face is shaded
or strongly backlit.
Fill flash may also be selected in conjunction with self-timer.
FLASH OFF FEATURE
In some low lighting situations where flash photography may be prohibited, or where for artistic effect no flash
is desired, the automatic flash may be disabled.
Press the
RED EYE REDUCTION
Pictures of people or animals taken at low light levels may exhibit “Red-Eye” effect. The eye pupils appear as
red circles in the pictures. This can be reduced by having your subject look away from the camera or by turning
on bright room lights. Additionally this camera is equipped with a Red-eye Reduction feature.
Press the
The high power
bright LED will cause the subject’s eye pupils to partially close, reducing the “Red-Eye” effect. Red-Eye
Reduction may also be selected in conjunction with self-timer mode.
NOTE: The camera will stay in the selected flash mode after you take the picture. To return to auto flash mode,
O) SELF-TIMER
Self-timer feature is useful when you wish to be included in the picture. With camera turned ON, Press
Timer Button
Self-timer symbol “ ” will appear on LCD display to confirm self-timer mode is engaged. Then press the
Shutter Button
During the 10 second count down,
then blink quickly for next 3 seconds and then the shutter will fire.
To cancel the self-timer before the picture is taken, press the
depressing
Any mode option (flash modes and infinity focus) may be selected when taking self-timer pictures. Refer to
J) “MODE SELECTION” for details of these options.
After picture has been taken the camera will revert to normal picture taking mode. If further self-timer picture is
desired,
P) REWINDING/UNLOADING FILM
When the last picture on the roll of film has been taken the film will automatically rewind.
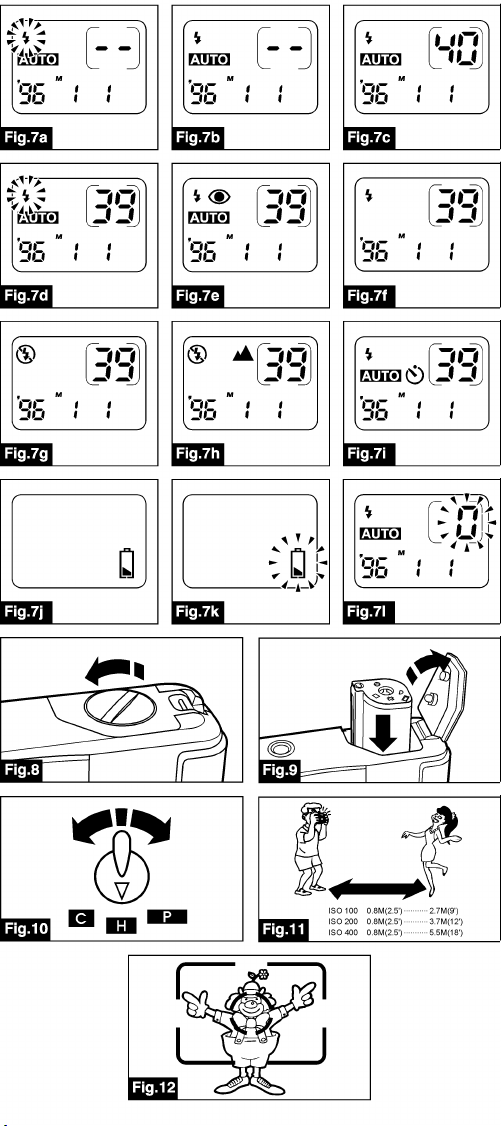
When film has fully rewound, a flashing “0” will appear on
CAUTION:- Do NOT attempt to open the film door before rewinding is complete as you may damage the camera
and ruin your film.
For safety the shutter will be automatically inhibited until rewound film has been removed.
Turn the
promptly for processing.
MID ROLL REWIND:
The camera also has a
film and have it processed.
NOTE: A partially exposed film cannot be reloaded into the camera for picture taking.
will glow red and Flash Symbol “ ” on LCD Panel will blink while flash is charging. The
Flash
is fired it will automatically recharge ready for next picture. If recharging takes excessively long or
symbol appears steadily on LCD display (fig 7f). Then the flash will always fire, even outside in bright
Mode Button
Mode Button
Red Eye Reduction LED
select by pressing the mode button or turn off the camera’s power.
(22).
to activate 10 second count down.
On/Off Switch
Self-Timer Button
Film Door Lock Switch
Flash
which will automatically fire indoors or outdoors in low-light
“Wait” Light
Shutter Release Button
Mode Button
(16) until flash symbol “ ” alone without
until no flash symbol “ ” appears (see fig 7g).
until Red Eye Reduction symbol “ ” appears (see fig 7e).
.
must be pushed again before pressing shutter button.
Mid Roll Rewind Switch
(8) will turn on momentarily before the flash picture is taken. This
Red Eye Reduction Light
(19) per arrow indication to open the film compartment and take out the film
(8) on front of camera will blink slowly for 7 seconds;
Self-Timer Button
LCD Panel
(21), which may be pressed at any time when you wish to rewind
again or turn the camera off by
.
no longer
Self-
Page 8

Q) PROCESSING & PRINTING
Fully exposed film cassette will show Exposed indication. Refer to figure 3.
After removing exposed film from camera have your film processed promptly by
photofinisher that offers Certified Advanced Photo System processing.
Negatives produced will be returned to you inside the film cassette for easy storage
and protection.
You should also receive an index print that shows each of the images in miniature size
for future identification.
To order reprints, refer to the index print to identify the images required and return the
film cassette to the photofinisher.
Reprints may be ordered in any of 3 print formats - (Classic), (Wide view)
or (Panorama) - irrespective of the original print type selected when taking the picture.
Store the cassette in a cool dry place together with the index print for future reference.
R) CARING FOR YOUR CAMERA
• Protect the camera from dirt, rain, dampness or high heat
• Do not use solvents, alcohol or abrasive cleaners to clean the camera body
• Do not drop the camera
• Do not leave the camera in a car especially on a hot or sunny day
• Do not store the camera in extremely hot or very cold location
• Do not disassemble the camera, as it contains high voltage components
NOTE: Before undertaking an extended trip with the camera (especially if it has just been purchased), please
take a test roll of film to ensure that you are fully conversant with all key features of the camera and that
the picture results confirm correct performance. Carry spare battery with you.
S) TROUBLESHOOTING
Symptom
Film cassette does not fit
completely into film
chamber
Film does not advance
immediately after loading
(frame counter shows “0”)
Camera will not operate
Probable Cause
• Incorrectly trying to load
conventional 35mm film cassette.
• Batteries are weak or dead or
improperly inserted.
• Film status indicator of the loaded
cassette shows partially exposed ( ),
fully exposed ( ) or processed ( )
see fig 3 for details.
• Film cassette problems.
• Camera transport problems.
• There are no more pictures remaining
and film has not been removed.
• Batteries are weak, dead, missing,
or improperly inserted.
Corrective Action
• Use only Advanced Photo System
film cassette.
• Reload batteries correctly or replace
with fresh batteries. See paragraph D)
“LOADING BATTERIES”. Then reload
film i.e. film must be inserted after
batteries are loaded to properly
sequence camera operation.
• Remove used film completely from
camera and load a fresh unexposed
film into the camera.
• Review paragraph G) “LOADING FILM”
• Remove film completely from camera
and load another new, unexposed film.
• Return to dealer for assistance.
• Remove film completely from camera
and load a fresh film.
• Check LCD Panel for camera status.
Low battery symbol blinks warning that
no more pictures can be taken until
battery is replaced. If no symbol
appears on LCD Panel replace or
reload battery correctly.
Page 9

T) DATE AND TIME IMPRINTING
The camera is capable of recording Date and Time information on the film’s magnetic strip. Your film
processing lab will print the Date And Time information onto the photographs.
Please refer to figure 2 for identification of the
SET
(23). The
DATE Button
imprinted in choice of 3 styles with either Day, Month or Y ear appearing first.
Date may be set by pressing the
scroll through the desired date and time formats:
-- -- --
Press the
SEL Button
(Press
Set Button
(25) controls the type of information that appears on the LCD. Date may be
year/month/day month/day/year day/month/year hour/m inute
(24) so the 2 digit “ year ” display blinks. Press the
continuously for rapid digit advance and lightly once for each single digit advance.) Repeat the
LCD Panel
DATE Button
to select one of 3 styles. Press the
(15) and three control buttons,
Date Button
SET Button
DATE
(23) to set correct year.
(25),
SEL
(24) and
(25) repeatedly to
 Loading...