

Page 1
Introducing Your Polaroid PhotoMAX
PDC 640CF Digital Camera
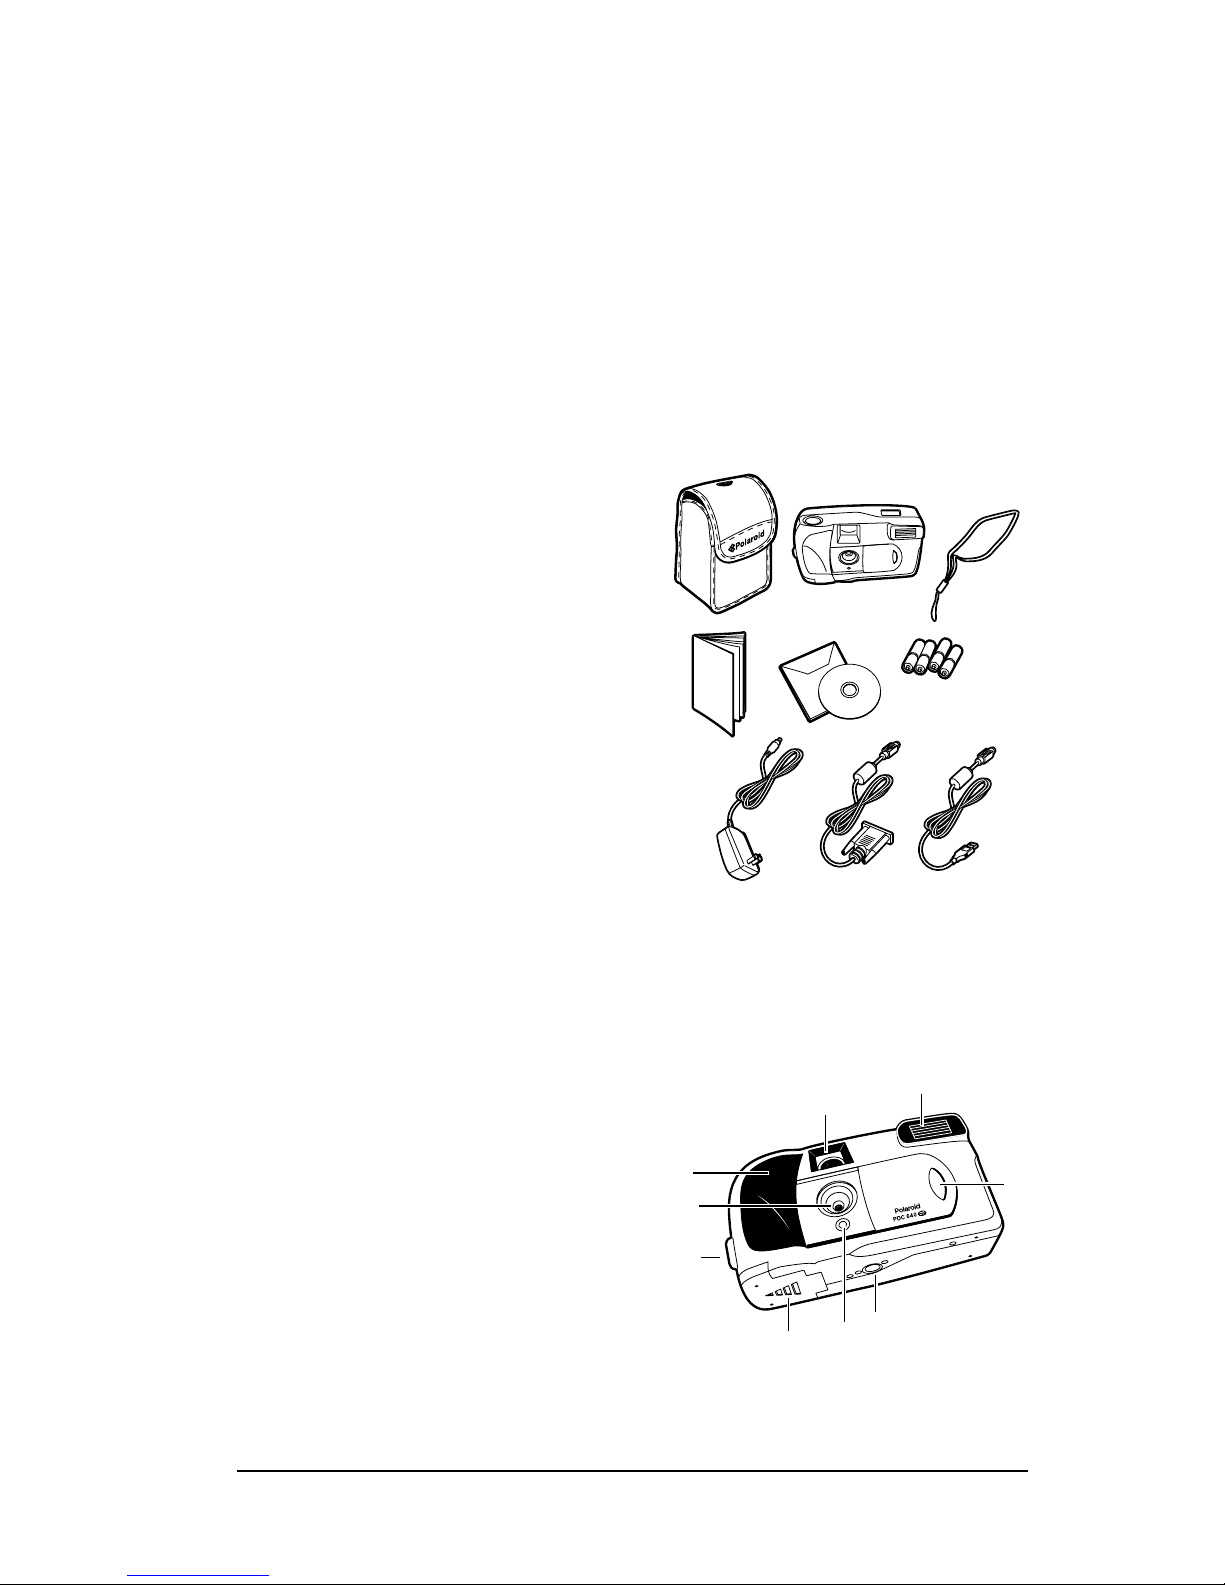
Yo ur Polaroid PhotoMA X PDC 640CF Digital Camera Kit contains
everything you need to take digital photos, transfer them to your computer,
change them in many creative wa ys, include them in e-mails, print them, and
find other great ways to use them.
Note:
To install the Ph ot oM AX software that comes with the camera, see
page 22.
Camera case
a
P ola r oid 640CF Digital Camera
b
Wrist strap
c
User’s Guide
d
Polaroid PhotoMAX Image Maker
e
Softwar e CD-ROM
Four AA batterie s
f
AC power adapter
g
Camera-to-computer RS-232 Serial
h
cable
Camera-to-computer USB cable
i
Your Camera
c
a
e
d
g
b
f
i
h
Fro nt v i ew
Optical viewfinder
a
Flash
b
Lens cover and on/off switch
c
Tripod mount
d
Self-timer LED
e
Battery compartment
f
Wrist str ap slot
g
Lens
h
Hand grip
i
Polaro id PhotoMA X PDC 640CF Digital Camera User’s Ma nual 1
b
a
i
h
g
d
e
f
Rev. 1, June 10, 2002
c
Page 2
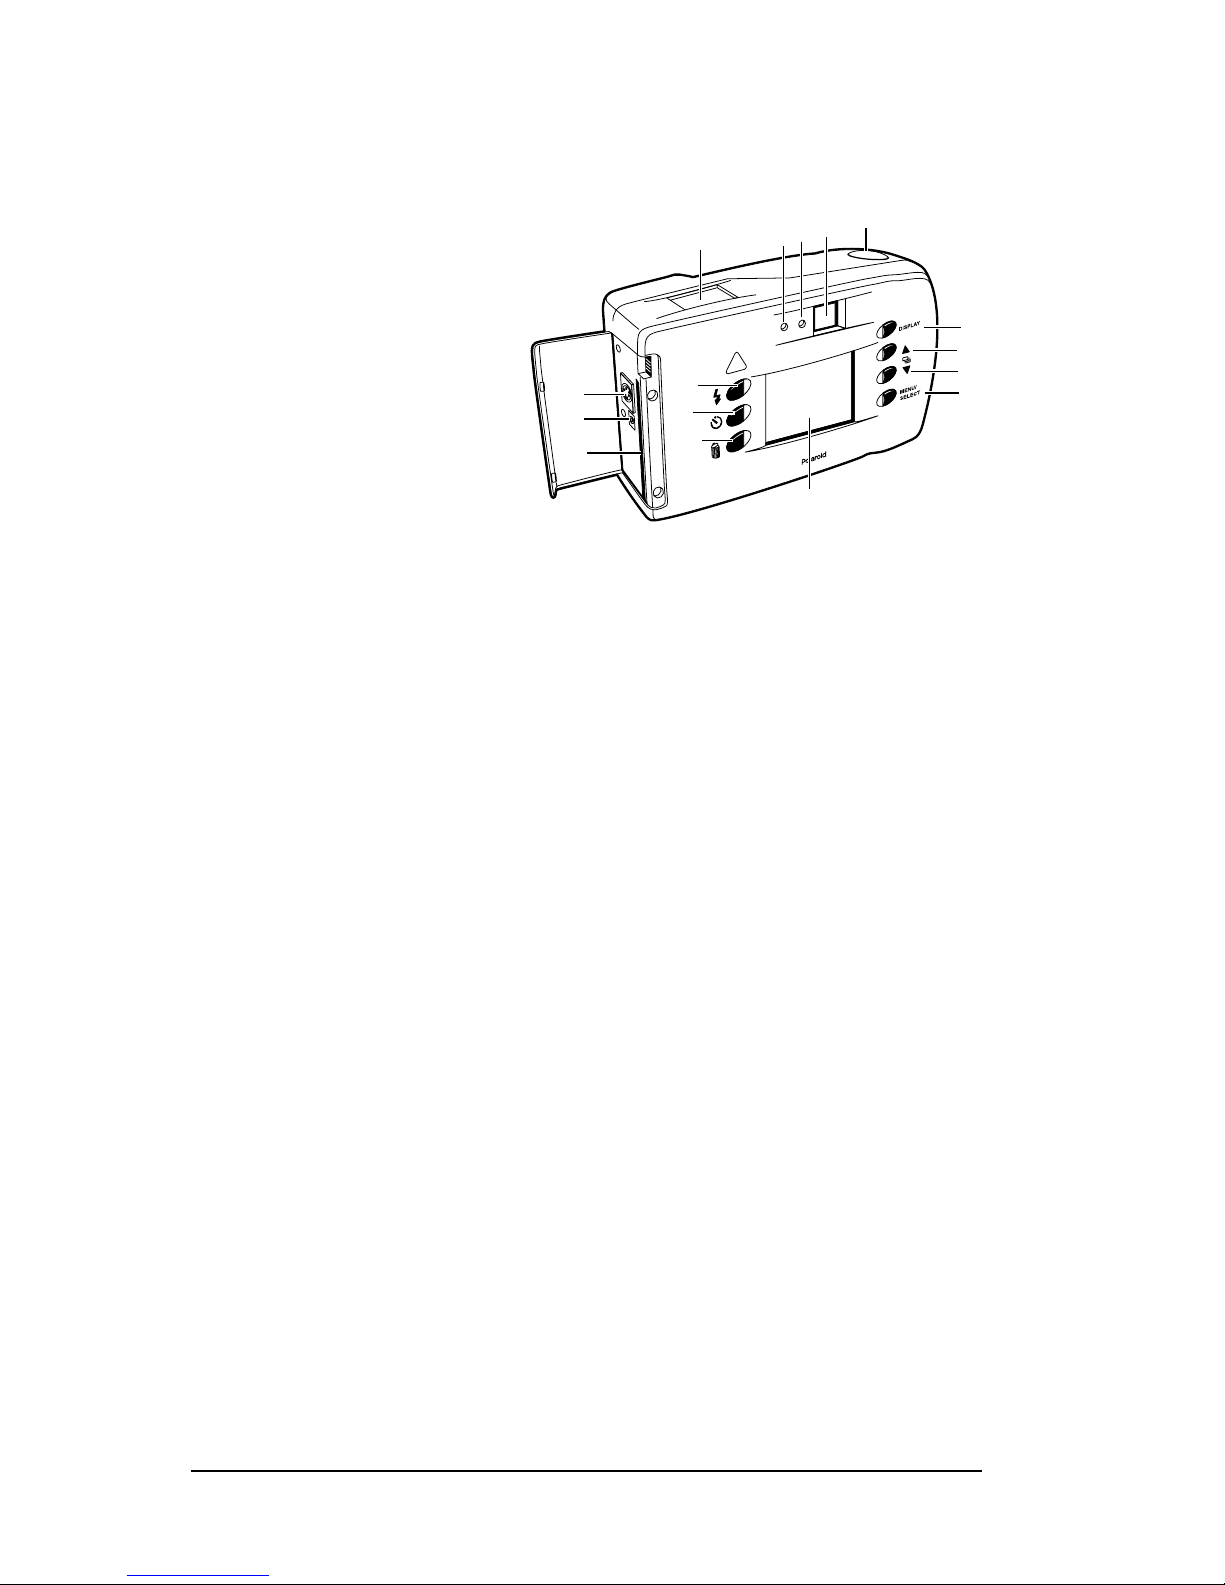
Rear view
Status LCD
a
Flash status LED
b
Camera power/status
c
LED
Optical viewfinder
d
Shutter button
e
Color LC D on/off bu t ton
f
(
DISPLAY
Color LCD scroll up
g
)
button
Color LCD scroll down button
h
Menu on/off an d s electi on button (
i
Color LCD (menu/viewfinder)
j
Flash setting butt on
k
Self-timer butto n
l
Photo delete (trashcan) button
m
a
n
o
p
MENU/SELECT
k
l
m
e
d
c
b
f
g
h
i
j
)
USB and RS-232 Serial connection
n
AC power adapter connection
o
Memory card slot
p
Note:
For a detailed list of camera specifications, see the PhotoMAX PDC
640CF Digital Camera Specifications section of the online Polaroid
PhotoMAX Image Mak er U ser’s Guide.
2 P olaroid PhotoMA X PDC 640CF Digital Camera User’s Manual
Page 3
Status LCD
When y ou turn the ca m era on, icons appear on the Status LCD on top of the
camera. Icons may appear differently (or not at all), depending on the mode
the camera is in.
Battery status (page12)
a
Self-timer status (page 13)
b
Phot os in the cam er a (p a ge13) or th e self-
c
b ca
timer countdown (page 13).
Photo resolution setting (page 14)
d
Photo quality setting (page14)
e
Flash setting (page15)
f
f
e d
Color M en u/view finder LCD
You use the color LCD on the back
of the camera:
• As a live vi ewfinder for taking
photos
• To review photos you have
taken
a
b
c
• To change camera settings and
menus
Flash mode button (page 15)
a
Self-timer button (page 13)
b
Photo delete (trashcan) button (page20)
c
Color LCD
d
Color LCD scroll up button (page 11 and pag e19)
e
Color LCD scroll down button (page 11 and pag e19)
f
gMENU/SELECT
DISPLAY
on/off button
button (page11)
d
e
f
g
Polaro id PhotoMA X PDC 640CF Digital Camera User’s Manual 3
Page 4
Preparing to Take Photos
Power supply
You can operate the camera using batteries or the AC adapter provided. To
conserv e b at tery life, the camera shuts off after 30 seconds of inactivity, if the
menu/viewfinder LCD is on. The camera then shuts off after 3 minutes of
inactivity . To activate the camera again, close and reopen the lens cover .
Note:
Use the AC adap ter whenever possibl e t o extend th e li f e of you r
batteries. K eep a set o f extra batteries handy, especially on a trip, when
it may not be possible to find replacement batteries easily.
When not using the c am era , close the len s cov e r. And when not using
the camera for more than a few days, remove the batteries.
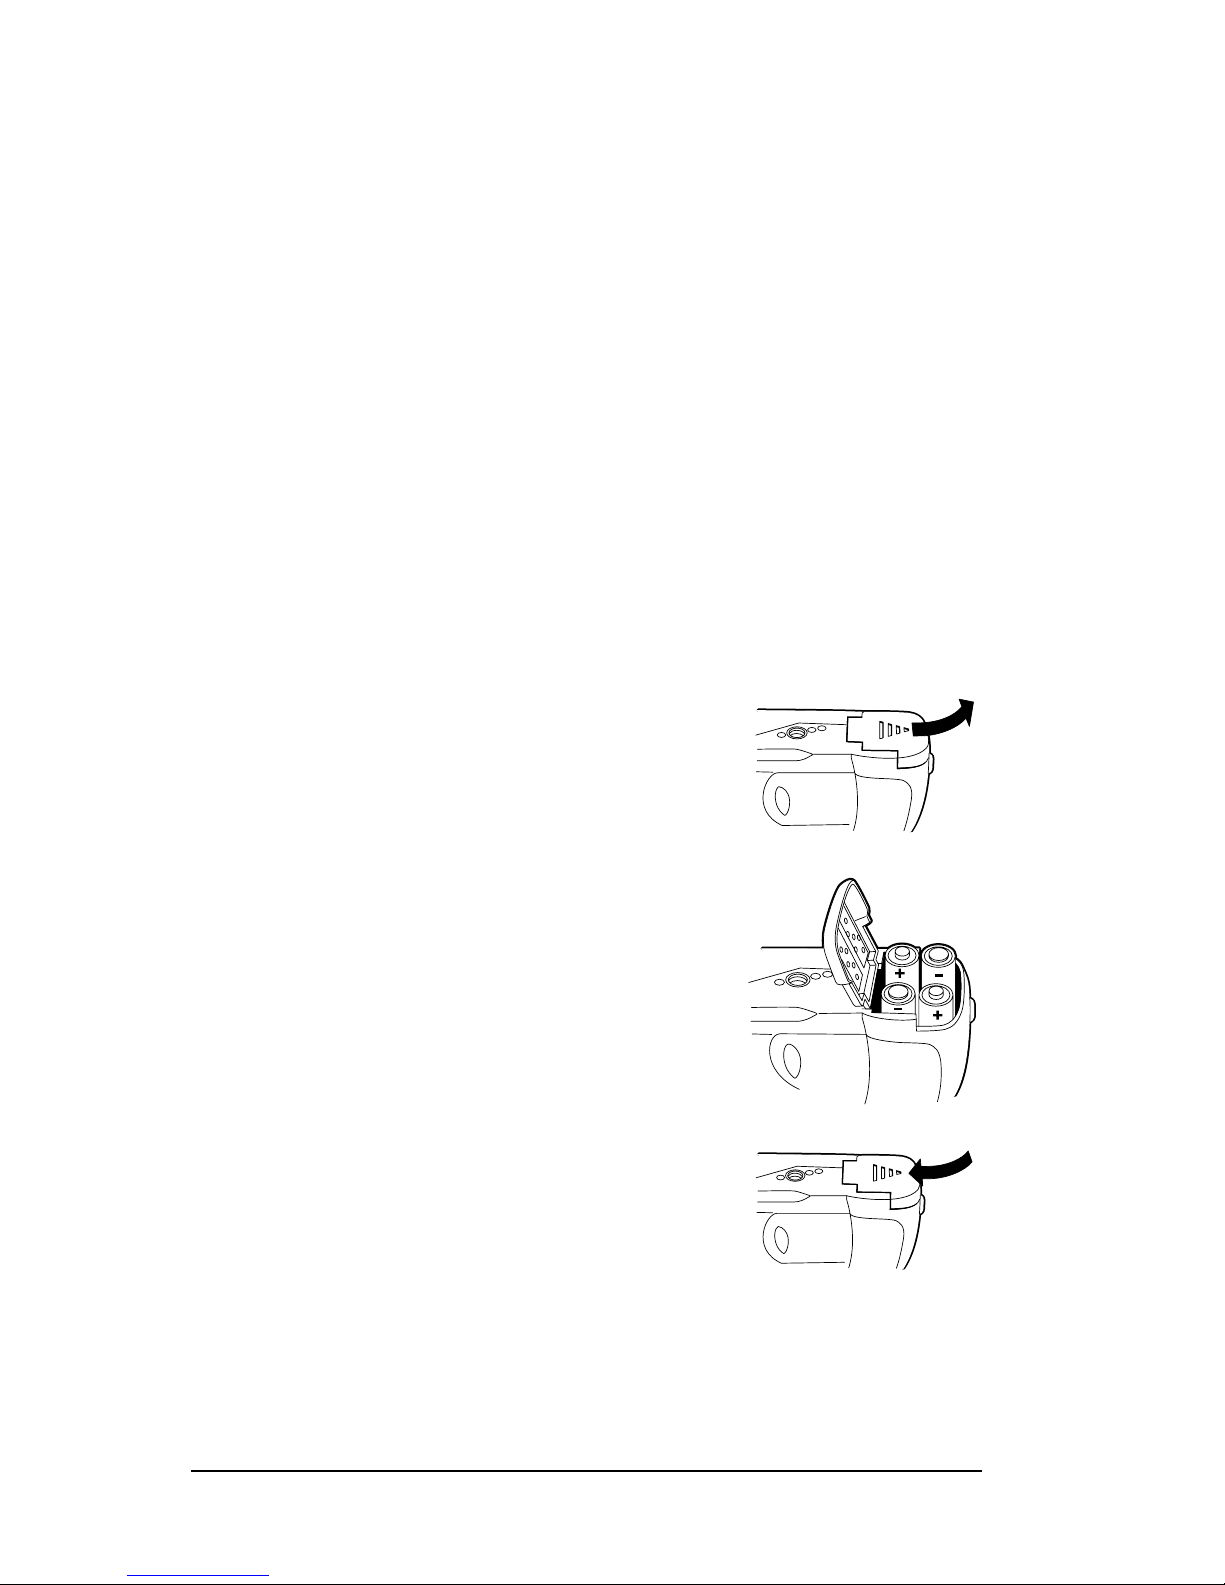
Load ing ba tterie s
1 Open the battery compartment cover on the
bottom of the camera by sliding the cover out to
the side as far as it will go and lifting it.
and –
2 Insert four AA batteries with the
terminals oriented as shown inside the battery
compartment.
Use only AA high-capacity super alkaline
•
or lithium disposable batteries or NiCad or
NiMH rechargeable batteries.
+
Neve r m ix old batte ries with new b atteries,
•
different types of batteries, or batteries
from different manufacturers.
3 Close the battery compartment cov e r secu r ely.
If you feel resistance, do not force the cover.
Slide it out to the side as far as it will go, press it
down flat against the camera base, and slide it
back into the base to lock it closed.
Note:
4 P olaroid PhotoMA X PDC 640CF Digital Camera User’s Manual
For important information about using batteries properly and safely,
see th e Tips, Tricks, Terms, and Techniques section of the online
Polaro id PhotoMAX Image Maker User’s G uide.
Page 5
Using the A C adapter
To maximize the life of your camera batteries, use the AC adapter whenever
possible. For example, always use the AC adapter when reviewing stored
photos on the LCD or transferring ph otos into your computer.
Note:
The AC adapter may become warm to the touch after extended
periods of use. This is no cause for alarm.
If you are using rechargeable batteries, using the A C adapter will not
recharge them. For more information about how to recharge the
batteries, see the instructions provided by the battery manufacturer.
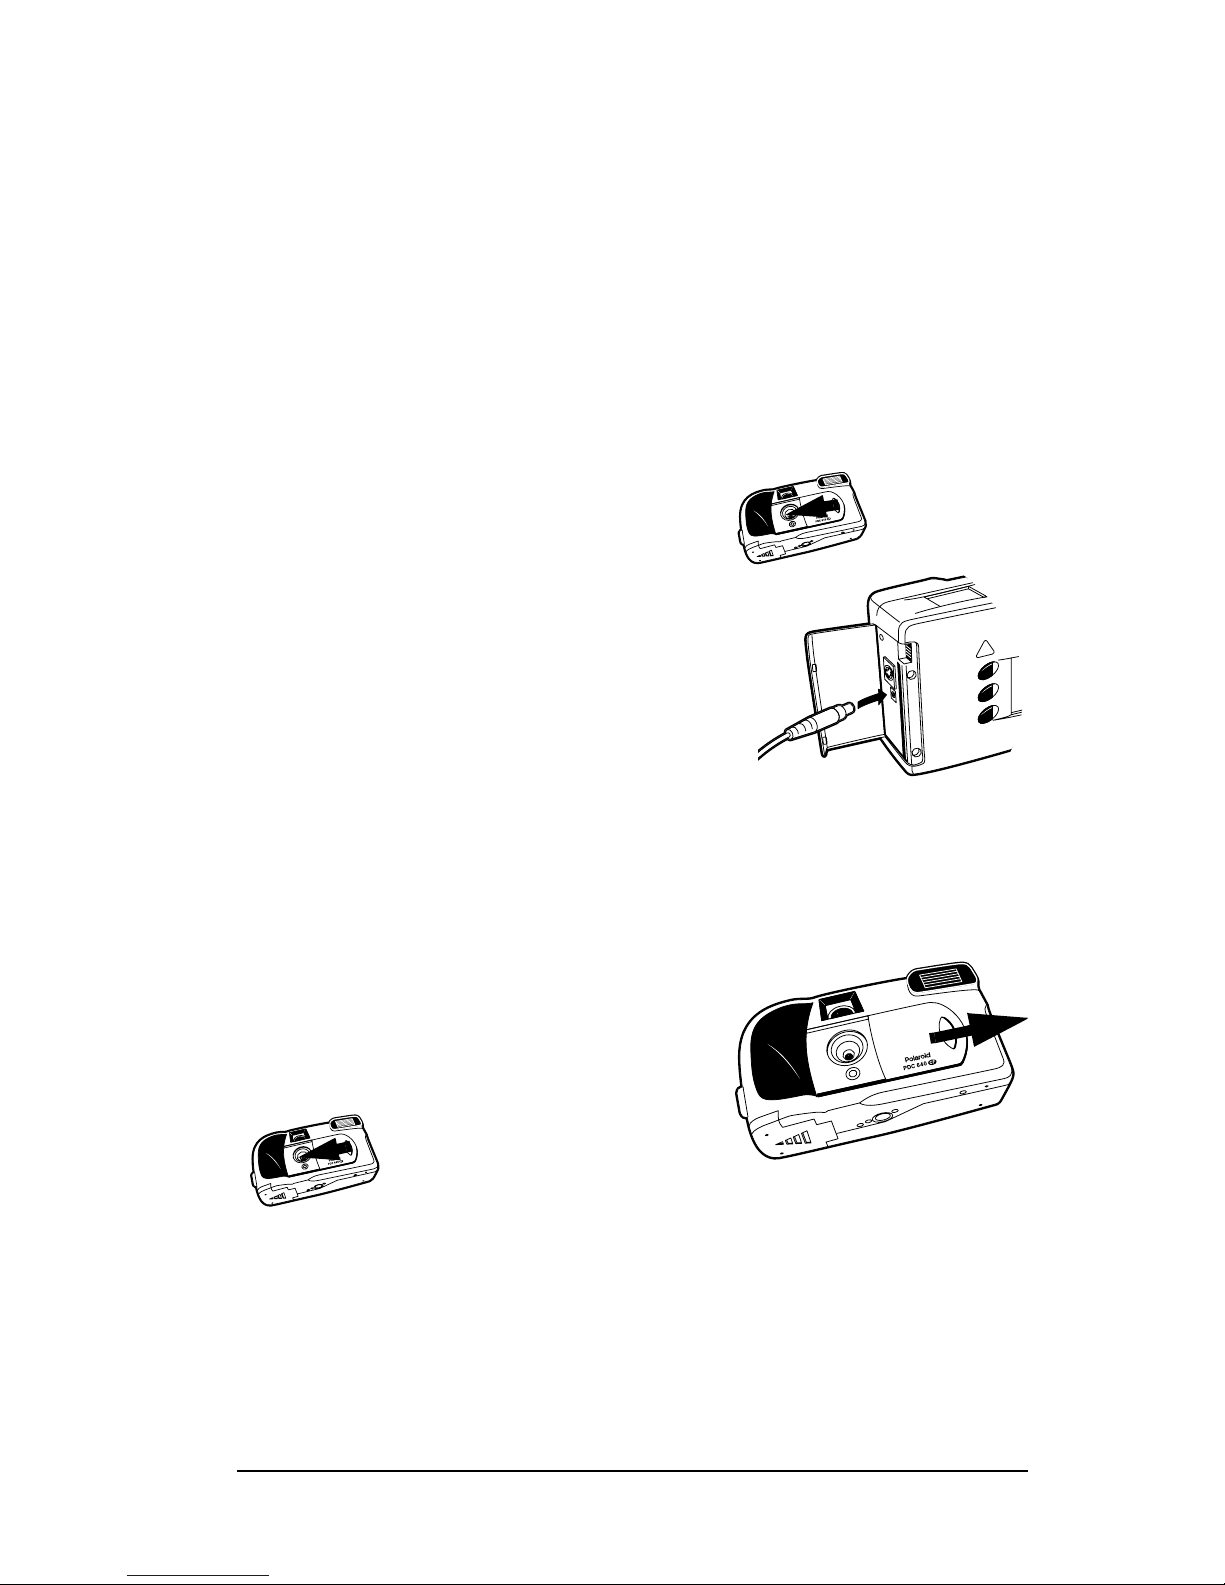
1 Close th e lens cover to turn the camera off.
) to
2 Connect one end of the AC adapter (
a
the AC connection on the camera.
3 Connect the other end of the AC adapter to
a grounded el ectrical outlet.
4 Slid e the lens co v er open to turn the came ra
on.
Note:
For important information about using
the AC adapter properly and safely, see the Tips, Tricks, Terms, and
Techniques section of the online Polaroid PhotoMAX Image Maker
User’s Guide.
a
Turning the camera on
Slide the lens cover t o the right to turn the
camera on.
Close th e lens cover to turn the camera off.
Polaro id PhotoMA X PDC 640CF Digital Camera User’s Manual 5
Page 6

Photo storage
The PhotoMAX PDC 640CF Digital Camera is ready to store your photos in
2 MB of internal memor y (or in any optional ATA Type I CompactFlash
memor y card, as d escribe d b elow).
Depending on the camera’s photo-quality setting (page 14), its internal
memory normally stores from 16 to 33 photos at 640 x 480 resolution or 64
to 132 photos at 320 x 240 r esolution.
Note:
For more information about the camera’s st or ag e ca pa city, see the
Tips, Tricks, Terms, and Techniques section of the online Polaroid
PhotoMAX Image Maker Us er’s Guide.
Using an optional CompactFlash card
The PhotoMAX PDC 640CF Digital Camera includes a slot for an optional
ATA Type I CompactFlash memo ry card of any size.
Note:
If you insert a CompactFla sh memory card into the camera, pho to s ar e
stored on the card, and not in the camera’s internal memory. Photos already
in the camera’s internal memory are not lost, however. You can still access
them by removing the C o mpact Flas h car d.
Caution:
For more information about CompactFlash memory cards, visit your
local comp ut er retail er.
Do not insert or remove a memory card while the camera power is on.
Doing so may damage the memory card or corrupt photos stored on it.
6 P olaroid PhotoMA X PDC 640CF Digital Camera User’s Manual
Page 7
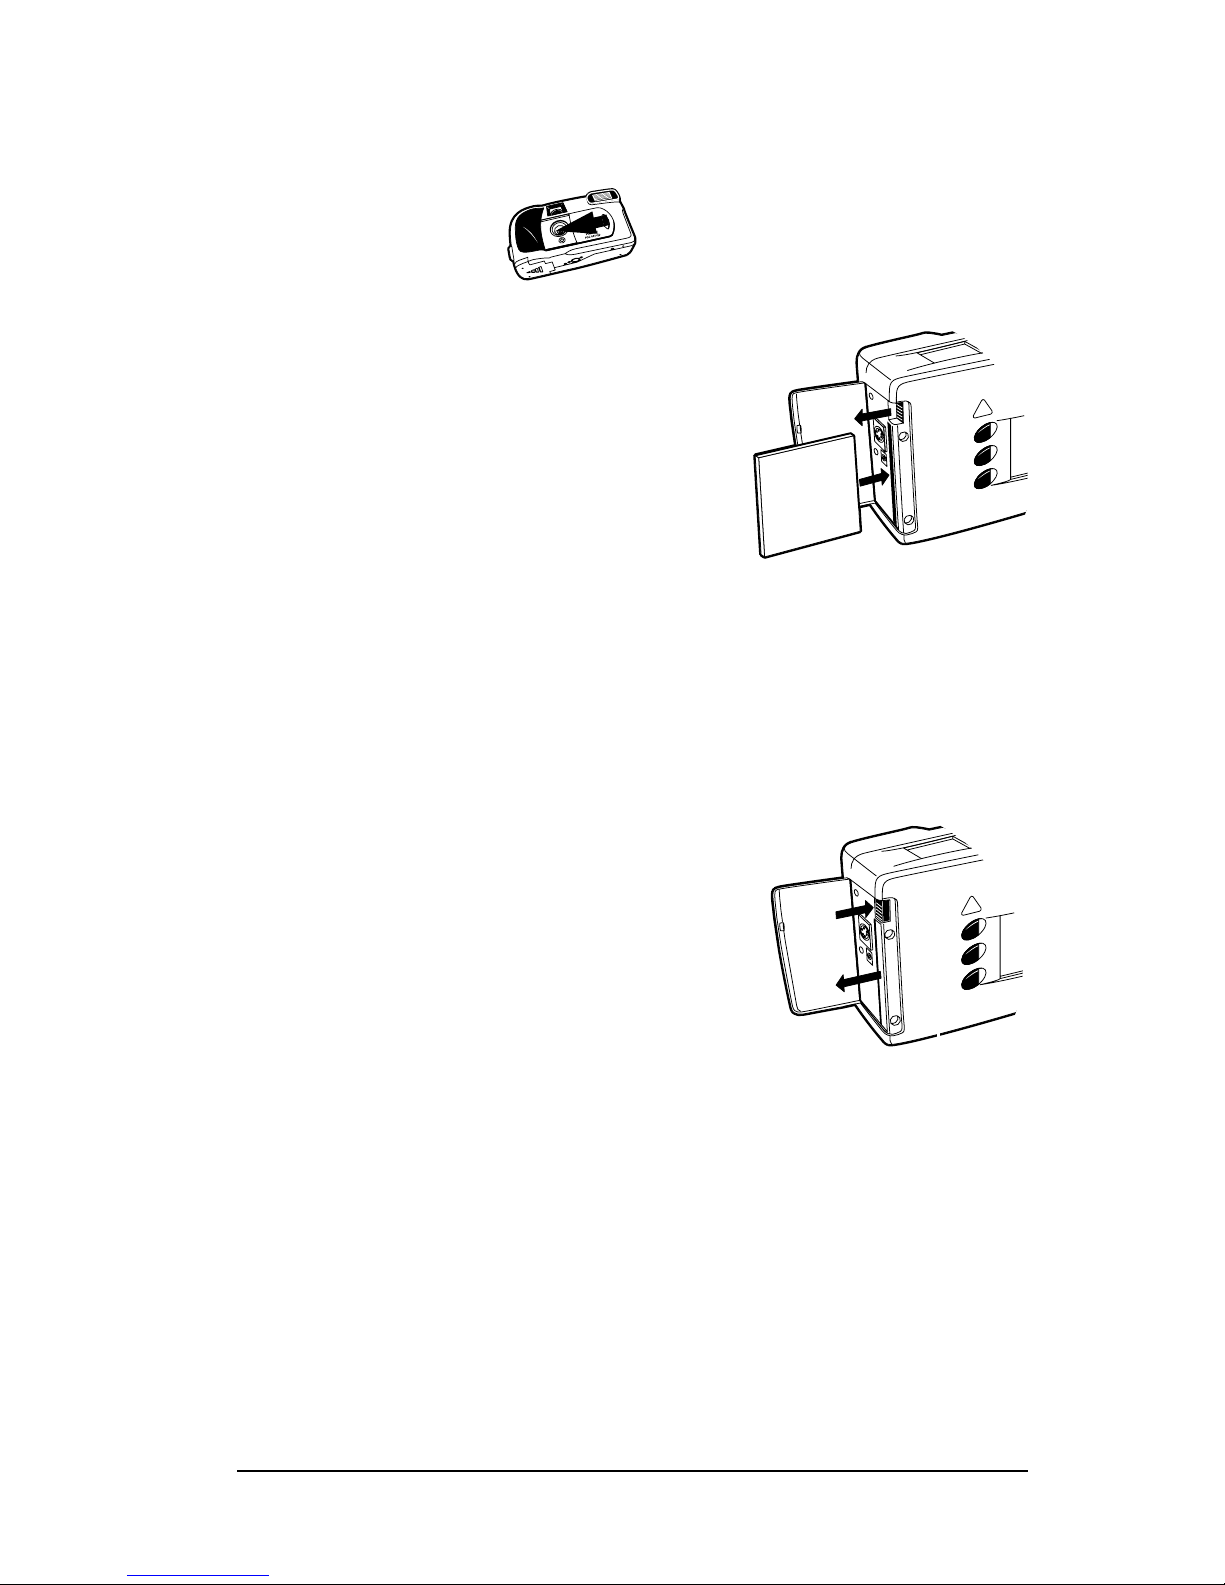
Installing and Removing a CompactFlash card
1 Turn the camera off.
2 To install a memory card:
Open the memory co mpartment c ov er
a
on the side of the came ra (
Insert the card ca r efully, but firmly,
b
into the slot with the raised lip on the
edge of the card facing the front of the
).
camera (
b
The card fits comp letely into the slot in
only one way. When the card is inserted
correctly, the eject button above the card
).
pops up (
c
).
a
a
c
b
Note:
If the card does not seem to fit correctly, do not force it. Turn the
card over and retry.
Close th e mem ory compartmen t co v er .
c
3 To rem ove a memory card:
Open th e memory compartment cover
a
on the side of the came ra (
Push the eject button above th e
b
).
b
).
c
c
d
Note:
memory card (
Grasp the edge of the m emo ry card
and pull it out (
Close th e mem ory compartmen t co v er .
For a description of card-related error
messages that may appear on the color LCD, see page 26.
).
a
a
b
c
Polaro id PhotoMA X PDC 640CF Digital Camera User’s Manual 7
Page 8

Formatting a CompactFlash card
You ma y need to fo rmat a new memory card bef ore you can us e it . Al so, you
may need to reformat a card (or the camera’s internal memory) to eliminate
corrupted files.
Note:
If you are using a CompactFlash memory card, any photos on the
card are deleted, but photos stored in the camera’s internal memory
are not. You must remove the memory card to format the camera’s
internal memory.
1 Insert the new CompactFlash memory card.
2 Turn the camera on.
3 Press th e
MENU/SELECT
4 Us e the LCD scro ll b ut to ns to highli ght
5 Press th e
MENU/SELECT
button to display the
FORMAT MEDIA
button to display the
options.
The camera di spl a y s a
6 Us e the LCD scro ll b ut to ns to highli ght
and press the
If you select OK, the camera displays
•
MENU/SELECT
CONTINUE FORMAT OF MEDIA?
OK
button to make your selection.
then turns the LCD off.
If you select
•
CANCEL
, the camera returns to the
without formatting memory.
MAIN MENU
.
in green.
FORMAT MEDIA
message.
or
CANCEL
FORMATTING CARD
(the d efau lt )
MAIN MENU
and
7 If you are finished with the
to highlight
MAIN M E NU
Note:
For a description of card-related error messages that may appear on
DONE
and press the
and turn the LCD off.
MAIN M E NU
MENU/SELECT
, use the LC D sc rol l butt ons
button to exit the
the color LCD, see page 26.
Note:
If you cannot format the card, it may be defective. Return it to the
retailer where you purchased it.
8 P olaroid PhotoMA X PDC 640CF Digital Camera User’s Manual
Page 9

Taking Photos
No w that you have prepar ed your Photo MAX PDC 640CF Digital Camera
for action, it’s time to take some photos! For your convenience, this section
briefly describes the entire process:
• Taking photos
• Reviewing p hotos in the camera
• Deleting un wanted photos
• Transferring photos to your computer
This section also tells you where go in this guide for detailed explanations of
each step.
You can take photos using either the optical viewfinder or the LCD
viewfi nd er . Use the optic a l viewfind er:
• For faster processing a nd f lash recyc le ti me
• To optimize battery life
To tak e a photo
To take a p h oto , se t u p th e came ra fo r th e f i rst time, or to redefi n e camera
settings after changing the batteries:
1 Turn the camera on (page 5).
2 Set the flash mode, if needed (pag e15).
3 Set the photo resolution (pag e14).
Note:
4 Set the photo quality (pag e14).
5 Set the ex posure-value brightness compensation, if needed (pa ge16).
6 Set the white-balance compensation, if needed (pag e17).
7 Set the preview mode, if desired (page18).
8 Activat e the self-timer, if desired (page 13).
You need not set every parameter for every photo. You can often
use camera def a ult setti ngs. Some set tings (like resolution) a ls o
remain at their current value until you change them or remove
the came ra’s batteries.
Polaro id PhotoMA X PDC 640CF Digital Camera User’s Manual 9
Page 10

9 Stand at the proper distanc e from the su bject:
Outdoors: 2 feet (60 cm) or more from the subject
•
Indoors: 3 to 10 ft. (1 to 3 m) from the subject (see page15)
•
10 Frame the subject:
With in the yello w f raming l ine s in the optical viewfinder
•
Within the color LCD screen
•
11 Press the shutter button down fully to take the photo.
Hold the camer a steady until you hea r a beep followed by two quick
beeps.
Note:
If the camera’s intern al memor y (or CompactFlash card) is full,
the camera will not tak e more p hotos. For a de s cri p tio n of
storage-related error messages that may appear on the color LCD ,
see page 26. When a card is full, you must review and delete some
photos before taking more (see page 19).
Note:
After you take a photo, the green power/status LED immediately
to the le ft of th e op ti cal viewfin d e r blinks whi l e t he camer a
processes and saves the photo. Wai t until the power/status LED
stops blinking before you turn the came ra off or take another
photo. If yo u used th e flas h, the flas h L ED to the f ar l e ft of the
optical viewfinder also blinks after the power/status LED stops
blinking.
12 R eview and delete unwanted photos from the camera to regain storage
space (page 19).
13 Transfer photos from the camera to your computer and delete unwanted
photos using the PhotoMAX software (page 22).
Note:
For more information about taking better photos, see the Tips,
Tricks, Terms, and Techniques section of the online Polaroid
PhotoMAX Image Maker Us er’s Guide.
10 Pola roid PhotoMA X PDC 640CF Digital Camera User’s Manual
Page 11

Using Camera Controls and Functions
Camera menus
Here is t he gen eral p rocedure for using th e came ra m enus :
1 Turn the camera on.
2 Press th e
MENU/SELECT
button to display the
MAIN MENU
.
3 Use the LCD scroll buttons to highlight, in green, a menu option you
want to use (
MEDIA
Note:
).
The
CAMERA SETUP, DELETE ALL
DELETE ALL
and
FORMAT MEDIA
, or
FORMAT
commands operate
differently than discussed here, and are described on page20 and
page 21.
4 To change
With
a
SELECT
Use the LCD scroll buttons to highlight, in green, a camera-setup
b
CAMERA SETUP
CAMERA SETUP
button to go to the
options:
hi ghlighted in green, press the
CAMERA SETUP
page.
MENU/
command you want to configure (in the left-hand column). For
.
button to highlight, in green, the
c
example:
Press th e
QUALITY
MENU/SELECT
command’s current setting (in the right-hand column). For
example:
Use the LCD scroll buttons to display and highlight, in green, the
d
HIGH, NORMAL
, or
LOW
.
new setting you want to use (in the right-hand column). For
example:
NORMAL
.
Press th e
e
reverts to white text on the screen.
5 Repeat step 4 for all menu options that you want to change.
6 Use the LCD scroll down button to highlight
7 Press th e
MENU/SELECT
and return to the
8 If yo u are fin ished with the
highlight
MAIN MENU
DONE
The LCD viewfinder turns off or returns to a live LCD viewfinder,
depending on its state when you opened the
Polaro id PhotoMA X PDC 640CF Digital Camera User’s Manual 11
MENU/SELECT
button to implement your menu selections
MAIN MENU
MAIN MENU
and pr ess the
.
button to select this new setting, which
SA VE
in green.
.
, use the L CD scr oll butto ns to
MENU/SELECT
button to exit the
MAIN MENU
in step 2.
Page 12

Battery status indicator
Note:
This is an automatic indicator that you do not configure.
The battery status icon on the Status LCD shows how much energy remains
in the batteries:
Status LCD Icon Battery Status
Fully charged
Low charge—You can still take photos, but the
flash and LCD viewfinder cannot be used. As
battery power drops still lower, the camera
eventually shuts down, and you need to repl ac e all
four batteries.
Note:
For important information about using batteries properly and safely,
see th e Tips, Tricks, Terms, and Techniques section of the online
Polaro id PhotoMAX Image Maker User’s G uide.
12 Polaroid PhotoMA X PDC 640CF Digital Camera U ser’s Manu a l
Page 13

Self-timer
Note:
You configure this setting with the self-timer button on the
camera back.
Us e th e self-tim er fea ture to take a pho to ten sec on ds af te r you press the
shutter bu tton. The self-timer works only for the n ex t p ho to t aken, and then
turns itself off.
Note:
For best results, mount the camera on a tripod for self-timed photos.
1 Turn the camera on.
).
2 Press the self-timer button (
a
The self-timer icon appears on
the Status L CD ( a nd on the menu/
viewfinder LCD, if it is on).
Note:
To cancel t he s elf- tim er, pres s
a
the self-timer button again.
3 Frame the photo using the optical
viewfi n d e r or the LCD viewfind er .
4 Press the shutter button.
The red self-tim er LE D on th e fr o nt of the cam e ra blinks fo r te n seco nds
before the photo is taken and blinks rapidly immediately before the
photo is taken. A ten-second countdown also appe ars on the Status LCD
(whe r e t h e number of stored p hotos normally appears) :
Store d photo s indicat or
Note:
The Status LCD shows the number of photos stored in the camera’s internal
memory (or in an inst alled CompactFlash card). When the number of
photos exceeds 99, a small plus sign appears beside the number. For example:
• This icon shows that the number of stored photos is 8:
• This icon shows that the number of stored photos is 108, 208, 308,
Note:
Note:
This is an automatic indicator that you do not configure.
etc.:
This icon also appears at the bottom of the menu/viewfinder LCD.
For more information about the camera’s storage capacity, Tips,
Tricks, Terms, and Techniques section of the online Polaroid
PhotoMAX Image Maker Us er’s Guide.
Polaro id PhotoMA X PDC 640CF Digital Camera User’s Manual 13
Page 14

Photo resolution setting
Note:
You configure this setting with the
CAMERA SETUP RES
menu,
using the general procedure described on page 11.
The PhotoMAX PDC 640CF Digital Camera offers two resolution settings:
Menu Setting Status LCD Icon Pixels in Photo
RES
LARGE
Note:
SMALL
Note:
(default)
Use for best results.
For mo r e information abou t digital photo resol utio n, see th e Tips,
640 x 480
320 x 240
Tricks, Terms, and Techniques section of the online Polaroid
PhotoMAX Image Maker Us er’s Guide.
Photo quality setting
Note:
You configure this setting with the
CAMERA SETUP QUALITY
menu, using the general pro cedur e de scribed on page 11.
The PhotoMAX PDC 640CF Digital Camera offers three quality settings:
QUALITY
Status LCD Icon JPEG Compres sion Ratio
Menu Setting
HIGH
Low compression for best
photo quality
NORMAL
Medium compression
(default)
LOW
High compressi on fo r smallest
file size
Note:
These icons also appear at the b ottom of the menu/viewfinder LCD.
You can apply these quality settings at either resolution.
Note:
For more information about digital photo quality, see the Tips,
Tricks, Terms, and Techniques section of the online Polaroid
PhotoMAX Image Maker Us er’s Guide.
14 Pola roid PhotoMA X PDC 640CF Digital Camera User’s Manual
Page 15

Flash setting
Note:
You conf igure th is setting with th e
flash button on the camera
).
back (
a
The Flash mode button lets you cycle
through the flash- m ode ic o ns on the
Status LCD. The default setting is
No Flash
Note:
.
The optimum camera-to-subject
flash range is 3 to 7 feet.
(1 to2m). In very dark lighting, stand 3 to 6 feet from the subject. In
bright indoor lighting, stand 3 to 10 feet (1 to 3 m) from the subject.
Status LCD Icon Flash Setting
(default)
No Flash
The fl a sh d o es not fir e .
•
U se in places where flash is prohibited or may be
•
distracting. Also use when shooting toward a
reflective surface, such as a window or mirror .
a
Note:
Note:
If you don’t have enough light when using the No
•
Flash sett i ng, your ph otos will be too dark.
Use for outdoo r phot os.
•
Auto Flash
Use this setting to take most photos.
•
The flash fires automatically as needed.
•
Forced Flash
The fla s h f ir es for ev ery photo.
•
U se indoors in low light. Using F orce d Flash in
•
brig ht lig h t may overexpose the photo.
These icons also appear at th e bott o m of the menu/viewfinder LCD.
For more information about using the camera’s flash properl y , see the
Tips, Tricks, Terms, and Techniques section of the online Polaroid
PhotoMAX Image Maker Us er’s Guide.
Polaro id PhotoMA X PDC 640CF Digital Camera User’s Manual 15
Page 16

Expos u re -value br i g ht ne s s c ompensation
Note:
You configure this setting with the
CAMERA SETUP EXP
menu,
using the general procedure described on page 11.
Exposure-value compensation works best when you don’t use the flash. If a
photo come s out too d a rk or too ligh t, change this setting and try again.
The PhotoMAX PDC 640CF Digital Camera offers nine exposure-value
settings:
Menu Setting Brightness Compensation
EXP
NORMAL
-0.5 t o -2.0
+0.5 to +2.0
Note:
Each time you turn the camera off and on again, exposure-value
compensation resets to the default,
Note:
For more information about using exposure-value brightness
(default) No compensation
Makes photos progressively darker
Makes photos progressively lighter
NORMAL
.
compensation, see the Tips, Tricks, Terms, and Techniques section
of the online Polaroid PhotoMAX Image Maker User’s Guide.
16 Pola roid PhotoMA X PDC 640CF Digital Camera User’s Manual
Page 17

White balance compensation
Note:
You configure this setting through the
WHT BAL
menu, using the general procedure described on page 11.
CAMERA SETUP
If you are shooting indoors without a flash, or in other unusual lighting
conditions, your photos may be tinted with strange colors (such as orange,
green, or blue). If this happens, use this setting to fix the problem.
Note:
Leav e the whit e-b alanc e se tting at
AUTO
(the default) for most
photos. If flash is prohibit ed or if the f lash is not used indoors, you
may want to try the
FLRSCN
or
TUNGST
settings, depending on
the s o urce of prev a i li ng lig hti ng.
The PhotoMAX PDC 640CF Digital Camera offers six white-balance
settings:
WHT BAL
Lighting Conditions
Menu Setting
AUTO
Automatic compensation for most situations
(default)
OFF
No compe n sati o n
SUN
SHADE
FLRSCN
TUNGST
Note:
Note:
Note:
Use thi s se tt ing when yo u do NOT want th e
camera to change the photo’s lighting and color, such as
when shooting sunsets.
Outdoors in sunlight
Outdoors in shade
Indoors in fluorescent illumination
Indoors in light-bulb illumination
Each time y ou turn the camera off and on again, white b alanc e resets
to the default,
AUTO
.
For mo re information about using white-balance compensation, see
the Tips, Tricks, Terms, and Techniques section of the online
Polaro id PhotoMAX Image Maker User’s G uide.
Polaro id PhotoMA X PDC 640CF Digital Camera User’s Manual 17
Page 18

Photo preview mode
Note:
When the
You configure this setting through the
PREVIEW
PREVIEW
menu, using the general procedure described on page 11.
mode is
, the camera displays a photo after it is
ON
CAMERA SETUP
taken and gives you a chance to delete it immediately.
The PhotoMAX PDC 640CF Digital Camera offers two preview settings:
PREVIEW
Camera Action
Menu Setting
(default)
OFF
ON
The camera automatically saves each ph oto taken.
The camera displays the photo just taken on the
viewfinder LCD, and lets you delete or save it.
At the prompt, use the LCD scroll buttons to
highlight
DELETE
quickly press the
If you select
•
DELETE
or
SA VE
MENU/SELECT
(the default) and
button.
, the camera discards the photo
and turns the LCD off.
If you select
•
SA VE
, the camera stores the photo in
memory and turns the LCD off.
If you do no t select
DELETE
or
SA VE
within 3
second s, the camera automatically saves the photo for
you.
18 Pola roid PhotoMA X PDC 640CF Digital Camera User’s Manual
Page 19

Reviewing and Deleting Photos
Reviewi ng s tored photo s
You can rev iew one photo a t a time using the me nu/vi ewfi nder LCD.
Note:
1 Turn the camera on.
2 Press th e
3 Use the LCD scroll buttons to display a stored photo on the LCD.
4 Use the LCD scroll buttons to scroll through the stored photos.
5 Press th e
To maximize battery life, use the AC adapter whenever possible while
you re view your photos.
DISPLAY
DISPLAY
your photos.
button to turn the menu/viewfinder LCD on.
button or turn the camera off to stop reviewing
Deleting photos from the camera
To free up space in your camera for more photos, delete som e photos from
the camera as described here, or transfer photos from the camera to your PC
(page 22) and then delete them.
Note:
When you delete one or more photos, the remaining photos are
renumbered.
Note:
Warning: Once you delete a photo, is cannot be retr ieved—it is gone
You can delete photos from the camera using the camera’s:
• Delete button (page 20)
•
•
• PhotoMAX Image Maker S o ftwar e (page25)
If you are using a CompactFlash memory card, only the photos on the
card are deleted. Photos stored in the camera’s internal memory are
not erased; you must remove the memory card to delete these photos.
forever!
DELETE ALL
FORMAT MEDIA
Polaro id PhotoMA X PDC 640CF Digital Camera User’s Manual 19
command (page 20)
command (page 21)
Page 20

Using the camera’s delete bu tton:
1 When a photo is displayed on t h e
LCD as described above:
To delete only the displayed
•
photo, quickly press and release
).
the delete b utt o n (
To delete all photos from the
•
camera’s internal memory (or
from a CompactFlash card),
press and hold the delete
) for at least 3 seconds.
button (
a
a
a
The
DELETE
menu option appears, highlighte d in green on the LCD.
If you change your mind about deleting the photo or photos, use the
LC D scroll buttons t o hi ghli g h t
2 Press th e
MENU/SELECT
CANCEL
button to implement your choice.
.
3 If you are deleting photos individually, repeat steps 1 and 2 for each
photo that you want to delete.
Using the camera’s
DELETE ALL
command:
1 Turn the camera on.
2 Press th e
MENU/SELECT
button to display the
3 Us e the LCD scro ll b ut to ns to highli ght
4 Press the
MENU/SELECT
The camera di spl a y s a
button to display the
CONTINUE DELETE OF ALL IMAGES?
MAIN MENU
DELETE ALL
DELETE ALL
in green.
.
options.
message.
5 Us e the LCD scro ll b ut to ns to highli ght
and press the
MENU/SELECT
button to make your selection.
OK
or
CANCEL
(the default)
If you select OK, the camera displays an
•
all photos, and returns to the
If you select
•
without deleting photos.
6 If you are finished with the
highlight
MAIN MENU
20 P olaroid PhotoMAX PDC 640CF Digital Camera User’s Ma n u a l
DONE
and pr ess the
.
CANCEL
ERASING
MAIN MENU
.
, the camera returns to the
MAIN MENU
MENU/SELECT
, use th e L C D scr oll but ton s t o
button to exit the
message , deletes
MAIN M EN U
Page 21

The LCD viewfinder turns off or returns to a live LCD viewfinder,
depending on its state when you opened the
MAIN MENU
in step 2.
Note:
You can also delete all photos from the camera’s inte rnal memo ry or a
CompactFla sh card using the
FORMAT MEDIA
command (see the
following section).
Using the camera’s
FORMAT MEDIA
command:
You ma y need to f ormat a new me mory card before you can use it. You may
also need to reformat a card (or the camera’s internal memory) to delete
corrupted files.
Note:
If you are using a CompactFlash memory card, only photos on the
card are deleted. Photos stored in the camera’s internal memory are
not erased; you must remove the memory card to delete these photos.
1 Turn the camera on.
2 Press th e
MENU/SELECT
button to display the
3 Us e the LCD scro ll b ut to ns to highli ght
4 Press th e
MENU/SELECT
button to display the
MAIN MENU
FORMAT MEDIA
FORMAT MEDIA
.
in green.
options.
The camera di spl a y s a
CONTINUE FORMAT OF MEDIA?
5 Us e the LCD scro ll b ut to ns to highli ght
and press the
If you select OK, the camera displays a
•
message (or
MENU/SELECT
FORMATTING CARD
button to make your selection.
or
OK
CANCEL
FORMATTING MEMORY
if y ou are using a
message.
(the default)
CompactFl a sh card) and turn s the LCD off.
If you select
•
CANCEL
, the camera returns to the
MAIN M EN U
without formatting memory.
Note:
If you are finished with the
buttons to highlight
to exit the
MAIN MENU
DONE
MAIN MENU
and press the
and turn the LCD off.
You can also delete all photos from the camera’s inte rnal memo ry or a
CompactFla sh card using the
DELETE ALL
, use the LCD scroll
MENU/SELECT
button
command (see page20).
Using the PhotoM A X software:
You can also delete photos from the camera when it is connected to the
P olar oid PhotoMAX software. Fo r mor e information, see the next section.
Polaro id PhotoMA X PDC 640CF Digital Camera User’s Manual 21
Page 22

Transferring Photos to Your Computer
The following s ec t io ns describe h ow to tra n sf er photos from t h e Polaroid
PhotoMAX PDC 640CF Digital Camera to your computer. The TWAIN
driver for the came ra is automa tically insta lled with the Polaroid PhotoMAX
Image Maker Software included in your kit. The TWAIN software allows you
to transfe r ph otos from y ou r ca m e ra into another so f tw are applic ati o n.
Installin g the software
Before installing the s oftw ar e tha t came with y ou r camera, be sur e that your
computer meets these minimum require ments:
• 200 MHz Pentium processor or equivalent
• Microsoft Windows 95, 98, or Me
• 32 MB RAM
• 210 MB available hard disk space
• Available USB port (Windows 98 or Me o nly) or RS-232 Serial port
• High-color display with 800 x 600 DPI resolution or higher
• 2x or faster CD-ROM drive
• Mouse
Note:
If you have any questions a bout t he capabilities of your computer,
read the do cu mentation that came with the comput er or co nta ct its
manufacturer.
To install the softwa re
1 Insert the software CD in your PC’s CD -ROM drive .
If the installation program does not start automatically:
Select
a
Click
b
Select
c
Click
d
Click OK. The installation program begins.
e
from the Windows Start menu.
Run
Browse
Setup.exe
Open
to locate your CD-ROM drive.
from the CD-ROM.
.
2 Follow the instructions on your computer screen.
22 P olaroid PhotoMAX PDC 640CF Digital Camera User’s Ma n u a l
Page 23

Transferring Photos to Your Computer
Caution:
Reboot your c ompu ter after insta lli ng the Phot oMAX software and
BEFORE connecting the camera to the computer’s USB p o r t.
1 Turn the camera off.
2 If you are using the camera’s USB c a ble, leave you r c omputer on.
If you are using the camera’s Serial cable, turn off your computer and all
its peripherals (scanner, printer, etc.).
3 Insert the round connector on the USB
or Serial cab le into th e c onnection on
).
the side o f the came ra (
Note:
Insert the connector straight into
a
a
the came ra without twisting, so
that the fl at side o f the c o nne ctor
(the side with the arrow on it)
faces toward the front of the
b
camera. If you encounter
resistance, do not force the
connector, but reposition it and try again.
4 Connect the other end of the cable to the appropriate port on your
computer:
Connect the rectangular connector on the USB cable to the USB
•
port on your computer.
Connect the 9-pin female Serial connector to the Serial port on your
•
computer.
) into the power port on the
5 Insert one end of the AC power adapter (
b
side of the camera (page 5) and plug the other end of the adapter into a
grounded electrical outlet.
6 Turn the computer on, if y ou turned it off to attach t he Serial cable.
7 Turn the camera on.
8 Open the PhotoMAX Image Maker Software by double-clicking the
PhotoMAX software icon on your desktop.
Polaro id PhotoMA X PDC 640CF Digital Camera User’s Manual 23
Page 24

Get Photo
The
button is
automatically selected.
This button lets you acquire
images from several sources:
Selection: Used To:
Get
Photo
Album
From File
Open an image file from a PhotoMAX photo album
Open a rece ntly used image or an y imag e file on y our
computer
Camera/
Scanner
Create New
Screen
Capture
Get From Web
9 Click
The
10 Select
Camera
Camera/Scanner
Select Source
Polaroid 640CF Digital
.
T ransfer a photo from your camera, scanner, or other
TWAI N-compa t ib le de vice
Creat e a new im age fil e
Grab an entire computer screen or active window
Gets images from your Storage Room on the
www.PolaroidDigital.com
.
list appears.
11 Choose th e dest in atio n album for
your photos from the
Select Album
Note:
To create a new album,
select
album named
list.
[New]
and use the
NewAlbum1
Web site
Acquire button
Select Album list
Select Source list
Camera/Scanner button
or enter a different album name.
12 Click the
Acquire
The digital camera TW AIN software
window opens. TWAIN software is
used to transfer, delete, and save
photos from your camera.
24 P olaroid PhotoMAX PDC 640CF Digital Camera User’s Ma n u a l
button.
Page 25

13 Click
Refresh Thumbnails
to display your photos in the TWAIN
window.
14 S elect photos for transfer t o y our computer:
To select a single photo, click on the photo thumbnail. A red border
•
appears around the photo.
To select more that one photo, press
•
Control (Ctrl
) on yo ur
keyboard while you click on each thumbnail image. Red borde rs
appear around all selected thumbnails.
To s elect all photos, cli ck
•
Select All
. Red borders appear around
all thumbnails in the camera.
15 Click
Get Photos
.
The photos transfer into your computer and appear in the active photo
album.
Note:
a
b
To delete p h otos from th e ca m er a using the P h otoMAX so f tw are:
Select one or more photos for deletion as described in step 14.
Click
Delete Selected
.
16 Double-click on an image to open it in the image tray.
The image can be manipulated using the PhotoMAX tools.
Fo r more infor mati o n abou t using Ph ot oM A X
software tools:
• Select the
button to open t he
?
? button
PhotoMAX O nli ne User’s Guide, which
provides a searchable topic index and
step -by-step proc edures for usi ng your
Polaroid PhotoMAX Image Maker
Software.
• You can also get help with any butt o n or featu r e in the so f tw a re b y
moving your mouse cursor over it and clicking your right mouse button.
This brings up context-sensitive help that explains the software button
or feature.
• Visit our Help site on the W e b for more information.
Polaro id PhotoMA X PDC 640CF Digital Camera User’s Manual 25
Page 26

Camera Troubleshooting
Your PhotoMAX PDC 640CF Digital Camera ma y display the following error
messag es on its color LCD:
LCD Message Meaning and Corrective Action
MEMORY FULL
PRESS SHUTTER RELEASE
TO C ONTINUE
CARD FULL
PRESS SHUTTER RELEASE
TO C ONTINUE
COMPACT FLASH CARD
F AIL!
COMPACT FLASH CARD
F AIL!
POWER OFF AND REMOVE
CARD
Memor y ma y be full. Tra nsfer
•
phot os t o you r co mpu t er (pa ge22)
or delete some images from the
memory (page 19).
The Compa ctFlash card may be
•
full. Transfer photos to your
computer (page 22) or delete some
imag es from the card (page 19).
The CompactFlash card may have
•
become unstable. Install a new card
(page6).
The Compa ctFlash card may be
•
unstable or inserted incorrectly.
Reinsert the card or install a new
card (page6).
•
The Compa ctFlash card is
corrupted or damaged. Install a
new card (page6).
NEW CARD
PRESS SHUTTER RELEASE
TO C ONTINUE
NO CARD
PRESS SHUTTER RELEASE
TO C ONTINUE
26 P olaroid PhotoMAX PDC 640CF Digital Camera User’s Ma n u a l
The Co mpact Fl a sh c ar d was
•
inserted while the camera was on.
Press the shut te r butt on to
continue storing photos in this new
card.
The Co mpact Fl a sh c ar d was
•
removed while the camera was on.
Press the shut te r butt on to
continue storing photos in the
camera’s internal memory.
Page 27

Camera P recautions
Observe the following precautions when you use this digital camera:
• This camera is battery operated. Supervise children when the camera is
operated by them or used in their presence. To avoid electrical shock, do
not expose the c a mera to or imme rs e it in water or o th er fluids . D o not
disassemble or operate the camera if dropped or damaged. Contact a
P olar oid Service Center for repair information.
• Do not open the camera case or attem p t your o wn repairs. Hi gh-v ol tage
internal components create the risk of electrical shock when exposed.
Return your camera to authorized Polaroid service providers for all
maintenance and repairs.
• K eep the came ra awa y from water and other liquids. Mo isture create s the
danger of fire and electrical shock. Do not use the camera in the rain, at
the seashore, or any location where there is the possibility of exposure to
liquids.
• Turn the camera off, unplug the AC adapte r, and remove the batt e ries
immediately if the camera is exposed to water or any other liquid.
• Do not open the battery compartment, unplug the AC adapter, or
remove an internal memory card while the camera is on. If the camera
loses power wh ile processing a new photo, the phot o canno t be sto r e d
and may cause corrup tion of other stored photos.
Polaro id PhotoMA X PDC 640CF Digital Camera User’s Manual 27
Page 28

FCC Notice
This device complies with Part 15 of the FCC rules. Operation is subject to
the following two conditions: (1) This device may not cause harmful
interference, and (2) This device must accept any interference received,
including interference that may cause undesired operation.
Warning: Changes or modifications to this equipment not expressly
approved by the party responsible for compliance could void
the user's authority to operate the equipment.
Note:
This equipment generates, uses, and can radiate radio frequency energy and,
if not installed and used in accordance with the instruction manual, may
cause harmfu l interference to rad i o communications. However, there is no
guarantee that interference will not occur in a particular installation.
If th is equipment does cau se harmful interference to radio or television
reception, which can be determined by turning the equipment off and on,
the user is encouraged to try to correct the interference by one or more of the
following measures:
• Reorient or reloca te the r e c ei ving antenna.
• Increase the se pa ration betwe en the equipment and the r e cei v e r.
• Co nnect the equipment into an outlet on a circuit different fro m that to
This equipment has been tested and found to comply with the limits
for a Class B digital device, pursuant to Part 15 of the FCC rules.
These limits are designed to provide reasonable protection against
harmful interference when the equipment is operated in a residential
installation.
whi ch t he receiver is conn ected.
• Us e the USB o r RS232 serial cable shipped with this unit, which must be
used to ensure c o m p lianc e with the Cl as s B F CC limit s.
• Consult the dealer or an experienced radio/TV technician for help.
28 P olaroid PhotoMAX PDC 640CF Digital Camera User’s Ma n u a l
Page 29

Warranties
One Year Limited Warranty
Polaroid Photo M A X PDC 640CF Digital Came ra
P olaroid will, at our option, repair or replace any unit found defective in
manufactur e within the warranty period. The warranty period is determined
by the date of purchase. K eep the receipt as proof of purchase. Otherwise, the
warranty period is determined by the date of manufacture. This warranty
does not a pply to damag e cause d by accident, misu se or tampe ring, and
exc lud es all consequential damages ex c ept in jurisdictions not allowing such
exclusions or limitations.
Ninety Day Limited Warranty
Po laroid PhotoM AX Image Maker Sof t w ar e
P o l a r oi d war ra nt s th a t the soft ware med ia will be free of defe ct s in mat er i als
and workmanship for a period of 90 days from the date of purchase.
Polaroid's entire liability and your exclusive remedy shall be to repair or
replace the sof tware that does not meet Polar oid's Limited Warranty and is
returned to P olaroid with a copy of your sales receipt. This Limited W arranty
is void if failure of the software has resulted from accident, abuse, or
misapplication. Any replacement software will be warranted for the
remainder of the original warranty period or 30 days, whichever is longer.
Pol a roid makes no other warranties with respect to the sof twa re, either
express or implied, including but not limited to implied warranties of
merchantability and fitness for a particular purpose.
Polaro id PhotoMA X PDC 640CF Digital Camera User’s Manual 29
Page 30

Contacting Polaroid
Polaroid Corporation provides technical support for digital cameras at
www.PolaroidDigital.com, and within the U nited States by calling 800-8970356 from 8 A.M. t o 8 P.M. EST, 7 days a week. Please note that phonesupport and repair services are regional and may not be available for a
particular product outside the c ou ntry where it was purchased. To obtain
parts for cameras purchased in the United States, call 800-343-4846 (9 a.m.
to 5 p.m. EST, Mon. - Fri.). A list of Polaroid International sales and
customer support off i ces is availa ble at www.p olaroid . com/servi ce/
phone.html.
©1999-2000 Polaroid Corporation, Cambridge, MA 02139, U.S.A., owner of
the tradem arks “Polaroid”, “PhotoMAX”, and “PDC”. All other product
names may be the pro perty of the ir res pecti ve o wn ers. All rights r eserv ed,
Printed in the U.S.A.
PU-21741M-0 01/01
30 P olaroid PhotoMAX PDC 640CF Digital Camera User’s Ma n u a l
Page 31

PDC 640 CF
Technical Support Information
(This information replaces that found on Page 30)
Polaroid Corporation provides technical support for digital cameras at
http://www.polaroid.com/
800-897-0356 from 10 A.M. to 7 P.M. EST, (Mon - Fri) and 10 A.M.
to 4 P.M. EST (Sat). Please note that phone support and repair services are
regional and may not be available for a particular product outside the
country where it was purchased. To obtain parts for cameras purchased in
the United States, call 800-343-4846 from 9 a.m. to 5 p.m. EST, Mon. - Fri.
(Note: No technical support is available at this number.) A list of Polaroid
international sales and customer support offices is available at
http://www.polaroid.com/service/phone.html
, and within the United States by calling
.
 Loading...