

Page 1

600/600SE Camera
User Guide
Page 2

600/600 SE Camera User Guide
Introduction
The Polaroid Models 600 and 600 SE
Professional Pack Film Cameras combine
the features of a professional camera with
the convenience of Polaroid pack film. The
lenses are fully coated and color corrected
(interchangeable on the Model 600 SE) and
each is in a shutter that allows full exposure
control with a wide range of shutter speed /
aperture combinations. The Shutter is
synchronized for electronic flash.
The removable pack film holder
accommodates the Polaroid T ype 100 / 600
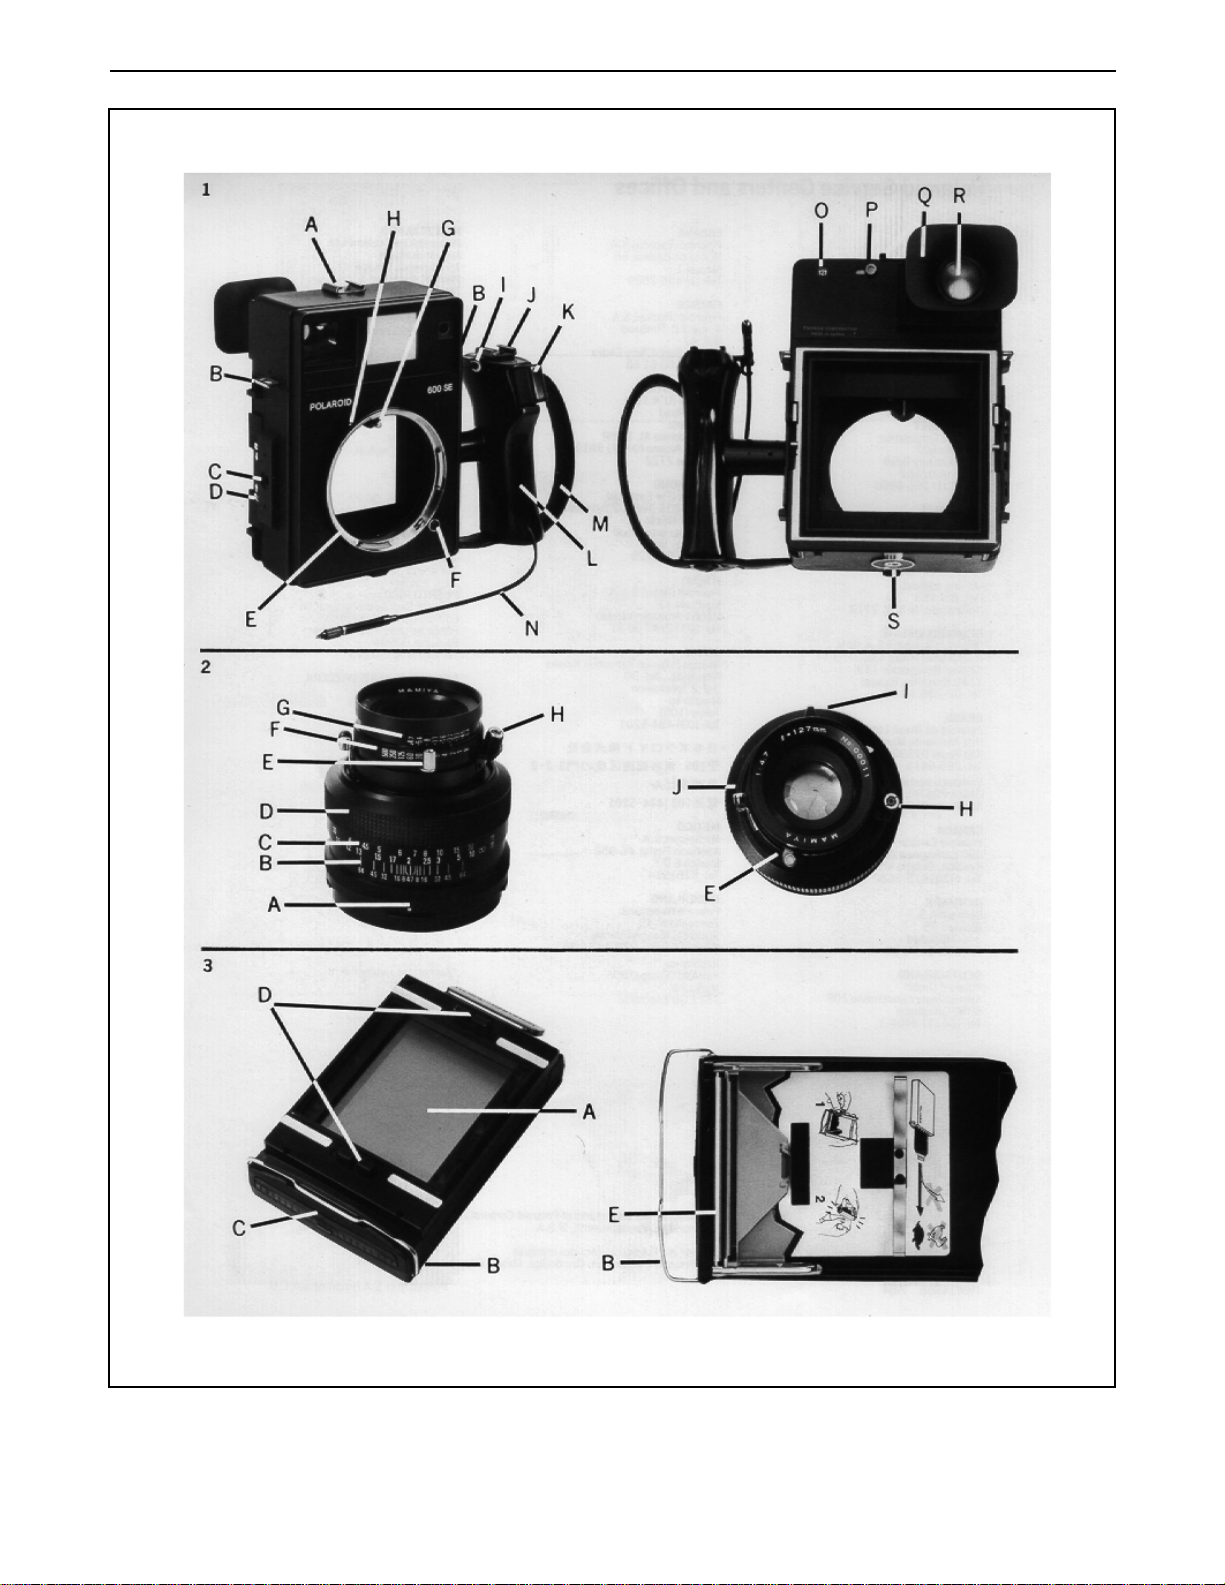
Nomenclature
Camera (Picture 1)
A. Flash and viewfinder accessory shoe
B. Neck strap eyelets
C. Flash bracket mount
D. Film holder lock
E. Bayonet lens mount
F . Lens release button*
G. Rangefinder coupling pin
H . Red dot*
I . Cable release holder*
J. Hand grip flash shoe*
K. Shutter release
L. Hand grip
M. Hand strap (adjustable)
N . Cable release
O. Viewfinder indicator*
P. Viewfinder selector switch*
Q. Eyecup
R . Eyepiece
S. Tripod socket
* Model 600 SE only
film format which offers a variety of film types
including black and white prints, color prints,
and high quality black and white negatives.
This User Guide is illustrated with the Model
600 SE camera. The Model 600 is similar
but does not have interchangeable lenses.
The numbers throughout the text refer to
the pictures at the back of this User
Guide. (See page 14.)
Lens (Picture 2)
A. Red dot*
B. Depth of field scale
C. Distance scale
D. Focusing ring
E. Shutter cocking lever
F . Shutter speed ring
G. Aperture control ring
H . PC flash connector socket
I . Aperture control lever
J. Cable release socket
* Model 600 SE only
Film holder (Picture 3)
A. Dark slide
B. Door latch
C. Film tab slots
D. Camera mounting brackets
E. Developer rollers
Extra film holders (Model #73) are available
from your local Polaroid dealer .
2
Page 3

600/600 SE Camera User Guide
Accessories (not illustrated)
A. Body cap for camera*
B. Lens cap for 127mm lens
C. Rear lens cap for 127mm lens
D. Collapsible rubber lens hood for
127mm lens
E. Neckstrap
* Model 600 SE only
Polaroid pack films
Speed
Film type (approx. ASA / DIN equiv .) Description
Types 669/108 80 ASA / 20 DIN These films yield a positive color print. They are
Polacolor ER balanced for use in average daylight and with
electronic flash units approximating average
daylight (5500°K). Ideal for both outdoor and
studio photography .
Types 667 3000 ASA / 36 DIN Very high speed black and white films, which
Black and White yield a positive print. Ideal for general purpose
photography , recording high-speed events or
low-light situations. Panchromatic. Prints need
not be coated after development.
Type 665 75 ASA / 20 DIN A black and white film which produces a
Positive/Negative high-resolution negative, in addition to a high
quality positive print. Ideal for general purpose
photography where a medium contrast instant
print and a permanent negative are desired.
Panchromatic. Prints must be coated.
Each pack produces 8 prints, 8.3 x 10.8cm (3 1/4 x 4 1/4 in.). Type 665 film also produces a
usable negative.
3
Page 4

600/600 SE Camera User Guide
Assembly (Picture 4)
Attaching the lens (Model 600 SE only)
Insert the lens, aligning the red dot on the lens
barrel with the red dot on the camera body
(4). Turn the lens clockwise until the red dot is
directly on top and the lens locks in place.
Screw the end of the cable release into the
cable release socket on the lens (5).
Before removing a lens, unscrew the cable
release from its socket on the lens and hang
it on the cable release holder on the hand
grip (6). (The cable release is permanently
fixed to the handle and cannot be removed.)
If there is film in the camera, be sure the dark
slide is inserted before removing the lens.
T o detach the lens, press the lens release
button and turn the lens counterclockwise (7).
Always place the body cap on the camera
when storing it without the lens, and keep
both front and rear lens caps on the lens. T o
attach the body cap, fit it into the lens mount
and turn it clockwise one-eighth of a turn (8).
Eyecup
Fit the rubber eyecup over the viewfinder
eyepiece (11).
Lens hood
Screw the collapsible rubber lens hood onto
the lens (12). For best picture-taking results,
a lens hood should always be used. For
storage, you may fold it back over the lens
barrel and put on the lens cap.
Film holder
The removable film holder is attached to the
camera by means of two sliding locks on
either side of the camera body (13). When
attaching the film holder, be sure it is properly
seated and that the film tab slot is on the
opposite side of the camera from the hand
grip (14).
If there is film in the holder , be sure the dark
slide is inserted before removing the holder .
Neckstrap
Attach the neckstrap as shown for the Model
600 (9) and the Model 600 SE (10).
4
Page 5

600/600 SE Camera User Guide
Lenses (Pictures 15 through 17)
The Models 600/600SE cameras have a 127mm f/4.7 lens (15). Two additional lenses are
available for the Model 600 SE (16 and 17). Each lens comes complete with front and rear lens
caps and a collapsible rubber lens hood.
All lenses are equipped with a Seiko between-the-lens shutter , with 10 speeds ranging from
1 sec. to 1/500 sec. and Bulb. The shutter is X synchronized for electronic flash at all speeds.
127mm f/4.7 lens (15) 75mm f/5.6 lens* (16) 150mm f/5.6 lens (17)
(normal) (wide angle) (portrait)
Lens Construction 3 groups 4 groups 3 groups
4 elements 7 elements 4 elements
Apertures f/4.7 to f/64 f/5.6 to f/45 f/5.6 to f/45
Closest Focusing 1.1m (3.5 ft.) 1m (3.3 ft.) 2m (6.6 ft.)
Distance
Angle of View 41o horizontal 65
o
horizontal 35
o
horizontal
Screw-in-Filter 55 mm 72 mm 55 mm
Size
* The 75mm lens comes with an accessory viewfinder.
5
Page 6

600/600 SE Camera User Guide
Focusing
The Models 600 and 600 SE are equipped
with a coincidence-type rangefinder in which
two images come together within a circle
when in focus. T o familiarize yourself with it,
first set the lens at infinity and focus on a
nearby subject, as described below.
How to focus
View your subject through the bright circle in
the viewfinder (18). Position your eye so the
entire circle is visible. Within the circle your
subject will appear as two images (19). Turn
the focusing ring so that these two images
coincide (20). Now the camera is focused on
your subject.
Using the viewfinder (Picture 21)
127mm lens (Models 600 and 600 SE)
Compose within the framing lines seen in
your viewfinder (21). When focused beyond
3m (10ft.), use the dots outside of the lines.
Model 600 SE only
The viewfinder frame is adjustable for
127mm and 150mm focal length lenses.
Slide the selector switch to match the focal
length of the lens in use (22, 23).
secure the viewfinder. Focus your subject
through the camera’s viewfinder , read the
subject distance from the lens barrel (25),
and set the wide angle viewfinder knob to
that distance (26). Now look through the
wide angle viewfinder and compose your
subject within the bright frame (27).
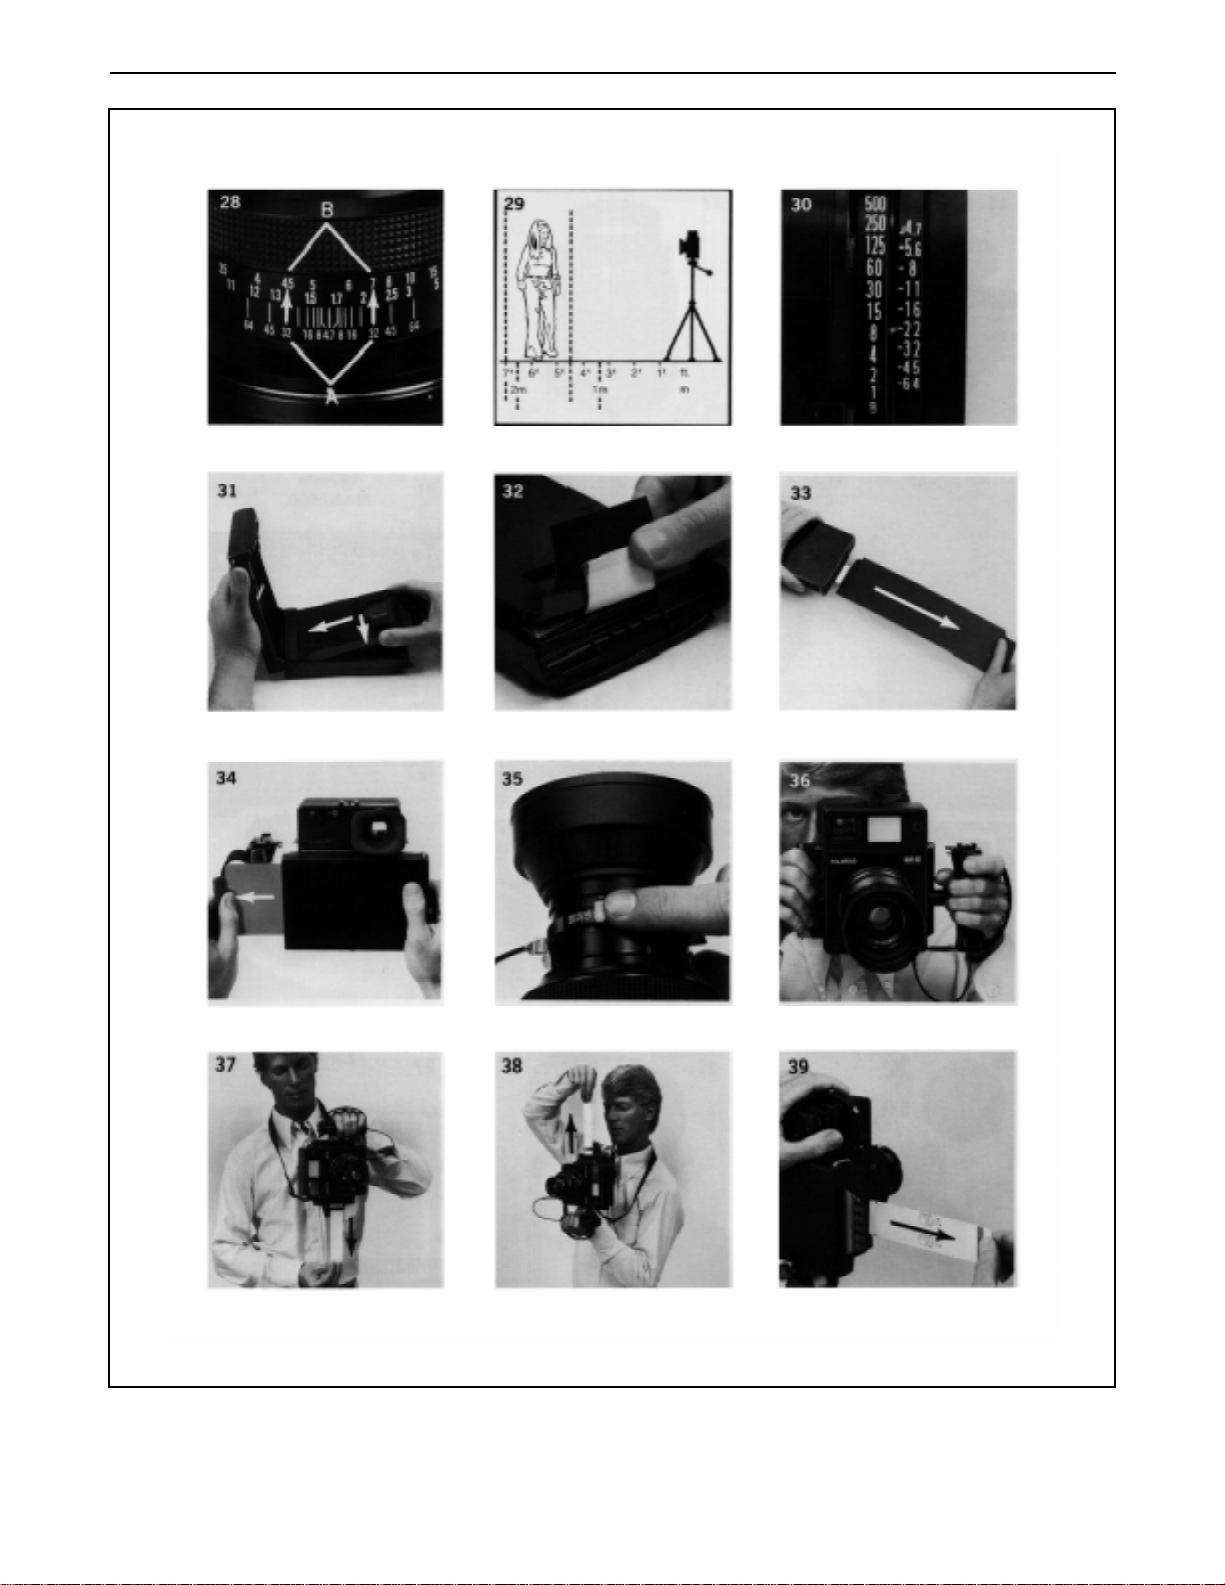
Depth of field scale
When you focus on the most important part of
your subject, some parts in the foreground
and background of the scene will also be in
acceptably sharp focus in the picture.
The distance between the nearest and
farthest points in sharp focus is called the
zone of sharp focus, or the depth of field. T o
determine this distance for a particular scene
use the depth of field scale on the lens barrel
(28). After choosing the aperture setting and
focusing the subject, locate the aperture
number on both sides of the red focus mark
on the depth of field scale (28A). Follow the
white line up to the distance scale and read
the near and far limits of your zone of sharp
focus (28B). For example, with the 127mm
lens at f/32, at a subject distance of 1.7m
(5 1/2ft.), the depth of field will be
approximately 1.4-2.1m (4 1/2-7ft.) (29).
Exposure controls (Picture 30)
75mm lens (Model 600 SE only)
When using the 75mm lens, attach the
wide angle viewfinder supplied with that lens
to the accessory shoe on top of the camera
(24).
When attaching or removing the viewfinder,
be sure the locking device (24A) is unlocked.
Once attached, turn the locking knob as far
as it will go, in the direction of the arrow , to
Setting the shutter speeds (30)
The shutter has 10 speeds, ranging from
1 sec. to 1/500 sec., plus a B setting for
time exposures. These are set by turning
the shutter speed ring. If set at B, the shutter
stays open as long as the shutter release
button is kept depressed. When setting
shutter speeds, be sure that the red mark
points directly at the speed number, not
between two numbers.
6
Page 7

600/600 SE Camera User Guide
Setting the lens opening (30)
Apertures can be varied by turning the
aperture control lever . There are click stops
at every f-number, but the dial can be set
between the numbers.
Neutral density filter
In very bright daylight with 3000 speed black
and white film, you may want to use a four
or five stop neutral density filter (available
from your photo dealer) which will enable you
to choose a wider range of apertures and
shutter speeds, if necessary .
Loading the film
The holder may be loaded before or after it is
attached to the camera. Pull up on the latch
to open the film holder door; the door does
not open flat. Always hold the film pack by
the edges, not in the center. Slide the pack
in at an angle, then push it down into place
(31). Check that the white tabs are not
caught between the pack and the holder (32).
Close and latch the door , with the end of the
black tab sticking out. Pull the black tab
straight, all the way out of the holder (33). A
small white tab will appear .
Making the exposure
• Remove the dark slide (34).
• Set the shutter speed and lens aperture.
• Cock the shutter lever (35).
• Focus.
• Frame the subject in the viewfinder.
• Depress the shutter release (36).
Processing the film
T ab-pulling tips
In order for the film to develop properly , the
tabs must be pulled out of the exit door
straight. Be careful not to bend the film unit
towards you or towards the lens as you pull,
and do not pull it out at an angle. Here are
some recommended techniques.
Handheld: Hold the camera in front of you
and let the camera hang with the film tab slot
down. Then pull the tabs straight down (37).
Or, bracing your elbow against your body ,
hold the camera so the film tab slot is up, and
pull the tabs straight up (38).
On a tripod: Brace the camera and pull the
tabs straight, as shown (39).
Caution
The Polaroid film process uses a caustic jelly which is safely packed inside sealed containers
within the film pack. If accidentally you should get some of this jelly on your skin, wipe it
off immediately . T o avoid an alkali burn, wash the area with plenty of water as soon as possible.
It is particularly important to keep the jelly away from eyes and mouth. Keep discarded
materials out of reach of children and animals, and out of contact with clothing and furniture, as
discarded materials still contain some jelly .
7
Page 8

600/600 SE Camera User Guide
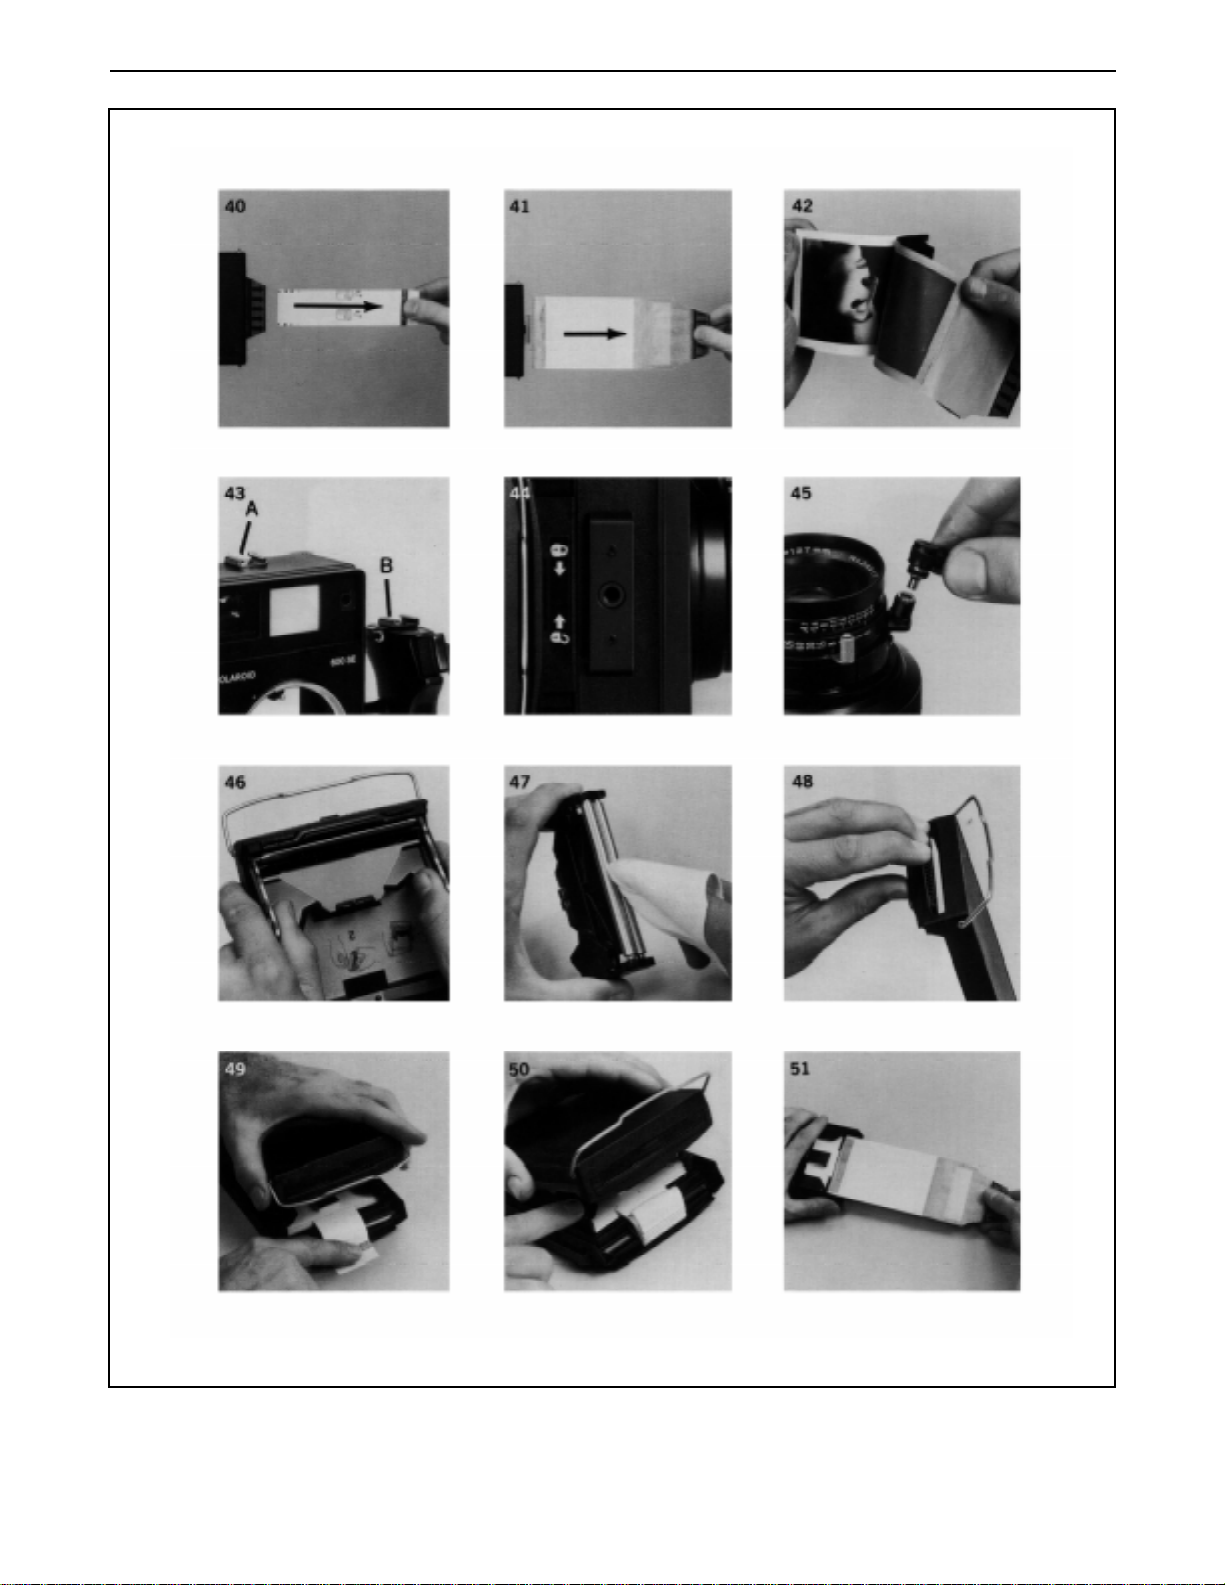
How to pull the tabs
After making the exposure, pull the white tab
straight, all the way out of the camera. A large
yellow tab will appear (40). Grip the yellow
tab firmly . Pull it straight out of the camera at
moderate speed, without hesitation (41). The
picture is now developing, so start timing.
Develop the picture for the full time
recommended in the film instructions inside
the fim box. Separate the print from the
negative in one continuous motion, starting at
the end nearest the yellow tab (42).
Information on handling of prints and
negatives is in the film instructions.
Electronic flash (Picture 43)
An electronic flash unit can be mounted on
the accessory shoe on top of the camera
(43A). The Model 600 SE has an additional
accessory shoe on top of the handgrip (43B)
that can be used for mounting the flash unit
using the 75mm lens and viewfinder.
If you use a large handle-type flash, a special
bracket may be available for your unit that
attaches to the flash mount on the side of the
camera (44). If you use the bracket that
comes with your unit, be sure it does not
obstruct the film holder and its operation.
Consult your photo dealer for further
information.
Plug the connector cord from the electronic
flash unit into the PC connector socket on the
lens (45). The shutter is X synchronized for
electronic flash at all speeds. Consult the
instructions provided with the flash unit for
proper lens aperture settings.
problem can usually be corrected by suitable
filtration on the camera lens or the flash unit.
Automatic flash units and color film
It is recommended that you keep an
automatic flash unit set for “manual”
operation when using color film.
When set for “automatic” operation, exposure
is controlled by the duration of the flash.
When your subject is close, the flash duration
may be considerably shorter than 1/1,000
sec. The resulting reciprocity effects tend to
cause a color shift towards the warmer
colors. If necessary , this can be corrected
with weak cyan or blue and cyan CC filtration.
Maintenance
Lens care
The lens supplied with the Models 600 and
600 SE is a high quality , professional lens
that should be kept clean and handled with
extreme care. If it should become dirty , blow
off any dust, then wipe gently with a clean,
lint-free cloth. Fingerprints should be cleaned
off immediately with a drop of lens cleaning
fluid and lens tissue. Never use siliconecoated eyeglass tissue to clean the lens.
Keep the developer rollers clean
It is extremely important to keep the rollers
clean at all times. Dirt or developer
chemicals on the rollers will leave marks on
the picture and may even cause the picture to
jam in the rollers.
There may be noticeable differences in the
color quality of the light from various makes
of electronic flash units. If your flash produces
displeasing colors with Polaroid film, the
T o clean the rollers: With both hands, lift
the steel loops, and remove the roller
assembly (46). Clean both rollers with a
damp, lint-free cloth (47). Never scrape them
with anything metallic, nor with your fingernail.
8
Page 9

600/600 SE Camera User Guide
Rotate both rollers as you clean and inspect
them. Also clean the film tab slot (48). Then
replace the roller assembly .
Storage
T o protect the lens and camera parts, be sure
to put on lens caps and body cap when not in
use. Do not store your lens with the shutter
cocked.
Filters
The Models 600 and 600 SE lenses
accommodate standard screw-in filters,
available from your local photo dealer.
When photographing outdoors, particularly in
shady or overcast situations, you may find it
helpful to use a UV filter (available from your
local photo dealer).
T o increase exposure (make pictures lighter),
use a longer exposure time (slower shutter
speed), or a larger lens opening (aperture).
T o decrease exposure (make pictures
darker), use a shorter exposure time (faster
shutter speed), or smaller lens opening
(aperture).
The shutter stays open for the length of time
indicated on the ring. The numbers signify
fractions of a second; thus, 60 = 1/60 sec.,
4 = 1/4sec., 1 = 1 sec., etc.
The lens opening can be made larger or
smaller. The size of the opening is measured
in f-numbers, which are marked on the lens
ring. The highest f-number indicates the
smallest opening; the lowest f-number
indicates the largest opening.
More on film
More on exposure
Guide to exposure control
Exposure is the amount of light that reaches
the film through the lens. It is controlled by the
length of time the shutter is open (shutter
speed) and the size of the opening in the lens
(lens aperture).
Shutter speeds
500 250 125 60 30 15 8 4 2 1
← ←
← Darken/Lighten
← ←
Lens openings
The importance of the film instruction
sheet: The most up-to-date and accurate
information on a film will always be found in
the instruction sheet packaged with that film.
Time, temperature and development: The
ideal development temperature for all the
films is about 70-75o F (21-24o C). When it’s
much warmer or colder, you may need to
adjust the development time or the exposure.
→ →
→
→ →
4,7 5,6 8 11 16 22 32 44 64
←←
← Lighten / Darken
←←
9
→→
→
→→
Page 10

600/600 SE Camera User Guide
Coat black and white prints: Prints from all
black and white films except T ype 667 must
be coated as soon as possible to protect
them from scratches, fingerprints and fading,
and to prevent changes in tone. For details,
see the film instructions. Do not coat color
prints.
T ype 665 negatives: These must be
immersed in a sodium sulfite solution
immediately after separation from the
positive print. See the instructions on the
inside of the fim box for full details.
Protect film from heat: Keep film away
from heat. Extreme heat and humidity can
damage it, especially after the pack is
removed from its sealed foil wrapping.
T roubleshooting
If no white tab appears: Open the door
and, without moving the film pack, push the
white tab out (49). Then close and latch the
door.
If no yellow tab appears when you pull
the white tab: Do not pull another white tab.
Instead, carefully open the holder far enough
to get a finger on top of the film pack to hold it
down (50). Grasp the topmost yellow tab,
and gently pull it all the way out and discard it
(51). Inspect the rollers and clean them if
necessary . Close and latch the holder, with
the next white tab sticking out.
Picture faults and probable causes
Repeated, evenly-spaced spots: Due to
dirt on the steel rollers in the film holder.
Oblong in print: The white tab was not
pulled all the way out. When the yellow tab
was pulled, the white tab was pulled back into
the camera.
Many small white specks: Caused by
pulling the yellow tab out too fast. This can
also cause pink lines, streaks or blotches on
color prints.
Picture with dull, weak colors: The print
was not developed long enough.
Underdeveloped color prints may be
brownish pink.
Picture with reddish tint and muddy
colors: The picture was developed at
temperatures below 65o F (18o C).
Color prints much too red: May occur with
some electronic flash units when set at
“Auto”.
V ery light image or none at all: The film
was fogged or extremely overexposed. Do
not remove the safety cover from the film
pack before inserting it into the camera, and
do not remove a loaded film holder from the
camera without inserting the dark slide. Be
sure your exposure is based on the correct
film speed.
Nearly black image or solid black:
Caused by insufficient or no exposure. Be
sure you have cocked the shutter and
removed the dark slide. Be sure your
exposure is based on the correct film speed.
Broad streak or curtain-shaped mark:
Due to hesitation or stopping while pulling the
yellow tab out.
Missing corners or orange-red marks
along edges: Caused by pulling the yellow
tab out of the camera at an angle. Also
caused by dried developer chemicals at the
ends of the steel rollers in the film holder.
10
Page 11

600/600 SE Camera User Guide
Three-year warranty (outside the
U.S.)
Y our Polaroid Professional Pack Film
Camera has been thoroughly tested and
inspected before shipment. All parts are
guaranteed against defects in materials and
workmanship for three full years from the date
of original purchase. During this period any
such defects will be remedied by Polaroid
Corporation without charge. T o take
advantage of this warranty , the camera must
be repaired by a Polaroid Service Center.
Cameras damaged by accident, misuse, or
tampering will be promptly repaired at a
reasonable charge. Please pack the camera
carefully in a solid container , with plenty of
padding, and ship it, prepaid and insured, to
the nearest Polaroid Service Center.
THE ABOVE WARRANTY AND
PROVISIONS DO NOT AFFECT YOUR
ST ATUT ORY RIGHTS.
Information and technical
assistance (outside the U.S.)
If you have any question about your camera
or any other photographic problem, please
contact the Polaroid Office nearest you.
The warranty period is three years from the
original date of purchase. T o verify the
warranty period, you should keep the
sales slip or other proof of the purchase
date. Without this information, the warranty
period is four years from the manufacturing
date on the camera.
If, within the warranty period, your camera is
mailed to us for service from inside the U.S.,
will be returned with a postal refund
approximately equal to the cost of insured
parcel post. We will also give you a free
pack of film.
This warranty does not cover damage
caused by accident, misuse, or tampering
with the camera, and a charge will be made
for such repairs.
FOR WARRANTY SER VICE the camera
must be returned to and repaired by a
Polaroid Service Center. You can return the
camera through your Polaroid camera
dealer. If that is not convenient, see below for
information on how to return the camera, or
call Americas Business Center toll-free at
1-800-343-5000 from anywhere in the U.S.
We can be reached Monday through Friday ,
8 a.m. to 5 p.m., Eastern Time.
In Canada call toll-free 1-800-268-6970.
Full three-year warranty (U.S.
only)
If your camera proves to be defective within
the warranty period we will repair it, or at our
option replace it with a similar camera,
without charge. The warranty applies
whether you do or do not return a registration
card to us.
This warranty gives you specific legal rights
and you may also have other rights which
vary from state to state.
This warranty excludes all consequential
damages. Some states do not allow the
exclusion or limitation of incidental or
consequential damages, so the
foregoing limitation or exclusion may not
apply to you.
11
Page 12

600/600 SE Camera User Guide
Repairs
If you believe your equipment may need
repair,
Customer Service toll-free:
from anywhere in the U.S. and explain the
problem. Y ou may be able to use your
camera again right away , without repair .
Y our camera dealer will return your camera
for repair, should that ever be necessary .
Or , you may mail the camera to Polaroid for
repairs. Pack it carefully . Address it to the
nearest Polaroid Service Center and send it
by
will send a sturdy pre-addressed shipping
before your send it to us,
1-800-343-500
insured
parcel post. (Upon request, we
call
carton to you anywhere in the continental
U.S.) Include a note describing the problem
and, if you can, pictures that illustrate it.
Information and technical
assistance (U.S. only)
If you ever need additional help with your
camera or with picture-taking in general, call
us toll-free at 1-800-343-5000 from anywhere
in the U.S. We can be reached Monday
through Friday , 8 a.m. to 5 p.m., Eastern
Time.
In Canada call toll-free 1-800-268-6970.
Or, write to Polaroid, Americas Business
Center, 201 Burlington Rd., Bedford,
Massachusetts 01730.
12
Page 13

600/600 SE Camera User Guide
Depth of field tables (in feet)
ft
f ∞ 30151087654.543.5
5.6 32’ 10" 15’ 10" 10’ 6" 7’ 9 1/2” 5’ 10 1/2" 4’ 5" 3' 7 1/4” 3’ 2 3/4”
∞ 312' 26’ 10" 14' 8’ 8” 5’ 9" 4' 5 1/4” 3’ 10"
8 23’ 4 “ 13’ 4 “ 9’ 3 1/2 “ 7’ 2" 5’ 6" 4’ 2 3/4” 3 ’6" 3’ 1 1/2”
∞∞40’ 0" 16’ 10" 9’ 7 1/2" 6’ 2" 4’ 8'’ 3’ 11 3/4”
11 16’ 7 “ 10’ 10" 8’ 0" 6’ 5'’ 5’ 1‘’ 3’ 11 3/4” 3’ 4'’ 3’ 0”
∞∞133' 23’ 7” 11 ’6“ 6’ 9 1/2“ 5’ 0” 4’ 2 3/4“
75mm f/5.6
127mm f/4.7
16 11‘ 9 “ 8’ 7 1/2” 6’ 9 1/2” 5’ 7" 4’ 6 3/4 “ 3’ 5'’ 3’ 1 1/2” 2’ 10"
∞∞∞55’ 7” 15’ 8” 8’ 1/ 2" 5’ 7 1/2“ 4’ 7 1/2"
22 8’ 5" 6 ’8 1/2 “ 5’ 6 1/2” 4’ 9" 4’ 0" 3’ 3 3/4“ 2’ 10 1/2" 2’ 7 1/2“
∞∞∞∞ 33’ 5" 10’ 10” 6’ 9 1/2“ 5’ 4"
32 6’ 0” 5’ l 1/2“ 4’ 5 1/4” 3’ 11 1/4” 3’ 5" 2’ 11“ 2’ 7” 2’ 4 3/4“
∞∞∞∞ ∞ 22’ 4" 9’ 8 1/2“ 6’ 11 1/2"
45 4’ 4" 3’ 10 1/4" 3’ 5 3/4” 3’ 2 1/4” 2’ 10 1/4” 2’ 6 1/4“ 2’ 3 3/8" 2’ 1 5/8”
∞∞∞∞ ∞ ∞ 26’ 2: 12’ 4"
4.7 113' 24' 13 ’4" 9’ 3 1/2'’ 7’ 6" 6’ 8" 5’ 9" 4’ 10 “ 4’ 4 1/2" 3' 10 3/4“ 3' 5 1/4 “
∞ 40' 17’ 1 “ 10’ 10” 8 ’6" 7’ 4 1/2‘’ 6’ 3" 5’ 2" 4’ 7 1/2“ 4’ 11 1/4” 3’ 6 3/4“
8 66' 21' 12’ 5“ 8’ 10” 7’ 3" 6’ 5 1/2“ 5’ 7” 4’ 8 3/4” 4’ 3 1/2” 3’ 10” 3’ 4 3/4“
∞ 53' 19’ 0" 11’ 6” 8’ 11" 7’ 8'’ 6’ 5 1/2“ 5’ 3 1/2” 4’ 8 3/4’’ 4’ 2'’ 3’ 7 1/2“
11 47' 18’ 11’ 7“ 8’ 5" 7' 0” 6 ’3" 5’ 5 1/2“ 4’ 7 1/2” 4’ 2 1/2“ 3’ 9 1/2" 3’ 4'’
∞ 79' 21’ 4" 12’ 4" 9’ 4 1/2” 8’ 0” 6’ 8'’ 5 ’5 1/2” 4’ l 0“ 4’ 3" 3’ 8 1/4”
16 33' 16' 10’ 8" 7’ 11” 6’ 8" 5’ 11 1/2” 5’ 3" 4’ 6" 4’ 13/4” 3’ 8 1/4” 3’ 3 1/4”
∞ 250' 25’ 11” 13 ’8" 10’ 1” 8’ 6" 7’0” 5’ 8” 5’ 0” 4’ 4 1/2 “ 3’ 9"
22 24' 13' 9’ 6'’ 7’ 3 1/2" 6’ 3" 5’ 71/2” 5’ 0" 4’ 3 3/4” 3’ 11 1/2” 3’ 7' 3’ 2 1/2”
∞∞37’ 4” 16’ 2” 11’ 4” 9’ 4" 7’ 6 1/2“ 5' 11 1/2” 5’ 3'’ 4’ 6 1/2“ 3’ 10 1/2”
32 17' 11’ 8’ 3 1/2” 6’7” 5’ 8 1/2” 5’ 2 1/2” 4’ 8 1/4" 4’ 1” 3’ 91/4" 3’ 5 1/4” 3’ 1”
∞∞102' 32' 13’ 9” 10’ 10” 8’ 6'’ 6 ’6'’ 5’ 7 1/2” 4’ 9 3/4" 4' 3/4”
45 12' 8’ 10" 7’ 0” 5’ 9 1/2" 5’ 1 1/2" 4’ 9" 4’ 3 1/4 “ 3’ 9 3/4” 3’ 6 1/2” 3’ 3" 2’ 11 1/2”
∞∞∞44' 20' 14’ 3 “ 10’ 4“ 7’ 5 1/2" 6’ 3 1/2” 5’ 3 1/2" 4’ 4 1/4"
64 8’ 8" 6’ 11 “ 5’ 9 1/2 “ 4’ 11 3/4” 4’ 6" 4’ 2 1/2 “ 3’ 10 1/2” 3’ 5 3/4" 3’ 3 3/4" 3’ 1/2" 2’ 9 1/4"
∞∞∞∞56' 26' 15' 9’ 6" 7’ 7 1/2” 6’ 1 1/2" 4’ 10 1/2"
150mm f/5.6
5.6 131' 24’ 8 “ 13’ 7“ 9’ 4 1/2 “ 7’ 7 1/2” 6’ 8 1/2”
∞ 38’5 “ 16’9" 10,8" 8151, T31 2
8 92' 22’ 11” 13’ 1" 9’ 2" 7' 5 1/2” 6’ 7 1/2”
∞ 43’ 6 17’ 7” 11” 0" 8’ 7 1/2” 7’ 5 1/2”
11 65' 20’ 11” 12’ 5 “ 8’ 10" 7' 3 1/2” 6' 5 1/2”
∞ 53’ 7” 18’ 11” 11’ 6" 8' 10 1/2” 7’ 8"
16 46' 18’ 7” 11’ 8" 8’ 5 1/2" 7’ 0” 6’ 3"
∞ 80’ 21’ 4" 12’ 4” 9’ 4'’ 7’ 11 1/2”
22 33' 16’ 1” 10’ 8” 7' 11 1/2” 6’ 8" 6’ 0"
∞ 267' 25’ 11” 13’ 7“ 10’ 0” 8’ 5 1/2”
32 23’ 7” 13’ 7“ 9’ 6 1/2” 7’ 4" 6’ 3" 5’8”
∞∞37’ 4" 16’ 1” 11’ 3" 9’ 3"
45 16’ 10" 11’ 1” “ 8’ 3 1/2 “ 6’ 7 1/2” 5’ 9'’ 5’ 3"
∞∞103’ 0" 21’ 8" 13’ 7“ 10’ 9”
13
Page 14

600/600 SE Camera User Guide
Depth of field tables (meters)
m
f ∞ 10 5 3 2,5 2 1,7 1,5 1,3 1,2 1,1
5,6 10,02 5,06 3,39 2,35 1,70 1,33 1,09 0,93
∞∞9,69 4,17 2,44 1,72 1,33 1,01
8 7,11 4,21 2,99 2,16 1,60 1,27 1,06 0,90
∞∞15,94 4,99 2,68 1,84 1,39 1,13
11 5,05 3,40 2,57 1,94 1,48 1,20 1,01 0,81
∞∞∞6.92 3,13 2,03 1,50 1,19
16 3,59 2,69 2,14 1,69 1,34 1,1 1 0,94 0,82
75mm f/5.6
127mm f/4.7
22 2,56 2,08 1,74 1,44 1,18 1,00 0,87 0,77
32 1,83 1,58 1,39 1,19 1,01 0,88 0,78 0,70
45 1,32 1,19 1,08 0,96 0,85 0,76 0,69 0,63
4,7 34,60 7,80 4,41 2,79 2,36 1,91 1,64 1,45 1,27 1,17 1,08
8 20,00 6,80 4,07 2,66 2,26 1,85 1,59 1,42 1,24 1,15 1,06
11 14,40 6,00 3,78 2,54 2,18 1,80 1,56 1,39 1,22 1,13 1,06
16 10,20 5,10 3,44 2,89 2,07 1,72 1,50 1,35 1,19 1,11 1,03
22 7,30 4,30 3,05 2,20 1,93 1,63 1,44 1,30 1,15 1,08 1,00
32 5,20 3,5 2,64 1,99 1,77 1,52 1,35 1,23 1,10 1,03 0,96
45 3,70 2,77 2.22 1,75 1,59 1,39 1,25 1,15 1,04 0,98 0.92
64 2,65 2,16 1.82 1,50 2,10 1,24 1,13 1,05 0,98 0,91 0,86
∞∞∞15,47 4,13 2,38 1,67 1,29
∞∞∞∞ 7,56 3,18 2,01 1,47
∞∞∞∞ ∞ 6,14 2,88 1,86
∞∞∞∞ ∞ ∞ 7,09 2,44
∞ 14,00 5,78 3,25 2,67 2,10 1.77 1,55 1,33 1,23 1,12
∞ 19.00 6,50 3,45 2,79 2,17 1.82 1,59 1,36 1,25 1,14
∞ 31,00 7,43 3,68 2,94 2,25 1,87 1,63 1,39 1,27 1,16
∞∞9,30 4.07 3,18 2,39 1,96 1,69 1,43 1,31 1,18
∞∞15,00 4,79 3,58 2,60 2,09 1,78 1,49 1,36 1,22
∞∞∞6,42 4,39 2,98 2,32 1,94 1,60 1,44 1.29
∞∞∞12,50 6,49 3,77 2,75 2,22 1,77 1,57 1,39
∞∞∞∞1,39 6,13 3,76 2,80 2,10 1,81 1,56
150mm f/5.6
5,6 40,00 8,07 4.49 2,82 2,38 1,92
∞ 13,20 5.65 3,21 2,64 2,08
8 28,30 7,47 4,31 2,75 2,33 1,89
∞ 15,20 5,97 3, 30 2,70 2,12
11 20,00 6,77 4,07 2,66 2,27 1,86
∞ 19,40 6,50 3,44 2,79 2,17
16 14,20 5,98 3,79 2,54 2,18 1,80
∞ 31,00 7.43 3,67 2,93 2,25
22 10,00 5,14 3,44 2,39 2,08 1,73
∞∞9,33 4,05 3,16 2,37
32 7,18 4,29 3,06 2,21 1,94 1,64
∞∞14,70 4,76 3,56 2,58
45 5,12 3,50 2.65 2,00 1,78 1,53
∞∞∞6,35 4,34 2,44
14
Page 15
600/600 SE Camera User Guide
15
Page 16

600/600 SE Camera User Guide
16
Page 17

600/600 SE Camera User Guide
17
Page 18
600/600 SE Camera User Guide
18
Page 19
600/600 SE Camera User Guide
19
 Loading...