

Page 1
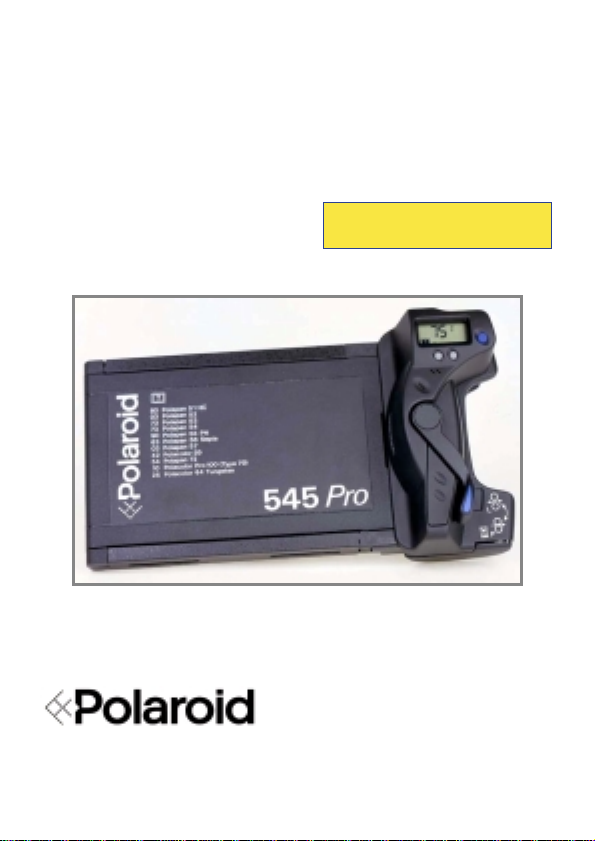
545 Pro
Film Holder
User Guide
Page 2

Contents
1 Introduction
2 Film Holder
3 Film Codes
4 Attaching the holder to the
camera
5 Determining the processing
time
6 Displaying the ambient
temperature
7 Displaying the exposure
compensation value
8 Displaying the film
processing time
9 Changing the auto off option
10 LCD display
11 Loading the film
12 Making the exposure
13 Processing more than one
film
14 Timing more than one film
15 Removing film for later
processing.
16 Changing the batteries
17 Cleaning the rollers
18 Troubleshooting
19 Warranty
19 Caution
Page 3

English 3
1 Introduction
Thank you for choosing the
Polaroid 545 Pro Film Holder.
This enables you to use
Polaroid 4x5 sheet films in
most 4x5 field or view
cameras that are equipped
with spring backs, lock backs
and similar backs, without
making any alteration to the
camera or focusing system.
It comes equipped with a built
in film processing timer which
provides visible and audible
indication of processing time
for a variety of Polaroid film
types and can display any
required exposure
compensation for the
Polaroid film type used.
The film holder can also be
used with instruments (such
as microscope and
oscilloscope cameras)
equipped with similar backs,
and with the Polaroid MP-4+
and MP-4 cameras, the CU-5
4x5 camera (88-45) and
Polaroid Miniportrait 4x5
cameras.
Important: When the holder
is not in use, leave the
control arm at P (as shown in
illustration 1.)
The numbers throughout
the text refer to the
illustrations at the end of
the book.
2 Film holder (Illustration 1)
a Focal plane
b Steel processing rollers
c Rubber light seal roller
d Hinged roller cover
e Roller hooks
f Film slot
g Film processing timer
h Control arm
i Film release lever
j Timer code table
k LCD backlight button
l Scroll button
m Mode button
n Film timer code icon
o Ambient temperature icon
p Exposure compensation icon
q Processing time icon
r Film engaged icon
s Auto off function icon
3 Film timer codes
The actual image area of
Polaroid 4x5 Instant Sheet
films is approx. 3 1/2 x 41/2
in. (9 x 11.5cm), and is off
centre about 1/8 in. (3mm)
toward the thicker end of the
holder. This area is marked
on the ground glasses for the
MP 4+ and MP-4 cameras,
but may not correspond
precisely with the area
marked on the other ground
glasses. For extreme
accuracy in composition,
make test shots and mark the
exact area on your ground
Page 4

4 English
FILMTYPE
Polapan 51 HC
Polacolor 52
Polapan 53
Polapan 54
Polapan 55 PN
Polapan 56 Sepia
Polapan 57
Polacolor 59
Polacolor 64
Tungsten
Polapan 72
Polacolor Pro100
(Type 79)
The Polaroid Corporation reserves the right to change the film timer
codes without any prior warning. If in any doubt, contact the customer
services department for the latest information.
DESCRIPTION
High contrast, black and white film producing
both a negative and positive print.
Black and white, coaterless, medium contrast
film for general photographic purposes.
High quality, high speed, medium contrast,
panchromatic black and white film.
Black and white, medium contrast, coated film
for professional photographic proofing.
Panchromatic black and white film that produces
both a positive print and a recoverable negative.
Amedium contrast sepia tone film for creative
professional photography.
Panchromatic black and white, high speed,
medium contrast coated film.
Polacolor ER (Extended Range)colour print
film, balanced for daylight and electronic flash
(5500oK).
Colour print film balanced for longer exposure
times with tungsten/halogen light source
(3200oK).
High quality, medium contrast black and white
film for professional and scientific purposes.
Colour print film, balanced for daylight and
electronic flash (5500oK) for professional
photographic proofing.
80
03
73
73
90
63
03
42
25
54
10
Page 5
4 Attaching the holder to the
camera
Before use, open the roller
cover and inspect the
processing rollers. Clean
them if necessary (see
section 16
rollers
the back of the camera, just
as you would a standard film
holder. If your camera has
slide locks, use them in
addition to the spring back;
the locks fit into slots on the
sides of the film holder.
5 Determining the processing
time
The processing time for any
exposure is dependent on the
film type. Each Polaroid film
type has a two digit timer
code which can be found on
the film packaging, on the
film holder or in the table on
the previous page. This timer
code has to be entered
manually into the timer:
a Press the mode button until
the film timer code icon is
displayed.
Cleaning the
). Slide the holder into
English 5
c Pushing the scroll button
again will rotate the numbers
from 0 to 9.
d When you have reached the
desired number press the
mode button and theright
digit will flash.
e Repeat step c. Once the
correct film timer code is
displayed, press the mode
button to save the selection.
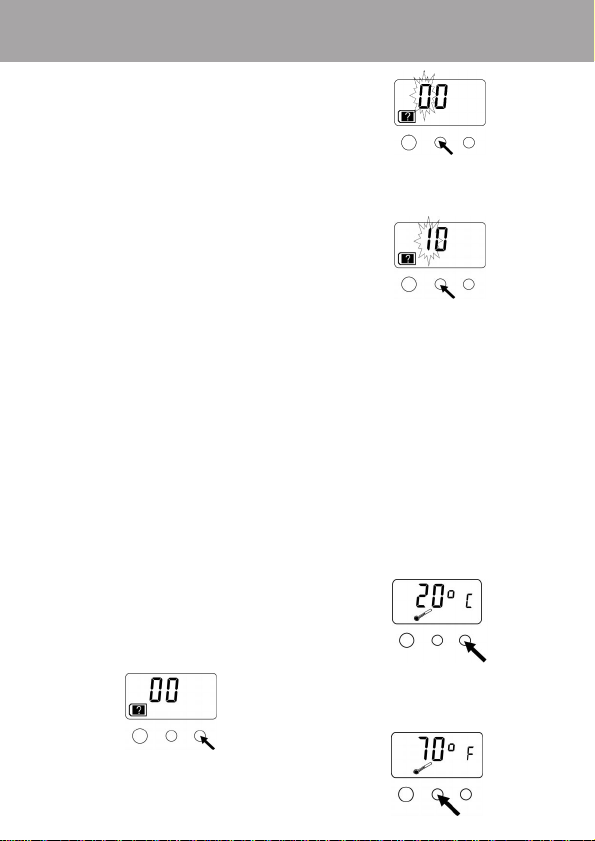
6 Displaying the ambient
temperature
a Press the mode button until
the temperature icon is
displayed.
b Pressing the scroll button
changes the display from °C
to°F.
b Pressing the scroll button will
cause the left digit to flash.
Page 6

6 English
Caution: The timer will
function only within the
temperature range -10°C 35°C (14 °F-95°F).
If outside this range, the
timer will show a warning
signal in which the LCD
display will alternate between
showing the peel time and a
“HI” or “LO” signal.
This indicates that the film is
being used outwith the
recommended temperature
guidelines and therefore in
these extreme conditions the
indicated peel timer may be
inaccurate.
7 Displaying the exposure
compensation value
To obtain the best results
from some Polaroid films, the
camera
exposure must be
altered by a value dependent
on temperature and film type.
a Press the mode button until
the exposure compensation
icon is displayed.
b Adjust the camera by the
number of stops shown.
8 Displaying the film
processing time
a Press the mode button until
the processing time icon is
displayed.
Film processing time is
dependent on film type (film
timer code) and ambient
temperature. When the film
is removed from the film
holder, this mode is selected
automatically and the time
counts down to zero.
9 Changing the auto off
options mode
This function allows you to
manually turn off the timer
and / or alter the period after
which the timer automatically
powers down if no user
intervention.
a Press the mode button until
the auto off options icon is
displayed.
b Pressing the scroll button will
cause the OFF display to
flash.
Page 7

English 7
c If you wish to manually switch
off the timer, press the mode
button at this point and the
display will power down.
Alternatively, to change the
time out period, press the
scroll button to toggle through
the auto off settings. The
timer can be set to power
down after 1, 5, 15, 30
minutes or 1 hour. if no user
intervention occurs
d Press the mode button to
save the auto off time.
10 LCD Backlight
The timer comes with an LCD
backlight to operate this
press and hold the blue
button (1k) below the display.
When the button is not
depressed the backlight will
go off.
11 Loading the film
a Move the control arm to L (2).
b Hold the envelope as shown
(3) and insert the metal clip
end into the holder. Be sure
that the side marked THIS
SIDE TOWARD LENS faces
the lens. Do not hold the
envelope by the end when
first inserting it into the
holder, as you may buckle
the envelope (4) and damage
the film. Do not press on the
area marked DO NOT
PRESS HERE where the pod
of developer chemicals is
located.
c Push the envelope in halfway
(5), then shift your grip to the
end, and push it in the rest of
the way (6). When the
envelope is fully inserted the
timer will display a film
engaged symbol in the top
right corner.
If this is not displayed, the
film is not engaged correctly.
Remove the film from the
holder and repeat the
process. Note that if film is
loaded and no user
intervention of the timer
occurs for more than 4 hours,
the engaged symbol will
disappear from the display.
Page 8

8 English
12 Making the exposure
a Gently withdraw the envelope
from the holder until it comes
to a firm stop (7). It will come
out almost 6 inches (15cm),
then stop. The negative will
remain inside the holder,
ready for exposure. To
prevent possible light leak,
the envelope should not be
removed for longer than
necessary. If outdoors,
protect the envelope from
bright sunlight and also from
bending in the wind.
b If you wish to use the timer in
the processing of the film,
check the timer display is
powered up (press any
button) and ensure the film
engaged symbol is still
displayed. If this symbol is
not displayed, the negative
was withdrawn accidently
with the envelope. Push the
envelope in again, withdraw
it, and check again.
c Make the exposure.The
recommended exposure
meter setting is printed on the
film envelope.
d Push the envelope all the
way in (8). Use moderate
pressure but don’t force it. If
the envelope will not slide in
all the way, withdraw it
slightly and try again. The
exposed film is now ready to
be processed.
13 Processing the film
a Move the control arm toP (9).
b Grip the envelope firmly, and
pull it straight, all the way out
of the holder (10). Pull
smoothly, at medium speed,
without slowing down or
stopping. You will feel a
slight resistance when the
metal cap reaches the rollers,
but continue pulling without
hesitation. The rollers will
separate to allow the cap to
pass through.
c On pulling the film through
the rollers the peel timer will
automatically count down the
processing time. At the end
of this time a single beep will
sound to indicate the
processing time is complete.
d Remove the print from the
envelope: grip both tabs with
your thumbs as shown (11).
Roll both flaps back slightly.
Using moderate pressure,
tear the envelope open all the
way down to the metal cap
(12). With your left thumb
hold down the negative and
thin paper mask, and with
your right hand quickly lift off
the print (13). It will come
right out of the envelope.
With the exception of
Page 9

English 9
Type55P/N film, the negative
serves no further purpose.
Discard it with the envelope.
Avoid contact with the
chemical on the negative.
This process uses a caustic
paste. Avoid contact with
skin, eyes and mouth and
keep away from children and
animals. If you get paste on
your skin, wipe it off
immediately and wash with
water to avoid an alkali
burn. If eye or mouth contact
occurs, quickly wash the area
with plenty of water and see
a doctor. Keep discarded
materials away from children,
animals,clothing andfurniture.
Type 55P/N film only:
your left thumb to hold down
the negative. With your right
hand, quickly peel away the
print and thin paper mask.
Pull hard, and the print and
mask will separate
completely from the negative
section and cap. Remove
the mask from the print and
discard the mask. Complete
instructions on removing the
negative from the envelope
and preparing it for
enlargement are in the film
instructions.
Use
14 Timing more than one film
The film processing timer has
the ability to time up to three
Polaroid Instant films
simultaneously. The display
indicates the timer countdown
of the first processed film by
displaying the digit 1 to the
right of the time display.
On completion of this
development the timer
sounds a single beep and
displays the second film’s
remaining process time.
The timers sounds a double
beep on completion of the
second film’s process time
and so on until all film
process times are complete.
15 Removing film for later
processing
a After exposure, re-insert the
envelope; push it in very
firmly to ensure that it
engages the metal cap at the
end of the negative. Do not
move the control arm to P.
Leave it atL.
b Remove the film holder from
the camera. Depress the film
Page 10

10 English
release lever R (14).
Keepthe lever depressed
throughout the following
procedure.
c Hold the film holder in one
hand with the opening in the
film plane facing you. With
the thumb of the other hand,
gently push the film envelope
out as shown (15) until the
metal cap is visible. Then
grasp the end of the
envelope and pull it out. To
process the film, carefully
reinsert the envelope into the
film holder as when first
loading, move the control arm
to P, and process it as
described in section 12.
16 Changing the batteries
If the display or tone fades,
or if the timer stops
functioning, the batteries
should be replaced. The
timer uses either two 1.5 volt
SR-54 or two 1.5 volt LR-54
batteries. Slide battery cover
open (16) and the insert
batteries (17). Then replace
the cover. The timer will
display “545” for a few
seconds as shown.
Always re-enter the film timer
code and reset the Auto off
function after changing the
batteries. NOTE: It is
recommended that the SR-54
batteries are used as LR-54
batteries will require to be
replaced more often.
17 Cleaning the rollers
Dirt on the two steel
processing rollers can cause
repeated spots on the print
and poor colours. Check
regularly to see that the
rollers are clean and free of
foreign matter.
a Move the control arm to L (?).
b Grip the hinged roller cover
as shown (18) and pull
upward to open the cover.
c Disengage the hooks (19) at
the ends of the rollers. The
top roller will swing up to
permit easy cleaning of the
entire assembly (20).
d Clean the rollers with a soft,
lint free cloth, dampened with
water if necessary. Rotate
the rollers as you clean and
inspect them. Also clean
therubber light seal roller.
Never scrape the rollers with
anything metallic, nor with
your fingernail.
e Replace the top roller,
engage the hooks, then snap
the cover closed.
Page 11

English 11
18 Troubleshooting
No exposure:
black picture indicates that no
light reached the negative.
Check that your equipment is
functioning (shutter, flash
sync, etc.) This also can be
caused by failure to insert the
film envelope all the way into
the the holder when loading
the film; failure to withdraw
the envelope before exposing
the film; or failure of the
holder to catch the metal cap
when the envelope was
inserted. Check the film
loading instructions. If this
trouble occurs frequently,
check the film holder for
possible malfunction.
Black edge:
withdraw the protective
envelope fully before making
an exposure will produce a
black strip along the edge of
the picture. Always withdraw
the envelope as far as
possible before exposing the
film.
Missing corners:
and white film, this can be
caused by pulling too fast;
with colour film it can be
caused by pulling either too
fast or too slowly. Pull
straight, at medium speed,
without hesitation.
A completely
Failure to
With black
Spots:
Deposits of dirt or
foreign matter on the steel
rollers will cause evenly
spaced spots or marks
across the length of the
picture. Inspect and clean
the rollers regularly.
Streaks:
motion is uneven or jerky
when removing the film
envelope, the rollers will
leave impressions across the
picture in the form of vertical
streaks. Always pull
smoothly without hesitation.
Detached envelope:
film is loaded backwards, the
envelope will detach
completely when withdrawn
for exposure. To gain access
to the negative (which
remains inside the holder),
open the hinged cover and
disengage the rollers just as
you would for cleaning.
Move the control arm to P (9)
and withdraw the negative by
pulling the negative tab.
If your pulling
If the
Page 12

12 English
Jammed metal cap:
negative (and metal clip)
cannot be removed from the
holder as described above,
you can disassemble the
holder as follows:
a Move the control arm to L(?).
b Insert a small flat-head
screwdriver into the slot
below the side clip, and twist
it to pry off the clip (21).
Remove both side clips.
c Tilt the back panel up, then
remove it from the film holder
(22). Remove the jammed
cap and negative.
d To replace the back panel,
insert the end of the panel
under the lip of the roller
cover (23), then lower the
panel into position.
e Hold the back panel in
position, and replace the side
clips.
If the
Metal cap and envelope
misaligned:
the envelope and the metal
clip may become misaligned
(24). If the metal clip and
tape on the back of the
envelope are not parallel, tap
the length of the cap lightly
against a flat, solid surface.
If mishandled,
19 Warranty
Your Polaroid 545 Pro Film
Holder has been thoroughly
tested and inspected before
shipment. All parts are
guaranteed against defects in
materials and workmanship
for one full year from the date
of original purchase. During
this period, any such defects
will be remedied by Polaroid
Corporation without charge,
except for transportation
costs.
Damage resulting from
normal wear, mishandling or
accident will be promptly
repaired at a reasonable
charge. To make returns pack
the holder carefully in it’s
original shipping carton or
other sturdy container with
plenty of padding and ship it
prepaid to your nearest
Polaroid Office (see list on
back page).
Page 13

nopqrs
klm
1
d
c
ba
e
g
f
h
j
i
Page 14

23
45
67
98
Page 15

10 11
12 13
14 15
1716
Page 16

18 19
20 21
22 23
24
 Loading...