

Page 1

A Guide to Using Polaroid
4 x 5 Sheet Films
For people who work in a variety of ways.
Tips, techniques and inside information designed to help you
get consistently good results with Polaroid 4 x 5 sheet films.
4 x 5 Sheet Films
What’s inside
w Processing tips relating to 4x5
films and proper use of 545
family of film holders
w Polaroid 4x5 films: The big
picture
w The inside story abut 4x5
instant film
w The 3 critical keys to quality
images
w Storing, handling, loading
and processing Polaroid films
w If it’s hotter or colder than
o
F (24oC)...
75
w Film processing: How
fast to pull...and how to get
it straight!
w Type 55 P/N film:
Positive approaches to good
negative results (peeling
techniques; sodium sulfite
solutions)
w Making sure your prints
and images last a long time
w Picture problems
and problem prevention
w Toll-free help and technical
assistance
Page 2

Polaroid 4x5 films:
The big picture
Please keep this booklet
within reach of your
Polaroid Model 545
film holder
The information in this booklet
is designed to help experienced
and occasional users of
Polaroid 4x5 sheet films get
good pictures... avoid some
common picture-taking
errors...perform a
few simple, routine, preventive maintenance checks... and
get expert assistance when
needed.
This booklet covers in
quick reference form much
of the material contained
in the instructions originally
packed with the Polaroid
Model 545 film holder. Please
consult those instructions
when first learning to use the
film holder.
Film Data Sheets covering
most Polaroid films used for
business, technical, medical
and professional applications
are available at no charge on
the Web at www.polaroid.com.
Polaroid 4x5 sheet films for
use with the Model
545, 545i, and 545 Pro film
holders
Color
Type 59, Polacolor ER,
(ISO 80/20
Type 64, Polacolor Pro T ungsten
(ISO 64/19
Type 79, Polacolor Pro 100
(ISO 100/21
Polacolor Pro 100
(International only)
(ISO 100/21
o
)
o
)
o
)
o
)
Black & White
Type 51, High Contrast
Positive/Negative
(ISO 640/29
ISO 400/27
ISO 80/20
ISO 50/18
Type 52, Fine Grain
(ISO 400/27
Type 53, Medium Contrast
Coaterless (ISO 800/30
Type 54, PolaPan 100
Coaterless (ISO 100/21
Type 55, Positive/Negative
(ISO 50/18
Type 56, Sepia (ISO 400/27
Type 57, High Speed
(ISO 3000/36
Type 72, PolaPan 400
(ISO 400/27
o
Positive/Daylight;
o
Positive/Tungsten;
o
Negative/Daylight;
o
Negative/Tungsten)
o
)
o
)
o
)
o
)
o
)
o
)
o
)
Polaroid 4x5 sheet films
are available in two types:
instant and wet-process
(E6) films. These 4x5 films
are used in the Polaroid
Model 545 film holder.
The Model 545 film holder
is designed to fit most
4x5 field and view cameras;
microscope and oscilloscope
cameras; the Polaroid MP-4
camera; and the Polaroid
CU-5 4x5 camera. (See note
below.)
If you use Polaroid instant
pack films
A similar booklet is available
to users of Polaroid 3
4x5 and square-format pack
films. To obtain a copy, call
Polaroid T echnical Assistance
at the toll-free number given
on page 2.
1/4 x 4
1
1/4,
Note
The image area of Polaroid
4x5 instant films used
with the Model 545 film holder is off-center about 1/8 in.
(3 mm) toward the thick end
of the holder. For extreme
accuracy with 4x5 cameras
making test shots is
recommended so that the
exact image area can be
marked on the ground glass.
On the Polaroid MP 4
camera this area is marked
on the ground glass.
Page 3

The inside story about 4x5 instant films
Technical Assistance & Film
Data Sheets
For further information
about Polaroid 4x5 sheet films,
or for information about other
Polaroid films, products, and
applications,
call toll-free from within
the U.S.A. at 800-225-1618
Monday through Friday,
8 a.m. to 8 p.m., Eastern time.
Or, write to:
Technical Assistance
Polaroid Corporation
201 Burlington Rd.
Bedford, MA 01730
For assistance outside the
U.S.A., consult your nearest
Polaroid Office.
Film Data Sheets covering
most Polaroid films used for
business, technical, medical
and professional applications
are available at no charge on
the Web at www.polaroid.com.
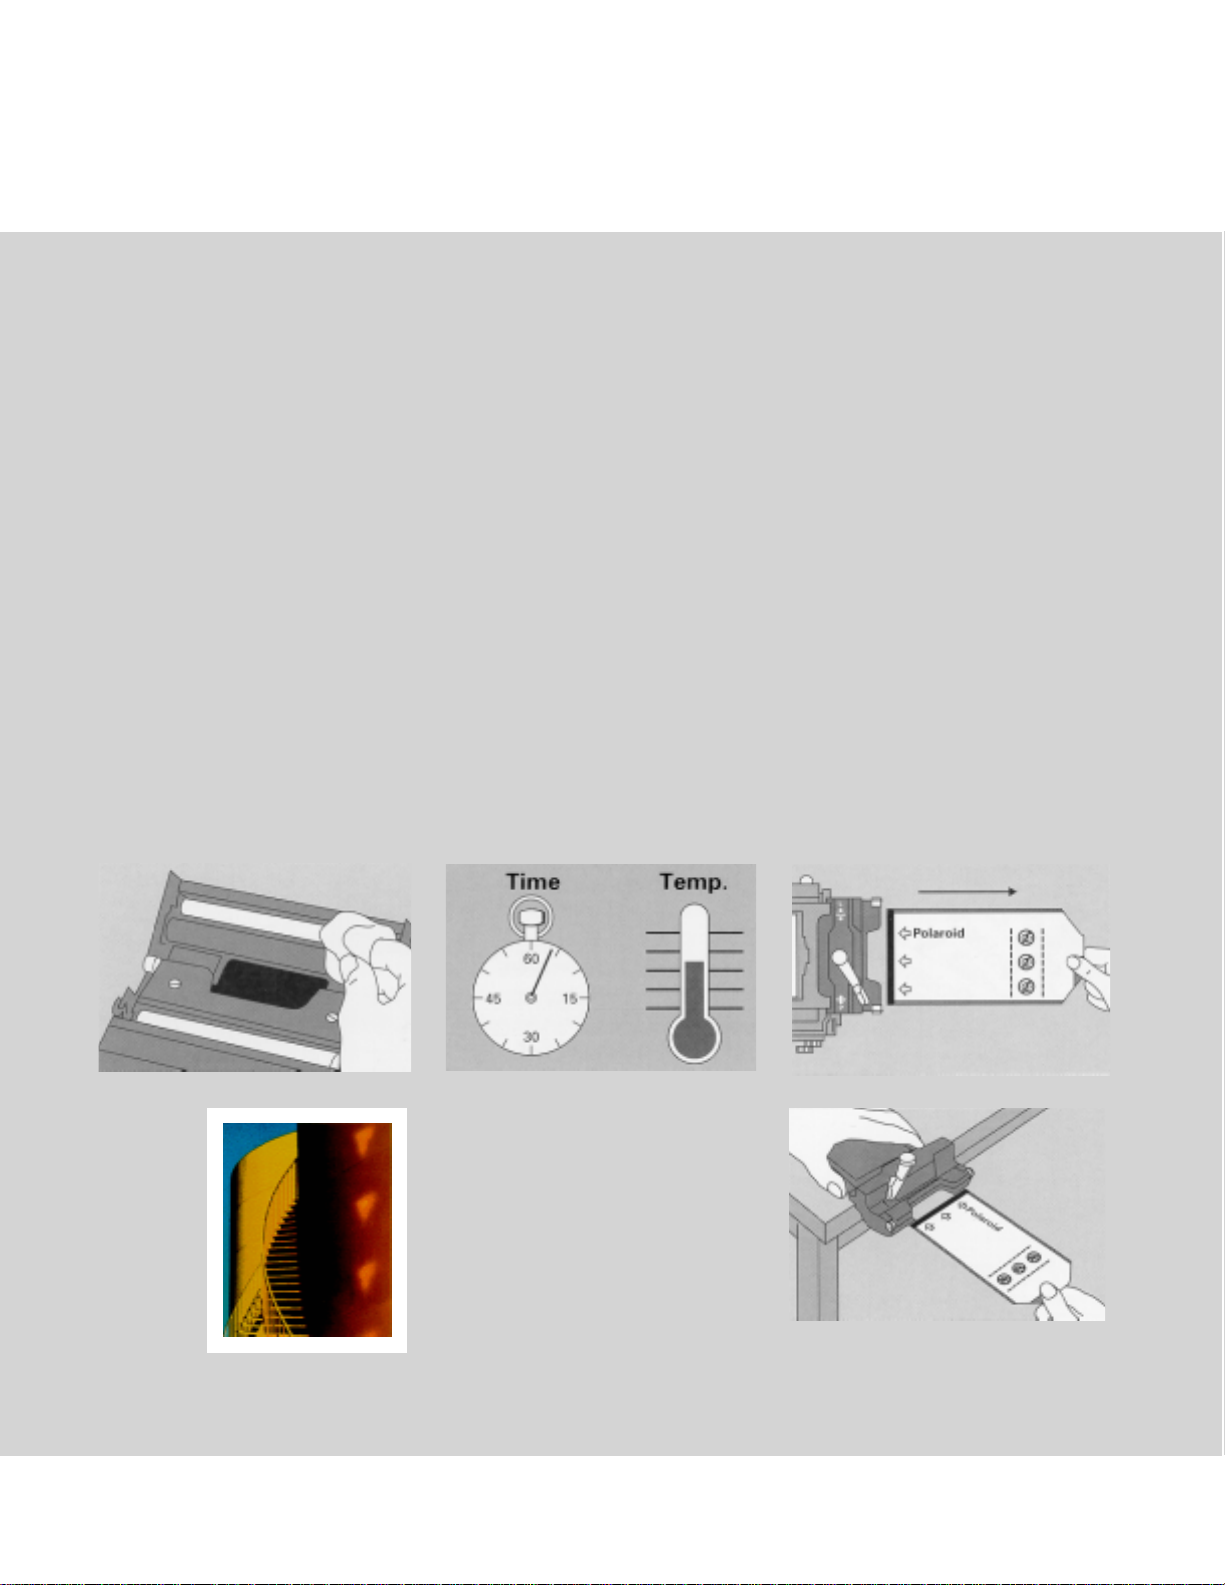
How the system works
Each Polaroid instant
4x5 sheet film envelope
contains all the elements
needed to produce an instant
picture. Inside, there is a
film assembly consisting of
a light-sensitive negative,
a positive sheet, and a pod
containing the developer.
The rollers inside the
Polaroid Model 545 film
holder are used to break the
pod and spread the developer between the exposed
negative and positive sheet.
Clean rollers are important
in achieving a smooth, consistent spread; they should
be inspected and cleaned regularly to assure high quality
results. (See page 12.)
Exposing and processing
The positive sheet is withdrawn during exposure, then
re-mated with the negative
inside the envelope before
processing.
Pulling the envelope drags
the film assembly negative,
pod, and positive sheet
between the rollers. The pod
bursts open and the
developer is spread between
the positive and negative.
It is important to pull the film
straight and at a steady,
moderate speed to cause the
developer to spread evenly.
(See page 3.)
Development begins
immediately, outside the film
holder. After the proper
processing time, the finished
picture is peeled away from
the negative. (See page 5 for
important tips about handling
developing pictures.)
2
Page 4
The 3 critical keys to quality instant images
1
Keep the processing
rollers in the
film holder clean
Make it a habit to inspect
and clean the roller surfaces
regularly, and especially
before each picture-taking
session.
Cleaning the rollers is easy.
Use a soft, non-abrasive
cloth, moistened with water
if necessary. Dry the
rollers thoroughly before
use. Do not use alcohol
or other cleaning fluids, and
never scrape the rollers
one
with a hard object or with
your fingernails.
The Model 545 film holder
instruction book contains
details on locating and cleaning the rollers. If you need
further information, please
call us at the toll-free number
on page 2.
2
Note the temperature...
and time development
accurately
You can take Polaroid
pictures at any temperature.
But, processing time and
the temperature of the film
at the time of processing affect
picture quality. Ideally,
Polaroid films should
be processed at about 75
o
C). If the temperature
(24
is much higher or lower,
you may need to adjust processing times and/or
exposure settings for best
results. Make it a habit
two
to check the Film Data Sheets
located on the Web at
www.polaroid.com for more
information.
o
F
3
Pull the film straight
Always pull the film
envelope straight out of the
film holder. The film
should be pulled parallel to
the film holder. If the
camera is positioned so that
it is difficult to pull straight,
remove the film holder,
if possible, for film pulling.
Pull at a steady, moderate
speed. Saying the word
Polaroid is a good way to
time the speed of the pull.
three
3
Page 5

Storing, handling, loading and processing Polaroid films
Note the film
expiration date
Always use Polaroid film
before the expiration
date stamped on the package.
Outdated film may not
produce satisfactory results,
and is not covered by
the Polaroid film warranty.
Storage recommendations
& cautions
w Store Polaroid film in a cool,
dry place. Unopened film may
be refrigerated in its sealed
wrapper. Do not freeze film.
w Before opening film that
has been refrigerated, allow it
to reach room temperature.
This will take about 2 hours.
w Avoid leaving film or a
loaded film holder in direct
sunlight, or in a hot, humid
place, such as the trunk
or glove compartment
of a car. High temperatures
and humidity can affect
picture quality.
w Store unused Polaroid
4x5 sheet film flat in a dry,
cool place.
When loading film
w Keep the film sealed in its
tray until you are ready
to use. Tear open the tray
along the printed arrow.
w Lift the film envelopes
out of the film tray carefully
so the metal end caps dont
catch on other envelopes.
If you accidentally pull off an
end cap, discard that film
sheet. (See page 12.)
w Always hold film envelopes
by their edges to avoid
damaging film surfaces or the
pod of developer inside.
w Set the control arm on
the film holder to L before
attempting to insert the
film envelope.
w Avoid loading the film back-
wards (note the printing
on the film envelope). Be sure
the envelope side marked
This side toward lens faces
the lens. If the film is loaded
backwards, the envelope will
come all the way out of the
film holder when withdrawn
to make an exposure. (If this
happens, turn to page 13
for instructions.)
w Insert the film envelope
straight into the film holder,
being careful not to buckle
the envelope. Then, slowly
withdraw the envelope until
it stops.
4
Page 6
Storing, handling, loading
and processing Polaroid films
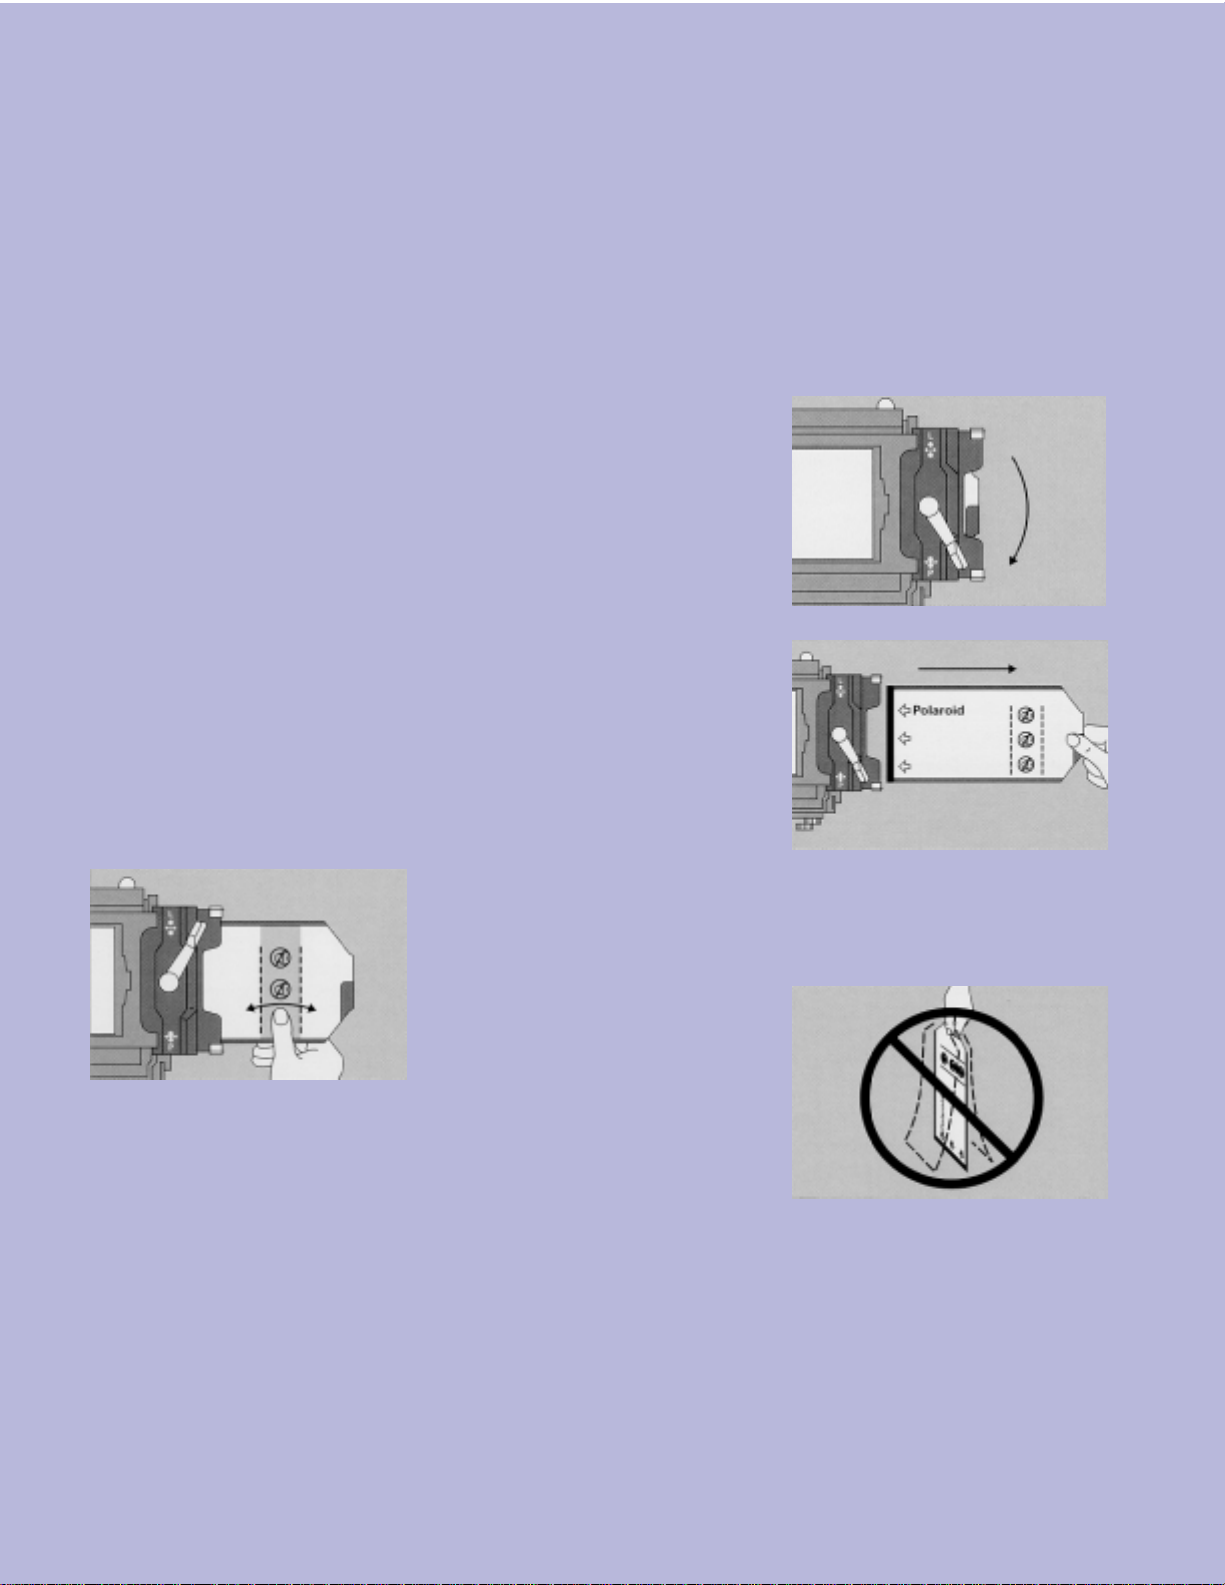
Before making an
exposure
w Make it a habit to test to be
sure the film has engaged
properly in the film holder.
After inserting the film envelope, and withdrawing it
prior to making the exposure,
gently run your finger and
thumb over the area marked
Do Not Press Here,
as shown. It should be flat.
If you can feel the pod
of dev elope r, the film i s not
engaged properly. Reinsert
the envelope and test again.
If the film does not engage
in the holder properly, an allblack picture (no exposure)
may result.
Important
If you have repeated trouble
engaging film envelopes,
your film holder may need
adjustment. If your holder is
several years old or has been
subjected to heavy use, you
may want to consider replacing it with an updated model.
Call us for further information, toll-free: 800-225-1618,
Monday through Friday,
8 a.m. to 8 p.m., Eastern time.
When processing film
Instant films
w After making the exposure,
push the envelope all the way
in until the tabs are aligned
with the edge of the film
holder. Use moderate pressure, but dont force it. If
the envelope does not slide all
the way in, withdraw it a
little, and try again.
w Move the film holder control
arm to P before pulling the
envelope out to start instant
film processing.
w Remember that you
can remove an exposed sheet
of film without processing
it, if temperature or other
conditions make it desirable
to process the film later.
(See page 8.)
w Handle developing pictures
with care. Hold them only
at the tab end or lay them flat
on a table. Never wave or
bend the film while it is developing, and never touch the
image area, otherwise image
quality may be affected.
5
Page 7

Questions? Problems? Call
us, toll-free:
800-225-1618
Many common instant picturetaking problems are discussed
on pages 11 - 14. But...if you
cant find a solution to a
problem you might be having,
or if you have a question, or
need information, please call
us. Chances are we can help.
The call is toll-free, and
we can be reached Monday
through Friday, 8 a.m.
to 8 p.m., Eastern time.
w At the end of the specified
development time, open
the envelope as shown. Then
hold the negative in place
while quickly lifting off the
print. Peel the print away
from the negative rapidly and
smoothly to avoid causing
streaks on the image area.
(See special tips for using
Type 55 Positive/Negative
film on page 9.)
w Please note the Caution
statement printed on Polaroid
film packages:
Caution
This process uses a caustic
paste. Avoid contact
with skin, eyes and mouth
and keep away from
children and animals. If you
get some paste on your
skin, wipe it off immediately
and wash with water to
avoid an alkali burn. If eye
or mouth contact occurs,
quickly wash the area with
plenty of water and see
a doctor. Keep discarded
materials away from
children, animals, clothing
and furniture.
w Please dispose of used nega-
tives and packaging properly.
6
Page 8

If it’s hotter or colder than 75oF (24oC)....
You can take Polaroid instant
pictures at any temperature,
but when processing Polaroid
films, you should be aware
of the temperature since it can
affect picture quality.
The developer in each sheet
of film is designed to work
best at about 75
By minimizing temperature
variations when processing
pictures you will get more
consistent results.
At temperatures higher
or lower than 75
may be necessary to adjust
processing time and/or exposure settings to achieve
optimum results. Always refer
to the Film Data Sheets
located on the Web at
www.polaroid.com for the
latest information about
adjusting processing times
according to temperature.
o
F (24oC).
o
F (24oC), it
Normal development
Overdeveloped
Underdeveloped
7
Page 9

w At low temperatures, keep the
film warm, under your coat
or in a heated car or room.
Place developing film in a
warm place, such as a heated
car or under your coat, being
careful not to bend or crush
it. Or, wait until you are
in a warm place before developing each picture. (Allow
film exposed to cold to warm
up to room temperature
before processing.)
w At high temperatures,
keep your film in the shade,
or in an air-conditioned
car or room, or in a picnic
cooler, before exposure.
Wait until you have reached
a cool place before developing each picture.
w Never wave developing film
back and forth in an attempt
to keep it warm or cool;
this could adversely affect
image quality.
If it’s very hot or cold,
process your film later
When using Polaroid 4x5
instant sheet films in hot
or cold locations, remember
that you can remove the
exposed film for processing
later, under more optimal
conditions. Heres how:
1
After exposure, reinsert the
envelope all the way into
the film holder as you would
normally. Do not move the
control arm to P.
2
Remove the film holder from
the camera.
3
Depress the film release
lever R.
4
Keep the lever depressed and
turn over the film holder.
Gently push the film envelope
out, as shown, until the metal
cap is visible.
5
Grasp the end of the envelope
and pull the film all the
way out of the film holder.
Mark exposed film envelopes to prevent re-exposing
them by mistake.
To process the film, reinsert
the envelope all the way
into the film holder. Move the
control arm to P, and
pull the envelope all the way
out in the normal manner.
8
Page 10

Film processing: How fast to pull...
and how to get it straight!
Type 55 P/N film:
Positive approaches to good negative results
To assure consistently
well-processed images
Always pull the film straight
out of the film holder. The
envelope should be pulled
parallel to the film holder.
Pulling at an angleup or
down, or forward or backwardcan cause marks and
streaks on pictures.
(See page 11.)
If the camera is positioned
so that it is difficult to
pull straight, or if film pulling
would disturb the camera
set-up, remove the film
holder, if possible, for pulling.
The speed at which
you pull is very important
Pull at a steady, moderate
speed. Saying the word
Polaroid is a good way to
time the speed of the pull.
Pulling too rapidly can cause
white specks in images and/or
angle pull. Pulling too slowly,
or stopping or hesitating,
can cause streaks on pictures
(See page 11.)
First things first
Prepare an 18% sodium
sulfite clearing bath before
exposing the film. See
the instructions for mixing
this solution on page 10.
Peeling techniques
After opening the film
envelope at the end of the
development time, hold
down the negative with your
left thumb, as shown.
Quickly peel away the print
and the thin paper mask. Pull
hard so the print and mask
separate completely from the
negative. Remove the mask
from the print, and discard
the mask.
Hold the negative by the tab
end. (Dont touch the damp
face of the negative.)
Flex the perforation near
the metal clip, then tear
off the metal clip along the
perforation.
Please note the Caution
printed on Polaroid film
packages. (See page 6.)
Immerse negatives in an
18% sodium sulfite solution
immediately. Use film hangers, such as Kodak #6 or 4A,
to keep negatives apart
in tanks, or clear negatives
individually in trays.
9
Page 11

Sodium sulfite solutions
The negatives produced with
Type 55 Positive/Negative
black & white film must be
cleared of the residual
developer layer, if they are to
be saved and printed. It is
recommended that this be
done immediatelywithin 3
minutesto prevent staining.
Negatives should be
immersed and agitated in an
18% sodium sulfite solution
for approximately 1 minute,
being careful not to let them
come in contact with each
other. Occasionally, it may be
necessary to gently rub off
the developer layer with your
fingers or a damp sponge.
Keep in mind that, at first, the
negative emulsion is soft
and can be damaged easily.
After treating the negative in
the sodium sulfite solution,
tear off the tab from the negative along the perforation.
Flex the perforation beforehand to make it tear easily.
After clearing, negatives
should be washed in running
water for at least 5 minutes.
(Negatives may remain in the
sodium sulfite solution for
up to 72 hours, if immediate
washing is inconvenient.)
If you are in a hurry to print
a negative, wash the negative
for about 30 seconds before
use, then wash thoroughly
again later.
To avoid drying marks
after washing, dip negatives
in a wetting agent, such as
Kodak Photo-Flo (diluted at
least 1:600), before hanging
up to air dry in a dust-free
area. Use film hangers or
wooden clothespins to hold
the negatives while drying.
All solutions and wash water
should be nearly the same
temperature, ideally 65-75
o
C).
(18-24
When dry, negatives can be
retouched and printed using
conventional techniques.
Don’t use fixers and
hardeners
Polaroid does not recommend
the use of hardeners or commercial fixers, since the chemistry of these solutions may
damage the negative emulsion.
o
F
If you are shooting on
location or do not
have immediate access
to sodium sulfite
Developed negatives
may be safely stored in water
(at about 70
a few hours. While they are in
water, handle them carefully
and do not attempt to rub off
the developer layer. Treat
the negatives in sodium sulfite
as soon as possible.
More about sodium sulfite
Sodium sulfite powder is
readily available from professional photographic dealers
and chemical supply houses.
Mix with water in the following proportions:
Warm water
2 Liters
(70 fluid oz.)
Sodium sulfite
(anhydrous/desiccated)
440 grams
(16 oz. avdp.)
Be sure all of the sodium
sulfite is dissolved before
using. Store the solution in
brown, well-stoppered
bottles or in a tank with a
floating lid. Discard the
solution when it becomes
discolored.
The sodium sulfite solution
produces white, harmless
deposits if it is allowed to dry
on hands, clothes and other
surfaces. These can be cleaned
with water.
If you need further
information about processing Polaroid
Positive/Negative films,
please call us, toll-free:
800-225-1618.
o
F, 21o C) for
10
800-225-1618
Page 12

Making sure your prints and
images last a long time
Picture problems & problem prevention
w Always use your film before
the expiration date stamped
on the package.
w Process exposed film
promptly.
w Be aware that development
time and the temperature of
the film at the time of
processing affect picture
quality. Ideally, Polaroid
films should be developed at
o
about 75
w Allow color pictures to
dry thoroughly before
stacking them or touching
the image areas.
w Black & white pictures
that require coating should
be print-coated immediately
to protect them from
scratches and fading. Use
six to eight overlapping
strokes to fully coat each
image.
F (24oC).
w Handle coaterless black &
white prints with care while
they are drying.
w Avoid writing directly on
prints. If necessary, write
only in the border area,
using a soft pencil, china
marker, or a felt-tip pen
designed for use with
photographic materials.
w To preserve prints, protect
them from exposure to direct
sunlight, high heat and
humidity, chemicals and
chemical vapors, and excessive or rough handling.
w For long term storage, use
seamless envelopes or
sleeves made of acid-free
paper, cellulose acetate,
polyethylene or polyester.
Avoid using glassine
envelopes, PVC plastic,
ordinary black album paper,
brown Kraft paper
and cardboard.
Pictures with missing
corners, and/or streaks and
marks, are usually the
result of pulling the envelope
crookedly, at an angle, from
the film holder. See page 9.
Pictures with small white
specks in the image area are
often caused by pulling
the envelope out of the film
holder too rapidly. Pulling
too fast may also cause
a mottled appearance in
color photographs.
Prevention
Preservation
11
Always pull the film at
a moderate speed. Saying
the word Polaroid is a
good way to time the speed
of pulling.
Page 13

Pictures with evenly
spaced spots or streaks are
usually caused by dirty
rollers inside the film holder.
Typically, the pattern is
repeated across the picture
surface because dirt or other
particles are stuck to one or
both rollers. The rollers
should be cleaned regularly
to prevent this problem.
Important notice for high
volume film users
If your film holder is several
years old or has been subjected to heavy use, you may
want to consider replacing it
with an updated model to
ensure consistent, trouble-free
results. For further information, please call Polaroid
Technical Assistance
(See page 2).
Problem: Black picture
(no picture)
A picture that is totally
black usually indicates that
no exposure was made
no light reached the film.
There are several possible
causes:
Equipment problem
w The camera shutter may
not be working.
w The flash may have failed
to fire, resulting in a severely
underexposed picture
(which may appear all black).
Check your flash unit
and sync mechanism; allow
sufficient recycle time
between flash exposures.
Operator mistakes
With some photographic systems occasional oversights
will result in a black picture:
w A black picture may result if
the film does not engage
properly in the film holder.
(See page 5.)
w Wrong exposure setting: lens
aperture too small; shutter
speed too fast; incorrect flash
exposure guide number;
incorrect film speed setting
(for example, using ISO
o
color film in a camera
80/20
system set for ISO 3000/36
black & white film).
Problem: White picture
(fogged)
A picture that is totally white
usually indicates that the film
was severely overexposed, or
light-struck or fogged
exposed to light outside of the
film holder.
There are several possible
causes:
Handling errors
w Withdrawing the film
envelope with the processing
lever at L while the
film holder is off the camera.
w Removing the metal end cap
from a film envelope, then
replacing it, or other handling
mishaps which damage the
film envelope.
Operator mistake
An occasional oversight
may result in white pictures.
For example, a wrong
exposure setting: lens aperture
too large; shutter speed too
slow; incorrect flash exposure
guide number; incorrect film
speed setting (using ISO
o
3000/36
in a camera system set
for ISO 80/20
Equipment problem
w The camera shutter may not
o
black & white film
o
color film).
be working properly.
w The camera system has
developed a light leak, or
the film holder is not
mounted correctly.
Problem: Overexposed
pictures (too light)
Pictures with faint, washed
out images usually indicate
that the film was overexposed
too much light reached
the negative. Check the camera settings.
Problem: Underexposed
pictures (too dark)
Pictures that are too dark
overall, or in which the main
subject appears as a silhouette
with little or no detail, usually indicate that the film was
underexposedtoo little
light reached the negative.
Check the camera settings.
Problem: “Solarized” negative (Type 55 P/N film)
If type 55 P/N film
is processed for too short a
time, the negative may be
re-exposed to light when the
film envelope is opened.
Always time development
accurately and adjust
the time according to the
temperature of the film
at the time of processing.
12
Page 14

If something jams in your film holder and you
can’t get it out
Problem: Envelope
comes all the way out
before exposure
If the film envelope ever
comes all the way out
of the film holder when it is
withdrawn to make an
exposure, that film sheet
will be fogged.
Remove the rest of the
film assembly by following
these procedures:
1
Open the hinged roller cover,
as shown.
2
Disengage the top roller.
3
Move the control arm to P.
4
Pull the film negative
assembly out of the holder.
If a metal end cap or some
other part of a Polaroid
4x5 film envelope becomes
jammed inside your film
holder, you may be able to
free it, quickly and easily, by
disassembling the holder
if youre willing to carefully
follow a few simple steps.
Please read all the way
through these instructions
before you begin. Be sure
that you can clearly
identify the various parts of
the film holder and that
you have the recommended
tools. While its easy to
take the holder apart and fix
the jam, its important
that the holder be reassembled correctly to assure
proper operation.
If you do not wish to
fix the film holder
yourself, or if you would
like further information
about the steps involved,
please call us, toll-free:
800-225-1618, Monday
through Friday, 8 a.m. to
8 p.m., Eastern time.
To disassemble the
film holder
You will need a small screwdriver (to pry off the side
clips) and a large paper clip
(to hold a piece in place
during re-assembly).
1
Move the control arm to L.
2
Pry off the two side clips on
the edges of the film holder.
3
Open the roller cover and
swing the top roller out of
the way.
4
Lift off the aperture plate,
as shown. Be careful not to
lose the envelope latch
mechanism (see next page).
5
Any metal end cap or
other material that jammed
in the holder should now
be visible and easily removed.
13
Page 15

To reassemble the
film holder
1
Place the aperture plate on
a flat surface with the springs
facing up.
2
Locate the envelope latch
mechanisma thin strip of
metal. Place it on top of
the short ends of the springs,
as shown, and press it
down into the groove at the
top of the aperture plate.
Secure it in place with the
large paper clip, as shown.
3
Turn the aperture plate
over and seat it properly in
its groove on the holder.
Make sure the springs are
not twisted or caught.
4
Re-attach the side clips.
Then, remove the paper clip.
Your film holder should
now function properly.
5
Before taking pictures,
inspect the rollers to be sure
they are clean.
14
Page 16

How to get consistently good results with
Polaroid 4x5 sheet films
3 things you need to know
When loading film
1
Keep processing
rollers clean.
Clean rollers regularly—
before each picture-taking
session.
Use soft, non-abrasive
cloth, moistened with
water.
2
Note temperature.
Time accurately.
Take Polaroid instant pictures at any temperature.
But...temperature of film
at time of processing
affects instant picture
quality. Instant films
should be processed at
about 75
the Film Data Sheets on the
Web at www.polaroid.com
for latest time/temperature
processing information.
After taking each picture
o
F (24oC). See
3
Pull envelope straight,
at moderate speed.
Pull film straight out of
film holder. Avoid camera
positions that make
pulling awkward. Remove
and place film holder
on flat surface for film
pulling, if possible.
Always pull at steady,
moderate speed.
1
Handle film envelopes by
edges to avoid pressure
on pod.
2
Move control arm to “L”.
3
Insert envelope straight
into holder all the way.
(Note printed instructions
on envelope.) Then,
slowly withdraw it until
it stops.
4
Test to be sure film
has engaged properly
in holder.
Gently run finger and
thumb over area marked
“Do Not Press Here”.
It should be flat.
If not, reinsert envelope
and test again.
1
Push envelope all the
way in.
2
Move control arm to “P”.
3
Pull envelope straight
out of holder at moderate
speed to start development.
Handle developing film
only at tab end or lay flat
on a table. Never wave,
bed or squeeze film.
4
Time development of
instant film accurately,
according to information in
the Film Data Sheets at
www.polaroid.com.
5
After specified
development time, open
envelope. Peel print
rapidly and smoothly.
Please note the “Caution”
printed on Polaroid film
packages (see page 6).
Quick Tips
Page 17

To remove exposed
film for processing later
After processing pictures
1
After reinserting envelope,
do not move control
arm to “P”. Remove holder from camera.
2
Depress lever “R”.
Picture problems &
problem prevention
“Missing” corner, and/or
streaks and marks,
indicates film was pulled
crookedly, at angle, from
film holder.
Always pull film straight.
White Picture
White picture indicates
film was severely overexposed, or light-struck
or “fogged”—exposed to
light outside of envelope
or film holder.
3
Keep lever depressed.
Turn holder over and push
envelope out, as shown,
until metal cap is visible.
Evenly spaced spots
or streaks indicate rollers
inside film holder
are dirty. Clean rollers
regularly.
Possible causes:
w Withdrawing film enve-
lope with the processing
lever at “L” while the film
holder is off camera.
w Removing metal end cap
from a film envelope.
w Wrong exposure setting.
w Equipment problem.
4
Pull envelope out of
film holder.
Mark exposed film
envelopes to prevent
re-exposure.
To process, reinsert
envelope, move control
arm to “P”, pull film
straight out.
Small white specks are
often caused by pulling envelope out of film
holder too rapidly.
Always pull film at moderate speed.
Black Picture
Black picture indicates
no exposure was made–
no light reached film.
Possible causes:
w Camera shutter not work-
ing; flash out of synch or
failed to fire.
w Wrong exposure setting.
w Film did not engage
properly in film holder.
w Let color pictures
and coaterless black &
white pictures dry
thoroughly before stacking or touching.
w Black & white pictures
requiring coating
should be print-coated
immediately.
w When using Polaroid
Type 55 Positive/Negative
film, prepare 18%
sodium sulfite clearing
bath before exposing
film. (See Film Data Sheets
at www.polaroid.com.)
About storing film
w Use film before expiration
date on package.
w Do not freeze Polaroid
instant film. Store film in
cool, dry place. Keep
film in sealed package
until use.
Allow refrigerated film
to reach room temperature before opening
(about 2 hours).
Keep film and camera
out of direct sunlight and
hot, humid places.
Toll-free technical
assistance
For help or information,
call Polaroid Technical
Assistance toll-free from
within U.S.A.
800-225-1618
Monday through Friday,
8 a.m. to 8 p.m.,
Eastern time.
PP1388-1
“Polaroid” ®
Printed in U.S.A. 3/92
Quick Tips
800-225-1618
Page 18

Toll-free help and technical
assistance
Information about — and
assistance with using — Polaroid
products is available to all
Polaroid customers. And it’s as
close as your telephone.
Call us toll-free: 800-225-1618.
Monday through Friday,
8 a.m. to 8 p.m., Eastern time
We recommend that you call us
if you encounter any difficulties
with film or your photographic
system. Y ou may also contact
Polaroid through the Web at
www.polaroid.com.
PP1388 1B5563
“Polaroid”, “Polacolor”, “Polapan”
and “Polachrome”
Printed in U.S.A. 3/92
®
 Loading...