

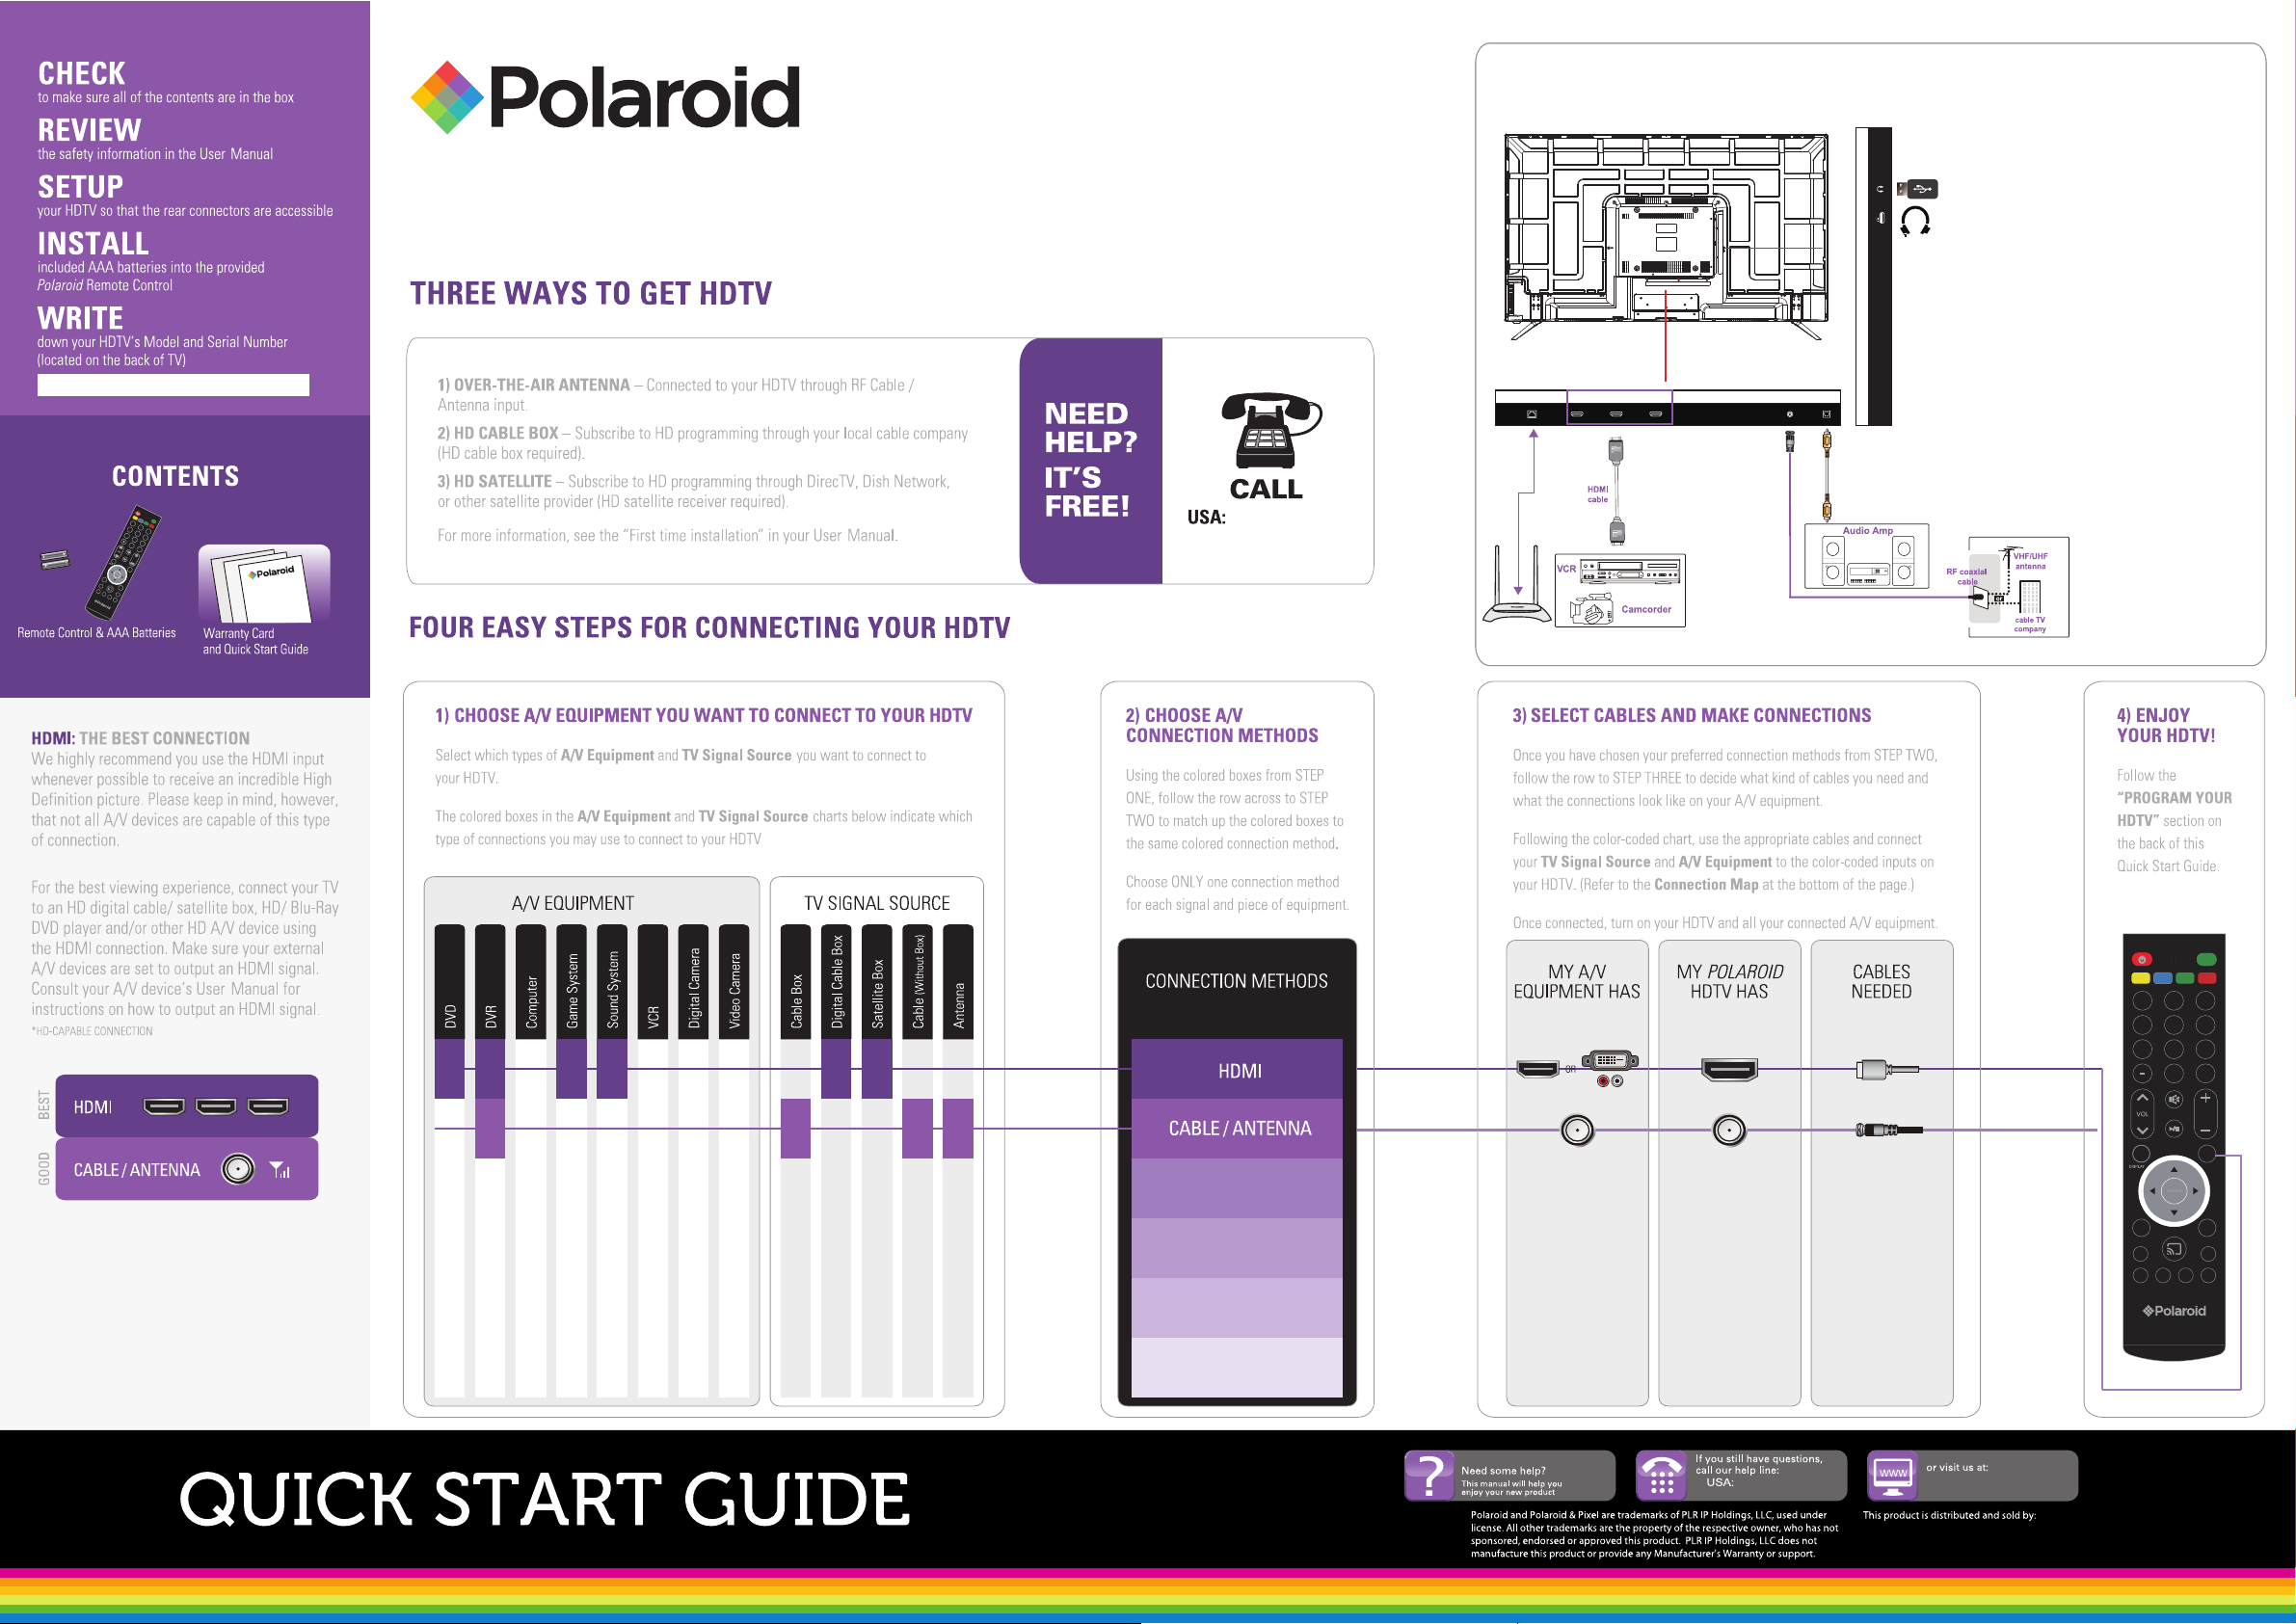
Page 1
EXTERNAL DEVICE CONNECTIONS
You can enjoy picture,sound and a PC
monitor by connecting a DVD player,video
game system or computer to the inputs
located on the rear of the LED TV set.
Digital UHD LED TV 49GSR4100KM
(ARC)
HDMI3 HDMI2
LAN
P.MODE S.MODE SLEEP ASPECT
MTS
123
456
789
0
RECALL
CH
SOURCE
TIXEUNEM
EPG
ADD
.VAFCC
-VAF+VAF
1-888-636-8599
(MHL)
HDMI1
RF OPTICAL
HeadphoneUSB
5V 0.5A
Questions?
1-888-636-8599
www.polaroidhdtv.com
P.MODE S.MODE SLEEP ASPECT
123
456
789
RECALL
0
EPG
.VAFCC
MTS
CH
SOURCE
TIXEUNEM
ADD
-VAF+VAF
Empire Electronic Corporation
5550 Jurupa St, Ontario, CA 91761
Page 2
Digital UHD LED TV 49GSR4100KM
If you need additional information on your new Television, complete instruction manuals are available for reference and download in our SUPPORT section online at www.polaroidhdtv.com
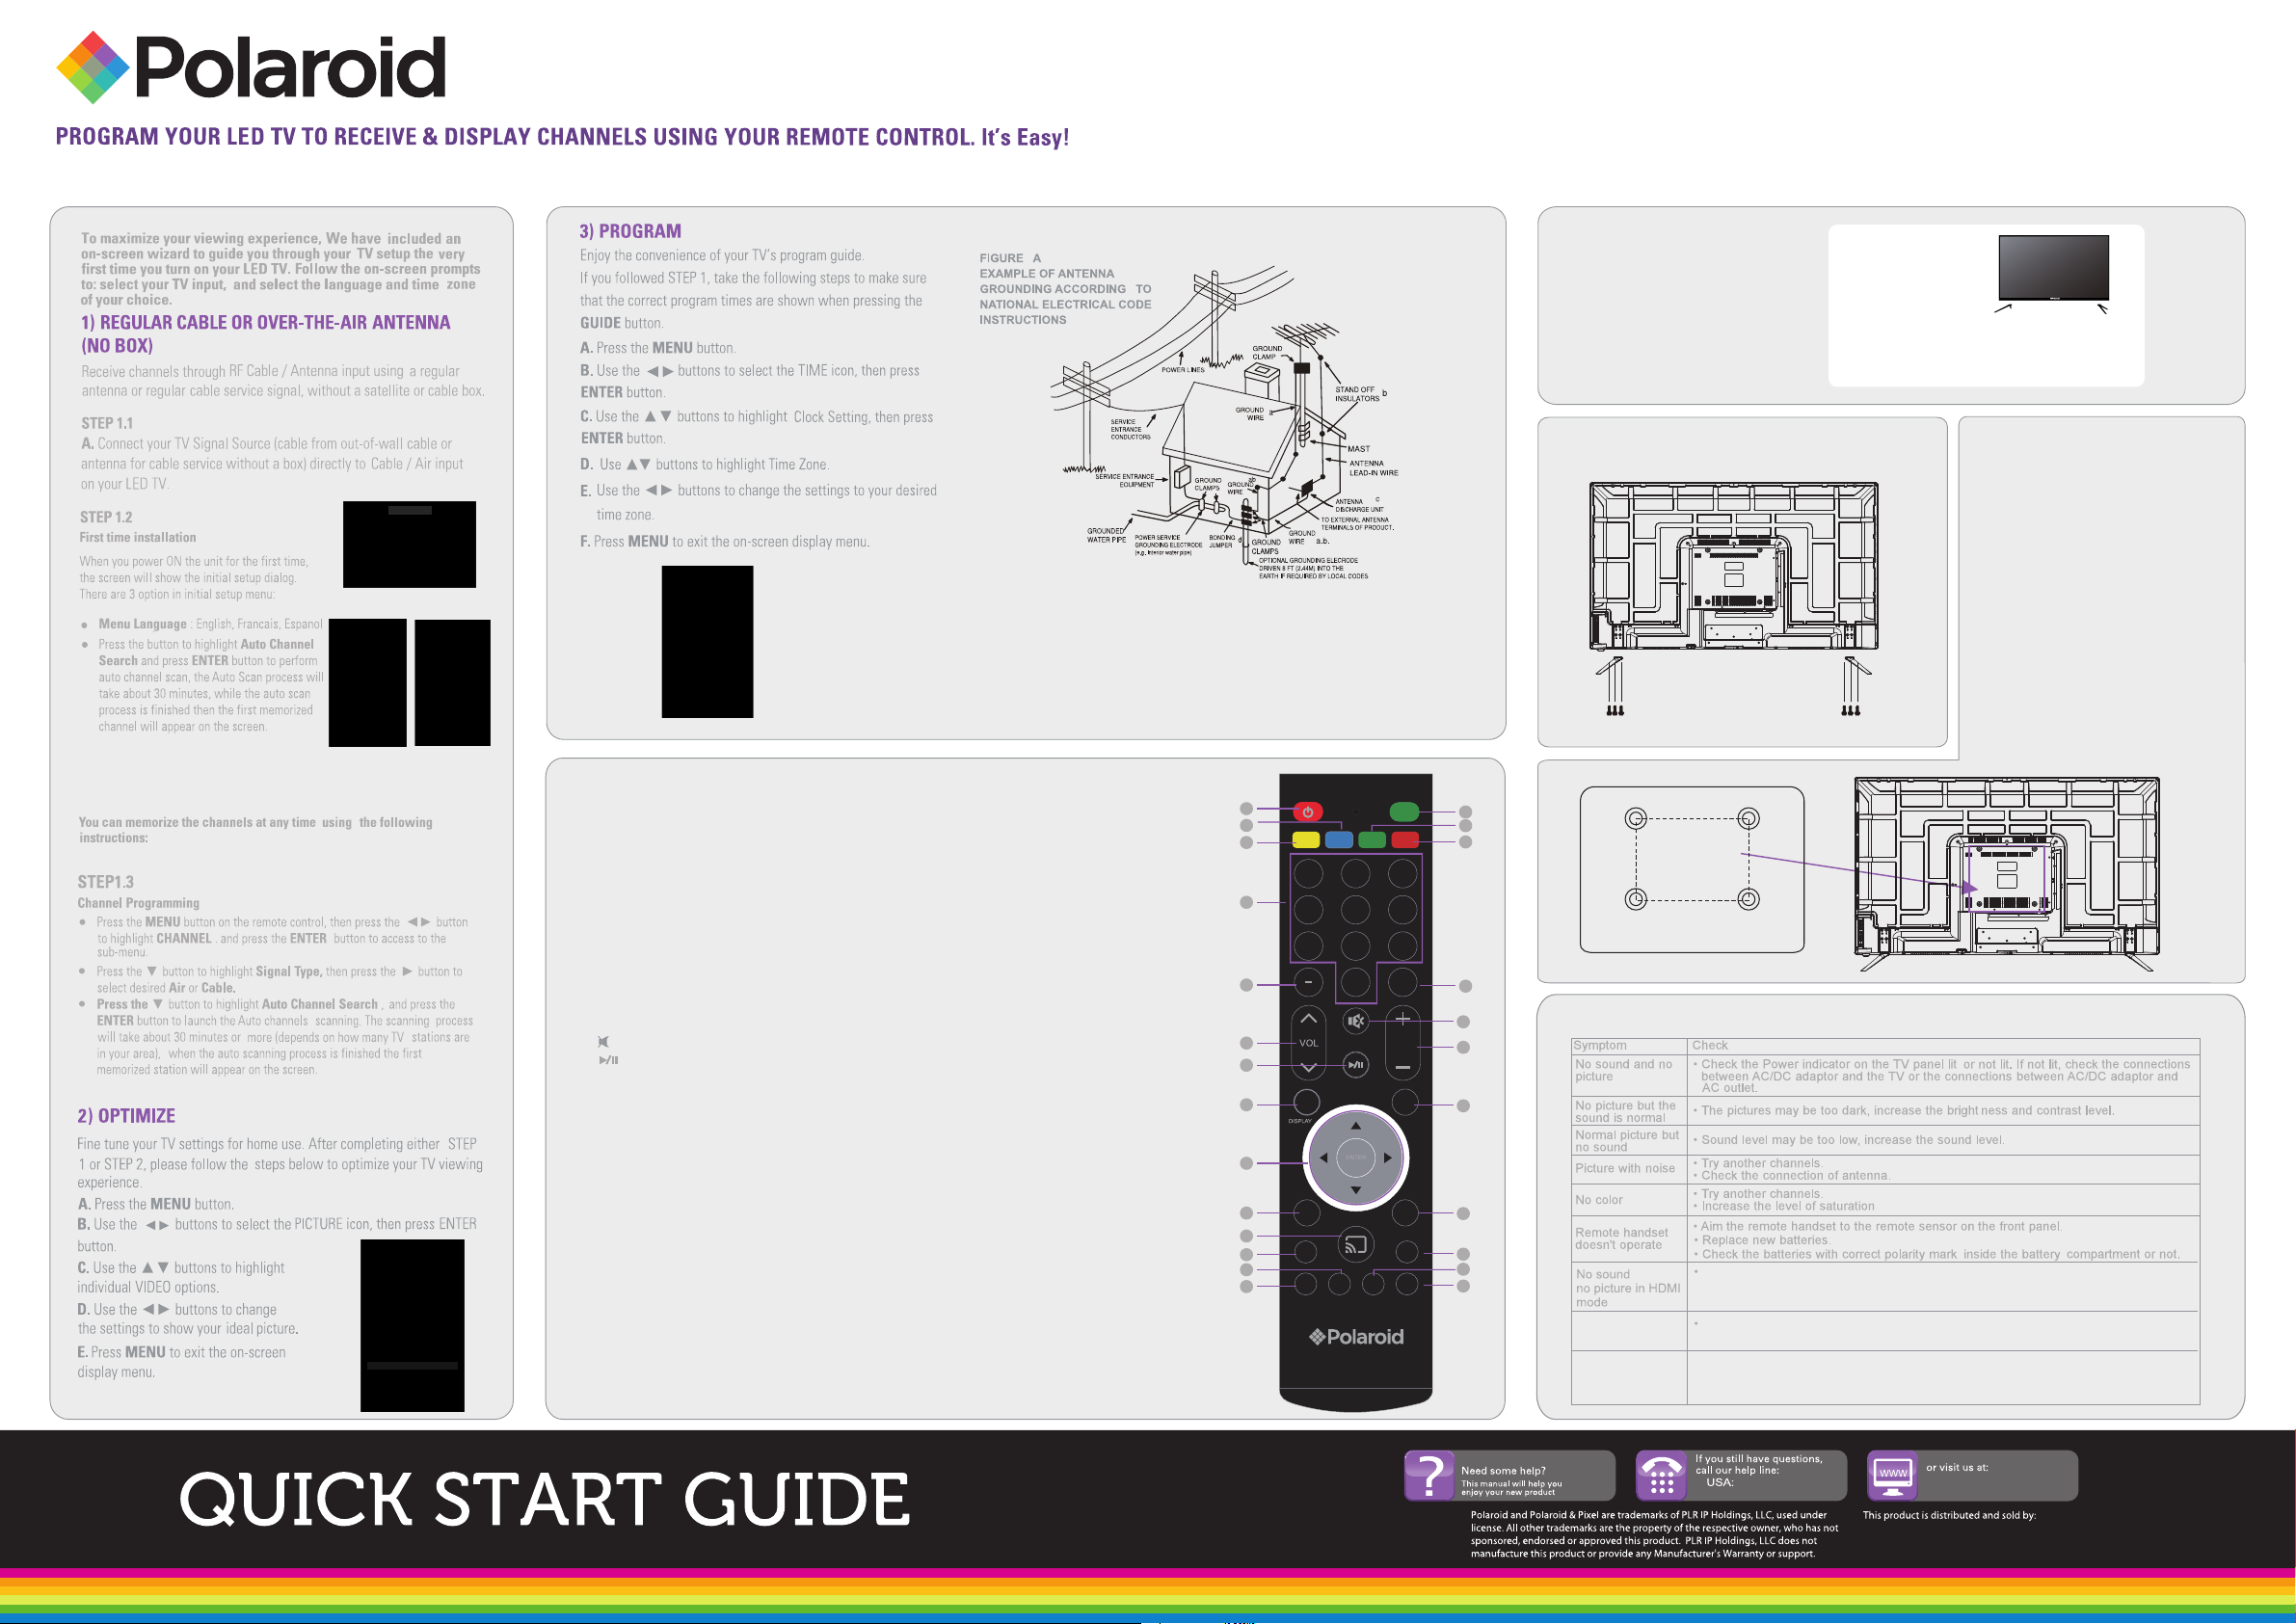
Setup Wizard
IMPORTANT SAFELY INSTRUCTIONS
a.
Use No.10AWG(5.3mm²)copper,No.8AWG(8.4mm²)aluminun,No.17AWG(1.0mm²)
conper-clad steel or bronze wire,or larger,as a ground wire.
b.
Secure antennal lead-in and grounding wires to house with insulators spaced forom
4-6 feet (1.22-1.83m) apart.
c.
Mount antenna discharge uint as close as possible to where lead-in enters house.
d.
Use jumper wire ont smaller than No.6AWG(13.3mm²)copper,or the equivalent,when
a separate antenna grounding electrode is used.
1. POWER Turns the LED TV on and off (standby mode).
2. MTS In NTSC receiving mode, press to select. the audio modes to Mono, Stereo or SAP.
In ATSC Digital receiving mode, press to display the audio selection menu on the screen. Using
the Navigator▲,▼button to select the desire audio mode.
3. S.MODE Sound Mode, press repeatedly to select the presetting sound effect modes.
4. P.MODE Picture Mode, press repeatedly to select the preset picture modes.
5. SLEEP Press repeatedly to activate and/or set the sleep timer.
6. ASPECT Press repeatedly to select the aspect ratio of screen as desired.
7. 0-9 Numeric buttons.
8. —.Select channel with two digits.
9. RECALL Recall Mode.
10. VOL+/VOL- Press to increase or decrease the volume level.
11. CH+/CH- Press to increase or decrease the channel number.
12. Turn off the sound temporary. Press again to turn the sound back.
13. Play/Pause picture.
14. DISPLAY Press to display the information; settings and the status of current mode/station
on the screen.
15. SOURCE Press to display the source menu on the screen. Using the Navigator ▲ or ▼
buttons to select the source as desire then press (ENTER) button to confirm your selection.
16. ▲▼ ►◄/ ENTER Press to move the cursor within the setting menu. ENTER Press the
ENTER button to confirm the selection. Press the "ENTER" button, the check mark
will appear to the channel , and the channel is marked as channel list.
17. MENU Displays the setting menu on the screen.
18. EXIT Press to exit from the setting menu.
19. Google cast Enter cast connect surface
20. EPG Press to display the Electronic Program Guide in digital TV channels(Operation in
ATSC mode only functions on signals emitting from TV station) .
21. ADD In FAV display mode, press to increase or delete the highlighted channel.
22. FAV+.Next favourite channel.
23. CC Press repeatedly to activate and/or set the CC (Closed Caption Display) modes.
24. FAV. Show the list of favorite channels.
25.FAV-.Previous favourite channel.
1
3
4
7
8
10
13
14
16
17
19
20
22
23
P.MODE S.MODE SLEEP ASPECT
MTS
123
456
789
RECALL
0
CH
SOURCE
EPG
.VAFCC
PLEASE READ THIS
BEFORE REMOVING
PRODUCT FROM
THE BOX
Simple Steps for Attaching Your TV Stand
We’ve provided:
A. LED TV
B. Stand
C. Screws
If you prefer to wall mount your
TV, do not attach the stand.
Use the instructions in your
wall-mounting kit (not included).
Mounting on the wall
This unit is VESA-complian,and is
designed to be wall-mounted with
a VESA-compliant 7.87"x7.87"(200
mmx200mm) mounting kit designde
for flat-panel TVs(not supplied).
Mount this unit according to the
instructions included in the monting
kit. Length of screw should not
exceed 10 mm
NOTE
Screws(3)
4*23BMH
2
5
6
7.87"
Screws(3)
4*23BMH
Remove the base stand before
mounting the unit on the wall.
7.87"
Four mounting holes
(Size M6 screw)
9
12
11
15
TIXEUNEM
18
ADD
21
24
-VAF+VAF
25
TROUBLESHOOTING
and / or
The TV turn off
automatically.
Forgotten the
preset parental
lock password
Check and make sure the Video output from the connected device is set to HD (High
Definition) and the Audio output is set to PCM (Plus Code Modulation). For details,
refer to the Instruction Manual of the connected device.
No Signal Auto Power off was set to on, when no was received
within 30 minutes, the TV will turn of f automatically.
Use the master password 1470 to reset a new password.
Questions?
1-888-636-8599
www.polaroidhdtv.com
Empire Electronic Corporation
5550 Jurupa St, Ontario, CA 91761
 Loading...