

Page 1
Page 2

Donated to www.orphancameras.com
Page 3
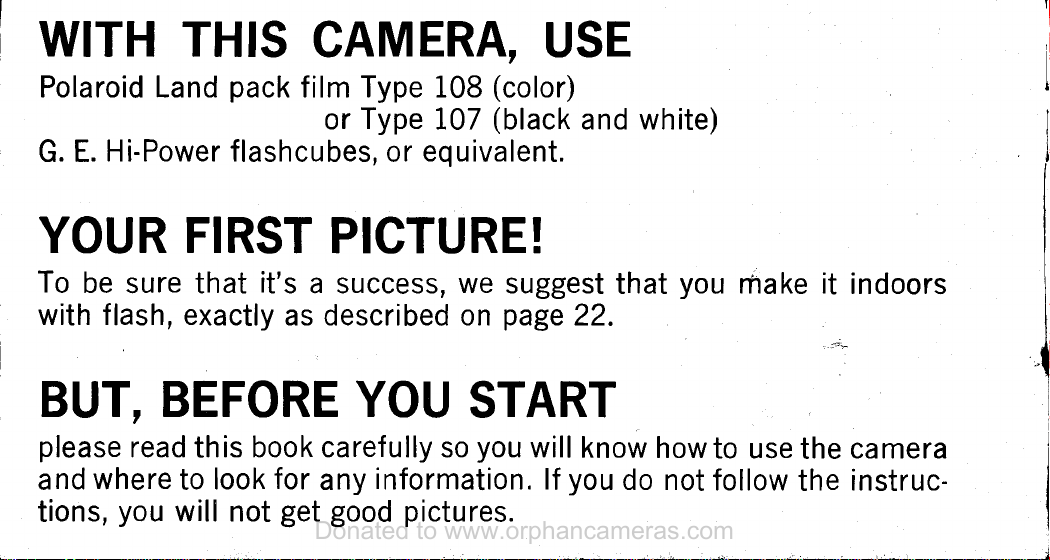
WITH
Donated to www.orphancameras.com
THIS
CAMERA, USE
Polaroid Land
G. E.
Hi-Power flashcubes,
YOUR FIRST
To
be
sure that
with flash, exactly
pack
film Type 108
Type
or
or
PICTURE!
it's
a success,
as described on
BUT, BEFORE YOU
please
and
tions,
read
where
you
to
will not
book caref ully
this
for
look
any
get
information.
good
(color)
(black
107
equivalent.
we
suggest
page
START
you
so
pictures.
will
lf
and white)
that
22.
know
you
you
how
do not
make it
to use
follow
the
the
indoors
;
camera
instruc-
Page 4

The Model 430 and
Donated to www.orphancameras.com
and operation, except:
the Model 430
the Model 430 has a 3-element
accessories;
the Model 42O has a
accessories.
lnstructions in
pictures
tions are different.
are of the 430. Both
Getting Acquainted
The Model 430 camera........:.
Model
The
How to
Howto hold the
Howto usethe
How to focus with the"rngefinder.
Knowyourflash
How
How to insert a
The cube rotation
Why
The controls
What
42O camera.
and
open
to attach and remove the
you
must
. , .
you
should
42O
cameras are similar
has a built-in
this book are for both models, although most
timer; the Model 420 does not;
lens
2-element lens that does not take
models are shown when instruc-
in
that
i?_
'he
close
camr-.ra.
viewl
$'r.
unitand flashcubes....
f lashcube...
lever.....
focus accurately
and
know
mera...
ca
what they
your
about
f lash unit.
when using
do.
ilm
f
flash
construction
takes some
10
11
If
72
I2
I4
16
43Ol42O
Operation
How
to load a film
Howtosetthecamera
Howto
make
Howtomakedaylightpictures.,.
How
to develop the
Checkthetemperature....
yellow
lf
no
Careof the
How
to use the
How to
make
Howto make
How to make black
without flash...
2
4
Miscellaneous
6
You must take
7
Batteryloadingandreplacement.
8
Copies and
9
Some helpf ul accessories.
For the
Model 430, a cloud filter.
yourflashpicturesaretoodark....
lf
Picture troubles, theircause
Where
to write for information.
Warranty.....
Polaroid
Service Centers
pack.
forflash
pictures
flash
picture.
tab appears when
print...
Cold-Clip with
prints
lighter
prints
care of
enlargements
or darker
lighterordarker(Flash)..............
and white
your
camera.
and
and daylightpictures...,.
....,....24
you pullthe
color f
pictures
..
and cure.
offices...
white
tab....
ilm
(Non-flash)..
in
dim light
. 38
1,....,. 39
.....,...,
L7
20
22
26
29
. .. 30
31
32
34
35
36
40
4I
42
43
44
47
47
48
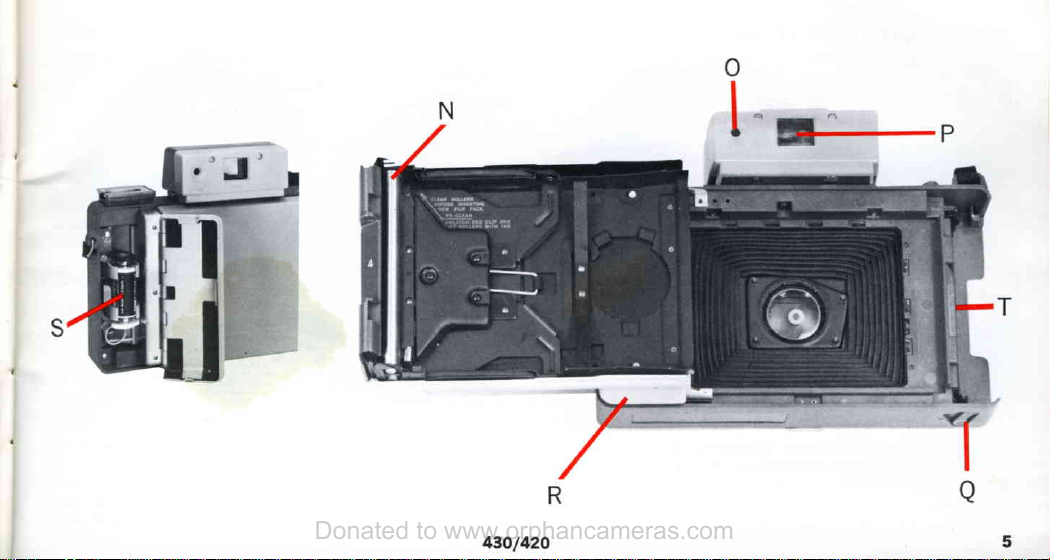
Page 5
THE
Donated to www.orphancameras.com
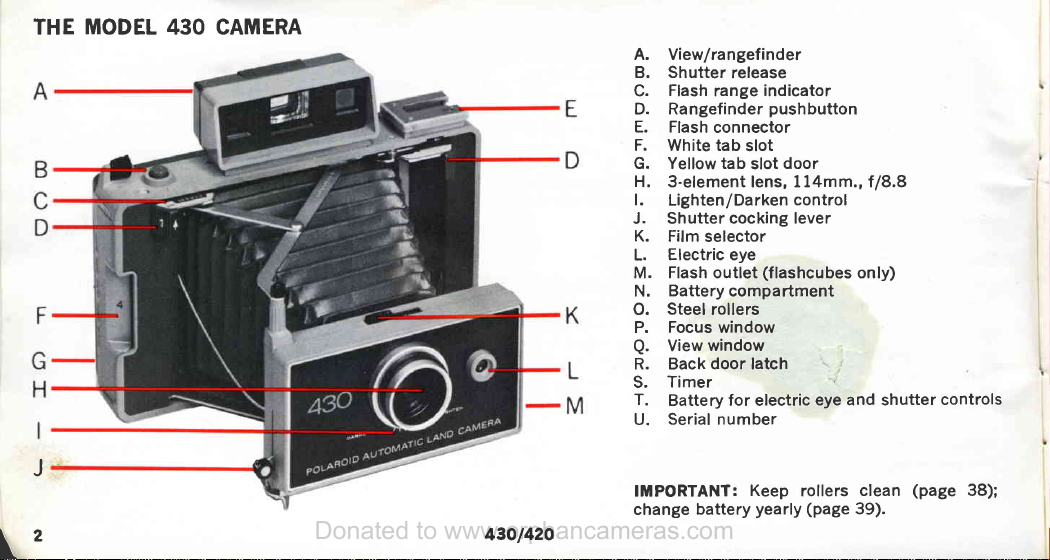
MODEL
430 CAMERA
A. View/rangefinder
B. Shutter
Flash
C.
D. Rangefinder
E. Flash
F. White tab
G. Yellow tab
H. 3-element lens, 114mm., t18.8
l.
Lighten/Darkencontrol
J. Shutter
K. Film
Electric eye
L.
M. Flash outlet
Battery
N.
Steel
O.
P. Focus window
View
a.
R. Back door latch
Timer
S.
T.
Battery for electric
Serial number
U.
release
indicator
range
pushbutton
connector
slot
slot
cocking lever
selector
(flashcubes
compartment
rollers
window
door
only)
eye and shutter
controls
J
43Ol42O
IMPORTANT:
change
battery
Keep
yearly
rollers
(page
clean
39).
(page
38);
Page 6

l
Donated to www.orphancameras.com
i
I
I
43Ol42O
Page 7
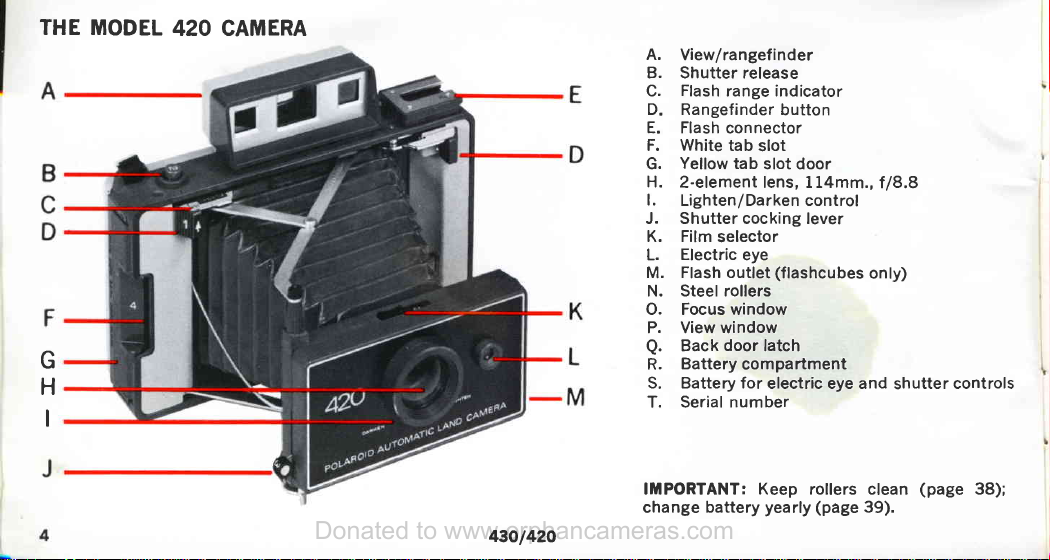
THE MODEL
Donated to www.orphancameras.com
G
H
I
42O CAMERA
A.
View/rangefinder
B. Shutter release
Flash
C.
D. Rangefinder
E. Flash
F.
G.
H.
l.
J. Shutter cocking lever
K. Film
L.
M.
N. Steel rollers
O. Focus window
P. View window
a.
R.
S. Battery for
T. Serial number
range indicator
button
connector
White
tab
Yellow
2-element lens, 114mm.,
Lighten/Darkencontrol
Electric
Flash outlet
Back
Battery
slot
tab
slot door
selector
eye
(flashcubes
door
latch
compartment
electric eye and
t/8.8
only)
shutter
controls
43Ol42O
IMPORTANT: Keep rollers clean
change
battery
yearly
(page
39).
(page
38);
Page 8
Donated to www.orphancameras.com
Page 9
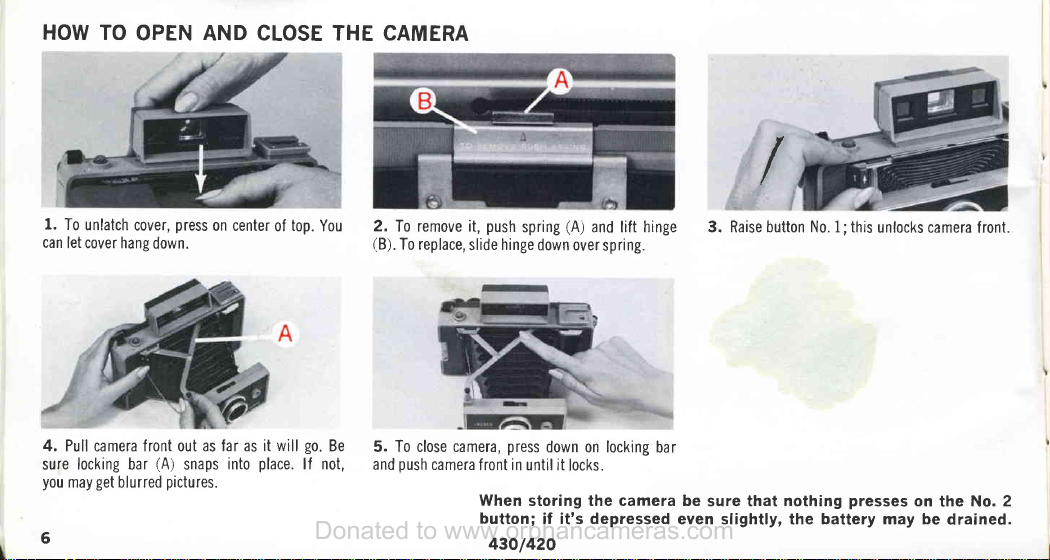
HOW TO
Donated to www.orphancameras.com
OPEN AND CLOSE THE CAMERA
/
1.
To
unlatch
can
let cover hang
4. Pull
camera
sure locking bar
you
get
may
6
press
cover,
front out as far as it
blurred
down.
(A)
snaps
pictures.
on center
into
top.
of
will
place.
You
go.
Be
lf not,
2.
To remove it,
(B).
To replace,
5. To close camera,
push
and
push
hinge
slide
camera
f ront in untrl it
When storing the camera be
button;
43O/42O
(A;
spring
press
and lift hinge
down over
down on locking
locks.
if it's depressed
spring.
3. Raise button No. 1; this
bar
sure that
even slightly,
nothing
the
presses
battery may be
unlocks camera front.
on
the No.
2
drained.
Page 10

HOW TO
Donated to www.orphancameras.com
HOLD
THE
CAMERA
HORIZONTAL:
the
No. 1 buttons;
the
No.2 button.
your
into
Grip the two
ribs; rest the
you
To
ends. Place
can easily shift the right forefinger
the
steady
camera against
camera,
your
your
press
nose.
forefingers on VERTICAL:
your
elbows
picture,
to
againstyourforeheadandface.
43O/42O
turn
Grip
it
so
the
your
camera
hand is
right
as
you
would for a horizontal
Brace
below.
the camera
Page 11

HOW TO
Donated to www.orphancameras.com
USE THE VIEWFINDER
Looking through the viewfinder window
bright, white broken line.
Always
concentrate
try to look through the center of the
your
on
subject,
the
Frame
not on the white line.
(A) you'll
scene
with
see
this line.
window
lf
a
and
your
43O/42O
subject
space between
above.
one's head in
is very
lf not,
(372
close
your
subject
you
may accidentally
your picture.
ft., for
example), allow a
and the top frame line, as
off the top of
cut
little
extra
shown
some-
Page 12

HOW TO FOCUS
Donated to www.orphancameras.com
WITH
THE RANGEFINDER
Look through here
Holding the
both No. 1 buttons
your
left. Look
bright spot in the
for example).
get
To
correct flash erposures,
(B)
camera horizontal,
through the
center at
You
should
at the
bright
as shown
see
a
spot.
place
push
and
FocUS window
a nearby
subject
two images
you
must
Push No. 1 buttons.
v
your
forefingers
them all the
(B)
(about
your
of
focus accurately
-l>
way
and
aim
4 ft. away,
target
on
to
the
in
the
(see page
43Ol42O
bright
that distance. Push
the two
camera is focused.
the
camera horizontal, turn it to aim and shoot.
spot;
13).
this means
images
that the camera
the No. I buttons back and forth until
become
one - sharp and clear. Now the
For vertical
pictures, you
is
not focused for
can focus with
Page 13

KNOW
Donated to www.orphancameras.com
The Polaroid
signed
flashcubes,
flash unit
the
set at a
flashcube
louvers
pictures,
open
as
ject.
3y2tt.
YOUR
for use
attached
camera, the
constant
there
(A).
these louvers
and
close by the
the
camera is focused
The
total
to about
FLASH
Focused
only
with
or
equivalent.
and
shutter is
speed. In front
is a
get
To
correctly
flash
range extends
10 ft. f
UNIT
Flash unit
G.E.
automatically
set of variable
automatically
required
rom the
Hi-Power
With
plugged
of
exposed
amount
on
the sub-
camera.
is
into
f rom
AND
FLASHCUBES
de-
You must focus
correct
the
flashcube
flash
(B)
the
ness
fourth
its
cube must
by the flashcubes
semble average daylight
excellent
and
exposure
you
in order to
for the next
flash the
normal
black and
accurately,
(see
gives
four flashes.
push
must
rotate the
picture.
lever
position,
be changed.
results with
indicating
is
white films. On
to
page
12).
After
forward
will not
the lever
cube in readi-
After
return to
that
The light
balanced
both Polacolor
and
to
will
the
get
Each
each
the
the
given
re-
give
rear
D
C
a
of the flash
(C)
control
flash
The flash unit
in the
YOUR NEW
CONTAIN BATTERIES.
vided separately
Before
must insert
page
on
for adjustment
exposures
rear for two
FLASH
you
can take
the batteries,
39.
unit
is a Lighten/Darken
(see
has a
with
of individual
pages
15
compartment
batteries.
UNIT DOES
These
the flash
pictures,
flash
as
and 35).
(D)
NOT
pro-
are
unit.
you
described
lo
43Ol42O
Page 14

HOW TO ATTACH AND REMOVE THE FLASH
Donated to www.orphancameras.com
Hold the flash
of
theunitontothecameraconnector(F).Slidetheunitonall
the
way,
HOW
Hold the cube as shown, so
the flash
above the
down firmly
pull
cube,
unit
as shown.
till it
comes
to a firm
TO INSERT A FLASHCUBE
unit.
Be sure
pin (l)
in
the
(H)
that
so
up.
it
Slide
the rails
stop.
its
sides
that
the cube socket
flash unit,
(l)
and
engage.
(E)
on
Push
the flash
parallelto
are
and
(H)
push
then
To remove a used
the
cord
the
is directly
the cube
UNIT
bottom
plug
of
sides
into the outlet
slidetheunitoff thecameraconnector.
(G).
To remove the unit,
pull
out
the
plug
and
Use
only G.E. Hi-Power flashcubes, or
equivalent.
43O/42O
Page 15

THE
Donated to www.orphancameras.com
CUBE ROTATION
After each of the
the flashcube must
next flash
ally with the cube
With the left
forward as
remember
get
not
always do
No. 3 button
shutter
fourth flash, it
matically to its
stay
as
changed for a new
tion when the flashcube is
a flash.
(see
When the
in
the forward
a remihder that
The lever will return to
four flashes
position.
far as
to
this
on the camera
page
lever is
be rotated to the
This
rotation lever
thumb
push
just
normal
push
it
will
lever, or
the
lt is a
after
23).
pushed
will not return auto-
position,
position.
the cube
one.
its
LEVER
is
is
done manu-
the
go.
You must
you
good
idea
you press
reset
to
after the
but will
This serves
must
normal
pulled
out.
fired,
(K).
lever
will
to
the
the
be
posi-
WHY YOU
FOCUS
WHEN
Focusing
adjusts
the
between
10 ft. a
will
f ight
correctly
if
a subject is
light
greater
subject
receive
8 ft.
than
ACCURATELY
USING
the camera
the
opening
flash unit.
a distance
subject which is
also
receive the
from
the flashcube
exposed
output
from the
than it
3V2 tt. away, if
the
same exposure.
the louvers must
at a3Yztt.
MUST
FLASH
of the
This assures
of 3Yz
picture.
8 ft. from
flash unit must
would
setting.
automatically
louvers in
ft. and about
sharply
right amount
For
the
need to be
both
be wider
that,
focused
give
to
example,
camera, the
for a
are to
Thus, at
open
of
a
be
L2
43Ol42O
Page 16

Top:
Donated to www.orphancameras.com
GORREGT
away.
The louvers
amount,
exposed
to light
picture.
focus
opened
the
on subject
the
subject
for a well
3y2tt.
correct
Bottom:
ject
was
a
The
the
INGORREGT
distance
focused
result the
subject
picture
was
3y2tt.
greater
for a
louvers
were
received too
was
overexposed.
focus.
but the
distance.
too wide
much
The sub-
camera
As
open.
light and
43Ol42O
13
Page 17

THE
Donated to www.orphancameras.com
CONTROLS
llllflll
AND
llllfftf
WHAT
THEY
DO
The
A.
you
to
eye
Film
are using. For75
For 3000
set
speed black and
it to
3000.
(B)
can't
lt
the
Selector:
lf
make a correct exposure.
sets
speed color film, set
you
don't
camera for the
white
film, slide
set the Film Selector,
kind
it to
75, as
it
the other way
the
of film
shown.
electric
The electric eye:
B.
pictures;
Instantly, the
reflected
to
The electric eye does not
page
when
from the
give
correct exposure.
10).
43Ol42O
The electric eye
you press
eye measures
electric
subject
only works for non-flash
2 button, the
No.
the
and times the closing of the shutter
measure flash
shutter
brightness of the light
exposures
opens.
(see
Page 18

C. The
Donated to www.orphancameras.com
without
eye
would
(shown
flash.
page
D.
adjusts
can make
the
For more
camera
flash:
you
so
be if
here).
For more
34.
The flash
the
amount
a flash
L/D control were
details
Lighten/Darken
Turning
can make
the L/D
This
Lighten/Darken
this L/D
your
control
control
about
of light
lighter
at the
left
has no effect
coming from
details
picture
about its use,
control,
control
picture
were left
lighter
the camera
control:
or darker
Normal
page
see
pictures
for
adjusts the
or darker
the
at
Normal
pictures
on
Turning this
the flash unit
than it
position (shown
35.
L/D
made
control,
L/D control
would be if
made
electric
than it
position
with
see
you
so
here).
43Ol42O
15
Page 19

WHAT
Donated to www.orphancameras.com
This camera
pack
Land
and white,
color, Type
tional types
You must know
ber, 3000
controls correctly.
A film
to make eight
ture there is a
of
sheet
(the
tainer
chemicals
tu re.
After snapping
development
paper
out of the
the
exposed
paper,
and a
two steel
SHOULD
YOU
uses two types
films: 3000 speed
Type
108. There
of film in the
or 75, to
pack
contains
pictures.
piece
print paper,
pod)
filled with the
needed
by
negative,
pod
rollers. The
KNOW ABOUT YOUR
of Polaroid
107, and 75
may be addifuture.
the film speed
the
pulling a piece
camera. This
of chemicals
the camera
set
all the materials
For each
negative
of
and a thin
develop
to
picture, you
a sheet of
foil
jelly-like
the
between
pressure
black
speed
num-
pic-
film,
con-
pic-
start
drags
print
the
of
rollers squashes
the chemicals
print paper
and
"sandwich".
The
camera.
velopment
wich and there
PROTECTION
a
Extreme
damage
especially
era),
been
film, or
in
or
of
a car
storage
bottom,
unwrap
FILM
the
between the negative
to
picture
placed
a loaded camera,
film until
develops outside
the
After
time
heat and high
your
during hot
place
where the air
recommended
you
separate
your
is
OF FILM
(and
film
after the
in
camera. Don't leave
the
closet
in a
you
pod,
spreading
form a
the sand-
finished
weather.
is
are ready to
picture.
AND
CAMERA
humidity can
your
also
pack
film
in direct sun
The
is near the
cooler. Don't
picture
the
de-
cam-
has
best
use it.
important label:
An
packs you
you
to a special setting
made with
your pictures
may see a label
the Lighten/Darken
to turn
that
On some color
pack.
may be too
(A)
for all
Please
dark.
film
advising
control
pictures
do so, or
be
CAUTION:
important
16
Please
notice
sure to
inside
back coyer.
the
read the
43Ol42O
Page 20

HOWTO
Donated to www.orphancameras.com
LOAD
A FILM
PACK
A
special request!
As soon as
late waste
pictures.
be
or
What
an
empty foil bag
lots of outdoor
container for waste.
effort
you
open
paper.
We hope
scattered around
do
to
your part.
on
There will be more
with
or film bor.
pictures,
film
the
it won't become
that
the landscape.
waste
the
bring
Everyone
pack you
paper?
Or, if
will appreciate
will begin
when
litter in
Usually, it will fit Into
you're
along a
paper
accumu.
to
you
develop
the streets
planning
this little ertra
bag
to take
or other
the
Open the top
gently,
press
corner, tear open
dotted line and
absorbing
of the box.
carefully. Hold
hard on
card
the
remove the
(A)
Pull out the film
package
the
middle
the entire
supplied with
of the
side of the foil
film
pack.
color film.
package.
near the
package.
Discard
edges. Don't
Starting at
bag along
the
Handle the
Handle it
the
the
moisture
pack
43Ol42O
the
by
edges only. With
with black and white
instruction
can also be
Always open the
in direct
sheet. Save the box to
very useful when
sunlight,
package
to
color film there's a
film there's a
coating black and white
and
avoid fogging
load film in
coater. Please read the
carry
film.
the
set of mounts;
prints
in
safely.
the shade,
lt
prints.
not
L7
Page 21

LOADING
Donated to www.orphancameras.com
(Cont.)
1. Push the back
4.
the
Push
18
latch; the door will
door
pack
down into the camera.
pop
up.
2.
Open
lf not, clean
5. & 6. Check
Close
cover must
it
the way.
all
them as
described
the back door.
to be
stick
out of the
43O/42O
Are
the rollers
page
on
that the white tabs are
sure
Press
both
sides
small slot.
(A)
clean?
38.
firmly to
lf not, reopen the
3. Hold the film
and
door
not caught between the film
be sure
push
the
hinge
against spring
that both
sides
back, lead
pack
by
closed end of the
the tab
latch.
out.
tension.
pack
The black
the
edges as
and the camera
pack
tab
shown,
under
of the
the
body.
safety
Page 22

7. Grip the
Donated to www.orphancameras.com
safety cover.
IF NO
WHITE
black
TAB
tab.
This is the
APPEARS
end
of
the
8. Pull
the
camera
without
cover
safety
stopping. Don't rip it.
all
the
way
out of
the
9. With
should
stick
pull
the tab.
the
safety cover
out of the
You're
out, a white
small slot
now ready
(No.
picture
for
tab
4).
(A)
Don't
No.
l.
l.
lf there's no white
the
following in the
bright
sunlight.
the
tab in
shade or
No.4 slot,
indoors, not
do
in
2.
0pen the back of
without
the white tab
out
into the
or moving
43Ol42O
disturbing
the camera
the film
open.
part
way
pack, push
and,
3.
Close
that both
tab is
outside,
the back of
are locked
sides
in the No.4
the
camera,
securely
slot.
making
sure
and the white
19
Page 23

r
Donated to www.orphancameras.com
HOW
FOR 75
TO SET
SPEED
COLOR
THE
CAMERA
FOR
FLASH
DAYLIGHT
AND
PICTURES
A
For flash.
it to 75.
it to 75.
Set
you
front
Set
can take
be down
must
picture,
a
(see
the No.
pages
Film Setector:
Film Selector:
Before
camera
20
Lighten/Darken
tne
on
of a loaded
shade
button
3
and25).
23
back
indoors
or
the
on
controls:
the
of
camera
and
43Ol42O
film
to see
don't
y
For daylight.
them to
Set
(A)
pack
if there
move
shows
is such
pack,
the
the Normal
a
special
a label.
the film
position
setting.
You can
you
lf
will not be
(shown)
do this
damaged.
unless
the
open
carefully
a label
back
in
the
Page 24

FOR 3OOO
Donated to www.orphancameras.com
BLACK AND WHITE
SPEED
For
I
Film Selector: Set it to 3000.
you
Before
camera front must be
can take a
picture,
down
the No. 3
(see
pages
Lighten/Darken
at the
you
want to make
da
rker.
button on
23 and 25).
flash. Y
controls:
Normal
position (shown)
a
the
picture
43Ol42O
daylight.
For
Leave them
unless
lighter or
Fast focus for action
used only with 3000 speed film in
bright daylight. Set the camera so that
the arrow
letter S of
able scale, as shown. ln this
get
will
to well beyond the
would normally take action shots,
without the need to focus with the
rangefinder tor
method is
photographing
activities in
to medium range.
Don't try to use this
pictures
on the camera is at the
the word
pictures
sharp
particularly
bright daylight,
or with color film
pictures:
ruRsH
from about 3 ft.
range
each
sports and other lively
setting
To be
on the mov-
in which
picture.
usef ul when
at any time.
way
in the
for flash
you
you
This
near
2t
Page 25

HOW
Donated to www.orphancameras.com
TO
MAKE FLASH PICTURES
PLACE
SUBJECT: Try to have
subject near a light colored
light background.
PLACEYOURSELF: You
any
distance between 3Yz and
For the most striking
your
to
subject
CHECK
set correctly
Be
sure that a flash cube is inserted
correctly
22
that the
(see
in
the f
and
camera controls
pages
lash
wall or other
can shoot from
pictures, get
get
a large image.
20,2L).
(see page
unit
your
10 ft.
close
are
11).
1.
AIM AND FOCUS: Frame
ject
in the
to
the Focus window.
buttons until the
rangefinder
of the most important
subject. Then frame
in
the vtew window.
Focus accurately:
exposed flash
correctly
window.
vtew
shows a single clear
picture you
(see
page
Move
Push
bright spot
your
get
To
13).
43Ol42O
your
your
the
No.
in
image
part
of
subject
again
a correctly
must
focus
sub-
eye
the
your
2.
SHOOT:
it smoothly and
quite
1
and the flash fires.
AVOID
PICTURES by making
neither the camera nor the
moves during the exposure.
Press button No. 2. Press
slowly.
still until
you
GETTING
Hold
the camera
hear a loud click
BLURRED
quite
FLASH
sure that
subject
Page 26

3. RESET: lmmediately
Donated to www.orphancameras.com
picture,
a
firmly until
This
ready for the next
DO NOT
The recommended
flash
the flash
after focusing
points
are
points
refocus
press
it locks and
resets the
SHOOT FLASH PICTURES FROM
pictures(3Yz
range indicator,
at the
within
beyond
the camera, the arrow
black bar, as
the flash
the
before
shootin
after
No.
3 button down
shutter
picture.
to 10 ft.) is
bar, come
stays
so
range for
range.
g.
snapping
down.
you'll
shown
(right).
shown,
lf
the arrow
closer
be
good
by
lf,
you
and
4.
ADVANCE FLASH
cube
will
ffash. See also
YOU ARE NOW
THE PICTURE.
FURTHER
rotation
go,
to
lever
forward
prepare
page
READY TO
SEE
THAN 10
CUBE:
as
you
for
L2.
PAGE 26.
FT.
INF
Press
the
far
as it
the next
DEVELOP
FLASH PICTURE
Line
about
camera
Have
gray
Medium
are best: In
light,
reflected
further
more important
reflective
Spare
elsewhere
Flash
pictures
pictures
GET CLOSE
GET A LARGE IMAGE.
groups:
up
the
so
plenty
don't
sized rooms
which
you
surfaces
the eyes:
don'ts: Don't
in
in
HINTS
Try
to
distance
same
they'll be
of color: White,
improve
would otherwise
back onto
are from
than
daylight.
explosive
lighted
color
such a setting a lot
it
is to have
nearby.
your
Let
right at the
try to make
Don't
atmospheres.
TO
YOUR SUBJECT AND
have
evenly.
black,
pictures.
with
light walls
the
subject. The
the
subject, the
subjects look
camera.
shoot flash
everyone
f
rom the
and
be lost,
such
flash
23
of
is
Page 27

MAKE
Donated to www.orphancameras.com
DAYLIGHT
PICTURES
I
1. AIM
from
and L/D
is
is
the
you
not
ject
in
to the
buttons
rangefinder
the
of
subject.
in
the
the subject
the light
STAND
coming
side,
CHECK
control
are using
so
from
but not
that
are set
(see page
BE SURE
plugged
electric
24
into the camera.
eye
f rom
the
that
will not
on
behind
you
in f ront of
Film Selector
kind of film
the
for
20).
the flash
f unction.
or
the camera.
unit
lf it is, the
FOCUS:
AND
the vtEW
Focus
until
shows
most
Then
window.
vtEw
Frame
window.
window.
the bright
important
frame
43Ol42O
Push
a single
your
your
Move
the No.
spot
clear
part
subject
your
in
image
of
again
sub'
eye
the
Your
1
2.
SHOOT:
slowly,
and
you
until
in the shade
ing
down
2
No.
a second
hear
Then
closes.
Press
without
a loud click.
hear
and
let
button
moving
in dim light,
or
move
don't
as
click
button
No. 2
No.2 smoothly
camera,
the
When shoot'
hold
until
come
You
up.
the shutter
I
Page 28

DAYLIGHT PICTURE HINTS
Donated to www.orphancameras.com
The
On a very
even and the
Move
is in
the
you'll
Have
and backgrounds
3. RESET:
picture,
a
firmly until it
This resets the
ready for the
YOU
THE PICTURE.
lmmediately after
press
locks and stays
shutter so
picture.
next
ARE NOW READY TO DEVELOP
SEE
No. 3
PAGE 26.
button
snapping
down
down.
you'll
strong, bright colors.
Watch the
be
should be
light on the
Keep an eye
or very
quality
read
temperatu re affects
best
light for
bright, hazy day
shadows are soft.
in
close: The bigger
print,
be
plenty
page
the more
able to
see.
of color:
background:
just
about
subject.
on the
hot
weather
your pictures.
of
29, which
43O/42O
pictures
Look for
with big areas
as bright as the
temperature: Cold
can
you r pictu
of
the light is
your
and
color
subjects
The light
affect
Be sure to
explains
res.
people:
subject
detail
on
how
Lighting to
a shaded subject
of
it
the
Your subject
eye.
fffi1--r9--=
ItrIilI-:=-E:t
::Tffitlf
If!taaaa----
ttt=ia-rnl
llr
avoid: Bright light behind
will "fool" the electric
will be too dark.
|
--2!2
l
l
I
 Loading...