

Page 1
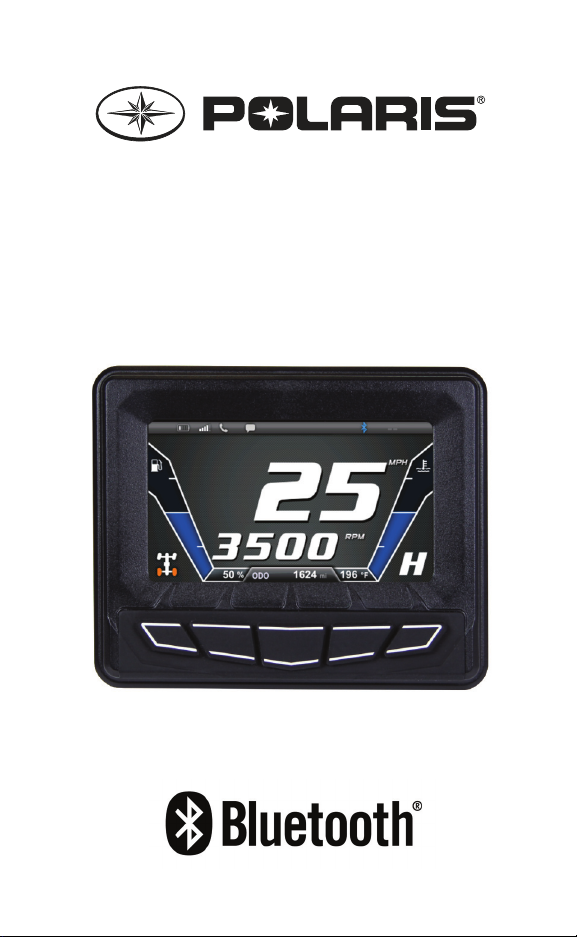
Interactive
Digital Display
Owner’s Manual
Page 2

1
Page 3

Copyright 2014 Polaris Industries Inc.
All information contained within this publication is based on the
latest product information available at the time of publication.
Product improvements or other changes may result in
differences between this manual and the product. Depictions
and/or procedures in this publication are intended for reference
use only.
No liability can be accepted for omissions or inaccuracies.
Polaris Industries Inc. reserves the right to make changes at any
time, without notice and without incurring obligation to make the
same or similar changes to products previously built. Any
reprinting or reuse of the depictions and/or procedures
contained within, whether whole or in part, is expressly
prohibited.
The following are trademarks of POLARIS Industries Inc.:
POLARIS® PERC® RANGER®
RIDERX™ RZR® AXYS™
RiderX™
The Bluetooth® word mark and logos are registered trademarks
owned by Bluetooth SIG, Inc. and any use of such marks by
Polaris Industries Inc. is under license. Other trademarks and
trade names are those of their respective owners.
Printed in U.S.A.
P/N 9925416
2
Page 4

Table of Contents
Welcome . . . . . . . . . . . . . . . . . . . . . . . . . . . . . . . . . . . .4
Quick Start Guide . . . . . . . . . . . . . . . . . . . . . . . . . . . . .5
Interactive Digital Display . . . . . . . . . . . . . . . . . . . . . .7
General Information . . . . . . . . . . . . . . . . . . . . . . . . .9
Display Keys . . . . . . . . . . . . . . . . . . . . . . . . . . . . .10
Maps/Trails . . . . . . . . . . . . . . . . . . . . . . . . . . . . . .13
Phone . . . . . . . . . . . . . . . . . . . . . . . . . . . . . . . . . .15
GPS Settings . . . . . . . . . . . . . . . . . . . . . . . . . . . . .17
System Settings. . . . . . . . . . . . . . . . . . . . . . . . . . .23
Diagnostics . . . . . . . . . . . . . . . . . . . . . . . . . . . . . .29
IDD For Snowmobiles. . . . . . . . . . . . . . . . . . . . . . . . .30
General Snowmobile IDD Information . . . . . . . . . .30
Initialization Process . . . . . . . . . . . . . . . . . . . . . . .32
Left Hand Controls. . . . . . . . . . . . . . . . . . . . . . . . .33
Vehicle Settings . . . . . . . . . . . . . . . . . . . . . . . . . . .35
Detonation Elimination Technology . . . . . . . . . . . .42
Engine Overheat Indicators . . . . . . . . . . . . . . . . . .43
Bluetooth . . . . . . . . . . . . . . . . . . . . . . . . . . . . . . . . . . .44
Before Connecting . . . . . . . . . . . . . . . . . . . . . . . . .44
Connection Management. . . . . . . . . . . . . . . . . . . .45
Phone . . . . . . . . . . . . . . . . . . . . . . . . . . . . . . . . . .53
RiderX . . . . . . . . . . . . . . . . . . . . . . . . . . . . . . . . . .58
Hardware . . . . . . . . . . . . . . . . . . . . . . . . . . . . . . . .58
Connect, Register and Update. . . . . . . . . . . . . . . .60
Update Process Flow Chart . . . . . . . . . . . . . . . . . .70
Frequently Asked Questions . . . . . . . . . . . . . . . . . . .71
3
Page 5

Welcome
Thank you for purchasing a Polaris Interactive Digital
Display (IDD), and welcome to the Polaris RiderX family.
Your IDD is easy to use and will allow you to customize
the information displayed through the use of alternate
screen selections. The RiderX app gives you the power
to plan, track and share your rides, as well as connect to
radar weather, rider services and more.
For a safe and enjoyable riding experience with your new
IDD, please read your vehicle’s owner’s manual and this
IDD owner’s manual. If you should need additional
assistance with IDD operation or software updates,
please see your Polaris dealer or visit RiderX.com.
WARNING! Do not enter information or adjust this
device while operating your vehicle. Distracted driving
can result in loss of control, collision or accident,
which may result in serious injury or death. Avoid
using any features and devices while driving that may
take your attention away from the road or trail and
safe driving habits, even for a moment.
The operator assumes all risk associated with using
this device. Please read the owner’s manual provided
with your vehicle.
CAUTION! The speedometer may display incorrect
values at the existence of electromagnetic radiation
>= 10 V/m.
4
Page 6
Quick Start Guide
Key 1
Alternate Screen
Selection
Key 2
ODO / Trip 1 / Trip 2
Key 3
Main Menu
Key 4
Battery Voltage /
Temperature Reading
Key 5
Bluetooth Menu or
Diagnostics
if present
Before Riding With Your New IDD
1. Read this entire manual.
2. Familiarize yourself with the features and operation of
the IDD while the vehicle is stationary.
3. Register for a RiderX account (page 60).
4. Register your IDD (page 61).
5. Update trails data or maps/trails data to verify that the
trails data on the IDD is current (page 61).
NOTE: Trails data expires 90 days from the file’s
release date.
IDD Features
5
Page 7
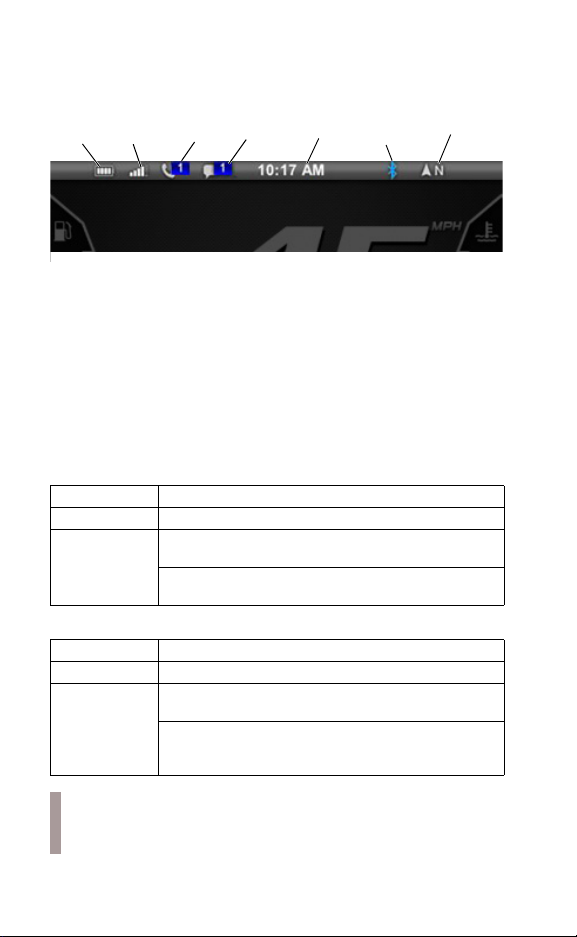
The icon bar at the top of the screen allows quick access
Phone
Battery
Phone
Signal
Stre ngth
Missed Text
Messages
GPS
Heading
Missed
Calls
Real Time
Clock
Blue if
Bluetooth
Connected
to cell phone-related information, a real time clock and
the GPS heading.
In most situations, the GPS and mapping features will
function best while the vehicle is outdoors in an open
space. The GPS signal may be impeded by overhead
structures or by being too close to a structure.
Please follow the installation instructions provided in the
accessory kit or see your dealer for assistance.
Getting Started
Use the ignition key to turn the IDD on or off or to reboot
(when necessary).
Models With Battery
ON Turn the key to the ON/RUN position.
OFF Turn the key to the OFF position.
REBOOT Option 1: Turn the key OFF for 5 seconds,
Models Without Battery
ON Start the engine.
OFF Turn the key to the OFF position.
REBOOT Option 1: Turn the key OFF for 5 seconds,
NOTE: Using the auxiliary engine stop switch on a
snowmobile to turn off the engine will not turn off the
IDD.
then turn the key to ON/RUN.
Option 2: With the key ON, press and hold
Display Key 5 for 20 seconds, then release.
then start the engine.
Option 2: With the engine running, press and
hold Display Key 5 for 20 seconds, then
release.
6
Page 8

Interactive Digital Display
The Polaris IDD features a 4.3-inch high resolution full
color LCD display that provides access to the following
information and functions.
Performance
View the speedometer, tachometer, dual trip meters,
odometer.
Operating Conditions
View fuel level, coolant temperature, battery voltage,
gear position, all-wheel drive status, diagnostics and
maintenance warnings.
Riding Conditions
View the clock, change display between day and night
mode.
Bluetooth Functionality
Use Bluetooth-enabled communication with cell phone
(with notification of incoming calls or texts and ability to
view battery strength and signal strength).
GPS/Mapping
NOTE: The compass is controlled by the GPS
system. Calibration is not required.
Use the compass and full-featured GPS when the GPS
receiver is installed (includes the display of latitude,
longitude and elevation). Mark and save waypoints and
tracks.
Security (Snowmobiles)
If security is enabled, lock your vehicle using a security
code.
Screen Options
Customize screens.
7
Page 9
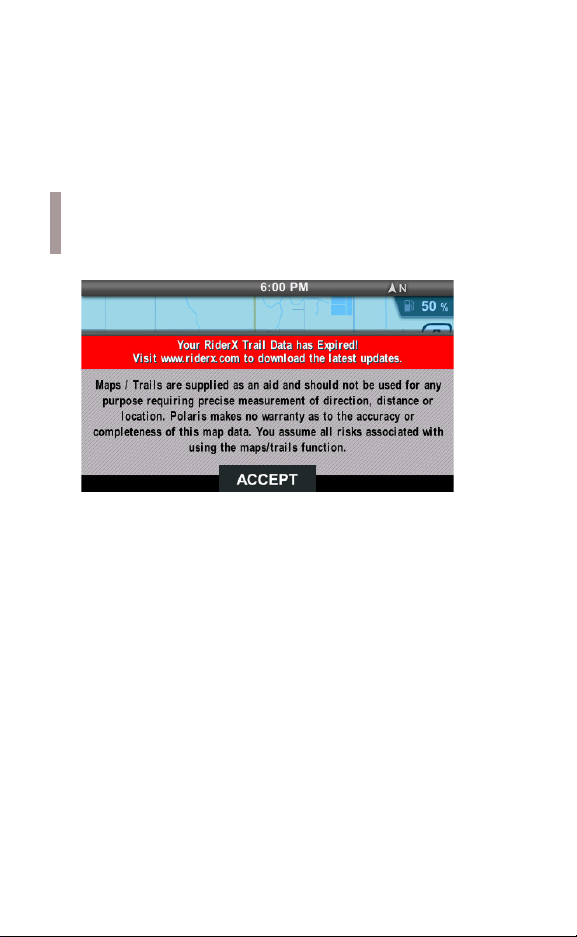
Software Upgrades
Update software for the life of the vehicle.
Update the IDD every 90 days or more often (especially
before long trips) to ensure the most recent trails data is
on your IDD at all times. Log in at RiderX.com to
download the latest software updates. If you need
assistance, please see your Polaris dealer.
NOTE: Trails data expires 90 days from the file’s
release date. If an update is not performed within 90
days, a notification screen displays.
Maps/Trails are supplied as an aid and should not be
used for any purpose requiring precise measurement of
direction, distance or location. Polaris makes no warranty
as to the accuracy or completeness of this map data. You
assume all risks associated with using the maps/trails
function.
8
Page 10

General Information
Device Operating Requirements
Phone functionality is dependent on the capabilities of
your cell phone. Text messaging functionality may vary
depending on your phone’s operating system.
NOTE: Some cell phones or operating systems will
not work as shown in this manual.
Care and Maintenance
Use a soft cloth to clean the housing. Mild soap and
water may be used. Do not use harsh or abrasive
cleaners.
For best results, use a microfiber towel to clean the
screen. Window cleaner or alcohol may be used.
NOTICE: Immediately clean off any gasoline that
splashes on the display.
Storage
When preparing the vehicle for storage, make sure the
ignition switch is in the OFF position to prevent battery
drain and a shortened battery life.
9
Page 11
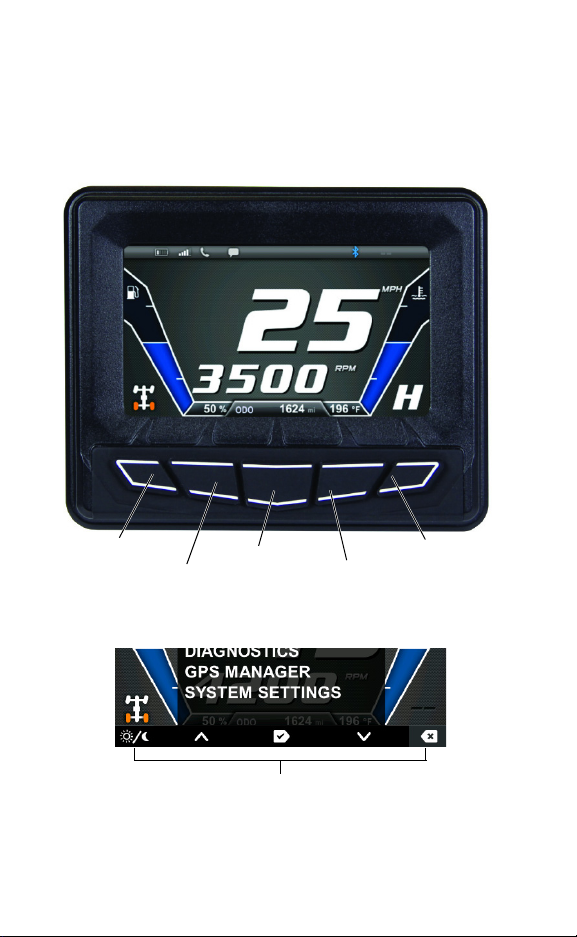
Display Keys
Key 1
Alternate Screen
Selection
Key 2
ODO / Trip 1 / Trip 2
Key 3
Main Menu
Key 4
Battery Voltage /
Temperature Reading
Key 5
Bluetooth Menu or
Diagnostics
if present
IDD Menu Icons
(varies by current screen displayed)
Use the five display keys to access the IDD menus.
Press and release any key to display the IDD menu icons
at the lower edge of the screen. With the menu icons
displayed, press a specific key to view menu options for
that key.
10
Page 12
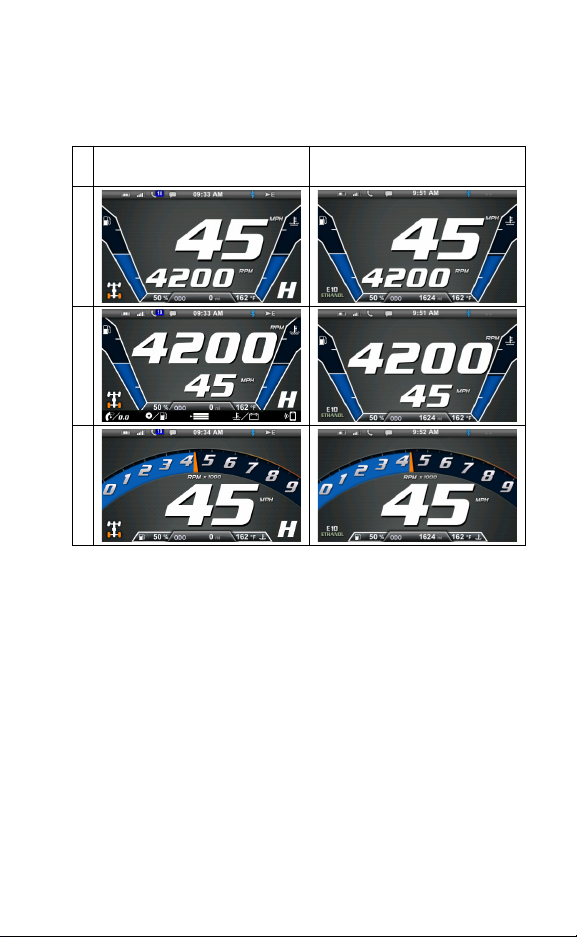
Key 1 - Alternate Home Screen Selection
1. Press any key to display the IDD screen icons.
2. Press Key 1 repeatedly to display each home screen
option.
Off-Road Vehicle
Home Screen Options
PRIMARYSECONDARYAUXILIARY
Snowmobile
Home Screen Options
Key 2 - Odometer / Trip Meter 1 / Trip Meter 2
1. Press any key to display the IDD screen icons.
2. Press Key 2 repeatedly to display each option.
• Odometer (ODO)
•Trip 1
•Trip 2
11
Page 13

Key 3 - Main Menu
1. Press any key to display the IDD screen icons.
2. Press Key 3 to display the main menu options.
3. Toggle through the menu.
Key 2: Toggle up
Key 4: Toggle down
4. Use the remaining keys to perform other actions in
the main menu.
Key 1: Toggle between day and night screen
(brightness) (See page 24 to adjust brightness levels
for both screen options.)
Key 3: Select
Key 5: Exit menu
Key 4 - Battery Voltage / Coolant Temperature
1. Press any key to display the IDD screen icons.
2. Press Key 4 repeatedly to display each option.
• Battery Voltage
• Coolant Temperature
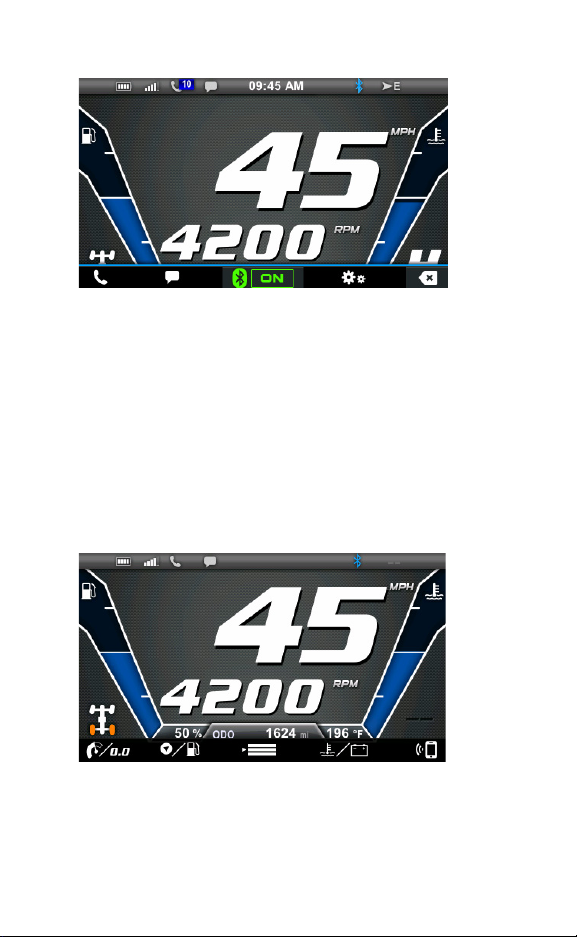
Key 5 - Bluetooth Menu (or Diagnostics Menu)
1. Press any key to display the IDD screen icons.
2. Press Key 5 to display Bluetooth features. If a fault
exists, Key 5 enters the Diagnostics menu (see page
29).
3. Use the display keys to access Bluetooth features.
Key 1: Phone
Key 2: Text
Key 3: Toggle Bluetooth on/off
Key 4: Settings
Key 5: Exit menu
12
Page 14
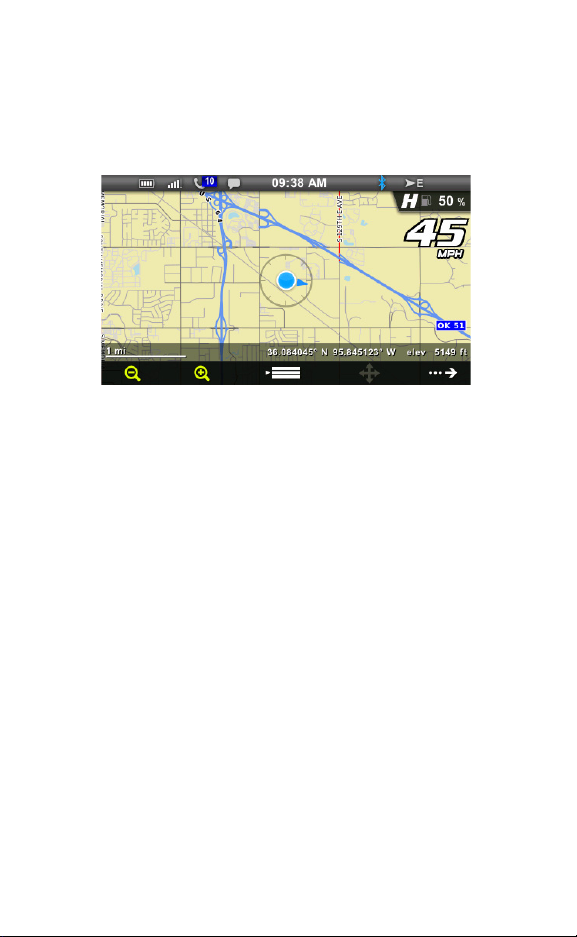
Maps/Trails
Key 1 Key 2 Key 3 Key 4 Key 5
View Map
1. Press any key to display the IDD screen icons.
2. Press Key 3 to display the main menu options.
3. Toggle to MAPS/TRAILS. Press Key 3 to select.
4. Use the display keys to access the map features.
Key 1: Zoom out
Key 2: Zoom in
Key 3: Display menu
Key 4: Pan (disabled above 10 MPH / 16 km/h)
Key 5: Advance to next screen (GPS/Tracks Map)
13
Page 15
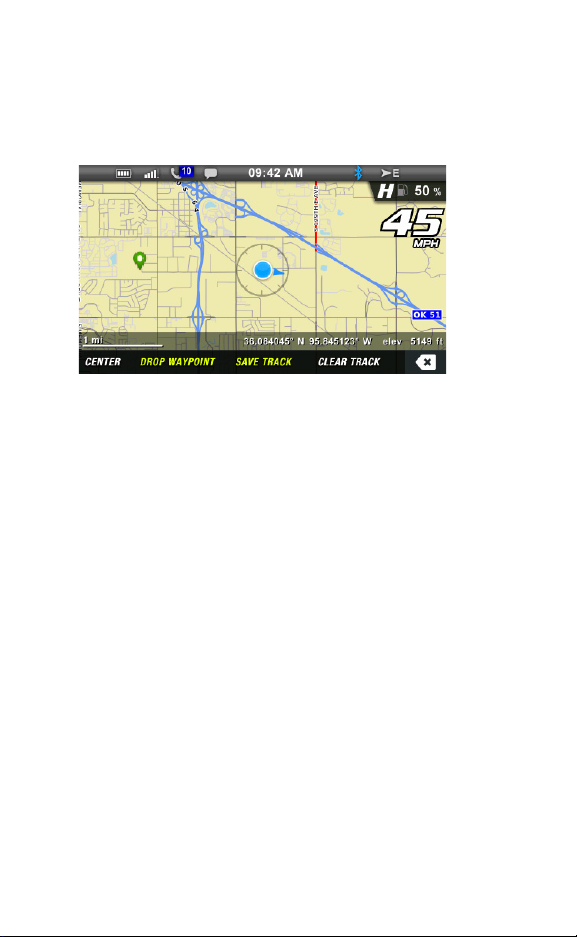
GPS/Tracks Map
Key 1 Key 2 Key 3 Key 4 Key 5
Use the display keys to navigate the GPS/Tracks menu.
Key 1: Center the map on your GPS location. The
centering will occur after vehicle speed exceeds 10 MPH
(16 km/h).
Key 2: Place a marker at your GPS location. If your
vehicle is stopped, the keyboard will display so you can
name and save the waypoint. (See Keyboard Operation
on page 15.) If your vehicle is moving, the waypoint will
be placed and automatically named. Press and hold Key
2 to enter the Waypoint Manager menu.
Key 3: Display the keyboard to name and save the track.
Up to 10 tracks can be saved. Press and hold Key 3 to
enter the Track Manager menu.
Key 4: Display a confirmation message before clearing
the current track.
Key 5: Exit
14
Page 16
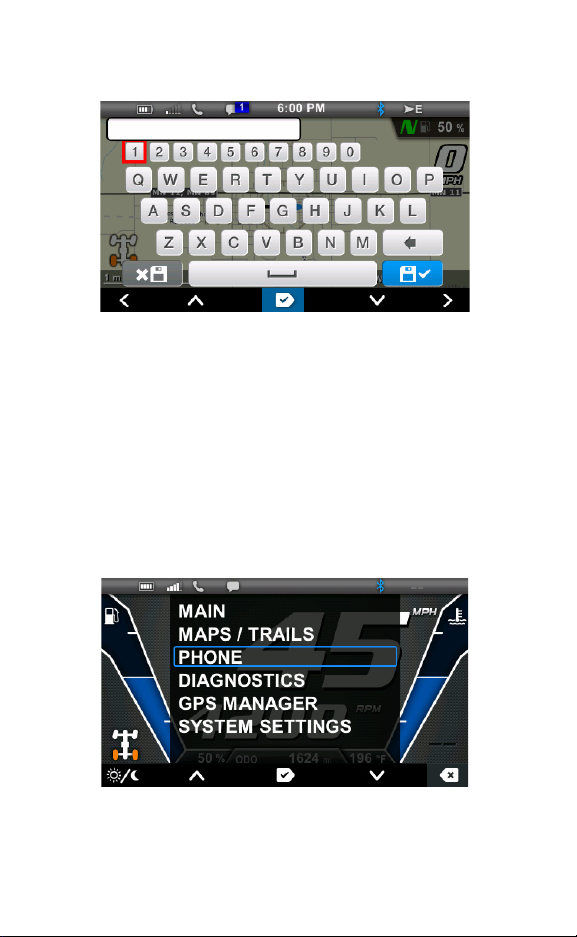
Keyboard Operation
Key 1 Key 2 Key 3 Key 4 Key 5
Key 1 Key 2 Key 3 Key 4 Key 5
1. Use the display keys to navigate the keyboard.
Key 1: Move left
Key 2: Move up
Key 3: Select the letter or number
Key 4: Move down
Key 5: Move right
Phone
1. Press any key to display the IDD screen icons.
2. Press Key 3 to display the main menu options.
3. Toggle to PHONE. Press Key 3 to select.
15
Page 17
4. The phone main menu screen displays.
Key 1 Key 2 Key 3 Key 4 Key 5
Key 1 Key 2 Key 3 Key 4 Key 5
5. Use the display keys to navigate the phone main
menu.
Key 1: Missed Calls
Key 2: Text Messages
Key 3: Turn Bluetooth on/off
Key 4: Bluetooth Settings
Key 5: Exit
6. When one of the IDD main screens is displayed,
press any key to display the IDD screen icons. Press
Key 5 to access the phone menu. (The diagnostic
screen displays if an active fault exists. See page 29.)
7. For more information about the Bluetooth functions,
see page 44.
16
Page 18
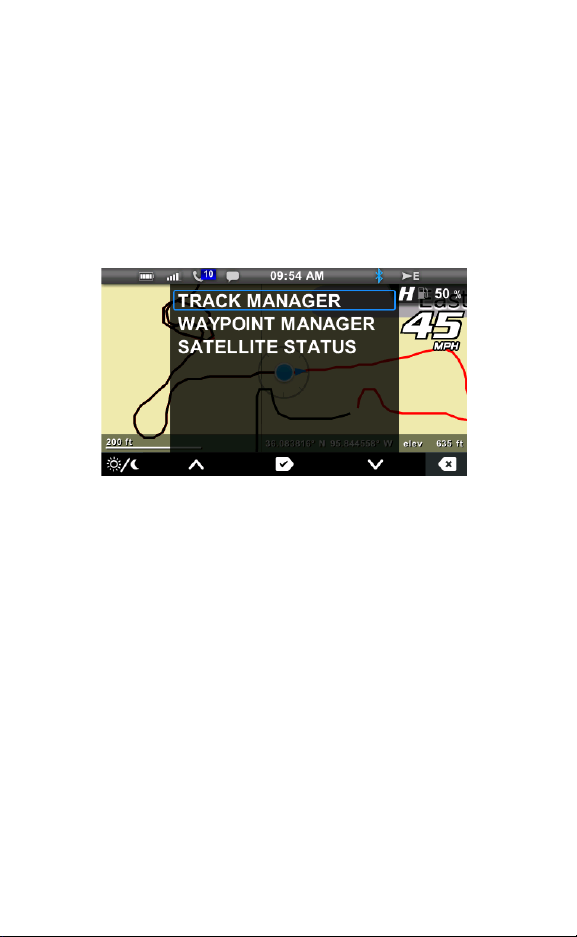
GPS Settings
Key 1 Key 2 Key 3 Key 4 Key 5
1. Press any key to display the IDD screen icons.
2. Press Key 3 to display the main menu options.
3. Toggle to GPS MANAGER. Press Key 3 to select.
4. Toggle through the menu.
• Track Manager
• Waypoint Manager
• Satellite Status
5. Press Key 3 to select.
Track Manager / Waypoint Manager
The Track Manager allows you to edit a track name, hide
or display a track and import or export a track.
The Waypoint Manager allows you to edit, delete, import
or export a waypoint or view a saved waypoint on the
map.
17
Page 19
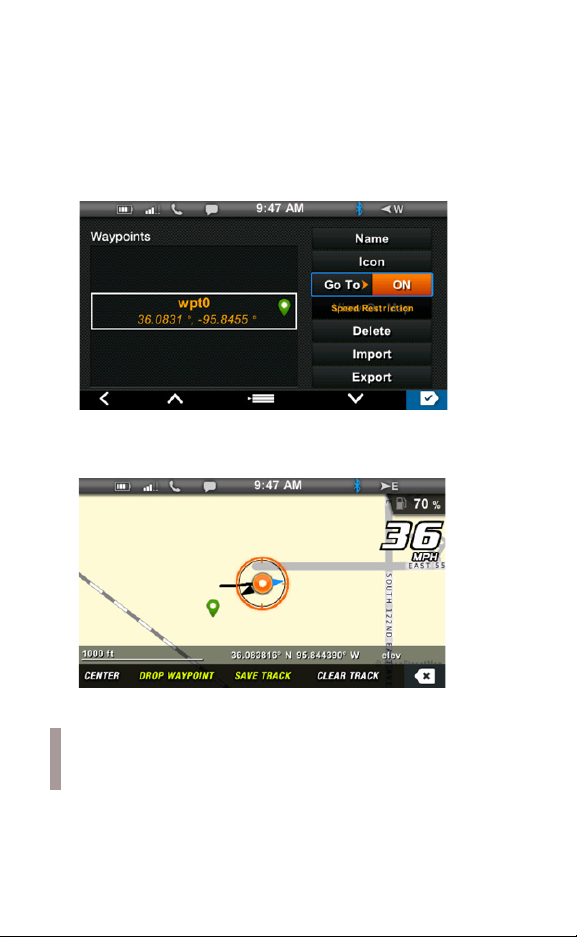
When Go To is turned ON in the Waypoint Manager, an
Key 1 Key 2 Key 3 Key 4 Key 5
Key 1 Key 2 Key 3 Key 4 Key 5
arrow displays on the map, pointing in the direction of the
selected waypoint. This feature can be used for only one
waypoint at a time.
1. Press Key 5 to toggle to the selection list.
2. Press Key 4 until Go To is highlighted. Press Key 5 to
toggle the setting ON or OFF.
3. Press Key 5 to exit the map.
NOTE: When Go To is ON, the arrow points to the
waypoint that was selected when Go To was turned
ON.
18
Page 20
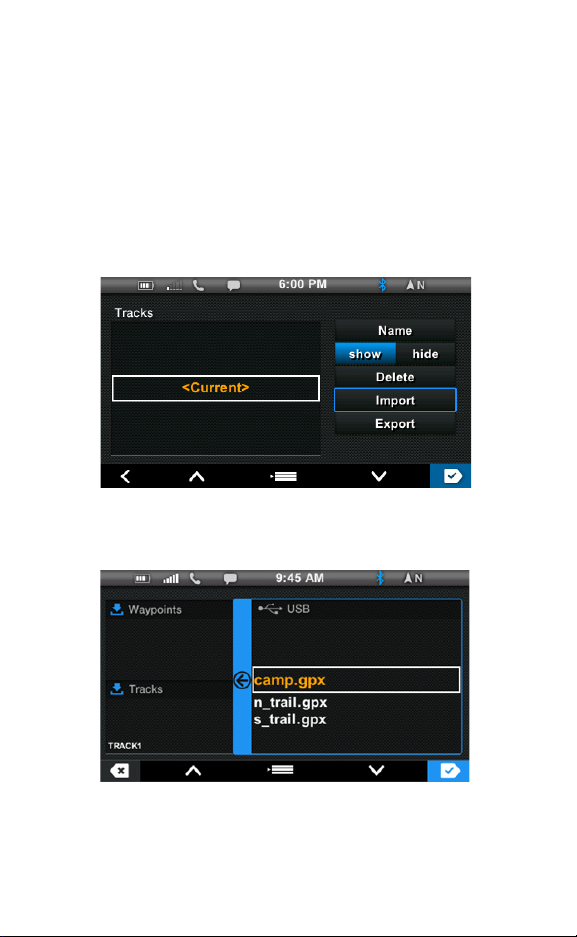
Importing and Exporting Tracks and Waypoints
Key 1 Key 2 Key 3 Key 4 Key 5
Key 1 Key 2 Key 3 Key 4 Key 5
Importing or exporting tracks and waypoints requires a
USB drive in the accessory connector. An exported file
will be a .gpx format file that can be read by various
devices or imported into mapping software. Any files you
import must be available on the USB drive at the root
level (not in a folder) and must be .gpx format files.
1. Enter the desired manager menu (Tracks or
Waypoints).
2. Press Key 5 to toggle to the selection list. Toggle to
Import or Export. Press Key 5 to select.
3. Toggle to the desired track or waypoint file name.
Press Key 5 to select.
19
Page 21
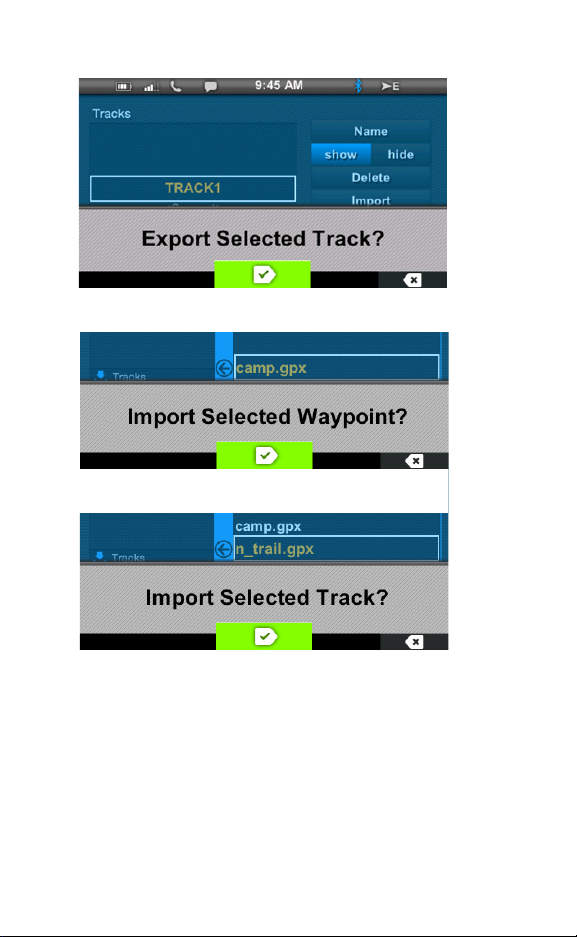
4. Press Key 3 to confirm. Press Key 5 to reject.
Key 1 Key 2 Key 3 Key 4 Key 5
Key 1Key 2Key 3Key 4Key 5
Key 1 Key 2 Key 3 Key 4 Key 5
5. If exporting, the file will be saved to the USB drive.
20
Page 22
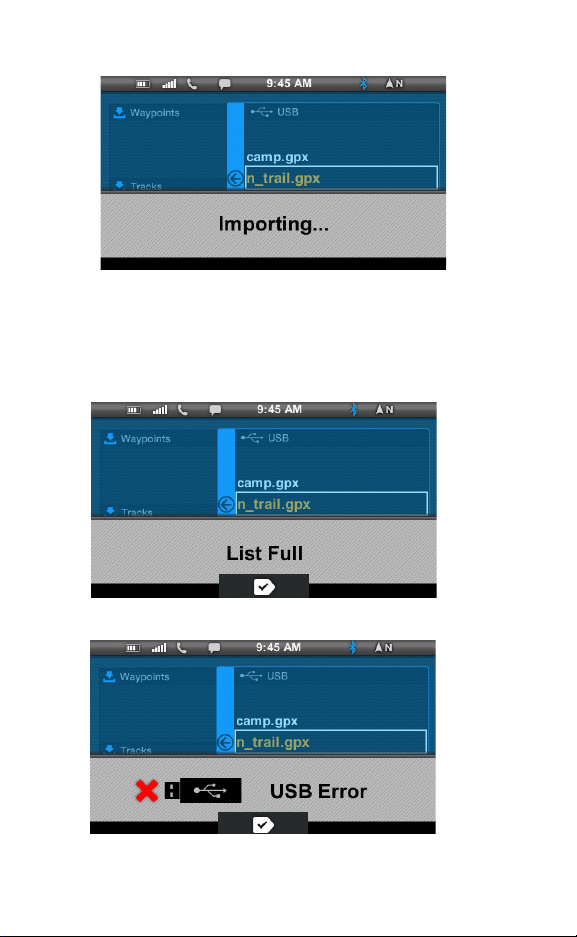
6. If importing, the processing screen displays.
Possible Errors
One of the following screens displays if a processing
error occurs.
• The device does not contain enough space to save the
waypoint or track.
• The USB device is not seated properly.
21
Page 23
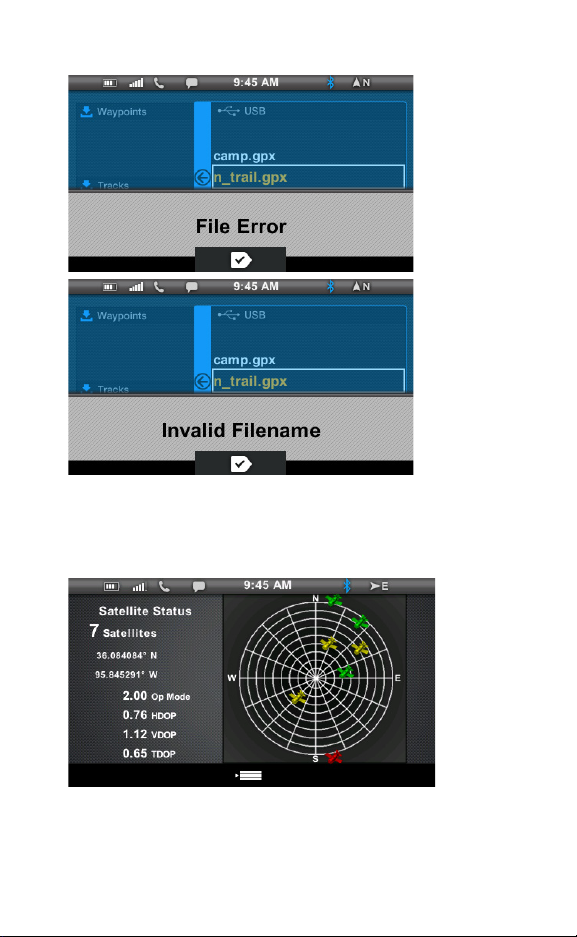
• The file or file name contains an error.
Key 1 Key 2 Key 3 Key 4 Key 5
Satellite Status
In the GPS Manager menu, select Satellite Status. The
screen displays all available satellites in the area. Press
Key 3 to exit.
22
Page 24

System Settings
Key 1 Key 2 Key 3 Key 4 Key 5
1. Press any key to display the IDD screen icons.
2. Press Key 3 to display the main menu options.
3. Toggle to System Settings. Press Key 3 to select.
NOTE: If demo mode is enabled, you can toggle
through the resulting menu to view options without the
risk of changing settings. This tool is useful as a
tutorial or for training at your dealership. See page 24
for instructions.
4. Toggle through the menu.
• Display
• Service
•Units
•Time
• System Info
• Vehicle Settings (snowmobiles only, see page 35)
5. Press Key 3 to select.
23
Page 25

Display
Key 1 Key 2 Key 3 Key 4 Key 5
1. In the System Settings menu, select DISPLAY.
2. Toggle to the desired setting.
• Day/Night mode
• Brightness level
• Language
• Demo (enable/disable)
3. Press Key 1 or Key 5 to change a setting.
NOTE: If Day is selected, changing the brightness will
change the day mode brightness level. If Night is
selected, changing the brightness will change the
night mode brightness level.
4. Press Key 3 to exit.
24
Page 26

Service and Engine Hour Information
Key 1 Key 2 Key 3 Key 4 Key 5
Key 1 Key 2 Key 3 Key 4 Key 5
1. In the System Settings menu, select SERVICE.
• Engine Hours displays hours of engine operation
since manufacture.
• Interval is an editable setting that provides a service
reminder at the set interval. Interval can be set to
any 5-hour increment between OFF and 100 hours.
• Hours to Service displays hours remaining to reach
the set service interval.
2. Press Key 5 to reset.
3. Press Key 2 to increase the interval or Key 4 to
decrease the interval, if desired. Press Key 3 to
confirm a change or reset the existing interval.
25
Page 27

Units
Key 1 Key 2 Key 3 Key 4 Key 5
The units can be set to display U.S. customary units or
the International System of Units (metric) and a 12-hour
clock or a 24-hour clock.
1. In the System Settings menu, select UNITS.
• Speed
• Temperature
• Clock
2. Toggle to the desired setting.
3. Press Key 1 or Key 5 to change the setting.
4. Press Key 3 to exit.
26
Page 28

Time
Key 1 Key 2 Key 3 Key 4 Key 5
Key 1 Key 2 Key 3 Key 4 Key 5
1. In the System Settings menu, select TIME.
• Source (GPS satellites or Internal Clock)
• GMT (Greenwich Mean Time) Offset
• DST (Daylight Savings Time) (Enable/Disable)
2. Toggle to the desired setting.
NOTE: Enabling DST adds one hour regardless of the
date. DST does not automatically update and must be
selected by the rider.
3. Press Key 1 or Key 5 to change the setting.
4. If Source was changed to Internal Clock, set the time
on the resulting screen. Toggle to Time. Press Key 1
or Key 5 to change the setting. Press Key 3 to exit.
5. Toggle to Set & Restart. Press Key 5 to select.
27
Page 29

System Info
Key 1 Key 2 Key 3 Key 4 Key 5
1. In the System Settings menu, select SYSTEM INFO.
2. View the following system information in this display.
•IDD Serial Number
• Bootloader Version
• Display Operating System Application Version
• Software Configuration and Date
• Map Data Version Build Date
• Trails Data Version and Build Date
3. To initialize an IDD for a snowmobile (when required),
see page 32. To update software, see page 61.
4. Press Key 3 to exit.
Vehicle Settings
In the System Settings menu, the VEHICLE SETTINGS
menu is specific to snowmobiles. See page 35.
28
Page 30

Diagnostics
Key 1 Key 2 Key 3 Key 4 Key 5
1. Press any key to display the IDD screen icons.
NOTE: For snowmobiles, only active faults display
and the engine must be running to view faults. If the
Malfunction Indicator Light (MIL) illuminates, stop the
snowmobile but do not stop the engine if you wish to
view the faults.
2. Press Key 3 to display the main menu options.
3. Toggle to DIAGNOSTICS. Press Key 3 to select.
4. If any faults have been detected, a description screen
displays with the number of faults listed at the bottom
center of the display.
5. Press Key 2 or Key 4 to scroll through the faults.
NOTE: Faults display if they were active at least once
during the current ignition cycle. If the Malfunction
Indicator Light (MIL) is ON, one or more of the faults
in this list is an active fault.
6. Press Key 5 to exit.
7. For a system diagnostics inspection and/or service,
please see your authorized Polaris dealer.
29
Page 31

IDD for Snowmobiles
General Snowmobile IDD Information
Certain Polaris IDD features are active only when using
the display on snowmobiles. Some IDD features may
function only while the engine is running (such as
Security and Diagnostics). If an IDD feature seems nonfunctional, start the engine to access that feature. Do not
allow an engine to run in an enclosed area without
adequate ventilation.
Snowmobile-specific IDD features include:
• Left Hand Controls
• Fuel Type Selection
• Security (if enabled)
IDD features that are not active when installed on a
snowmobile include:
• Gear selection (reverse only)
• All-Wheel Drive Indicator
CAUTION! The speedometer may display incorrect
values at the existence of electromagnetic
radiation >= 10 V/m.
The IDD initialization process must be performed on
some snowmobiles in order for a new or newly installed
IDD to function properly. It must also be performed every
time the IDD is updated with files from the RiderX web
site. See page 32. These models include:
• 600 AXYS models
• Any non-AXYS model for which an accessory IDD is
available
30
Page 32

IDD Power Sources
On snowmobiles equipped with an electric start battery
and IDD, always turn the key off when the IDD is not in
use. If the key remains in the RUN position after using
the auxiliary engine stop switch to stop the engine, the
IDD remains active, drawing power from the battery.
The IDD is not dependent on the battery while the engine
is running, but the battery supplies a constant power
source when the engine is off or when the engine is
transitioning between forward and reverse operation. If a
battery is not installed, the IDD reboots when the engine
is started and when electronic reverse (PERC) is used.
31
Page 33

Initialization Process
Key 1 Key 2 Key 3 Key 4 Key 5
Key 1 Key 2 Key 3 Key 4 Key 5
The initialization process must be performed when the
engine is running. Not all models require this procedure.
See page 30.
1. Start the engine. Do not allow an engine to run in an
enclosed area without adequate ventilation.
2. In the System Settings menu, select SYSTEM INFO.
3. Press and hold Key 1 until the next screen displays.
32
Page 34

4. Press Key 3. The display will reboot and begin the
configuration process.
Left Hand Controls
The left hand controls on AXYS and 600/800 PRO-RIDE
models allow riders to switch screens, zoom in or out and
drop waypoints without removing their hands from the
handlebars.
WARNING! Do not enter information or adjust this
device while operating your vehicle. Distracted driving
can result in loss of control, collision or accident,
which may result in serious injury or death. Avoid
using any features and devices while driving that may
take your attention away from the road or trail and
safe driving habits, even for a moment.
The operator assumes all risk associated with using
this device. Please read the owner’s manual provided
with your vehicle.
33
Page 35

MODE and SET Switch
Pressing the MODE and
SET switches quickly
(press/release) or slowly
(hold 2 seconds or longer)
allows riders to change a
variety of display options.
The functionality of each
switch is based on the
screen the IDD is
displaying at the time.
Switch functions are
outlined in the following
tables. Review these tables
to become familiar with the
functions of each switch.
Switch Functions While Viewing Maps
Quick = Press/Release Slow = Hold 2+ Seconds
Switch Motion
SET Slow Toggle between MAPS/TRAILS and
SET Quick Zoom IN (+)
MODE Quick Zoom OUT (-)
MODE Slow Drop waypoint at current location
Speed
MAIN screens
Result
Switch Functions While Viewing Main Screens
Quick = Press/Release Slow = Hold 2+ Seconds
Switch Motion
SET Slow Toggle between MAPS/TRAILS
SET Quick Toggle between Battery Voltage and
MODE Quick Toggle between Odometer, Trip 1 and
MODE Slow Clear the current trip meter
Speed
screen and MAIN screens
Coolant Temperature
Trip 2
Result
34
Page 36

Vehicle Settings
Key 1 Key 2 Key 3 Key 4 Key 5
Key 1 Key 2 Key 3 Key 4 Key 5
1. Press any key to display the IDD screen icons.
2. Press Key 3 to display the main menu options.
3. Toggle to System Settings. Press Key 3 to select.
4. In the System Settings menu, toggle to VEHICLE
SETTINGS (specific to snowmobiles). Press Key 3 to
select.
• Fuel type
• Lock
• Change Code
NOTE: Lock and Change Code display only if the
engine is running and the IDD has been initialized.
35
Page 37

Fuel Type Selection (Ethanol/non-Ethanol)
Key 1 Key 2 Key 3 Key 4 Key 5
1. In the Vehicle Settings menu, toggle to FUEL TYPE.
2. Press Key 3 to select.
3. Press Key 2 or Key 4 to toggle between the fuel
types. When the screen displays the fuel type used in
the fuel tank, press Key 3 to exit.
36
Page 38

Lock the Ignition
Key 1 Key 2 Key 3 Key 4 Key 5
First Time Activation
Snowmobiles equipped with the IDD are equipped with a
security function that can be activated by an authorized
Polaris dealer. If you have this feature activated, you can
lock the ignition to prevent unauthorized use when
leaving the snowmobile unattended. A locked system will
limit engine speed to 3000 RPM, which prevents clutch
engagement, and the snowmobile will not move when
throttle is applied.
1. Have the security system activated by your
authorized Polaris dealer.
2. The factory default security code is “000”. Change the
default security code to a code of your own choosing.
See Change Security Code on page 40.
Locking the Ignition
1. Start the engine. Do not allow an engine to run in an
enclosed area without adequate ventilation.
2. Press any key to display the IDD screen icons.
3. Press Key 3 to display the main menu options.
4. Toggle to System Settings > Vehicle Settings >
LOCK.
5. Press Key 3 to select. The ENTER CODE screen will
display.
37
Page 39

6. Press Key 2 or Key 4 to enter the current 3-digit
Key 1 Key 2 Key 3 Key 4 Key 5
security code. Press Key 5 to toggle to each digit.
7. If the code is not accepted, a BAD CODE screen will
display.
8. Follow the prompts and re-enter the current security
code. When the code is accepted, the “locked”
symbol and ENTER CODE screen displays. The
ignition is locked.
38
Page 40

Unlocking the Ignition
1. Start the engine. The locked symbol and ENTER
CODE screen displays. Do not allow an engine to run
in an enclosed area without adequate ventilation.
2. Press Key 2 or Key 4 to enter the current 3-digit
security code. Press Key 5 to toggle to each digit.
3. If the code is not accepted, a BAD CODE screen will
display. Follow the prompts and re-enter the current
security code.
4. When the code is accepted, the “unlocked” symbol
and SECURE OFF screen displays. The ignition is
now unlocked.
39
Page 41

Change Security Code
Key 1 Key 2 Key 3 Key 4 Key 5
Key 1 Key 2 Key 3 Key 4 Key 5
The first time you change the security code, enter the
default security code (000) at step 4.
1. Start the engine. Do not allow an engine to run in an
enclosed area without adequate ventilation.
2. Toggle to System Settings > Vehicle Settings >
CHANGE CODE.
3. Press Key 3 to select. The ENTER CODE screen will
display.
4. Press Key 2 or Key 4 to enter the current 3-digit
security code. Press Key 5 to toggle to each digit.
40
Page 42

5. After successfully entering the current security code,
Key 1 Key 2 Key 3 Key 4 Key 5
the CHANGE CODE screen will display. Enter your
new 3-digit security code.
6. Any time you change your security code, record the
new code below for future reference. Keep this
manual (or your security code) in a secure location
where others will not be able to access your code.
Code: ________________ Date: ______________
Code: ________________ Date: ______________
Code: ________________ Date: ______________
Code: ________________ Date: ______________
NOTE: If you lose or forget your code please see your
authorized Polaris dealer to have the code reset to
the default code (000). Only authorized Polaris
dealers may reset a lost or forgotten security code.
41
Page 43

Detonation Elimination Technology (DET)
The DET system prevents damage to the engine from
detonation by entering an engine protection mode
whenever the DET system is active.
When excessive detonation is detected, the check
engine light will illuminate. You may notice decreased
engine performance and RPM when the DET system is
activated. In most cases this is temporary and no action
is required. The engine will return to its normal
performance automatically.
If severe detonation occurs:
• The check engine light begins to flash steadily.
• The IDD displays “Detonation Detected - MAG (or
PTO)”.
• The engine enters DET latching (limp home) mode.
• On 2015 800 AXYS models, the ECU closes
exhaust valves to limit engine power in DET latching
mode. On all other 2015 AXYS and PRO-RIDE
models, the ECU will shut down the engine during
DET latching mode. In either event, restart the
engine to reset the mode.
• For all 2015 AXYS and PRO-RIDE models, the ECU
will shut down the engine during a critical overheat
condition.
42
Page 44

Engine Overheat Indicators
Temperature Scale
The engine temperature scale at the right side of the IDD
screen changes to RED and the check engine
temperature indicator at the top left of the screen
illuminates when the engine is overheating. Take action
to cool the engine.
The indicator will flash when engine temperature reaches
critical levels. Stop the engine immediately.
NOTE: Please see your vehicle owner’s manual for
more information.
A flashing indicator indicates continued operation could
result in serious engine damage. The engine
management system will automatically reduce engine
power and create a misfire condition. Stop the engine
immediately. Allow the engine to cool down.
NOTE: If engine overheating seems to be caused by
something other than poor cooling conditions, see
your dealer for service.
43
Page 45

Bluetooth
Before Connecting
Compatibility
1. Refer to your phone’s user manual before attempting
to connect to the IDD.
• Review how to connect your phone to a Bluetooth
device.
• Review the different types of connections offered by
your phone manufacturer and how the connection
type affects information sharing.
2. Verify that your phone is equipped with Bluetooth and
that Bluetooth is turned on.
NOTE: Some of the features and functionality of the
IDD may vary due to the operations software on your
phone.
44
Page 46

Connection Management
Key 1 Key 2 Key 3 Key 4 Key 5
Key 1 Key 2 Key 3 Key 4 Key 5
Enabling/Disabling Bluetooth
1. Press any key to display the IDD screen icons.
2. Press Key 3 to display the main menu options.
3. Toggle to PHONE. Press Key 3 to select.
4. The phone main menu screen displays.
5. Press Key 3 to turn Bluetooth on or off.
NOTE: The display will remember the state of
Bluetooth at the next power-up. It will automatically
connect to a paired device following the order set in
the priority list.
45
Page 47

Bluetooth Settings
Key 1 Key 2 Key 3 Key 4 Key 5
1. With the phone main menu screen displayed, press
Key 4 to open Bluetooth Settings.
2. When the display opens Bluetooth Settings it
becomes discoverable to other Bluetooth devices.
After 5 seconds the display will start searching for
devices.
NOTE: Devices must be discoverable to show up in
the list. Your phone settings may need to be changed
to allow notifications and missed calls and text
messages to display.
46
Page 48

3. When the search is completed, the IDD displays any
Key 1 Key 2 Key 3 Key 4 Key 5
devices found. Press Key 4 to toggle through the list.
The indicators at the lower right edge of the screen
indicate whether the selected device is paired and/or
connected.
Color/Indicator Description
BLUE The device is paired but not connected.
GREEN The device is paired and connected.
None The device is not paired.
4. The IDD will perform the search again every 10
seconds until the device is paired.
5. The display will not search for devices again unless
one of the following occurs:
• You exit and re-enter the display
• The device is disconnected
47
Page 49

Pairing From the Display
Key 1 Key 2 Key 3 Key 4 Key 5
Key 1 Key 2 Key 3 Key 4 Key 5
1. Refer to your phone’s user manual before attempting
to connect to the IDD. See page 44.
2. Toggle through the list to the desired device.
3. Press Key 3 to pair.
4. Accept the pairing request on your phone.
5. Press Key 3 to accept the request on the display. To
cancel the request, press Key 5.
48
Page 50

6. When the device is connected, the Pairing Complete
Key 1 Key 2 Key 3 Key 4 Key 5
Key 1 Key 2 Key 3 Key 4 Key 5
screen displays.
7. Press Key 3 to exit.
Pairing From the Device
To pair from the device follow the device’s instructions to
pair with the display. Accept the request on the display
when it appears. The device will automatically connect
after pairing.
If an error occurs during pairing, or if the pairing is
rejected by either device, the Pairing Canceled screen
displays.
8. Press Key 3 to exit.
49
Page 51

Connecting a Formerly Paired Device
Key 1 Key 2 Key 3 Key 4 Key 5
Key 1 Key 2 Key 3 Key 4 Key 5
1. To connect a device that was previously paired,
toggle to the device in the display. Press Key 3.
2. After connecting, the display will request the number
of missed calls and update the display.
NOTE: Phone compatibility may vary. Some functions
are dependent on phone settings that must be set by
the user. Refer to your phone’s user manual for more
information.
Disconnecting a Device
To disconnect a device, toggle to the device in the
display. Press Key 3.
50
Page 52

Unpairing a Device
Key 1 Key 2 Key 3 Key 4 Key 5
1. If the device is connected, disconnect the device
before unpairing.
2. To unpair a device, toggle to the device in the display.
Press Key 3 to unpair.
3. The confirmation screen displays. Press Key 3 to
confirm.
51
Page 53

Changing Device Automatic Connection Priority
Key 1 Key 2 Key 3 Key 4 Key 5
Key 1 Key 2 Key 3 Key 4 Key 5
1. To change which device automatically connects,
toggle to the desired device in the display. Press Key
1 to display the priority screen.
2. Press Key 3 to move the selected device up the list.
3. Press Key 5 to exit.
52
Page 54

Phone
Key 1 Key 2 Key 3 Key 4 Key 5
If a phone call is received while the phone is connected,
the caller’s name (if available) or phone number (if
supported) displays. Press Key 5 to acknowledge and
remove the notification.
NOTE: If the text messaging symbol in the upper left
corner of the display does not illuminate (in white), the
device is either not connected or not compatible with
this feature. Check your phone’s text notification
settings to make sure this feature is enabled.
53
Page 55

View Missed Calls List
Key 1 Key 2 Key 3 Key 4 Key 5
Key 1 Key 2 Key 3 Key 4 Key 5
1. With the phone main menu screen displayed, press
Key 1 to request missed calls. The screen displays
the phone symbol and “Reading Data”.
NOTE: To switch between Missed Calls and Unread
Text Messages while navigating either menu, press
Key 1.
2. If an error occurs during the request, an error
message screen displays. Press Key 3 to accept.
• For a “Data Request Timeout” message, press
Key 3 to repeat the request.
• For a “Data Error from Phone” message, verify that
your phone is compatible and that Bluetooth is
turned on before repeating the request.
54
Page 56

3. If the phone is compatible, the screen displays the
Key 1 Key 2 Key 3 Key 4 Key 5
Key 1 Key 2 Key 3 Key 4 Key 5
most recent missed calls (up to 20) or “No Missed
Calls”.
4. Press Key 2 or Key 4 to toggle through the list.
5. Press Key 3 to refresh the list.
View Unread Text Messages List
1. With the phone main menu screen displayed, press
Key 2 to request unread text messages. The screen
displays the text message symbol and “Reading
Data”.
55
Page 57

NOTE: To switch between Missed Calls and Unread
Key 1 Key 2 Key 3 Key 4 Key 5
Text Messages while navigating either menu, press
Key 1.
2. If an error occurs during the request, an error
message screen displays.
• “Data Request Timeout”: Press Key 3 to accept.
Press Key 1 to repeat the request.
• “Data Error from Phone”: Press Key 3 to accept.
Verify that your phone is compatible and that
Bluetooth is turned on before repeating the request.
56
Page 58

3. If the phone is compatible, the screen will display a
Key 1 Key 2 Key 3 Key 4 Key 5
Key 1 Key 2 Key 3 Key 4 Key 5
list of the unread messages. If there are no unread
messages since the device was paired, “No new
messages since connected” displays.
NOTE: Most Android phones will display ALL unread
messages. Other phones may display unread
messages only since connection with the display.
4. Press Key 2 or Key 4 to toggle through the list.
5. Press Key 3 to refresh.
Bluetooth Not Responding
Press Key 3 to reboot or press Key 5 to cancel. Bluetooth
may not be functional until the device is rebooted.
57
Page 59

RiderX
RiderX is the #1 resource for power sports enthusiasts.
RiderX provides everything you need to enhance your
riding experience. For the Polaris IDD, RiderX provides
downloadable trails. For more information about all of our
free features, please visit RiderX.com.
Hardware
USB Hardware Recommendations
For software updates, Polaris recommends using a
SanDisk® or similar USB flash drive with a minimum of
4G in available memory, formatted using the FAT32 file
system. For assistance, search the web for “How to
format FAT32”. For best results, remove all files from the
flash drive before starting the update process.
USB Connection Locations
NOTICE: The USB connection is not designed or
intended to support the connection of any phone or
device other than the recommended USB drive. The
vehicle’s USB connection is designed to support IDD
updates and allow the user to upload and download
tracks and waypoints.
RZR Models
The USB connector (if equipped)
is located behind the storage
compartment/glove box on the
dash.
58
Page 60

RANGER Models
The USB connector (if equipped) is located inside the
glove box.
AXYS Snowmobile Models
The USB connector (if equipped) is located under the
hood near the rear of the hood vents. Open the right side
panel to access the connector.
59
Page 61

Connect, Register and Update
Connect Your Smartphone to the IDD
The Polaris IDD can be used with most smartphones.
RiderX can be used to provide trail data for the IDD
device. Before registering and connecting the IDD to
RiderX, use the following steps to connect your
smartphone to the IDD.
1. Open your phone’s Bluetooth menu and make your
phone discoverable.
2. On the vehicle, turn the ignition key to the ON/RUN
position. The engine does not have to be running.
3. View the Bluetooth settings on your phone. The
Polaris IDD Connect Bluetooth Adapter should
appear as “Polaris - # # # #” (the last 4 digits of the
adapter’s address).
4. When the adapter is visible, select it to connect your
phone to the adapter.
5. Launch the Polaris IDD and verify that the connection
status bar indicates the phone is connected.
Register for a RiderX Account
1. If you don’t already have a RiderX account, go to
RiderX.com.
2. Click Sign In at the upper right corner of the page.
3. Scroll down and complete the online form to register
for a free account.
NOTE: Multiple IDD devices can be registered to the
same RiderX account. Additional accounts are not
required for multiple devices.
60
Page 62

Register an IDD (Rider or Dealer)
Be prepared to provide the following information when
registering an IDD:
• The vehicle’s Vehicle Identification Number (VIN)
(see the vehicle’s owner’s manual for location)
• The IDD serial number (located in the Systems Info
display on the IDD) (see page 28)
1. Log in at RiderX.com.
2. Select Digital Displays in the menu bar.
3. If you are a Polaris dealer, check the box next to “I
have a dealer number”. Enter your 7-digit dealer
number.
NOTE: When a user (rider or dealer) logs in to a
RiderX account, the user information for that account
will automatically populate the online registration
form.
4. Click on Register My Display.
Update Trails Data or Maps/Trails Data
The Trails data and the Maps/Trails data on your IDD can
be updated using files downloaded from your RiderX
account.
NOTE: Trails data expires 90 days from the file’s
release date.
An update involves four (4) procedures:
• Download the data
• Copy files to a USB flash drive
• Update the IDD
• Verify the update appears in SYSTEM INFO and in
the MAPS/TRAILS display.
Each procedure is outlined in detail on the following
pages. For future reference, a condensed version of the
entire update process is provided in a flow chart on page
70.
NOTE: Before updating the IDD, fully charge the
vehicle’s battery (if equipped). A 12-volt minimum is
required for completing the updates.
61
Page 63

Download the Data
1. Log in at RiderX.com.
2. Select Digital Displays.
3. Select Download Trails Data (recommended every 90
days) or Download Trails and Map Data
(recommended seasonally) for your vehicle type.
4. Accept the User Acknowledgement.
5. Choose “Save” if prompted to Run or Save. The
download may take several minutes depending on
your internet connection speed.
Copy Files to USB Flash Drive
Connect the recommended USB flash drive to the
computer used to download updates from RiderX.com.
See page 58.
The general procedures for extracting the files and
saving them to the USB drive are outlined below. Your
procedure may differ slightly depending on your
computer’s operating system.
NOTE: Do not place the extracted files inside a folder
on the USB drive. Place only the extracted files on
the flash drive.
MAC Computers
1. Locate the downloaded zipped file (.zip) on your
computer. Double-click the file to extract the contents.
2. Locate the extracted files and copy them onto the
USB flash drive.
WINDOWS Computers
1. Locate the downloaded executable file (.exe) on your
computer. Double-click the file. Select “Run”.
2. Make a note of the file path shown in the “Extract to”
window. Click “Extract”.
3. Navigate to the file location noted in the previous
step. Open the folder and copy all of the extracted
files onto the USB flash drive.
62
Page 64

Update the IDD
Key 1 Key 2 Key 3 Key 4 Key 5
1. Before updating the IDD, always export your existing
tracks and waypoints to a USB drive to avoid losing
them. When the IDD update is performed, all formerly
saved tracks and waypoints will be erased from the
IDD.
2. After downloading an update from your RiderX
account and saving the extracted files to the USB
flash drive, connect the flash drive to the USB
connector on your vehicle. For vehicle USB connector
locations, see page 58.
NOTE: Always download the most recent data from
RiderX.com before updating the IDD.
3. Turn the ignition key to the ON/RUN position. If your
vehicle does not have a battery, start the engine and
allow the idle to stabilize before continuing. Do not
allow an engine to run in an enclosed area without
adequate ventilation.
4. Press any display key to display the IDD screen
icons.
5. Press Key 3 to display the main menu options.
6. Toggle to System Settings. Press Key 3 to select.
7. In the System Settings menu, select SYSTEM INFO.
63
Page 65

8. Compare the “Trails date” on this screen with the
Key 1 Key 2 Key 3 Key 4 Key 5
“date modified” of the newly downloaded file on your
USB drive or computer.
9. Continue with the update only if the new file date is
more recent than the date listed in the IDD.
NOTE: Trails data expires 90 days from the file’s
release date.
10. Press Key 5 twice to continue.
11. If an error message occurs, perform one or all of the
following actions to resolve the issue.
• Remove and reconnect the USB flash drive
securely.
• Make sure the RiderX files are not inside a folder on
the flash drive.
• Make sure only RiderX files are on the flash drive.
Remove any other files if necessary.
• Try using a different USB flash drive.
12. If files are found by the device, you’ll be prompted to
restart in bootloader mode. Press Key 3 to confirm.
64
Page 66

13. After the restart, read the warning message.
Key 1 Key 2 Key 3 Key 4 Key 5
Key 1 Key 2 Key 3 Key 4 Key 5
“WARNING! Maps/Trails are supplied as an aid and
should not be used for any purpose requiring precise
measurement of direction, distance of location.
Polaris makes no warranty as to the accuracy or
completeness of this map data.”
14. Press Key 3 to accept. The screen displays the files
found on the USB flash drive.
15. Press Key 3 or Key 4 to toggle to the desired file.
Press Key 5 to select.
16. Press Key 5 to confirm.
65
Page 67

NOTE: Do NOT turn the ignition key off while the file
Key 1 Key 2 Key 3 Key 4 Key 5
is downloading. A Trails Data update will take about 5
minutes. A Trails and Map Data update will take
about 35 minutes.
17. Wait for the process to complete. If the update
indicator at the upper left corner of the screen is
spinning, the update is processing even if the status
bar stops moving.
NOTE: If an error message displays, if the update
takes much longer than expected or if a black screen
displays when Maps are selected (after update is
complete), an interruption or other event may have
resulted in corrupt files. Perform the update manually
by following the Manual IDD Update procedure on
page 68.
18. The IDD will reboot automatically when the download
is complete.
19. Turn the ignition key off.
20. Remove the USB flash drive from
the vehicle. Close the protective
cover on the USB connector.
21. Return the USB connector to its
secured position if it was moved
when connecting.
66
Page 68

22. Repeat steps 3-7 to verify the update in SYSTEM
Key 1 Key 2 Key 3 Key 4 Key 5
2014 - 11 - 07
INFO. The “Trails date” should now reflect the more
recent file date.
23. Press Key 3 to exit.
24. Perform the following steps for snowmobiles after
every update.
• 800 AXYS models: Turn the ignition key off. Start
the engine to allow the IDD to automatically initialize
(AWD indicator will disappear when completed).
• 600 AXYS and all non-AXYS models: Turn the
ignition key off. Perform the manual initialization
procedure. See page 32.
67
Page 69

Manual IDD Update
Use this procedure only in the event of a failed update
using the previous procedure.
1. Delete the formerly downloaded (corrupt) files from
the USB drive. Return to RiderX.com and download
new files. See Download the Data on page 62.
2. Turn the ignition key off for at least 10 seconds.
3. Connect the flash drive to the USB connector on your
vehicle.
4. Press and hold any IDD key while turning the ignition
key to the ON/RUN position. Continue to hold the IDD
key until “Booting...” is no longer displayed. Release
the IDD key.
5. Return to page 65 and perform steps 13-24 of the
Update the IDD procedure.
6. For more assistance:
• See your Polaris dealer
• Go to RiderX.com
• Go to Polaris.com (Select your product group and
click on the “Help” link at the upper right corner of
the page. When the help page displays, look for
“Helpful Links” at the right side of the page.)
68
Page 70

Verify the Update in MAPS/TRAILS Display
Key 1 Key 2 Key 3 Key 4 Key 5
1. Press any key to display the IDD screen icons.
2. Press Key 3 to display the main menu options.
3. Toggle to MAPS/TRAILS. Press Key 3 to select.
4. Read the warning message that displays.
“WARNING! Maps/Trails are supplied as an aid and
should not be used for any purpose requiring precise
measurement of direction, distance of location.
Polaris makes no warranty as to the accuracy or
completeness of this map data.”
5. Press Key 3 to accept.
6. Press any key to display the IDD screen icons.
7. Press Key 1 multiple times to zoom out.
8. Verify that the updated trails data is on map. Toggle to
System Settings > SYSTEM INFO. The Trails and
Map dates should now reflect the more recent file
dates.
69
Page 71

Update Process Flow Chart
Log in at RiderX.com
Select DIGITAL DISPLAYS
Turn key to ON/RUN
(Start engine if no battery)
Install USB drive
to computer
Register new IDD
or Enter existing IDD #
Navigate to
SYSTEM INFO
Install USB drive
to vehicle connector
IDD reboots
Select UPDATE
(Press Key 5 twice)
Select UPDATE
(Key 5: Blue Arrow)
Verify update in
MAPS/TRAILS display
Verify update in
SYSTEM INFO
Remove USB drive
Select file
(gci.bin or tar.gz)
Confirm update
(Key 5: Green Arrow)
Extract files and
copy to USB drive
Initialize
(Snowmobiles only)
Save to computer
(Choose Save, not Run)
Select TRAILS or
TRAILS & MAP data
This flow chart is a condensed version of the procedures
outlined on the preceding pages.
70
Page 72

Frequently Asked Questions
Q: How do I register my device?
A: Log in at RiderX.com to register your device and
receive access to maps and trails updates. See
page 61.
Q: How do I update my trails/map on my display?
A: Log in at RiderX.com to download the latest
MAPS/TRAILS data. Then transfer the files to the
IDD using a USB flash drive. Refer to Update
TRAILS or MAPS/TRAILS Data on page 61.
Q: How do I find the USB connection on my specific
vehicle?
A: Refer to USB Connection Locations on page 58.
Q: How can I place, name and save a waypoint?
A: Refer to GPS/Tracks Map on page 14.
Q: Why does my display not acquire satellite signal
or GPS?
A: The GPS can take a few minutes to lock from a
cold start. After warm-up, if less than 4 satellites
are shown in the GPS satellite screen move the
vehicle to an area free of overhead obstructions.
Refer to GPS Settings on page 17.
Q: How can I save, import and export a track or
waypoint?
A: Refer to GPS/Tracks Map on page 14 or
Importing and Exporting Tracks and Waypoints on
page 19.
Q: I get a “Memory Full” warning while in the MAPS/
TRAILS screen, what should I do?
A: You are reaching the limit allowed for an individual
track. Save the current track and start a new
track. Up to 10 tracks can be saved.
Q: How can I select different fuel types on the
display for my snowmobile?
A: Refer to Fuel Type Selection on page 36.
71
Page 73

Q: How do I set the security function on the display
for my snowmobile?
A: Refer to Lock the Ignition on page 37.
Q: How do I connect my phone via Bluetooth to the
IDD?
A: Refer to Bluetooth on page 44. Refer to the
phone’s user manual for specific Bluetooth
functionality.
Q: How do I change the screen brightness from day
to night mode?
A: Option 1: While viewing the main menu screen,
press Key 1 to switch between Day/Night mode.
Option 2: Main Menu > System Settings > Display
> Day/Night
Q: How do I find what version of software my display
currently has?
A: Main Menu > System Settings > System Info >
Config File
Q: How do I set the clock on my display?
A: Option 1: Make sure the time zone (GMT offset)
and daylight savings mode is correct for your
location if in GPS mode. See page 27. GPS
automatically sets the clock when there is a
locked GPS signal.
Option 2: Main Menu > System Settings > Time
Q: What happens if I lose or forget my security code
for my snowmobile?
A: If you lose or forget your code please see your
authorized Polaris dealer to have the code reset
to the default code (000). Only authorized Polaris
dealers may reset a lost or forgotten security
code.
72
Page 74

For your nearest Polaris dealer,
call 1-800-POLARIS (765-2747)
or visit www.polaris.com
Polaris Industries Inc.
2100 Highway 55
Medina, MN 55340
Part No. 9925416 Rev 03
Printed in USA
 Loading...