

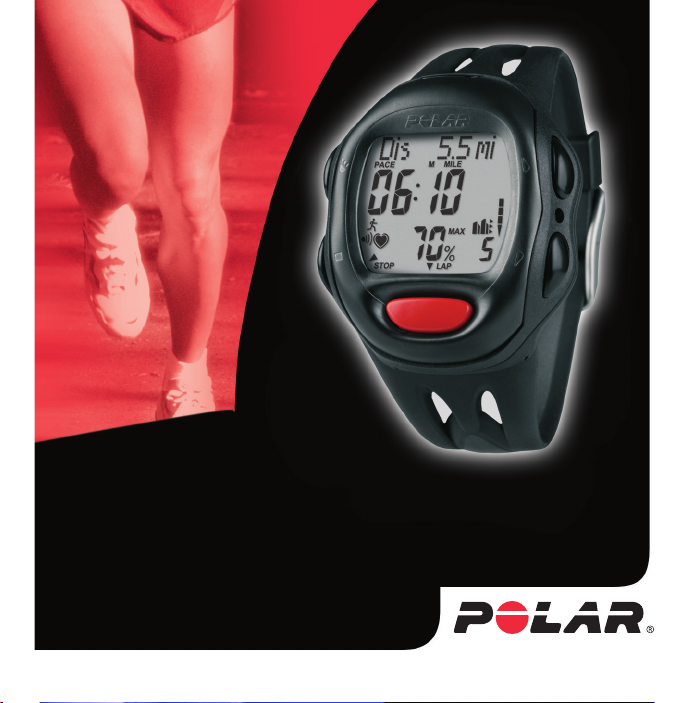
S 625X
RUNNING COMPUTER
ENG
USER MANUAL

Display symbols
Indicates an ongoing heart rate measurement and flashes to the beat of your heart.
Indicates there has not been heart rate reception for at least 5 seconds.
- - Indicates there is no heart rate reception. Bring the wrist unit up to your chest
near the transmitter’s Polar logo.
The wrist unit starts looking for the heart rate signal again.
Options mode: indicates that you are setting the running functions
Time of day/Measuring/Recording mode: indicates that running speed is on.
File mode: indicates running information.
Options mode: indicates that you are setting the bike functions
Time of day/Measuring/Recording mode: indicates that bike 1 or 2 is on.
File mode: indicates cycling information.
In the Time of day display the alarm is on.
Measuring mode: beeps if you are exercising outside your target heart rate zone.
Fitness Test mode: sounds an alarm at the end of the fitness test.
Indicates the Interval Trainer.
Indicates continuous interval (Cont).
Recording mode: indicates the heart rate above the target zone.
Recording mode: indicates the heart rate below the target zone.
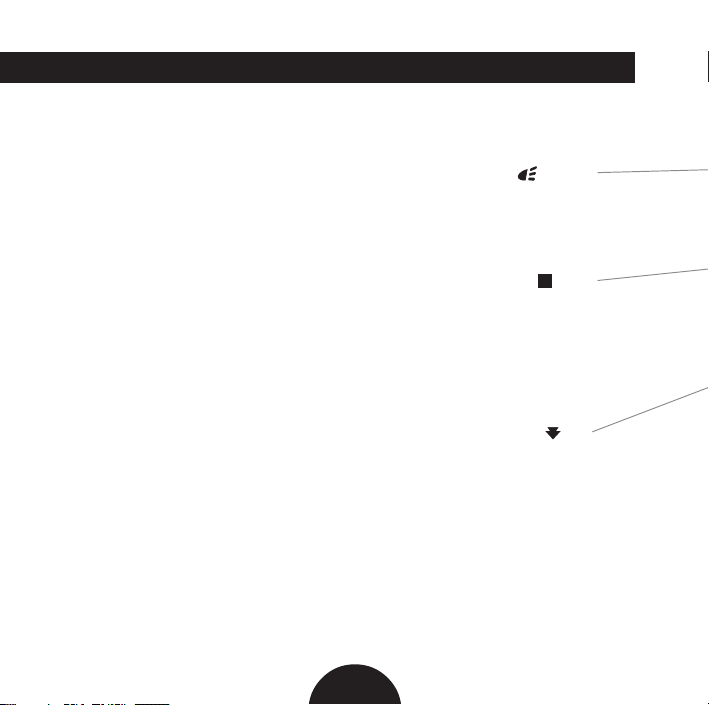
The graphic bar consists of five blocks. A flashing block indicates in which level you are
in the Options settings or File recalling loops. Continuously running bars indicate that
the exercise is recorded.
Indicates low battery.
See the glossary for display text interpretation.
Road Map
Time of
Day
Measuring
Mode
Recording
Mode
Monitor
Set
Sound
On/OFF
Units 1/2
Help
On/OFF
Keep the Road Map and Quick Guide on the back cover open while reading the manual.
File
Recorded
Information
Watch
Set
Alarm
Time 1/2
Date
Remind
On/OFF
Options Tests
Op. Test
Fit. Test
Op. Test
Exercise
Set
BasicUse, E0
ExeSet 1, E1
E2
E3
E4
E5
Interval
On/OFF
Memory
Rec. Rate
Reset
Set
5 Sec
15 Sec
60 Sec
Connect
Infrared
Communication
Function
Set
OwnCal
On/OFF
Tests
On/OFF
HR
-p
max
On/OFF
Altitude
On/OFF
AutoLap
On/OFF
OK
Scroll Up / Down
STOP - exit the displayed
mode
Speed
Set
Speed OFF
Run On
Bike 1/2
Wheel
Cadence
On/OFF
Power
On/OFF
Foot pod
calibration
User
kg/lbs
cm/ft inch
Birthday
Activity
HR
VO
Set
Sex
max
2max

Dear Customer
Congratulations on purchasing a Polar Running Computer! We are proud
to assist you in achieving personal fitness and performance goals.
If you want to get even more out of your Running Computer during training,
check www.polar.fi for:
• the best product and training tips in Polar Personal Trainer
• the software updates and other value added service for your S-series
Running Computer in Polar Product Support

The features of this Running Computer provide you with the various ways to
customize your exercise sessions so they meet your personal needs.
For more information about the different functions, see the "All that you can
do with your Running Computer" section.
Please read this manual carefully to familiarize yourself with the Polar Running
Computer. Here is where you can find the information you need to use and
maintain your equipment. The function Road Map on the front cover is a quick
guide to the versatile features of the Running Computer. The front cover also
contains the different display symbols. There is a Quick Guide on the back cover
on how to use the buttons of the wrist unit.
Please refer to the glossary for special terms and text explanations.
The alphabetical index will help you quickly find answers to any questions
that you might encounter while using your Polar Running Computer.
Thank you for choosing Polar!

CONTENTS
A. Getting going ....................... 5
Running Computer parts . ....................... 5
Buttons and their functions ....................6
Easy start ...................................................8
How to prepare the wrist unit ........... 8
Installing the Polar S1™ foot pod ..... 9
Assembling the S1 foot pod
battery .................................................. 9
Attaching the S1 foot pod
on your shoe ...................................... 10
How to put the transmitter on ........ 11
How to start measuring
your heart rate ................................... 11
How to stop measuring
your heart rate ................................... 12
After exercising .................................. 12
All that you can do with your
Running Computer ................................ 13
B. How to enter settings ........ 17
User information settings ..................... 18
Exercise settings ..................................... 21
Selecting exercise type .......................... 21
Setting exercise sets .......................... 22
Setting timers ................................ 24
Setting limits .................................. 24
Setting pace limit .......................... 24
Turning limits on/off ..................... 25
Setting recovery calculation ......... 26
Setting interval type ..................... 27
Setting number of intervals and
recoveries ....................................... 28
Setting interval recovery .............. 29
Naming exercise sets ......................... 30
Setting recording rate ........................... 31
Turning functions on/off ....................... 33
OwnCal calorie counter on/off......... 33
Test on/off .......................................... 34
Predicted maximum
heart rate on/off ................................ 34
Altitude and thermometer on/off ... 34
AutoLap on/off .................................. 35
Speed settings ........................................ 36
Running settings .................................... 36
Calibration by running ...................... 37
Calibration manually ......................... 38
Bicycle settings ....................................... 38
Wheel size .......................................... 39
Cadence on/off .................................. 40
Power on/off ...................................... 41
Naming bike 1 or 2 ............................42
Monitor settings .................................... 43

Activity/button sound on/off ............ 43
Selecting measuring units ................ 43
Help on/off ......................................... 44
Watch settings ........................................ 45
Setting alarm ..................................... 45
Setting time of day ............................ 46
Setting date ........................................ 46
Reminders on/off ............................... 47
Setting tips ............................................. 48
Swap time 1 or time 2 .......................48
Shortcut to watch settings ............... 48
Swap measuring units ....................... 48
Swap date, user ID number,
user name and logo .......................... 48
C. Exercise ................................ 49
Measuring mode .................................... 49
Recording mode .....................................52
Heart rate zone alarm on/off ........... 53
Swapping the heart rate
pace limits .......................................... 54
Illuminating the display .................... 54
Storing lap and split time ................. 55
Pausing the exercise .......................... 55
Swapping the displayed
exercise information ......................... 56
Starting an exercise set ......................... 58
Exercising with Interval Training Set ... 59
Warm-up phase .................................. 60
Interval phase .................................... 60
Cool-down phase ............................... 63
Interrupting an interval
training exercise ................................ 64
Exercising with BasicSet ........................ 64
Starting the timers ............................ 64
Starting the recovery calculation ..... 65
Stopping the exercise ............................ 65
Tips during the exercise ........................ 65
Swapping the exercise type .............. 65
Swapping the speed setting .............66
Resetting the trip distance ............... 66
Returning to the manually
set altitude ......................................... 66
Restarting the interval or
recovery calculation .......................... 66
Interrupting an interval or
recovery calculation .......................... 67
Interrupting a phase of an
interval training exercise .................. 67
Heart Touch Function ........................ 67

D. How to recall
training information .......... 68
Exercise time ...................................... 70
Recovery information of BasicSet .... 70
Exercise distance ................................ 70
Pace information ............................... 70
Speed information ............................ 70
Cadence information ........................ 70
Altitude ............................................... 71
Temperature....................................... 71
Ascended meters/feet ....................... 71
Power ..................................................71
Pedaling index ................................... 71
Left right pedaling balance ..............71
Limits ................................................... 71
Exercise time within, above and
below the target zones ..................... 72
Calorie expenditure ........................... 72
Cumulative calorie count ..................72
Cumulative exercise time count ....... 72
Cumulative running/riding time ...... 72
Total distance (Tot. Dist./Odometer) .. 73
Interval Training information........... 73
Lap information .................................75
Recorded samples .............................. 77
Deleting a file .................................... 78
Deleting all files ................................. 78
Records file ............................................. 79
Resetting cumulative
counts to zero .................................... 80
Returning to your previous
maximum value ................................. 81
E. Tests ...................................... 82
Polar Fitness Test .................................... 82
OwnIndex ........................................... 82
Predicted maximum heart rate ........ 84
Fitness test settings ........................... 85
Carrying out the test .........................85
Update OwnIndex and HR
Fitness classes ..................................... 88
Training Optimizer................................. 90
OwnOptimizer ................................... 90
Baseline tests ...................................... 91
Monitoring OwnOptimizer values ...91
Carrying out the test .........................91
How to interpret the results ............. 93
-p ........ 87
max
F. Care and maintenance ....... 97
G. Precautions ....................... 101
H. Frequently asked
questions ........................... 105
I. Technical Specifications ... 109
J. Limited Polar International
Guarantee ......................... 112
K. Disclaimer ......................... 113
L. Polar glossary ................... 114
Display texts ......................................... 115
Index ...................................................... 119
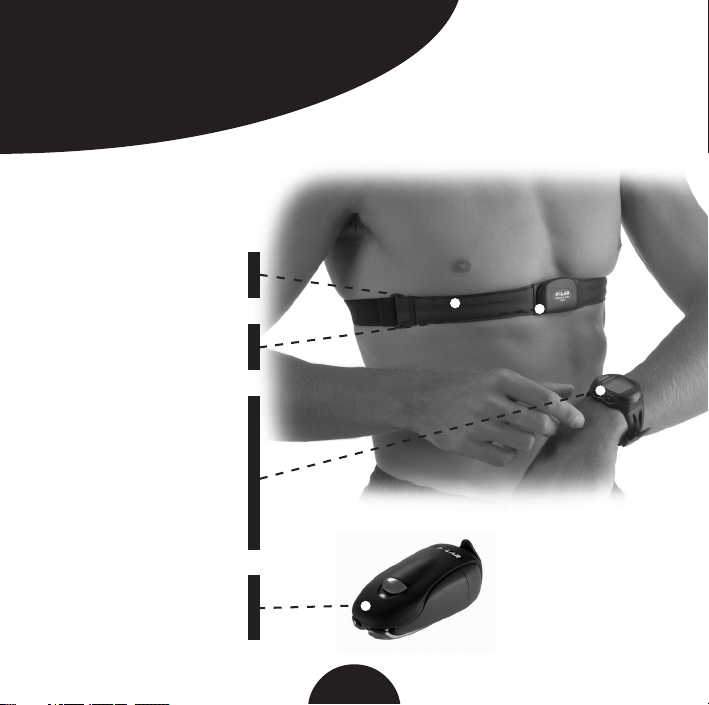
A. GETTING GOING
Running Computer
parts and their
functions
The electrode areas of
the strap detect your
heart rate.
The connector transmits
your heart rate signal
to the wrist unit.
The wrist unit displays
and records your heart
rate and running/cycling
data during exercise.
Enter your personal
settings into the wrist
unit and analyze the
exercise files after you’re
done.
The foot pod transmits
the running speed and
distance measurements
to your wrist unit.
A 5
Buttons and their functions
Signal/ Light Turns the beep on or off.
Turns the backlight on.
Stop Return - Stops measuring the heart rate.
Exits the displayed mode and returns to
the previous mode level.
Returns to the Time of day display
from any mode by pressing and
holding the stop button.
OK Accept - Starts measuring the heart rate (start).
Enters the displayed mode shown on
the lower level (start). Locks in your
selection (ok). Records lap information
(lap). The Help text (start, ok or lap)
that appears on the display above the
button indicates its use.
SIGNAL
LIGHT
STOP
OK
/
A 6
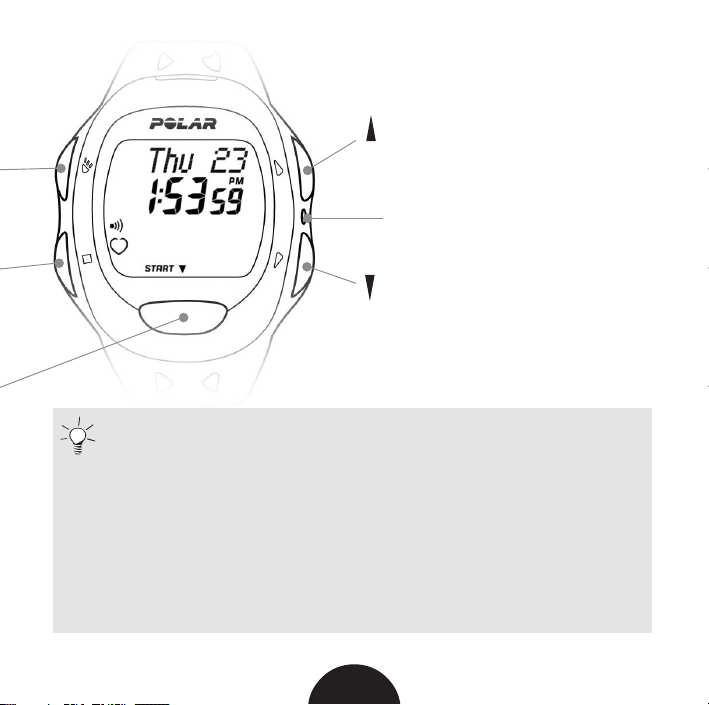
Up Moves to the following
mode. Increases the
selected value.
Reset Resets the Running
Computer.
Down Returns to the previous
mode. Decreases the
selected value.
Useful tips
• Briefly pressing a button (approximately 1 second) will do different
things than pressing and holding the button for a longer period of
time (approximately 2 to 5 seconds). If your press the button for a
longer period of time, you can use shortcuts.
• The buttons are slightly stiffer than those of an ordinary watch to
prevent them from being pressed accidentally.
•You can always return to the Time of day display from the Options
setting or File recalling loops by pressing and holding the stop button.
A 7

Easy start
How to prepare the wrist unit
1. Since the display is blank when the wrist unit leaves the
factory, you have to activate the wrist unit by pressing the
OK button twice, after which the Time of day display
appears. This is a one-off procedure; once you have turned
on your wrist unit you can not turn it off anymore.
2. You may start measuring your heart rate right away
using the default settings. However, the following
settings are ones that it would be useful to change as
soon as possible: Time of day (see section Setting the
watch) and personal user settings (see section User
information settings).
3. Your Running Computer has various functions that you
can use according to your personal training needs. For
more information, see section All that you can do with
your Running Computer. You can either manually enter
the settings by pressing the wrist unit buttons or you can
define your settings with Polar Precision Performance
software, after which the data should be transferred from
your PC to the wrist unit.
4. Wear the wrist unit as you would wear an ordinary
watch. If you go biking, we recommend attaching the
wrist unit to the accessory Polar Bike Mount™.
A 8

Installing the Polar S1™ foot pod
First, make sure that there is a battery in the foot pod. You can check this by
pressing the red button on the foot pod. If a green light starts to flash, you
can start attaching the foot pod on your shoe. If there is no light, start from
the chapter Assembling the S1 foot pod battery.
Assembling the S1 foot pod battery
The estimated average battery life span of the foot pod is 40 hours of use. If
you prefer Polar to replace the battery, you can send or take the sensor to a
Polar Service Center. There the sensor is tested after the battery is replaced.
However, the S1 foot pod was designed so that you can replace the battery
yourself. If you do so, follow the instructions below carefully:
1. Detach the foot pod from its holder by unfastening the flap and lifting
the foot pod from the rear.
2. Remove the black top cover from the foot
pod by lifting the cover from the rear. Use
the holder to remove the cover (see picture).
3. Open the battery cover carefully. Pull out the
battery case. Replace the old battery (AAA)
with a new one.
4. Insert the battery case back inside the foot pod. Make sure that the
battery case slides into the grooves of the sensor.
5. Check that the sealing rings are in the grooves. Close the battery cover and
place the black top cover on top of the foot pod. Make sure that it is secured.
6. Test the foot pod by checking that the green light starts to flash after you
press and hold the red button on the foot pod. Press and hold the red
button again to turn the foot pod off.
7. Do not throw the replaced battery away with normal waste; take it to a
place where batteries are recycled.
A 9
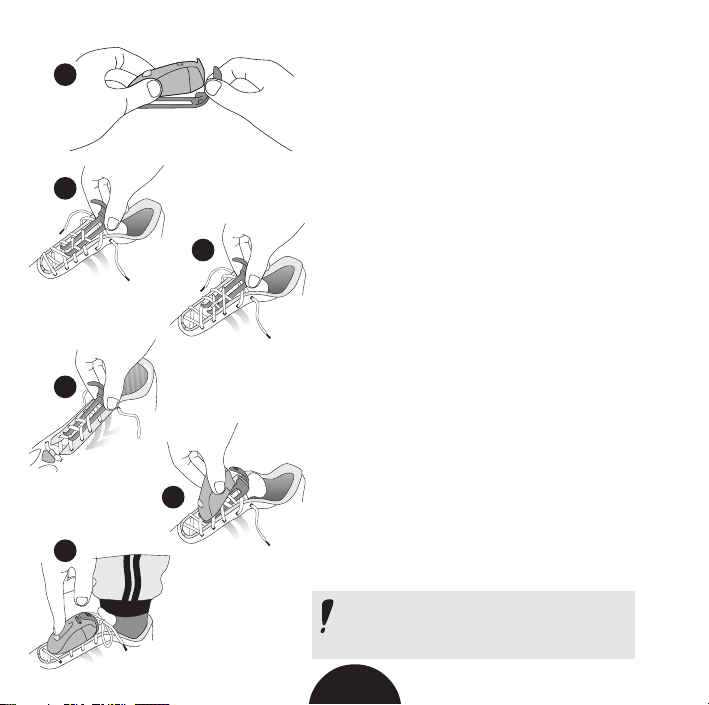
1
Attaching the S1 foot pod on your shoe
1. Detach the holder from the foot
pod by unfastening the flap and
lifting the foot pod from the rear.
2a./b./c. Loosen your shoelaces and place
2a
the holder under the laces,
above the tongue of the shoe.
Tighten the laces.
2b
3. Attach the foot pod to the
holder by fitting the front part
(closer to the red button) of the
foot pod to the holder and
pressing from the rear. Fasten
the flap. Make sure that the
foot pod does not move and
2c
4. Turn the foot pod on by pressing
that it is aligned with your foot.
and holding the red button. A
green light will start to flash.
Turn the foot pod on after
your heart rate is displayed
3
on the wrist unit.
5. After exercising, turn the foot
4
pod off by pressing and holding
the red button. The green light
fades.
When the green light on the foot
pod turns red, you need to replace
the battery before your next run.
A 10
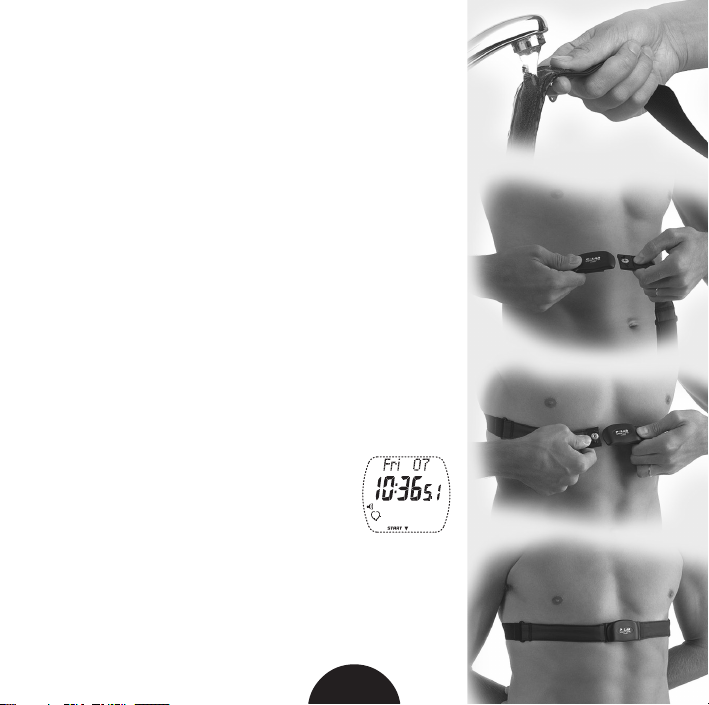
How to put the transmitter on
1. Moisten the electrode areas of the strap
under running water and make sure that they
are well moistened.
2. Attach the connector to the strap. Position
the connector's letter L to the word LEFT on
the strap and snap the fastener.
3. Adjust the strap length to fit snugly and
comfortably. Secure the strap around your
chest, just below the chest muscles, and snap
the second fastener.
4. Check that the wet electrode areas are firmly
against your skin and that the Polar logo of
the connector is in a central, upright position.
How to start measuring your heart rate
1. Begin with the display that
shows the time of day.
2. Keep the wrist unit within
1 meter/ 3 feet of your
transmitter.
3. Check that you are not near other people
that have heart rate monitors, high voltage
power lines, televisions or other sources of
electromagnetic disturbance. In some cases,
A 11

mobile phones may cause interference when starting
the heart rate measurement.
4. Press the OK button to start measuring your heart rate.
A heart symbol will start flashing and your heart rate
(beats per minute) will appear in a maximum of 15
seconds.
5. Press OK again. The stopwatch starts running and you
can start exercising. The exercise data will only be
stored in a file if you have turned the stopwatch on.
How to stop measuring your heart rate
1. Press the stop button. The stopwatch and other calculations stop.
The heart rate measuring continues, although exercise data is no longer
recorded.
2. Press the stop button again. The heart rate measuring stops.
The wrist unit shows the Time of day display again.
After exercising
1. Carefully wash the transmitter with a mild soap and water solution.
2. Rinse it with pure water.
3. Dry the transmitter carefully with a soft towel.
4. Store the transmitter in a clean and dry place. Dirt impairs the elasticity
and functioning of the transmitter. Sweat and moisture can keep the
electrodes wet and the transmitter activated, which shortens battery life.
A 12

All that you can do with your Running Computer
Here is a short overview of the modes of the wrist unit and the different
functions they offer you.
1. TIME OF DAY
In this mode you can use your running computer as a watch since it can
display the time, date, weekday, alarm and two different time zones. In
addition, you can upload a personal logo, user number or user name
from a PC. You can also upload 7 reminders with alarms.
2. MEASURING MODE (SEE SECTION C. EXERCISE)
In this mode your heart rate is displayed, but exercise information is not
recorded or stored in the File mode. In Measuring mode you can choose
the information that is displayed on the wrist unit during exercise.
3. RECORDING MODE (SEE SECTION C. EXERCISE)
In Recording mode your exercise is recorded and stopwatch and other
calculations are started. You can use the BasicUse function when you
just want to exercise without setting target limits, timers or other
exercise settings. If you use the settings mentioned above, you can
program up to five exercise sets for different kind of exercises.
A 13

A. BasicUse is the easiest way to start exercising because you do not
have to set different target limits or timers. You just start in Measuring
mode and choose BasicUse and you are ready to go. You can select
among several different heart rate, running or cycling information
alternatives for the display of your wrist unit.
B. Freely programmable BasicSet offers you the possibility to set
three functions to control your exercise session. 1. Three adjustable
target limits (either HR, % of HR
or Pace limit types) 2. Three
max
adjustable alternating timers. 3. Time-based or heart rate-based
recovery calculation. By using these functions, you can easily control
your normal exercise session. You can program several different kinds of
exercise sets. When training, choose the one that suits the training you
plan to do best.
C. Freely programmable Interval Trainer automatically guides you
through your interval training session. You can program the following
exercise phases:
1. warm-up period with target limits and a countdown timer
2. up to 30 intervals with target limits and an option for a recovery
calculation after each interval
3. a cool-down period, using a countdown timer after intervals
Use of this Interval Training function leaves you free to concentrate
on your exercise during the interval training. Your running computer
takes care of observing timers and limits, all you have to do is exercise.
A 14

4. FILE (SEE SECTION D. HOW TO RECALL TRAINING INFORMATION)
In this mode you can recall your training information. Your running
computer saves up to 99 files of exercise information when you use the
Recording mode (stopwatch on). For more information about the recorded
training information, see chapter D. How to Recall Training Information.
5. OPTIONS (SEE SECTION B. HOW TO ENTER SETTINGS)
In the Options mode you set all your personal settings for optimal use of
your running computer. It is highly recommended that you enter all
your personal settings in your wrist unit before you start to use your
running computer for the first time. By doing so, you guarantee the
optimal functioning of your running computer. You can also use the
Polar Precision Performance software to set and upload your personal
settings from your PC to your wrist unit.
6. TESTS (SEE SECTION E. TESTS)
In this mode you can carry out the Polar Fitness and OwnOptimizer
Tests.
Polar Fitness test estimates your maximal aerobic power (VO
2max
) and
shows the result as a Polar OwnIndex value. This test also provides a
predicted maximum heart rate value (HR
-p). The Polar Fitness Test is
max
designed to monitor your personal progress. You should do the test
regularly to see the changes in your cardiovascular fitness. Your running
computer will memorize your last OwnIndex value.
A 15

Polar OwnOptimizer helps you to optimize training load during training
program so that training will develop performance and will not lead to
long-term under- or overtraining. OwnOptimizer is a modification of
traditional proven orthostatic overtraining test and is based on heart
rate and heart rate variability measurements done during an orthostatic
test. Polar OwnOptimizer test is a perfect tool for all those who want to
practice sports, avoiding at the same time all eventual problems caused
by incorrect training methods.
7. CONNECTION (SEE THE SEPARATE TOOLKIT CD-ROM MANUAL)
In Connection mode you can download recorded training information
from your wrist unit’s memory to your PC for more elaborated analysis.
You can also upload your wrist unit settings from your PC. To perform
the above-mentioned operations, you need the Polar Precision
Performance software.
A 16
B. HOW TO ENTER SETTINGS
This section describes how to manually enter
settings by pressing the wrist unit buttons.
However, Polar Running Computer offers you
another and faster way as well: prepare your
settings with Polar Precision Performance
software and upload them to your wrist unit from
your PC. See the separate CD-ROM set for infrared
communication possibilities.
After preparing your settings you can upload options lock from the
Polar Precision Performance software to ensure that your settings will
not change. You must deactivate the options lock from the "user
features" of the software.
Time Of
Day
Monitor
Set
File
Watch
Set
Options
Exercise
Set
Memory
B 17
Tests
Set
Connect
Function
Set
Speed
Set
User
Set
User information settings
Options
User Set
kg/lbs
cm/
feet inch
Birthday
In the User Set loop you can move forward only by pressing OK.
The digits run faster if you press and hold the up or down button as you
adjust the value. Release the button when approaching the desired value.
Measuring units depend on your choice in Options/ Monitor Set/ Unit 1 or Unit 2.
Weight kg lbs
Height cm ft/ inch
Date of birth setting order day - month - year month - day - year
As you set your weight and height, adjustable units 1/2 can be
changed by pressing and holding the signal/light button.
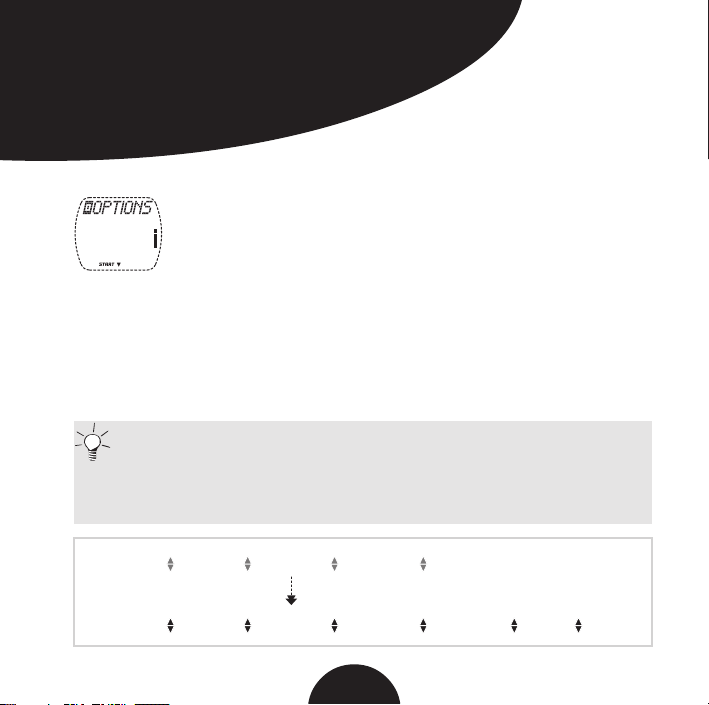
1. In the Time of day display scroll up or down until OPTIONS is displayed.
2. Press OK to enter the Options mode. EXERCISE SET
is displayed.
3. Scroll up or down until USER SET is displayed.
4. Press OK to start the user information settings.
Sex
Activity
HR
max
Units 1 Units 2
VO
2max
B 18

Weight (kg or lbs)
5. Scroll up or down to adjust your weight. Press OK.
Height (cm or ft/ inch)
6. Scroll up or down to adjust your height. Press OK.
Date of birth (Birthday)
7. Scroll up or down to adjust your day of birth.
Press OK.
8. Month appears. Scroll up or down to select
Units 2: setting order
is month - day - year.
your month of birth. Press OK.
9. Year appears. Scroll up or down to adjust the year of birth. Press OK.
Sex
10. Scroll up or down to select your gender. Press OK.
Activity level (Activity)
11. Scroll up or down to select your activity level for Polar Fitness Test. Press OK.
Assess your long-term physical activity level. Do not change your activity level
description if your regular exercise habits have changed during the last six months.
Low You do not participate regularly in programmed recreational sport
or heavy physical activity. E.g. you walk only for pleasure or
occasionally exercise sufficiently to cause heavy breathing or
perspiration.
Middle You participate regularly in recreational sports. E.g. you run 5-10 km/
3-6 miles per week or spend 1/2-2 hours per week in comparable
physical activity or, your work requires modest physical activity.
B 19

High You participate regularly, at least 3 times a week, in heavy physical
exercise. E.g. you run 10-20 km/ 6-12 miles per week or spend
2-3 hours per week in comparable physical activity.
TopYou participate regularly in heavy physical exercise at least 5 times
a week. E.g. you exercise to improve performance for competitive
purposes.
Maximum heart rate value (HR
max
)
12. Your age-predicted maximum heart rate value is displayed as a default
setting when you set this value for the first time. If you know your
exact clinically tested current maximum heart rate value, set the
value by scrolling up or down.
13. Press OK.
If you do not know this value, update it in the Fitness Test mode after
having carried out the Polar Fitness Test.
Maximal oxygen uptake value (VO
2max
)
14. The wrist unit suggests value 35 for females and value 45 for males as a
default setting when you set this value for the first time. If you know
your exact clinically tested current maximal oxygen uptake
value, set the value by scrolling up or down.
15. Press OK. USER SET appears.
If you do not know this value, update it in Fitness Test mode after having
carried out the Polar Fitness Test
To continue your settings, press the stop button or to return to the Time of
day display, press and hold the stop button.
B 20

Exercise settings for Recording mode
When you start setting your exercise preferences your first choice is to select
whether you want to set your personal exercise set or to exercise with
BasicUse option. If you select to start setting the exercise sets, your second
choice is whether you want to select BasicSet or an Interval
Training Set.
Selecting exercise type
BasicUse (E0)
BasicUse is a simple mode for
exercising. You do not have to do any
settings before exercising with this
Recording mode. While exercising, you
can see the following optional values:
• current heart rate and average
heart rate of the exercise
• stopwatch
• time of day
• split- and lap times
Additionally, you can follow calories
of your exercise session, percentage
of your maximum heart rate and
running or cycling information, if
you have set all the user information
and turned the functions on.
Exercise set (E1-E5)
During exercising with this mode you
can see the same optional values as
in the BasicUse mode. Additionally,
the exercise set will guide you
through your exercise according to
the settings you have made. You can
also name the exercise sets e.g. after
an exercise type.
You can set following exercise
guiding functions:
•3 limits
(HR, % of HR
or Pace based)
max
•3 countdown timers
• interval function
• recovery calculation
B 21
Setting exercise sets
Preset exercise sets ready for five exercise sets; when you start exercising,
just select one of the sets.
Interval Training Set
If you choose interval on, you can
set 3 different exercise phases for
each exercise set in following order:
Warm-up phase
• countdown timer 1 On/OFF
• limits 1 On/OFF
Interval phase
• interval calculation type: manual,
time-, heart-rate- or distancebased interval
• number of repeated interval
phases
• limits 2 On/OFF
• recovery calculation On/OFF
Cool-down phase
• countdown timer 3 On/OFF
• limits 3 On/OFF
summary limits On/OFF
If you set the countdown timers of
the phase off, you have to manually
stop the phase.
BasicSet
If you choose interval off, you can set the
following functions to your exercise:
• timer 1 On/OFF
• timer 2 On/OFF
• timer 3 On/OFF
• limits 1 On/OFF
HR, % of HR
• limits 2 On/OFF
or Pace based limit types
max
• limits 3 On/OFF
• summary limits On/OFF
• recovery calculation On/OFF
You should select the timers on
sequentially. E.g. you cannot set
timer 2 on if timer 1 is off.
Your choice of HR, % of HR
limit type in limits 1 determines the
max
way they will be displayed in all other
limits. Only one limit type can be
selected in an exercise set.
Summary limits are not shown or
alarmed during an exercise. The time
spent within/above/below the summary
limits can be seen from the exercise file.
B 22
or Pace

1. In the Time of day display
Options
scroll up or down until
OPTIONS is displayed.
Exercise Set
2. Press OK to enter the
Options mode. EXERCISE
E0 E1 E2 E3
E5E4
SET is displayed.
3. Press OK to start the exercise settings. BasicUse E0 or exercise set E1 - E5
is displayed.
4. Scroll up or down until the desired exercise type is displayed. Press OK.
If you chose BasicUse (E0): to return to the Time of day display, press and
hold the stop button and skip the rest of the exercise settings.
If you chose exercise set (E1-E5) Interval On/OFF is displayed.
5. Scroll up or down to turn the interval function on or off. Press OK.
Timer 1 is displayed.
Exercise
Set 1-5
IntervalOnInterval OFF
(BasicSet)
Timer1Timer2Timer
Limits
Limits
3
Limits
1
2
Summary
3
Limits
Recovery
Timer1Limits
1
Timer/Hr/Dist./Manual
Interval
HR/% of HR
Repeat
Interval
Limits
B 23
/Pace
max
Recovery
2
Timer/Hr/Dist.
Timer
3
Limits
3
Timer/Hr
Summary
Limits

Setting timers
If you start from the Time of day display, repeat steps 1-5.
6. Scroll up or down until desired timer is displayed. Press OK to start
setting the timer.
7. Scroll up or down to turn the timer on or off. Press OK.
Timer OFF: skip steps 8-9.
8. Scroll up or down to adjust minutes. Press OK.
9. Scroll up or down to adjust seconds. Press OK.
Setting heart rate limits
If you start from the Time of day display, repeat steps 1-5.
6. Scroll up or down until desired limits are displayed.
7. Press OK to start setting the limits.
8. Only when setting limits 1, scroll up or down to choose HR or % of HR
based limits. Press OK to select.
max
9. Lim High appears. Scroll up or down to adjust your upper limit. Press OK.
10. Lim Low appears. Scroll up or down to adjust your lower limit. Press OK.
Only one limit type (HR, % of HR
exercise set. The limit type selected in limits 1 determines the limit type
or Pace) can be selected in an
max
in all limits in an exercise set.
Setting pace limit
Pace is the speed at which you run. It is measured in minutes per kilometer
or mile. Pace limits can only be used when running.
If you start from the Time of day display, repeat steps 1-5.
6. Scroll up or down until desired limits are displayed.
7. Press OK to start setting the limits.
8. Only when setting limits 1, scroll up or down to choose PACE based limits.
Press OK to select.
B 24
9. Scroll up or down to adjust minutes. Press OK.
10. Scroll up or down to adjust seconds. Press OK.
11. Scroll up or down to adjust the tolerance value for the pace limit in
seconds. Press OK.
Tolerance value is the time your pace is allowed to differ from the
preset pace limit.
Heart
rate
160
140
120
100
80
60
40
limits 1
010 20304050
limits 2 limits 3
Time
•Time within, above and below limits 1, 2 and 3 is recorded only when
those particular limits are activated.
•Time within, above and below summary limits is recorded during the
entire exercise, regardless of which limits are in use.
Tur ning limits on/off
If you start from the Time of day display, repeat steps 1-5.
6. Scroll up or down until Limits is displayed.
7. Press and hold the signal/light button to turn limits on or off.
Release.
B 25
Summary
limits

Setting recovery calculation
You can select 2 optional types of recoveries in a BasicSet:
A. Time-based recovery Ends your recovery as you reach the preset
time.
B. Heart-rate-based recovery Ends your recovery as you reach the preset
heart rate.
If you start from the Time of day display, repeat steps 1-5.
6. Scroll up or down until Recovery TIMER/ Hr is displayed.
7. Press OK to start setting recovery calculation on or off.
On/OFF is flashing.
8. Scroll up or down to turn the recovery calculation on or off. Press OK.
OFF: skip steps 9-11.
On: TIMER/ Hr is flashing.
9. Scroll up or down to select recovery timer or heart rate.
Press OK.
A. RecoTime is displayed.
10. Scroll up or down to adjust minutes. Press OK.
11. Scroll up or down to adjust seconds. Press OK. Recovery TIMER appears.
Or
B. RecoHr is displayed.
10. Scroll up or down to adjust the value. Press OK. Recovery Hr appears.
B 26

Setting interval type
You can select four optional types of intervals:
A. Time-based interval Ends your interval when you have used
the preset time.
B. Heart-rate-based interval Ends your interval as you reach the
preset heart rate.
When selecting heart-rate-based interval,
recovery calculation must be set on.
C. Distance-based interval Ends your interval as you reach the
selected distance.
D. Manual interval End the interval training session
by pressing and holding OK.
If you start from the Time of day display, repeat steps 1-5.
6. Scroll up or down until Interval TIMER/ Hr/ DIST/ MANUAL is
displayed. Press OK to start setting the interval type.
TIMER/ Hr/ DIST/ MANUAL is flashing.
7. Scroll up or down to select the interval type that will be used to end the
interval. Press OK. If you chose manual interval skip steps 8-9.
B 27

A. Time-based interval
8. Scroll up or down to adjust minutes. Press OK.
9. Scroll up or down to adjust seconds. Press OK. Interval TIMER appears.
Or
B. Heart-rate-based interval
8. Scroll up or down to adjust the heart rate that will end your interval.
Press OK. Interval Hr appears.
Or
C. Distance-based interval
8. Scroll up or down to adjust kilometers.
Press OK.
9. Scroll up or down to adjust hundreds of
Units 2: Adjustable units
are miles and feet.
meters. Press OK. Interval DIST appears.
Setting the number of intervals and recoveries (Repeat)
If you start from the Time of day display, repeat steps 1-5.
You can set up to 30 intervals and recoveries (if set on) for an interval phase.
6. Scroll up or down until Repeat is displayed.
7. Press OK to start setting the number.
8. Scroll up or down to adjust the number. Press OK.
Or
If you do not know in advance the number of intervals and recoveries,
select continuous interval. The intervals will succeed until you manually
stop the exercise or until 30 intervals have been made.
8. Scroll down until Cont appears. Press OK.
B 28

Setting interval recovery calculation
You can select 3 optional types of recoveries:
A. Time-based recovery Ends your recovery as you reach the preset time.
B. Heart-rate-based recovery Ends your recovery as you reach the preset
heart rate.
C. Distance-based recovery Ends your recovery as you reach the selected
distance.
If you start from the Time of day display, repeat steps 1-5.
6. Scroll up or down until Recovery TIMER/ Hr/ DIST is displayed.
7. Press OK to start setting recovery calculation on or off.
On/OFF is flashing.
8. Scroll up or down to turn the recovery calculation on or off. Press OK.
OFF: skip steps 9-11.
On: TIMER/ Hr/ DIST is flashing.
9. Scroll up or down to select recovery timer, heart rate or distance.
Press OK.
A. RecoTime is displayed.
10. Scroll up or down to adjust minutes. Press OK.
11. Scroll up or down to adjust seconds. Press OK. Recovery TIMER appears.
Or
B. RecoHr is displayed.
10. Scroll up or down to adjust the value. Press OK. Recovery Hr appears.
Or
B 29

C. Rec. Dist is displayed.
10. Scroll up or down to adjust kilometers.
Press OK.
Units 2: Adjustable units
are miles and feet.
11. Scroll up or down to adjust hundreds
of meters. Press OK. Recovery DIST appears.
To continue your settings, press the stop button or to return to the Time of
day display, press and hold the stop button.
Naming exercise sets
You can name the exercises with seven letters, numbers or punctual marks.
The available digits are: 0-9, space, A-Z, a-z, - % / ( ) * + : ?.
1. In the Time of day display scroll up or down until OPTIONS is displayed.
2. Press OK to enter the Options mode. EXERCISE SET is displayed.
3. Press OK. E0-E5 is displayed.
4. Scroll up or down until desired exercise set (E1-E5) is displayed.
5. Press and hold signal/light button. Adjustable letter is flashing.
6. Scroll up or down to select the desired mark. Press OK.
7. Repeat previous step until you have chosen all 7 letters.
To continue your settings, press the stop button or to return to the Time of
day display, press and hold the stop button.
B 30

Setting recording rate
1. In the Time of day display scroll
up or down until OPTIONS
is displayed.
2. Press OK to enter the Options mode.
EXERCISE SET is displayed.
Options
Memory Set
Rec. Rate 5 Sec/ 15 Sec/ 60 Sec
3. Scroll up or down until MEMORY SET
is displayed.
4. Press OK to start the memory settings.
Rec. Rate is displayed.
5. Scroll up or down to select the desired
recording rate. As you change the
recording rate you can see the memory
there is left in the lower row.
Press OK.
The recording time of the wrist unit depends on the selected recording rate
(5 s, 15 s, or 60 s). When the memory is full, you can continue exercising but
the exercise is no longer recorded.
B 31

The following table shows the maximum exercise times for each
recording rate.
Altitude Speed Cadence Power Rec. Rate 5s Rec. Rate 15s Rec. Rate 60s
On On On On 4 h 57 min 14 h 53 min 59 h 34 min
On On On OFF 8 h 56 min 26 h 48 min 99 h 59 min
On On OFF On 5 h 35 min 16 h 45 min 67 h 01 min
On On OFF OFF 11 h 10 min 33 h 31 min 99 h 59 min
On OFF OFF OFF 14 h 53 min 44 h 41 min 99 h 59 min
OFF On On On 5 h 35 min 16 h 45 min 67 h 02 min
OFF On On OFF 11 h 10 min 33 h 31 min 99 h 59 min
OFF On OFF On 6 h 23 min 19 h 09 min 76 h 37 min
OFF On OFF OFF 14 h 53 min 44 h 41 min 99 h 59 min
OFF OFF OFF OFF 44 h 42 min 99 h 59 min 99 h 59 min
in one file in one file
and total 130 h and total 520 h
The use of exercise sets and lap recording reduces the maximum exercise
times.
To continue your settings, press the stop button or to return to the Time of
day display, press and hold the stop button.
B 32

Turning functions on/off
Options
Function Set
OwnCal
On/OFF
1. In the Time of day display scroll up or down until OPTIONS
is displayed.
2. Press OK to enter the Options mode. EXERCISE SET is
displayed.
3. Scroll up or down until FUNCTION SET is displayed.
4. Press OK to start the function settings. OwnCal is displayed.
To set the following functions on you have to set your user information.
If kg/lbs are displayed as you start setting the function on, the wrist unit
points out that you have not set your all user information.
OwnCal calorie counter on/off
If you start from the Time of day display, repeat steps 1-4.
5. Press OK to start setting the OwnCal function. On/OFF starts to flash.
6. Scroll up or down to set the OwnCal on or off. Press OK.
For getting the most accurate OwnCal results, update the VO
and the HR
not know your clinically measured values perform Polar Fitness Test and
update the OwnIndex and HR
Tests
On/OFF
setting with clinically measured values (if available). If you do
max
HR
-p
max
On/OFF
-p settings in Fitness Test mode.
max
Altitude
On/OFF
AutoLap
On/OFF
2max
setting
B 33

Tests on/off
If you start from the Time of day display, repeat steps 1-4.
5. Scroll up or down until Tests is displayed.
6. Press OK to start setting the tests. On/OFF starts to flash.
7. Scroll up or down to set the tests on or off. Press OK.
Predicted maximum heart rate on/off (HR
max
-p)
If you start from the Time of day display, repeat steps 1-4.
5. Scroll up or down until HRmax-p is displayed.
6. Press OK to start setting the HR
7. Scroll up or down to set the HR
HR
-p can be turned on only if Polar Fitness Test is on.
max
-p. On/OFF starts to flash.
max
-p on or off. Press OK.
max
Altitude and thermometer on/off
If you start from the Time of day display, repeat steps 1-4
5. Scroll up or down until Altitude is displayed.
6. Press OK to start setting the altitude measurement and thermometer.
On/OFF starts to flash.
7. Scroll up or down to set the altitude on or off. Press OK.
If you turned Altitude off, skip the rest of the altitude settings.
8. If you turned Altitude on, “Wait...” appears for a few seconds.
9. Altitude and a flashing number appear. Start adjusting the starting
point altitude. Adjustable units of 1/ 2 can be changed by pressing and
holding the signal/light button.
Scroll up or down until the desired altitude is displayed. Press OK.
It is recommended that you reset the altitude whenever a reliable
reference is available.
B 34

To use the thermometer the altitude must be turned on. For most
accurate altitude readings, calibrate the altimeter every time before an
exercise.
To continue setting your settings, press the stop button or to return to the
Time of day display, press and hold the stop button.
AutoLap on/off
When you use the AutoLap function, the running computer automatically
records lap times continuously after each time you have run or cycled the
preset distance. For example if you set the AutoLap distance at 400 meters,
the first lap will be recorded at 400 meters, the second lap at 800 meters
and so on.
If you start from the time of the day display, repeat steps 1-4.
5. Scroll up or down until AUTOLAP is displayed.
6. Press OK to start setting the AutoLap. On/Off starts to flash.
7. Scroll up or down to set the AutoLap on or off. Press OK.
OFF: skip the rest of AutoLap settings.
8. Set A. Lap Distance is displayed. Scroll up or down to set the AutoLap
distance. Press OK to select the lap distance.
AutoLap can be turned on only if the speed function is activated in
speed settings.
B 35

Speed settings
Options
Speed Set
Speed OFF
Run On Bike 1/2
WheelFoot pod calibration
Cadence
On/OFF
Power
On/OFF
1. In the Time of day display scroll up or down until OPTIONS is displayed.
2. Press OK to enter the Options mode. EXERCISE SET is displayed.
3. Scroll up or down until SPEED SET is displayed.
4. Press OK to start the Speed settings.
5. Choose to start setting Running speed, Bike 1 or 2, or
turn the speed features off. Scroll up or down until desired
option is displayed. Press OK. If you selected speed features off skip the
rest of the speed settings.
Running settings
Calibrating the Polar S1 foot pod
It is recommended that you calibrate the foot pod when; you use it for the
first time, there are significant changes in your running style or the position
of the foot pod on the shoe is changed.
B 36

You can calibrate the S1 foot pod by running a preset distance; for
example, one lap on a 400-meter track, at a steady pace or by manually
adjusting the calibration factor.
Units 2: Adjustable units
Calibration by running
are feet.
If you start from the Time of Day display,
repeat steps 1-5.
6. CALIBRATE? SPEED is displayed. Press OK.
7. CALIBRATION RUN is displayed. Press OK.
Minimum calibration
distance is 400 meters/
250 feet.
8. Hundreds of meters start to flash, scroll up
or down to adjust the hundreds of meters. Press OK.
Meters start to flash, scroll up or down to adjust the meters. Press OK.
9. CALIBRATION START is displayed. Turn the speed sensor on by pressing
the red button on the sensor and press OK on the wrist unit to start
calibration. Start the run by making the first step with the sensor foot
onto the starting line and run the preset distance at a steady pace.
While running, the wrist unit shows the uncalibrated distance you have
run.
10. Stop exactly on the stop line of the preset distance. Wait until the distance
measurement stops accumulating on the wrist unit and press OK.
11. Scroll up or down to adjust the distance displayed on the wrist unit to
indicate the actual distance you ran. Press OK to save the calibration.
CALIBRATION DONE is displayed.
B 37

You get the best calibration result if you wear the same shoes that you
normally use and you run on the same type of surface.
You can cancel the calibration by pressing the stop button on the wrist unit.
If you ran less than the preset distance, CALIBRATION FAILED is displayed.
Calibration manually
The calibration factor is calculated as a ratio of the actual distance to the
uncalibrated distance. For example if you ran 400 meters and the wrist unit
shows a distance of 390 meters, the calibration factor should be adjusted to
400/390 = 1026.
If you start from the Time of Day display, repeat steps 1-5.
6. CALIBRATE? SPEED is displayed. Press OK.
7. Scroll up or down until Calibration Manual is displayed.
8. Press OK to start adjusting the calibration factor.
9. SET FACTOR is displayed. Scroll up or down to adjust the factor. Press OK.
Bicycle settings
You can set two bike preferences for the wrist unit. Make the settings
ready for both bikes; when you start exercising, just select bike 1 or 2. As
you take the bike settings 1 or 2 in use speed and distance measuring
functions are always on. Select the bike features off when exercising
without a bicycle. Wheel size settings are a prerequisite for cycling
information.
B 38

Adjusting the wheel size (Wheel)
If you start from the Time of day display, repeat steps 1-5.
6. Start with the display showing Wheel.
7. Press OK to start setting the wheel size.
8. Scroll up or down to adjust the wheel size. Press OK.
You have the following alternatives to find out
the wheel size of your bike:
METHOD 1.
Look at the wheel of your bike and find the wheel diameter printed on it.
On the chart below, find your wheel diameter in inches or in ERTRO
reading and match it to the wheel size in millimeters on the right.
ERTRO Wheel size diameter (inches) Wheel size setting (mm)
30-559 26x1.25 1953
35-559 26x1.5 1985
44-559 26x1.75 2030
47-559 26x1.95 2050
26x1 1/8 Tubular 1970
650-20C 1952
622-20 700x20C 2086
622-23 700x23C 2096
622-25 700x25C 2105
700C Tubular 2130
28 (700 B) 2237
B 39

METHOD 2.
Mark the tread of the front tire with a line and roll the tire
perpendicular to the ground. You can also use the valve as
a mark. Mark a line on the ground. Move your bike on a
flat surface straight ahead for one complete wheel rotation.
Check that the tire is perpendicular to the ground. Draw
another line on the ground exactly where the mark on the
front tire touches the ground.
Measure the distance between the two lines on the ground.
Substract 4 mm to account for your weight on the bike to
- 4 mm
get your wheel circumference.
This is the value you must set on the meter.
The wheel size is always indicated in millimeters as this is more accurate.
Resetting the monitor enters the default values.
Cadence* on/off
If you start from the Time of day display, repeat steps 1-5.
6. Scroll up or down until Cadence is displayed.
7. Press OK to start setting the Cadence. On/OFF starts to flash.
8. Scroll up or down to set the Cadence on or off. Press OK.
*Optional Polar Cadence Sensor or Polar Power Output Sensor required.
mm
mm
B 40

Power* on/off
If you start from the Time of day display, repeat steps 1-5.
6. Scroll up or down until Power is displayed.
7. Press OK to start setting the Power Output. On/OFF starts to flash.
8. Scroll up or down to set Power Output on or off. Press OK.
OFF: Skip the rest of the Power Output settings.
9. C. weight is displayed. Scroll up or down to adjust the chain weight. Press OK.
10. C. length is displayed. Scroll up or down to adjust the chain length.
Press OK.
11. S. length is displayed. Scroll up or down to adjust the span length.
Press OK.
If you are using the wireless Polar Speed Sensor, set the Power off.
You can find more information about the Polar Cadence and Polar Power
Output Sensor on the back cover of this manual.
B 41

Naming bike 1 and bike 2
You can name the bikes with four letters, numbers or marks.
The number in the right corner indicates, which bike settings are in use.
(--=Speed OFF, b1=Bike 1, b2=Bike 2)
1. In the Time of day display scroll up or down until OPTIONS is displayed.
2. Press OK to enter the Options mode. EXERCISE SET is displayed.
3. Scroll up or down until SPEED SET is displayed. Press OK.
4. Scroll up or down until Bike 1 or 2 is displayed.
5. Press and hold signal/light button. Adjustable letter is flashing.
6. Scroll up or down to select the desired mark. Press OK.
7. Repeat previous step until you have chosen all four letters.
To continue your settings, press the stop button or to return to the Time of
day display, press and hold the stop button.
B 42

Monitor settings
1. In the Time of day display
Options
scroll up or down until
OPTIONS is displayed.
2. Press OK to enter the
Options mode. EXERCISE
Monitor Set
Sound On/OFF Units 1/2 Help On/OFF
SET is displayed.
3. Scroll up or down until MONITOR SET is displayed.
4. Press OK to start the monitor settings. Sound is displayed.
Tur ning activity/button sound on/off
If you start from the Time of day display, repeat steps 1-4.
5. Press OK to start setting the sound. On/OFF starts to flash.
6. Scroll up or down to set sound On or Off. Press OK.
Activity/button sound consists of the button sound and in the Measuring
and Recording modes the following activity sounds: start, stop and lap
recording, phase start, interval phase end and recovery calculation end
sounds. It does not consist of target zone alarms, watch alarm or fitness
test alarm.
Selecting measuring units
If you start from the Time of day display, repeat steps 1-4.
5. Scroll up or down until Units is displayed.
6. Press OK to start setting the units. 1 or 2 starts to flash.
7. Scroll up or down the unit which best suits you. Press OK.
B 43

The units settings affect the following features:
Units 1: Units 2:
User information kg, cm lbs, feet
Date of birth day-month-year month-day-year
Speed km/h mph
Distance km, hundreds of meters miles, feet
Pace minutes/km minutes/mile
Altitude meters feet
Meters ascended meters feet
Temperature °C °F
Wheel size mm mm (Note!)
Power Chain weight g g
Chain length mm mm
Span length mm mm
Tur ning Help on/off
If you start from the Time of day display, repeat steps 1-4.
5. Scroll up or down until Help is displayed.
6. Press OK to start setting the Help function. On/OFF starts to flash.
7. Scroll up or down to set the Help on or off. Press OK.
If you turn Help on, the flashing arrows guide you to use the correct
buttons in the Options and File modes. During the exercise, when you are
changing the middle row information, you can see the name of the
function for few seconds. The names are also shown as you recall
information on lap and exercise samples in the File mode.
To continue your settings, press the stop button or to return to the Time of
day display, press and hold the stop button.
B 44

Watch settings
1. In the Time of day
display scroll up or
down until OPTIONS
is displayed.
2. Press OK to enter
Options
Watch Set
Alarm Time 1/2 Date Remind On/OFF
the Options mode.
EXERCISE SET is displayed.
3. Scroll up or down until WATCH SET is displayed.
4. Press OK to start the watch settings. ALARM is displayed.
Setting alarm
If you start from the Time of day display, repeat steps 1-4.
5. Press OK to start alarm settings.
On/OFF starts to flash.
OFF: Skip
steps 7-9.
6. Scroll up or down to set alarm on or off. Press OK.
24h: skip step 7.
7. 12h: AM/PM starts to flash. Scroll up or down to select AM or PM.
Press OK.
8. The hours start to flash. Scroll up or down to adjust the hours. Press OK.
9. The minutes start to flash. Scroll up or down to adjust the minutes.
Press OK.
When the alarm comes on, it will sound for one minute or you can turn it
off by pressing any of the five buttons.
B 45

Setting time of day
If you start from the Time of day display, repeat steps 1-4.
5. Scroll up or down until TIME1/ TIME2 is displayed.
6. Press OK to start setting the time of day.
7. Time is flashing. Scroll up or down to select time 1 or time 2. Press OK.
8. 12h/ 24h starts to flash. Scroll up or down to select 12h or 24h
time mode. Press OK. 24h: skip step 9.
9. AM/PM starts to flash. Scroll up or down to select AM or PM. Press OK.
10. The hours start to flash. Scroll up or down to adjust the hours. Press OK.
11. The minutes start to flash. Scroll up or down to adjust the minutes.
Press OK.
Setting date
If you start from the Time of day display, repeat steps 1-4.
5. Scroll up or down until DATE is displayed.
6. Press OK to start adjusting the date.
7. Day appears. Scroll up or down to select the
desired value. Press OK.
12h time mode:
month - day - year
8. Month appears. Scroll up or down to select the
desired value. Press OK.
9. Year digits start to flash. Scroll up or down to select the year. Press OK.
B 46

Tur ning reminders on/off
If you start from the Time of day display, repeat steps 1-4.
5. Scroll up or down until REMIND is displayed.
6. Press OK to start setting the reminders.
7. Scroll up or down until desired reminder is displayed. The number of the
reminder is displayed in the corner of the display.
8. Press OK. On/OFF starts to flash.
9. Scroll up or down to set the reminder on or off. Press OK.
You can upload 7 reminders, each including time and name, to your wrist
unit from Polar Precision Performance software.
The reminder sounds an alarm only when time of day is displayed. When
the reminder alarm comes on, it will sound for 15 seconds or you can turn it
off by pressing any of the buttons except the signal/light button. Erase the
reminder text by pressing any of buttons except the signal/light button.
To continue your settings, press the stop button or to return to the Time of
day display, press and hold the stop button.
B 47

Setting tips
Swap time 1 or time 2
In the Time of day display press and hold the down button. Time 1 or
Time 2 is displayed in the uppermost row for a couple of seconds. Displayed
time will now be used in all watch and alarm functions. If you chose time 2,
“2” is displayed in the Time of day display.
Shortcut to watch settings
Press and hold the signal/light button for a couple of seconds to enter to
watch setting loop. Scroll up or down button until the desired watch
function is displayed. Set the function as in the “Watch settings” section.
Swap measuring units
• as you set your user information on weight and height.
• as you set an Interval Training Set on distance-based interval or recovery.
• as you set the altitude reference point.
Press and hold the signal/light button until the units are swapped. Release
the button.
Swap date, user ID number, user name and logo
You are able to set a user ID number, user name and logo by Polar Precision
Performance software. These settings are shown on the upper row of the
Time of day display. You can swap between the user ID, user name, logo
and date by pressing and holding the up button.
B 48

C. EXERCISE
Time of Day
You can use two modes in your exercise:
Measuring or Recording mode. In the Measuring
Measuring
Mode
Recording
Mode
mode you can see your heart rate but your
exercise is not recorded. In the Recording mode
your exercise is recorded and stopwatch and
other calculations are started.
Measuring mode
1. Wear the transmitter and the wrist unit as described in “Easy start”
section.
2. To make sure that the code search will be successful:
• Keep the wrist unit within 1 meter/ 3 feet of your transmitter.
• Check that you are not near other people that have heart rate monitors,
high voltage power lines, televisions or other sources of electromagnetic
disturbance. In some cases, mobile phones may cause interference when
starting the heart rate measurement.
C 49

3. Start from the Time of day display by pressing the OK to start measuring
your heart rate. A heart symbol will start flashing and your heart rate in
beats per minute will appear in max. 15 seconds. The wrist unit returns
automatically to the Time of day display within 5 minutes if there is no
heart rate reception.
The following displays start to alternate, if you have no speed or altitude
settings in use, as you enter the Measuring mode:
Exercise name Memory left Speed OFF Altitude OFF
Time of day
Current
heart rate
BasicUse (E0)/
Exercise set in use
(E1-E5)
Recording rate
No speed settings in use
If you are running or cycling, turn the speed settings on by pressing and
holding the down button. Repeat until the right speed setting is displayed
in the right-hand corner of the display.
-- = speed settings off
ru = running speed
b1 = bike 1
b2 = bike 2
Make sure that you have the right speed settings turned on before
starting the recording.
C 50

The following displays start to alternate, if you have running speed and
altitude settings on, as you enter the Measuring mode.
Exercise name Memory left Speed type Altitude
Time of day
Current
heart rate
BasicUse (E0)/
Exercise set in use
(E1-E5)
Recording rate
Running speed
in use
If you are not running or cycling, turn the speed settings off by pressing and
holding the down button. Repeat until -- appears. This will give you more
memory capacity.
4. If you want to record running information, turn the foot pod on
after your heart rate is displayed on the wrist unit. Press OK to start
recording your exercise.
Or
If you want to record running information without heart rate
measurement: after the heart rate reading 00 appears turn the foot
pod on.
C 51

Recording mode
Before starting recording, check that you have enough memory left.
This information is displayed in the upper row, in the Measuring mode.
If you are starting from the Time of day display, press and hold OK.
Exercise information will be stored in an exercise file only when the
stopwatch is running. The ongoing recording is indicated with a graphic
bar that runs continuously on the display.
If your preset exercise requires speed settings, Set Speed is displayed
for a few seconds. In order to start the exercise set you need to select
running speed, bike 1 or bike 2 by pressing and holding the down button
until the desired speed setting is displayed.
The choice is displayed in the lower right corner:
-- = speed off
ru = running speed
b1 = bike 1
b2 = bike 2
If there is - - / 00 reading on the display, there is no heart rate reception.
Bring the wrist unit up to your chest near the transmitter’s Polar logo. The
wrist unit starts looking for the heart rate signal again.
In the beginning of your exercise, when it has lasted less than
60 minutes, the exercise time is displayed in minutes and seconds.
When you have exercised more than 60 minutes, the exercise time is
displayed in hours and minutes.
C 52

If there is no or irregular running speed readings on the display,
check the following:
• Keep distance to other runners with foot pods.
• If you keep the wrist unit in front of you for longer than 15 seconds the
speed and distance measurements stop. You need to reactivate the
measurements by moving your hand.
Tur ning the zone alarm on/off
Note that you can not use the alarm when Bicycle functions are on.
Note that trip distance is reset by pressing and holding signal/light
button. Therefore Trip should not be displayed in the upper row when
turning zone alarm on/off.
Press and hold the signal/light button.
When appears on the display the zone alarm is on. You will hear a beeping
sound if you are outside the limit.
If you do not want to use the zone alarm the flashing heart rate/pace
reading indicates if you are outside the limit. This function can be used if
you have set limits on for Interval Training Set or BasicSet.
In addition to the alarm you can see:
if you are exercising above heart rate/pace zone.
if you are exercising below heart rate/pace zone.
C 53

Swapping the heart rate/pace limits
Press and hold the up button. Repeat until the desired limits are displayed.
In the Interval Training mode the limits are automatically swapped when
the phase changes to the preset limits.
You have three optional Recording modes depending on the
selected exercise:
• BasicUse
• Interval Training Set (Int On)
• BasicSet (Int OFF)
The following functions can be used during all three optional Recording
modes.
Illuminating the display (Night Mode)
Press the signal/light button in the Measuring or Recording mode. After
you have illuminated the display once, the display automatically illuminates:
• at the end of an interval or recovery calculation
• if you start or stop the exercise session
• if you store lap information
• if you bring the wrist unit near the Polar transmitter (Heart touch)
You can turn this function off by pressing the signal/light button again. It is
automatically turned off when you return to the Time of the day display. If
you want to illuminate the display in the Time of the day mode, press the
signal/light button.
C 54

Storing lap and split time
Press OK to store lap and split time.
First Then
Lap time Split time
Average heart
rate of the lap
Number of
the lap
The wrist unit automatically stores a lap time when you stop recording
an exercise. You can store 99 laps if you have not used the interval
function. After storing 99 laps FULL appears for a few seconds every
time you take a lap on the display. You can continue taking laps but
they will not be stored. The wrist unit continues recording all other
information of the exercise, except lap and interval information.
Pausing the exercise
Press the stop button.
The exercise recording, stopwatch and other calculations are paused. To
continue them, press OK. Or, to return to the Time of day display, press and
hold the stop button.
The wrist unit automatically returns to the Time of day display within
30 minutes if you forget to quit the heart rate measuring after having
stopped the stopwatch and taken the transmitter off your chest.
C 55

Swapping the displayed exercise information
You can swap the display information by pressing the down button in the
Measuring or Recording mode. The wrist unit saves the upper and lower
row settings for the display options. If the Help function is on, the name of
the selected function appears for a few seconds. When you start the
exercise next time the stopwatch appears on the middle row and the saved
functions appear on the upper and lower rows.
1. Time of day
Stopwatch
2. Time of day
Lap time
Current heart rate
Number of the lap
3. Speed
4. Pace
Pace difference
5. Distance
6. Altitude
Temperature
7. Power*
8. Stopwatch
Time of day
For most accurate altitude readings, calibrate the altimeter every time
before an exercise.
C 56

When you have set your Interval
Training Set on, you will have one
extra display. You can only change the
lower row for this display. See the
alternative phase displays from
Phase Name
Countdown
timer
“Exercising with Interval Training Set”
section.
You can configure the middle and upper rows either in the Measuring
and Recording mode.
1. Select the middle row information
Press the down button briefly to select the desired display alternative.
When you swap the middle row information, the upper and lower rows
change also. Continue selecting the upper and lower rows.
2. Select the upper row information
Press the up button briefly to select from the following:
Time of day (Time), stopwatch (Sw), lap time (Lp),
or if you have turned the functions on select from:
calorie expenditure (Cal), trip (Trip), current speed (Spd), average speed
(Avg speed), maximum speed (Max speed), pace (Pc), cadence* (Cad),
altitude (Alt), ascended meters (Asc), output power* (Pwr), left right
pedaling balance* (L - R), pedaling index* (PI).
You cannot select the same displayed function to the upper and middle row
i. e. the option on the middle row is no longer available for the upper row.
*Optional Polar Cadence Sensor or
C 57
Polar Power Output Sensor required.

3. Select the lower row information
Press and hold the down button to select from the following:
Current heart rate, average heart rate (avg) or the reading in
percentages of your maximum heart rate (% max) if you have set your
user information. If you have pace limits on you can also select the pace
difference value to the lower row.
You can only change the displayed function of the lower row if the
stopwatch is on.
The pace difference value indicates the time you are running slower/
faster from your preset target pace. If the value is negative you are
running faster than your target pace and vice versa.
Starting an exercise set
1. Start from the Time of day display. Press OK to enter the Measuring mode.
2. If you want to swap the preset exercise set, press and hold the up button
until the exercise set (E1-E5) is swapped. Release. Repeat until desired
exercise set is displayed.
3. To start exercising and recording the preset exercise type press OK.
C 58

Exercising with Interval Training Set (Int On, E1-E5)
In this mode you can also use the functions described in “Recording mode”
section.
The Interval Trainer automatically guides you through your exercise. In
order to hear the activity sounds when the phase starts and stops make
sure the activity sound is on. If you have turned the countdown timer of
the phase off, you have to stop the phase manually by pressing and holding
OK button. When the stopwatch starts running indicates that Interval
Trainer is on. As the interval training exercise ends the wrist unit
automatically starts a BasicUse exercise, which is recorded to the same file
as your interval training exercise.
Structure of an interval training exercise:
Heart
rate
160
140
120
WarmUp phase
100
Countdown timer 1
80
Limits 1
60
40
010 20304050
Interval Phase
Repeats 03
Interval
Recovery
Interval
Recovery
CoolDown phase
Countdown timer 3
Limits 3
Interval
Recovery
Time
C 59

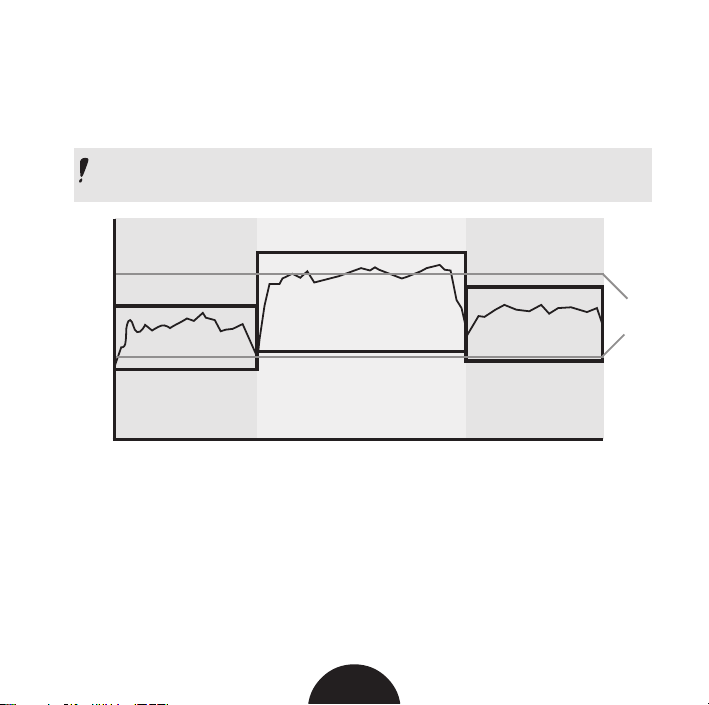
Warm-up phase
1. First
Heart rate or pace limits 1 (if set on).
2. Then
Countdown timer 1.
Heart rate information.
Countdown timer starts running if you have set the timer 1
on. If you have set the timer off, press and hold OK and
continue from the interval phase.
3. At the end of warm-up phase
Warm-up phase duration.
Average heart rate of the warm-up phase.
Interval phase
The wrist unit records up to 30 repeated interval phases. Your interval
phase is divided into interval and recovery calculation (if set on) sections,
which alternate continuously through your interval phase. As the interval
phase changes, the limits are automatically swapped. For example, when
the first phase changes to the second phase, the preset limits 1 changes to
preset limits 2. You can also swap the limits by pressing and holding the up
button. Repeat until the desired limits are displayed.
C 60

Interval session
1. First
Preset heart rate or pace limits 2 (if set on).
2. Then
One of the following is displayed depending on your settings:
A. manual, B. time-based, C. heart rate-based or
D. distance-based interval.
A. Manual interval.
Number of set intervals.
Current interval number.
Interval time.
Heart rate information.
If you selected manual interval your interval will end as you
press and hold OK.
Or
B. Time-based interval.
Countdown timer 2.
If you selected time-based interval your interval will end as
you reach the preset time.
Or
C. Heart-rate-based Interval.
The difference between the preset interval heart rate and
current heart rate.
Or
D. Distance-based interval.
Countdown distance.
Your interval will end as you reach the preset distance.
C 61

3. At the end of Interval
Interval duration.
Average heart rate of the interval.
When your interval ends the wrist unit automatically
continues with following preset function: recovery
calculation or cool-down phase.
Recovery calculation
One of the following is displayed depending on your settings:
A. time-based recovery calculation or B. heart-rate-based
recovery calculation or C. distance-based recovery calculation.
A. Time-based recovery.
Recovery countdown timer.
Current heart rate.
Or
B. Heart-rate-based recovery.
The difference between the preset recovery heart rate and
current heart rate.
Current heart rate.
Or
C. Distance-based recovery.
Recovery countdown distance.
Current heart rate.
You will hear two beeps when the recovery calculation is done.
C 62

At the end of recovery
A. and B. Or C.
Recovery duration. Recovery distance.
Drop in your heart rate.
Cool-down phase
1. First
Preset heart rate limits 3 (if set on).
2. Then
Countdown timer 3.
Heart rate information.
Countdown timer starts running if you have set the timer 3 on.
If you have set the timer off, press and hold OK to end a phase.
3. At the end of cool-down phase
Cool-down phase duration.
Average heart rate of the cool-down phase.
After your cool-down phase has ended the wrist unit
automatically continues recording exercise with BasicUse mode.
You can continue using the limits of the interval exercise in
the BasicUse mode, too. Or, if you want to do another
interval training exercise, press and hold the OK button.
C 63

Interrupting an interval training exercise
1. Press the stop button to pause the exercise.
2. Press and hold the stop button to return to the Time of day display.
Or
Press the stop button. BasicUse appears. You can continue measuring your
heart rate in this mode (Measuring mode). To continue exercising with
BasicUse and recording your exercise information press OK. You can
continue using and swapping the same limits of the previous exercise.
Repeat steps 1 and 2 to return to the Time of day display.
Exercising with BasicSet (Int OFF, E1-E5)
In this mode you can also use the functions in “Recording mode” section.
Starting the timers
If timers are set on, they automatically start running once you start the
stopwatch. Timers alternate in the following order: timer 1, 2, 3, 1, 2, 3 etc.
At the end of timer 1 you will hear 1 beep, at the end of timer 2 you will
hear 2 beeps and at the end of timer 3 you will hear 3 beeps. Timers stop
running when you stop the stopwatch.
C 64

Starting the recovery calculation
To start the recovery calculation, press and hold the OK button.
See “Exercising with Interval Trainer”/ “Recovery calculation” for the
displayed information during the recovery calculation. After the recovery
calculation is done the exercise is paused.
You can continue the exercise by pressing the OK button after the recovery
calculation. If you do another recovery calculation, the previous recovery
information will be deleted.
Stopping the exercise
1. Press the stop button to pause the exercise.
2. Press and hold the stop button until Time of day is displayed.
Your lap and split time are automatically recorded, when you end the
exercise.
Tips during the exercise
Swapping the exercise type (E0 or E1-E5)
In the Measuring mode press and hold the up button. Release. Repeat until
desired exercise set or BasicUse is displayed.
C 65

Swapping the speed settings (--, ru, b1 or b2)
Tips during the exercise
In the Measuring mode press and hold the down button. Release. Repeat
until Run speed, Bike 1 or 2 or Speed Off is displayed. You can now exercise
with the chosen settings. From running to cycling and vice versa can be
swapped in the BasicUse (E0) mode, if the exercise is paused. A new file is
created if you change the speed settings.
Resetting the trip distance
Start from the Measuring or Recording mode. Scroll up until Trip is displayed.
Press and hold the signal/ light button until the trip reading is zero. Release.
Returning to the manually set altitude
Start from the Measuring mode. Scroll down until altitude is displayed in
the middle row. Press and hold the signal/light button until the previous
manually set altitude is displayed.
If the manually set altitude reference value deviates over ±610 m/ ± 2000 ft
from the altitude calculated by the wrist unit, Failed appears and the
measured altitude appears. Set the reference altitude from the Options
mode. As you start adjusting the reference altitude, the wrist unit suggests
a measured altitude for you instead of the previously set altitude.
Restarting the interval or recovery calculation
In the Recording mode press the stop button to pause the interval or
recovery calculation.
Start resetting by pressing and holding the down button. To restart the
same calculation press the OK button or to reset the interval training
exercise, see “Resetting stopwatch to zero” section.
C 66

Interrupting an interval or recovery calculation
Press and hold the OK button during your interval training exercise session
to interrupt the calculation. The following section automatically starts. E.g.
if you interrupt an interval your recovery calculation (if set on)
automatically starts.
Interrupting a phase of an interval training exercise
Press the stop button to pause your phase. Press and hold the OK button.
The following phase automatically starts.
Heart touch function
The heart touch function is activated as you bring the wrist unit near the
transmitter’s Polar logo.
You have three alternatives for the heart touch function. To select heart
touch display, use your Polar Precision Performance software:
• Checking the current limits
• Swapping the display options
• Storing lap time
During the heart touch, the backlight is on for a couple of seconds, if you
have already used the backlight during the exercise.
C 67

D. HOW TO RECALL TRAINING INFORMATION
The wrist unit starts saving exercise information
to a file as you start the stopwatch. You can recall
the information in the File mode. In the File mode
there are up to 99 exercise files and a records file,
which keeps track of the cumulative and maximum
exercise values.
Time of Day File Options Tests Connect
F99 ... F1 Records
Your first file is F1, then F2 and so on, until you have recorded maximum 99
exercise files. The bigger the file number the more recent it is.
There is a two-way communication between the wrist unit and a PC.
Polar Precision Performance Software offers an easy way to analyze
training data, keep training diary, and plan future training. See the
CD-ROM for further information.
D 68

If a function was not activated in the settings mode, that
information will not be displayed in the recorded file.
Exercise file
1. In the Time of day display scroll up or down until FILE is displayed.
2. Press OK to enter the File mode. The main information of
your file is displayed.
Starting date and time alternate on the display.
Exercise name
File number
Used exercise set
(E1-E5)
or BasicUse (E0)
3. Scroll up or down until the desired file is displayed.
4. Press OK to start recalling an exercise file. Exe. Time is displayed.
• Move forward and backward within file loops with
up or down buttons.
• Press OK to enter a file or to enter a deeper level in the file loop.
• Press the stop button to move backward to the previous file level.
•Press and hold the stop button to return to the Time of day
display, wherever you are in the File recalling cycle.
Some information alternates on the display automatically.
You can make the alternation faster by pressing the OK button
e.g. the target heart rate zone information.
D 69
File
(F1-F99)
Exe. Time
Recovery
Distance
Pace
Speed
Cadence
Altitude
°C/ °F
Ascent
Power
Pl %
LRB
Limits
InZone 1
InZone 2
InZone 3
InZone S
KCal
Tot. KCal
Tot. Time
Run./Rid. Time
Odometer
EXE SET
LAPS
SAMPLES

Exercise time (Exe. Time)
The exercise time is the amount of time that you have exercised
with the stopwatch running. Average and maximum heart
rates of your exercise alternate on the display. To continue
recalling the file, scroll up or down button.
Recovery information of BasicSet exercise (Reco)
Recovery time.
Recovery duration.
Drop in your heart rate.
Or
Recovery heart rate.
Time it took reach the preset heart rate reading.
Drop in your heart rate.
Exercise distance (Exe. Dist.)
You can see the exercised distance.
Pace information (Pc. Avg/ Max)
Average and maximum pace of the exercise alternate.
Speed information (Spd. Avg/ Max)
Average and maximum speed of the exercise alternate.
Cadence information* (Cad. Avg/ Max)
Average and maximum cadence of the exercise alternate.
*Optional Polar Cadence Sensor or
Polar Power Output Sensor required.
D 70

Altitude (Alt. Avg/ Max/ Min)
Average, maximum and minimum altitude of the exercise alternate.
Temperature (°C or °F Avg/ Max/ Min)
Average, maximum and minimum temperature of the exercise alternate.
Ascended meters/feet (Ascent)
You can see the ascended meters/ feet of the exercise.
Power* (Pwr Avg/ Max)
Average and maximum output power of the exercise alternate.
Pedaling index* (PI Avg/Max)
Average and maximum pedaling index of the exercise alternate.
Left right pedaling balance* (LRB Avg)
You can see the average balance between left and right foot pedaling.
Limits 1, 2, 3 and summary (Limits 1/ Limits 2/ Limits 3/ Limits S)
Settings of the limits alternate on the display. Limits 1 are used for zone 1,
limits 2 for zone 2, limits 3 for zone 3 and limits S for summary zone.
Summary limits are not shown or alarmed during an exercise. The time
spent within/above/below the summary limits can be seen from the
exercise file.
D 71

Exercise time within, above and below the target zones
Indicates the exercise time, which you have spent within (InZone), above and
below each limits. Time within, above and below limits 1,2 and 3 is recorded
only when those particular limits are activated. Time within, above and below
summary limits is recorded during the entire exercise, regardless of which
limits are in use.
Calorie expenditure (KCal)
You will see how many kilocalories you have expended during the exercise.
Cumulative calorie count (Tot. KCal)
You will have a count for cumulative calories expended during several
exercise sessions starting from the previous resetting of the value in records
file. This function allows you to follow the calorie count as a gauge of
effective exercise e.g. during one week.
Cumulative exercise time count (Tot. Time)
This function counts cumulative exercise time expended during several
exercise sessions starting from the previous resetting of the value in records
file. It allows you to follow the exercise time count as a gauge of amount
of exercise e.g. during one week.
Your cumulative total time is displayed in hours and minutes until
99 hours 59 minutes is reached. After this your cumulative exercise
time is displayed in hours until 9999 hours is reached.
Cumulative running/riding time (Run./Rid. Time)
You will have a count for cumulative running or riding time expended during
several exercise sessions starting from the previous resetting of the value in
records file.
D 72

Total distance (Tot. Dist./Odometer)
Measures cumulative total distance of several exercise sessions starting
from the previous resetting of the value in records file. In a running file
value is indicated as total distance and in a cycling file as odometer.
Interval Training information (EXE. SET)
Start with the display
showing EXE. SET.
1. Press OK to start
F1-F99
EXE. SET
recalling the interval
training information.
2. Scroll up or down to see
the information on
WarmUp Interval CoolDown
Reco 1
Int 1
...
Int 30 Reco30
warm-up, interval and cool-down phases.
Warm-up phase
Warm-up duration.
The heart rate at the end of the warm-up,
average and
maximum heart rates of your warm-up phase.
Interval phase
Interval phase duration.
Average heart rate of intervals and recoveries.
D 73

Cool-down phase
Duration of the cool-down.
The heart rate at the end of the cool-down,
average and
maximum heart rates of the cool-down phase.
3. Press the stop button to return to the previous file level and skip steps
4-6. Or, continue recalling more detailed information of the interval
phase.
4. Start with the display showing Interval. Press OK to see details of each
interval and recovery.
5. Scroll up or down between intervals (Int) and recoveries (Reco).
Interval information
Interval number. Split time of the interval
Interval duration.
Speed at the end of an
interval (If speed was on).
The heart rate at the
end of the interval,
average and
maximum
heart rates of the
selected interval.
D 74

Recovery information
Time-based recovery.
Recovery duration.
Drop in your heart rate.
Or
Heart-rate-based recovery.
Time it took reach the preset heart rate reading.
Drop in your heart rate.
Or
Distance-based recovery.
Recovery distance.
Drop in your heart rate.
6. To continue recalling, e. g. , lap information press the stop button twice.
Scroll up or down until LAPS is displayed.
Lap information (LAPS)
Start with the display showing LAPS and
the number of recorded laps.
1. Press OK to start recalling the lap
information.
2. Scroll up or down to see the following
information:
D 75
FILE
F1-F99
LAPS
Best Lap
Lap 1
...
Lap 99

Best Lap
Shortest lap time.
The number of the best lap.
The best lap information is displayed if you have stored at
least 3 laps. The best lap can not be the last lap.
Laps
Split time.
Lap time.
Lap number.
The heart rate at the end of the lap,
average and
maximum heart rates of the lap.
In the upper row, the split time alternates with the help texts if the Help
function is turned on. You can check the following detailed lap
information in the middle row by pressing the OK button repeatedly:
• lap time (Lap Time),
• speed at the end of the lap (Speed),
• cadence* at the end of the lap (Cadence),
• altitude at the end of the lap (Altitude),
• ascended meters at the end of the lap (Ascent),
• power* at the end of the lap (Power),
*Optional Polar Cadence Sensor or Polar Power Output Sensor required.
D 76

• left right pedaling balance at the end of the lap* (LRB),
• pedaling index* (PI %),
• run/ridden distance at the end of the lap (Distance),
• temperature at the end of the lap (°C/ °F).
Press the stop button to exit the LAPS display.
Press and hold stop to return to the Time of day display.
Recorded samples
Check the detailed information of the exercise in the
sample file.
Start with the display showing SAMPLES and the number
of recorded samples.
FILE
F1-F99
SAMPLES
S 1
S 2
1. Press OK to start recalling the samples.
The sample number, heart rate and time when the sample was recorded
are displayed. In the upper row the sample number alternates with the
help texts.
2. The following detailed sample information is shown one by one as you
press OK repeatedly: stopwatch (Stopwatch), speed (Speed), cadence*
(Cadence), altitude (Altitude), power* (Power), left right pedaling
balance* (LRB), pedaling index* (PI %).
3. Scroll up or down from one sample to another.
4. Press and hold stop to return to the Time of day display.
D 77
...

Deleting a file
1. In the Time of day display scroll up or down until FILE is displayed.
2. Press OK to enter the File mode.
3. Scroll up or down until desired exercise file is displayed. Press and hold
the signal/light button. DELETE FILE and file number are displayed.
4. Press OK. The wrist unit confirms if you want to delete a file
(Are you sure).
5. Press OK to delete the selected file.
6. Press stop to exit the file. Wait appears. The wrist unit rearranges your
file, which takes few seconds.
7. Repress stop to return to the Time of day display.
Deleting all files
1. In the Time of day display scroll up or down until FILE is displayed.
2. Press and hold the signal/light button. DELETE FILES is displayed.
3. Press OK. The wrist unit confirms if you want to delete all files
(Are you sure).
4. Press OK to delete all exercise files.
5. Press stop to return to the Time of day display.
D 78

Records file
This file is updated each time your exercise is recorded to file.
1. In the Time of day display scroll up or down until FILE is displayed.
2. Press OK to enter the File mode.
3. Scroll up or down until Records is displayed.
4. Press OK to enter the records file. Tot. KCal is displayed.
You will have a count for cumulative calories expended
during several exercise sessions.
5. Scroll up or down to see the following values:
• cumulative exercise time (Tot. Time)
• cumulative running/riding time (Run./Rid. Time)
• cumulative running/riding distance (Tot. Dist./Odometer)
• maximum speed (Max Spd.)
• maximum cadence* (Max Cad.)
• maximum altitude (Max Alt.)
• maximum power* (Max Pwr.)
You can now return to the Time of day display by pressing and holding the
stop button, continue resetting your cumulative counts or return to your
previous maximum value.
*Optional Polar Cadence Sensor or Polar Power Output Sensor required.
D 79

Resetting your cumulative counts to zero
Once your have reset the cumulative count you cannot retrieve it.
Start with the display showing Tot. KCal, Tot. Time, Run./Rid. Time or
Tot. Dist./Odometer in the records file.
1. Press OK to start resetting the desired total count. Reset appears and the
value starts to flash.
2. Press and hold the down button. Reset starts to flash. You can still cancel
the resetting by releasing the down button before the value is reset. If
you are sure that you want to reset the value keep holding the down
button until value is reset. Release.
3. Press the stop button to exit the reset display.
Press and hold the stop button to return to the Time of day display.
D 80

Returning to your previous maximum value
Start with the display showing Max Spd, Max Cad*, Max Alt or Max Pwr* in
the records file.
1. Press and hold the signal/light button to start returning to the previous
value. Return OLd appears and the value starts to flash.
2. You can still cancel the reset by pressing the stop button. If you are sure
you want to return to the previous value, press OK.
3. Press the stop button to exit the display.
Or, if you want to start resetting your maximum value to zero, press and
hold the signal/light button. Reset VALUE starts to flash. Once your have
reset the value you cannot retrieve it.
4. You can still cancel the reset by pressing the stop button. If you are sure
you want to return to the previous value, press OK.
5. Press and hold the stop button to return to the Time of day display.
*Optional Polar Cadence Sensor or Polar Power Output Sensor required.
D 81

E. TESTS
If you have not set the user information before trying
to enter the Tests mode, you will automatically move to
the user settings.
Polar Fitness Test
The Polar Fitness Test is an easy, safe and quick
way to estimate individual maximal aerobic power
and to get predicted maximum heart rate value.
The Polar Fitness Test is targeted to healthy adults.
OwnIndex
OwnIndex is a value which is comparable to maximal oxygen uptake (VO
a commonly used descriptor of aerobic fitness. Cardiovascular (aerobic)
fitness relates to how well your cardiovascular system works to transport
and utilize oxygen in your body. The stronger and more efficient your heart
is, the better the cardiovascular fitness is. VO
performance in endurance sports.
is a good indicator of
2max
2max
),
E 82

If you want to improve your cardiovascular fitness, it takes a minimum of
6 weeks on an average to see a noticeable change in OwnIndex. Less fit
individuals see progress even more rapidly and for more fit individuals
more time is needed.
Cardiovascular fitness is best improved by exercise types which employ
large muscle groups. Such activities include running, swimming, rowing,
skating, cross-country skiing, cycling and walking.
To monitor your fitness progress start with measuring your OwnIndex a
couple of times during the first two weeks, to get a baseline value.
Thereafter, repeat the test approximately once a month.
OwnIndex is based on resting heart rate, heart rate variability at rest, age,
gender, height, body weight and self-assessed physical activity.
E 83

Predicted maximum heart rate (HR
The HR
-p definition is carried out simultaneously with the Polar Fitness
max
Test.
max
-p)
The HR
-p score predicts your individual maximum heart rate value more
max
accurately than the age-based formula (220 - age). The age-based method
provides a rough estimation and is thus not very accurate, especially for
people who have been fit for many years or for older people. The most
accurate way of determining your individual maximum heart rate is to have
it clinically measured (in maximal treadmill or bicycle stress test) by a
cardiologist or an exercise physiologist.
Your maximum heart rate changes to some extent in relation to your
fitness. Regular exercise tends to decrease HR
whereas reduced training
max
tends to increase it. There may also be some variation according to the
sport you participate in. For example, running HR
swimming HR
HR
-p gives the possibility of defining training intensities as percentages
max
max
.
> cycling HR
max
max
>
of maximum heart rate and of following maximum heart rate changes due
to training, without an exhaustive maximal stress test. HR
-p is based on
max
resting heart rate, heart rate variability at rest, age, gender, height, body
weight and maximal oxygen uptake, VO
most accurate HR
VO
into the wrist unit.
2max
-p is obtained by entering your clinically measured
max
(measured or predicted). The
2max
E 84

Fitness test settings
To be able to carry out the Polar Fitness Test you need to do the following
settings in the Options mode:
• Set your personal user information and long-term physical activity level.
• Set the Polar Fitness Test on.
• Set the HR
-p on if you want to get a prediction of your
max
maximum heart rate.
Carrying out the test
To get reliable test results, the following basic requirements apply:
•You should be relaxed and calm.
• The test can take place anywhere - home, office, health club - as long as
the testing environment is peaceful. No disturbing noises (e.g. television,
radio or telephone), no other people talking to you.
• Keep the testing place, time of day and environment the same every
time the test is repeated.
•Avoid eating a heavy meal or smoking 2-3 hours prior to testing.
•Avoid heavy physical effort, alcoholic beverages or pharmacological
stimulants on the test day and the day before.
E 85

Time of Day File Options Tests Connect
Op.Test Fit. Test Op. Test reset
1. In the Time of day display scroll up or down until TESTS is displayed. Press OK:
If you cannot find Tests mode check that you have turned the function
on in the Options mode.
2. Scroll up or down until FIT. TEST is displayed. Press OK. Your latest
OwnIndex and the testing date are displayed.
3. Scroll up or down to see your latest HR
-p and the testing date.
max
4. Lie down and relax yourself for 1-3 minutes before the test.
Start the test
It takes 3-5 minutes to carry out the test.
5. Press OK to start the test. The wrist unit starts searching for your
heart rate. TEST On and your heart rate are displayed. The test begins.
6. Lie relaxed. Keep your hands beside your body and avoid body
movements. Don’t communicate with other people.
7. Your current OwnIndex and the testing date are displayed.
8. If HR
-p is on: Scroll up or down to see the HR
max
-p result and the
max
testing date.
Turn the Fitness test sound signal on/off
The sound signal will alarm you at the end of the test. If the sound signal is
on appears on the display.
• To turn the sound signal on or off either before or during the test, press
and hold the signal/light button.
E 86

Interrupt the test
•You can stop the test any time during the test by pressing the stop button.
Failed TEST is displayed for a few seconds.
The latest OwnIndex and HR
-p are not replaced.
max
If the wrist unit does not succeed in receiving your heart rate at the
beginning or during the test, the test will fail. Check that the transmitter
electrodes are wet and the elastic strap is snug enough.
Update OwnIndex and HR
You can update your OwnIndex and HR
max
-p
-p values to the Options mode/
max
User information. When you update these values regularly, the reading in
percentages of your maximum heart rate and calorie calculation give more
accurate individual information.
1. In the Time of day display scroll up or down until TEST is displayed.
2. Press OK to enter the Fitness Test mode.
3. Scroll up or down until Update USER SET is displayed. This display
appears if you have not updated your latest test results.
4. Press OK to update the OwnIndex and HR
-p values.
max
5. To return to the Time of day display, press and hold the stop button.
Your maximum heart rate value is updated if the HR
E 87
-p is on.
max

Fitness classes
The Polar Fitness Test result, your OwnIndex, is most meaningful when
comparing your individual values and changes in them. OwnIndex can also
be interpreted according to your gender and age. Locate your OwnIndex on
the table to find out your current cardiovascular fitness classification,
compared with those who are of the same age and gender.
Age 1234567
(years) (very (poor) (fair) (average) (good) (very (excellent)
poor) good)
20-24 < 32 32-37 38-43 44-50 51-56 57-62 >62
25-29 < 31 31-35 36-42 43-48 49-53 54-59 >59
30-34 < 29 29-34 35-40 41-45 46-51 52-56 >56
MENWOMEN
35-39 < 28 28-32 33-38 39-43 44-48 49-54 >54
40-44 < 26 26-31 32-35 36-41 42-46 47-51 >51
45-49 < 25 25-29 30-34 35-39 40-43 44-48 >48
50-54 < 24 24-27 28-32 33-36 37-41 42-46 >46
55-59 < 22 22-26 27-30 31-34 35-39 40-43 >43
60-65 < 21 21-24 25-28 29-32 33-36 37-40 >40
20-24 < 27 27-31 32-36 37-41 42-46 47-51 >51
25-29 < 26 26-30 31-35 36-40 41-44 45-49 >49
30-34 < 25 25-29 30-33 34-37 38-42 43-46 >46
35-39 < 24 24-27 28-31 32-35 36-40 41-44 >44
40-44 < 22 22-25 26-29 30-33 34-37 38-41 >41
45-49 < 21 21-23 24-27 28-31 32-35 36-38 >38
50-54 < 19 19-22 23-25 26-29 30-32 33-36 >36
55-59 < 18 18-20 21-23 24-27 28-30 31-33 >33
60-65 < 16 16-18 19-21 22-24 25-27 28-30 >30
The classification is based on literature review of 62 studies where VO
healthy adult subjects in the USA, Canada and 7 European countries. Reference: Shvartz E, Reibold
RC: Aerobic fitness norms for males and females aged 6 to 75 years: a review. Aviat Space Environ
Med; 61:3-11, 1990.
E 88
was measured directly in
2max

For various fitness classes we recommend the following:
5-7 Maintain current
exercise habits
for good health
and fitness.
7
6
1-3 Increase exercise
for health
benefits and
fitness
improvement.
2
1
4To ensure good health,
maintain current exercise
habits. For fitness
improvement an increase in
exercise is recommended.
5
4
3
Top athletes typically score OwnIndex values above 70 (men) and 60
(women). As high values as 95 can be reached by Olympic level athletes.
OwnIndex is highest in sports that involve large muscle groups such as
cross-country skiing and cycling.
E 89

Training Optimizer
Successful training requires temporary overloading: longer exercise
duration, higher intensity, or higher total volume. In order to avoid severe
overtraining, overloading must always be followed by an adequate
recovery period. With an inadequate recovery period, you may experience a
decrease in performance as a result of high training volumes, instead of
improvement. Polar OwnOptimizer is an easy and reliable way to
determine whether your training program is optimally developing your
performance.
OwnOptimizer
Polar OwnOptimizer is a modification of a traditional orthostatic
overtraining test. It is a perfect tool for everyone training regularly, at least
three times a week, for fitness improvement or to reach competitive
targets. This feature is based on heart rate and heart rate variability
measurements taken during an orthostatic test (standing up from relaxed
resting). OwnOptimizer helps you to optimize your training load during a
training program so that you experience an increase in performance and do
not undertrain or overtrain over the long-term.
Polar OwnOptimizer is based on regular long-term measurements of five
heart rate parameters. Two of these five values are calculated at rest, one
while standing up and two while standing. Each time you perform the test,
the Running Computer saves the heart rate values and compares them to
the previous values registered.
E 90

Baseline tests
When you start using OwnOptimizer for the first time, six baseline tests
should be conducted over a period of two weeks to determine your
personal baseline value. These baseline measurements should be taken
during two typical basic training weeks, not during heavy training weeks.
The baseline measurements should include tests taken after training and
after recovery days.
Monitoring your OwnOptimizer values
After the baseline recordings, you should continue to perform the test 2-3
times a week. Test yourself weekly in the morning following both a
recovery day and a heavy training day (or a series of heavy training days).
An optional third test can be performed after a normal training day.
OwnOptimizer may not provide reliable information during detraining or
in a very irregular training period. If you take a break from exercise that is
14 days or longer, the baseline tests should be performed again.
Carrying out the test
The test should be always taken in standardized/similar conditions in order
to have the most reliable results. It is recommended that you take the test
in the morning before breakfast.
E 91

To get reliable test results, the following basic requirements apply:
-You should be relaxed and calm.
-Avoid eating, drinking and smoking 2-3 hours prior to the test.
- The test can take place anywhere – at home, in the office, at a health
club – as long as the test environment is peaceful. There should be no
disturbing noises (for example, television, radio or telephone) or other
people talking to you.
-You can be seated in a relaxed position or lying in bed. The position
should always be the same when you do the test.
Wear the transmitter and the wrist unit as described in the "Easy start"
section.
Time of Day File Options Tests Connect
Op. Test Fit. Test Op. Test Reset
1. In the Time of day display, scroll up or down until TESTS is shown. If you
cannot find the Tests mode, check that you have turned the function on
in the Options mode.
2. Press OK to enter the Tests mode.
3. Op. Test is displayed. Press OK.
4. Your latest OwnOptimizer Test information is displayed
(date and your latest test value).
5. Sit or lay down, relax and press the OK button to start
the test. Lay down is displayed on the wrist unit. Do not move during
this first part of the test, which lasts 3 minutes.
E 92

6. After 3 minutes, the wrist unit gives a signal and Stand up is displayed.
Stand up and remain standing still for 3 minutes.
7. After 3 minutes the wrist unit again gives again a signal and the test is
finished.
8. You can see both a numerical and a verbal interpretation of the result
on the wrist unit display.
If the test fails, the wrist unit gives a signal and the text "Failed test" is
displayed. You can retake the test by starting from the very beginning.
How to interpret the results
The wrist unit calculates five heart rate and heart rate variability based
parameters. The OwnOptimizer values are calculated by comparing your
latest results to your previous results. The wrist unit will display a written
description of your training status. They are defined in detail below. The
wrist unit also displays your average heart rate (bpm) while lying down
(Rest HR), the highest heart rate while standing up (Peak HR) and the
average heart rate while standing (Stand HR).
The display texts for interpretation of your OwnOptimizer values are:
Recovered / Recovered (1)
Your test heart rates are lower than average. This indicates that you
have recovered very well. You can continue training, including intensive
exercise sessions.
Normal / Normal Training State (2)
Your test heart rates are at a normal level. Go on with your training;
include both light and intensive training sessions, and recovery days.
E 93

TrEffect / Training Effect (3)
Your test heart rates are higher than average. You may have exercised
intensively in the previous days. You have two choices: 1) rest or light
train for one or two days, or 2) continue intensive training for one or
two days and then recover well.
Other sources of stress, the beginning of a fever or an attack of the flu
can result in the same kind of response.
Steady / Steady Training State (4)
Your test heart rates have continuously been at a normal level for a
long time now. Effective training requires both heavy training and good
recovery, and this should cause variation in your test heart rates. Your
OwnOptimizer Test indicates that you have not had very intensive
training or good recovery for a while. Perform the test again after a rest
or light training day. If the recovery is effective, you will get Recovered
as a test result.
Stagnant / Stagnant Training State (5)
Your test heart rates are still at a normal level, and this has continued
for a long time. Your test indicates that your training has not been
intensive enough to develop optimally. To improve your condition most
effectively, you should now include more intense or longer exercise
sessions in your training.
Hard Tr / Hard Training Effect (6)
Your test heart rates have been higher than average several times. You
may have trained hard on purpose. Your test indicates overloading, and
you should recover well now. To control your recovery, perform the test
again after one or two resting or easy training days.
E 94

OverReach / Overreaching (7)
Your OwnOptimizer Test indicates that you have had a very intensive
training period for several days or weeks. Your test heart rates have
continuously stayed at a high level. This seriously indicates that you
should have a complete recovery period. The longer you have trained
intensively, the longer the recovery period required to recover. Perform
the test again after at least two days of recovery.
OverTrS / Sympathetic Overtraining (8)
Your OwnOptimizer Test indicates that you have had a very intensive
training period for several days or weeks, and your recovery has not
been sufficient. This has result in a state of overtraining. To get back to
a normal training state, you have to rest for a carefully controlled
recovery period. Control your recovery with OwnOptimizer Test by
performing the test 2 – 3 times per week.
OverTrP / Parasympathetic Overtraining (9)
Your heart rates have stayed at a low level, which is generally interpreted
as a sign of a good recovery. However, other parameters indicate
parasympathetic overtraining. You may have trained with high volumes
for a long time and your recovery times may not have been long enough.
You should check if you have other signs of overtraining. For example,
overtraining is marked by decreased performance, increased fatigue,
mood disturbances, sleeping problems, persistent muscle soreness and/
or a feeling of being burnt out or stale. You may also have been
subjected to other stresses.
In general, the development of parasympathetic overtraining requires a
long history of heavy training volumes.
E 95

To recover from a state of parasympathetic overtraining, you have to
recover your body balance completely. Recovering may take several weeks.
You should not exercise, and instead rest completely for most of the
recovery period. You can possibly have a few days with some light aerobic
training in short sessions, and only occasionally include short, high intensity
sessions. You can also consider some other sport than your main sport.
However, it should be one you are familiar and feel comfortable with.
Control your recovery with OwnOptimizer Test by performing the test
2 – 3 times per week. If you feel that you have recovered your body balance
and you get Normal Training State or Recovered as a test result, preferably
more than once, you can consider continuing your training. When you
can start training again, you should start a new testing period with new
baseline measurements.
Note
Before you radically change your training program, consider your OwnOptimizer
results together with your subjective feelings and the symptoms you have.
You should repeat the OwnOptimizer test if you are unsure of the standardized
conditions. An individual test result can be affected by several external factors,
such as mental stress, latent illness, environmental changes (temperature,
altitude) and others.
You should update the baseline calculations at least once a year when you
start a new training season.
Analyzing the result with the PC software
If you download the results of the test from your wrist unit to the PC, you
can analyze the results with the Polar Precision Performance software. The
software offers you various ways to analyze the results and receive more
detailed information about your progress. You can also generate graphical
comparisons with your previous values.
E 96
 Loading...