

Page 1

ENGLISH
RS800CX User Manual
Page 2

ENGLISH
CONTENTS
1. INTRODUCTION ................. ... ... ... ... ... ... .. . ....... .... .... ...... . .... .... ........... .... .... ........... .... .... .......... 5
2. TRAINING COMPUTER PARTS .... ........... .... .... ........... .... .... ...... . .... .... ........... .... .... ........... .... .... .... 6
Optional Accessories ...... ........ ..................................................................... ........ ........ ...... 6
3. GETTING STARTED .... .... ...... . .... .... ........... .... .... ........... .... .... ........... .... .... ........... .... .... ...... . .... .. 7
Basic Settings... .... ........... .... .... ........... .... .... ........... .... .... ........... .... .... ........... .... .... ...... . .... .... 7
Menu Structure .... .... ........... .... .... ........... .... .... ........... .... .... ........... .... .... ........... .... .... ...... . .... . 8
4. PREPARE FOR TRAINING .... ........... .... .... ........... .... .... ........... .... .... ........... .... .... ...... . .... .... .......... 9
Plan Your Training .... .... .... ........... .... .... ........... .... .... ........... .... .... ...... . .... .... ........... .... .... ........ 9
Exercise Types ....................................... ........ ........ ........ .................................................. 9
Create New Exercises........................................................... ........ ........ .............................. 9
Calibrate the Polar s3/s3+ Stride Sensor W.I.N.D. . ........... .... .... ........... .... .... ........... .... .... ...... . .... .... 11
Calibrate Sensor by Running a Distance (on-the-fly calibration) .................................................. 11
Set Calibration Factor Manually ...................... ........ ........ ........ ........ ........ ........ ........ ........ ..... 11
5. TRAINING.... .... ........... .... .... ........... .... .... ........... .... .... ........... .... .... ...... . .... .... ........... .... .... ..... 13
Wear the Heart Rate Sensor .. . .... .... ........... .... .... ........... .... .... ........... .... .... ........... .... .... ...... . .... .. 13
Start Training..... .... .......... . .... .... ........... .... .... ........... .... .... ........... .... .... ...... . .... .... ........... .... ... 13
Combine Exercises ... . .... .... ........... .... .... ........... .... .... ........... .... .... ...... . .... .... ........... .... .... ........ 14
Information on the Display .... .... .... ........... .... .... ........... .... .... ...... . .... .... ........... .... .... ........... .... ... 15
Personalize the Training Computer Display ........ .... .... ........... .... .... ...... . .... .... ........... .... .... ........... .. 16
Button Functions During Exercise... .... .... ...... . .... .... ........... .... .... ........... .... .... ........... .... .... ...... . .... 20
Record a Lap ........ ........ ........ ........ ........ ........ ........ ........ ........ ........................................... 20
Lock a Zone.................... ........ ........ ........ ........ ........ ......................................................... 20
Zoom the Display ............................................................. ........ ........ ........ ........ ........ ........ 20
Illuminate the Display (Night mode on) .................................................. ........ ........ ........ ....... 20
View Quick Menu ..................................................................... ........ ........ ........ ........ ......... 20
Pause Exercise ..................................... ........ ........ ........ ........ ........ ........ ........ ........ ............ 21
Determine Your OwnZone ... .... .... ...... . .... .... ........... .... .... ........... .... .... ........... .... .... ...... . .... .... ..... 21
6. AFTER TRAINING .... .... .... ...... . .... .... ........... .... .... ........... .... .... ........... .... .... ........... .... .... ...... . .... 23
Stop Recording.... .... ........... .... .... ........... .... .... ........... .... .... ........... .... .... ...... . .... .... ........... .... .. 23
Analyze Exercise Results.... .... .... ........... .... .... ...... . .... .... ........... .... .... ........... .... .... ........... .... .... . 23
Exercise Log ................................................... ........ ........ ................................................. 23
Weekly Summary ................................................. ........ .................................................... 30
Totals................................................................... ........ ........ ........ ........ ........ ........ ........ .. 30
Delete Files ................................................................... ........ ........ ........ ........ ........ ........ . 31
7. SETTINGS ..... .... ........... .... .... ........... .... .... ........... .... .... ...... . .... .... ........... .... .... ........... .... .... ... 32
Feature Settings .... .... .......... . .... .... ........... .... .... ........... .... .... ........... .... .... ...... . .... .... ........... .... 32
Polar s3/s3+ Stride Sensor W.I.N.D. ............................ ........ ........ ........ ........ ........ ........ ......... 32
Polar Cycling Speed Sensor W.I.N.D. .... ........ ........ ................................................................ 32
Polar Cadence Sensor W.I.N.D... ........ ........ ........ ........ .......................................................... 32
Measuring Wheel Size............ ........ ........ ..................................................................... ....... 33
Polar G3/G5 GPS Sensor W.I.N.D......... ........ ........ ........ ........ ........ ........ ................................ 33
Altitude ........................................................... ........ ....................................................... 34
Recording Rate .............. ........ ........ ........ ..................................................................... ..... 34
RR Data Function ................ ........ ........ ........ ........ ........ ........ ........ ..................................... 37
Speed View ................................................................................... ........ ........ ........ ........ .. 37
Automatic Lap Recording ................................................................................... ........ ........ 37
Heart Rate View ............................ ..................................................................... ........ ...... 37
Sport Zones ............................................................. ........ ........ ....................................... 37
User Settings ..... .... .... ........... .... .... ........... .... .... ........... .... .... ...... . .... .... ........... .... .... ........... ... 37
General Settings .... .... .... ........... .... .... ........... .... .... ...... . .... .... ........... .... .... ........... .... .... ........... 38
Page 3

ENGLISH
Sound ...... ........ ..................................................................... ........ ........ ........ ........ ........ 38
Keylock .................................................................... ........ ........ ........ ............................. 39
Units............................................................. ........ ........ ........ ........ ........ ........ ................. 39
Language ..................................................................... ........ .......................................... 39
Sleep ................................................................... ........ ........ ........ ........ ......................... 39
Watch Settings.. .... .... ........... .... .... ........... .... .... ...... . .... .... ........... .... .... ........... .... .... ........... .... 39
Reminder ....................................................... ........ ........ ........ ........ ........ ........ ........ ........ 39
Event ................................................... ........ ........ .......................................................... 40
Alarm ............................................... ........ ........ ........ ........ ........ ..................................... 40
Time ..................................................... ..................................................................... .... 40
Date ...... ........ ..................................................................... ........ ........ ........ ........ ........ ... 41
Shortcut Button (Quick Menu) ..... .... .... ...... . .... .... ........... .... .... ........... .... .... ........... .... .... ...... . .... .. 41
8. TRAINING PROGRAM .... ........... .... .... ........... .... .... ........... .... .... ........... .... .... ........... .... .... ...... . ... 42
View Program .... .... .... ........... .... .... ...... . .... .... ........... .... .... ........... .... .... ........... .... .... ...... . .... ... 42
Perform Programmed Exercise ........ .... .... ...... . .... .... ........... .... .... ........... .... .... ........... .... .... ...... . .. 43
Start training ............................................................. ........ ........ ........ ........ ........ ........ ...... 43
Exercise with Phases ............................................................. ........ ........ ........ ........ ........ .... 43
Views during the exercise ................................................................................................. .. 43
Functions During Exercise .............. ........ ........ ........ ........ ........ ........ .................................... 44
Lap Menu .............. ........ ........ ........ ........ ........ ........ ......................................................... 44
9. TESTS.... .... ........... .... .... ........... .... .... ........... .... .... ........... .... .... ........... .... .... ...... . .... .... ......... 45
Polar Fitness TestTM..... .... .... ........... .... .... ...... . .... .... ........... .... .... ........... .... .... ........... .... .... ..... 45
Before the Test ............................................................... ........ ........ ........ ........ ................. 45
Performing the Test....................................................... ........ ........ ........ ........ ........ ........ .... 46
After the Test ........ ........ ........ ..................................................................... ........ ........ ..... 46
Polar OwnOptimizerTM .... .... ........... .... .... ........... .... .... ........... .... .... ...... . .... .... ........... .... .... ....... 48
General ...... ........ ........ ........ ........ ........ ........ ........ ............................................................ 48
Before the Test......................................................... ........ ........ ........................................ 48
Performing the Test....................................................... ........ ........ ........ ........ ........ ........ .... 48
After the Test ........ ........ ........ ..................................................................... ........ ........ ..... 49
10.USING A NEW HEART RATE SENSOR ...... .... .... ........... .... .... ........... .... .... ........... .... .... ...... . .... .... .... 52
Teach a New Heart Rate Sensor .... .... .... ........... .... .... ........... .... .... ...... . .... .... ........... .... .... ........... 52
11.BACKGROUND INFORMATION ...... .... .... ........... .... .... ........... .... .... ........... .... .... ...... . .... .... ........... .. 53
Polar Sport Zones .... .... ........... .... .... ........... .... .... ........... .... .... ........... .... .... ........... .... .... ...... . .. 53
OwnZone Training .... .... .... ........... .... .... ........... .... .... ........... .... .... ...... . .... .... ........... .... .... ......... 54
Maximum Heart Rate... .... .... ...... . .... .... ........... .... .... ........... .... .... ........... .... .... ...... . .... .... ........... 54
Heart Rate Value in a Sitting Position .. .... ........... .... .... ........... .... .... ........... .... .... ...... . .... .... .......... 55
Heart Rate Reserve... .... .... ...... . .... .... ........... .... .... ........... .... .... ........... .... .... ........... .... .... ...... . .. 55
Heart Rate Variability .... .... ........... .... .... ........... .... .... ...... . .... .... ........... .... .... ........... .... .... ......... 55
Running Cadence and Stride Length .... .... ........... .... .... ........... .... .... ...... . .... .... ........... .... .... .......... 56
R-R Recording... .... ........... .... .... ........... .... .... ........... .... .... ........... .... .... ........... .... .... ...... . .... .... 57
Polar Running Index.... .... ........... .... .... ........... .... .... ........... .... .... ........... .... .... ...... . .... .... ........... 57
Polar Training Articles... .... .... ........... .... .... ........... .... .... ........... .... .... ...... . .... .... ........... .... .... ..... 59
12.CUSTOMER SERVICE INFORMATION ....... .... .... ........... .... .... ........... .... .... ...... . .... .... ........... .... .... .... 60
Care and Maintenance.... .... ........... .... .... ........... .... .... ........... .... .... ........... .... .... ...... . .... .... ........ 60
Caring For Your Product ........ ........ ..................................................................... ........ ........ 60
Service ............................................. ........ ..................................................................... . 60
Changing Batteries............ ........ ........ ........ ........ ........ ........ ................................................ 60
Changing Training Computer Battery ...................... ........ ........ ........ ....................................... 61
Precautions... .... .... ...... . .... .... ........... .... .... ........... .... .... ........... .... .... ........... .... .... ...... . .... .... ... 62
Interference During Exercise ............................................................. ........ ........ ........ ........ . 62
Minimizing Risks When Exercising............................ ........ ........ ........ .................................... 62
Technical Specifications .... . .... .... ........... .... .... ........... .... .... ........... .... .... ...... . .... .... ........... .... .... 63
Frequently Asked Questions..... .... .... ...... . .... .... ........... .... .... ........... .... .... ........... .... .... ...... . .... .... . 64
Page 4

ENGLISH
Limited International Polar Guarantee ..... .... ........... .... .... ........... .... .... ...... . .... .... ........... .... .... ....... 66
Polar Disclaimer ..... .... .... ........... .... .... ........... .... .... ...... . .... .... ........... .... .... ........... .... .... .......... 67
INDEX ..... .... .... ........... .... .... ........... .... .... ...... . .... .... ........... .... .... ........... .... .... ........... .... .... .... 68
Page 5
ENGLISH
1. INTRODUCTION
Congratulations! You have purchased a complete training system to tailor-fit your training needs. This user
manual includes complete instructions on getting the most of your Polar RS800CX training computer.
The latest version of this user manual can be downloaded at http://www.polar.com/support. For video
tutorials, go to http://www.polar.com/en/support/video_tutorials.
Introduction 5
Page 6

ENGLISH
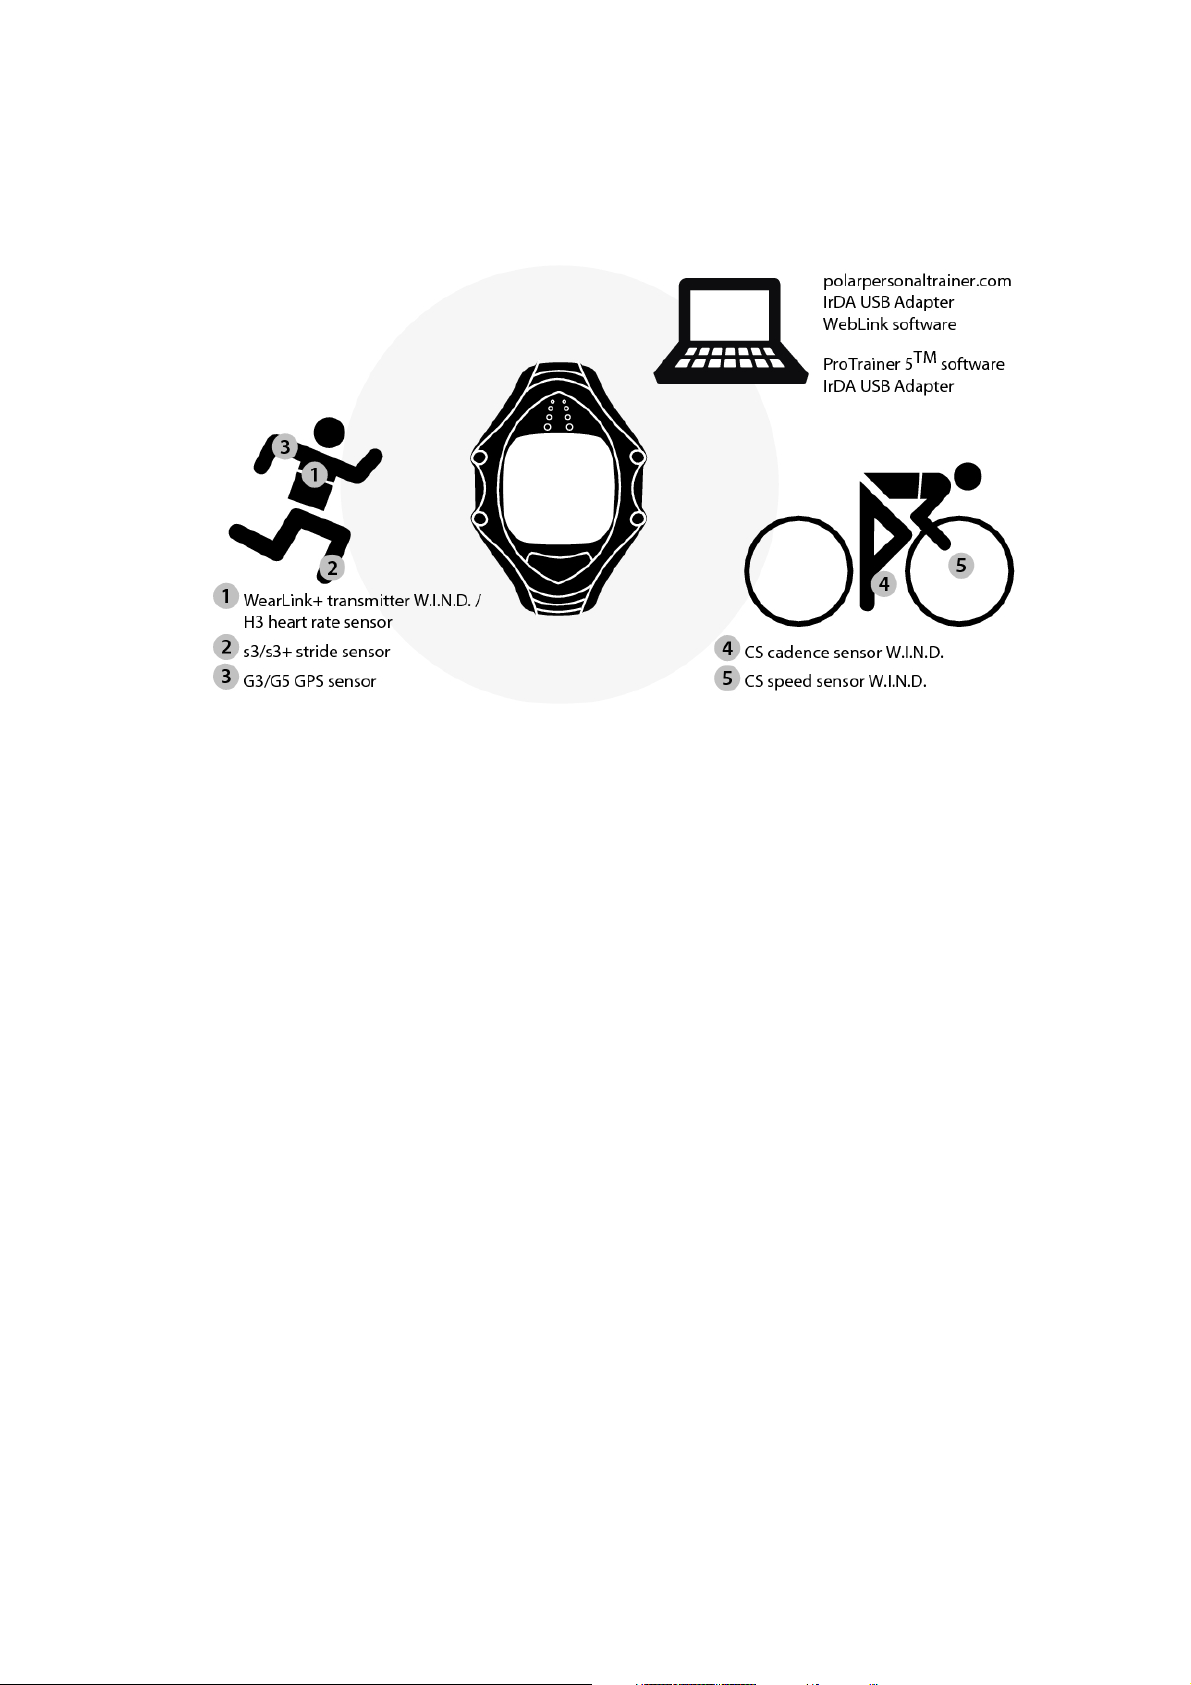
2. TRAINING COMPUTER PARTS
1. Polar RS800CX training computer: displays and records your heart rate and other exercise data during
exercise.
2. Polar Polar H3 heart rate sensor: sends the heart rate signal to the training computer. Includes a
connector and strap.
CD-ROM: The CD includes Polar ProTrainer 5TMsoftware and a complete user manual.
Polarpersonaltrainer.con web service: Polarpersonaltrainer.com is your online training diary and interactive
training community that keeps you motivated.
The latest version of this user manual can be downloaded at www.polar.com/support.
Optional Accessories
1. Polar s3/s3+ stride sensorTMW.I.N.D.: transmits the running speed/pace and distance measurements to
the training computer. Also measures running cadence and stride length.
2. Polar G3/G5 GPS sensorTMW.I.N.D.: provides speed, distance and location data, as well as track
information, in all outdoor sports using Global Positioning System (GPS) technology. You can transfer
your track data to the Polar ProTrainer 5 software to view in Google Earth or to convert into a GPX file.
For more information, see software help.
3. Polar Cycling Speed SensorTMW.I.N.D.: measures speed and distance when cycling.
4. Polar Cadence SensorTMW.I.N.D.: measures cadence, i.e. crank revolutions per minute when cycling.
When using the Polar G3/G5 GPS sensor with a Polar s3/s3+ stride sensor or Polar cycling speed sensor, the GPS
will only be used for location and route tracking. However, when the s3/s3+ stride sensor or cycling speed sensor is
not in range (e.g. the type of sport changes during training), the training computer automatically retrieves speed
and distance data from the GPS sensor. This way the speed and distance measurement is secured throughout your
training session. To start using the s3/s3+ stride sensor or the cycling speed sensor again, long press LIGHT and
select Seek sensor.
For video tutorials on how to use these accessories, go to http://www.polar.com/en/polar_community/videos.
6 Training Computer Parts
Page 7
3. GETTING STARTED
Basic Settings
ENGLISH
Before exercising with your training computer, customize the basic settings. Enter as accurate data as
possible to ensure correct performance feedback based on your personal metrics.
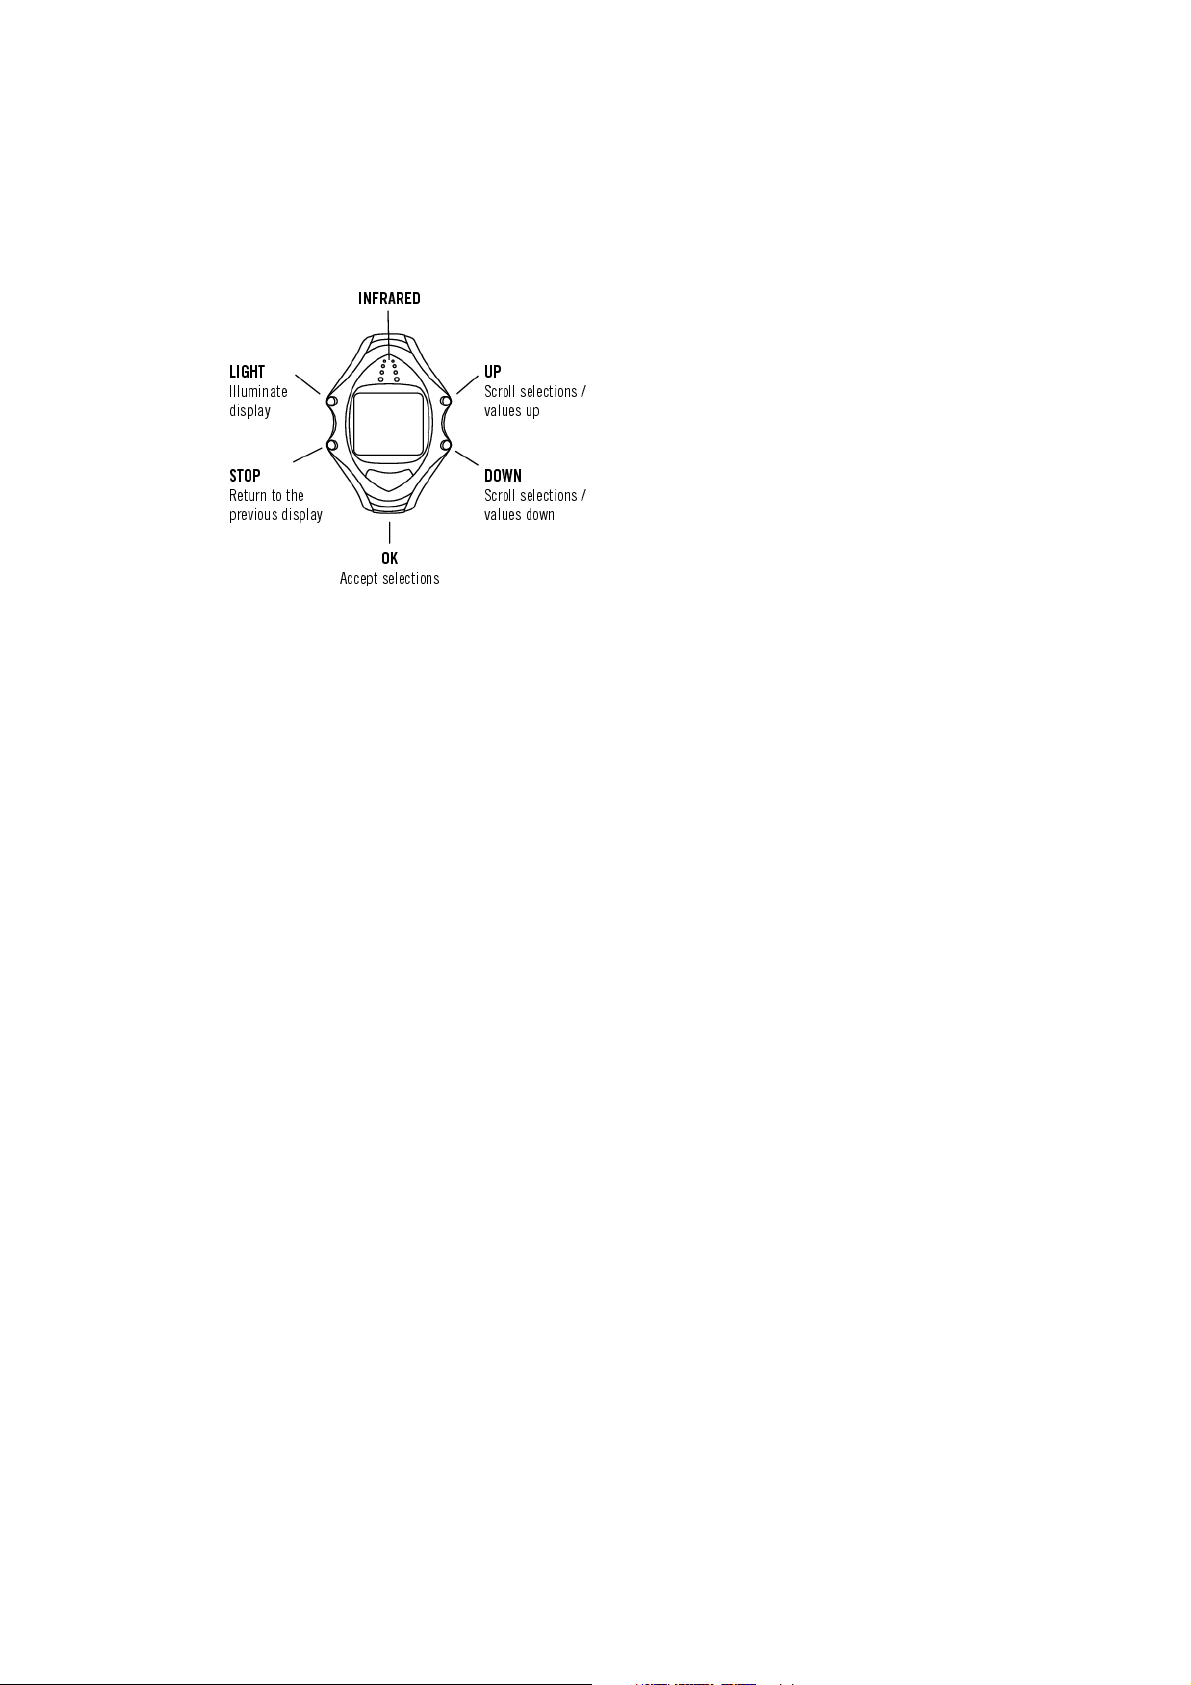
To a djus t th e d a ta, us e UP, DOWN and accept with OK.ThevaluesscrollfasterifyoupressandholdUP
or DOWN.
1. To activate your training computer, press OK twice.
2. The Polar logo will appear. Press OK.
3. Language: Select English, Deutsch, Español, Français or Italian.
4. Start with basic settings is displayed. Press OK.
5. Time: Select 12h or 24h. With 12h, select AM or PM. Set the local time.
6. Date: Set today’s date, dd=day, mm=month, yy=year.
7. Units: Select metric (kg/cm/km) or imperial (lb/ft/mi) units.
8. Weight: Enter your weight. To change units, press and hold LIGHT.
9. Height: Enter your height. If you use imperial units, first set feet (ft) then inches (in).
10. Birthday: Enter your date of birth, dd=day, mm=month, yy=year.
11. Sex: Select Male or Female.
12. Settings OK? is displayed. Select Yes: Settings are accepted and saved. The training computer will
display the time. Select No if settings are incorrect and need to be changed. Press STOP to return to the
data you want to change.
Getting Started 7
Page 8
ENGLISH
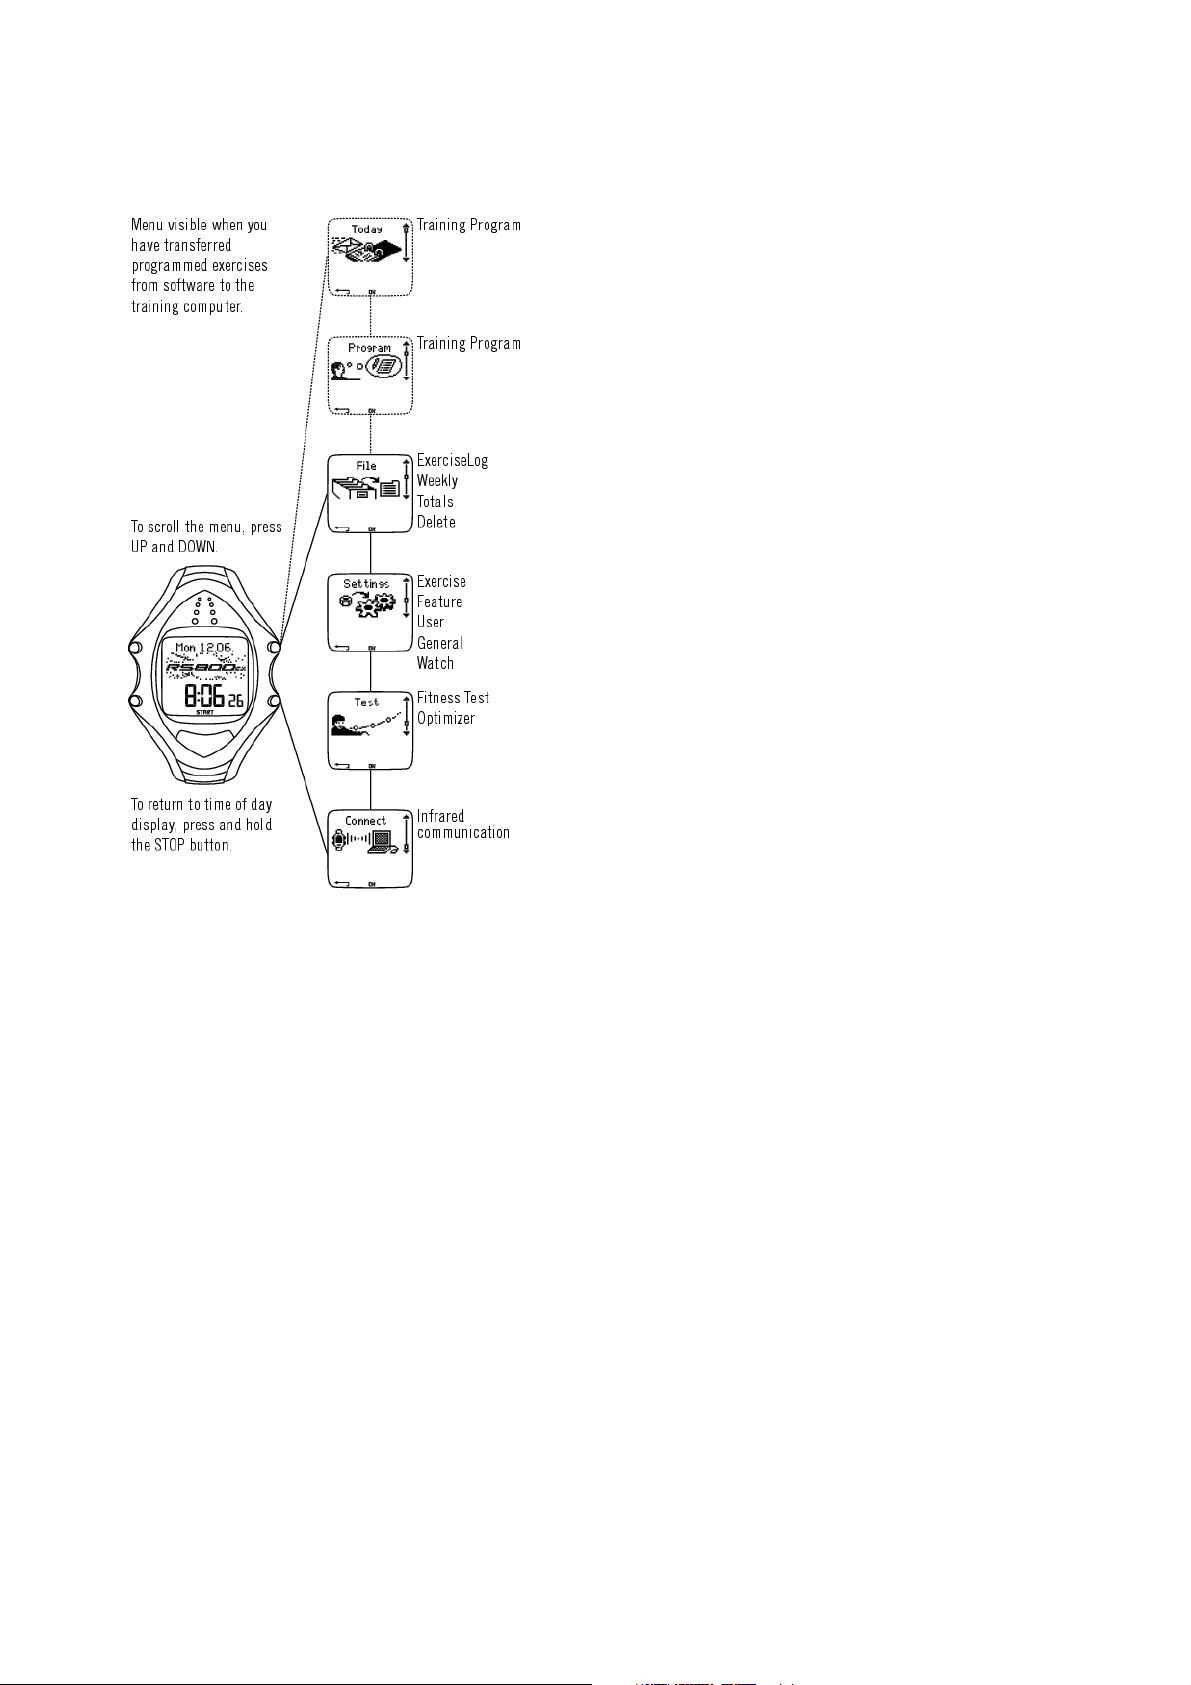
Menu Structure
8 Getting Started
Page 9
ENGLISH
4. PREPARE FOR TRAINING
Plan Your Training
Exercise Types
You can u tilize the instal led rea dy-m ade exerci ses or cre ate you r o wn using the tra inin g c ompu ter. Creat e
more versatile ones and transfer them to the training computer by using the Polar ProTrainer 5.
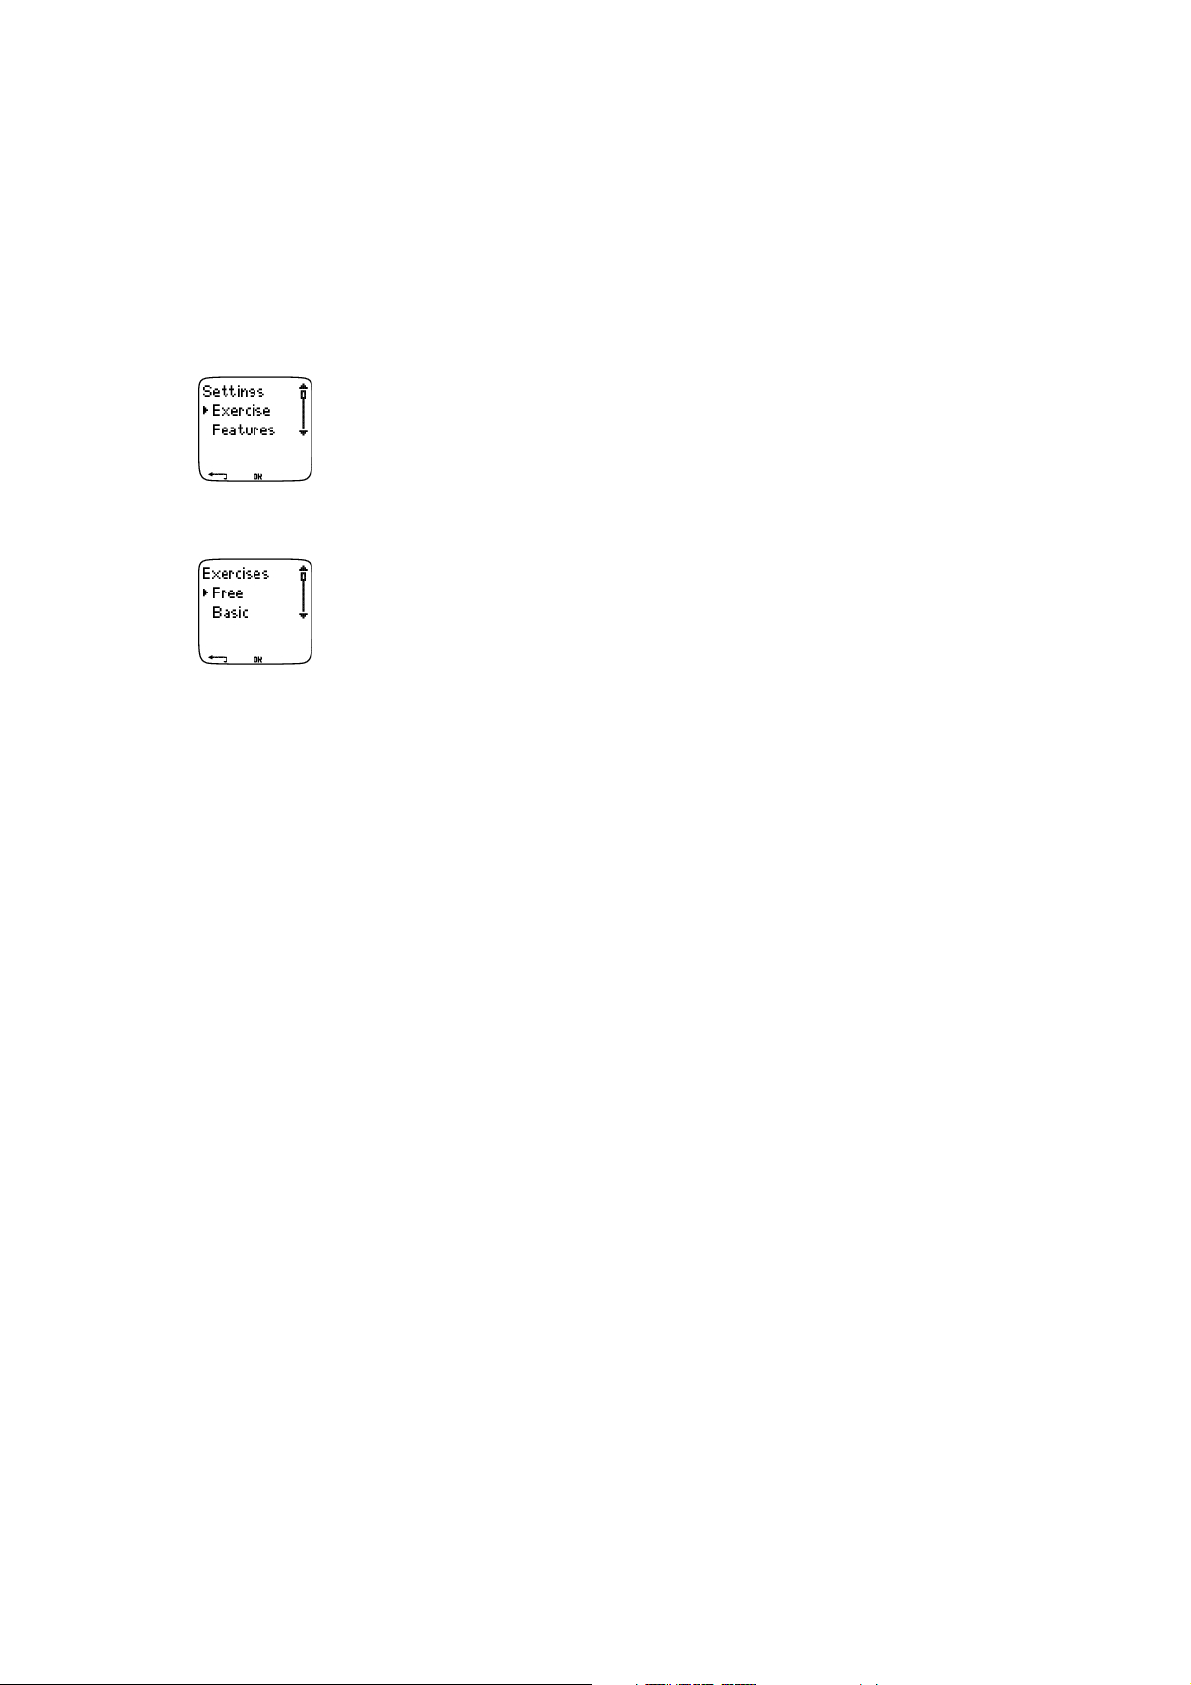
Select Settings > Exercise
The Exercise menu shows a list of exercises. Navigate through the options with UP or DOWN and view the
exercise by pressing OK.
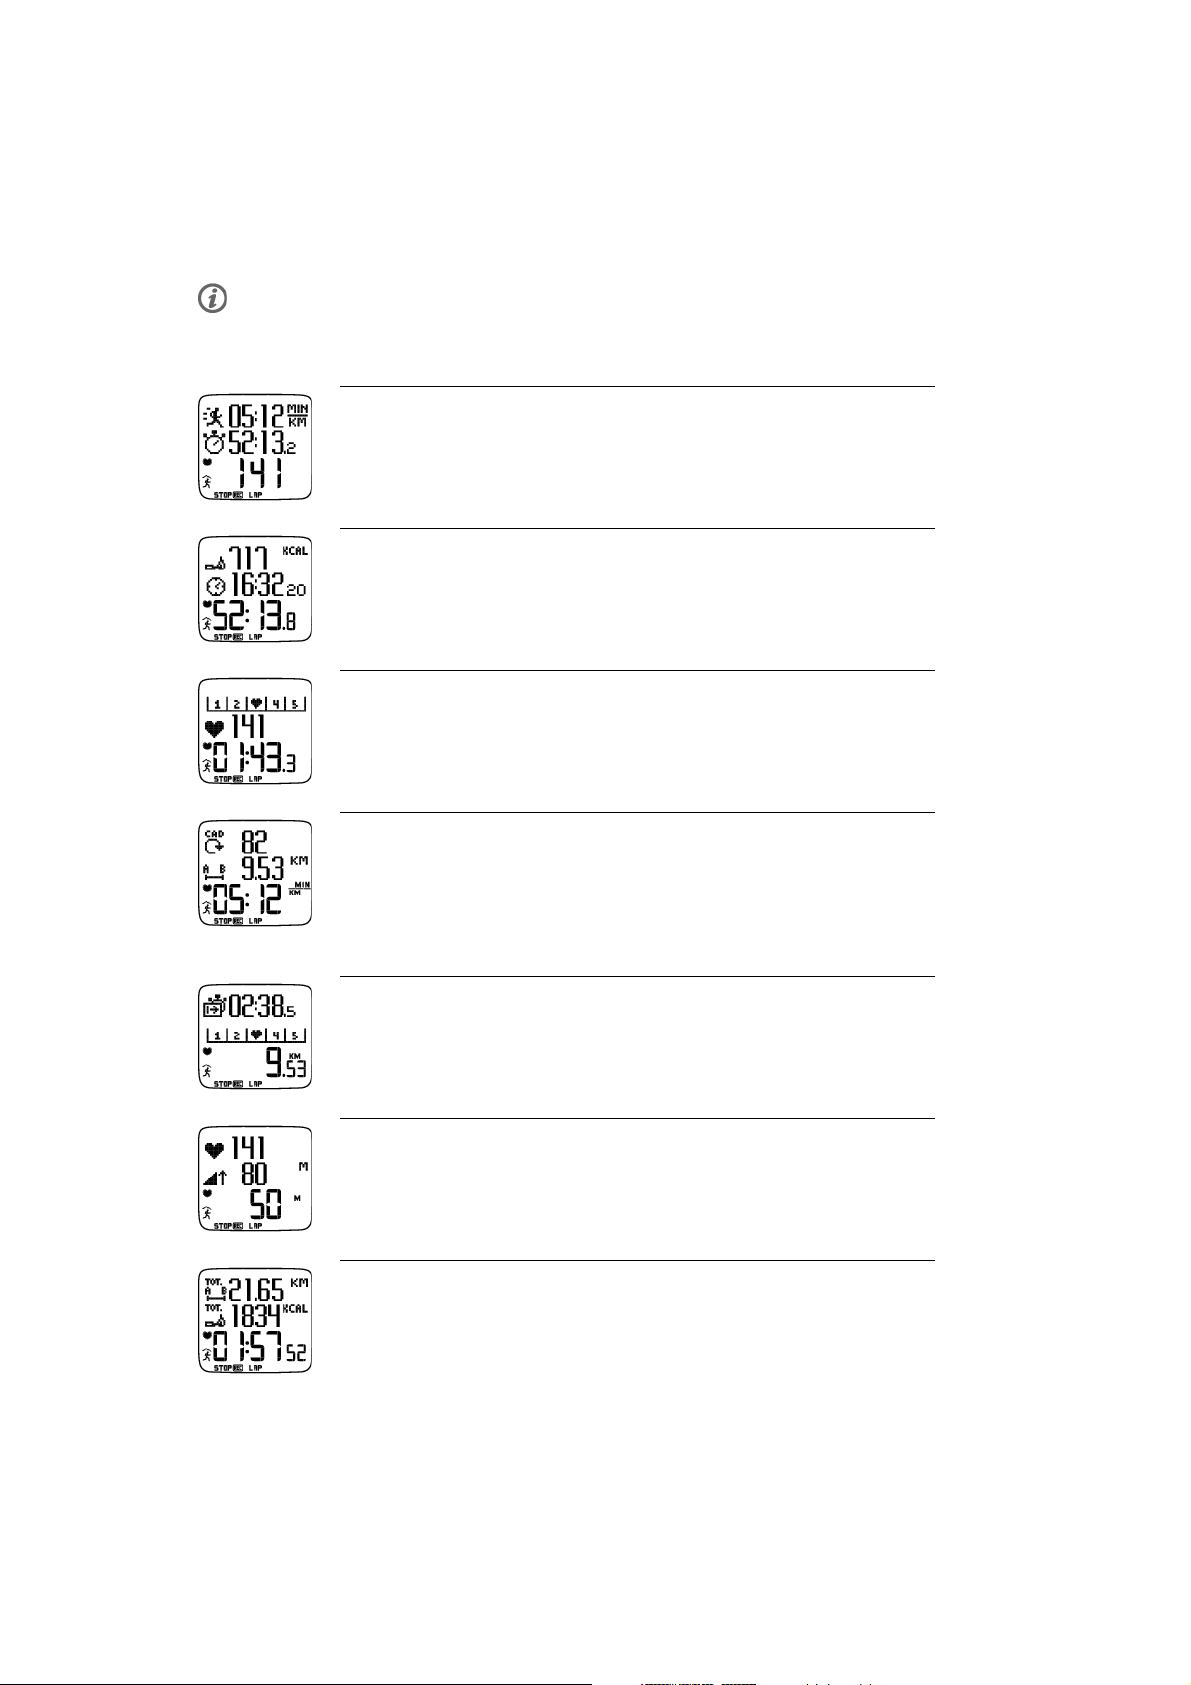
• Free: Free exercise with no preset settings.
• Basic: Basic training with moderate intensity. Duration around 45 min.
• Interval: Basic interval training. Exercise starts with a 15-minute warm-up, followed by a 1km interval
and a 3-minute recovery period, repeated 5 times. The session ends with a 15-minute cool-down.
• OwnZone: The training computer automatically determines your individual aerobic (cardiovascular) heart
rate zone. This is called OwnZone. Suggested duration for the exercise is 45 minutes. For further
information, see Determine Your OwnZone (page 21). Additional background information can be found in
OwnZone Training (page 54).
• Add new: Create and save your own basic exercise. You can store a total of 10 exercises + 1 Free exercise
in your training computer.
After selecting the exercise, the following options are displayed. Select the desired option and press OK.
1. Select the exercise as a default exercise. The next time you train, your training computer will offer this
exercise as a default.
2. View the exercise settings. Scroll UP or DOWN to view:
a. Basic exercise with 1-3 exercise zones: target heart rate zone, speed/pace or cadence limits for each
zone, timer/distance* for the zone, or
b. Exercise created with the software: name, description, target exercise time. (Press and hold LIGHT
to view the exercise phases and chosen sport profile.)
3. Edit Basic or OwnZone exercise according to personal requirements. You can also edit an exercise created
with the training computer. For further information, see Create New Exercises (page 9). If you created
an exercise with the software that includes phases, you cannot edit them with the training computer.
4. Rename Basic, Interval or other exercise created with the training computer.
5. Default - Return to default settings of Basic, Interval or OwnZone exercise.
6. Delete exercises created with the training computer or the software.
Create New Exercises
Create a New Exercise with Zones
Create your own exercises with the training computer. You can create more diversified exercises by using
Polar ProTrainer 5. For further information, see software help.
Select Settings > Exercises > Add new
Prepare For Training 9
Page 10

ENGLISH
1. Set the Number of zones for the exercise (0-3) and press OK. For 0 zones, see Create a New Exercise
without Zones.
2. Choose Zone type:
• Heart rate
For heart rate zones, select sport zones, or manual heart rate zones. Press OK.
Sport zone: Select one of the sport zones (e.g. Z1: 50-59%) for your exercise. Press OK to continue
to step 3.
Polar sport zones are heart rate intensity areas expressed as percentages of your maximum heart rate.
Five different sport zones are set in the training computer as a default: very light (50-59% HR
light (60-69% HR
HR
). Default HR
max
thresholds, have had your predicted maximum heart rate (HR
), moderate (70-79% HR
max
value is usually age-based, but if you know your aerobic and anaerobic
max
), hard (80-89% HR
max
max
), and maximum (90-99%
max
-p) measured in a Polar Fitness
max
TestTM, tested your maximum heart rate yourself or in a lab, then you can define sport zones to better
suit your training needs. For more information, see ProTrainer 5 software help.
Manual: Set the high and low zone limits as bpm or HR% / HRR% and press OK to continue to step
3.
• Speed/pace (optional s3/s3+ stride sensor, G3/G5 GPS sensor or cycling speed sensor W.I.N.D
required)
For speed/pace zones, set the high and low zone limits. Press OK to continue to step 3.
• Cadence (optional s3/s3+ stride sensor or cadence sensor W.I.N.D. required)
For cadence zones, set the high and low zone limits. Press OK to continue to step 3.
3. Set Zone guide to change zone after a specified time or distance*. During your workout, the training
computer will alert you when changing zones.
• Timers: Set a timer for the zone (minutes and seconds) and press OK. Or
• Distances*: Set the distance for the zone and press OK. Or
• Off: Select off for timers and distances and press OK.
),
Once you have defined the first zone, Zone 1 OK is displayed. For more than one exercise zone, repeat
steps 2 and 3 until all zones are defined.
When the exercise is ready, New exercise added is displayed. The new exercise (NewExe)isstoredinthe
Exercises menu, where you can select it during your next workout. Rename the exercise by selecting
Rename from the list.
Create a New Exercise without Zones
If you create a new exercise without zones, you can use timers or distances* to guide your training.
Select Settings > Exercises > Add new .
1. Number of zones: Set the number of zones to 0.
2. Guide type: Choose to sound a timer during workout (reminding you to drink, for example), or set a
distance* (for following lap times without recording them).
Time r s
• Number of timers : Choose the number of timers (1-3) for the session. Press OK.
• Timer 1: Define minutes and seconds for the timer and press OK. Or
Distances*
• Number of distances: Choose the number of distances (1-3) for the session. Press OK.
• Distance 1: Enter the distance(s) and press OK.
Repeat step 2 until you have defined timers or distances*. When the exercise is ready, New exercise
added is displayed. The new exercise (NewExe)isstoredintheExercises menu, where you can select it
during your next workout. Rename the exercise by selecting Rename from the list.
10 Prepare For Training
Page 11

ENGLISH
Calibrate the Polar s3/s3+ Stride Sensor W.I.N.D.
Optional calibration of the s3/s3+ sensor* improves accuracy of speed, pace, and distance measurements.
It is recommended that you calibrate the sensor before using it for the first time, if there are significant
changes in your running style, or if the position of the sensor on the shoe is dramatically changed (e.g. if
you have new running shoes). You can calibrate the sensor by running a known distance, or by setting the
calibration factor manually.
You can cali brate one s3/s3 + sen sor f or ea ch shoe setting .
Calibrate Sensor by Running a Distance (on-the-fly calibration)
You can c alibrat e t he sens or at any pha se of your exercise wit h l ap dist ance correc tion, prov ided you a re
not exercising with distance-based targets. Just run a known distance, preferably more than 1000 meters.
Make sure the sensor function in the training computer is on (Settings > Features > Shoes/bikes > Shoes
1/2/3 > On).
In time mode press OK once. Select Settings > Shoes/bikes > Shoes 1/2/3.
Then select Start and start running.
When you are in a starting point of a known lap distance, press OK.Whenyouhaverunthewholelap
distance, press OK.Thencalibratethesensorbychoosingeitheralternative:
1. Press and hold LIGHT to go to Settings. Or,
2. Press STOP once. Select Settings.
Select Calibrate > Correct lap > Set true lap distance.Fixthedisplayedlapdistancewiththedistance
you just ran, and press OK.
Calibration complete and the factor are displayed. The sensor is now calibrated and ready for action.
Set Calibration Factor Manually
The calibration factor is calculated as a ratio of the actual distance to the uncalibrated distance. Example:
you run 1200m, the training computer shows a distance of 1180m, the calibration factor is 1.000.
Calculate the new calibration factor as follows: 1.000*1200/1180 = 1.017. The measuring range for the
factor is 0.500-1.500.
There are four options for setting the calibration factor:
1. Before exercise.
Select Settings > Features > Shoes/bikes > Shoe 1/2/3 > Calibrate .
Set the Calibration factor and press OK.Thesensorisnowcalibrated.
2. During exercise by pausing exercise recording.
Start exercising by pressing OK twice in the time display. Press STOP once and the exercise recording is
paused.
Select Settings > Calibrate > Set factor .
Set the Calibration factor and press OK.Thesensorisnowcalibrated.Continueexerciserecordingby
pressing OK.
3. During exercise without pausing exercise recording.
Start exercising by pressing OK twice in the time display. Press and hold LIGHT to get to Settings.
Select Calibrate > Set factor .
Prepare For Training 11
Page 12

ENGLISH
Set the Calibration factor and press OK.Thesensorisnowcalibrated.Continuerunning.
If message Ssensorcalibrationfailed is displayed the sensor has not been calibrated and you need to try
again.
*Optional s3/s3+ stride sensor W.I.N.D. required.
12 Prepare For Training
Page 13
ENGLISH
5. TRAINING
Wear the Heart Rate Sensor
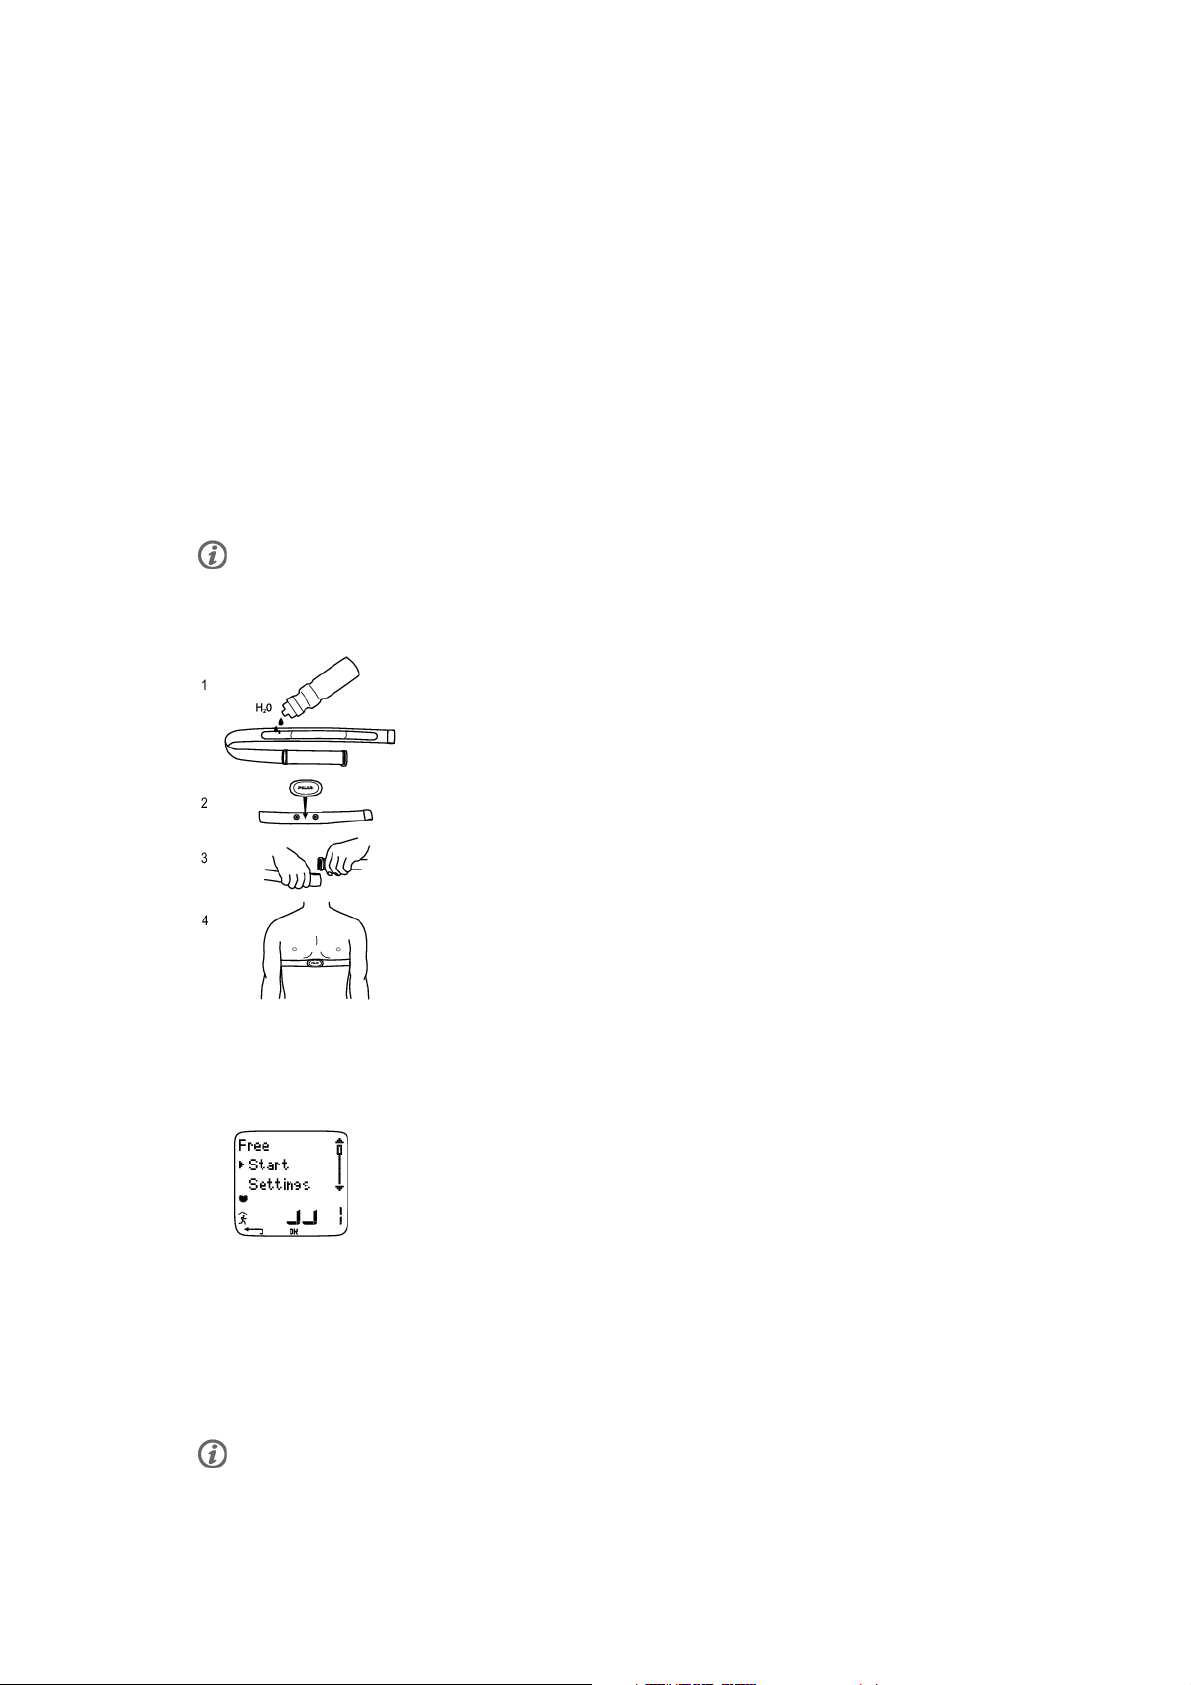
Wear the heart rate sensor to measure heart rate.
1. Moisten the electrode area of the strap.
2. Attach the connector to the strap.
3. Tie the strap around your chest, just below the chest muscles, and attach the hook to the other end of
the strap.
4. Adjust the strap length to fit tightly but comfortably. Check that the moist electrode areas are firmly
against your skin and that the Polar logo of the connector is in a central and upright position.
Detach the connector from the strap and rinse the strap under running water after every use. Sweat and
moisture may keep the electrodes wet and the heart rate sensor activated. This will reduce the heart rate
sensor battery life. For more detailed washing instructions, see Care and Maintenance (page 60).
The Polar H3 heart rate sensor can be used with specific apparel that has built-in soft textile electrodes. Wet the
electrode areas of the apparel. Clip the connector of the heart rate sensor straight onto the apparel without the
strap so that the connector’s Polar logo is in an upright position.
Start Training
1. Wear the heart rate sensor as instructed and start heart rate measurement by pressing OK.
2. Within 15 seconds, your heart rate appears on the display.
• If you use a sensor, select the shoe or bike by pressing and holding DOWN, or in Settings >
Shoes/bikes. The number in the lower right hand corner of the display indicates your shoe or bike
selection. Stand still and wait until the training computer finds the sensor signal (depending on the
sensor you are using, runner, biker or GPS symbol stops flashing).
• To quick-change exercise type, press and hold UP.
3. Start exercising by pressing OK.
If the following message is displayed: (Exercise name) requires a speed sensor,yourexerciserequiresaspeed
Training 13
Page 14

ENGLISH
sensor to display speed/pace and distance* data (e.g. you have defined speed/pace* zones for the exercise). The
training computer returns to exercise type selection menu, where you can select an exercise which does not require
aspeedsensor.
Alternatively, select Settings, Reset trip or Location.
In Settings you can change or view different settings before exercise. For further information on all the
settings available, see Settings (page 32). The Settings menu lists the following options:
• Exercise: Choose an exercise type Free, Basic, Interval, or OwnZone (If you have created new exercises,
these will be listed, as well.)
1. Select: Set a default exercise to be performed at once, or
2. View: View exercise settings.
• Shoes/bikes: Select shoes 1/2/3, bike 1/2/3 or none. Only shoes/bikes that you have activated in Settings
>Features>Shoes/bikesare listed.
If you select a shoe or bike, and have also set the GPS function on, the GPS will only be used for location and
route tracking.
• GPS: Set the GPS function On/Off.
• Altitude: Switch the altitude on or off, or calibrate altitude.
• Rec.rate: Set the recording rate.
• RR data: Switch the RR recording on or off.
• TZ Alarm: Switch target zone alarm sounds on or off.
• HR view: Choose to view heart rate in beats per minute (bpm), as a percentage of maximum heart rate
(HR%), or as a percentage of heart rate reserve (HRR%).
• Speed view: Choose to view speed* in kilometers or miles per hour (km/h or mph), or in minutes per
kilometer or mile (min/km or min/mi).
• A.Lap: Switch the automatic lap function on or off.
• Display: Modify the display (for further information, see Personalize the Training Computer Display
(page 16)).
In Reset trip you can reset the trip distance before starting an exercise session.
In Location** you can check your current location. The training computer will pinpoint your location using
the latest GPS coordinates. Latitude and longitude are expressed in degrees and minutes. Number of
satellites visible on lowest row.
To furt her a nalyze the track inf ormation, transf er th e data to Pola r Pro Traine r 5. See Softwa re he lp for instruct ions.
*Optional s3/s3+ stride sensor, G3/G5 GPS sensor or cycling speed sensor W.I.N.D. required.
**Optional G3/G5 GPS sensor W.I.N.D. required.
Combine Exercises
The RS800CX training computer offers you the option of combining consecutive exercises. When you start
anewexercisesessionwithinanhourofthepreviousone,Combine exercises? is displayed.
To c ombi n e , s e lec t YES.Themultisportexerciseviewisdisplayedduringtraining.Amaximumoften
exercises can be combined. For more information see Information on the Display (page 15).
By using Polar ProTrainer 5 software, you can combine exercises after training and analyze them further. For more,
see Polar ProTrainer 5 help.
14 Training
Page 15
ENGLISH
Information on the Display
Your trai ning comput er offers you a simulta neou s v iew of thr ee differe nt line s o f e xerc ise inform atio n. By
pressing UP or DOWN,youcanviewdifferentdisplays.Thenameofthedisplayappearsforafewseconds.
The name indicates the lower row information. The display varies depending on the sensors you have
installed, which features are set On and what kind of exercise you are performing.
Customize the training computer display easily with Polar ProTrainer 5 software.
Default displays while exercising:
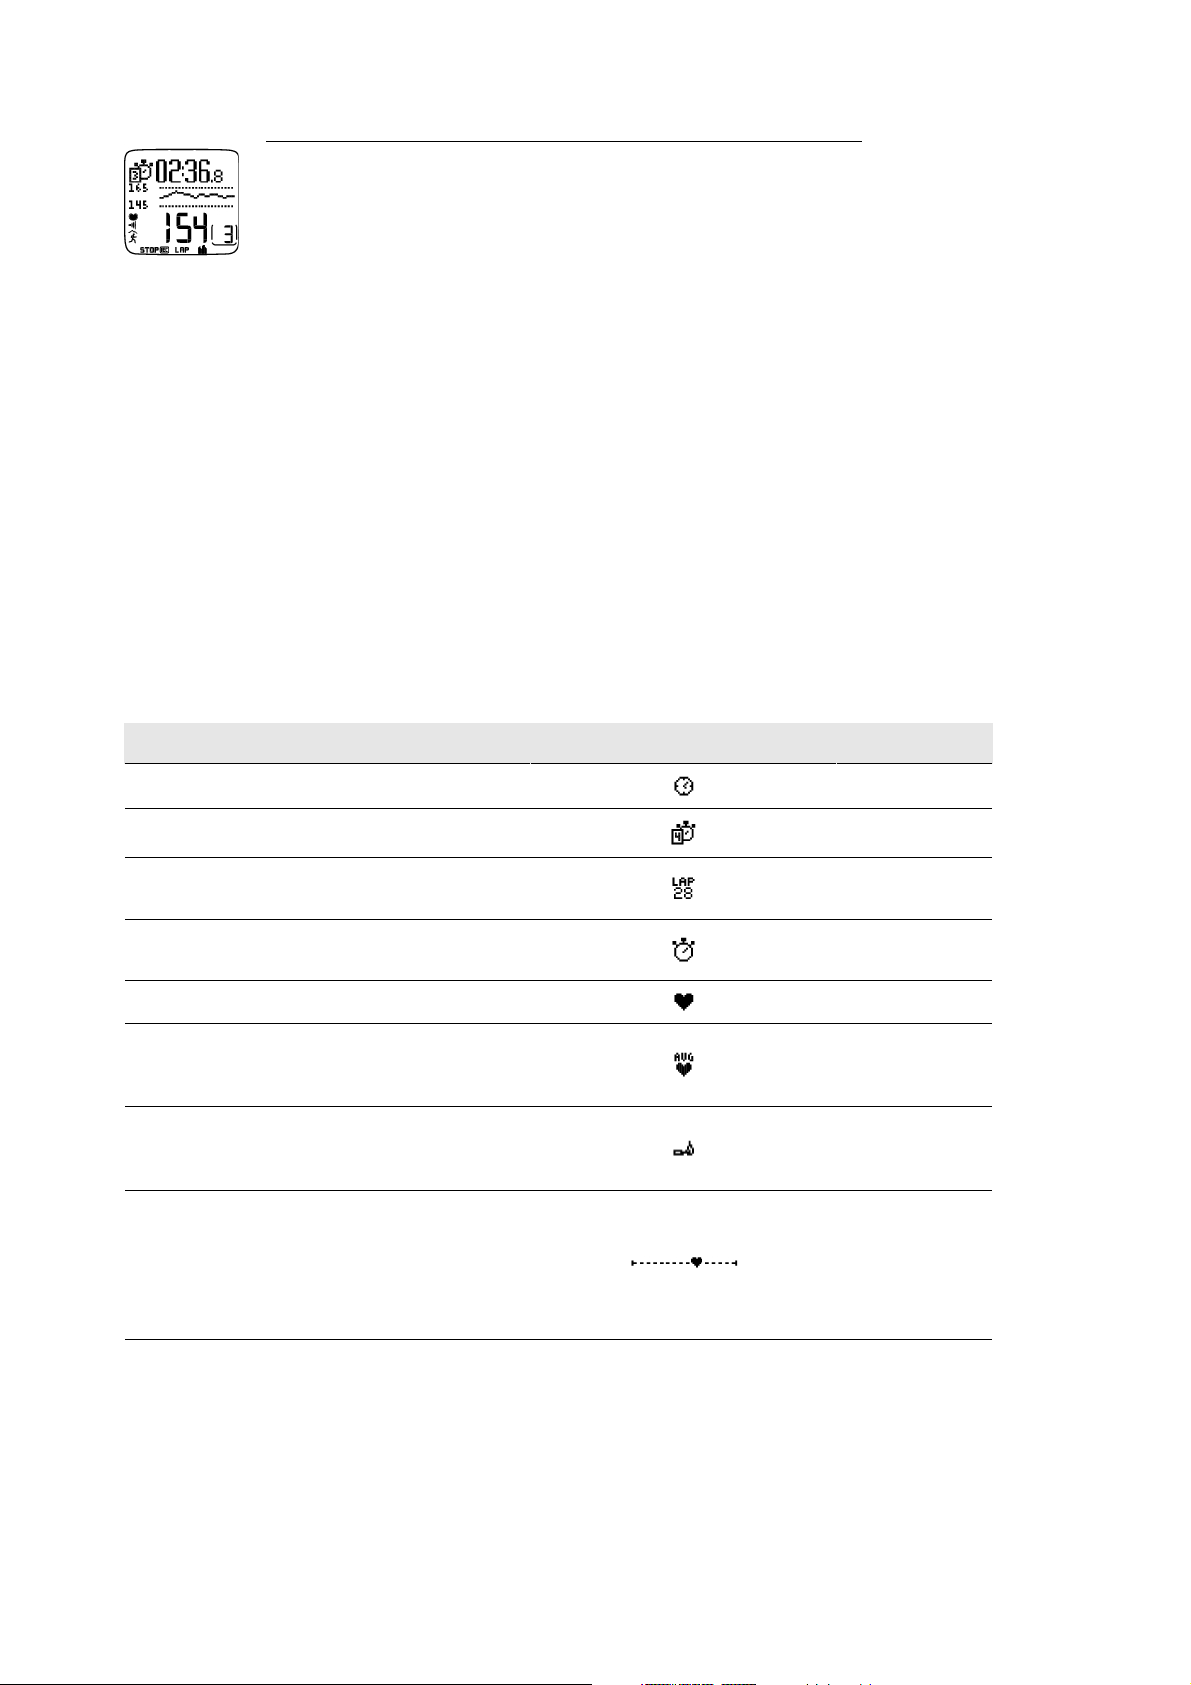
Heart rate view
Speed/pace* / Calories
Stopwatch
Heart rate
*s3/s3+stridesensor,G3/G5GPSsensororcyclingspeedsensorW.I.N.D.required.
Stopwatch view
Calories
Time
Stopwatch
*s3/s3+stridesensor,G3/G5GPSsensororcyclingspeedsensorW.I.N.D.required.
Lap time view
Zone pointer
Heart rate
Lap time
Speed/pace view
Cadence*
Distance**
Speed/pace**
*s3/s3+stridesensororcadencesensorW.I.N.D.required.
*s3/s3+stridesensor,G3/G5GPSsensororcyclingspeedsensorW.I.N.D.required.
Distance view
Countdown timer
Zone pointer
Distance* / Lap time
*s3/s3+stridesensor,G3/G5GPSsensororcyclingspeedsensorW.I.N.D.required.
Altitude view
Heart rate
Ascent
Altitude
Multi-sport view (displayed only if you have combined the current exercise with the
previous exercise file)
Total dura tion of comb ined exercis e
Total calo ries of comb ined exercis e
Total dist ance of comb ined exercis e*
*s3/s3+stridesensor,G3/G5GPSsensororcyclingspeedsensorW.I.N.D.required.
Training 15
Page 16
ENGLISH
Exercise created with Polar ProTrainer 5
If you have downloaded a program from the software, you can see the details of your
exercise session on a separate display. For further information, see Perform
Programmed Exercise (page 43).Youcannotmodifythisdisplayusingthe
training computer.
Personalize the Training Computer Display
Personalize your training computer display to show the information you want to see during training, either
by using the training computer or the software. A programmed exercise downloaded from the software and
atrainingviewhavetheirowndisplaysthatcannotbemodified.
In time mode, select OK > Settings > Display > Edit
Select the display you want to change by pressing UP or DOWN,andpressOK.Settheinformationforthe
blinking upper row with UP or DOWN,andpressOK.Theinformationavailabledependsonthefeatures
that are activated. For further information, see Feature Settings (page 32).
Repeat the same to change the middle and lower rows. Each display is named after the information shown
on the lower row. To return the default settings of the display, press and hold LIGHT when the rows are
blinking.
Activate Titles to view help texts while changing displays during exercise: In time mode, select OK >
Settings > Display > Titles
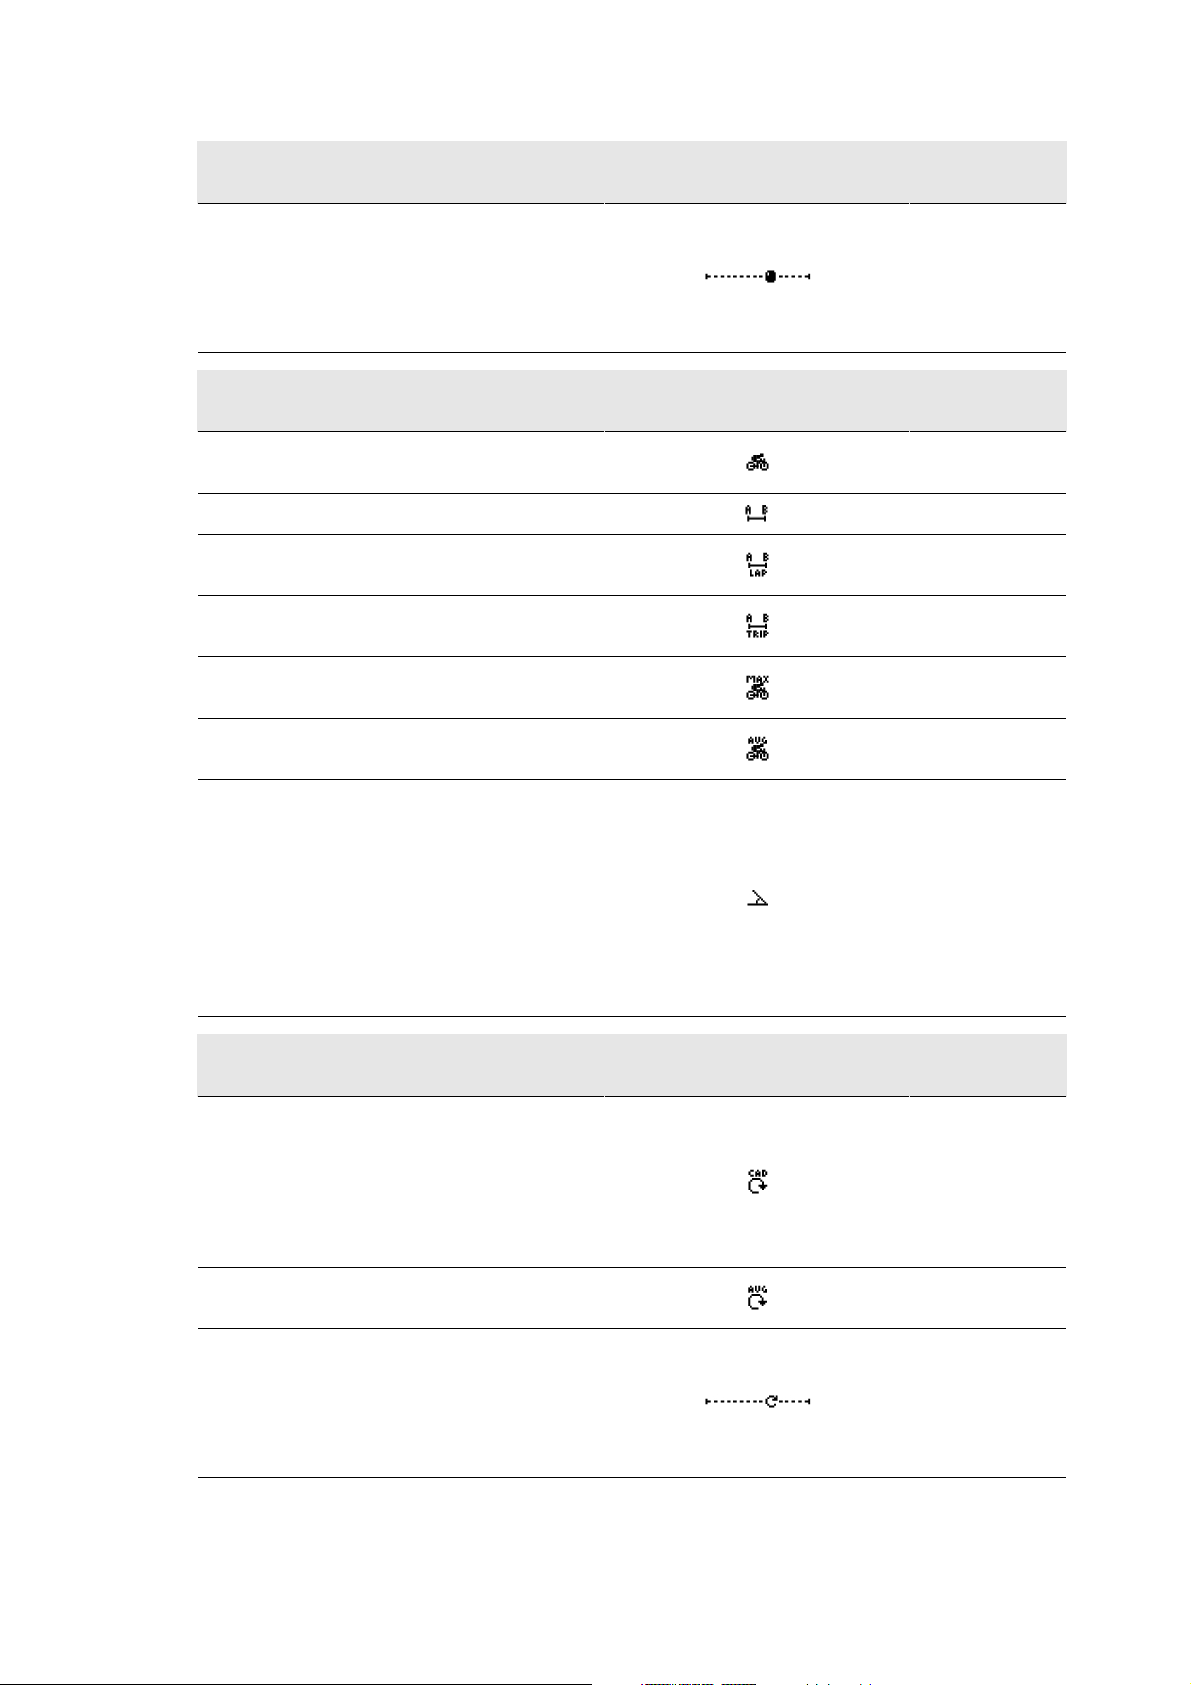
Information on the display Symbol Explanation
Time of day
Countd. timer
Lap time Lap number and lap
Time o f d ay
Countdown timer
time
Stopwatch Total dura tion of the
exercise so far
Heart rate
Average heart rate Average heart rate
Current heart rate
of the exercise so
far.
Calories Expended calories /
Expended calories
per hour
Zone pointer (heart rate) If the heart symbol
is not visible and/or
an alarm sounds,
your heart rate is
outside the target
zone.
16 Training
Page 17
ENGLISH
Information on the display Symbol Explanation
Zone pointer (Polar sport zones) Target zon e
indicator with a
heart symbol that
moves left or right
on the sport zone
scale according to
your heart rate. For
further information
on setting a sport
zone, see Button
Functions
During Exercise
(page 20).
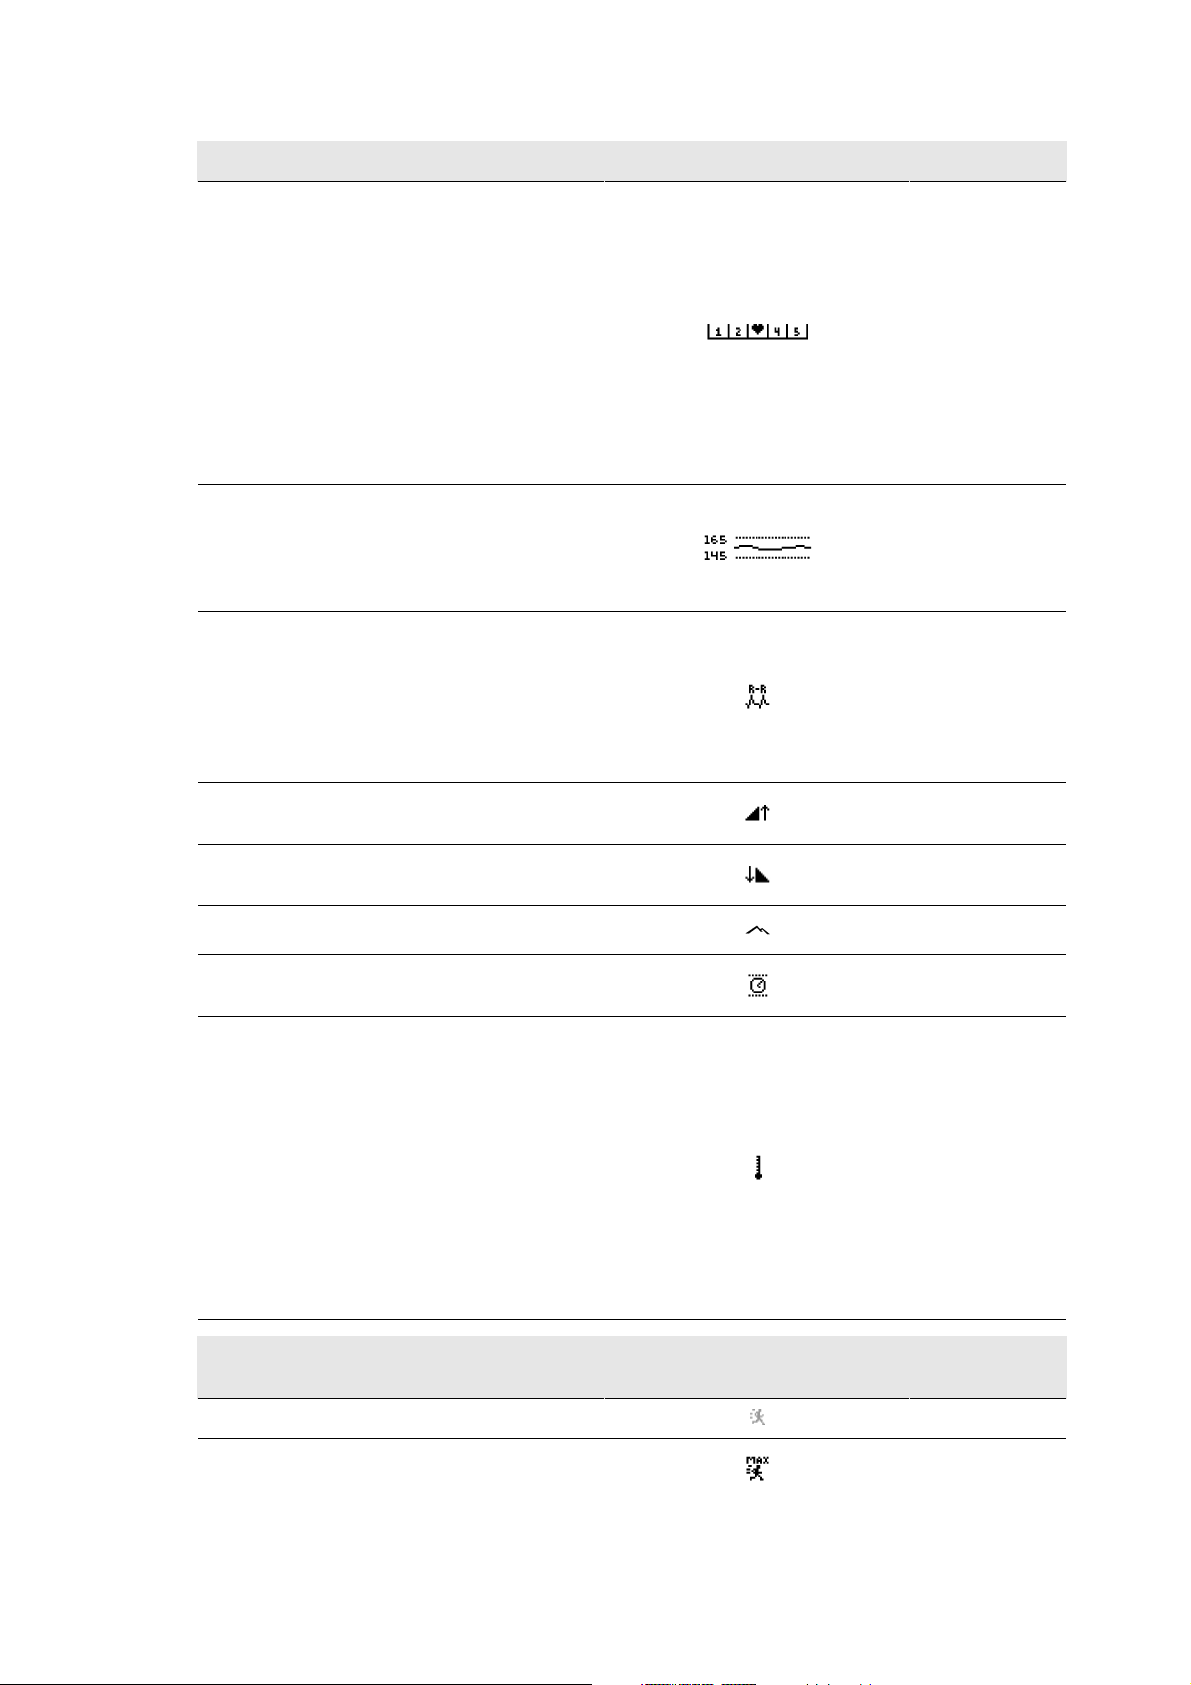
Target zone Agraphshowing
your actual heart
rate compared to
the set heart rate
zones.
RR variation Beat to beat
variation in heart
beat intervals, i.e.
the variation in
times between
successive heart
beats.
Ascent Ascended
meters/feet
Descent Descended
meters/feet
Altitude
Time in zone Tim e s pent in the
Current altitude
zone
Temperature Tempera ture
reading (°C).
Because your body
temperature affects
the actual
temperature
reading, the best
way to obtain an
accurate
temperature is to
take your wrist unit
off for at least 10
minutes.
Information on the display (Polar s3/s3+ sensor
Symbol Explanation
W.I.N.D. required)
Speed/pace
Max speed Maximum
Current speed/pace
speed/pace so far
Training 17
Page 18

ENGLISH
Information on the display (Polar s3/s3+ sensor
Symbol Explanation
W.I.N.D. required)
Average speed Average speed/pace
so far
Distance Distance covered so
far
Lap distance Lap number and lap
distance
Trip distance Distance between
points A and B.
Zone pointer (speed/pace) If the symbol is not
visible and/or an
alarm sounds, your
speed/pace is
outside the target
zone.
Cadence Running cadence
(pair of steps per
minute)
Avg Cadence The average
running cadence so
far (pair of steps
per minute)
Zone pointer*(cadence) If the cadence
symbol is not visible
and/or an alarm
sounds, you are
outside the target
cadence zone limits.
Information on the display (Polar G3/G5 GPS sensor
Symbol Explanation
W.I.N.D. required)
Speed/pace Current speed/pace.
The amount of bars
above the letter G
indicates the GPS
signal strength.
Max speed Maximum
speed/pace so far
Average speed Average speed/pace
so far
Distance Distance covered so
far
Lap distance Lap number and lap
distance
Trip distance Distance between
points A and B.
18 Training
Page 19
ENGLISH
Information on the display (Polar G3/G5 GPS sensor
Symbol Explanation
W.I.N.D. required)
Zone pointer (speed/pace) If the symbol is not
visible and/or an
alarm sounds, your
speed/pace is
outside the target
zone.
Information on the display (Polar speed sensor W.I.N.D
Symbol Explanation
required)
Bike speed Speed you are
currently cycling at
Distance
Lap distance* Lap number and lap
Distance cycled
distance
Trip distance Distance between
points A and B.
Max speed The maximum speed
so far.
Avg speed The average speed
so far.
Inclinometer Uphill/downhill
steepness in
percentages and
grades. Estimates
uphill or downhill
inclination in
numerical form,
helping you to
adjust cycling effort
accordingly.
Information on the display (Polar cadence sensor
Symbol Explanation
W.I.N.D required)
Cadence Measures the speed
at which you turn
the cranks of your
bicycle (i.e.
cadence), in
revolutions per
minute (rpm).
Avg Cadence The average
cadence.
Zone pointer*(cadence) If the cadence
symbol is not visible
and/or an alarm
sounds, you are
outside the target
cadence zone limits.
Training 19
Page 20
ENGLISH
Button Functions During Exercise
Record a Lap
Press OK to record a lap. The display will show:
Lap number
Average heart rate of the lap
Lap time
If a speed sensor* is activated, the following will also appear:
Lap number
Lap distance
Average speed/pace of the lap
Lock a Zone
When training without preset target zones, you can lock your heart rate to the current sport zone. This way,
if you did not preset target zones before starting the exercise, you can do it on-the-go during a session.
To l ock/ u n loc k th e zone , pr e ss and ho l d OK.
During programmed exercises: Press and hold OK and select Lock zone/Unlock zone from the Lap menu.
If, for example, you are running with a heart rate of 130 bpm which is 75% of your maximum heart rate,
and matches sport zone 3, you can press and hold OK to lock your heart rate into this zone. Sport zone3
Locked 70%-79% is displayed. An alarm sounds if you are below or above the sport zone (if the target zone
alarm function is on). Unlock the sport zone by pressing and holding OK again: Sport zone3 Unlocked is
displayed.
Using the software, you can also base ZoneLock on your speed/pace or cadence*. For further information,
see software help.
*Optional sensor required.
Zoom the Display
Press and hold UP to zoom into the upper row, and DOWN to zoom into the middle row. Return to the
normal display by pressing and holding the buttons again.
Illuminate the Display (Night mode on)
To i llum i n ate yo u r disp l a y, p res s LIGHT during the exercise. Night mode is turned on, and the display
illuminates automatically when any button is pressed or exercise phase is changed.
View Quick Menu
Press and hold LIGHT. Settings is displayed. You can change certain settings without pausing the exercise
recording. The contents of this menu vary according to exercise type. For further information, see Settings.
• Prev. phase: View summary information of the previous phase or repetition (displayed when an exercise
with phases is created in the software).
• Keylock: Lock/unlock buttons to prevent accidental button presses.
• TZ Alarm: Turn target zone alarm sound on/off.
• Change zone: Switch target zones (displayed when you have defined multiple target zones, except when an
exercise with phases is created with the software).
• HR view: Select heart rate format.
20 Training
Page 21

ENGLISH
• Speed view: Select km/h or min/km.
• Calibrate: Calibrate stride sensor* (not displayed if stride sensor is off).
• Seek sensor: Searches for heart rate sensor or sensor data, if the signal disappears during exercise due to
interference.
• A.Lap*: Activate/deactivate automatic lap.
Once you have changed the settings, the training computer will return to exercise mode.
Pause Exercise
Pause exercise recording by pressing STOP.
In pause mode you can:
• Continue: Continue exercise recording.
• Exit: Stop exercise recording (or press STOP).
• Summary: View a summary of the exercise so far. The following summary information is displayed:
calories, distance*, exercise time, maximum heart rate, minimum heart rate, average heart rate, maximum
speed/pace*, average speed/pace*, ascent and altitude.
• Combine: Combine your current exercise with the previous exercise file.
• Settings: Change or view different settings.
• Reset: Delete recorded exercise information. Confirm with OK and press OK again to restart recording.
• Reset trip: Reset a trip distance. Confirm with OK and press OK again to restart recording.
• Location**: Check your current location. The training computer presents the location with the latest GPS
coordinate data. Latitude and longitude are expressed in degrees and minutes. Number of visible satellites
visible on lowest row.
• Free mode: Change your exercise profile to free exercise mode. This does not delete the exercise you have
performed, but will continue the exercise without settings. Restart the original exercise by pausing the
session, and choosing Restart P1.
**Optional G3/G5 GPS sensor W.I.N.D. required.
Determine Your OwnZone
For background information on Polar OwnZone®, see OwnZone Training (page 54).
Find your OwnZone in 1-5 minutes during a warm-up period by walking and jogging. You should start
exercising gently at a light intensity and gradually increase intensity to raise your heart rate.
Redefine your OwnZone:
• When changing exercise environment or exercise mode.
• When taking up exercise after more than a week’s break.
• If you are not 100 percent sure of your physical or mental state – for example, if you are not recovered
from previous training, not feeling well, or are stressed.
• After changing user settings.
Before you start to determine your OwnZone, make sure that:
• Your user settings are correct.
• You select the OwnZone exercise. Every time you start the OwnZone exercise, the training computer will
automatically determine your OwnZone.
1. Wear the heart rate sensor and stride sensor* as instructed. Start measurement by pressing OK twice.
2. When your exercise starts, OZ is displayed and OwnZone determination begins.
Determination of your OwnZone happens in five stages. After each stage, you will hear a beep (if the
sound settings are on) indicating the end of the stage.
OZ > Walk at a slow pace for 1 min. Keep your heart rate below 100 bpm / 50% HR
during this first
max
stage.
OZ >> Walk at a normal pace for 1 min. Slowly increase your heart rate by 10-20 bpm / 5% HR
Training 21
max
.
Page 22

ENGLISH
OZ >>> Walk at a brisk pace for 1 min. Increase your heart rate by 10-20 bpm / 5% HR
OZ >>>> Jog at a slow pace for 1 min. Increase your heart rate by 10-20 bpm / 5% HR
OZ >>>>> Jog at a brisk pace or run for 1 min. Increase your heart rate by approximately 10 bpm/ 5 %
max
max
.
.
HRmax.
3. At some point during the session, you will hear two consecutive beeps. This means your OwnZone has
been determined.
4. If determination was successful, OwnZone Updated and the zone are displayed. The zone is displayed in
beats per minute (bpm), as a percentage of maximum heart rate (HR%), or as a percentage of your heart
rate reserve (HRR%) depending on your settings.
5. If OwnZone determination was not successful, your previously determined OwnZone will be used and
OwnZone Limits is displayed. If OwnZone has not previously been recorded, age-based limits are
automatically applied.
You can n ow continu e w ith you r e xerc ise. T ry to keep insi de the given heart rate zone to maxi mize exerci se
benefits.
Alternatively, to skip OwnZone determination and use the previously determined OwnZone, press OK at
any phase of the process.
The elapsed time used for OwnZone determination is included in your exercise recording time.
22 Training
Page 23
ENGLISH
6. AFTER TRAINING
Stop Recording
Pause exercise recording by pressing STOP.Tostoprecordingcompletely,press STOP again.
Care for your heart rate sensor after exercise. Detach the heart rate sensor connector from the strap and
rinse the strap under running water after every use..Forcompletecareandmaintenanceinstructions,see
Care and Maintenance (page 60).
Analyze Exercise Results
To v iew ba s i c d a ta o n y o ur p erf o r manc e , see File on your training computer. For deeper analysis, transfer
the data to Polar ProTrainer 5. The software offers various options to analyze the data with.
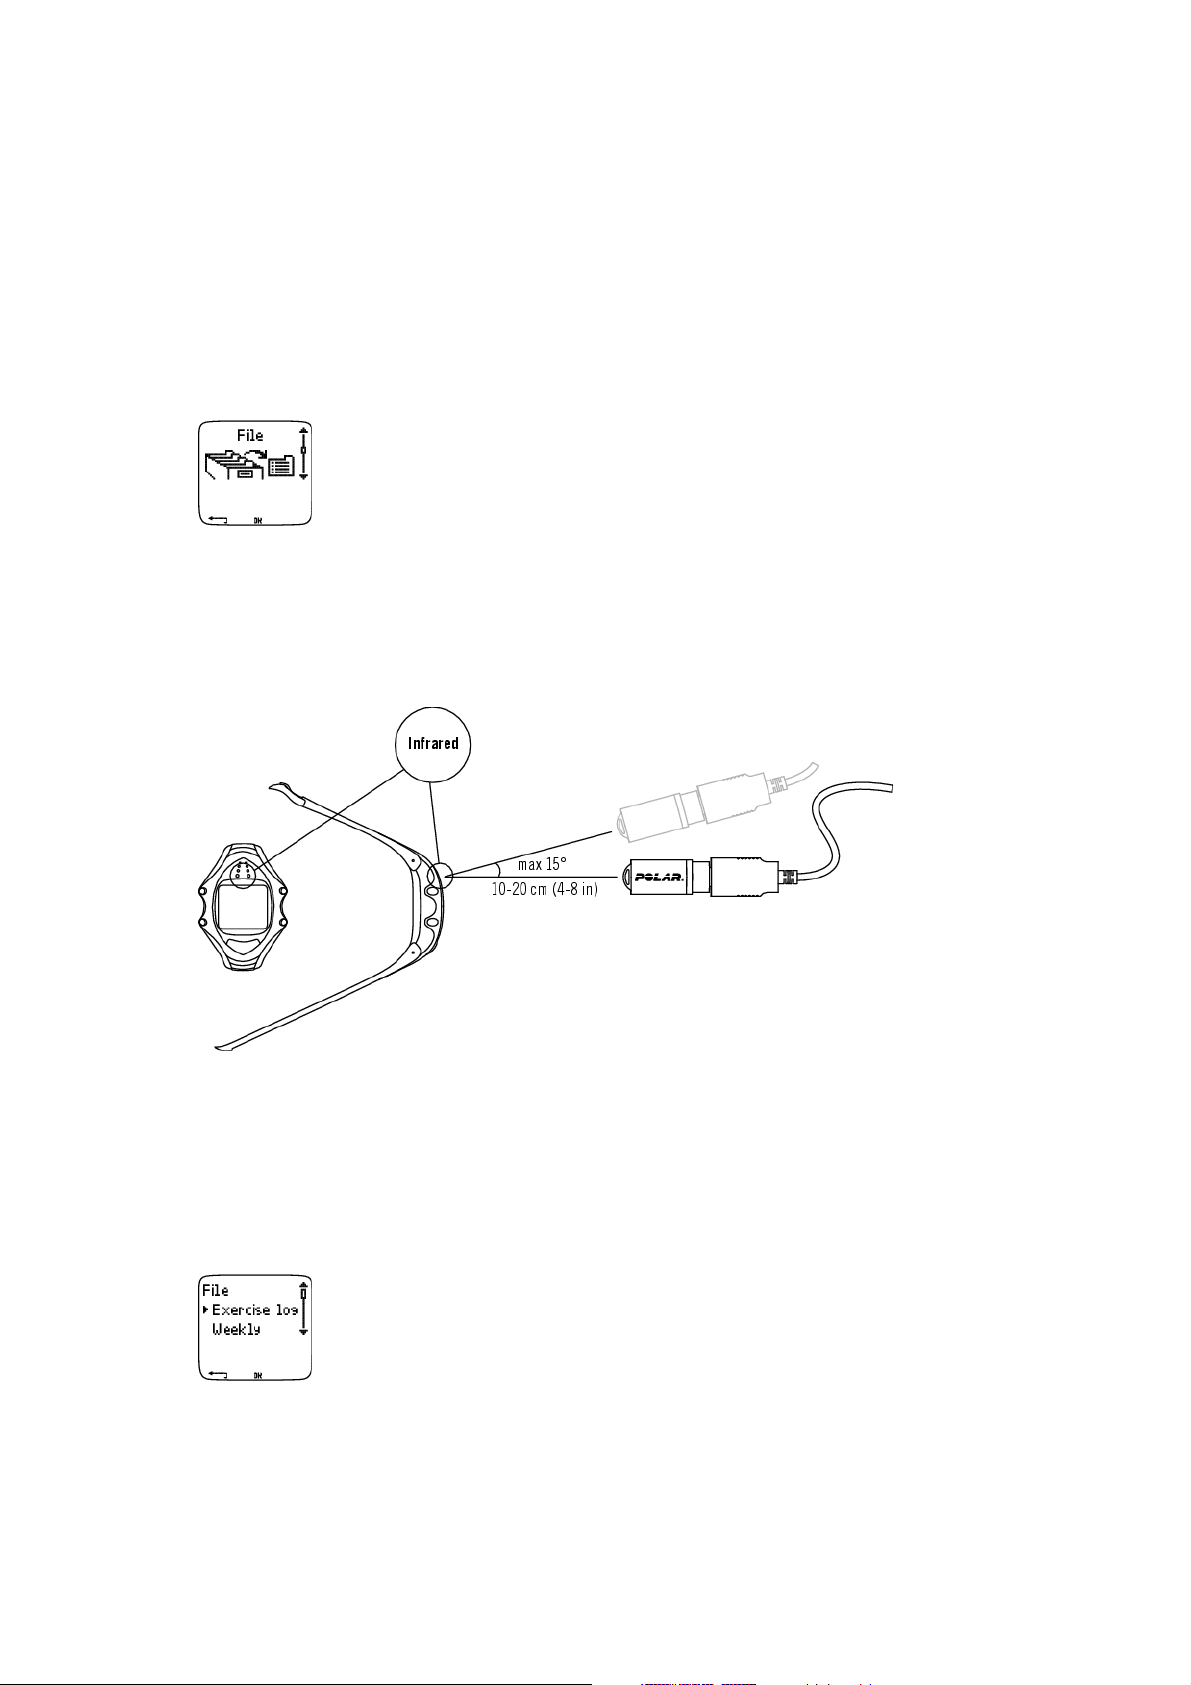
The training computer and software are connected via IrDA. First, open the software. Then, select Connect
from your training computer and place the wrist unit in front of the infrared window on the Polar IrDA USB
Adapter or on the computer or other IrDA compatible infrared adapter. For complete instructions on
transferring data, see software help.
Select File for the following options:
• Exercise log lists a maximum of 99 exercise files.
• Weekly includes summaries of the past 16 weeks.
• Totals shows cumulative exercise information.
• In the Delete menu, you can delete exercise files.
Exercise Log
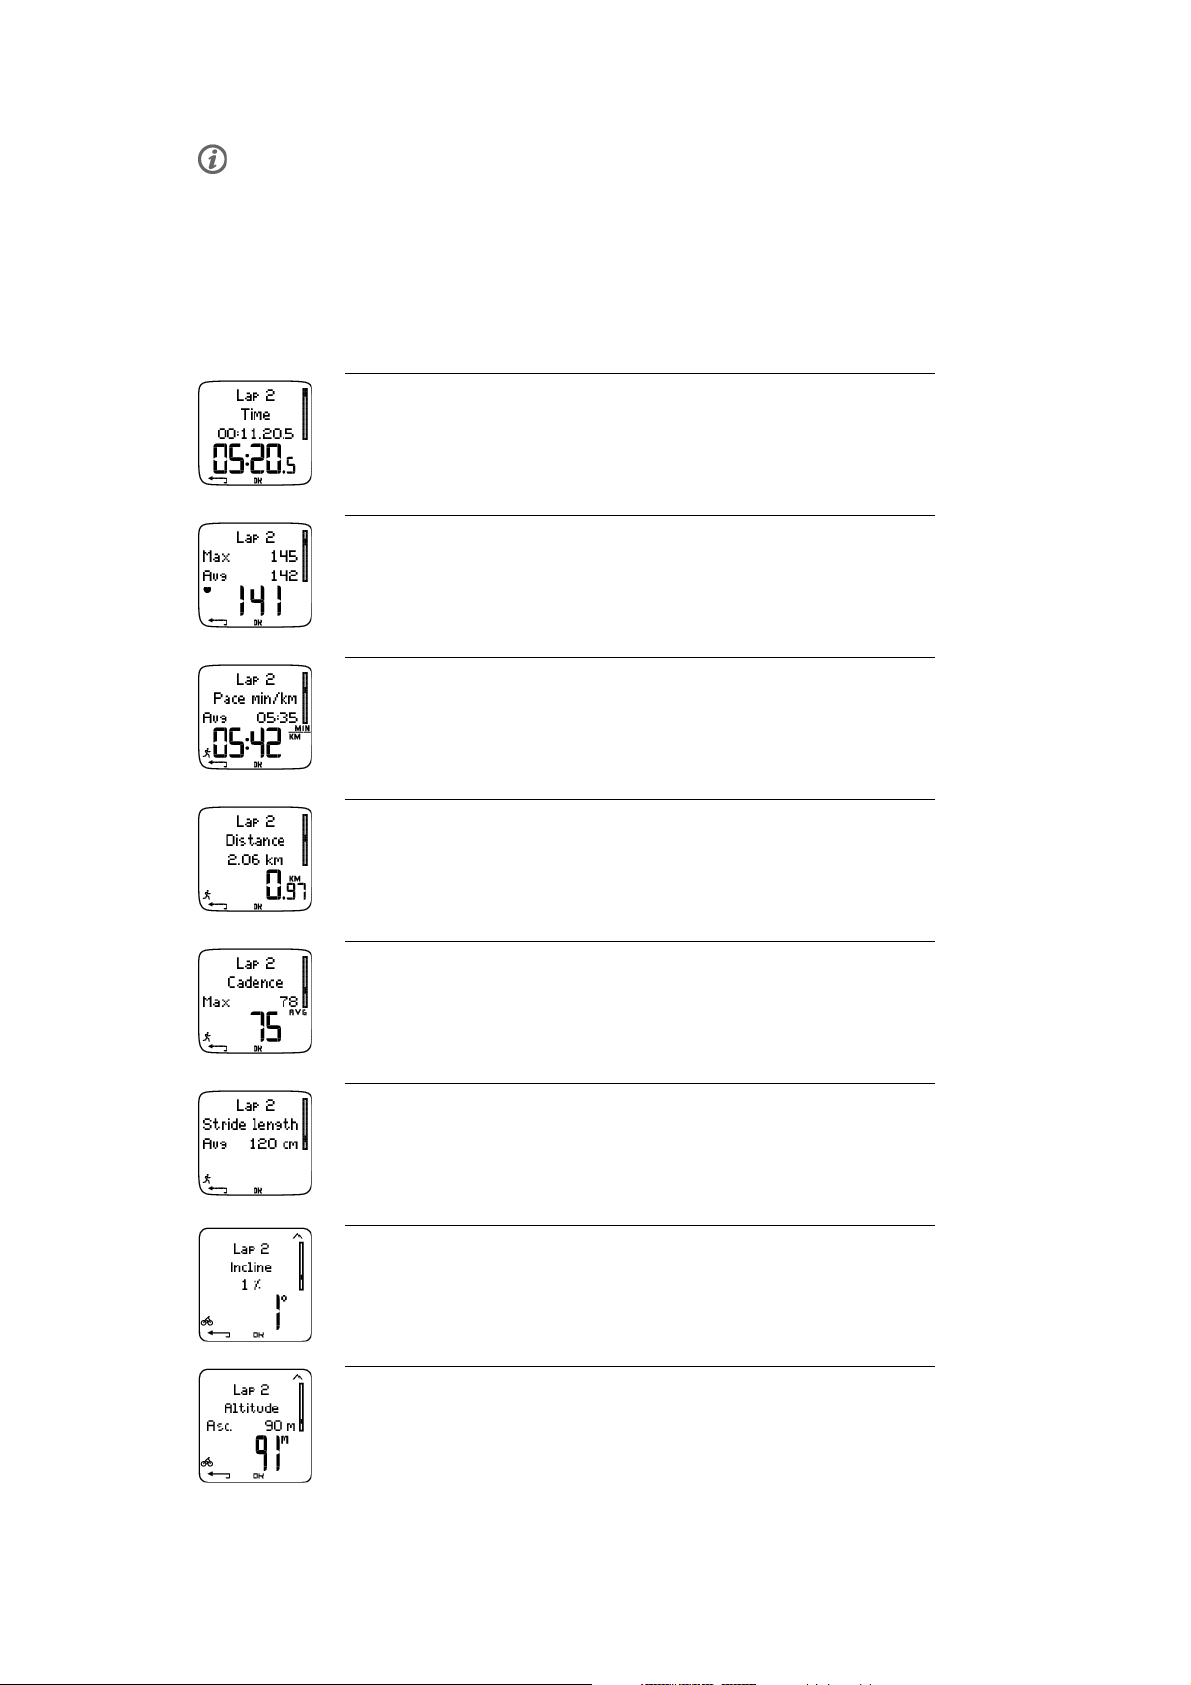
Select File > Exercise log
You can v iew detail ed info rmat ion on your exer cise sessio ns in the Exercise log.Thefollowinginfowill
appear:
• Exercise name.
After Training 23
Page 24
ENGLISH
• A graphic bar representing an exercise session. The height of the bar indicates exercise duration. This
shows the variation of your sessions in graphical form.
• The date the exercise session was performed.
The information that can be viewed (a-d below) depends on exercise type and and settings (e.g. if your
exercise does not include phases, phase information will not be seen).
Scroll the exercise bars with UP or DOWN and press OK to view:
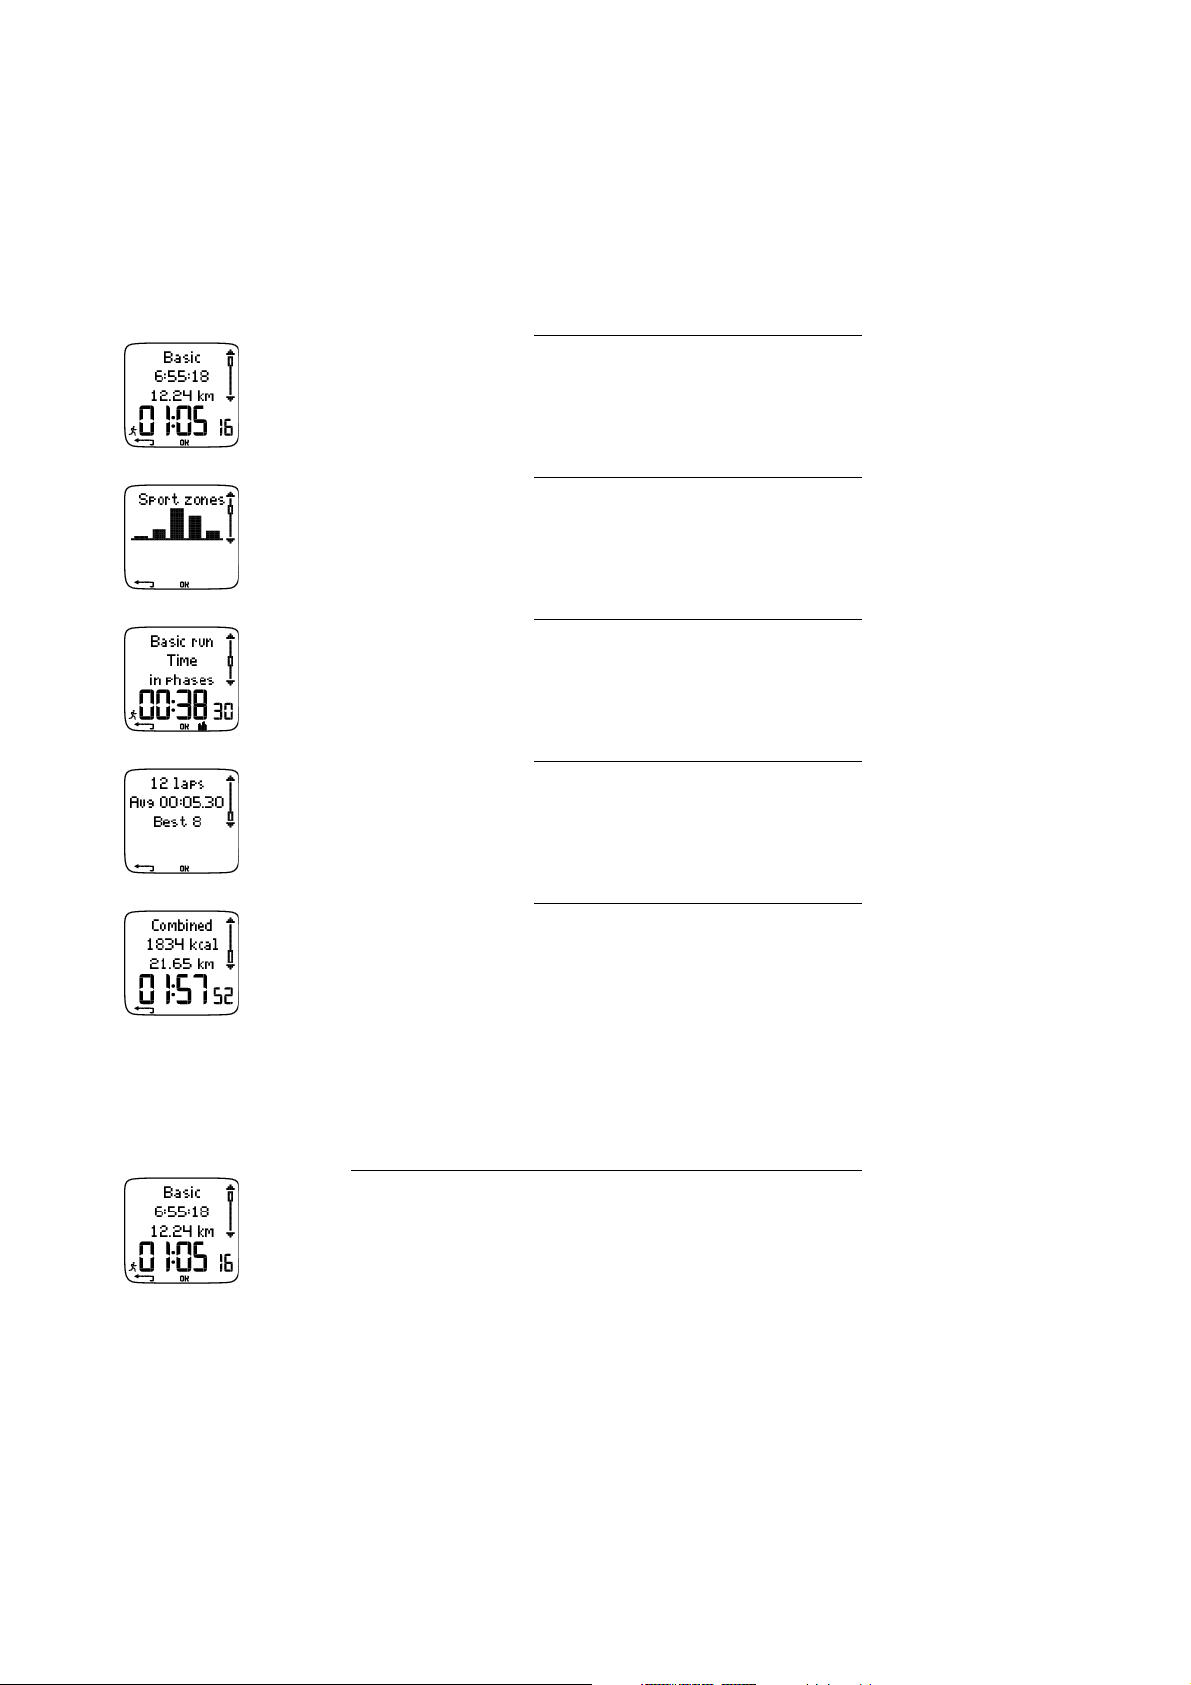
a. Basic
Select File > Exercise log > Basic
b. Sport zones
Select File > Exercise log > Sport zones
c. Phases
Select File > Exercise log > Phases
a. Basic
Select File > Exercise log > Basic
Name of exercise
Starting time
Distance*
Duration
*s3/s3+,G3/G5orspeedsensorW.I.N.D.required.
Press OK and scroll with UP or DOWN to view:
d. Laps
Select File > Exercise log > Laps
d. Multisport summary
Amultisportsummaryisattachedtoeach
exercise file that is a part of a combined
exercise.
Select File > Exercise log > Multisport
summary
24 After Training
Page 25
Heart rate in beats per minute (bpm), alternating with a
percentage of your maximum heart rate (%), or as a percentage
of your heart rate reserve.
Maximum heart rate
Minimum heart rate
Average heart rate
Target zones (HR / speed / pace) ,alternatingzone1,
zone 2, and zone 3.
Upper limit
Lower limit
Time in, above, and below zone 1/2/3 (phase name
displayed in programmed exercise).
Time a bove zon e
Time b elow zon e
Time i n z one
Calories expended during exercise.
Energy expenditure indicates overall exertion during exercise.
ENGLISH
Speed/pace*
Maximum speed/pace
Average speed/pace
Distance
Press and hold LIGHT to switch speed/pace.
*s3/s3+stridesensor,G3/G5GPSsensororcyclingspeed
sensor W.I.N.D. required.
Cadence*
Maximum cadence
Average cadence
*s3/s3+stridesensororcadencesensorW.I.N.D.required.
Stride length*
Average stride length
*s3/s3+stridesensorW.I.N.D.required.
Running Index*
To get a Runn ing Index v alue, th ere are req uirements yo ur
exercise has to fulfil. For further information, see Polar
Running Index (page 57).
*s3/s3+stridesensororG3/G5GPSsensorW.I.N.D.required.
The Running Index feature is designed for use in
running sports, only. It will not function when cycling
with a G3/G5 sensor, for example.
After Training 25
Page 26
ENGLISH
Altitude
Maximum altitude
Minimum altitude
Average altitude
Riding time
Bike name
Riding time
Ascent/ Descent
Ascended meters/feet
Descended meters/feet
Incline*
Maximum incline in %
Minimum incline in degrees
*Cycling speed sensor W.I.N.D. required.
Decline*
Maximum decline in %
Minimum decline in degrees
*Cycling speed sensor W.I.N.D. required.
Temperature
MaximumoCdegrees
MinimumoCdegrees
AverageoCdegrees
Press STOP to return to the basic information view.
Additional Basic Information
Select File > Exercise log.SelecttheexercisewithOK.
To a dd y our ow n ex e rci s e in for m a tion or de l ete th e ex e rci s e fr om File,pressandholdLIGHT in basic
information view (exercise name is displayed).
To a dd i nfor m a tio n , se lec t Add info:
• Rank: Give a grade to your exercise.
• Feeling: Evaluate your subjective feeling during the exercise.
• Temperat. : Set the temperature with UP or DOWN.
• Distance: Select the shoe or bike and then enter the distance. The distance is updated in total and weekly
distance logs.
b. Sport Zones
26 After Training
Page 27
Select File > Exercise log > Sport zones
In the basic information view, press DOWN to see Sport zones information.
Press OK and scroll UP or DOWN to view time spent in each sport zone. Here, the variation of your
sessions is presented in graphical form.
Press STOP to return to the Sport zones information view.
c. Phases
ENGLISH
Select File > Exercise log > Phases
The Phases menu is displayed only if the exercise is created with the software, and includes phases.
In the Sport zones information view, press DOWN to view Phases information. You can view each phase
separately.
Scroll data of an individual phase by pressing OK.ComparephasesbypressingUP or DOWN.
Time
Phase name
Split time
Duration of current phase
Heart rate in beats per minute (bpm), alternating with a
percentage of maximum heart rate (%), or as a percentage of heart
rate reserve.
Maximum heart rate
Average heart rate
After Training 27
Page 28
ENGLISH
Increased HR / Recovery HR / HR differ.
The difference between heart rate at the beginning and end of the
phase. Current heart rate in beats per minute (bpm), alternating
with a percentage of your maximum heart rate, or as a percentage of
heart rate reserve.
Increased HR: If heart rate was lower at the beginning of the
phase than it was at the end, the training computer will show the
difference in heart rate (heart rate at the end minus heart rate at
the beginning). During the working phase, the training computer will
show the increased heart rate value.
Recovery HR: If the heart rate was higher at the beginning of the
phase than it was at the end, the training computer will show the
difference in heart rate (heart rate at the beginning minus heart
rate at the end). During the recovery phase, the training computer
will show the recovery heart rate value.
HR differ: If the heart rate value was the same at the beginning
and end of the phase, the training computer will show an HR
difference value of 0.
Speed/pace*
Maximum speed/pace
Average speed/pace
*s3/s3+stridesensor,G3/G5GPSsensororcyclingspeedsensor
W.I.N.D. required.
Distance*
Split distance
Distance of current phase
*s3/s3+stridesensor,G3/G5GPSsensororcyclingspeedsensor
W.I.N.D. required.
Cadence*
Maximum cadence
Average cadence of the current phase
*s3/s3+stridesensororcadencesensorW.I.N.D.required.
Stride length*
Average stride length of the current phase
*s3/s3+stridesensorW.I.N.D.required.
Press STOP to return to the Phases information view.
d. Laps
Select File > Exercise log > Laps
In the Phases information view, see Laps information by pressing DOWN.Lapsinformationisshownonlyif
there is more than one lap in the memory.
28 After Training
Number of recorded laps/autolaps (lap information alternating with
autolap information)
Average lap time
Best (fastest) lap number alternating with its time
Page 29
The last lap is never shown as the best lap, even if it is the fastest lap. If you are in a running event and wish to
include your last lap, press OK on the finishing line instead of STOP. This way, the last actual lap is included in the
calculation for best lap. You can then stop recording after the finishing line.
Scroll the various information of an individual lap by pressing OK.
Compare information on different laps by pressing UP or DOWN.
For easy view of lap information, transfer the files to the software.
Time
Split time
Lap time
Heart rate in beats per minute (bpm) alternating with percentage of maximum
heart rate (%), or as a percentage of your heart rate reserve.
Maximum heart rate
Average heart rate
End heart rate of lap
ENGLISH
Speed/Pace
Average speed/pace
End speed/pace of lap
Press and hold LIGHT to switch speed/pace.
*s3/s3+stridesensor,G3/G5GPSsensororcyclingspeedsensorW.I.N.D.required.
Distance
Split distance
Lap distance
*s3/s3+stridesensor,G3/G5GPSsensororcyclingspeedsensorW.I.N.D.required.
Cadence
Maximum
Average cadence of the lap
*s3/s3+stridesensororcadencesensorW.I.N.D.required.
Stride length
Average stride length of lap
*s3/s3+stridesensorW.I.N.D.required.
Incline
Incline in %
Incline in degrees
*Cycling speed sensor W.I.N.D. required.
Altitude
Ascent
Altitude
After Training 29
Page 30
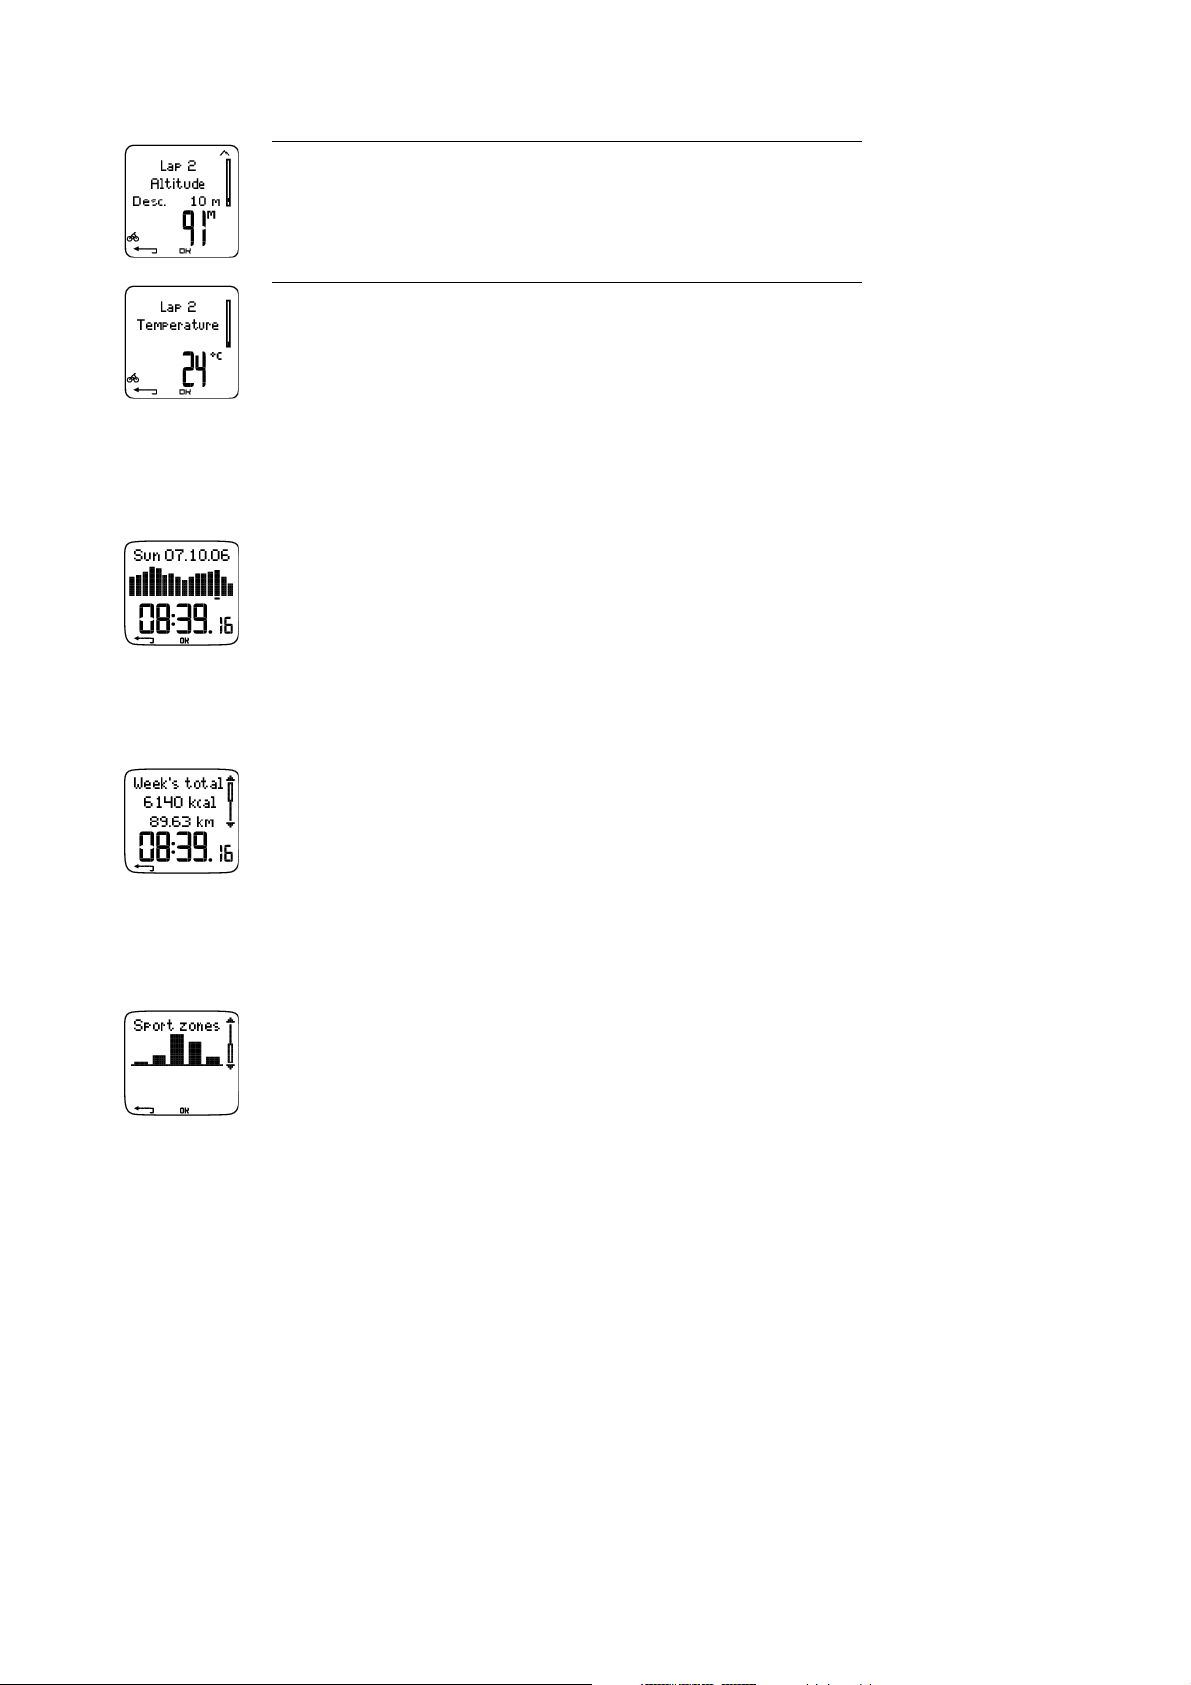
ENGLISH
Altitude
Descent
Altitude
Temperature
Press STOP to return to Laps information view.
Weekly Summary
Select File > Weekly
In Weekly summary, you can view data accumulated during the past 16 weeks of exercise. The bar on the
far right named This week displays the exercise summary for the current week. Earlier bars are dated the
Sunday of the week in question. Scroll the displayed weeks with UP or DOWN,andviewtotalexercise
duration on the lower row.
Press OK to select the week and view total calories, distance, and exercise time.
Press DOWN to see the week’s total Shoes distance, GPS distance and Bikes distance.
Press DOWN to see week’s sport zones.
To s ee t ime sp e n t i n ea ch s por t zo n e, p res s OK and scroll the sport zones UP or DOWN.
Totals
Select File > Totals
Totals includes cumulative information recorded during training sessions since the last reset. Use the
Tota l va l ues fi l e as a se aso n a l o r mo nth l y co unt e r of tr ain i n g d a ta. Th e va lues ar e up dat e d au tom a t ical l y
when exercise recording is stopped.
Use UP or DOWN to scroll through the following information:
• Tot. Shoe1 distance
• Tot. Shoe2 distance
• Tot. Shoe3 distance
30 After Training
Page 31

ENGLISH
• Tot. Bike1 distance
• Tot. Bike2 distance
• Tot. Bike3 distance
• Total Shoes distance
• Total GPS distance
• Total Bikes distance
• Total distance
• Total duration
• Total calories
• Total exerc. count
• Total ascent
• Total odometer (Cumulative distance; cannot be reset)
• Reset totals
To r eset to t al v alue s
Select File > Totals > Reset totals
Select the value you wish to reset from the menu and confirm with OK.ToconfirmresettingselectYes.
The deleted information cannot be retrieved. Select No to return to the Reset menu.
Delete Files
Select File > Delete
In Delete,youcandeletepreviousexercisesonebyone,allexercisesatthesametime,ortotalvalues.
Scroll through the following information with UP or DOWN:
• Exercise: Select a single exercise to delete.
• All exerc. : Delete all exercise from the memory with one button press.
• Totals: Delete the total values one by one or all totals at the same time.
Confirm by selecting Yes.
After Training 31
Page 32

ENGLISH
7. SETTINGS
Feature Settings
Anewsensorpurchasedasaseparateaccessoryhastobeintroducedtothetrainingcomputer.Thisis
called teaching and takes only a few seconds. Teaching ensures that your training computer receives
signals from your sensor only, and enables disturbance-free exercise in a group. If you have purchased the
sensor and the training computer as a set, the sensor has already been “taught” to work together with the
training computer. You just need to activate the sensor in your training computer.
When you activate a sensor in feature settings, Teach new sensor? is displaeyd. You can teach a new
sensor by selecting Yes.SelectNo if the sensor has already been taught.
To teac h a s epara tely purchased H3 he art r ate s ensor, see Tea ch a Ne w He art Ra t e Se nso r (p age ).
Polar s3/s3+ Stride Sensor W.I.N.D.
To a ctiv a t e t h e s t rid e se n sor in yo u r t r ain i n g c o mput e r, s ele c t Settings > Features > Shoes/bikes > Shoe
1/2/3 > On. Teach new sensor? is displayed.
• If your sensor is already taught, select No.
• If your sensor has not been taught yet, select Yes.
Before teaching, make sure that there are no other s3/s3+ stride sensors or G3/G5 GPS sensors nearby (40 m/131
ft). The sensor should be within 1,5 meters/5 ft of the training computer. Before entering a running event, for
example, make sure to perform the teaching process at home, first. This is to prevent interference due to the
long-range data transmission.
To r etur n to ti me m ode , pr e ss a nd h old th e STOP button.
Polar Cycling Speed Sensor W.I.N.D.
To a ctiv a t e t h e s p eed se n s or in yo u r tr ain i n g c o mpu t e r, s ele c t Settings > Features > Shoes/bikes > Bike
1/2/3 > On > Speed > On. Teach new sensor? is displayed.
• If your sensor is already taught, select No.
• To teach a new sensor, make sure that there are no other speed sensors nearby (40 m/131 ft) and then
select Yes.
After selecting Yes, rotate the wheel a few times to activate the sensor. The flashing red light indicates
that the sensor is activated. Completed is displayed once the teaching process is over. The training
computer is now ready to receive speed and distance data.
To r etur n to ti me m ode , pr e ss a nd h old th e STOP button.
Wheel size settings are a prerequisite for correct cycling information. For more information on measuring the wheel
size, see Measuring Wheel Size.
Polar Cadence Sensor W.I.N.D.
To a ctiv a t e t h e c a den c e se nso r in yo ur t rai n i ng c ompu t e r, se l e ct Settings > Features > Shoes/bikes >
Bike 1/2/3 > On > Cadence > On. Teach new sensor? is displayed.
• If your sensor is already taught, select No.
32 Settings
Page 33

ENGLISH
• To teach a new sensor, make sure that there are no other cadence sensors nearby (40 m/131 ft) and then
select Yes.
After selecting Yes, Start test drive is displayed. Rotate the crank a few times to activate the sensor.
The flashing red light indicates that the sensor is activated. Completed is displayed after the teaching has
been finished. The training computer is now ready to receive cadence data.
To r etur n to ti me m ode , pr e ss a nd h old th e STOP button.
Measuring Wheel Size
Select Settings > Features > Shoes/bikes > Bike 1/2/3 > Wheel
Wheel size settings are a prerequisite for correct cycling information. There are two ways of determining
the wheel size of your bike:
Method 1
Look for the diameter in inches or in ETRTO printed on the wheel. Match it to the wheel size in
millimeters in the right column of the chart.
ETRTO Wheel size diameter (inches) Wheel size setting (mm)
25-559 26 x 1.0 1884
23-571 650 x 23C 1909
35-559 26 x 1.50 1947
37-622 700 x 35C 1958
47-559 26 x 1.95 2022
20-622 700 x 20C 2051
52-559 26 x 2.0 2054
23-622 700 x 23C 2070
25-622 700 x 25C 2080
28-622 700 x 28 2101
32-622 700 x 32C 2126
42-622 700 x 40C 2189
47-622 700 x 47C 2220
Wheel sizes on the chart are advisory as wheel size depends on the wheel type and air pressure.
Method 2
Measure the wheel manually for the most accurate result.
Use the valve to mark the point where the wheel touches the ground. Draw a line on the ground to mark
that point. Move your bike forward on a flat surface for one complete rotation. The tire should be
perpendicular to the ground. Draw another line on the ground at the valve to mark a full rotation. Measure
the distance between the two lines.
Subtract 4 mm to account for your weight on the bike to get your wheel circumference. Enter this value in
the cycling computer.
Polar G3/G5 GPS Sensor W.I.N.D.
To a ctiv a t e t h e G 3 /G5 GP S se nsor in yo u r t r ain i n g c o mpu t e r, s ele c t Settings > Features > G3 > On . Teach
Settings 33
Page 34

ENGLISH
new sensor? is displayed.
• If your sensor is already taught, select No.
• To teach a new sensor, make sure that there are no other s3/s3+ stride sensors or G3/G5 GPS sensors
nearby (40 m/131 ft) and then select Yes.
To r etur n to ti me m ode , pr e ss a nd h old th e STOP button.
Altitude
The training computer converts measured air pressure into an altitude reading. Change the settings of the
altimeter in the Altitude menu. You can calibrate the altimeter manually or automatically.
Set the altitude function on or off
Select Settings > Features > Altitude > On / Off
Calibrating the Altitude Manually
Select Settings > Features > Altitude > Calibrate >setthealtitudeofcurrentlocation
If the altitude of your location differs significantly from the displayed altitude value Calibrate to xx? is
displayed.
• Yes: Altitude calibrated to xx is displayed.
• No: Altitude calibration canceled is displayed. The last altitude value stored in the training computer’s
memory is applied.
Calibrate the altitude to ensure it remains accurate. Set the reference altitude whenever a reliable
reference, such as a peak or a topographic map, is available or when at sea level.
Calibrating the Altitude Automatically
Select Settings > Features > Altitude > AutoCalib > On / Off
When automatic calibration is on, the last altitude value stored in the training computer’s memory is
applied when exercising. This feature is especially useful if you always start a session in the same
environment. If automatic calibration fails, you are not in the usual environment and will need to calibrate
the altitude manually.
Altitude calibrated to xx m/ft indicates that calibration has succeeded. If Altitude calibration failed is
displayed, re-calibrate the altitude.
Recording Rate
Select Settings > Features > Rec.rate > 1 / 2 / 5 / 15 / 60 sec
The training computer can store your heart rate, speed/pace,* and altitude in 1, 2, 5, 15 or 60 second
intervals. A longer interval gives you more recording time, while a shorter interval allows you to record
more heart and other data. This enables accurate data analysis using the software.
Ashorterrecordingrateconsumesthememoryofthetrainingcomputermorerapidly.Theremaining
recording time is displayed on the lower row when setting the rate. Default recording rate is 5 seconds.
When less than 30 minutes of maximum recording time is left, the recording rate changes automatically to
longer recording time (1s > 2s > 5s > 15s > 60s). This will maximize the time to record exercise data.
When the session ends, the current recording rate remains as default.
The following table shows the maximum recording times for each recording rate. Note that recording rate
might change when there is less than 30 minutes of recording time left.
34 Settings
Page 35

RR-data Speed Cadence S3/S3+ GPS Altitude Recording Rate
1s 2s 5s 15s 60s
ENGLISH
Off
Off
Off
Off
Off
Off
Off
Off
Off
Off
Off Off Off Off Off
Off Off Off Off On
Off Off Off On Off
Off Off Off On On
Off Off On Off Off
Off Off On Off On
Off Off On On Off
Off Off On On On
Off On Off Off Off
Off On Off Off On
67h
40min
22h
30min
5h
30min
135h
20min
45h
00min
11h
10min
4h
50min9h40min
13h
30min
9h
40min
5h
10min
27h
00min
19h
20min
10h
20min
4h
30min9h00min
33h
50min
16h
50min
67h
40min
33h
50min
338h
30min
112h
50min
28h
10min
24h
10min
67h
40min
48h
20min
26h
00min
22h
30min
169h
10min
84h
30min
1015h
40min
338h
30min
78h
00min
67h
40min
169h
10min
126h
50min
72h
30min
63h
20min
507h
50min
203h
00min
4036h
00min
1354h
20min
312h
30min
270h
50min
677h
10min
507h
50min
290h
10min
253h
50min
2031h
30min
812h
30min
Off
Off
Off
Off
Off
Off
Off
Off
Off
Off
Off On Off On Off
Off On Off On On
On Off Off Off Off
On Off Off Off On
On Off Off On Off
On Off Off On On
On On Off Off Off
On On Off Off On
On On Off On Off
On On Off On On
5h
10min
10h
20min
4h
30min9h00min
16h
50min
11h
10min
5h
30min
33h
50min
22h
30min
11h
10min
4h
50min9h40min
13h
30min
9h
40min
27h
00min
19h
20min
5h
10min1020min
4h
30min9h00min
26h
00min
22h
30min
84h
30min
56h
20min
28h
10min
24h
10min
67h
40min
48h
20min
26h
00min
22h
30min
72h
30min
63h
20min
203h
00min
145h
00min
78h
00min
67h
40min
169h
10min
126h
50min
72h
30min
63h
20min
290h
10min
253h
50min
812h
30min
580h
20min
312h
30min
270h
50min
677h
10min
507h
50min
290h
10min
253h
50min
Settings 35
Page 36

ENGLISH
RR-data Speed Cadence S3/S3+ GPS Altitude Recording Rate
1s 2s 5s 15s 60s
On
On
On
On
On
On
On
On
On
On
Off Off Off Off Off
Off Off Off Off On
Off Off Off On Off
Off Off Off On On
Off Off On Off Off
Off Off On Off On
Off Off On On Off
Off Off On On On
Off On Off Off Off
Off On Off Off On
40h
30min
18h
20min
40h
30min
25h
20min
5h
20min9h20min
4h
30min8h10min
11h
50min
8h
40min
18h
20min
14h
30min
4h
50min8h40min
4h
10min7h40min
25h
20min
14h
30min
31h
10min
21h
20min
40h
30min
32h
40min
17h
30min
15h
50min
27h
20min
23h
30min
16h
30min
15h
00min
36h
10min
29h
50min
40h
30min
37h
30min
27h
20min
26h
00min
33h
50min
31h
40min
26h
40min
25h
20min
39h
00min
36h
10min
40h
30min
39h
50min
36h
10min
35h
40min
38h
40min
38h
00min
36h
00min
35h
20min
40h
10min
39h
30min
On
On
On
On
On
On
On
On
On
On
Off On Off On Off
Off On Off On On
On Off Off Off Off
On Off Off Off On
On Off Off On Off
On Off Off On On
On On Off Off Off
On On Off Off On
On On Off On Off
On On Off On On
4h
50min8h40min
4h
10min7h40min
14h
30min
10h
00min
21h
20min
16h
10min
5h
20min9h20min
4h
30min8h10min
11h
50min
8h
40min
18h
20min
14h
30min
4h
50min8h40min
4h
10min7h40min
16h
30min
15h
00min
29h
50min
25h
20min
17h
30min
15h
50min
27h
20min
23h
30min
16h
30min
15h
00min
26h
40min
25h
20min
35h
00min
32h
40min
27h
20min
26h
00min
33h
50min
31h
40min
26h
40min
25h
20min
36h
00min
35h
20min
39h
00min
38h
20min
36h
10min
35h
40min
38h
40min
38h
00min
36h
00min
35h
20min
36 Settings
Page 37

ENGLISH
** This is a sum of 2 or more exercises; maximum duration of a single exercise is 99 h 59 min 59 s. The
maximum recording time can be shorter, if you record a large number of short exercises.
The durations in the table are estimates. For RR data, maximum recording time depends on heart rate and
variation of heart rate. If you record laps in your exercise, and/or if you have created an exercise that includes
phases with the software, the maximum recording time will decrease.
Recording doesn't automatically stop when the memory becomes full. Therefore, exercise time may be
longer than recording time.
RR Data Function
Select Settings > Features > RR data > On / Off
The RR data recording function measures and records heartbeat variations within one millisecond
resolution. This enables the analysis (accuracy 1ms) of heart rate variability (HRV) using the software. The
RR data function consumes the memory of the training computer, therefore when setting the function, the
remaining recording time is shown on the lower row of the display.
Speed View
Select Settings > Features > Speed view > km/h (mph) or min/km (min/mi)
Automatic Lap Recording
Set the automatic lap recording
Select Settings > Features > A.Lap > On > set the lap distance
The training computer will automatically record laps. Choose Off to deactivate.
Heart Rate View
Define the way to display your heart rate
Select Settings > Features > HR view > HR / HR% / HRR%
Sport Zones
Define the sport zones in the training computer
Select Settings > Features > Sport zones > Sport zone low limit
Set the lower limit of sport zone 1 by pressing UP or DOWN.ThenpressOK.Setthelowerlimitsofeach
sport zone in the same way. When setting the lower limit, the upper limit of the previous zone is set
automatically.
Press and hold LIGHT to switch between sport zone views: HR% (percentage of maximum heart rate) or
BPM (beats per minute) or HRR% (percentage of heart rate reserve).
You can chan ge se tting s eas ily b y usi ng the software . For further inform ation , see soft ware help.
User Settings
Set accurate user information in the training computer to receive the correct feedback on your
performance.
To s et u ser in f o rmat i o n i n the tr a i ning co m pute r
Select Settings > User
Settings 37
Page 38

ENGLISH
• Weight: To change units, press and hold LIGHT
• Height: To change units, press and hold LIGHT
• Birthday: dd=day, mm=month, yy=year
• Sex: Male/Female
• Activity: Top/High/Moderate/Low
• Heart Rate: HR
max
, HR
sit
• VO2max: Maximal oxygen intake
Activity Level
Activity level is an assessment of your level of long-term physical activity. Select the alternative that best
describes the overall amount and intensity of your physical activity during the past three months.
• Top: You participate in heavy physical exercise at least 5 times a week, or you exercise to improve
performance for competitive purposes.
• High: You participate at least 3 times a week in heavy physical exercise, e.g. you run 20-50 km/12-31
miles per week or spend 3-5 hours per week in comparable physical activity.
• Moderate: You participate regularly in recreational sports, e.g. you run 5-10 km or 3-6 miles per week or
spend 1/2-2 hours per week in comparable physical activity, or your work requires modest physical
activity.
• Low: You do not participate regularly in programmed recreational sport or heavy physical activity, e.g. you
walk only for pleasure or exercise hard enough to cause heavy breathing or perspiration only occasionally.
In the training computer, these values are used to calculate your energy expenditure.
Heart Rate: HR
HR
(Maximum heart rate): Your age-predicted HR
max
HR
manually if your maximum heart rate has been determined in a lab, or if you have tested your
max
max
,HR
sit
value (220 - age) is used as a default. Set your
max
maximum heart rate in the field yourself.
HR
(Heart rate value in a sitting position): Set your HR
sit
value if you have determined it according to
sit
the instructions. For instructions, see Heart Rate Value in a Sitting Position (page 55).
Maximal Oxygen Intake: VO
VO
is your body’s maximum capacity for oxygen consumption during maximum exertion. The most
2max
accurate way of determining VO
exact clinically-tested VO
2max
is to perform a maximal stress test in a laboratory. If you know your
2max
,setthevalueinthetrainingcomputer.Otherwise,measureacomparable
2max
value, OwnIndex, by taking the Polar Fitness Test. For further information, see Polar Fitness Test
(page ? ).
If changes are made to the user settings, User settings updated is displayed.
You can chan ge se tting s eas ily b y usi ng the software . For further inform ation , see soft ware help.
General Settings
TM
Sound
To s et t he s ound le v el
Select Settings > General > Sound > Volume > On / Off
Volume settings control button sounds and activity sounds during exercise. This does not affect the watch
38 Settings
Page 39

or target zone alarms (TZ Alarm).
To s et t he t arge t zo ne a lar m on / off
Select Settings > General > Sound > TZ Alarm > On / Off
The target zone alarm will go off, and the limits will flash when you are outside the target zone. If the
volume is turned off, but TZ Alarm is still on, the TZ Alarm will still function.
Keylock
Define keylock settings
Select Settings > General > Keylock > Manual / Automatic
Keylock prevents accidental button presses.
• Manual: Activate the manual keylock. To turn keylock on/off, press and hold LIGHT for at least one
second.
• Automatic: Keylock is activated in time mode when buttons have not been pressed for one minute.
Units
Set preferred units in the training computer
Select Settings > General > Units > kg/cm/km or lb/ft/mi
ENGLISH
Language
Select language
Select Settings > General > Language > English / Deutsch / Español / Français / Italian
Sleep
Activate the sleep function
Select Settings > General > Sleep > Activate sleep mode? > Yes
Activating the sleep mode will help save the battery when the training computer is out of use for a long
period of time. The watch alarm will still function in sleep mode.
Awaken the training computer
Press any button > Turn display on? > Yes / No
• Yes: the training computer is activated.
• No: the training computer returns to sleep mode.
You can chan ge se tting s eas ily b y usi ng the software . For further inform ation , see soft ware help.
Watch Settings
Reminder
Set a reminder to remind you of different tasks or exercises
Select Settings > Watch > Reminders > Add new
• Date: Enter the date of the task, dd=day, mm=month, yy=year.
• Reminder time: Enter the time for the task.
• Alarm: Set alarm to sound on time, or 10 min / 30 min / 1 hour before the task.
Settings 39
Page 40

ENGLISH
• Sound: Select alarm sound Silent / Beep / Normal.
• Repeat: Select reminder to repeat Once / Hourly / Daily / Weekly / Monthly / Yearly.
• Exercise: Select an exercise to link to the reminder. When the reminder goes off, the training computer
will present this exercise as default. Select NONE if you do not want to link the reminder to an exercise
session.
• Rename: To rename the reminder, select letters with UP or DOWN, and accept with OK.
You can p rogram sev en remi nder s i n t he trainin g c ompu ter.
See active reminders and modify them
Select Settings > Watch > Reminders
Select a reminder to view, edit, rename or delete.
Event
Set an event countdown in the training computer
Select Settings > Watch > Event
Event day:dd=day,mm=month.
Rename:Torenametheevent,selectletterswith UP or DOWN,andacceptwithOK.
Modify the event countdown
Select Settings > Watch > Event
You can v iew the event countd own, set a new date, rename or delete it.
In time mode, hide or view the event countdown again by pressing and holding UP.
Alarm
Set an alarm on your training computer
Select Settings > Watch > Alarm > Off / Once / Mon-Fri / Daily
You can s et the alarm to go off once ever yday betwee n M onda y a nd Friday, or daily. Th e a larm sounds in
all modes except in exercise mode, and will do so for a minute unless you press STOP.Thewatchalarm
also functions in sleep mode. The alarm will sound even if you have turned the sound off in the General
settings.
To s nooz e th e a l arm an ex t r a 1 0 mi nut e s , p r ess UP or DOWN buttons or OK: Snooze is displayed and the
snooze time starts counting. To abort the snooze stage and alarm mode, press STOP.
If a battery symbol appears in the display, the alarm cannot be activated.
Time
Set time 1 in the training computer
Select Settings > Watch > Time 1 > 24h / 12h
Set time 2 in the training computer
Select Settings > Watch > Time 2
Set the time difference between time 1 and time 2 in hours.
Switch between time zones
Select Settings > Watch > Time zone > Time 1 / Time 2
40 Settings
Page 41

ENGLISH
Select a time zone
In time mode, change the time zone by pressing and holding DOWN.Number2onthelowerrightcorner
of the display indicates that Time 2 is in use.
Date
Set the date in the training computer
Select Settings > Watch > Date
dd=day, mm=month, yy=year
You can chan ge se tting s eas ily b y usi ng the software . For further inform ation , see soft ware help.
Shortcut Button (Quick Menu)
Some settings can be changed with a shortcut button in time mode.
Press and hold LIGHT > Quick menu
• Keylock
• Reminders
• Alarm
• Time zone
• Sleep
Settings 41
Page 42

ENGLISH
8. TRAINING PROGRAM
View Program
You can c reate and dow nloa d a person aliz ed trainin g p rogr am to your traini ng compute r b y u sing Polar
ProTrainer 5. This chapter includes the basic instructions on how to navigate and manage the program
once you have downloaded it to your training computer. For further information on creating programmed
exercises with the software, transferring them to your training computer, and analyzing your performance
after training, see Polar ProTrainer 5 help.
After downloading the program, two special menus are created in your training computer where you can
view your program and check your daily schedule. Scroll weeks, days, and exercises with UP or DOWN.
Select week and day with OK.
View your weekly program
Select Program > Week view
The week view offers an overview of your weekly exercises. The white bar represents planned exercise time
and the black bar represents performed exercise time. Weekly target exercise time is shown below the
bars.
Press and hold LIGHT to view the following information on the week:
• Week info: Week name and description.
• Targets: Summary of targets for the week. Calories, distance* and duration. Planned time for sport zones:
press OK and scroll between sport zones with UP or DOWN.
• Results: Summary of results for the week. Calories, distance* and duration. Performed time in sport
zones: press OK and scroll between sport zones with UP or DOWN.
• Reminder: Set alarm (on time, 10 min, 30 min or 1 hour before the exercise) and define sound type
(Silent, Beep, Normal).
• Program off: Remove the program from your training computer.
View your daily program
Select Program > Week view > Day view
Select Today > Exercise view
The day view offers an overview of your daily exercises. The white bar represents planned exercise time
and the black bar represents performed exercise time. Daily target exercise time is shown below the bars.
Press and hold LIGHT to view additional information on the day:
• Targets: Summary of targets for the day. Calories, distance,* and duration. Planned time for sport zones:
press OK and scroll between sport zones with UP or DOWN.
• Results: Summary of results for the day. Calories, distance,* and duration. Performed time in sport zones:
press OK and scroll between sport zones with UP or DOWN.
View your daily exercise
42 Training Program
Page 43

ENGLISH
Select Program > Week view > Day view > Exercise view
The exercise view shows the following information: exercise name, description, and target duration.
Press and hold LIGHT to view following information:
• Targets: Summary of targets for the training session. Calories, distance* and duration. Planned time for
sport zones: press OK and scroll between sport zones with UP or DOWN.
• Phases: Summary of phases for the training session.
• Sport profile: View the name of chosen sport profile. For further information, see software help.
• Reminder: Set the reminder time.
*Optional s3/s3+ stride sensor, G3/G5 GPS sensor or cycling speed sensor W.I.N.D. required.
Perform Programmed Exercise
Start training
If you have set a reminder, your training computer will remind you to train according to plan on the
scheduled date. Check the planned exercise information by pressing OK when the reminder has gone off.
Start Daily Exercise
Select Today > Exercise view >PressOK >PressOK
Select Program > Week view > Day view > Exercise view >PressOK >PressOK
For further information on exercise recording, see Start Training (page 13). Your training computer will
guide you through the session.
Exercise with Phases
Below is an example of an interval exercise, which is divided into four phases:
Warm up / P1: Run 10 minutes at a heart rate between 55-65% of maximum heart rate.
Interval / P2: Run 3 km at a pace between 3:30-4:00 min/km.
Recovery / P3: After 3 km let your heart rate drop to 120 bpm. Repeat phases 2 and 3 6 times each.
Cool down / P4: Run 10 minutes at a pace between 5:00-6:00 min/km.
Views during the exercise
During the exercise you will see the following display types:
Every phase starts with a display showing:
Phase name
Zone type
Zone limits
Number of phase repeats left
During exercise the phase display shows:
Countdown timer/distance*, countup timer, number of current phase
Target zon e in gr aphical form at ( upda ted ever y 10 se cond s, s howi ng the last 8
minutes on the display)
Heart rate
Number of phase repeats left
Training Program 43
Page 44

ENGLISH
Every phase ends with a phase-end display showing:
Phase duration or distance*
Heart rate difference (how much you have increased or decreased your heart rate
during the phase) or average speed/pace
Average heart rate
Number of ended phase
After performing the programmed exercise, this display shows that the exercise is
completed.
The training computer enters Free exercise mode, and you can continue exercising
without settings. The exercise is recorded and information is gathered to File until you
stop the exercise.
For further information on how to plan sessions with the software, and then transfer them to your training
computer, see software help.
Functions During Exercise
You can c hange the sam e s etti ngs in a prog rammed exe rcis e a s i n a ny othe r e xercise type. For furthe r
information on different functions during exercise, see Button Functions During Exercise (page 20).
The programmed exercise uses the sport profile settings set in the software. If you change the training
computer settings during exercise (e.g. calibration factor), the changes will only apply to the current
exercise. Next time you start the same exercise, the training computer will use the sport profile settings
defined in the software.
Lap Menu
To s ee t he l ap m enu du r i ng p rog r a mmed ex e rcis e , pres s an d h o ld O K. S cro l l be twe e n op tio n s wi th UP or
DOWN and select with OK.Thecontentsofthelapmenudependonyourexercise.
• End phase: End current phase and move to the next phase in the exercise.
• Jump to: Move to any other phase in your exercise.
• Lock zone or Unlock zone: Lock your heart rate or speed/pace* to a certain sport zone if exercising without
preset target zones.
See Exercise Results
Select File > Exercise log
After completing a programmed exercise, your training data will be saved under File.Forfurther
information, see Analyze Exercise Results (page 23).
*Optional s3/s3+ stride sensor, G3/G5 GPS sensor or cycling speed sensor W.I.N.D. required.
44 Training Program
Page 45

9. TESTS
ENGLISH
Polar Fitness Test
The Polar Fitness TestTMis an easy, safe, and quick way to measure your aerobic (cardiovascular) fitness
at rest. The result, Polar OwnIndex, is comparable to maximal oxygen uptake (VO
used to evaluate aerobic fitness. Your long-term level of physical activity, heart rate, heart rate variability
at rest, gender, age, height, and body weight all influence OwnIndex. The Polar Fitness Test is developed
for use by healthy adults.
Aerobic fitness relates to how well your cardiovascular system works to transport oxygen to your body. The
better your aerobic fitness, the stronger and more efficient your heart is. Good aerobic fitness has many
health benefits. For example, it helps in decreasing high blood pressure and your risk of cardiovascular
diseases and stroke. If you want to improve your aerobic fitness it takes, on average, six weeks of regular
training to see a noticeable change in your OwnIndex. Less fit individuals see progress even more rapidly.
The better your aerobic fitness, the smaller the improvements in your OwnIndex.
Aerobic fitness is best improved by exercise types that use large muscle groups. Such activities include
running, cycling, walking, rowing, swimming, skating, and cross-country skiing.
To m onit o r your pr o g res s , st art by me a suri n g your Ow n Inde x a c o u ple of ti m e s d u rin g th e fi rst tw o we eks
in order to get a baseline value, and then repeat the test approximately once a month.
TM
), which is commonly
2max
With the Polar Fitness Test, you can also calculate the predicted maximum heart rate value (HR
HR
-p score predicts your individual maximum heart rate more accurately than the age-based formula
max
(220 - age). For further information on HR
To m ake su r e th e t e st r esu l t s a r e r e lia b l e, t he f oll o w ing ba s i c r e qui r e ment s ap ply:
• You can perform the test anywhere - at home, at the office, at a health club - provided the testing
environment is peaceful. There should be no disturbing noises (e.g. television, radio, or telephone) and no
other people talking to you.
• Always take the test in the same environment and at the same hour.
• Avoid eating a heavy meal or smoking 2-3 hours prior to testing.
• Avoid heavy physical exertion, alcohol, and pharmacological stimulants on the test day and the previous
day.
• You should be relaxed and calm. Lie down and relax for 1-3 minutes before starting the test.
,seeUserSettings(page37).
max
max
-p). The
Before the Test
Wear the Heart Rate Sensor
For further information, see Wear the Heart Rate Sensor (page 13).
Enter User Information
Select Settings > User
To c arry ou t th e P o lar Fi t n ess Tes t , en ter yo u r pers o n al u ser in f o rma t i on a nd l ong - t erm ph y s ica l ac t ivi t y
level in User settings.
Set HRmax-p On
If you want to obtain your predicted maximum heart rate value, turn HR
Select Test > Fitness > HR max-p > On
max
-p on.
Tests 45
Page 46

ENGLISH
Performing the Test
Select Test > Fitness > Start > Fitness Test Lie Down
The fitness test begins in five seconds. Arrows indicate that the test is ongoing. Stay relaxed and limit
body movements and communication with other people.
If you have not set your long-term physical activity level in User Settings, Set your personal activity level
is displayed. Select Top, High, Moderate ,orLow.Forfurtherinformationonactivitylevels,seeUser
Settings (page 37).
If your training computer does not receive your heart rate at the beginning or during the test, the test fails
and Test failed, check WearLink is displayed. Check that the heart rate sensor electrodes are wet and that
the textile strap is snug enough, and start the test again.
When the test is over, you will hear two beeps. OwnIndex is displayed with a numerical value and level
evaluation. For further information on evaluations, see Fitness Level Classes.
To d ispl a y your Predicted maximum heart rate value press DOWN.PressOK to exit.
Update to VO2 max?
• Select Yes to save the OwnIndex value to your user settings and Fitness Test Trend menu.
• Select No only if you know your laboratory-measured VO
level class from the OwnIndex result. Your OwnIndex value is saved only to the Fitness Test Trend menu.
For further information, see Fitness Test Trend.
value, and if it differs more than one fitness
2max
Update to HR max? (if HRmax-p is on)
• Select Yes to save the value to your user settings.
• Select No if you know your laboratory-measured HR
You can s top the test at any time by pres sing STOP. Fitness Test canceled is displayed for a few seconds.
After saving the OwnIndex and HR
-p values, they will be used for calculating calorie consumption.
max
max
.
After the Test
Fitness Level Classes
Your OwnI ndex is mo st mean ingf ul when comparing your indi vidu al valu es and change s i n t hem ove r t ime.
OwnIndex can also be interpreted based on gender and age. Locate your OwnIndex on the table below, and
find out how your aerobic fitness compares to others of the same gender and age.
Top ath l e tes ty p i cal l y sc ore Ow n I nde x va l ues ab o ve 7 0 ( m en) an d 60 (w o men ) . Ol ymp i c -le v e l e n dur a n ce
athletes can reach values as high as 95. OwnIndex is highest in sports that involve large muscle groups,
such as running and cross-country skiing.
Men
Age / Years Very low Low Fair Moderate Good Very good Elite
20-24 <32 32-37 38-43 44-50 51-56 57-62 >62
25-29 <31 31-35 36-42 43-48 49-53 54-59 >59
30-34 <29 29-34 35-40 41-45 46-51 52-56 >56
35-39 <28 28-32 33-38 39-43 44-48 49-54 >54
40-44 <26 26-31 32-35 36-41 42-46 47-51 >51
45-49 <25 25-29 30-34 35-39 40-43 44-48 >48
50-54 <24 24-27 28-32 33-36 37-41 42-46 >46
46 Tests
Page 47

Age / Years Very low Low Fair Moderate Good Very good Elite
55-59 <22 22-26 27-30 31-34 35-39 40-43 >43
60-65 <21 21-24 25-28 29-32 33-36 37-40 >40
Women
Age / Years Very low Low Fair Moderate Good Very good Elite
20-24 <27 27-31 32-36 37-41 42-46 47-51 >51
25-29 <26 26-30 31-35 36-40 41-44 45-49 >49
30-34 <25 25-29 30-33 34-37 38-42 43-46 >46
35-39 <24 24-27 28-31 32-35 36-40 41-44 >44
40-44 <22 22-25 26-29 30-33 34-37 38-41 >41
45-49 <21 21-23 24-27 28-31 32-35 36-38 >38
50-54 <19 19-22 23-25 26-29 30-32 33-36 >36
55-59 <18 18-20 21-23 24-27 28-30 31-33 >33
ENGLISH
60-65 <16 16-18 19-21 22-24 25-27 28-30 >30
The classification is based on a literature review of 62 studies where VO
healthy adult subjects in the USA, Canada and 7 European countries. Reference: Shvartz E, Reibold RC.
Aerobic fitness norms for males and females aged 6 to 75 years: a review. Aviat Space Env iron Med ;
61:3-11, 1990.
Fitness Test Trend
Select Test > Fitness > Trend
In the Trend menu you can see how your OwnIndex value has been developing. Up to 16 OwnIndex values
and respective dates are included in the display. When the test trend file becomes full, the oldest result is
automatically deleted.
The most recent test date, a graph of your OwnIndex results, and the latest OwnIndex value are displayed.
Scroll UP or DOWN to view other values.
Delete OwnIndex Value
Select Test > Fitness > Trend
Select the value you wish to delete and press and hold LIGHT > Delete value? No/Yes is displayed.
Confirm with OK.
Analyzing OwnIndex Results with Software
Downloading test results to the software offers you the possibility of analyzing results in various ways, as
well as accessing more detailed information about your progress. The software also allows you to make
graphical comparisons with previous results.
was measured directly in
2max
Tests 47
Page 48

ENGLISH
Polar OwnOptimizer
TM
General
Successful training requires temporary overloading: longer exercise duration, higher intensity, or higher
total volume. In order to avoid severe overtraining, overloading must always be followed by an adequate
recovery period. With an inadequate recovery period, you may experience a decrease in performance as a
result of high training volumes, instead of improvement. Polar OwnOptimizer is an easy and reliable way to
determine whether your training program is optimally developing your performance. Polar OwnOptimizer is
developed for use by healthy adults.
Polar OwnOptimizer is a modification of a traditional orthostatic overtraining test. It is a perfect tool,
embedded in the training computer, for everyone training regularly, at least three times a week, for fitness
improvement or to reach competitive targets. This feature is based on heart rate and heart rate variability
measurements taken during an orthostatic test (standing up from relaxed resting). OwnOptimizer helps you
to optimize your training load during a training program so that you experience an increase in performance
and do not undertrain or overtrain in the long run. Polar OwnOptimizer is based on regular long-term
measurements of five heart rate parameters. Two of these five values are calculated at rest, one while
standing up, and two while standing. Each time you perform the test, the wrist unit saves the heart rate
values and compares them to the previous values registered.
Before the Test
Baseline Tests
When you use OwnOptimizer for the first time, six baseline tests should be conducted over a period of two
weeks to determine your personal baseline value. These baseline measurements should be taken during
two typical basic training weeks, not during heavy training weeks. The baseline measurements should
include tests taken after a training day and after recovery days.
Monitoring OwnOptimizer Values
After the baseline recordings, you should continue to perform the test 2-3 times a week. Test yourself
weekly in the morning following both a recovery day and a heavy training day (or a series of heavy training
days). An optional third test can be performed after a normal training day. OwnOptimizer may not provide
reliable information during detraining or in a very irregular training period. If you take a break from
exercise for 14 days or longer, the baseline tests should be performed again.
Performing the Test
The test should always be taken in standardized/similar conditions in order to get the most reliable results.
It is recommended that you take the test in the morning before breakfast. The following basic
requirements apply:
• Wear the heart rate sensor.
• You should be relaxed and calm.
• You can be seated in a relaxed position or lying in bed. The position should always be the same when you
do the test.
• The test can take place anywhere – at home, in the office, at a health club – as long as the test
environment is peaceful. There should be no disturbing noises (for example, television, radio or telephone)
or other people talking to you.
• Avoid eating, drinking and smoking 2-3 hours prior to the test.
Performing the Test
Select Test > Optimizer > Start > Optimizer Lie Down
Arrows indicate the test is ongoing. Do not move during this first part of the test, which lasts 3 minutes.
48 Tests
Page 49

ENGLISH
After 3 minutes, the wrist unit will beep and Optimizer Stand up is displayed. Stand up and remain
standing still for 3 minutes.
After 3 minutes, the wrist unit will beep again and the test is finished.
Anumericalandwritteninterpretationoftheresultisdisplayed.PressDOWN to see your average heart
rate (bpm) while lying down (HRrest), the highest heart rate while standing up (HRpeak), and the average
heart rate while standing (HRstand).
You can i nterrup t t he test in an y p hase by pr essi ng STOP. Optimizer Test canceled is displayed.
If the training computer cannot receive your heart rate signal, the message Test failed. Check WearLink is
displayed. In which case, you should check that the heart rate sensor electrodes are wet and that the
textile strap fits snugly.
After the Test
How to Interpret Results
The wrist unit calculates five heart rate and heart rate variability based parameters. The OwnOptimizer
values are calculated by comparing your latest results to previous ones. The wrist unit will display a
written description of your training status. The descriptions are defined in detail below.
Good Recovery (1)
Your hear t r ate is low er than averag e. This indicates that you hav e r ecov ered very well . Yo u c an continu e
training, including intensive exercise sessions.
Normal State (2)
Your hear t r ate is at a norm al leve l. Go on with your trainin g; incl ude bot h l ight and i ntensiv e t rain ing
sessions, and recovery days.
Training Effect (3)
Your hear t r ate is hig her than a verage. You may have exercis ed inte nsiv ely in the previous day s. You have
two choices: 1) rest or train lightly for one or two days, or 2) continue intensive training for one or two
days and then recover well. Other sources of stress such as the beginning of a fever or an attack of the flu
can result in the same kind of response.
Steady State (4)
Your hear t r ate has contin uous ly been at a nor mal level for a long time now. Eff ective tra inin g r equi res
both heavy training and good recovery, and this should cause variation in your heart rate results. Your
OwnOptimizer result indicates that you have not had very intensive training or good recovery for a while.
Perform the test again after a rest or light training day. If the recovery is effective, your result should show
Good recovery.
Stagnant State (5)
Your hear t r ate is sti ll at a n orma l l evel, and thi s h as cont inue d f or a l ong time. The result indica tes tha t
your training has not been intensive enough to develop optimally. To improve your condition effectively,
you should now include more intense or longer exercise sessions in your program.
Hard Training (6)
Your hear t r ate has been high er than averag e s everal tim es. You may have trai ned har d o n p urpose. The
result indicates overloading, and you should try to recover well now. To monitor your recovery, perform the
test again after one or two resting or easy training days.
Overreaching (7)
Your OwnO ptim izer result indica tes that you hav e h ad a v ery int ensi ve trainin g p erio d f or seve ral days or
weeks. Your heart rate has continuously remained at a high level. This seriously indicates that you should
Tests 49
Page 50

ENGLISH
have a complete recovery period. The longer you have trained intensively, the longer the recovery period
required to recover. Perform the test again after at least two days of recovery.
Sympathetic Overtraining (8)
Your OwnO ptim izer result indica tes that you hav e h ad a v ery int ensi ve trainin g p erio d f or seve ral days or
weeks, and your recovery has not been sufficient. This has resulted in a state of overtraining. To return to
anormaltrainingstate,restforacarefullymonitoredrecoveryperiod.Followyourrecoverybyperforming
the OwnOptimizer Test 2–3 times a week.
Para s y m p a t h e t i c Overtraining (9)
Your hear t r ate has stayed at a low level, which is general ly inte rpreted as a sign of a goo d r ecov ery.
However, other parameters indicate parasympathetic overtraining. You may have trained with high volumes
for a long time, and recovery may not have been sufficient. Check for other signs of overtraining, such as
decreased performance, increased fatigue, mood disturbances, sleeping problems, persistent muscle
soreness, and/or a feeling of being burnt out or stale. You may also have been subjected to other stresses.
In general, the development of parasympathetic overtraining requires a long history of heavy training
volumes. To recover from a state of parasympathetic overtraining, you have to recover body balance
completely. Recovering may take several weeks. You should not exercise, instead rest completely for most
of the recovery period. You can possibly have a few days with some light aerobic training in short sessions,
and only occasionally include short, high-intensity sessions.
You can a lso consid er doin g o ther than your main spor t. However, i t should be on e y ou are famili ar and
comfortable with. Monitor your recovery by performing the OwnOptimizer Test 2–3 times a week. Once you
feel you have recovered your body balance, and your result shows Normal State or Good recovery,
preferably more than once, you can then consider resuming training. Once you start training again, begin a
new testing period with new baseline measurements.
Before you radically change your training program, consider your OwnOptimizer results together with your
subjective feelings and any symptoms you may have. Repeat the OwnOptimizer test if you are unsure of the
standardized conditions. An individual test result can be affected by several external factors, such as mental
stress, latent illness, environmental changes (temperature, altitude), and others. You should update the baseline
calculations at least once a year, when you start a new training season.
OwnOptimizer Trend
Select Test > Optimizer > Trend
See how your OwnOptimizer value has been developing in the Trend menu. It includes 16 of your latest
OwnOptimizer values, and the dates when the results were recorded. When the trend file becomes full, the
latest result automatically replaces the oldest one.
The most recent test date, a graphical trend of your results, and the latest value are displayed. Press OK
to see the written description of the result. Scroll UP or DOWN to view other values.
Delete OwnOptimizer Value
Select Test > Optimizer > Trend
Select the value and press and hold LIGHT. Delete value? No/Yes is displayed. Confirm with OK.
Reset the Trend File
Select Test > Optimizer > Reset
You can r eset the O wnOptim izer test peri od. All the t est res ults will be deleted from the mem ory. Wh en
taking the test after a 365-day test period, or for the first time in 30 days, Reset test period? is
displayed.
Analyzing Results with Software
50 Tests
Page 51

ENGLISH
Downloading test results to the software offers you the possibility of analyzing results in various ways, as
well as accessing more detailed information about your progress. The software also allows you to make
graphical comparisons with previous results.
Tests 51
Page 52

ENGLISH
10. USING A NEW HEART RATE SENSOR
Teach a New Heart Rate Sensor
If you purchase a new heart rate sensor, it has to be introduced to the training computer. This is called
teaching and takes only a few seconds. Teaching ensures that your training computer receives signals from
your heart rate sensor only, and enables disturbance-free exercise in a group.
In time mode, press OK > New WearLink found, Teach new WearLink?
Wear the heart rate sensor and make sure that you are not near (40 m/131 ft) other Polar H3 heart rate
sensors. In time mode, press OK.Thetrainingcomputerstartssearchingfortheheartratesensorsignal.
Once the new heart rate sensor is identified, New WearLink found, Teach new WearLink? is displayed.
• Select YES to confirm teaching. Completed! is displayed. Start exercise recording by pressing OK.
• Select NO to cancel teaching.
To r etur n to ti me m ode , pr e ss a nd h old th e STOP button.
52 Using a New Heart Rate Sensor
Page 53

ENGLISH
11. BACKGROUND INFORMATION
Polar Sport Zones
Polar sport zones introduce a new level of effectiveness in heart rate-based training. Training is divided
into five sport zones based on percentages of maximum heart rate. With sport zones, you can easily select
and monitor training intensities.
Target zone
MAXIMUM
HARD
MODERATE
LIGHT
Intensity % of
HR
,bpm
max
90–100%
171–190 bpm
80–90%
152–172 bpm
70–80%
133–152 bpm
60–70%
114-133 bpm
Example
durations
less than 5
minutes
2–10 minutes
10–40
minutes
40–80
minutes
Training benefit
Benefits: Maximal or near maximal effort for
breathing and muscles.
Feels like: Very exhausting for breathing and
muscles.
Recommended for: Very experienced and fit
athletes. Short intervals only, usually in final
preparation for short events.
Benefits: Increased ability to sustain high speed
endurance.
Feels like: Causes muscular fatigue and heavy
breathing.
Recommended for: Experienced athletes for
year-round training, and for various durations.
Becomes more important during pre competition
season.
Benefits: Enhances general training pace,
makes Moderate intensity efforts easier and
improves efficiency.
Feels like: Steady, controlled, fast breathing.
Recommended for: Athletes training for events,
or looking for performance gains.
Benefits: Improves general base fitness,
improves recovery and boosts metabolism.
Feels like: Comfortable and easy, low muscle
and cardiovascular load.
Recommended for: Everybody for long training
sessions during base training periods and for
recovery exercises during competition season.
VERY LIGHT
50–60%
104–114 bpm
20–40
minutes
Benefits: Helps to warm up and cool down and
assists recovery.
Feels like: Very easy, little strain.
Recommended for: For recovery and cool-down,
throughout training season.
HR
=Maximumheartrate(220-age).Example:30yearsold,220–30=190bpm.
max
Exercising in sport zone 1 is done at a very low intensity. The main training principle is that performance
improves when recovering after, and not only during, training. Accelerate the recovery process with very
light intensity training.
Sport zone 2 is for endurance training, an essential part of any training program. Exercise sessions in this
zone are easy and aerobic. Long-duration training in this light zone results in effective energy expenditure.
Progress will require persistence.
Aerobic power is enhanced in sport zone 3.Thetrainingintensityishigherthaninsportzones1and2,
Background Information 53
Page 54

ENGLISH
but still mainly aerobic. Training in sport zone 3 may, for example, consist of intervals followed by
recovery. Exercising in this zone is especially effective for improving the efficiency of blood circulation in
the heart and skeletal muscles.
If your goal is to compete at top potential, you will have to train in sport zones 4 and 5.Inthesezones,
you exercise anaerobically, in intervals of up to 10 minutes. The shorter the interval, the higher the
intensity. Sufficient recovery between intervals is very important. The training pattern in zones 4 and 5 is
designed to produce peak performance.
The Polar sport zones can be personalized by using a laboratory measured HR
value, or by taking a field
max
test to measure the value yourself. When exercising in a sport zone, try to make use of the entire zone. The
mid-zone is a good target, but keeping your heart rate at that exact level all the time is not necessary.
Heart rate gradually adjusts to training intensity. For instance, when crossing from sport zone 1 to 3, the
circulatory system and heart rate will adjust in 3-5 minutes.
Heart rate responds to exercise intensity depending on factors such as fitness and recovery levels, as well
as environmental factors. It is important to look out for subjective feelings of fatigue, and to adjust your
training program accordingly.
Asimplewayofmakinguseofthesportzonesistoworkwithtargetheartratezones.Forfurther
instructions, see Plan Your Training (page 9).
After the exercise, exercise duration is displayed in sport zones. Access the Weekly display to see in which
sport zones you have been exercising, and for how long.
The Polar ProTrainer 5 offers up to 10 sport zones to better serve your training needs and heart rate
reserve.
OwnZone Training
Your trai ning comput er determines aut omat ically an individ ual and safe exer cise intens ity zone: you r
OwnZone. The unique Polar OwnZone defines your personal training zone for aerobic training. The function
guides you through your warm-up, and takes your present physical and mental condition into account. For
most adults, OwnZone corresponds to 65-85% of maximum heart rate.
OwnZone can be determined in 1-5 minutes during a warm-up period by walking, jogging, or doing some
other sport. The idea is to start exercising slowly at a light intensity, and to gradually increase intensity
and heart rate. OwnZone is developed for use by healthy people. Some health conditions may cause heart
rate variability-based OwnZone determination to fail. These conditions include high blood pressure,
cardiac arrhythmias, and certain medications.
Listening to and interpreting the signals your body sends during physical exertion is an important part of
getting fit. Since warm-up routines differ for different types of exercise, and since your physical and
mental state may also vary from day to day (due to stress or illness), using the OwnZone function for every
session guarantees the most effective heart rate target zone for that particular type of exercise and day.
Maximum Heart Rate
Maximum heart rate (HR
physical exertion. It is individual and depends on age, hereditary factors, and fitness level. It may also
vary according to the type of sport performed. HR
Determining Maximum Heart Rate
Your HR
can be determined in several ways.
max
• The most accurate way is to have your HR
taking a bicycle stress test supervised by a cardiologist or exercise physiologist.
• You can also determine your HR
• You can obtain a HR
• HR
can also be estimated by using the commonly used formula: 220 - age, although research shows
max
that the method is not very accurate, especially for older persons or those who have been fit for many
54 Background Information
)isthehighestnumberofheartbeatsperminute(bpm)duringmaximum
max
is used to express exercise intensity.
max
clinically measured, usually on a maximal treadmill or by
max
by taking a field test together with a training partner.
max
-p score that predicts your HR
max
by taking a Polar Fitness Test.
max
Page 55

ENGLISH
years.
If you have done some hard training in recent weeks and know that you can safely reach maximum heart
rate, you can safely take a test to determine your HR
yourself. Having a training buddy with you during
max
the test is recommended. If you are uncertain, consult your physician before undertaking the test.
Here is an example of a simple test.
Step 1: Warm up for 15 minutes on a flat surface, building up to your usual training pace.
Step 2: Choose a hill or stairwell that will take more than 2 minutes to climb. Run up the hill/steps once,
building to as hard a pace as you can hold for 20 minutes. Return to the base of the hill/steps.
Step 3: Run up the hill/steps again, building towards a pace you could just about hold for 3 kilometers.
Note your highest heart rate. Your maximum is approximately 10 beats higher than the noted value.
Step 4: Run back down the hill, allowing your heart rate to drop 30-40 beats per minute.
Step 5: Run up the hill/steps once again at a pace that you can only hold for 1 minute. Try to run halfway
up the hills/steps. Note your highest heart rate. This brings you close to your maximum heart rate. Use this
value as your maximum heart rate to set training zones.
Step 6: Make sure you get a good cool-down, a minimum of 10 minutes.
Heart Rate Value in a Sitting Position
HR
is your average heart rate when completely still (i.e. while sitting). To easily determine HR
sit
your heart rate sensor, sit down, and do not engage in any physical activity. For a more precise
measurement, repeat the procedure several times and calculate your average.
,wear
sit
Heart Rate Reserve
Heart rate reserve (HRR) is the difference between maximum heart rate (HR
(HR
)*. HRR is used to calculate exercise heart rates. It is the range within which heart rate varies
rest
depending on exertion level. HRR equals oxygen uptake reserve (VO2R).
Exercise heart rate can be determined by using the Karvonen formula**. Add the given percentage of heart
rate reserve to resting heart rate.
Exercise HR = % of target intensity (HR
max
–HR
rest
)+HR
rest
Example:
Targ e t in ten s i ty 7 0 % HR R f o r a pe r son wi t h HR
201 bpm and HR
max
rest
Exercise HR= 70% (201-50) + 50
Exercise HR=156 bpm
For a precise exercise heart rate, you need your exact HR
max
and HR
.WhenusingestimatedHR
rest
exercise heart rate values are always estimates.
*In Polar RS800CX training computer, the heart rate value during a resting state is measured in a sitting
position (HR
of accuracy. HR
). This is for practical reasons since HR
sit
matches the low intensity to which different exercise intensities can be compared.
sit
is used in energy expenditure calculation because
sit
**Karvonen M, Kentala K, Mustala O. The effects of training on heart rate: a longitudinal study. Ann Med
Exp Biol Fenn 1957; 35: 307-315.
), and resting heart rate
max
50 bpm
max
,
Heart Rate Variability
Heart rate varies with every heartbeat. Heart rate variability (HRV) is the variation of beat to beat intervals,
also known as R-R intervals.
Background Information 55
Page 56

ENGLISH
HRV indicates the fluctuations of heart rate around an average heart rate. An average heart rate of 60
beats per minute (bpm) does not mean that the interval between successive heartbeats would be exactly
1.0 sec, instead they may fluctuate/vary from 0.5 sec up to 2.0 sec.
HRV is affected by aerobic fitness. HRV of a well-conditioned heart is generally large at rest. Other factors
that affect HRV are age, genetics, body position, time of day, and health status. During exercise, HRV
decreases as heart rate and exercise intensity increase. HRV also decreases during periods of mental
stress.
HRV is regulated by the autonomic nervous system. Parasympathetic activity decreases heart rate and
increases HRV, whereas sympathetic activity increases heart rate and decreases HRV.
HRV is used in the Ownzone, OwnIndex, and in OwnOptimizer features. It can also be monitored on its
own using the training computer. If your HRV changes at a given pace and heart rate, this may indicate a
change in your training load and stress.
Running Cadence and Stride Length
Cadence* is the number of times the foot with the stride sensor* hits the ground per minute.
Stride length* is the average length of one step. That is the distance between your right and left foot
contacting the ground.
Running speed = 2 * stride length * cadence
There are two ways to run faster: moving your legs at a higher cadence or taking longer steps.
Elite long distance runners typically run with a high cadence of 85-95. On uphills, typical cadence values
are lower. On downhills they are higher. Runners adjust stride length to gather speed: stride length
increases as speed increases.
Yet one o f t he most common mistakes nov ice run ners make is over- stridin g. The mos t e ffic ient stride
length is the natural one – the one that feels most comfortable. You will run faster in races by
strengthening your leg muscles so they take you forward with a longer stride.
You should also work on ma ximizin g c aden ce effi ciency. Ca denc e d oes not progre ss easily, but if pr operly
trained, you will be able to sustain it throughout your runs and maximize your performance. To develop
cadence, the nerve-muscle connection needs to be trained - and reasonably frequently. A session of
cadence training a week is a good start. Incorporate some cadence work into the rest of your week. During
long easy runs, you could include some faster cadence every now and then.
When training for longer running events (½ Marathon, Marathon or longer), it may be helpful to monitor
cadence. A low cadence at expected race pace can cause problems later in the event, as your legs tire.
56 Background Information
Page 57

ENGLISH
One way around this is to work on increasing leg speed at expected race pace. You can set your training
computer to show pace and cadence. Try to shorten your stride and increase cadence while holding the
same pace (set a narrow pace zone to give you audio feedback).You can aim to raise running cadence
above the following:
• 80/min (4hour Marathoners)
• 85/min (3hr 30min Marathoners)
• 88/min (3hour Marathoners)
This is a general guide only, taller runners will naturally have slightly lower cadences. Runners should also
tune in to what feels comfortable for them personally.
Agoodwayofimprovingstridelengthistoundertakespecificstrengthwork,likerunninghills,runningin
soft sand, or running up steps. A six-week training period including strength work should result in
noticeable improvements in stride length, and if combined with some faster leg speed work (such as short
strides at best 5km pace), noticeable improvements should be seen in overall speed, as well.
*Optional s3/s3+ stride sensor W.I.N.D. required.
R-R Recording
R-R recording rate saves heartbeat intervals, i.e. intervals between successive heartbeats. This information
is also shown as instantaneous heart rate in beats per minute in recorded samples.
When recording every single interval, extra systoles and artefacts can also be seen. We recommend using
contact gel (ECG gel) to optimize contact between your skin and the heart rate sensor. Readings
interpreted as incorrect in the heart rate data can be adjusted and corrected with the software.
Polar Running Index
Running Index offers an easy way to monitor performance changes. Performance (how fast/easily you run
at a given pace) is directly influenced by aerobic fitness (VO2
your body is at running), and Running Index is a measurement of this influence. By recording your
Running Index over time, you can monitor progress. Improvement means that running at a given pace
requires less of an effort, or that your pace is faster at a given level of exertion. The Running Index feature
calculates such improvements. Running Index also gives you daily information on your running
performance level which may vary from day to day.
Benefits of Running Index:
• emphasizes the positive effects of good training sessions and resting days.
• monitors fitness and performance development at different heart rate levels - not only during maximal
performance.
• you can determine your optimal running speed by comparing running indexes from different kinds of
trainings.
• stresses progress through better running technique and fitness level.
Running Index is calculated during every exercise when heart rate and the s3/s3+ stride sensor/ G3/G5
GPS sensor* signal is recorded, and when the following requirements apply:
• speed should be 6km/h / 3,75 mi/h or faster and duration 12 minutes minimum.
• heart rate should be above 40% HR
Make sure that the stride sensor is calibrated. Calculation begins when you start recording the session.
During the session, you may stop once at traffic lights, for example, without interrupting the calculation.
In the end, your training computer displays a Running Index value and stores the result in the File section.
Compare your result to the table below. Using the software, you can monitor and analyze your progress in
Running Index values against time and different running speeds. Or compare values from different
exercise sessions and analyze them in the short and long term.
max
.
)andexerciseeconomy(howefficient
max
Short-term analysis
Background Information 57
Page 58

ENGLISH
Men
Age / Years Very low Low Fair Moderate Good Very good Elite
20-24 <32 32-37 38-43 44-50 51-56 57-62 >62
25-29 <31 31-35 36-42 43-48 49-53 54-59 >59
30-34 <29 29-34 35-40 41-45 46-51 52-56 >56
35-39 <28 28-32 33-38 39-43 44-48 49-54 >54
40-44 <26 26-31 32-35 36-41 42-46 47-51 >51
45-49 <25 25-29 30-34 35-39 40-43 44-48 >48
50-54 <24 24-27 28-32 33-36 37-41 42-46 >46
55-59 <22 22-26 27-30 31-34 35-39 40-43 >43
60-65 <21 21-24 25-28 29-32 33-36 37-40 >40
Women
Age / Years Very low Low Fair Moderate Good Very good Elite
20-24 <27 27-31 32-36 37-41 42-46 47-51 >51
25-29 <26 26-30 31-35 36-40 41-44 45-49 >49
30-34 <25 25-29 30-33 34-37 38-42 43-46 >46
35-39 <24 24-27 28-31 32-35 36-40 41-44 >44
40-44 <22 22-25 26-29 30-33 34-37 38-41 >41
45-49 <21 21-23 24-27 28-31 32-35 36-38 >38
50-54 <19 19-22 23-25 26-29 30-32 33-36 >36
55-59 <18 18-20 21-23 24-27 28-30 31-33 >33
60-65 <16 16-18 19-21 22-24 25-27 28-30 >30
The classification is based on a literature review of 62 studies where VO
healthy adult subjects in the USA, Canada and 7 European countries. Reference: Shvartz E, Reibold RC.
Aerobic fitness norms for males and females aged 6 to 75 years: a review. Aviat Space Env iron Med ;
61:3-11, 1990.
There may be some daily variation in the Running Indexes due to running circumstances e.g. surface,
hills, wind, temperature.
Long-term analysis
was measured directly in
2max
The single Running Index values form a trend that predicts your success in running certain distances.
The following chart estimates the duration that a runner can achieve in certain distances when performing
maximally. Use your long-term Running Index average in the interpretation of the chart. The prediction is
best for those Running Index values that have been received at speed and running circumstances similar
to the target performance.
58 Background Information
Page 59

ENGLISH
Running Index Cooper test (m) 5km(h:mm:ss) 10 km (h:mm:ss) 21.098 km
(h:mm:ss)
42.195 km
(h:mm:ss)
36 1800 0:36:20 1:15:10 2:48:00 5:43:00
38 1900 0:34:20 1:10:50 2:38:00 5:24:00
40 2000 0:32:20 1:07:00 2:29:30 5:06:00
42 2100 0:30:40 1:03:30 2:21:30 4:51:00
44 2200 0:29:10 1:00:20 2:14:30 4:37:00
46 2300 0:27:50 0:57:30 2:08:00 4:24:00
48 2400 0:26:30 0:55:00 2:02:00 4:12:00
50 2500 0:25:20 0:52:40 1:57:00 4:02:00
52 2600 0:24:20 0:50:30 1:52:00 3:52:00
54 2700 0:23:20 0:48:30 1:47:30 3:43:00
56 2800 0:22:30 0:46:40 1:43:30 3:35:00
58 2900 0:21:40 0:45:00 1:39:30 3:27:00
60 3000 0:20:50 0:43:20 1:36:00 3:20:00
62 3100 0:20:10 0:41:50 1:32:30 3:13:00
64 3200 0:19:30 0:40:30 1:29:30 3:07:00
66 3300 0:18:50 0:39:10 1:26:30 3:01:00
68 3350 0:18:20 0:38:00 1:24:00 2:55:00
70 3450 0:17:50 0:36:50 1:21:30 2:50:00
72 3550 0:17:10 0:35:50 1:19:00 2:45:00
74 3650 0:16:40 0:34:50 1:17:00 2:40:00
76 3750 0:16:20 0:33:50 1:14:30 2:36:00
78 3850 0:15:50 0:33:00 1:12:30 2:32:00
It is worth to remember that in addition to good Running Index, maximal running performance demands
good preparation, optimal running conditions, speed endurance and guts. Training quantity and quality
have an affect as well as natural talent.
*Optional s3/s3+ stride sensor or G3/G5 GPS sensor required.
Polar Training Articles
For more facts and know-how to enhance your running, visit Polar Article Library
[http://www.polar.com/en/training_with_polar/training_articles] .
Background Information 59
Page 60

ENGLISH
12. CUSTOMER SERVICE INFORMATION
Care and Maintenance
Caring For Your Product
Like any electronic device, the Polar training computer should be treated with care. The suggestions below
will help you fulfill guarantee obligations and enjoy this product for many years to come.
Connector: Detach the connector from the strap after every use and dry the connector with a soft towel.
Clean the connector with a mild soap and water solution when needed. Never use alcohol or any abrasive
material (eg. steel wool or cleaning chemicals).
Strap: Rinse the strap under running water after every use and hang to dry. Clean the strap gently with a
mild soap and water solution when needed. Do not use moisturizing soaps, because they can leave residue
on the strap. Do not soak, iron, dry clean or bleach the strap. Do not stretch the strap or bend the
electrode areas sharply.
Check the label on your strap to see if it is machine washable. Never put the strap or the connector in a dryer!
Tra i n i n g computer a n d sensors: Keep your training computer and sensors clean. To maintain the water
resistance, do not wash the training computer or the sensors with a pressure washer. Clean them with a
mild soap and water solution and rinse them with clean water. Do not immerse them in water. Dry them
carefully with a soft towel. Never use alcohol or any abrasive material such as steel wool or cleaning
chemicals.
Keep your training computer and sensors in a cool and dry place. Do not keep them in a damp
environment, in non-breathable material (a plastic bag or a sports bag) nor with conductive material (a wet
towel). The training computer and heart rate sensor are water resistant, and can be used in water
activities. Other compatible sensors are water resistant, and can be used in rainy weather. Do not expose
the training computer to direct sunlight for extended periods, such as by leaving it in a car or mounted on
the bike mount.
Avoid har d h its to the traini ng comp uter and t he sensors , a s t hese may d amag e t he sens or units.
Operating temperatures are -10 °C to +50 °C / +14 °F to +122 °F.
Service
During the two-year guarantee/warranty period we recommend that you have service, other than battery
replacement for the heart rate sensor, done by an authorized Polar Service Center only. The warranty does
not cover damage or consequential damage caused by service not authorized by Polar Electro. For further
information, see Limited International Polar Guarantee (page 66).
For contact information and all Polar Service Center addresses, visit www.polar.com/support and
country-specific websites.
Changing Batteries
Have the battery replaced by an authorized Polar Service Center. Avoid opening the sealed battery cover.
To c hang e th e b a tter i e s o f the tr a i ning co m pute r an d h e art ra t e se nso r yo u rse l f , c a ref u l ly f ollo w th e
instructions in Changing Training Computer Battery. For video tutorials on how to change the batteries, go
to http://www.polar.com/en/polar_community/videos.
Before battery change, transfer all data from your training computer to Polar Prorainer 5 to avoid data loss. For
more information see Polar ProTrainer 5 help.
If you would prefer Polar to replace the battery, contact an authorized Polar Service Center.
60 Customer Service Information
Page 61

ENGLISH
Changing Training Computer Battery
To c hang e th e t r aini n g comp u t er b att e r y, y ou n eed a coi n an d b a tter y (C R 2 0 32) .
1. Using the coin open the battery cover by pressing slightly and turning counter clockwise .
2. Remove the battery cover. The battery is attached to the cover, which should be lifted carefully. Remove
the battery and replace it with a new one. Be careful not to damage the threads of the back cover.
3. Place the positive (+) side of the battery against the cover and negative (-) side toward the training
computer.
4. The sealing ring of the battery cover is also attached to the cover. Replace the sealing ring if it is
damaged. Before closing the battery cover, make sure that the sealing ring is undamaged and is placed
correctly in its groove.
5. Put the battery cover in its place and turn the cover clockwise with a coin to CLOSE position. Make sure
that the cover is closed properly!
Excessive use of the backlight drains the training computer’s battery more rapidly. In cold conditions, the
low battery indicator may appear, and disappear again when you return to a warmer environment. To
ensure the maximum lifespan of the battery cover, open it only when changing battery. When changing the
battery, make sure the sealing ring is not damaged, in which case you should replace it with a new one.
Battery kits with sealing rings are available at well-equipped Polar retailers and authorized Polar Service
Centers. In the USA and Canada, sealing rings are available at authorized Polar Service Centers only.
Keep batteries away from children. If swallowed, contact a doctor immediately. Batteries should be properly
disposed of according to local regulations.
Changing Polar H1/H2/H3 Heart Rate Sensor
Battery
1. Lever the battery cover open by using the clip on
the strap.
2. Remove the old battery from the battery cover
with a suitable sized small ridgid stick or bar,
such as a toothpick. A non-metal tool is
preferable. Be careful not to damage the battery
cover.
3. Insert the battery inside the cover with the
negative (-) side outwards. Make sure the sealing
ring is in the groove to ensure water resistance.
4. Align the ledge on the battery cover with the slot
Customer Service Information 61
Page 62

ENGLISH
on the connector and press the battery cover
back into place. You should hear a snap.
Changing Polar WearLink+ Heart Rate Sensor
Battery
1. Using a coin, open the battery cover by turning it
counterclockwise to OPEN.
2. Insert the battery inside the cover with the
negative (-) side outwards. Make sure the sealing
ring is in the groove to ensure water resistance.
3. Press the cover back into the connector.
4. Use the coin to turn the cover clockwise to
CLOSE.
Danger of explosion if the battery is replaced with wrong type.
Precautions
Interference During Exercise
Electromagnetic Interference and Exercise Equipment
Disturbance may occur near microware ovens and computers. Also WLAN base stations may cause
interference when exercising with RS800CX. To avoid erratic reading or misbehaviors, move away from
possible sources of disturbance.
Exercise equipment with electronic or electrical components such as LED displays, motors and electrical
brakes may cause interfering stray signals. To solve these problems, try the following:
1. Remove the heart rate sensor from your chest and use the exercise equipment as you would normally.
2. Move the training computer around until you find an area in which it displays no stray reading or does not
flash the heart symbol. Interference is often worst directly in front of the display panel of the equipment,
while the left or right side of the display is relatively free of disturbance.
3. Put the heart rate sensor back on your chest and keep the training computer in this interference-free area
as much as possible.
If the training computer still does not work with the exercise equipment, it may be electrically too noisy
for wireless heart rate measurement.
Using RS800 Training Computer in Water
The training computer is water resistant. However, heart rate measurement does not work in water. You
can use the training computer under water as a watch but it is not a diving instrument. To maintain water
resistance, do not press the buttons of the training computer under water. Using the training computer in
excessive rainfall may also cause interference.
Minimizing Risks When Exercising
Exercise may include some risk. Before beginning a regular exercise program, it is recommended that you
answer the following questions concerning your health status. If you answer yes to any of these questions,
we recommend that you consult a doctor before starting any training program.
• Have you been physically inactive for the past 5 years?
• Do you have high blood pressure or high blood cholesterol?
• Are you taking any blood pressure or heart medication?
• Do you have a history of breathing problems?
• Do you have symptoms of any disease?
• Are you recovering from a serious illness or medical treatment?
62 Customer Service Information
Page 63

ENGLISH
• Do you use a pacemaker or other implanted electronic device?
• Do you smoke?
• Are you pregnant?
Note that in addition to exercise intensity, medications for heart conditions, blood pressure, psychological
conditions, asthma, breathing, etc., as well as some energy drinks, alcohol, and nicotine may also affect
heart rate.
It is important to be sensitive to your body’s responses during exercise. If you feel unexpected pain or
excessive fatigue when exercising, it is recommended that you stop the exercise or continue at a lighter
intensity.
Note! If you are using a pacemaker, you can use Polar training computers. In theory interference to
pacemaker caused by Polar products should not be possible. In practice no reports exist to suggest anyone
ever having experienced interference. We cannot however issue an official guarantee on our products'
suitability with all pacemakers or other implanted devices due to the variety of devices available. If you
have any doubts, or if you experience any unusual sensations while using Polar products, please consult
your physician or contact the implanted electronic device manufacturer to determine safety in your case.
If you are allergic to any substance that comes into contact with your skin or if you suspect an allergic
reaction due to using the product, check the listed materials in Technical Specifications. To avoid any
skin reaction to the heart rate sensor, wear it over a shirt, but moisten the shirt well under the electrodes
to ensure flawless operation.
Your safe ty is impo rtant to us. The shape of the s3/s3+ stride sensor * i s d esig ned to min imize the
possibility of it getting caught in something. In any case, be careful when running with the stride sensor in
brushwood, for example.
The combined impact of moisture and intense abrasion may cause a black color to come off the heart rate sensor’s
surface, possibly staining light-colored clothes. If you use insect repellent on your skin, you must ensure that it
does not come into contact with the heart rate sensor.
WARNING: This product and its packaging contain chemicals known to the State of California to cause
cancer, birth defects or reproductive harm. This notice is provided in accordance with California’s
Proposition 65. More information: http://www.polar.com/regulatory_information.
*Optional s3/s3+ stride sensor W.I.N.D. required.
Technical Specifications
Training computer
Battery life: Average 1 year (1h/day, 7 days/week)
Battery type: CR2032
Battery sealing ring: O-Ring 20.0 x 1.1, material silicone
Operating temperature: -10 °C to +50 °C / 14 °F to 122 °F
Wrist band and buckle material: Polyurethane, stainless steel
Back cover: Polyamide, stainless steel complying with the EU Directive 94/27/EU and its amendment
Watch accuracy: Better than ± 0.5 seconds / day at 25 °C / 77 °F temperature.
Accuracy of heart rate monitor: ± 1% or 1 bpm, whichever larger. Definition applies to stable conditions.
Heart rate measuring range: 15-240
Current speed display range: Stride sensor: 0-36 km/h or 0-22,3 mph, cadence 0-255 rpm
Altitude display range: -550 m … +9000 m / -1800 ft … +29500 ft
Ascent/Descent resolution: 5 m / 20 ft
1999/C 205/05 on the release of nickel from products intended to come into direct and
prolonged contact with the skin.
G3/G5 GPS sensor: 0-250 km/h or 0-155,3 mph
Speed sensor: 0-127 km/h or 0-78,9 mph
Cadence sensor: 15-200 rpm
The Polar wrist unit calculates altitude by using the standard average altitude at defined air
pressures according to ISO 2533.
Training computer limit values
Maximum files:
99
Customer Service Information 63
Page 64

ENGLISH
Maximum time: 99 h 59 min 59 s
Maximum manual laps: 99
Maximum automatic laps: 99
Shoes 1/2/3 total distance: 999 999 km / 621370 mi
Bike 1/2/3 total distance: 999 999 km / 621370 mi
Total Sho es / To tal GP S / Total Bi kes dis tance 999 999 km / 621 370 mi
Total dis tan ce : 9 99 999 km / 6 213 70 mi
Total dur ati on : 999 9h 59m in 59s
Total cal ori es : 999 99 9 kc al
Total exe rci se cou nt: 9999
Total asc ent : 30479 5 m / 9 99 980 ft
Total odo met er : 999 999 km / 62 1370 mi
Heart rate sensor
Battery life:
1600 h
Battery type: CR2025
Battery sealing ring: O-ring 20.0 x 0.90 Material Silicone
Operating temperature: -10 °C to +40 °C / 14 °F to 104 °F
Connector material: Polyamide
Strap material: 38% Polyamide, 29% Polyurethane, 20% Elastane, 13% Polyester
Polar ProTrainer 5™
System Requirements:
PC
Windows® 2000/XP (32bit), Vista
IrDA compatible port (an external IrDA device or an internal IR port)
Additionally, for the software your PC must have a Pentium II 200 MHz
processor or faster, SVGA or higher resolution monitor, 50 MB hard disk
space and a CD-ROM drive.
Polar WebLink using IrDA Communication
System Requirements:
PC
Windows® 2000/XP, Vista 32/64-bit or Windows 7 32/64-bit
IrDA compatible port (an external IrDA device or an internal IR port)
The Polar training computer is designed to indicate the level of physiological strain and recovery during and after exercise
session. It displays performance indicators and environmental conditions such as altitude and temperature. It also
measures speed and distance when used with s3/s3+ stride sensor/cycling speed sensor/G3/G5 GPS sensor, running
cadence when used with s3/s3+ stride sensor, cycling cadence when used with a cadence sensor, and location data when
used with a G3/G5 GPS sensor. No other use is intended or implied.
The Polar training computer should not be used for obtaining environmental measurements that require professional or
industrial precision. Furthermore, the device should not be used to obtain measurements when engaged in airborne or
underwater activities.
The water resistance of Polar products is tested according to International Standard ISO 2281. Products
are divided into three different categories according to their water resistance. Check the back of your Polar
product for the water resistance category, and compare it to the chart below. Please note that these
definitions do not necessarily apply to products of other manufacturers.
Marking on case back Water resistant characteristics
Water resistant Protected against wash splashes, sweat, raindrops etc. Not
Water resistant 30 m/50 m Suitable for bathing and swimming
Water resistant 100 m Suitable for swimming and snorkeling (without air tanks)
suitable for swimming.
*These characteristics also apply to Polar heart rate sensors marked Water resistant.
Frequently Asked Questions
What should I do if...
...the battery symbol and Battery low is displayed?
The low battery indicator is usually the first sign of an expired battery. However, in cold conditions the low
battery indicator may appear. The indicator will disappear as soon as you return to a normal temperature.
When the symbol appears, the training computer sounds and backlight are automatically deactivated. For
further information on changing the battery, see Care and Maintenance (page 60).
64 Customer Service Information
Page 65

ENGLISH
...I do not know where I am in the menu?
Press and hold STOP until the time of day is displayed.
...there are no reactions to any buttons?
Reset the training computer by pressing all the buttons simultaneously for two seconds until the display
fills with digits. Press any button and set the time and date in Basic Settings after the reset. All other
settings are saved. Skip the rest of the settings by pressing and holding STOP.
...the heart rate reading becomes erratic, extremely high or shows nil (00)?
• Make sure the heart rate sensor strap has not loosened during exercise.
• Make sure the textile electrodes in the sports apparel fit snugly.
• Make sure that the electrodes of the heart rate sensor / sports apparel are moistened.
• Make sure the heart rate sensor / sports apparel is clean.
• Strong electromagnetic signals can cause erratic readings. For further information, see Precautions
(page 62).
• If the erratic heart rate reading continues despite moving away from the source of disturbance, slow down
your speed and check your pulse manually. If you feel it corresponds to the high reading on the display,
you may be experiencing cardiac arrhythmia. Most cases of arrhythmia are not serious, but consult your
doctor nevertheless.
• A cardiac event may have altered your ECG waveform. In this case, consult your physician.
…Memory full is displayed?
The message appears during exercise if you have recorded 99 laps or if no memory space is left for the
exercise. In that case, stop recording the exercise and transfer the exercise files from your training
computer to the Polar ProTrainer 5. Then delete them from the training computer.
…Check WearLink! is displayed and your training computer cannot find your heart rate signal?
• Make sure the heart rate sensor strap has not loosened during exercise.
• Make sure the textile electrodes in sports apparel fit snugly.
• Make sure that the electrodes of the heart rate sensor / sports apparel are moistened.
• Make sure the heart rate sensor / electrodes in the sports apparel are clean and undamaged.
• If the heart rate measurement does not work with the sports apparel, try using a heart rate sensor strap. If
your heart rate is detected with the strap, the problem is most probably in the apparel. Please contact the
apparel retailer / manufacturer.
• If you have done all of the above-mentioned actions, and the message still appears and heart rate
measurement does not work, the battery of your heart rate sensor may be empty. For further information,
see Care and Maintenance (page 60).
…New WearLink found. Teach new WearLink? is displayed?
If you have purchased a new heart rate sensor as an accessory, it will have to be introduced to the training
computer. For further information, see Teach a New Heart Rate Sensor (page ).
If the heart rate sensor you are using is included in the product set, and the text appears on the display,
the training computer may be detecting the signal of another heart rate sensor. In that case, make sure
you are wearing your own heart rate sensor, that the electrodes are moistened, and that the heart rate
sensor strap has not loosened. If the message still appears, the battery of your heart rate sensor is empty.
For further information, see Care and Maintenance (page 60).
...Ssensorcalibrationfailed is displayed?*
Calibration did not succeed and you need to re-calibrate. Calibration fails if you move during the process.
Once you reach lap distance, stop running and stand still for calibration. The range of the calibration
factor during manual calibration is 0.500-1.500. If you have defined the calibration factor below or above
these values, calibration fails.
Customer Service Information 65
Page 66

ENGLISH
…Teach new sensor? is displayed?
If you have purchased a new sensor as an accessory, it will have to be introduced to the training computer.
For further information, see Feature Settings (page 32).
If the sensor you are using is included in the product set, and the text appears on the display, the training
computer may be detecting the signal of another sensor. In that case, make sure you are wearing your own
sensor. If the message still appears, the sensor battery is empty. For further information, see Care and
Maintenance (page 60).
...the altitude keeps changing even if I am not moving?
The training computer converts measured air pressure into an altitude reading. This is why changes in the
weather may cause changes in altitude readings.
…the altitude readings are inaccurate?
Your alti mete r m ay show faulty altitu de if it is exposed to extern al inte rfer ence like strong win d o r a ir
conditioning. In this case, try to calibrate the altimeter. If the readings are constantly inaccurate, dirt may
be blocking the air pressure channels. In this case, send the training computer to a Polar Service Center.
....Memory low is displayed?
Memory low is displayed when there is approximately 1 hour memory left. To maximize the remaining
memory capacity, select the longest Recording Rate (60 sec) from Settings > Features > Rec.rate .Once
the memory has been depleted Memory full is displayed. To free memory transfer the exercises to Polar
Pro Trainer 5 software and delete them from the wrist unit memory.
*Optional s3/s3+ stride sensor W.I.N.D. required.
Limited International Polar Guarantee
• This guarantee does not affect the consumer’s statutory rights under applicable national or state laws in
force, or the consumer’s rights against the dealer arising from their sales/purchase contract.
• This limited Polar international guarantee is issued by Polar Electro Inc. for consumers who have
purchased this product in the USA or Canada. This limited Polar international guarantee is issued by Polar
Electro Oy for consumers who have purchased this product in other countries.
• Polar Electro Oy/Polar Electro Inc. guarantees the original consumer/purchaser of this device that the
product will be free from defects in material or workmanship for two (2) years from the date of purchase.
• The receipt of the original purchase is your proof of purchase!
• The guarantee does not cover the battery, normal wear and tear, damage due to misuse, abuse, accidents
or non-compliance with the precautions; improper maintenance, commercial use, cracked, broken or
scratched cases/displays, armband, elastic strap and Polar apparel.
• The guarantee does not cover any damage/s, losses, costs or expenses, direct, indirect or incidental,
consequential or special, arising out of, or related to the product.
• Items purchased second hand are not covered by the two (2) year warranty, unless otherwise stipulated by
local law.
• During the guarantee period, the product will be either repaired or replaced at any of the authorized Polar
Service Centers regardless of the country of purchase.
Guarantee with respect to any product will be limited to countries where the product has been initially
marketed.
This product is compliant with Directives 93/42/EEC, 1999/5/EC and 2011/65/EU. The relevant
Declaration of Conformity is available at www.polar.com/support.
This crossed out wheeled bin marking shows that Polar products are electronic devices and are in the
66 Customer Service Information
Page 67

ENGLISH
scope of Directive 2012/19/EU of the European Parliament and of the Council on waste electrical and
electronic equipment (WEEE) and batteries and accumulators used in products are in the scope of
Directive 2006/66/EC of the European Parliament and of the Council of 6 September 2006 on batteries
and accumulators and waste batteries and accumulators. These products and batteries/accumulators
inside Polar products should thus be disposed of separately in EU countries.
This marking shows that the product is protected against electric shocks.
Polar Electro Oy is a ISO 9001:2008 certified company.
©2013PolarElectroOy,FI-90440KEMPELE,Finland.Allrightsreserved.Nopartofthismanualmay
be used or reproduced in any form or by any means without prior written permission of Polar Electro Oy.
The names and logos in this user manual or in the package of this product are trademarks of Polar Electro
Oy. The names and logos marked with a®symbol in this user manual or in the package of this product are
registered trademarks of Polar Electro Oy. Windows is a registered trademark of Microsoft Corporation and
Mac OS is a registered trademark of Apple Inc.
Polar Disclaimer
• The material in this manual is for informational purposes only. The products it describes are subject to
change without prior notice, due to the manufacturer’s continuous development program.
• Polar Electro Inc./Polar Electro Oy makes no representations or warranties with respect to this manual or
with respect to the products described herein.
• Polar Electro Inc./Polar Electro Oy shall not be liable for any damages, losses, costs or expenses, direct,
indirect or incidental, consequential or special, arising out of, or related to the use of this material or the
products described herein.
This product is protected by one or several of the following patents: US 5486818, GB 2258587, HK
306/1996, WO96/20640, EP 0748185, US6104947, EP 0747003, US5690119, DE 69630834.7-08,
WO 97/33512, US 6277080, EP 0984719, US 6361502, EP 1405594, US 6418394, EP 1124483,
US 6405077, US 6714812, US 6537227, FI 114202, US 6666562 B2, US 5719825, US 5848027,
EP 1055158, FI 113614, FI23471, USD49278S, USD492784S, USD492999S, FI68734,
US4625733, DE3439238, GB2149514, HK81289, FI88972, US5486818, DE9219139.8,
GB2258587, FR2681493, HK306/1996, FI96380, WO95/05578, EP665947, US5611346,
JP3568954, DE69414362, FI4150, US6477397, DE20008882, FR2793672, ES1047774, FI112844,
EP 724859 B1, US 5628324, DE 69600098T2, FI110915. Other patents pending.
Manufactured by:
Polar Electro Oy
Professorintie 5
FIN-90440 KEMPELE
Tel +35 8 8 5 2 0 2 1 0 0
Fax +358 8 5202 300
www.polar.com
4.0 ENG 05/2013
Customer Service Information 67
Page 68

ENGLISH
INDEX
12h/24h time mode . . .. . . . .. . . . .. . . . .. . . . .. . . . .. . . . . . .. . . . .. . . . 40
A.Lap on/off . . .. . . . .. . . . .. . . . .. . . . .. . . . .. . . . . . .. . . . .. . . . .. . . . .. . 37
Activity level . . . .. . . . .. . . . .. . . . .. . . . .. . . . . . . . . . . .. . . . .. . . . .. . . . .. 38
Alarm setting . . . .. . . . .. . . . .. . . . .. . . . .. . . . . . .. . . . .. . . . .. . . . .. . . . . 40
Altitude calibration . . . .. . . . .. . . . .. . . . .. . . . .. . . . . . .. . . . .. . . . .. . . . 34
Analyzing training in software . . .. . . . .. . . . .. . . . .. . . . . . .. . . . .. . . . 23
Backlight . . . .. . . . .. . . . .. . . . .. . . . .. . . . .. . . . . . .. . . . .. . . . .. . . . .. . . . . 7
Basic settings . . . . . . .. . . . .. . . . .. . . . .. . . . .. . . . .. . . . . . .. . . . .. . . . .. . 7
Battery low . . .. . . . .. . . . .. . . . .. . . . .. . . . .. . . . . . .. . . . .. . . . .. . . . .. . . 64
Battery replacement . . . .. . . . .. . . . .. . . . .. . . . .. . . . .. . . . . . .. . . . .. . . 60
Cadence . . . .. . . . .. . . . .. . . . .. . . . .. . . . .. . . . . . .. . . . .. . . . .. . . . .. . . . . 56
Calorie expenditure . . . .. . . . .. . . . .. . . . .. . . . .. . . . . . .. . . . .. . . . .. . . . 25
Care instructions . . . . . . .. . . . .. . . . .. . . . .. . . . .. . . . .. . . . . . .. . . . .. . . 60
Create exercises . . . . . . .. . . . .. . . . .. . . . .. . . . .. . . . .. . . . .. . . . . . .. . . 9, 9
Customizing display . . . .. . . . .. . . . .. . . . .. . . . . . . . . . . .. . . . .. . . . .. . . 16
Data transfer . . . . . . .. . . . .. . . . .. . . . .. . . . .. . . . .. . . . . . .. . . . .. . . . .. . 23
Date settings . . . . . . .. . . . .. . . . .. . . . .. . . . .. . . . .. . . . . . .. . . . .. . . . .. . 41
Deleting a file .. . . .. . . . .. . . . .. . . . .. . . . .. . . . . . .. . . . .. . . . .. . . . .. . . 31
Event countdown .. . . .. . . . .. . . . .. . . . .. . . . .. . . . . . .. . . . .. . . . .. . . . . 40
Exercise settings . . .. . . . .. . . . .. . . . .. . . . .. . . . .. . . . . . .. . . . .. . . . .. 9, 9
Fitness test trend . . . .. . . . .. . . . .. . . . .. . . . .. . . . . . .. . . . .. . . . .. . . . .. 47
Frequently asked questions . . .. . . . .. . . . .. . . . .. . . . .. . . . . . .. . . . .. 64
Guarantee . . . . . . .. . . . .. . . . .. . . . .. . . . .. . . . .. . . . .. . . . . . .. . . . .. 60, 66
Heart rate sensor . . . .. . . . .. . . . .. . . . .. . . . .. . . . .. . . . . . .. . . . .. . . 6, 13
Heart rate zones . . . .. . . . .. . . . .. . . . .. . . . .. . . . .. . . . . . .. . . . .. . . . .. . 10
HR
.. . . . . . .. . . . .. . . . .. . . . .. . . . .. . . . .. . . . .. . . . . . .. . . . .. . . . . 38, 54
max
HR
-p .. . .. . . . .. . . . .. . . . . . . . . . . .. . . . .. . . . .. . . . .. . . . .. . . . .. . . . . 45
max
HR
.. . . . . . .. . . . .. . . . .. . . . .. . . . .. . . . .. . . . .. . . . . . .. . . . .. . . . .. 38, 55
sit
Illuminate the display . .. . . . .. . . . .. . . . .. . . . .. . . . .. . . . . . .. . . . .. . . 20
Interval training . .. . . . .. . . . .. . . . .. . . . .. . . . .. . . . . . . . . . . .. . . . .. . . . . 9
Start exercise recording .. . . .. . . . .. . . . .. . . . .. . . . .. . . . . . .. . . . .. . . 13
Start measuring heart rate . .. . . . .. . . . .. . . . .. . . . .. . . . .. . . . . . .. . . 13
Stop exercise recording . . .. . . . .. . . . .. . . . .. . . . .. . . . .. . . . . . .. . . . .. 23
Stride length . . . .. . . . .. . . . .. . . . .. . . . .. . . . . . .. . . . .. . . . .. . . . .. . . . . 56
Target zone alarm .. . . .. . . . .. . . . .. . . . .. . . . . . .. . . . .. . . . .. . . . .. . . . 39
Teaching .. . . .. . . . .. . . . .. . . . .. . . . .. . . . . . .. . . . .. . . . .. . . . .. . . . .. . . 52
Timer setting . . . . . . .. . . . .. . . . .. . . . .. . . . .. . . . .. . . . . . .. . . . .. . . 10, 10
Time setting . . . .. . . . .. . . . .. . . . .. . . . .. . . . . . . . . . . .. . . . .. . . . .. . . . .. 40
Time zone . . . .. . . . .. . . . .. . . . .. . . . . . .. . . . .. . . . .. . . . .. . . . .. . . . .. . . . 40
Titles . . . . .. . . . . . .. . . . .. . . . .. . . . .. . . . .. . . . .. . . . . . .. . . . .. . . . .. . . . . 16
Totals . . .. . . . .. . . . .. . . . .. . . . .. . . . .. . . . . . .. . . . .. . . . .. . . . .. . . . .. . . . 30
Units setting . . . .. . . . .. . . . .. . . . .. . . . .. . . . . . .. . . . .. . . . .. . . . .. . . . . 39
VO
.. . . . . . .. . . . .. . . . .. . . . .. . . . .. . . . .. . . . .. . . . . . .. . . . .. . . . 38, 45
2max
Water resistance . .. . . . .. . . . .. . . . .. . . . .. . . . .. . . . . . .. . . . .. . . . .. . . 64
Wrist unit buttons . . . . . . .. . . . .. . . . .. . . . .. . . . .. . . . .. . . . . . .. . . . .. . . 7
Zoom the display . .. . . . .. . . . .. . . . .. . . . .. . . . .. . . . .. . . . . . .. . . . .. . . 20
Keylock .. . . .. . . . .. . . . .. . . . .. . . . .. . . . .. . . . . . .. . . . .. . . . .. . . . .. . . . . 39
Language settings . . . .. . . . .. . . . .. . . . .. . . . . . .. . . . .. . . . .. . . . .. . . . 39
Lap storing .. . . .. . . . .. . . . .. . . . .. . . . .. . . . . . .. . . . .. . . . .. . . . .. . . . .. 20
Manual limits . . . .. . . . .. . . . .. . . . .. . . . . . . . . . . .. . . . .. . . . .. . . . .. . . . 10
Night mode . . . . . . .. . . . .. . . . .. . . . .. . . . .. . . . .. . . . . . .. . . . .. . . . .. . . . 20
OwnIndex . . . .. . . . .. . . . .. . . . .. . . . .. . . . .. . . . . . .. . . . .. . . . .. . . . .. . . . 45
OwnOptimizer .. . . . . . .. . . . .. . . . .. . . . .. . . . .. . . . .. . . . . . .. . . . .. . . . . 48
OwnZone . . .. . . . .. . . . .. . . . .. . . . .. . . . .. . . . .. . . . . . .. . . . .. . . . .. 21, 54
Pace limits . . .. . . . .. . . . .. . . . .. . . . .. . . . .. . . . . . .. . . . .. . . . .. . . . .. . . 10
Pause an exercise .. . . .. . . . .. . . . .. . . . .. . . . .. . . . . . .. . . . .. . . . .. . . . 21
Phases . . .. . . . .. . . . .. . . . .. . . . .. . . . .. . . . .. . . . . . .. . . . .. . . . .. . . . .. . 43
Polar ProTrainer 5 . . .. . . . .. . . . .. . . . .. . . . . . .. . . . .. . . . .. . . . 6, 23, 42
Precautions . . . .. . . . .. . . . .. . . . .. . . . .. . . . . . .. . . . .. . . . .. . . . .. . . . .. . 62
Predicted maximum heart rate .. . . .. . . . .. . . . .. . . . .. . . . . . .. . . . .. 45
Programmed exercise . . .. . . . .. . . . .. . . . .. . . . .. . . . .. . . . .. . . . . . 42, 43
Recalling training information .. . . .. . . . .. . . . .. . . . .. . . . . . .. . . . .. 23
Recording rate settings . . .. . . . .. . . . .. . . . .. . . . .. . . . .. . . . . . .. . . . . 34
Reminders .. . . . . . .. . . . .. . . . .. . . . .. . . . .. . . . .. . . . .. . . . . . .. . . . .. . . . 39
Reset the training computer . . .. . . . .. . . . .. . . . .. . . . .. . . . . . . . . . . .. 65
Reset totals file . . .. . . . .. . . . .. . . . .. . . . .. . . . .. . . . . . . . . . . .. . . . .. . . 30
Return to time mode . . .. . . . .. . . . .. . . . .. . . . .. . . . .. . . . . . .. . . . .. . . . . 8
Running Index . .. . . . .. . . . .. . . . .. . . . .. . . . .. . . . . . .. . . . .. . . . .. . 25, 57
Selecting exercise type .. . . .. . . . .. . . . .. . . . .. . . . .. . . . . . .. . . . .. . . . . 9
Sound . . .. . . . .. . . . .. . . . .. . . . .. . . . .. . . . . . . . . . . .. . . . .. . . . .. . . . .. . . 38
Speed limits . . . . . . .. . . . .. . . . .. . . . .. . . . .. . . . .. . . . . . .. . . . .. . . . .. . . 10
68 Index
Page 69

DEUTSCH
RS800CX Gebrauchsanleitung
Page 70

DEUTSCH
INHALTSVERZEICHNIS
1. EINFÜHRUNG ................... ........................................................................ ........................... 5
2. BESTANDTEILE DES TRAININGSCOMPUTERS........... ...................................................................... 6
Optionale Accessoires ............................................. ........ ........ ........ ........ ........ ........ ........ ... 6
3. ERSTE SCHRITTE.................................................... .............................................................. 7
Basiseingaben................... ........................................................................ .......................... 7
Menüstruktur ... ........................................................................ ........................................... 8
4. VORBEREITUNG AUF DAS TRAINING ................................................. .......................................... 9
Planen Sie Ihr Training......................................................................................... ................. 9
Trainingstypen ........ ........ ..................................................................... ........ ........ ........ .... 9
Neue Trainingseinheiten erstellen .................. ........ ........ ...................................................... 10
Kalibrieren des Polar s3/s3+ Laufsensors W.I.N.D. ................................................. ....................... 11
Kalibrierung des Sensors durch Laufen einer Distanz (on-the-fly Kalibrierung) ........... ........ ........ .... 11
Kalibrierungsfaktor manuell einstellen............................ ....................................................... 11
5. TRAINING.......................................................................................... ................................. 13
So tragen Sie den Herzfrequenz-Sensor
....................................................................................................................................... 13
Beginnen Sie Ihr Training......................................................................................... .............. 13
Kombinieren von Trainingseinheiten................. ......................................................................... 15
Informationen im Display................. ........................................................................ ............... 15
Individuelle Gestaltung des Trainingscomputerdisplays.................................... ............................... 16
Funktionen der Tasten während des Trainings .... ........................................................................ .. 21
Runde speichern ...................... ........ ........ ........ ........ ........ ................................................ 21
Eine Zone sperren ............................................................. ........ ........ ................................ 21
Das Display zoomen ..................................................................... ........ ........ ........ ........ .... 22
Displaybeleuchtung (Nachtmodus aktiviert) ........................................................... ........ ........ . 22
Ansicht Schnellmenü................................................................................... ........ ........ ...... 22
Unterbrechen einer Trainingseinheit ........ ........ ........ ............................................................. 22
Bestimmen Ihrer OwnZone ........................................................................................... ........... 23
6. NACH DEM TRAINING ................................. ........................................................................ ... 25
Beenden der Aufzeichnung .......................................................................................... ........... 25
Trainingsergebnisse analysieren ......................................... ..................................................... 25
Training.................... ........ ..................................................................... ........ ........ ........ . 25
Wöchentliche Zusammenfassung ............................ ........ ........ ........ ........ ........ ........ ............. 32
Gesamt-Datei.... ..................................................................... ........ ........ ........ ........ ........ .. 33
Dateien löschen ................................................................................................. ........ ...... 33
7. EINGABEN ...................................... ........................................................................ ............ 35
Einstellen der Funktionen ........................................................................... ............................ 35
Polar s3/s3+ Laufsensor W.I.N.D....................................... ........ ........ ........ ........ ........ ........ ... 35
Polar Rad-Geschwindigkeitssensor W.I.N.D.................................................... ........ ........ ........ . 35
Polar Rad-Trittfrequenzsensor W.I.N.D. ........................................... ........ ........ ........ .............. 36
Messen des Reifenumfangs......................................................................... ........ ........ ........ 36
Polar G3/G5 GPS-Sensor W.I.N.D... ........ ..................................................................... ........ . 37
Höhe...... ........ ..................................................................... ........ ........ ........ ........ ........ ... 37
Speicherintervall ...... ........ ........ ........ ........ ........ ........ ........ ................................................ 37
RR-Daten-Funktion ................ ..................................................................... ........ ........ ...... 40
Geschwindigkeitsansicht ........ ........ ........ ........ ........ ........ ........ ........ ........ ............................ 40
Automatische Rundenaufzeichnung ........................................................................... ........ ... 40
Herzfrequenz-Ansicht ............................................................ ........ ........ ........ ........ ........... 40
SportZonen .............. ..................................................................... ........ ........ ........ ........ .. 40
Benutzereinstellungen ......................................................... .................................................. 41
Page 71

DEUTSCH
Allgemeine Eingaben .......................................................................................... .................. 42
Signalton ................................................................... ........ ........ ........ ........ ........ ........ .... 42
Tastensperre ............................................... ........ ........ ........ ........ ........ ............................ 42
Maßeinheiten.............. ........ ........ ........ ..................................................................... ........ 42
Sprache ....................................................... ........ ........ ........ ........ .................................. 42
Schlaf ................................................................... ........ ................................................ 43
Uhreinstellungen................... ........................................................................ ....................... 43
Erinnerung ...... ........ ..................................................................... ........ ........ ........ ........ .. 43
Ereignis ............................................. ........ ........ ........ ........ ........ ........ ........ ..................... 43
Wecker ........................................... ........ ........ ........ ........ ........ ........ ........ ........ ........ ....... 44
Uhrzeit ............................................. ........ ..................................................................... . 44
Datum ....................................................... ........ ............................................................ 44
Schnellmenü ............................................................................................................. ......... 44
8. TRAININGS-PROGRAMM ....................................................................................... .................. 46
Ansehen des Programms ... ........................................................................ ............................. 46
Durchführen einer programmierten Trainingseinheit ....................................................................... 47
Beginnen Sie Ihr Training ........................................................ ........ ........ ........ ........ ........ ... 47
Training mit Phasen ........ ........ ........ ........ ........ ........ ........ ........ ........ .................................. 47
Ansichten während des Trainings ...................................... ........ ........ ........ ........ ........ ........ ... 47
Funktionen während des Trainings........................................................................................ 48
Rundenmenü ..................................................................... ........ ...................................... 48
9. TESTS............................................................................................................. .................. 49
Polar Fitness-TestTM....................................... ...................................................................... 49
Vor dem Test ........................................................... ........ ........ ....................................... 49
Durchführung des Tests .... ........ ..................................................................... ........ ........ .... 50
Nach dem Test ..................................................................... ........ ........ ........ ........ ........ ... 50
Polar OwnOptimizerTM ....................................................................... ................................... 52
Allgemein ...... ........ ........ ........ ........ ........ ........ ........ ......................................................... 52
Vor dem Test ................................................................................................................ ... 52
Durchführung des Tests .... ........ ..................................................................... ........ ........ .... 53
Nach dem Test ..................................................................... ........ ........ ........ ........ ........ ... 53
10.VERWENDEN EINES NEUEN HERZFREQUENZ-SENSORS? ...... ............................................................. 56
Koppeln eines neuen Herzfrequenz-Sensors
....................................................................................................................................... 56
11.HINTERGRUNDINFORMATIONEN ................................................................................................ 57
Polar SportZonen ........................................................ ......................................................... 57
OwnZone Training ........................................................................... ..................................... 58
Maximale Herzfrequenz ...................................... ................................................................... 59
Herzfrequenz in sitzender Position ............................................................................................ 59
Herzfrequenz-Reserve ............................................................................ ............................... 60
Herzfrequenz-Variabilität............................................................................................. ........... 60
Schrittfrequenz und Schrittlänge ....................................................................... ....................... 61
RR-Aufzeichnung .......................................................................................... ....................... 62
Polar Running Index.......................................................................................... .................... 62
Polar Trainingsartikel................... ........................................................................ ................. 64
12.SERVICEINFORMATIONEN FÜR DEN KUNDEN.... ........................................................................ ..... 65
Pflege und Wartung .. ........................................................................ .................................... 65
Pflege Ihres Produktes ....................................................................................................... 65
Service ............................................. ........ ..................................................................... . 65
Batteriewechsel......................................................................... ........ ........ ........ ........ ....... 65
Wechseln der Batterie des Trainingscomputers................................ ........................................ 66
Wichtige Hinweise ........................................................................................... .................... 67
Störungen während des Trainings .............................. ........ ........ ........ ........ ........ ........ ........ .. 67
Gehen Sie auf Nummer sicher ............ ........ ........ ........ ........ ........ ......................................... 68
Page 72

DEUTSCH
Technische Spezifikationen .... .... .... ........... .... .... ........... .... .... ........... .... .... ...... . .... .... ........... .... . 69
Häufig gestellte Fragen (FAQ) ... .... .... ........... .... .... ........... .... .... ...... . .... .... ........... .... .... ........... .... 70
Weltweite Garantie des Herstellers ... .... .... ........... .... .... ...... . .... .... ........... .... .... ........... .... .... ........ 72
Polar Haftungsausschluss.... .... .... ........... .... .... ........... .... .... ...... . .... .... ........... .... .... ........... .... .... 73
STICHWORTVERZEICHNIS .... .... ........... .... .... ........... .... .... ........... .... .... ........... .... .... ...... . .... .... .... 74
Page 73

1. EINFÜHRUNG
Herzlichen Glückwunsch! Sie haben ein komplettes, auf Ihre Trainingsbedürfnisse zugeschnittenes
Trai n i ngs s y ste m ge k auf t . Di ese Ge b r auc h s anle i t ung en t h ält al l e Info r m ati o n en, di e Si e benö t i gen , um
Ihren Polar RS800CX Trainingscomputer optimal zu nutzen.
DEUTSCH
Die aktuellste Version dieser Gebrauchsanleitung kann unter http://www.polar.com/support
heruntergeladen werden. Video-Lernprogramme finden Sie unter
http://www.polar.com/en/support/video_tutorials.
Einführung 5
Page 74

DEUTSCH
2. BESTANDTEILE DES TRAININGSCOMPUTERS
1. Polar RS800CX Trainingscomputer: Zeigt während des Trainings Ihre Herzfrequenz sowie andere
Trainingsdaten an und speichert diese.
2. Polar H3 Herzfrequenz-Sensor: Sendet das Herzfrequenz-Signal EKG-genau an Ihren Trainingscomputer.
Besteht aus Sendeeinheit und Gurt.
CD-ROM: Die CD enthält die Polar ProTrainer 5TMSoftware und die komplette Gebrauchsanleitung.
Web-service polarpersonaltrainer.com: polarpersonaltrainer.com ist Ihr kostenloses
Online-Trainingstagebuch und Ihre interaktive Trainings-Community, die Sie immer wieder neu motiviert.
Die aktuellste Version dieser Gebrauchsanleitung kann unter www.polar.com/support heruntergeladen werden.
Optionale Accessoires
1. Polar s3/s3+ LaufsensorTMW.I.N.D.: Überträgt Laufgeschwindigkeit/Tempo und Distanzmessungen auf
den Trainingscomputer. Der Laufsensor misst auch die Schrittfrequenz und Schrittlänge.
2. Polar G3/G5-GPS SensorTMW.I.N.D.: Liefert für alle Outdoor-Sportarten Daten zu Geschwindigkeit,
Distanz und Aufenthaltsort sowie Streckendaten per Global Positioning System (GPS). Sie können Ihre
Streckendaten in die Polar ProTrainer 5 Software übertragen, um sie mit Google Earth anzusehen oder in
eine GPX-Datei zu konvertieren. Weitere Informationen hierzu finden Sie in der Hilfe zur Software.
3. Polar Rad GeschwindigkeitssensorTMW.I.N.D.: Misst Geschwindigkeit und Distanz beim Radfahren.
4. Polar Rad-TrittfrequenzsensorTMW.I.N.D.: Misst beim Radfahren die Trittfrequenz, d. h. die Anzahl der
Kurbelumdrehungen pro Minute.
Wenn Sie den Polar G3/G5-GPS Sensor mit dem Polar s3/s3+ Laufsensor oder einem Polar
Rad-Geschwindigkeitssensor verwenden, wird GPS nur zur Positionsbestimmung und Routenverfolgung verwendet.
Wenn sich jedoch der s3/s3+ Laufsensor oder Rad-Geschwindigkeitssensor nicht in Empfangsreichweite befindet
(z. B. durch einen Wechsel der Sportart während des Trainings), bezieht der Trainingscomputer seine
Geschwindigkeits- und Distanzdaten automatisch vom GPS-Sensor. So wird die Geschwindigkeits- und
Distanzmessung während der Trainingseinheit gesichert. Um wieder den s3/s3+ Laufsensor oder
Rad-Geschwindigkeitssensor zu verwenden, halten Sie die LICHT-Taste lange gedrückt und wählen dann
Sens.suche aus.
Video-Lernprogramme zur Verwendung dieser Accessoires finden Sie unter
http://www.polar.com/en/polar_community/videos.
6 Bestandteile des Trainingscomputers
Page 75

3. ERSTE SCHRITTE
Basiseingaben
DEUTSCH
Stellen Sie vor dem ersten Training mit Ihrem Trainingscomputer die Basiseingaben ein. Geben Sie Ihre
persönlichen Daten so exakt wie möglich ein, um sicherzustellen, dass Sie korrekte Rückmeldungen
hinsichtlich Ihrer Leistung erhalten.
Um Daten zu verändern, drücken Sie die UP-oderDOWN-Taste und bestätigen diese mit der OK-Taste.
Die Ziffern laufen schneller, wenn Sie beim Einstellen des Wertes die UP-oderDOWN-Taste gedrückt
halten.
1. Aktivieren Sie Ihren Trainingscomputer durch zweimaliges Drücken der OK-Taste.
2. Das Polar Logo wird angezeigt. Drücken Sie die OK-Taste.
3. Language: Wählen Sie English, Deutsch, Español, Français oder Italiano als Sprache für die
Anzeigentexte.
4. Starten mit Basiseingaben wird angezeigt. Drücken Sie die OK-Taste.
5. Uhrzeit: Wählen Sie zwischen dem 12 Std.- und dem 24 Std.-Modus. Wählen Sie im 12 Std.-Modus AM
oder PM. Geben Sie die lokale Zeit ein.
6. Datum: Geben Sie das aktuelle Datum ein; TT = Tag, MM = Monat, JJ = Jahr.
7. Einheiten: Wählen Sie zwischen metrischen (kg/cm/km) oder imperischen (lb/ft/mi) Maßeinheiten.
8. Gewicht: Geben Sie Ihr Gewicht ein. Um die Maßeinheiten zu ändern, halten Sie die LICHT-TASTE
gedrückt.
9. Größe: Geben Sie Ihre Größe ein. Falls Sie imperische Maßeinheiten verwenden, geben Sie bitte erst
Feet (ft) und dann Inches (in) ein.
10. Geburtstag: Geben Sie Ihr Geburtsdatum ein; TT = Tag, MM = Monat, JJ = Jahr.
11. Geschlecht: Wählen Sie MÄNNLICH oder WEIBLICH.
12. Eingaben OK? wird angezeigt. Wählen Sie Ja, und Ihre Eingaben werden akzeptiert und gespeichert. Der
Trainingscomputer zeigt die Uhrzeit an. Wählen Sie Nein, falls die Eingaben nicht korrekt sind und
geändert werden müssen. Drücken Sie die STOP-Taste, um zu dem Wert zurückzukehren, den Sie ändern
möchten.
Erste Schritte 7
Page 76
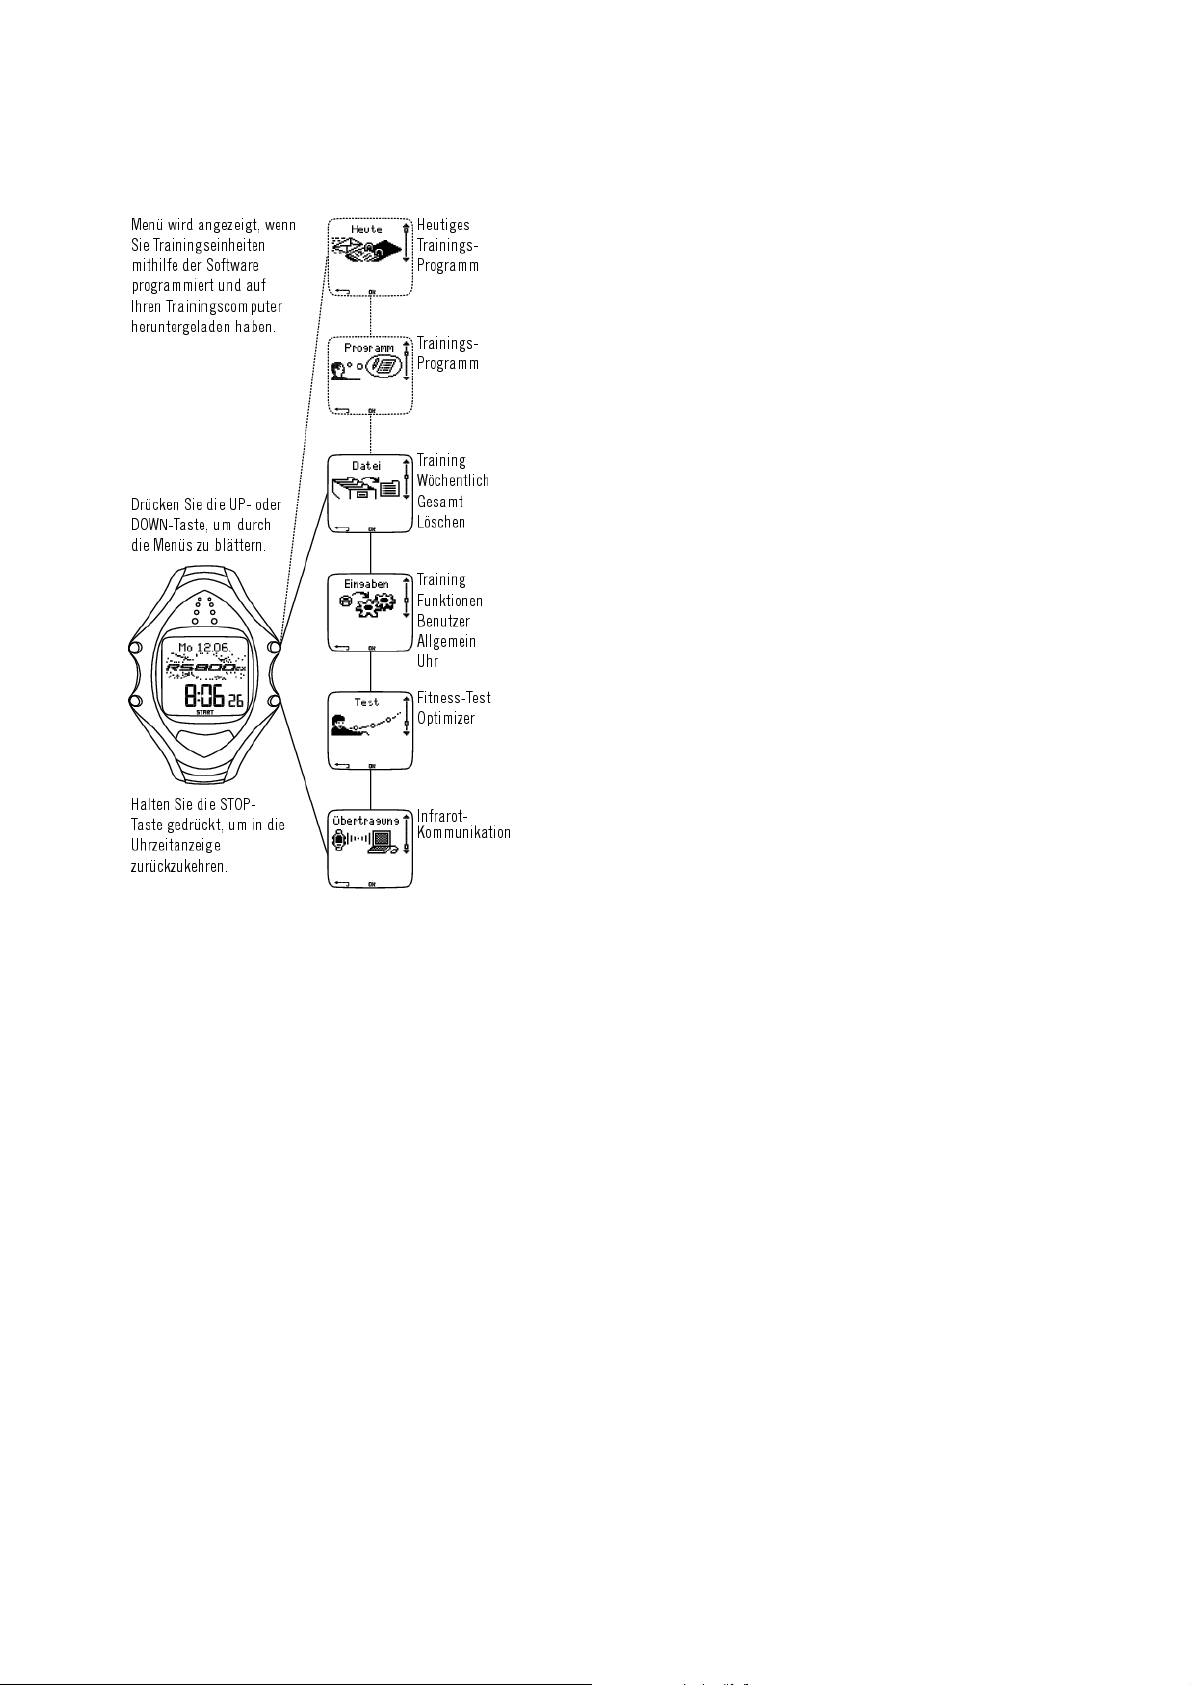
DEUTSCH
Menüstruktur
8 Erste Schritte
Page 77

DEUTSCH
4. VORBEREITUNG AUF DAS TRAINING
Planen Sie Ihr Training
Trainingstypen
Sie können die vorprogrammierten Trainingseinheiten verwenden oder mit Ihrem Trainingscomputer neue
Trai n i ngs e i nhe i t en e rste l l en. Er s t ell e n Si e v iels e i tig e r e Tr a ini n g sei n h eite n un d ü b ertr a g en Sie di e se
mithilfe der Polar Pro Trainer 5 Software auf Ihren Trainingscomputer.
Wählen Sie Eingaben > Training
Im Trainingsmenü wird eine Liste von Trainingseinheiten angezeigt. Blättern Sie mit der UP- oder
DOWN-Taste durch die Optionen, und schauen Sie sich das Training durch Drücken der OK-Taste an.
• Freies: Freies Training ohne voreingestellte Eingaben.
• Basis: Basistraining mit mittlerer Intensität. Dauer ca. 45 Minuten.
• Int.vall: Basis-Intervalltraining. Das Training beginnt mit einer 15-minütigen Aufwärmphase, dann folgen
ein Intervall von 1 km und eine 3-minütige Erholungsphase. 5 Wiederholungen. Die Einheit endet mit
einer 15-minütigen Abkühlphase.
• OwnZone: Der Trainingscomputer bestimmt automatisch Ihre individuelle aerobe (kardiovaskuläre)
Herzfrequenz-Trainingszone. Diese Trainingszone wird OwnZone genannt. Die vorgeschlagene Länge für
diese Trainingseinheit beträgt 45 Minuten. Weitere Informationen erhalten Sie in dem Kapitel Bestimmen
Ihrer OwnZone (Seite 23). Zusätzliche Hintergrundinformationen erhalten Sie in dem Kapitel OwnZone
Trai n i ng ( Sei t e 58).
• Hinzufügen: Erstellen und speichern Sie Ihr eigenes Basistraining. Sie können insgesamt 10
Trainingseinheiten + 1 freies Training in Ihrem Trainingscomputer speichern.
Nach Auswahl des Trainings werden folgende Optionen angezeigt. Wählen Sie die gewünschte Option, und
bestätigen Sie mit OK.
1. Auswahl eines Trainings als Standardtraining. Wenn Sie das nächste Mal trainieren, bietet Ihnen Ihr
Trainingscomputer dieses Training als Standardtraining an.
2. Ansicht der Trainingseinstellungen. Blättern Sie mit der UP- oder DOWN-Taste, um sich Folgendes
anzuschauen:
a. Basistraining mit 1-3 Trainingszonen: Herzfrequenz-Zielzone, Geschwindigkeits-/Tempo- oder
Trittfrequenz-Grenzwerte für jede Zone, Timer/Distanz* für die Zone oder
b. mithilfe der Software erstelltes Training: Name, Beschreibung, angestrebte Trainingszeit. (Halten Sie
die LICHT-Taste gedrückt, um sich die Trainingsphasen und gewählten Sportprofile anzusehen.)
3. Bearbeiten Sie das Basis- oder OwnZone Training, um es Ihren Bedürfnissen anzupassen. Ebenso können
Sie Trainingseinheiten bearbeiten, die Sie mit dem Trainingscomputer erstellt haben. Weitere
Informationen erhalten Sie in dem Kapitel Neue Trainingseinheiten erstellen (Seite 10). Sollten Sie mit
der Software ein Training erstellt haben, das Phasen beinhaltet, können Sie es nicht mit dem
Trainingscomputer bearbeiten.
4. Basis umbenennen, Int.vall oder sonstiges Training umbenennen, das mit dem Trainingscomputer erstellt
wurde.
5. Grundeinst. - Rückkehr zu den Standardeinstellungen für das Basis-, Intervall - oder OwnZone Training.
Vorbereitung auf das Training 9
Page 78

DEUTSCH
6. Löschen eines Trainings, das Sie mit dem Trainingscomputer oder der Software erstellt haben.
Neue Trainingseinheiten erstellen
Ein neues Training mit Zonen erstellen
Erstellen Sie Ihre eigenen Trainingseinheiten mit dem Trainingscomputer. Mit der Polar Pro Trainer 5
Software können Sie abwechslungsreichere Trainingseinheiten erstellen. Weitere Informationen hierzu
finden Sie in der Hilfe-Funktion der Software.
Wählen Sie Eingaben > Training > Hinzufügen
1. Stellen Sie die Anzahl Trainingszonen für das Training ein (0-3), und drücken Sie die OK-Taste. Bei 0
Zonen gehen Sie bitte zum Abschnitt Ein neues Training ohne Zonen erstellen .
2. Wählen Sie den Zonen-Typ:
• Herzfrequenz
Für die Herzfrequenz-Zone wählen Sie SportZone oder eine manuelle Herzfrequenz-Zone. Drücken Sie
die OK-Taste.
SportZone: Wählen Sie eine der SportZonen (z. B. Z1: 50-59%) für Ihr Training aus. Drücken Sie OK,
um mit Schritt 3. fortzufahren.
Polar SportZonen sind Herzfrequenz-Intensitäten ausgedrückt in Prozentsätzen der maximalen
Herzfrequenz. Standardmäßig sind 5 verschiedene SportZonen im Trainingscomputer eingerichtet:
sehr leicht (50-59% HF
und Maximum (90-99% HF
Sie jedoch Ihre aeroben und anaeroben Grenzen genau kennen, Ihre vorhergesagte maximale
Herzfrequenz (HF
max
Herzfrequenz selbst bzw. in einem Labor getestet haben, dann können Sie die SportZonen definieren
und somit Ihren Trainingsbedürfnissen gerecht werden. Weitere Informationen hierzu finden Sie in
der Hilfe-Funktion der ProTrainer 5 Software.
Manuell : Stellen Sie die oberen und unteren Zonen-Grenzwerte in Schlägen/Minute oder als HF%
/HFR% ein, und drücken Sie die OK-TASTE, um mit Schritt 3. fortzufahren.
• Geschwindigkeit/Tempo (optionaler s3/s3+ Laufsensor, G3/G5 GPS-Sensor oder
Rad-Geschwindigkeitssensor W.I.N.D erforderlich)
Stellen Sie für die Geschwindigkeits-/Tempozone die oberen und unteren Zonen-Grenzwerte ein.
Drücken Sie OK, um mit Schritt 3. fortzufahren.
• Trittfrequenz (optionaler s3 Laufsensor oder Rad-Trittfrequenzsensor W.I.N.D. erforderlich)
Stellen Sie für die Trittfrequenzzone die oberen und unteren Zonen-Grenzwerte ein. Drücken Sie OK,
um mit Schritt 3. fortzufahren.
3. Stellen Sie den Zonen Guide ein, um die Zone nach einer bestimmten Zeit oder Distanz* zu wechseln.
Während Ihres Trainings alarmiert Sie Ihr Trainingscomputer, wenn ein Zonenwechsel bevorsteht.
• Timer: Stellen Sie einen Timer für die Zone ein (Minuten und Sekunden) und drücken Sie die OK-Taste.
Oder
• Distanz: Stellen Sie die Distanz für die Zone ein und drücken Sie die OK-Taste. Oder
• Aus: Stellen Sie Timer und Distanzen aus, und bestätigen Sie mit OK.
), leicht (60-69% HF
max
). Normalerweise ist der HF
max
), mittel (70-79% HF
max
-Wert abhängig vom Lebensalter. Wenn
max
), hart (80-89% HF
max
-p) in einem Polar Fitness TestTMhaben messen lassen oder Ihre maximale
max
)
Wenn Sie die erste Zone definiert haben, wird Zone 1 OK angezeigt. Für mehr als 1 Trainingszone
wiederholen Sie die Schritte 2. und 3., bis alle Zonen definiert sind.
Wenn Sie das Training fertiggestellt haben, erscheint Neues Training hinzugefügt im Display. Das neue
Trai n i ng ( Neu.Tr.)wirdimMenüTraining gespeichert, aus dem Sie es bei Ihrem nächsten Training
auswählen können. Benennen Sie das Training um, indem Sie Umbenennen aus der Liste auswählen.
Ein neues Training ohne Zonen erstellen
Falls Sie ein neues Training ohne Zonen erstellen, können Sie Timer oder Distanz* verwenden, die Sie
durch Ihr Training lenken.
Wählen Sie Eingaben > Training > Hinzufügen
10 Vorbereitung auf das Training
Page 79

DEUTSCH
1. Anzahl Trainingszonen: Stellen Sie die Anzahl der Zonen auf 0.
2. Bezogen auf: Wählen Sie, ob ein Timer während des Trainings ertönen soll (der Sie z. B. daran erinnert,
etwas zu trinken) oder stellen Sie eine Distanz* ein (um Rundenzeiten zu verfolgen, ohne diese
aufzuzeichnen).
Time r
• Anzahl Trainingstimer : Wählen Sie die Anzahl an Timern (1-3) für die Trainingseinheit. Drücken Sie die
OK-Taste.
• Timer 1: Bestimmen Sie die Minuten und Sekunden für den Timer, und drücken Sie die OK-Taste. Oder
Distanz*
• Anzahl Trainingsdistanzen: Wählen Sie die Anzahl an Distanzen (1-3) für die Trainingseinheit. Drücken
Sie die OK-Taste.
• Distanz 1: Geben Sie die Distanz(en) ein, und bestätigen Sie mit OK.
Wiederholen Sie Schritt 2., bis Sie die Timer oder Distanz* bestimmt haben. Wenn Sie das Training
fertiggestellt haben, erscheint Neues Training hinzugefügt im Display. Das neue Training ( Neu.Tr.)wirdim
Menü Training gespeichert, aus dem Sie es bei Ihrem nächsten Training auswählen können. Benennen Sie
das Training um, indem Sie Umbenennen aus der Liste auswählen.
Kalibrieren des Polar s3/s3+ Laufsensors W.I.N.D.
Durch das optionale Kalibrieren des s3/s3+ Laufsensors* kann die Geschwindigkeits-, Tempo und
Distanzmessung noch präziser werden. Es wird empfohlen, den Sensor zu kalibrieren, wenn Sie ihn das
erste Mal benutzen, es signifikante Veränderungen in Ihrem Laufstil gibt oder die Position des Laufsensors
an Ihrem Schuh grundlegend verändert wurde (wenn Sie z. B. Ihre Laufschuhe gewechselt haben). Sie
können den Sensor kalibrieren, indem Sie eine voreingestellte Distanz mit einer gleichmäßigen
Geschwindigkeit laufen oder den Kalibrierungsfaktor manuell einstellen.
Sie können einen s3/s3+ Laufsensor für jede Schuheingabe kalibrieren.
Kalibrierung des Sensors durch Laufen einer Distanz (on-the-fly Kalibrierung)
Sie können den Laufsensor mithilfe einer Rundendistanzkorrektur in jeder beliebigen Phase Ihres
Trai n i ngs ka l i bri e r en - vo rau s g ese t z t, S ie t rai n i eren ni c ht m it d ist a n zbas i e rte n Zi e lzo n e n. L auf e n Si e
einfach eine voreingestellte Distanz, am besten mehr als 1.000 Meter.
Vergewissern Sie sich, dass die Sensor-Funktion im Trainingscomputer aktiviert ist ( Eingaben > Funktionen
>Schuhe/Rad>Schuhe1/2/3>Ein).
Drücken Sie in der Uhrzeitanzeige einmal OK.WählenSieEingaben > Schuhe/Rad > Schuhe 1/2/3.
Wählen Sie dann Starten und beginnen Sie zu laufen.
Wenn Sie am Startpunkt einer Distanz sind, deren Länge Sie kennen, drücken Sie OK.NachdemSiedie
gesamte Rundendistanz gelaufen sind, bleiben Sie stehen und drücken Sie OK.KalibrierenSiedannden
Sensor durch Auswahl einer der folgenden Möglichkeiten:
1. Halten Sie die LICHT-Taste gedrückt, um in das Menü Eingaben zu gelangen. Oder
2. Drücken Sie einmal STOP. Wählen Sie Eingaben.
Wählen Sie Kalibrieren > Lapl. korrig. > Korrekte Laplänge einstellen .StellenSiediekorrekteDistanz
ein, die Sie gerade gelaufen sind, und drücken Sie OK.
Kalibrierung abgeschlossen und der Kalibrierungsfaktor werden angezeigt. Der Sensor ist nun kalibriert
und funktionsbereit.
Kalibrierungsfaktor manuell einstellen
Der Kalibrierungsfaktor ist das Verhältnis zwischen der aktuellen Distanz im Vergleich zu der nicht
kalibrierten Distanz. Beispiel: Sie sind 1.200 Meter gelaufen, der Trainingscomputer zeigt eine Distanz
Vorbereitung auf das Training 11
Page 80

DEUTSCH
von 1.180 Meter an und der Kalibrierungsfaktor ist 1,000. Der neue Kalibrierungsfaktor ist wie folgt zu
berechnen: 1,000*1.200/1.180 = 1,017. Der Messbereich für den Faktor liegt bei 0,500-1,500.
Es gibt vier Möglichkeiten, den Kalibrierungsfaktor einzustellen:
1. Vor dem Training.
Wählen Sie Eingaben > Funktionen > Schuhe/Rad > Schuhe 1/2/3 > Kalibrieren.
Stellen Sie den Kalibrierungsfaktor ein, und drücken Sie die OK-Taste. Der Sensor ist nun kalibriert.
2. Während des Trainings durch Unterbrechen der Trainingsaufzeichnung.
Starten Sie Ihr Training, indem Sie die OK-Taste in der Uhrzeitanzeige zweimal drücken. Drücken Sie
einmal die STOP-Taste; die Trainingsaufzeichnung wird unterbrochen.
Wählen Sie Eingaben > Kalibrieren > Fakt. einst.
Stellen Sie den Kalibrierungsfaktor ein, und drücken Sie die OK-Taste. Der Sensor ist nun kalibriert.
Fahren Sie mit der Trainingsaufzeichnung durch Drücken der OK-Taste fort.
3. Während des Trainings ohne Unterbrechen der Trainingsaufzeichnung.
Starten Sie Ihr Training, indem Sie die OK-Taste in der Uhrzeitanzeige zweimal drücken. Halten Sie die
LICHT-Taste gedrückt, um in das Menü Eingaben zu gelangen.
Wählen Sie Kalibrieren > Fakt. einst.
Stellen Sie den Kalibrierungsfaktor ein, und drücken Sie die OK-Taste. Der Sensor ist nun kalibriert.
Fahren Sie mit Ihrem Training fort.
Sollte die Nachricht Fehler bei S Sensor-Kalibrierung angezeigt werden, ist die Kalibrierung des Sensors nicht
geglückt und Sie müssen es erneut versuchen.
*Optionaler s3/s3+ Laufsensor W.I.N.D. erforderlich.
12 Vorbereitung auf das Training
Page 81

DEUTSCH
5. TRAINING
So tragen Sie den Herzfrequenz-Sensor
Legen Sie den Herzfrequenz-Sensor an, um die Herzfrequenz zu messen.
1. Befeuchten Sie den Elektrodenbereich des Gurtes.
2. Befestigen Sie die Sendeeinheit am Gurt.
3. Legen Sie den Gurt so um die Brust, dass er bei Herren unter dem Brustmuskel, bei Damen unter dem
Brustansatz sitzt, und hängen Sie den Haken in die Schlaufe am anderen Ende des Gurtes ein.
4. Stellen Sie die Gurtlänge so ein, dass der Gurt fest, jedoch nicht zu eng anliegt. Stellen Sie sicher, dass
die befeuchteten Elektroden flach auf Ihrer Haut aufliegen und das Polar Logo der Sendeeinheit mittig
und aufrecht sitzt.
Tre n n e n Sie die S e n d eeinheit n a c h dem Training vom Gurt u n d waschen S i e den G u r t nach j e d e m
Gebrauch unter fließendem Wasser aus. Schweiß und Feuchtigkeit können bewirken, dass die Elektroden
feucht bleiben und der Herzfrequenz-Sensor aktiviert bleibt. Dies verkürzt die Lebensdauer der Batterie
des Herzfrequenz-Sensors. Wischen Sie ihn daher mit einem weichen Handtuch ab. Ausführliche
Anweisungen zur Reinigung und Pflege finden Sie unter Pflege und Wartung (Seite 65).
Der Polar H3 Herzfrequenz-Sensor kann mit spezieller Sportbekleidung verwendet werden, in die weiche
Textil-E lektr oden integriert sind. Feuchten Sie die E lektro denbe reiche der Bekl eidung an. Brin gen S ie di e
Sendeeinheit des Herzfrequenz-Sensors ohne den Gurt so auf der Kleidung an, dass das Polar Logo der
Sendeeinheit aufrecht sitzt.
Beginnen Sie Ihr Training
1. Tragen Sie den Herzfrequenz-Sensor wie beschrieben, und starten Sie die Herzfrequenz-Messung durch
Drücken der OK-Taste.
2. Innerhalb von 15 Sekunden wird Ihre Herzfrequenz im Display angezeigt.
• Wenn Sie einen Sensor benutzen, wählen Sie die Schuhe oder das Rad aus, indem Sie DOWN
gedrückt halten, oder im Menü Eingaben > Schuhe/Rad. Die Zahl in der unteren rechten Ecke des
Displays zeigt die Schuh- oder Radauswahl an. Stehen Sie still und warten Sie, bis der
Trainingscomputer das Sensorsignal findet (je nach Sensor hört das Läufer-/Radfahrer-/GPS-Symbol
Training 13
Page 82

DEUTSCH
auf zu blinken).
• Um den Trainingstyp schnell zu wechseln, halten Sie die UP-Taste gedrückt.
3. Beginnen Sie Ihr Training durch Drücken der OK-Taste.
Falls die folgende Nachricht im Display erscheint: (Trainingsname) benötigt Geschw.sensor,benötigenSiefür
Ihr Training einen Geschwindigkeitssensor, um Geschwindigkeits-/Tempo- und Distanzdaten anzeigen zu lassen (z.
B. wenn Sie Geschwindigkeits-/Tempozonen* für das Training festgelegt haben). Der Trainingscomputer kehrt zum
Auswahlmenü für den Trainingstyp zurück, wo Sie ein Training auswählen können, welches keinen
Geschwindigkeitssensor benötigt.
Alternativ hierzu können Sie Eingaben, Reset Trip oder Position auswählen.
Unter Eingaben können Sie verschiedene Einstellungen vor dem Training ändern oder anzeigen. Weitere
Informationen über alle vorhandenen Einstellungen erhalten Sie in dem Kapitel „Eingaben“. Das Menü
Eingaben enthält folgende Optionen:
• Training: Wählen Sie als Trainingstyp Freies, Basis, Intervall oder OwnZone. (Falls Sie neue
Trainingseinheiten erstellt haben, werden diese ebenso aufgelistet.)
1. Auswahl: Stellen Sie ein Standardtraining ein, das Sie sofort durchführen möchten oder
2. Ansicht: Sehen Sie sich die Trainingseinstellungen an.
• Schuhe/Rad: Wählen Sie Schuhe 1/2/3, Rad 1/2/3 oder Keines. Es werden nur die Schuhe und Räder
aufgelistet, die in Eingaben > Funktionen > Schuhe/Rad aktiviert wurden.
Wenn Sie Schuhe oder ein Rad ausgewählt und auch die GPS-Funktion aktiviert haben, wird GPS nur für
Positions- und Routenverfolgung verwendet.
• GPS: Stellen Sie die GPS-Funktion Ein/Aus.
• Höhe: Schalten Sie die Höhenmessung ein oder aus oder kalibrieren Sie die Höhe.
• Sp.int.v.: Stellen Sie das Speicherintervall ein.
• RR-Daten: Schalten Sie die RR-Aufzeichnung ein oder aus.
• Zonenal.: Schalten Sie den Zielzonenalarm ein oder aus.
• HF-Ansicht: Wählen Sie zwischen der Darstellung der Herzfrequenz in Schlägen pro Minute (S/min) und
der Darstellung als Prozentsatz Ihrer maximalen Herzfrequenz (HF%) bzw. als Prozentsatz Ihrer
Herzfrequenz-Reserve (HFR%).
• Geschw.Ans.: Wählen Sie die Anzeige der Geschwindigkeit* in Kilometern pro Stunde (km/h) oder in
Minuten pro Kilometer (min/km).
• A.Lap: Schalten Sie die automatische Rundenaufzeichnung ein oder aus.
• Anzeige: Verändern Sie das Display (weitere Informationen finden Sie in dem Kapitel Individuelle
Gestaltung des Trainingscomputerdisplays (Seite 16)).
Unter Reset Trip können Sie die Tageskilometer zurücksetzen, bevor Sie eine Trainingseinheit beginnen.
Unter Position** können Sie Ihren aktuellen Standort überprüfen. Der Trainingscomputer bestimmt Ihre
Position anhand der aktuellen GPS-Koordinaten. Breite und Länge werden in Grad und Minuten
angegeben. Die Anzahl der Satelliten ist in der untersten Zeile zu sehen.
Um die Streckendaten weiter zu analysieren, übertragen Sie diese in die Polar ProTrainer 5 Software. Anweisungen
finden Sie in der Hilfe-Funktion der Software.
*Optionaler s3/S3+ Laufsensor, G3/G5 GPS-Sensor oder Rad-Geschwindigkeitssensor W.I.N.D.
erforderlich
**Optionaler G3/G5 GPS-Sensor W.I.N.D. erforderlich.
14 Training
Page 83

DEUTSCH
Kombinieren von Trainingseinheiten
Der RS800CX Trainingscomputer bietet Ihnen die Möglichkeit, aufeinander folgende Trainingseinheiten zu
kombinieren. Wenn Sie eine neue Trainingseinheit innerhalb von einer Stunde nach der vorherigen
beginnen, wird Tr.einheiten kombinieren? angezeigt.
Wählen Sie JA,umsiezukombinieren.WährenddesTrainingswirddieMultisport-Trainingsansicht
angezeigt. Es lassen sich maximal zehn Trainingseinheiten kombinieren. Weitere Informationen hierzu
finden Sie unter Informationen im Display (Seite 15).
Mithilfe der Polar ProTrainer 5 Software können Sie Trainingseinheiten nach dem Training kombinieren und diese
weiter analysieren. Weitere Informationen erhalten Sie in der Hilfe-Funktion der Polar ProTrainer 5 Software.
Informationen im Display
Auf Ihrem Trainingscomputer können Sie sich die Trainingsinformationen gleichzeitig in drei
verschiedenen Zeilen ansehen. Mit den Tasten UP und DOWN können Sie verschiedene Anzeigen
aufrufen. Der Name der Anzeige erscheint für einige Sekunden. Er bezeichnet die in der unteren Zeile
angezeigte Information. Die Anzeige variiert je nachdem, welche Sensoren Sie montiert haben, welche
Funktionen Sie mit Ein aktiviert haben und welches Training Sie durchführen.
Passen Sie die Anzeige Ihres Trainingscomputers ganz einfach mithilfe der Polar ProTrainer 5 Software auf Ihre
Bedürfnisse an.
Standard-Ansichten während des Trainings:
Herzfrequenz-Ansicht
Geschwindigkeit/Tempo*/Kalorien
Stoppuhr
Herzfrequenz
*s3/s3+Laufsensor,G3/G5GPS-SensoroderRad-GeschwindigkeitssensorW.I.N.D.
erforderlich.
Stoppuhr-Ansicht
Kalorien
Uhrzeit
Stoppuhr
*s3/s3+Laufsensor,G3/G5GPS-SensoroderRad-GeschwindigkeitsmesserW.I.N.D.
erforderlich.
Lapzeit-Ansicht
Zone Pointer
Herzfrequenz
Rundenzeit
Geschwind./Tempo-Ansicht
Schritt-/Trittfrequenz*
Distanz**
Geschwindigkeit/Tempo**
*s3/s3+LaufsensoroderRad-TrittfrequenzsensorW.I.N.D.erforderlich.
*s3/s3+Laufsensor,G3/g5GPS-SensoroderRad-GeschwindigkeitssensorW.I.N.D.
erforderlich.
Training 15
Page 84

DEUTSCH
Distanz-Ansicht
Countdown-Timer
Zone Pointer
Distanz*/Lapzeit
*s3/s3+Laufsensor,G3/G5GPS-SensoroderRad-GeschwindigkeitssensorW.I.N.D.
erforderlich.
Höhen-Ansicht
Herzfrequenz
Aufstieg
Höhe
Multisport-Ansicht (nützlich z. B. beim Triathlon, wird nur angezeigt, wenn Sie die
aktuelle Trainingseinheit mit der vorhergehenden Trainingsdatei kombiniert haben)
Gesamtdistanz der kombinierten Trainingseinheiten*
Gesamtkalorien der kombinierten Trainingseinheiten
Gesamtdauer der kombinierten Trainingseinheiten
*s3/s3+Laufsensor,G3/G5GPS-SensoroderRad-GeschwindigkeitssensorW.I.N.D.
erforderlich.
Mit der Polar ProTrainer 5 Software erstelltes Training
Wenn Sie ein Programm von der Software heruntergeladen haben, können Sie sich auf
einem separaten Display Ihre Trainingseinheit im Detail ansehen. Weitere
Informationen erhalten Sie in dem Kapitel Durchführen einer programmierten
Trai n ing s ein h eit (S ei t e 47).MithilfedesTrainingscomputerskönnenSiedieses
Display nicht verändern.
Individuelle Gestaltung des Trainingscomputerdisplays
Gestalten Sie das Display Ihres Trainingscomputers individuell, entweder mit dem Trainingscomputer
selbst oder mithilfe der Software, damit Ihnen während des Trainings diejenigen Informationen angezeigt
werden, die für Sie von Interesse sind. Ein von der Software heruntergeladenes, programmiertes Training
und eine Trainingsansicht haben eigene Displays, die nicht verändert werden können.
Wählen Sie ausgehend von der Uhrzeitanzeige OK > Eingaben > Anzeige > Bearbeiten
Wählen Sie durch Drücken der UP- oder DOWN-Taste das Display aus, das Sie ändern möchten, und
bestätigen Sie mit OK.StellenSiedieInformationfürdieblinkendeobereZeilemitderUP-oder
DOWN-Taste ein, und bestätigen Sie mit der OK-Taste. Die verfügbaren Informationen hängen von den
aktivierten Funktionen ab. Weitere Informationen erhalten Sie in dem Kapitel Einstellen der Funktionen
(Seite 35).
Wiederholen Sie diesen Vorgang, um die mittlere und untere Zeile zu ändern. Jedes Display wird nach der
Information in der unteren Zeile benannt. Um zu den Standardeinstellungen des Displays zurückzukehren,
halten Sie die LICHT-TASTE gedrückt, wenn die Zeilen blinken.
Wenn Sie während des T rainings die Displays ändern, aktivieren Sie den Menüpunkt Titel,umsich
Hilfetexte anzeigen zu lassen: Wählen Sie ausgehend von der Uhrzeitanzeige OK > Eingaben > Anzeige >
Titel
Informationen im Display Symbol Erläuterung
Uhrzeit
Uhrzeit
Countdownzeit
16 Training
Countdown-Timer
Page 85

DEUTSCH
Informationen im Display Symbol Erläuterung
Rundenzeit Rundennummer und
Rundenzeit
Stoppuhr Gesamtdauer des
bisherigen
Trainin gs
Herzfrequenz Aktuelle
Herzfrequenz
Durchschnittliche Herzfrequenz Durchschnittliche
Herzfrequenz des
bisherigen
Trainin gs
Kalorien Bisher verbrauchte
Kalorien/Verbrauchte
Kalorien pro Stunde
Zone Pointer (Herzfrequenz) Sollte das
Herzsymbol nicht
sichtbar sein
und/oder der Alarm
ertönen, befindet
sich Ihre
Herzfrequenz
außerhalb der
Zielzone.
Zone Pointer (Polar SportZonen) Zielzonenindikator
mit einem
Herzsymbol, das
sich auf der
SportZonen-Skala
entsprechend Ihrer
Herzfrequenz nach
links oder rechts
bewegt. Weitere
Informationen zur
Einstellung einer
SportZone erhalten
Sie in dem Kapitel
Funktionen der
Tast e n wä h ren d
des Trainings
(Seite 21).
Zielzone Eine Grafik, die Ihre
aktuelle
Herzfrequenz als
Kurve im Vergleich
zu den eingestellten
Herzfrequenz-Zielzonen
anzeigt.
Training 17
Page 86

DEUTSCH
Informationen im Display Symbol Erläuterung
RR-Variation Die
Beat-to-Beat-Messung
misst die Intervalle
der Herzschläge,
d. h. die Zeit
zwischen zwei
aufeinander
folgenden
Herzschlägen.
Aufstieg
Abstieg
Höhe
Trainingszeit innerhalb der Zielzone Zeit, die bisher in
Aufstieg in Metern
Abstieg in Metern
Aktuelle Höhe
der Zielzone
verbracht wurde
Temperatur Tempera turm esswe rt
(°C).
Da Ihre
Körpertemperatur
die
Tempera turm essun g
beeinflusst, ist es
am besten, den
Armbandempfänger
für eine genaue
Tempera turm essun g
mindestens 10
Minuten lang
abzulegen.
Informationen im Display (Polar s3/s3+ Sensor
Symbol Erläuterung
W.I.N.D. erforderlich)
Geschwindigkeit/Tempo Aktuelle
Geschwindigkeit/aktuelles
Tempo
Max. Geschw. Maximale
Geschwindigkeit/Tempo
bisher
Durchschnittliche Geschwindigkeit Bisherige
durchschnittliche
Geschwindigkeit/Tempo
Distanz Bisher
zurückgelegte
Distanz
Rundendistanz Rundennummer und
Rundenzeit
Tageskilometer Distanz zwischen
Punkt A und B
18 Training
Page 87

DEUTSCH
Informationen im Display (Polar s3/s3+ Sensor
Symbol Erläuterung
W.I.N.D. erforderlich)
Zone Pointer (Geschwindigkeit/Tempo) Sollte das Symbol
nicht sichtbar sein
und/oder der Alarm
ertönen, befindet
sich Ihre
Geschwindigkeit/Ihr
Tempo auße rhalb
der Zielzone.
Trittfrequenz Schrittfrequenz
(Schrittpaar pro
Minute)
øTrittfrequ. Bisherige
durchschnittliche
Schrittfrequenz
(Schrittpaar pro
Minute)
Zone Pointer* (Trittfrequenz) Sollte das
Trittfr eque nzsym bol
nicht sichtbar sein
und/oder der Alarm
ertönen, befindet
sich die
Trittfr eque nz
außerhalb der
Zielzone.
Informationen im Display (Polar G3/G5 GPS-Sensor
Symbol Erläuterung
W.I.N.D. erforderlich)
Geschwindigkeit/Tempo Aktuelle
Geschwindigkeit/aktuelles
Tempo. Die Anz ahl
der Balken über
dem Buchstaben G
zeigt die Stärke des
GPS-Signals an.
Max. Geschw. Bisherige maximale
Geschwindigkeit/Tempo
Durchschnittliche Geschwindigkeit Bisherige
durchschnittliche
Geschwindigkeit/Tempo
Distanz Bisher
zurückgelegte
Distanz
Rundendistanz Rundennummer und
Rundenzeit
Tageskilometer Distanz zwischen
Punkt A und B
Training 19
Page 88

DEUTSCH
Informationen im Display (Polar G3/G5 GPS-Sensor
Symbol Erläuterung
W.I.N.D. erforderlich)
Zone Pointer (Geschwindigkeit/Tempo) Sollte das Symbol
nicht sichtbar sein
und/oder der Alarm
ertönen, befindet
sich Ihre
Geschwindigkeit/Ihr
Tempo auße rhalb
der Zielzone.
Informationen im Display (Polar
Symbol Erläuterung
Rad-Geschwindigkeitssensor W.I.N.D. erforderlich)
Radgeschwindigkeit Die
Geschwindigkeit,
mit der Sie aktuell
fahren.
Distanz Bisher gefahrene
Distanz
Rundendistanz* Rundennummer und
Rundenzeit
Tageskilometer Distanz zwischen
Punkt A und B
Max. Geschw. Bisherige maximale
Geschwindigkeit
øGeschwind. Bisherige
durchschnittliche
Geschwindigkeit
Neigungsmesser Steilheit
bergan/bergab als
Prozentsatz und in
Grad. Gibt eine
Schätzung des Auf-
oder Abstiegs in
numerischer Form
an, was Ihnen
helfen kann, Ihre
Anstrengung beim
Radfahren
einzuschätzen.
Informationen im Display (Polar
Symbol Erläuterung
Rad-Trittfrequenzsensor W.I.N.D. erforderlich)
Trittfrequenz Misst die Anzahl der
Kurbelumdrehungen
(die Trittfrequenz)
in Umdrehungen pro
Minute (U/min =
rpm).
20 Training
Page 89

DEUTSCH
Informationen im Display (Polar
Symbol Erläuterung
Rad-Trittfrequenzsensor W.I.N.D. erforderlich)
øTrittfrequ. Bisherige
durchschnittliche
Trittfr eque nz
Zone Pointer* (Trittfrequenz) Sollte das
Trittfr eque nzsym bol
nicht sichtbar sein
und/oder der Alarm
ertönen, befindet
sich die
Trittfr eque nz
außerhalb der
Zielzone.
Funktionen der Tasten während des Trainings
Runde speichern
Drücken Sie die OK-Taste, um eine Runde aufzuzeichnen. Im Display erscheint:
Nummer der Runde
Durchschnittliche Herzfrequenz der Runde
Rundenzeit
Wenn ein Geschwindigkeitssensor* aktiviert ist, erscheinen zusätzlich folgende
Informationen:
Nummer der Runde
Rundendistanz
Durchschnittliche/s Geschwindigkeit/Tempo der Runde
Eine Zone sperren
Wenn Sie ohne voreingestellte Zielzonen trainieren, können Sie Ihre Herzfrequenz für die aktuelle
SportZone sperren. Falls Sie vor dem Training keine voreingestellte Zielzone bestimmt haben, können Sie
während der laufenden Trainingseinheit eine Zielzone einstellen.
Um die Zone zu sperren/zu entsperren, halten Sie die OK-Taste gedrückt.
Während der TrainingsProgramme: Halten Sie die OK-TASTE gedrückt, und wählen Sie Zone sperr./Zone
freig. aus dem Menü Lap aus.
Sie laufen zum Beispiel mit einer Herzfrequenz von 130 Schlägen/Minute. Dies entspricht 75 % Ihrer
maximalen Herzfrequenz und der SportZone 3. Nun können Sie die OK-TASTE gedrückt halten, um Ihre
Herzfrequenz in diese Zone zu sperren. D. h., Sie haben diese Zone als aktuelle Trainingszone gewählt.
SportZone3 gesperrt 70%-79% erscheint im Display. Ein Alarmsignal ertönt, wenn Sie unterhalb oder
oberhalb der SportZone trainieren (falls der Zielzonenalarm aktiviert ist). Entsperren Sie die SportZone,
indem Sie die OK-TASTE nochmals gedrückt halten: SportZone3 freigegeben wird angezeigt.
Mithilfe der Software können Sie die Zonensperre ebenfalls auf Ihre Geschwindigkeit/Tempo oder
Trit t f req u e nz* st ü t zen . We i t ere In f o rma t i onen fi n den Si e in de r Hi lfe zu r So ftw a r e.
*OptionalerSensorerforderlich.
Training 21
Page 90

DEUTSCH
Das Display zoomen
Halten Sie die UP-Taste gedrückt, um die obere Zeile zu zoomen und die DOWN-Taste, um die mittlere
Zeile zu zoomen. Durch nochmaliges Drücken der Tasten kehren Sie in die normale Display-Ansicht
zurück.
Displaybeleuchtung (Nachtmodus aktiviert)
Um die Displaybeleuchtung einzuschalten, drücken Sie während des Trainings die LICHT-Taste. Der
Nachtmodus wird aktiviert und das Display automatisch für einige Sekunden beleuchtet, sobald irgendeine
Taste ge d rück t wi rd oder ei ne Tr aini n gspha s e w e chse l t.
Ansicht Schnellmenü
Halten Sie die LICHT-Taste gedrückt. Eingaben wird angezeigt. Sie können bestimmte Eingaben ändern,
ohne die Trainingsaufzeichnung zu unterbrechen. Entsprechend des Trainingstyps variiert der Inhalt
dieses Menüs. Weitere Informationen finden Sie im Kapitel „Eingaben".
• Vorherg. Ph.: Ansicht der Summeninformationen der vorherigen Phase oder Wiederholung (wird angezeigt,
wenn mithilfe der Software eine Trainingseinheit mit Phasen erstellt wurde).
• Sperre: Sperren/Entsperren der Tasten, um ein versehentliches Drücken der Tasten zu vermeiden.
• Zonenal.: Ein-/Ausschalten des Zielzonenalarms.
• Zone ändern: Wechseln der Zielzonen (wird angezeigt, wenn Sie mehrere Zielzonen definiert haben, außer
wenn mithilfe der Software ein Training mit Phasen erstellt wurde).
• HF-Ansicht: Wählen Sie ein Format für die Herzfrequenz.
• Geschw.Ans.: Wählen Sie km/h oder min/km.
• Kalibrieren: Kalibrieren Sie den Laufsensor* (wird bei deaktiviertem Laufsensor nicht angezeigt).
• Sens.suche: Sucht nach Daten des Herzfrequenz-Sensors oder Sensors, wenn das Signal während des
Trainings störungsbedingt unterbrochen wurde.
• A.Lap*: Automatische Rundenaufzeichnung Ein/Aus.
Wenn Sie die Eingaben geändert haben, kehrt der Trainingscomputer in den Trainingsmodus zurück.
Unterbrechen einer Trainingseinheit
Unterbrechen Sie die Trainingsaufzeichnung, indem Sie die STOP-Taste drücken.
Im Pausenmodus können Sie:
• Fortfahren: Mit der Trainingsaufzeichnung fortfahren.
• Beenden: Die Trainingsaufzeichnung beenden (alternativ hierfür die STOP-Taste drücken).
• Zus.fassung: Ansicht der Zusammenfassung des bisherigen Trainings anzeigen. Die folgenden
Informationen werden angezeigt: Kalorien, Distanz*, Trainingszeit, maximale/minimale/durchschnittliche
Herzfrequenz, maximale(s)/durchschnittliche(s) Geschwindigkeit/Tempo*, Aufstieg und Höhe.
• Kombinieren: Kombinieren Sie Ihre aktuelle Trainingseinheit mit der vorherigen Trainingsdatei.
• Eingaben: Ändern oder rufen Sie verschiedene Eingaben auf.
• Reset: Die aktuell aufgezeichneten Trainingsinformationen löschen. Bestätigen Sie mit der OK-Taste und
drücken Sie nochmals OK, um die Aufzeichnung erneut zu starten.
• Reset Trip: Tageskilometer zurücksetzen. Bestätigen Sie mit der OK-Taste und drücken Sie nochmals OK,
um die Aufzeichnung erneut zu starten.
• Position**: Überprüfen Sie Ihren aktuellen Standort. Der Trainingscomputer bestimmt Ihre Position
anhand der aktuellen GPS-Koordinaten. Breite und Länge werden in Grad und Minuten angegeben. Die
Anzahl der empfangenen Satelliten ist in der untersten Zeile zu sehen.
• Freier Mod.: Von Ihrer Trainingsform in den freien Trainingsmodus wechseln. Hierdurch wird die
Trainingseinheit, die Sie schon absolviert haben, nicht gelöscht. Sie wird ohne Eingaben fortgeführt. Sie
können die ursprüngliche Trainingseinheit erneut starten, indem Sie das Training wieder unterbrechen und
Neust. P1 wählen.
22 Training
Page 91

DEUTSCH
**Optionaler G3/G5 GPS-Sensor W.I.N.D. erforderlich.
Bestimmen Ihrer OwnZone
Hintergrundinformationen über die Polar OwnZone® finden Sie im Kapitel OwnZone Training (Seite 58).
Die OwnZone wird während der Aufwärmphase einer Trainingseinheit bestimmt. Die Ermittlung dauert ca.
1-5 Minuten. Am einfachsten lässt sich die OwnZone durch Rad fahren, Gehen oder Laufen ermitteln. Das
Prinzip ist, das Training langsam und bei leichter Intensität zu beginnen und dann die Intensität und
Herzfrequenz nach und nach zu steigern.
Die Neubestimmung der OwnZone wird empfohlen:
• Bei einem Wechsel der Trainingsumgebung oder des Trainingsmodus.
• Wenn das Training eine Woche lang unterbrochen wurde.
• Wenn Sie sich von vorherigen Trainingseinheiten nicht erholt haben, sich nicht wohlfühlen oder unter
Stress stehen.
• Nach Änderung der Benutzereingaben.
Überprüfen Sie vor Bestimmung Ihrer OwnZone:
• Ob Sie Ihre persönlichen Benutzerinformationen korrekt eingegeben haben.
• Ob Sie das OwnZone Training gewählt haben. Wenn Sie das OwnZone Training starten, ermittelt der
Trainingscomputer automatisch Ihre OwnZone.
1. Tragen Sie den Herzfrequenz-Sensor wie empfohlen. Starten Sie die Herzfrequenz-Messung durch
zweimaliges Drücken der OK-Taste.
2. Sobald Ihre Trainingseinheit startet, erscheint OZ im Display und die OwnZone Ermittlung beginnt.
Die OwnZone wird in maximal fünf Stufen bestimmt. Nach jeder Stufe hören Sie einen Signalton (wenn
die Signaltöne eingeschaltet sind), der das Ende der Stufe ankündigt.
OZ > wird angezeigt, und die Bestimmung der OwnZone beginnt. Fahren oder gehen Sie 1 Minute lang bei
langsamen Tempo. Halten Sie während der ersten Stufe Ihre Herzfrequenz unter 100 S/min bzw. 50 %
der HF
OZ >> Fahren oder gehen Sie 1 Minute lang bei normalem Tempo. Erhöhen Sie Ihre Herzfrequenz langsam
um ca. 10 S/min bzw. 5 % der HF
OZ >>> Fahren oder gehen Sie 1 Minute lang bei zügigem Tempo. Erhöhen Sie Ihre Herzfrequenz langsam
um ca. 10 S/min bzw. 5 % der HF
OZ >>>> Fahren Sie zügig oder joggen Sie langsam 1 Minute lang. Erhöhen Sie Ihre Herzfrequenz langsam
um ca. 10 S/min bzw. 5 % der HF
OZ >>>>> Fahren oder laufen Sie 1 Minute lang schnell. Erhöhen Sie Ihre Herzfrequenz um ca. 10 S/min
bzw. 5 % der HF
max
.
.
max
.
max
.
max
.
max
3. An einem gewissen Punkt während der fünf Phasen hören Sie zwei akustische Signale. Diese melden,
dass Ihre OwnZone bestimmt wurde.
4. Wenn die Bestimmung erfolgreich war, erscheinen OwnZone aktualisiert und die Grenzwerte im Display.
Die Grenzwerte werden entsprechend Ihren Einstellungen in Schlägen pro Minute (S/min), als
Prozentsatz Ihrer maximalen Herzfrequenz (HF%) oder als Prozentsatz Ihrer Herzfrequenz-Reserve
(HFR%) angezeigt.
5. Sollte die OwnZone Bestimmung misslungen sein, werden Ihre zuletzt bestimmten OwnZone Werte
verwendet und OwnZone Limits und die Grenzwerte erscheinen im Display. Wenn Sie die OwnZone zum
ersten Mal bestimmt haben, wird automatisch Ihre altersabhängige Zielzone verwendet.
Sie können nun mit Ihrer Trainingseinheit fortfahren. Versuchen Sie, innerhalb der vorgegebenen
Herzfrequenz-Zone zu bleiben, um den Trainingseffekt zu verstärken.
Sie können jederzeit die Bestimmung der OwnZone unterbrechen und die zuvor bestimmte OwnZone
verwenden, indem Sie die OK-Taste drücken.
Training 23
Page 92

DEUTSCH
Die für die OwnZone Bestimmung benötigte Zeit fällt in Ihre Trainingszeit, d. h. Ihre Trainingseinheit wird vom
Starten der OwnZone Bestimmung an aufgezeichnet.
24 Training
Page 93

DEUTSCH
6. NACH DEM TRAINING
Beenden der Aufzeichnung
Unterbrechen Sie die Trainingsaufzeichnung, indem Sie die STOP-Taste drücken. Um die Aufzeichnung
vollständig zu beenden, drücken Sie noch einmal die STOP-Taste.
Pflegen Sie Ihren Herzfrequenz-Sensor nach dem Training. Tr e n n e n Sie d e n Herzfrequenz-Sensor n a c h
dem Training vom Gurt und waschen Sie den Gurt nach jedem Gebrauch unter fließendem Wasser aus.
Ausführliche Informationen zur Pflege und Wartung finden Sie unter Pflege und Wartung (Seite 65).
Trainingsergebnisse analysieren
Die Basisdaten bezüglich Ihrer Leistung können Sie im Menü Datei Ihres Trainingscomputers ansehen. Um
eine tiefer gehende Datenanalyse durchzuführen, übertragen Sie die Daten in die Polar ProTrainer 5
Software. Die Software bietet Ihnen verschiedene Möglichkeiten der Datenanalyse.
Train i ngsc o mput e r u n d S o ftwa r e k ö nnen mi t tels Ir D A v e rbun d e n w erden . Öffne n Si e z unäch s t d i e
Software. Dann wählen Sie in Ihrem Trainingscomputer das Menü Übertragung aus und legen den
Armbandempfänger vor das Infrarotfenster des Polar IrDA USB-Adapters, des Computers oder eines
anderen IrDA-kompatiblen Infrarotadapters. Eine vollständige Anleitung zur Übertragung von Daten
erhalten Sie in der Hilfe-Funktion des Softwareprogramms.
Im Menü Datei haben Sie die folgenden Möglichkeiten:
• Im Training können maximal 99 Trainingsdateien gespeichert werden.
• In Wöchentlich werden Zusammenfassungen der vergangenen 16 Wochen gespeichert.
• Gesamt zeigt kumulierte Trainingsinformationen an.
• In dem Menü Löschen können Sie Trainingsdateien löschen.
Training
Wählen Sie Datei > Training.
Nach dem Training 25
Page 94

DEUTSCH
In der Datei Training können Sie sich Ihre Trainingseinheiten detailliert ansehen. Die folgenden
Informationen erscheinen:
• Name der Trainingseinheit
• Eine Trainingseinheit wird als Grafikbalken dargestellt. Die Höhe der Grafikbalken stellt die jeweilige
Trainingsdauer dar. Durch die grafische Darstellung werden die Unterschiede zwischen den
Trainingseinheiten sichtbar.
• Das Datum, an dem die Trainingseinheit absolviert wurde.
Es hängt von dem Trainingstyp und den Eingaben ab, welche Informationen einsehbar sind (nachstehend
a-d) (wenn in Ihrem Training z. B. keine Phasen sind, wird auch keine Phaseninformation angezeigt).
Wechseln Sie mit der UP-oderDOWN-Taste zwischen den Trainingsbalken und drücken Sie die OK-Taste,
um sich ein Training anzusehen:
a. Basis
Wählen Sie Datei > Training > Basis
b. SportZonen
Wählen Sie Datei > Training > SportZonen
c. Phasen
Wählen Sie Datei > Training > Phasen
d. Runden
Wählen Sie Datei > Training > Laps
d. Multisport-Zusammenfassung
Eine Multisport-Zusammenfassung wird an jede Trainingsdatei angehängt, die Teil
eines kombinierten Trainings ist.
Wählen Sie Datei > Training > Multisport Zus.fassung
a. Basis
Wählen Sie Datei > Training > Basis
Name der Trainingseinheit
Start-Uhrzeit des gespeicherten Trainings
Distanz*
Dauer
*s3/s3+,G3/G5oderGeschwindigkeitssensorW.I.N.D.erforderlich.
Drücken Sie die OK-Taste und blättern Sie mit der UP- oder DOWN-Taste, um sich folgende Informationen
anzusehen:
26 Nach dem Training
Page 95

Herzfrequenz: Wechsel zwischen der Darstellung der
Herzfrequenz in Schlägen pro Minute (S/min) und der Darstellung
als Prozentsatz Ihrer maximalen Herzfrequenz (%) bzw. als
Prozentsatz Ihrer Herzfrequenz-Reserve.
Maximale Herzfrequenz
Minimale Herzfrequenz
Durchschnittliche Herzfrequenz
Zielzonen (HF/Geschwindigkeit/Tempo) : Wechsel
zwischen Zone 1, Zone 2 und Zone 3.
Oberer Grenzwert
Unterer Grenzwert
Trainingszeit innerhalb, oberhalb und unterhalb der
Zielzone 1/2/3 (der Name der Phase wird im
Trainin gspr ogram m a ngezeigt) .
Trainin gsze it o berh alb der Zielzone
Trainin gsze it u nter halb der Zi elzon e
Trainin gsze it i nner halb der Zi elzon e
Kalorien während des Trainings.
Der Energieverbrauch gibt Aufschluss über die gesamte
Belastung der Trainingseinheit.
DEUTSCH
Geschwindigkeit/Tempo*
Maximale Geschwindigkeit/Tempo
Durchschnittliche Geschwindigkeit/Tempo
Distanz
Halten Sie die LICHT-Taste gedrückt, um zwischen
Geschwindigkeit/Tempo zu wechseln.
*s3/s3+Laufsensor,G3/G5GPS-Sensoroder
Rad-Geschwindigkeitssensor W.I.N.D. erforderlich.
Schrittfrequenz*
Maximale Schrittfrequenz
Durchschnittliche Schrittfrequenz
*s3/s3+LaufsensoroderRad-TrittfrequenzsensorW.I.N.D.
erforderlich.
Schrittlänge*
Durchschnittliche Schrittlänge
*s3/s3+LaufsensorW.I.N.D.erforderlich.
Nach dem Training 27
Page 96

DEUTSCH
Lauf-Index*
Ihr Training muss bestimmte Anforderungen erfüllen, um einen
Lauf-Indexwert liefern zu können. Weitere Informationen erhalten
Sie im Kapitel Polar Running Index (Seite 62).
*s3/s3+LaufsensoroderG3/G5GPS-SensorW.I.N.D.
erforderlich.
Die Funktion des Lauf-Index ist nur für Laufsportarten
vorgesehen. Sie funktioniert z. B. nicht, wenn Sie mit
einem G3/G5 GPS-Sensor Rad fahren.
Höhe
Maximale Höhe
Minimale Höhe
Durchschnittliche Höhe
Fahrzeit
Radname
Fahrzeit
Aufstieg/Abstieg
Aufstieg in Metern
Abstieg in Metern
Steigung*
Maximale Steigung in %
Minimale Steigung in Grad
*Rad-Geschwindigkeitssensor W.I.N.D. erforderlich.
Gefälle*
Maximales Gefälle in %
Minimales Gefälle in Grad
*Rad-Geschwindigkeitssensor W.I.N.D. erforderlich.
Temperatur
Maximale Temperatur inoC
Minimale Temperatur inoC
Durchschnittliche Temperatur inoC
Drücken Sie die STOP-Taste, um in die Basis-Informationsansicht zurückzukehren.
Zusätzliche Basisinformationen
Wählen Sie Datei > Training. Wählen Sie mit der OK-Taste ein Training aus.
Halten Sie die LICHT-Taste in der Basis-Informationsansicht gedrückt, um Ihre eigenen
Trai n i ngs i n for m a tion e n einz u g ebe n od e r d i e Tr a ini n g sei n h eit au s de m Me nü Datei zu löschen.
28 Nach dem Training
Page 97

DEUTSCH
Um Informationen hinzuzufügen, wählen Sie Info zufügen:
• Qualität: Geben Sie Ihrer Trainingseinheit einen Rang.
• Gefühl: Bewerten Sie Ihr subjektives Gefühl während der Trainingseinheit.
• Temperatur : Stellen Sie die Temperatur mithilfe der UP- oder DOWN-Taste ein.
• Distanz: Wählen Sie Schuhe oder Rad, und geben Sie dann die Distanz ein. Die Distanz wird aktualisiert
und in die Gesamt-Datei und die wöchentliche Distanzaufzeichnung übernommen.
b. SportZonen
Wählen Sie Datei > Training > SportZonen
Drücken Sie in der Basis-Informationsansicht die DOWN-Taste, um die Informationen für die SportZonen
anzusehen.
Drücken Sie die OK-Taste und sehen Sie sich mithilfe der UP- oder DOWN-Taste die in jeder SportZone
verbrachte Zeit an. Hier wird die unterschiedliche Dauer Ihrer Trainingseinheiten durch die grafische
Darstellung deutlich.
Drücken Sie die STOP-Taste, um in die SportZonen-Informationsansicht zurückzukehren.
c. Phasen
Wählen Sie Datei > Training > Phasen
Das Menü Phasen wird nur angezeigt, wenn das Training mithilfe der Software erstellt wurde und Phasen
enthält.
Drücken Sie in der SportZonen-Informationsansicht die DOWN-Taste, um die Informationen über die
Phasen anzusehen. Sie können sich jede Phase gesondert ansehen.
Durch Drücken der OK-Taste können Sie sich die Daten einer einzelnen Phase ansehen. Vergleichen Sie
die Phasen durch Drücken der UP- oder DOWN-Taste.
Uhrzeit
Phasenname
Zwischenzeit
Dauer der aktuellen Phase
Nach dem Training 29
Page 98

DEUTSCH
Herzfrequenz: Wechsel zwischen der Darstellung der Herzfrequenz
in Schlägen pro Minute (S/min) und der Darstellung als Prozentsatz
Ihrer maximalen Herzfrequenz (%) bzw. als Prozentsatz Ihrer
Herzfrequenz-Reserve.
Maximale Herzfrequenz
Durchschnittliche Herzfrequenz
HF-Anstieg/HF-Erholung/HF Differ.
Die Differenz zwischen der Herzfrequenz zu Beginn der Phase und
der Herzfrequenz am Phasenende. Wechsel zwischen der Darstellung
der aktuellen Herzfrequenz in Schlägen pro Minute (S/min) und der
Darstellung als Prozentsatz Ihrer maximalen Herzfrequenz bzw. als
Prozentsatz Ihrer Herzfrequenz-Reserve.
HF-Intervall: Wenn die Herzfrequenz zu Beginn der Phase niedriger
als am Ende war, zeigt der Trainingscomputer die Differenz (HF am
Ende minus HF zu Beginn) an. Während der Trainingsphase zeigt der
Trainin gsco mpute r d en anges tiegenen Her zfreq uenz -Interval l-Wert
an.
HF-Erholung: Wenn die Herzfrequenz zu Beginn der Phase höher
als am Ende war, zeigt der Trainingscomputer die Differenz (HF zu
Beginn minus HF am Ende) an. Während der Erholungsphase zeigt
der Trainingscomputer den Erholungs-Herzfrequenz-Wert an.
HF-Differ.: Sollte die Herzfrequenz zu Phasenbeginn mit der
Herzfrequenz am Phasenende übereinstimmen, zeigt der
Trainin gsco mpute r e ine HF-D ifferenz von 0 an.
Geschwindigkeit/Tempo*
Maximale Geschwindigkeit/Tempo
Durchschnittliche Geschwindigkeit/Tempo
*s3/s3+Laufsensor,G3/G5GPS-Sensoroder
Rad-Geschwindigkeitssensor W.I.N.D. erforderlich.
Distanz*
Zwischendistanz
Zurückgelegte Distanz der aktuellen Phase
*s3/s3+Laufsensor,G3/G5GPS-Sensoroder
Rad-Geschwindigkeitssensor W.I.N.D. erforderlich.
Schrittfrequenz*
Maximale Schrittfrequenz
Durchschnittliche Schrittfrequenz der aktuellen Phase
*s3/s3+LaufsensoroderRad-TrittfrequenzsensorW.I.N.D.
erforderlich.
Schrittlänge*
Durchschnittliche Schrittlänge der aktuellen Phase
*s3/s3+LaufsensorW.I.N.D.erforderlich.
Drücken Sie die STOP-Taste, um in die Phasen-Informationsansicht zurückzukehren.
d. Runden
Wählen Sie Datei > Training > Laps
In der Phasen-Informationsansicht können Sie die Rundeninformationen durch Drücken der DOWN-Taste
30 Nach dem Training
Page 99

DEUTSCH
einsehen. Rundeninformationen werden nur angezeigt, wenn mehr als eine Runde gespeichert wurde.
Anzahl der aufgezeichneten Runden/AutoLaps (Rundeninformationen
im Wechsel mit AutoLap-Informationen)
Durchschnittliche Rundenzeit
Die Nummer der besten (schnellsten) Runde und die zugehörige Rundenzeit
werden abwechselnd angezeigt.
Die letzte Runde wird niemals als beste Runde dargestellt, selbst wenn sie die schnellste Runde ist. Befinden Sie
sich in einem Wettkampf und möchten die letzte Runde speichern, dann drücken Sie auf der Ziellinie anstelle der
STOP-Taste die OK-Taste. So wird die letzte tatsächliche Runde bei der Berechnung der besten Runde
berücksichtigt. Hinter der Ziellinie können Sie dann die Aufzeichnung beenden.
Durch Drücken der OK-Taste können Sie sich die verschiedenen Informationen einer einzelnen Runde
ansehen.
Vergleichen Sie die Informationen der verschiedenen Runden durch Drücken der UP- oder DOWN-Taste.
Um sich die Rundeninformationen übersichtlich anschauen zu können, übertragen Sie die Dateien in das
Softwareprogramm.
Uhrzeit
Zwischenzeit
Rundenzeit
Herzfrequenz:WechselzwischenderDarstellungder
Herzfrequenz in Schlägen pro Minute (S/min) und der Darstellung
als Prozentsatz Ihrer maximalen Herzfrequenz (%) bzw. als
Prozentsatz Ihrer Herzfrequenz-Reserve.
Maximale Herzfrequenz
Durchschnittliche Herzfrequenz
Herzfrequenz am Rundenende
Geschwindigkeit/Tempo
Durchschnittliche Geschwindigkeit/Tempo
Geschwindigkeit/Tempo am Rundenende
Halten Sie die LICHT-Taste gedrückt, um zwischen
Geschwindigkeit/Tempo zu wechseln.
*s3/s3+Laufsensor,G3/G5GPS-Sensoroder
Rad-GeschwindigkeitssensorW.I.N.D. erforderlich.
Distanz
Zwischendistanz
Rundendistanz
*s3/s3+Laufsensor,G3/G5GPS-Sensoroder
Rad-Geschwindigkeitssensor W.I.N.D. erforderlich.
Trittfrequenz
Maximum
Durchschnittliche Schrittfrequenz der Runde
*s3/s3+LaufsensoroderRad-TrittfrequenzsensorW.I.N.D.
erforderlich.
Nach dem Training 31
Page 100

DEUTSCH
Schrittlänge
Durchschnittliche Schrittlänge der Runde
*s3/s3+LaufsensorW.I.N.D.erforderlich.
Steigung
Steigung in %
Steigung in Grad
*Rad-Geschwindigkeitssensor W.I.N.D. erforderlich.
Höhe
Aufstieg
Höhe
Höhe
Abstieg
Höhe
Temperatur
Drücken Sie die STOP-Taste, um in die Runden-Informationsansicht zurückzukehren.
Wöchentliche Zusammenfassung
Wählen Sie Datei > Wöchentlich
In der wöchentlichen Zusammenfassung Wöchentlich können Sie die kumulierten Daten der letzten 16
Trai n i ngs w o che n an s ehe n . De r m i t Akt. Woche gekennzeichnete Balken ganz rechts im Display stellt die
Trai n i ngs z u sam m e nfas s u ng d er akt u e lle n Wo c h e d a r. Di e vo r her g e hend e n Balk e n da tie r e n v o m S o nnt a g
der betreffenden Woche. Wechseln Sie mithilfe der UP- oder DOWN-Taste zwischen den dargestellten
Wochen. Die jeweilige Gesamte Trainingsdauer wird in der unteren Zeile angezeigt.
Drücken Sie die OK-Taste, um die Gesamtkalorien, die insgesamt zurückgelegte Distanz und die
Gesamttrainingsdauer einsehen.
Drücken Sie die DOWN-Taste, um die wöchentlichen Gesamtwerte der Distanz Schuhe, Distanz GPS und
Distanz Rad zu betrachten.
32 Nach dem Training
 Loading...