

Page 1
USER MANUAL
Page 2
CONTENTS
Contents 2
Polar Grit X Pro User Manual 8
Introduction 8
Take full advantage of your Grit X Pro 9
Polar Flow App 9
Polar Flow web service 9
Get started 10
Setting up your watch 10
Option A: Set up with a mobile device and Polar Flow app 10
Option B: Set up with your computer 11
Option C: Set up from the watch 11
Button functions and gestures 11
Time view and menu 12
Pre-training mode 12
During training 12
Color touch display 12
View Notifications 13
Tap feature 13
Backlight activation gesture 13
Watch faces and menu 13
Watch faces 13
Menu 22
Settings 26
Quick settings menu 26
Pairing a mobile device with your watch 27
Delete a pairing 27
Updating the firmware 27
With mobile device or tablet 27
With computer 28
Settings 29
General settings 29
Pair and sync 29
Bike settings 29
Continuous HR tracking 29
Recovery tracking 30
Flight mode 30
Backlight brightness 30
Do not disturb 30
Phone notifications 30
Music controls 30
Units 30
Language 30
Inactivity alert 30
Vibrations 30
I wear my watch on 30
Positioning satellites 31
About your watch 31
Choose views 31
Watch face settings 32
Time & date 33
Time 33
Date 33
2
Page 3

Date format 33
First day of week 33
Physical settings 34
Weight 34
Height 34
Date of birth 34
Sex 34
Training background 34
Activity goal 35
Preferred sleep time 35
Maximum heart rate 35
Resting heart rate 35
VO2max 35
Display icons 36
Restarting and resetting 36
Restart the watch 36
Reset the watch to factory settings 36
Reset to factory settings from the watch 37
Reset to factory settings via FlowSync software 37
Training 38
Wrist-based heart rate measurement 38
Wearing your watch when measuring heart rate from your wrist 38
Wearing your watch when not measuring heart rate from your wrist 38
Start a training session 39
Start a planned training session 40
Start a Multisport Training Session 40
Quick menu 40
During training 43
Browse the training views 43
Set timers 45
Interval Timer 46
Countdown Timer 46
Lock a Heart Rate, Speed or Power zone 46
Lock a heart rate zone 47
Lock a speed/pace zone 47
Lock a power zone 47
Mark a lap 47
Switch Sport During a Multisport Session 48
Training with a target 48
Change phase during a phased session 48
View training target information 48
Notifications 48
Pausing/Stopping a training session 48
Training summary 49
After training 49
Training data in Polar Flow App 52
Training data in Polar Flow Web Service 53
Features 54
Positioning satellites 54
Assisted GPS 54
A-GPS expiry date 54
Route Guidance 54
Route and elevation profiles 55
Total ascent and descent for planned routes 55
Adding a route to your watch 56
Start a training session with route guidance 56
Zoom 56
3
Page 4

Change route on-the-fly 56
Back to start 57
Track back 57
Use track back 57
Zoom 58
Race pace 58
Strava Live Segments 58
Connect your Strava and Polar Flow accounts 59
Import Strava Segments to your Polar Flow account 59
Start a session with Strava Live Segments 59
Hill Splitter™ 60
Add the Hill Splitter view to a sport profile 61
Training with Hill Splitter 61
Hill Splitter summary 62
Detailed analysis in the Flow web service and app 62
Komoot 64
Connect your komoot and Polar Flow accounts 65
Sync komoot routes to your watch 65
Start a session with a komoot route 66
Smart Coaching 67
Training Load Pro 67
Cardio Load 67
Perceived Load 67
Muscle Load 68
Training Load from a single session 68
Strain and Tolerance 68
Cardio Load Status 69
Cardio load status on your watch 69
Long term analysis in the Flow app and web service 69
Recovery Pro 71
Get started with Recovery Pro 72
View your Recovery feedback 73
FuelWise™ 74
Training with Fuelwise 74
Smart carbs reminder 74
Manual carbs reminder 75
Drink reminder 75
Orthostatic Test 76
Performing the test 76
Orthostatic test with Recovery Pro 79
Running Performance Test 79
Performing the test 79
Test results 80
Detailed analysis in the Flow web service and app 82
Cycling Performance Test 82
Performing the test 83
Test results 84
Detailed analysis in the Flow web service and app 85
Leg Recovery Test 86
Performing the test 86
Test results 86
Detailed analysis in the Flow web service and app 88
Running power from the wrist 88
Running power and muscle load 89
How running power is shown on your watch 89
Polar Running Program 90
Create a Polar Running Program 91
4
Page 5

Start a running target 91
Follow your progress 91
Running Index 91
Short-term analysis 92
Long-term analysis 93
Training Benefit 94
Smart Calories 95
Continuous Heart Rate 95
Continuous Heart Rate on your watch 95
24/7 Activity tracking 96
Activity Goal 96
Activity data on your watch 97
Inactivity alert 97
Activity data in Flow App and Flow web service 97
Activity Guide 98
Activity Benefit 98
Nightly Recharge™ recovery measurement 98
ANS charge details in the Flow app 101
Sleep charge details in Polar Flow 101
For exercise 102
For sleep 102
For regulating energy levels 102
Sleep Plus Stages™ sleep tracking 103
Serene™ guided breathing exercise 107
Fitness Test with wrist-based heart rate 109
Before the test 109
Performing the test 110
Test results 110
Performing the test 110
Test results 110
Fitness level classes 111
Men 111
Women 111
VO2max 111
FitSpark™ daily training guide 112
During training 113
Sport Profiles 115
Heart Rate Zones 115
HR sensor mode 115
Turn on HR sensor mode 115
Stop sharing HR 116
Speed Zones 116
Speed zones settings 116
Training target with speed zones 116
During training 116
After training 116
Speed and distance from the wrist 116
Cadence from the wrist 117
Swimming Metrics 117
Pool swimming 117
Pool Length setting 118
Open water swimming 118
Measuring heart rate in water 118
Start a swimming session 118
During your Swim 118
After your Swim 119
Barometer 120
5
Page 6

Altitude data when not training 120
Compass 120
Using the compass during a session 121
Using the compass outside of training sessions 121
Weather 122
Power save settings 124
Energy sources 125
Energy sources summary 125
Detailed analysis in the Flow mobile app 125
Phone notifications 126
Set phone notifications on 126
Do not disturb 126
View notifications 126
Music controls 126
From the watch face 127
During training 127
Changeable wristbands 127
Changing the wristband 127
Compatible sensors 127
Polar OH1 optical heart rate sensor 128
Polar Verity Sense 128
Polar H10 heart rate sensor 128
Polar H9 heart rate sensor 128
Polar Stride Sensor Bluetooth® Smart 128
Polar Speed sensor Bluetooth® Smart 129
Polar Cadence Sensor Bluetooth® Smart 129
Third-party Power sensors 129
Pairing sensors with your watch 129
Pair a heart rate sensor with your watch 129
Pair a stride sensor with your watch 129
Calibrate stride sensor 130
Pair a cycling sensor with your watch 130
Bike settings 130
Measuring wheel size 130
Calibrate cycling power sensor 131
Delete a pairing 131
Polar Flow 132
Polar Flow App 132
Training data 132
Activity data 132
Sleep data 132
Sport profiles 132
Image sharing 132
Start using the Flow app 132
Polar Flow Web Service 133
Diary 133
Reports 133
Programs 133
Sport profiles in Polar Flow 133
Add a sport profile 134
Edit a sport profile 134
Planning your training 136
Create a training plan with the Season Planner 136
Create a training target in the Polar Flow web service 137
Create a target based on a favorite training target 139
Sync the targets to your watch 140
Create a training target in the Polar Flow app 140
6
Page 7

Favorites 142
Add a Training Target to Favorites: 142
Edit a Favorite 142
Remove a favorite 142
Syncing 142
Sync with Flow mobile App 142
Sync With Flow Web Service Via FlowSync 143
Important information 144
Battery 144
Charging the battery 144
Charging during training 144
Battery status and notifications 145
Caring for your watch 145
Keep your watch clean 145
Take good care of the optical heart rate sensor 145
Storing 145
Service 146
Precautions 146
Interference During Training 146
Health and training 146
Warning - Keep batteries out of reach of children 147
How to use your Polar product securely 147
Technical specification 148
Grit X Pro 148
Polar FlowSync Software 150
Polar Flow mobile application compatibility 150
Water resistance of Polar products 150
Regulatory information 151
Limited International Polar Guarantee 151
Disclaimer 152
7
Page 8

POLARGRITXPROUSERMANUAL
This user manual helps you get started with your new watch. To see video tutorials and FAQs, go to
support.polar.com/en/grit-x-pro.
INTRODUCTION
Congratulations on your new Polar Grit X Pro!
For those who like to train outdoors and think of the world as their playground, Polar Grit X Pro is designed to military-level
standards with scratch-resistant sapphire glass and ultra-long battery life, providing ultimate durability for the most
demanding situations.
Explore the world and live for adventure with all-new navigation tools, always-on outdoor features and Polar's ultimate training
solutions. Water-resistant up to 100M with unrivaled GPS accuracy and Polar Precision Prime™ wrist-based OHR tracking, it
equips you with the toughest watch out there so you can go wherever you heart takes you.
Polar Grit X Pro Titan edition and its ultra-strength 12% lighter aerospace titanium case equips you with one of the most
durable outdoor watches on the market. The ultra-long battery life will not let you down, giving you up to 40 hours of battery
life for training with full GPS and HR tracking and even up to 100 hours with power save options.
All-new navigation dashboards include an always-on altimeter, a compass and location coordinates so you know exactly
where you are and where you’re heading. The new daylight dashboard gives you sunrise, sunset and twilight times. With the
Track back feature you can navigate back to your starting point via the same route you came. Track back allows you to get
lost in the thrill of adventure but never doubt that you will find your way back.
Polar Grit X Pro comes with all-new route and elevation profiles that help you outline your coming adventure better and see
your progress on the route. With route and elevation profiles you know your current position, how much you’ve ascended or
descended, and how much you still have left to go. With the third-party app Komoot, you can plan your route for all adventures
and easily import the route to your Grit X Pro, and let turn-by turn guidance keep you on the right track. With the FuelWise™
smart fueling assistant you'll learn how to refuel during your longer adventures.
Training Load Pro™ helps you see how much you’ve been training lately and how your training sessions strain the different
parts of your body so you can optimize your training.
With the Hill Splitter™ feature, you’ll know how you performed on the uphill and downhill sections of your session. Hill Splitter
automatically detects all uphills and downhills by using your speed, distance and altitude data.
Polar Grit X Pro also comes with the fully automatic and intelligent Nightly Recharge™ and Sleep Plus Stages™ features,
which offer an easy and simple way to see how your body recovers from training and stress so you can make optimal
choices for the day ahead.
With the running and cycling performance tests you can test your performance and personalize your heart rate, speed, and
power zones. The leg recovery test tells you whether your legs are ready for high intensity training. Not forgetting smart
features such as weather reports, phone notifications and music controls, Polar Grit X Pro allows you to go wherever your
heart takes you.
We are continuously developing our products for better user experience. To keep your watch up to date and get the best
performance, always make sure to
the functionality of your watch through new features and improvements.
update the firmware whenever a new version is available. The firmware updates enhance
8
Page 9

TAKEFULLADVANTAGEOFYOURGRITXPRO
You can use your watch straight from the box but for the full Polar experience connect your watch to Polar Flow, our free app
and web service.
POLAR FLOW APP
Get the Polar Flow app from the App Store®or Google PlayTM. Sync your watch with the Flow app after training, and get an
instant overview and feedback on your training results and performance and let all your friends know about your
achievements. In the Flow app you can also check how you’ve slept and how active you’ve been during the day.
POLAR FLOW WEB SERVICE
Sync your training data to the Polar Flow web service with the FlowSync software on your computer or via Flow app. In the
web service you can plan your training, track your achievements, get guidance and see detailed analysis of your training
results, activity and sleep. Let all your friends know about your achievements, find fellow exercisers and get motivation from
your social training communities. To help long-term follow up, we’ve gathered all the test data in one place in the Polar Flow
web service. In the Tests- page you can see all the tests you’ve performed and compare their results. You can see your longterm progress and easily view changes in your performance.
Find all this at flow.polar.com
9
Page 10
GETSTARTED
SETTINGUPYOURWATCH
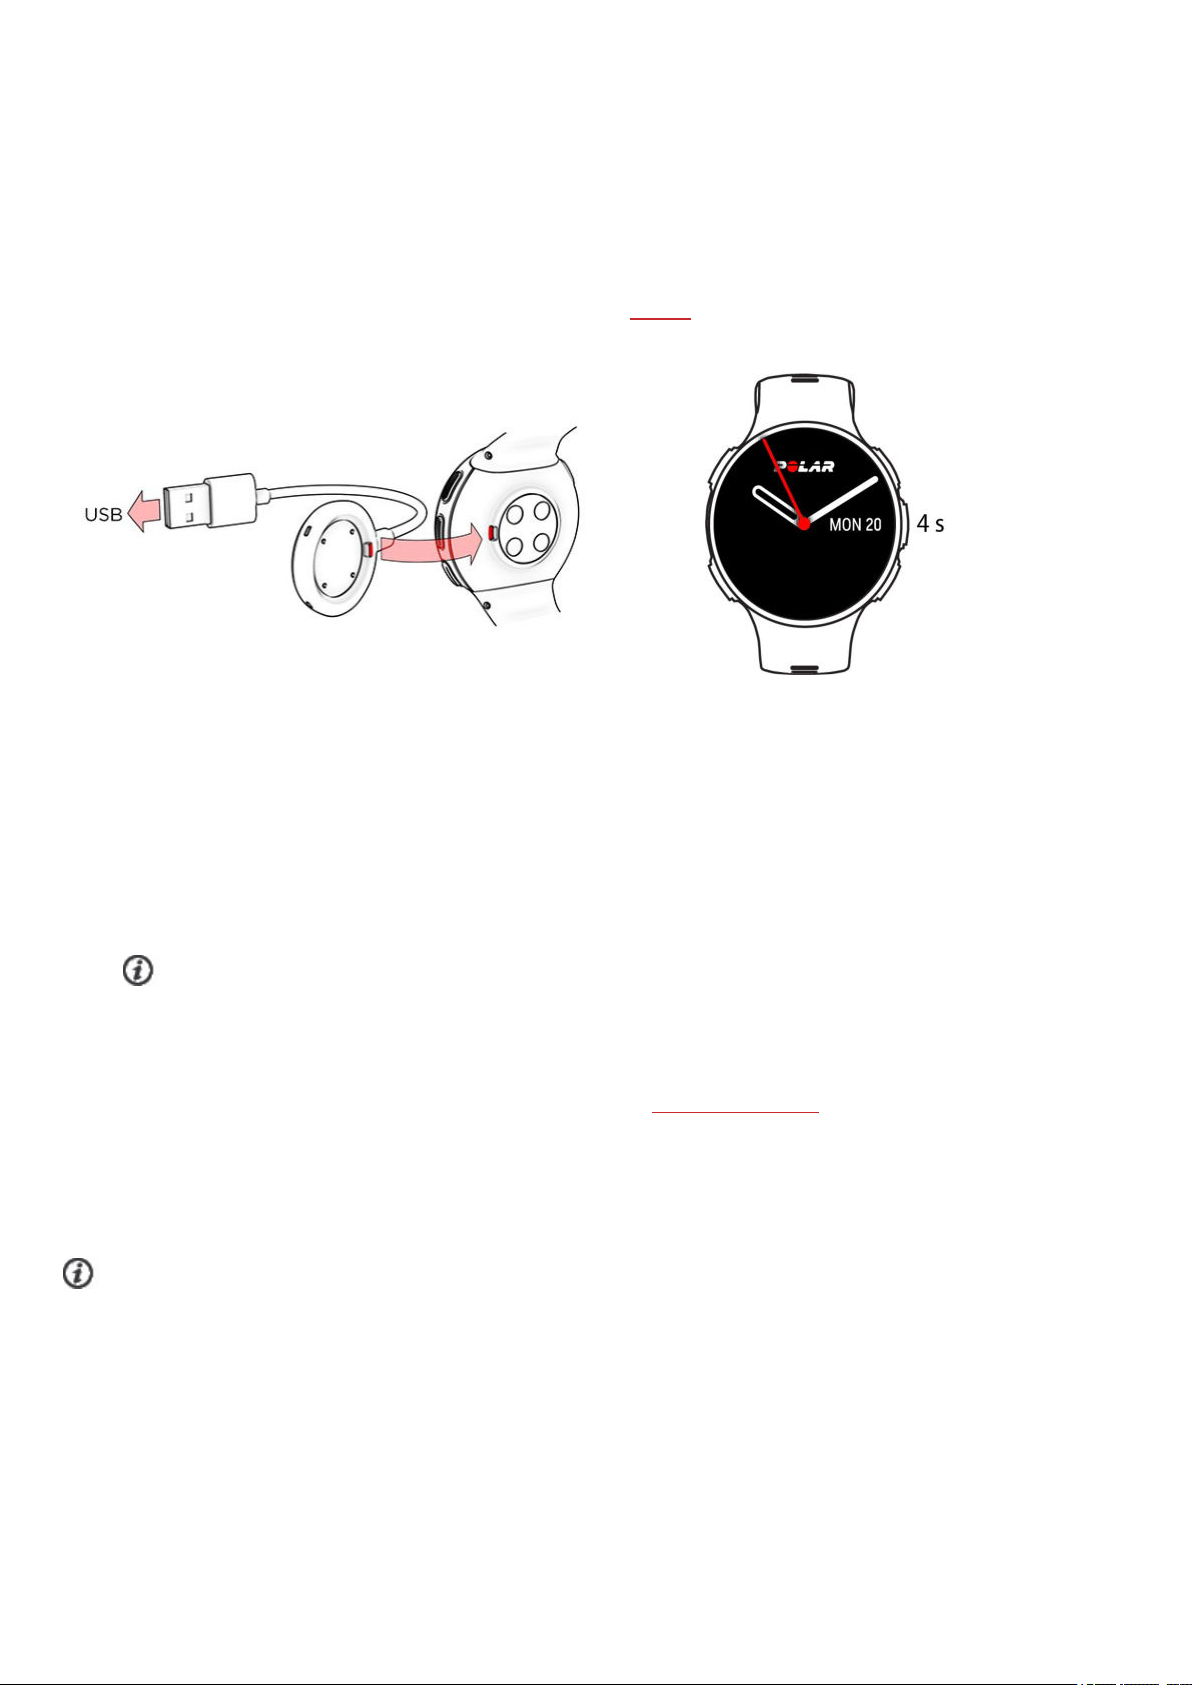
To wake up and charge your watch, plug it into a powered USB port or a USB charger with the custom cable that came in
the box. The cable magnetically snaps into place, just make sure to align the ledge on the cable with the slot on your watch
(marked with red). Please note that it may take a while for the charging animation to appear on the display. We recommend
that you charge the battery before you start using your watch. See Battery for detailed information on charging the battery.
Alternatively, you can wake up your watch by pressing and holding OK for 4 seconds.
OR
To set up your watch, choose your language and preferred setup method. The watch gives you three options for setup:
Browse to the option most convenient for you with UP/DOWN and confirm your selection with OK.
A. On your phone: Mobile setup is convenient if you don't have access to a computer with a USB port, but it
might take longer. This method requires an Internet connection.
B. On your computer:Wired computer setup is quicker and you can charge your watch at the same time, but
you need a computer available. This method requires an internet connection.
The A and B options are recommended. You can fill in all the physical details required for accurate training
data at once. You can also choose language and get the latest firmware for your watch.
C. On your watch: If you don't have a compatible mobile device and can't get to a computer with an internet
connection right away, you can start from the watch. Please note that when you do the setup from the
watch, your watch is not yet connected with Polar Flow. Firmware updates for your watch are
available only through Polar Flow. To make sure you get to enjoy your watch and the unique Polar features
at their best, it’s important that you do the setup later in the Polar Flow web service or with the Polar Flow
mobile app by following the steps in option A or B.
OPTION A: SET UP WITH A MOBILE DEVICE AND POLAR FLOW APP
Please note that you have to do the pairing in the Flow app and NOT in your mobile device’s Bluetooth settings.
1. Make sure your mobile device is connected to the internet and turn on Bluetooth.
2. Download the Polar Flow app from the App Store or Google Play on your mobile device.
3. Open the Flow app on your mobile device.
4. The Flow app recognizes your watch nearby and prompts you to start pairing it. Tap the Start button.
5. When the Bluetooth Pairing Request confirmation message appears on your mobile device, check that the code
shown on your mobile device matches the code shown on your watch.
10
Page 11
6. Accept the Bluetooth pairing request on your mobile device.
7. Confirm the pin code on your watch by pressing OK.
Pairing done is displayed once the pairing is completed.
8.
9. Sign in with your Polar account or create a new one. We’ll walk you through the sign-up and setup within the app.
When you’re done with the settings, tap Save and sync and your settings are synced to your watch.
If you're prompted to update the firmware, please plug your watch into a power source to ensure flawless update
operation, and then accept the update.
OPTION B: SET UP WITH YOUR COMPUTER
1. Go to flow.polar.com/start and download and then install the Polar FlowSync data transfer software to your computer.
2. Sign in with your Polar account or create a new one. Plug your watch into your computer's USB port with the custom
cable that came in the box. We’ll walk you through the sign-up and setup within the Polar Flow web service.
OPTION C: SET UP FROM THE WATCH
Adjust the values with UP/DOWN and confirm each selection with OK. If you want to return and change a setting at any point,
press BACK until you reach the setting you want to change.
When you do the setup from the watch, your watch is not yet connected with the Polar Flow web service. Firmware
updates for your watch are available only through Polar Flow. To make sure you get to enjoy your watch and the unique Polar
Smart Coaching features at their best, it's important that you do the setup later in the Polar Flow web service or with the Flow
mobile app by following the steps in option A or B.
BUTTONFUNCTIONSANDGESTURES
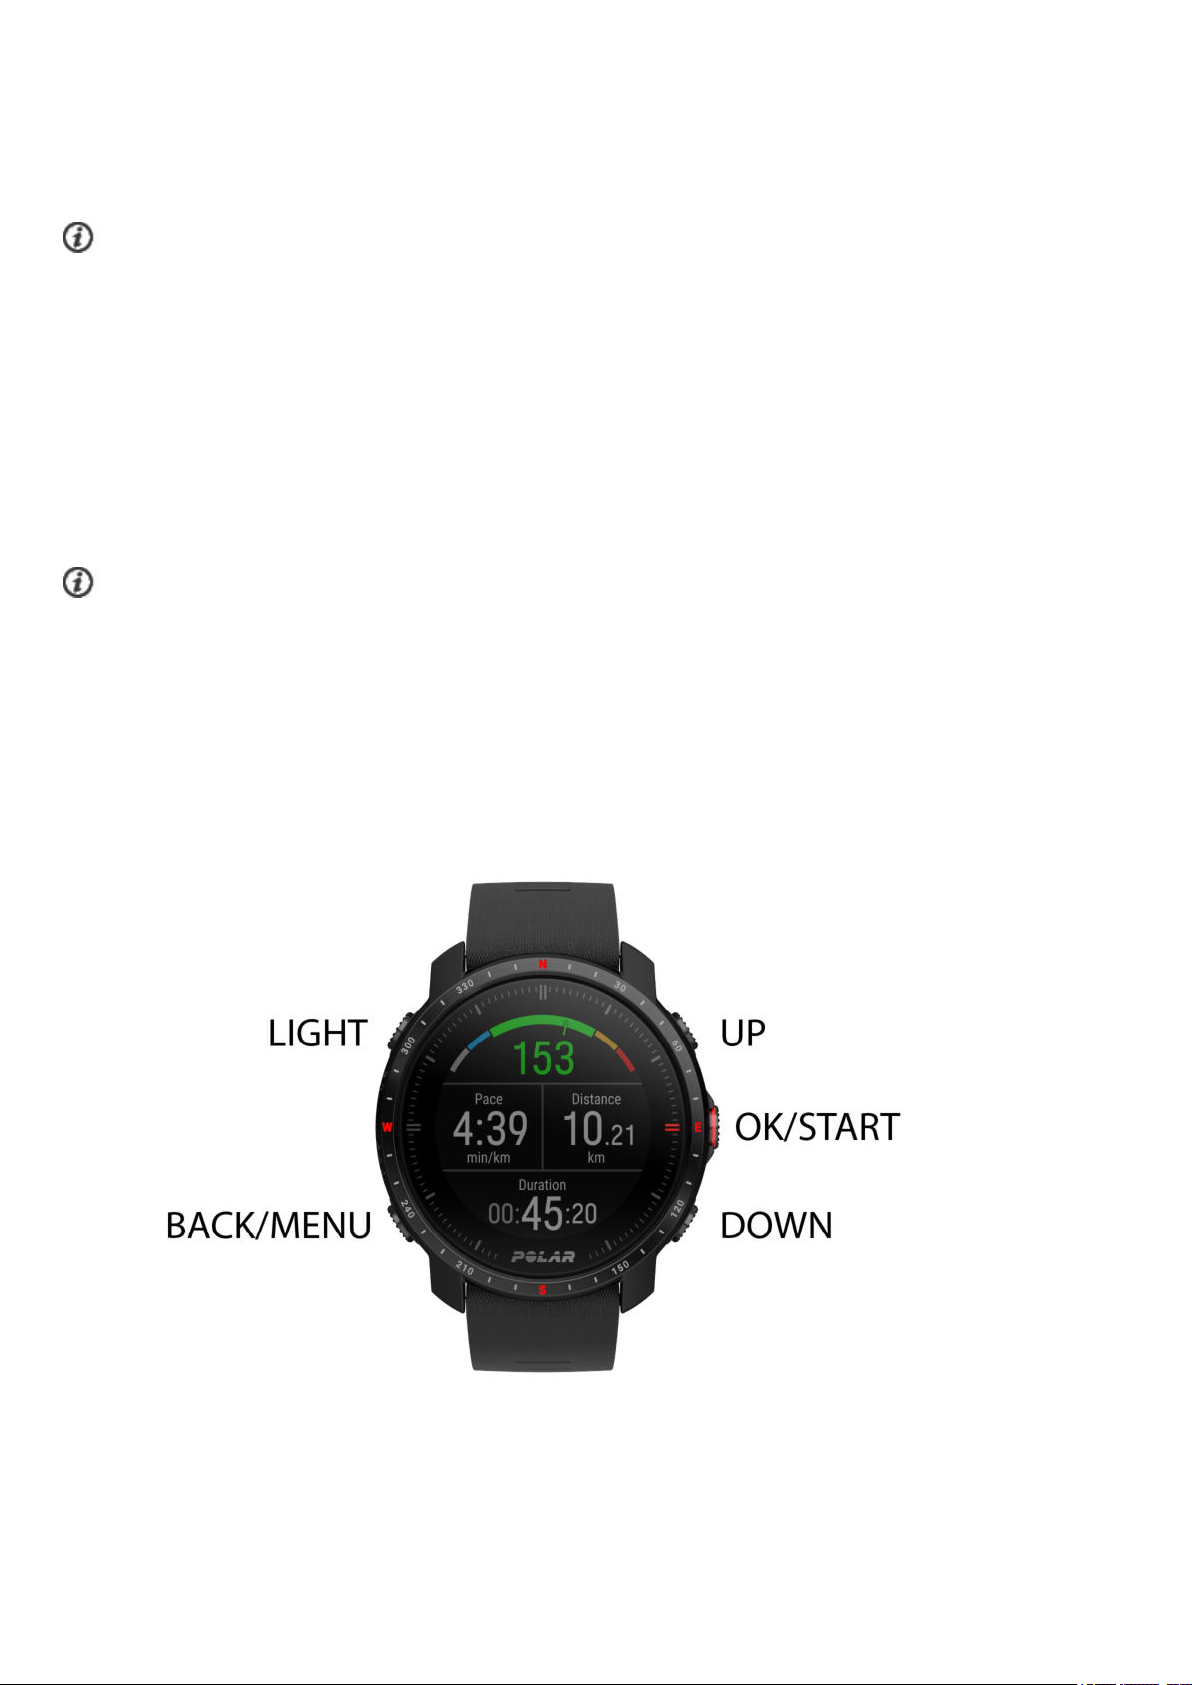
You watch has five buttons that have different functionalities depending on the situation of use. See the tables below to find
out what functionalities the buttons have in different modes.
11
Page 12
Time view and menu
LIGHT BACK OK UP/DOWN
Illuminate the display
In time view, press to view
the battery status symbol
Enter the menu
Return to the previous level
Leave settings unchanged
Confirm the selection shown
on the display
Press and hold to enter pretraining mode
Change the watch
face in time view
Move through
selection lists
Press and hold to lock
buttons and touch display
Cancel selections
Press and hold to return to
Press to view more details
about the information shown
on the watch face
Adjust a selected
value
time view from menu
In time view, press and
hold to start pairing and
syncing
Pre-training mode
LIGHT BACK OK UP/DOWN
Illuminate the display
Press and hold to lock
buttons
Press to enter quick menu
Return to time view Start a training session Move
throug
h
sports
list
During training
LIGHT BACK OK UP/DOWN
Illuminate the display
Pause training by pressing once
Mark a lap
Chang
e
Press and hold to lock
buttons
To stop the session, press and hold
when paused
Continue training recording when
paused
training
view
COLOR TOUCH DISPLAY
The always-on color touch display lets you easily swipe between watch faces, through lists and menus, as well as choose
items by tapping the display.
l Swipe up or down to scroll.
l In time view, swipe left or right to switch between the watch faces. Each watch face shows you an overview of
different information.
l In time view, swipe up from the bottom of the display to view notifications.
l Tap the display to see more detailed information.
Note that the touch display is disabled during training sessions. To ensure proper function of the touch display wipe any dirt,
sweat or water off the display with a cloth. The touch display won’t respond properly when trying to use it wearing gloves.
12
Page 13
VIEW NOTIFICATIONS
The red dot at the bottom of the display indicates if you have any new notifications. Swipe up from the bottom of the display
to view notifications.
TAP FEATURE
Tap the display firmly with two fingers to take a lap during a training session. Note that the tap feature is not a touch display
feature.
BACKLIGHT ACTIVATION GESTURE
The backlight is automatically switched on when you turn your wrist to look at the watch.
WATCHFACESANDMENU
WATCH FACES
The watch faces tell you a lot more than just the time. You'll get the most timely and relevant information right on the watch
face. Choose which watch faces are shown on the display in time view. You can choose from Time only, Daily activity,
Cardio load status, Continuous HR tracking, Latest training sessions, Last night's sleep, FitSpark training guide,
Weather, Weekly summary, Your name, Music controls, Location and Sunrise & sunset.
You can swipe left or right, or scroll through the watch faces with the UP and DOWN buttons and open more details by
pressing the display or with the OK button.
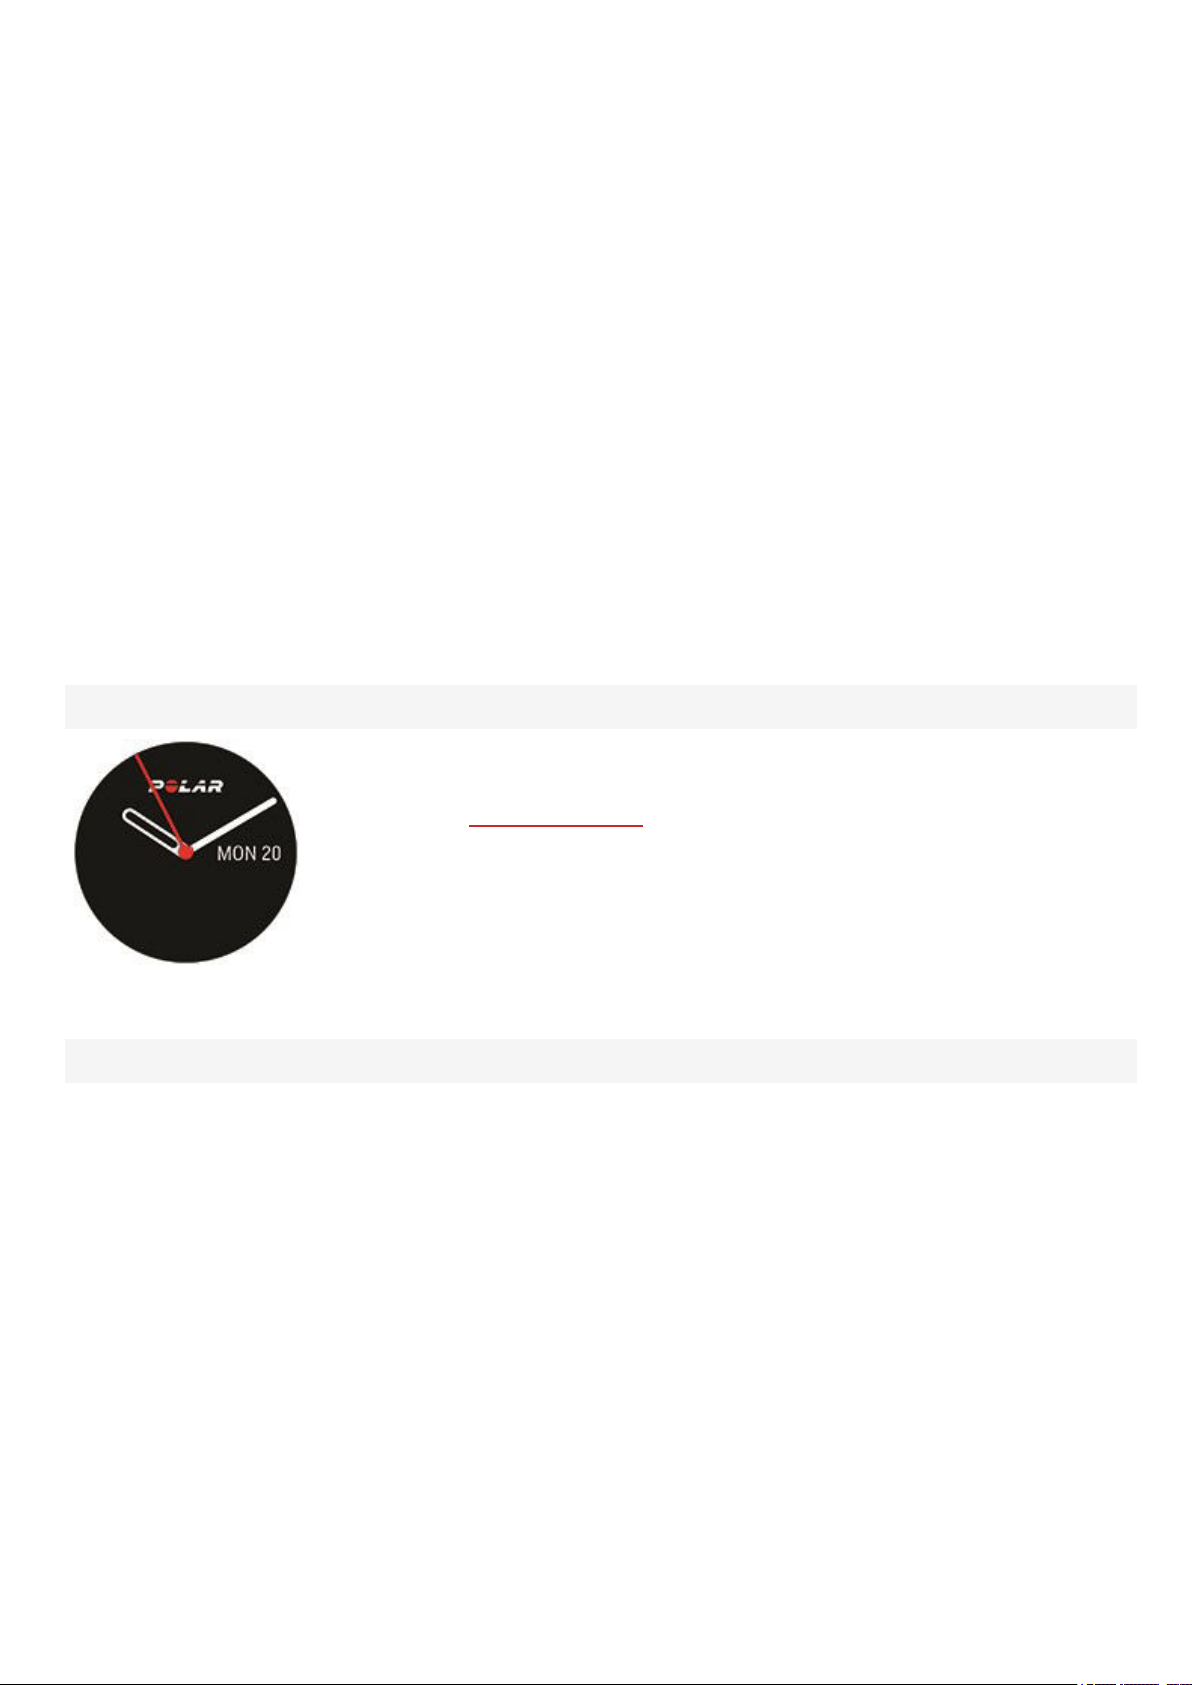
Time only
Activity
Time and date. You can customize the watch style and color.
Find out more in Watch face settings.
13
Page 14
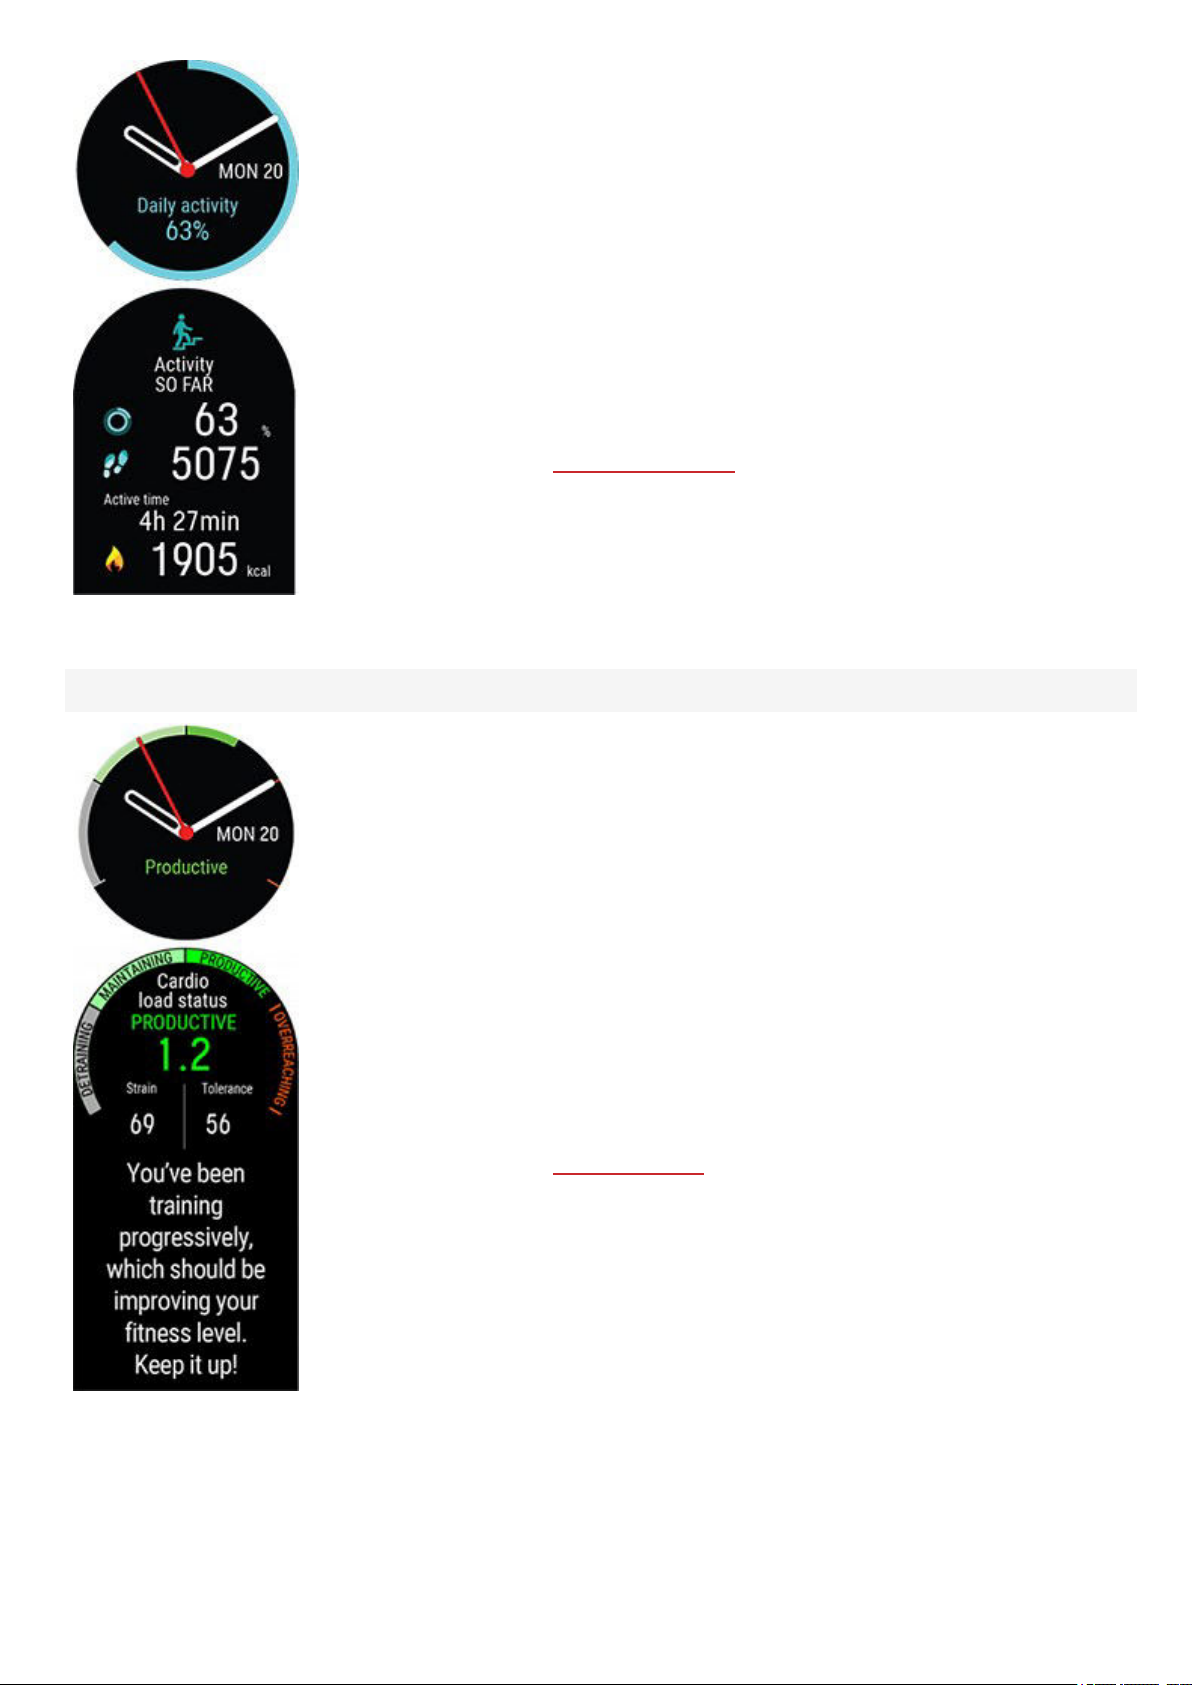
The circle around the watch face and the percentage below the time and date show your
progress towards your daily activity goal. The circle fills with a light blue color as you are
active.
In addition, when opening the details, you can see the following details of your day’s
accumulated activity:
• Steps you've taken so far. The amount and type of body movements are registered and
turned into an estimation of steps.
• Active time tells you the cumulative time of body movements that benefit your health.
• Calories you've burned through training, activity and BMR (Basal metabolic rate: the
minimum metabolic activity required to maintain life).
Cardio Load Status
For more information, see
24/7 Activity tracking.
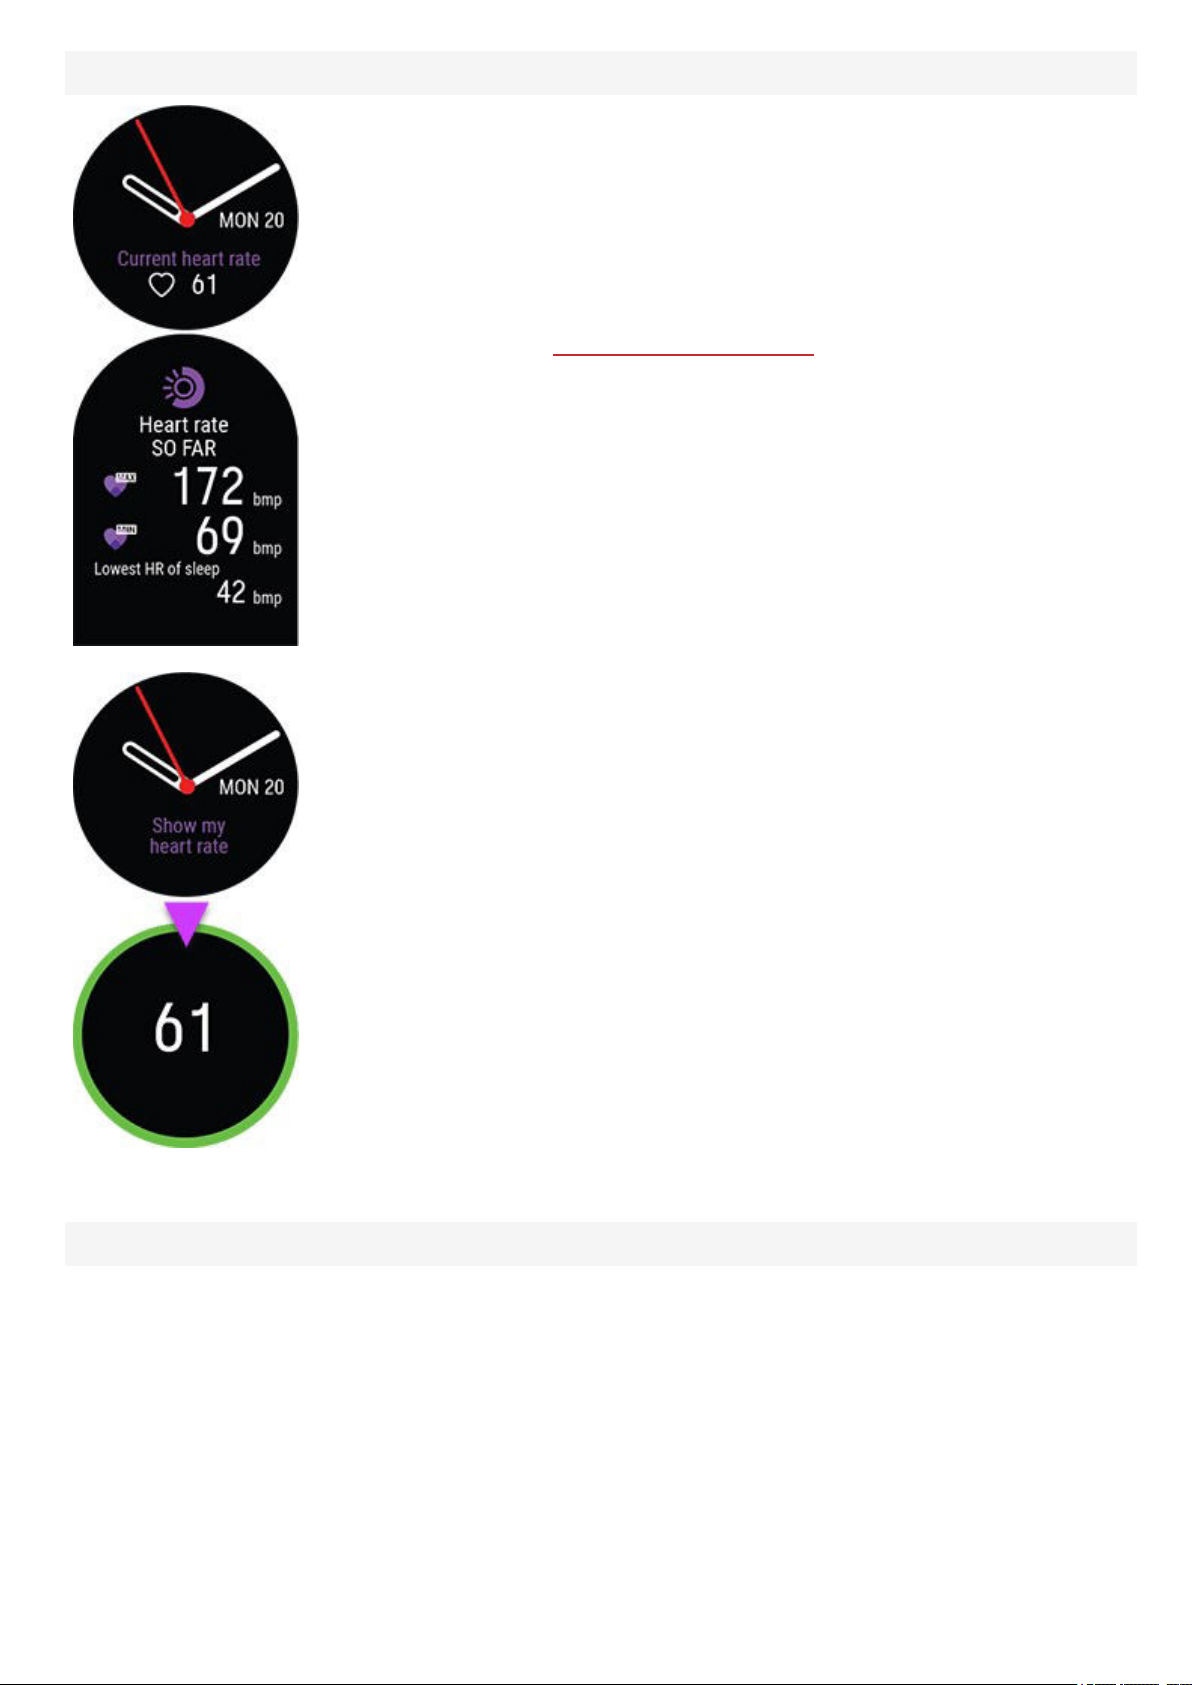
Cardio Load Status looks at the relation between your short term training load (Strain) and
long term training load (Tolerance) and based on that tells you whether you are in a
detraining, maintaining, productive or overreaching training load status. When recovery
tracking (Recovery Pro) is set on and enough data is available, you'll see your daily training
recommendation instead of your Cardio load status on the watch face.
In addition, when opening the details, you can see the numeric values for your Cardio Load
Status, Strain and Tolerance, and also a verbal description of your Cardio load status.
l The numeric value for your Cardio load status is Strain divided by Tolerance.
l Strain shows you how much you have strained yourself with training lately. It shows
your average daily cardio load from the past 7 days.
l Tolerance describes how prepared you are to endure cardio training. It shows your
average daily cardio load from the past 28 days.
l Verbal description of your Cardio load status.
For more information, see Training Load Pro.
14
Page 15
Heart rate
When using the Continuous Heart Rate feature your watch continuously measures your
heart rate and displays it on the Heart rate watch face.
You can check your highest and lowest heart rate readings of the day and also view what
your lowest heart rate reading of the previous night was. You can turn the Continuous Heart
Rate feature on and off on your watch in Settings > General settings > Continuous HR
tracking.
For more information, see Continuous Heart Rate feature.
Latest training sessions
If you're not using the Continuous Heart Rate feature, you can still quickly check your
current heart rate without starting a training session. Just tighten your wristband, choose
this watch face, press OK and the watch will display your current heart rate in a moment.
Return to the Heart rate watch face by pressing BACK.
15
Page 16
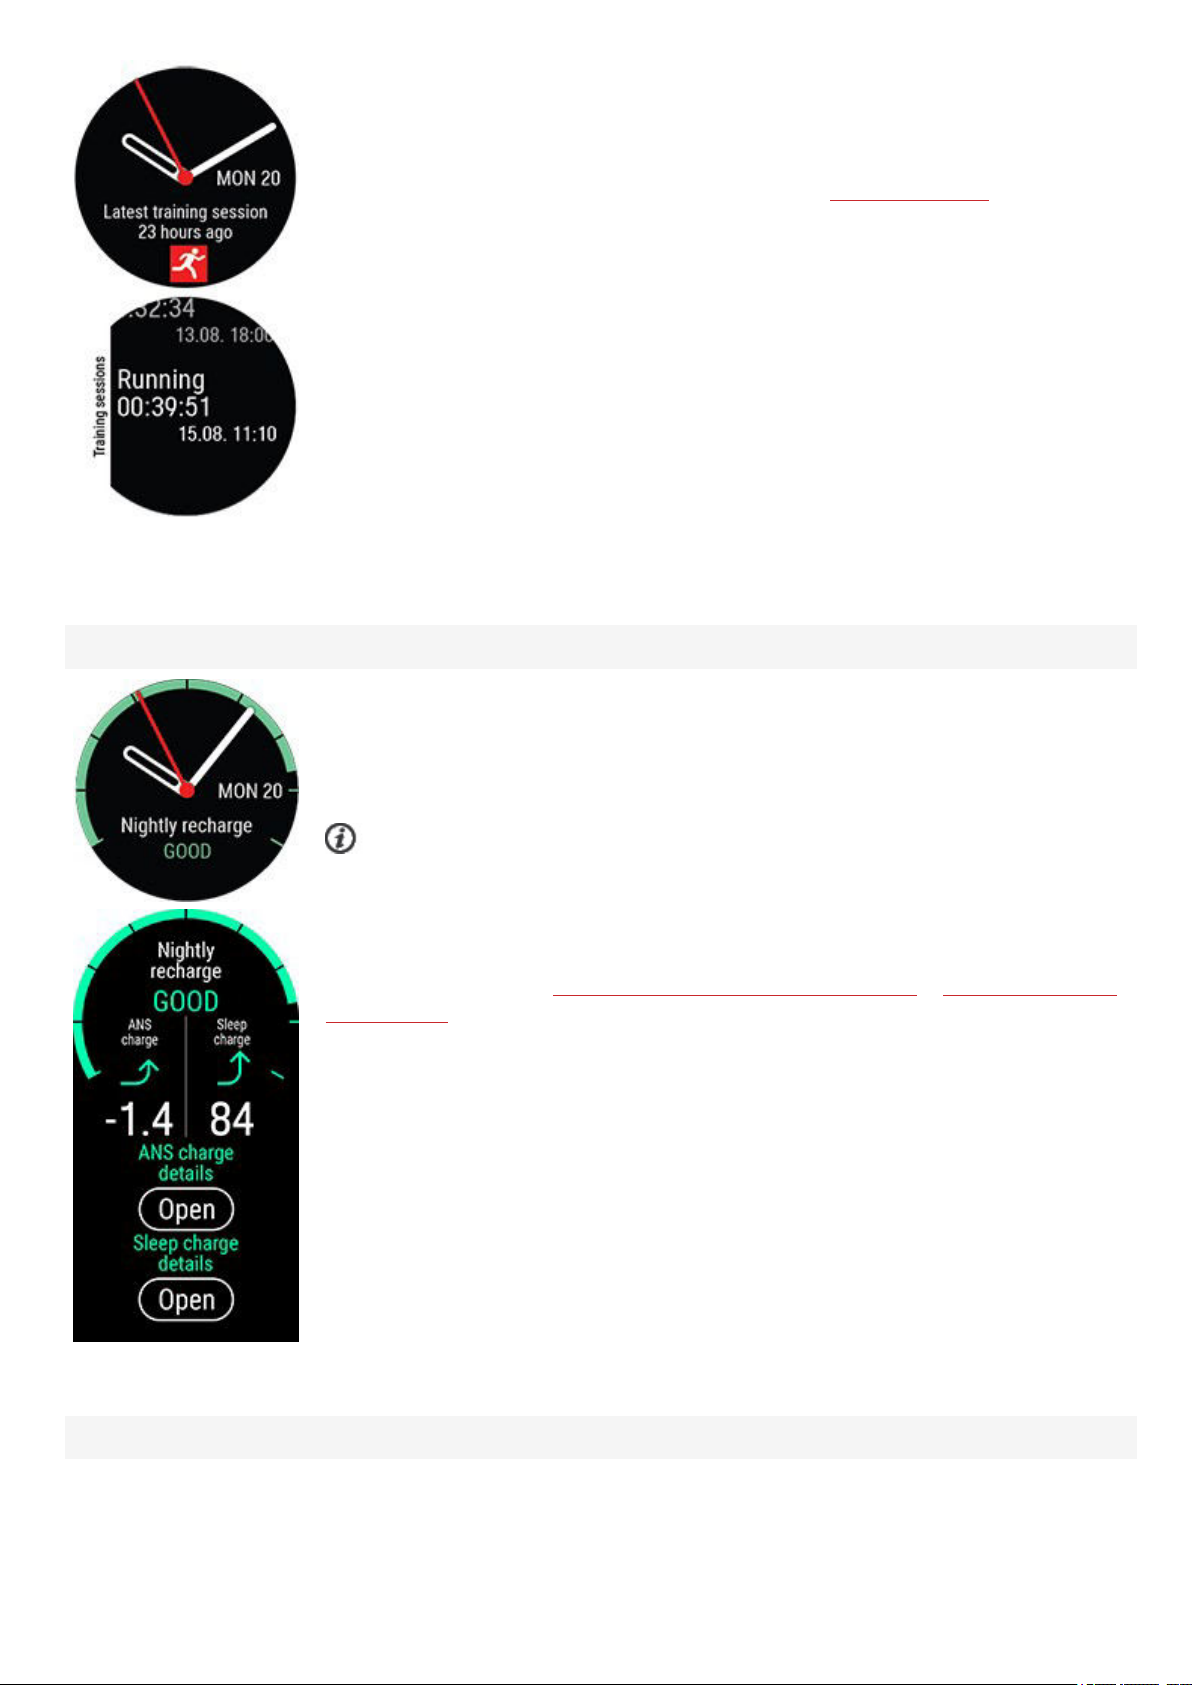
Nightly Recharge
See the time passed since your latest training session and the sport of the session.
In addition, when opening the details, you can view the summaries of your training sessions
from the last 14 days. Browse to the training session you want to view with UP/DOWN and
press OK to open the summary. For more information, see Training summary.
When you wake up you can see your Nightly Recharge status. Nightly Recharge status tells
you how restorative your last night was. Nightly Recharge combines information on how well
your autonomic nervous system (ANS) calmed down during the early hours of your sleep
(ANS charge) and how well you slept (sleep charge).
The feature is off by default. Keeping the Continuous Heart Rate feature on in your watch
will drain the battery quicker. Continuous heart rate tracking needs to be enabled for Nightly
Recharge to function. If you want to save battery and still use Nightly Recharge, you can set
the continuous heart rate tracking to be on only at night from your watch's settings.
For more information, see Nightly Recharge™ recovery measurement or Sleep Plus Stages™
sleep tracking.
FitSpark
16
Page 17
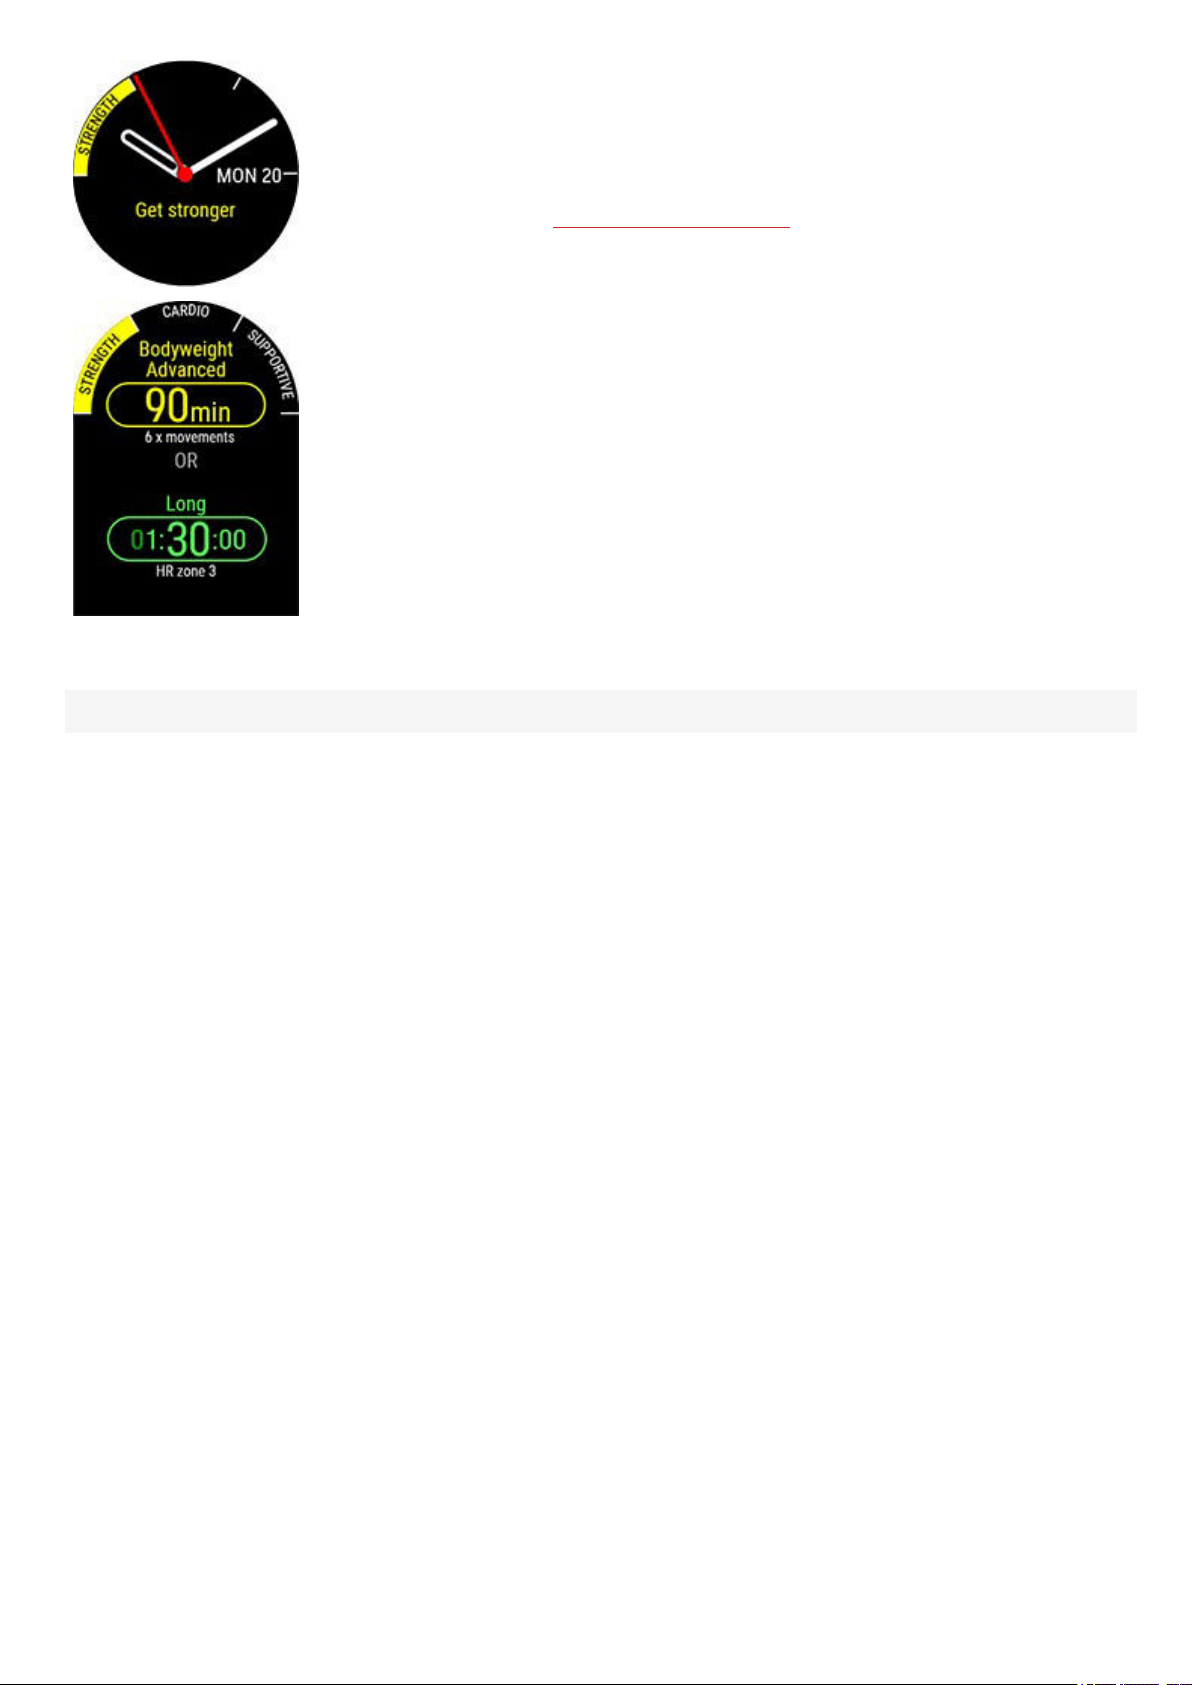
Your watch suggests the most suitable training targets for you based on your training
history, fitness level and current recovery status. Press OK to see all the suggested training
targets. Choose one of the suggested training targets to see detailed information about the
training target.
For more information, see FitSpark daily training guide.
Weather
17
Page 18
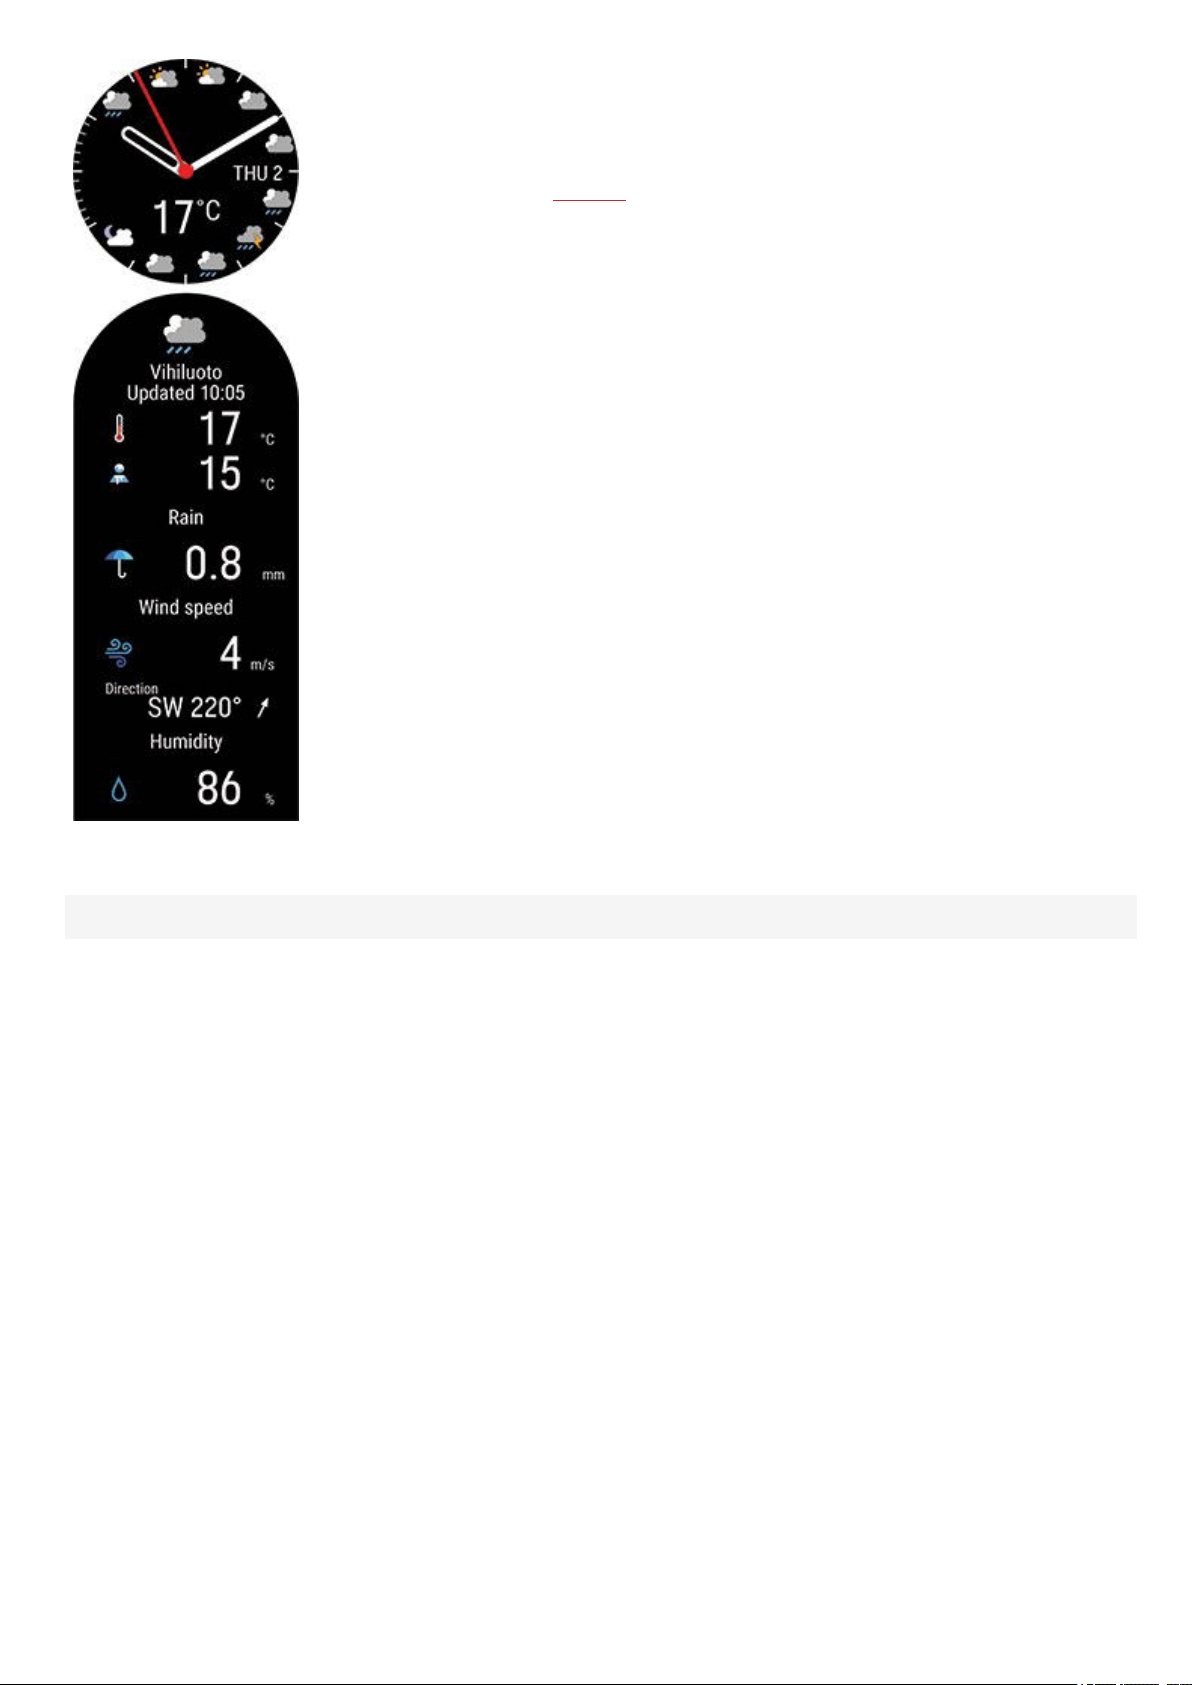
View the current day's hourly forecast straight from your wrist. Press OK to view more
detailed weather information including for example wind speed, wind direction, humidity and
chance of rain as well as tomorrow's 3-hour and the day after tomorrow's 6-hour forecast.
For more information, see Weather
Weekly summary
18
Page 19
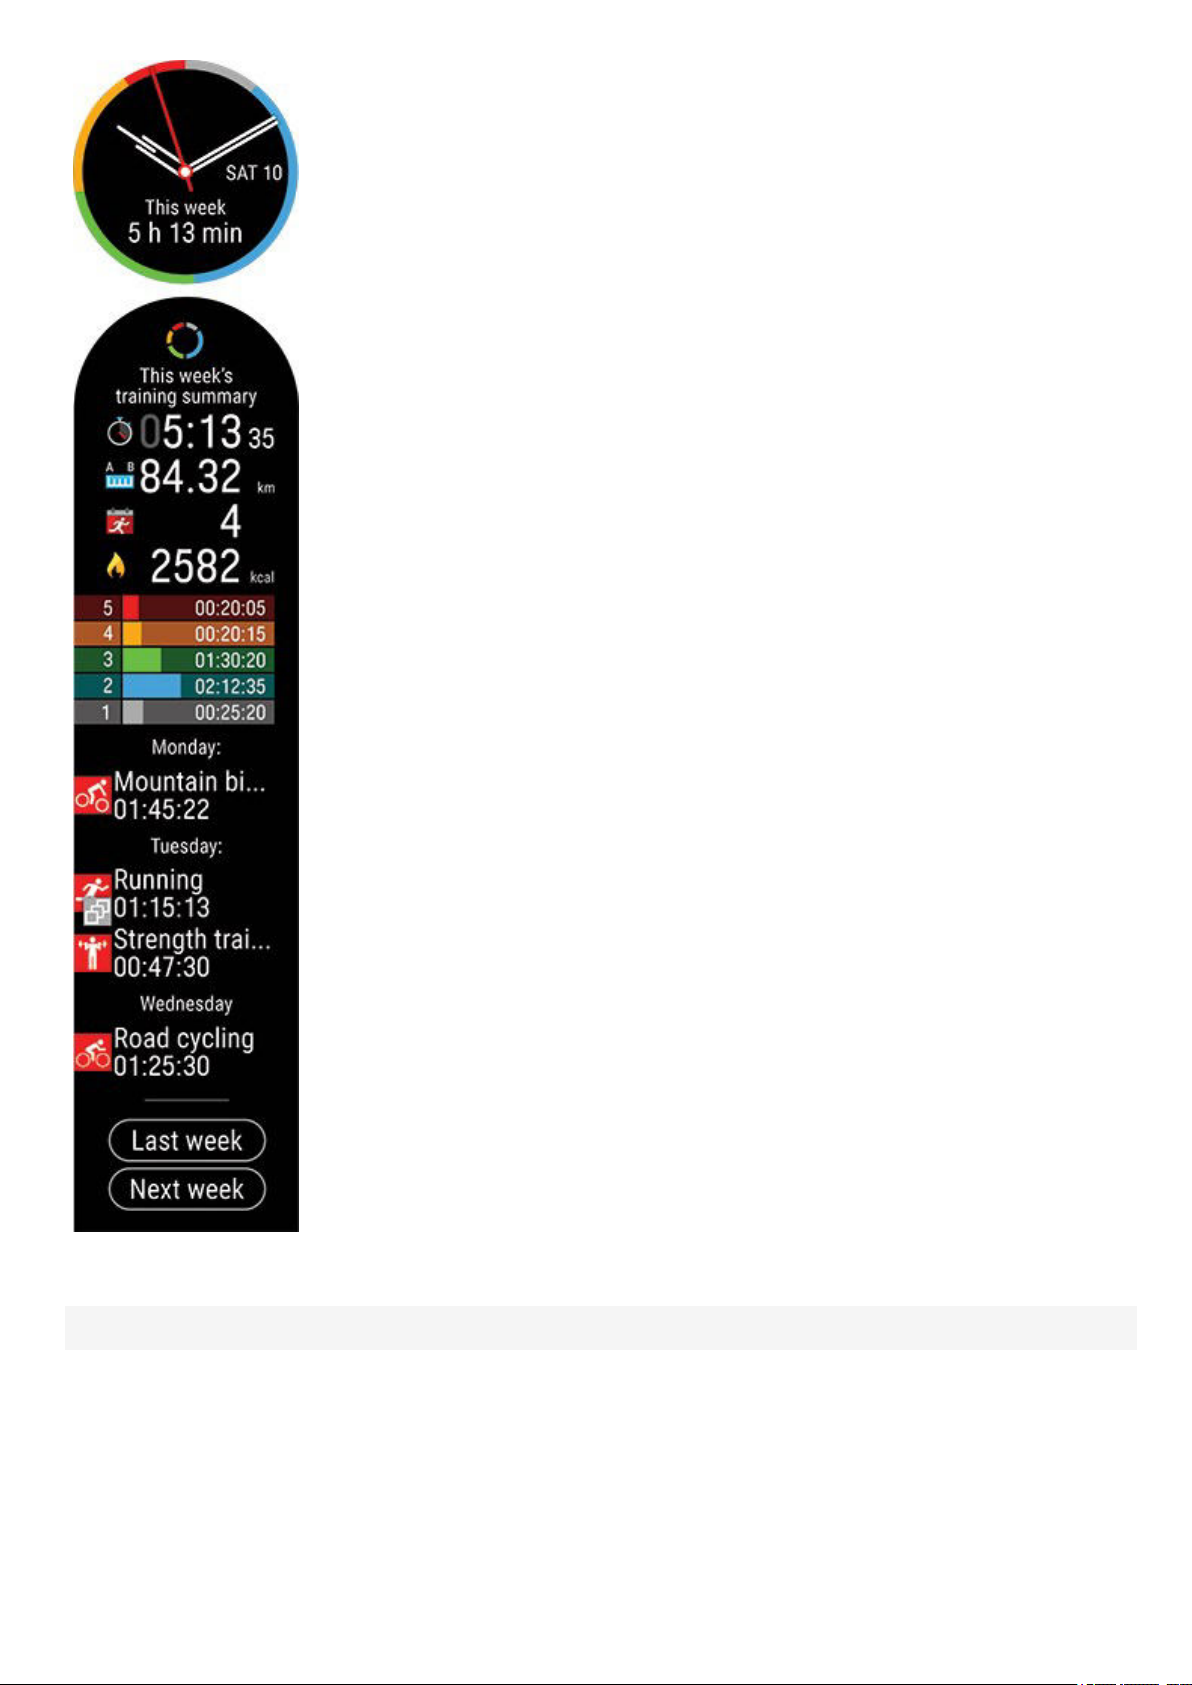
View an overview of your training week. Your total training time for the week split into
different training zones is illustrated on the display. Press OK to open more details. You’ll see
distance, training sessions, total calories and time spent in each heart rate zone. In addition,
you can view last week’s summary and details as well as any sessions planned for next
week.
Scroll down and press OK to view more information about a single session.
Your name
19
Page 20
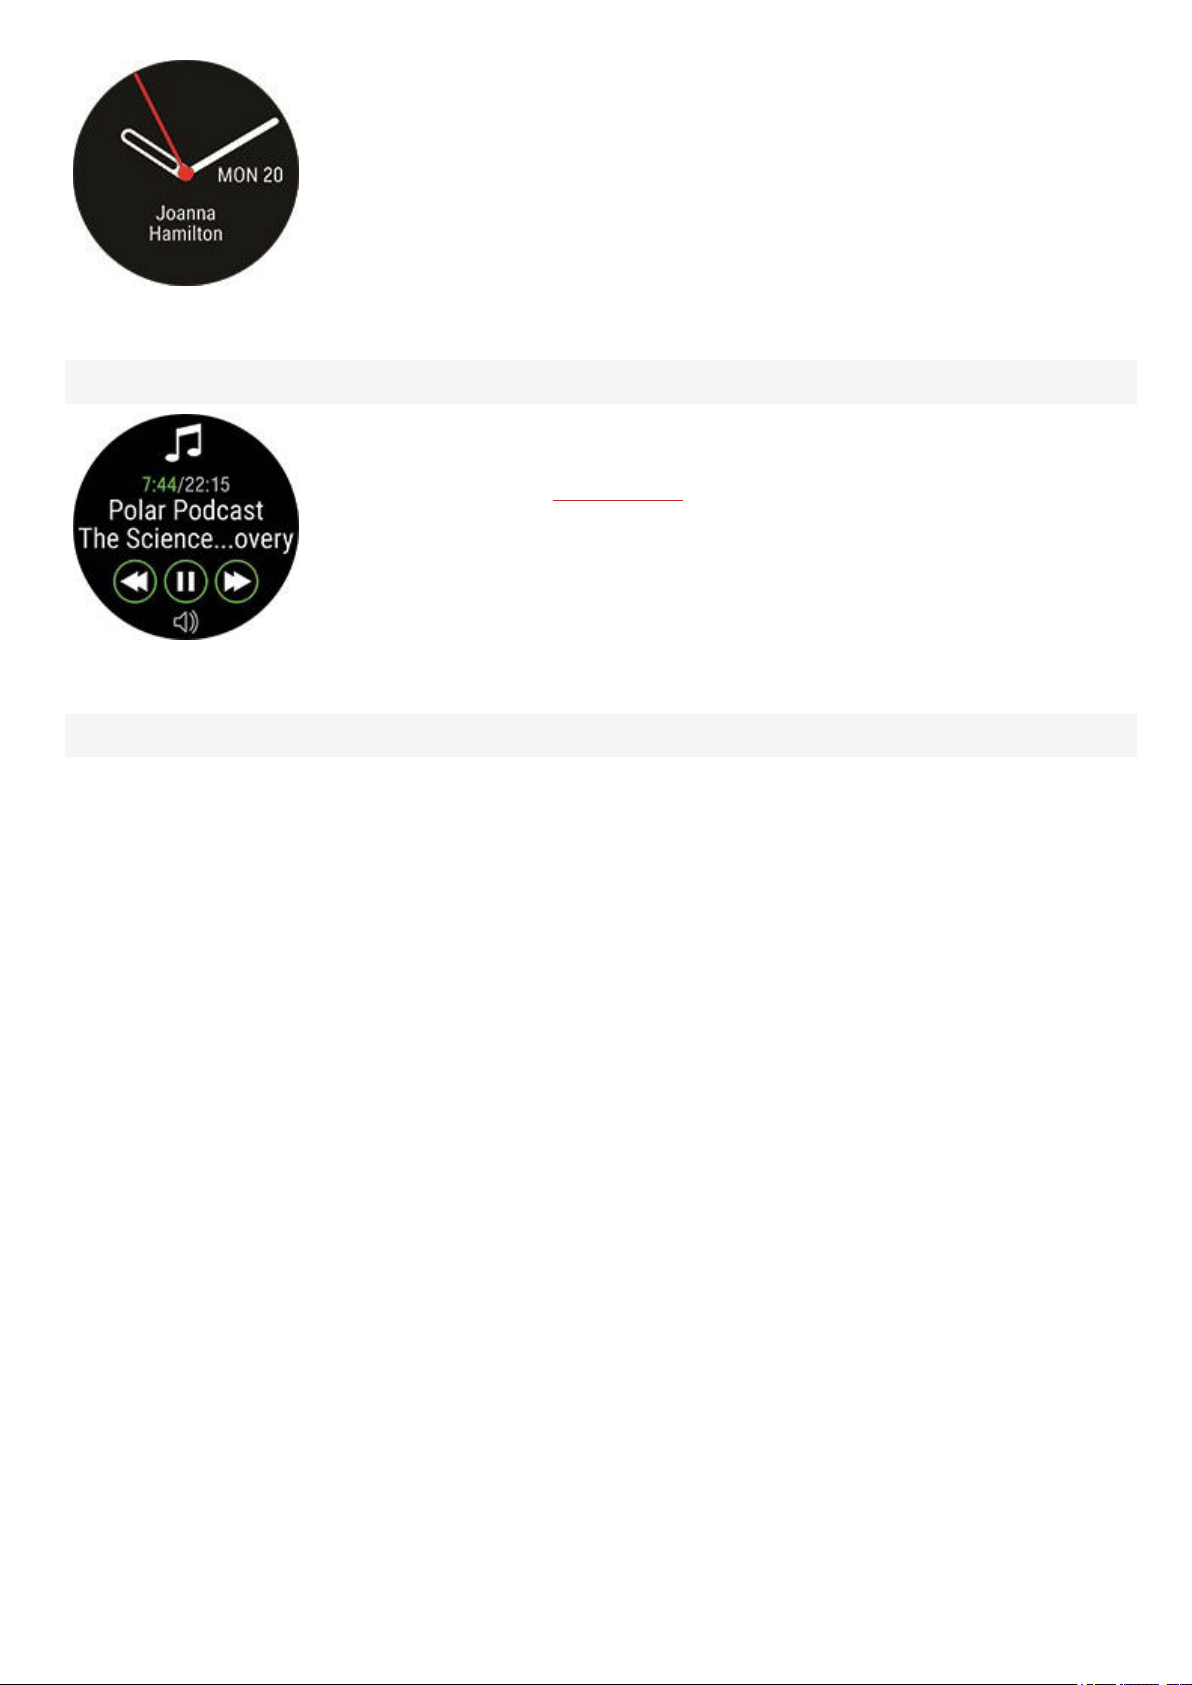
Music controls
Time, date and your name is displayed.
Control music and media playing on your phone with your watch when not training.
For more information, see Music controls
Location
20
Page 21
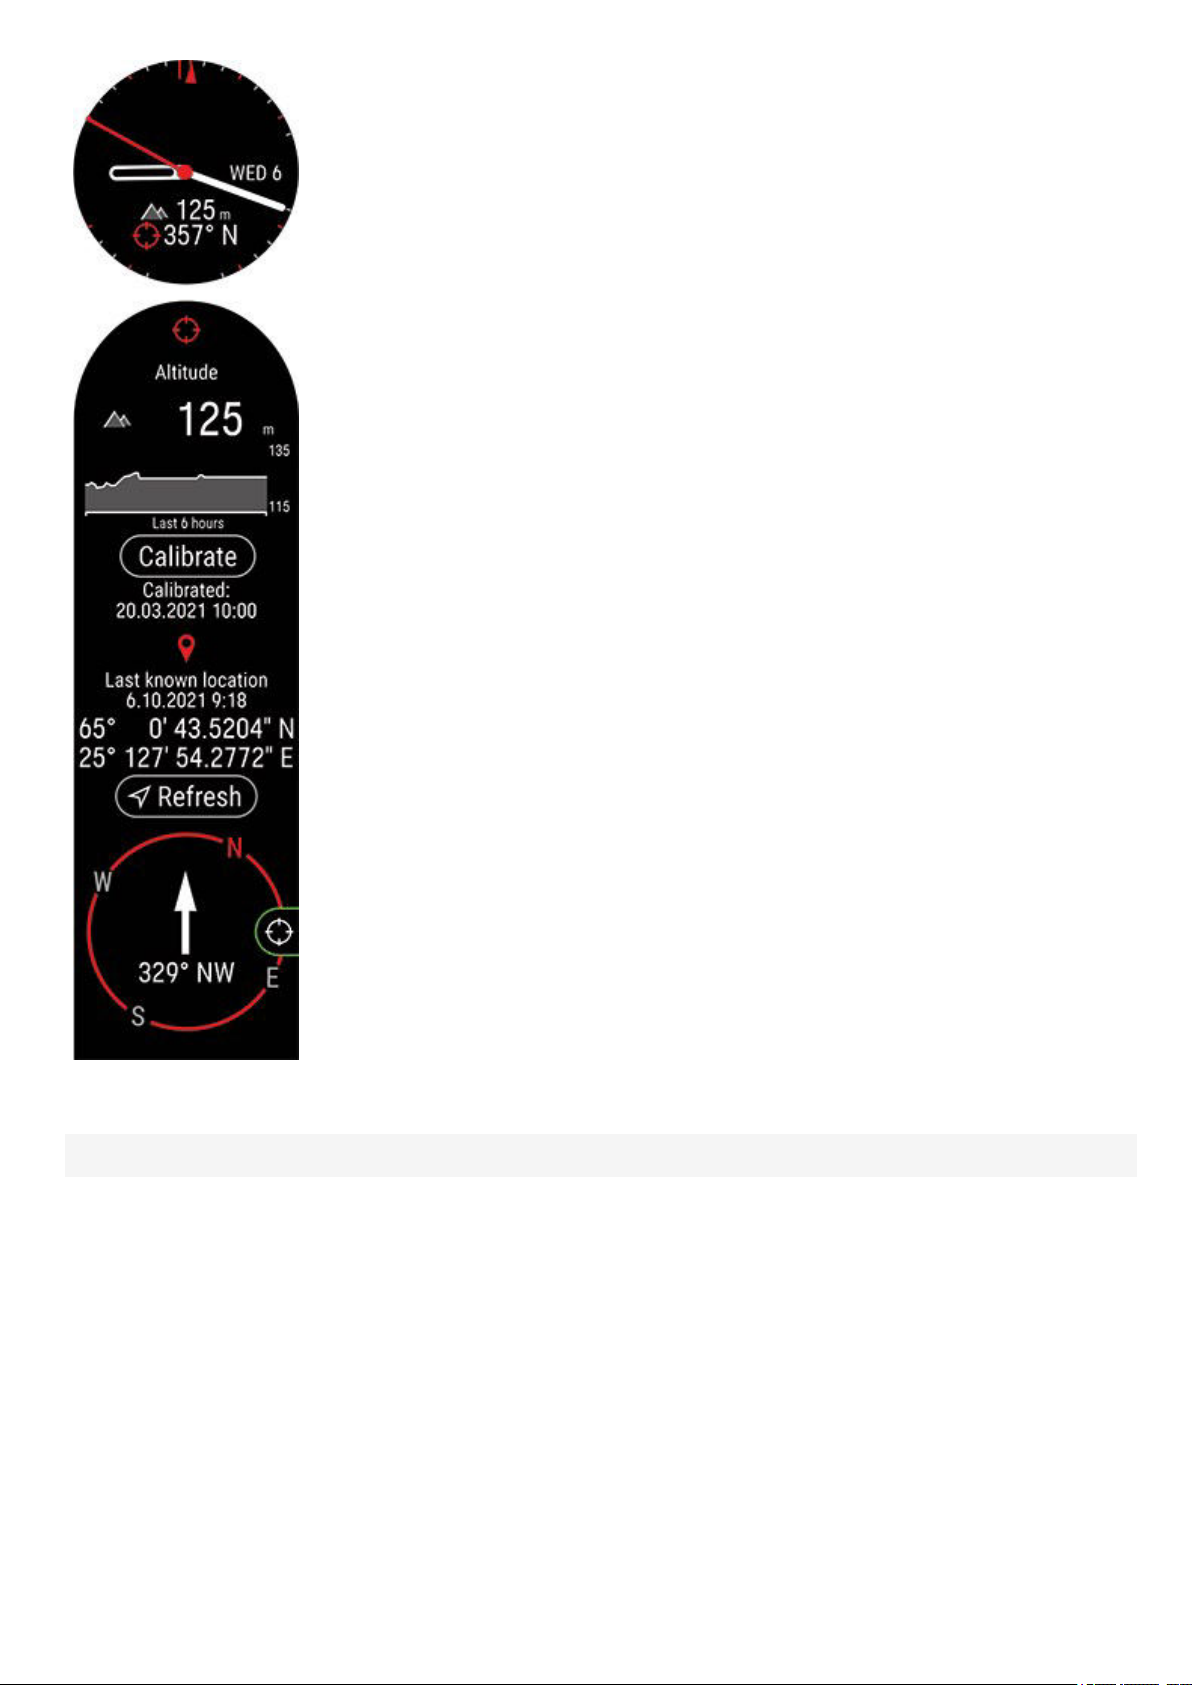
View your current altitude and heading at a glance. Press OK to see more details including
your altitude profile for the past 6 hours, the coordinates of your last known location and the
compass.
To calibrate your current altitude choose Calibrate and the calibration method: I'll add my
current altitude, Let my phone calibrate or Use watch location.
Choose Refresh to get the coordinates of your current location. Your current location is
based on GPSinformation.
In the compass view press OK to lock your current bearing. The display will then show the
deviation from your locked bearing in red.
To calibrate the compass scroll all the way down and choose Calibrate.
Sunrise & sunset
21
Page 22
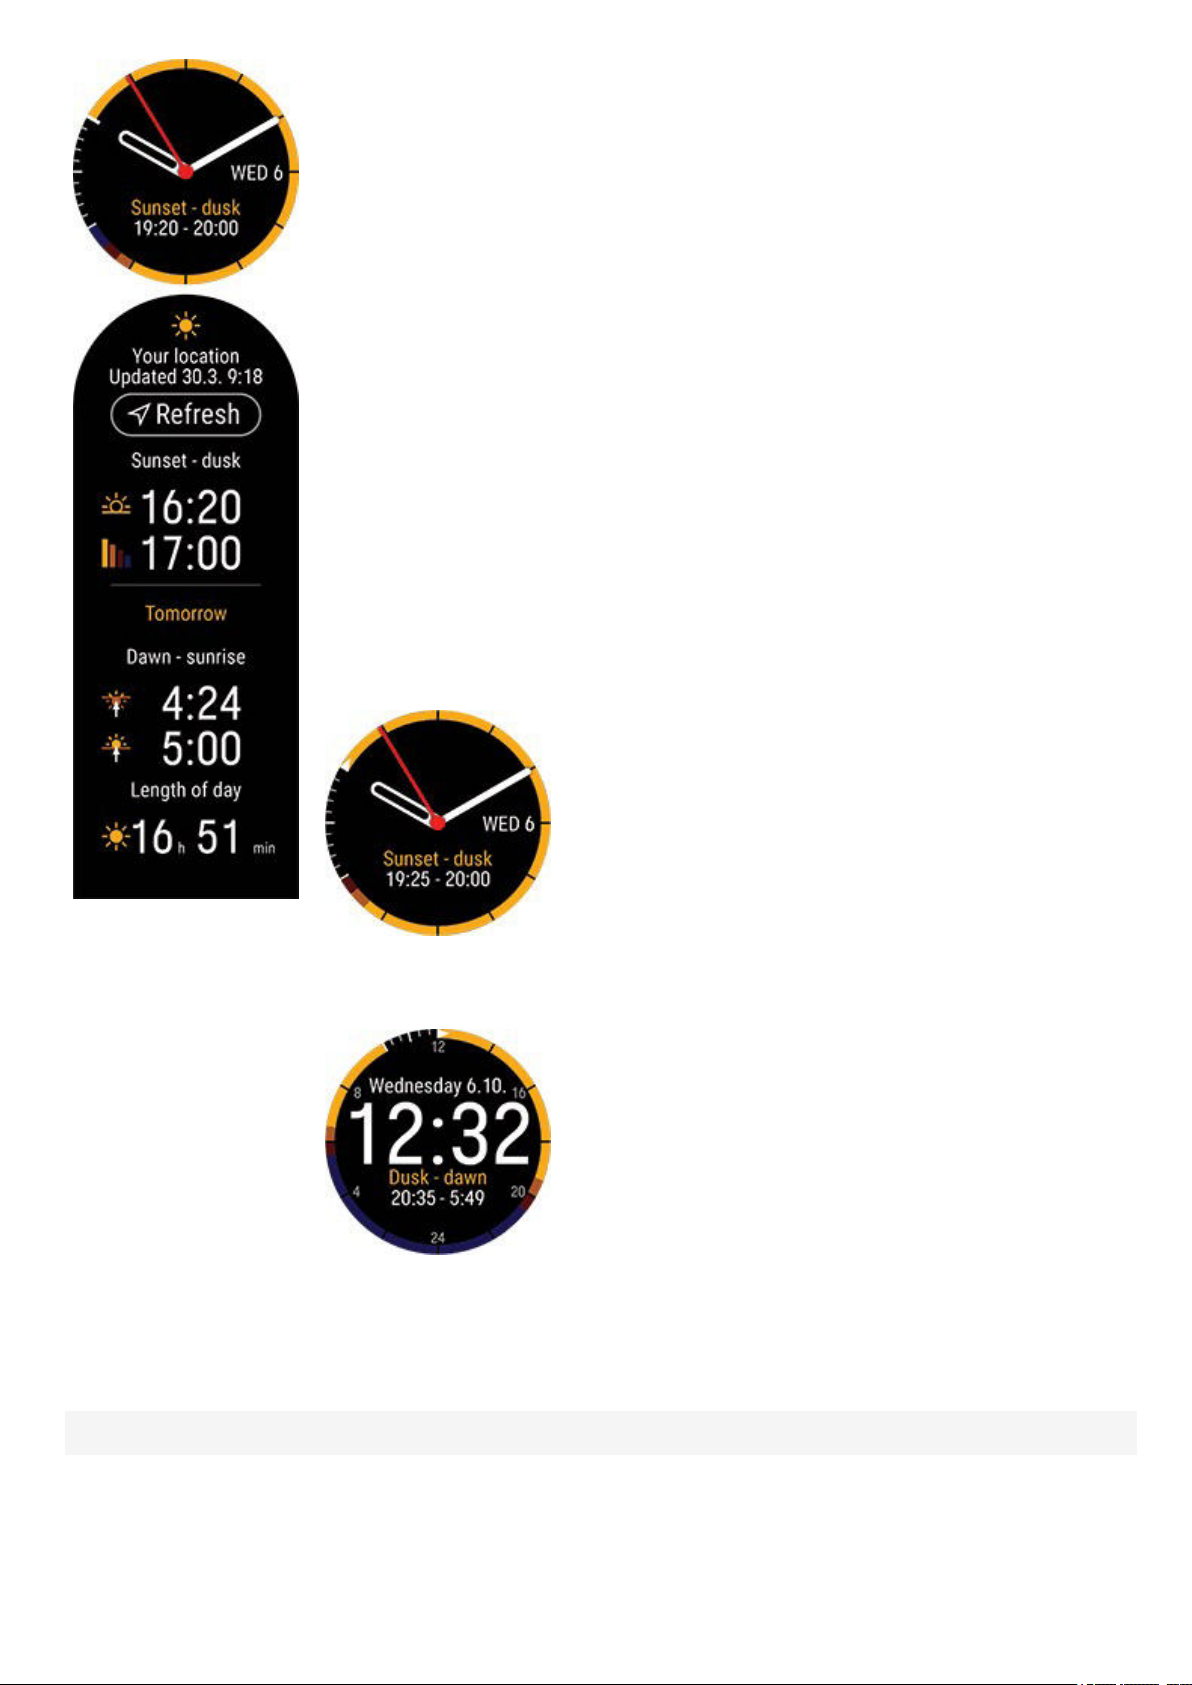
Check when the sun rises, sun sets and the length of day for your current location. Press OK
to see more details.
l Sunset - dusk
l Dawn - sunrise
l Length of day
Sunrise & sunset data is automatically updated via the Flow app if you've paired your watch
with it. You can also update it manually via GNSS by choosing Update.
Note that sunrise & sunset information can only be found from the sunrise & sunset watch
face.
The sunrise & sunset watch face view is illustrated differently depending on whether you’re
using the digital or analog watch face. The analog watch face shows the sunrise & sunset
information for the next 12 hours and the digital watch face shows the sunrise & sunset
information for the next 24 hours.
You can change the watch face in Settings > Watch settings > Watch face. Choose
Analog or Digital. After changing the watch face the Sunrise & sunset watch face view will
also be updated.
Analog (12-hour view)
Digital (24-hour view)
MENU
Enter the menu by pressing BACK and browse through the menu by pressing UP or DOWN. Confirm selections with the OK
button, and return with the BACK button.
Start training
22
Page 23
From here, you can start your training sessions. Press OK to enter the pre-training mode
and browse to the sport profile you want to use.
You can also enter the pre-training mode by pressing and holding OK in the time view.
See Start a training session for detailed instructions.
Serene guided breathing exercise
First, choose Serene and then choose Start exercise to start the breathing exercise.
For more information, see Serene™ guided breathing exercise.
Strava LiveSegments
Fueling
Timers
Strava live segments
View information about the Strava segments synced to watch. If you haven’t connected
your Flow account with a Strava account or haven’t synced any segments to your watch,
you can also find guidance here.
For more information see Strava live segments.
Fueling
Stay energized throughout your session with the FuelWise™ fueling assistant. FuelWise™
includes three reminders that remind you to refuel and help you maintain adequate energy
levels during your long sessions. These are Smart carbs reminder, Manual carbs
reminder and Drink reminder.
For more information see Fuelwise
23
Page 24
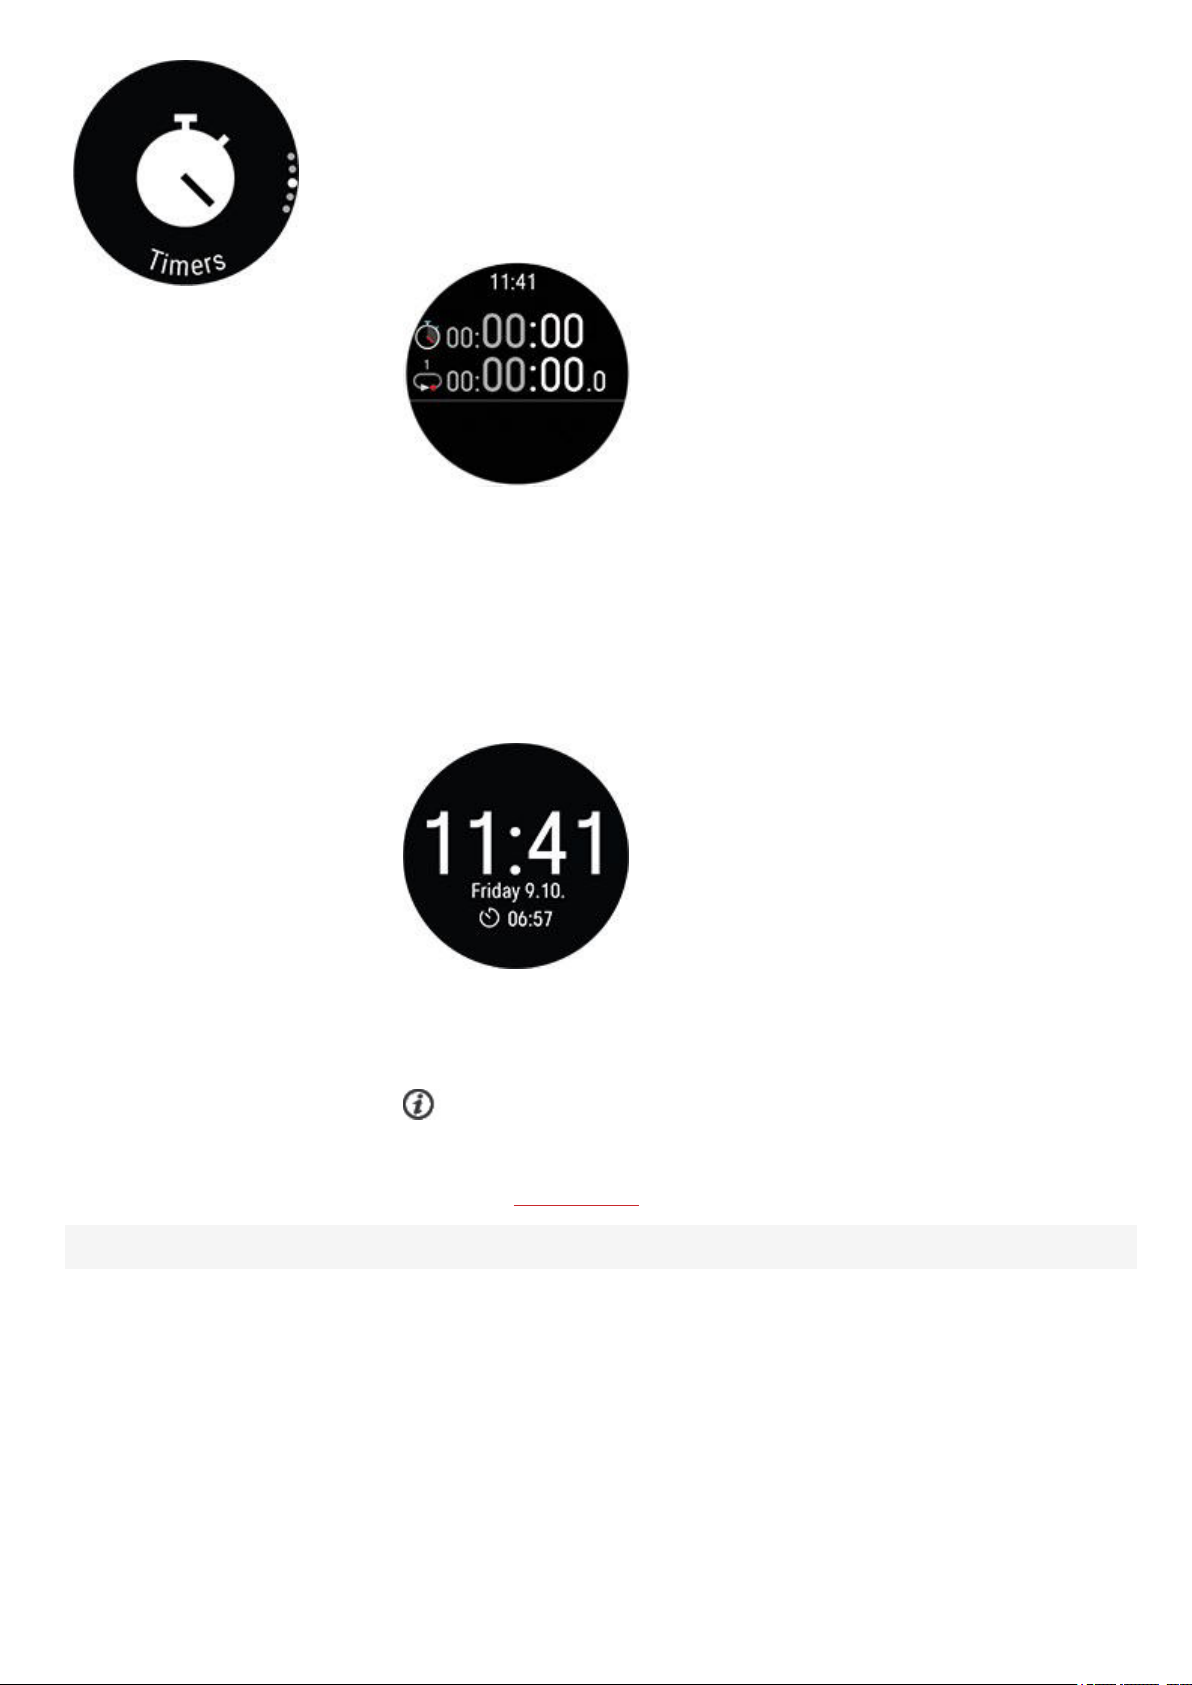
In Timers you'll find a stopwatch and countdown timer.
Stopwatch
To start the stopwatch, press OK. To add a lap, press OK. To pause the
stopwatch, press BACK.
Countdown Timer
You can set the countdown timer to count down from a preset time. Choose
Set Timer, and set the countdown time, and press OK to confirm. When
completed, choose Start and press OK to start the countdown timer.
Watch face views
The countdown timer is added to the basic watch face with time and date.
At the end of the countdown, the watch notifies you by vibrating. Press OK to
restart the timer, or press BACK to cancel and return to the time view.
During training you can use interval timer and countdown timer. Add the
timer views to training views in the sport profile settings in Flow and sync
the settings to your watch. For more information on using timers during
training, see
During training
24
Page 25
Tests
Choose which watch faces are shown on the display in time view. You can choose from
Time only, Daily activity, Cardio load status, Continuous HR tracking, Latest
training sessions, Last night's sleep, FitSpark training guide, Weather, Weekly
summary, Your name, Music controls, Location and Sunrise & sunset.
You need to choose at least one view.
In Tests you'll find Orthostatic test, Leg recovery test, Cycling test, Running test and
Fitness test
Orthostatic test
You can take the Orthostatic test (H10 heart rate sensor needed), view your latest results
compared to your average and reset the test period.
See Orthostatic test for detailed instructions.
Leg recovery test
The Leg Recovery Test tells you whether your legs are ready for high intensity training in
just a couple of minutes without any specialist equipment – all you need is your watch.
For more information see Leg Recovery Test.
Cycling test
The Cycling Performance Test allows you to personalize your power zones and tells you
your personal functional threshold power. Cycling power sensor required.
For more information see Cycling Performance Test.
Running test
The Running Performance Test helps you keep track of your progress and personalize
your heart rate, speed and power zones.
For more information see Running Performance Test.
Fitness Test
Settings
Measure your fitness level easily with wrist-based heart rate while you lie down and relax.
For more information, see Fitness Test with wrist-based heart rate.
25
Page 26
QUICKSETTINGSMENU
Settings
You can edit the following settings on your watch:
l
General settings
l
Watch face settings
l
Choose views
l
Time & date
l
Physical settings
In addition to the settings available on your watch, you can edit Sport Profiles in the
Polar Flow web service and app. Customize your watch with your favorite sports and the
information you want to follow during your training sessions. See
Sport Profiles in Flow for
more information.
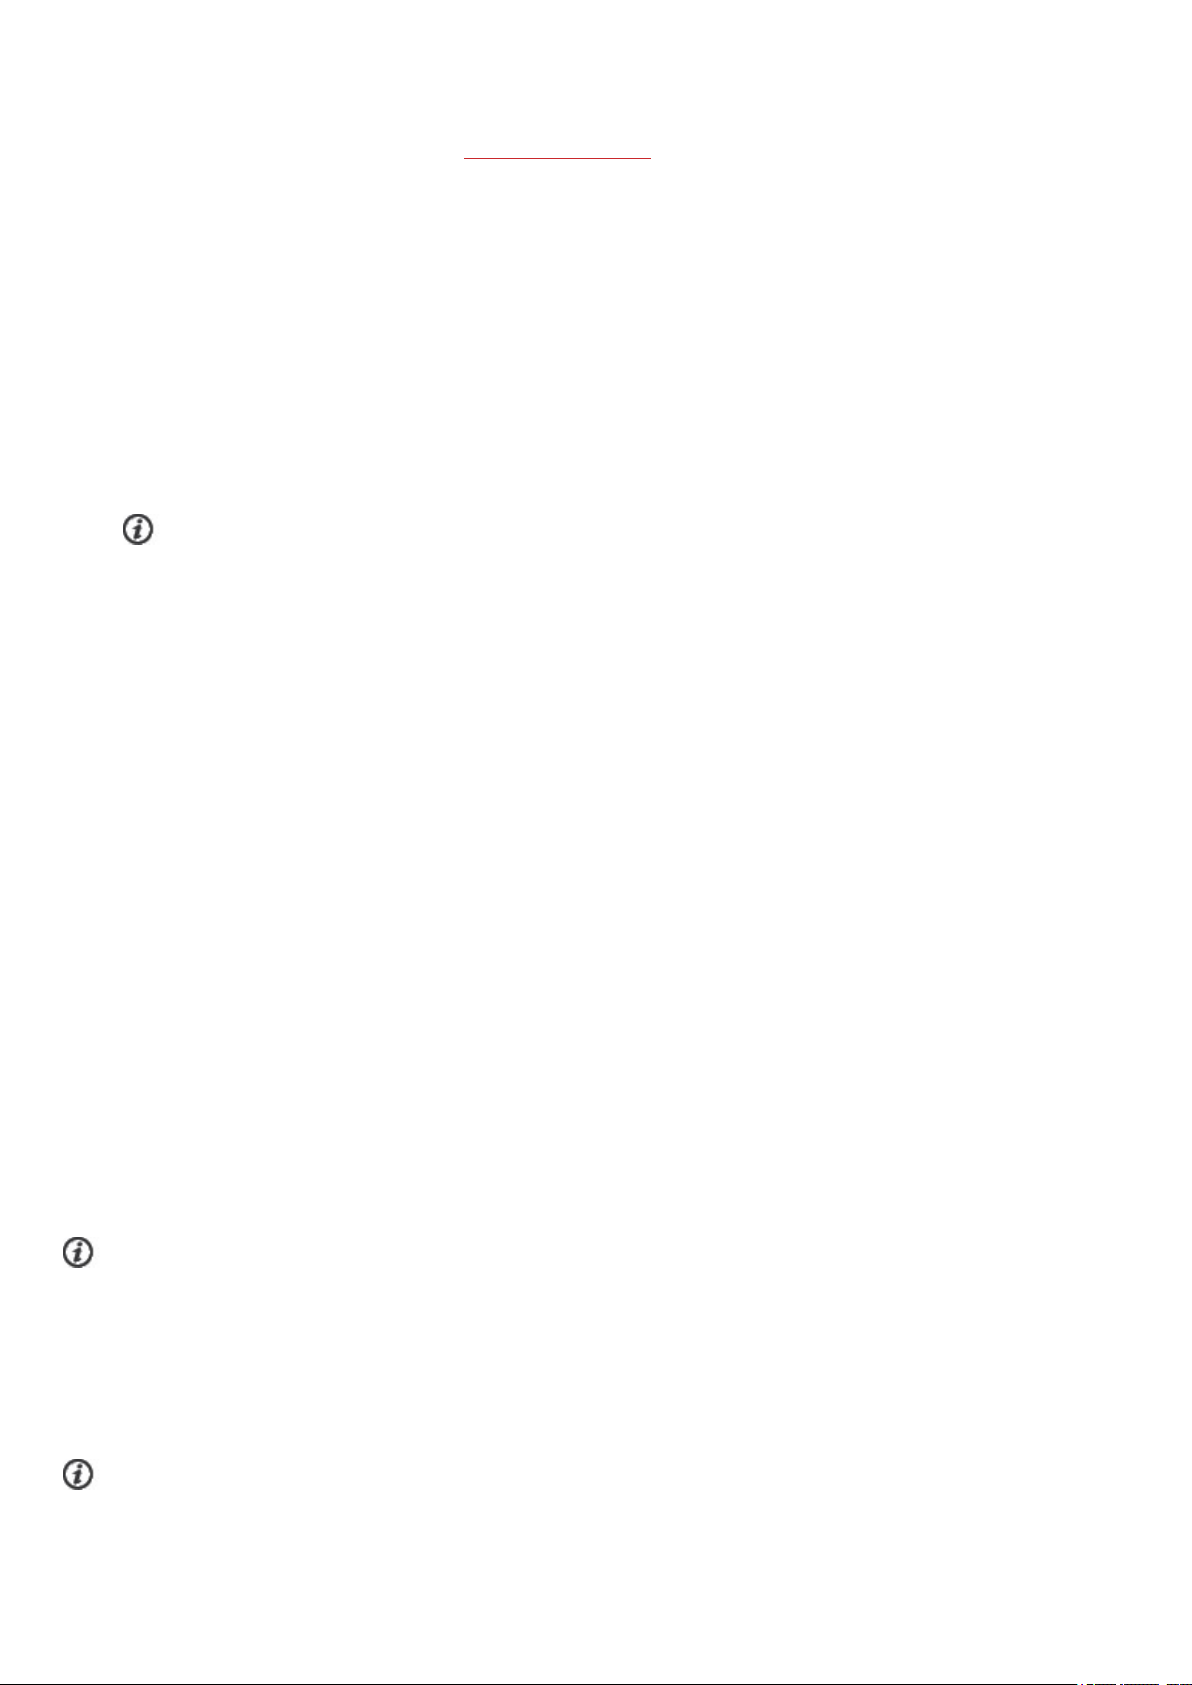
Swipe down from the top of the display in time view to pull down the Quick settings menu.
Swipe left or right to browse and tap to choose a feature.
Tap
from
l
to customize what features you want to see in the quick settings menu. Choose
Alarm, Countdown timer, Do not disturb and Flight mode.
Alarm: Set alarm repetition: Off, Once, Monday to Friday or Every day. If you
choose Once, Monday to Friday or Every day, also set the time for the alarm.
When the alarm is set on, a clock icon is displayed in the time view.
l Countdown timer: Choose Set Timer, and set the countdown time, and press OK to
confirm. When completed, choose Start and press OK to start the countdown timer.
l Do not disturb: Tap the do not disturb icon to switch it on and tap again to switch it
off. When do not disturb is switched on, you will not get any notifications or call alerts.
Also, the backlight activation gesture is disabled
l Flight mode: Tap the flight mode icon to switch it on and tap again to switch it off.
Flight mode cuts off all wireless communication from your watch. You can still use it,
but you can't sync your data with the Polar Flow mobile app or use it with any wireless
accessories.
The battery status icon shows how much charge is left in the battery.
26
Page 27
PAIRINGAMOBILEDEVICEWITHYOURWATCH
Before you can pair a mobile device with your watch, you need to setup your watch in the Polar Flow web service or with the
Polar Flow mobile app as described in chapter Setting up your watch. If you did the setup for your watch with a mobile device,
your watch has already been paired. If you did the setup with a computer and would like to use your watch with Polar Flow
app, please pair your watch and mobile as follows:
Before pairing a mobile device
• download Flow app from the App Store or Google Play
• make sure your mobile device has Bluetooth turned on, and airplane mode/flight mode is not turned on.
• Android users:make sure location is enabled for Polar Flow app in the phone's application settings.
To pair a mobile device:
1. On your mobile device, open Flow app and sign in with your Polar account, which you have created when setting up
your watch.
Android users: If you have several Flow app compatible Polar devices in use, make sure you have chosen Grit X
Pro as the active device in the Flow app. This way Flow app knows to connect to your watch. In the Flow app, go to
Devices and choose Grit X Pro.
2. On your watch, press and hold BACK in time mode OR go to Settings > General settings > Pair and sync > Pair
and sync phone and press OK.
3. Open Flow app and bring your watch close to phone is displayed on your watch.
4. When the Bluetooth Pairing Request confirmation message appears on your mobile device, check that the code
shown on your mobile device matches the code shown on your watch.
5. Accept the Bluetooth pairing request on your mobile device.
6. Confirm the pin code on your watch by pressing the OK.
7. Pairing done is displayed once the pairing is completed.
DELETE A PAIRING
To delete a pairing with a mobile device:
1. Go to Settings > General settings > Pair and sync > Paired devices and press OK.
2. Choose the device you want to remove from the list and press OK.
3. Remove pairing? is displayed. Confirm by pressing OK.
4. Pairing removed is displayed when you are done.
UPDATINGTHEFIRMWARE
To keep your watch up to date and get the best performance, always make sure to update the firmware whenever a new
version is available. Firmware updates are performed to improve the functionality of your watch. They can include completely
new features, improvements to existing features, or bug fixes.
You won't lose any data due to the firmware update. Before the update begins, the data from your watch is synced to the
Flow web service.
WITH MOBILE DEVICE OR TABLET
You can update the firmware with your mobile device if you're using Polar Flow mobile app to sync your training and activity
data. The app will let you know if there's an update available and will guide you through it. We recommend that you plug in the
watch to a power source before starting the update to ensure flawless update operation.
The wireless firmware update may take up to 20 minutes, depending on your connection.
27
Page 28
WITH COMPUTER
Whenever a new firmware version is available, FlowSync will notify you when you connect the watch to your computer. The
firmware updates are downloaded via FlowSync.
To update the firmware:
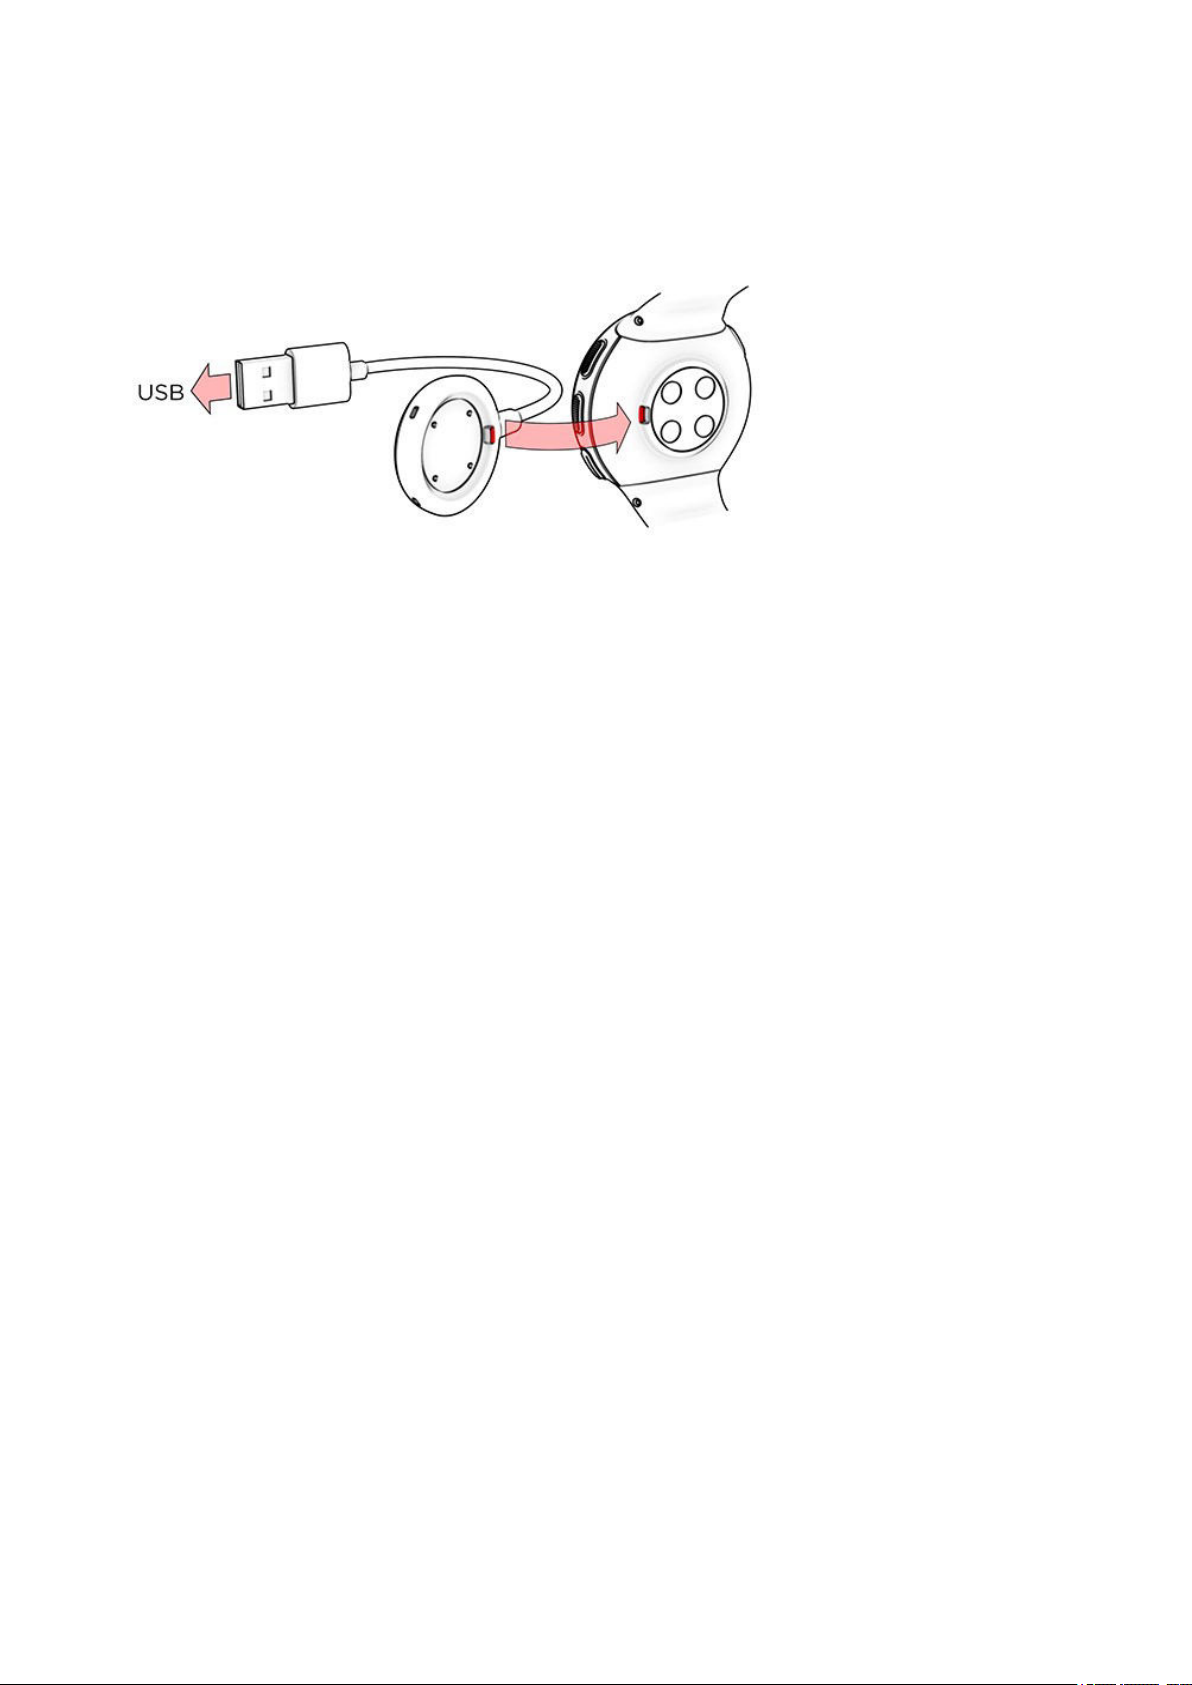
1. Plug your watch to your computer with the custom cable that came in the box. Make sure that the cable snaps into
place. Align the ledge on the cable with the slot on your watch (marked with red).
2. FlowSync starts syncing your data.
3. After syncing, you are asked to update the firmware.
4. Choose Yes. New firmware is installed (this may take up to 10 minutes), and the watch restarts. Please wait until the
firmware update has been finalized before you detach the watch from your computer.
28
Page 29
SETTINGS
GENERALSETTINGS
To view and edit your general settings, go to Settings > General settings.
In General settings you'll find:
• Pair and sync
• Bike settings (Visible only if you have paired a cycling sensor with your watch)
• Continuous HR tracking
• Recovery tracking
• Flight mode
• Backlight brightness
• Do not disturb
• Phone notifications
• Music controls
• Units
• Language
• Inactivity alert
• Vibrations
• I wear my watch on
• Positioning satellites
• About your watch
PAIR AND SYNC
• Pair and sync phone/Pair sensor or other device: Pair sensors or mobile devices with your watch. Sync data with
Flow app.
• Paired devices: View all the devices you have paired with your watch. These can include heart rate sensors, running
sensors, cycling sensors and mobile devices.
BIKE SETTINGS
Bike settings are visible only if you have paired a cycling sensor with your watch.
l Wheel size: Set the wheel size in millimeters. For instructions on measuring the wheel size, see Pairing sensors with
your watch.
l Crank length: Set the crank length in millimeters. The setting is visible only if you have paired a power sensor.
l Sensors in use: View all the sensors you have linked to the bike.
CONTINUOUS HR TRACKING
Turn the Continuous Heart Rate feature On, Off or Night-time only. If you choose Night-time only, set heart rate tracking to
begin at the earliest time you might go to bed.
For more information, see Continuous Heart Rate.
29
Page 30

RECOVERY TRACKING
Choose how to track your recovery.
Use Recovery Pro for specific guidance on balancing your training load and recovery, based on Orthostatic tests and
recovery questions. When set on the watch asks you to schedule an Orthostatic test for at least three days a week. Choose
the days, and choose Save. For information, see Recovery Pro.
Choose Nightly Recharge for automatic recovery tracking and tips, based on overnight measurements. The watch asks you
to turn on the Continuous heart rate tracking feature if it's not on already. Continuous heart rate tracking needs to be enabled
for Nightly Recharge to function. Choose On or Night-time only. If you choose Night-time only, set heart rate tracking to
begin at the earliest time you might go to bed.
FLIGHT MODE
Choose On or Off.
Flight mode cuts off all wireless communication from your watch. You can still use it, but you can't sync your data with the
Polar Flow mobile app or use it with any wireless accessories.
BACKLIGHT BRIGHTNESS
Choose High, Medium, Low or Only with light button. This setting only affects brightness of the backlight activation
gesture and the automatic backlight that is lit when pressing any button. The backlight brightness of the LIGHT button is not
affected, it cannot be changed.
DO NOT DISTURB
Choose Off, On or On ( - ) . Set the period when do not disturb is on. Choose when it Starts at and Ends at. When it is set on,
you will not get any notifications or call alerts. The backlight activation gesture and sounds are also disabled.
PHONE NOTIFICATIONS
Set phone notifications Off or On, when not training. Notifications are available when not training and during training
sessions.
MUSIC CONTROLS
Set music controls on for the training display and/or watch face. For more information see Music controls.
UNITS
Choose metric (kg, cm) or imperial (lb, ft). Set the units used to measure weight, height, distance and speed. To measure
temperature metric units use Celsius and imperial units use Fahrenheit.
LANGUAGE
You can choose the language you want to use on your watch. Your watch supports the following languages: Bahasa
Indonesia, Čeština, Dansk, Deutsch, Eesti, English, Español, Français, Italiano, 日 本 語 , Magyar, Nederlands, Norsk,
Polski, Português, 简 体 中 文 , Русский, Slovenščina, Suomi, Svenska or Türkçe.
INACTIVITY ALERT
Set the inactivity alert On or Off.
VIBRATIONS
Set vibrations for scrolling menu items On or Off.
I WEAR MY WATCH ON
Choose Left hand or Right hand.
30
Page 31

POSITIONING SATELLITES
Change the satellite navigation system your watch uses in addition to GPS. The setting is located on your watch in General
settings > Positioning satellites. You can choose GPS + GLONASS, GPS + Galileo or GPS + QZSS. The default setting is
GPS + GLONASS. These options give you the possibility to test different satellite navigation systems and find out if they can
give you improved performance in areas covered by them.
GPS + GLONASS
GLONASS is a Russian global satellite navigation system. It is the default setting as its global satellite visibility and reliability
is the best of these three, and in general we recommend using it.
GPS + Galileo
Galileo is a global navigation satellite system created by the European Union.
GPS + QZSS
QZSS is a four-satellite regional time transfer system and a satellite-based augmentation system developed to enhance GPS
in the Asia-Oceania regions, with a focus on Japan.
ABOUT YOUR WATCH
Check the device ID of your watch, as well as the firmware version, HW model, A-GPS expiry date and watch-specific
regulatory labels. Restart your watch, turn it off or reset all data and settings on it.
Restart: If you experience problems with your watch, you can try restarting it. Restarting the watch will not delete any of the
settings or your personal data from the watch.
Turn off: Turn your watch off. To turn it back on press and hold the OK button.
Reset all data and settings: Reset the watch back to factory settings. This will erase all data and settings on your watch.
CHOOSEVIEWS
The watch faces tell you a lot more than just the time. You'll get the most timely and relevant information right on the watch
face. Choose which watch faces are shown on the display in time view.
Go to Settings > Choose views and pick from:
l Time only
l Daily activity
l Cardio load status
l Current heart rate / Continuous HR tracking
l Latest training sessions
l Nightly Recharge / Last night's sleep
l FitSpark training guide
l Weather
l Weekly summary
l Your name
l Music controls
l Location
l Sunrise & sunset.
31
Page 32
You can swipe left or right, or scroll through the watch faces with the UP and DOWN buttons and open more details by
pressing the display or with the OK button.
WATCHFACESETTINGS
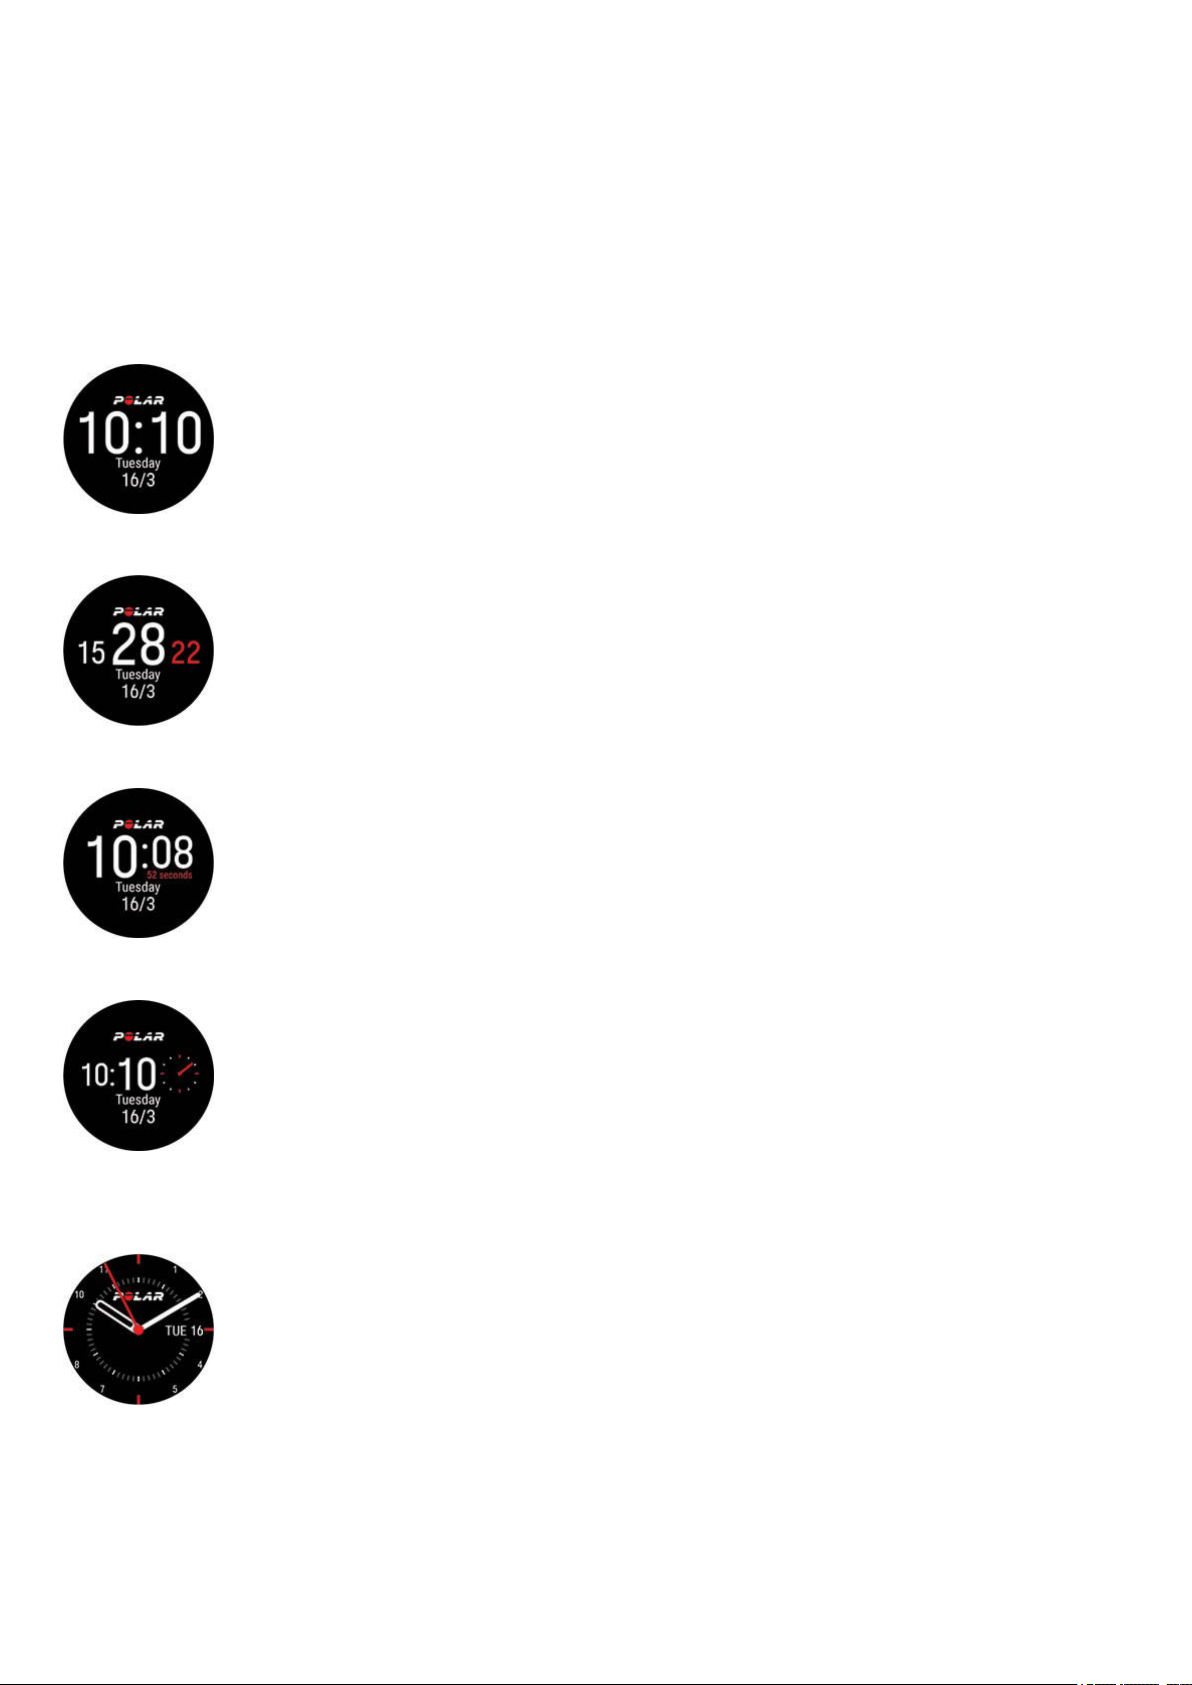
In Settings > Watch face you can choose between analogue and digital display and customize the watch style and color.
First choose Digital or Analog. Then choose the style.
Under Digital you'll find Symmetry, Minutes in middleSmall seconds and Seconds in circle.
Symmetry
Minutes in middle
Small seconds
Seconds in circle
Under Analog you'll find Classic, Art Deco, Lollipop and Pearl.
Classic
Art deco
32
Page 33
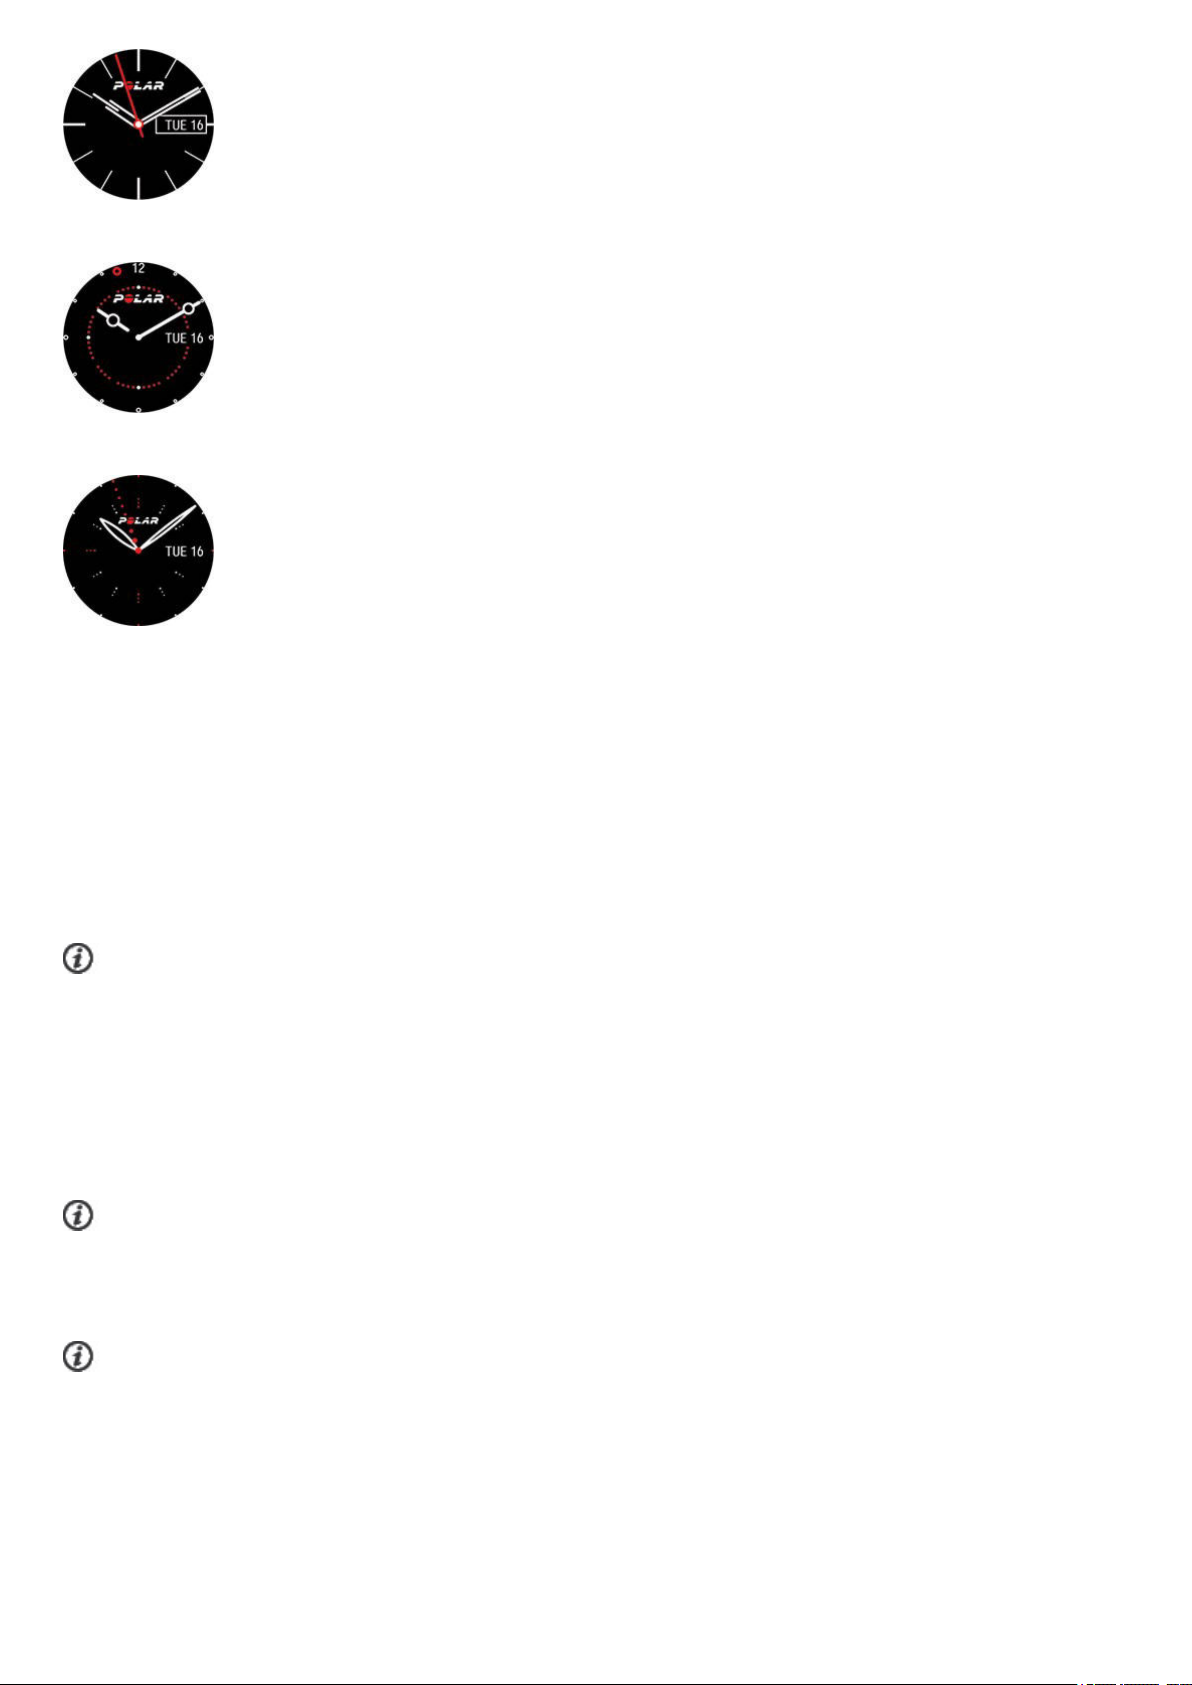
Lollipop
Pearl
Choose the color theme for your watch face. The available colors are red, orange, yellow, green, blue, purple, pink and peach.
Note that for the DigitalSymmetry option you cannot change the color.
TIME&DATE
To view and edit your time & date settings, go to Settings > Time & date
TIME
Set the time format: 24 h or 12 h.Then set the time of day.
When syncing with the Flow app and web service, the time of day is automatically updated from the service.
DATE
Set the date.
DATE FORMAT
Set the Date format, you can choose mm/dd/yyyy, dd/mm/yyyy, yyyy/mm/dd, dd-mm-yyyy, yyyy-mm-dd,
dd.mm.yyyy or yyyy.mm.dd.
When syncing with the Flow app and web service, the date is automatically updated from the service.
FIRST DAY OF WEEK
Choose the starting day of each week. Choose Monday, Saturday or Sunday.
When syncing with the Flow app and web service, the week's starting day is automatically updated from the service.
33
Page 34

PHYSICALSETTINGS
To view and edit your physical settings, go to Settings > Physical settings. It is important that you are precise with the
physical settings, especially when setting your weight, height, date of birth and sex, as they have an impact on the accuracy
of the measuring values, such as the heart rate zone limits and calorie expenditure.
In Physical settings you'll find:
• Weight
• Height
• Date of birth
• Sex
• Training background
• Activity goal
• Preferred sleep time
• Maximum heart rate
• Resting heart rate
• VO
2max
WEIGHT
Set your weight in kilograms (kg) or pounds (lbs).
HEIGHT
Set your height in centimeters (metric) or in feet and inches (imperial).
DATE OF BIRTH
Set your birthday. The order in which the date settings are depends on which time and date format you have chosen (24h: day
- month - year/12h: month - day - year).
SEX
Select Male or Female.
TRAINING BACKGROUND
Training background is an assessment of your long-term physical activity level. Select the alternative that best describes the
overall amount and intensity of your physical activity during the past three months.
• Occasional (0-1h/week): You do not participate regularly in programmed recreational sport or heavy physical activity,
e.g. you walk only for pleasure or exercise hard enough to cause heavy breathing or perspiration only occasionally.
• Regular (1-3h/week): You participate regularly in recreational sports, e.g. you run 5-10 km or 3-6 miles per week or
spend 1-3 hours per week in comparable physical activity, or your work requires modest physical activity.
• Frequent (3-5h/week): You participate at least 3 times a week in heavy physical exercise, e.g. you run 20-50 km/12-31
miles per week or spend 3-5 hours per week in comparable physical activity.
• Heavy (5-8h/week): You participate in heavy physical exercise at least 5 times a week, and you may sometimes take
part in mass sports events.
• Semi-pro (8-12h/week): You participate in heavy physical exercise almost daily, and you exercise to improve
performance for competitive purposes.
• Pro (>12h/week): You are an endurance athlete. You participate in heavy physical exercise to improve your
performance for competitive purposes.
34
Page 35

ACTIVITY GOAL
Daily activity goal is a good way to find out how active you really are in your everyday life. Choose your typical activity level
from three options and see how active you need to be to reach your daily activity goal.
The time you need to complete your daily activity goal depends on the level you have chosen and the intensity of your
activities. Age and gender also affect the intensity you need to reach your daily activity goal.
Level 1
If your day includes only a little sports and a lot of sitting, commuting by car or public transport and so on, we recommend
you pick this activity level.
Level 2
If you spend most of your day on your feet, perhaps due to the type of work you do or your daily chores, this is the right activity
level for you.
Level 3
If your work is physically demanding, you’re into sports or otherwise tend to be on the move and active, this is the activity
level for you.
PREFERRED SLEEP TIME
Set Your preferred sleep time to define how long you aim to sleep every night. By default, it is set to the average
recommendation for your age group (eight hours for adults from 18 to 64 years). If you feel that eight hours of sleep is too
much or too little for you, we recommend you adjust your preferred sleep time to meet your individual needs. By doing this,
you’ll get accurate feedback on how much sleep you got in comparison to your preferred sleep time.
MAXIMUM HEART RATE
Set your maximum heart rate, if you know your current maximum heart rate value. Your age-predicted maximum heart rate
value (220-age) is displayed as a default setting when you set this value for the first time.
HR
physical exertion.The most accurate method for determining your individual HR
test in a laboratory. HR
hereditary factors. To find out your maximum heart rate you can take the Running Performance Test.
is used to estimate energy expenditure. HR
max
is also crucial when determining training intensity. It is individual and depends on age and
max
is the highest number of heartbeats per minute during maximum
max
is to perform a maximal exercise stress
max
RESTING HEART RATE
Your resting heart rate is the lowest number of heartbeats per minute (bpm) when fully relaxed and without distractions. Your
age, fitness level, genetics, health status and sex affect the resting heart rate. A typical value for an adult is 55–75 bpm, but
your resting heart rate can be significantly lower than that, for example, if you’re very fit.
It’s best to measure your resting heart rate in the morning after a good night’s sleep, right after you wake up. It’s OK to go to
the bathroom first if it helps you to relax. Don’t do any strenuous training leading up to the measurement and make sure
you’re fully recovered from any activity. You should do the measurement more than once, preferably on consecutive
mornings, and calculate your average resting heart rate.
To measure your resting heart rate:
1. Wear your watch. Lie down on your back and relax.
2. After about 1 minute, start a training session on your wearable. Choose any sport profile, for example Other indoor.
3. Lie still and breathe calmly for 3–5 minutes. Don’t look at your training data during the measuring.
4. Stop the training session on your Polar device. Sync the wearable with the Polar Flow app or web service and check
the training summary for the value of your lowest heart rate (HR min)—this is your resting heart rate. Update your
resting heart rate to your physical settings in Polar Flow.
VO
2MAX
Set your VO2
max
.
35
Page 36
VO2
during maximal exercise; it is related directly to the maximal capacity of the heart to deliver blood to the muscles. VO2
can be measured or predicted by fitness tests (e.g. maximal exercise tests and submaximal exercise tests). To find out your
VO2
(maximal oxygen uptake, maximal aerobic power) is the maximal rate at which oxygen can be used by the body
max
you can take the
max
Running Performance Test or the Cycling Performance Test.
max
DISPLAYICONS
Flight mode is on. Flight mode cuts off all wireless communication from your watch. You can still use it, but
you can't sync your data with the Polar Flow mobile app or use it with any wireless accessories.
Do not disturb mode is on. When do not disturb is switched on, the watch will not vibrate when you
receive notifications or calls (the red dot will still appear at the bottom left of the display). Also, the
backlight activation gesture is disabled.
When do not disturb is switched on, the watch will not vibrate when you receive notifications or calls (the
red dot will still appear at the bottom of the display). Also, the backlight activation gesture is disabled.
Alarm is set. You can set the alarm in the quick settings menu.
Your paired phone is disconnected and you have notifications and/or music controls turned on. Check that
your phone is within Bluetooth range from your watch and Bluetooth is enabled on your phone.
Button lock is on. You can unlock the buttons by pressing and holding the LIGHT button.
RESTARTINGANDRESETTING
If you experience problems with your watch, try restarting it first. Restarting the watch will not delete any of the settings or
your personal data from the watch.
RESTART THE WATCH
1. On your watch, press the BACK button, and go to Settings > General settings > About your watch.
2. Scroll all the way down and choose Restart your watch.
RESET THE WATCH TO FACTORY SETTINGS
If restarting your watch didn't help, you can reset the watch back to factory settings. Note that resetting the watch back to
factory settings empties all personal data and settings from the watch, and you will need to set it up again for your personal
use. All data that you have synced from your watch to your Flow account is safe.
36
Page 37

Reset to factory settings from the watch
1. On your watch, press the BACK button, and go to Settings > General settings > About your watch.
2. Scroll all the way down and choose Reset all data and settings.
Reset to factory settings via FlowSync software
1. Go to flow.polar.com/start and download and then install the Polar FlowSync data transfer software onto your
computer.
2. Connect your watch to the computer’s USB port with the cable.
3. Open settings in FlowSync.
4. Choose the Factory Reset button.
5. If you use Flow app to sync, check the list of paired Bluetooth devices on your phone, and remove your watch from the
list if it's there.
After resetting back to factory settings you need to set up your watch again, either via mobile or computer. Just remember to
use the same Polar account in the setup you've used before resetting.
37
Page 38
TRAINING
WRIST-BASEDHEARTRATEMEASUREMENT
Your watch measures your heart rate from the wrist with the Polar Precision Prime™ sensor fusion technology. This new
heart rate innovation combines optical heart rate measurement with skin contact measurement, ruling out any disturbances
to the heart rate signal. It tracks your heart rate accurately even in the most demanding conditions and training sessions.
Although there are many subjective clues as to how your body is doing during exercise (perceived exertion, breathing rate,
physical sensations), none of them are as reliable as measuring heart rate. It is objective and affected by both internal and
external factors—meaning that you will have a dependable measure of your physical state.
WEARING YOUR WATCH WHEN MEASURING HEART RATE FROM YOUR WRIST
To measure wrist-based heart rate accurately during training (and when using the Continuous Heart Rate feature) make sure
that you wear the watch correctly:
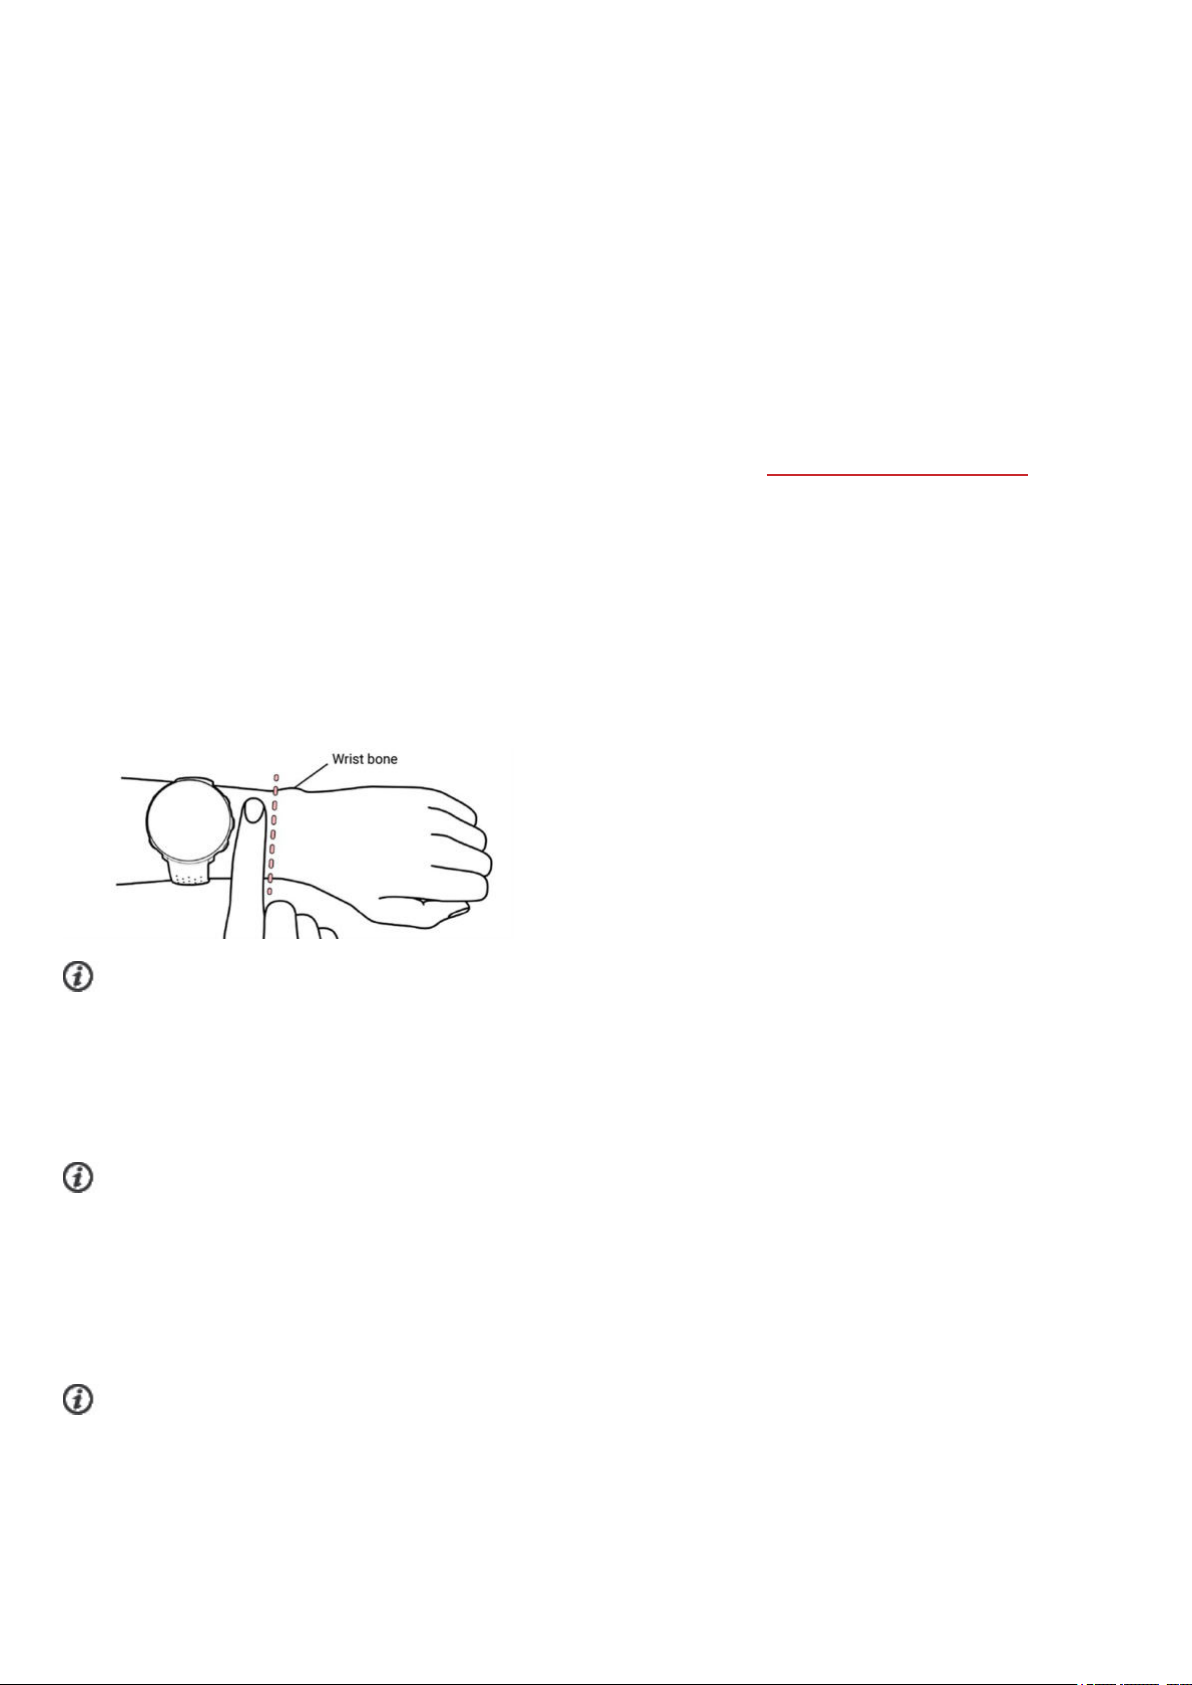
l Wear your watch on top of your wrist, at least a finger’s width up from the wrist bone (see the picture below).
l Tighten the wristband firmly around your wrist. The sensor on the back must be in constant touch with your skin and
the watch should not be able to move on your arm. A good way to check that the wristband is not too loose is if you
push the wristband lightly up from both sides of your arm and make sure the sensor doesn’t lift from your skin. When
pushing the wristband up you shouldn't see the LED light shining from the sensor.
l For most accurate heart rate measurement, we advise you to wear your watch for a few minutes prior to starting the
heart rate measurement. Also it's a good idea to warm up the skin if your hands and skin get cold easily. Get the blood
going before starting your session!
If you have tattoos on the skin of your wrist, avoid placing the sensor right on it as it may prevent accurate readings.
In sports where it's more challenging to keep the sensor stationary on your wrist or where you have pressure or movement in
muscles or tendons near the sensor, we recommend using a Polar heart rate sensor with a chest strap if you’re looking for
supreme accuracy in your training. Your watch is compatible with Bluetooth® heart rate sensors, like Polar H10. The Polar
H10 heart rate sensor is more responsive to rapidly increasing or decreasing heart rate, so it’s the ideal option also for interval
type of training with quick sprints.
To maintain the best possible performance of the wrist-based heart rate measurement, keep your watch clean and
prevent scratches. After a sweaty training session, we recommend that you wash the watch under running water with a mild
soap and water solution. Then wipe it dry with a soft towel. Let it fully dry before charging.
WEARING YOUR WATCH WHEN NOT MEASURING HEART RATE FROM YOUR WRIST
Loosen the wristband a bit for a more comfortable fit and to let your skin breathe. Wear the watch just as you would wear a
normal watch.
Every once in a while it’s a good idea to let your wrist have a breather, especially if you have sensitive skin. Take off your
watch and recharge it. This way both your skin and your watch can have a rest, and be ready for your next training event.
38
Page 39
STARTATRAININGSESSION
1. Wear your watch and tighten the wristband.
2. To enter the pre-training mode, press and hold OK in time view or press BACK to enter the main menu and choose
Start training
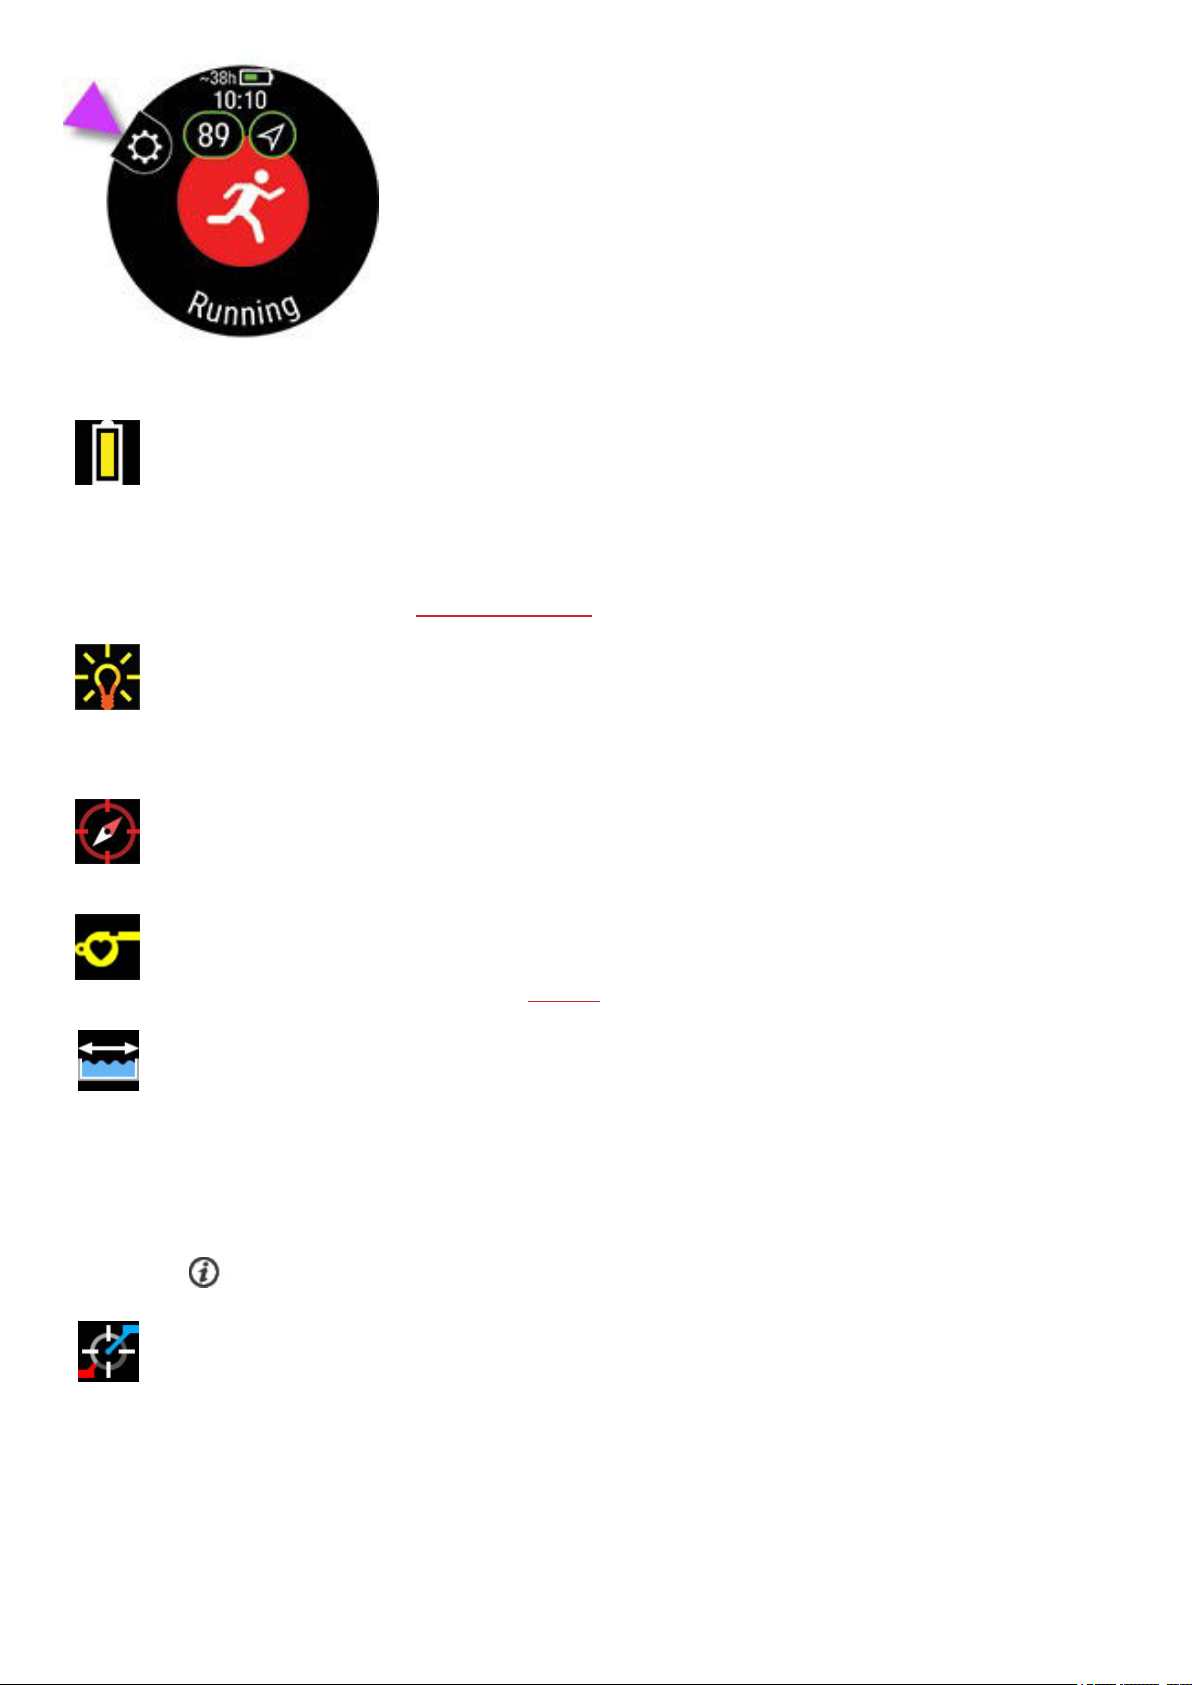
From the pre-training mode, you can access quick menu by tapping the icon or with
the LIGHT button. The options displayed in the quick menu depend on the sport you
have chosen and whether you are using GPS.
You can, for example, choose a favorite training target or route you want to perform
and add timers to your training views. Power save options are also set on from here.
For more information, see Quick menu.
After your choice the watch returns to the pre-training mode.
3. Browse to your preferred sport.
4. Stay in the pre-training mode until the watch has found your heart rate and the GPS satellite signals (if applicable to
your sport) to make sure your training data is accurate. To catch GPS satellite signals, go outdoors and away from tall
buildings and trees. Keep your watch still with the display upwards and avoid touching the watch during the GPS signal
search.
If you have paired an optional Bluetooth sensor with your watch, the watch will automatically start searching for
the sensor signal as well.
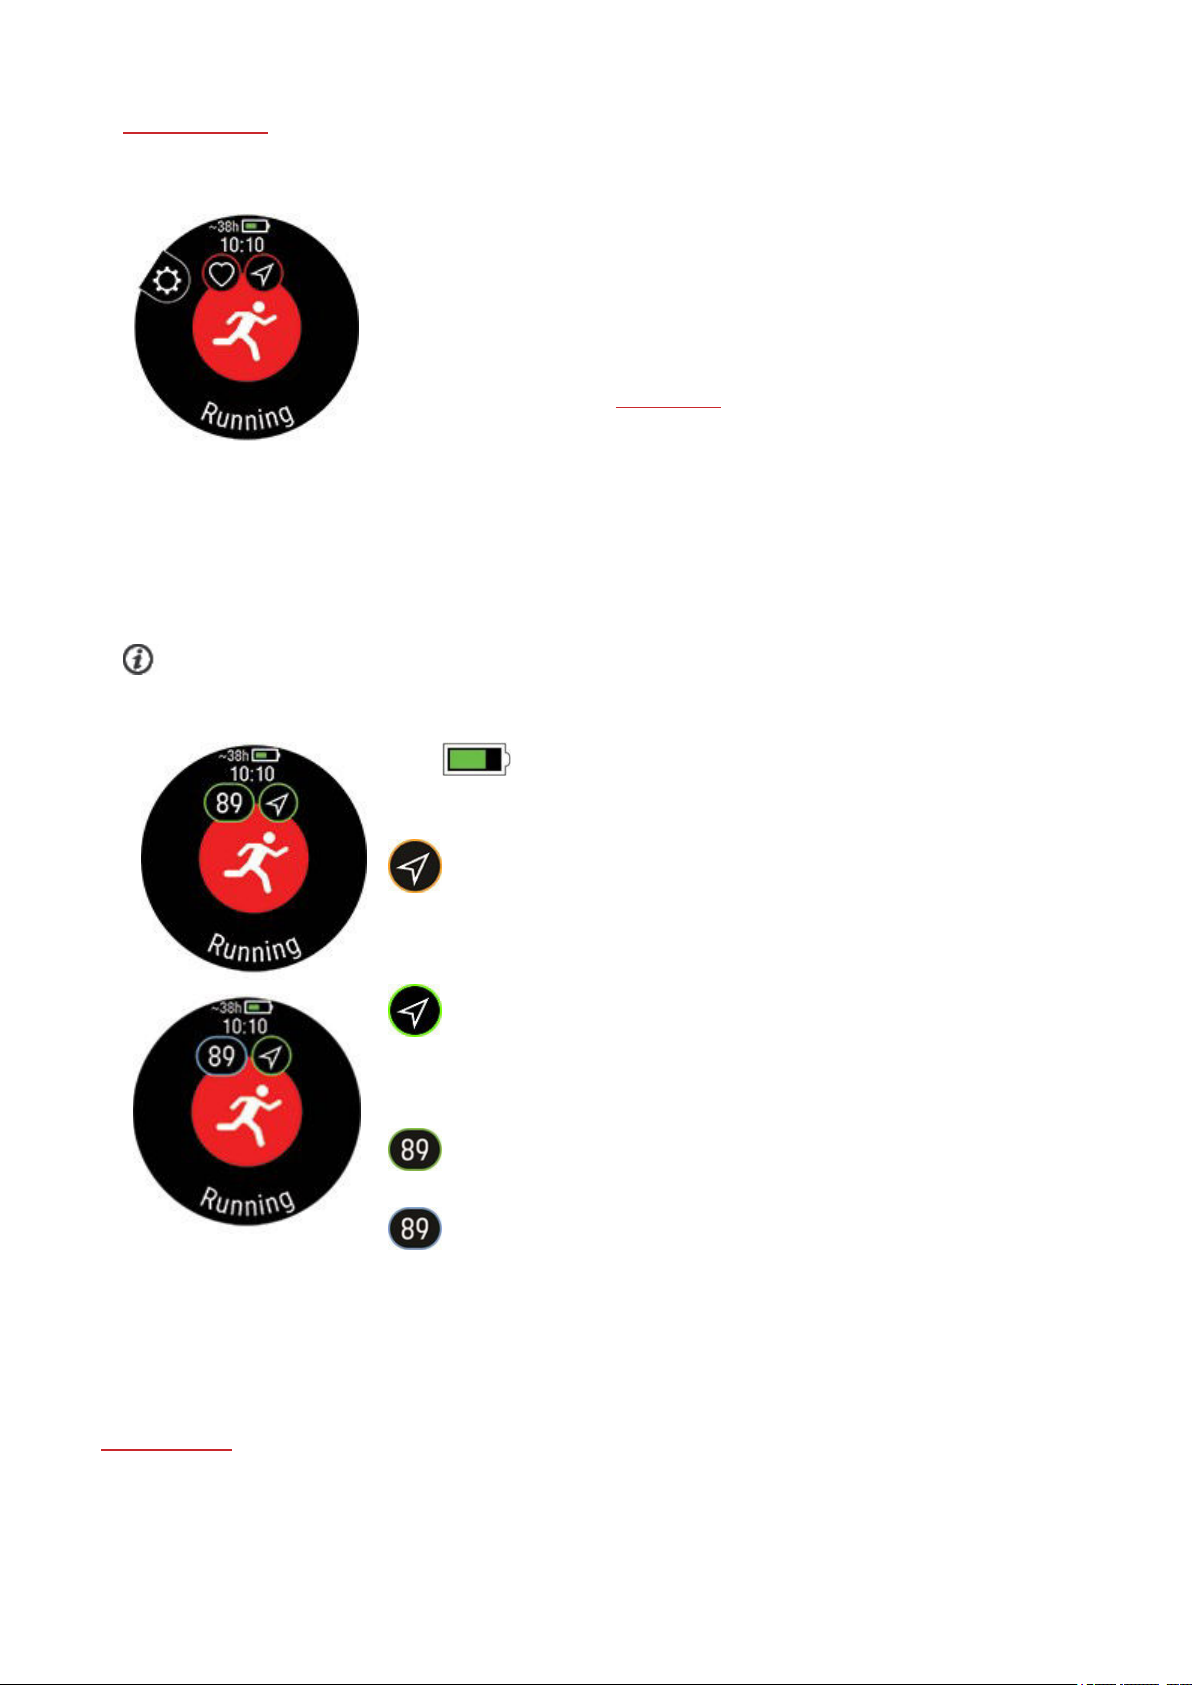
~ 38h Estimated training time with current settings. By using power save
settings, the estimated training time can be extended.
The circle around the GPS icon will turn orange when the minimum amount of
satellites (4) needed for the GPS fix are found. You can start your session but for
better accuracy wait until the circle turns green.
The circle around the GPS icon will turn green when enough satellites required
for good accuracy have been found. The watch notifies you with a sound and
vibration.
The watch has found your heart rate when your heart rate is shown.
When you're wearing a Polar heart rate sensor that's paired with your watch,
the watch automatically uses the connected sensor to measure your heart rate
during training sessions. A blue circle around the heart rate symbol indicates that
your watch uses the connected sensor to measure your heart rate.
5. When all signals are found, press OK to start training recording.
See
During Training for more information on what you can do with your watch during training.
39
Page 40
START A PLANNED TRAINING SESSION
You can plan your training and create detailed training targets in the Polar Flow app or the Polar Flow web service and sync
them to your watch.
To start a planned training session scheduled for the current day:
1. Enter the pre-training mode by pressing and holding OK in time view.
2. You'll be prompted to start a training target you've scheduled for the day.
3. Press OK to view the target information.
4. Press OK to return to pre-training mode, and choose the sport profile you want to use.
5. When the watch has found all the signals, press OK. Recording started is displayed and you can start training.
Your watch will guide you towards completing your target during training. See During Training for more information.
Your planned training targets will also be included in the FitSpark training suggestions.
START A MULTISPORT TRAINING SESSION
Multisport allows you to include multiple sports in one training session, and seamlessly switch between sports without
interrupting your training recording. During a multisport training session your transition times between sports are
automatically monitored, allowing you to see how long it took you to switch from one sport to another.
There are two different ways to perform a multisport training session: fixed multisport and free multisport. In a fixed
multisport (multisport profiles in the Polar sports list) like triathlon, the order of the sports is fixed, and they must be
performed in that specific order. In free multisport, you can choose what sports you perform and in which order you perform
them by selecting them from the sport list. You can also switch back and forth between sports.
Before starting a multisport training session, make sure that you have set the sport profile settings for each of the sports that
you are going to use for the training session. For more information, see Sport profiles in Flow.
1. Press BACK to enter the main menu, choose Start training, and then browse to a sport profile. Choose Triathlon, Free
multisport or any other multisport profile (can be added in the Flow web service).
2. Once your watch has found all the signals, press OK. Recording started is displayed and you can start training.
3. To change the sport press BACK to go to transition mode.
4. Choose your next sport, and press OK (your transition time is shown) and continue training.
QUICKMENU
You can access the quick menu from pre-training mode, during a session when paused and during transition mode in
multisport sessions. In pre-training mode it can be accessed by tapping the icon or with the LIGHT button. In pause and
transition mode it can only be accessed with the LIGHT button.
40
Page 41
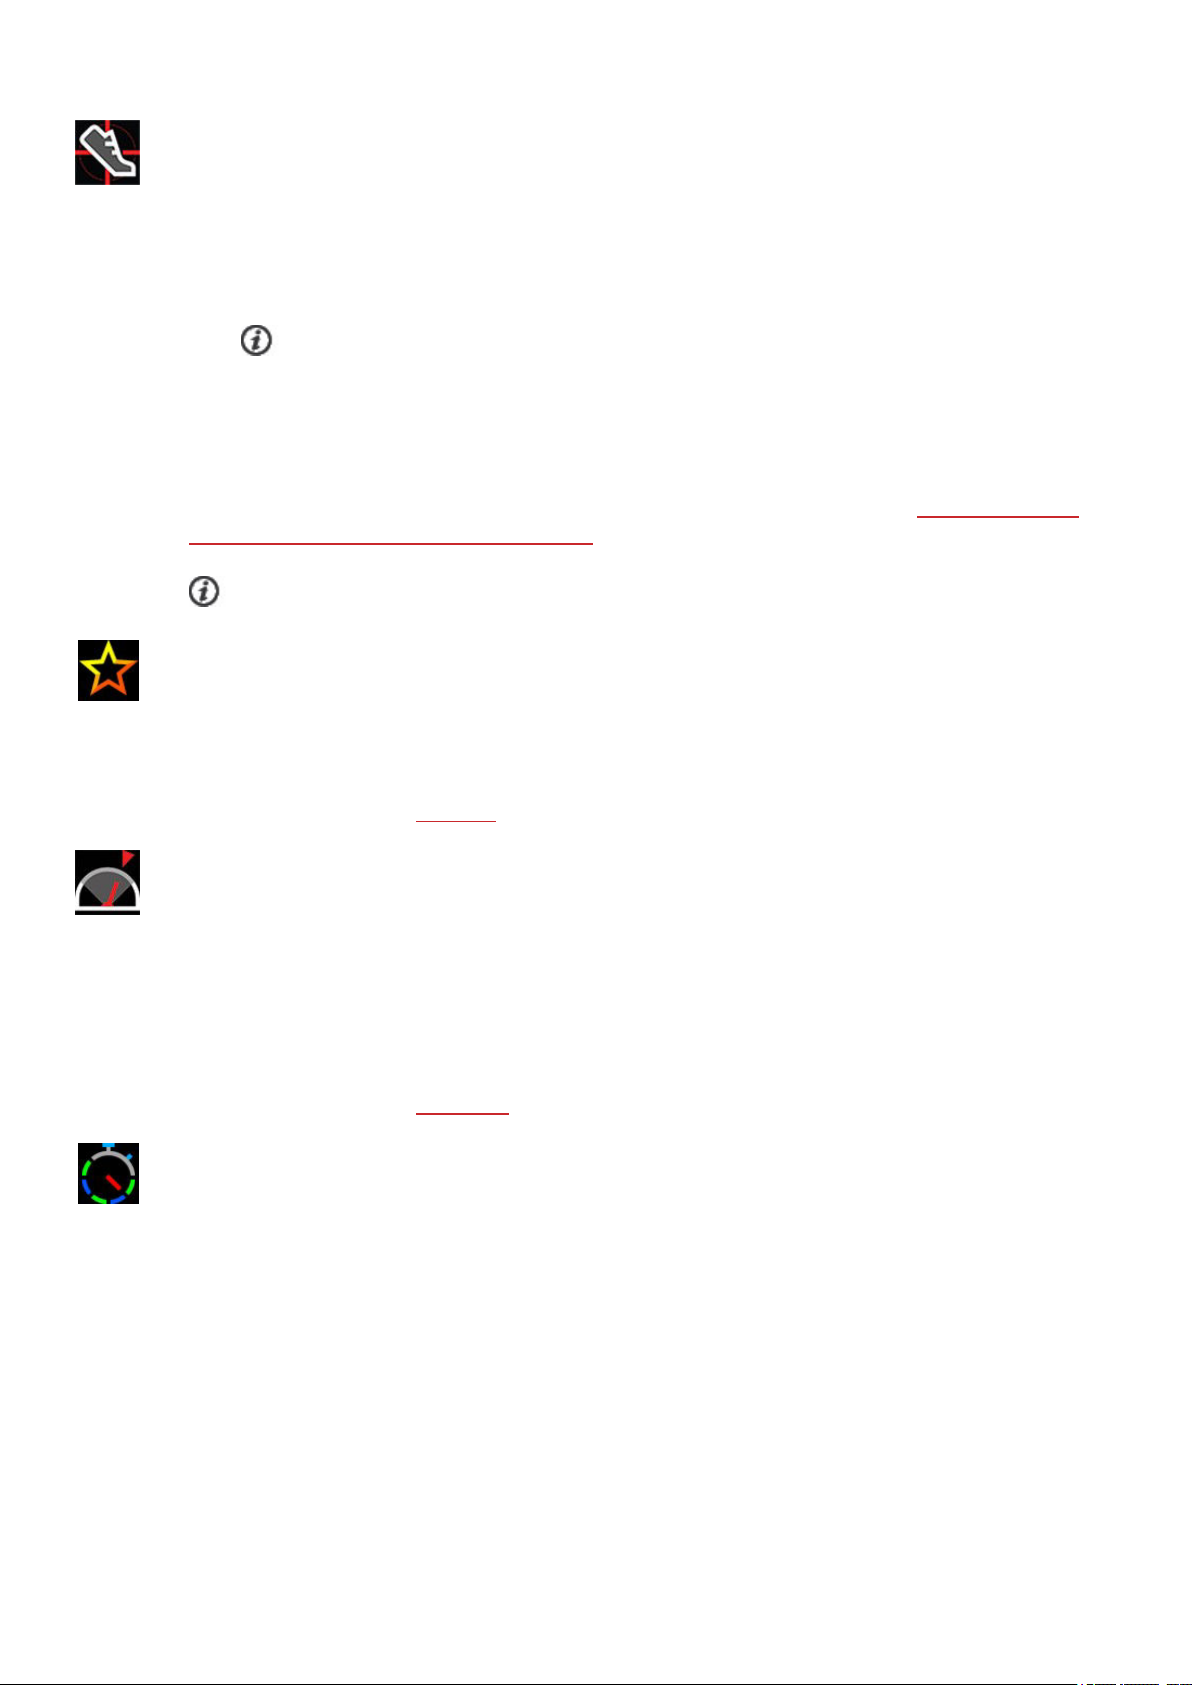
The options displayed in the quick menu depend on the sport you have chosen and whether you are using GPS.
Power save settings:
The power save settings allow you to extend your training time by changing the GPSrecording rate, setting
Wrist-based heart rate off and using the Screen saver. These settings let you optimize battery usage and
get more training time for extra long sessions or when the battery is running low.
For more information, see Power save settings
Backlight:
Set the Backlight always on feature On or Off. With always on chosen the watch display will be illuminated
throughout your training session. The backlight setting will default back to Off after you finish your training
session. Please note that the always on setting will drain your battery much faster than the default setting.
Calibrate compass;
Follow the instructions on the display to calibrate the compass.
Our suggestions:
In Our suggestions you'll find the daily FitSpark training suggestions.
Pool length:
When using the Swimming/Pool swimming profile, it’s important that you choose the correct pool length, as
it affects pace, distance and stroke calculation, as well as your SWOLF score. Press OK to access the Pool
length setting and change the previously set pool length if necessary. The default lengths are 25 meters, 50
meters and 25 yards, but you can also set it manually to a custom length. The minimum length that can be
chosen is 20 meters/yards.
Pool length setting is only available in the pre-training mode from the quick menu.
Calibrate power sensor:
If you have paired a third-party cycling power sensor with your watch, you can calibrate the sensor from the
quick menu. First, choose one of the cycling sport profiles and wake up the transmitters by rotating the
cranks. Then choose Calibrate power sensor from the quick menu and follow the on-screen instructions
to calibrate your sensor. For calibration instructions specific to your power sensor, see the manufacturer's
41
Page 42
instructions.
Calibrate stride sensor:
There are two ways to manually calibrate your stride sensor via the quick menu. Choose one of the running
sport profiles and then choose Calibrate stride sensor > Calibrate by running or Calibration factor.
l Calibrate by running: Start the training session and run a distance you know. The distance has to be
more than 400 meters. When you have ran the distance, press OK to take a lap. Set the actual distance
you have ran and press OK. The calibration factor is updated.
Please note that interval timer cannot used during the calibration. If you have set the interval timer
on, the watch will ask you to turn it off to enable manual stride sensor calibration. You can turn the
timer on from the pause mode quick menu after calibration.
l Calibration factor: Set the calibration factor manually if you know the factor which gives you accurate
distance.
For detailed instructions on manual and automatic calibration of a stride sensor, see Calibrating a Polar
stride sensor with Grit X/Vantage V/Vantage M.
This option is shown only if you have paired a stride sensor with your watch.
Favorites:
In Favorites you'll find training targets that you have saved as favorites in the Flow web service, and sync it
to your watch. Choose a favorite training target you want to perform. After your choice, the watch returns to
the pre-training mode where you can start the training session.
For more information, see Favorites.
Race pace:
The Race Pace feature helps you keep a steady pace and achieve your target time for a set distance. Define
a target time for the distance - 45 minutes for a 10k run for example and follow how far behind or ahead you
are compared to your pre-set target. You can also check what the steady pace/speed to meet your target is.
Race Pace can be set on your watch. Just choose the distance and target duration and you’re ready to go.
You can also set a Race Pace target in the Flow web service or app, and sync it to your watch.
For more information, see Race Pace.
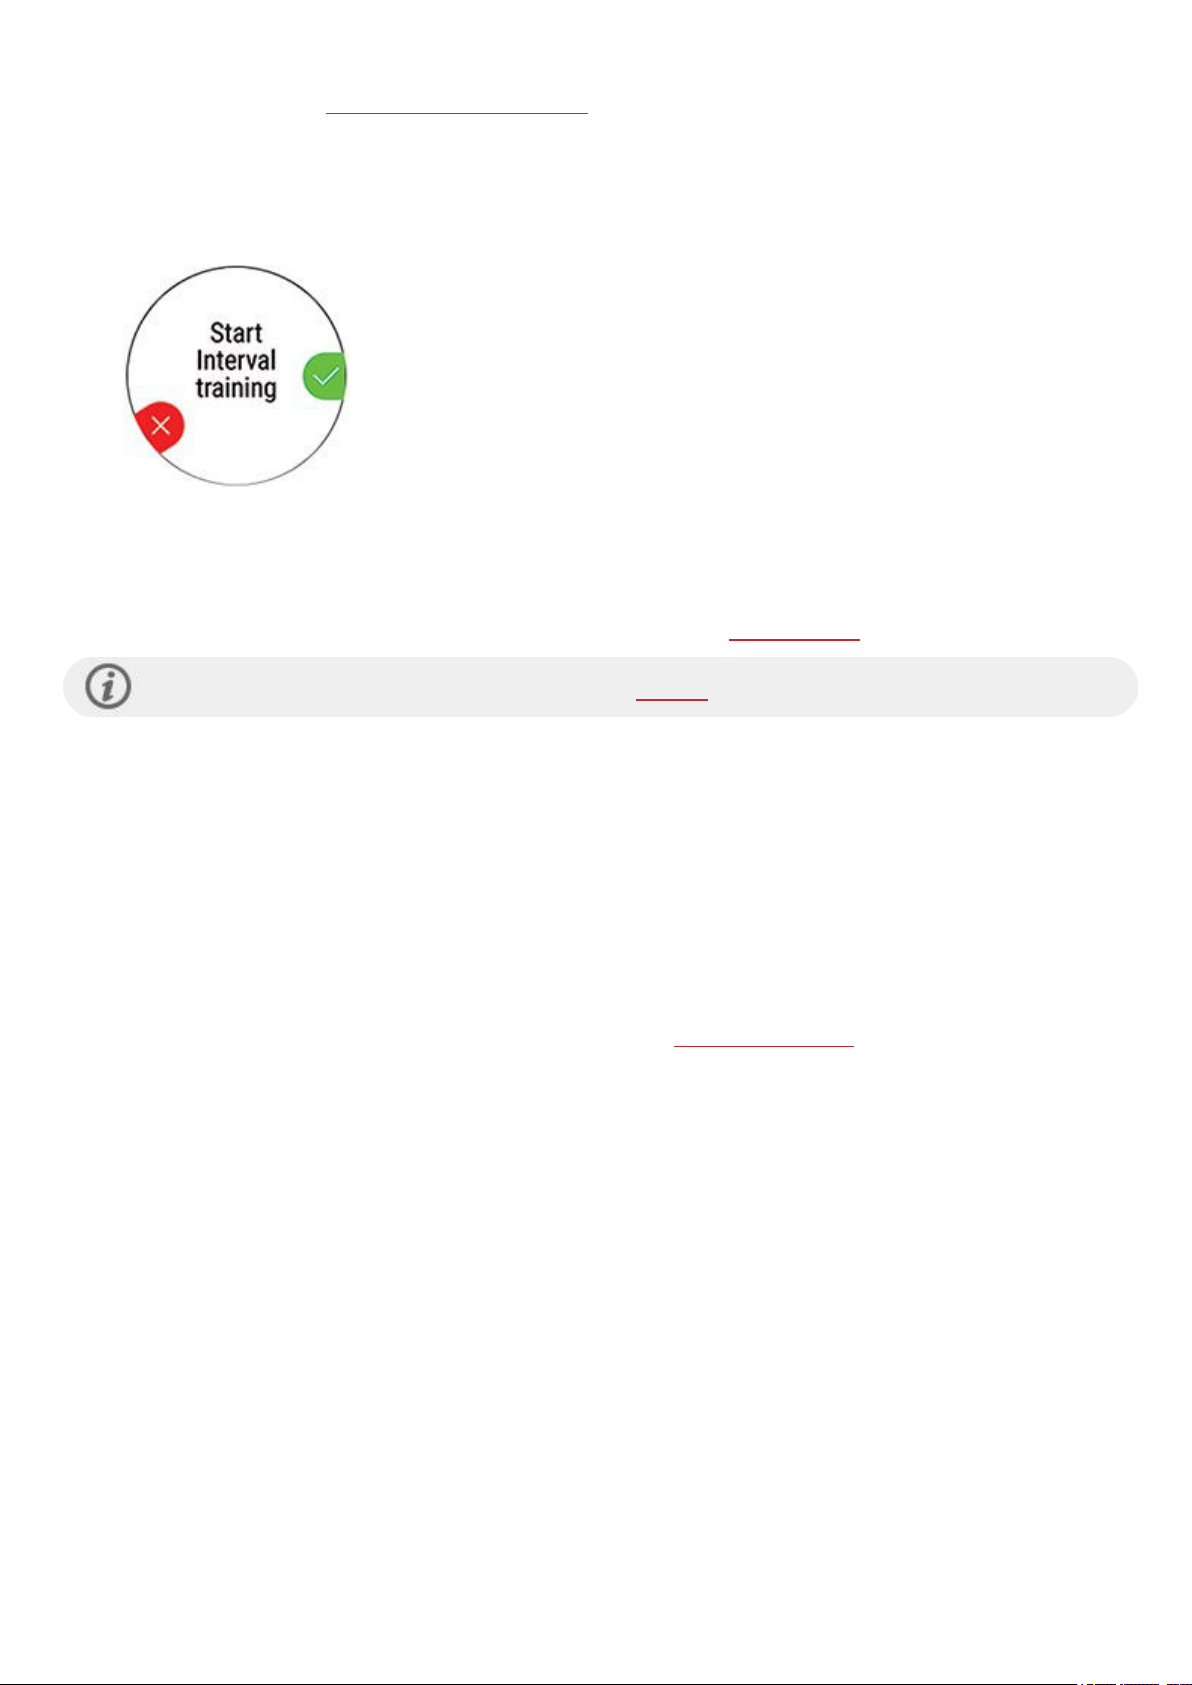
Interval timer:
You can set time and/or distance based interval timers to precisely time work and recovery phases in your
interval training sessions.
To add interval timer to your training views for the session, choose Timer for this session > On. You can
use a previously set timer or create a new timer by returning to the quick menu and choosing Interval timer
> Set interval timer:
1. Choose Time-based or Distance-based: Time-based: Define minutes and seconds for the timer and
press OK. Distance-based: Set the distance for the timer and press OK. Set another timer? is shown.
To set another timer, press OK.
42
Page 43
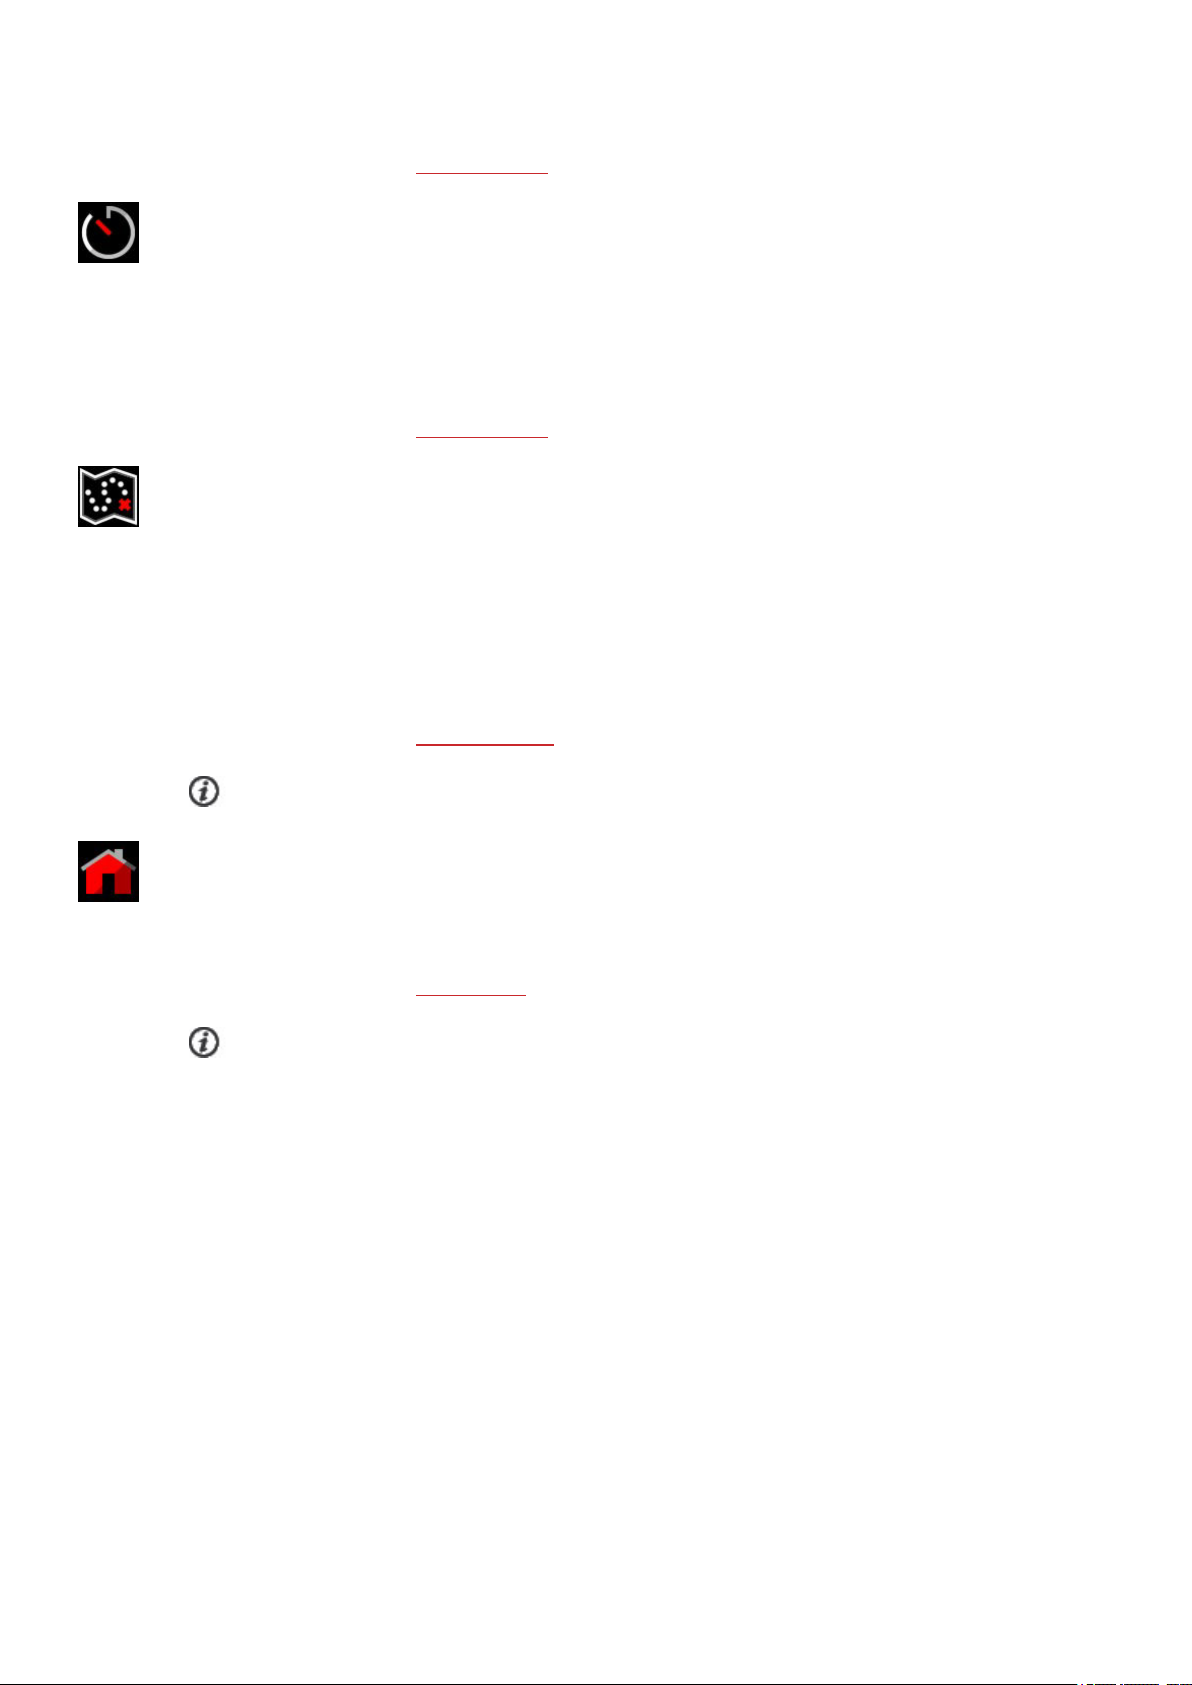
2. When completed, the watch returns to pre-training mode where you can start the training session. The
timer starts when you start the training session.
For more information, see
Countdown timer:
To add countdown timer to your training views for the session, choose Timer for this session > On. You
can use a previously set timer or create a new timer by returning to the quick menu and choosing
Countdown timer > Set timer. Set the countdown time, and press OK to confirm. When completed, the
watch returns to pre-training mode where you can start the training session. The timer starts when you start
the training session.
For more information, see During Training.
Routes:
In Routes, you'll find the routes that you have saved as favorites in the Flow web service Explore view or in
the analysis view of your training session, and synced to your watch. Komoot routes are also found here.
Choose the route from the list, and then choose where you want to start the route: Start point (original
direction), Mid-route (original direction), End point to reverse direction or Mid-route to reverse
direction.
For more information, see Route Guidance.
During Training.
Routes are only available in the pre-training mode quick menu if GPS is set on for the sport profile.
Back to start:
The back to start feature guides you back to the starting point of your session. To add the Back to start
view to your training views of the current training session, choose Back to start on, and press OK.
For more information, see Back to start.
The back to start feature is only available if GPS is set on for the sport profile.
When you choose a training target for your session, the Favorites and Routes options are crossed out in the quick menu.
This is because you can only choose one target for the session. And if you choose a route for your session, the Back to start
feature will be crossed out in the quick menu because Routes and Back to start features cannot be chosen at the same
time. To change the target, choose the crossed out option and you will be asked if you want to change your target or route.
Confirm with OK to choose another target.
DURINGTRAINING
BROWSE THE TRAINING VIEWS
During training you can browse through the training views with UP/DOWN. Note that the available training views and the
information you see on the training views depend on the sport you've chosen and on your edit of the chosen sport profile.
43
Page 44
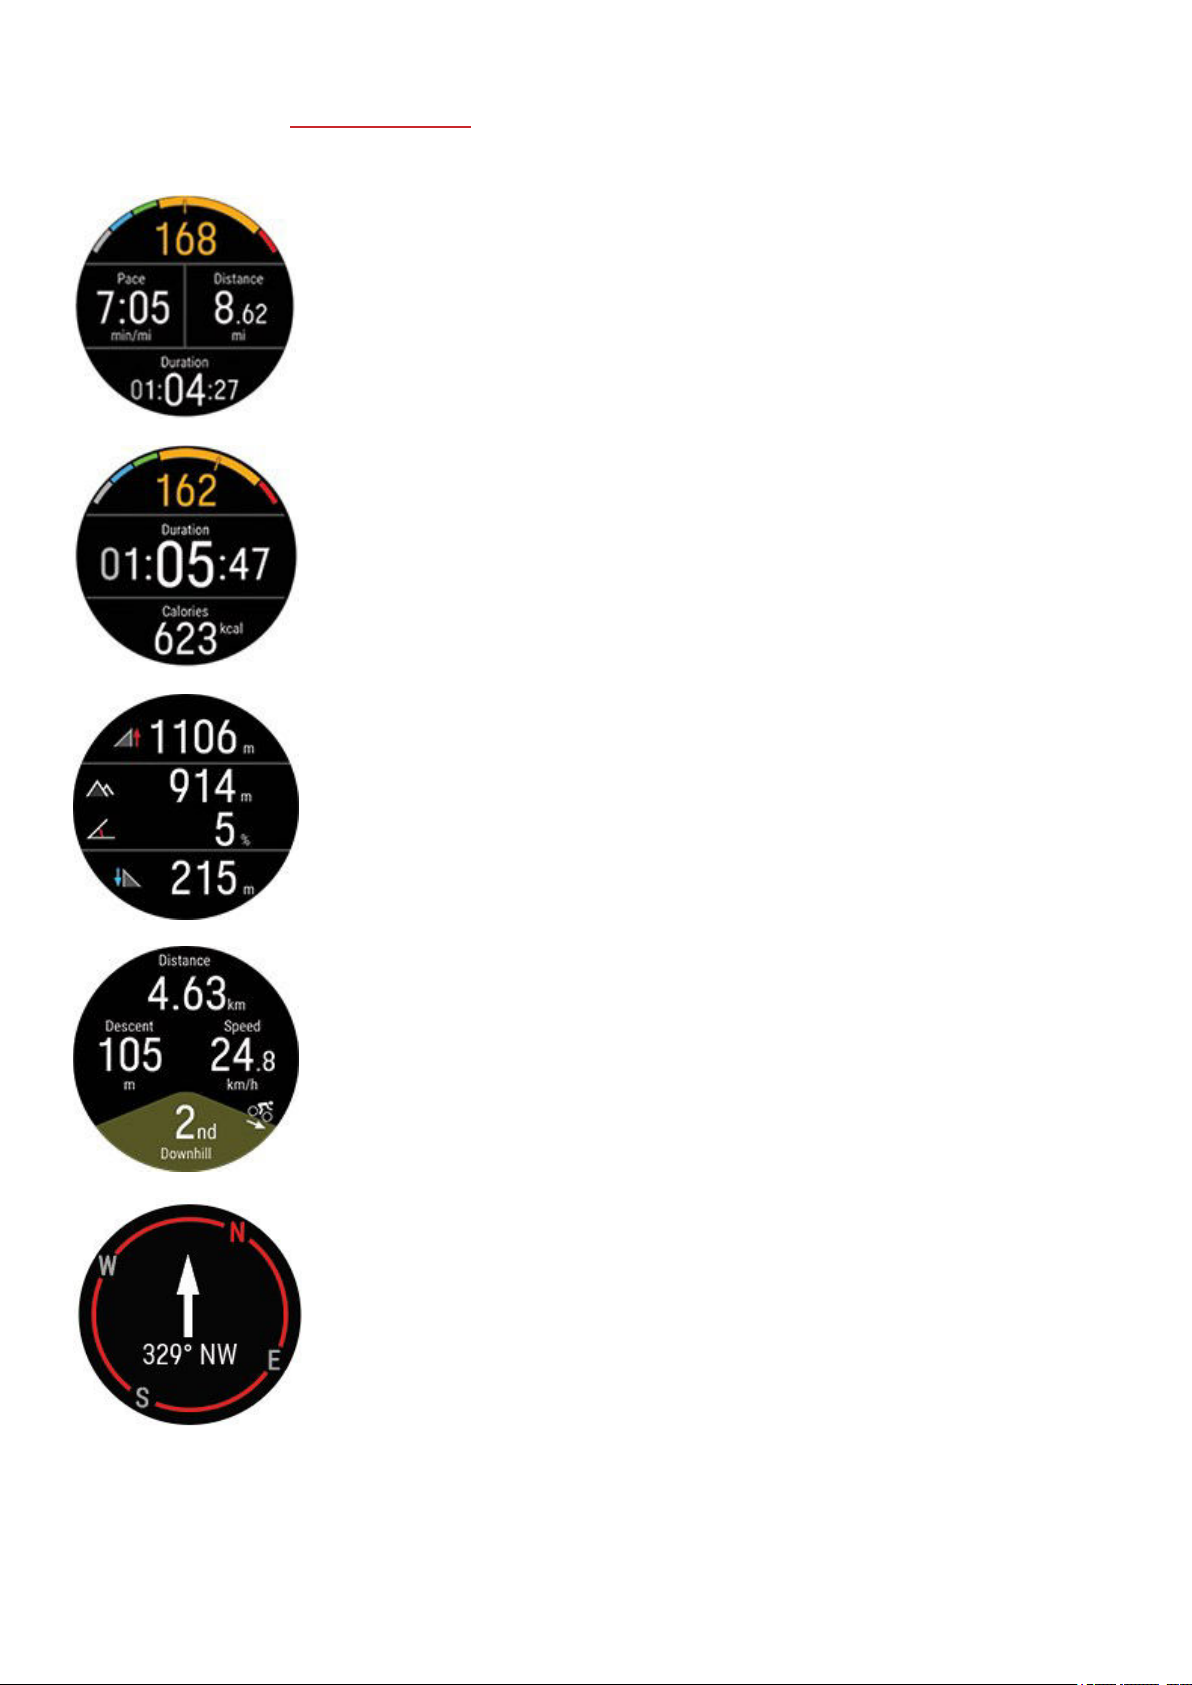
You can add sport profiles on your watch and define the settings for each sport profile in the Polar Flow app and web service.
You can create tailored training views for each sport you do and choose what data you want to follow during your sessions.
For more information, see
Sport profiles in Flow.
For example, your training views can have the following information:
Your heart rate and the heart rate ZonePointer
Distance
Duration
Pace/Speed
Your heart rate and the heart rate ZonePointer
Duration
Calories
Ascent
Your current altitude (press OK to calibrate altitude manually)
Descent
Distance of current segment (flat, uphill or downhill)
Ascent/descent
Speed/Pace
Uphill/downhill count
Your bearing
Cardinal directions
44
Page 45
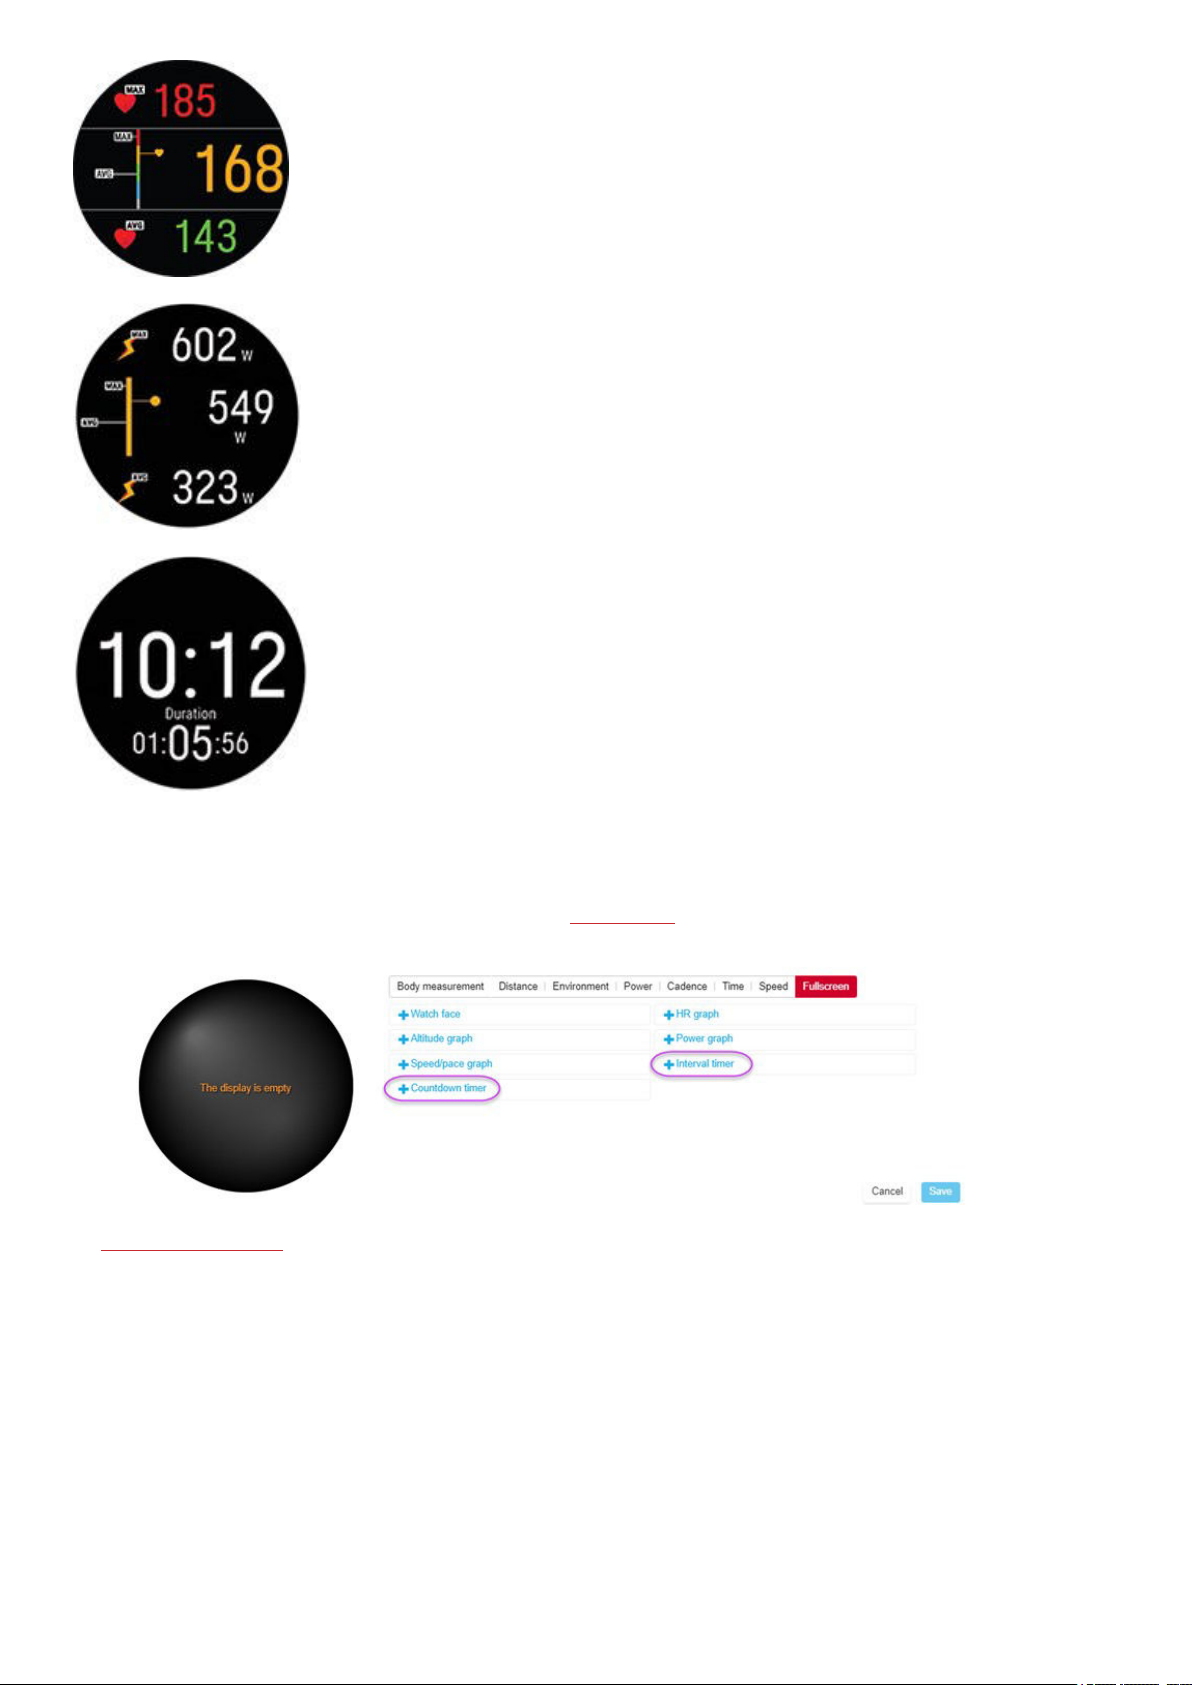
Maximum heart rate
Heart rate graph and your current heart rate
Average heart rate
Maximum power
Power graph and your current power
Average power
Time of day
Duration
SET TIMERS
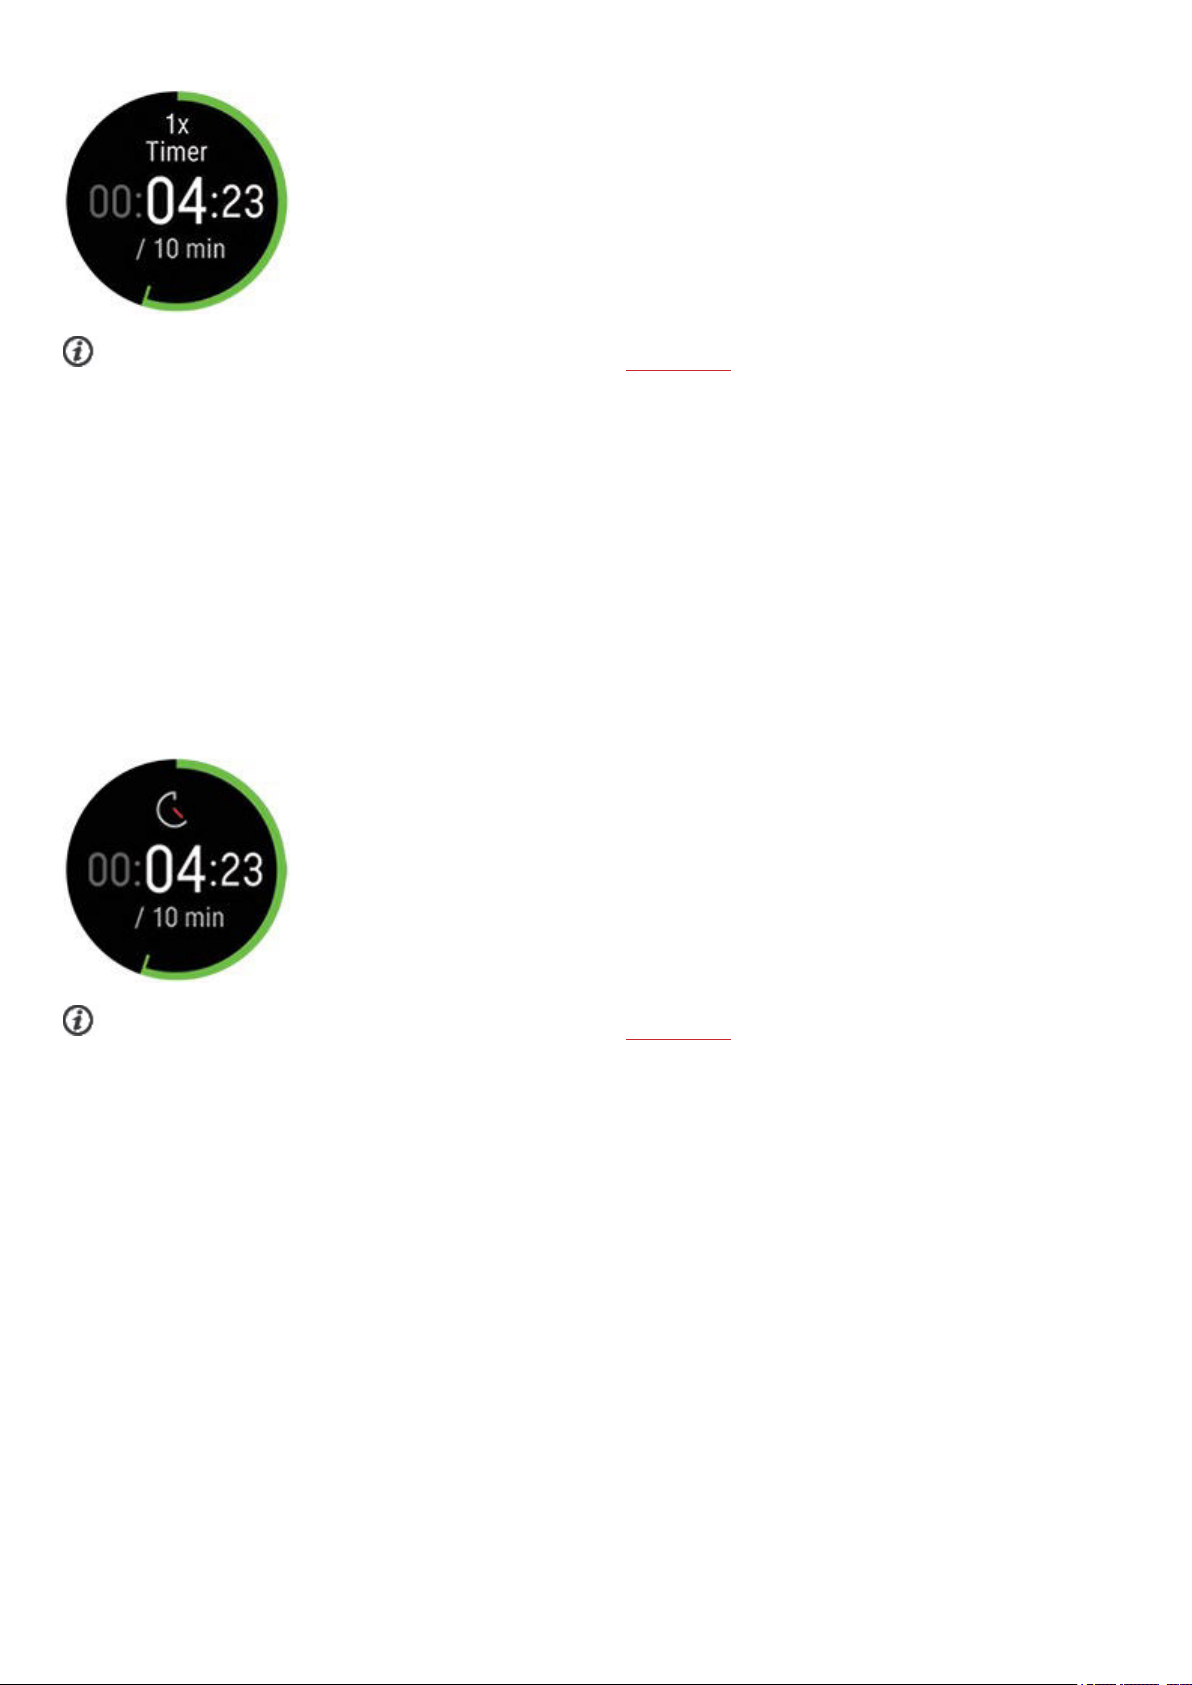
Before you can use timers during training, you need to add the timers to your training views. You can do this either by setting
the timer view on for your current training session from the Quick menu or by adding the timers to the training views of the
sport profile in the Flow web service sport profile settings and syncing the settings to your watch.
See Sport Profiles in Flow for more information.
45
Page 46
Interval Timer
If you set the timer view on for your training session from the Quick menu, the timer starts when you start the training
session. You can stop the timer and start a new timer as instructed below.
If you have added the timer in the training views of the sport profile you are using, you can start the timer as follows:
1. Browse to the Interval timer view and press and hold OK. Choose Start to use a previously set timer or create a new
timer in Set interval timer:
2. Choose Time-based or Distance-based: Time-based: Define minutes and seconds for the timer and press OK.
Distance-based: Set the distance for the timer and press OK.
3. Set another timer? is shown. To set another timer, press OK.
4. When completed, choose Start to start the interval timer. At the end of each interval, the watch notifies you by
vibrating.
To stop the timer, press and hold OK and choose Stop timer.
Countdown Timer
If you set the timer view on for your training session from the Quick menu, the timer starts when you start the training
session. You can stop the timer and start a new timer as instructed below.
If you have added the timer to the training views of the sport profile you are using, start the timer as follows:
1. Browse to the Countdown timer view and press and hold OK.
2. Choose Start to use a previously set timer or choose Set countdown timer to set a new countdown time. When
completed, choose Start to start the countdown timer.
3. At the end of the countdown, the watch notifies you by vibrating. If you want to restart the countdown timer, press and
hold OK and choose Start.
To stop the timer, press and hold OK and choose Stop timer.
LOCK A HEART RATE, SPEED OR POWER ZONE
With the ZoneLock feature you can lock the zone you’re currently in based on heart rate, speed/pace or power, and make sure
you stay in the chosen zone during training without having to check your watch. If you go outside the locked zone during
training, your watch notifies you with a vibration.
46
Page 47
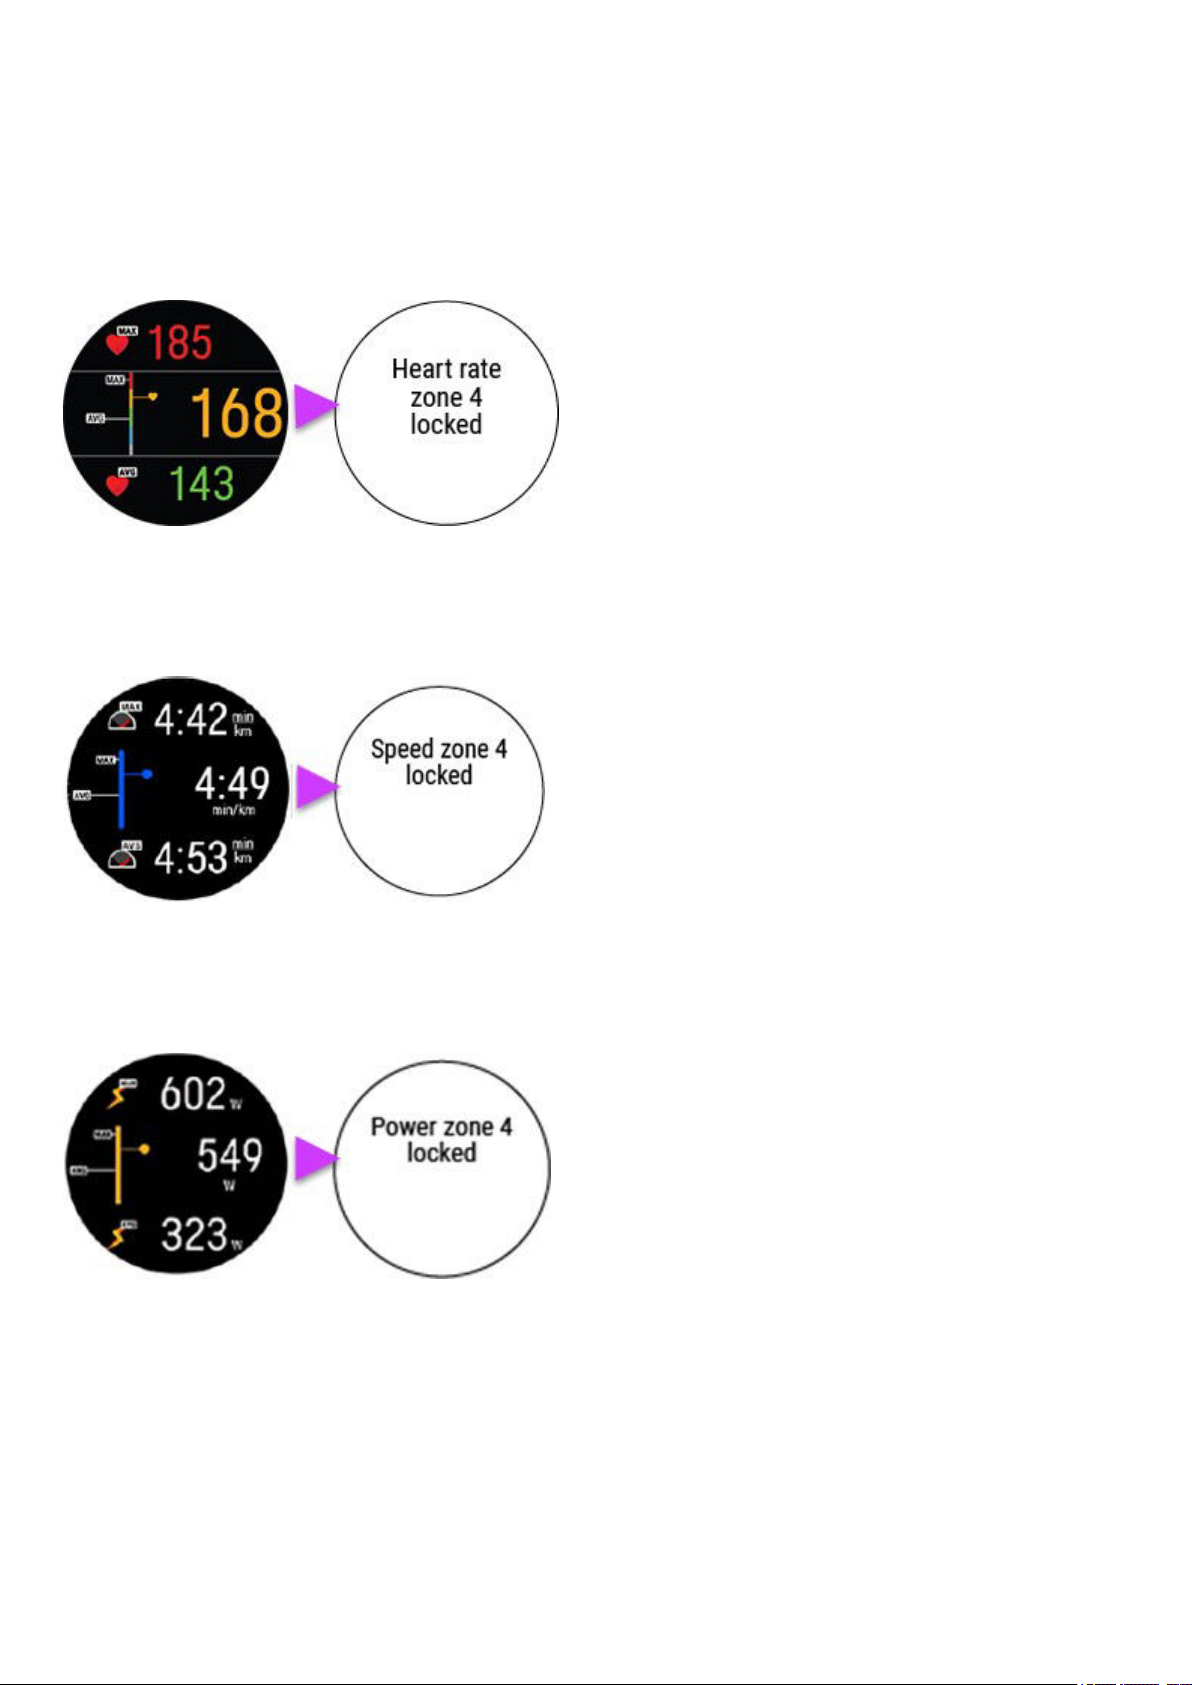
The ZoneLock feature for heart rate, speed/pace and power zones must be set on for each sport profile individually. You can
set it on in the Flow web service sport profile settings under the Heart rate, Speed/Pace or Power settings.
In order to use ZoneLock to lock your speed/pace or power zone, you will also need to add the fullscreen
or Power graph view to the training views of the sport profile.
Speed/pace graph
Lock a heart rate zone
To lock the heart rate zone you are currently in, press and hold OK in the fullscreen HR graph view or in any of the views
that are editable in Flow.
To unlock the zone, press and hold the OK button again.
Lock a speed/pace zone
To lock the speed/pace zone you are currently in, press and hold OK in the fullscreen Speed/pace graph view .
To unlock the zone, press and hold the OK button again.
Lock a power zone
To lock the power zone you are currently in, press and hold OK in the fullscreen Power graph view.
To unlock the zone, press and hold the OK button again.
MARK A LAP
Press OK to mark a lap. Laps can also be taken automatically. In the sport profile settings in the Polar Flow app or web
service, set Automatic lap to Lap distance, Lap duration, Location-based. If you choose Lap distance, set the distance
after which each lap is taken. If you choose Lap duration, set the duration after each lap is taken. If you choose Location-
based
, a lap is taken every time you arrive at the point where you started the session.
47
Page 48
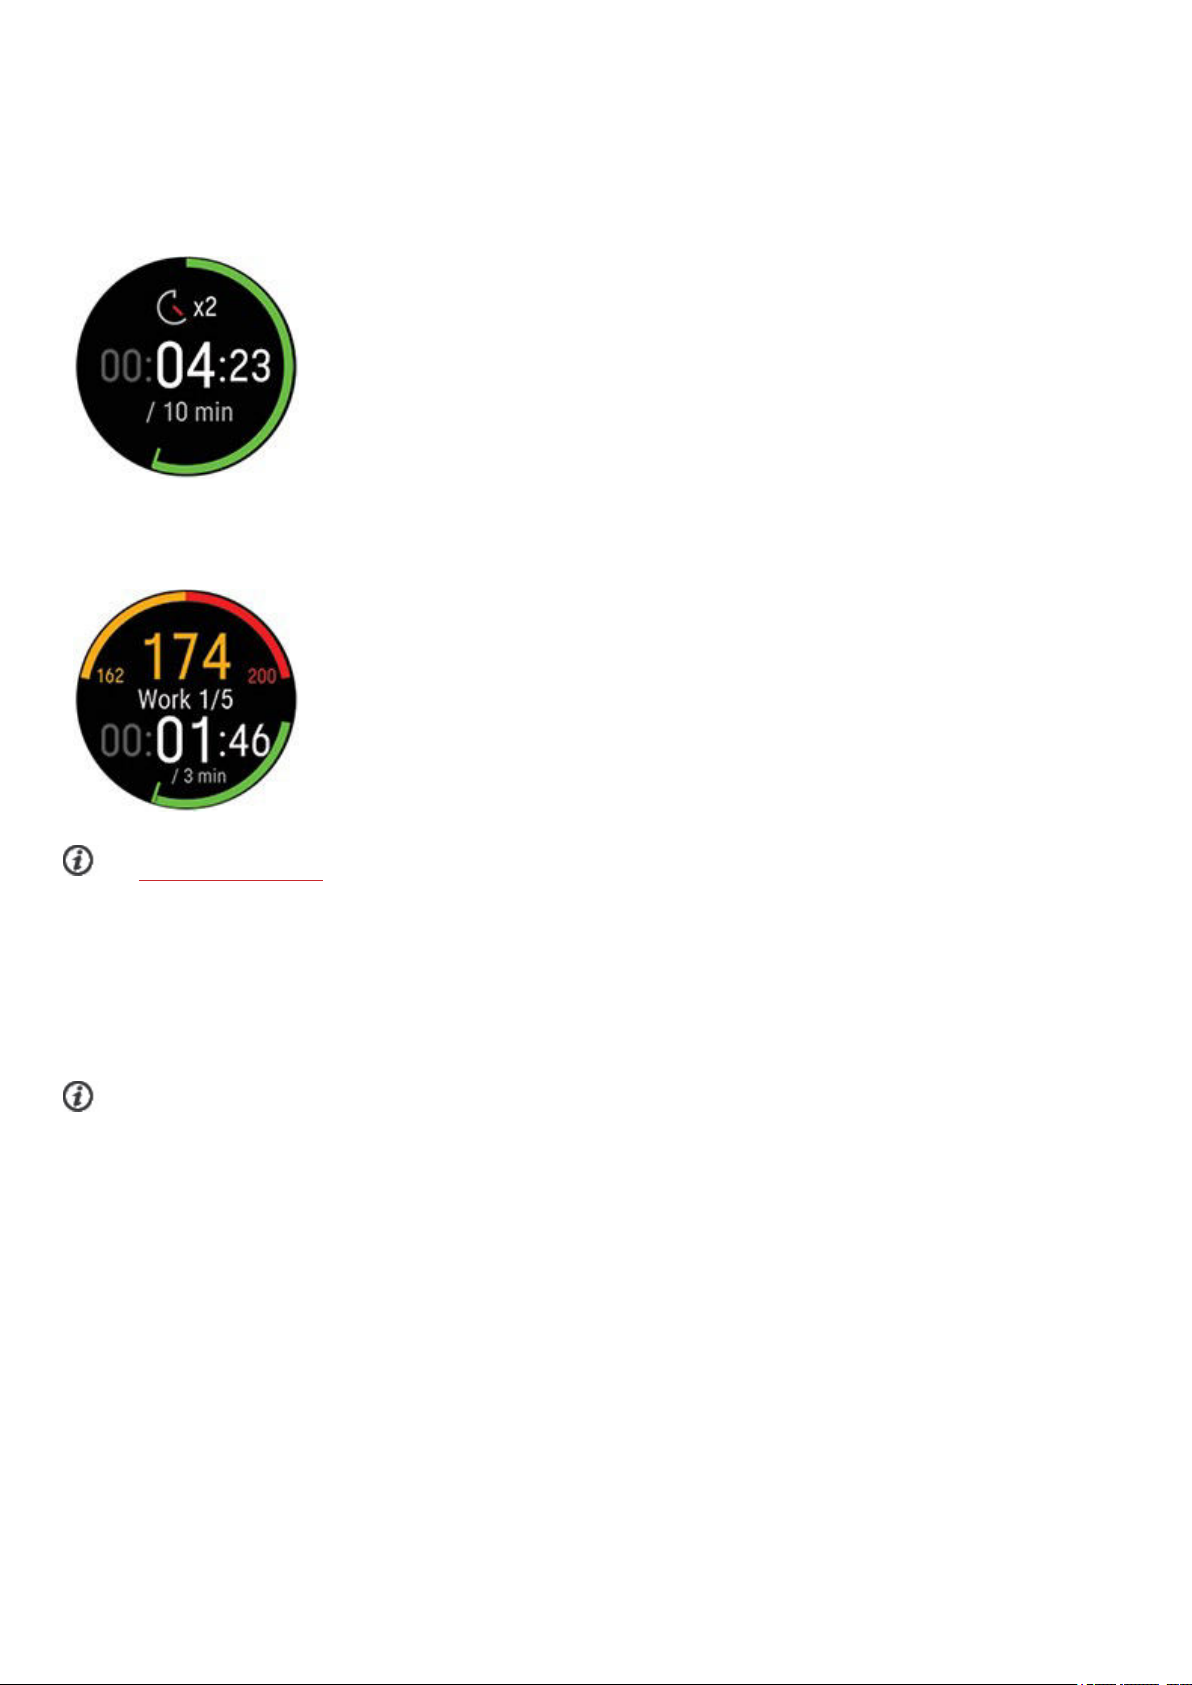
SWITCH SPORT DURING A MULTISPORT SESSION
Press BACK, and choose the sport you want to switch to. Confirm your selection with OK.
TRAINING WITH A TARGET
If you have created a quick training target based on duration, distance or calories in the Flow app or web service and
synced it to your watch, you have the following training target view as the default first training view:
If you've created a target based on duration or distance, you can see how much of your
target you still have remaining before you reach it.
OR
If you've created a target based on calories, you can see how many calories of your target
you have left to burn.
If you have created a phased training target in the Flow app or web service and synced the target to your watch, you have
the following training target view as the default first training view:
l Depending on the chosen intensity, you can see either your heart rate or speed/pace
and the lower and upper heart rate or speed/pace limit of the current phase.
l Phase name and phase number/total number of phases
l Duration/distance covered so far
l Target duration/distance of the current phase
See Planning your training for instructions on creating training targets.
Change phase during a phased session
If you chose manual phase change when you created the phased target, press OK to continue to the next phase after
finishing a phase.
If your chose automatic phase change, the phase will change automatically when you have finished a phase. The watch
notifies you by vibrating when the phase changes.
Note that when setting very short phases (under 10 seconds) you will not get an audible alarm when the phase is over.
View training target information
To view the training target information during training, press and hold OK in the training target view.
Notifications
If you are training outside the planned heart rate zones or speed/pace zones, your watch notifies you with a vibration.
PAUSING/STOPPINGATRAININGSESSION
1. Press BACK to pause your training session.
2. To continue training, press OK. To stop the session, press and hold BACK. You’ll get a summary of your training
session on your watch right after you’ve stopped training.
48
Page 49
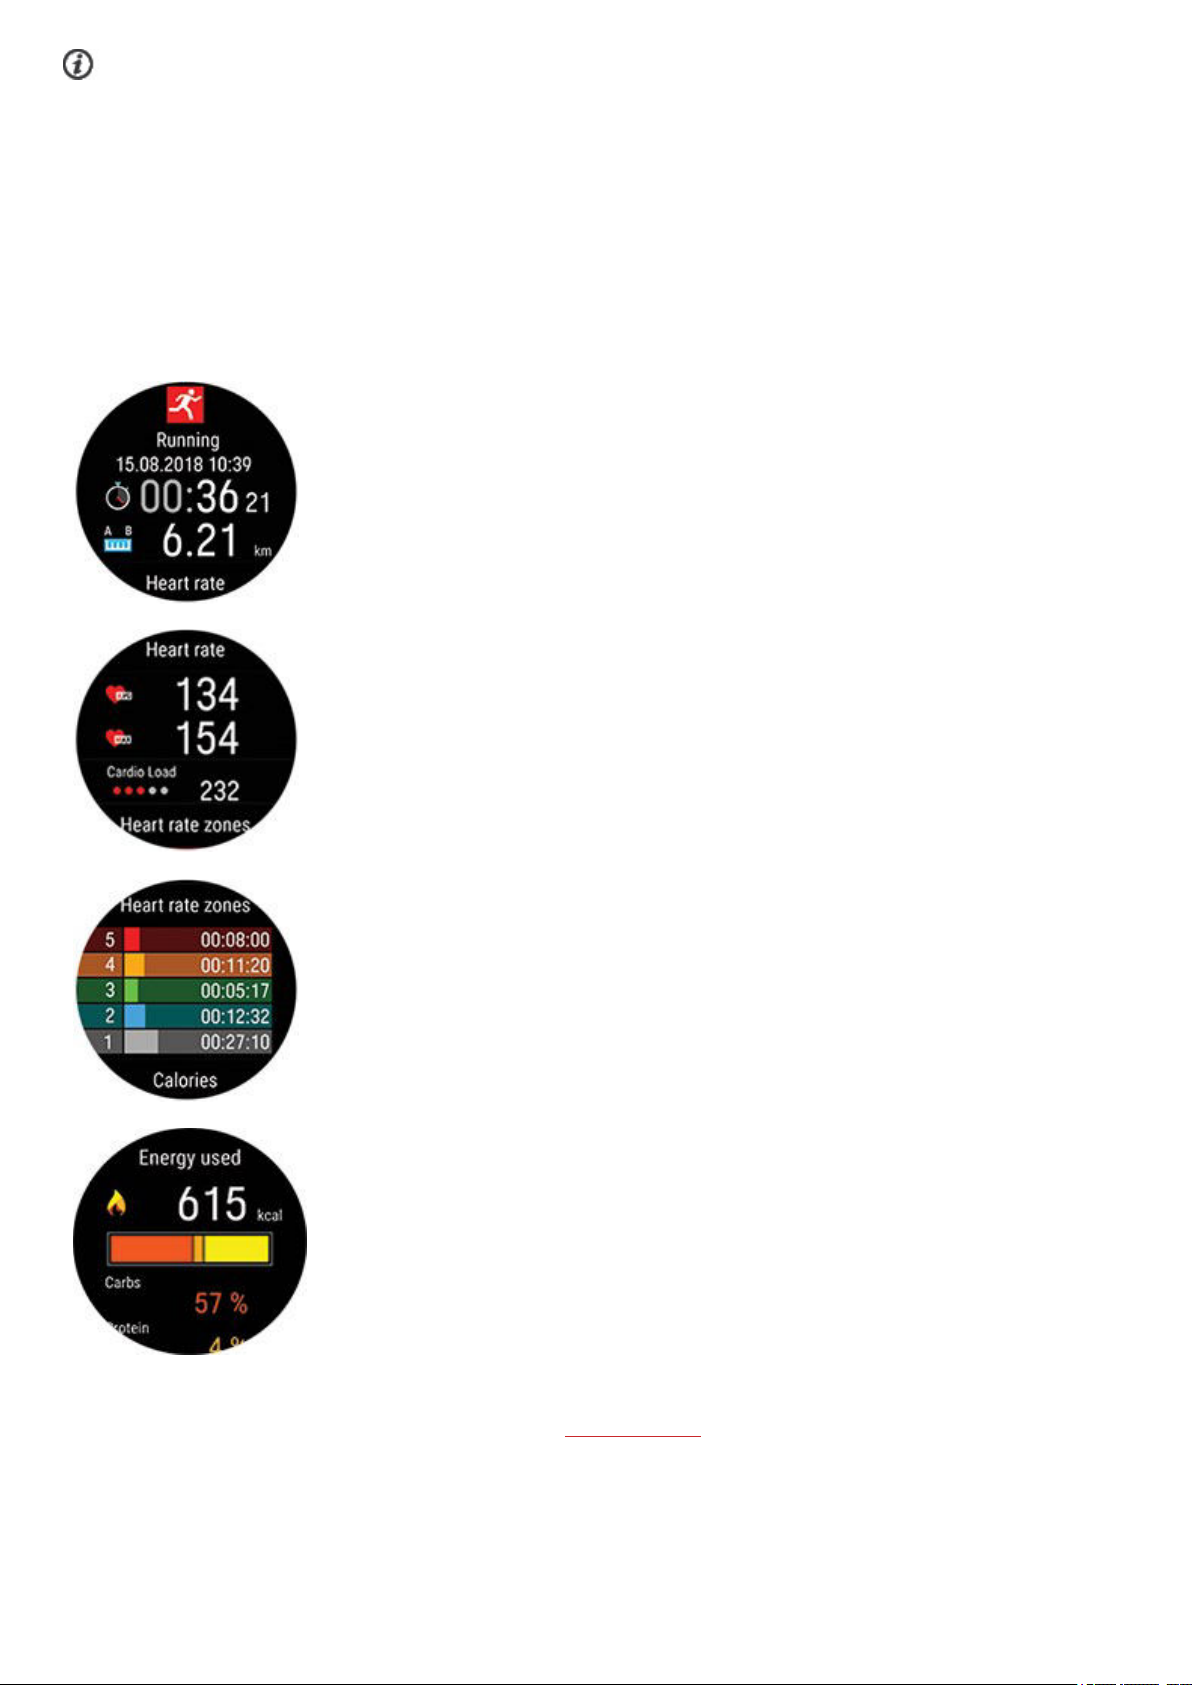
If you stop your session after pausing, the time elapsed after pausing is not included in the total training time.
TRAININGSUMMARY
AFTER TRAINING
You'll get a summary of your training session on your watch right after you've stopped training. Get a more detailed and
illustrated analysis in the Polar Flow app or in the Polar Flow web service.
The information shown in your summary depends on the sport profile and data collected. For example, your training summary
can include the following information:
Start time and date
Duration of the session
Distance covered in the session
Heart rate
Your average and maximum heart rate during the session.
Your Cardio Load from the session
Heart rate zones
Training time spent in different heart rate zones
Energy used
Energy used during the session
Carbs
Protein
Fat
For more information, see Energy Sources
49
Page 50
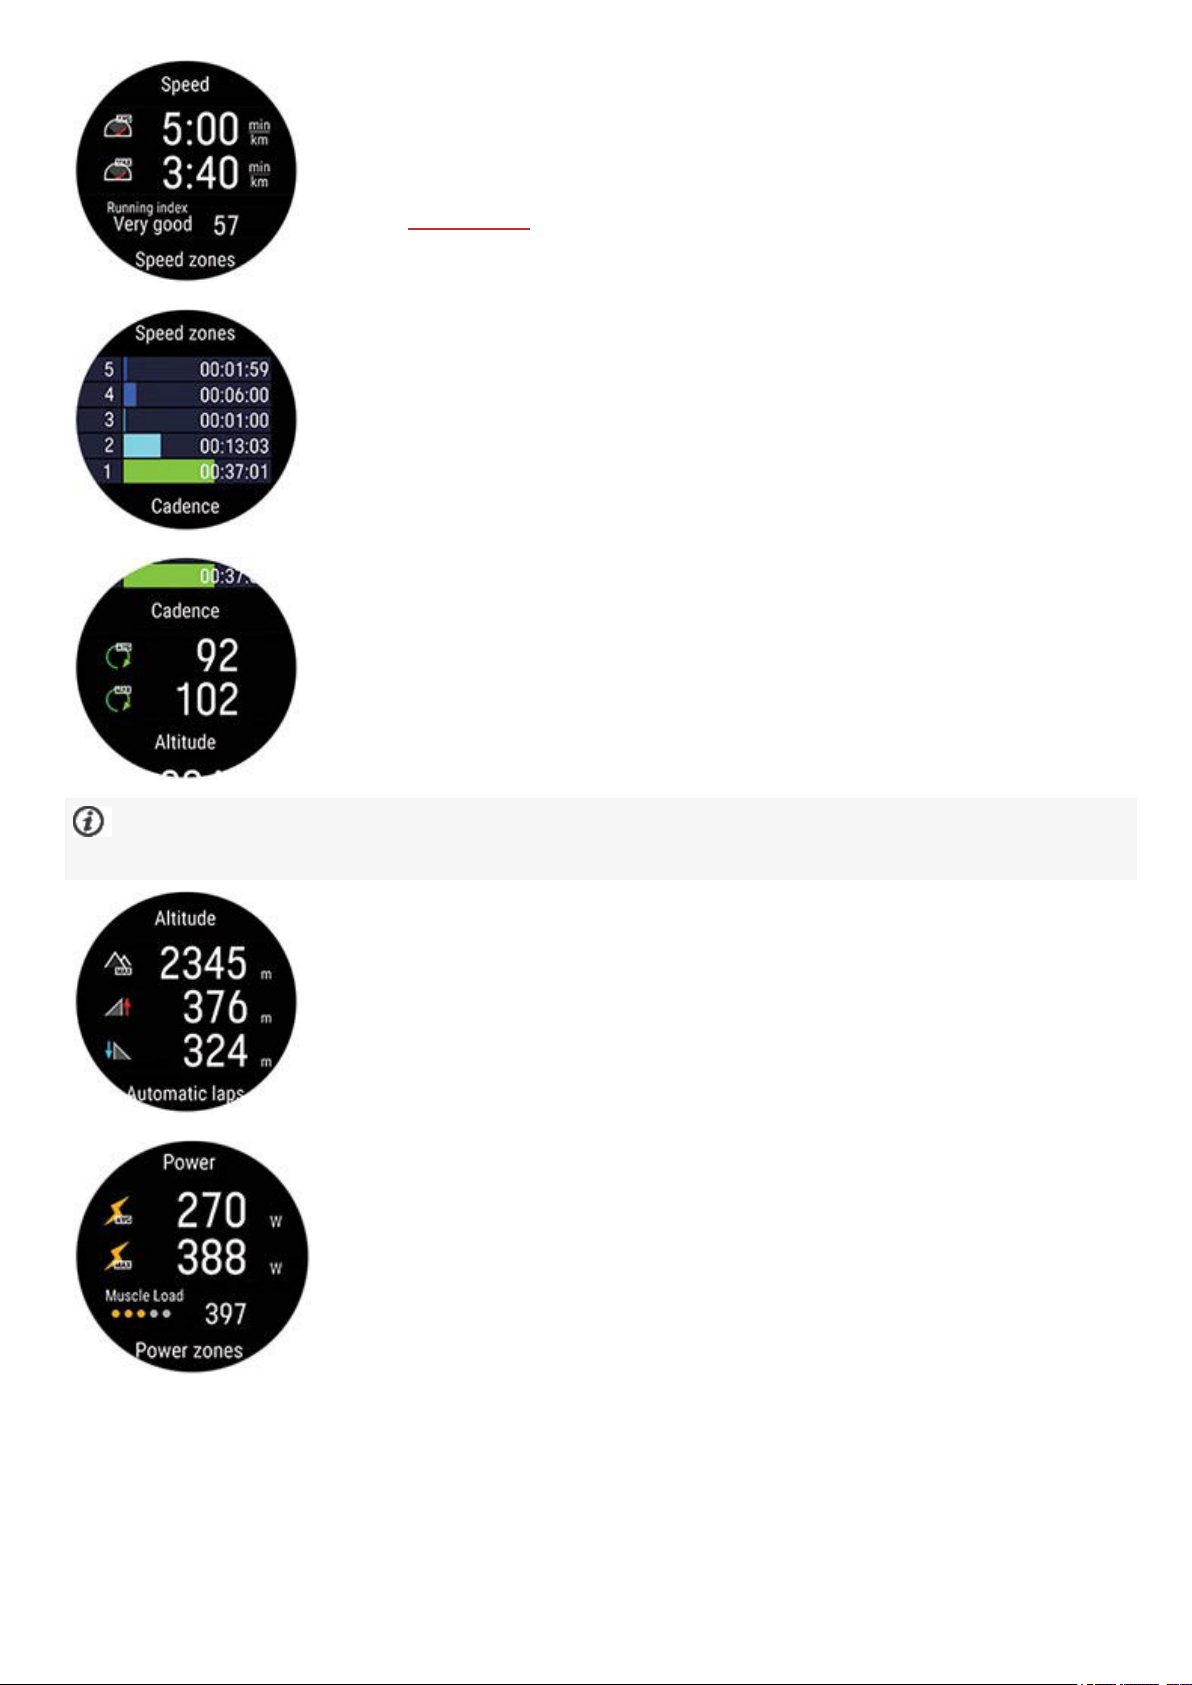
Pace/Speed
Average and maximum pace/speed of the session
Running Index:Your running performance class and numerical value. Find out more from
chapter Running Index.
Speed zones
Training time spent in different speed zones
Cadence
Your average and maximum cadence for the session
Running cadence is measured with a built-in accelerometer from your wrist movements. Cycling cadence is shown if
you have a Polar Cadence Sensor Bluetooth® Smart in use.
Altitude
Maximum altitude during the session
Ascended meters/feet during the session
Descended meters/feet during the session
Power
Average power
Maximum power
Muscle load
50
Page 51
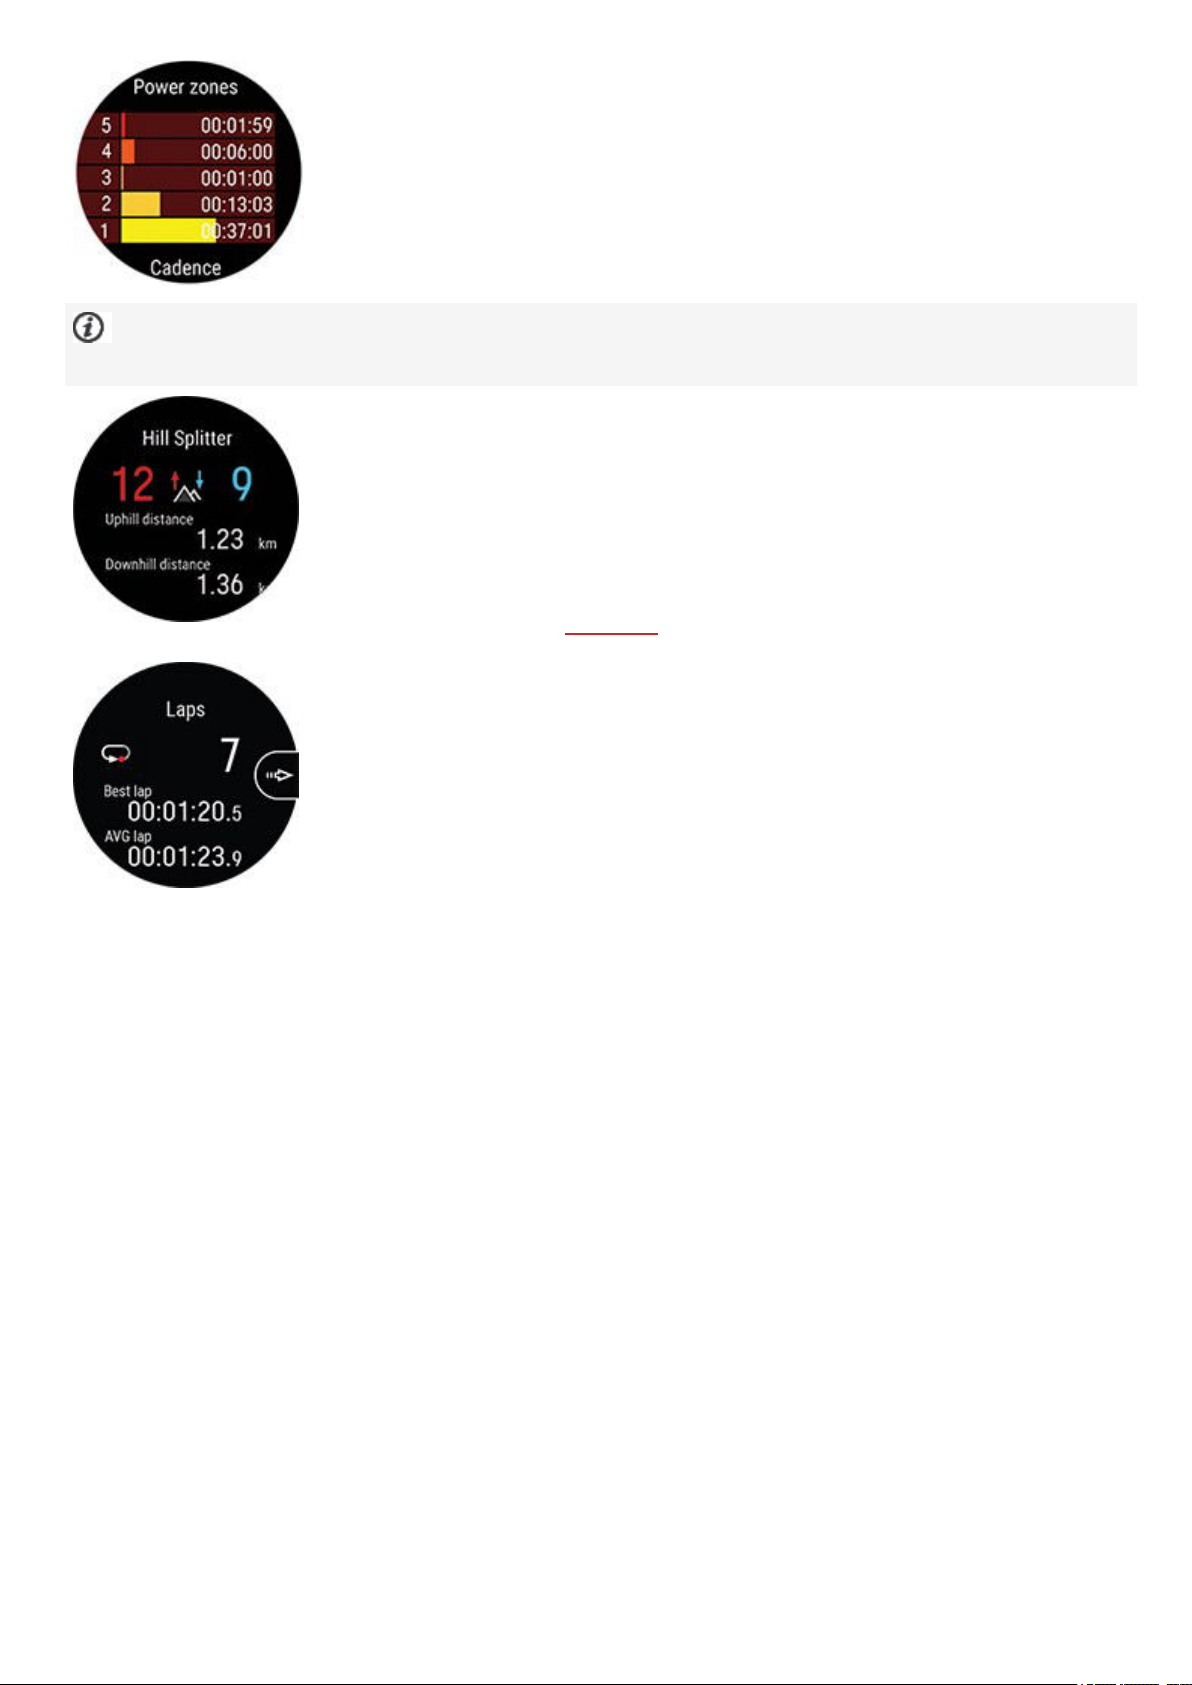
Power zones
Training time spent in different power zones
Running power is measured from the wrist when using a running type sport profile and GPS is available. Cycling power
is shown when using a cycling type sport profile and you have an external cycling power sensor in use.
Hill Splitter
Total number of uphills and downhills
Total uphill and downhill distance
Press OK to view ascent/descent details per hill
For more information, see Hill Splitter
Laps/Automatic laps
The number of laps, your best lap and average duration of laps.
You can scroll through the following details by pressing OK:
1. Duration of each lap (the best lap is highlighted in yellow)
2. Distance of each lap
3. Average and maximum heart rate during each lap in the color of the heart rate zone
4. Average speed/pace of each lap
5. Average power of each lap
51
Page 52
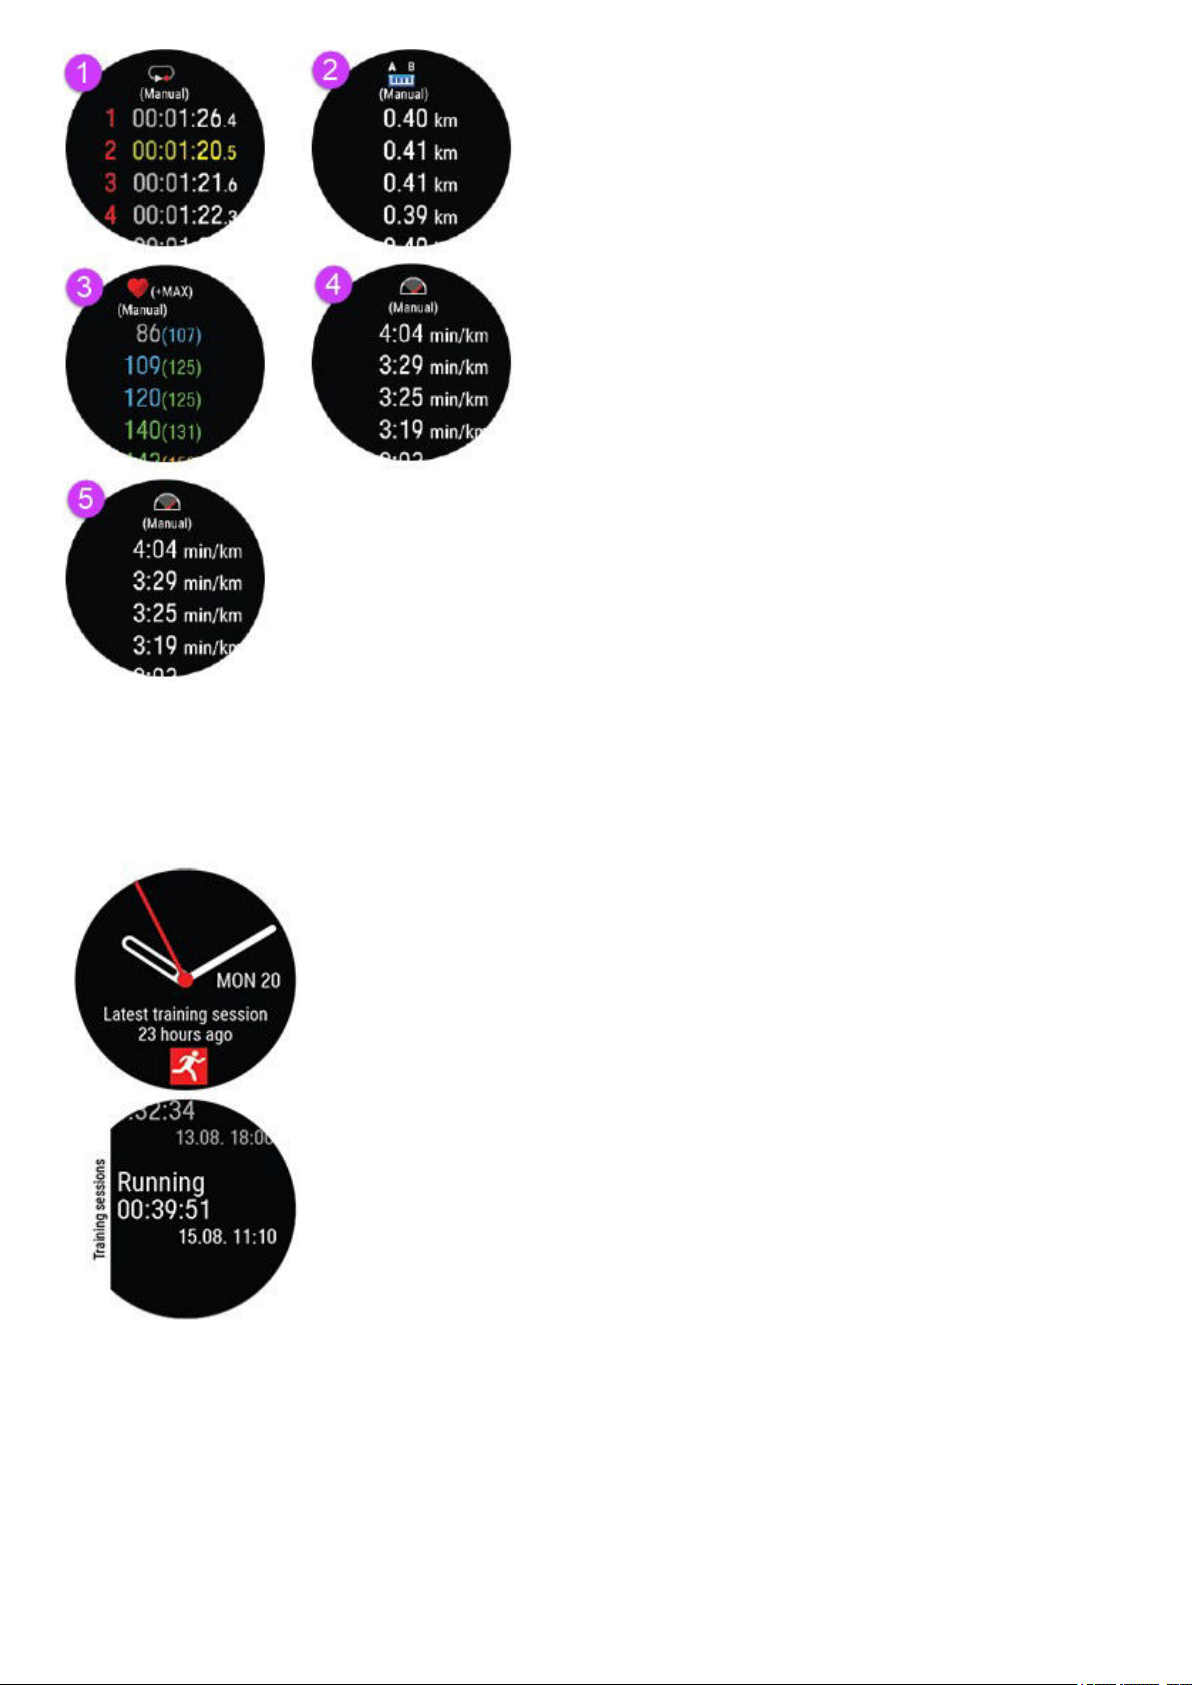
Multisport Summary
Multisport summary includes an overall summary of the session as well as sport specific summaries, which include
duration and distance covered in the sport.
To view your training summaries later on your watch:
In time view, use the UP and DOWN buttons to navigate to the Latest training sessions
watch face, and then press OK.
You can view the summaries of your training sessions from the last 14 days. Browse to the
training session you want to view with UP/DOWN and press OK to open the summary. Your
watch can contain a maximum of 20 training summaries.
TRAINING DATA IN POLAR FLOW APP
Your watch syncs with the Polar Flow app automatically after you finish a training session if your phone is within the
Bluetooth range. You can also sync your training data manually from the watch to the Flow app by pressing and holding the
52
Page 53

BACK button of your watch when you're signed in to the Flow app and your phone is within the Bluetooth range. In the app you
can analyze your data at a glance after each session. The app allows you to see a quick overview of your training data.
For more information, see
Polar Flow App.
TRAINING DATA IN POLAR FLOW WEB SERVICE
Analyze every detail of your training and learn more about your performance. Follow your progress and also share your best
sessions with others.
For more information, see Polar Flow Web Service.
53
Page 54
FEATURES
POSITIONINGSATELLITES
Your watch has built-in GPS (GNSS) that provides speed, pace, distance and altitude measurement for a range of outdoor
sports, and allows you to see your route on map in the Flow app and web service after your session.
You can change the satellite navigation system your watch uses in addition to GPS. The setting is located on your watch in
General settings > Positioning satellites. You can choose GPS + GLONASS, GPS + Galileo or GPS + QZSS. The default
setting is GPS + GLONASS. These options give you the possibility to test different satellite navigation systems and find out if
they can give you improved performance in areas covered by them.
GPS + GLONASS
GLONASS is a Russian global satellite navigation system. It is the default setting as its global satellite visibility and reliability
is the best of these three, and in general we recommend using it.
GPS + Galileo
Galileo is a global navigation satellite system created by the European Union.
GPS + QZSS
QZSS is a four-satellite regional time transfer system and a satellite-based augmentation system developed to enhance GPS
in the Asia-Oceania regions, with a focus on Japan.
ASSISTED GPS
The watch uses Assisted GPS (A-GPS) to acquire a fast satellite fix and improve positioning performance during training. The
A-GPS data tells your watch the predicted positions of the GPS, Glonass, Galileo and QZSS satellites. This way the watch
knows where to search for the satellites and thus makes defining your location faster.
The A-GPS data updates once a day. The latest A-GPS data file is automatically updated to your watch each time you sync it
with the Flow web service via FlowSync software or via the Flow app.
A-GPS expiry date
The A-GPS data file is valid for up to 14 days. Positioning accuracy is relatively high during the first three days, and
progressively decreases during the remaining days. Regular updates help to ensure a high level of positioning accuracy.
You can check the expiry date for the current A-GPS data file from your watch. Go to Settings > General settings > About
your watch > Assisted GPS expires. If the data file has expired, sync your watch with the Flow web service via FlowSync
software or with the Flow app to update A-GPS data.
Once the A-GPS data file has expired, more time may be required for acquiring your current position.
For best GPS performance, wear the watch on your wrist with the display facing up. Due to the location of the
GPS antenna on the watch, it is not recommended to wear it with the display on the underside of your wrist.
When wearing it on the handlebars of a bike, make sure the display is facing up.
ROUTEGUIDANCE
The route guidance feature guides you along routes that you have recorded in previous sessions or routes that you've
imported into Flow from a third-party service like komoot or Strava for example. You can also import route files directly into
54
Page 55
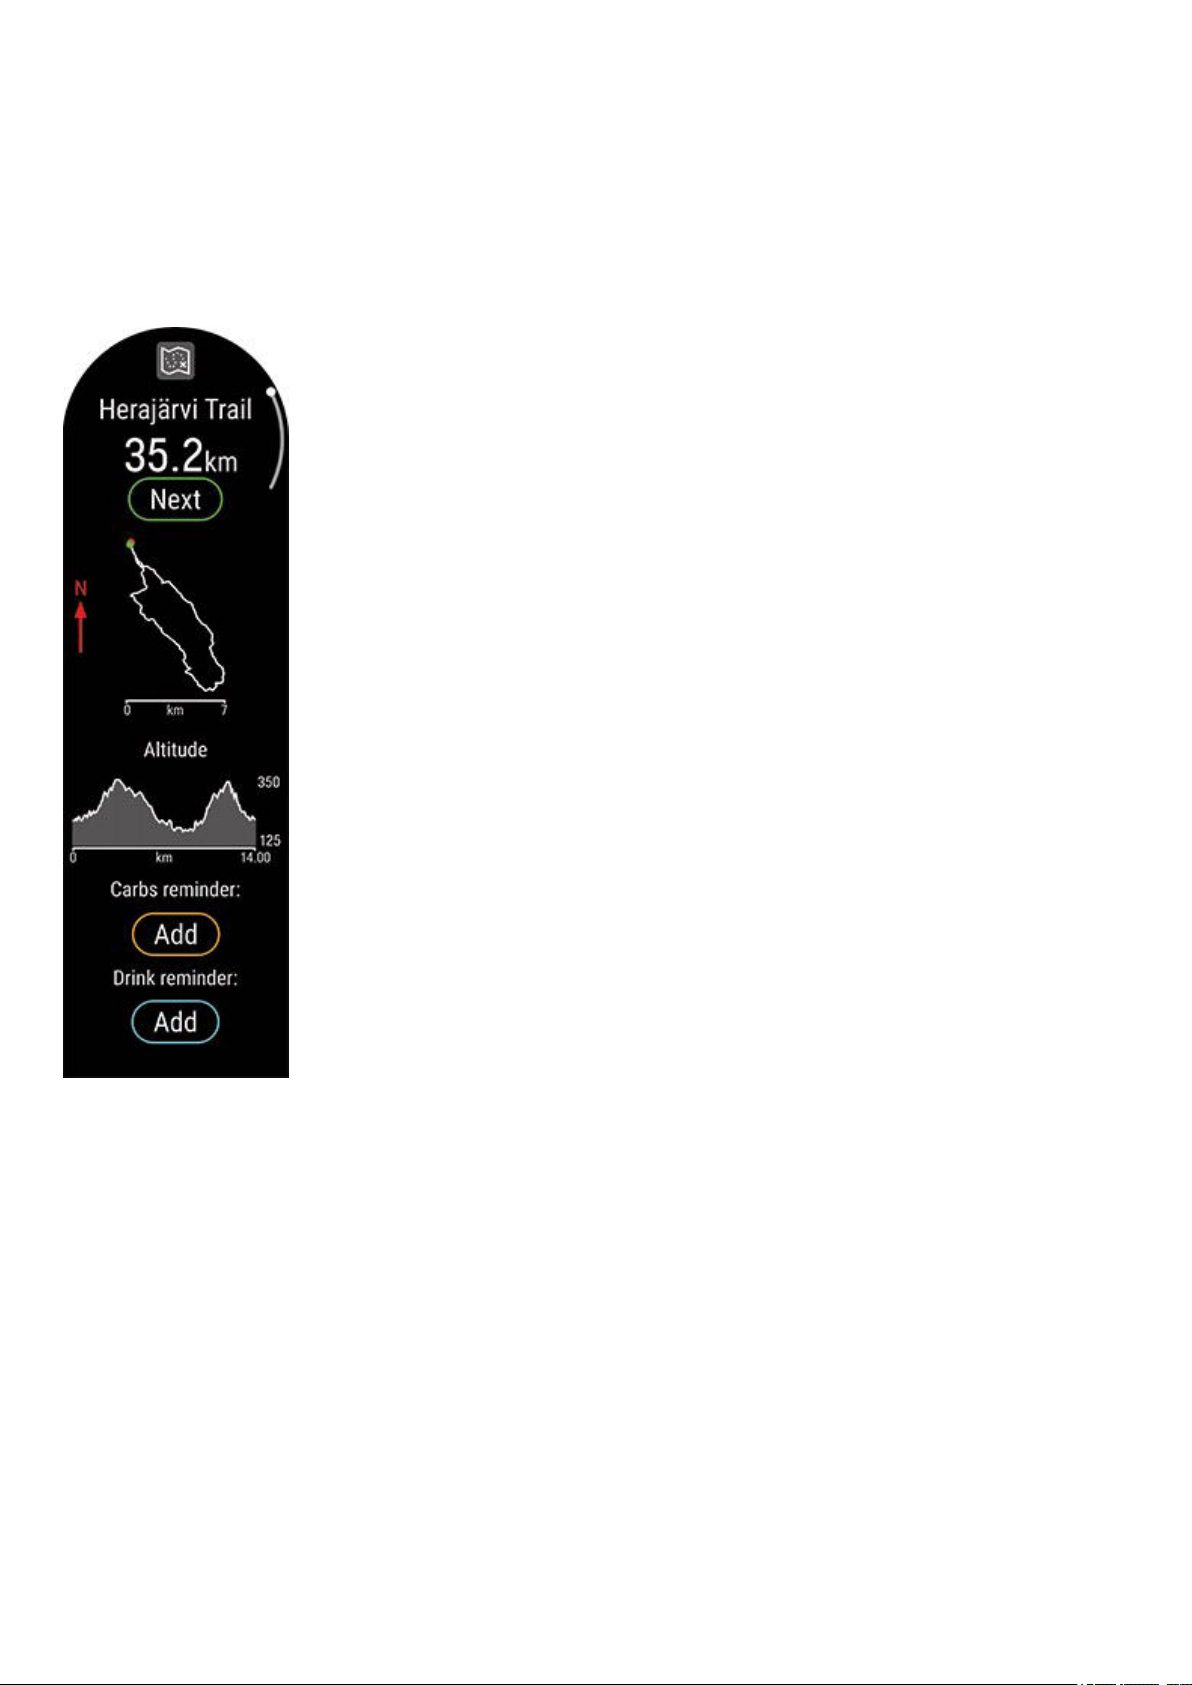
Flow in GPX or TCX file format.
You can choose to go to the route start point, route end point or nearest point on the route (mid-route). First your watch will
guide you to your chosen start point on the route. Once on the route, your watch will guide you all the way through and keep
you on track. Just follow the guidance on the display. At the bottom of the display you’ll see how much distance you still have
left.
ROUTE AND ELEVATION PROFILES
After choosing a route you'll see an overview of the route, and the elevation profile of it. This helps you identify which route is
which, and what to expect from your session.
TOTAL ASCENT AND DESCENT FOR PLANNED ROUTES
When starting a planned route you'll see the total ascent and descent on your route. As you go along the route the
ascent/descent values will update and you'll always see the total ascent and descent still left on the route. You'll also see
your current ascent/descent grade. At all times you'll know exactly where you are and how much you have left to go.
When doing an unplanned route you'll see the ascent and descent for the previous kilometer as well as your current
ascent/descent grade.
55
Page 56
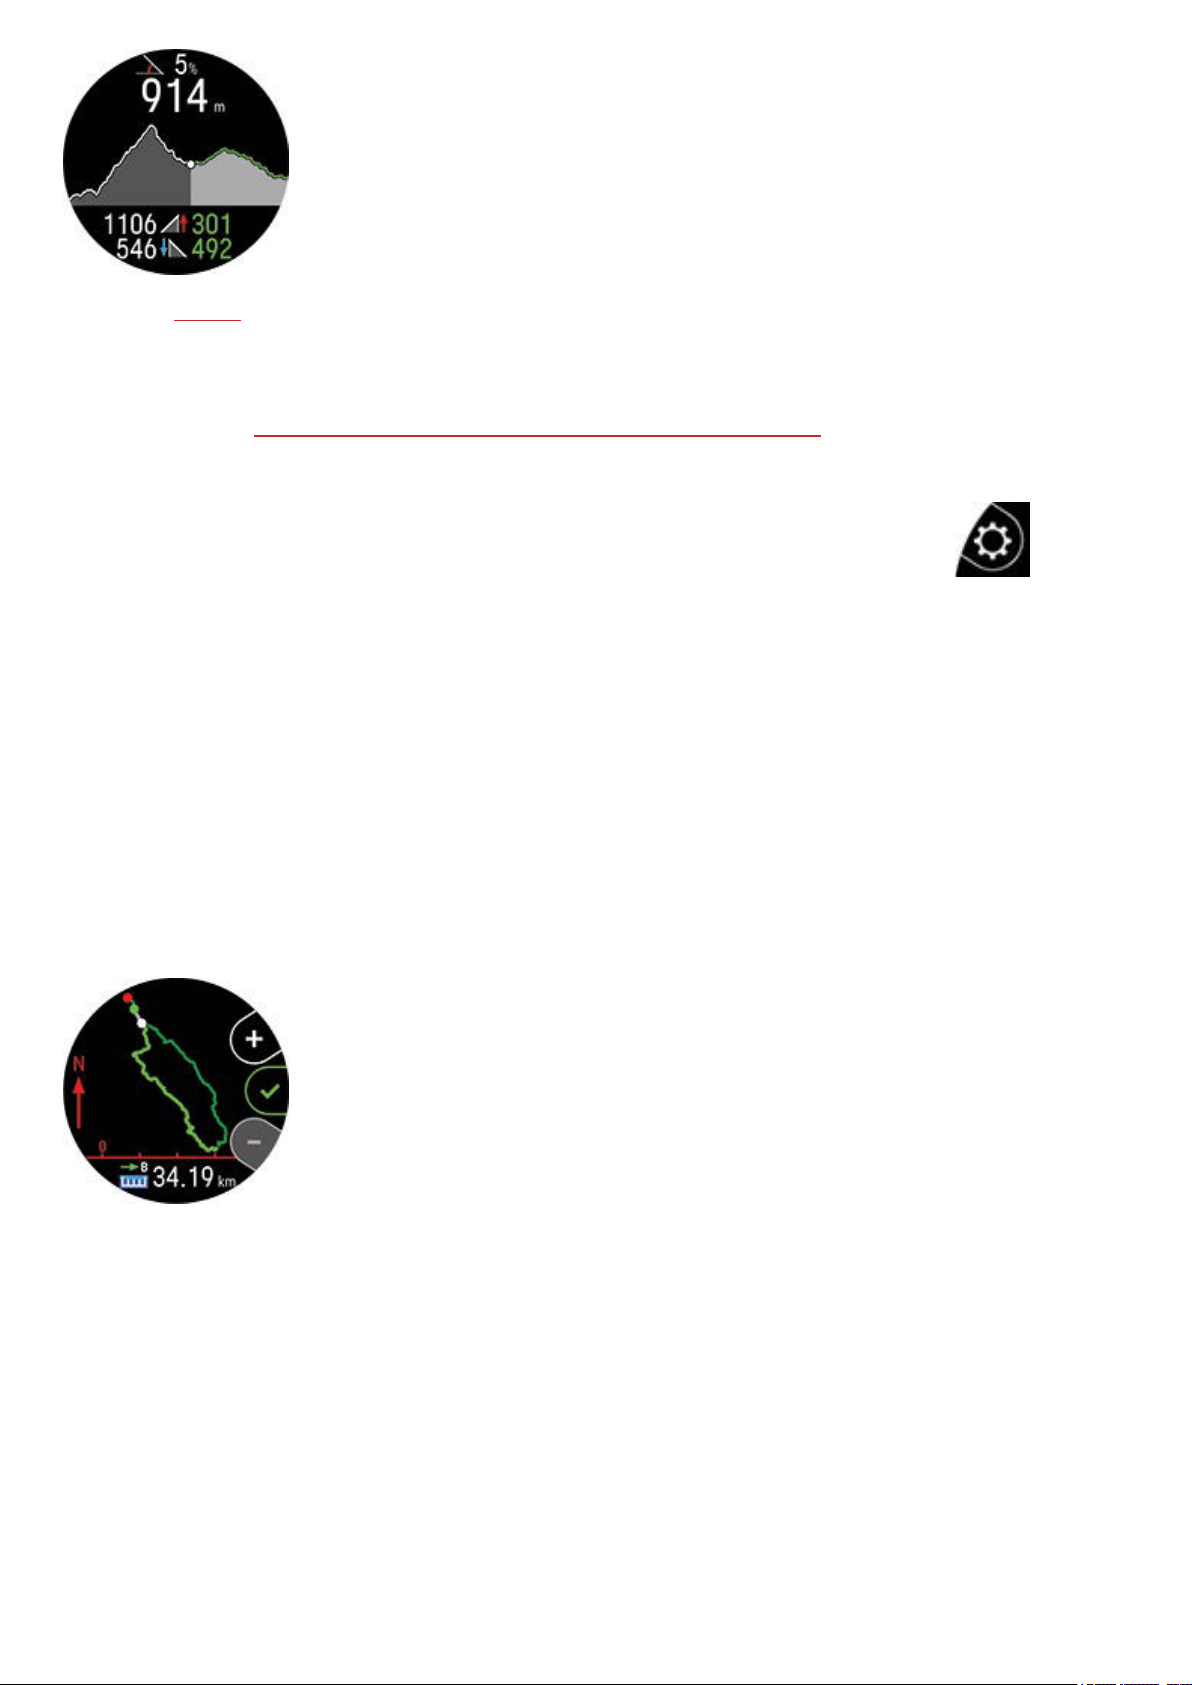
You can use komoot to plan detailed routes on maps and transfer the routes to your watch via Flow.
ADDING A ROUTE TO YOUR WATCH
To add a route to your watch you must save it as a favorite in the Flow web service or app , and sync it to your watch. For
more information see MANAGE FAVORITES AND TRAINING TARGETS IN POLAR FLOW.
START A TRAINING SESSION WITH ROUTE GUIDANCE
1.
Choose the sport profile you want to use, and in pre-training mode, press the LIGHT button or tap
quick menu.
2. Choose
3. Add a carbs reminder or drink reminder if you wish, and then choose Start.
4. Choose where you want to start the route: Start point, Mid-route, End point to reverse direction or Mid-route to
reverse direction.
5. Stay in the pre-training mode until the watch has found your heart rate and the GPS satellite signals, and start your
session by pressing OK. You may be asked to the calibrate the compass before starting your session. If so, follow the
instructions on the display to calibrate it.
6. Your watch will guide you to the route. Route start found is displayed when you reach it, and then you're ready to go.
Route-end point reached is shown when you're finished.
Routes from the list, and then choose the route you want to do.
to enter the
ZOOM
Zoom in or out on your route. Press OK and choose Zoom in/out, and then use the + and - buttons to adjust the route view.
CHANGE ROUTE ON-THE-FLY
Switch to a different route during your session.
1. Press BACK to pause your session, and press the LIGHT button to enter the quick menu.
2. Choose Routes, the watch then asks you Want to change your route?, choose Yes, and choose a route from the
list.
3. Choose Start when you're ready.
56
Page 57
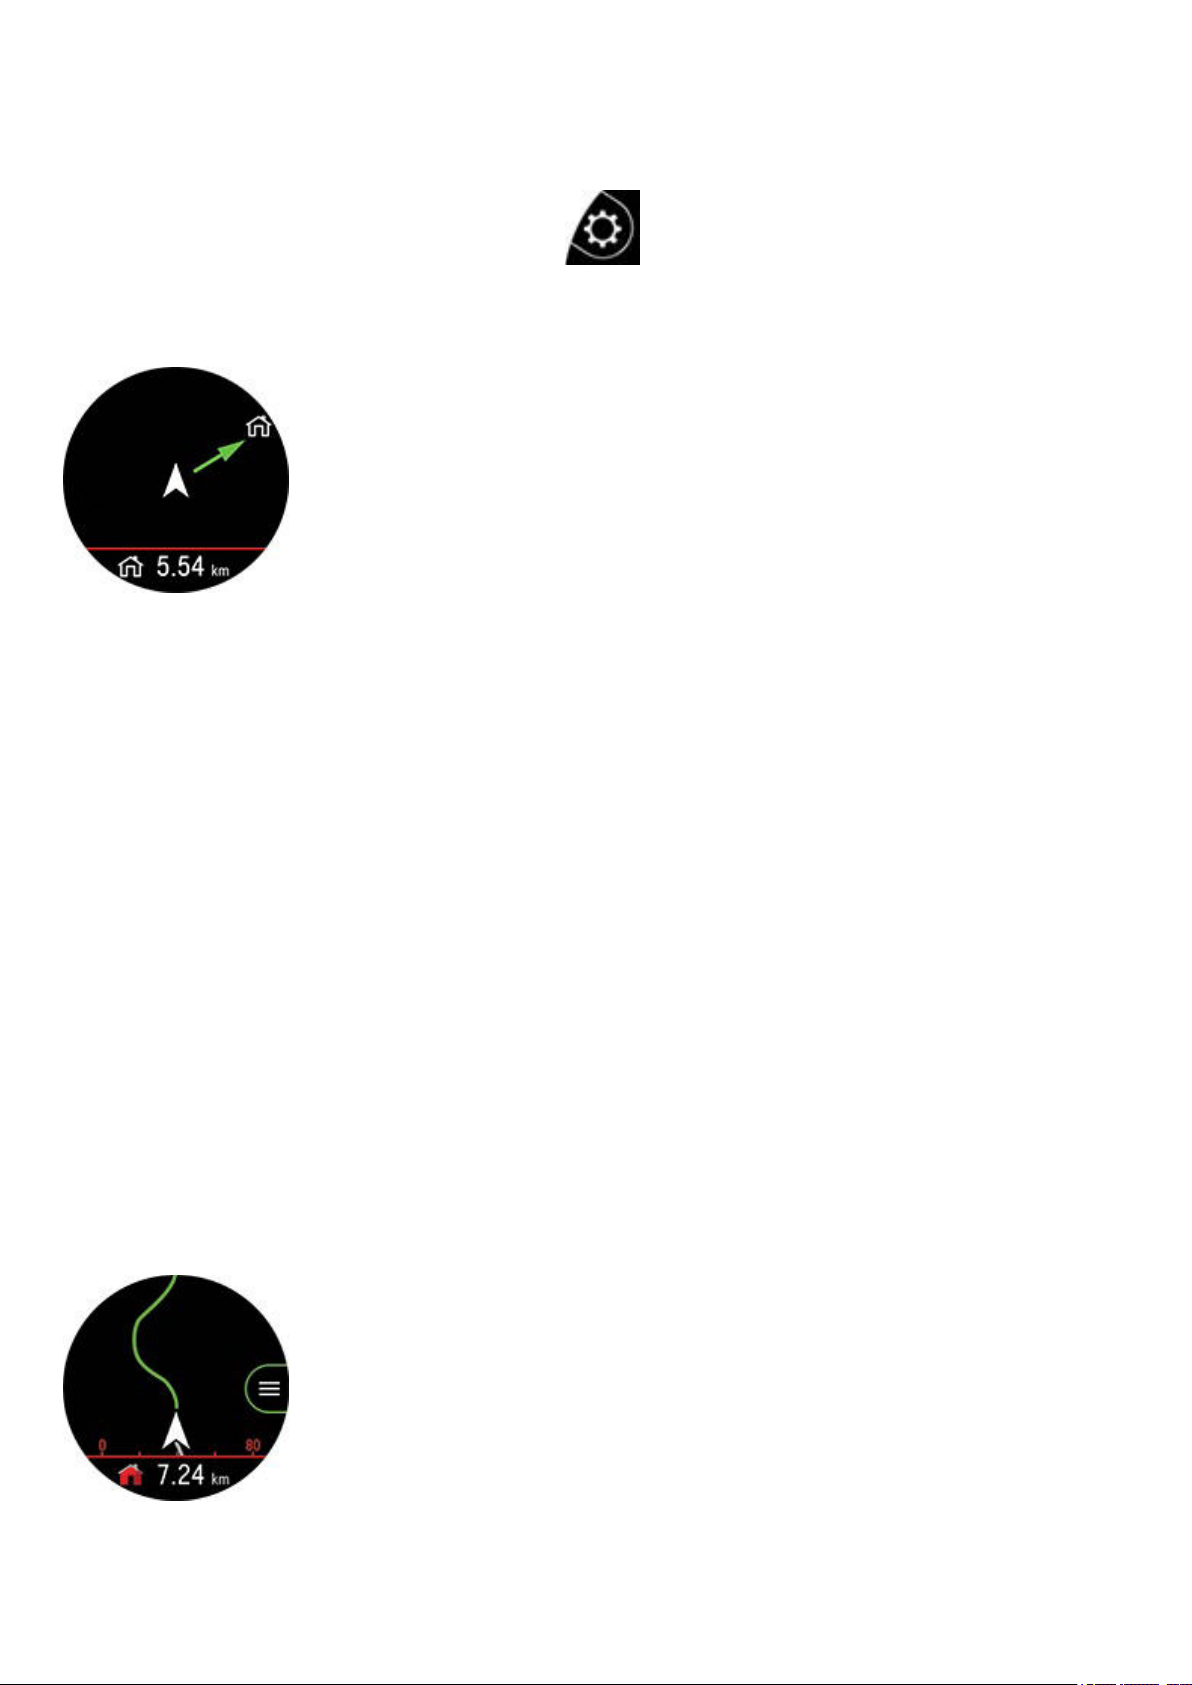
BACKTOSTART
The back to start feature guides you back to the starting point of your session via beeline.
To use the back to start feature for one session:
1.
In pre-training mode, press the LIGHT button or tap
2. Choose
To return to your starting point via beeline:
l Keep your watch in a horizontal position in front of you.
l Keep moving in order for your watch to determine which direction you are going. An arrow will point in the direction of
your starting point.
l To get back to the starting point, always turn in the direction of the arrow.
l Your watch also shows the bearing and the direct distance (beeline) between you and the starting point.
You can also set back to start on during a training session by pausing your session and opening the quick menu with the
LIGHT button and by scrolling to Back to start, and choosing Go back via beeline.
Back to start from the list, and choose Go back via beeline.
to enter the quick menu.
If you add the back to start training view to a sport profile in Polar Flow, it is always set on for that sport profile and it does not
need to be switched on every session.
When in unfamiliar surroundings, always keep a map at hand in case the watch loses the satellite signal or the battery runs
out.
TRACKBACK
Navigate back to the starting point of your session via the same route you came. Guidance on the display keeps you on track
and guides you all the way back. Track back is useful when you want to choose safe and familiar route back to your starting
point.
Use track back
1. Press BACK to pause your session, and the choose press the LIGHT button to enter the quick menu.
2. Choose Back to start, and choose Go back via the same route.
57
Page 58
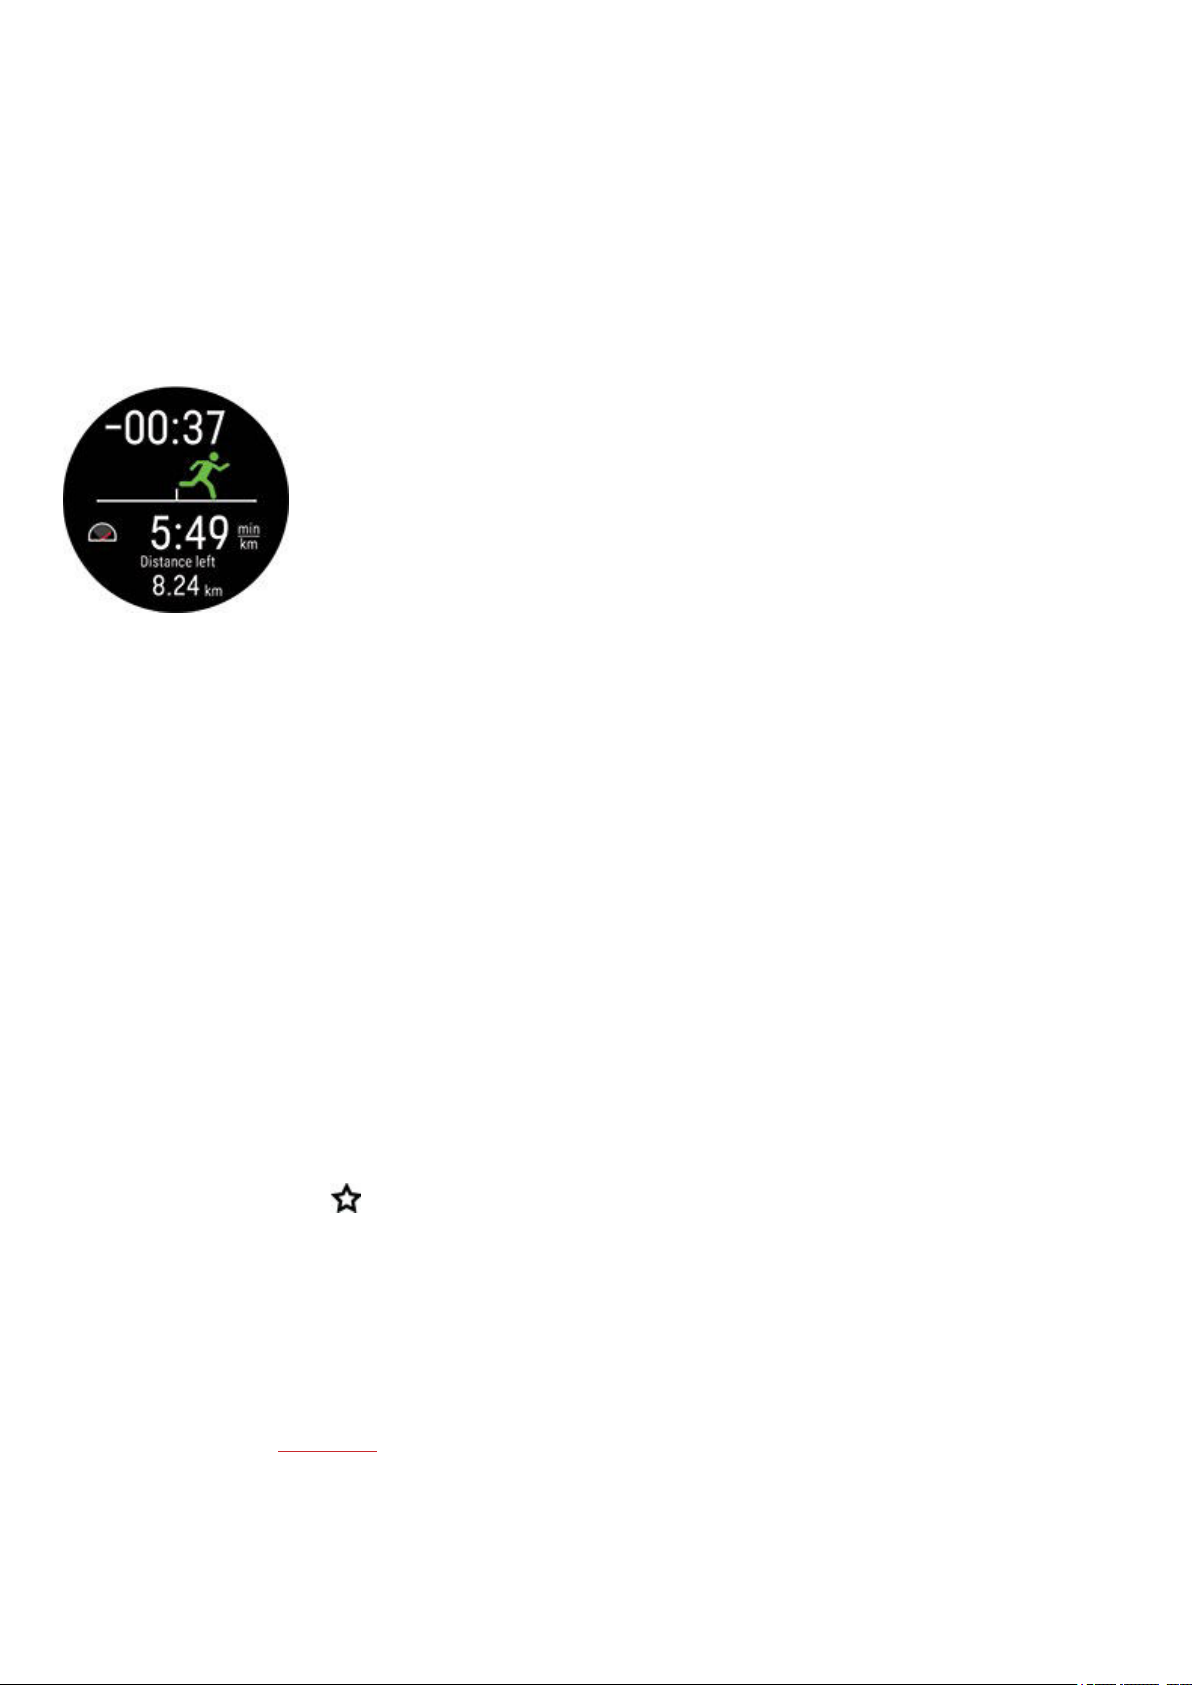
Follow the guidance on the display to the starting point of your session. On the display you'll see the distance to the starting
point of your session via the route.
Zoom
Zoom in or out on your route. Press OK and choose Zoom in/out, and then use the + and - buttons to adjust the route view.
RACEPACE
The race pace feature helps you to keep a steady pace and achieve your target time for a set distance. Define a target time
for the distance - 45 minutes for a 10k run for example and follow how far behind or ahead you are compared to your pre-set
target.
Race pace can be set on your watch, or you can also set a Race Pace target in the Flow web service or app, and sync it to
your watch.
If you have scheduled race pace target for that day, your watch suggests you to start it when entering pre-training mode.
Create a race pace target on your watch
You can create race pace target from the Quick menu in pre-training mode.
1. Enter pre-training mode by pressing and holding OK in time view or by pressing BACK to enter the main menu and
choose Start training
2. In pre-training mode tap the Quick menu icon or press the LIGHT button.
3. Choose Race pace from the list and set the distance and duration. Press OK to confirm. The watch displays the
pace/speed required to meet your target time and then returns to pre-training mode where you can start the training
session.
Create a race pace target in the Flow web service
1. In the Flow web service, go to Diary, and click Add > Training target.
2. In Add training target, choose Sport, and enter a Target name (maximum 45 digits), Date and Time and any Notes
(optional) you want to add.
3. Choose Race Pace.
4. Fill in two of the following values: Duration, Distance or Race Pace. You get the third one automatically.
5.
Click Add to favorites
6. Click
Save to add the target to your Diary.
to add the target to your list of favorites, if you want.
Sync the target to your watch via FlowSync, and your ready to go.
STRAVALIVESEGMENTS
Strava Segments are previously defined sections of road or trail where athletes can compete for time in cycling or running.
Segments are defined in Strava.com and can be created by any Strava user. You can use segments to compare your own
58
Page 59
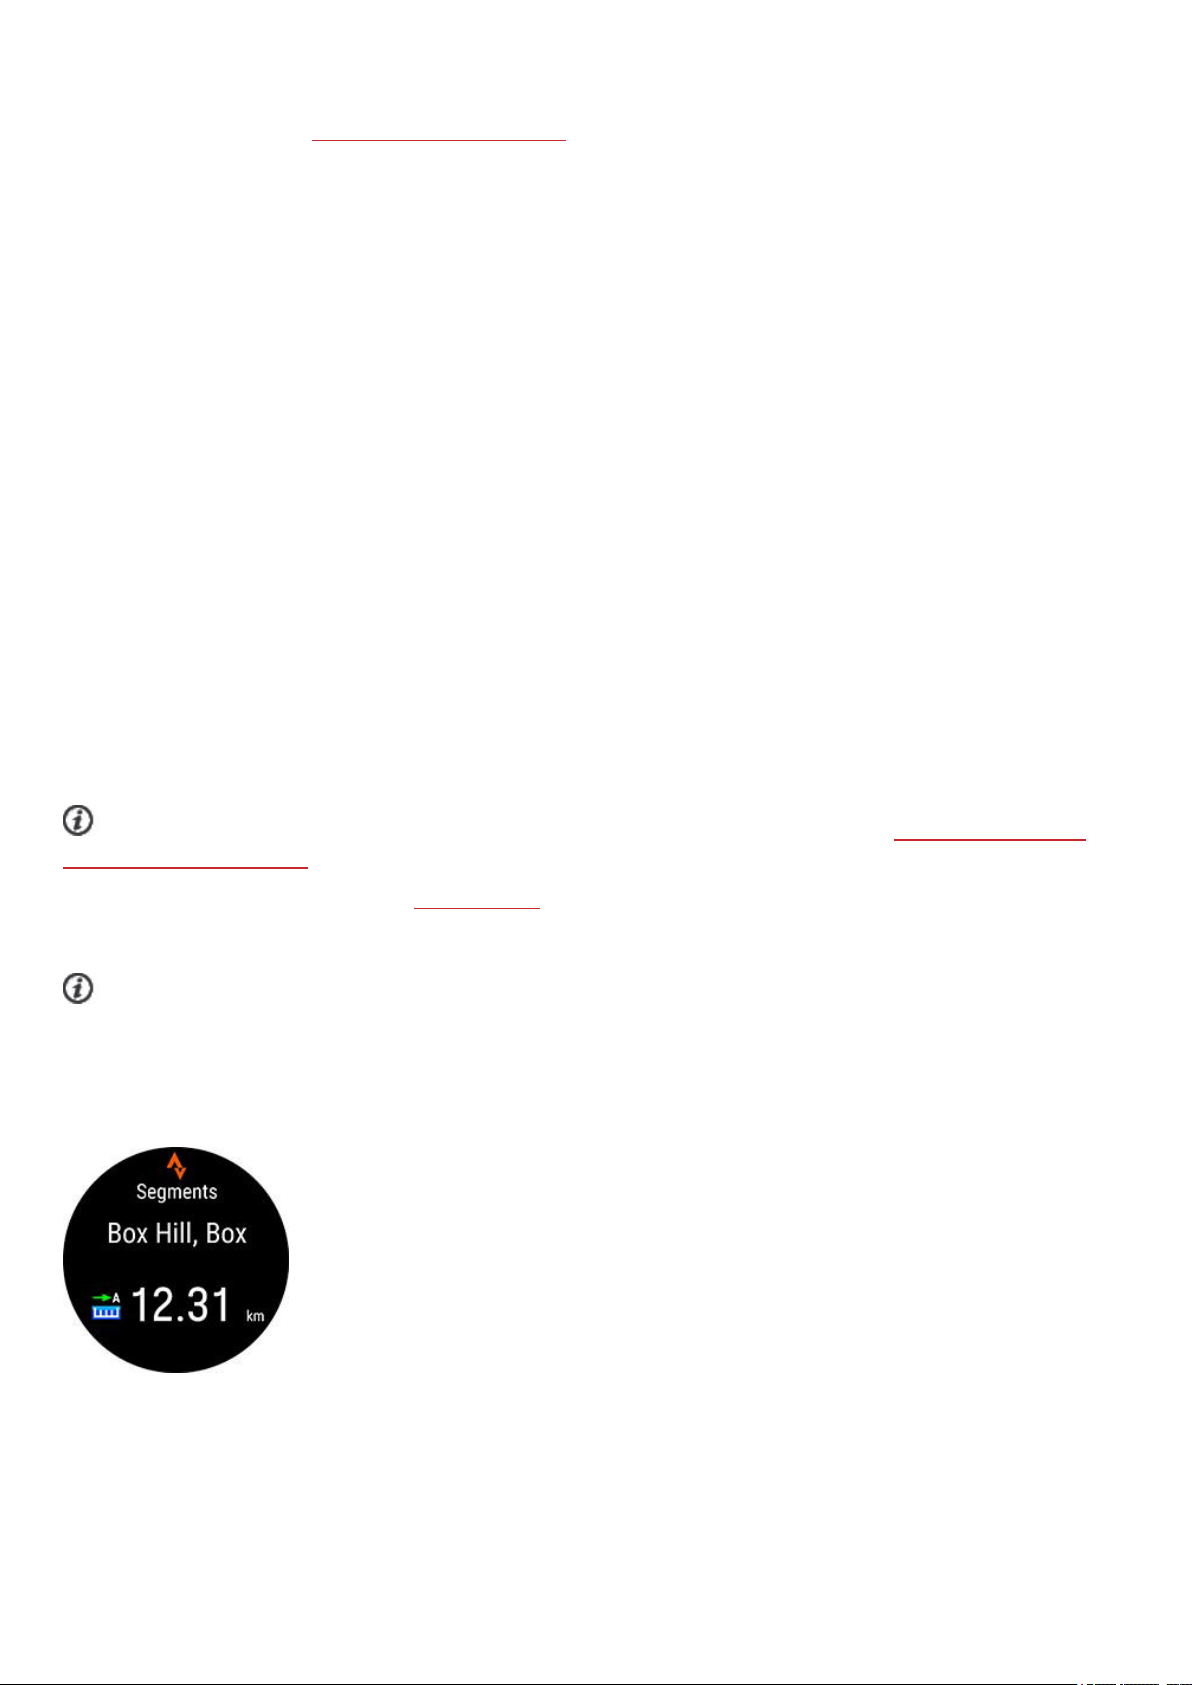
times, or to compare with other Strava users' times who have also completed the segment. Each segment has a public
leaderboard with King/Queen of the Mountain (KOM/QOM) who has the best time for that segment.
Note that you need to have a
Once you have activated Strava Live Segments and exported segments to your Flow account and synced them to your Grit X
Pro you will receive an alert on your watch when approaching any of your favorite Strava segments.
When performing a segment, you'll get real-time performance data displayed on your watch showing whether you are ahead
or behind your personal record (PR) of the segment. Your results are calculated and displayed instantly on your watch when
the segment ends, but you need to check the final results at Strava.com.
Strava Summit Analysis pack to use the Strava Live Segments feature on your Polar Grit X Pro.
CONNECT YOUR STRAVA AND POLAR FLOW ACCOUNTS
You can connect your Strava and Polar Flow accounts in the Polar Flow web service OR in the Polar Flow app.
In the Polar Flow web service go to Settings > Partners > Strava > Connect.
or
In the Polar Flow app go to General Settings > Connect > Strava (swipe the button to connect).
IMPORT STRAVA SEGMENTS TO YOUR POLAR FLOW ACCOUNT
1. In your Strava account, choose the segments you wish to import to your Polar Flow Favorites/Grit X Pro. This is done
by choosing the star icon next to a segment name.
2. Then in the Polar Flow web service's Favorites page choose the Update Strava Live Segments button to import the
starred Strava Live Segments to your Polar Flow account.
3. Your Grit X Pro can have a maximum of 100 favorites at a time. Choose the segments you want to transfer to your Grit
X Pro by clicking the selection boxes on the left of the Strava Live Segments list to move them to the sync list for your
Grit X Pro on the right. You can change the order of your favorites on the Grit X Pro by dragging and dropping them.
4. Sync your Grit X Pro to save your changes to the watch.
For more information on managing your favorites in the Polar Flow web service and app, see Manage favorites and
training targets in Polar Flow.
Find out more about Strava segments at Strava Support.
START A SESSION WITH STRAVA LIVE SEGMENTS
Strava Live Segments require GPS. Make sure you have GPS set on in the running and cycling sport profiles you wish to
use.
When you start a running or cycling training session, the nearby Strava segments (50 kilometers or closer in cycling or 10
kilometers or closer in running) synced to your watch are shown in the Strava segments training view. Scroll to the Strava
segments view with the UP and DOWN buttons during sessions.
When you approach a segment (200 meters or closer in cycling or 100 meters or closer in running) you’ll get an alert on your
watch, and the distance remaining to the segment will be counted down. You can cancel the segment by pressing the back
button on your watch.
59
Page 60
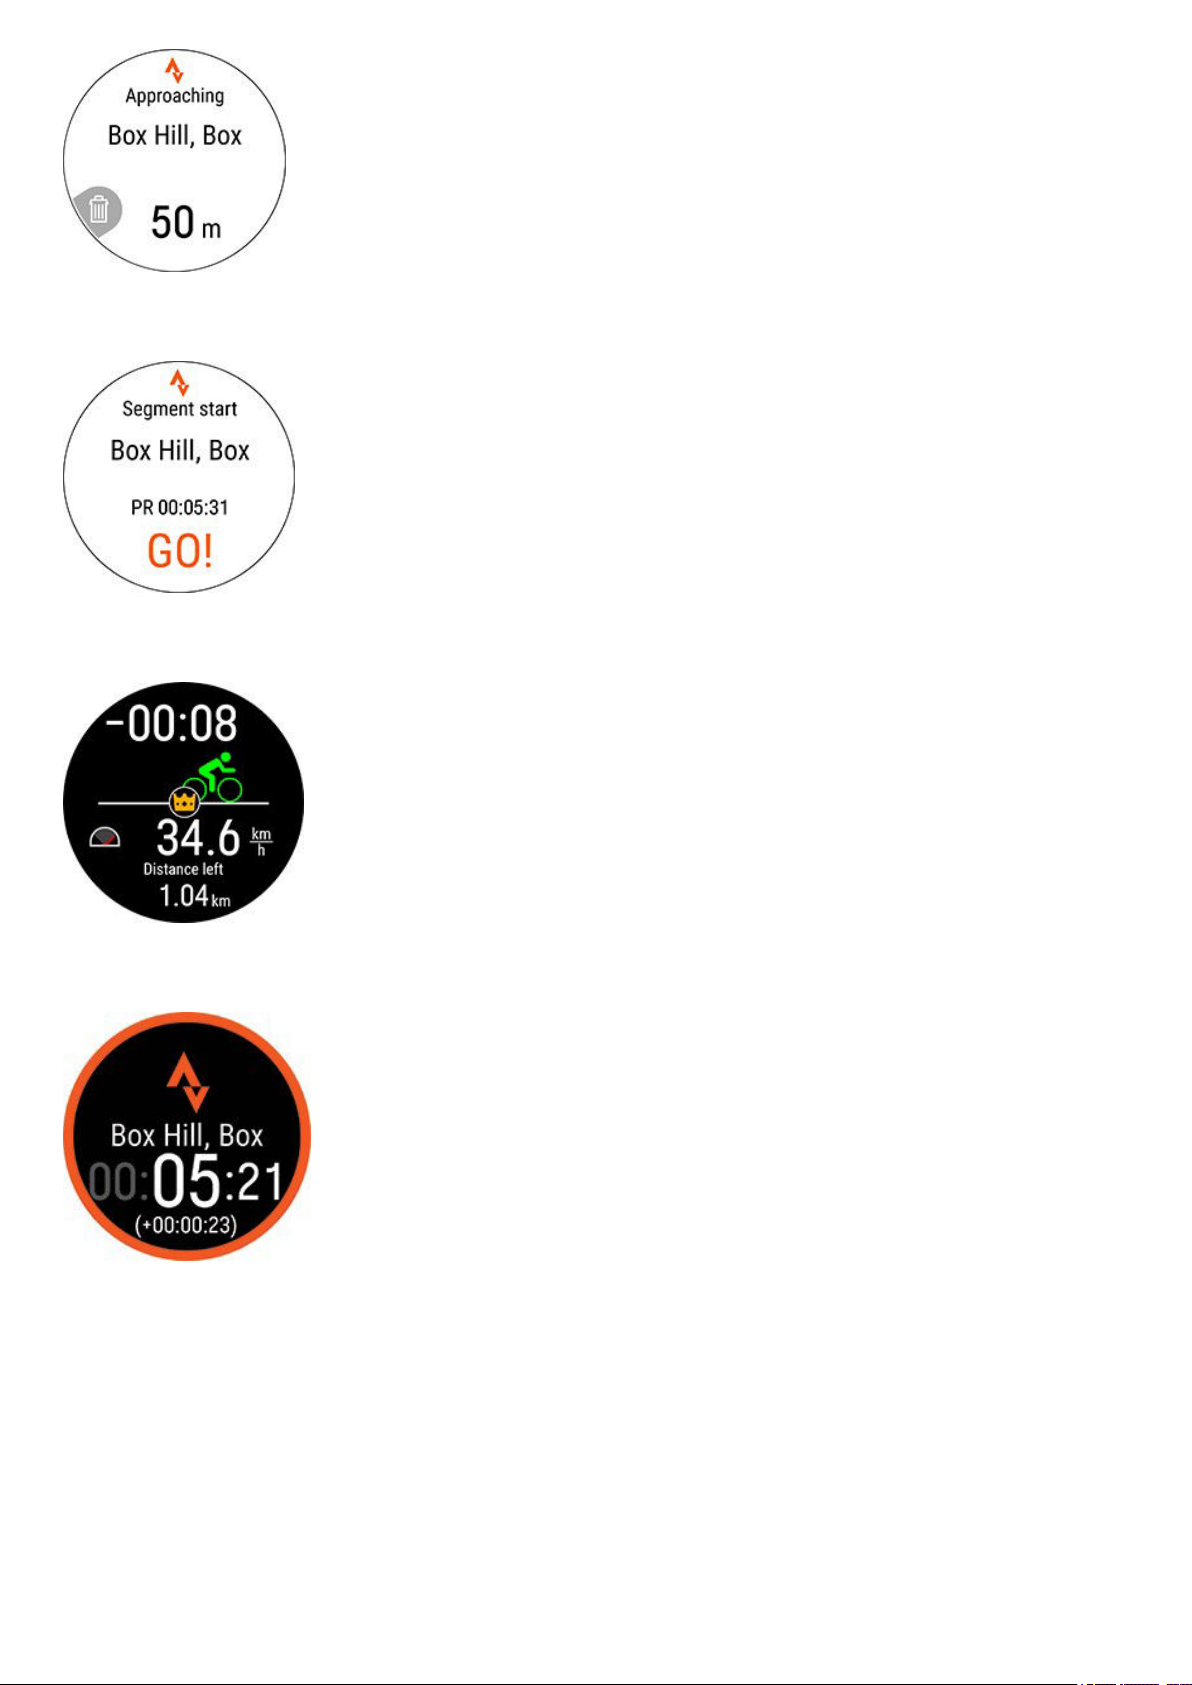
You’ll get another alert when you reach the starting point of the segment. Recording of the segment starts automatically, and
both the name of the segment and your personal record time for the segment are shown on your watch.
The display shows if you are behind or ahead of your personal best (or KOM/QOM if you are doing the segment for the first
time), as well as your speed/pace and distance left.
After you've completed the segment, your watch displays your time, and the difference to your personal best time. The PR
symbol is displayed if you set new personal record.
HILLSPLITTER™
Hill Splitter™ tells you how you performed on the uphill and downhill sections of your session. Hill Splitter™ automatically
detects all uphills and downhills by using your GPS-based speed and distance, and barometric altitude data. It shows you
detailed insights into your performance, such as distance, speed, ascent and descent, for every detected hill on your course.
You get data about the elevation profile of your training session, and you can compare hill stats between different sessions.
Detailed information about each hill is recorded automatically, no need to take laps manually.
60
Page 61
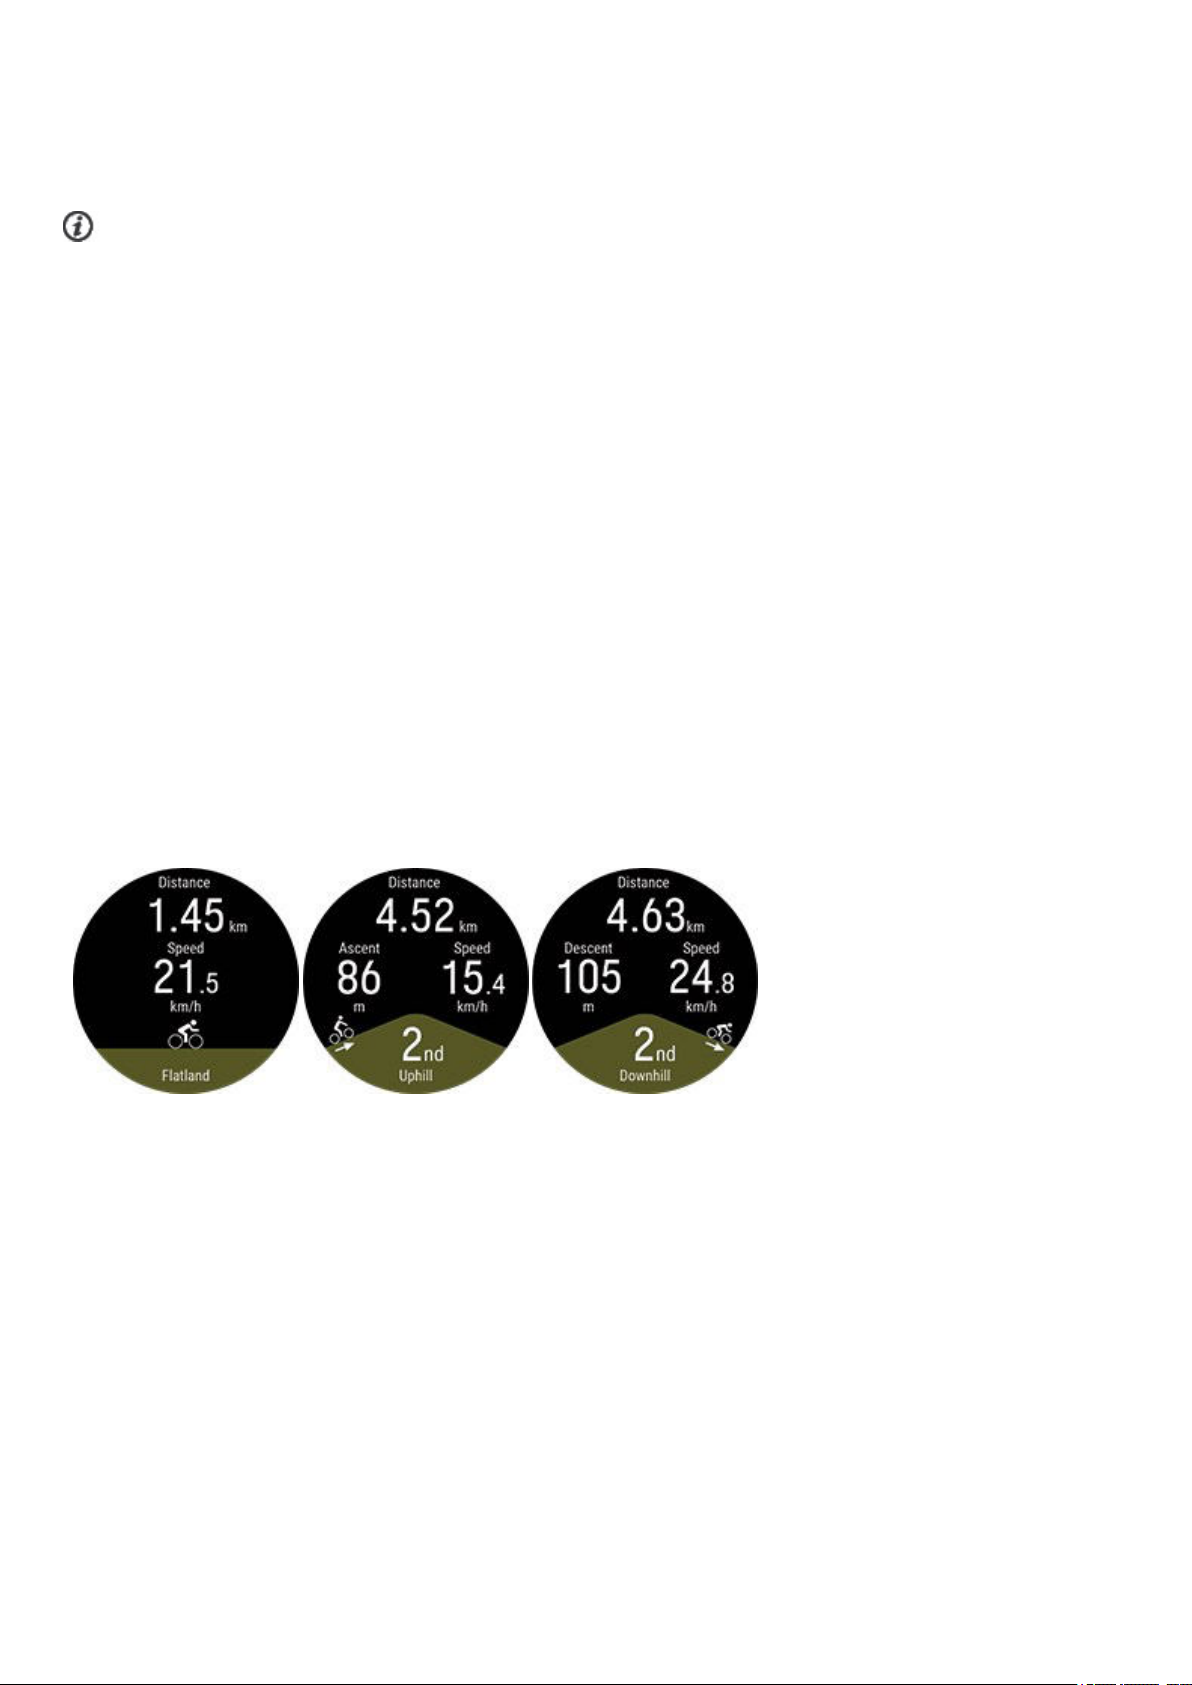
Hill Splitter adapts to the terrain in each session. In practice this means that when doing a session in relatively flat terrain,
even small hills are counted. Then again when training in areas with large variation in elevation such as mountains, the
smallest hills are not counted. This adaptation is always session specific.
The minimum ascent or descent counted as a hill differs depending on your sport profile. In downhill sports (snowboarding,
downhill skiing, backcountry skiing and telemark skiing) it's 15 meters, and in all other sports it's 10 meters.
Hill Splitter requires 1 second GPSrecording rate. It cannot be used with 1 minute or 2 minute recording rates.
ADD THE HILL SPLITTER VIEW TO A SPORT PROFILE
By default the Hill Splitter training view is on in all running, cycling and downhill type sport profiles, but it can be added to any
sport profile that uses GPS and barometric altitude.
In the Flow web service:
1. Go to Sport Profiles, and choose edit on the sport profile you wish to add it to.
2. Choose Related to device
3. Choose Grit X Pro > Training views > Add new > Fullscreen > Hill Splitter and save.
In the Flow mobile app:
1. Go to the main menu, and, choose Sport profiles.
2. Choose a sport and tap Edit.
3. Add the Hill Splitter training view.
4. When you're ready, tap Done.
Remember to sync the settings to your Polar device.
TRAINING WITH HILL SPLITTER
After starting your session, scroll to the Hill Splitter view with the UP/DOWN buttons. Details you can view during your
session include:
l Distance : The distance of the
current segment (flat, uphill or
downhill)
l Ascent/descent of current
segment
l Speed
Note that there is some delay when switching from a hill to flatland. This is to make sure that the hill is over. Even though the
switch from a hill to flatland shown in the Hill Splitter training view is delayed, the end of the hill is marked correctly in the
data, so when viewing your training summary in Flow web service or app it is shown correctly.
Hill details pop-up
In downhill sports (snowboarding, downhill skiing, backcountry skiing and telemark skiing) you'll get a pop-up with details
from your previous hill after finishing it, and then going back uphill for 15 meters. This is designed so that you'll get the pop-up
when heading back up on a ski-lift.
61
Page 62
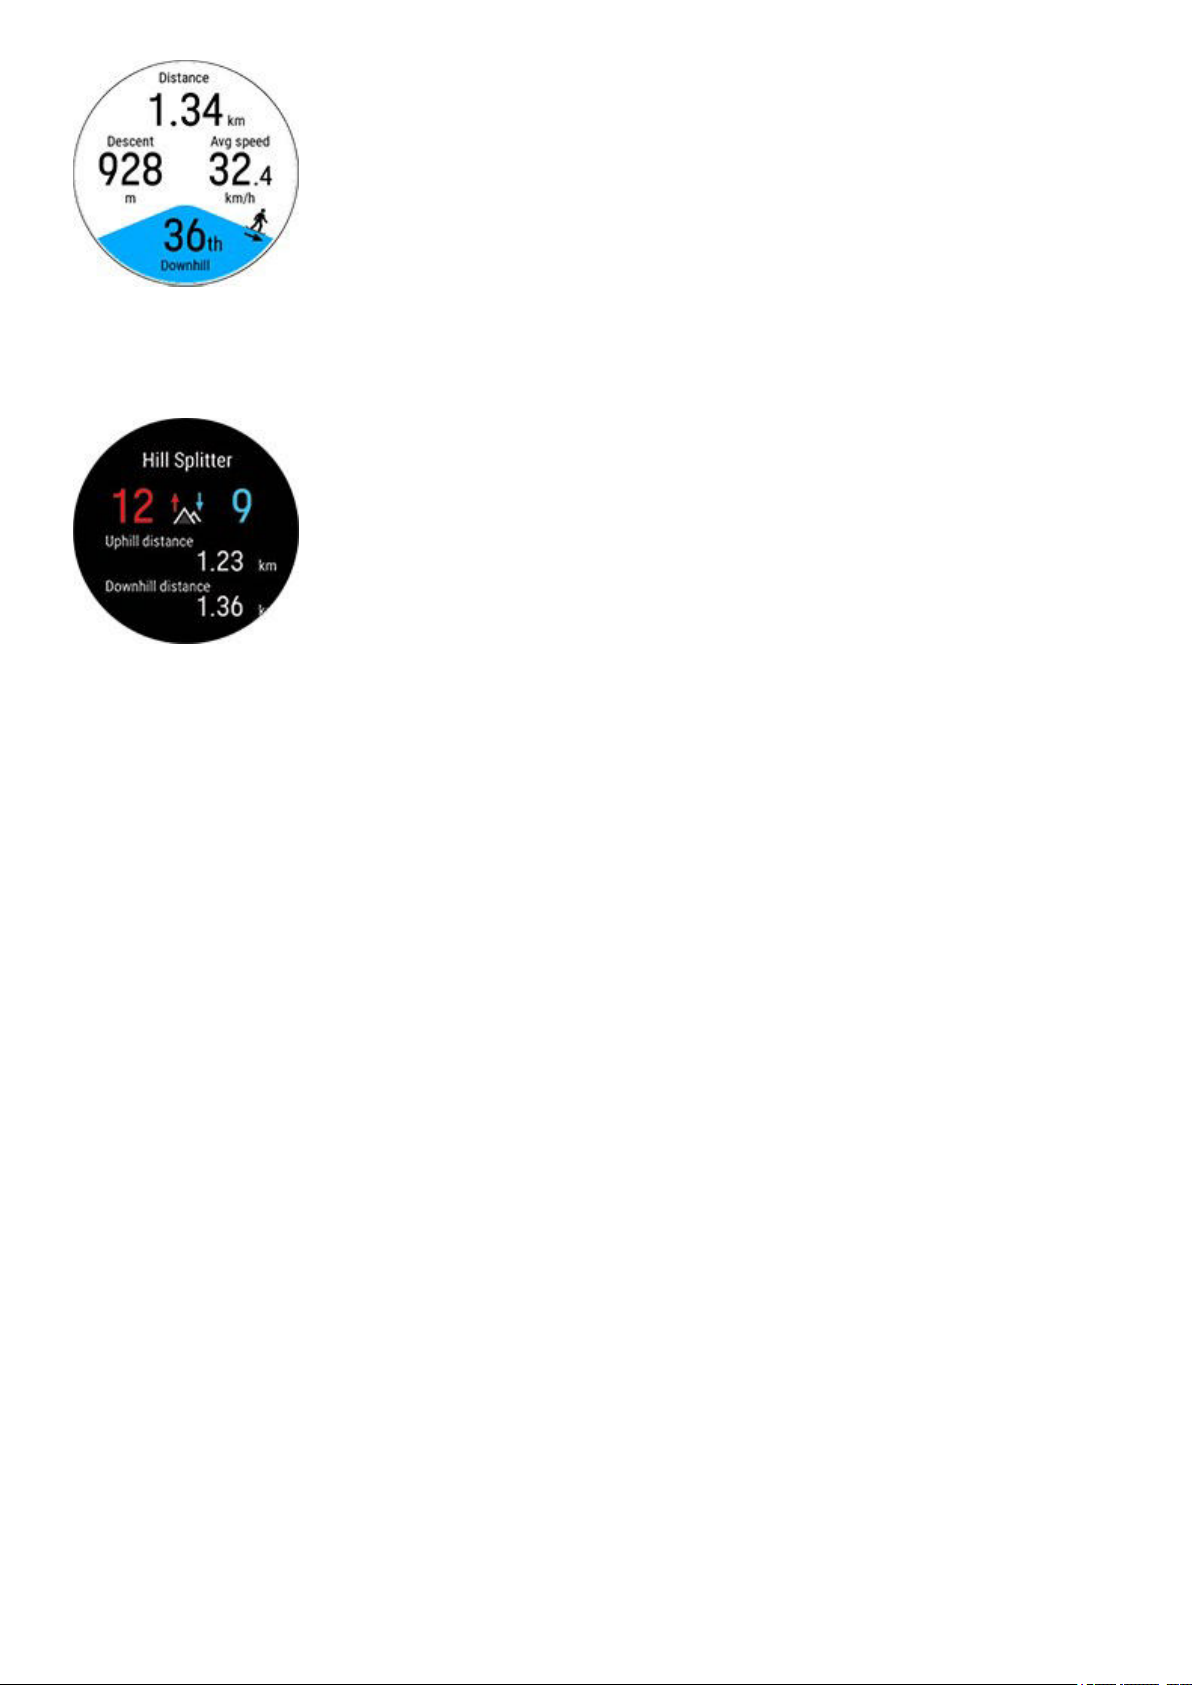
l Distance : The distance of the current segment (flat, uphill or downhill)
l Ascent/descent of current segment
l Average speed
l Hill number
HILL SPLITTER SUMMARY
After your session, you'll see the following information in the training summary:
l Number of uphills and downhills
l Total uphill and downhill distance
DETAILED ANALYSIS IN THE FLOW WEB SERVICE AND APP
View detailed data for each uphill, downhill and flat segment in the Flow web service after syncing your data to it after your
session. An overview of your session is also available in the Flow app.
The data available for each segment depends on the sport profile and sensors you used but it can for example include
altitude, power, heart rate, cadence and speed data.
62
Page 63
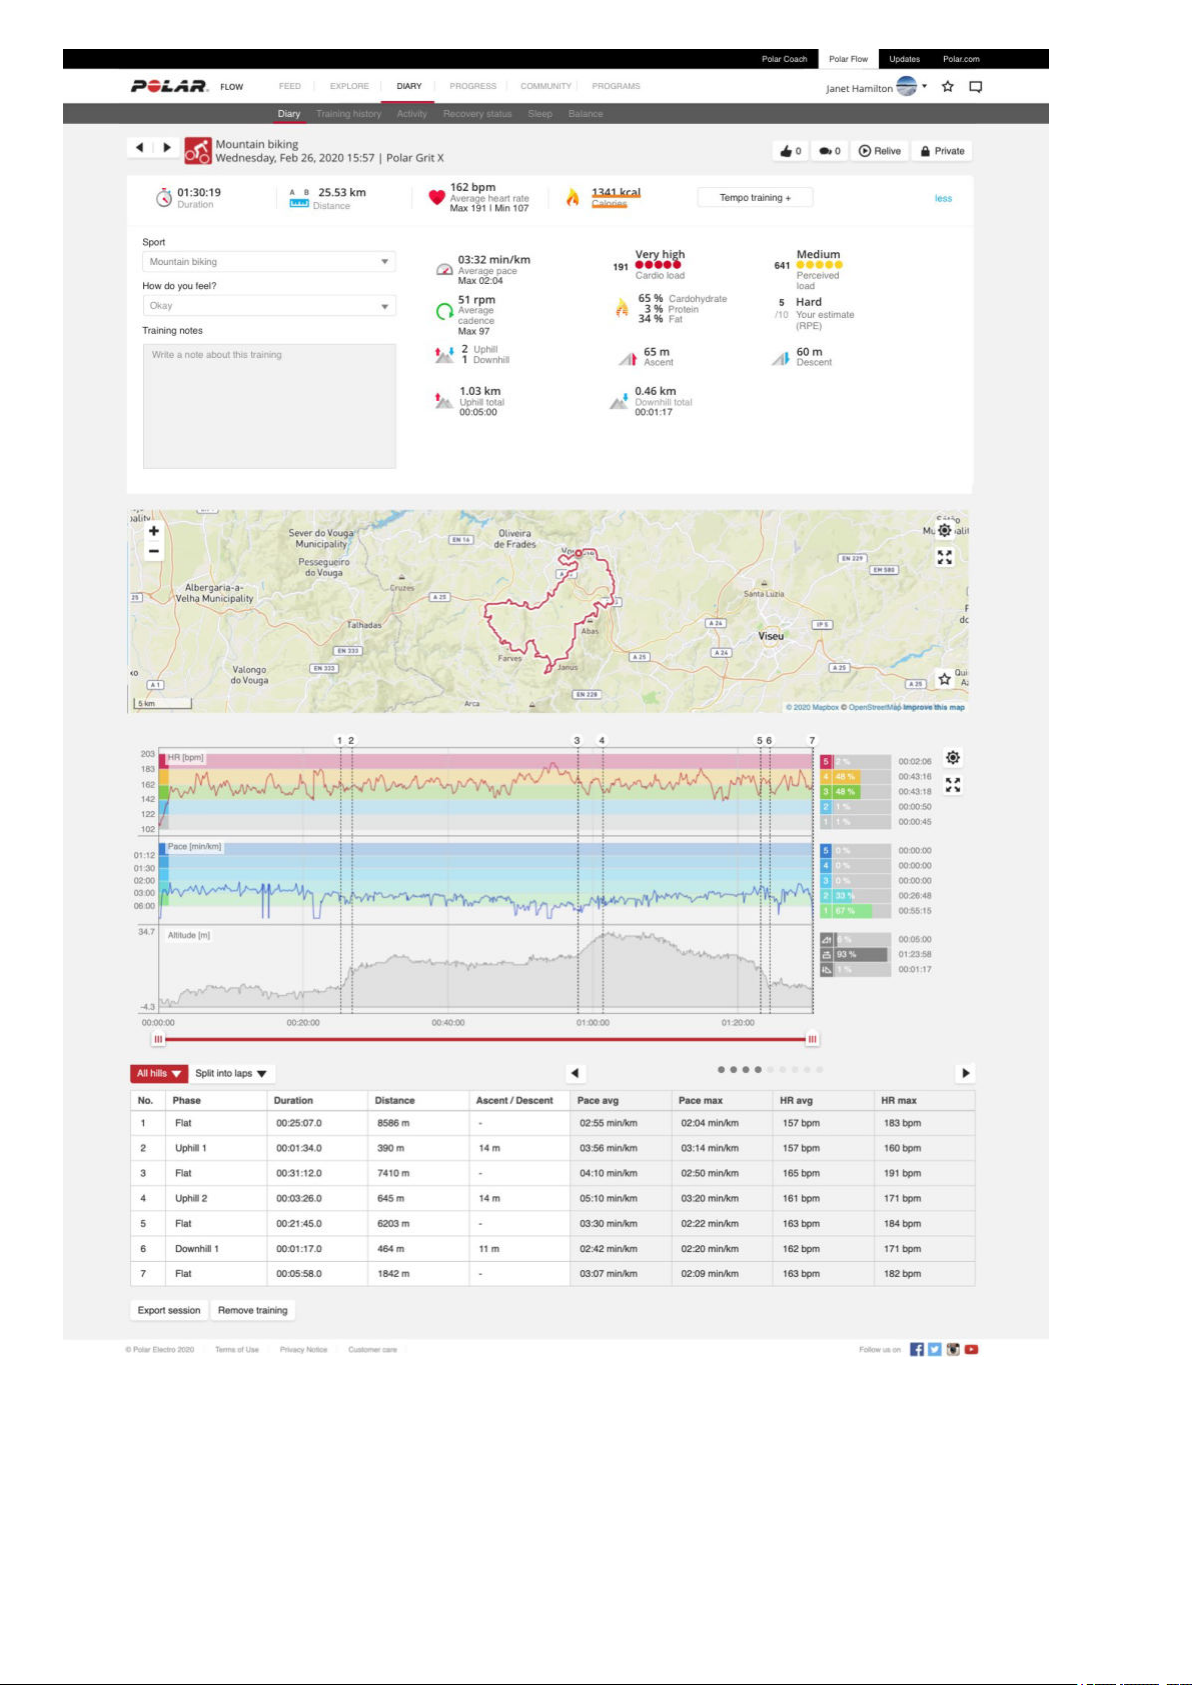
63
Page 64
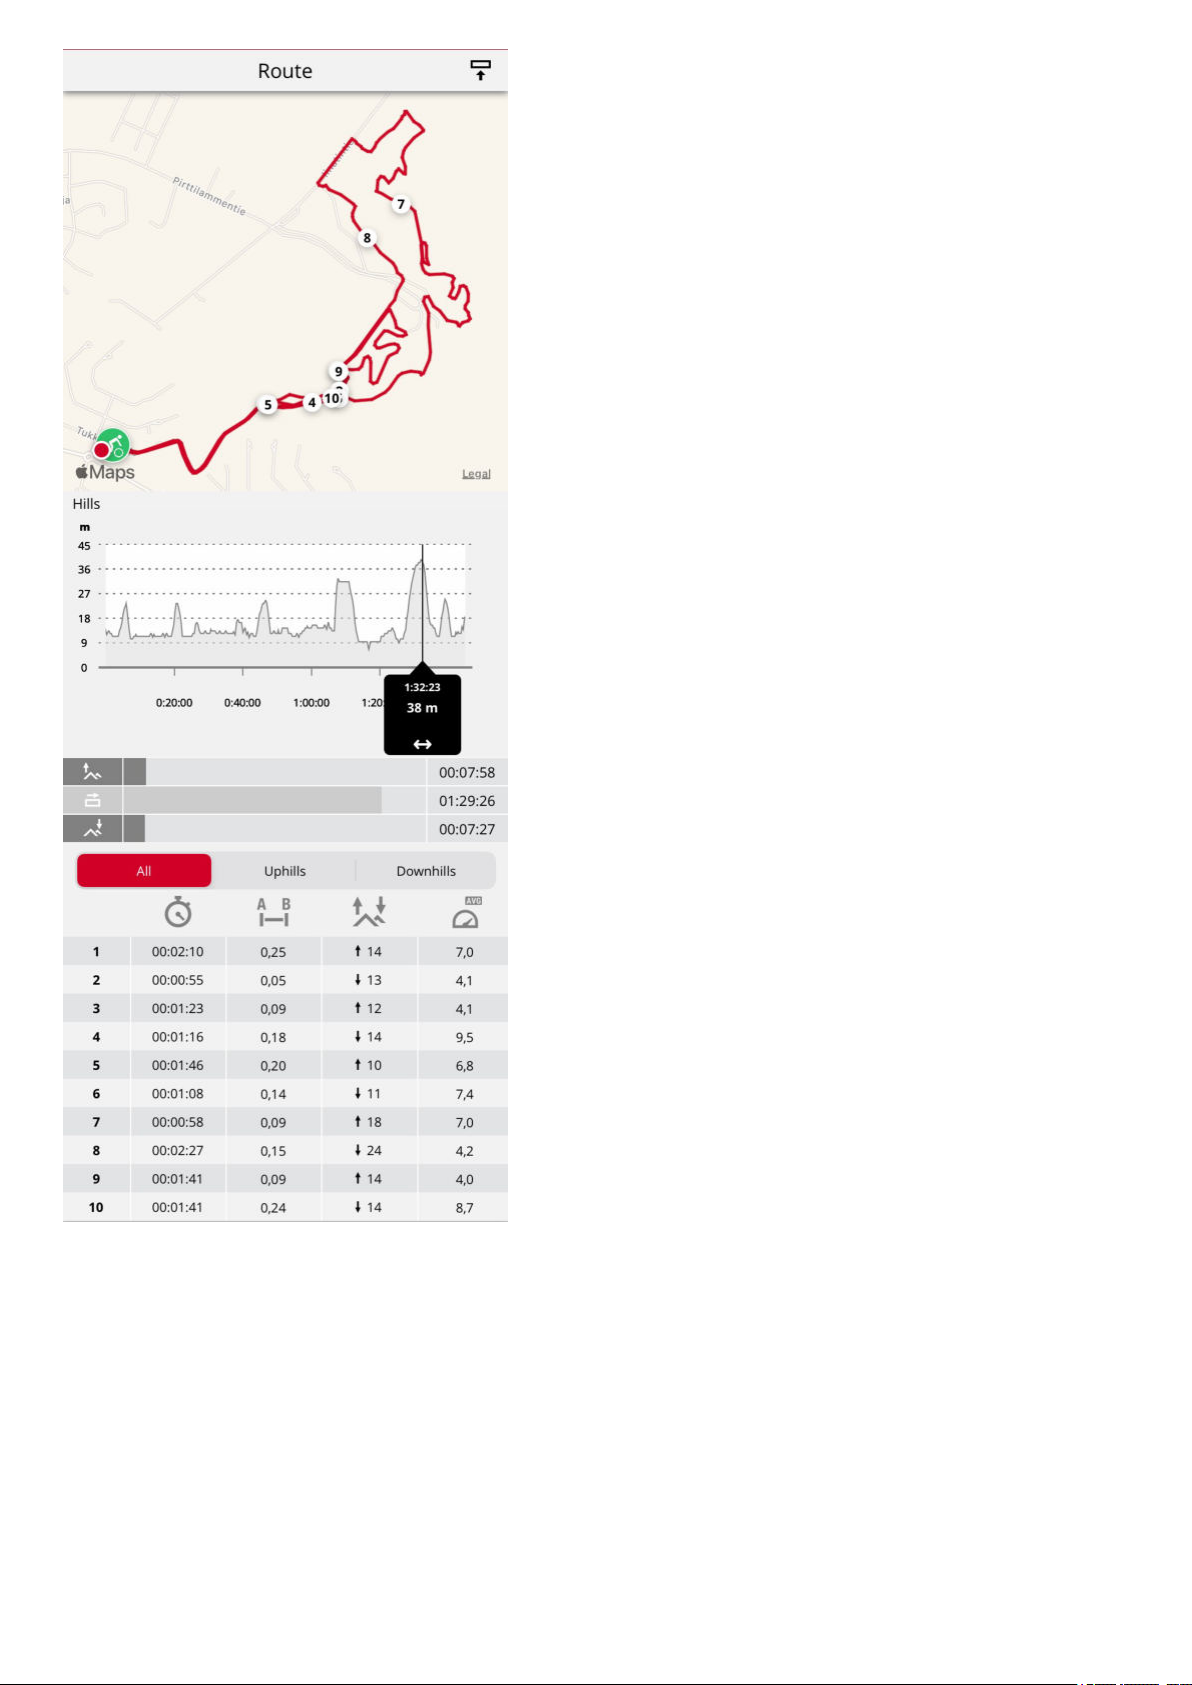
KOMOOT
Plan detailed routes on maps with komoot and transfer the routes to your watch for turn-by-turn route guidance on the go!
Whether road cycling, hiking, bikepacking or mountain biking, komoot’s superior planning and navigation technology allows
you to easily discover more of the great outdoors.
Create a komoot account if you don't have one. When you sign up for komoot, you get a free region to test all of their core
features. Komoot recommends to unlock your home region as your free region. Then connect komoot to Polar Flow, and get
your komoot routes on your watch. Every time you sync your watch your Flow routes sync back to komoot automatically.
64
Page 65
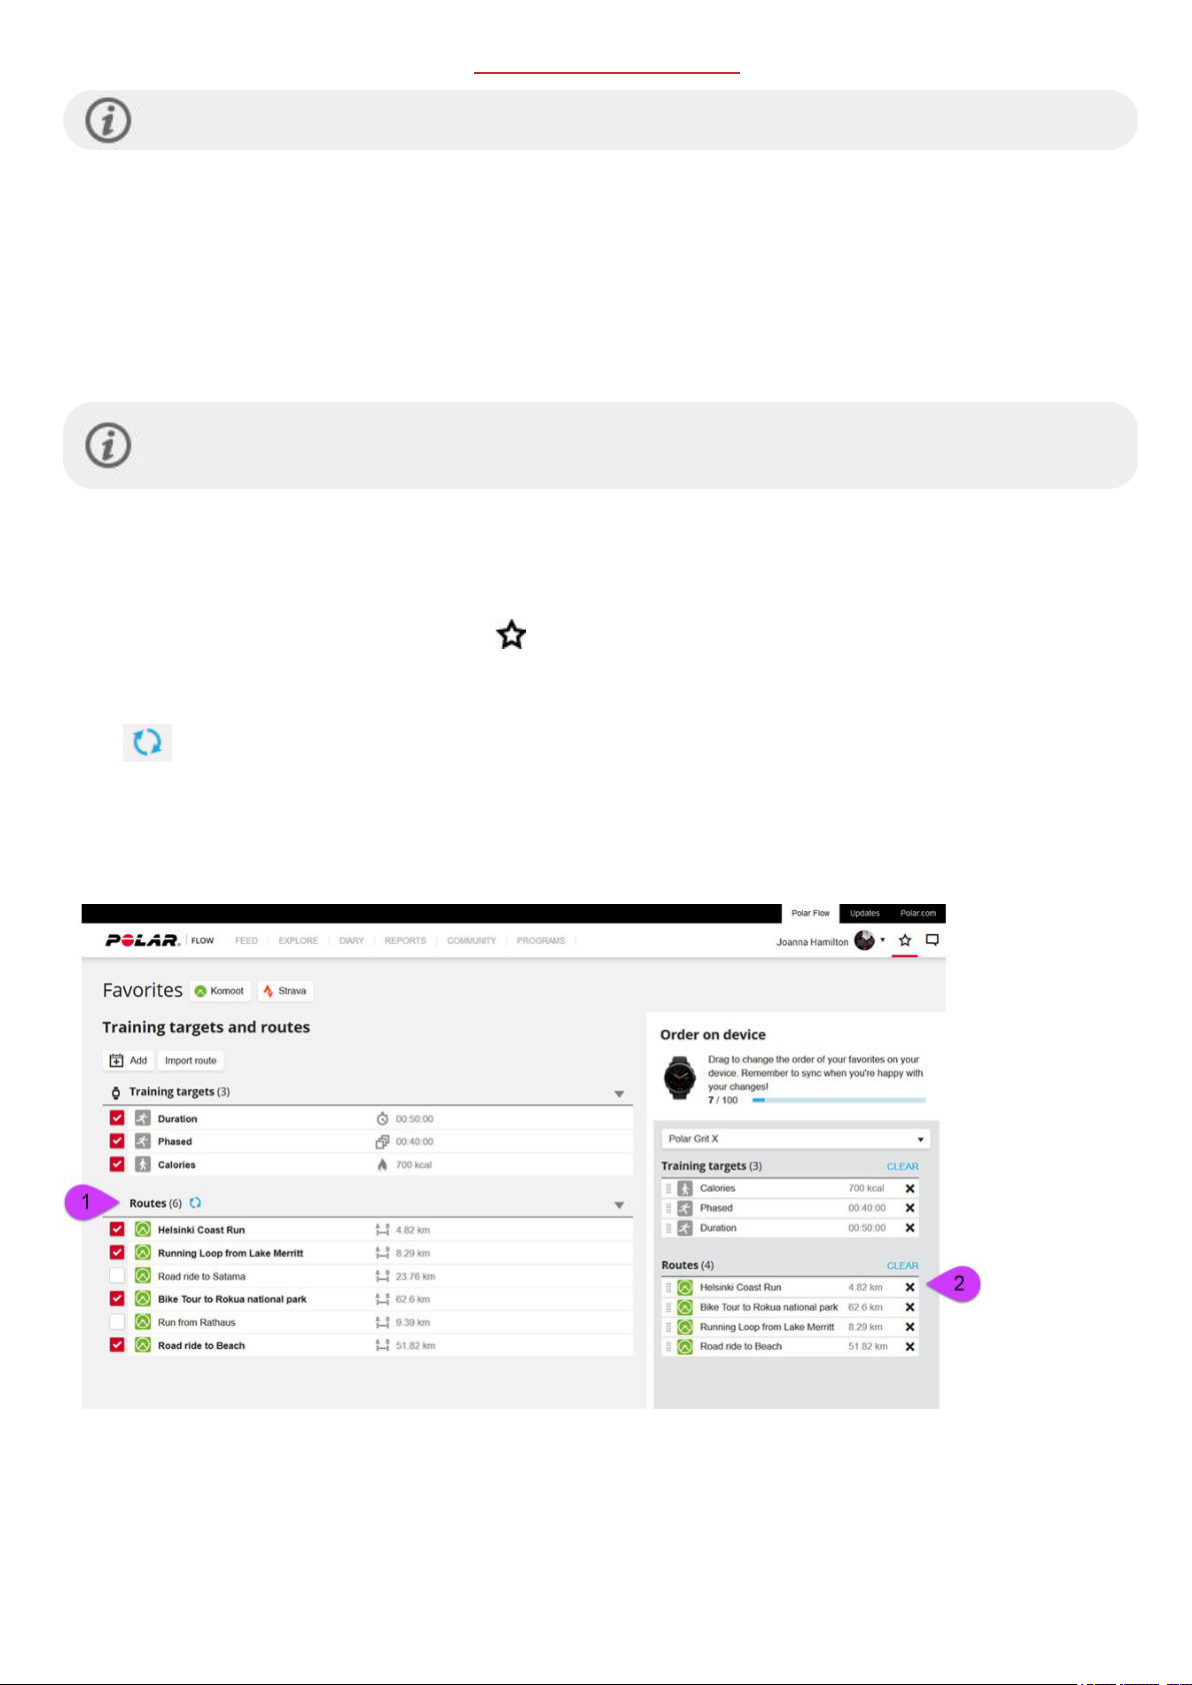
For help using Komoot, see their support site at
Komoot routes require 1 second GPSrecording rate. It cannot be used with 1 minute or 2 minute recording rates.
support.komoot.com/hc/en-us
CONNECT YOUR KOMOOT AND POLAR FLOW ACCOUNTS
First, make sure you have a polar Flow account and a komoot account. You can connect your komoot and Polar Flow
accounts in the Polar Flow web service or in the Polar Flow app.
In the Polar Flow web service go to Settings > Partners > Komoot > Connect.
or
In the Polar Flow app go to General Settings > Connect > Komoot (swipe the button to connect).
After connecting your komoot and Polar Flow accounts, all of your planned komoot tours that start in a region
that you have unlocked in your Komoot account will be synced to your favorites in Flow.
SYNC KOMOOT ROUTES TO YOUR WATCH
You can choose the routes you want to transfer to your watch in the Polar Flow web service or app. Your watch can have a
maximum of 100 favorites at a time.
In the Flow web service, click the Favorites icon
1. Choose the routes by clicking the selection boxes on the left of the routes list to move them to the sync list for your
watch on the right. If you have planned new routes with komoot, you can update them to the routes list by clicking the
button.
2. You can change the order of the routes on the watch by dragging and dropping them. You can remove individual routes
by clicking X or all routes at once by clicking
remove them from your watch.
3. Sync your watch to save your changes to it.
on the menu bar on top of the page to enter your Favorites page.
CLEAR. Note that they still remain available in your favorites even if you
In the Flow app, go to Devices menu and onto the device page. Scroll down the page and tap Add/remove to see your
current favorites on the watch.
65
Page 66
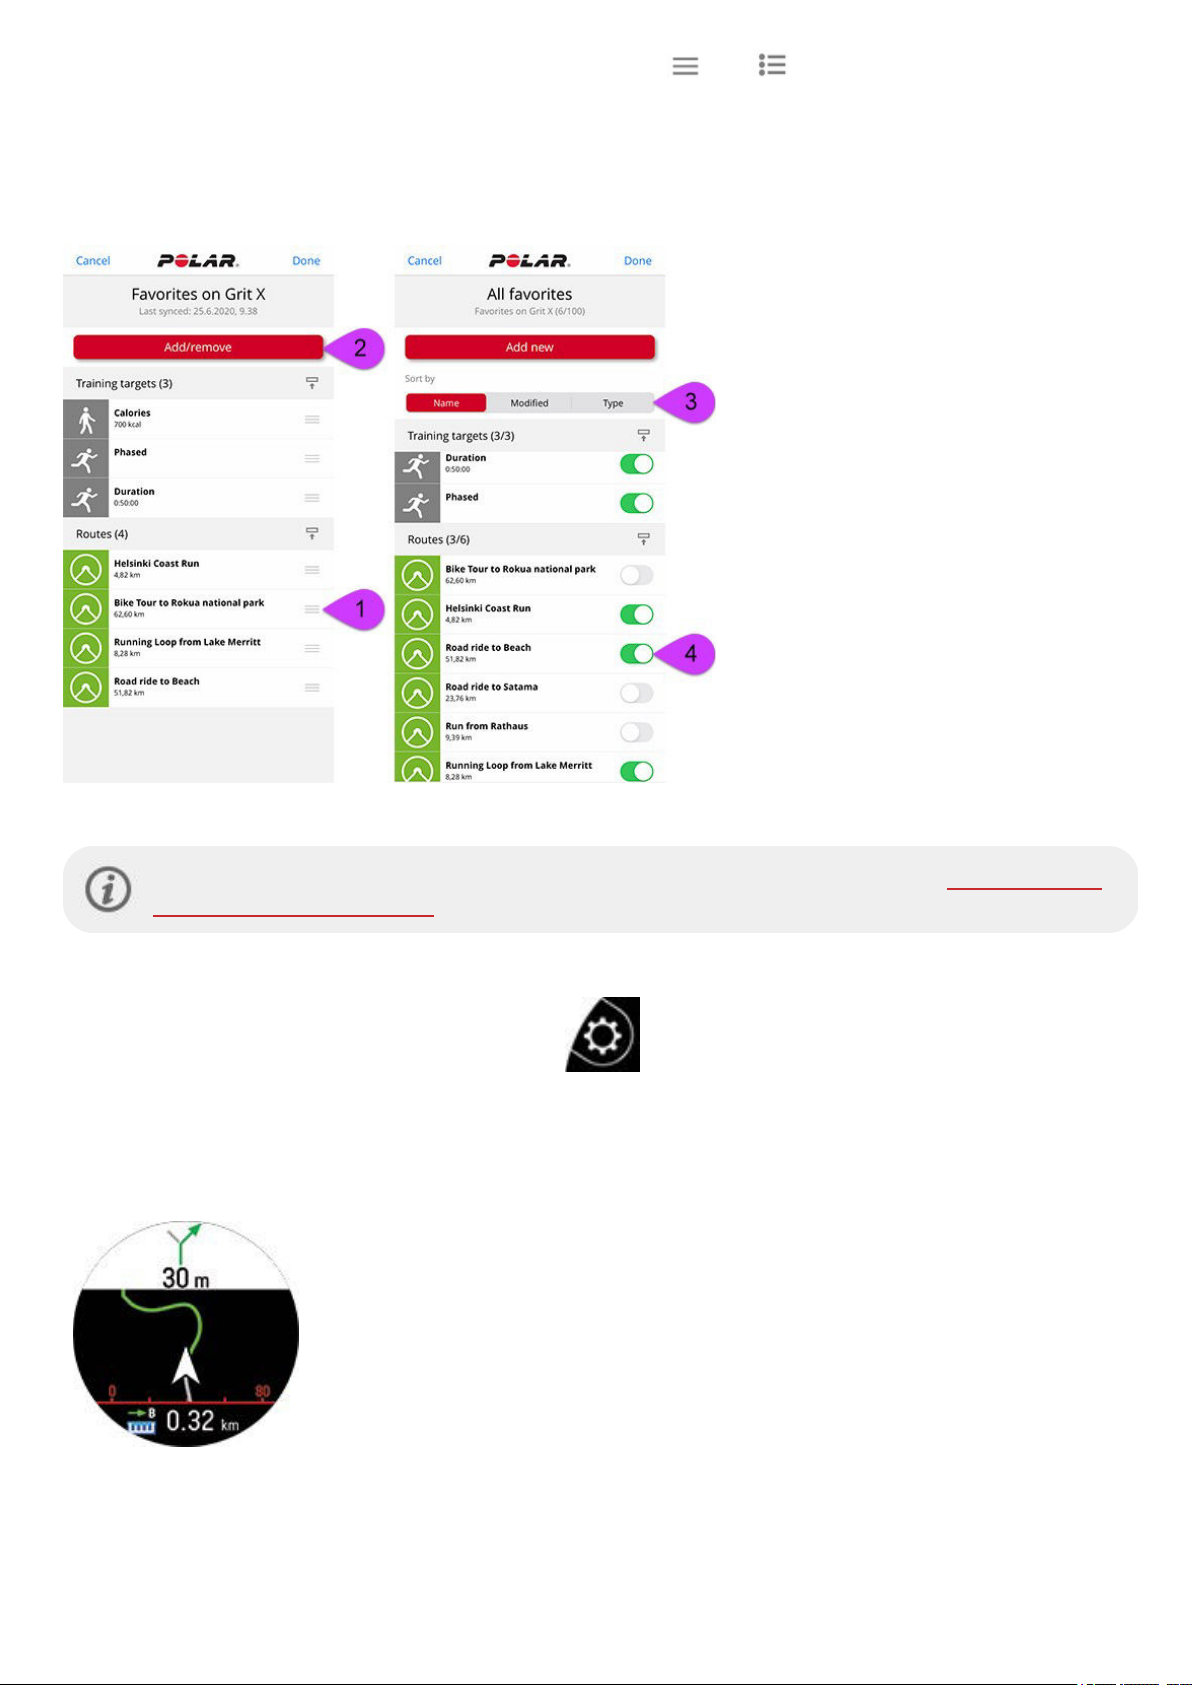
1.
You can reorder the routes on the watch by tapping and holding
routes where you want them.
2. To add or remove a route, tap
3. You can sort the favorites by Name, Modified and Type.
4. To remove a route from the watch, turn the switch to left. To add a route, turn the switch to right.
5. Sync your watch with the app to save the changes.
Add/remove again to access all your favorites.
(iOS)/ (Android) on the right and dragging the
For more information on managing your favorites in the Polar Flow web service and app, see Manage favorites
and training targets in Polar Flow.
START A SESSION WITH A KOMOOT ROUTE
1.
In pre-training mode, press the LIGHT button or tap
2. Choose
3. Choose where you want to start the route: Start point or Mid-route.
4. Choose the sport profile you want to use, and start your session.
5. Your watch will guide you to the route. Route start found is displayed when you reach it, and then you're ready to go.
Routes from the list, and pick the komoot route you want to do. The closest route is shown first.
Your watch guides you through your route with turn-by-turn instructions.
to enter the quick menu.
66
Page 67

SMARTCOACHING
Whether it’s assessing your day-to-day fitness levels, creating individual training plans, working out at the right intensity or
receiving instant feedback, Smart Coaching offers a choice of unique, easy-to-use features, personalized to your needs and
designed for maximum enjoyment and motivation when training.
Your watch includes the following Polar Smart Coaching features:
• Training Load Pro
• FuelWise™
• Running power from the wrist
• Running Program
• Running Index
• Training benefit
• Smart calories
• Continuous heart rate
• Polar Sleep Plus
• Activity Guide
• Activity Benefit
• Nightly Recharge™ recovery measurement
• Sleep Plus Stages™ sleep tracking
• Serene™ guided breathing exercise
• Fitness Test with wrist-based heart rate
• FitSpark™ daily training guide
TRAINING LOAD PRO
The new Training Load Pro™ feature measures how your training sessions strain your body and helps to understand how it
impacts your performance. Training Load Pro gives you a training load level for your cardiovascular system Cardio Load, and
with Perceived Load you can rate how strained you feel. Training Load Pro also gives you a training load level for your
musculoskeletal system (Muscle Load). When you know how strained each body system is, you can optimize your training
by working the right system at the right time.
Cardio Load
Cardio Load is based on training impulse calculation (TRIMP), a commonly accepted and scientifically proven method to
quantify training load. Your Cardio Load value tells you how much strain your training session put on your cardiovascular
system. The higher the Cardio Load, the more strenuous the training session was for the cardiovascular system. Cardio Load
is calculated after every workout from your heart rate data and session duration.
Perceived Load
Your subjective feeling is one useful method of estimating training load for all sports. The Perceived Load is a value that
takes into account your own subjective experience of how demanding your training session was and the duration of your
session. It's is quantified with Rate of Perceived Exertion (RPE), a scientifically accepted method to quantify subjective
training load. Using the RPE scale is especially useful for sports where measuring training load based on heart rate alone has
its limitations, for example strength training.
67
Page 68
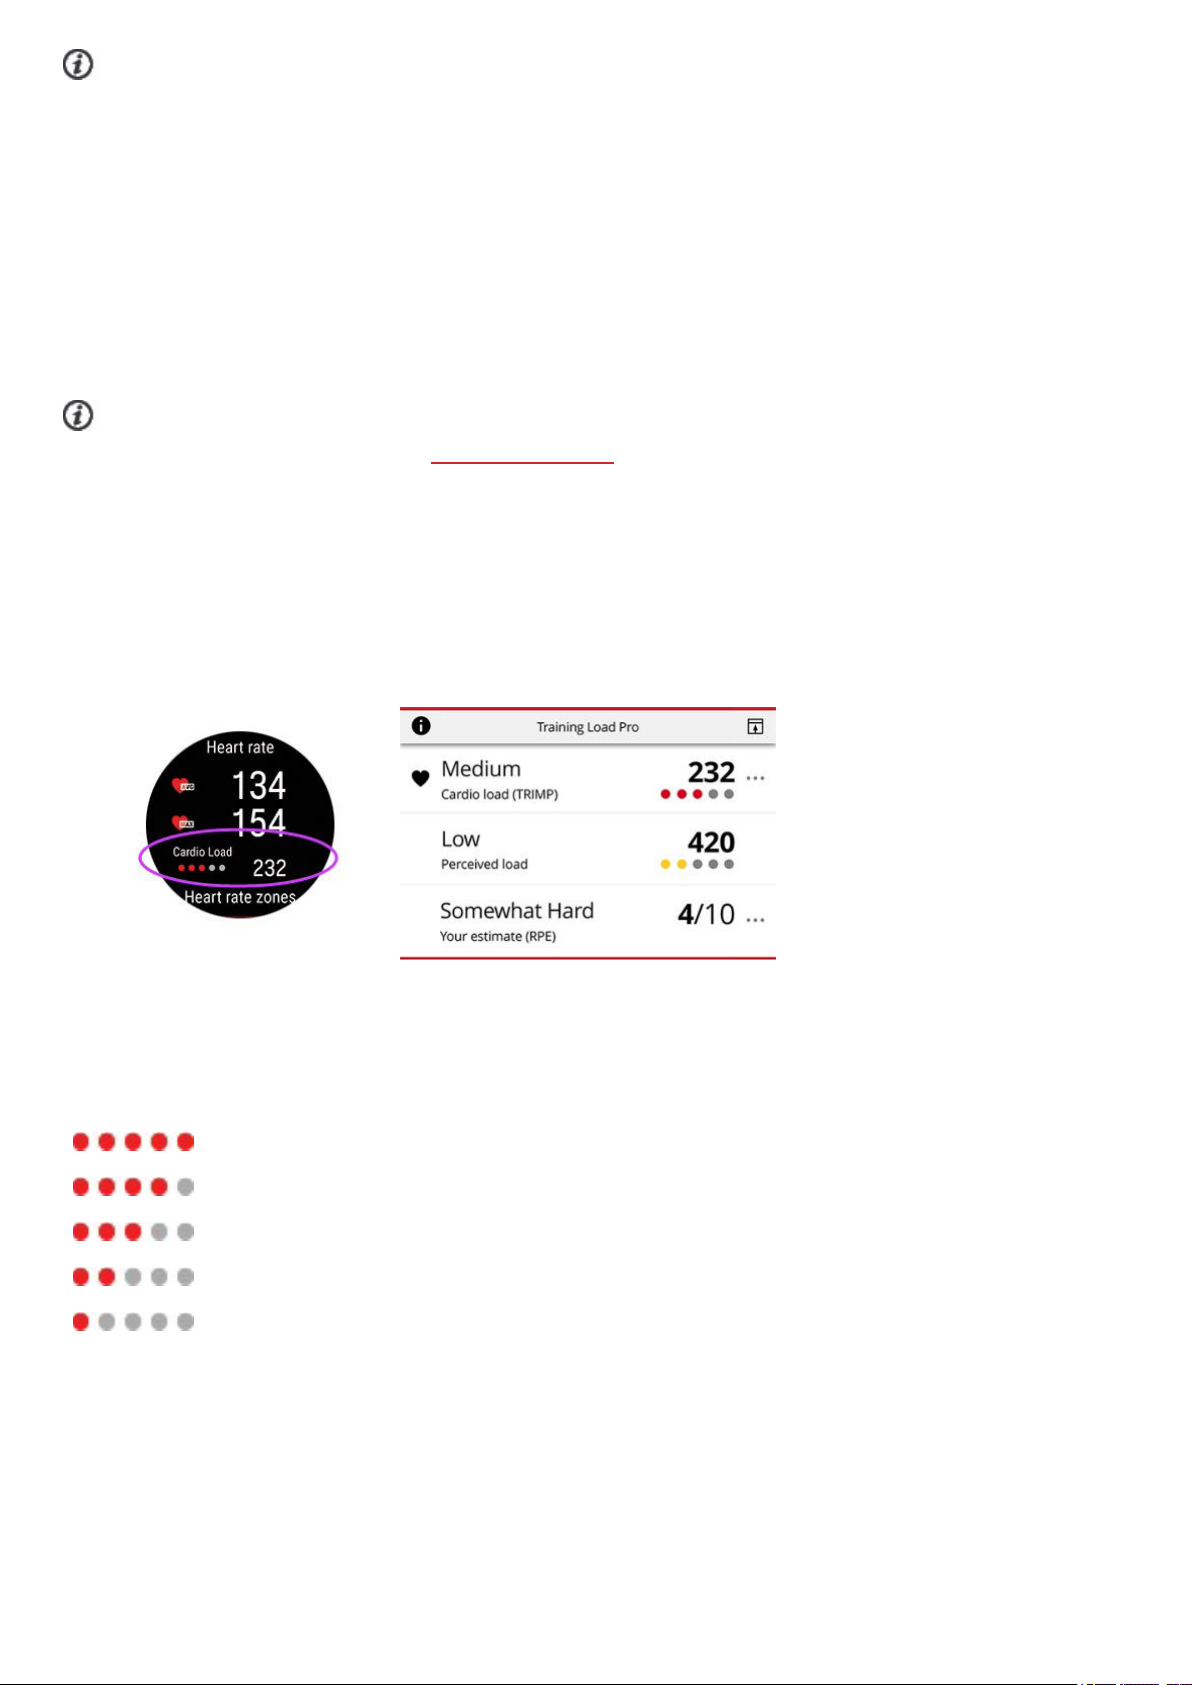
Rate your session in the Flow mobile app to get your Perceived Load for the session. You can choose from a scale from
1-10, in which 1 is very, very easy and 10 is maximum effort.
Muscle Load
Muscle Load tells you how much your muscles were strained during your training session. Muscle Load helps you quantify
your training load in high-intensity training sessions, such as short intervals, sprints and hill sessions, when your heart rate
doesn’t have enough time to react to the changes in the intensity.
Muscle load shows the amount of mechanical energy (kJ) that you produced during a running or cycling session. This
reflects your energy output, not the energy input it took you to produce that effort. In general, the fitter you are, the better the
efficiency between your energy input and output. Muscle load is calculated based on power and duration. In case of running,
also your weight counts.
Muscle Load is calculated from your power data, so you only get a Muscle Load value for your running workouts, and
cycling sessions if you’re using a separate
cycling power sensor.
Training Load from a single session
Your Training Load from a single session is shown in the summary of your training session on your watch, in the Flow app
and in the Flow web service.
You'll get an absolute training load number for each measured load. The higher the load, the more strain it caused to your
body. In addition, you can see a visual bullet scale interpretation and a verbal description of how hard your training load from
the session was compared to your 90 days training load average.
The scale of bullets and verbal descriptions adapts according to your progress: the smarter you train, the higher loads you
tolerate. As your fitness and tolerance for training improves, a training load that was ranked worth 3 bullets (Medium) a
couple of months ago, could rank for only 2 bullets (Low) later on. This adaptive scale reflects the fact that the same kind of
training session can have a different impact on your body depending on your current condition.
Very high
High
Medium
Low
Very low
Strain and Tolerance
In addition to the Cardio load from individual training sessions, the new Training Load Pro feature measures your short term
Cardio load (Strain) and long term Cardio load (Tolerance).
68
Page 69
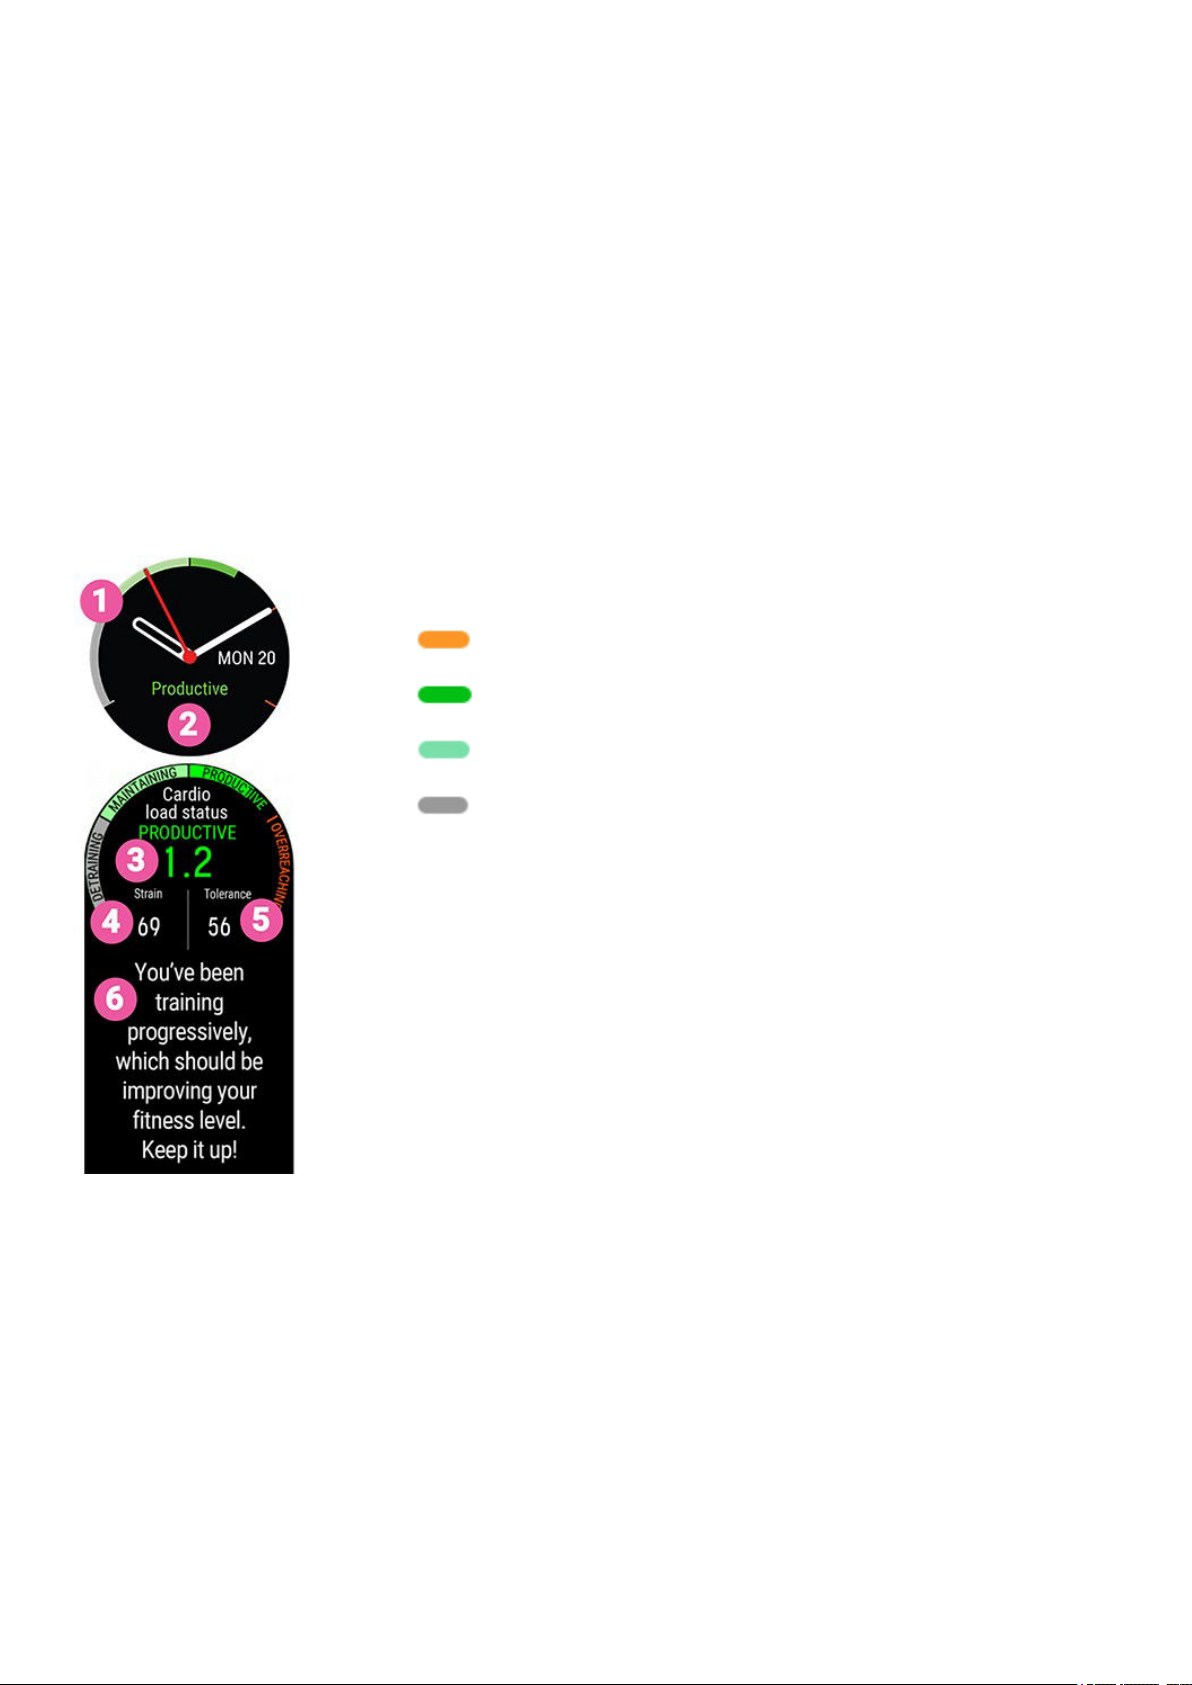
Strain shows you how much you have strained yourself with training lately. It shows your average daily load from the past 7
days.
Tolerance describes how prepared you are to endure cardio training. It shows your average daily load from the past 28 days.
To improve your tolerance for cardio training, you need to slowly increase your training over a longer period of time.
Cardio Load Status
Cardio load status looks at the relation between your Strain and Tolerance and based on that shows you whether you are in
a detraining, maintaining, productive or overreaching Cardio load status. You will also get personalized feedback based on
your status.
Cardio load status guides you in evaluating the impact your training has on your body and how it affects your progress.
Knowing how your past training affects your performance today allows you to keep your total training volume in control and
optimize the timing of training at different intensities. Seeing how your training status changes after a session helps you
understand how much load was caused by the session.
Cardio load status on your watch
In time view, use the UP and DOWN buttons to navigate to the Cardio Load Status watch face.
1. Cardio load status graph
2. Cardio load status
Overreaching (Load much higher than usual):
Productive (Load slowly increasing)
Maintaining (Load slightly lower than usual)
Detraining (Load way lower than usual)
3. The numeric value for your Cardio load status (=Strain divided by Tolerance.)
4. Strain
5. Tolerance
6. Verbal description of your Cardio load status
Long term analysis in the Flow app and web service
In the Flow app and web service you can follow how your Cardio Load builds up over time and see how your Cardio loads
have varied over the past week or months. To view your Cardio Load Buildup in the Flow app, tap the vertical three dots icon
in the week summary (Cardio Load Status module) or in the training summary (Training Load Pro module).
69
Page 70
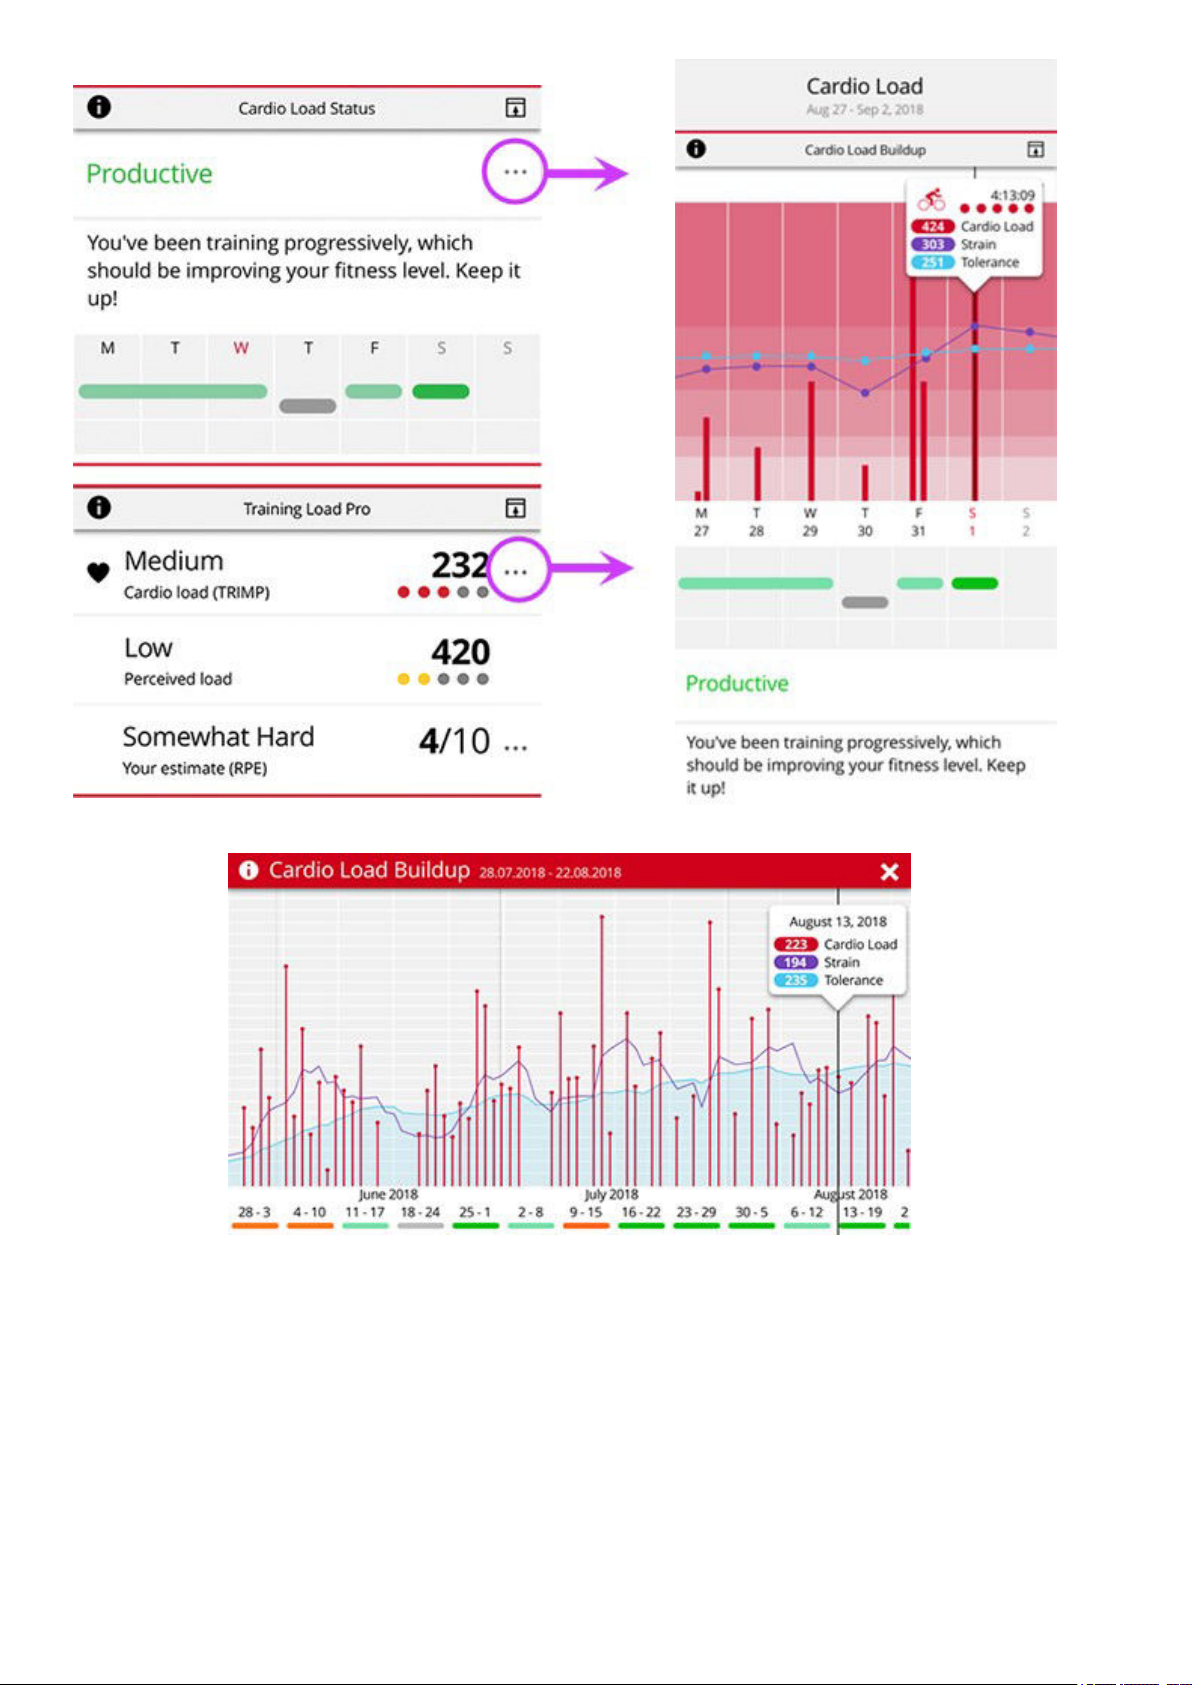
To view your Cardio load status and Cardio load buildup in the Flow web service, go to Progress > Cardio Load report.
70
Page 71
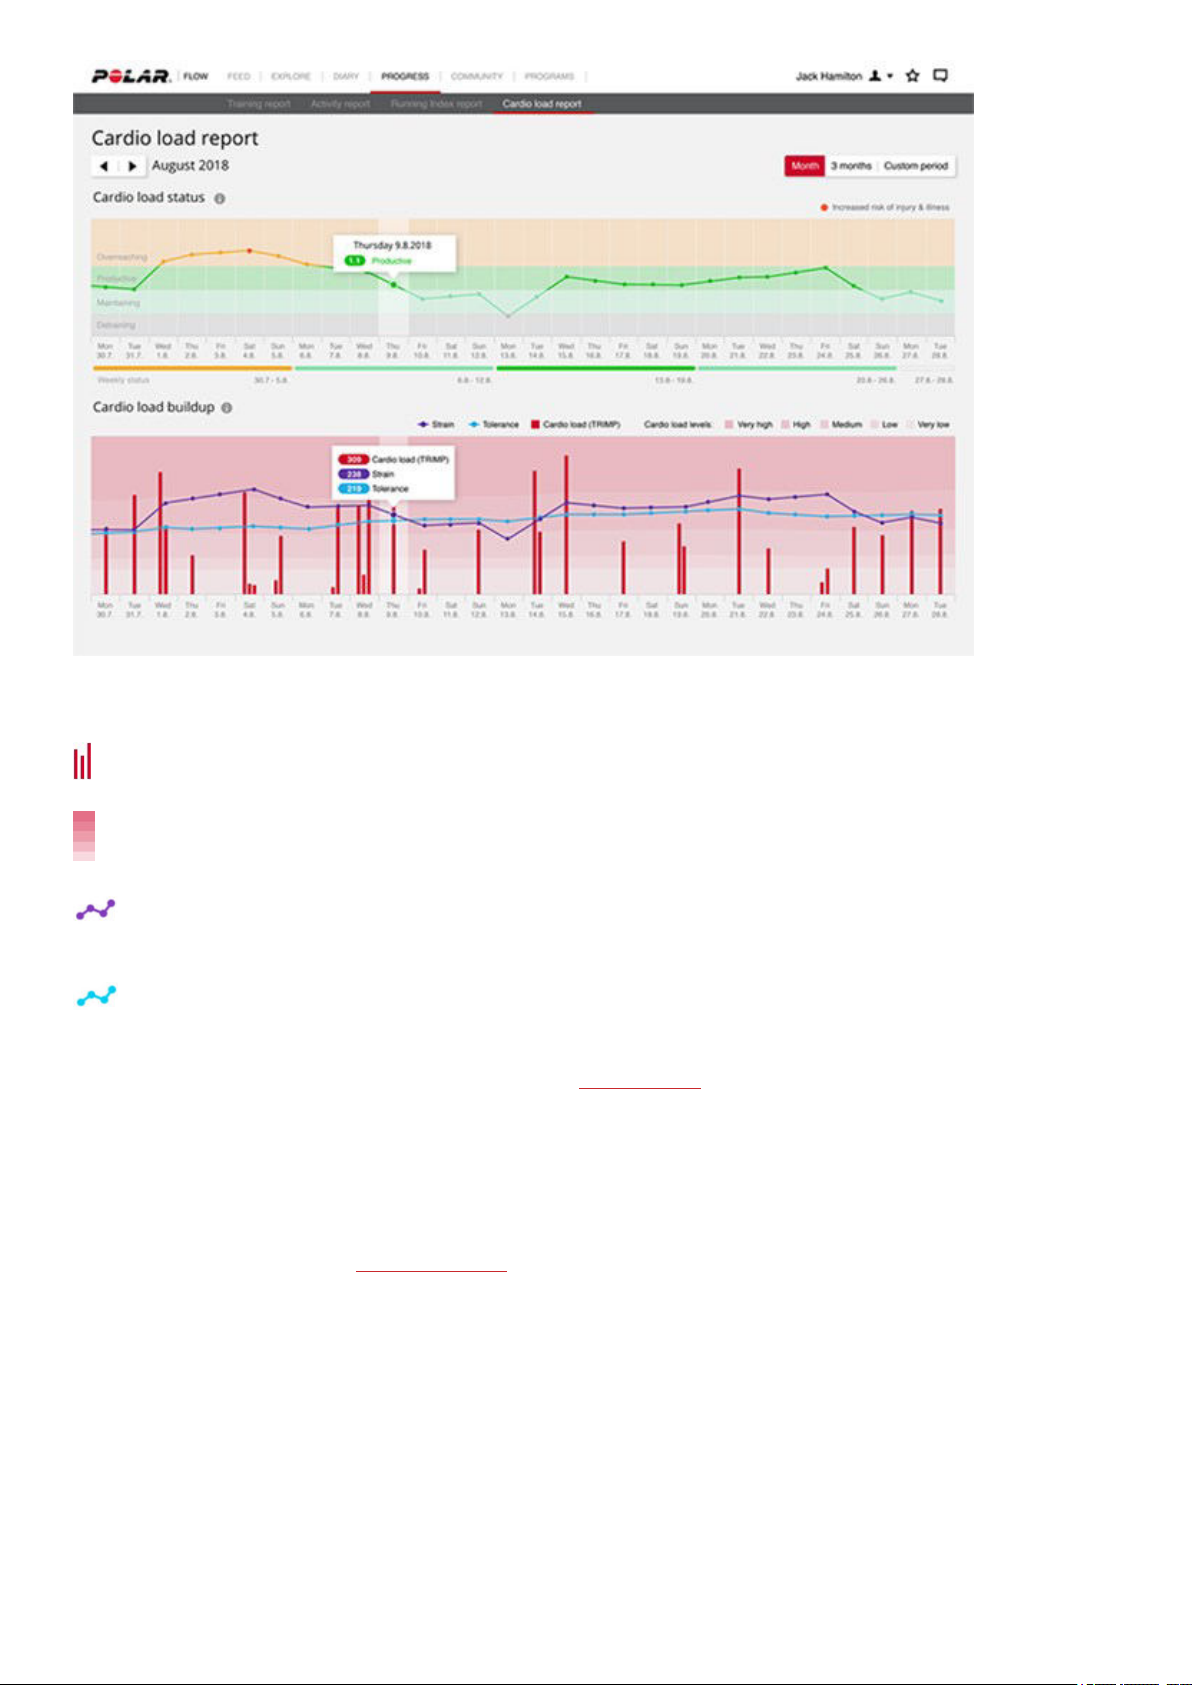
The red bars illustrate the cardio load from your training sessions. The higher the bar, the harder the session was
on your cardio system.
The background colors show how hard a session was compared to your session average from the past 90 days,
just like the scale of five bullets and verbal descriptions (Very low, Low, Medium, High, Very high).
Strain shows how much you have strained yourself with training lately. It shows your average daily cardio load from
the past 7 days.
Tolerance describes how prepared you are to endure cardio training. It shows your average daily cardio load from
the past 28 days. To improve your tolerance for cardio training, slowly increase your training over a longer period of
time.
Learn more about the Polar Training Load Pro feature in this in-depth guide.
RECOVERY PRO
Recovery Pro is a unique recovery tracking solution that lets you know if your cardio system is recovered and ready for cardio
training. In addition, it offers recovery feedback and training recommendations based on your short and long-term training
and recovery balance.
Recovery Pro works together with Training Load Pro that gives you a holistic view on how your training sessions strain
different systems. Recovery Pro then tells you how your body is coping with this strain, and how it affects your daily readiness
for cardio training, and short and long-term recovery.
Recovery and readiness for cardio training
Your cardio system’s recovery, which affects your daily readiness for cardio training is measured with the Orthostatic test.
Your heart rate variability values measured with the test are compared to your individual baseline to spot if there are any
deviations from your average range.
Training and recovery balance
71
Page 72

Recovery Pro combines your measured and subjective long-term recovery data with your long-term training load (Cardio
Load) to monitor the balance between training and recovery. In addition to training-induced factors affecting your recovery,
Recovery Pro also takes into account other factors such as poor sleep and mental stress with subjective recovery questions
asking about your muscle soreness, how strained you feel and how you slept.
Recovery feedback and daily training recommendation
With Recovery Pro you get feedback for both your cardio system’s current recovery and your longer-term training and recovery
balance. Your daily personalized training recommendation is based on these both. It takes into account your heart rate
variability values from the Orthostatic test and your recovery questions within your personal baseline and normal range for
both together with your Cardio Load status from your training sessions.
Get started with Recovery Pro
When you start using Recovery Pro, you need to gather data for a while to build up your personal baseline and typical range
before we can give you accurate feedback on your recovery. Recovery feedback is available when:
l Your Cardio load status is available (you’ve done training sessions with heart rate monitoring on at least three days)
l You’ve taken at least three Orthostatic tests in the previous seven-day window (You’ll need an H10 heart rate sensor
for the Orthostatic test. If you already own an H6 or H7, you can also use either of them.)
l You have answered the perceived recovery questions three times in a seven-day window
1. Set Recovery Pro on
Start using the Recovery Pro feature by setting recovery feedback on. This is done on your watch. Go to Settings > General
Settings > Recovery tracking > Recovery Pro, and set it on. The Recovery Pro feature and the recovery tracking setting is
available on your watch only, it is not shown in the Flow web service or app.
2. Schedule an Orthostatic test for at least three mornings a week
When Recovery Pro is set on, the watch asks you to schedule an Orthostatic test for at least three mornings per week (e.g. on
Mondays, Thursdays and Saturdays). For the most accurate recovery information, we recommend you take the Orthostatic
test every morning if possible. By doing this you’ll get your cardio system’s recovery information every day in addition to daily
recovery feedback.
3. Take the Orthostatic test on the scheduled mornings
The Orthostatic test measures your heart rate and heart rate variability (HRV). Heart rate variability is responsive to training
overload and to stress outside of training. Its affected by stress factors such as mental stress, sleep, latent illness and
environmental changes (temperature, altitude) to mention a few. Recovery Pro uses your resting heart rate variability (RMSSD
rest) and standing heart rate variability (RMSSD stand) measured with the test and compares them to your individual normal
range. If your heart rate variability values deviate from your normal range, this could mean that something is interfering with
your recovery.
Your normal range is calculated from your individual mean and standard deviation of your test results from the past four
weeks. If you’ve taken the test more than four times during this period, standard deviation is calculated based in your own
individual values. If you’ve taken the test less four than times during the past four weeks, the standard deviation is calculated
based on population norms. At least one test is result is needed during this four-week period.
The more frequently you take the test, the more accurate the results are. To make sure that your results are as reliable as
possible, perform the test in similar conditions every time – we recommend that you take the test in the morning before
breakfast.
In the evening before a scheduled test you’ll get a reminder about it. On the scheduled mornings, you’ll get a notification to
take the test. From the time view on your watch, swipe up from the bottom of the display to view your notifications which
include your Orthostatic test reminder. The test can be started directly from the reminder. See detailed instructions for taking
the Orthostatic test here.
4. Answer the recovery questions daily
72
Page 73
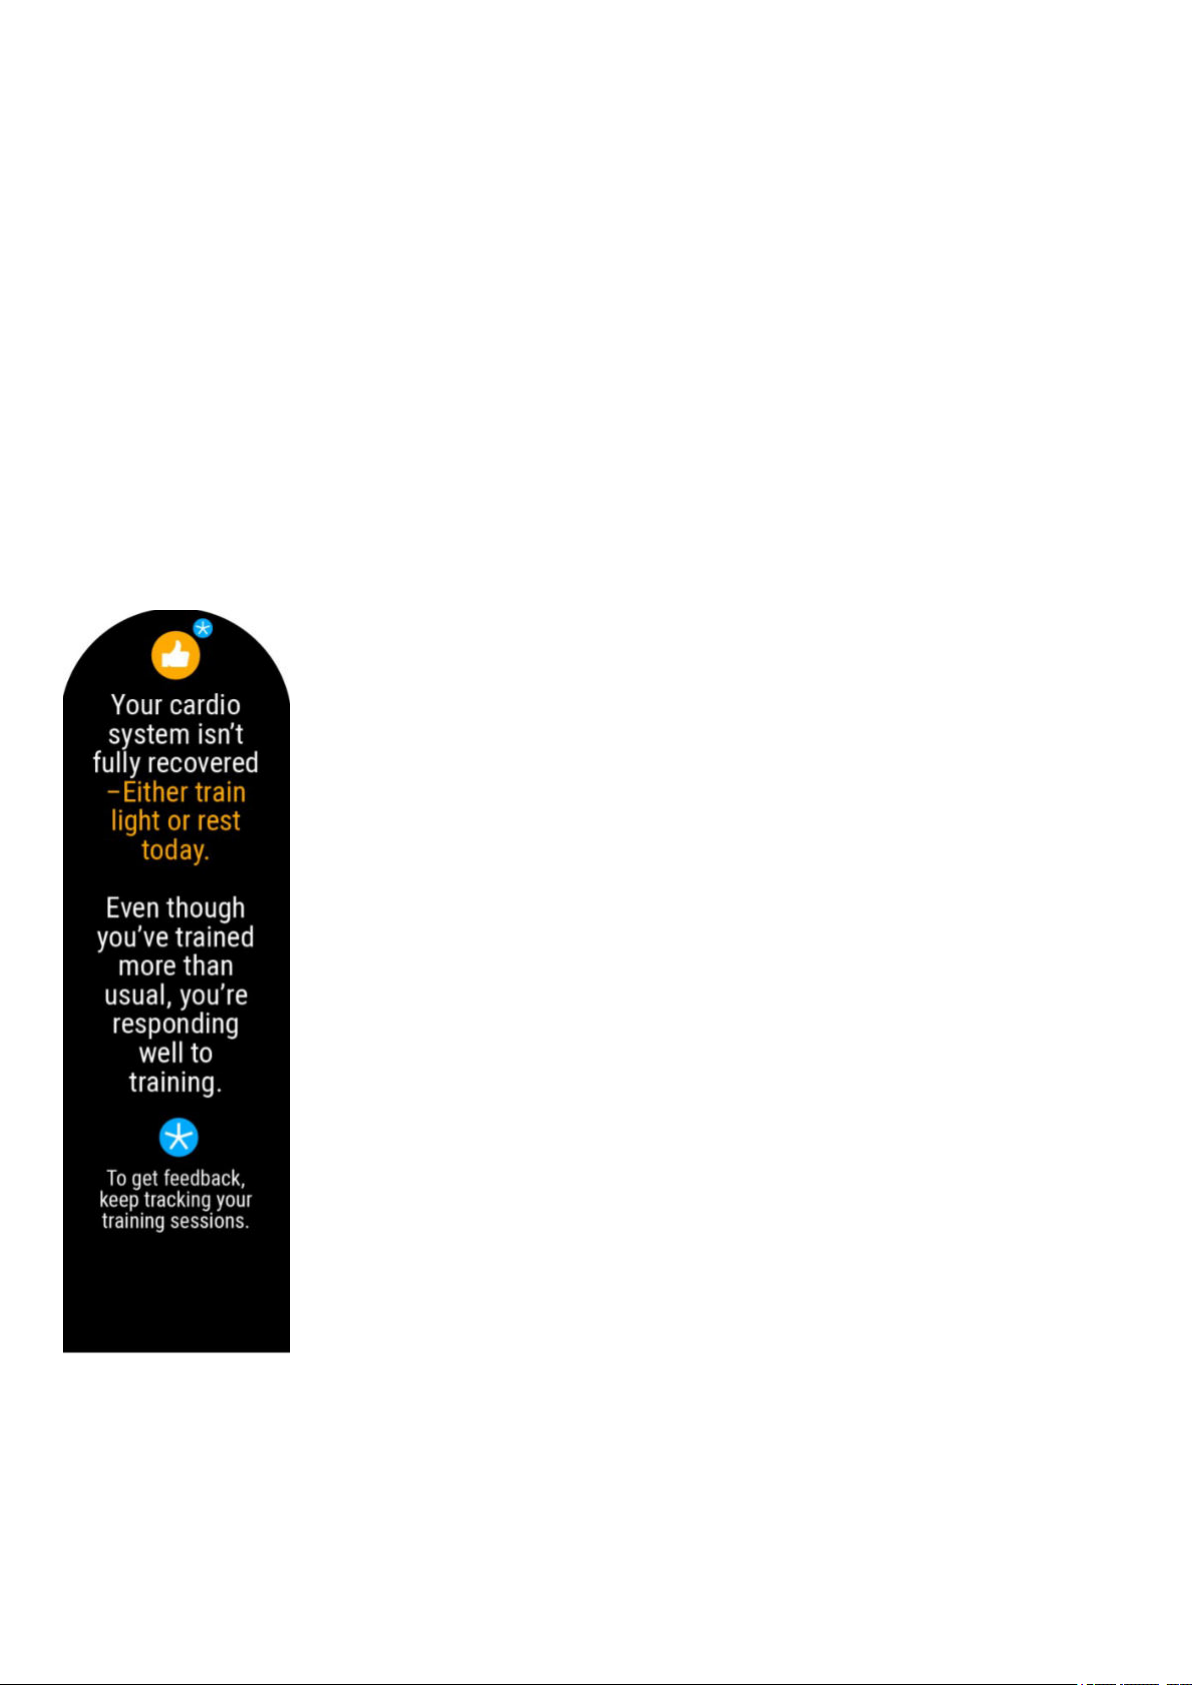
Your watch will ask the recovery questions via a reminder every day, whether there is an Orthostatic test scheduled for the
day or not. From the time view on your watch, swipe up from the bottom of the display to view your notifications which
include your recovery question reminder. On days you have an Orthostatic test, the recovery questions pop up on your watch
straight after the test. Ideally, they should be answered about 30 minutes after waking up.
The questions are designed to help establish if anything is affecting your recovery. Some examples of factors affecting
recovery are excessive muscle fatigue, mental pressure or maybe just a bad night’s sleep. See the recovery questions below:
Are your muscles more sore than usual? No, Somewhat, Much more
l
l Are you feeling more strained than usual? No, Somewhat, Much more
l How did you sleep? Very well, Well, Okay, Poorly, Very poorly.
View your Recovery feedback
Recovery feedback is viewed on your watch. You can conveniently see your daily training recommendation on the Cardio
Load status view on your watch face. Swipe left/right or scroll with the UP/ DOWN buttons until you reach it.
1. Press the display or press the OK button to see more details. First, you’ll see your Cardio Load status (Detraining,
Maintaining, Productive or Overreaching), which is a part of Training Load Pro. When you’ve gathered enough recovery
data you’ll see your daily training recommendation on this view.
2. Swipe or scroll down with the buttons to Recovery feedback. Tap More or press the OK button to view more detailed
recovery feedback. It’s made up of:
An icon illustrating your readiness for cardio training today that reflects the daily training recommendation stating how we
advise you to train. An increased injury or illness alert icon replaces the training advice icon when your risk for injury or illness
is increased. The short training advice can be:
73
Page 74

Daily feedback stating if your cardio system is recovered or not*, followed by your daily training recommendation based on
that day’s Orthostatic test result, and if available, your recovery question answers and your history for these together with your
training data (Cardio Load) over a longer period of time. The recommendation can contain a warning about an increased risk
of overtraining, or it can alert you about an increased injury and illness risk.
*To know if your cardio system is recovered or not you need to perform the Orthostatic test on that day.
Feedback about your long-term training habits and recovery. This can contain information about how you’re responding to
training, if you’ve been training more than or less than usual or if you’re at risk to get injured or fall ill because you’ve been
training more than usual. It can also contain feedback if you seem to have too much stress from something else than
training. Your long-term feedback is based on:
l Your average mood score of past of the seven days calculated from your perceived recovery question answers
l Your seven-day rolling average of your heart rate variability values measured with the Orthostatic test compared to
your individual normal values from the past four weeks
l Your training history (Cardio Load status)
A disclaimer if we don’t have enough data yet to give you accurate feedback. The more you use this feature the more
accurate recovery feedback you’ll get.
FUELWISE™
Stay energized throughout your session with the FuelWise™ fueling assistant. FuelWise™ includes three features that remind
you to refuel and help you maintain adequate energy levels during your long sessions. These features are Smart carbs
reminder, Manual carbs reminder and Drink reminder.
It’s crucial for any serious endurance athlete to maintain adequate energy levels and stay hydrated throughout a long
performance. To perform at your best, you need to fuel your system with carbohydrates and drink regularly in the course of a
long race or a training session. With two useful tools, carbs reminder and drink reminder, FuelWise helps you find the optimal
way to fuel and stay hydrated.
Carbohydrates are ideal for fueling because they can be absorbed and converted into glucose quickly, unlike fat or protein.
Glucose is the primary source of energy used during training. The higher your training intensity, the more glucose you use in
proportion to fat. If your session is shorter than 90 minutes, you don't usually need to fuel with carbs. However, extra carbs
may help you stay more alert and focused even during a shorter session.
Training with Fuelwise
FuelWise™ is located in the main menu under Fueling, and consists of three types of reminders during training sessions.
These are Smart carbs reminder, Manual carbs reminder and Drink reminder. The Smart carbs reminder calculates your
refueling need from your estimated session intensity and duration taking your training background and physical details into
account. The Manual carbs reminder and Drink reminder are time-based, which means you'll get a reminder at preset
intervals, every 15 or 30 minutes for example.
When using any of the fueling features the training session is started from the Fueling menu. After setting your reminder and
choosing Next , you'll be taken straight to the pre-training mode. Then choose your sport profile and start your session.
Smart carbs reminder
When using the smart carbs reminder, set the estimated session duration and intensity, and we'll estimate the amount of
carbs you'll need for refueling during your session. When estimating your carbohydrate need for refueling we take your
training background and physical settings including age, gender, height, weight, maximum heart rate, resting heart rate,
VO2max, aerobic heart rate threshold and anaerobic heart rate threshold into account.
Your capability to absorb carbohydrates is estimated from your training background. This limits the maximum amount of
carbohydrates (grams per hour) that the smart carbs reminder can give you. This data is used to pre-calculate the
relationship between your heart rate and carbohydrate consumption rate based on your physical settings. The recommended
carbohydrate intake rate is then adjusted up or down (within min/max limits) based on your heart rate data and the precalculated heart rate vs. carbohydrate consumption rate relationship.
74
Page 75
During training, your watch will track your actual energy expenditure and adjust the frequency of the reminders accordingly
but the portion size (carbs in grams) is always the same during a session.
Set smart carbs reminder
1. In the main menu choose
Fueling > Smart carbs reminder.
2. Set the estimated duration of your session. The minimum is 30 minutes.
3. Set the estimated intensity of your session. The intensity is set with heart rate zones. See heart rate zones to learn
more about different training intensities.
4. Set the carbs per serving (5 -100 grams) of your preferred sports fuel.
5. Choose Next
After setting the reminder you'll see an overview of your selection. At this point you can still remove the reminder you just set
or add a drink reminder. When you're ready to start your session choose Use now to go to pre-training mode.
When adding a drink reminder to a smart carbs reminder, you'll also get an estimation of your hydration need per reminder.
This is based on the average sweat rate in moderate conditions
Take ( ) g carbs! is shown on the display including vibration and sound when it's
time to take some carbs.
Manual carbs reminder
A time-based reminder that helps you stay fueled by reminding you to take some carbs at preset intervals. Can be set to
remind you in 5 to 60-minute intervals.
Set manual carbs reminder
1. In the main menu choose Fueling > Manual carbs reminder.
2. Set the interval (5-60 minutes) of the reminder.
After setting the reminder you'll see an overview of your selection. At this point you can still remove the reminder you just set
or add a drink reminder. When you're ready to start your session choose Use now to go to pre-training mode.
Take carbs! is shown on the display including vibration and sound when it's time to
take some carbs.
Drink reminder
A time-based reminder that helps you stay hydrated by reminding you to drink. Can be set to remind you in 5 to 60-minute
intervals.
75
Page 76
Set drink reminder
1. In the main menu choose
Fueling > Drink reminder.
2. Set the interval (5-60 minutes) of the reminder.
After setting the reminder you'll see an overview of your selection. At this point you can still remove the reminder you just set
or add a carbs reminder. When you're ready to start your session choose Use now to go to pre-training mode.
Drink! is shown on the display including vibration and sound when it's time to drink.
Learn more about FuelWise™
ORTHOSTATIC TEST
The Orthostatic test is a generally used tool for monitoring the balance between training and recovery. It allows you to track
how your body responds to training. In addition to training induced changes, there are many other factors that can affect your
Orthostatic test results, such as mental stress, sleep, latent illness and environmental changes (temperature, altitude) to
mention a few.
The test is based on measuring heart rate and heart rate variability. Changes in heart rate and heart rate variability reflect
changes in the autonomic regulation of the heart.
Performing the test
For the Orthostatic test, you need to use a Polar H9/H10 heart rate sensor (an H6 or H7 heart rate sensor can also be used if
you have one). The test lasts for four minutes, and to make sure that your results are as reliable as possible, you need to
perform the test in similar conditions every time – we recommend that you take the test in the morning before breakfast. Do
the test regularly to establish your individual baseline. Sudden deviations from your averages could signify that something is
off-balance. See the instructions below:
l Wear the heart rate sensor with the strap. Moisten the electrode area of the strap and wear the strap snugly around
your chest.
l You should be relaxed and calm.
l There should be no disturbing noises (for example, television, radio or telephone) or other people talking to you.
l It is recommended to perform the test regularly and at the same time of day in the morning after waking up to get
comparable test results.
On your watch, choose Tests > Orthostatic test > Start the test with HR sensor. The watch starts searching for your
heart rate. When your heart rate is found Lie down & relax is shown on the display.
l You can be seated in a relaxed position or lying in bed. The position should always be the same when you do the test.
l Do not move during this first part of the test, which lasts for two minutes.
l After two minutes, the watch will beep and Stand up is displayed. Stand up and remain standing for another two
minutes until the watch will beeps again, and the test is finished.
You can interrupt the test in any phase by pressing BACK. Test canceled is then displayed.
If your watch cannot receive your heart rate signal, Test failed is displayed. In which case, you should check that the heart
rate sensor electrodes are wet, and that the textile strap fits snugly.
Test results
76
Page 77
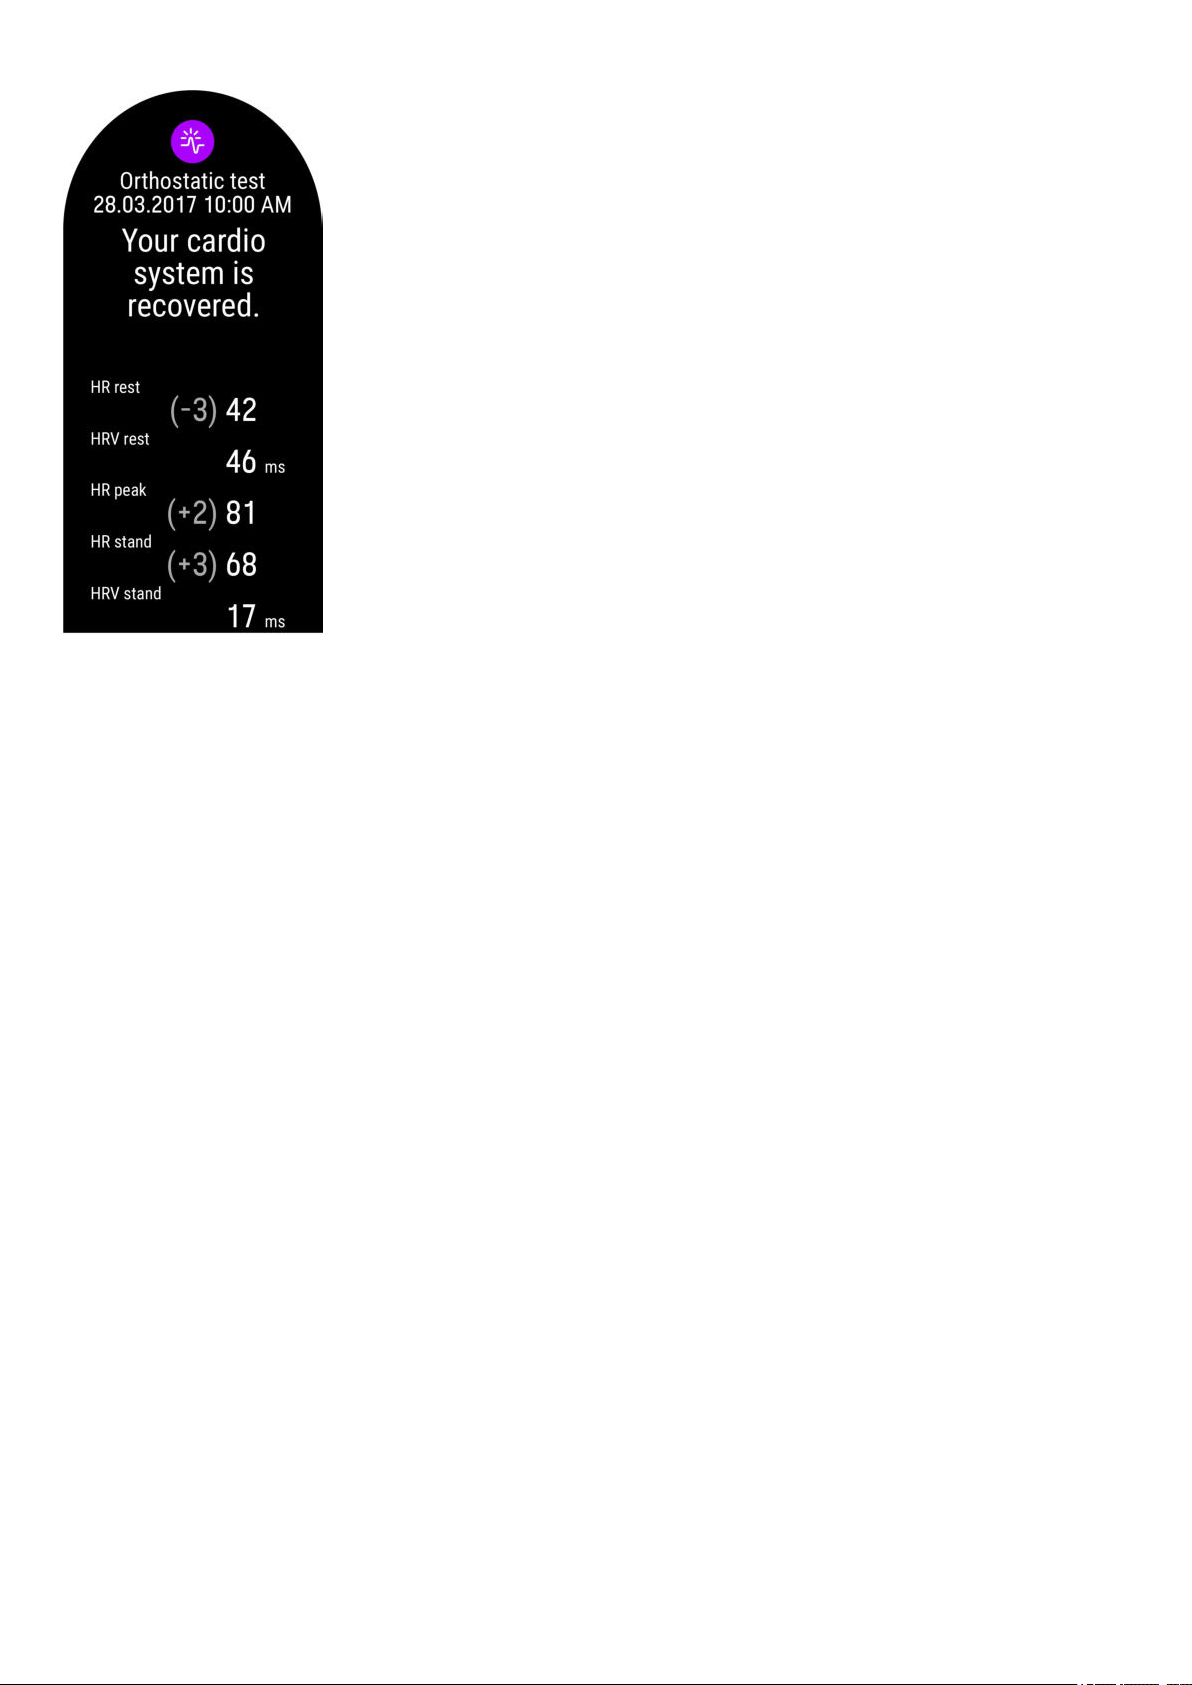
The test gives you five different heart rate and heart rate variability values. These are:
l HR rest: Average heart rate when lying down
l HRV rest (RMSSD rest): Heart rate variability when lying down
l HR peak: This is the one highest heartbeat that occurs after you stand up.
l HR stand: Average heart rate when standing still.
l HRV stand (RMSSD stand): Heart rate variability when standing still
View your latest test result on your watch in Tests > Orthostatic test > Latest results. Only your most recent result is
shown, and only your first successful test for the day is taken into account as a part of Recovery Pro. The difference of your
HR rest, HR peak and HR stand values to your averages are shown in parentheses next to your latest result.
For a visual analysis of your Orthostatic test results, go to the Flow web service and choose the test from your Diary to view
details from it. You can also follow your test results in the long-term and spot any deviations from your baseline.
77
Page 78
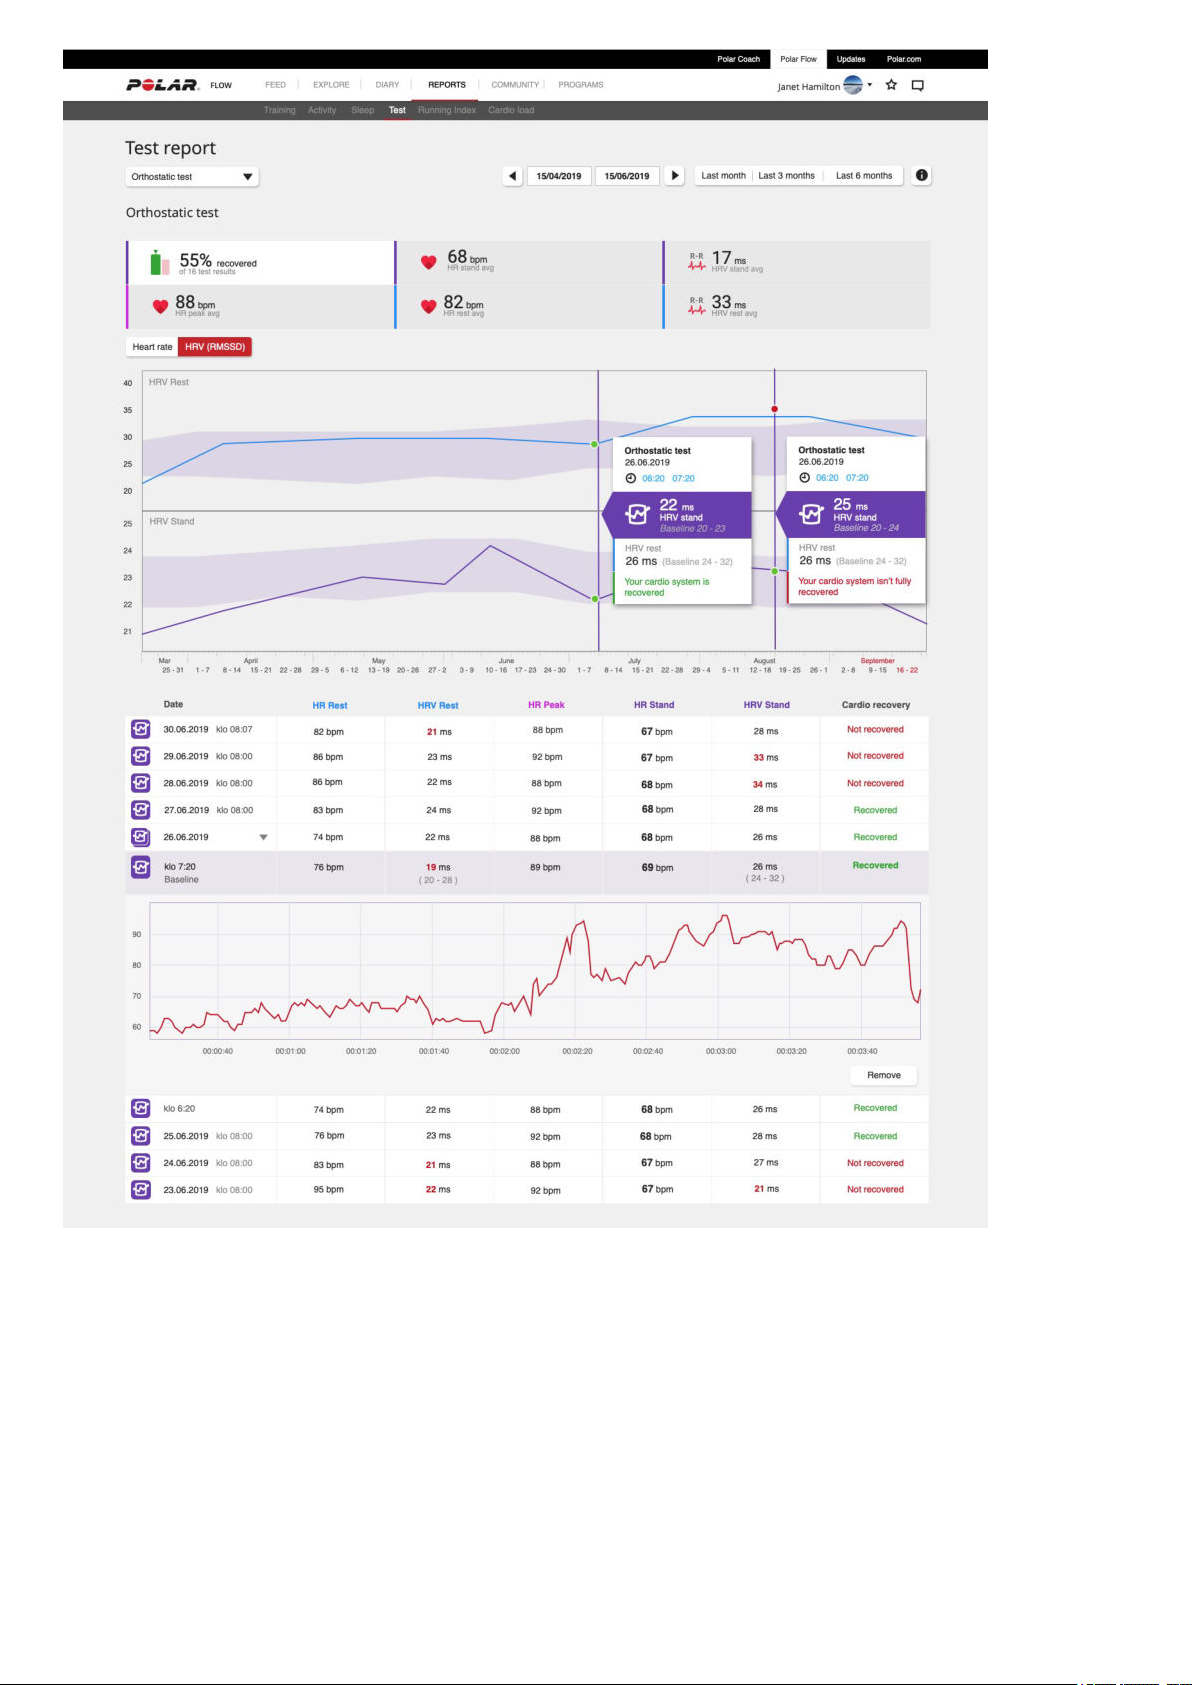
When you’ve performed at least two Orthostatic tests during 28-day period, you’ll get feedback on your cardio system’s
recovery on your watch after the test.
After performing at least four tests in a 28-day period your latest Orthostatic test result is compared to your individual normal
heart rate variability (RMMS) range. Your normal range is calculated from the standard deviation of the test results from the
past 4 weeks. As heart rate variability values are very individual, the accuracy of the test result becomes more accurate the
more measurements are done.
78
Page 79
Orthostatic test with Recovery Pro
The Orthostatic test is also an integral part of the Recovery Pro feature that tells if your cardiovascular system is recovered or
not. It compares your Orthostatic test results to your baseline gathered over time, and also takes into account your subjective
recovery, as well as your long-term training history.
RUNNING PERFORMANCE TEST
The Running Performance Test is a tool especially designed for runners allowing them to track their progress and find out
their unique training zones (heart rate, speed and power zones) for running sports. Regular and frequent testing helps you plan
your training wisely and follow changes in your running performance
You can take the test as maximal or submaximal (at least 85 % of your maximum heart rate). The maximal test requires allout effort, but it gives you more accurate results. Taking the maximal test is a good way to find out your current individual
maximum heart rate, and get your settings up to date. The load of the maximal running test is considerably heavier compared
to the submaximal test. Therefore, it's recommended that you include only light training sessions in your plan for the next 1-3
days after the maximal test.
The submaximal test, which requires that at least 85% of HR
alternative to the maximal test. You can repeat the submaximal test as often as you wish, and you can also perform it as a
warmup before a training session. It's important that your maximum heart rate is set correctly in your physical settings in
order to get accurate results from the submaximal test as the submaximal test uses your HR
results. If you don’t know your HR
The idea of the test is to run at a steadily increasing speed, following the given target speed as precisely as possible. To
complete the test successfully you have to run for at least six minutes and reach at least 85 % or your maximum heart rate. If
you have trouble reaching this, your current HR
settings.
, you could benefit from doing maximal test first to find out your maximum heart rate.
max
value might be too high. You can change it manually in your physical
max
is exceeded, is a reproducible, safe and non-exhaustive
max
when calculating your
max
Performing the test
Before taking the test, read the Health and Training section in this user manual or in the Important information sheet that
came in the product package. Do not take the test during illness, injury or if you have any doubts over your health. Take the
test only when you feel recovered. Avoid exercise that causes fatigue on the day preceding the test. Wear running shoes and
clothes that allow freedom of movement.
Take the test in flat terrain, track or road, and repeat it regularly under similar conditions. Run at a steadily increasing speed,
following the given target speed as precisely as possible. Also, the conditions before testing should be fairly similar each
time. For instance, an intense training session the day before or a heavy meal right before testing can influence your test
result. You need to run for at least six minutes and reach at least 85 % or your maximum heart rate to complete the test.
By default the test uses GPS to track your speed but you can also perform the test with a Polar Stride Sensor Bluetooth®
Smart or a STRYDrunning power meter. In this case your speed is measured with the sensor.
Check heart rate sensor is shown if your heart rate cannot be detected during the test.
Speed unavailable, GPS signal lost is shown if the satellite signals cannot be detected during the test.
Have a look at the instructions on your watch in
breakdown of the test, and instructions on performing it.
1. First, define your initial speed for the test in Tests > Running test > Initial speed. The initial speed can be set
between 4-10 min/km. Note that if you set the initial speed too high, you may have you to quit the test too soon.
2. Then go to Tests > Running test > Start and scroll down to see an overview of the test. When you’re ready to start
the test, choose Next.
3. Check the questions concerning your health and accept to go to the pre-training mode.
4. The sport profile is shown in a purple color in the test view. Choose an appropriate indoor or outdoor running sport
profile. Stay in the pre-training mode until the watch has found your heart rate and the GPS satellite signals (GPS icon
turns green).
Tests > Running test > How to once more before starting to see a detailed
79
Page 80
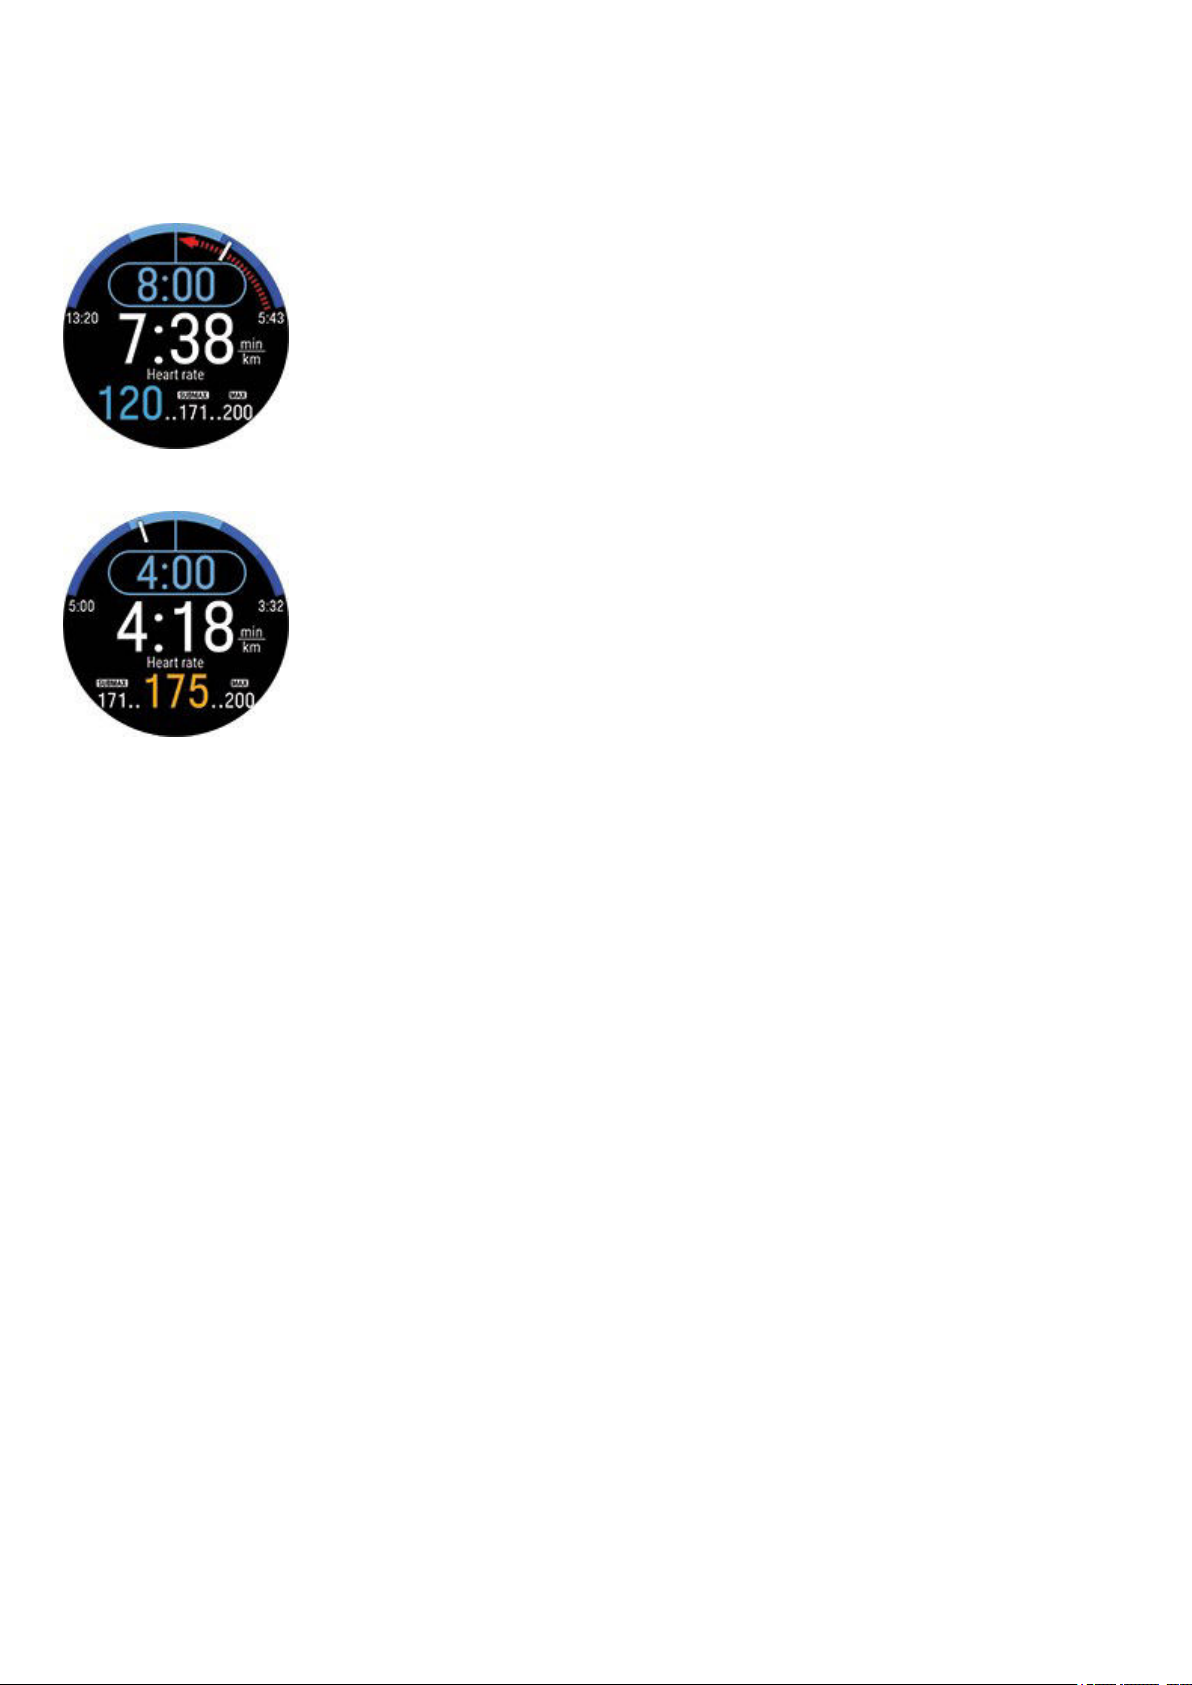
5. Tap the display or press the OK button to begin. The watch guides you through the test.
6. The test begins with a warmup phase (~ 10 min). Follow the guidance on the display to complete the warmup.
7. After a proper warmup, choose
During the test: The blue value shows the steadily increasing target speed that you should follow as precisely as possible.
The white value below it shows your current speed. The watch gives you an audible alarm if you go too fast or too slow.
The blue curve with the speed values at each end illustrates the allowed range.
Start test. Then you need to reach the initial speed for the actual test to start.
At the bottom, you can see your current heart rate, the minimum heart rate required for the submaximal test and your current
maximum heart rate value.
Your watch will ask Was this your maximum effort? if didn't reach or exceed your maximum heart rate value. Your test is
considered submaximal, if your effort wasn't maximal but you reached at least 85 % of your maximum heart rate. Your test is
automatically considered maximal, if you reach or exceed your current maximum heart rate value.
Test results
The Running Performance Test gives you your maximum aerobic power (MAP), maximum aerobic speed (MAS) and
maximal oxygen uptake (VO2max) as results. In addition, if you performed the maximal test you get your maximum heart
rate (HR
) value. You can view your latest result in Tests > Running test> Latest result.
max
80
Page 81
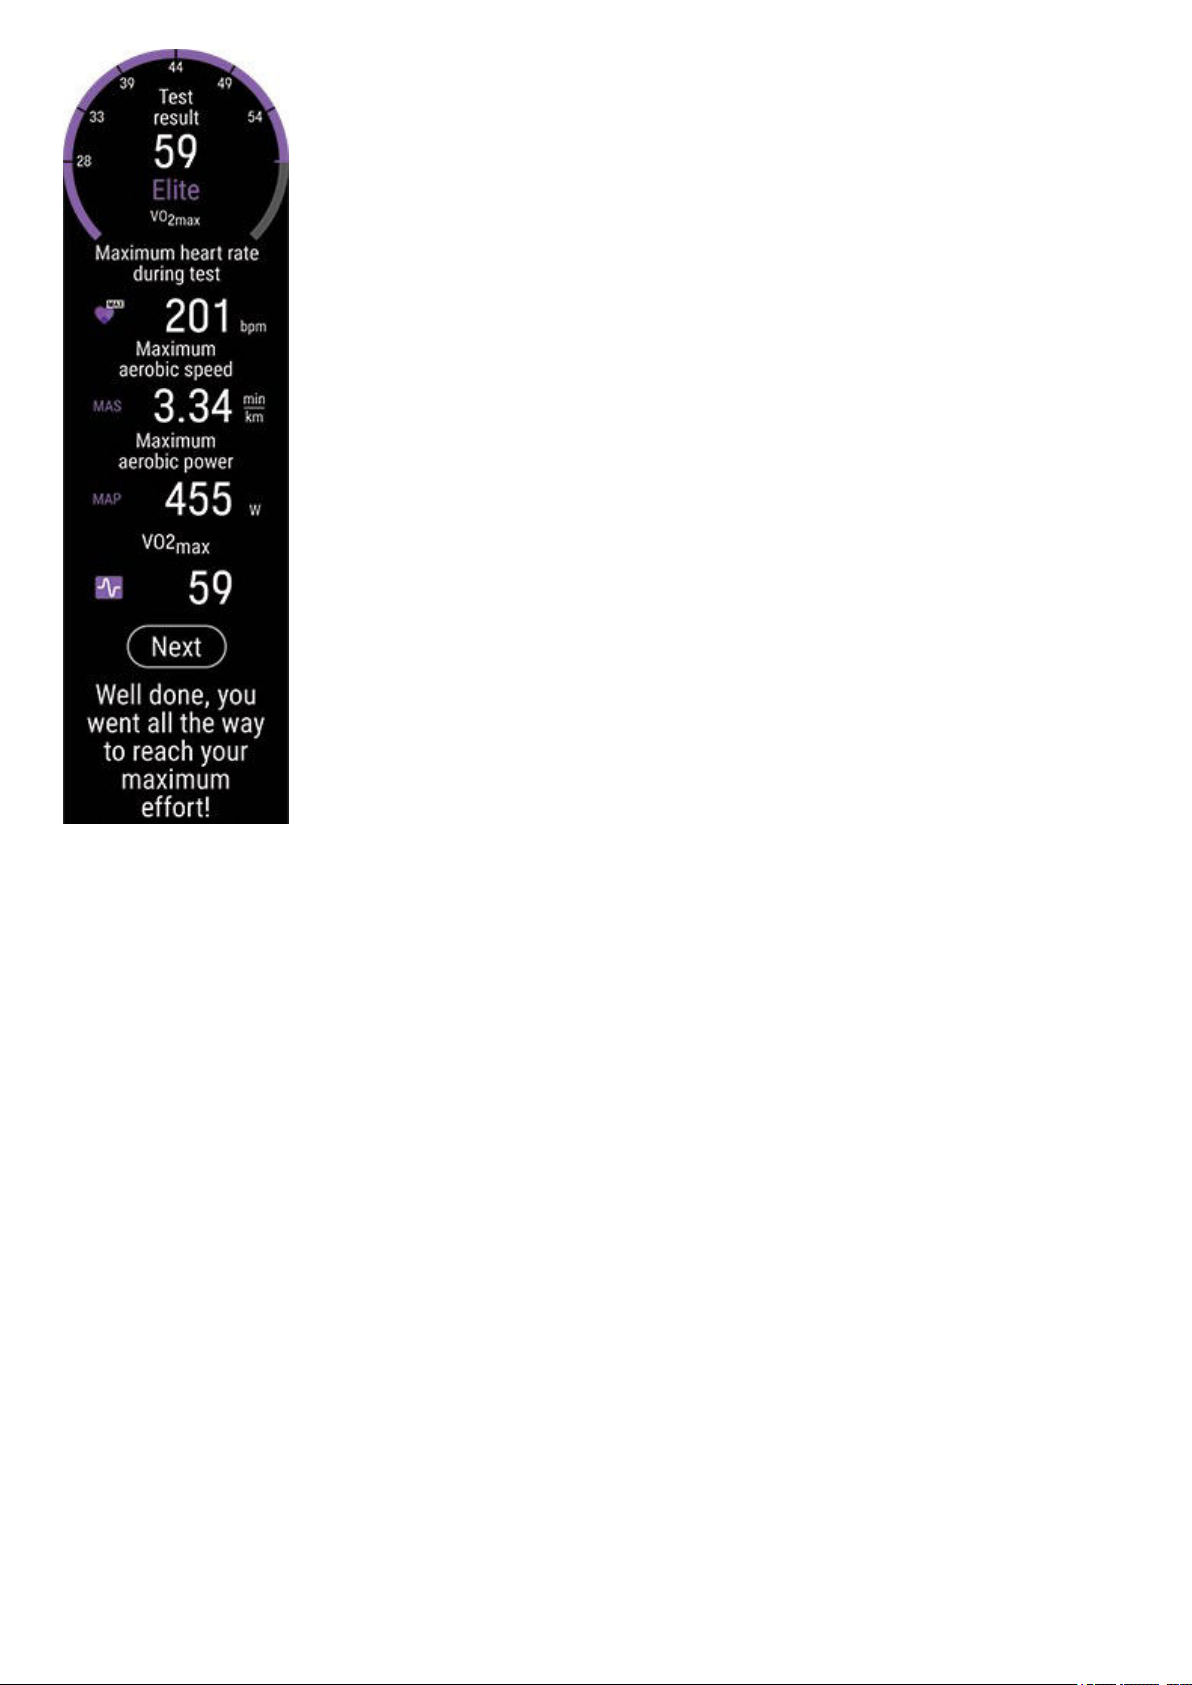
l Your maximum aerobic power (MAP) is the lowest exercise intensity where your body reaches its maximum ability to
consume oxygen (VO2
l Your maximum aerobic speed (MAS) is the lowest exercise intensity where your body reaches its maximum ability to
consume oxygen (VO2
l Your maximal oxygen uptake (VO2
). Maximum aerobic power can usually be sustained for a few minutes only.
max
). Maximum aerobic speed can usually be sustained for a few minutes only.
max
) is your body's maximum capacity to consume oxygen during maximum effort.
max
If you choose to update your sport profile settings with your new MAP, MAS and VO2
results, your speed, pace and power
max
zones, as well as calorie calculation are updated to match your current condition. If you performed the maximal test you can
also update your heart rate zones based on your new HR
Note that to update your training zones and HR
value you need to sync the results to the Flow app. When opening the Flow
max
max
value.
app after syncing you'll be asked if you want to update your values. The sport profile settings for all running type sports will be
updated with the new values.
Whether you should follow power zones, speed/pace zones or heart rate zones in your training, depends on your goals and
training routines. Power zones work in all types of terrains – flat or hilly. Speed zones are reliable only when you run in flat
terrain. Speed or power zones are also a good choice for interval training.
If you want to use the Running Performance Test to track your progress and help you choose the right training intensities, we
recommend that you repeat the maximal test every three months to ensure that your training zones are always up to date. If
you want to follow your progress more closely, you can repeat the submaximal test as often as you wish in between the
maximal tests.
Note that you will not get a Running Index result from your Running Performance Test.
Your weight is used as one input in the Running Performance Test. Note that if you change your weight setting, it also affects
the comparability of your test results.
81
Page 82
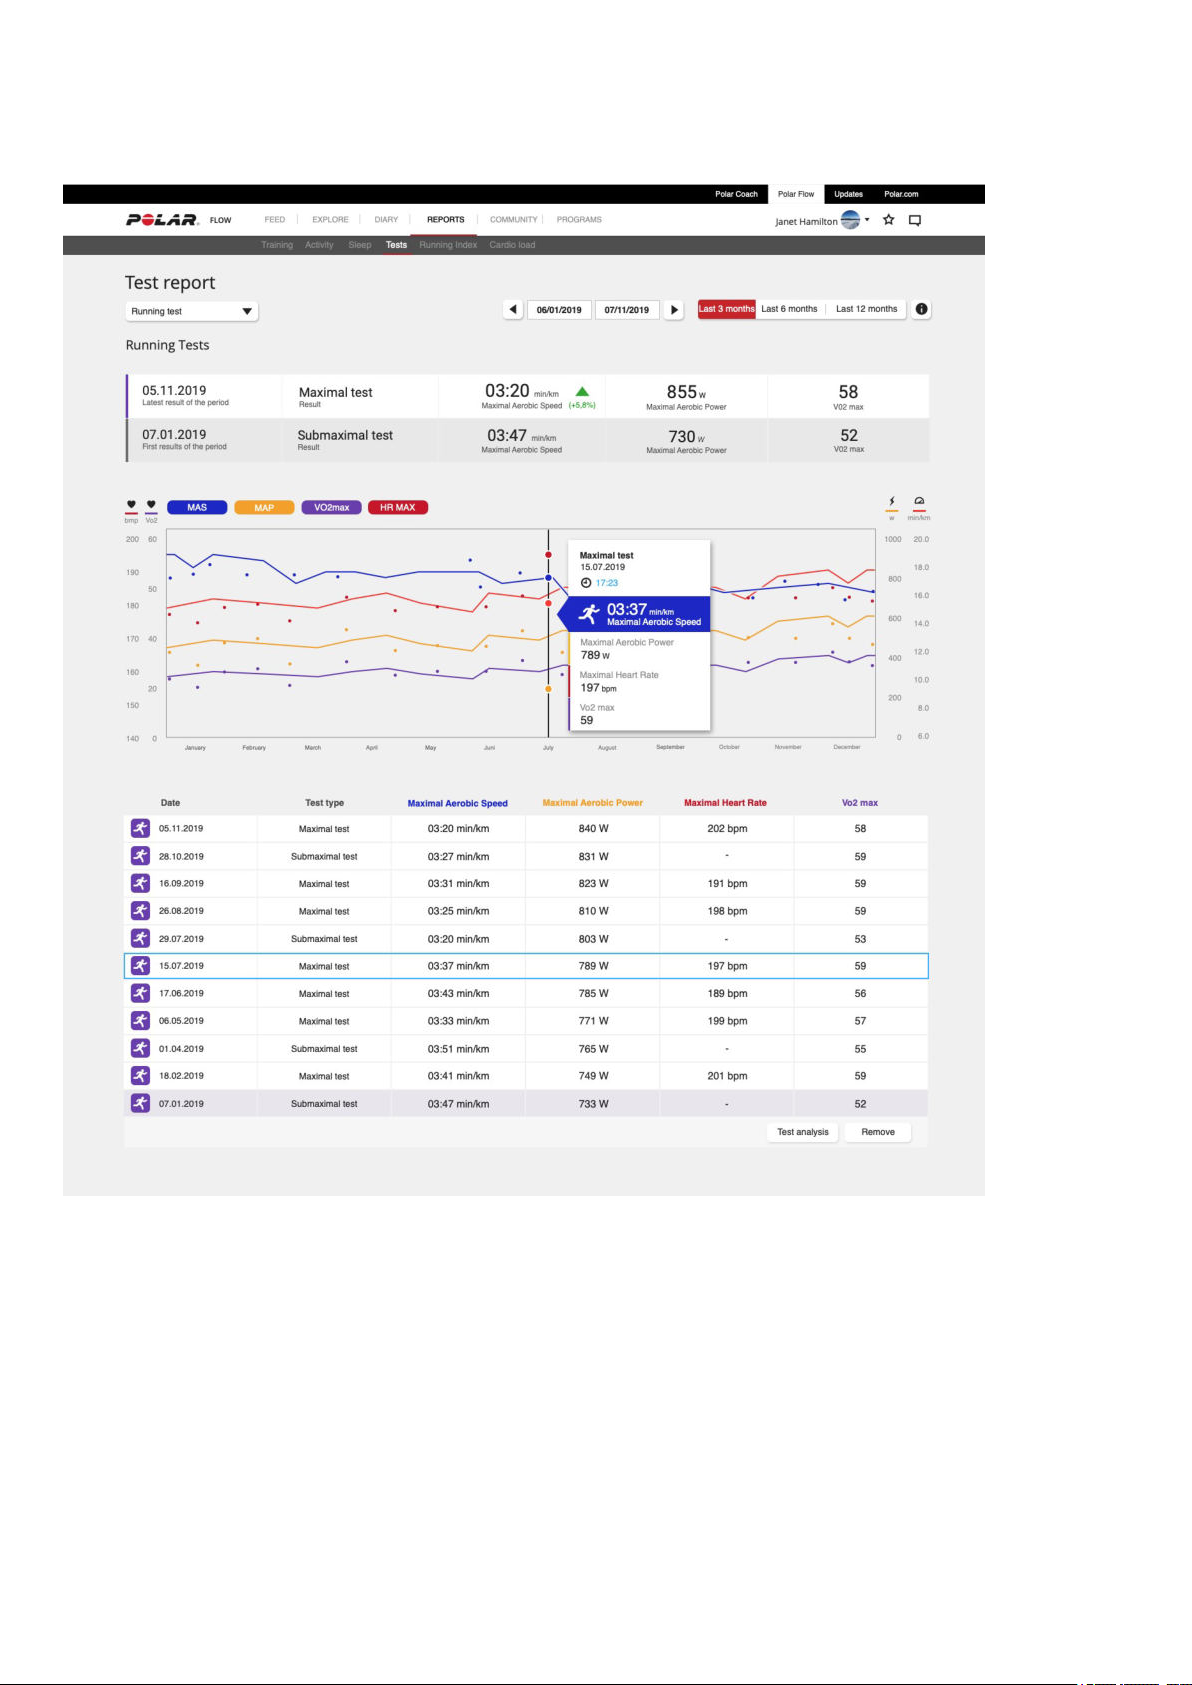
Detailed analysis in the Flow web service and app
Remember to sync your test result to Polar Flow. To help long-term follow up, we’ve gathered all the test data in one place in
the Polar Flow web service. In the Tests page you can see all the tests you’ve performed and compare their results. You can
see your long-term progress and easily view changes in your performance.
CYCLING PERFORMANCE TEST
The Cycling Performance Test measures the maximum average power you can maintain for 60 minutes. It's also known as
the functional threshold power, FTP-test. The test can be used to determine your individual cycling power zones. When you
have your individual power zones figured out, it's easier to optimize your training. The test is also good for tracking your
cycling performance development over time.
In addition to the 60-minute FTP-test, you can also take a shorter test that lasts for 20, 30 or 40 minutes, in which case we'll
estimate the 60-minute result. Note that with the shorter tests the result may not be as precise as with the 60-minute test. A
shorter test is better for inexperienced cyclists or if you're recovering from an injury. Always take the same type of test to
make the results comparable over time.
82
Page 83

We recommend using an indoor bike with a power sensor to get the most reliable results, but you can take the test outdoors
as well. If you take the test outdoors, it's wiser to take a shorter one in order to minimize stopping and power changes.
Choose a route on flat terrain, and avoid traffic lights or any other reasons to stop.
To take the Cycling Performance Test you need a compatible cycling power sensor. For a complete list a compatible cycling
power sensors see
also needs to be paired with your watch. For detailed pairing instructions see Pairing sensors with your watch.
WHICH THIRD-PARTY POWER SENSORS ARE COMPATIBLE WITH Grit X/Vantage? The power sensor
Performing the test
Before taking the test, read the Health and Training section in this user manual or in the Important information sheet that
came in the product package. The test is very demanding so do not take the test if you do not feel recovered from training.
Wear cycling shoes and clothes that allow freedom of movement.
Also, check that your weight is set correctly in your physical settings. This is important so that you can compare your results
over time. In your first test, we'll guide you with a power target that's based on your background information. This helps you
maintain a steady power throughout the test. When you repeat the test, the target is based on your earlier results.
The cycling test includes warmup, test and cool down phases. The warmup phase is power-based, and the cool down phase
is based on heart rate. Note that the warmup and cooldown phases are optional. You can skip them if you wish.
1. On your watch go to Tests > Cycling test > Duration, and choose 20, 30, 40 or 60 minutes.
2. Then go to Tests > Cycling test > Start and scroll down to see an overview of the test. When you’re ready to start the
test, choose Next.
3. Check the questions concerning your health and accept to go to the pre-training mode.
4. The sport profile is shown in a purple color in the test view. Choose an appropriate indoor or outdoor cycling sport
profile. Stay in the pre-training mode until the watch has found your cycling power sensor.
5. Tap the display or press the OK button to begin.
6. The test begins with a warmup phase. The warmup should be about 20 minutes of easy riding in the beginning.
Include 2-3 full-on sprints in the middle of the warmup, about 1-minute each with recovery. Now you should be well
warmed up and ready to take the full-on test. If you choose to do a shorter warmup, make sure to include the fast
sprints and recovery moments nonetheless. The warmup also allows you to check that everything works as it should
and that your bike is adjusted optimally for you.
7. After a proper warmup, choose Start test.
8. Speed up and find the maximum power you believe you can keep up for the whole test. The test view shows your
power in watts. The red value tells your current power and the white value your estimated target power. Try to keep
your pace close to the target, and make sure you stay on the same power level throughout the test. Slowing down will
make the results less reliable.
9. The test phase ends after the pre-defined time is over.
We recommend performing the cooldown phase after the test.
83
Page 84
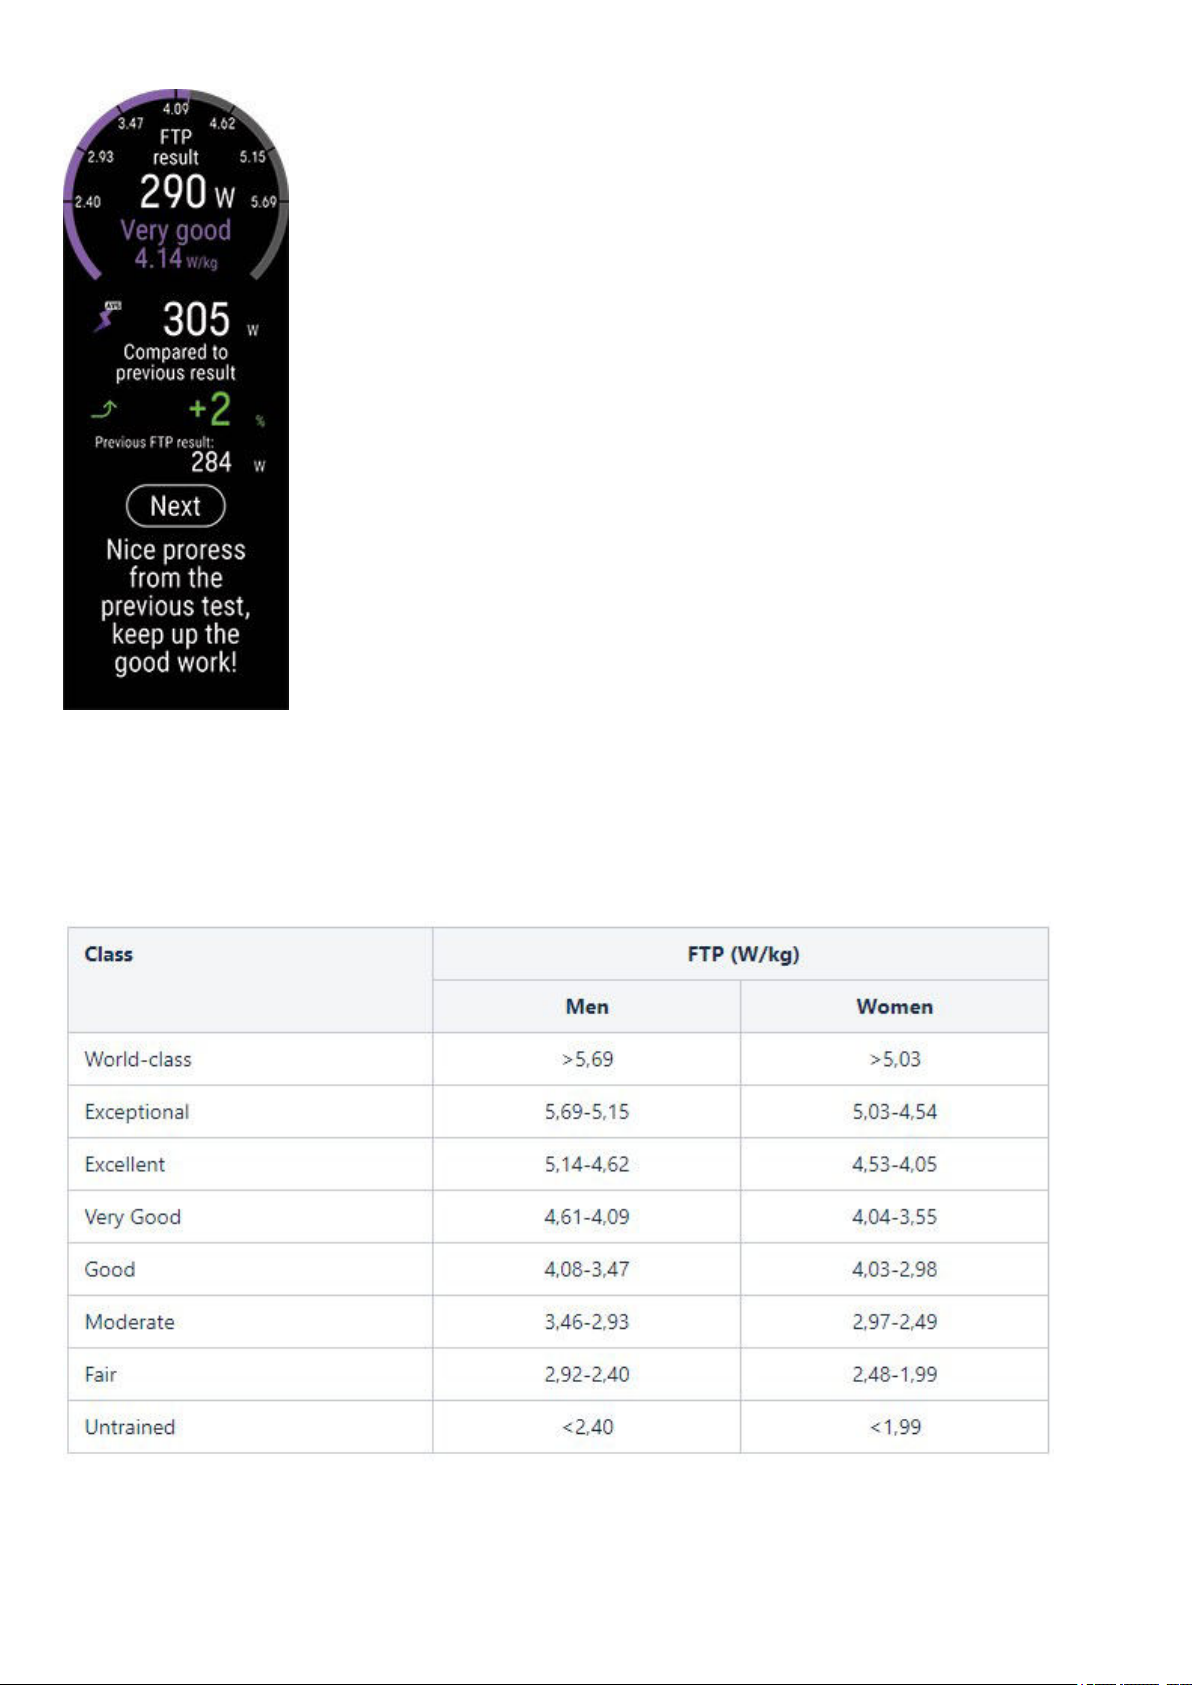
Test results
The test summary shows your FTP value which shows power in watts, your maximum heart rate and your maximal oxygen
uptake known as VO2max. You can view your latest result in Tests > Cycling test > Latest result.
Dividing FTP with a cyclist's weight produces a comparable value, called power-to-weight ratio- which can be compared with
other cyclists of the same sex. The more power you can produce in your current weight, the better your power-to-weight ratio
is. This reflects your aerobic fitness. We use a simplified, 8-tiered result table ranging from untrained to world-class when
giving you feedback based on your power-to-weight ratio.
84
Page 85
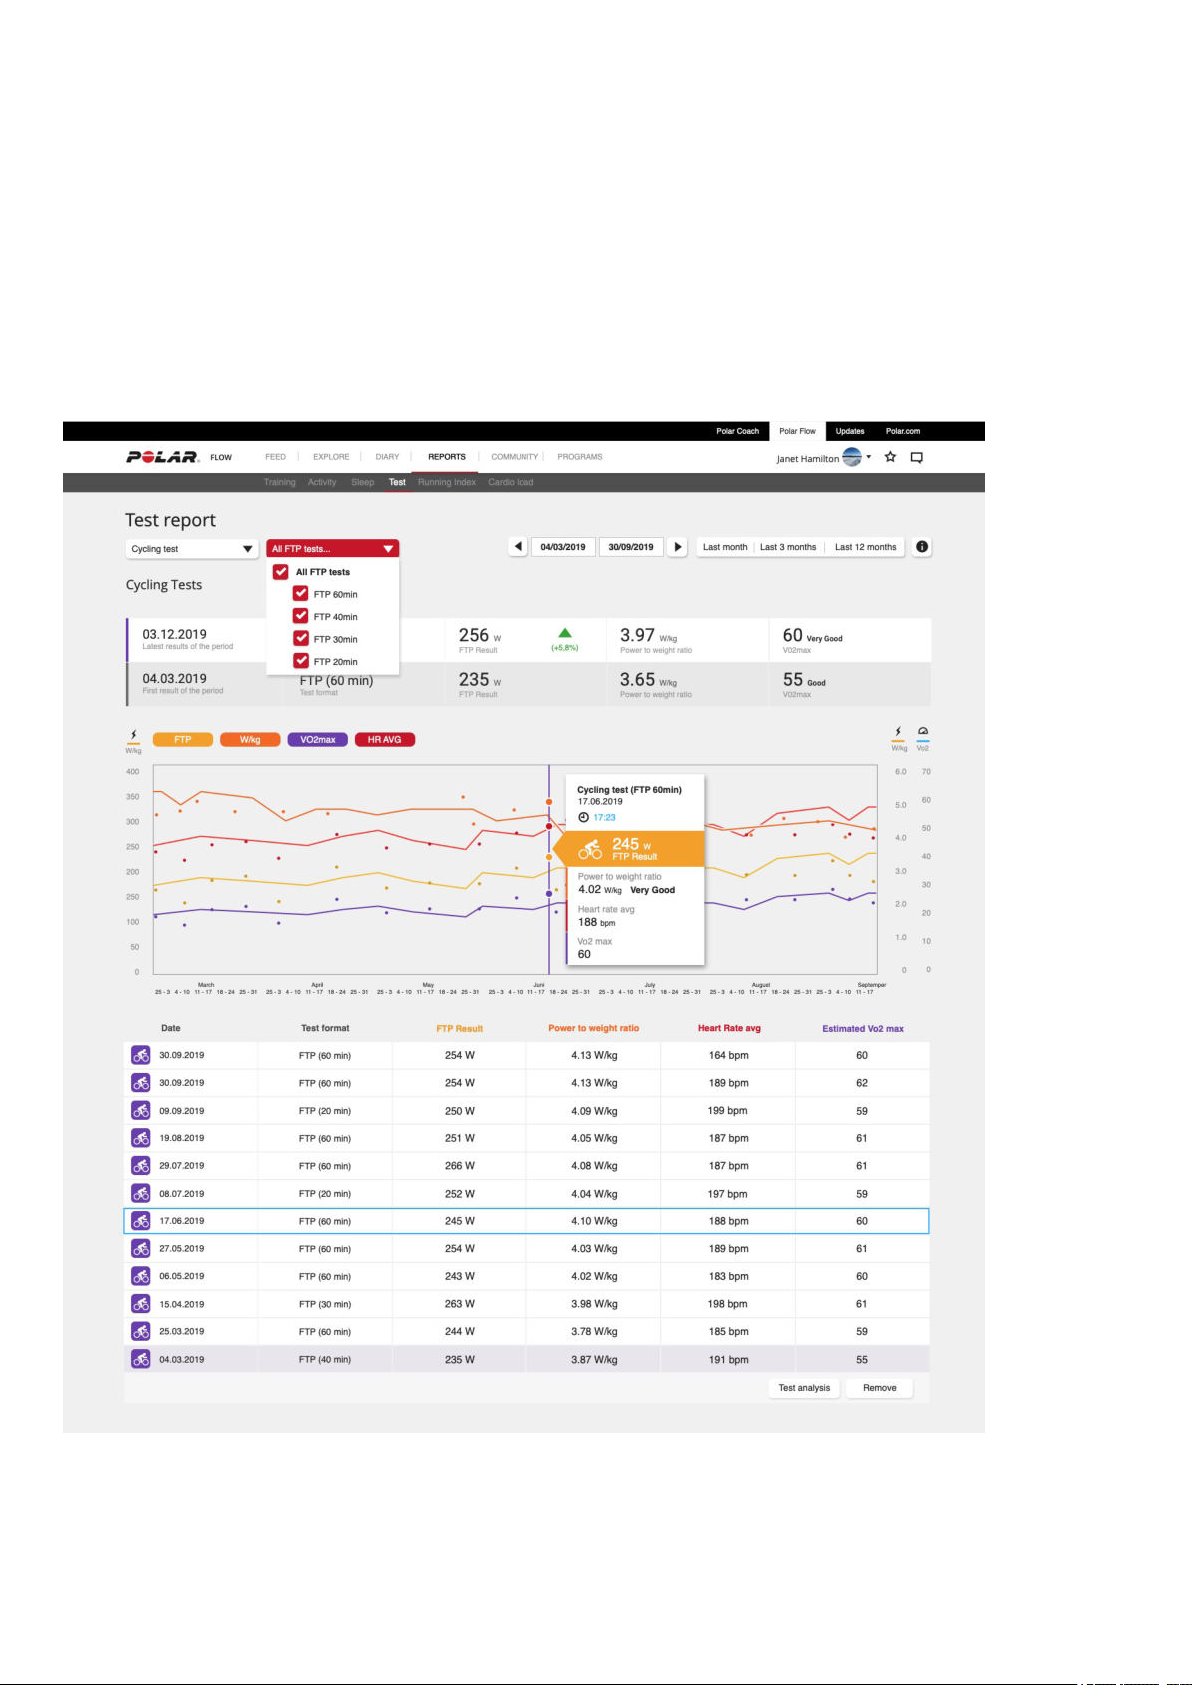
In your first test, the result is compared with other cyclists of the same sex as you. When you repeat the test, the result is
compared to your previous test results and test feedback is also based on them.
If you want to use the Cycling Performance Test to track your progress and help you choose the right training intensities, we
recommend that you repeat the maximal test every three months to ensure that your training zones are always up to date.
Note that to update your training zones and HR max value you need to sync the results to the Flow app. When opening the
Flow app after syncing you'll be asked if you want to update your values. The sport profile settings for all cycling type sports
will be updated with the new values.
Detailed analysis in the Flow web service and app
Remember to sync your test result to Polar Flow. To help long-term follow up, we’ve gathered all the test data in one place in
the Polar Flow web service. In the Tests page you can see all the tests you’ve performed and compare their results. You can
see your long-term progress and easily view changes in your performance.
85
Page 86

LEG RECOVERY TEST
The Leg Recovery Test helps you see how your leg muscles have recovered from training, and also how your explosive
strength is developing. You can use it to check if you’re ready for speed and strength training. It's a widely-used, easy and
safe test you can take anywhere, with no other equipment needed apart from your Polar watch.
In the test you perform three countermovement jumps with a short pause in between each jump. You first squat down rapidly
right before launching yourself straight up into the air, as high as possible. This two-way motion gives your muscles springlike elastic energy for maximal explosive strength. It also makes the test more easily repeatable and less prone to errors.
To get feedback on the recovery of your leg muscles you need to take at least two tests in a 28-day-period to establish a
baseline. From the third test onwards in a 28-day-period, you'll get feedback about your leg muscle recovery. Essentially, if
you jump to a considerably lower height than what your baseline is, your leg muscles aren't entirely recovered. We
recommend taking the test as often as possible as the more results your baseline is calculated from, the more reliable it is.
When giving you verbal feedback the test also takes into account the recovery of your cardio system, provided either by the
Recovery Pro feature or the Nightly Recharge feature if you are using either of them.
Performing the test
If you're feeling sick or have an injury, you shouldn't take the test. However, feeling tired from training doesn't stop you from
taking the test, as one of the points of taking it is to see how well you've recovered from training. If you've been training a lot
and have an increased risk for injury or illness, you can take the Leg recovery test daily to find out when you're good to go for
some more serious training.
Have a look at the instructions on your watch in Tests > Leg recovery test > How to once more before starting to see a
detailed breakdown of the test with instructions and animations.
When you're ready to start go to Tests > Leg recovery test, and choose Start. You need to perform three jumps.
Repeatability is key with this test, so make sure you perform the test each time with the same correct technique.
1. Stand with your back and legs straight, with your hands on your hips. Play close attention to the placement of your
hands as it is crucial for accuracy and repeatability. Always keep your hands on your hips during the test. This ensures
each jump is measured correctly.
2. When you hear a beep. Squat down rapidly and jump explosively straight up, and come down on the balls of the feet,
with your legs straight. You have 40 seconds to jump after each beep.
3. WAIT is displayed before each jump. Wait until JUMP is displayed and you hear a beep before jumping.
4. Test completed is displayed, after you've successfully performed all three jumps.
Test results
After the test, you'll see the height of each jump, and the average of the three jumps which is used to calculate your baseline.
You can view your latest result in Tests > Leg recovery test > Latest result.
Your leg recovery is measured by comparing your test result to your individual baseline, which is the rolling average of your
test results from the previous 28 days. Only one result per day is used for baseline calculation. If you do the test several
times only your best result of the day is taken into account.
86
Page 87
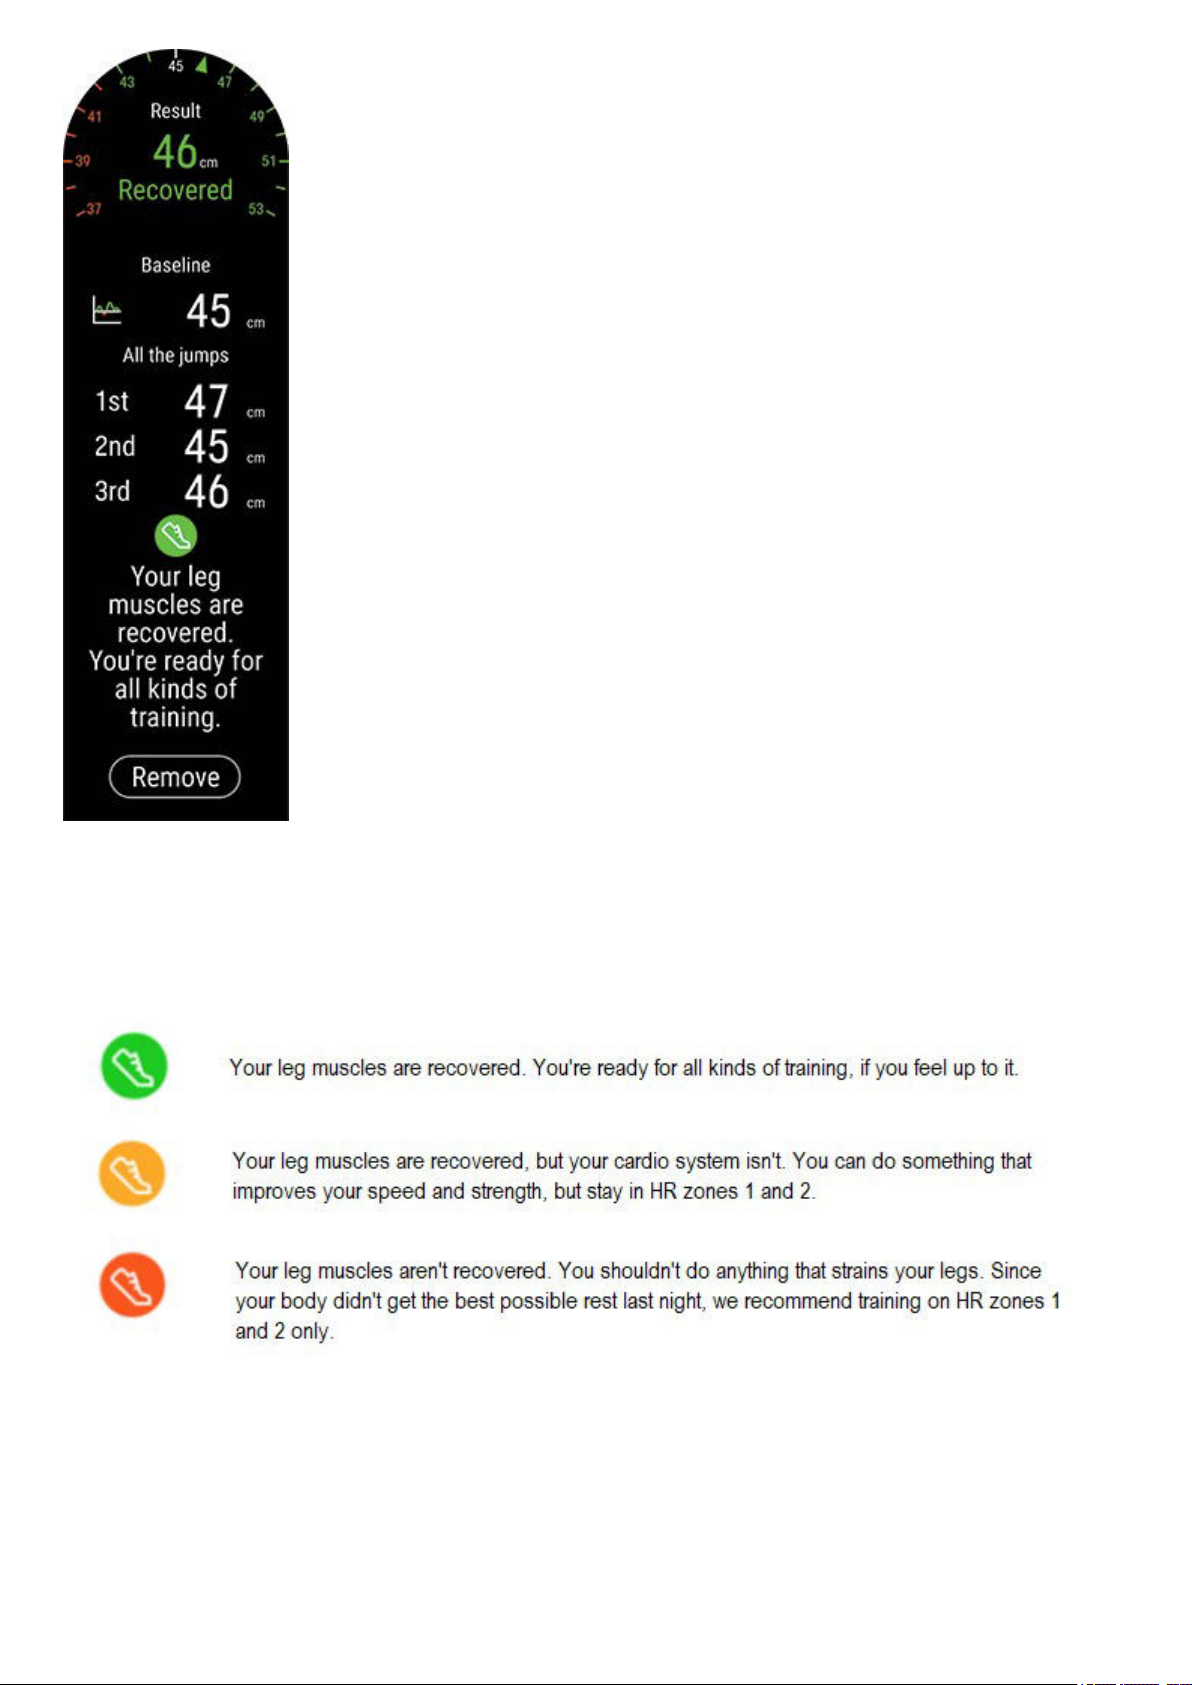
Essentially, if you jump considerably lower than your baseline, your leg muscles aren't entirely recovered. Your leg muscles
aren't considered recovered:
l If your baseline is 28 cm or higher: When your test result is 7% or more less than your baseline.
l If your baseline under 28 cm: When your test result is 2 centimeters or more less than your baseline.
Your readiness for speed and strength is illustrated with an icon and feedback.
l Green if you're ready
l Orange if you're ready with some considerations
l Red if you're not ready
87
Page 88
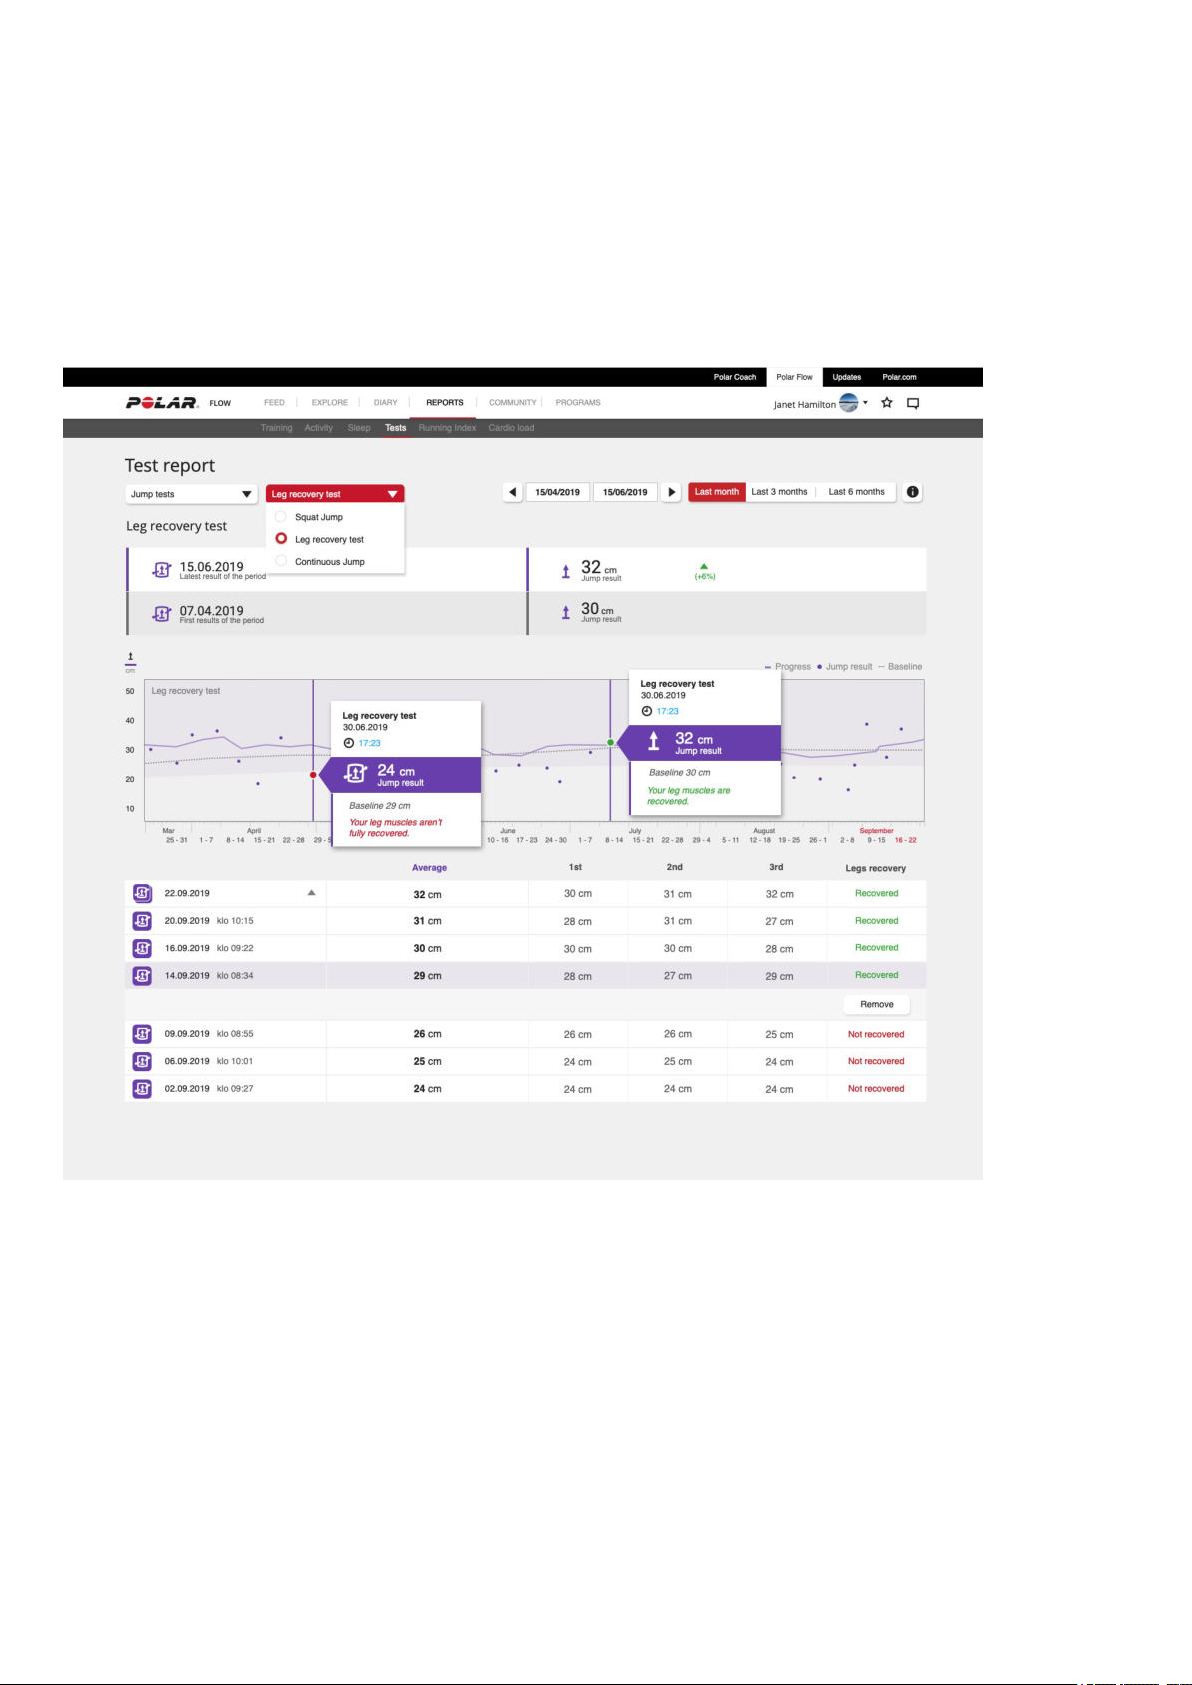
Your leg muscle recovery information is complemented with information about the recovery of your cardio system. This
information is provided by the following features: Injury and illness risk (based on your Cardio Load from Training Load Pro),
Recovery Pro, Orthostatic test and Nightly recharge. What this means is that first your watch checks if you're injury & illness
risk is activated. If it's not available, your watch checks if you're using Recovery Pro, and after that if you've performed an
Orthostatic test and finally if you're using Nightly Recharge. If any of these features spot anything affecting the recovery of
your cardio system it'll be taken into account in your feedback.
Detailed analysis in the Flow web service and app
Remember to sync your test result to Polar Flow. To help long-term follow up, we’ve gathered all the test data in one place in
the Polar Flow web service. In the Tests page you can see all the tests you’ve performed and compare their results. You can
see your long-term progress and easily view changes in your performance.
RUNNING POWER FROM THE WRIST
Running power is a great complement to heart rate monitoring – it helps you monitor the external load of your running. Power
responds to changes in intensity faster than your heart rate, which is why Running Power is a great guiding metric in interval
and hill sessions. You can also use it to maintain a steady effort level during your run, for example in a race.
The calculation is done with Polar’s proprietary algorithm, and it is based on your GPS and barometer data. Your weight also
affects the calculation, so make sure its up-to-date.
88
Page 89
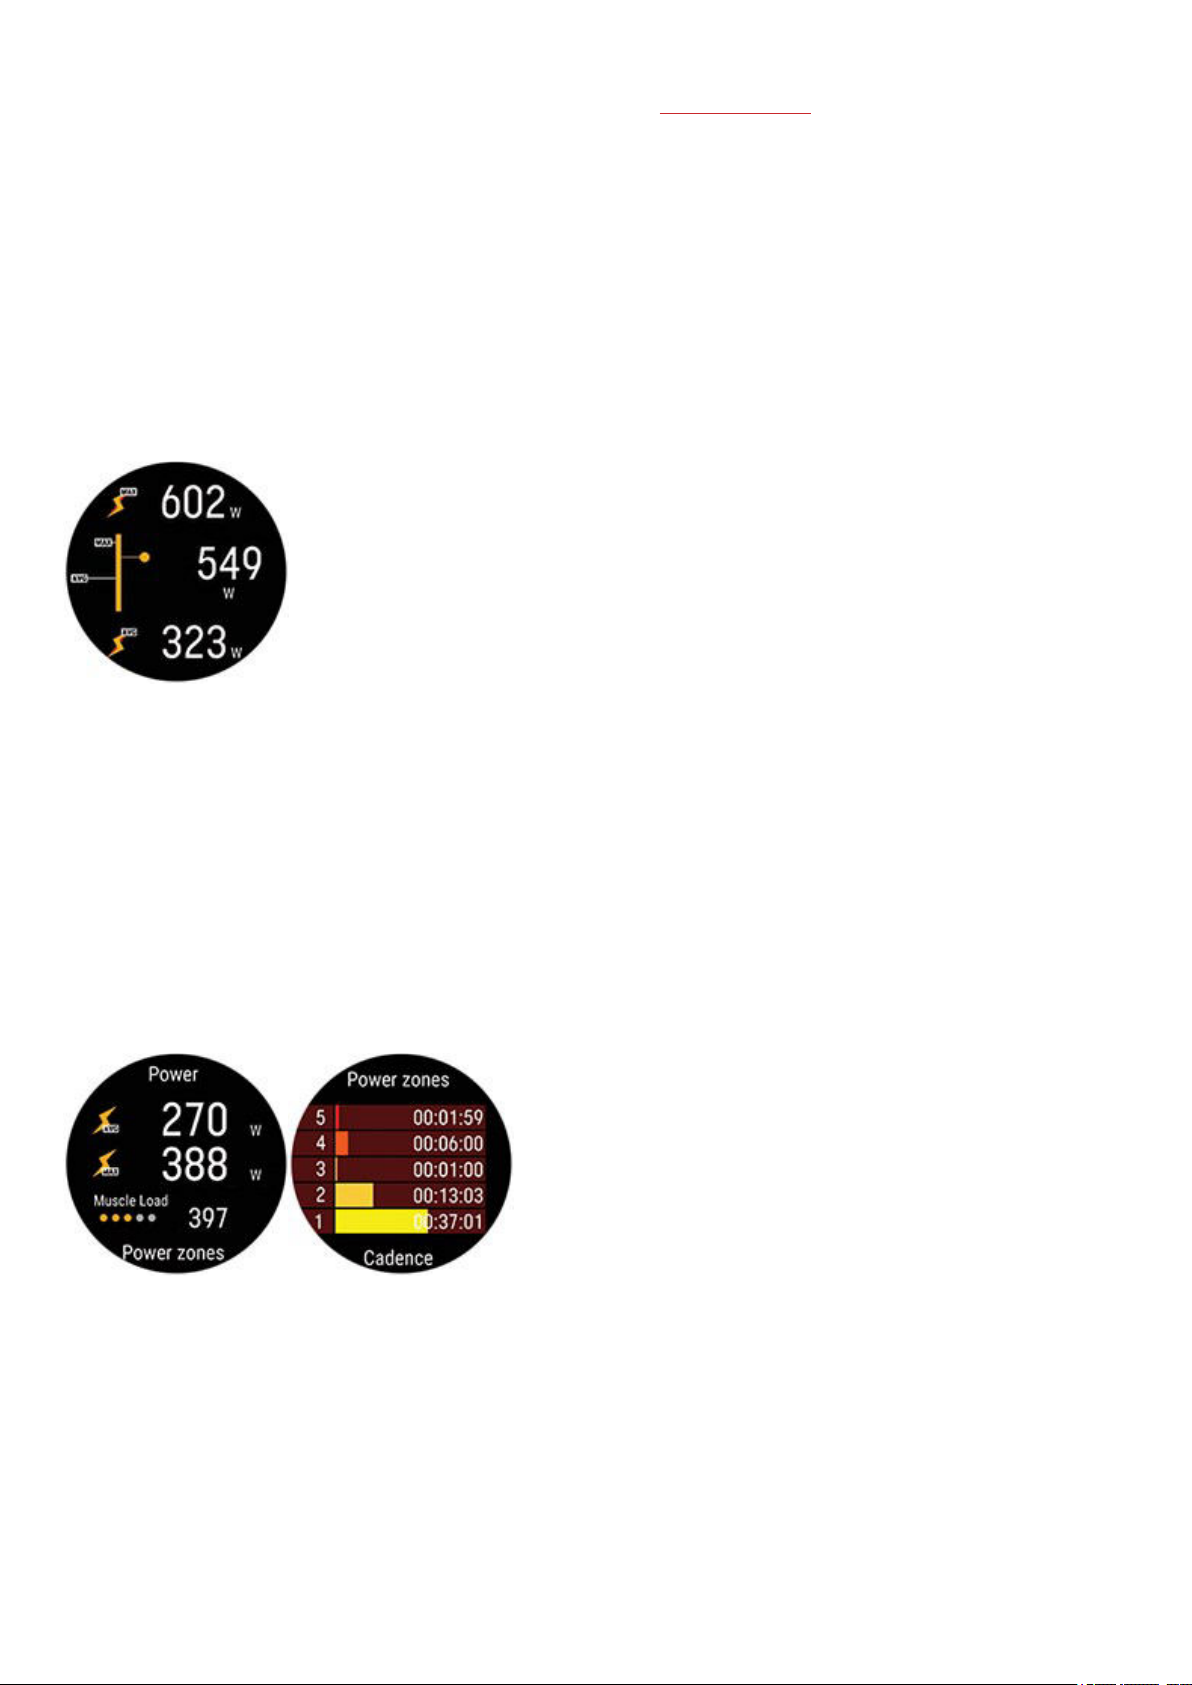
Running power and muscle load
Polar uses running power to calculate Muscle load, one parameter of Training Load Pro. Running causes musculoskeletal
stress, and Muscle load tells you how much your muscles and joints were strained during your training session. It shows the
amount of mechanical work (kJ) that you produced during your running sessions (and cycling sessions if you’re using a
cycling power meter). Muscle load helps you quantify your training load in high-intensity running training sessions, such as
short intervals, sprints and hill sessions, when your heart rate doesn’t have enough time to react to the changes in the
intensity.
How running power is shown on your watch
Running power is automatically calculated for your running sessions done with running type sport profiles with GPS available.
Choose the power data you want to view during your sessions by customizing your training views in the Flow web service
sport profile settings.
During your run you can view the following data:
l Maximum power
l Average power
l Lap power
l Maximum lap power
l Automatic lap power average
l Automatic lap power maximum
Choose how power is shown during sessions and in the Flow web service and app:
l Watts W
l Watts per kilogram W/kg
l Percentage of MAP (% of MAP)
After your session in the training summary on your watch you’ll see:
l Your average power as Watts
l Your maximum power as Watts
l Muscle Load
l Time spent in power zones
How running power is shown in the Polar web service and app
89
Page 90
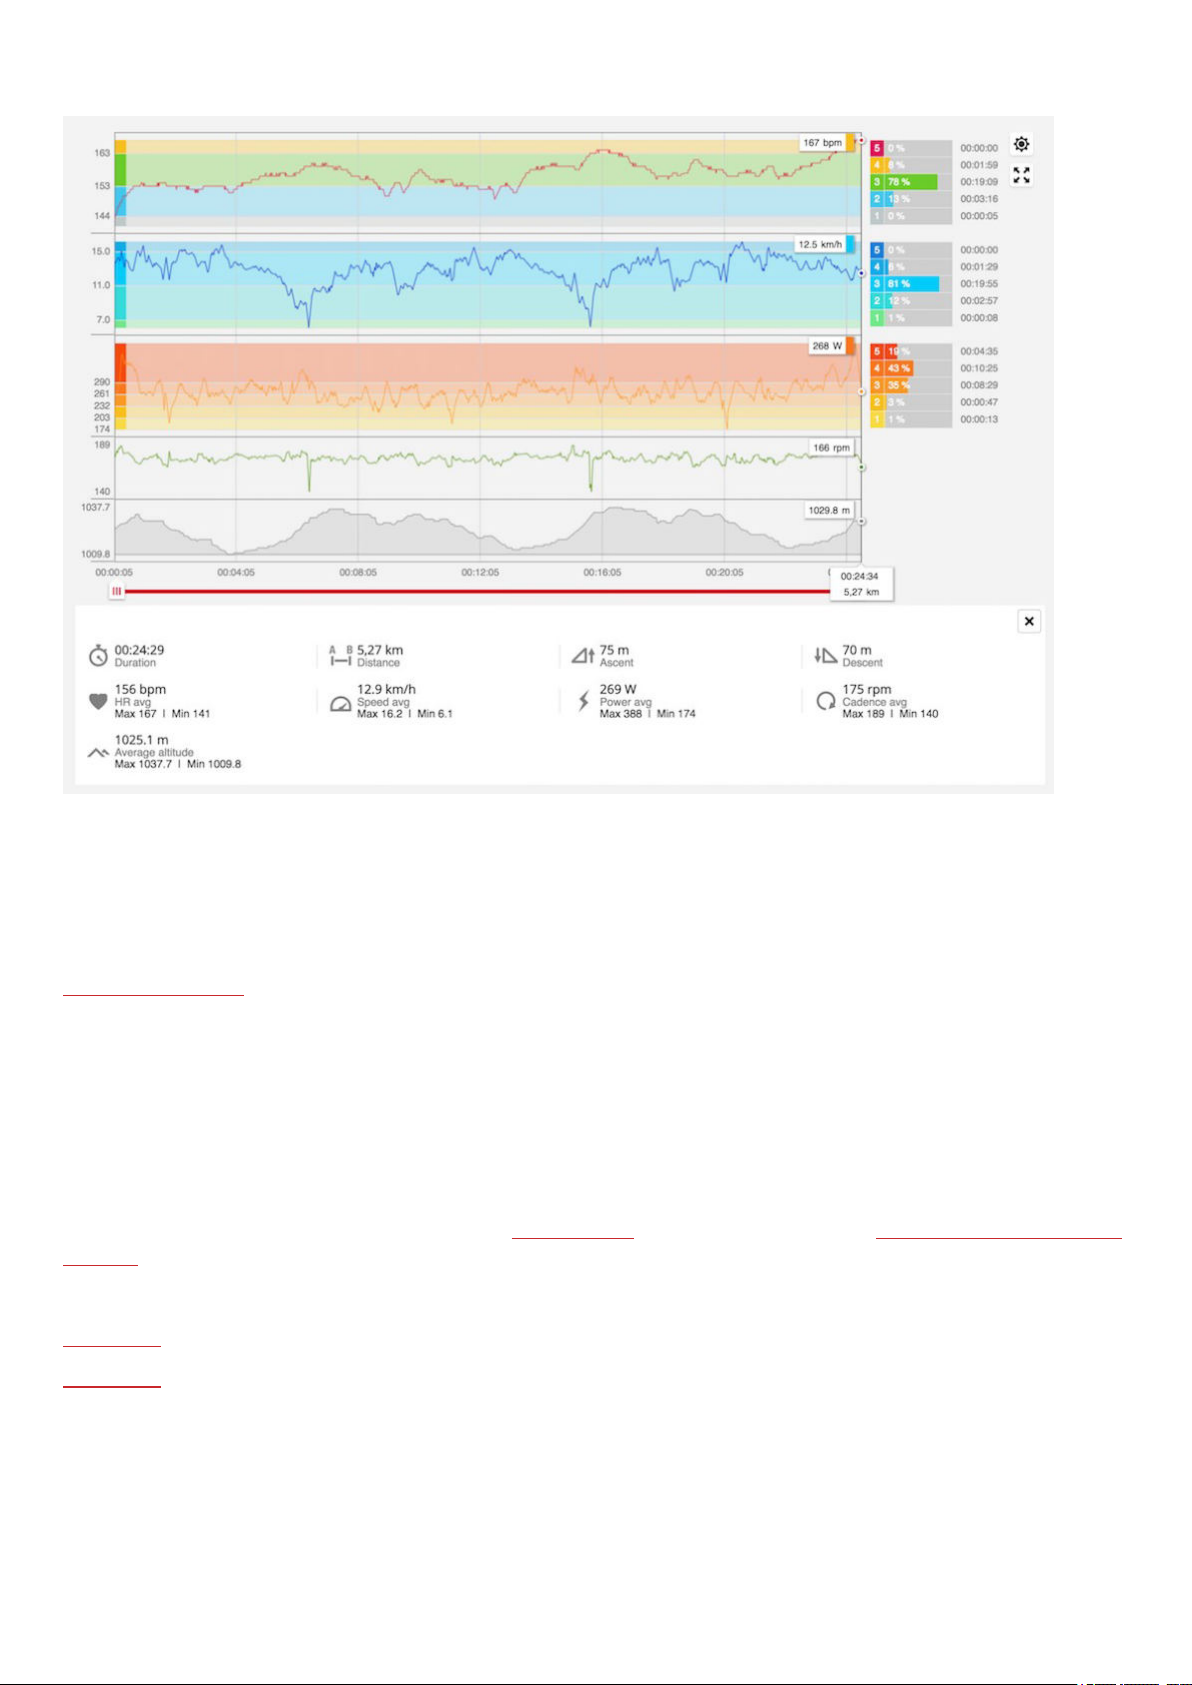
Detailed graphs for analysis are available in the Flow web service and app. See your power values from your session, and
how they were distributed compared to heart rate, and how incline, decline and different speeds affected them.
POLAR RUNNING PROGRAM
Polar Running program is a personalized program based on your fitness level, designed to make sure that you train right and
avoid overreaching. It’s intelligent, and adapts based on your development, and lets you know when it might be a good idea to
cut back a little and when to step it up a notch. Each program is tailored for your event, taking your personal attributes,
training background and preparation time into account. The program is free, and available in the Polar Flow web service at
www.polar.com/flow.
Programs are available for 5k, 10k, half marathon and marathon events. Each program has three phases: Base building,
Build-up and Tapering. These phases are designed to gradually develop your performance, and make sure you’re ready on
race day. Running training sessions are divided into five types: easy jog, medium run, long run, tempo run and interval. All
sessions include warm-up, work, and cool-down phases for optimal results. In addition, you can choose to do strength, core,
and mobility exercises to support your development. Each training week consists of two to five running sessions, and the
total running training session duration per week varies from one to seven hours depending on your fitness level. The
minimum duration for a program is 9 weeks, and the maximum is 20 months.
Learn more about the Polar Running Program in this in-depth guide. Or read more about how to get started with the Running
Program.
To see a video, click on one of the following links:
Get Started
How to use
90
Page 91
Create a Polar Running Program
1. Log into the Flow web service at www.polar.com/flow.
2. Choose Programs from the Tab.
3. Choose your event, name it, set the event date, and when you wish to start the program.
4. Fill in the physical activity level questions.*
5. Choose if you want to include supporting exercises in the program.
6. Read and fill in the physical activity readiness questionnaire.
7. Review your program, and adjust any settings if necessary.
8. When you’re done, choose Start program.
*If four weeks of training history is available, these will be pre-filled.
Start a running target
Before starting a session, make sure you’ve synced your training session target to your device. The sessions are synced to
your device as training targets.
To start a training target scheduled for the current day:
1. Enter the pre-training mode by pressing and holding OK in time view.
2. You'll be prompted to start a training target you've scheduled for the day.
3. Press OK to view the target information.
4. Press OK to return to pre-training mode, and choose the sport profile you want to use.
5. When the watch has found all the signals, press OK. Recording started is displayed and you can start training.
Follow your progress
Sync your training results from your device to the Flow web service via the USB cable or Flow app. Follow your progress from
the Programs tab. You’ll see an overview of your current program, and how you’ve progressed.
RUNNING INDEX
Running Index offers an easy way to monitor running performance changes. The Running index score is an estimate of your
maximal aerobic running performance (VO2max). By recording your Running Index over time, you see how efficient your
running is and how you improve your running performance. Improvement means that running at a given pace requires less of
an effort, or that your pace is faster at a given level of exertion.
To receive the most accurate information on your performance, make sure you have set your HR
Running Index is calculated during every training session when heart rate is measured and the GPS function is on/Stride
Sensor is in use, and when the following requirements apply:
max
value.
• Sport profile used is a running type sport (Running, Road Running, Trail running etc.)
• Speed should be 6 km/h / 3,75 mi/h or faster and duration 12 minutes minimum
Calculation begins when you start recording the session. During a session, you may stop twice, for example, at traffic lights
without interrupting the calculation.
91
Page 92
Running Index takes the effect of terrain into account. At a given pace, running uphill is physiologically more stressful than
running on a level surface, and running downhill is physiologically less stressful than running on a level surface. Please note
that altitude data must be available for uphills and downhills to be taken into account. Altitude data is gathered by the
barometer.
When using a Polar Stride Sensor Bluetooth Smart in a running session and GPS is set off, the sensor needs to be calibrated
in order to get a Running Index result.
You can view your Running Index in the summary of your training session on your watch. Follow your progress and see
race time estimations in the
Compare your result to the table below.
Polar Flow web service.
Short-term analysis
Men
Age/Years Very low Low Fair Moderate Good Very good Elite
20-24 < 32 32-37 38-43 44-50 51-56 57-62 > 62
25-29 < 31 31-35 36-42 43-48 49-53 54-59 > 59
30-34 < 29 29-34 35-40 41-45 46-51 52-56 > 56
35-39 < 28 28-32 33-38 39-43 44-48 49-54 > 54
40-44 < 26 26-31 32-35 36-41 42-46 47-51 > 51
45-49 < 25 25-29 30-34 35-39 40-43 44-48 > 48
50-54 < 24 24-27 28-32 33-36 37-41 42-46 > 46
55-59 < 22 22-26 27-30 31-34 35-39 40-43 > 43
60-65 < 21 21-24 25-28 29-32 33-36 37-40 > 40
Women
Age/Years Very low Low Fair Moderate Good Very good Elite
20-24 < 27 27-31 32-36 37-41 42-46 47-51 > 51
25-29 < 26 26-30 31-35 36-40 41-44 45-49 > 49
30-34 < 25 25-29 30-33 34-37 38-42 43-46 > 46
35-39 < 24 24-27 28-31 32-35 36-40 41-44 > 44
40-44 < 22 22-25 26-29 30-33 34-37 38-41 > 41
45-49 < 21 21-23 24-27 28-31 32-35 36-38 > 38
50-54 < 19 19-22 23-25 26-29 30-32 33-36 > 36
55-59 < 18 18-20 21-23 24-27 28-30 31-33 > 33
60-65 < 16 16-18 19-21 22-24 25-27 28-30 > 30
The classification is based on a literature review of 62 studies where VO
in the USA, Canada and 7 European countries. Reference: Shvartz E, Reibold RC. Aerobic fitness norms for males and
females aged 6 to 75 years: a review. Aviat Space Environ Med; 61:3-11, 1990.
92
was measured directly in healthy adult subjects
2max
Page 93
There may be some daily variation in the Running Indexes. Many factors influence Running Index. The value you receive on a
given day is affected by changes in running circumstances, for example different surface, wind or temperature, in addition to
other factors.
Long-term analysis
The single Running Index values form a trend that predicts your success in running certain distances. You can find your
Running Index report in the Polar Flow web service under the PROGRESS tab. The report shows you how your running
performance has improved over a longer time period. If you're using the Polar Running program to train for a running event,
you can follow your Running Index progress to see how your running is improving towards the goal.
The following chart estimates the duration that a runner can achieve in certain distances when performing maximally. Use
your long-term Running Index average in the interpretation of the chart. The prediction is best for those Running Index values
that have been received at speed and running circumstances similar to the target performance.
Running Index Cooper test (m) 5 km (h:mm:ss) 10 km (h:mm:ss) 21.098 km (h:m-
m:ss)
36 1800 0:36:20 1:15:10 2:48:00 5:43:00
38 1900 0:34:20 1:10:50 2:38:00 5:24:00
40 2000 0:32:20 1:07:00 2:29:30 5:06:00
42 2100 0:30:40 1:03:30 2:21:30 4:51:00
44 2200 0:29:10 1:00:20 2:14:30 4:37:00
46 2300 0:27:50 0:57:30 2:08:00 4:24:00
48 2400 0:26:30 0:55:00 2:02:00 4:12:00
50 2500 0:25:20 0:52:40 1:57:00 4:02:00
52 2600 0:24:20 0:50:30 1:52:00 3:52:00
54 2700 0:23:20 0:48:30 1:47:30 3:43:00
56 2800 0:22:30 0:46:40 1:43:30 3:35:00
58 2900 0:21:40 0:45:00 1:39:30 3:27:00
42.195 km (h:mm:ss)
60 3000 0:20:50 0:43:20 1:36:00 3:20:00
62 3100 0:20:10 0:41:50 1:32:30 3:13:00
64 3200 0:19:30 0:40:30 1:29:30 3:07:00
66 3300 0:18:50 0:39:10 1:26:30 3:01:00
68 3350 0:18:20 0:38:00 1:24:00 2:55:00
70 3450 0:17:50 0:36:50 1:21:30 2:50:00
72 3550 0:17:10 0:35:50 1:19:00 2:45:00
74 3650 0:16:40 0:34:50 1:17:00 2:40:00
76 3750 0:16:20 0:33:50 1:14:30 2:36:00
78 3850 0:15:50 0:33:00 1:12:30 2:32:00
93
Page 94
TRAINING BENEFIT
Training Benefit gives you textual feedback on the effect of each training session helping you to better understand the
effectiveness of your training. You can see the feedback in Flow app and Flow web service. To get the feedback, you
need to have trained at least a total of 10 minutes in the heart rate zones.
Training Benefit feedback is based on heart rate zones. It reads into how much time you spend and how many calories you
burn in each zone.
The descriptions of different training benefit options are listed in the table below
Feedback Benefit
Maximum training+ What a session! You improved your sprint speed and the nervous system of your muscles,
which make you more efficient. This session also increased your resistance to fatigue.
Maximum training What a session! You improved your sprint speed and the nervous system of your muscles,
which make you more efficient.
Maximum & Tempo training What a session! You improved your speed and efficiency. This session also significantly
developed your aerobic fitness and your ability to sustain high intensity effort for longer.
Tempo & Maximum training What a session! You significantly improved your aerobic fitness and your ability to sustain
high intensity effort for longer. This session also developed your speed and efficiency.
Tempo training+ Great pace in a long session! You improved your aerobic fitness, speed, and ability to sus-
tain high intensity effort for longer. This session also increased your resistance to fatigue.
Tempo training Great pace! You improved your aerobic fitness, speed, and ability to sustain high intensity
effort for longer.
Tempo & Steady state training
Steady state & Tempo training
Steady state training + Excellent! This long session improved the endurance of your muscles and your aerobic fit-
Steady state training Excellent! You improved the endurance of your muscles and your aerobic fitness.
Steady state & Basic training, long
Steady state & Basic training Excellent! You improved the endurance of your muscles and your aerobic fitness. This ses-
Basic & Steady state training, long
Basic & Steady state training Great! You improved your basic endurance and your body's ability to burn fat during exercise.
Good pace! You improved your ability to sustain high intensity effort for longer. This session
also developed your aerobic fitness and the endurance of your muscles.
Good pace! You improved your aerobic fitness and the endurance of your muscles. This session also developed your ability to sustain high intensity effort for longer.
ness. It also increased your resistance to fatigue.
Excellent! This long session improved the endurance of your muscles and your aerobic fitness. It also developed your basic endurance and your body's ability to burn fat during exercise.
sion also developed your basic endurance and your body's ability to burn fat during exercise.
Great! This long session improved your basic endurance and your body's ability to burn fat
during exercise. It also developed the endurance of your muscles and your aerobic fitness.
This session also developed the endurance of your muscles and your aerobic fitness.
Basic training, long Great! This long, low intensity session improved your basic endurance and your body's abil-
ity to burn fat during exercise.
Basic training Well done! This low intensity session improved your basic endurance and your body's ability
to burn fat during exercise.
94
Page 95
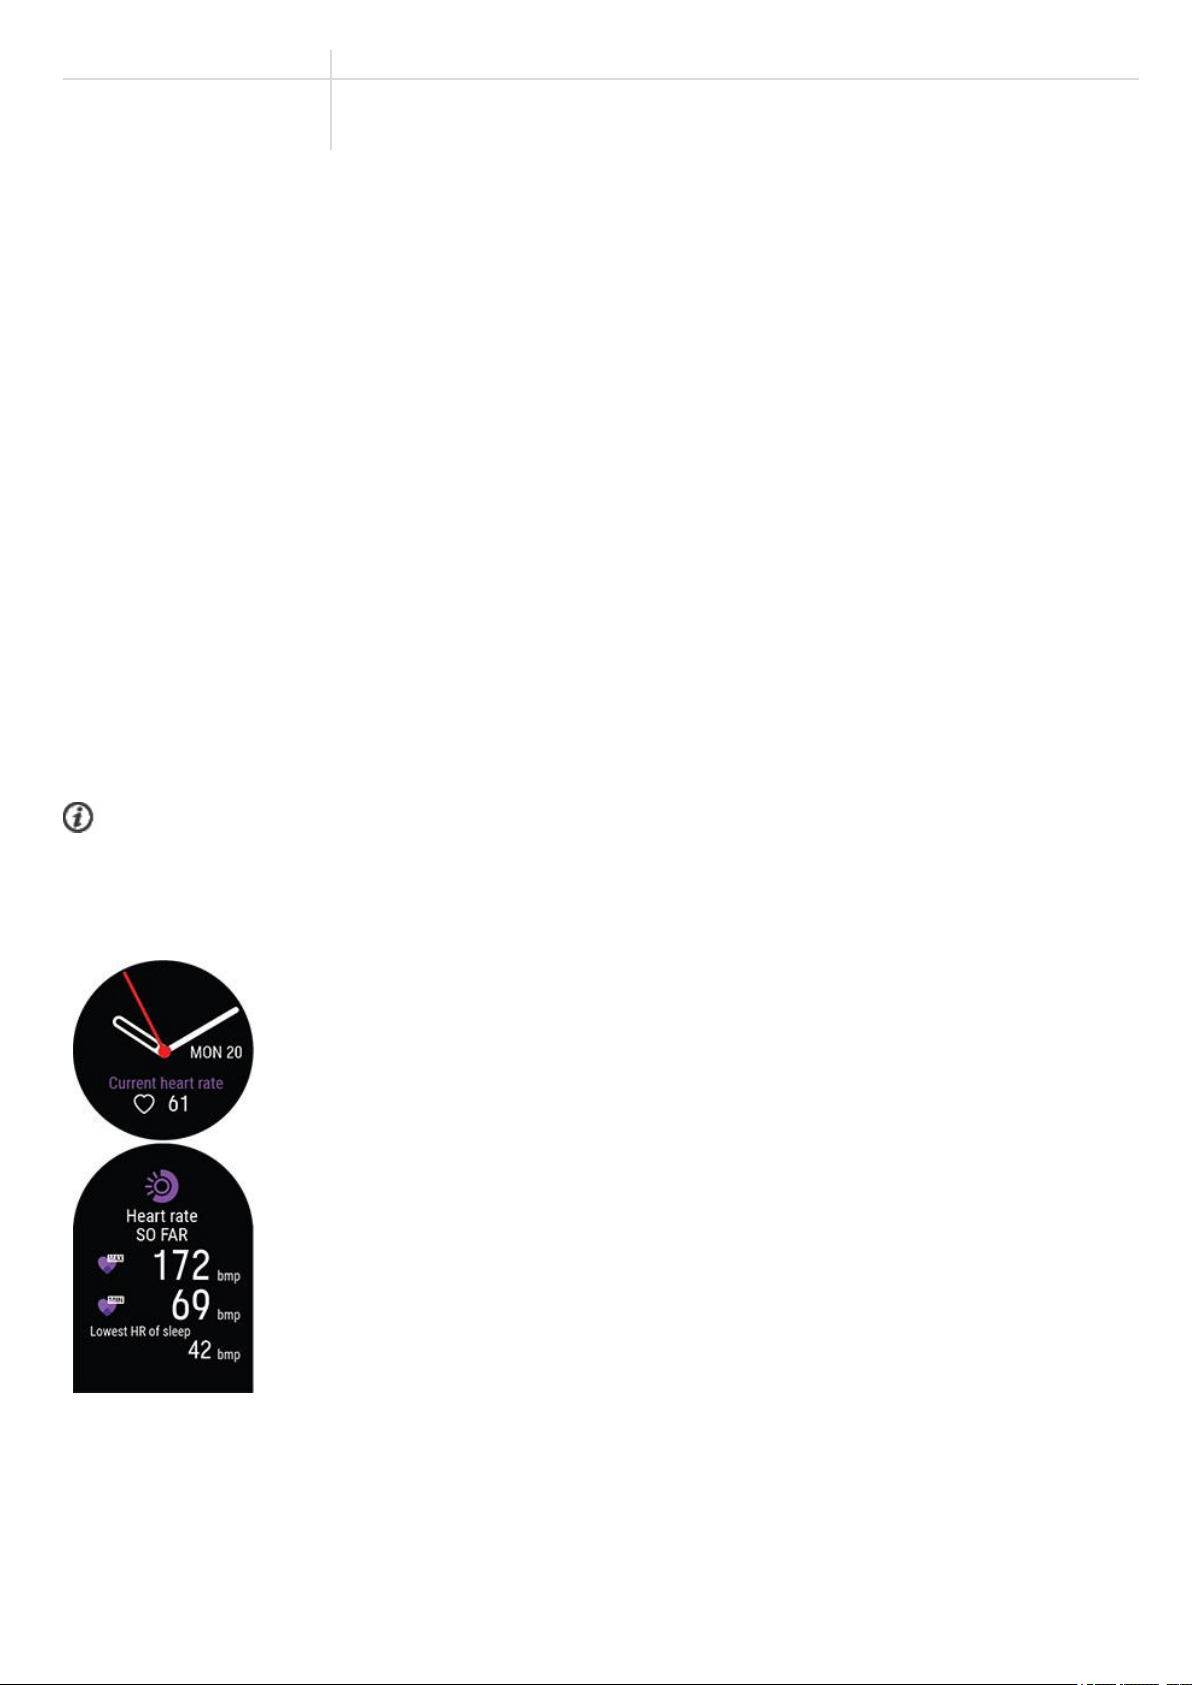
Feedback Benefit
Recovery training Very nice session for your recovery. Light exercise like this allows your body to adapt to your
training.
SMART CALORIES
The most accurate calorie counter on the market calculates the number of calories burned based on your individual data:
l Body weight, height, age, gender
l Individual maximum heart rate (HR
l The intensity of your training or activity
l Individual maximal oxygen uptake (VO2
max
)
max
)
The calorie calculation is based on an intelligent combination of acceleration and heart rate data. The calorie calculation
measures your training calories accurately.
You can see your cumulative energy expenditure (in kilocalories, kcal) during training sessions, and your total kilocalories of
the session afterwards. You can also follow your total daily calories.
CONTINUOUS HEART RATE
The Continuous Heart Rate feature measures your heart rate around the clock. It enables a more accurate measurement of
daily calorie consumption and your overall activity because also physical activities with very little wrist movement, such as
cycling, can be tracked.
Continuous Heart Rate on your watch
You can turn the Continuous heart rate feature on, off or to night-time only mode on your watch in Settings > General
settings > Continuous HR tracking. If you choose Night-time only mode, set heart rate tracking to begin at the earliest
time you might go to bed.
The feature is off by default. Keeping the Continuous Heart Rate feature on in your watch will drain the battery quicker.
Continuous heart rate tracking needs to be enabled for Nightly Recharge to function. If you want to save battery and still use
Nightly Recharge, set the continuous heart rate tracking to be on only at night.
In time view, use the UP and DOWN buttons to navigate to the heart rate watch face. Press OK to open a detailed view.
When the feature is on, the watch continuously measures your heart rate and displays it
on the Heart rate watch face. When opening the details, you can check your highest and
lowest heart rate readings of the day and also view what your lowest heart rate reading
of the previous night was.
The watch tracks your heart rate in 5-minute intervals and records the data for later
analysis in the Flow app or web service. If the watch detects that your heart rate is
elevated, it starts to record your heart rate continuously. Continuous recording can also
start based on your wrist movements, for example, when you’re walking with a fast
enough pace for at least one minute. The continuous recording of your heart rate stops
automatically when your activity level drops low enough. When your watch detects that
your arm is not moving or when your heart rate is not elevated it tracks your heart rate in
5-minute cycles to find your lowest reading of the day.
In some cases, it is possible that you’ve seen a higher or lower heart rate on your watch
during the day than is shown in the continuous heart rate summary as the highest or
lowest reading of your day. This can happen if the reading you’ve seen falls outside the
tracking interval.
95
Page 96
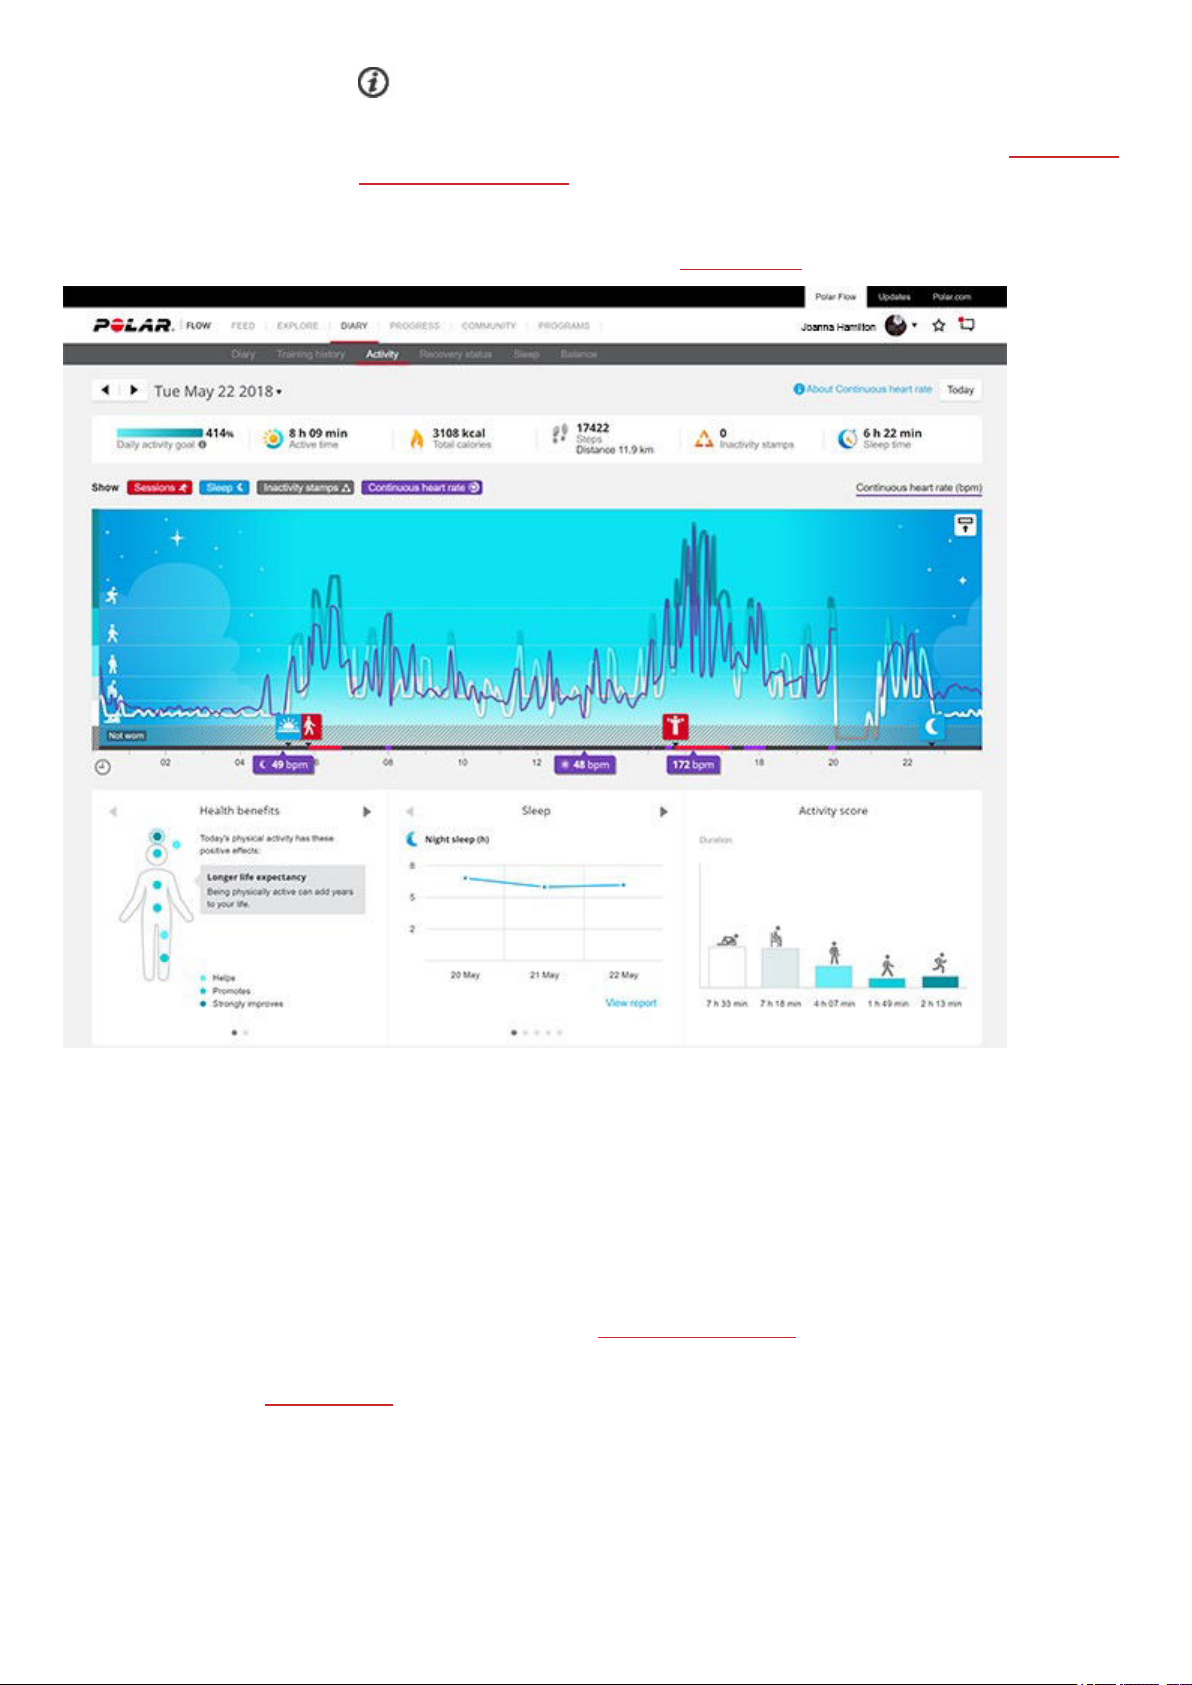
The LEDs on the back of your watch are always on when the continuous heart rate
feature is on and the sensor on the back is in touch with your skin. For instructions on
how to wear your watch for accurate heart rate readings from the wrist, see
heart rate measurement.
You can follow the Continuous Heart Rate data in more detail and in longer periods in Polar Flow, either in web or in the
mobile app. Learn more about the Continuous Heart Rate feature in this in-depth guide.
Wrist-based
24/7 ACTIVITY TRACKING
Your watch tracks your activity with an internal 3D accelerometer that records your wrist movements. It analyzes the
frequency, intensity and regularity of your movements together with your physical information, allowing you to see how active
you really are in your everyday life, on top of your regular training. You should wear your watch on your non-dominant hand to
ensure you get the most accurate activity tracking.
Activity Goal
You'll get your personal activity goal when you set up your watch. The activity goal is based on your personal data and activity
level setting, which you can find in the Polar Flow app or in the Polar Flow web service.
If you want to change your goal, open your Flow app, tap your name/profile photo in the menu view, and swipe down to see
Activity goal. Or go to flow.polar.com and sign in to your Polar account. Then click your name > Settings > Activity goal.
Choose one of the three activity levels that best describes your typical day and activity. Below the selection area, you can see
how active you need to be to reach your daily activity goal on the chosen level.
96
Page 97
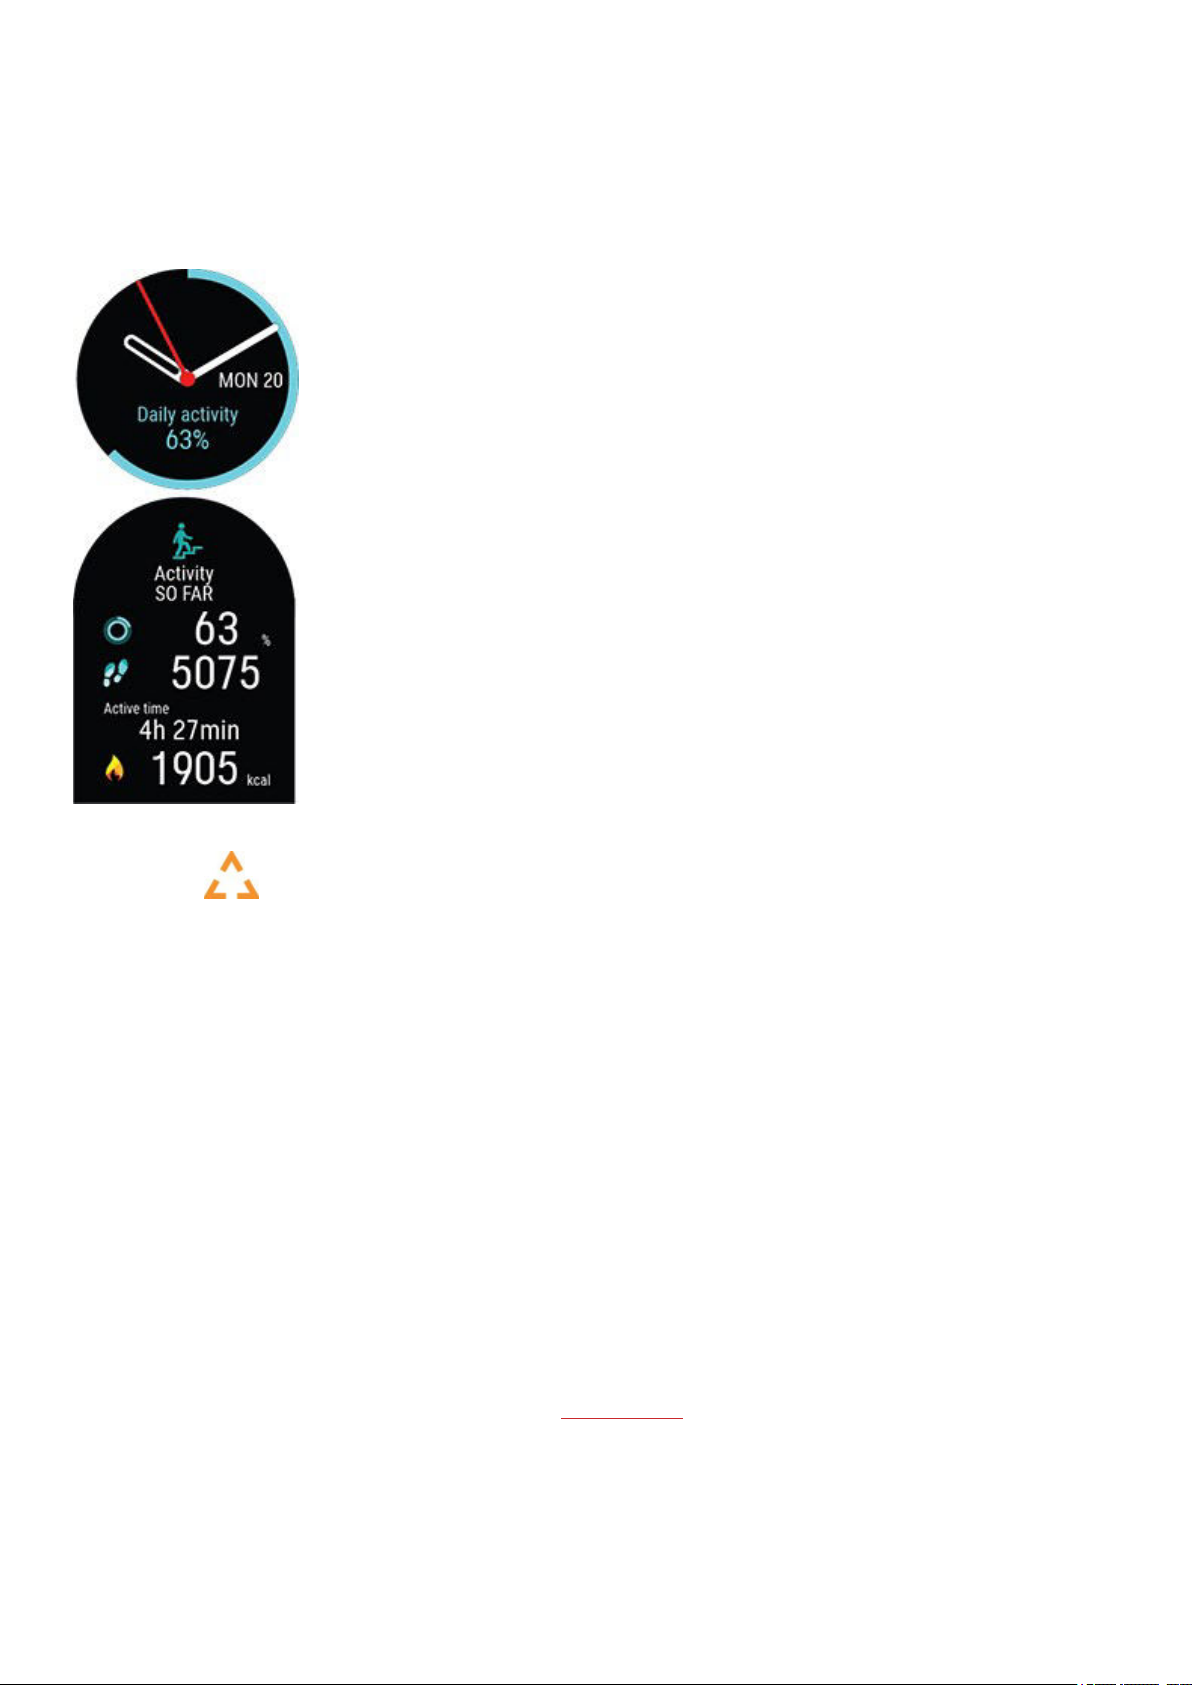
The time you need to be active during the day to reach your activity goal depends on the level you have chosen and the
intensity of your activities. Meet your goal faster with more intense activities or stay active at a slightly more moderate pace
throughout the day. Age and gender also affect the intensity you need to reach your activity goal. The younger you are, the
more intense your activity needs to be.
Activity data on your watch
In time view, use the UP and DOWN buttons to navigate to the Activity watch face.
The circle around the watch face and the percentage below time and date show your
progress towards your daily activity goal. The circle fills with light blue color as you are
active.
In addition, you can see the following details of your day’s accumulated activity:
• Steps you've taken so far. The amount and type of body movements are registered and
turned into an estimation of steps.
• Active time tells you the cumulative time of body movements that benefit your health.
• Calories you've burned through training, activity and BMR (Basal metabolic rate: the
minimum metabolic activity required to maintain life).
Inactivity alert
It's widely known that physical activity is a major factor in maintaining health. In addition to being physically active, it's
important to avoid prolonged sitting. Sitting for long periods of time is bad for your health, even on those days when you train
and gain enough daily activity. Your watch spots if you’re being inactive for too long during your day and this way helps you to
break up your sitting to avoid the negative effects it has on your health.
If you’ve been still for 55 minutes, you'll get an inactivity alert: It's time to move is shown along with a small vibration. Stand
up and find your own way to be active. Take a short walk, stretch, or do some other light activity. The message goes away
when you start moving or press the BACK button. If you don't get active in five minutes, you'll get an inactivity stamp, which
you can see on the Flow app and Flow web service after syncing. The Flow app and Flow web service show you the whole
history of how many inactivity stamps you have received. This way you can check back on your daily routine and make
changes towards a more active life.
Activity data in Flow App and Flow web service
With Flow app you can follow and analyze your activity data on the go and sync it wirelessly from your watch to the Flow web
service. The Flow web service gives you the most detailed insight into your activity information. With the help of the activity
reports (under the PROGRESS tab), you can follow the long-term trend of your daily activity. You can choose to view either
daily, weekly or monthly reports.
Learn more about the 24/7 Activity tracking feature in this in-depth guide.
97
Page 98
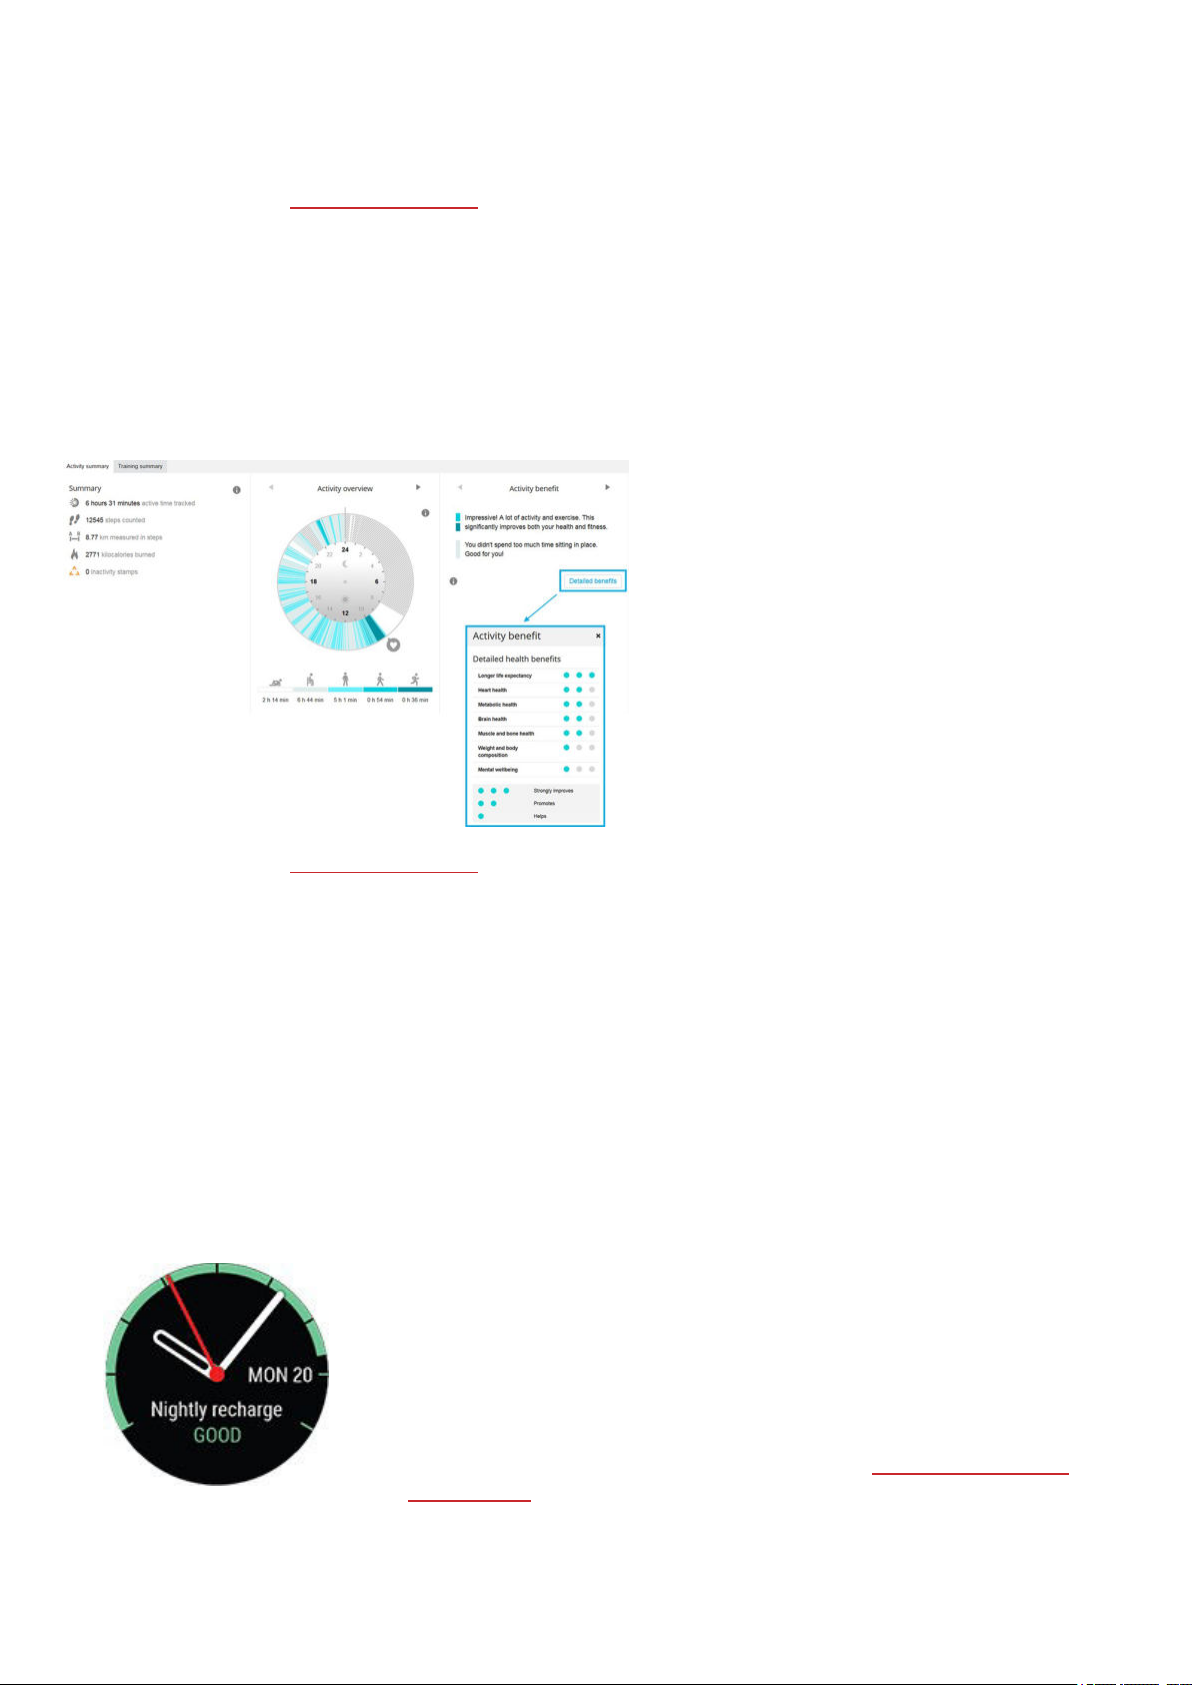
ACTIVITY GUIDE
The Activity Guide feature shows how active you've been during the day, and tells you how much you need to still do to reach
the recommendations for physical activity per day. You can check how you’re doing in reaching your activity goal for the day
either from your watch, from the Polar Flow app or web service.
For more information, see 24/7 Activity Tracking.
ACTIVITY BENEFIT
Activity benefit gives you feedback on the health benefits that being active has given you, and also on what kind of unwanted
effects sitting for too long has caused to your health. The feedback is based on international guidelines and research on the
health effects of physical activity and sitting behavior. The core idea is: the more active you are, the more benefits you get!
Both the Flow app and Flow web service show the activity benefit of your daily activity. You can view the activity benefit on
daily, weekly and monthly basis. In the Flow web service, you can also view the detailed information on health benefits.
For more information, see 24/7 Activity Tracking.
NIGHTLY RECHARGE™ RECOVERY MEASUREMENT
Nightly Recharge™ is an overnight recovery measurement that shows you how well you recover from the demands of your
day. Your Nightly Recharge status is based on two components: how you slept (sleep charge) and how well your
autonomic nervous system (ANS) calmed down during the early hours of your sleep (ANS charge). Both components are
formed by comparing your last night to your usual levels from the past 28 days. Your watch automatically measures both
sleep charge and ANS charge during the night.
You can see your Nightly Recharge status on your watch and in the Polar Flow app. Based on what we've measured from you,
you get personalized daily tips in Polar Flow app on exercise, and tips on sleep and regulating your energy levels on those
particularly rough days. Nightly Recharge helps you make optimal choices in your everyday life to maintain overall well-being
and reach your training goals.
How tostart using Nightly Recharge?
1. Set Nightly Recharge on. This is done on your watch. Go to Settings >
General Settings > Recovery tracking and choose Nightly Recharge. Turn
on continuous HR tracking is then shown, confirm by pressing the START
button, and then choose On or Night-time only. If you choose Night-time
only also set your earliest possible bedtime.
2. Tighten the wristband firmly around your wrist and wear the watch when you
sleep. The sensor on the back of the watch must be in constant touch with
your skin. For more detailed wearing instructions, see Wrist-based heart rate
measurement.
98
Page 99
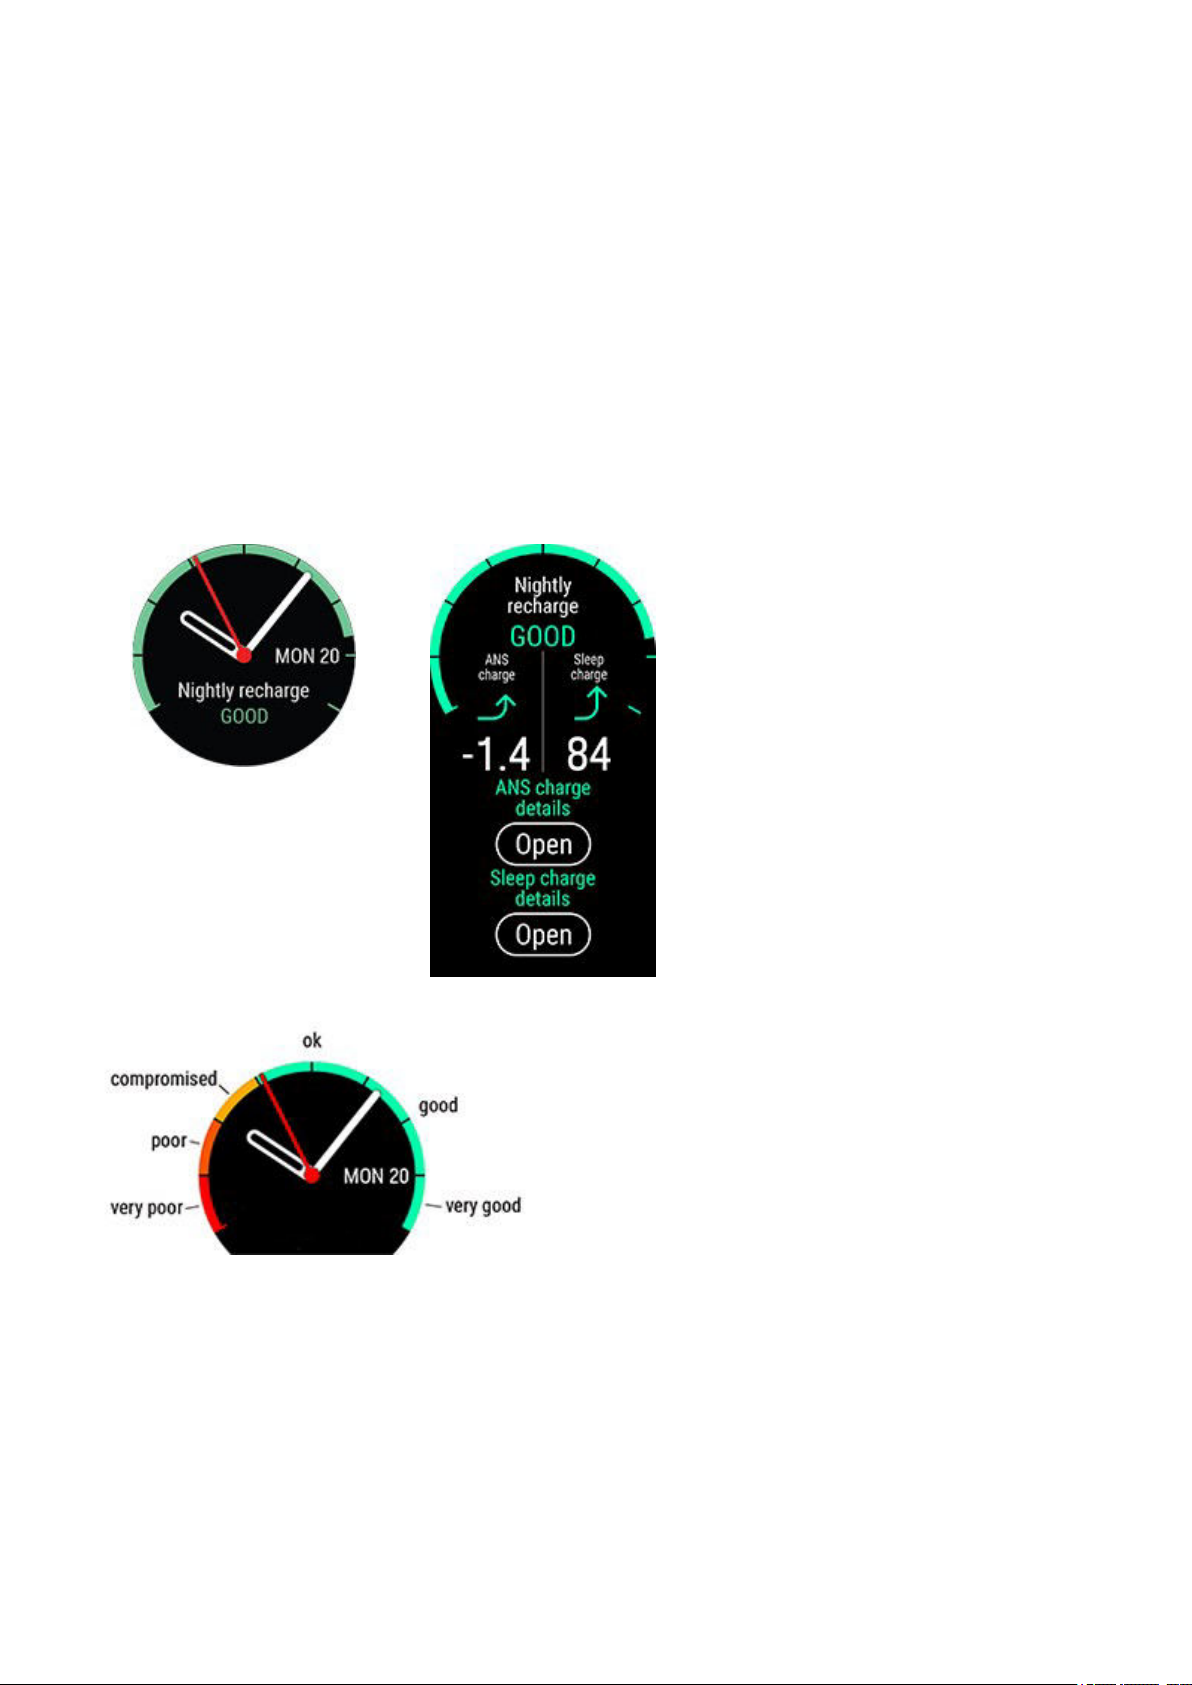
3. You need to wear your watch for three nights before you start to see the
Nightly Recharge status on your watch. This is how long it takes to establish
your usual level. Before you get your Nightly Recharge you can view your sleep
and ANS measurement details (heart rate, heart rate variability and breathing
rate). After three successful nightly measurements you can see your Nightly
Recharge status on your watch.
Nightly Recharge on your watch
Already awake? is shown on the Nightly Recharge watch face when your watch has detected a minimum of four
hours of sleep. Press OK to tell the watch that you're awake. Confirm with OK and the watch summarizes your
Nightly Recharge instantly. The Nightly Recharge status tells you how restorative last night was. Scores for both
ANS charge and sleep charge are taken into account when calculating your Nightly Recharge status. Nightly
Recharge status has the following scale: very poor – poor – compromised – OK – good – very good.
In time view, use the UP and DOWN buttons to navigate to the Nightly Recharge watch face. Press OK to open
detailed Nightly recharge view.
Scroll down to ANS charge details/Sleep charge details and press OK to see further information about your ANS
charge and your sleep charge.
99
Page 100
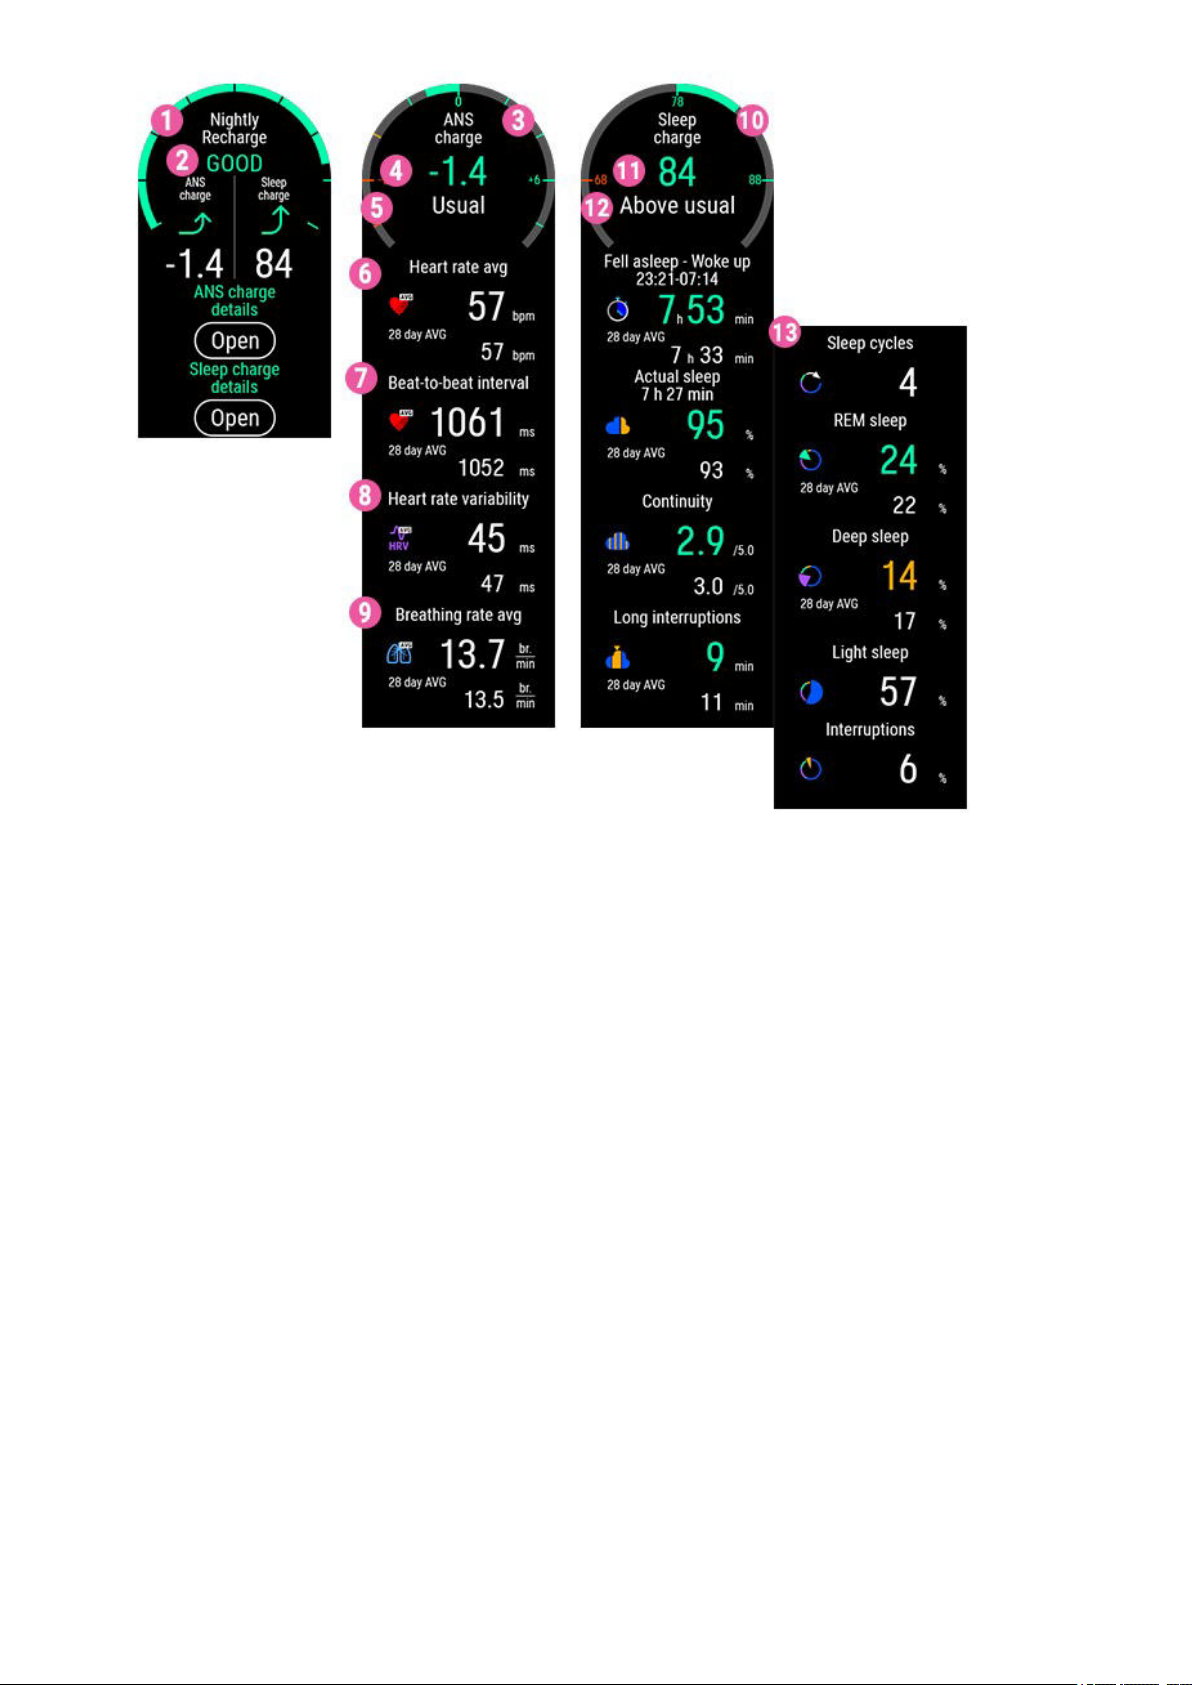
1. Nightly Recharge status graph
2. Nightly Recharge status Scale: very poor – poor – compromised – OK – good – very good.
3. ANS charge graph
4. ANS charge The scale is from -10 to +10. Around zero is your usual level.
5. ANS charge status Scale: much below usual – below usual – usual – above usual – much above usual.
6. Heart rate bpm (4 h average)
7. Beat-to-beat interval ms (4 h average)
8. Heart rate variability ms (4 h average)
9. Breathing rate br./min (4 h average)
10. Sleep score graph
11. Sleep score (1 - 100) A score that summarizes your sleep time and sleep quality into a single number.
12. Sleep charge status = Sleep score compared to your usual level. Scale: much below usual – below usual –
usual – above usual – much above usual.
13. Sleep data details. See "Sleep data on your watch" on page103 for more detailed information.
Nightly Recharge in the Flow app
You can compare and analyze your Nightly Recharge details from different nights in the Polar Flow app. Choose
Nightly Recharge from the Flow app menu to see the details of your last night's Nightly Recharge. Swipe the display
right to see the Nightly Recharge details for previous days. Tap the ANS charge or sleep charge box to open
detailed view of ANS charge or sleep charge.
100
 Loading...