

Page 1

Polar FT60
User Manual
™
Page 2

ENGLISH
Contents
1. GET STARTED.... .... .... ..... .... .... .... ... 4
Get to Know Your Polar FT60.. ..... .... .... 4
Start With Basic Settings ..... .... . .... .... . 5
Wrist Unit Buttons and Menu Structure ... . 6
Symbols on the Display . .... .... ..... .... ... 7
2. BEFORE TRAINING .... .... ..... .... .... .... .. 8
Activate Your Polar Star Training
Program .... .... .... ..... .... .... .... ..... ... 8
Change/End your program......... ...... 11
Test Your Fitness Level.................. 12
3. TRAINING ..... .... .... .... ..... .... .... .... .. 15
Wear the WearLink ..... .... .... .... .... . ... 15
Start Training.. .... .... .... .... . .... .... .... . 16
Start Training With OwnZone .... .... ..... .. 17
During Training.. . .... .... .... .... ..... .... .. 18
Stop Training Recording... .... .... ..... .... 21
4. AFTER TRAINING . .... .... ..... .... .... .... .. 22
Training Feedback ..... .... .... ..... .... .... 22
Weekly Follow-up.... .... .... .... ..... .... .. 24
Program Update... ..... .... .... .... ..... .... 26
Weight Diary ..... .... .... .... ..... .... .... .. 27
Follow Your fitness Test Results... ..... .... 28
Review Training Data ..... ..... .... .... .... . 29
Transfer Data. .... ..... .... .... .... .... ..... . 31
5. SETTINGS. .... .... ..... .... .... .... ..... .... . 32
Watch Settings... .... ..... .... .... .... ..... . 32
Training Settings. .... .... . .... .... .... .... .. 32
User Information ... ..... .... .... .... ..... ... 33
General Settings . .... .... ..... .... .... .... .. 34
Accessory Settings.... ..... .... .... .... ..... 35
Page 3

Footpod Calibration* ....... ............. 35
6. CUSTOMER SERVICE INFORMATION ..... ... 36
Caring for Your Polar FT60 . .... .... ..... ... 36
Service . ............................. ...... 36
Changing Batteries.... ......... .......... 37
Precautions . . .... .... .... .... ..... .... .... .. 39
Troubleshooting.. .... .... .... .... ..... .... .. 41
Technical Specifications ..... ..... .... .... . 42
Guarantee and Disclaimer .. ..... .... .... ... 43
ENGLISH
Page 4
ENGLISH
1. GET STARTED
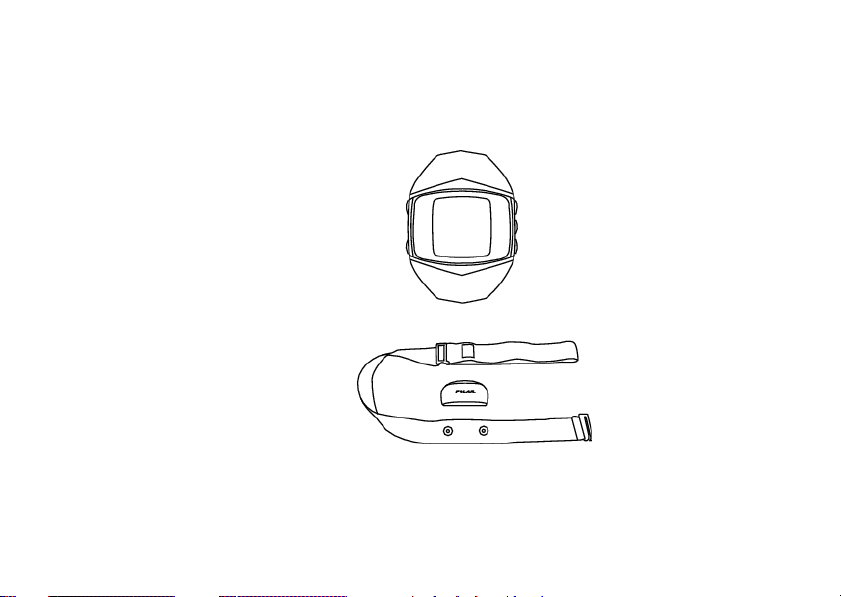
Get to Know Your Polar FT60
The Wrist Unit records and displays
your heart rate and other data during
training.
The WearLink transmits the heart rate
signal to the wrist unit. The transmitter
consists of a connector and strap.
The latest version of this user manual
can be downloaded at
www.polar.fi/support.
Register your Polar product at
http://register.polar.fi, and help us
improve our products and services to
better meet your needs.
4 Get Started
Page 5

ENGLISH
Start With Basic Settings
To activate your Polar FT60, press and hold any
button for one second. Once the FT60 is
activated, it cannot be switched off.
1. Language: Select Deutsch, English, Español,
Français, Italiano, Português or Suomi with
UP/DOWN. Press OK.
2. Please enter basic settings is displayed.
Press OK.
3. Select Time format.
4. Enter Time.
5. Enter Date.
6. Select Units, metric (KG, CM) or imperial (LBS,
FT). By selecting lbs/ft, calories are displayed
as CAL, otherwise they are shown as KCAL.
Calories are measured as kilocalories.
7. Enter Weight.
8. Enter Height.
9. Enter Date of birth.
10. Select Sex.
11. Settings OK? is displayed.
Select Yes to accept and save the settings.
Basic settings complete is displayed and the
FT60 enters Time mode.
Select No if you want to change the settings.
Please enter basic settings is displayed.
Re-enter your basic settings.
To modify your personal settings later, see
Settings.
Get Started 5
Page 6
ENGLISH
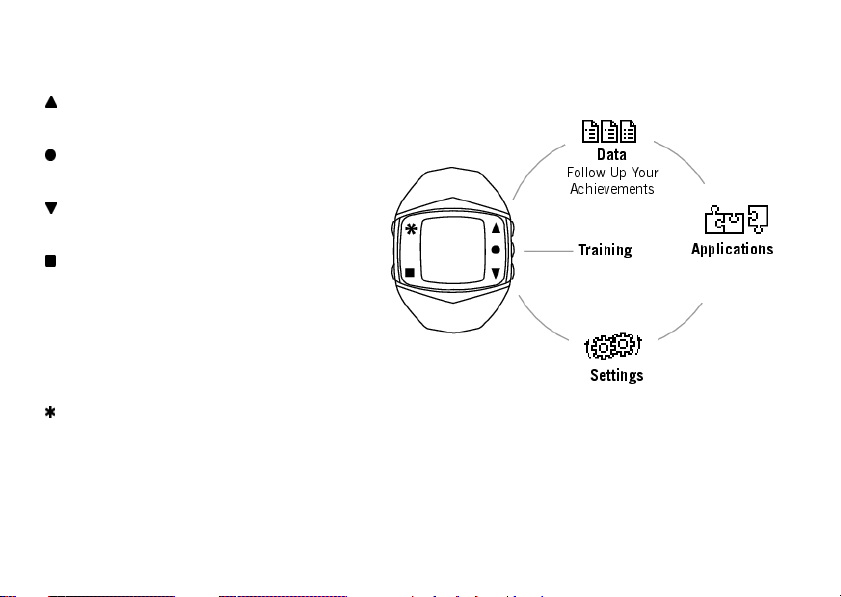
Wrist Unit Buttons and Menu Structure
UP: Enter the menu and move through
selection lists, adjust values
OK: Confirm selections, select training
type or training settings
DOWN: Enter the menu and move through
selection lists, adjust values
BACK:
• Exit the menu
• Return to the previous level
• Cancel selection
• Leave settings unchanged
• With a long press, return to Time view
LIGHT:
• Illuminate the display
• With a long press, enter quick menu in Time view (to lock buttons, set alarm or select time zone) or during
training (to adjust training sounds or lock buttons)
6 Get Started
Page 7
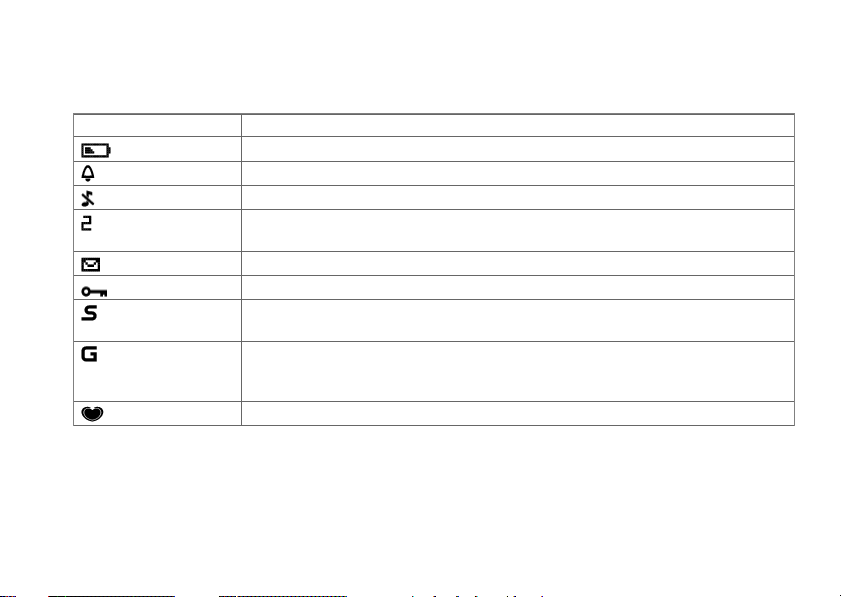
Symbols on the Display
The following table presents the display symbols and their descriptions.
Symbol Description
The battery of the wrist unit is low.
The alarm is active.
Sounds are off.
Time 2 is in use. Number two is displayed at the lower right corner of the
display.
You have one or more new messages.
The button lock is active.
The footpod is in use. If the symbol is blinking, the FT60 is trying to establish
a connection with the footpod.
The GPS sensor is in use. If the symbol is blinking, the FT60 is trying to
establish a connection with the GPS sensor, or the GPS sensor is trying to
establish a connection with the satellites.
Heart rate is transmitted.
ENGLISH
Get Started 7
Page 8

ENGLISH
2. BEFORE TRAINING
Activate Your Polar Star Training
Program
The adaptive, personalized and in-built Polar Star
Training Program gives you the optimal intensity
and time targets for your training. The wrist unit
gives feedback on your performance after each
training session and once a week.
The Polar FT60 creates a training program based
on your user information (weight, height, age,
sex), fitness level, activity level, and training goal.
By analyzing your weekly training results and
fitness level, the wrist unit gives you training
guidance for the following week. The training
program adapts to your training habits and to your
changing fitness level.
8 Before Training
1. In Time mode, select Menu > Applications >
Training program > Create new program .
2. Perfom Polar Fitness Test. For more
information, see Test Your Fitness Level.
3. Select your training goal:
• Improve fitness if your target is to improve
your current cardiovascular fitness level and
you are able to train regularly.
• Maximize fitness if your target is to
maximize your current cardiovascular fitness
level, and if you have been training regularly
for at least 10-12 weeks and training nearly
every day is not a problem for you.
• Lose weight if your target is to lose some
weight.
4. Training program created! is displayed.
Page 9
ENGLISH
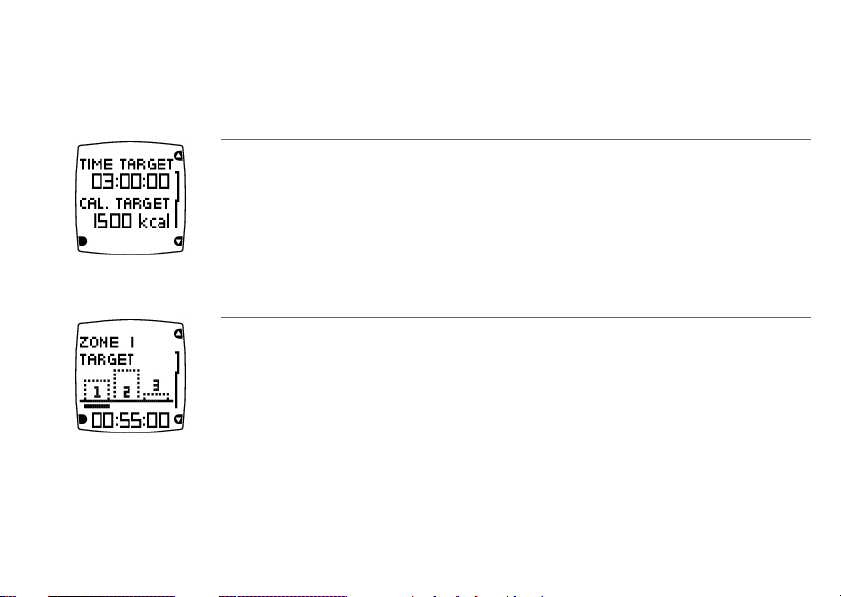
5. Next, View week targets? is displayed. Select YES to view the time and calorie targets for your first
training week. If you select No, Training program active! is displayed and the wrist unit returns to Time
view.
Time target
The amount of time you should train during this week.
Calorie target
The number of calories you should burn this week.
6. Press DOWN and OK to view your target training time in three different heart rate zones (intensity
targets). Press DOWN to change the display.
Time target for intensity zone 1
The bars indicate the target times in different intensities. The bars fill up as you train. The target time for intensity
zone 1 for the week is displayed in the lowest row.
7. You have now activated your training program. Press BACK to return to Time mode.
To view your week targets later, select Menu > Applications > Training Program > View week targets.
Before Training 9
Page 10
ENGLISH
Zone Intensity % of HR
Zone 3
Zone 2
Zone 1
Troubleshooting
• User information missing is displayed > Enter the missing user information.
• Fitness test result required is displayed > You need to perform the Fitness Test.
80-90%
70-80%
60-70%
max
Training benefit
• Benefits: Increases maximum performance capacity
• Feels like: Tiredness in muscles and heavy breathing
• Recommended for: Fit users for short training sessions
• Benefits: Improves aerobic fitness
• Feels like: Good, easy breathing, moderate sweating
• Recommended for: Everybody for typical training
sessions with moderate length
• Benefits: Improves basic endurance and helps recovery
• Feels like: Comfortable, easy breathing, low loading for
muscles, light sweating
• Recommended for: Everybody
Read more about training in Training Articles at http://articles.polar.fi.
10 Before Training
Page 11

ENGLISH
Change/End your program
• To change your fitness goal, create a new
program in Menu > Applications > Training
program > Change program. For instance, if
you have started with weight loss program and
have achieved your goal, change your goal to
Improve Fitness or Maximize Fitness.
• To end your active training program, select Menu
> Applications > Training program > End
program > End Program? Select Yes.
To view the results of your previous program:
Select Menu > Applications > Training program
> Results of past prog. The following
information is displayed:
• Start date and Duration: The start date and
the duration of the training program.
• Excel. wks and Calories: The number of
excellent training weeks (100% of target
reached) vs. total number of training weeks and
the calories expended during the program.
• Before/After: Your Fitness Test result
(OwnIndex) or your weight (when weight loss
program active) before and after the program.
Before Training 11
Page 12

ENGLISH
Test Your Fitness Level
To train right and to monitor your progress, it is
important to know your current fitness level. The
Polar Fitness TestTMis an easy and quick way to
measure your cardiovascular fitness. The test is
performed at rest.
As a result you will get a value called OwnIndex.
OwnIndex is comparable to maximal oxygen
uptake (VO
aerobic fitness measure. Read more on how to
interpret the results in Interpret Your Fitness Test
Results.
The OwnIndex value also affects the accuracy of
the training program and calorie calculation during
training.
), which is a commonly used
2max
12 Before Training
The test is developed for healthy adults. To make
sure the test is reliable, take the following issues
into consideration:
• Avoid distractions. The more relaxed you are and
the more peaceful the testing environment is,
the more accurate the test result will be (for
instance, no television, telephone or talking).
• Avoid heavy physical effort, alcohol and
unprescribed pharmacological stimulants on the
test day and the day before.
• Avoid eating a heavy meal or smoking 2-3 hours
prior to the test.
• Always perform the test in similar conditions and
at the same time.
• Make sure that your user information is correct.
Page 13

ENGLISH
Perform Polar Fitness Test
1. Wear the WearLink, lie down and relax for 1-3
minutes.
2. In Time mode, select Menu > Applications >
Fitness test > Start test. The fitness test
begins instantly once the FT60 has located
your heart rate.
3. About 5 minutes later, a beep will indicate the
end of the test, and your test result will appear
on the display.
4. Press OK. UPDATE VO
? is displayed.
2max
5. Select Yes to save the test result in your User
information and OwnIndex results. If you
know your laboratory measured VO2max value
and have entered it in User information,
select No to save your test result in OwnIndex
results only.
Troubleshooting
• Set activity lev. of past 3 months is displayed
> Set your activity level (see Settings for more
information on activity levels). Activity set! is
displayed and the test begins.
• Test Failed is displayed > Your most recent
OwnIndex value is not replaced.
• No heart rate shown > Test fails. Check that the
transmitter electrodes are moist enough and that
the strap is snug enough around your chest.
Before Training 13
Page 14
ENGLISH
Interpret your fitness test results
Interpret the OwnIndex values by
comparing your individual values and
their progression over time. OwnIndex
can also be interpreted based on gender
and age. Locate your OwnIndex on the
table, and find out your fitness level
class and how your aerobic fitness
compares to others of the same gender
and age.
This classification is based on a literature
review of 62 studies where VO
measured directly in healthy adult subjects in
the USA, Canada and 7 European countries.
Reference: Shvartz E, Reibold RC: Aerobic
fitness norms for males and females aged 6 to
75 years: a review. Aviat Space Environ Med;
61:3-11, 1990.
2max
was
14 Before Training
Page 15

3. TRAINING
Wear the WearLink
Before starting training recording, you need to wear the WearLink.
1. Wet the electrode areas of the strap well under running water.
2. Attach the connector to the strap. Adjust the strap length to fit
tightly but comfortably.
3. Tie the strap around your chest, just below the chest muscles,
and attach the hook to the other end of the strap.
4. Check that the wet electrode areas are firmly against your skin
and that the Polar logo of the connector is in a central and
upright position.
Detach the connector from the strap when you are not using it to
maximize the transmitter lifetime. See detailed washing instructions
in Care and Maintenance.
ENGLISH
Training 15
Page 16

ENGLISH
Start Training
1. Wear the wrist unit and WearLink.
2. In Time mode press OK and select Start or
long-press OK once when you want to start
recording your training session.
To modify sound, heart rate view or other training
settings before recording your training session,
select Training Settings. See Settings for more
information
Your training session is recorded only if the
stopwatch has been on for more than one minute.
16 Training
Page 17

ENGLISH
Start Training With OwnZone
Starting every training session with the OwnZone
guarantees safe and effective heart rate zones for
your daily condition. Check your OwnZone at least
• when changing training environment or sport.
• when training for the first time after a week's
break.
• If you have not recovered from the previous
training or if you are not feeling well or are
stressed.
• after changing user information.
Determining OwnZone limits take five minutes,
and can be performed as a warm-up. Start slowly
keeping your heart rate below 100 bpm/ 50%
HRmax. After each minute, increase your speed
gradually about 10 bpm/ 5% HR
If you have activated your training program and
you actively use the OwnZone determination, the
wrist unit takes into account your long-term
OwnZone results when updating the program
targets.
max
.
1. Wear the wrist unit and WearLink.
2. Press OK and select Start with OwnZone.
• Walk slowly for 1 min.
• Walk at a normal pace for 1 min.
• Walk fast for 1 min.
• Jog for 1 min.
• Run for 1 min.
• Speed up.
3. At some point during OwnZone determination,
New limits in use is displayed. Proceed
normally with your training.
Troubleshooting
• If OwnZone determination fails, and you have
determined your OwnZone limits earlier,
Previous limits in use is displayed. If you have
not determined your OwnZone limits, Age-based
limits in use is displayed. The OwnZone
determination fails if the heart rate rises too fast
during the OwnZone determination, or if the
heart rate is too high at the beginning of the
test.
Training 17
Page 18

ENGLISH
During Training
The following information can be displayed during training recording. Press UP/DOWN to change the view.
Session duration is displayed in all views.
Heart rate
Your heart rate during training.
Calories
Burned calories.
In zone 1, 2 or 3
Training time in zone and your heart rate. Smiley face means that OwnZone determination was succesfull.
If your heart rate is not within the zones, NOT IN ZONE is displayed.
18 Training
Page 19
Week target (displayed if training program is active)
Weekly target for each zone and the actual training time.
Speed
Optional GPS sensor or footpod required to view speed data.
Distance
Optional GPS sensor or footpod required to view distance data.
ENGLISH
Training 19
Page 20
ENGLISH
Time of day
Lock a zone: Depending on your goal for a training session, you can lock zone 1, 2 or 3 during the session.
When you are training in a desired zone, lock it by pressing OK for one second. For instance, when you have
achieved your weekly target for zones 2 and 3, you can lock zone 1. The zone alarm helps you stay inside the locked
zone.
For example, zone 2 is locked in this image.
Quick Menu: Long pressing LIGHT during recording brings you to Quick menu. The Quick menu is a short
cut to locking buttons, adjusting training sounds, and if footpod is in use, calibrating it.
Heart Touch: Check the time of day during training recording by bringing the wrist unit near WearLink.
Set Heart Touch function On/Off in Settings > Training Settings > HeartTouch .
20 Training
Page 21

ENGLISH
Stop Training Recording
To pause your training session, press BACK.
To stop the training session press BACK twice and Stopped is displayed.
For more information on instant, training session feedback, see Follow-Up Your Achievements.
Training feedback will be shown only if the training session has lasted for ten minutes or longer.
Detach the transmitter connector from the strap and rinse the strap under running water after every use.
Wash the strap regularly in a washing machine at 40ºC/104ºF at least after every fifth use.
Training 21
Page 22

ENGLISH
4. AFTER TRAINING
Training Feedback
The wrist unit provides you with the following feedback after a training session.
Effect
Intensity
Zone limits
Calories
Average /Maximum
Average /Maximum*
Distance*
This week
*Optional GPS sensor or Footpod required to view speed and distance data.
22 After Training
Training effect feedback. See Table 1 for more information.
Time spent in zones 1, 2, and 3.
OwnZone limits (displayed if OwnZone in use).
Expended calories during the session, and fat percentage.
Average and maximum heart rate during training session.
Average and maximum speed of training session (displayed only if optional GPS/footpod in use).
Distance and duration of training session (displayed only if optional GPS/footpod in use).
Your targets for the current training week and the results you have achieved so far. This information is
only visible when the program is active.
Page 23
Table 1.
Feedback
Fat burn improving Training at low intensity is improving your body's ability to burn fat.
Fitness improving Training at moderate intensity is improving your fitness.
Maximal perform. improving Training at hard intensity is improving your maximal performance.
If you are training enough at more than one intensity level, training will have several effects.
Fat burn and fitness
improving
Fitness and fat burn
improving
Max. perf. and fitness
improving
Training is primarily improving your body's ability to burn fat, but it
also improves your fitness.
Training is primarily improving your fitness, but also your body's ability
to burn fat.
Training is improving your fitness and maximal performance.
After Training 23
ENGLISH
Page 24

ENGLISH
Weekly Follow-up
Every Sunday at midnight, an envelope with the week's results will appear on the display of your wrist
unit. Press UP to view.
Week targets achieved
Results
Tells you whether or not you have achieved the week's targets.
Excellent! / Well done! / Nice! / Fitness maintained / Incomplete training week / Good recovery week /
Excellent recovery week
If your result is excellent, the FT60 rewards you with a trophy. The trophy
appears in the time mode display.
Achieved/Week target
Achieved/Week target
Sessions
Achieved time per zone
This week
24 After Training
Achieved training duration vs. week target duration
Expended calories vs. week target
The number of training sessions achieved this week (also displayed without a program).
Time spent in intensity zones 1, 2, and 3.
Training guidance for the starting week displayed only when accessed from the envelope. See Table 2 for
more information.
Page 25

Table 2.
Training guidance for the starting
week
Train a lot more You need to train a lot more to get effects.
Train more You do not train enough for improvement.
Train more in zone X You need to train more in this zone.
Train like last week! You did a good job last week. Keep it up!
Train less in zone X You should decrease training in this zone.
Train much less in zone 3 You should train less in hard intensity zone this week.
Recovery week You need recovery to avoid overreaching.
Recovery week still needed You have not recovered yet; last week was still too hard.
Train as planned You have had a good start, continue training according to the
program.
After Training 25
ENGLISH
Page 26

ENGLISH
Weight Update
If you are following the weight loss program, the
FT60 will remind you to update your weight by
displaying an envelope once a week.
1. Time to check your weight is displayed. Press
OK.
2. Set current weight? appears. Select Yes to
update your weight.
Fitness Test
As soon as you reach your training targets, the
FT60 will post an envelope reminding you to take
a fitness test. The result of the test is taken into
account in the weekly program update.
1. Time to test fitness is displayed.
2. Test fitness? appears. Select Yes or No.
3. If you decide to take a new test, see Test Your
Fitness Level for more information.
26 After Training
Program Update
Polar FT60 continuously analyzes your progress
and adjusts by increasing or decreasing weekly
targets. An envelope appears on the display to
notify you when the program has been updated.
Press UP to open the envelope.
1. Program has been updated is displayed: the
FT60 has analyzed your progress and adapted
your program targets accordingly.
2. Time for a recovery week is displayed: To
optimize your training, you need to have an
ideal balance between training and recovery.
Recovery week allows your body to improve and
adapt to the stimulus that training has
provided.
Page 27

ENGLISH
Weight Diary
In the weight diary, you can monitor your weight loss and view your progress over a period of time. To
update your weight, select Menu > Applications > Weight diary > Set current weight. Set your weight
and press OK. Your current weight will also be updated in User information.
To view your weight trend, select Menu > Applications > Weight diary > Weight trend and press OK.
Weight trend
The weight and the date on which it was entered.
The weight trend including the lowest and highest weight.
To delete a value, select the value you want to delete with UP/DOWN. When the value is displayed, press
and hold LIGHT until Delete this value? is displayed. Select Yes.
After Training 27
Page 28

ENGLISH
Follow Your fitness Test Results
On average, it takes six weeks of regular training to improve your aerobic fitness noticeably. To improve
your aerobic fitness most efficiently, you need to train large muscle groups. Monitor your long-term test
results under the OwnIndex results, containing 47 of your latest OwnIndex values and the date the tests
were performed.
1. Select Menu > Applications > Fitness test > OwnIndex results.
2. The latest OwnIndex result and the date of the test is displayed. Press UP/DOWN to view the previous
OwnIndex results.
OwnIndex
The date and the result of the test
Your OwnIndex result graph with the lowest and highest OwnIndex value
To delete an OwnIndex value, select the value you want to delete with UP/DOWN. When the value is
displayed, press and hold LIGHT until Delete this value? is displayed. Select Yes.
28 After Training
Page 29

ENGLISH
Review Training Data
Review your training data in Training files, Week summaries and Totals.
1. Select Data > Training files to view detailed training information on your 100 most recent training
sessions. The information is similar to what is displayed after each training session.
Each bar represents one training session. Select a training session you wish to view.
Upper row: Date and time of day when the file was created
Lower row: Training time
When Training files becomes full, the oldest training file is replaced by the most recent one. If you want
to save the file for a longer period, transfer it to Polar web service on www.polarpersonaltrainer.com. For
further information, see Transfer Data.
To delete a training file, select Data > Delete files and the file you want to delete. Delete file? is
displayed. Select Yes. Remove from total? is displayed. To remove the file from totals, as well, select
Yes.
After Training 29
Page 30

ENGLISH
2. Select Data > Week summaries to view the training data and results for the last 16 weeks.
Each bar represents one training week. Select a week you wish to view with UP/DOWN.
Upper row: Week start / Week end date
Lower row: Total training time
To reset week summaries select Data > Reset weeks?. Select Yes to reset week summaries.
3. Select Data > Totals since xx.xx.xxxx to view the total cumulative duration, number of training
sessions and calories starting from the last reset.
To reset totals, select Data > Reset totals and select Yes.
30 After Training
Page 31

ENGLISH
Transfer Data
How to transfer data from your FT60 to polarpersonaltrainer.com
For long-term follow-up, you can store all your training files at polarpersonaltrainer.com. There you can
see graphs and more of your training data and get a better understanding of your training. With Polar
FlowLink* it is easy to transfer the training files to the web service.
1. Register in polarpersonaltrainer.com
2. Follow instructions to download and install WebSync data transfer software onto your computer.
3. Polar WebSync software is automatically activated and instructions for downloading the data are
displayed on your computer. Follow the instructions and your training data is transferred to
polarpersonaltrainer.com web service.
4. Place your FT60 onto FlowLink display facing down.
5. Follow data transfer process from the WebSync Software on your computer screen. For further
instructions on data transfer, see polarpersonaltrainer.com "Help".
*Optional Polar FlowLink required.
After Training 31
Page 32

ENGLISH
5. SETTINGS
Watch Settings
Select the value you want to change and press OK.
Adjust the values with UP/DOWN and accept with
OK.
Select Settings > Watch, time and date.
• Alarm: Set the alarm to go on Once, from
Monday to Friday, Every day, or turn it Off.
Press BACK to stop the alarm or UP/DOWN to
snooze for 10 minutes. The alarm cannot be
used during training.
• Time: Select Time 1 and set the time format,
hours and minutes. Select Time 2 to set time for
another time zone by adding or substracting
hours. In the Time view, you can quickly change
from Time 1 to Time 2 by pressing and holding
DOWN.
• Time zone: Select time zone 1 or 2.
• Date: Set the date.
• Watch face: Select Time and logo, Time and
trophy or Time only.
32 Settings
Training Settings
Select Settings > Training settings.
• Training sounds: Select Very loud, Loud, Soft
or Off.
• Speed sensor: Activate or deactivate speed and
distance sensor by selecting GPS sensor,
Footpod or Off.
• Heart rate view: Set the FT60 to display your
heart rate as Beats per minute or as Percent
of maximum.
• Speed view: Select Kilometres per hour
(KM/H) / Minutes per kilometre (MIN/KM) or
Miles per hour (MPH) / Minutes per mile
(MIN/M)
• Footpod calib. factor: For more information,
see Accessory settings.
• HeartTouch: Select On or Off.
• Zone lock: Select Zone 1, 2 0r 3 to train on a
specific heart rate zone or set the zone lock Off.
Page 33

ENGLISH
• Zone 1 Limits: Adjust your zone 1 limits
manually. When setting the upper limit, the
lower limit of zone 2 is set automatically.
• Zone 2 limits: Adjust your zone 2 limits
manually. When setting the lower limit, the
upper limit of zone 1 is set automatically. When
setting the upper limit, the lower limit of zone 3
is set automatically.
• Zone 3 limits: Adjust your zone 3 limits
manually. When setting the lower limit, the
upper limit of zone 2 is set automatically.
Change the zone limits defined by Polar FT60 only
if you know your limits for burning fat, improving
fitness and maximizing fitness. If the training
program is active, the FT60 will incorporate your
new zone limits when updating the program
targets.
User Information
Select Settings > User Information and press OK.
• Weight: Enter your weight.
• Height: Enter your height.
• Date of birth: Enter your date of birth
• Sex : Select MALE or FEMALE.
• Maximum heart rate is the highest number of
heartbeats per minute (bpm) during maximum
physical exertion. Change the default value only
if you know your laboratory-measured value.
• Activity: Select the alternative that best
describes the overall amount and intensity of
your physical activity during the past three
months.
1. TOP (5+ hours per week): You participate
in heavy physical exercise at least 5 times a
week, or you exercise to improve
performance for competitive purposes.
2. HIGH (3-5 hours per week): You
participate at least 3 times a week in heavy
physical exercise, e.g. you run 20-50 km or
12-31 miles per week or spend 3-5 hours
per week in comparable physical activity.
Settings 33
Page 34

ENGLISH
3. MODERATE (1-3 hours per week): You
participate regularly in recreational sports,
e.g. you run 5-10 km or 3-6 miles per week
or spend 1-3 hours per week in comparable
physical activity, or your work requires
modest physical activity.
4. LOW (0-1 hours per week): You do not
participate regularly in programmed
recreational sport or heavy physical activity,
e.g. you walk only for pleasure, or exercise
hard enough to cause heavy breathing or
perspiration only occasionally.
• OwnIndex (VO
Fitness Test, your OwnIndex value is shown as a
): When you perform the Polar
2max
default. Change the default value only if you
know your laboratory-measured VO
2max
34 Settings
value.
General Settings
Select Settings > General settings.
• Button sounds: Select Off, Soft, Loud or Very
loud.
• Button lock: Select Manual lock or Automatic
lock.
Automatic lock: The wrist unit automatically
locks all the buttons except LIGHT during
training. You can switch the button lock off by
pressing and holding LIGHT until Buttons
unlocked is displayed.
Manual lock: To lock buttons manually, press
and hold LIGHT and confirm with OK. To unlock
press LIGHT until Buttons unlocked is
displayed.
• Units: Select Metric (kg/km) or Imperial
(lb/ft). By selecting lb/ft, calories are displayed
as Cal, otherwise they are shown as kcal.
• Language: Select Deutsch, English, Español,
Français, Italiano, Português or Suomi.
Page 35

ENGLISH
Accessory Settings
Footpod Calibration*
Calibrate Foot Pod during training (on-the-fly
calibration)
Make sure the foot pod function in the Polar FT60
is on. Select Settings > Training settings >
Speed sensor > Footpod and press OK.
To calibrate the footpod during training, choosing
either alternative:
1. Stop running, stand still, and press and hold
LIGHT to go to Quick menu.
OR
2. Stop running, stand still, and press BACK once.
Select Calibrate footpod. Fix the displayed
distance with the actual distance you just run, and
press OK. Calibration factor set! is displayed.
The foot pod is now calibrated and ready for
action.
Set Calibration Factor Manually
There are two options for setting the calibration
factor manually:
1. Before training: Select Settings > Training
settings > Footpod calib. factor. Set the
calibration factor and press OK. The foot pod is
now calibrated.
2. After starting heart rate measurement and
before training recording: In the time mode,
press OK and then select Training settings >
Footpod calib. factor. Set the calibration
factor and press OK. The foot pod is now
calibrated. To start training recording press
BACK once and then select Start.
*Optional S1 foot pod required.
Settings 35
Page 36

ENGLISH
6. CUSTOMER SERVICE INFORMATION
Caring for Your Polar FT60
Wrist Unit: Clean with a mild soap and water solution, dry
with towel. Never use alcohol or any abrasive material
(steel wool or cleaning chemicals). Keep in a cool and dry
place. Do not store in a damp environment, in
non-breathable material (a plastic bag or a sports bag) nor
with conductive material (a wet towel). Do not expose to
direct sunlight for extended periods.
Transmitter: Detach the transmitter connector from the
strap and rinse the strap under running water after every
use. Dry the connector with a soft towel. Never use alcohol
or any abrasive material (steel wool or cleaning
chemicals).
Wash the strap regularly in a washing machine at
40ºC/104ºF or at least after every fifth use. This ensures
reliable measurement and maximizes the life span of the
transmitter. Use a washing pouch. Do not soak, spin-dry,
iron, dry clean or bleach the strap. Do not use detergent
with bleach or fabric softener. Never put the transmitter
connector in the washing machine or drier!
36 Customer Service Information
Dry and store the strap and the transmitter connector
separately. Wash the strap in a washing machine before
long-term storage and always after use in pool water with
high chlorine content.
Service
Your Polar FT60 is designed to help you achieve personal
fitness goals and indicate the level of physiological strain
and intensity during training sessions. No other use is
intended or implied. During the two-year
guarantee/warranty period we recommend that you have
service done by an authorized Polar Service Center only.
The warranty does not cover damage or consequential
damage caused by service not authorized by Polar Electro.
Please see the separate Polar Customer Service Card for
details. Register your Polar product at
http://register.polar.fi/ to ensure we can keep improving
our products and services to better meet your needs.
Page 37

ENGLISH
Changing Batteries
Avoid opening the sealed battery cover during the
guarantee period. We recommend that you have the
battery replaced by an authorized Polar Service Center.
They test your Polar FT60 for water resistance after
battery replacement and make a full periodic check.
Please note the following:
• The low battery indicator is displayed when 10-15% of
the battery capacity is left.
• Before battery change, transfer all data from your FT60
to polarpersonaltrainer.com to avoid data loss. For more
information see Transfer Data.
• Excessive use of the backlight drains the battery more
rapidly.
• In cold conditions, the low battery indicator may appear,
but will disappear when the temperature rises.
• The backlight and sound are automatically turned off
when the low battery indicator is displayed. Any alarms
set prior to the appearance of the low battery indicator
will remain active.
• Changing the battery may have an effect on water
resistance
To change the battery yourself:
Change the sealing ring of the battery cover every time you
change the battery. You can purchase the sealing
ring/battery kits at well-equipped Polar retailers and
authorized Polar Services. In the USA and Canada, the
additional sealing rings are available at authorized Polar
Service Centers only. Keep the batteries away from
children. If swallowed, contact a doctor immediately.
Batteries should be disposed of properly according to local
regulations.
When handling a new, fully charged battery, avoid
clasp-like contact, i.e. simultaneously from both sides,
with metal or electrically conducting tools, like tweezers.
This may short circuit the battery, causing it to discharge
more rapidly. Typically, short circuiting does not damage
the battery, but it may decrease the capacity and the
lifetime of the battery.
Customer Service Information 37
Page 38

ENGLISH
Open the battery cover with a coin by turning it from CLOSE to OPEN.
1.
When changing wrist unit battery (2a), remove the battery cover and lift
2. •
the battery out carefully with a suitable sized small rigid stick or bar, for
instance, a toothpick or small screwdriver. However, prefer a non-metal
tool for wrenching the battery out. Be careful not to damage the metal
sound element (*) or the grooves. Insert a new battery with the positive
(+) side outwards.
When changing transmitter battery (2b), place the battery inside the
•
cover with the positive (+) side facing the cover.
Replace the old sealing ring with a new one, fitting it snuggly in the cover
3.
groove to ensure water resistance.
Put the cover back on and turn it clockwise to CLOSE.
4.
5. Re-enter the basic settings if you changed the wrist unit batteries.
38 Customer Service Information
Page 39

ENGLISH
Precautions
Minimizing Possible Risks
Training may include some risk. Before beginning a
regular training program, answer the following questions
concerning your health status. If you answer yes to any of
these questions, consult a physician before starting any
training program.
• Have you been physically inactive for the past 5 years?
• Do you have high blood pressure or high blood
cholesterol?
• Do you have symptoms of any disease?
• Are you taking any blood pressure or heart medication?
• Do you have a history of breathing problems?
• Are you recovering from a serious illness or medical
treatment?
• Do you use a pacemaker or other implanted electronic
device?
• Do you smoke?
• Are you pregnant?
Note that in addition to training intensity, medications for
heart conditions, blood pressure, psychological conditions,
asthma, breathing, etc., as well as some energy drinks,
alcohol, and nicotine may also affect heart rate.
It is important to be sensitive to your body’s responses
during training. If you feel unexpected pain or excessive
fatigue when training, stop the exercise or continue at a
lighter intensity.
If you have a pacemaker, defibrillator or other implanted
electronic device, you use the Polar FT60 at your own risk.
Before starting use, take a maximal training stress test
under the supervision of a physician. The test is to ensure
the safety and reliability of the simultaneous use of the
pacemaker and the Polar FT60.
If you are allergic to any substance that comes into
contact with your skin or if you suspect an allergic
reaction due to using the product, check the listed
materials in Technical Specifications. To avoid any skin
reaction to the transmitter, wear it over a shirt. Moisten
the shirt well under the electrodes to ensure flawless
operation. If you use insect repellent on your skin, make
sure that it does not come into contact with the
transmitter.
Customer Service Information 39
Page 40

ENGLISH
Exercise equipment with electronic components may cause interfering stray signals. To tackle these problems, try the
following:
1. Remove the transmitter from your chest and use the exercise equipment as you would normally.
2. Move the wrist unit around until you find an area in which it displays no stray reading or does not flash the heart symbol.
Interference is often worst right in front of the display panel of the equipment, while the left or right side of the display is
relatively free of disturbance.
3. Put the transmitter back on your chest and keep the wrist unit in this interference-free area as much as possible.
If the FT60 still does not work, the piece of equipment may be electrically too noisy for wireless heart rate measurement.
Polar FT60 may be worn when swimming. To maintain water resistance, do not press buttons under water. For more
information, visit http://support.polar.fi. Water resistance of Polar products is tested according to International Standard
ISO 2281. Products are divided into three categories according to their water resistance. Check the back of your Polar
product for the water resistance category, and compare it to the chart below. Please note that these definitions do not
necessarily apply to products of other manufacturers.
Marking on case back Water resistant characteristics
Water resistant Protected against wash splashes, sweat, raindrops etc. Not
Water resistant 30 m/50 m Suitable for bathing and swimming
Water resistant 100 m Suitable for swimming and snorkeling (without air tanks)
suitable for swimming.
40 Customer Service Information
Page 41

ENGLISH
Troubleshooting
If you don't know where you are in the menu, press and
hold BACK until the time of day is displayed.
If there are no reactions to any buttons or the wrist unit
displays unusual readings, reset the wrist unit by pressing
four buttons (UP, DOWN, BACK and LIGHT)
simultaneously for four seconds. All other settings but
time and date are saved.
If the heart rate reading becomes erratic, extremely high
or shows nil (00), make sure that there are no other heart
rate transmitters within 1 m/3 ft and that the transmitter
strap/the textile electrodes fit snugly and are moistened,
clean and undamaged.
If the heart rate measurement does not work with the
sports apparel, try measuring using the strap. If it works,
the problem is most probably in the apparel. Please
contact the apparel retailer/manufacturer.
Strong electromagnetic signals can cause erratic readings.
Electromagnetic disturbances may occur near high-voltage
power lines, traffic lights, overhead lines of electric
railways, electric bus lines or trams, televisions, car
motors, bike computers, some motor driven training
equipment, cellular phones, or at electric security gates.
To avoid erratic readings, move away from possible
sources of disturbance.
If the abnormal reading continues despite moving away
from the source of disturbance, slow down and check your
pulse manually. If you feel it corresponds to the high
reading on the display, you may be experiencing cardiac
arrhythmia. Most cases of arrhythmia are not serious, but
consult your doctor nevertheless.
A cardiac event may have altered your ECG waveform. In
this case, consult your physician.
If heart rate measurement does not work despite the
actions mentioned previously, the battery of your
transmitter may be empty.
Customer Service Information 41
Page 42

ENGLISH
Technical Specifications
Wrist Unit
Battery type
Battery life Average 1 years (1 h/day, 7 days/week
Operating temperature -10 °C to +50 °C / 14 °F to 122 °F
Wrist strap material Polyurethane
Back cover and wrist strap
buckle
Watch accuracy Better than ± 0.5 seconds/day at 25 °C /
Accuracy of heart rate
measurement
Transmitter
Battery type
Battery life Average 2 years (1 h/day, 7 days/week)
Battery sealing ring O-ring 20.0 x 1.0 Material FPM
Operating temperature -10 °C to +50 °C / 14 °F to 122 °F
Connector material Polyamide
Strap material 35% Polyester, 35% Polyamide, 30%
42 Customer Service Information
CR2025
exercise)
Stainless steel complying with the EU
Directive 94/27/EU and amendment 1999/C
205/05 on the release of nickel from
products intended to come into direct and
prolonged contact with the skin.
77 °F temperature.
± 1% or ± 1 bpm, whichever larger,
definition applies to steady state
conditions.
CR 2025
Polyurethane
Limit values
Chronometer
Heart rate 15 - 240 bpm
Total time 0 - 9999 h 59 min 59 s
Total calories 0 - 999999 kcal/Cal
Total exercise count 65 535
Year of birth 1921 - 2020
Maximum speed with a GPS
sensor
Maximum speed with
footpod
23 h 59 min 59 s
199.9 km/h
29.5 km/h
Polar FlowLink and Polar WebSync 2.1 (or newer)
System Requirements:
PC MS Windows (2000/XP/Vista), 32 bit,
Microsoft .NET Framework Version 2.0
Intel Mac OS X 10.5 or newer
Page 43

Guarantee and Disclaimer
Limited International Polar Guarantee
This guarantee does not affect the consumer’s statutory
•
rights under applicable national or state laws in force, or
the consumer’s rights against the dealer arising from
their sales/purchase contract.
This limited Polar international guarantee is issued by
•
Polar Electro Inc. for consumers who have purchased
this product in the USA or Canada. This limited Polar
international guarantee is issued by Polar Electro Oy for
consumers who have purchased this product in other
countries.
Polar Electro Oy/Polar Electro Inc. guarantees the
•
original consumer/purchaser of this device that the
product will be free from defects in material or
workmanship for two (2) years from the date of
purchase.
The receipt of the original purchase is your proof of
•
purchase!
The guarantee does not cover the battery, normal wear
•
and tear, damage due to misuse, abuse, accidents or
non-compliance with the precautions; improper
maintenance, commercial use, cracked ,broken or
scratched cases/displays, elastic strap and Polar
apparel.
ENGLISH
The guarantee does not cover any damage/s, losses,
•
costs or expenses, direct, indirect or incidental,
consequential or special, arising out of, or related to the
product.
Items purchased second hand are not covered by the
•
two (2) year warranty, unless otherwise stipulated by
local law.
During the guarantee period, the product will be either
•
repaired or replaced at any of the authorized Polar
Service Centers regardless of the country of purchase.
Guarantee with respect to any product will be limited to
countries where the product has been initially marketed.
© 2009 Polar Electro Oy, FIN-90440 KEMPELE, Finland.
Polar Electro Oy, FIN-90440 KEMPELE, Finland. Polar
Electro Oy is a ISO 9001:2000 certified company. All
rights reserved. No part of this manual may be used or
reproduced in any form or by any means without prior
written permission of Polar Electro Oy. The names and
logos marked with a ™ symbol in this user manual or in
the package of this product are trademarks of Polar
Electro Oy. The names and logos marked with a ® symbol
in this user manual or in the package of this product are
registered trademarks of Polar Electro Oy, except that
Windows is a trademark of Microsoft Corporation.
Customer Service Information 43
Page 44

ENGLISH
Disclaimer
The material in this manual is for informational
•
purposes only. The products it describes are subject to
change without prior notice, due to the manufacturer’s
continuous development program.
Polar Electro Inc. / Polar Electro Oy makes no
•
representations or warranties with respect to this manual
or with respect to the products described herein.
Polar Electro Inc. / Polar Electro Oy shall not be liable
•
for any damages, losses, costs or expenses, direct,
indirect or incidental, consequential or special, arising
out of, or related to the use of this material or the
products described herein.
This product is protected by the incorporeal rights of Polar
Electro Oy as defined by the following documents: FI
88972, DE4223657.6 A, FI 9219139.8, FR 92.09150,
GB 2258587, HK 306/1996, SG 9592117-7, US
5486818, FI 110303 B, EP 0748185, JP3831410,
US6104947, DE 69532803.4-08, FI 111514 B, DE
19781642T1, GB 2326240, HK 1016857, US
6277080, FI 114202, US 6537227, EP 1147790,
HK1040065, EP 1245184, US 7076291, HK1048426.
Other patents pending.
Manufactured by Polar Electro Oy, Professorintie 5,
FIN-90440 KEMPELE, Tel +358 8 5202 100, Fax +358
8 5202 300, www.polar.fi
44 Customer Service Information
This product is compliant with Directive 93/42/EEC. The
relevant Declaration of Conformity is available at
www.support.polar.fi/declaration_of_conformity.
This crossed out wheeled bin marking shows that Polar
products are electronic devices and are in the scope of
Directive 2002/96/EC of the European Parliament and of
the Council on waste electrical and electronic equipment
(WEEE) and batteries and accumulators used in products
are in the scope of Directive 2006/66/EC of the European
Parliament and of the Council of 6 September 2006 on
batteries and accumulators and waste batteries and
accumulators. These products and batteries/accumulators
inside Polar products should thus be disposed of
separately in EU countries.
This marking shows that the product is protected against
electric shocks.
Page 45

Manufactured by
Polar Electro Oy
Professorintie 5
FIN-90440 KEMPELE
Tel +358 8 5202 100
Fax +358 8 5202 300
www.polar.fi
 Loading...