

Page 1

España Manual de.........................................................219
English Manual............................................................2035
Россию Руководство..................................................4660
Deutsch Manuelle........................................................3645
Manual do usuário.......................................................6176
Uživatelský Manuál.....................................................7790
Ghid de utilizare........................................................91106
Gebruikershandleiding............................................107-121
Page 2

Introducción
La ‘Mobii Android Tablet’es un dispositivo móvil que le da una asombrosa
experiencia de Internet – permitiendole comunicarse con los demás, disfrutar
de sus entretenimientos favoritos y acceder a la información que hay en el
Internet a cualquier hora y en cualquier lugar. Esta última generación de
dispositivos conectados al Internet pequeños, potentes, altamente portátiles
combinan muchas capacidades buenísimas con la conveniencia de una
solución deltamaño del bolsillo para su vida en marcha.
Sumario de las Características
Sistema Operativo Androide Incorporado
Con el Sistema Operativo Androide incorporado, su Mobii Tablet soporta la
mayoría de las apliciones populares de terceros. Las aplicaciones están
disponibles en el Internet o directamente en su Mobii Tablet.
Conectividad de Wi-Fi / 3G (3G opcional)
Con la última tecnología de Wi-Fi y 3G, su Mobii Tablet puede conectarle
con el Internet dondequiera que esté.
Pantalla de Tacto de 7 pulgadas
Toque o deslice su dedo en la pantalla, la pantalla responde
inmediatamente.
Sensor G incorporado
Permite que el interfaz del usuario gire su orientación automáticamente al
paisaje o retrato cuando este dispositivo gire.
Entretenmientos
Le permite disfrutar música, película o fotos a cualquier hora y en cualquier
lugar.
Contenido del Paquete
Unidad Principal
Auriculares estéreos
Cable USB
Adaptador de AC
Manual del Usuario
Tarjeta de Garantía
Botones y Orificios
Vista Superior
b
a
2
Page 3

a. Orificio USB: conecta al ordenador, USB flash drive, ratón o teclado a
o apagar la pantalla.
través del cable USB.
b. Botón de alimentación: presione y mantenga presionado para
encender o apagar el dispositivo; presione brevemente para encender
Vista Delantera
modelo 1
modelo 2
Vista Inferior
Side View
m
j
k
d
e
b
c
d
e
c
h
l
n
c. Display de LCD
f
d. Lente de la Cámara (opcional)
g
e. Home: Vaa la Pantalla de Home.
h
f. Menú: Visualizaisplay un menú de
recubrimiento.
g. Botón de Enrrollar: Rueda en
todas las direcciones para hacer la
selección; presione para confirmar la
f
selección. (opcional)
h. ESC: Volver
i
i. Ranura de la Tarjeta
Micro-SD
j. Clavija de los Auriculares
k. Orificio de DC-IN: conecta
a cualquier salida
electrónica estándard a
través del adaptador deAC.
l. Agujero del pin de reset
m. Micrófono incorporado
n. Ranura de la Tarjeta 3G:
abra para insertar una
tarjeta de red 3G (opcional)
Cargar la Batería
El dispositivo tiene incorporada una batería recargable. No se requiere la
instalación de batería extra. Solamente cargue el dispositivo cuando indique
baja potencia de la batería.
Para cargar la batería, conecte el dispositivo a cualquier salida de pared
3
Page 4

estándara través del adaptador de AC vía el orificio de DC-IN. Tarda unas 5
horas en cargar la batería por completo.
Nota:
a. Usted puede operar el dispositivo incluso cuando estásiendo cargado. Pero para
extender la vida de la batería, le sugerimos que NO use el dispositivo cuando esté
cargando.
b. Le recomendamos que cargue la batería cuando use el dispositivo pr primera vez.
c. Para el rendimiento máximo, se necesita que se use frecuentemente las baterías de
litio-ion. Si no usa frecuentemente el dispositivo, asegurese de recargar la batería por
lo menos una vez al mes.
Instalar la tarjeta de Memória
Además de la memória incorporada, su Mobii Tablet tiene una ranura de tarjeta
de memória para extender su espacio de memória. Usted puede leer e-book,
música, imagen o archivos de video directamente desde una tarjeta SD.
Para instalar una tarjeta de memória, encuentre la ranura de la tarjeta en la
parte inferior de la máquina, y después inserte una tarjeta Micro-SD en la
ranura con la dirección correcta.
Para acceder la la tarjeta de memória, entre en el modo de Explorador y
después seleccione el disrectorio de “SDCard”.
Transferir Archivos
Antes de leer o emitir archivos, asegurese de que la memória interna de su
Mobii Tablet o la tarjeta de la memória externa tenga archivos de media. Si no,
transfiera archivos desde el ordenador a su Mobii Tablet.
(1)Conecte su Mobii Tablet a un ordenador con el cable USB que se
suministra.
(2)Una vez conectado, los dos discos desmontables aparecen en su ordenador.
Uno representa la memória interna de su Mobii Tablet, y el otro representa
la tarjeta de memória insertada en su Mobii Tablet. Ahora usted puede
copiar archivos desde o para estos disk drives.
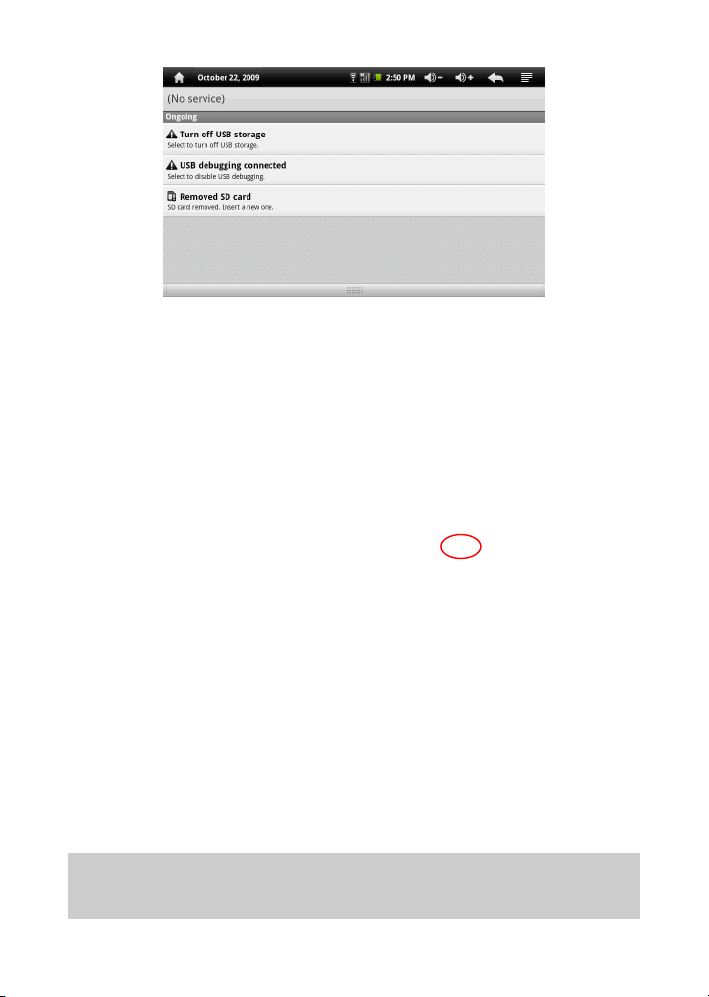
(3)Una vez que la transferencia de los datos haya completado, arrastre desde
la barra superior hacia abajo para visualizar el mensaje de notificación USB.
Elija “Turn off USB Storage”ydespués presione en “Turn Off”para
desconectar el dispositivo desde el ordenador.
Arrastrar hacia abajo
4
Page 5
(4)Quite el player del PC con seguridad.
a) Haga click izquierdo en el icono que hay en la esquina inferior
derecha del ordenador.
b) Haga click en la mini ventana que salta con mensaje de “Parar el
Dispositivo USB de Almacenaje en Masa –Drive (X)”.
c) Quite el player del ordenador.
Encender / Apagar
Para encender el dispositivo, presione y mantenga presiona el botón de Power
que hay en la unidad hasta que vea la pantalla de activación. Puede que tarde
unos minutos para que inicie el sistema, por favor espere antes de proceder.
Debería ver la siguiente pantalla bloqueada una vez que el dispositivo se encienda.
Antes de empezar a usar el dispositivo, primero tendráque desbloquear la pantalla.
Para desbloquear la pantalla, arrastre el icono de candado hacia arriba.
Para apagar el dispositivo, presione y mantenga presionado el botón de Power
hasta que vea la opción de “Power Off”, presionar en “Power Off”y después
presione en “OK”.
Pista: Su Mobii Tabletse dormirácon la pantalla apagada si permanece inactivo durante
unos segundos. Usted puede presionar brevemente en el botón de Power para encender
la pantalla y despertarlo.
5
Page 6

Pantalla de Home
Indicaciones
a. Home: Vuelve a la Pantalla de Home dondequiera que estéen el interfaz.
b. Tarjeta de Memória: tel símbolo de exclamación indicate que no hay
disponible tarjeta de memória, y debería desaparecer una vez que la
tarjeta de memória estédisponible.
c. Red de Wi-Fi
d. Red de 3G (opcional)
e. Cargar la Batería
f. Hora Actual
g. Bajar el Volumen: Presionar brevemente o contínuamente para disminuir
el volumen.
h. Subir el Volumen: Presionar brevemente o contínuamente para aumentar
el volumen.
i. Volver: Volver al directorio previo.
j. Menú: Presionar para visualizar un menúde programación de
recubrimiento.
k. Área de Entrada de la Dirección. Usted puede entrar la dirección de la
web rellenando esta casilla. Debería aparecer un teclado virtual. Use el
teclado para escribir las letras. Presionando en esconderáel teclado.
l. Lengüeta de las Aplicaciones: Presionar en este icono para revelar
todas las aplicaciones instaladas en su Mobii Tablet (reloj de alarma,
calculadora, Hora Global, etc.).
a b c d e f g h i j
k
l
6
Page 7

- Usted puede copiar las aplicaciones en la pantalla de Home
presionando y manteniendo presionado en sus iconos.
- Usted puede eliminar la aplicación desde la Pantalla de Home
arrastrando sus iconos a la Lengüeta de Aplicación. Para eliminar un
elemento de la pantalla Home, mantenga presionado su dedo en él
hasta que se quede resaltado, después arrastrelo a la Lengüeta de
Aplicación que se haya convertido en icono basura.
m. Atajos por defecto (“Browser”, “Video Player”, “Audio Player”, etc.)
- Presionar en un icono para abrr la aplicación correspondiente.
- Enrrollar el botón de SCROLL que hay en la unidad para seleccionar
un elemento.
- Usted puede personalizar la Pantalla de Home agregando / quitando
atajos y widgets, cambiando el papel del sobremesa, etc.
Personalizar los elementos de la pantalla de Home
- Para agregar un elemento de la pantalla de Home (atajos, widgets,
carpetas, etc.), presionar en el icono del Menú y después seleccione
“Add” , o mantenga presionado en la Pantalla de Home hasta que se
visualice un menúque salta.
- Para eliminar un elemento de la pantalla de Home, mantenga presionado
su dedo en él hasta que se quede resaltado, después arrastrelo al lugar
deseado, y soltarlo.
Cambiar el papel de sobremesa
Presionar en el icono de Menú , y después presione en “Wallpaper”.
presione en la foto y después presione en “Set Wallpaper”para confirmar.
Ir a la Pantalla de Home extendida
Deslice su dedo horizontalmente en la pantalla O enrrollar el botón de SCROLL
para ir hacia el panel izquierdo o derecho de la Pantalla de Home estendida.
7
Page 8
Puede ver la siguiente pantalla de Home extendida en la cual usted tiene
algunos atajos útiles. Presionando en esos atajos puede activar sus funciones.
a b c
Cambiar las Programaciones del Sistema
Presionar en el icono de Menú , y después presione en “Settings” . Elija
una categoria: “Inalámbrico y Redes”, “Sonido y Display”, “Fecha y Hora”,
etc. para más información en diferentes programaciones, vea la sección de
Programaciones del Sistema.
a. Conecta a una red de Wi-Fi
disponible.
b. Refresca la biblioteca de la
media.
c. Ajusta el brillo de la pantalla.
Usar la Pantalla de Tacto
Su Mobii Tablet estáequipado con una pantalla de tacto. A continuación son
unas pistas sobre cómo usar la pantalla de tacto.
Acciones principales de la Pantalla de Tacto
En diferentes aplicaciones, usted puede volver en un nivel en el interfaz
presionando en el icono de Back (en la esquina superior derecha de la
pantalla).
Dondeqy¡uiera qe estéen el interfaz, usted puede volver directamente a la
Pantalla de Home presionando en el icono de Home (en la esquina
superior izquierda de la pantalla).
Otras Acciones de la Pantalla de Tacto
Cuando estéviendo un video o esté
escuchando música, usted puede presionar en
la barra de progresión para ir directamente a un
lugar diferente en el video o canción. Usted
8
Page 9

puede también usar su dedo para
dae
arrastrar el cursor en la barra de
progresión a otro lugar en el video o
canción.
En diferentes browsers (Archivo, Música,
Video, Foto, etc.), usted puede arrastrar
su dedo hacia arriba y hacia abajo para
enrrollar la lista de archivos hacia arriba y hacia abajo.
En el Web browser, usted puede enrrollar hacia arriba y hacia abajo
presionando en la página y arrastrandola hacia arriba y hacia abajo (de
todas formas tenga cuidado en no presionar en un enlace!).
Tap on the link to open the page.
Usar el Teclado Virtual
Presionando en cualquier casilla para entrar textos se puede mostrar el teclado
virtual. Con el teclado virtual, usted puede entrar el website address o cualquier
texto si se requiere.
Indicaciones
a. Bloqueo de Mayúsculas.
b. Retroceso.
c. Número y Caracteres /
Teclado de letras.
d. Espacio.
c
b
e. Enter.
Seleccionar el Método de Entrar
Si tiene instalados más de un método de entrada en su Mobii Tablet, usted puede
seleccionar un método haciendo a) mantener presionado en el botón de hasta
que aparezca las programaciones del teclado Androide; b) elegir “InputMethod”y
después elegir el que desea.
Acceder al Internet
Usted puede navegar en Internet con su Mobii Tablet delgado.
Su Mobii Tablet tiene la tecnología del Wi-Fi incorporado y ranura de la tarjeta
de 3G, de tal forma que usted puede acceder al internet vía la red de Wi-Fi y
3G.
9
Page 10

Antes de nada, usted tiene que configurar una red de Wi-Fi o 3G. Para que el
proceso de la configuración del Wi-Fi funcione, usted tiene que estar en una
zona de Wi-Fi que le vaya a permitir conectarlo. Cada vez que su Mobii Tablet
estéen el margen de una red que usted ya haya configurado una vez, intentará
a hacer una conexión. Para la configuración de la red de 3G funcione, usted
tiene que insertar una tarjeta de 3G en el dispositivo.
Hacer la Conexión de WIFI
(1) Vaya a la pantalla de Home, presione en el icono de Menú y después
seleccione “Programaciones”.
(2) En la pantalla de “Programaciones”, seleccione “Inalámbrico y Redes”.
(3) Si el WiFi está apagado, presionar en la programación de “Wi-Fi”para
encenderlo. Después seleccione “Programaciones de Wi-Fi”. Su Mobii
Tablet escaneará automáticamente las redes disponibles de WiFi y los
visualizarán. La lista de redes disponibles muestra todas las redes
inalámbricas en el margen de su dispositivo.
- Constantemente la lista se refresca automáticamente.
- Cuando el WiFi estéhabilitado, su Mobii Tablet se conectará
automáticamente a sus redes configuradas cuando estén en su margen.
- Si su Mobii Tablet encuentra una red que núnca ha estado configurada,
visualizaráun icono de notificación.
(4) Presione en la red que desea conectar, entre la información (contraseña)
requerida de la red y después presione en “Connect”. Su Mobii Tablet
ahora intentaráestablecer una conexión a ese punto caliente de WiFi con
los parámetros de red que usted ha entrado. Si la conexión es efectuada
con éxito, aparecerá el mensaje de Conectado al XXX debajo de la
programación del WIFI.
Nota:
a) Constantemente la lista de red disponible se refresca automáticamente.
b) Cuando el Wi-Fi estéhabilitado, su Mobii Tablet se conectaráautomáticamente a sus
redes configuradas cuando estén dentro del margen.
c) Si du Mobii Tablet encuentra una red que núnca ha estado configurada, visualizaráun
icono de notificación.
Conexión Avanzada
Para escanear manualmente las redes disponibles de Wi-Fi,
(1)En la pantalla de “Wi-Fi settings”, presione en el icono de Menú , y
después presione en “Scan”.
(2)Si la red de Wi-Fi que desea conectar no aparece en la lista, enrrollar hacia
10
Page 11
abajo la pantalla, después presione en “Add a Wi-Fi network”. Entre las
programaciones requeridas, después presione en “Save”.
Para acceder a los parámetros avanzados de la red (“Dominio regulador”, “IP
address”, etc), presione en el icono de Menú , y después presione en
“Advanced”. Otros parámetros aparecerán. La información requerida puede ser
obtenida de las personas que administran la red.
Poner en marcha el WEB browser
Presionar en el icono de “Browser”que hay en la Pantalla de Home para
poner en marcha el WEB browser.
Si ya ha conectado a una red, el Web browser se abrirásimplemente y usted
puede comenzar a ojear la Web.
Nota: No todas las redes inalámbricas ofrecen acceso al Internet. Some WiFi networks
only link several computers together, without any Internet connection.
Usar el WEB Browser
Usted puede enrrollar hacia arriba y hacia abajo en la pantalla presionando
en la página y arrastrandola hacia arriba o hacia abajo (de todas formas
tenga cuidado en no presionar en un enlace!).
Para abrir un enlace, simplemente presione en él.
Usted puede abrir varias páginasweb a la vez, verlas todas a la vez en la
pantalla, y después presionar en una de ellas para verla en pantalla
completa.
Para volver a la página previa que ha visto, presione en el icono de Volver
.
Para visualizar los elementos disponibles del menú, presione en el icono del
menú .
Para volver directamente a la pantalla de Home, presione en el icono del
Menú .
Dependiendo de donde estéen el web browser, manteniendo presionado un
elemento le daráacceso a más opciones.
Para rellenar una casilla de texto, presione en la casilla, después use el
teclado virtual para escribir el texto requerido.
Los elementos del Menú del WEB Browser
Cuando estéviendo una página, puede presionar en el icono del menú
para visualizar los elementos del menú.
11
Page 12
Ventana
nueva
Marcapágin
as
Ventanas
Refrescar /
Stop
Hacia
delante
Más
Le permite abrir nuevas ventanas.
Abriráel administrador de “Marcapáginas”. Usted verátres
lengüetas:“Marcapáginas”, “Lomás visitado”, e “Historia”.
El “Marcapáginas”le muestra una lista de páginas marcadas.
Presione en una de ellas para abrirla en la ventana actual.
Manteniendo presionado en una página marcada le daráacceso
a varias opciones (le seráposible editarla, renombrarla,
eliminarla, etc.). También puede usar el icono del Menú que
le permita marcar la última página que ha visto.
“Lo más visitado”e “Historia”le permite acceder a sus sitios
“Más visitados”y su “Historia”. En la lengüeta de “Historia”, el
icono del Menú le permite borrar la historia.
Cuando tenga varias ventanas abiertas actualmente, presione
en “Ventanas”para visualizarlas todas a la vez en la pantalla.
Presione solamente en una de las ventanas pequeñas para
verla en pantalla completa, o presione en el icono de Cerrar en
la ventana pequeña para cerrar la ventana.
“Stop”pararáde descargar la página web, si estádescargando.
“Refrescar”refrescarála página web actual, si ha sido parado
de descargar.
Iráhacia delanta hasta la siguiente página que usted haya visto.
Le daráacceso a otras opciones (“Encontrar página”,
“Seleccionar texto”, “Información de la Página”, “Descargas”,
“Programaciones”etc.).
Explorer
El browser de archivo le da la posibilidad de navegar el sistema del archivo de
la memória interna de su Mobii Tablet y la tarjeta de memória. Presione en la
lengüeta de la Aplicación para visualizar todas las aplicaciones, y después
seleccione “Explorer”para entrar en el modo explorador del archivo.
Navegar a través de los Archivos y Carpetas
Usted puede arrastrar su dedo hacia
arriba y hacia abajo para enrrollar la lista
de archivo hacia arriba y hacia abajo.
Para abrir un archivo o carpeta,
presione en el archivo / carpeta.
12
Page 13
Presione en el icono de menú , usted puede administrar las aplicaciones
(vea detalles en la sección de “Administrar la Aplicación”).
Usted puede volver o avanzar un nivel en el interfaz presionando en el icono
de Volver o en el icono de Siguiente .
Usted puede volver un nivel en el directorio presionando en el botón de
Nivel hacia Arriba .
Dondequiera que usted estéen el interfaz, usted puede volver directamente
a la pantalla de Home presionando en el icono de Volver o en el icono
de Home .
Presione en el icono de Home para ir al directorio de raíz.
Usar la Barra de Herramientas
Usted puede usar la barra de herramientas para navegar a través de la
memória interna / tarjeta de memória de su dispositivo, eliminar o copiar
archivos.
Presionando en el área gris se puede esconder /
visualizar la barra de herramientas.
Home Ir a la Pantalla de Home.
Nivel Hacia Arriba Volver a un nivel en el directorio.
Multi Seleccionar juntos más de un archivo.
Editor Copiar, eliminar, mover, pegar o renombrar el
archivo o carpeta.
Volver Volver a un nivel en el interfaz.
Siguiente Avanzar un nivel en el interfaz.
Copiar / Mover Archivos y Carpetas
(1) En la lista de archivo, enrrollar hacia arriba y abajo
deslizando su dedo para seleccionar el archivo / carpeta
que desea copiar o mover.
(2) Mantenga presionado en el archivo / carpeta
seleccionado hasta que aparezca el menúque salta.
(3) Seleccione “Copiar”o “Mover”desde el meúque salta.
(4) Navegar al lugar donde sesea copiar o mover el archivo / carpeta.
(5) Seleccione el icono de Editor desde la barra de herramientas y
después elija “Pegar”.
13
Page 14

Eliminar Archivos y Carpetas
(1) En la lista de archivo, enrrollar h la lista acia arriba y hacia abajo
deslizando el dedo para seleccionar el archivo / carpeta que desea
eliminar.
(2) Mantenga presionado en el archivo / carpeta seleccionado hasta que
aparezca un menúque salta.
(3) Seleccione “Eliminar”desde el menúque salta, después seleccione
“Delete”para confirmar o “Cancelar”para salir.
Renombrar Archivos y Carpetas
(1) En esta lista de archivo, enrrollar hacia arriba y hacia abajo deslizando el
dedo para seleccionar el archivo / carpeta que desea renombrar.
(2) Mantenga presionado en el archivo / carpeta seleccionado hasta que
aparezca un menúque salta.
(3) Seleccione “Renombrar”desde el menúque salta.
(4) Presionar en la casilla de entrada para visualizar el teclado virtual, y
después elija las letras desde el teclado virtual para renombrar el archivo /
carpeta.
(5) Presionar en “OK”para confirmar el nombre nuevo.
Seleccionar Múltiples Elementos
Usted puede seleccionar juntos más de un archivo o carpeta.
(1) En la barra de herramientas de la parte superior, presione en el icono de
Multi “ ”.
(2) Presione en los archivos / carpetas que desea elegir. El nombre del
archivo / carpeta se vuelve en color rojo cuando son seleccionados.
Presionarlo de nuevo se puede cancelar la selección. Una vez que usted
haya terminado de seleccionar, usted puede eliminar, copiar o mover los
archivos seleccionados juntos presionando en el icono de Editor .
E-mail
Su Mobii Tablet tiene preinstalado una aplicación de E-mail. Usted puede
enviar o recivir e-mails del Internet a cualquier hora con su Mobii Tablet.
Asegurese de que tenga una conexión de internet antes de usar el servicio de
email.
Presionar en la Lengüeta de la Aplicación para visualizar todas las
aplicaciones, y después seleccione “Email”para lanzar la aplicación de email.
Debería entrar el inbox si ha programado una cuenta de email. De lo contrario,
programe primero una cuenta.
14
Page 15

Programar una Cuenta de Email
Primero usted tiene que programar una cuenta de E-mail para recibir o enviar
emails.
(1)Le incitan a programar una cuenta una vez que usted comience la
aplicación del email. Presione en “Siguiente”para cotinuar.
(2)Entre su email address y contraseña de conexión. Usted puede programar
la cuenta como por defecto seleccionando la opción de “Enviar email desde
esta cuenta por defecto”. Después presione en “Siguiente”para continuar.
(3)Escriba la información requerida para programar el servidor de PO3 / IMAP.
Usted puede obtener la información desde el proveedor del servicio,
administrador de la red o del Internet.
(4)Presione en “Siguiente”para continuar después de que usted haya
programado el servidor de POP3. Su Mobii Tablet revisarálas
programaciones del servidor y procederácon las programaciones del
servidor de IMAP si la programación es cprrecta. Programar el servidor de
IMAP como lo ha hecho con el servidor de POP3. Por favor tenga en cuenta
en la casilla del “Servidor de IMAP”, usted deberáentrar “imap.+ nombre del
dominio”.
(5)Su Mobii Tablet revisarálas programaciones. Cuando le incitan que “Su
cuenta estáprogramada, y email estáen su camino”, su cuenta está
programada con éxito.
(6)Entre su nombre a ser visualizado en cada email y después presione en
“Hecho”para terminiar.
Nota: Si tiene más de una cuenta, cada vez que comience la aplicacióndel email,
debe entrar la cuenta de email por defecto.
Administrar Cuentas
Usted puede programar más de una cuenta y administrar estas cuentas
revisando la información sobre la cuenta, agregando otra cuenta o eliminando
una cuenta.
Agregar otra Cuenta
Siga estos pasos para agregar otra cuenta si lo desea.
(1)Lanzar la aplicaión del email y después presionar en el icono de Menú
para visualizar el elemento del menú. Elija “Cuentas”para visualizar las
cuentas.
(2)Presionar en el icono de Menú para visualizar el elemento del menú, y
después elija “Agregar cuenta”.
(3)Siga los pasos de programar una Cuenta de Email para agregar una cuenta.
15
Page 16
Eliminar una Cuenta de Email
(1)Cuando estéen el buzón de email, presionar en el icono de Menú para
visualizar los elementos del menú.
(2)Presionar en “Cuentas”para visualizar todas las cuentas de email.
(3)Mantenga presionado en la cuenta que desea eliminar hasta que salte un
menú.
(4)Presione en “Quitar Cuenta”,y después presione en “OK”para confirmar.
Revisar las Programaciones de la Cuenta
(1)Cuando estéen el bizón del email, presione en el icono de Menú para
visualizar los elementos del menú.
(2)Presionar en “Cuentas”para visualizar todas las cuentas de email.
(3)Mantenga presionado en la cuenta que desea eliminar hasta que salte un
menú.
(4)Presionar en “Programaciones de la Cuenta”,y después debería ver toda la
información de programaciones sobre la cuenta. Usted puede editar estas
programaciones como desea.
Ver Emails
Debería entrar su buzón de correo cuando comience la aplicación del email.
En el buón de correo, usted puede deslizar su dede hacia arriba y hacia
abajo para enrrollar la lista de email.
Presionar en un email para abrirlo.
Manteniendo presionado en el email se puede vsualizar el menú. Con el
menú, usted puede abrir, contestar, enviar o eliminar el email.
Elementos del menúde Email
En la lista de email, presione en el icono de Menú para visualizar
el menú.
Refrescar Refrescar los emails.
Componer Componer un email nuevo.
Cuentas Ver todas las cuentas de email.
Programaciones
de la Cuenta
Revisar las programaciones de su
cuenta.
Administrar las Aplicaciones
Su Mobii Tablet estáprovisto para soportar muchas aplicaciones de terceros
útiles. Usted puede adquirir las aplicaciones para agregar más funciones a su
dispositivo. Están disponibles online en el Internet o directamente en su
producto.
16
Page 17

Aplicaciones Preinstalaladas
El dispositivo tiene aplicaciones preinstaladas cuando fue fabricado. Usted
puede verlas presionando en la Lengüeta de Aplicación. Estos son player de
video, player de audio, visor de fotos, relaj de alarma, calculadora, calendario,
etc.
Instalar las Aplicaciones
Usted puede instalar manualmente las aplicaciones siguiendo estos pasos:
(1)Descargar en su ordenador el archivo de la instalación. Asegurese de que el
archivo estéen formato de .apk el cual estásoportado por el sistema de su
Mobii Tablet.
(2)Conecte su Mobii Tablet al ordenador con el cable de USB.
(3)Copiar el archivo de instalación a su Mobii Tablet.
(4)Desconectar su Mobii Tablet del ordenador.
(5)Encienda su Mobii Tablet y entre en el modo de explorador de archivo con
el Explorador.
(6)Localice el archivo de instalación y abralo.
(7)Siga las instrucciones que hay en la pantalla para instalar la aplicación.
(8)Una vez que la aplicación estéinstalada con éxito, usted podráencontrarla
en la lengüeta de aplicación.
Desinstalar las Aplicaciones
(1)Visualizar todas las aplicaciones presionando en la Lengüeta de
Aplicación.
(2)Seleccione “Programaciones”, y después seleccione “Aplicaciones”.
(3)Seleccione “Administrar Aplicaciones”.
(4)Presione en la aplicación que desea desinstalar.
(5)Presione en “Desinstalar”para desinstalar la aplicación.
Nota: Usted no puede desinstalar las aplicaciones preinstaladas.
Programaciones del Sistema
En la pantalla de Home, presione en “Programaciones”y elija una categoría:
“Controles de las Redes”, “Sonido y Display”, “Fecha y Hora”, etc.
Cuando aparezca una flecha hacia abajo en la parte derecha de un
parámetro, esto significa que esta programación incluye sub-parámetros.
Presione eb él para revelar la lista de los sub-parámetros.
Cuando aparezca una caja de revisión en la parte derecha de un parámetro,
presione en él para habilitar o deshabilitar esta opción.
Cuando sea posible, usted puede usar su dedo para enrrollar la pantalla
17
Page 18
hacia arriba y hacia abajo para revelar las programaciones que inicialmente
usted no veía.
Cuando haya terminado de ajustar sus programaciones, presione en el
icono de Volver para volver a la lista de las programaciones, o presione
en en el icono de Home para ir directamente a la pantalla de Home. Sus
programaciones son salvadas instantáneamente.
Inalámbrico y
redes
Sonido y
Display
Localización y
Seguridad
Aplicaciones Esta pantalla le permite administrar sus aplicaciones de
Tarjeta SD y
Almacenaje
Mobii Tablet
Este menúle permite administrar sus conexiones de Wi-Fi y
Bluetooth como también programar el modo de Avión.
Wi-Fi –presionar en esta línea para habilitar o deshabilitar la
conexión de Wi-Fi.
Programaciones de Wi-Fi – le permite programar y
administrar sus redes de Wi-Fi.
Programaciones del sonido:
Volumen de la media –Programa el volumen para la música
y los videos. Usted también puede ajustar el sonido usando
los botones del Volumen que hay en la parte superior del
dispositivo.
Tono de Llamada de Notificación – Programa el tono de
llamada de notificación por defecto.
Selección audible – Habilita / deshabilita el sonido de click
de la pantalla de tacto.
Notificaciones de la tarjeta SD –Deshabilita los sonidos de
notificación de la tarjeta SD.
Programaciones de la visualización:
Animación – habilita / deshabilita la visualización de las
animaciones cuando se abren y se cierran las aplicaciones.
Brillo –Le permite ajustar el brillo de la pantalla.
Descanso de la pantall –le permite ajustar el retraso antes
de que la pantalla se apague automáticamente y se cierre por
si mismo. Para encender de nuevo la pantalla, presione una
vez el botón de Power, y presionelo de nuevo para cerrar la
pantalla.
Esta pantalla le da la posibilidad de permitir ciertas
aplicaciones de Android™ para determinarsu localización vía
el WiFi o el GPS. Usted también puede definir el patrón de
una pantalla no cerrada y otros parámetros.
Android™ . Usted puede ver la información acerca de todas
las aplicaciones instaladas en su dispositivo.
Esta programación le permite desmontar la tarjeta SD o
revisar la tarjeta SD y el espacio interno de almacenaje.
18
Page 19

Lenguaje y
teclado
Fecha y Hora Esta programación le permite programar la fecha, la hora, la
Calibración del
panel de tacto
Seleccionar el
Modo de USB
Actualizar la
Biblioteca de la
Media
Acerca del
Dispositivo
Programar su lenguaje y región preferido, y configurar las
programaciones de texto para que sea una entrada de testo
más rápido y más preciso.
zona horária y formatos.
Si la pantalla de tacto no responde adecuadamente, use esta
programación y siga las instrucciones que hay en la pantalla.
Seleccione esta opción si usted conecta a un USB flash drive
con la tecnología 3G incorporada en vez de una tarjeta de
red 3G.
Actualiza manualmente la biblioteca de la media de su Mobii
Tablet.
Visualiza la información acerca del sistema de su Mobii
Tablet.
Soluciones de Problemas
Reset su Mobii Tablet
En el evento en que su Mobii Tablet se queda congelado, usted puede
forzar al dispositivo para que se apague manteniendo presionado el botón
de Power durante 15 segundos.
Solamente si el botón de Power no puede hacer reset a su dispositivo,
entonces usted debería usar el botón de “reset del agujero de alfiler”,
localizado en la parte trasera del dispositivo.
Problemas de la Pantalla de Tacto
Si la pantalla de tacto no responde adecuadamente, intente ir a la pantalla de
las programaciones de la “Calibración de la Pantalla de Tacto”.
19
Page 20

Introduction
The Mobii Android Tablet is a mobile device that gives you an amazing Internet
experience -- allowing you to communicate with others, enjoy your favorite
entertainments, and access information on the Internet at anytime and
anywhere. This latest generation of small, powerful, highly portable
Internet-connected devices combines many great capabilities with the
convenience of a pocket-sized solution for your life on-the-go.
Feature Summary
Built-in Android Operating System
With the built-in Android OS, your Mobii Tablet supports most of popular
third-party applications. Applications are available on the Internet or directly
in your Mobii Tablet.
Wi-Fi / 3G Connectivity (3G optional)
With the latest Wi-Fi and 3G technology, your Mobii Tablet can connect you
to the Internet wherever you are.
7-inch Touch Screen
Touch or slide your finger in the screen, the screen responds instantly.
Built-in G-sensor
Allows the user interface to rotate its orientation to landscape or portrait
automatically when this device rotates.
Entertainment
Allows you to enjoy music, movie or pictures any time and any where.
Package Content
Main Unit
Stereo earphones
USB cable
AC Adaptor
User Manual
Warranty Card
Buttons & Ports
Top View
b
a
a. USB Port: connect to computer, USB flash drive, mouse or keyboard
through USB cable.
b. Power button: press and hold to turn on or off the device; briefly press
to turn on or off the screen.
20
Page 21

Front View
e
b
f
g
h
e
f
c. LCD Display
d. Camera Lens (optional)
e. Home: Go to the Home Screen.
f. Menu: Display an overlay menu.
g. SCROLL button: Roll in all
ways to make selection; press to
confirm selection (optional)
h. ESC: Return
h
i
n
i. Micro-SD Card Slot
j. Earphone Jack
k. DC-IN Port: connect to
any standard electronic
outlet through AC
adaptor.
l. Reset pin hole
m. Built-in microphone
n. 3G Card Slot: open to
insert a 3G network card
(optional)
model 1
model 2
Bottom View
Side View
m
j
k
d
c
d
c
l
Charging Battery
The device has built-in rechargeable battery. No extra battery installation is
required. Just charge the device when it indicates low battery.
To charge the battery, connect the device to any standard wall outlet through
the AC adaptor via the DC-IN port. It takes about 5 hours to fully charge the
battery.
Note:
a. You can operate the device even when it is being charged. But for extending the battery
life, you are suggested NOT to use the device when it is in charge.
b. You are recommended to charge the battery when you use the device for the first time.
c. For maximum performance, lithium-ion batteries need to be used often. If you don’t use
the device often, be sure to recharge the battery at least once per month.
21
Page 22
Installing Memory card
In addition to the built-in memory, your Mobii Tablet features a memory card slot
to extend its memory space. You can read e-book, music, image or video files
from a SD card directly.
To install a memory card, find the card slot at the bottom of the machine, and
then insert a Micro-SD card into the slot with the correct direction.
To access the memory card, enter the Explorer mode and then select the
“SDCard”directory.
Transferring Files
Before reading or playing files, make sure your Mobii Tablet’s internal memory
or the external memory card has media files. If not, transfer files from computer
to your Mobii Tablet.
(1)Connect your Mobii Tablet to a computer with the supplied USB cable.
(2)Once connected, two removable disk drives appear in your computer. One
represents the internal memory of your Mobii Tablet, and the other
represents the memory card inserted into your Mobii Tablet. Now you can
copy files from or to these disk drives.
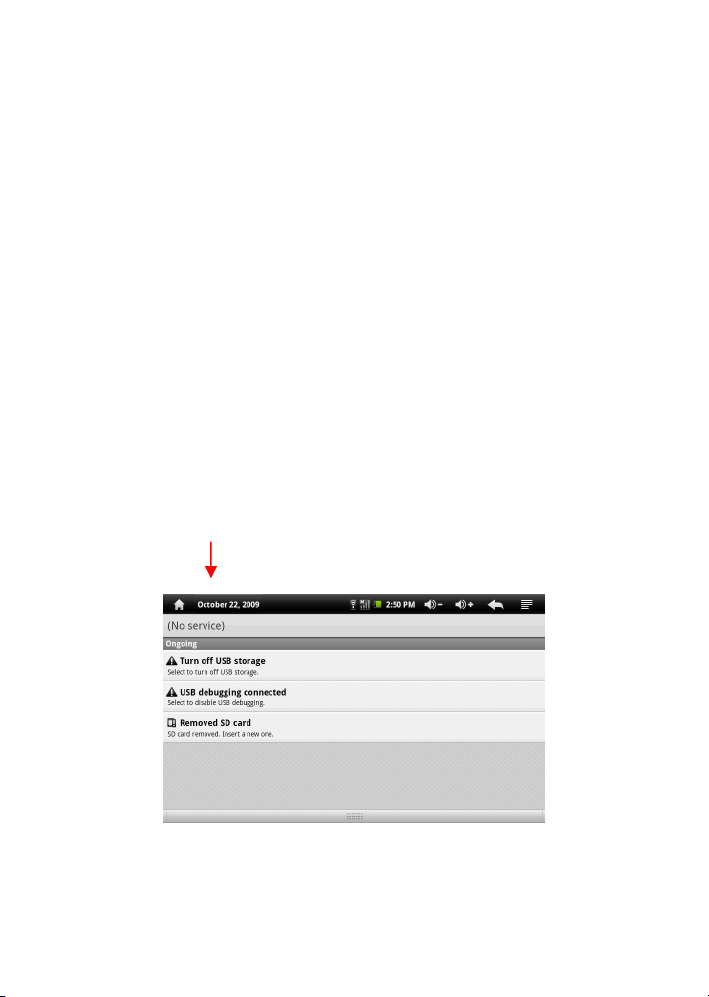
(3)Once the data transfer completes, drag from the top bar downwards to
display the USB notification message. Choose “Turn off USB Storage”and
then tap on “Turn Off”todisconnect the device from computer.
Drag downwards
(4)Remove the player from the PC safely.
a) Left-click the icon at the right bottom corner of the computer
desktop.
b) Click the pop-up mini-window with message of “Stop the USB Mass
22
Page 23

Storage Device –Drive (X)”.
c) Remove the player from the computer.
Turning On/Off
To turn on the device, press and hold the Power button on the unit until you see
the boot-up screen. It may take a few minutes to start up the system, please
wait before you proceed.
You should see the following locked screen once the device turns on. Before
you start using the device, you need to unlock the screen first. To unlock the
screen, drag the lock icon upward.
To turn off the device, press and hold the Power button until you see the option
“Power Off”, tap on “Power Off”and then tap on “OK”.
Tip: Your Mobii Tablet will sleep with the screen off if it stays inactive for a few seconds.
You can briefly press the Power button to turn on the screen and wake it up.
Home Screen
Indications
a b c d e f g h i j
k
l
a. Home: Go back to the Home Screen wherever you are in the interface.
b. Memory Card: the exclamation mark indicates no available memory card,
23
Page 24

and it should disappear once a memory card is available.
c. Wi-Fi Network
d. 3G Network(optional)
e. Battery Charge
f. Current Time
g. Volume Down: Tap briefly or continuously to decrease the volume.
h. Volume Up: Tap briefly or continuously to increase the volume.
i. Return: Return to the previous directory.
j. Menu: Tap to display an overlay setting menu.
k. Address Inputting Area. You can input the website address by tapping
this field. A virtual keyboard should appear. Use the keyboard to type in
letters. Tapping will hide the keyboard.
l. Applications Tab: Tap on this icon to reveal all applications installed on
your Mobii Tablet (alarm clock, calculator, GlobalTime etc.).
- You can copy the applications onto the Home screen by pressing and
holding on their icons.
- You can delete the application from the Home Screen by dragging
their icons to the Application Tab. To delete a Home screen item, hold
your finger onto it until it is highlighted, then drag it to the Application
Tab which has become a trash icon.
m. Default shortcuts (“Browser”, “Video Player”, “Audio Player”, etc.)
- Tap on an icon to open the corresponding application.
- Roll the SCROLL button on the unit to select an item.
- You can customize the Home Screen by adding/removing shortcuts
and widgets, changing the wallpaper, etc.
Customizing the Home screen items
- To add a Home screen item (shortcuts, widgets, folders etc.), tap on the
Menu icon and then select “Add” , or hold your tap on the Home
Screen until a pop-up menu displays.
24
Page 25
- To move a Home screen item, hold your finger onto it until it is highlighted,
then drag it to the desired location, and release it.
Changing the wallpaper
Tap on the Menu icon , and then tap on “Wallpaper”. Tap on one picture
and then tap on “Set Wallpaper”to confirm.
Go to the extended Home Screen
Slide your finger horizontally on the screen OR roll the SCROLL button to go to
the left or right panel of the extended Home Screen.
You may see the following extended Home Screen in which you have some
useful shortcuts. Tapping on these shortcuts can activate their functions.
a b c
Changing the System Settings
Tap on the Menu icon , and then tap on “Settings”.. Choose a category:
“Wireless& networks”, “Sound & Display”, “Date & Time”, etc. For more
information on the different settings, see the System Settings section.
a. Connect to available Wi-Fi
network
b. Refresh the media library
c. Adjust the screen brightness
Using the Touch Screen
Your Mobii Tablet is equipped with a touch-screen. Below are a few tips on how
to use the touch screen.
Main Touch Screen Actions
In different applications, you can go back one level in the interface by
tapping on the Back icon (at the top right corner of the screen).
Wherever you are in the interface, you can go back directly to the Home
25
Page 26

Screen by tapping on the Home icon (in the top left corner of the
dae
screen).
Other Touch Screen Actions
When watching a video or listening to music,
you can tap on the progression bar to go
directly to a different location in the video or
song. You can also use your finger to
drag the cursor in the progression bar to
another location in the video or song.
In the different browsers (File, Music,
Video, Photo, etc.), you can drag your
finger up and down to scroll the file list up
and down.
In the Web browser, you can scroll up and down by tapping on the page and
dragging it up or down (be careful however not to tap on a link!).
Tap on the link to open the page.
Using the Virtual Keyboard
Tapping on any text input field can show up the virtual board. With the virtual
keyboard, you can enter website address or any text if required.
Indications
a. Caps Lock
b. Backspace.
c. Number and Characters
/Letter keyboard.
d. Space
c
b
e. Enter
Selecting Input Method
If you have installed more than one input method on your Mobii Tablet, you can
select one method by a) holding your tap on the button until the Android
keyboard settings appear; b) choosing “Input Method”and then choosing your
desired one.
Access Internet
You can surf on the Internet with your slim Mobii Tablet.
26
Page 27

You Mobii Tablet features built-in Wi-Fi technology and 3G card slot(optional)
so that you can access the internet via Wi-Fi and 3G network.
First of all, you need to configure a Wi-Fi or 3G network(optional). For the Wi-Fi
configuration procedure to work, you need to be in a Wi-Fi zone that will allow
you to connect to it. Every time your Mobii Tablet is in range of a network that
you have already configured once, it will attempt to make a connection. For the
3G network (optional) configuration to work, you need to insert a 3G card into
the device.
Making WIFI Connection
(1) Go on the Home screen, tap on the Menu icon and then select
“Settings”.
(2) In the “Settings”screen, select “Wireless & Networks”.
(3) If the WiFi is off, tap on the “Wi-Fi”setting to turn it on. Then select “Wi-Fi
settings”. Your Mobii Tablet will scan automatically for available WiFi
networks and display them. The list of available networks shows all the
wireless networks in range of your device.
- The list is constantly refreshed automatically.
- When the WiFi is enabled, your Mobii Tablet will connect automatically to
your configured networks when they are in range.
- If your Mobii Tablet finds a network that has never been configured, it will
display a notification icon.
(4) Tap on the network you want to connect to, enter the required network
information (password) and then tap on “Connect”. Your Mobii Tablet will
now attempt to establish a connection to that WiFi hot spot with the
network parameters you entered. If the connection is successful, the
message Connected to XXX will appear under the WIFI setting.
Note:
a) The available network list is constantly refreshed automatically.
b) When the Wi-Fi is enabled, Your Mobii Tablet will connect automatically to your
configured networks when they are in range.
c) If Your Mobii Tablet finds a network that has never been configured, it will display a no-
tification icon.
Advanced Connection
To manually scan for available Wi-Fi networks,
(1)In the “Wi-Fi settings”screen, tap on the Menu icon , and then tap on
“Scan”.
(2)If the Wi-Fi network you want to connect to does not appear in the list, scroll
27
Page 28
down the screen, then tap on “Add a Wi-Fi network”. Enter the required
settings, then tap on “Save”.
To access the advanced network parameters (“Regulatory domain”, “IP
address”, etc), tap on the Menu icon , and then tap on “Advanced”. Other
parameters will appear. The required information can be obtained from the
person who manages the network.
Launching the WEB browser
Tap on the “Browser”icon in the Home Screen to launch the WEB browser.
If you are already connected to a network, the Web browser will simply open
and you can start browsing the Web.
Note: Not all wireless networks offer access to the Internet. Some WiFi networks only link
several computers together, without any Internet connection.
Using WEB Browser
You can scroll up and down the screen by tapping on the page and dragging
it up or down (be careful however not to tap on a link!).
To open a link, simply tap on it.
You can open several web pages at a time, view them all at once on the
screen, and then tap on one of them to view it in full screen.
To go back to the previous page that you browsed, tap on the Back icon .
To display the available menu items, tap on the Menu icon .
To go back directly to the Home screen, tap on the Home icon .
Depending on where you are in the web browser, holding down on an item
will give you access to more options.
To fill in a text field, tap in the field, then use the virtual keyboard to type in
the required text.
WEB Browser Menu Items
When you are viewing page, you can tap on the menu icon to display the
menu items.
New
window
Bookmarks Will open the “Bookmarks”manager. You will see three tabs:
Allows you to open new windows.
“Bookmarks”, “Most visited”, and “History”.
“Bookmarks”show you a list of bookmarks. Just tap on one
of them to open it in the current window. Holding down on a
bookmark will give you access to several options (you will be
able to edit it, rename it, delete it, etc.). You can also use the
28
Page 29
Menu icon which will allow you to bookmark the
last-viewed page.
“Most visited”and “History”allow you to access your “Most
visited”sites and your “History”. In the “History”tab, the Menu
icon allows you to clear the history.
Windows When you have several windows currently opened, tap on
“Windows”to display them all at once on the screen. Just tap
on one of the small windows to view it in full screen, or tap on
the Close icon in the small window to close the window.
Refresh/
Stop
Forward Will go to the next page that you browsed.
More Will give you access to other options (“Find on page”, “Select
“Stop”will stop loading the web page, if it is currently loading.
“Refresh”will refresh the current web page, if it has stopped
loading.
text”, “Page info”, “Downloads”, “Settings”etc.).
File Explorer
The file browser gives you the possibility to navigate the file system of your
Mobii Tablet internal memory and memory card. Tap on the Application Tab to
display all applications, and then select “Explorer” to enter the file explorer
mode.
Navigate through Files and Folders
You can drag your finger up and
down to scroll the file list up and
down.
To open a file or folder, tap on
the file/folder.
Tap on the menu icon , you
can manage the applications (see
details in the “Manage
Application”section).
You can go back or forward one level in the interface by tapping on the Back
icon or Next icon .
You can go back one level in the directory by tapping on the LevelUp button
.
Wherever you are in the interface, you can go back directly to the Home
screen by tapping on the Return icon or Home icon .
Tap on the Home icon to go to the root directory.
29
Page 30
Using the Toolbar
You can use the toolbar to navigate through your device’s internal memory/
memory card, delete or copy files.
Tapping on the grey area can hide/display the toolbar.
Home Go to the Home Screen.
LevelUp Go back one level in the directory.
Multi Select more than one file together.
Editor Copy, delete, move, paste or rename the file or folder.
Back Go back one level in the interface.
Next Go forward one level in the interface.
Copy/Move Files and Folders
(1) In the file list, scroll up and down by sliding your finger to
select the file/folder that you want to copy or move.
(2) Hold your tap on the selected file/folder until a pop-up
menu appears.
(3) Select “Copy”or “Move”from the pop-up menu.
(4) Navigate to the location where you wish to copy or move
the file/folder to.
(5) Select the Editor icon from the toolbar and then choose “Paste”.
Delete Files and Folders
(1) In the file list, scroll up and down the list by sliding finger to select the
file/folder that you want to delete.
(2) Hold your tap on the selected file/folder until a pop-up menu appears.
(3) Select “Delete”from the pop-up menu, then select “Delete”to confirm or
“Cancel”to quit.
Rename Files and Folders
(1) In the file list, scroll up and down the list by sliding finger to select the
file/folder that you want to rename.
(2) Hold your tap on the selected file/folder until a pop-up menu appears.
(3) Select “Rename”from the pop-up menu.
(4) Tap on the inputting field to display the virtual keyboard, and then choose
letters from the virtual keyboard to rename the file/folders.
(5) Tap on “OK”to confirm the new name.
30
Page 31

Select Multiple Items
You can select more than one file or folder together.
(1) In the top toolbar, tap on the Multi icon “ ”.
(2) Tap the files/folders you want to choose. The file/folder name turns red
when selected. Tapping it again can cancel the selection. Once you
finished selection, you can delete, copy or move the selected files together
by tapping on the Editor icon .
E-mail
Your Mobii Tablet has pre-installed an E-mail application. You can send or
receive e-mails from the Internet at any time with your Mobii Tablet. Make sure
you have an internet connection before using the email service.
Tap on the Application Tab to display all applications, and then select “Email”
to launch the email application. You should enter the inbox if you have set up
an email account. Otherwise, set up an account first.
Setup a Email Account
First you need to setup an E-mail account for receiving or sending emails.
(1)You are prompted to setup an account once you start up the email
application. Tap on “Next”to continue.
(2)Input your email address and login password. You can set the account as
default by selecting the option “Send email from this account by default”.
Then tap on “Next”to continue.
(3)Type in required information for setting up the PO3/IMAP server. You can
get the information from the service provider, network administrator or the
Internet.
(4)Tap on “Next”to continue after you set up the POP3 server. Your Mobii
Tablet will check the server settings and will proceed to the IMAP server
setting if the setting is correct. Setup the IMAP server as you do to POP3
server. Please note in the “IMAP Server”field, you should input “imap.+
domain name”.
(5)Your Mobii Tablet will check the settings. When it prompts you that “Your
account is set up, and email is on its way”, your account is set up
successfully.
(6)Input your name to be displayed in every email and then tap on “Done”to
finish.
Note: If you have more than one account, every time when you start up the email
application, you enter the default email account.
31
Page 32

Manage Accounts
You can setup more than one account and manage these accounts by checking
information about the account, adding another account or deleting an account.
Add another Account
Following these steps to add another account if you want.
(1)Launch the email application and then tap on the Menu icon to display
the menu item. Choose “Accounts”to display accounts.
(2)Tap on the Menu icon to display the menu item, and then choose “Add
account”.
(3)Follow the steps of setting up a Email Account to add an account.
Delete a Email Account
(1)When you are in the email box, tap on the Menu icon to display the
menu items.
(2)Tap on “Accounts”to display all email accounts.
(3)Hold your tap on the account that you want to delete until a menu pop up.
(4)Tap on “Remove Account”,and then tap on “OK”to confirm.
Check the Account Setting
(1)When you are in the email box, tap on the Menu icon to display the
menu items.
(2)Tap on “Accounts”to display all email accounts.
(3)Hold your tap on the account that you want to check until a menu pop up.
(4)Tap “Account settings”,and then you should see all setting information about
the account. You can edit these settings as you want.
View Emails
You should enter your mailbox when you start up the email application.
In the mailbox, you can slide your finger up and down to scroll through the
email list.
Tap on an email to open it.
Holding your tap on the email can display a menu. With the menu, you can
open, reply, forward or delete the email.
Email Menu Items
In the email list, tap on the Menu icon to display the menu.
Refresh Refresh the emails.
Compose Compose a new email.
Accounts View all email accounts.
Account Settings Check your account settings.
32
Page 33

Manage Applications
Your Mobii Tablet provides support to many useful third-party applications. You
can purchase the applications to add more functions to your device. They are
available online at the Internet or directly on your product.
Pre-installed Applications
The device has pre-installed applications when it was manufactured. You can
see them by tapping Application Tab. They are video player, audio player,
photo viewer, alarm clock, calculator, calendar etc.
Install Applications
You can install applications manually following these steps:
(1)Downloadthe installation file to your computer. Make sure the file is in
format of .apk which is supported by your Mobii Tablet system.
(2)Connect your Mobii Tablet to computer with the USB cable.
(3)Copy the installation file to your Mobii Tablet.
(4)Disconnect your Mobii Tablet form the computer.
(5)Turn on your Mobii Tablet and enter the file explorer mode with the Explorer.
(6)Locate the installation file and open it.
(7)Follow the on-screen instructions to install the application.
(8)Once the application is installed successfully, you can find it in the
application tab.
Uninstall Applications
(1)Display all applications by tapping on Application Tab.
(2)Select “Settings”, and then select “Applications”.
(3)Select “Manage Applications”.
(4)Tab on the application that you want to uninstall.
(5)Tab on “Uninstall”to uninstall the application.
Note: You cannot uninstall the pre-installed applications.
System Settings
In the Home screen, tap on “Settings”and choose a category:
“Wireless&Networks”, “Sound & Display”, “Date & Time”, etc.
When a down arrow appears on the right of a parameter, this means that
this setting includes sub-parameters. Tap on it to reveal the list of
sub-parameters.
When a check box appears on the right of a parameter, tap on it to enable or
disable this option.
33
Page 34

When it is possible, you can use your finger to scroll the screen up and down
to reveal settings that you don’t initially see.
When you have finished adjusting your settings, tap on the Back icon to
go back to the list of settings, or tap on the Home icon to go directly to
the Home screen. Your settings are saved instantly.
Wireless &
networks
Sound &
Display
Location &
Security
Applications This screen allows you to manage your Android™
SD card &
Tablet Storage
Language &
keyboard
Date & Time This setting allows you set up the date, time, time zone and
Touch Panel If the touch-screen is not responding properly, use this setting
This menu allows you to manage your Wi-Fi and Bluetooth
connections as well as set up the Airplane mode.
Wi-Fi – tap on this line to enable or disable the Wi-Fi
connection.
Wi-Fi settings –allows you to set up and manage your Wi-Fi
networks.
Sound settings:
Media volume –Sets the volume for music and videos. You
can also adjust the sound by using the Volume buttons, on
the top of the device.
Notification Ringtone –Set your default notification ringtone.
Audible selection –enables/disables the touchscreen click
sound.
SD card notifications –Disable SD card notification sounds.
Display settings:
Animation –enables/disables the display of animations when
opening and closing applications.
Brightness –allows you to adjust the brightness of the
screen.
Screen timeout –allows you to adjust the delay before the
screen automatically turns off and locks itself. To turn the
screen back on, press the Power button once, and press it
again to unlock the screen.
This screen gives you the possibility to allow certain
Android™ applications to determine your current location via
the WiFi or the GPS. You can also define a screen unlock
pattern and other security parameters.
applications. You can view information about all the
applications installed on your device.
This setting allows you un-mount the SD card or check SD
card and internal storage space.
Set your preferred language and region, and configure text
settings for faster and more accurate text input.
formats.
34
Page 35

calibration and follow the instructions on the screen.
USB Mode
Select
Update Media
Library
About Device Display information about your Mobii Tablet system.
Select this option if you connect to a USB flash drive with
built-in 3G technology instead of a 3G network card.
Update the media library of your Mobii Tablet manually.
Troubleshooting
Reset your Mobii Tablet
In the event that your Mobii Tablet freezes, you can force the device to shut
down by holding the Power button for 15 seconds.
Only if the Power button does not reset your device, then should you use
the “pinhole reset”button, located on the back the device.
Touch-screen Problems
If the touch-screen is not responding properly try to go to the “Touch-Screen
Calibration”settings screen.
35
Page 36

Einführung
DasMobiiAndroidTabletisteintragbarerComputer,derIhneneinenleistungsfähigenInternetbrowserbietet,
KommunikationmitFreundenundBekanntenermöglicht,IhreMusikundFilmeabspielenkannund überalleinen
drahtlosenZuganginsInternetbereitstellt.DieneusteGenerationdieserkleinen,leistungsfähigen,bequem
tragbarenGerätekombiniertvieleLeistungsmerkmalefüreinmobilesLeben.
Produkteigenschaften
EingebautesAndroid-Betriebssystem
MitdeminstalliertenAndroid-BetriebssystemunterstütztIhrMobiiTabletvielepopuläreAnwendungen,auch
sogenannteAppsvonDrittanbietern.EinigeAppssindaufIhremMobiiTabletbereitsinstalliert,weitereApps
könnenimInternetbezogenwerden.
- Wi-Fi/3G-Verbindung(3Goptional)
- MitderaktuellenWi-Fiundder3G-TechnologiehabenSiemitIhremMobiiTabletjederZeit
einenZuganginsInternet.
- 7-Zoll-Sensorbildschirm
DerBildschirmreagiertbeiBerührungIhresFingers
- EingebauterG-Sensor
DurchdrehendesGerätskannderBildschirminhaltdesMobiiTabletsimHochkant-oderim
Querformatdargestelltwerden.
- Unterhaltung
ErmöglichtIhnenjederzeit,MusikzuhörenundFilmeoderBilderanzuschauen.
Lieferumdang
TastenundAnschlüsse
l
m
Grundgerät
Stereo-Kopfhörer
USB-Kabel
a b
d e
c g
Modell1
d
c f
Modell2
n
Netzteil
Benutzerhandbuch
Garantiekarte
f
h
e
g
i
j
a. USB-Anschluss:
VerbindetdasGerätmitIhremComputer,einem
USB-Stick,einerMausodereinerTastatur.
b. Ein-/Aus-Schalter:
Langdrückenundhalten,umdasGerätein-und
auszuschalten.Kurzdrücken,umlediglichden
Bildschirmein-oderauszuschalten.
c. LCD-Bildschirm
d. Kamera (optional)
e. Home-Taste:
MitderHome-TasterufenSieden "Home"-
Bildschirmauf.
f. Menü-Taste:
MitderMenü-TastezeigenSieFunktionenaufdem
Bildschirman.
g. Scroll-Ball:
MitdemScroll-BallwählenSieBildschirminhalteaus.
DurchdrückendesScroll-BallswirdIhreAuswahl
bestätigt.
h. Zurück-Taste:
MitderZurück-TastegelangenSiezumvorherigen
Bildschirminhalt.
i. Micro-SD-Karteneinschub:
HierkönnenSieeinezusätzlicheSpeicherkarte
einschieben,umdenSpeicherIhresGerätszu
vergrößern.
j. Kopfhörer-Anschluss:
HierkönnenSieeinenStereo-Köpfhörermiteinem
3,5-mm-Klinkensteckeranschließen.
k. Netzteil-Anschluss
l. Reset-Schalter(Stiftloch)
m.Mikrofon
n. 3G-Kartenanschluss:
ÖffnenSiediesenDeckel,umdenoptionalen3G-
Netzwerkadapterzuinstallieren.
36
Page 37

LadendesAkkus
DasMobiiTablethateineneingebauten,wiederaufladbarenAkku.SomitistdieVerwendungvonBatterien
nichterforderlich.LadenSieIhrGerätauf,sobaldeinniedrigerLadestandangezeigtwird.
UmdasGerätaufzuladen verbindenSieesmitdemNetzteilundeinerWandsteckdose.Esdauertungefähr
5Stunden,bisdasGerätvollständigaufgeladenist.
Hinweis:
a.
SiekönnendasGerätbetreiben,währendderAkkugeladenwird.UmdieAkkuladezeitzuverkürzen
empfehlenwirIhnenjedoch,dasGerätruhenzulassen,bisesvollständigaufgeladenist.
b.
WirempfehlendenAkkuvollständigzuladen,bevorSiedasMobiiTableterstmaligbenutzen.
c.
FüreinebestmöglicheAkkuleistungsolltedasGeräthäufigbenutztwerden.WennSieIhrMobiiTabletnur
seltenbenutzen,stellenSiesicher,dassdieAkkumindestenseinmalproMonataufgeladenwird.
InstallationderSpeicherkarte
ZusätzlichzumbereitseingebautenSpeicherhatIhrMobiiTableteinenSpeicherkartensteckplatzfüreine
Micro-SD-Speicherkarte,mitderSiedenSpeicherplatzvergrößernkönnen.SiekönnenE-Books,Musik,
Bilder,oderVideodatendirektvonsolcheinerMicro-SDKarteherunterladen.
DerSpeicherkartensteckplatzbefindetsichanderUnterseitedesGeräts.FührenSiedieMicro-SD-Kartein
derrichtigenRichtungein.
UmaufdieSpeicherkartezuzugreifen,wechselnSieinden Explorer-Modus,undwählenSiedann
„SDKarte“ ausdemVerzeichnis.
ÜbertragungvonDateien
BevorSieDateienlesenoderabspielenkönnen,stellenSiesicher,dasssichMediendateienaufderinternen
oderderexternenSpeicherkarteIhresMobiiTabletsbefinden.SolltediesnichtderFallsein, übertragenSie
einfachdieDateienvonIhremComputeraufdasMobiiiTablet.
1.SchließenSieIhrMobiiTabletamComputermittelsdesmitgeliefertenUSB-Kabelsan.
2.SobalddasMobiiTabletmitdemCompuerverbundenist,werdenIhnenzweiWechselmedienDatenträgerzurVerfügunggestellt.EinerderbeidenDatenträgerrepräsentiertdeninternenSpeicherauf
demMobiiTablet,deranderedieMicro-SD-Speicherkarte,dieSieinIhremMobiiTabletinstallierthaben.
JetztkönnenDateienzwischendenbeidenGer äten übertragen(kopiert)werden.
3.WennSiedieDateiübertragungbeendethaben,ziehenSiedieStatusleisteaufdemMobiiTabletmitdem
Fingernachunten,umdenUSB-Statusberichtanzuzeigen.WählenSie"USB-Speicherausschalten"und
danntippenSieauf"Trennen",umdasGerätvomComputerzutrennen.
Nach unten ziehen
4.TrennenSiedasMobiiTabletvomPC
1.KlickenSiemitderlinkenMaustasteaufdasSymbolindderrechtenunterenEckeIhresWindows
Desktops.
2.WählesnSieimPop-Up-FensterdieOption"USB-Massenspeicherbeenden".
3.TrennenSiedasUSBKabelvonIhremPC.
37
Page 38

Ein-undAusschaltendesMobiiTablets
UmdasMobiiTableteinzuschalten,drückenundhaltenSiediePower-Taste amGerätsolangegedrückt,bis
sichderBildschirmeinschaltet.EskanneinpaarMinutendauern,bisdasBetriebssystembereitist.Bitte
habenSieetwasGeduld.
WenndasGeräteingeschaltetist,sehenSiezuerstfolgendengesperrtenBildschirm.BevorSiedasGerät
benutzenkönnen,müssenSiedenBildschirmentsperren.UmdenBildschirmzuentsperren,ziehenSiedas
Sperrsymbol nachoben.
UmdasGerätauszuschalten,drückenundhaltenSiedieTaste Powersolange,bisSiedieOption
"Ausschalten"aufdemBildschirmangezeigtwird.WählenSie"Ausschalten"unddannbestätigenSiemit"OK".
Tipp:
DieAnzeigeIhresMobiiTabletswirdausgeschaltet,wennerfüreinpaarSekundeninaktivist.Miteiner
kurzenBetätigungderPower-Taste
DerHome-Bildschirm
könnenSiedenBildschirmwieder"wecken".
a b cde f g h i j
k
l
m
a. Home: TippenSiediesesSymbolan,umzum Home-Bildschirm zugelangen.
b. Statusanzeige: DasAusrufezeichensignalisiert,dasskeineSpeicherkarteverfügbarist,unddas
SymbolverschwindetsobaldSieeineSpeicherkarteimSteckplatzinstallierthaben.
c. Wi-Fi-Netzwerk
d. 3G-Netzwerk(optional)
e. Akkuladestand
f. AktuelleUhrzeit
g. Leiser: TippenSiekurzoderanhaltend,umdieLautstärkezureduzieren.
h. Lauter: TippenSiekurzoderanhaltend,umdieLautstärkezuerhöhen.
i. Zurück: ZurückzurvorherigenBildschirminhalt.
j. Menü: TippenSiehier,umein überlagerndesEinstellungsmenü anzuzeigen.
k. BereichzurEingabevonInternet-Adressen: WennSieaufdiesesFeldtippen,könnenSieeine
Internetadresseeingeben.EinevirtuelleTastaturwirdzurDateneingabeangezeigt.TippenSieauf
dasZurück-Symbol, ,umdieTastaturwiederzuverstecken.
l. Anwendungs-Tab: TippenSieaufdiesesSymbol,umdieAnwendungen,dieaufIhremMobiiTablet
installiertsind,anzuzeigen(Alarmuhr,Rechner,Weltzeit-Uhrundmehr.).
38
Page 39

• SiekönnenAnwendungenaufIhrenHome-Bildschirmkopieren,indemSieauf Anwendungs-
symboletippenundhalten.
• SiekönnendieAnwendungvonIhremHome-Bildschirmentfernen,indemSiedasAnwendungssymbolzum
Anwendungstabziehen.UmdiesenHome-Bildschirmzuleeren,haltenSieIhrenFingerdrauf,bises
markiertist,dannziehenSiedenFingerzumAnwendungssymbol,welchessichzumPapierkorbverwandelt
hat.
m. Standardverknüpfungen ("Browser";"VideoPlayer","AudioPlayer", usw.)
• KlickenSiedasSymbol,umdieentsprechendeAnwendungzu öffnen.
• RollenSiemitderScroll-TasteamGerät,umProgrammfunktionenzuwählen.
• SiekönnendenHome-Bildschirmkundengerechtgestalten,indemSieVerknüpfungenundWidgets
hinfügenoderentfernen,denBildschirmhintergrund ändern,usw.
AnwendungsobjekteaufdemHome-Bildschirmhinterlegen
UmAnwendungsobjekteaufdemHome-Bildschirmzuhinterlegen(Verknüpfungen,Widgets,Ordnerusw.),
tippenSiezuerstaufdasMenüsymbol unddannauf"Hinzufügen" ,odertippenSieaufeinen
leerenBereichininnerhalbdesHome-BildschirmsundhaltendenFingersolangegedrückt,bisdasPop-UpMenü "ZumStartbildschirmhinzufügen"angezeigtwird.NunkönnenSiezwischenVerknüpfungen,Widgets,
OrdnerundHintergrundbilderwählen,indemSieaufdasObjekttippen.
WechselndesBildschirmhintergrunds
UmeinenanderenBildschirmhintergrundfestzulegen,tippenSiezuerstaufdasMenüsymbol unddann
auf"Hintergrund",odertippenSieaufeinenleerenBereichininnerhalbdesHome-Bildschirmsundhalten
denFingersolangegedrückt,bisdasPop-Up-Menü "ZumStartbildschirmhinzufügen"angezeigtwird.Nun
tippenSieaufdenMenüpunkt"Hintergrundbilder".JetzterscheinteinweiteresPop-Up-Menü "Hintergrund
auswählen".HierkönnenSieeinBildausIhreneigenenBilderwählen,odereinsausderGalerie.
ZwischenerweitertenHome-Bildschirmenwechseln
GleitenSiemitIhremFingerhorizontalnachlinksoderrechts überBildschirm,ODERrollenSiedie SCROLLTaste, umzumlinkenoderrechtenerweitertenHomeBildschirmszuwechseln.
FolgenderHome-Bildschirmwirdangezeigt,aufdemsicheinigenützlicheVerknüpfungenbefinden.Hinter
diesenSymbolesverbergensichfolgendeFunktionen:
39
Page 40

a b c a.VerbindenmiteinemvorhandenenWi-Fi-
Netzwerk
b.AktualisierenderMediabibliothek
c.EinstellenderBildschirmhelligkeit
ÄndernderSystemeinstellungen
TippenSieaufdasMenüsymbol unddannauf"Einstellungen" .WählenSieeineKategorieausder
Liste aus. Für mehr Information über verschiedene Einstellmöglichkeiten lesen Sie das Kapitel
"Systemeinstellungen".
VerwendungdesSensorbildschirms
InIhrenAnwendungenkönnenSiemitdemZurück-Symbol zumvorangegangenenBildschirminhalt
wechseln,indemSiedasSymboltippen.(DasZurück-SymbolbefindetsichinderoberenrechtenEckedes
Bildschirms).
BedienungdesSensorbildschirms
WennSieeinVideoanschauenoderMusikhören,können
SieaufdieFortschrittsleistetippen,umsofortaneine
gewünschte Stelle Ihrer Musik oder Ihres Videos zu
gelangen.
ImDateimanager(Dateien,Musik,Videos,Photos,usw.)
könnenSieihrenFingernachobenunduntenziehen,umin
derDateilistezublättern.
ImWebbrowserkönnenSienachuntenundobenblättern,
indemSieaufdieSeitetippenundesnachobenoderunten
schieben.(SeienSiebittevorsichtig,dassSienichtungewollt
einenLinkantippen!).
TippenSieaufdenLink,umdiegewünschteSeitezu öffnen.
VerwendungdervirtuellenTastatur
TippenSiemitIhremFingeraufeinTexteingabefeld,umdievirtuelleTastaturanzeigen.Mitdervirtuellen
TastaturkönnenSiezumBeispieldieAdresseeinerWebseiteodereinenTexteingeben.
Funktionen
a.Feststelltaste
b.Rücktaste.
c.WechselnzurEingabevonZiffern,Zeichenund
Buchstaben
d.Leertaste
e.Eingabetaste
a b
c d e
40
Page 41

WählenderEingabemethode
WennSiemehralseineEingabemethodeaufIhremMobiiTabletinstallierthaben,könnenSieeineMethode
wählen,indemSiedieTaste tippenundhalten,bisdas"AndroidTastatur"-Pop-up-Fenstererscheint.Hier
könnenSie"AndroidTastatureinstellungen"vornehmen,oderdieEingabemethodeauswählen.
Internet-Zugang
ZurNutzungdesInternetshatIhrMobiiTableteineingebautesWi-Fi-Modul(WLAN)undoptionalauchein
3G-Modem.
ZuerstmüssenSiedenWi-Fi-oder3G-Netzwerk-Zugangkonfigurieren.DamitdasWi-FiKonfigurations-
verfahrenfunktioniert,müssenSiesichineinemWi-Fi-Empfangsbereichbefinden,undsichdanndort
anmelden.Immer,wennsichIhrMobiiTabletimEmpfangsbereicheinesbekanntenNetzwerksbefindet,wird
esversuchen,eineVerbindungherzustellen.
Damitdasoptionale3G-Netzwerkkonfiguriertwerdenkann,müssenSieeine3G-KarteindasGerät
hereinstecken.
SoerstellenSieeineVerbindungmiteinemWiFi-Netzwerk:
1.WechselnsSiezumHome-Bildschirm,tippenSiedasSymbolMenü unddannwählenSie
"Einsttellungen" .
2.Inden"Einstellungen" wählenSie "Drahtlos&Netzwerke".
3.WennWiFiausgeschaltetist,tippenSieaufdieEinstellung"WiFi",umeseinzuschalten.Danachwählen
Sie"WiFi-Einstellungen".Ihr Mobii Tablet wirdautomatisch nachverfügbaren WiFi-Netzwerken
suchen.DieListederverfügbarenNetzwerkezeigtalledrahtlosenNetzwerkeinderNäheIhresGer äts.
4.TippenSieaufdasNetzwerk,mitdemSiesichverbindenmöchten.GgebenSiedieerforderlichen
Informationen(Passwort)einunddanntippenSieauf"Verbinden".IhrMobiiTabletwirdnunversuchen,
eineVerbindungmitdem WiFi-HotspotunterVerwendungderNetzwerkparameter,dieSieeingegeben
haben,herzustellen.WenndieVerbindungerfolgreichist,wirddieMitteilung"VerbundenanXXX"unter
WiFi-Einstellungenangezeigt.
Anmerkung:
DieListederverfügbarenNetzwerkewirdkontinuierlichaktualisiert.
WennsichIhrMobiiTabletinderReichweiteeinesbereitsbekanntenNetzwerksbefindet,wirdes
automatischeineVerbindungzudiesemNetzwerkherstellen.
WennIhrMobiiTableteinneues,nochunbekanntesNetzwerkentdeckt,wirdeinMitteilungssymbol
angezeigt.
ErweiterteVerbindungs-Einstellungen
SosuchenSiemanuellnachverfügbareWiFi-Netzwerken:
1.WemmSiesichimBild"WiFi-Einstellungenbefinden,tippenSieaufdasMenü-Symbol ,unddannauf
"Scan"("Suchen").
2.WenndasNetzwerk,mitdemSiesichverbindenmöchten,nichtinderListeerscheint,scrollenSieinder
ListeganznachUnten,undtippenauf"WiFiNetzwerkhinzufügen".GebensiedieangefordertenDaten
ein,unddannklickenSieauf"Speichern".
UmeinNetzwerkmiterweitertenNetzwerkparameterzubetreten(Domänen,IP-Adressen,usw.)dann
tippenSiedasMenü-Symbol ,unddannauf"Erweitert".ErweiterteParameterwerdenangezeigt.Die
hierfürnotwendigenInformationenerhaltenSievonderPerson,dieIhrNetzwerkbetreut.
StartendesWeb-Browsers
KlickenSieaufdasBrowser-SymbolimHomeBildschirm,umdenWeb-Browserzustarten.WennSiemit
einemNetzwerkverbundensind,wirdderWeb-BrowsergeöffnenundSiekönnenimInternetsurfen.
Anmerkung:NichtalledrahtlosenNetzwerkebietenZugangzumInternetan.EinigeWiFiNetzwerkeverbinden
nurComputermiteinander,ohneeineInternetverbindungzurVerfügungzustellen.
BenutzendesWeb-Browsers
• SiekönnendenBildschirmnachuntenundnachobenscrollen,indemSieaufdieSeitetippenundmit
demFingernachobenodernachuntenziehen.(AchtenSiejedochdarauf,nichtversehentlicheinenLink
anzutippen.)
• UmeinenLinkzu öffnen,tippenSieaufdenLink.
• SiekönnenmehrereWebseitengleichzeitig öffnen,undaufdemBildschirmanzeigen.TippenSiehierfüraufdas
41
Page 42

Menü-Symbol unddannauf"Fenster".HierwirdIhneneinListedergeladenenWebseitenangezeigt.
TippenSieaufdieWebseite,dieSieimVoll-Bild-Modussehenmöchten.
• UmzurvorherigenSeitezurückzugehen,klickenSieaufdasZurück-Symbol .
• UmdieverfügbarenMenüpunkteanzuzeigen,klickenSieaufdasMenü-Symbol .
• UmzumHomeBildschirmdirektzurückzugehen,klickenSieaufdasHome-Symbol .
• UmeinTextfeldauszufüllen,tippenSieaufdasTextfeld.DievirtuelleTastaturwirdangezeigt,mitderSiedie
notwendigenEingabenmachenkönnen.
Menü-OptionenfürdenWebBrowser
NeuesFenster ErmöglichtIhnen,einneuesBrowser-Fensterzu öffnen.
Lesezeichen ImLesezeichenManagerwerdendreiRegisterreiterangezeigt:
Fenster WennSiemehrereWebseitengleichzeitiggeöffnethaben,tippenSieauf"Fenster",
Aktualisieren/
Anhalten
Vorwärts Mit"Vorwärts"gelangenSiezurnächstenSeite,dieSiebereitsbesuchthaben
Mehr Mit"Optionen"erscheinteinPop-up-Menü.Hierkönnensie"Lesezeichen
---------------------------------------
Datei-Manager– keineReferenzenvorhanden,dadiesein3rd-Party-Appist
_______________________
"Lesezeichen","Ammeistenbesucht"und"Geschichte".
“Lesezeichen"zeigtIhneneineListederLesezeichen.
TippenSieaufeinLesezeicheninderListe,umesimaktuellenFensterzu öffnen.Wenn
SieeinLesezeichengedrückthalten,erscheinteinPop-up-Menü miterweiterten
Optionen.(SiekönnenhierLesezeichen"Bearbeiten","Umbenennen","Löschen",
"Weiterleiten",usw.).
Nebst"Lesezeichen"bietetdieSymbolleistenochweitereFunktionen,"Meistbesucht"
und"Verlauf":
Mit"Meistbesucht"erhaltenSieeineListedervonIhnenamhäufigstenbesuchten
Webseiten.
Mit"Verlauf"erhaltenSieeinechronologischeAuflistungderbesuchtenSeitenim
Internet.
umsiealleFenstergleichzeitigaufdemBildschirmanzuzeigen.UmeinederSeitenim
Vollbildzusehen,tippenSieeinfachaufeinesderkleinenFenster,oderklickenSie
aufdasSchließen-Symbol,umdieSeitezuentfernen.
"Anhalten"stopptderweitereHerunterladenvonInhaltenderWebseite.
Mit"Aktualisieren"wirdzugelassen,dassdieWebseitesicherneuert,unddassInhalte
heruntergeladenwerden,wenndieszuvordurch"Anhalten"unterbundenwurde.
hinzufügen","AufSeitesuchen","Textauswählen",die"Seiteninfo"lesen,
den"Seitenlinkweiterleiten","Einstellungen"fürIhrenInternetBrowser
vornehmen,usw.
E-mail
AufIhremMobiiTabletistbereitseinE-MaiI-Programminstalliert.HiermitkönnenSieE-Mailssendenund
empfangen,sofernSieeineVerbindungzumInternethaben.
TippenSieaufdasAnwendungen-SymbolumalleAnwendungenanzuzeigen,unddannaufdasE-MailSymbol.SofernSiebereitseineEmailAdresseeingerichtethaben,wirddasProgrammsofortstartenund
IhnenalleEmailsanzeigen.
EinrichtenderE-Mail-Adresse
BevorSiedieE-Mail-Anwendungverwendenkönnen,musszuersteineE-MailAdressezumEmpfangund
Versandeingerichtetwerden.
1.SiewerdenaufgeforderteineE-MailAdresseeinzurichten,wennSiedieE-MailAnwendungerstmalig
starten.TippenSieauf"Weiter".
2.GebenSiedieE-MailAdresseundIhrLogin-Passwortein.SiekönnendieE-Mail-Adresseals
Standardeinstellungkonfigurieren,wennSiedieOption"SendenvonEmailsausdiesemKonto"
auswählen.TippenSieauf"Weiter",umfortzufahren.
3.GebenSiedieerforderlichenInformationenzurEinstellungfürdenIMAP/PO3/SMTP-Mail-Serverein.
DieseInformationenerhaltenSiedurchIhrenInternet-Service-ProviderodervonIhrenNetzwerk-
42
Page 43

Administrator.TippenSieauf “Weiter”,umfortzufahren.
4.JetztwirdIhrMobiiTabletdieEinstellungen überprüfen.WenndieAngabenkorrektsinderscheinteine
Nachricht,dassIhrKontoerfolgreichkonfiguriertwurde.
5.GebenSiezumSchlussIhrenNamenein.DiesistderAnzeigename,mitdemIhreE-Mailsversandt
werden.TippenSieauf"Fertig",umdieKonfigurationabzuschließen.
Hinweis:WennSiemehralseinE-Mail-KontoaufIhremMobiiTabletkonfigurierthaben,werdenSiebeim
StartderE-Mail-Anwendunggefragt,daszuverwendendeKontofestzulegen.
VerwaltenvonE-Mail-Konten
SiekönnenmehralseinE-Mail-Kontoeinrichtenundverwalten.HierzugehörtdiePrüfungeinesE-Mail-
KontossowiedasHinzufügenundLöschen.
HinzufügeneinesKontos:
FolgenSiediesenSchritten,umeinenneuesKontohinzuzufügen.
1.StartenSiedieE-Mail-AnwendungundklickenSieaufdasSymbol-Menü.WählenSiedann"Konten".
2.KlickenSieaufdasSymbol-Menü undwählenSiedann"Kontohinzufügen".
3.FolgenSiedenSchrittenderE-Mail-Konten-Einstellung.
LöscheneinesE-Mail-Kontos:
1.WennSieinderE-Mail-Boxsind,klickenSieaufdasSymbol-Menü.
2.KlickenSieauf"Konten",umalleE-Mail-Kontenanzuzeigen.
3.HaltenSiedenFingeraufdemKontogedrückt,bisdasUntermenü erscheint.
4.KlickenSiedannauf"Kontoentfernen"undbestätigenSiedannmit"OK".
PrüfenvonE-Mail-Einstellungen:
1.WennSieimE-Mail-Boxsind,klickenSieaufSymbol-Menü.
2.KlickenSieauf"Konten",umalleE-Mail-Kontenanzuzeigen.
3.HaltenSiedenFingeraufdemKontogedrückt,bisdasUntermenü erscheint.
4.KlickenSieauf"Konteneinstellungen"umalleEinstellungsmöglichkeitenaufzulistenundzubearbeiten.
AnsehenvonE-Mails
WennSiedieE-Mail-Anwendungstarten,gelangenSiedirektinIhrPostfach.
ImPostfachkönnenSiemitIhremFingernachobenunduntengleiten,umdurchdieE-Mail-Liste
zuscrollen.
KlickenaufeineE-Mail,umdiesezu öffnen.
WennSiedenFingeraufeinerE-Mailgedrückthalten,wirdeinUntermenü angezeigt.Hiermit
könnenSieauswählendieE-Mails öffnen,aufsiezuantworten,sieweiterzuleitenoderzulöschen.
MenüpunktederE-Mail-Funktion
KlickenSieaufdasMenüsymbolderE-Mail-Liste,umdasfolgendeMenü anzuzeigen:
Aktualisieren AktualisiertalleE-Mails
Erstellen HiermiterstellenSieeineneueE-Mail
Konten ZeigtallekonfiguriertenE-Mail-Konten
Konteneinstellungen HierkönnenSieIhreE-Mail-Konten-
an
einstellungen überprüfenund
gegebenenfallsändern.
VerwaltenvonAnwendungen
IhrMobiiTabletunterstütztzahlreichepraktischeAnwendungen,sogenannteApps,vonDrittanbietern.Sie
könnendieseAppsimInternetzumTeilsogarkostenlosbeziehen,undgebenIhremMobiiTabletsomit
nochmehrFunktionalität.
VorinstallierteAnwendungen
DasMobiiTablethatWerksseitigbereitsinstallierteAnwendungen.SiefindendieseAnwendungen,
indemSieauf Anwendungen tippen.DortfindenSieAnwendungsprogrammewiez.B.Videoplayer,
Audioplayer,Fotoviewer,Alarmuhr,Rechner,Kalender,E-Mail,Facebook,Internet-Browser,usw.
InstallierenvonAnwendungen
SiekönnenzusätzlichAnwendungenmanuellinfolgendenSchritteninstallieren:
1.LadenSiediegewünschteInstallationsdateiausdemInternetherunter.StellenSiesicher,dassessich
hierbeiumeine".apk"-Dateihandelt,unddiesezurVerwendungunterAntroid2.1oder2.2geeignetist.
43
Page 44

2.VerbindenSieIhrMobiiTabletmitIhremComputer überdasUSB-Kabel.
3.KopierenSiedieInstallationsdateiaufIhrMobiiTablet
4.TrennenSieIhrMobiiTabletvomComputer.
5.StartenSiedenDatei-ExploreraufIhremMobiiTabletundsuchendiezuvorheruntergeladene
Installationsdatei.
6.TippenSieaufdieDateiunderlaubenSiedessenAusführung.
7.FolgenSiedenAnweisungenaufdemBildschirmumdieAnwendungzuinstallieren.
8.NachdemdieAnwendunginstalliertwurde,findeSiesiebeialldenanderenAnwendungen.
EntfernenvonAnwendungen
1.TippenSieaufdas"Anwendungen"-Symbol,unddannauf"Einstellungen"
2.TippenSieauf"Anwendungen"unddannauf"Anwendungenverwalten"
3.WählenSiedieAnwendung,dieSieentfernen/deinstallierenmöchten.
4.BestätigenSie,dassSiedieausgewählteAnwendungdeinstallierenmöchten
Hinweis: WerksseitiginstallierteAnwendungenkönnennichtentferntwerden.
Systemeinstellungen
AufdemHome-BildschirmtippenSieauf"Anwendungen"unddannauf “Einstellungen”.HierwerdenIhnen
EinstellungsmöglichkeitenfürdiverseKategorienangezeigt.SiekönnenEinstellungenfür"Drahtlos&
Netzwerke","Töne","Display","Standort&Sicherheit",usw.vornehmen.TippenSieaufeineKategorie,um
derenEinstellungsparameterzu ändern.
• WennaufderrechtenSeitederAnzeigeeinPfeil-nach-unten-Symbolerscheint,bedeutetdies,dasses
weitere,untergeordneteEinstellmöglichkeitengibt.
• WenneinAuswahlkästchenaufderrechtenSeitederAnzeigeerscheint,kannhiermiteinParameter
aktiviertoderdeaktiviertwerden.
• VerwendenSieIhrenFinger,umindenEinstellmöglichkeitennachobenoderuntenzuscrollen.
• WennSieeineKategoriefertigkonfigurierthaben,tippensieaufdasZurück-Symbol ,umdie
EinstellungenzusichernunddannzurListederKategorienzurückzugelangen.
• UmdieEinstellungenzubeenden,tippenSieaufdasHome-Symbol, ,umaufdenHome-Bildschirmzu
gelangen.
Drahtlos&Netzwerke
Töne Medien-Lautstärke – StelltdieLautstärkefürMusikundVideosein.Sie
Display Anzeigeneinstellungen:
Standort&Sicherheit HierhabenSiedieMöglichkeit,bestimmtenAndroid-Anwendungenzu
DiesesMenü ermöglichtIhnen,IhreWiFi-undBluetooth-Verbindungenzu
verwalten.HierkönnenSieauchdenFlug-Modusein-undausschalten.
WiFi – klickenSiehier,umdieWiFi-Verbindungzuaktivierenoder
deaktivieren.
WiFiEinstellungen – ermöglichtIhnen,IhreWi-FiNetzwerkezu
konfigurierenundzuverwalten.
könnenauchdenToneinstellen,indemSiedieTasteLautstärkeaufder
OberseitedesGerätsbenutzen.
Benachrichtigungston – Stellen Sie Ihren Standardton als
Benachrichtigungstonein.
AkustischeAuswahl – aktiviert/deaktiviert denKlicktonbeimBerühren
desSensorbildschirms.
BenachrichtigungSDKarte – DeaktiviertdieTönederBenachrichtigung
derSD-Karte.
Animation – aktiviert/deaktiviertdieanimierteAnzeige,wennman
Anwendungen öffnetoderschließt.
Helligkeit – ermöglichtIhnen,dieHelligkeitdesBildschirmseinzustellen.
Bildschirm-Timeout – ermöglichtIhnen,dieVerzögerungeinzustellen,
bevorderBildschirmautomatischausgeschaltetwirdundsichselbst
blockiert.UmdenBildschirmwiederanzuschalten,drückenSiedieTaste
An/Aus Power umdenBildschirmzuentsperren.
WennderSensorbildschirmnichtrichtigreagiert,benutzenSiedieseOption
Display-Kalibrierung undfolgendenAnweisungenaufdemBildschirm.
erlauben,IhreaktuellenPositionsdatenperWiFi oder GPSauszulesen.
SiekönnenauchdasEntsperrungsmusterdesBildschirmsoderandere
Sicherheitsparameterzubestimmen.
44
Page 45

Anwendungen DieserBildschirmermöglichtIhnen,IhreAndroid-Anwendungenzu
Konten&
Synchronisierung
SD-KarteundSpeicher DieseEinstellungermöglichtIhnendieSD-Speicherkartean-und
Sprache&Tastatur StelltIhrebevorzugteSpracheundRegionein,undkonfiguriertdie
Datum&Uhrzeit DieseEinstellungermöglichtIhnendasDatum,dieZeit,dieZeitzoneund
USB-Moduswählen WählenSiedieseOption,wennSieeinenUSB-Stickmiteingebautem3G-
Geräte-Informationen ZeigtInformationen ü berIhrMobiiTabletan
verwalten.SiekönnenInformationenallerAnwendungen,dieaufIhrem
Gerätinstalliertsind,ansehen.
AktualisierenSiedieMedia-BibliothekaufIhremMobiiTabletmanuell.
abzumelden,sowiedieSD-KarteunddeninternenSpeicherplatzzuprüfen.
TexteinstellungenfüreineschnellereundkorrekteTexteingabe.
dasAnzeigeformatzu ändern.
Modemanstelleder3G-Netzwerkkarteanschließen.
Problembeseitigung
ZurücksetzenIhresMobiiTablets
Wenn IhrMobiiTabletnichtmehrreagiert,schaltenSiedasGerätaus,indemdiediePower-Taste15
Sekudenlanggedrückthalten.
WennIhrGerätnichtzurückgesetztwerdenkann,betätigenSiebittedenReset-SchalterimStift-Lochauf
derRückseitedesGeräts.
ProblemedesSensorbildschirms
WennderSensorbildschirmnichtrichtigreagiertmusseventuellderSensorbildschirmneukalibriertwerden.
WechselnSiehierfürbittezuden"Einstellungen".dann"Display"undwählenSie"Display-Kalibrierung".
45
Page 46

Введение
Планшетныйкомпьютер MobiiAndroid этомобильноеустройство, которое
позволяетВам, используяинтернет, общатьсясдругимилюдьми, игратьв
игрыиполучатьдоступкинформациивлюбомместевлюбоевремя. Это
последнеепоколениепортативныхипроизводительныхинтернетустройств
сочетает в себе большие возможности с удобством повседневного
использования.
Особенности
l Встроеннаяоперационнаясистема Android
Со встроеннойоперационнойсистемой Android ваш планшетный
компьютер поддерживает большинство популярных приложений
сторонних производителей. Вы можете использовать как
веб-приложения, так и приложения установленные на Ваш
планшетныйкомпьютер
l Беспроводнаясвязь Wi-Fi/3G (3G опционально)
Используя Wi-Fi и 3G, Выможетеполучитьдоступвинтернетвлюбом
месте.
l Сенсорныйэкрансдиагональю 7”
Дляуправленияустройством–прикоснитесьилипроведитепальцем
поэкрану.
l Датчикположенияэкрана
Автоматическименяеториентациюэкранасповоротомустройства.
l Развлечения
MobiiAndroid даетВамвозможностьслушатьмузыку, смотретьфильмы
ипросматриватьфотографии.
Комплектация
l Планшетныйкомпьютер
l Наушники
l USB кабель
Кнопкииразъемы
ВидСверху
l Зарядноеустройство
l Руководствопоэксплуатации
l Гарантийныйталон
b
a
46
Page 47

a.USB порт: ПредназначендляподключениякПК, подключения
flash накопителя,USB клавиатурыилимыши.
b. Кнопка включения: Нажмите и удерживайте кнопку чтобы
включить или выключить устройство. Быстрое нажатие
включает\выключаетэкран.
ВидСпереди
d
b
c
model1
d
c
model2
ВидСнизу
ВидСбоку ВидСзади
l
m
j
n
k
e
f
g
h
e
f
c.LCD экран
d. Камера (опционально)
e. Кнопка Home: возврат к
основномуэкрану.
f. Кнопка Menu: Отображаети
скрываетМеню.
g. Трекбол: Выбор пунктов
Менюиподтверждениевыбора.
(опционально)
h. ESC: Назад
h
i
i. Разъем Micro-SD
j. Разъемнаушников
k. Разъемподключения
зарядногоустройства
l. Ресет.
m. Встроенныймикрофон
n. Разъем 3G: откройте,
чтобывставить 3G карту
(опционально)
ЗарядкаБатарей
Устройствоимеетвстроенныйаккумулятор. Дополнительнойустановки
аккумуляторанетребуется. Заряжайтеустройство, когдаоносигнализирует
онизкомзаряде.
Чтобызарядитьаккумулятор, подключите MobiiAndroid крозеткес
47
Page 48

помощьюзарядногоустройства. Полнаязарядказанимает 3 часа.
Примечание:
a. Выможетепродолжатьиспользоватьустройствавовремяегозарядки. Нодля
продлениясрокаслужбыаккумуляторалучшеэтогонеделать.
b. Передпервымиспользованиемполностьюзарядитеаккумулятор.
c. Дляоптимальнойработылитий-ионныхбатарейнеобходимоихчастое
использование. ЕслиВывременнонеиспользуетеустройство, заряжайтеегоразв
месяц.
Установка MicroSD карты
Вдополнениеквстроеннойпамяти, Ваш Mobii имеетслотдляустановки
MicroSD карты. Выможетечитатькниги, слушатьмузыку, просматривать
фотографииивидеонепосредственносSD карты.
При установке SD карты убедитесь, что вставляете её правильной
стороной.
ЧтобыполучитьдоступккартепамятизайдитевExplorer ивыберите
“SDCard”.
ПередачаФайлов.
ДляобменафайламимеждуПКипланшетнымкомпьютером Mobii:
(1) Подключите Mobii кПК, используяприлагаемый USB кабель.
(2) ПослеподключенияВыувидите 2 новыхсъемныхдискаввашемПК.
Одинизних–этовнутренняяпамять Mobii, второй–SD карта ,
установленнаявMobii. Далеекопируйтефайлыкаквслучаесобычными
внешнимидисками.
(3) Послезавершенияпередачиданныхоткройтеверхнююпанель, как
показанонарисунке, выберите“Отключить USB накопитель”инажмите
“Отключить”, чтобыотключитьустройствооткомпьютера.
Потянутьвниз
48
Page 49

(4) Безопасноеотключениеоткомпьютера.
a) Щелкнутьлевойкнопкоймышиназначок вправомнижемуглу
рабочегостолакомпьютера.
b) Нажатьнавсплывающеесообщение«Безопасноеизвлечение
устройства–Диск X:»
c) Отключить Mobii откомпьютера.
Включение/Выключение
Чтобывключитьустройствонажмитеидержитекнопку Power дотехпор
поканеувидитеэкранзагрузки. Этоможетзанятьнекотороевремя.
После загрузки устройства Вы увидите заблокированный экран. Чтобы
разблокироватьэкранпотянитезначок вверхдоупора.
Чтобывыключитьустройство, нажмитеиудерживайтекнопку Power до
появлениянадписи«Отключитьпитание», нажмите«Отключитьпитание»
затем«Ок».
Совет: Ваш Mobii автоматическипереходитврежимснаивыключаетэкран. Чтобы
включитьэкран, нажмитекнопку Power.
49
Page 50

Основнойэкран
Обозначения
a.Home: НажмитедлявозвратакОсновномуЭкрану.
b. Картапамяти: Восклицательныйзнакуказываетнаотсутствиекарты
памяти. ОнисчезнеткактолькоВывставитекартупамяти.
c.Wi-Fi сеть
d.3G сеть
e. Зарядаккумулятора
f. Текущеевремя
g. Уменьшениегромкости: Нажмите, чтобыуменьшитьгромкость.
h. Увеличениегромкости : Нажмите , чтобыувеличитьгромкость.
i. Назад: Возвраткпредыдущемуэкрануилидиректории.
j. Меню: Нажмите, чтобыотобразитьменю.
k. Строкаинтернетпоиска. Введитесюдаключевыесловадля
интернетпоиска. Виртуальнаяклавиатурапоявитсяавтоматически
принажатиинастроку. Нажатиекнопки уберетклавиатуру.
l. Панельприложений: Нажмитенаэтукнопку, дляпереходакпанели
приложенийустановленныхнаВаш Mobii(Будильник, Калькулятор,
МировоеВремяидругим).
a b cdef g h i j
k
l
50
Page 51

- ВыможетеперенестиярлыкиприложенийнаОсновнойЭкран.
Дляэтогонадонажатьиудерживатьярлыкприложения
некотороевремя.
- Выможетеудалитьярлыкприложениясосновногоэкрана,
перетащивегонакнопкувызовапанелиприложенийили
переместиввкорзину.
m. Основныеярлыки (“Браузер”, “VideoPlayer”, “AudioPlayer”.)
- Нажмитенаярлык, чтобыоткрытьсоответствующееприложение.
- Используйтепрокрутку, чтобывыбратьнужныйпункт.
- ВыможетенастроитьОсновнойЭкранподсебя–
добавляйте\удаляйтеярлыкиивиджеты, меняйтеобоиит.д.
l НастройкаэлементовОсновногоЭкрана
- ЧтобыдобавитьэлементОсновногоЭкрана (ярлык, виджет, папку),
нажмитенакнопку«Меню» ивыберите“Добавить” , или
прикоснитесьпальцемкосновномуэкрануинеубирайтеегопокане
появитсявсплывающееменю.
- ЧтобыпереместитьярлыкнаОсновномЭкране, прикоснитеськнему
пальцемидержите, покаоннеувеличится. Затемпереместитеегов
желаемоеместоиотпустите.
Изменениефоновогорисункарабочегостола
l
Нажмитенакнопку«Меню» , затемвыберите“Обои”. Нажмитена
понравившуюся картинку, для подтверждения установки нажмите
«Установитьобои».
l Использованиерасширенногорабочегостола
Проведитепальцемгоризонтальнопоэкрануилииспользуйтекнопки
прокруткидляпереключениямеждуокнамирасширенногорабочегостола.
НаодномизэкрановВыувидитедополнительныеярлыки, которые
активируютнекоторыеполезныефункции.
51
Page 52

a b c
l Изменениесистемныхнастроек
Нажмитенакнопку«Меню» , затем«Настройки» . Выберите
категорию: “Беспроводныесети”, “Звукиизображение”, “Датаивремя”,
идругие. Дляболееподробнойинформациисмотритераздел«Системные
настройки».
a. Подключитьсякдоступным
Wi-Fi сетям
b. Обновитьбиблиотекумедиа
c. Регулироватьяркостьэкрана
Использованиесенсорногоэкрана
Вашпланшетныйкомпьютер Mobii оборудовансенсорнымэкраном. Ниже–
несколькопримеромегоиспользования.
Основныедействияссенсорнымэкраном
Ÿ Вразличныхприложенияхвыможетепереключатьсякпредыдущему
экрануилипунктуменю, используякнопку«Назад» (вверхнем
правомуглуэкрана).
Ÿ ДлявозвратаизлюбогоприложениякОсновномуЭкранунажмите
кнопку«Домой» (влевомверхнемуглуэкрана).
Остальныедействияссенсорнымэкраном
Ÿ Припросмотревидеоилипрослушивании
музыки, нажмитепальцемнастроку
состояния, чтобыпереключитьсяна
необходимыйфрагментпроизведения.
Ÿ Влюбыхфайловыхменеджерах
(Музыка, Видео, Фото), спомощью
вертикальныхдвижений
пролистывайтесписокфайлов.
Ÿ ВинтернетбраузерахВыможете
прокручиватьстраницытакимжеобразом (будьтеосторожны, не
нажимайтенассылки).
Ÿ Нажатиенассылкуприведеткоткрытиюстраницы.
Использованиевиртуальнойклавиатуры
Нажатияналюбоеполедлявводатекставызоветвиртуальнуюклавиатуру.
52
Page 53

Спомощьювиртуальнойклавиатурывыможетеввестиадрессайта, текст,
поисковыйзапросит.д.
Обозначения
a. CapsLock
b. Backspace.
c. Цифрыисимволы
/Буквы.
d. Пробел
a
c
Выборметодаввода
ЕслинаВашемустройствеустановленболее, чемодинметодввода,
переключатьсямеждунимиможноследующимспособом a) удерживайтекнопку
дотехпор, поканепоявятсянастройкиклавиатуры Android;b) выберите
«Способввода»чтобывыбратьжелаемыйвариант.
d
b
e. Ввод
e
ДоступвИнтернет
СВашимпланшетнымкомпьютером Mobii Выможетепутешествоватьпо
Интернет.
ПолучитьдоступвИнтернетВыможетеиспользуявстроенный Wi-Fi или
3G(опционально).
ДляначалаВамнужноввестинастройки Wi-Fi или 3G. Дляработычерез
Wi-Fi Выдолжнынаходитьсявзонепокрытияоднойизсетей. Каждыйраз,
когдаВыбудетенаходитьсявзонедействияоднойизсетей, доступк
которойВыуженастроили, устройствобудетпытатьсяустановитьсней
соединениесамостоятельно. Дляустановкисети 3G Вамнеобходимо
вставитьвустройствосим-карту.
Настройка Wi-Fi соединения
(1) ПерейдитекОсновномуэкрануинажмитекнопку , затемвыберите
«Настройки».
(2) В“Настройках ”, нажмите“Беспроводныесети”.
(3) Если Wi-Fi выключен, нажмите «Wi-Fi» для включения. Далее
выберите«Настройки Wi-Fi». Вашпланшетныйкомпьютеротобразит
Wi-Fi сетидоступныеврадиуседействия Wi-Fi модуляВашего
устройства.
- Списокдоступныхсетейпостоянноавтоматическиобновляется.
53
Page 54

- Когда Wi-Fi включен,Mobii автоматическиподключаетсякоднойиз
ранеенастроенных Wi-Fi сетей.
- Если Mobii обнаружитсеть, котораянебыларанеенастроена, на
экранепоявитсяуведомление.
(4) Нажмитенаимясети , ккоторойхотитеподключиться. Введите
требуемыепараметры (пароль) инажмите«Подключить». Послеэтого
Mobii будет пытаться установить соединение с сетью. Если
соединение, этобудетотображеноподназваниемсети.
Примечание:
a) Списокдоступныхсетейпостоянноавтоматическиобновляется.
b) Когда Wi-Fi включен,Mobii автоматическивыбираетоднуизранеенастроенных
сетей.
c) Если Mobii нашелновуюсеть, Выувидитеуведомление.
Расширенныенастройкиподключения
Длятого, чтобывручнуюнайтидоступныесети,
(1) Наэкране«Настройки Wi-Fi», нажмитекнопку«Меню» , послеэтого
нажмите«Поиск».
(2) Если Wi-Fi сеть, ккоторойвыхотитеподключитьсянепоявляетсяв
списке, пролистайтесписоквниз , нажмите«Добавитьсеть Wi-Fi».
Введитетребуемыенастройкиинажмите«Сохранить».
Чтобыввестидополнительныепараметры («Шлюз», “IP адрес”, ит.д.),
нажмитекнопку«Меню» , затем“Дополнительныефункции”. Детальную
информациюодополнительныхпараметрахнеобходимозапроситьу
администраторовсетей
ФайловыйбраузердаетВамвозможностьнавигациипофайловойсистеме
каквстроеннойвMobii памяти, такикартыпамяти. ПерейдитенаПанель
приложенийивыберите “Explorer” чтобывключитьфайловыйбраузер.
Навигацияпофайламипапкам
Ÿ Двигаяпальцемвверх-внизпо
экрану, пролистывайтесписок
файлов.
Ÿ Чтобыоткрытьпапкуилифайл,
нажмитенанего.
Ÿ Нажмитекнопку«Меню» ,
длятого, чтобыуправлять
приложениями (подробнеев
разделе“Управление
54
Page 55

приложениями”).
Ÿ Выможетеперемещатьсянавпередилиназад, используякнопки
«Back» или«Next» .
Ÿ Выможетеперейтинауровеньвверх, используякнопку «LevelUp» .
Ÿ Чтобывернутьсякосновномуэкранунажимайтекнопку «Назад»
иликнопку «Домой» .
Ÿ Нажмитекнопку «Home» чтобыперейтивкорневуюдиректорию.
Использованиепанелиуправления
Используйтепанельуправлениядлянавигацииповстроенной\внешнейпамяти
устройства.
Home Возвратвкорневуюдиректорию
LevelUp Переходнауровеньвыше.
Multi Одновременныйвыборнесколькихфайлов.
Editor
Back Назад
Next Вперед
Нажатиенасеруюполоскуотображает/скрываетпанельуправления.
Копирование, удаление, перемещение, вставкаили
переименованиефайлаиликаталога.
Копирование/перемещениефайлов
(1) Выберитефайл/папку, которыйВыхотите
скопироватьилипереместить.
(2) Нажмитенанегоидождитесьпоявления
всплывающегоменю.
(3) Выберите “Copy” или “Move” изменю.
(4) Выберитеместо, кудаВыхотитескопироватьили
переместитьфайл/папку.
(5) Нажмитевменюкнопку «Editor» fromthetoolbarandthenchoose
“Paste”.
Удалениефайловипапок
(1) Выберитефайл/папку, которыйВыхотитеудалить.
(2) Нажмитенанегоидождитесьпоявлениявсплывающегоменю.
(3) Выберите «Delete» извсплывающегоменю, затемещеразнажмите
«Delete» дляподтвержденияудаленияили «Cancel» дляотмены.
Переименованиефайловипапок
55
Page 56

(1) Выберитефайл/папку, которыйВыхотитепереименовать.
(2) Нажмитенанегоидождитесьпоявлениявсплывающегоменю.
(3) Выберите «Rename».
(4) Нажмитенаполевводадлявызовавиртуальнойклавиатуры.
Используяклавиатуру, введитеновоеимяфайла (папки).
(5) Нажмите «ОК», чтобысохранитьновоеимя.
Одновременныйвыборнесколькихэлементов
Выможетевыбратьнесколькофаловилипапокодновременно.
(1) Впанелиуправлениянажмитекнопку «Multi» “ ”.
(2) Нажмитенафайлы/папки, которыеВамнеобходимовыбрать.
Выбранныефайлы/папкибудутподсвеченыкрасным. Повторное
нажатиеотменяетвыбор. Послеокончаниявыбора, Выможете
копировать, перемещатьилиудалятьфайлы/папки, нажавкнопку
«Editor» .
Электроннаяпочта
Дляотправки/полученияэлектроннойпочтывВашемпланшетном
компьютере Mobii предустановленпочтовыйклиент. Убедитесь, что Mobii
подключенкинтернетупередиспользованиемпочтовойпрограммы.
Нажмитенакнопкувызовапанелиприложений, затемна“Email”для
запускапочтовогоклиента. Еслидоступкпочтеуженастроен , Выпопадете
впапкувходящихсообщений. ВпротивномслучаеВамбудетпредложено
настроитьдоступксвоемупочтовомуящику.
Настройкапочты
ДляотправкииполученияписемВамнеобходимоввестинастройки
электроннойпочты
(1) Вамбудетпредложеноввестинастройкисразупослетогокаквы
нажметекнопку «Email». Нажмите«Далее»дляпродолжения.
(2) Введитеадреспочтыипароль. Выможетенастроитьотправкуписемпо
умолчанию. Дляэтоговыберите“Поумолчаниюотправлятьпочтус
этогоаккаунта”. Нажмите «Далее» дляпродолжения.
(3) Введитетребуемуюинформациюдлянастройки PO3/IMAP сервера.
Информациюможноуточнитьупоставщикауслуги, системного
администратораиливИнтернете.
(4) Нажмите «Далее» чтобыпродолжить, послетогокакВынастроили
доступкPOP3 серверу. Ваш Mobii проверитнастройки POP3 сервера,
еслиданныеверны, Вамбудетпредложеноввестинастройки IMAP
сервера.. Обратитевнимание, вполе“IMAP Сервер”, Выдолжныввести
“imap.+domainname”.
56
Page 57

(5)Mobii проверитнастройки. ЕслиВыувиделинадпись“Вашаккаунт
настроен, проверкапочты”, Вашаккаунтблагополучнонастроен .
(6) Введитесвоёимя, котороебудетотображатьсявкаждомписьмеи
нажмите «Готово». Настройказакончена.
Примечание: еслиуВаснесколькоаккаунтов, каждыйразпризапуске
почтовогоклиентаВамбудетпредложеновыбратьнужныйаккаунт.
Управлениепочтовымиящиками
Выможетенастроитьдоступкнесколькимпочтовымаккаунтам. Удалять
старыеидобавлятьновыеаккаунты.
Добавлениеновогопочтовогоящика
Длядобавленияновогопочтовогоящикапроделайтеследующие
операции.
(1) Запуститепочтовыйклиентинажмитекнопку «Меню» для
отображенияпунктовменю. Выберите «Аккаунты», чтобыувидеть
списокдоступныхпочтовыхящиков.
(2) Нажмитенакнопку «Меню» , выберите“ДобавитьАккаунт”.
(3) Повторитешаги, описанныевразделеНастройкаПочты.
Удалениепочтовогоаккаунта
(1) Зайдитевпочтовыйящикинажмитекнопку«Меню» чтобы
отобразитьэлементыменю.
(2) Выберите «Аккаунты», чтобыотобразитьпочтовыеаккаунты.
(3) Нажмитенапочтовыйящик, которыйхотитеудалитьинеотпускайтедо
появлениявсплывающегоменю.
(4) Нажмите «УдалитьАккаунт», затемнажмите «ОК» дляподтверждения.
Изменениенастроекпочтовогоящика
(1) Зайдитевпочтовыйящикинажмитекнопку«Меню» чтобы
отобразитьэлементыменю.
(2) Выберите «Аккаунты», чтобыотобразитьпочтовыеаккаунты.
(3) Нажмитенапочтовыйящик, настройкикоторогохотитеизменитьине
отпускайтедопоявлениявсплывающегоменю.
(4) Нажмите «НастройкиАккаунта», иВыувидитевсенастройки
почтовогоящика. Настройкидоступныдляредактирования.
Просмотрпочты
Запустивпочтовыйклиент, выпопадетевпапкувходящихсообщений.
Ÿ Вертикальнымидвижениямипальцапрокручивайтесписоксообщений
вверхивниз.
57
Page 58

Ÿ Нажмитенаписьмо, чтобыоткрытьего.
Ÿ Продолжительноенажатиенаписьмевызываетменю. Спомощьюэтого
менюВыможетеоткрыть, ответить, переслатьилиудалитьсообщение.
Менюпочтовогоящика
Находясьвпочтовомящике, нажмитекнопку«Меню» , чтобы
отобразитьменю.
Обновить Проверитьпочту.
Написать Написатьписьмо.
Аккаунта Списокаккаунтов.
Настройкиаккаунта Изменитьнастройкиаккаунта.
Управлениеприложениями
Ваш Mobii поддерживаетмногополезныхприложенийсторонних
производителей. Выможетекупитьилискачатьприложения, чтобы
расширитьфункцииВашегоустройства. Приложениядоступныв
Интернетеилиужепредустановленны.
Предустановленныеприложения
ВВашемустройствепредустановленны: ВидеоПлейер, АудиоПлейер ,
Программапросмотрафотографий, будильник, калькулятор, календарь.
Чтобыувидетьсписокпредустановленныхприложений, нажмитекнопку
доступакПанелиПриложений.
Установкаприложений
Чтобыустановитьприложениенеобходимовыполнитьследующиешаги:
(1) Скачатьустановочныйфайлнакомпьютер. Файлдолжениметь
расширение .apk котороеподдерживаетсяоперационнойсистемой
Вашего Mobii.
(2) Подключите Mobii ккомпьютеруспомощью USB кабеля.
(3) Скопируйтеустановочныйфайлскомпьютерана Mobii.
(4) Отсоедините Mobii откомпьютера.
(5) Включите Mobii изайдитевбраузерфайловчерез Explorer.
(6) Найдитеустановочныйфайлизапуститеего.
(7) Следуйтеуказаниямнаэкране, чтобыустановитьприложение.
(8) Еслиприложениеустановленоуспешно, вынайдетееговПанели
Приложений.
Удалениеприложений
(1) ЗайдитевПанельПриложений.
(2) Выберите «Настройки», затем «Приложения».
58
Page 59

(3) Выберите «Управлениеприложениями».
(4) Выберитеприложение, котороехотитеудалить.
(5) Нажмите «Удалить», чтобыудалитьприложение.
Примечание: Вынеможетеудалитьпредустановленныеприложения
SystemSettings
Впанелиприложенийнажмите «Настройки» ивыберите: «Беспроводные
сети», «Звукиизображение», «ДатаиВремя», другое .
Стрелкасправаотпараметрапозволяетвызватьвыпадающееменюс
Ÿ
настройками.
Ÿ Кнопкасфлажкомвключаетиливыключаетопцию.
Ÿ Выможетепролистыватьпараметрывверхивнизвертикальными
движениямипальца.
Ÿ Послевыборапараметранажмитекнопку чтобывернутьсяксписку
настроек, илинажмитекнопку чтобыперейтикОсновномуЭкрану.
Настройкибудутсохраненывлюбомслучае.
Беспроводные
сети
Звук и
изображение
Локация и
безопасность
ЭтоменюпозволяетВамуправлять Wi-Fi соединениямии
включатьрежимполета.
Wi-Fi –нажмитенаэтустроку, чтобывключить/выключить
Wi-Fi соединение.
Настройки Wi-Fi –позволяетвводитьнастройки Wi-Fi
сетей.
Настройкизвука:
Громкостьмультимедиа –Задаетгромкостьмузыкии
видео. Вы также можете регулировать громкость с
помощьюкнопок, расположенныхвверхуэкрана.
Мелодия уведомления –Выберите мелодию для
уведомления.
Звукинажатиянаэкран –включает/ выключаетзвук
нажатиянаэкран.
Уведомления SD-карты – включает/выключает звук
уведомления SD-карты.
Настройкиэкрана:
Ориентация–возможностьсменыориентацииэкрана.
Анимация –задаетуровеньанимациивприложениях.
Яркость –регулировкаяркостиэкрана.
Время отключения экрана – время отключения и
блокировки экрана. Чтобы включить экран, нажмите
кнопку«Power».
Этоменюдаетвозможностьопределеннымприложениям
Android™определятьВашеместонахождения, используя
59
Page 60

WiFi или GPS. ТакжездесьВыможетезадатьпараметры
блокировкиэкрана.
Приложения Это меню позволяет Вам управлять приложениями
Память ЗдесьВыможетебезопасноотключить SD-картуили
Язык и
клавиатура
Датаивремя Настройкидаты, времениичасовогопояса.
Touch Panel
calibration
USB Mode
Select
Update Media
Library
Обустройстве Информацияобустройстве.
Android™. ЗдесьВыможетеувидетьинформациюоб
установленныхприложениях.
проверить наличие свободного места во встроенной
памятиустройства.
Выберите предпочитаемый язык и регион . Задайте
настройкивводатекста.
Калибровкасенсорногоэкрана. Следуйтеинструкциями
наэкране.
Настройкаподключения 3G модема.
Обновлениемедиа-библиотеки.
Устранениенеполадок
Перезагрузкаустройства
Ÿ Вслучаезависанияперезагрузитеустройство , удерживаякнопку
«Power» втечение 15 секунд.
Ÿ Если Mobii всёравнонеперезагружается, используйтекнопку«Reset»
расположеннуюназаднейкрышкеустройства.
Проблемыссенсорнымэкраном
Еслисенсорныйэкраннереагируетдолжнымобразом, откалибруйтеего.
60
Page 61

Introdução
OMobiiTablet7”Basic é umdispositivoportátilquelhepermiteumaincrível
experiência de Internet: comunicar-se com os outros, desfrutar seu
entretenimentofavoritoeacessarinformaçõesnaInternetemqualquerhorae
emqualquerlugar.Estanovageraçãodepequenos,potentesealtamente
portáteisequipamentosconectados à Internetcombinamuitascapacidades
comaconveniênciadeumasoluçãodebolsoparaasuavidasempreem
movimento.
Resumodosrecursos
l AcompanhaSistemaOperacionalAndroid
ComosistemaoperacionalAndroidincluso,oMobiiTabletsuportavários
aplicativospopularesdeterceiros.Estesaplicativosestãodisponíveisna
InternetoudiretamentenoMobiiTablet.
l ConexãoWi-Fi
ComatecnologiaWi-Fi,oMobiiTabletpodeconectar-senaInternetapartir
dequalquerpontodeacessoWi-Fi.
l Telade7polegadassensívelaotoque
ToqueoudeslizeseudedosobreasuperfíciedatelaqueoMobiiTablet
responderá imediatamente.
l Sensor-Gembutido
Permitequeainterfaceaousuárioajustesuaorientaçãoparaosformatos
paisagemouretratoautomaticamentequandooMobiiTablet é girado.
l Entretenimento
Permitequeouçamúsicaevejafilmesefotosemqualquerlugaratoda
hora.
Conteúdodaembalagem
l UnidadeMobiiTablet
l Fonesdeouvido
l CaboUSB
l Adaptordeforçabivolt
l ManualdoUsuário
l CertificadodeGarantia
61
Page 62

BotõesePortas
VistaSuperior
1.PortaUSB: conecta-seaoPC,pendriveUSB,mouseouteclado
atravésdecaboUSB.
2.BotãoPower: pressioneesegureparaligaroudesligaroMobiiTablet;
pressionebrevementeparaligaroudesligaratela.
2
1
VistaFrontal
VistaInferior
VistaLateraleTraseira
12
9
10
4
5
3
6
7
11
13
3.DisplayLCD
4.LentesdaCamera (opcional)
5.Home: irparaTelaInicial.
6.Menu: mostramenudeopções.
7.ESC: voltatelaanterior
8
8.EntradaparacartãoMicroSD
9.Saídaparafonede
ouvido
10.EntradadeforçaDC:
conecteoadaptadorde
forçaparacarregarotablet.
11.BotãodeReset
12.Microfone
13.Suporteescamoteável
CarregandoaBateria
OMobiiTabletpossuiumabateriainternafixarecarregável;logonãoé
requeridainstalaçãodebateriaadicional.Apenascarregueoequipamento
quandomostraravisodebateriabaixa.
Paracarregarabateria,conecteoadaptadordeforçanatomadaeaoutra
pontanaentradadeforçaDCdoMobiiTablet.Paracarregarabateriapor
62
Page 63

completoserãonecessáriascercade3horas.
Nota:
a.Você poderá operaroequipamentomesmoquandoestiversendocarregado.Porém,
paraestenderavidadabateria,recomendamosqueNÃOouseenquantoestiver
carregando.
b.Recomendamosquecarregueabateriaporcompletoquandousaroequipamentopela
primeiravez.
c.Paramelhordesempenho,asbateriasdelítio-íonprecisamserusadassempre.Senão
forusá-locomfreqüencia,certifique-sedecarregá-lopelomenosumavezaomês.
Instalandocartãodememória
Adicionalmente à memóriainterna,oMobiiTabletpossuiumaentradapara
cartãodememóriatipomicroSDparaaumentaroespaçodearmazenamento.
Poderá entãoguardararquivosdee-books,músicas,imagensouvídeos
diretamentenamemóriamicroSD.
Parainstalarocartãodememória,localizeaentradadecartãonapartetraseira
doequipamentoeinsiraumcartãoMicroSDcomaorientaçãocorreta.Secartão
nãoencaixar,vire-oereinsira.
Paraacessarocartãodememória,acesseoaplicativo Explorer eentão
selecioneodiretório “SDCard”.
TransferindoArquivos
Antesdeleroureproduzirarquivos,certifique-sequeexistamarquivosdemídia
namemóriainternaouexternadoMobiiTablet.Casodeseje,transfiraarquivos
deseuPCparaoMobiiTablet.
(1)ConecteoMobiiTabletaoPCatravésdocaboUSBfornecido.
(2)Aguardeaté queoPCindique2dispositivosdediscoremovívelnoseuPC.
UmdelesrepresentaamemóriainternadoMobiiTableteooutrorepresenta
ocartãodememóriainseridonoMobiiTablet.Agoravocê poderá copiar
arquivosdoPCparaesteslocaisouvice-versa.
(3)Umavezqueatransferênciadearquivosterminar,cliqueedeslizeomenu
dabarrasuperiorparamostraranotificaçãodemensagemUSB.Selecione
“DesligararmazenamentoUSB” eentãocliqueem “Desligar” para
desconectaroequipamentodoPC.
Arrasteparabaixo
63
Page 64

(4)NoPC,removaodispositivoUSBdeformasegura.
a)Dêumclique-esquerdono íconedearmazenamentoUSB ,localizado
nomenudireitoinferiordoPC.
b)Cliquenamensagem “Pararodispositvodearmazenamentodemassa
USB – Drive(X)”.
c)DesconecteoequipamentodoPC.
LigandoeDesligando
Paraligaroequipamento,pressioneesegureobotão Power naunidadeaté
queapareçaateladebootdosistema.Podelevaralgunsminutosparainiciá-lo,
porfavoraguardeaté ofinalantesdeprosseguir.
Você deverá veraseguinteteladebloqueioassimqueligaroMobiiTablet.
Antesdeusá-lo,primeirodesbloqueieestatela.Paradesbloquear,arrasteo
íconedebloqueio paracima.
Paradesligaroaparelho,pressioneesegureobotão Power até queapareçaa
opção “Desligar”,cliqueem “Desligar” eentãocliqueem “OK”.
Dica: oMobiiTabletentrará nomododeesperacomatelaapagadaebloqueadasenão
houveratividadeporalgunssegundos.Pressionerapidamenteobotão Power paraligara
telaemostrarateladebloqueio.
64
Page 65

TelaInicial(Home)
a b cdef g h i j
k
l
a.Home: Retornapara TelaInicial independentedeondeestiverna
interface.
b.CartãodeMemória: umsinaldeexclamação(!)indicaqueocartãode
memórianãoestá disponíveledeveistodesaparecerquandoumcartãode
memóriaforinseridocorretamente.
c.RedeWi-Fi
d.Rede3G(nãodisponível)
e.NíveldeCargadaBateria
f. Horaatual
g.DiminuirVolume: cliquebrevementeoucontinuamenteparareduziro
volume.
h.AumentarVolume: cliquebrevementeoucontinuamenteparaaumentaro
volume.
i. Retorno: Retornaparatelaanterior.
j. Menu: cliqueparamostrarummenudeopçõesdoaplicativo.
k. Áreadedigitaçãodepesquisa. Digiteumendereçodeinternetouuma
palavraparapesquisaraoclicarnestecampo.Umtecladovirtualaparecerá
ecliquenasteclasparadigitarcadaletra.ClicandoemRetorno ,o
tecladoserá escondido.
l. MenudeAplicativos: cliqueneste íconeparamostrartodososaplicativos
instaladosnoMobiiTablet(Despertador,Calculadora,GlobalTime,Email,
etc.).
65
Page 66

- ParacopiarosaplicativosnaTelaInicial,pressioneesegureno ícone
desejado.
- ParadeletarumaplicativodaTelaInicial,arraste-oparaoíconedo
MenudeAplicativos.Pressioneesegureoitematé quefique
destacado,entãoarraste-oparaoMenudeAplicativosquesetornou
um íconedeLixeira.
m.Atalhospadrões (“Navegador”, “VideoPlayer”, “AudioPlayer”,etc.)
- Cliqueno íconeparainiciaroaplicativocorrespondente.
- PersonalizesuaTelaInicialaoadicionarouremoveratalhosewidgets,
modificandoopapeldeparede,etc.
l PersonalizandoositensnaTelaInicial
- ParaadicionarumitemnaTelaInicial(atalhos,widgets,arquivosetc.),
cliqueno íconedoMenu eentãoselecione “Adicionar” ,ouclique
esegureemlocalvazionaTelaInicialaté queummenupop-upapareça.
- ParamoverumitemnaTelaInicial,cliqueesegureoitematé quefique
destacado,entãoarraste-oparaaposiçãodesejadaesolte-o.
l Modificandoowallpaper
Cliqueno íconedoMenu ,eentãocliqueem “Papeldeparede”.Selecione
umaimagemeentãocliqueem “Definirpapeldeparede” paraconfirmar.
l Irpara áreasestendidasdaTelaInicial
Deslizeseudedohorizontalmentesobreatela,paradireitaouparaesquerda,
demodoanavegarparaopaineldireitoouesquerdodas áreasestendidasna
TelaInicial.
66
Page 67

Nessas áreasestendidas,poderá encontraralgunsatalhos úteis.Cliquenesses
a.
atalhosparaativar/desativarsuasfunções.
a b c
ModificandoaConfiguraçãodoSistema
l
Cliqueno íconedoMenu ,eentãocliqueem “Configurações” .
Selecioneumacategoria: “Redessemfioeoutras”, “Sometela”, “Datae
hora”,etc.Paramaioresinformaçõesnasdiferentesconfigurações,vejaa
seçãoConfiguraçãodoSistema.
a.ConecteaumaredeWi-Fi
disponível
b.Atualizeabibliotecademídia
c.Ajusteobrilhodatela
UsandooTouchScreen
OMobiiTabletpossuiatelasensívelaotoque(touch-screen).Abaixotemos
algumasdicasdeusodesterecurso.
PrincipaisaçõesdoTouchScreen
Ÿ Emaplicativosdiferentes,poderá voltarumnívelnainterfaceaoclicarno
ícone Voltar (notopodireitodatela).
Ÿ Dequalquerlocaldainterface,poderá voltardiretamenteparaaTelaInicial
aoclicarno ícone Home (notopoesquerdodatela).
OutrasaçõesdoTouchScreen
Ÿ Quandoestiverassistindoumvídeoououvindo
música,poderá clicarnabarradeprogresso
parairaumpontodiferentenovídeooumúsic
Poderá tambémusarseudedosobreatela
paraarrastarocursornabarradeprogressoparaoutropontonovídeoou
música.
67
Page 68

Ÿ Emdiferentesaplicativos(Arquivos,
dae
Música,Vídeo,Fotos,etc.),poderá
arrastarseudedosobreatelaparacima
ouparabaixopararolaralistaparacima
ouparabaixo.
Ÿ NoNavegadordeInternet,poderá
deslocarparacimaouparabaixoaoclicarnatelaearrastá-laparacimaou
parabaixo(tomecuidadoparanãoclicarinadvertidamentenumlink!).
Ÿ Cliquenolinkparaabrirapáginadesejada.
UsandooTecladoVirtual
Clicandoemqualquercampodeentradadetexto,devemostrarotecladovirtual.
Comotecladovirtual,porexemplo,poderá digitarumendereçodewebsiteou
outrodadosquedeseje.
Indicações
a.Trava/Maiúscula
b.Apagaparatrás.
c.Alternatecladoentre
NúmeroseCaracteres
paraLetras.
d.Espaço
e.Enter
c
Selecionandoométododeentrada
Sevocê instaloumaisdeummétododeentradanoMobiiTablet,poderá selecionar
umdosmétodosdaseguintemaneira:a)clicaresegurarnobotão até quea
configuraçãodotecladoAndroidapareça;b)selecionando “MétododeEntrada” e
entãoclicandonaescolhadesejada.
b
AcessoInternet
Você poderá navegarnaInternetcomoMobiiTablet.
OMobiiTabletpossuitecnologiaWi-Fiinclusaparaquepossaacessara
internetviarededeconectividadesemfiotipoWi-Fi.Inicialmente,precisará
configurá-loparaacessarumaredeWi-Fi.Paraqueoprocessodeconfiguração
Wi-Fifuncione,precisaestarnumaregiãocomredeWi-Fiequepermita
conexõesaela.TodavezqueoMobiiTabletestivernoalcancedaredeWi-Fi
quefoiconfiguradaumavez,eletentará fazerumaconexão.
68
Page 69

ConfigurandoumaconexãoWi-Fi
(1) Na Tela Inicial, clique no ícone Menu e então selecione
“Configurações”.
(2) Nestatela,selecione “Redessemfioeoutras”.
(3) SeafunçãoWi-Fiestiverdesligada,cliquenafunção “Wi-Fi” paraligá-la.
Entãoselecione “ConfiguraçõesdeWi-Fi”.OMobiiTabletirá procurar
automaticamenteparatodasredesWi-Fidisponíveisemostrá-las.Esta
listamostrará todasasredesvisíveisaoalcancedoequipamento.
- Alista é atualizadaautomaticamente.
- QuandooWi-Fiestiverhabilitado,oMobiiTabletirá conectar-se
automaticamentenassuasredesjáconfiguradasquandoelasestiverem
aoalcance.
- SeoMobiiTabletencontrarumaredequenuncafoiconfigurada
anteriormente,elemostrará um íconedenotificação.
(4) Cliquenaredequedesejaconectar-se,entreainformação(senha)
requiridapelaredeeentãocliqueem “Conectar”.OMobiiTabletirá agora
tentar estabelecer uma conexão com o hotspot Wi-Fi usando os
parâmetrosderedequeconfigurou.Seaconexãoforbemsucedida,a
mensagem “ConectadoaXXX” irá aparecersobafunçãoWi-Fi.
Nota:
a)Alistaderedesdisponíveis é constanteeautomaticamenteatualizada.
b)QuandooWi-Fi é habilitado,oMobiiTabletirá conectar-seautomaticamentenassuas
redesjáconfiguradasquandoelasestiveremaoalcance.
c)SeoMobiiTabletencontrarumaredequenuncafoiconfigurada,eleirá mostrarum
íconedenotificação.
ConexãoAvançada
ParaprocuramanualporredesWi-Fidisponíveis:
(1)Natelade “ConfiguraçõesWi-Fi”,cliqueno ícone Menu ,eentãoclique
em “Procurar”.
(2)SearedeWi-Fiquedesejaconectarnãoaparecernalista,desloqueabaixo
nalista,eentãocliqueem “AdicionarredeWi-Fi”.Entreasconfigurações
requeridas,eentãocliqueem “Salvar”.
Paraacessarosparâmetrosavançadosdarede(“Domínio”, “endereçoIP”,etc),
cliqueno íconeMenu ,eentãocliqueem “Avançado”.Outrosparâmetros
irãoaparecer.Ainformaçãorequeridapoderá serobtidacomoadministradorda
suarede.
69
Page 70

Explorer
Oexploradordearquivospermitequenavegueatravésdosistemadearquivos
doMobiiTablet,namemóriainternaenocartãodememória.Clique Menude
Aplicativos paramostrartodosaplicativoseentãocliqueem “Explorer” para
entrarnomododeexploraçãodosarquivos.
Navegandoatravésdearquivosepastas
Ÿ Poderá arrastarseudedopara
cimaouparabaixopararolara
listadearquivosparacimaou
parabaixo.
Ÿ Paraabrirumarquivooupasta,
cliquenoarquivo/pastadesejado.
Ÿ Cliqueno íconedomenu ,
paragerenciarosaplicativos
(vejadetalhesnaseção
“GerenciandoAplicativos”).
Ÿ Poderá voltarouavançarumnívelnainterfaceaoclicarno ícone Back
(anterior) ou Next(próximo) .
Ÿ Poderá voltarumnívelnodiretórioaoclicarno ícone LevelUp(acima) .
Ÿ Deondeestivernainterface,poderá retornardiretamenteparaTelaInicialao
clicarno ícone Voltar ou Home(TelaInicial) .
Ÿ Cliqueno ícone Home parairaodiretórioraiz.
UsandoaBarradeFerramentas
Poderá usarabarradeferramentasparanavegaratravésdamemóriainterna
oucartãodememóriadoequipamento,sejamover,deletaroucopiararquivos.
Clicandona áreacinzapodeocultar/mostrarabarradeferramentas
Home Vaiparaodiretórioraiz.
LevelUp Vaiparaumnívelacimanodiretóriodepastas.
Multi Selecionarjuntomaisdeumarquivooupasta.
Editor Copiar,deletar,mover,colarourenomearoarquivooupasta.
Back Voltaumnívelnainterface.
Next Avançaumnívelnainterface.
70
Page 71

Copiar/MoverArquivosePastas
(1) Nalistadearquivos,movaparacimaouparabaixoao
deslizarseudedoparalocalizaroarquivo/pastaque
desejacopiaroumover.
(2) Segureocliquesobreoarquivo/pastaselecionadoaté
queapareçaummenupop-up.
(3) Selecione “Copiar” ou “Mover” nestemenupop-up.
(4) Navegueaté alocalizaçãoondedesejacopiaroumoveroarquivo/pasta.
(5) SelecioneoíconeEditor nabarradeferramentaseentãoselecione
“Colar” (“Paste”).
DeletandoArquivosouPastas
(1) Nalistadearquivos,movaalistaparacimaouparabaixoaodeslizarseu
dedoparalocalizaroarquivo/pastaquedesejarenomear.
(2) Segureocliquesobreoarquivo/pastaselecionadoaté queapareçaum
menupop-up.
(3) Selecione “Deletar” nomenupop-upeentãoselecione “Deletar” para
confirmarou “Cancelar” parasair.
RenameFilesandFolders
(1) Nalistadearquivos,movaalistaparacimaouparabaixoaodeslizarseu
dedoparalocalizaroarquivo/pastaquedesejarenomear.
(2) Segureocliquesobreoarquivo/pastaselecionadoaté queapareçaum
menupop-up.
(3) Selecione “Renomear” nomenupop-up.
(4) Cliquenocampodeentradaparamostrarotecladovirtualeentãodigiteo
novonomedesejadoparaoarquivo/pasta.
(5) Cliqueem “OK” paraconfirmaronovonome.
SelecionandoMúltiplosItens
Poderá selecionarjuntomaisdeumarquivooupasta.
(1) Nabarradeferramentas,cliqueno ícone Multi “ ”.
(2) Cliquenosarquivos/pastasquedesejaselecionar.Onomedo
arquivo/pastaficavermelhoquandoselecionado.Clicandonovamente,
cancela-seoitemselecionado.Umavezterminadaaseleção,poderá
deletar,copiaroumoveremconjuntoessesarquivosselecionadosao
clicarno íconeEditor .
71
Page 72

E-mail
OMobiiTabletpossuiumaplicativocorreioeletrônico(E-mail)pré-instalado.
Você poderá receberouenviaremailspelaInternetaqualquermomentopelo
MobiiTablet.Certifique-sequepossuaumaconexãoInternetfuncionandoantes
deusaroserviçodeemail.
Cliqueno MenudeAplicativos paramostrartodosaplicativoseentão
selecione “Email” parainiciaresteaplicativodecorreiodeeletrônico.Aparecerá
suacaixadeentradasejátiverconfiguradoumacontadeemail.Senão,
configureprimeirosuaconta.
ConfigurandoumaContadeEmail
Primeirovocê precisará configurarumacontadeE-mailparareceberouenviar
emails.
(1)Aparecerá umavisoparaconfigurarumacontaassimqueiniciaroaplicativo
email.Cliqueem “Próximo” paracontinuar.
(2)Digiteseuendereçodeemailesenhadeacessoatravésdotecladovirtual.
Poderá configurarestacontacomopadrãoaoselecionaraopção “Enviar
emaildestacontaporpadrão”.Entãocliqueem “Próximo” paracontinuar.
(3)DigiteasinformaçõesrequeridasparaconfiguraroservidorPO3/IMAP.
Poderá obterestasinformaçõesdoprovedordeserviçosdeemail,
administradordaredeounaInternet.
(4)Cliqueem “Próximo” paracontinuardepoisqueconfigurarosdadosdo
servidorPOP3.OMobiiTabletirá verificaraconfiguraçãodoservidoreirá
procederparaservidorSMTPseaconfiguraçãoestivercorreta.Configureos
dadosdoservidorSMTPcomofeitoparaservidorPOP3.
(5)OMobiiTabletirá verificaraconfiguração.Quandoaparecerque “Suaconta
foiconfigurada,emailsemprocesso”,suacontafoiconfiguradacom
sucesso.
(6)Digiteseunomeparasermostradoemtodosemailseentãocliqueem
“Feito” paraterminar.
Nota: Setivermaisdeumaconta,todavezqueiniciaroaplicativoemail,deverá
selecionaracontapadrão.
GerenciandoContas
Poderá configurarmaisdeumacontaegerenciá-lasaoverificarainforma ção
sobreaconta,adicionaroutracontaoudeletarumaconta.
AdicionandooutraContadeEmail
Sigaestespassosparaadicionaroutraconta.
(1)Inicieoaplicativoemaileentãoselecioneno íconeMenu paramostrar
72
Page 73

asopções.Selecione “Contas” paramostrarascontas.
(2)Cliqueno íconeMenu paramostrarasopçõeseentãoselecione
“Adicionarconta”.
(3)Sigaospassosparaconfigurarumacontadeemailparaadicioná-la.
DeletandoumaContadeEmail
(1)Quandoestivernacaixadeentradadeemail,cliqueno íconeMenu para
mostrarasopções.
(2)Cliqueem “Contas” paramostrartodasascontasdeemail.
(3)Cliqueesegurenacontaquedesejadeletaraté queapareçaummenu
pop-up.
(4)Cliqueem “RemoverConta” eentãocliqueem “OK” paraconfirmar.
Verificandoaconfiguraçãodaconta
(1)Quandoestivernacaixadeentradadeemail,cliqueno íconeMenu para
mostrarasopções.
(2)Cliqueem “Contas” paramostrartodasascontasdeemail.
(3)Cliqueesegurenacontaquedesejaconfiguraraté queapareçaummenu
pop-up.
(4)Cliqueem “ConfiguraçãodaConta” eentãodeverá vertodasinformaçõesda
configuraçãodaconta.Poderá editarestaconfiguraçãosedesejar.
VizualizandoEmails
Deverá apareceracaixadeentradaquandoiniciaroaplicativodeemail.
Ÿ Nacaixadeentrada,poderá deslizarseudedoparacimaouparabaixopara
deslocar-seatravésdalistadeemails.
Ÿ Cliquesobreumemailparaabrí-lo.
Ÿ Cliqueeseguresobreumemailparamostrarummenupop-up.Então
poderá selecionarentreabrir,responder,encaminharoudeletaroemail.
ItensdoMenudoEmail
Nalistadeemails,cliqueno íconeMenu paramostraromenudeopções.
Atualizar Atualizaacaixadeentradadeemails.
Compor Escreverumnovoemail.
Contas Vizualizatodascontasdeemail.
ConfiguraçãodaConta Verificaasconfiguraçõesdaconta.
GerenciandoAplicativos
OMobiiTabletfornecesuporteparamuitosaplicativos úteisdeterceiros.Você
poderá comprarpordownloadestesaplicativosparaadicionarmaisfunçõesno
seuequipamento.ElesestãodisponíveisonlinenaInternetoudiretamenteno
73
Page 74

seuproduto.
AplicativosPré-instalados
Oequipamentopossuiaplicativospré-instaladosdefábrica.Poderá
visualizá-losaoclicarno MenudeAplicativos.Sãoeles:Reprodutordevídeos
(Videoplayer),Reprodutorde áudio(Audioplayer),Vizualizadordefotos(Photo
viewer),Alarme(Alarmclock),Calculadora(Calculator),Calendário(Calendar)
etc.
AplicativosInstaláveis
Você poderá instalaraplicativosmanualmenteaoseguirestespassos:
(1)BaixeoarquivodeinstalaçãoparaseuPC.Certifique-sequeoarquivoestá
noformato .apk que é suportadopelosistemaMobiiTablet.
(2)ConecteoMobiiTabletaoPCatravésdocaboUSB.
(3)CopieoarquivodeinstalaçãoparaoMobiiTablet.
(4)DesconecteoMobiiTabletdoPC.
(5)LigueoMobiiTableteentrenoExploradordearquivos.
(6)Localizeoarquivodeinstalaçãoeabra-o.
(7)Sigaasinstruçõesnatelaparainstalaroaplicativo.
(8)Umavezqueoaplicativoestiverinstaladocomsucesso,poderá encontrá-lo
noMenudeAplicativos.
DesinstalandoAplicativos
(1)Mostretodosaplicativosaoclicarem MenudeAplicativos.
(2)Selecione “Configurações” eentãoselecione “Aplicativos”.
(3)Selecione “Gerenciaraplicativos”.
(4)Cliquenoaplicativoquedesejadesinstalar.
(5)Cliqueem “Desinstalar” pararemoveroaplicativo.
Nota: Osaplicativospré-instaladosnãopodemserremovidos.
ConfiguraçõesdoSistema
NaTelaInicial,cliqueem “Menu”,depois “Configurações” eescolhauma
categoria: “RedessemFioeoutras”, “SomeTela”, “DataeHora”,etc.
Ÿ Quandohouverumasetaparabaixonoladodireitodeumparâmetro,ao
clicarnelasurgirá umalistadeopçõesselecionáveis.
Ÿ Quandohouverumacaixademarcaçãonoladodireitodeumparâmetro,
cliqueneleparahabilitaroudesabilitarestaopção.
Ÿ Quandoforpossível,poderá usarseudedosobreatelaparadeslizá-lapara
cimaouparabaixoparamostrarorestantedalistadeopções.
Ÿ Quandofinalizaramodificaçãodasconfigurações,cliqueno ícone Voltar
74
Page 75

pararetornar à listadeconfigurações,oucliqueno ícone Home
parairdiretamente à TelaInicial.Asconfiguraçõessãosalvas
instantaneamente.
Redessemfioe
outras
Sometela ConfiguraçõesdeSom:
Locale
Segurança
Aplicativos Estemenupermitequegerencieosaplicativosinstaladosno
CartãoSDe
armazenamento
Idiomae
teclado
Dataehora Esteajustepermitequeconfiguredata,hora,fusohorárioe
EstemenupermitequegerencieasconexõesWi-FieMobile
(desabilitado).
Wi-Fi – cliquenestalinhaparahabilitaroudesabilitara
conexãoWi-Fi.
ConfiguraçãoWi-Fi – permitequeconfigureegerencieas
redesWi-Fi.
Volumedamídia – Ajustaovolumeparamúsicaevídeos.
Poderá tambémajustarosomatravésdosbotõesdevolume
nabarrasuperiordateladoequipamento.
ToquedeNotificação – Ajustaotoquedenotificação
padrão.
Seleçãoaudível – habilita/desabilitaosomaofazeruma
seleçãonatela.
NotificaçõesdocartãoSD – habilita/desabilitasompara
notificaçõesdocartãoSD.
Configuraçõesdatela:
Orientação – habilita/desabilitaorientaçãoautomáticaao
girar
Animação – habilita/desabilitaasanimaçõesdejanela
quandoabrirefecharaplicativos.
Brilho – permiteajustarobrilhodatela.
Tempolimitedatela – permiteajustardepoisdequanto
tempoatelaserá automaticamentedesligadaebloqueada.
Paraligarnovamenteatela,pressioneobotão Power uma
vezedeslizeobotãodebloqueioparadesbloquearatela.
Estemenupermitequeajusteasconfiguraçõesdeaplicativos
Android™ paradeterminarasualocalizaçãoatualviaWi-Fi.
Poderá tambémdefinirumpadrãodedesbloqueiodetelaou
outrosparâmetrosdesegurança.
Android™.Poderá visualizarinformaçõessobretodosos
aplicativosinstaladosnoequipamento.
Estemenupermiteque “desmonte” ocartãoSDpara
remoçãoseguraouverifiqueoespaçodisponívelnocartão
microSDenoarmazenamentointerno.
Selecioneseuidiomapreferidoeregião.Configuretambém
ajustesdetextoparaumadigitaçãomaisrápidaeprecisa.
75
Page 76

formatosdedataehora.
Calibraçãodo
painelaotoque
Selecionar
modoUSB
Atualizar
blibliotecade
mídia
Sobreo
equipamento
Seopainelsensívelaotoquenãoestiverfuncionando
corretamente,cliquenesteajusteesigaasinstruçõesnatela.
SelecioneestaopçãoseforconectaraummodemUSBcom
tecnologia3G.
AtualizamanualmenteabibliotecademídiadoMobiiTablet.
MostrainformaçõessobreosistemadoMobiiTablet.
Resoluçãodeproblemas
ResetandooMobiiTablet
Ÿ CasooMobiiTablettravenumatelaeosbotõesnãofuncionem,poderá
forçarodesligamentodoequipamentoaopressionarpor15segundoso
botão Power.
Ÿ Somenteseobotão Power nãoresetarseuequipamento,entãopoderá usar
obotãodeResetembutidolocalizadonapartetraseiradoequipamento.
ProblemasnatelaTouch-screen
Seatelatouch-screennãoestiverrespondendoadequadamente,cliqueem
Configurações,selecioneaopção “CalibraçãodoTouch-Screen” esigaas
instruçõesindicadas.Useumpanolimpodemicrofibraparalimpezadatela.
ModelocobertonesteManualdoUsuário:
MobiiTablet7"Basic comversõesde4,8ou16Gbecâmeraopcional.
HomologaçãoAnatel
SuporteTécnicoPointofView: suporte.brasil@pointofview-online.com
76
Page 77

Představení
MobiiAndroidTabletjemobilní zařízení,které vámdáváúžasný zážitekz
internetu.Dovolujevámkomunikovatsostatními,užívatsivašioblíbenou
zábavuapřístupkinformacímnainternetkdykolivakdekoliv.Tatonejnovější
generacemalých,výkonnýchadobřepřenosnýchzařízení,připojenýchk
internetukombinujemnohoskvělýchmožnost í adobroupřenosnostzařízení,
které sevlezedokapsy.
Souhrnvlastností
l Zabudovaný operační systémAndroid
SezabudovanýmsystémemAndroidOS,váš MobiiTabletpodporuje
většinupopulárníchaplikací třetíchstran.Aplikacejsoudostupné na
internetnebopřímovevašemMobiitabletu.
l Wi-Fi/3Gkonektivita (3Gvolitelné)
Snejnovější Wi-Fia3Gtechnologií seváš MobiiTabletmůžepřipojit
kinternetu,kdekolivjste.
l 7palcová dotyková obrazovka
Dotkněteseneboposuňtesvůjprstpoobrazovce,která okamžitě reaguje.
l Zabudovaný G-senzor
Slouží kautomatickémuotáčení uživatelskéhoprostředí podlepolohy
zařízení.
l Multimediální zábava
Umožňujevám,siužívathudbu,filmyneboobrázkykdekolivjste.
Obsahbalení
l Zařízení
l Stereosluchátka
l USBkabel
l Napájecí adaptér
l Manuál
l Záruční list
Tlačítkaakonektory
Vrchní pohled
b
a
a.USBPort: Připojení kpočítači,USBflashpaměti,myšineboklávesnici
pomocí USBkabelu.
b.Vypínač: Stiskemapodrženímzapnetenebovypnetezařízení.
Krátkýmstiskemvypnetenebozapneteobrazovku.
77
Page 78

Přední pohled
model1
model2
Spodní pohled
Boční pohled
l
m
j
k
d
c
e
b
f
g
h
d
c
e
f
h
n
c.LCDDisplej
d.Objektivkamery (volitelné)
e. Home: Návrat na úvodní
obrazovku.
f.Menu: Zobrazení menu.
g. SCROLL tlačítko: Otáčením
vybertevolbu,stisknutímpotvrdíte
(volitelné).
h.ESC: Návrat
i
i. Micro-SDCardSlot
j. Výstupnasluchátka
k.DC-INPort: Připojení ke
standardní zásuvce
pomocí napájecího
adaptéru.
l. Tlačítkoreset
m.Zabudovaný mikrofon
n.3GCardSlot: Otevřete
avložte3Gkartu
(volitelné)
Nabíjení baterie
Zařízení má zabudovanounabíjecí baterii.Není potřebavkládatjakoukolivjinou
baterii.Stačí pouzenabítzařízení,pokudukazujenízký stavnabití baterie.
Pronabití baterie, připojtezařízení kzásuvcepomocí poskytnutéhonapájecího
adaptéru.Plné nabití baterietrvá okolo3hodin.
Pozn.:
a.Zařízení můžetepoužívat,Ikdyž senabíjí,proprodlouženíživotnostibaterietoto
nedoporučujeme.
b.Předprvnímpoužitímdoporučujemeplně nabítbaterii.
c.Promaximální výkon,Lithium-ionbateriemusí býtpoužívány často.Pokudnebudete
78
Page 79

používatzařízeníčasto,nabijtebateriiaspoň 1xdoměsíce.
Instalacepaměťové karty
Prorozšíření integrované paměti,váš Mobiitabletobsahujeslotnapaměťovou
kartuprorozšířeníúložnéhoprostoru.Můžete číste-booky,poslouchathudbune
sledovatvideopřímozSDpaměťové karty.
Proinstalacipaměťové karty,najděteslotprokartunaspodní straně zařízení a
pakvložtemicro-SDkartudoslotupodlenaznačené orientace.Propřístupna
paměťovoukartu,vrežimuprohlížení vyberteadresář“SDCard”.
Přenášení souborů
Před čtenímnebopřehrávánímsouborů seujistěte, žeinterní paměť nebo
paměťová kartaobsahujemediální soubory.Pokudne,překopírujtesoubory
zpočítačenaváš MobiiTablet.
(1)PřipojteMobiiTabletkpočítačipomocí dodanéhoUSBkabelu.
(2)Popřipojení seobjeví navašempočítačidvě odpojitelné diskové jednotky.
Jednajeinterní paměť adruhá jepaměťová kartavloženavtabletu.Nyní
můžetekopírovatsouborynatytodvě jednotky.
(3)Podokončení přenosu,posuňtevrchní panelsměremdolů avyberte
možnost “TurnoffUSBStorage” apoté potvrďtepomocí“TurnOff”.Tímto
odpojítezařízení odpočítače.
Dragdownwards
(4)Bezpečné odpojtezařízení odPC.
a)Stisknětelevýmtlačítkemnaikonu vpravémdolnímrohuobrazovky.
b)Kliknětenavyskakovací oknoavyberte “Odpojitzařízení USBMass
Storage”.
c)Odpojtezařízení odpočítače.
79
Page 80

Vypnutí/Zapnutí
Prozapnutí zařízení,stiskněteapodržtePowertlačítkonazařízení,dokud
neuvidítebootovací obrazovku.Startzařízení můžetrvatněkolikminut,než
budetepokračovat,prosímnechtesystémplně nastartovat.
Pozapnutí bystemělividětnásledující obrazovku.Předpoužitímzařízení,musíte
odemknoutobrazovku.Proodemčení obrazovky,přetáhněteoknuzámku
směremnahoru.
Provypnutí zařízení,podržtetlačítkoPower,dokudneuvidítemožnost “Power
Off”,vyberte “PowerOff” apoté potvrďtepomocí“OK”.
Tip: MobiiTabletse,pokudnení používán,přepneponěkolikasekundáchdo úsporného
režimu.Krátkýmstiskemtlačítka Power zapneteobrazovkuazařízení probudíte.
Domovská obrazovka
Ukazatele
a b cdef g h i j
k
l
a.Home: Návratna úvodní obrazovkukdekolivjste.
b.Paměťová karta: Vykřičníkoznačuje, ženení dostupnážádná paměťová
karta.Totoupozornění bymělozmizetpovložení paměťové karty.
c.Wi-Fisíť
80
Page 81

d.3Gsíť
e.Stavbaterie
f. Aktuálníčas
g.Snížení hlasitosti: Poklepánímsnižujetehlasitost.
h.Zvýšení hlasitosti: Poklepánímzvyšujetehlasitost.
i. Return: Návratdopředchozí složky.
j. Menu: Poklepánímzobrazítemenu.
k.Panelprovložení adresy: Zdemůžetezadatwebovouadresustránky.
Mělabysezobrazitvirtuální klávesnice.Pomocí klávesnicezadejteznaky.
Stiskem skryjeteklávesnici.
l. Panelaplikací: Poklepánímnatutoikonuzobrazítevšechnyaplikace
nainstalované navašemMobiitabletu(budík,kalkulačka,Globálníčas,
atd.).
- Můžetekopírovataplikacenaplochustisknutímapodrženímjejich
ikon.
- Můžeteodstranitaplikacezdomovské stránkypřetáhnutímjejichikon
napanelaplikaci.Provymazání položkyzdomovské stránkypodržte
prstnaikoně,dokudnení podsvícená apakjipřetáhnětenapanel
aplikací,který sezměnilnaikonukoše.
m.Základní zástupci (“Browser”, “VideoPlayer”, “AudioPlayer”,atd.)
- Poklepánímvybereteodpovídající aplikaci.
- Pomocí otáčení tlačítka SCROLL vybertepoložku.
- Můžeteupravitdomovskouobrazovkupřidáváním/odebíráním
zástupců,měněnímpozadí,atd.
l Úpravapoložeknadomovské obrazovce
- Propřidání položky(zástupce,widgety,adresáře,atd.)kliknětenaikonu
menu apoté vyberte “Add” ,nebopodržteprstnadomovské
obrazovce,dokudsenezobrazí vyskakovací menu.
- Pokudchcetepřesunoutpoložkuzdomovské obrazovky,podržtenaníprst,
81
Page 82

dokudsenepodsvítí,pakjipřetáhnětenaurčené místo.
l Změnapozadí
Vyberteikonumenu ,pakkliknětena “Wallpaper”.Vyberteobrázekav
otevřenémmenuvyberte “SetWallpaper”.
l Rozšířená domovská obrazovka
Posuňtesevodorovně poobrazovcevašímprstem,nebootočte SCROLL
tlačítkodolevanebodopravapropřístupnarozšířenoudomovskouobrazovku.
Můžetevidětnásledující rozšířenouplochu,nakteré jsouněkteré užitečné
zástupce.Vybránímtěchtozástupců můžeteaktivovatjejichfunkci.
a b c
l Změnasystémovéhonastavení
Vyberteikonumenu ,apoté vyberte “Settings” .Vybertekategorii:
“Wireless&networks”, “Sound&Display”, “Date&Time”,atd.Provice
informací orůznýchnastaveních,sepodívejtedosekce SystemSettings.
a.Připojitsekdostupné Wi-Fi
sítí.
b.Obnovení knihovnymédií.
c.Nastavení jasuobrazovky.
Používání dotykové obrazovky
MobiiTabletjevybavendotykovouobrazovkou.Následujepártipů napoužívání
dotykové obrazovky.
Hlavní akcedotykové obrazovky
Ÿ Vrůznýchaplikacích,můžetejítzpětojednu úroveň vybránímtlačítka Back
(vpravémhornímrohuobrazovky.
Ÿ Kdykolivjstevrozhraní,můžetesevrátitpřímonadomovskouobrazovku
82
Page 83

vybránímtlačítkaHome (vlevémhornímrohuobrazovky).
dae
Další funkcedotykové obrazovky
Ÿ Přisledování videaneboposlouchání hudby,
můžetedotykemnaukazatelstopypřeskočitna
konkrétníčástvideanebopísničky.
Můžetetaké použítprstnapřetáhnutí
ukazatele.
Ÿ Vrůznýchprohlížečích(souborů,hudby,
videa,atd.)můžeteposunoutprstnahoru
adolů proposunvseznamunahorua
dolů.
Ÿ Vewebovémprohlížeči,semůžetepostránceposunovatpoklepánímna
stránkuaposunemprstunahorunebodolů (pozoraťpřipoklepání nekliknete
naodkaz!)
Ÿ Poklepánímnaodkazotevřetestránku.
Použití virtuální klávesnice
Poklepánímnajakékolivtextové polevyvolátevirtuální klávesnici.Pomocí této
klávesnicemůžetezadávatwebové adresynebojakýkolivtext.
Ukazatele
CapsLock
a.
b. Backspace.
c. Přepínání kláves:
Písemná/ Číslaaznaky.
d. Mezerník
c
b
Výběrvstupní metody
Pokudjstenainstalovalivicenež jednuvstupní metodunaváš tablet,můžetevybrat
jednuznichpomocí a)podrženímtlačítka dokudseneobjeví nastavení Android
klávesnice;b)vybráním “InputMethod” apoté vybrání vámizvolené možnosti.
e. Enter
Přístupnainternet
Svašímtabletemmůžetesurfovatnainternet.
Váš tabletnabízí zabudovanouWi-Fitechnologiiaslotpro3Gkartu,abyste
mohlimítpřístupkinternetupomocí Wi-Fia3Gsítě.
83
Page 84

NejdřívevšakmusítenastavitWi-Fia3Gsíť.ProkonfiguraciWi-Fisemusíte
nacházetvmístě,kdejedostupná Wi-Fisíť.Pokudbudetevdosahusítě,kterou
už jstejednounastavili,tabletsepokusí automatickypřipojit.Profunkci3Gsítě,
musítedozařízení vložit3Gkartu.
Vytvoření WiFipřipojení
(1) Nadomovské obrazovce,vyberteikonuMenu apoté vyberte
“Settings”.
(2) V “Settings” obrazovce,vyberte “Wireless&Networks”.
(3) PokudjeWi-Fivypnutá,vyberte “Wi-Fi” nastavení prozapnutí.Poté
vyberte “Wi-Fisettings”.Tabletzačneautomatickyvyhledávatdostupné
WiFi sítě a zobrazí je. Seznam dostupných sítí ukazuje všechny
bezdrátové sítě vdosahuzařízení.
- Listjeautomatickyaktualizován.
- Když jeWiFizapnutá,váš tabletsepřipojí automatickykedříve
nastavenýmsítím,když jsouvdosahu.
- Pokudtabletnaleznesíť,která ještě nebylanastavena,zobrazí
upozornění.
(4) Vybertesíť,kekteré sechcetepřipojit,vložtepožadovanéúdaje(heslo)a
stiskněte “Connect”.Tabletsenyní pokusí připojitpomocí nastaven í,které
jstezadaly.Pokudjepřipojeníúspěšné,zobrazí sepodWi-Finastavením
oznámení opřipojení kuvedené síti.
Pozn.:
a)Listdostupnýchsítijeautomatický aktualizován.
b)Když jeWiFizapnutá,váš tabletsepřipojí automatickykedřívenastavenýmsítím,když
jsouvdosahu.
c)Pokudtabletnaleznesíť,která ještě nebylanastavena,zobrazí upozornění.
Pokročilé připojení
Promanuální vyhledávání dostupnýchWi-Fisítí:
(1)Vobrazovce “Wi-Fisettings” vyberte Menu ,apakvyberte “Scan”.
(2)Pokudsesíť,kekteré sechcetepřipojit,nenachází vseznamusítí,posuňte
senaobrazovcedolů avybertevolbu “AddaWi-Finetwork”.Vložtepotřebné
údajeauložtestisknutím “Save”.
Propřístupkpokročilýmsíťovýmparametrům(“Regulatorydomain”, “IP
address”,atd.),vyberteMenu ,apoté vyberte “Advanced”.Zobrazí sedalší
parametry.Potřebné informacemůžetezískatodsprávcetétosítě.
84
Page 85

Průzkumníksouborů vámdávámožnostprohlížetsouborynavašemtabletu.
Otevřete ApplicationTab prozobrazení všechaplikací apoté vyberte
“Explorer” provstupdoprohlížečesouborů.
Prohlížení souborů aadresářů
Ÿ Posunemprstusepohybujete
seznamemsouborů.
Ÿ Souborneboadresář otevřete
poklepáním.
Ÿ Poklepánímnaikonumenu
můžetespravovataplikace(vicev
sekci “ManageApplication”).
Ÿ Můžetesevrátitneboposunouto
jednou úroveň pomocí ikon Back
nebo Next .
Ÿ Můžetejítoúroveň výšepoklepánímnatlačítko LevelUp .
Ÿ Kdykolivjstevuživatelskémrozraní,můžetesevrátitnadomovskou
obrazovkupoklepánímnaikonuReturn neboikonuHome .
Ÿ Poklepánímnaikonu sevrátítedokořenovéhoadresáře.
Používání panelunástrojů
Panelmůžetepoužívatproprohl ížení interní paměti,paměťové karty,mazání
nebokopírování souborů.
Home Návratnadomovskoustránku.
LevelUp Návratoúroveň výš.
Multi Vybrání vicesouborů naráz.
Editor Kopírování,mazání,přesun,vložení nebopřejmenování
Back Vrátitsevrozhraní ojednu úroveň.
Next Posunvpředvrozhraní ojednu úrove ň.
Poklikánímnaš edouoblastskryjete/zobrazítepanel.
souboruneboadresáře.
Kopírování/Přesunsouborů aadresářů
(1) Vseznamusouborů vybertesoubor,který chcete
kopírovat,nebopřesunou.
(2) Podržteprstnavybranémsouboru,dokudsenezobrazí
menu.
85
Page 86

(3) Vyberte “Copy” nebo “Move” zvyskakovacíhomenu.
(4) Přejdětedolokace,kamchceteadresář nebosouborpřesunout.
(5) VyberteikonuEditor zpanelunástrojů apoté vyberte ”Paste”.
Mazání souborů neboadresářů
(1) Vseznamusouborů vybertesoubor,který chcetesmazat.
(2) Podržteprstnavybranémsouboru,dokudsenezobrazí menu.
(3) Vybertemožnost “Delete” zvyskakovacíhomenu,poté potvrďtepomocí
“Delete” nebozruštevolbupomocí“Cancel”.
Přejmenování souborů neboadresářů
(1) Vseznamusouborů vybertesoubor,který chcetepřejmenovat.
(2) Podržteprstnavybranémsouboru,dokudsenezobrazí menu.
(3) Vyberte “Rename” zvyskakovacíhomenu
(4) Poklepejtenatextové poleprozobrazení virtuální klávesnice,zadejte
název.
(5) Potvrďtepoklepánímna “OK”.
Výběrvícesouborů
Můžetevybratvicesouborů neboadresářů.
(1) Vpanelunástrojů poklepejtenaikonuMulti “ ”.
(2) Vybertesoubory/adresáře,které chcetevybrat.Vybránímsenázevobarví
na červeno.Opětovnýmpoklepánímzrušítevýběr.Podokončení výběru
můžetevybrané souborysmazat,kopírovatnebopřesunoutpomocí ikony
Editor .
E-mail
Váš tabletmápřed-instalovanéhoE-mailovéhoklienta.Můžetekdykolivposílat
nebopřijímatemailypomocí tohototabletu.Předpoužitímemailovéhoklientase
ujistěte, žejedostupné internetové připojení.
Otevřete ApplicationTab vyberte “Email”.Pospuštění bysteměli,pokudjste
nastavilyváš emailovýúčet,vidětvašipříchozí poštu.
Nastavení emailového účtu
Nejdřívemusítenastavitemailovýúčetproodesílání apříjememailů.
(1)Postartuemailové aplikacejstepožádání onastavení emailového účtu.
Pokračujtepoklepánímna “Next”.
(2)Zadejtevašiemailovouadresuaheslo.Tento účetmůžetenastavitjako
výchozí pomocí volby “Sendemailfromthisaccountbydefault”.Pokračujte
poklepánímna “Next”.
(3)Zadejtepotřebné informacepronastavení PO3/IMAPserveru.Tyto
86
Page 87

informacemůžetezískatodposkytovatelepřipojení,správcesítěneboz
internetu.
(4)Ponastavení POP3serverukliknětena “Next”.Váš tabletověří nastavení
serveruapostoupí knastavení IMAPserveru.NastavteIMAPserverjako
POP3server.Dopole “IMAPServer” bystemělizadat ”imap.+název
domény”.
(5)Poověření nastavení bysemělaobjevitzpráva “Youraccountissetup,and
emailisonitsway”,pokudsetakstane,je účetsprávně nastavený.
(6)Zadejtejméno,které má býtzobrazené vkaždémemailuapotvrďtepomocí
„Done”.
Pozn.: Pokudmatevice účtů,pokaždémspuštění aplikacevstoupítedovýchozího
emailového účtu.
Správa účtů
Můžetenastavitvicenež jeden účetaspravovatje,případně přidávatdalšíúčty
nebojemazat.
Přidání dalšího účtu
Následujtetytokrokyprozaložení dalšího účtu:
(1)Otevřeteemailový klientapoklepejtenaikonuMenu .Vzobrazeném
menuvybertemožnost “Accounts”.Tímtozobrazítevytvořenéúčty.
(2)VyberteikonuMenu prozobrazení menuavyberte “Addaccount”.
(3)Následujtekrokypronastavení emailového účtu.
Smazáníúčtu
(1)VemailovémklientuvyberteikonuMenu prozobrazení menu.
(2)Vybráním “Accounts” zobrazítevšechnyvytvořeníúčty.
(3)Podržteprstna účtu,který chcetesmazat,dokudsenezobrazí menu.
(4)Vybertemožnost “RemoveAccount” apotvrďtestiskem “OK” toconfirm.
Ověření nastaveníúčtu
(1)VemailovémklientuvyberteikonuMenu prozobrazení menu.
(2)Vybráním “Accounts” zobrazítevšechnyvytvořeníúčty
(3)Podržteprstna účtu,který chceteupravit,dokudsenezobrazí menu
(4)Vybertemožnost “Accountsettings” apoté bystemělividětvšechny
nastaveníúčtu.
Prohlížení emailů
Pospuštění emailovéhoklientabystemělybýtvevaší poštovní schránce.
Ÿ Veschráncesemůžeteposunovánímprstuposouvatnahoruadolů.
Ÿ Poklepánímnaemailhootevřete.
Ÿ Podrženímprstunapoložcezobrazítemenu.Vmenumůžeteotevřít,
87
Page 88

přeposlat,smazatneboodpovědětnazprávu.
EmailMenu
VseznamuemailupoklepánímnaikonuMenu zobrazítemenu.
Refresh Obnovitseznamemailů
Compose Vytvořitnový email.
Accounts Seznamvšech účtů
AccountSettings Nastaveníúčtu
Správaaplikací
Váš MobiiTabletpodporujemnohoužitečnýchaplikací třetíchstran.Pořízením
těchtoaplikací můžetedodatvašemutabletuvícefunkcí.Jsoudostupné online
nainternetunebopřímovevašemzařízení.
Předinstalované aplikace
Nazařízení jsouzvýrobypřeinstalované aplikace.Můžetesenaněpodívat
otevřením ApplicationTab.Mezipřeinstalované aplikacepatří:videopřehrávač,
audiopřehrávač,prohlížeč obrázků,budík,kalkulačka,kalendář,atd.
Instalaceaplikací
Proruční instalaciaplikací postupujtepodlenásledujícíchkroků:
(1)Stáhněteinstalační soubornaváš počítač.Ujistětese, žejesouborve
formátu.apk,který jepodporovánsystémemtabletu.
(2)Připojtetabletkpočítačipomocí USBkabelu.
(3)Překopírujteinstalační soubordovašehotabletu.
(4)Odpojteváš tabletodpočítače.
(5)Zapněteváš tabletavstuptedoprohlížečesouborů.
(6)Spusťteinstalační soubor.
(7)Následujteinstrukcenaobrazovce.
(8)Poinstalacibystemělinajítaplikacivpaneluaplikací.
Odstranění aplikací
(1)Zobraztevšechnyaplikaceotevřením ApplicationTab.
(2)Vyberte “Settings”,apoté“Applications ”.
(3)Vyberte “ManageApplications ”.
(4)Vyberteinstalací,kterouchceteodstranit.
(5)Potvrďtevolbou “Uninstall”.
Pozn.: Nemůžeteodstranitpřeinstalované aplikace.
88
Page 89

Systémové nastavení
Nadomovské obrazovce,vyberte “Settings” azvoltejednuzkategorií:
“NetworksControls”, “Sound&Display”, “Date&Time”,atd.
Ÿ Pokudsenapravoodparametruobjevíšipkadolů,znamená to, žetéto
nastavení obsahujevíceparametrů.Kliknutímzobrazíteseznamtěchto
parametrů.
Ÿ Pokudsevedleparametruzobrazí zaškrtávací políčko,poklepánímpovolíte
nebozakážetetutovolbu.
Ÿ Pokudjemožné,můžeteposunovánímprstuzobrazitmožnosti,které jste
původně neviděli.
Ÿ Podokončeníúpravnastavení,semůžetevrátitpomocí ikonyBack na
seznamnastavení,nebosepomocí ikonyHome můžetevrátitna
domovskouobrazovku.
Wireless &
networks
Sound &
Display
Location &
Security
Applications Tatoobrazovkavámdovolujespravovatvašeaplikacea
TotomenudovolujenastavitWi-FiaBluetoothpřipojení nebo
také režimproprovozvletadle „Airplanemode“.
Wi-Fi – Vypnutí /zapnutí Wi-Fipřipojení.
Wi-Fisettings – dovolujevámnastavitaspravovatvaše
Wi-Fisítě.
Soundsettings:
Mediavolume – Nastavení hlasistopropřehrávání hudbya
videa.Můžetetaké upravithlasitostpomocí tlačíteknavrchní
straně zařízení.
NotificationRingtone – Nastavení zvukuupozornění.
Audible selection – Vypnutí/zapnutí zvuku při dotyku
obrazovky.
SDcardnotifications – Vypnutí zvuků upozornění SDkarty.
Displaysettings:
Animation – Vypnutí/zapnutí zobrazení animací přiotevření
nebozavření aplikací.
Brightness – Dovolujnastavitjasobrazovky.
Screentimeout – Nastavení prodlevyautomatickéhovypnutí
obrazovkyazamknutí zařízení.Prozapnutí displejestiskněte
jednoutlačítko Power aopětovné zmáčknutí odemkne
obrazovku.
Tatoobrazovkavámdovolujenastavitmožnostpřístupu
některýchaplikací proAndroid™ kzjištění vaší aktuální
polohypomocí WiFineboGPS.Můžetezdenastavitzpůsob
odemykání obrazovkynebodalší parametryzabezpečení.
prohlédnoutinformaceonainstalovanýchaplikacíchnavašem
zařízení.
89
Page 90

SD card &
Mobii Tablet
Storage
Language &
keyboard
Date&Time Tatovolbavámumožňujenastaveníčasu,data, časového
Touch Panel
calibration
USB Mode
Select
Update Media
Library
AboutDevice Zobrazení informací ovašemtabletu.
TatovolbavámumožňujeodpojitnebozkontrolovatSDkartu.
Vyberteváš jazykaumístění.Dáleobsahujenastavení
virtuální klávesnice.
pásmaaformátuzobrazení data.
Pokudjeovládání dotykové obrazovkynepřesné,použijtetoto
nastavení anásledujteinstrukcenaobrazovce.
Vybertetutomožnost,pokudsek3Gsítipřipojujetepomocí
USBmodulunamístointegrované 3Gkarty.
Ruční aktualizujteknihovnymedií.
Řešení problémů
Resettabletu
Ÿ Vpřípadě, ževáš tabletzatuhne,můžetevypnoutzařízení podržením
tlačítka Power podobu15vteřin.
Ÿ Pokudvypnutí tlačítkem Power nefunguje,můžetepoužít “pinholereset”
tlačítkoumístěné nazadní straně zařízení.
Problémysdotykovouobrazovkou
Pokudjeovládání dotykové obrazovkynepřesné,zkustekalibrovatobrazovku
pomocí volby “Touch-ScreenCalibration” vnastavení zařízení.
90
Page 91

a
b
ײ¬®±¼«½»®»
Ì¿¾´»¬¿ Ó±¾·· ß²¼®±·¼ »-¬» «² ¼·-°±¦·¬·ª ³±¾·
¿°¿®¿¬» °±®¬¿¾·´» ³·½·ô °«¬»®²·½»ô ½±²»½¬¿¬» ´¿
·²¬»®²»¬ ½±³¾·²
¾«¦«²¿® °»²¬®« ¼·-°±¦·¬·ª» ³±¾·´»ò
Í«³¿® ½¿®¿½¬»®·-¬·½·
Í·-¬»³ ¼» ±°»®¿®» ·²½±®°±®¿¬ ß²¼®±·¼
Ý« -·-¬»³«´ ¼» ±°»®¿®» ·²½±®°±®¿¬ ß²¼®±·¼ô Ì¿¾´»¬¿ Ó±¾·· -«°±®¬
³¿¶±®·¬¿¬»¿ °±°«´¿® ò ß°´·½¿
ײ¬»®²»¬ -¿« ¼·®»½¬ 2² Ì¿¾´»¬¿ Ó±¾··ò
ݱ²»½¬·ª·¬¿¬» É·óÚ· ñ íÙ øíÙ ±° ·±²¿´÷
É·óÚ· íÙô Ì¿¾´»¬¿ Ó±¾··
ò
̱«½¸ ͽ®»»² ¼» éó·²½¸
¼»¹»¬«´ °» »½®¿²ô »½®¿²«´ ® ²¼» ·²-¬¿²¬ò
Í»²¦±® Ù ·²½±®°±®¿¬
±®·»²¬¿®»¿ °» ´¿²¼-½¿°» -¿«
°±®¬®»¬ 2² ³±¼ ¿«¬±³¿¬ô
Ü·ª»®¬·-³»²¬
ô ò
ò
п½¸»¬«´«·
¬»®»±
Ý¿¾´« ËÍÞ
Þ«¬±¿² б®¬ó«®·
Ê»¼»®» ¼» -«-
¿ò ᮬ ËÍÞæ ½±²»½¬ ½±³°«¬»®ô º´¿-¸ ¼®·ª» ËÍÞô ³±«-» -¿«
¾ò Þ«¬±² б©»®æ ¿°
¼·-°±¦·¬·ª«´å ò
ËÍÞò
91
Page 92

¶
µ
¾
ilm
n
Ê»¼»®» ¼
¼
½
³±¼»´ ï
Ê»¼»®» ¼» ¶±-
ª»¼»®» ´¿¬»®¿´
³±¼»´ î
¼
½
»
º
¹
¸
»
º
¸
½ò Û½®¿² ÔÝÜ
¼ò ø±° ·±²¿´÷
»ò ر³» æ Ó»®¹· ´¿
ر³»ò
ºò Ó»²«æ ߺ·
-«°®¿°«-ò
¹т Ю«¬±² НЭОСФФж Î
°»²¬®« ¿ º¿½» -»´»½
°»²¬®« ¿ ½±²º·®³¿
ø±° ·±²¿´÷
¸ò ÛÍÝæ 못²·®»
·ò Í´±¬ Ý¿®¼ Ó·½®±óÍÜ
¶ò Ö¿½µ
µт Р±®¬ ЬЭуЧТж ½±²»½¬
´¿ ±®·½» ±«¬´»¬ »´»½¬®±²·½
-¬¿²¼¿®¼ °®·² ¿¼¿°¬±®
ßÝò
´ò λ-»¬ °·² ¸±´»
³ò Ó·½®±º±² ·²½±®°±®¿¬
²ò Í´±¬ Ý¿®¼ íÙæ ¼»-½¸·¼»
°»²¬®« ¿ ·²-»®¿ «² ½¿®¼
íÙ
¿½«³«´¿¬±®«´«·
Ü·-°±¦·¬·ª«´ ¿®» «² ¿½«³«´¿¬±® ·²¬»®²ò Ò
ò
¿½«³«´¿¬±®«´«·ò
ô ½±²»½¬
°»®»¬» °®·²¬®у«² ¿¼¿°¬±® ЯЭ °®·² °±®¬у«´ ЬЭуЧТт í ±®»
¿½«³«´¿¬±®«´ ½±³°´»¬ò
æ
¿ò Ð ¼ ò Ü¿® °»²¬®« ¿ °®»´«²¹·
¿½«³«´¿¬±®«´«·ô
92
Page 93

¾ò Í» ®»½±³¿²¼ ¿½«³«´¿¬±®«´«· ¼·-°±¦·¬·ª«´ °»²¬®«
°®·³ ò
½ò ³¿¨·³ ô ¬®»¾«·» º±´±-·¬» ¼»- ¾¿¬»®·· ½« ·±²· ¼» ´·¬·«ò
¼·-°±¦·¬·ª«´ ¼»-ô ó ¿½«³«´¿¬±®«´ ± °» ò
ò
ײ-¬¿´¿®»¿ ½¿®¼«´«· ¼» ³»³±®·»
R² ô Ì¿¾´»¬¿ Ó±¾··
ò ô -¿«
ô ·³¿¹·²» -¿« ª·¼»± ¼·®»½¬ ¼» °» ½¿®¼«´ ÍÜò
л²¬®« ¿ ·²-¬¿´¿ ½¿®¼«´ ¼» ³»³±®·»ô 2² ¬«´«·
Ó·½®±óÍÜ 2² -´±¬ ò
л²¬®« ¿ ¿½½»-¿ ½¿®¼«´ ¼» ³»³±®·» ·²¬® ³±¼«´ Û¨°´±®»®
¼·®»½¬±®«´ “ÍÜÝ¿®¼’ò
Ì®¿²-º»® »®»
ô ó
Ó±¾·· ³»¼·¿ò R² ½¿¦ ½±²¬®¿®ô
¬®¿²-º»® º· »®» ¼·² ½±³°«¬»® °» Ì¿¾´»¬¿ Ó±¾··ò
øï÷ ݱ²»½¬ Ì¿¾´»¬¿ Ó±¾·· ´¿ «² ½±³°«¬»® ½« ½¿¾´«´ ËÍÞ º«®²·¦¿¬ò
øî÷ ½±²»½¬¿¬ô « 2² ½±³°«¬»®«´
¼ª-ò ˲«´ ®»°®»¦·²¬ ³»³±® Ó±¾··ô ·¿ ®»°®»
½¿®¼«´ ¼» ³»³±®·» ·²-»®¿¬ 2² Ì¿¾´»¬¿ Ó±¾··ò º·
-¿« °» ¿½»-¬» ò
øí÷ ¿²-º»®«´ ¼» ¼¿¬»ô
ËÍÞò
-¬±½¿®» ËÍÞ÷ ø¼»½±²»½¬¿®»÷ °»²¬®« ¿ ¼»½±²»½¬¿
¼·-°±¦·¬·ª«´ ¼·² ½±³°«¬»®ò
Ì®¿¹» 2² ¶±-
93
Page 94

øì÷ °´¿§»®ó«´ ½« ¹®· ÐÝò
¿÷ Ý´·½ -¬>²¹¿ °» ·½±²ó«´ ó«´
½±³°«¬»®«´«·ò
¾÷ Ý´·½ °» ³·²· º»®»¿-¬®¿ ½¿®» ¿°¿®» ½« ³»-¿¶«´ “ͬ±° ¬¸» ËÍÞ Ó¿--
ͬ±®¿¹» Ü»ª·½» › Ü®·ª» øÈ÷’ø-¬±° ¼·-°±¦·¬·ª
Ь·®»ª»шИччт
½÷ °´¿§»®ó«´ ¼·² ½±³°«¬»®ò
б®²·®»ñÑ°®·®»
л²¬®« ¿ °±®²· ¼·-°±¦·¬·ª«´ô ¿° б©»® ¼» °»
«²·¬ «´ ¼» ¾±±¬¿®»ò б¿¬» ²»½»-·¬¿ ½>¬»ª¿ ³·²«¬»
°»²¬®« ¿ °±®²· -·-¬»³«´ô ò
¾´±½¿¬
2²½»°» º±´±-·®»¿ ¿°¿®¿¬«´« «´ ³¿· 2²¬>·ò л²¬®« ¿ ¼»¾´±½¿
¿ ó«´ ¼» ¾´±½¿®» 2² -«-ò
¬ ¾«¬±²«´ б©»®
±° ·«²»¿ “б©»® Ѻº’ø¼»½±²»½¬¿®»÷ô
æ Ì¿¾´»¬¿ Ó±¾·· ª¿ ·²¬®¿ 2² ³±¼ ’-´»»°’
94
Page 95

½>¬»ª¿ -»½«²¼»ò б©»® ¿ó´ ¬®»¦·ò
«´ ر³»
ײ¼·½¿ ··
¿ ¾ ½ ¼ » º ¹ ¸ · ¶
µ
´
³
¿ò ر³» æ λª·²± 2² «´ ر³» ·²¬»®º¿ ò
¾ò Ý¿®¼ ¼» ³»³±®·»æ -»³²«´ »¨½´¿³ ·²¼·½
»-¬» ¼·-°±²·¾·´ò
½ò É·óÚ·
¼ò íÙ
»ò
ºò Ì·³° ½«®»²¬
¹ò λ¼«½»®» ª±´«³æ -¿« ½±²¬·²«« °»²¬®« ¿ ®»¼«½» ª±´«³«´ò
¸ò ±´«³æ ª±´«³«´ò
·ò 못²·®»æ 못²·®» ´¿ ¼·®»½¬±®«´ ¿²¬»®·±®ò
¶ò Ó»²«æ ò
µò ß ×²°«¬¬·²¹ ß®»¿ ø¦±²¿ ¼» ·²¬®±¼«½»®» ¿¼®» ÷ò
-» ª¿ ¿-½«²¼» ¬¿-¬¿¬«®¿ò
´ò ß°°´·½¿¬·±²- Ì¿¾ æ ¿½»-¬ ·½±²
·²-¬¿´¿¬» °» Ì¿¾´»¬¿ Ó±¾·· ø ô ½¿´½«´¿¬±®ô
Ù´±¾¿´Ì·³» »¬½ò÷ò
95
Ю·² ¿¬·²¹»®»¿
Page 96

ó ¿ ·´» °» «´ ر³» °»
·½±²ó· ´±®ò
ó °´·½¿ ·¿ ¼·² ر³» °®·² ¬®¿¹»®»¿ ·½±²ó·´±® 2² Ì¿¾«´
ò ر³»ô
ô ó ´¿ ½¿®» ¿
¼»ª»²·¬ «² ·½±² ¼» ¹«²±·ò
³ò »º¿«´¬ ø“Þ®±©-»®’ô “Ê·¼»± д¿§»®’ô “ß«¼·± д¿§»®’ô »¬½ò÷
ó ·½±² ½±®»-°«² ò
ó Î ¾«¬±²«´ НЭОСФФ °» «²·¬¿¬» °»²¬®« ¿ -»´»½¬¿ «² ·¬»³ò
ó ر³» ñ
©·¼¹»¬-ô -½¸·³¾¿®»¿ ©¿´´°¿°»®ô »¬½ò
ﮬ·½«´¿®·¦¿®»¿ ·¬»³ó·´±® ¼» °» ر³»
ó л²¬®« ¿ ¿¼ ر³» ø- ô ©·¼¹»¬-ô º±´¼»®ó» »¬½ò÷ô
¿¬ ó«´ Ó»²« -»´»½¬ “ß¼¼’
ر³» ó´ò
ó л²¬®« ¿ ³«¬¿ ·¬»³ó«´ ر³»ô
ª¿ -»´»½¬¿ô ó´ò
ͽ¸·³¾¿®»¿ ©¿´´°¿°»®ó«´«·
·½±²ó«´ Ó»²« ô É¿´´°¿°»®
°»²¬®« ¿ ½±²º·®³¿ò
Ó»®¹· ´¿ ر³» »¨¬·²-
НЭОСФФ °»²¬®« ¿ ³»®¹»
´¿ °¿²±«´ ¼·² -¬>²¹¿ -¿« ¼®»¿°¬¿ ¿ ر³» »¨¬·²-ò
96
Page 97

ر³» »¨¬·²- 2²
º±¿®¬» «¬·´»ò ò
¿ ¾ ½
ͽ¸·³¾¿®»¿ -
·½±²ó«´ Ó»²« ô ¿°±· ¿¬·² “Í»¬¬·²¹-’ ò
½¿¬»¹±®·»æ “É·®»´»--ú ²»¬©±®µ- ô “ͱ«²¼ ú Ü·-°´¿§’ø-«²»¬
ô “Ü¿¬» ú Ì·³» ·²º±®³¿ ·· -«°´·³»²¬¿®»
®»º»®·¬±¿®» ͧ-¬»³ Í»¬¬·²¹- ò
¿ò ݱ²»½¬ É·óÚ·
¾ò ®»º®»-¸ ´¿ ¾·¾´·±¬»½¿
³»¼·¿
½ò ߶«-¬
Ú±´±-·®»¿ ̱«½¸ ͽ®»»²
Ì¿¾´»¬¿ Ó±¾·· »- ¬±«½¸ó-½®»»²ò
°®·ª·®» ´¿ ³±¼«´ ¼» º±´±-·®» ¿´ ¬±«½¸ -½®»»²ò
̱«½¸ ͽ®»»²
R² ¼·º»®·¬» ¿°´·½¿ · ² ·²¬»®º¿
·½±²ó«´«· Þ¿½µ ø2²¿°±·÷ø ÷ò
·²¬»®º¿
ر³» °®·² ¿¬·²¹»®»¿ ·½±²ó«´«· ر³» ø2²
»½®¿²«´«·÷ò
ª·¼»± -¿«
°®±¹®»-·»
¼·º»®·¬» 2² ª·¼»± -¿« ³»´±¼·»ò Ü»¿-»³»²»¿
º±´±-· ¼»¹»¬«´ °»²¬®« ¿ ¬®¿¹» ½«®-±®«´ 2² ¾¿®¿ ¼» °®±¹®»-·»
97
Page 98

ª·¼»± -¿« ³»´±¼·»òò
R² ¾®±©-»®ó» ¼·º»®·¬» øÚ·´» ô
Ó«-·½ ô Ê·¼»±ô 豬±øº±¬±÷ô »¬½ò÷ô
R² ¾®±©-»®ó«´ É»¾ô
ø
¬®»¾«·» ¿¬·²- «² ´·²µÿ÷ò
ó«´ °»²¬®« ¿ ¼»-½¸·¼» °¿¹·²¿ò
Ú±´±-·®»¿ ¬¿-¬¿¬«®·· ª·®¬«¿´»
ª·®¬«¿´»ò ª·®¬«¿´ ó«´«· ©»¾ -¿«
±®·½» ¬»¨¬ -±´·½·¬¿¬ò
··
Ý¿°- Ô±½µ
Þ¿½µ-°¿½»ò
«³ ®
½¿®¿½¬»®» ñ´·¬»®»ò
Í°¿
¿
½
Í»´»½¬¿®»¿ ³»¬±¼»· ¼» ·²¬®±¼«½»®»
± ³»¬±¼ ¿÷
ß²¼®±·¼å ¾÷ ¿´»¹»®»¿ “ײ°«¬ Ó»¬¸±¼’øÓ» · ¿°±· ¿´»¹»®»¿ ½»´»·
¼±®·¬»ò
¼
¾
»
Û²¬»®
»®» 2² Ì¿¾´»¬¿ Ó±¾·· -»´»½¬¿
ß½½»- ´¿ ײ¬»®²»¬
» ײ¬»®²»¬ ½« Ì¿¾´»¬¿ Ó±¾··ò
Ì¿¾´»¬¿ Ó±¾·· É·óÚ· íÙ ¿-¬º»´
·²¬»®²»¬ó ó íÙò
Ó¿· 2²¬>·ô ½±²º·¹«® óÚ· -¿« íÙò
É·óÚ· ô ó É·óÚ·
°»®³·¬» ½±²»½¬¿®»¿ ´¿ »¿ò Ó±¾·· »-¬» 2² ®¿¦¿ ¼»
ó
98
Page 99

½±²»½¬»¦»ò íÙ
íÙ 2² ¼·-°±¦·¬·ªò
λ¿´·¦¿®»¿ ½±²»¨·«²·· É×Ú×
øï÷ ر³»ô ó«´ Ó»²« -»´»½¬
“Í»¬¬·²¹- ò
øî÷ R² “Í»¬¬·²¹-’ ô -»´»½¬ “É·®»´»-- ú Ò»¬©±®µ-’øÉ
ò
øí÷ É·Ú· »-¬» ±°®·¬ô ¿¬ “É·óÚ·’ °»²¬®« ¿ó´ °±®²·ò ß°±·
-»´»½¬ “É·óÚ· -»¬¬·²¹-’ óÚ·÷ò Ì¿¾´»¬¿ Ó±¾·· ª¿ -½¿²¿ ¿«¬±³¿¬
É·Ú· ò Ô·-¬
´»´» ©·®»´»-- ¼·-°±²·¾·´» 2² ®¿¦¿ ¼» ¿½ ò
ó Ô·-¬¿ »-¬» ½±²-¬¿²¬ ¿½¬«¿´·¦¿ 2² ³±¼ ¿«¬±³¿¬ò
ó Ý>²¼ »-¬» ¿½¬·ª¿¬ É·Ú·ô Ì¿¾´»¬¿ Ó±¾·· -» ª¿ ½±²»½¬¿ ¿«¬±³¿¬
½±²º·¹«®¿¬» ò
ó Ó±¾·· ô
²±¬·º·½¿®»ò
øì÷
ø°¿®±´¿÷ ò Ì¿¾´»¬¿
Ó±¾·· ª¿ 2²½»®½ É·Ú·
ó ò ½±²» ô ª¿
³»-¿¶«´ Э±²²»½¬»¼ ¬± ИИИ ш½±²»½¬¿¬ ´¿ ИИИч 2² -»¬¿®»¿ ЙЧЪЧт
Ò±¬ æ
¿÷ ½±²-¬¿²¬ ¿½¬«¿´·¦¿ 2² ³±¼ ¿«¬±³¿¬ò
¾÷ Ý>²¼ »-¬» ¿½¬·ª¿¬ É·óÚ·ô Ì¿¾´»¬¿ Ó±¾·· -» ª¿ ½±²»½¬¿ 2² ³±¼ ¿«¬±³¿¬
½±²º·¹«®¿¬» ¿¬«²½· ½>²¼ ¿½»-¬» ò
½÷ Ó±¾·· ô
«² ·½±² ¼» ²±¬·º·½¿®»ò
ß¼ª¿²½»¼ ݱ²²»½¬·±² ø ÷
л²¬®« ¿ -½¿²¿ ³¿²«¿´ É·óÚ· ¼·-°±²·¾·´»ô
øï÷ R² “É·óÚ· -»¬¬·²¹-’ø-» óÚ·÷ô ¿¬ ó«´ Ó»²« ô · ¿°±·
ò
øî÷ É·óÚ· ô
¶±-«´ »½®¿²«´«·ô ó óÚ·÷ò
ò
л²¬®« ¿ ¿½½»- ø“λ¹«´¿¬±®§ ¼±³¿·²’ø¼±³»²·« ¼»
®»¹´»³»²¬¿®»÷ ô »¬½÷ô ¿¬ ó«´ Ó»²« ô ¿°±·
99
Page 100

¿¬·² ø¿ª¿²-¿¬÷ò ®·ò ײº±®³¿ ·¿ -±
°±¿¬» º· ±¾ ¦ ò
Þ®±©-»®ó
¼» ³»³±®·» ¿´ Ì¿¾´»¬»· Ó±¾··ò
ß°°´·½¿¬·±² Ì¿¾ ø ÷ ô ¿°±· -»´»½¬
“Û¨°´±®»®’ °»²¬®« ¿ ·²¬®¿ ³±¼«´ »¨°´±®¿®» ò
Ò¿ª·¹¿ · °®·² º ó»
ò
«² º±´¼»®ô ¿¬ º· ·»®«´ñº±´¼»®ó
«´ò
ó«´ ³»²« ô
¿¼³·²·-¬®¿ ¿°´·½¿ ··´» øª»¦·
¼»¬¿´··´» 2² -» “Ó¿²¿¹»
÷ò
«² ²·ª»´ 2²¿°±· -¿« 2²¿·²¬» 2² ·²¬»®º¿ ó«´«·
Þ¿½µ ø2²¿°±·÷ -¿« ·½±²ó«´ Ò»¨¬ ò
Ô»ª»´Ë°
ø²·ª»´ ³¿· -«-÷ò
² ·²¬»®º¿ ô ر³»
°®·² ¿¬·²¹»®»¿ ·½±²ó«´«· 묫®² ø2²¬±¿®½»®»÷ -¿« ·½±²ó«´«· ر³»
ò
ó«´ Ø±³» ò
Ú±´±-·®»¿ ¾¿®»· ¼» ·²-¬®«³»²¬»
³»³±®·» ¿´ ¿°¿®¿¬«´«· ¼ª-òô ½±°·¿ º· ·»®»ò
ر³» Ó»®¹· ´¿ ر³»ò
Ô»ª»´Ë°ø²·ª»´
¿²¬»®·±®÷
Ó«´¬· Í»´»½¬ ³ ò
߬·²¹»®»¿ ¦±²»· ¹®· °±¿¬» ¿-½«²¼»ñ
Ó»®¹· 2²¿°±· «² ²·ª»´ 2² ¼·®»½¬±®ò
100
 Loading...