


PLACEPOD® VEHICLE COUNTING SENSOR
USER MANUAL

PlacePod® Vehicle Counting Sensor
In-Ground and Surface-Mount
PlacePod Vehicle Counting sensor (PlacePod VC) is an in-ground sensor that communicates with a LoRa
gateway to provide real-time vehicle counts. PlacePod VC provides accurate count data for passing vehicles in driveways and designated entrances/exits, up to 7 years of battery life, and is stable over temperature fluctuations, even in harsh environments. (Note: surface-mount PlacePod VC sensors are for
short-term product evaluation purposes only.)
Key Features & Benefits
• Includes the industry’s most accurate magnetic sensing system for vehicle detection with the
combination of PNI’s high-performance magnetic sensor and vehicle counting algorithms.
• Includes a built-in LoRa radio that communicates to a gateway with complete LPWAN compatibility.
• Sensors and algorithms are finely tuned for ultra-low power consumption, providing continuous
vehicle detection without missing a vehicle count.
• Capability for wireless configuration and software updates using Bluetooth Low Energy (BLE) via
PNI’s mobile iOS and Android applications.
• PNI’s Parking Management Application provides cloud-based algorithms for processing the vehicle count data
• PlacePod VC specifications are located in Appendix II.
Applications
• Smart Parking Management & Reporting
• Parking Guidance Systems
• Event Parking Management
• Smart City
• Commercial and Mixed-use Real Estate
• Public & Private Parking Lot Management
PNI Sensor
PlacePod Vehicle Counting Sensor User Manual R01 3/19 Page 2 of 29

TABLE OF CONTENTS
INTRODUCTION ....................................................................................................................4 1
SYSTEM FUNCTIONAL ELEMENTS .........................................................................................5 2
2.1
SYSTEM OVERVIEW ......................................................................................................5
2.2 PLACEPOD PHYSICAL SENSOR ......................................................................................6
2.3 GATEWAY .....................................................................................................................7
2.4 NETWORK SERVICE ......................................................................................................7
2.5 PNI PARKING MANAGEMENT APPLICATION ................................................................8
PLACEPOD COUNTING SOLUTION SETUP AND INSTALLATION ..............................................9 3
3.1
SETUP AND INSTALLATION OVERVIEW ........................................................................9
3.2 SET-UP OVERVIEW .......................................................................................................9
3.3 ACTIVATE PLACEPOD .................................................................................................10
3.4 INSTALLATION SITE SURVEY .......................................................................................11
3.5 INSTALL THE PLACEPOD .............................................................................................12
3.6 CALIBRATE THE PLACEPOD ........................................................................................13
3.7 PNI CLOUD SERVICE ...................................................................................................13
APPENDICES ....................................................................................................................... 27 4
4.1
APPENDIX I: GLOSSARY ..............................................................................................27
4.2 APPENDIX II: PLACEPOD SPECIFICATIONS ..................................................................29
PNI Sensor
PlacePod Vehicle Counting Sensor User Manual R01 4/19 Page 3 of 29

INTRODUCTION 1
This guide is designed to support the PlacePod VC device. For questions relating to other elements of
the LoRa Network, please contact the provider. For information about PNI’s PlacePod Vehicle Detection
Sensor, please visit: PlacePod Smart Parking
The PlacePod User Manual is divided into three sections:
• System Functional Elements
PNI’s PlacePod VC sensor is one component of a vehicle counting system. The System Functional Elements section describes the system components and preliminary decisions that
must be made to enable a smooth implementation.
• Setup and Installation
The Setup and Installation section provides setup and installation instructions for the
PlacePod VC sensor and references additional materials that will assist with this process.
• Appendices: Additional Information
The Appendices provide additional information such as a glossary and detailed specifications.
.
PNI Sensor
PlacePod Vehicle Counting Sensor User Manual R01 4/19 Page 4 of 29

PlacePod Vehicle
LoRa
Network Service
Parking Management Application
SYSTEM FUNCTIONAL ELEMENTS 2
2.1 SYSTEM OVERVIEW
The diagram below shows the primary elements of the PlacePod system architecture. A brief
description of these functional elements follows.
Actility, machineQ, Senet,
The Things Network, other
public & private networks
Counting Sensor
Gateway
Figure 2-1: PNI Vehicle Counting Solution - Functional Elements
• PlacePod VC Sensor – The PlacePod VC sensor is a LPWAN-compatible vehicle counting de-
vice. It is built with PNI’s high-performance magnetic sensor and vehicle detection algorithms that accurately detect the passing of a vehicle in a driveway or designated entrance/exit lane. Each sensor has a unique ID for easy provisioning, tracking and
management.
• Gateways – Each PlacePod VC device communicates to the gateways set up to receive these
signals. The gateways collect the signals from the PlacePod VC devices and send the information on to the Network Service. The number of gateways required depends upon the size
and environment of the areas covered by the vehicle counting system.
• Network Service – The Network Service collects the signals from the gateways and com-
municates this data to the PNI Parking Management Application. The choice of provider for
the Network Service is a key integration decision determined by the scope of the project.
• PNI Parking Management Application – A cloud-based service for interfacing with algo-
rithms for processing the vehicle count data, configuring the parking area size and managing
and resetting the current vehicle count. An API allows users to integrate vehicle count data
into their custom or 3
rd
party applications, digital signage, and parking guidance systems.
PNI Sensor
PlacePod Vehicle Counting Sensor User Manual R01 4/19 Page 5 of 29

Part Number
Model
Region
LoRa Frequency
VSC-NA915LR-SET
In-ground
North America
915 MHz
VSC-EU868LR-SET
In-ground
Europe
868 MHz
2.2 PLACEPOD VC PHYSICAL SENSOR
The physical sensor detects vehicle presence using the combination of PNI’s high-performance magnetic
sensor and vehicle detection algorithms that accurately detect and count each vehicle passing over a
sensor.
Two decision factors determine which PlacePod VC product is optimal for a particular customer installation:
1) In-Ground or Surface Mount:
The surface mount models are used for short term product evaluation only. The in-ground
model is the default since placing the PlacePod VC sensor just below the parking surface provides the most durable, permanent installation and the battery life of the surface mount is
designed for short term pilot studies.
Figure 2-2: PlacePod Vehicle Counting sensor models
2) LoRa Communications Bandwidth:
The PlacePod VC sensor communicates with the gateway over the following LoRa bandwidths
– 915 MHz and 868 MHz. The applicable bandwidth is determined by regional communications regulations. For example, in the United States 915 MHz is used, while in Europe 868
MHz is the default. Additional regional frequencies will be supported.
Product Ordering Information
In-ground
Surface-mount
PNI Sensor
PlacePod Vehicle Counting Sensor User Manual R01 4/19 Page 6 of 29

2.3 GATEWAY
PlacePod VC supports gateways that use the LoRaWAN™ specification for wireless communication.
Note that this manual describes the functional components in a linear manner – PlacePod VC to
Gateway to Network Service to Parking Application. However, the network service is generally chosen
before the gateway since many network providers offer bundled services that allow for smoother
implementation. Once a network service has been selected, talk to the network provider regarding the
bundled services they may offer.
The two decisions related to gateway deployment are: 1) choosing the desired gateway features, and 2)
determining the number of gateways required based on coverage area and number of PlacePods
deployed on the network.
PNI strongly recommends that the customer conduct a pre-installation site survey in order to determine
the number of gateways required for reliable network performance. The number of gateways needed
depends on the signal strength (RSSI) and the noise level (SNR) of PlacePods in each driveway or
entry/exit. Factors affecting the number of gateways required include location of gateways, density of
gateways, nearby buildings and obstructions, antenna size, and choice of manufacturer. The same lane
may have RSSI variation of 10 to 15dB when a car is present or when the space is vacant. PNI
recommends testing for a -90dBm RSSI without a car in the lane as the baseline for gateway setup. For
small projects, a minimum of two gateways are recommended as redundancy protection. Generally,
more gateways translate to better coverage. Deploying too few gateways will affect the network
reliability due to weak signal strength at the gateways and a lack of redundancy.
Gateways can be ordered from many LoRa gateway manufacturers, such as Multitech, Cisco, Tektelic,
Kerlink, The Things Network, and others.
2.4 NETWORK SERVICE
The Network Service uses remote servers to collect PlacePod VC sensor data relayed from the gateways.
This data is stored on the network service provider’s servers and accessed by the customer through the
Parking Application. PlacePod VC works with either public or private LoRa networks (such as Actility,
PNI, machineQ, The Things Network, and Senet). PlacePod VC is also successfully integrated into other
LoRa networks in the US, Canada and Europe.
PNI has developed a network service and Parking Management Application that is ideal for testing and
proof of concept purposes and monitoring and managing all parking resources
PNI partners with service companies that provide integrated gateway and network cloud solutions. Utilizing the bundled services from these companies allows for the smoothest implementation.
Some customers prefer to create and run their own custom parking management solutions. A systems
integrator can help implement a customized solution using less common components.
PNI Sensor
PlacePod Vehicle Counting Sensor User Manual R01 4/19 Page 7 of 29

2.5 PARKING MANAGEMENT APPLICATION
PNI provides a cloud-based service for interfacing with algorithms for processing the vehicle count data,
configuring the parking area size and managing and resetting the current vehicle count. An API allows
users to integrate the vehicle count data into their custom or 3rd party applications, digital signage, and
parking guidance systems.
PNI’s Parking Management Application is ideal for testing and proof of concept or large-scale system
implementations. Please contact your system integrator or the third-party Parking Application vendor
directly for information regarding these options.
Figure 2-5: Dashboard screenshots from PNI’s Parking Management Application
PNI Sensor
PlacePod Vehicle Counting Sensor User Manual R01 4/19 Page 8 of 29

PLACEPOD VEHICLE COUNTING SOLUTION SETUP AND INSTALLATION 3
3.1 SETUP AND INSTALLATION OVERVIEW
This section will outline the steps needed to ensure the PlacePod VC is successfully installed and functional.
This assumes that the customer has already chosen a LoRa network service provider and installed gateways.
3.2 SET-UP OVERVIEW
Following are the recommended steps to set up the PlacePod VC solution with a gateway and PNI’s
Network Service:
Pre-Installation Steps:
1. Choose a LoRa network service provider
2. Acquire gateways and install in pre-determined location decided from pre-installation LoRa RF
site survey. A pre-installation survey can be an important step in determining the number of
gateways required for a reliable network. A PlacePod VC sensor can be used as a survey tool in
a site survey as follows:
a. Determine all locations PlacePod VCs are expected to be installed.
b. Determine possible gateway locations taking into consideration the following:
i. Distance from gateway to each PlacePod VC
ii. Line of sight from gateway to each PlacePod VC
iii. Power connection for gateway
iv. Internet connection for gateway
c. Install a test gateway in one of the possible gateway locations.
d. Bring a PlacePod VC to each of the possible PlacePod VC installation locations and place
it on the ground in the center of the driveway or entrance/exit lanes you wish to
monitor.
e. Turn the PlacePod VC on and use the Network Logger* to monitor the RSSI levels as the
PlacePod VC sends messages.
* Network Logger will vary based on network service provider. Contact your network
service provider for information.
f. If signal is not within expected range (PNI recommends -90dBm), then gateway location
must be improved. This may be accomplished by bringing the gateway closer to the
PlacePod or repositioning the gateway so that it has direct line of sight to the PlacePod.
Note: For help installing gateways, please contact your gateway manufacturer.
PNI Sensor
PlacePod Vehicle Counting Sensor User Manual R01 4/19 Page 9 of 29

3. Ensure PlacePods have been provisioned onto the LoRa network.
Note: Provisioning is the process of adding each PlacePod VC sensor into the software monitoring
the system. If you are using PNI’s network service and parking management application, each sensor is recorded into PNI’s application. Some third-party applications provision directly into the network service. If you are using a third-party network service and parking application, contact the
vendor regarding how to provision the PlacePod VC sensors onto their network.
PlacePod VC Installation Steps:
1. Activate the PlacePod VC
2. Installation Site Survey
3. Install the PlacePod VC
4. Calibrate the PlacePod VC for the vacant driveway or entrance/exit lanes
3.3 ACTIVATE PLACEPOD
PNI’s PlacePod VC sensor ships in a special mode where the RF radio is inactive during product shipment. Using the PlacePod Sensor Utility iOS or Android application will activate the PlacePod so that it
will join and communicate with the RF network. In order for PlacePod VC to join the network it is important that the RF network is available at the time of activation.
This iOS application enables communication with PNI’s PlacePod VC sensor using Bluetooth Low Energy
(BLE).
The application is compatible with iOS platforms 9.0+ and has been tested on the following devices:
iPhone 6 Plus (A1522) iOS 12.0
iPad mini (Wi-Fi Only/1st Gen) (A1432) iOS 9.3.5
iPhone 6s (A1688) iOS 12.0
There are two main groups of core functionality in this application. These include:
BLE application for direct communication with a PlacePod VC
Label scanning application
PNI Sensor
PlacePod Vehicle Counting Sensor User Manual R01 4/19 Page 10 of 29

Figure 3-1: Utility Application Main Screen
To download the PlacePod Sensor Utility application, visit the iOS App Store at:
https://itunes.apple.com/us/app/placepod-sensor-utility/id1383901393
Detailed instructions for using the PlacePod Sensor Utility iOS application are included in the PlacePod
Utility Application User Manual. To download the user manual, visit:
https://www.pnicorp.com/download/placepod-utility-application-ios-user-manual/
To use the PlacePod Sensor Utility – Android application to activate PlacePod VC, please contact:
PNI Customer Support
.
3.4 INSTALLATION SITE SURVEY
Once the PlacePod VC has been activated it is important to ensure that the sensors are able to
communicate with the LoRa network by performing an installation survey. The installation survey is
performed in a similar manner to the pre-installation survey described in Section 3.2.2. However, in this
case the actual PlacePods and gateways being deployed are tested during installation (but before final
installation so adjustments can be made if required). If the pre-installation site survey was performed,
the installation site survey should confirm the signal strengths from the PlacePods to the gateways are
sufficient for the system to function properly. If a pre-installation site survey was not completed, then
gateways may need to be moved to a better location and/or added. PNI recommends testing for a
-90dBm RSSI without a car over the sensor as the baseline for gateway setup.
PNI Sensor
PlacePod Vehicle Counting Sensor User Manual R01 4/19 Page 11 of 29

The positioning of the PlacePod VC sensor must be carefully chosen so the vehicles approach from one
direction and the sensor will be between the wheels when a vehicle passes over it. If there is an
automatic gate arm, then the sensors should be positioned on either side of it.
3.5 INSTALL THE PLACEPOD
PlacePod VC should be installed in-ground (the surface-mounted model is for pilot/temporary testing
only). Please refer to the Installation Guide for details on each type of installation. PlacePod VC sensors
are installed in pairs, a front and back sensor for each lane being monitored. Each PlacePod has a unique
ID which can be found on the bottom of the sensor. PNI recommends that you record each sensor ID
and match it to the entrance/exit lane and make note of the sensor location (front or back) before
installing it into the driveway. The cloud based counting algorithm needs to determine if the sensor is in
the front or back position. PNI’s PlacePod Application allows this information to be input as part of the
provisioning process. Third-party Parking Applications will also generally allow this, although in some
systems this information is configured directly into the Network Service.
Download the PlacePod Installation Guide at:
https://www.pnicorp.com/download/placepod-installation-guide/
PNI Sensor
PlacePod Vehicle Counting Sensor User Manual R01 4/19 Page 12 of 29

3.6 CALIBRATE THE PLACEPOD
The PlacePod must be calibrated before it is able to properly detect a vehicle counting event. Once the
PlacePod is installed in the driveway, ensure that the space is free of any non-permanent ferrous objects
such as toolboxes, installation tools, and other equipment. Consult the
PlacePod Sensor Utility iOS ap-
plication User Manual for detailed instructions about calibrating the PlacePod.
3.7 PNI PARKING MANAGEMENT APPLICATION
Your Customer API Key will be included in a spreadsheet with your product shipment, this key is used to
secure your data when communicating with the cloud service.
3.7.1 Initial Setup
1. Look at the two received PlacePods. Record both of their serial numbers. For this example, we
will use “0000111122223333” and “4444555566667777”.
2. Once API key is received, go to URL: https://api.pnicloud.com
3. Make sure the selected spec is “PlacePod API V2” (it should be by default).
4. Click “Authorize”
PNI Sensor
PlacePod Vehicle Counting Sensor User Manual R01 4/19 Page 13 of 29
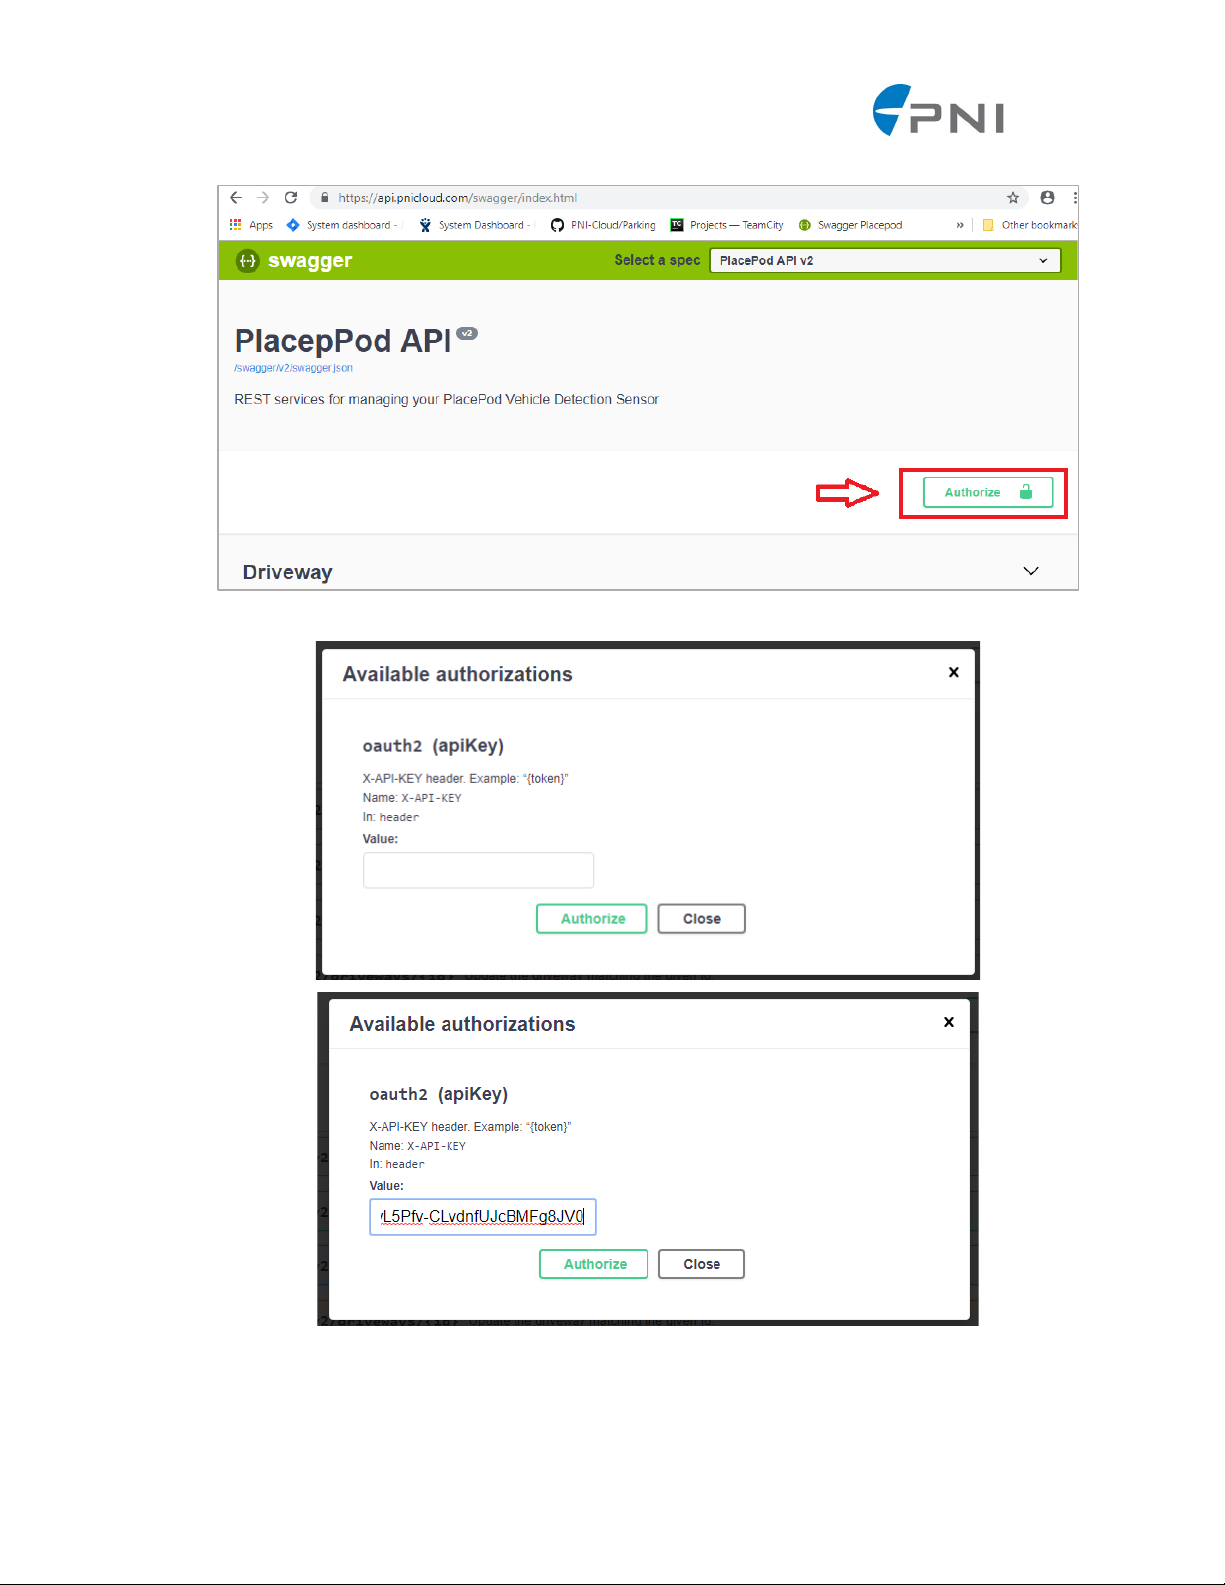
5. Paste the API key in the “Value” field and click “Authorize”
PNI Sensor
PlacePod Vehicle Counting Sensor User Manual R01 4/19 Page 14 of 29

6. Close the Authorization window, scroll down to the “ParkingLot” section and click on “POST”
/api/v2/parkinglots
7. The section will expand. Click on “Try it out”
PNI Sensor
PlacePod Vehicle Counting Sensor User Manual R01 4/19 Page 15 of 29

8. If you know the total number of spaces that are in the parking lot, then change “totalSpaces” to
that value. Otherwise do not change anything.
9. You can optionally change the fields like “name” or “address”. Once the fields look ok, click ”Execute.”
PNI Sensor
PlacePod Vehicle Counting Sensor User Manual R01 4/19 Page 16 of 29

10. You should see a response like this:
11. Record the ID in the response body.
12. Scroll down to the “Sensor” section and click on “POST” /api/v2/sensors
PNI Sensor
PlacePod Vehicle Counting Sensor User Manual R01 4/19 Page 17 of 29

13. The section will expand. Click on “Try it out”
PNI Sensor
PlacePod Vehicle Counting Sensor User Manual R01 4/19 Page 18 of 29

14. You will initially see a body like this:
15. Remove fields “appEui” and “appKey” and change “network” to “PNI”.
16. For field “parkingId”, enter the ID recorded from earlier.
17. For “sensorId”, enter the sensor’s ID that is included with it.
18. The body should now look something like this:
PNI Sensor
PlacePod Vehicle Counting Sensor User Manual R01 4/19 Page 19 of 29

19. Now click “Execute”
20. You should see a response like this:
PNI Sensor
PlacePod Vehicle Counting Sensor User Manual R01 4/19 Page 20 of 29

21. Go back up to the body, and enter the other PlacePod VC’s serial number
22. Repeat steps 18 and 19. You should see a result like this:
23. Scroll up to the “Driveways” section and click on “POST” /api/v2/driveways
PNI Sensor
PlacePod Vehicle Counting Sensor User Manual R01 4/19 Page 21 of 29

24. The section will expand. Click on “Try it out”
25. You will initially see a body like this:
26. Change “parkingLotId” to the Id that was recorded earlier.
27. Change “frontSensorId” to match the serial number of one of the PlacePods and “backSensorId”
to match the other serial number.
PNI Sensor
PlacePod Vehicle Counting Sensor User Manual R01 4/19 Page 22 of 29

28. If the driveway is leading into the parking lot, then leave “isDirectionIn” as true. If the driveway
is leaving the parking lot, then set “isDirectionIn” to false.
29. The body should now look something like this
30. Now click “Execute”
31. You should see a response like this:
PNI Sensor
PlacePod Vehicle Counting Sensor User Manual R01 4/19 Page 23 of 29

32. If another driveway is needed, repeat steps 11 – 29. Make sure to use the other PlacePod VC’s
serial numbers.
3.7.2 Sending data
Once you have decoded an event packet (Cayenne type 0x00 “digital input” and channel 0x21)
you should have an integer value between 0 and 128 inclusive.
Make a request to POST “api/v2/sensors/{id}/vehiclecount”
Replace {id} with the ID of the sensor that produced the event.
Example body:
{
"count": 12
}
Example request:
curl -X POST "https://api.pnicloud.com/api/v2/sensors/0000000000000011/vehiclecount" -H
"accept: application/json" -H "X-API-KEY: eyJ…O2qQ" -H "Content-Type: application/jsonpatch+json" -d "{ \"count\": 12}"
You can test this on the API swagger page.
PNI Sensor
PlacePod Vehicle Counting Sensor User Manual R01 4/19 Page 24 of 29
Or if you’re using our PlacePod VC evaluation kit and have the sensors provisioned on PNI’s
Cloud, then the necessary data will automatically be forwarded for processing. No additional
setup is required.
3.7.3 Receiving Data
1. Repeat steps 2 - 5 from Initial setup
2. Close the Authorization window.
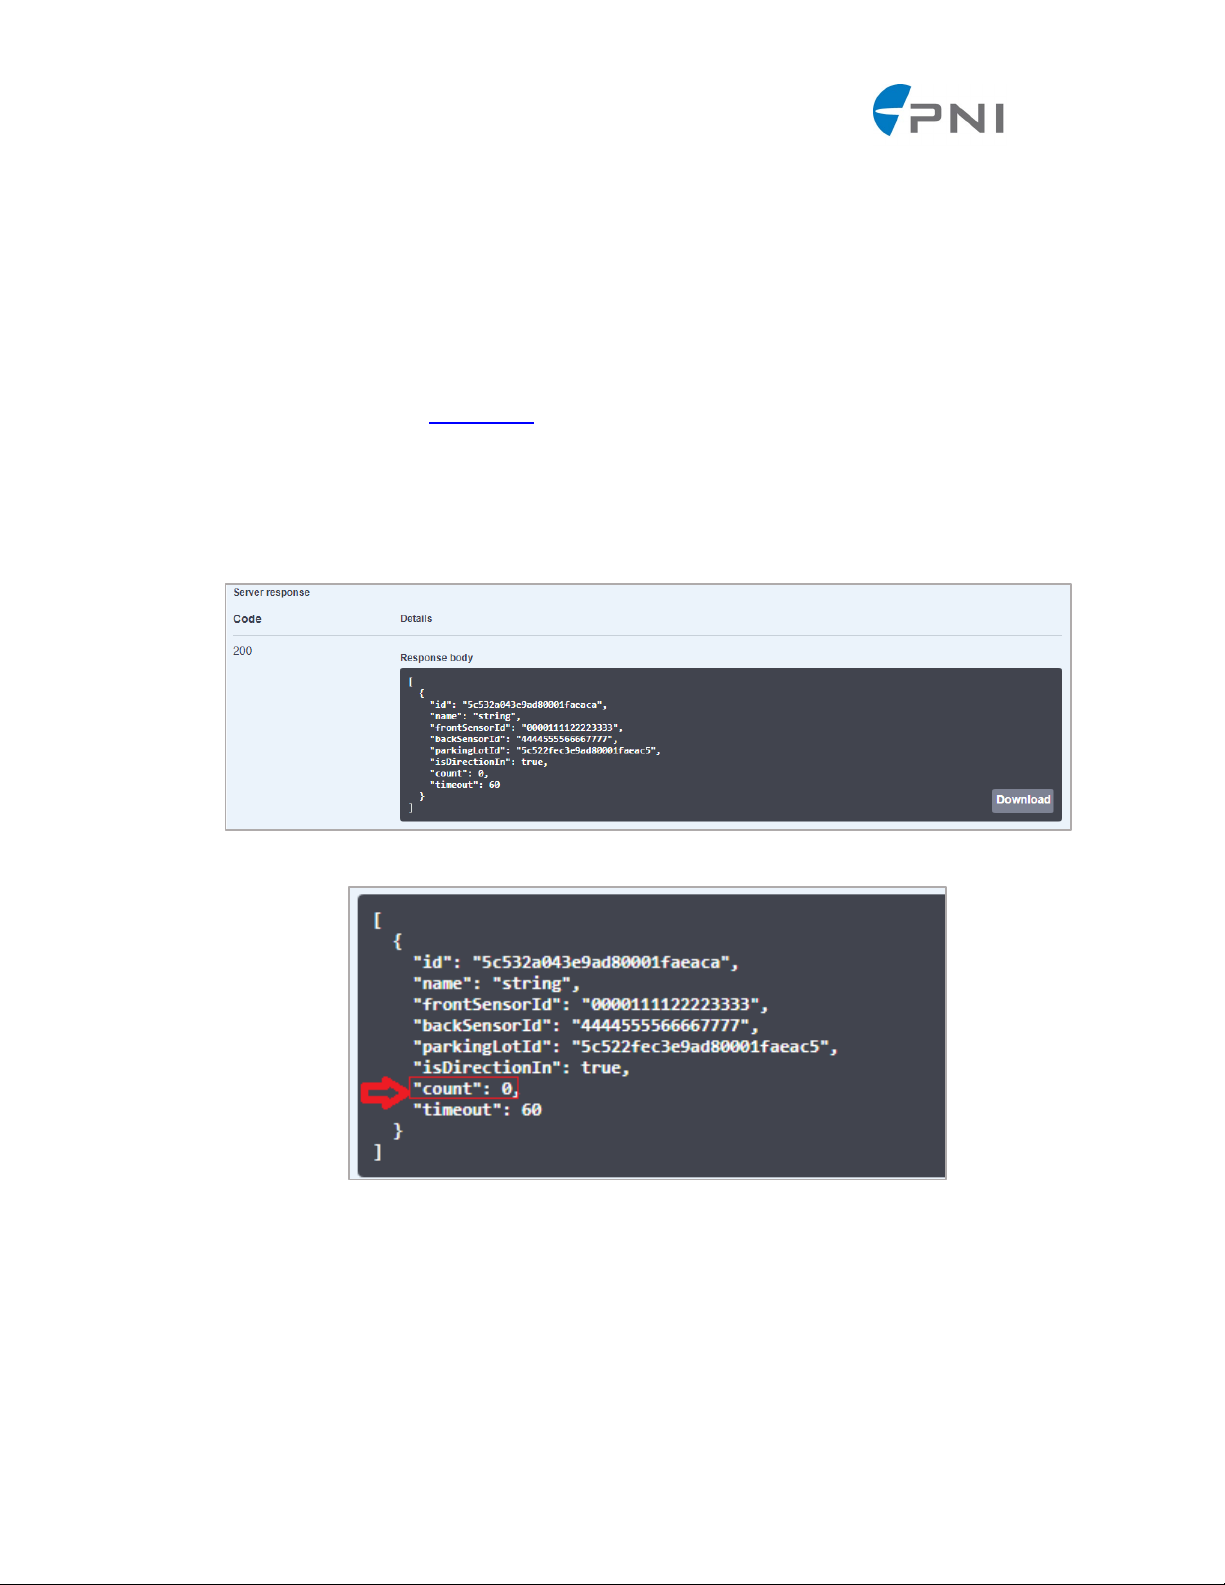
3. To get the currently computed count for all driveways, go to the “Driveway” section and click on
“GET” /api/v2/driveways.
4. Click “Try it out” then execute”, you should get results like this:
5. The “count” field indicates the current estimated vehicle count for that specific driveway.
6. To get an estimated running total of the number of cars in the parking lot (assuming you have at
least 1 in driveway and 1 out driveway and have set the total number of spaces in the parking
lot), then go to the “Parking Lot” section and click on “GET” /api/v2/parkinglots
7. Click “try it out” then “execute” and you should get a result like this:
PNI Sensor
PlacePod Vehicle Counting Sensor User Manual R01 4/19 Page 25 of 29

8. The “totalSpaces” field will be the same value as the one you set in step 8 of Initial setup
9. The “count” field will represent the estimated number of vacant parking spaces left in the parking lot. This is calculated using the counts from all the specific parking lot’s driveways.
PNI Sensor
PlacePod Vehicle Counting Sensor User Manual R01 4/19 Page 26 of 29

APPENDICES 4
4.1 APPENDIX I: GLOSSARY
Bluetooth Low Energy (BLE): A wireless technology designed to connect an individual person’s devices.
Ferrous: A material containing Iron. Materials containing iron in the vicinity of a PlacePod can interfere
with the calibration of the device.
Gateway: LPWAN equipment that receives wireless signals from remote devices (such as parking sensors) using LoRa bandwidth, and then relays these signals to a network service using a different communications protocol.
LoRaWAN™: A protocol, defined by the LoRa Alliance, specifying how devices (such as parking sensors)
communicate with LPWAN gateways.
LoRa: A low-power consumption, long-range technology for wireless data communication, utilizing unlicensed sub-1GHz bandwidths. The bandwidth utilized varies by region (915 MHz in North America, 868
MHz in Europe). PlacePod communicates with gateways using LoRa bandwidths.
LPWAN: A Low Power Wide Area Network, utilizing wireless communications to allow battery powered
devices (such as vehicle counting sensors) to communicate.
Network: Two or more devices that communicate with each other. The internet is a very large network
including every device connected to the internet, but a router connecting a computer and a printer is
also a network.
Provisioning: The process of identifying a device and incorporating it into a network so that it can be
utilized together with the software managing the network.
RSSI: Received Signal Strength Indicator (RSSI) is a measure of the power level at a receiving device from
a sending device. This power is often measured in dBm, and the higher the power, the stronger the signal.
SNR: Signal to Noise Ratio (SNR) is the ratio of the power of a particular signal to the background noise
associated with that signal.
PNI Sensor
PlacePod Vehicle Counting Sensor User Manual R01 4/19 Page 27 of 29

• LoRa 915 MHz or 868 MHz Module
• Uses Sub-GHz ISM bands in North America and Europe
Class A
Vehicle count
• Up to 7 years depending on configuration and distance from gateway
• Lithium-Thionyl Chloride
4.3 in (10.92 cm) diameter
9.0 in (22.86 cm) diameter
Parameter
Default
Frequency Sub Band (US915, AU915)
2
Spreading Factor
US915, EU868 = 7
Frame Port
3
Keep-Alive Interval
1 Hour
Over-The-Air Activation Keys
Programmable
Payload Format
CayenneLPP [1]
Confirmed Messages
None
BLE Advertise
Once every second while deactivated and once every 3
seconds once activated
4.2 APPENDIX II: PLACEPOD SPECIFICATIONS
Table 4-1: Performance Specifications*
Parameter Values
Communication
LoRaWAN Device Type
Output
Battery Life/Type
Dimensions In-Ground
Dimensions Surface-Mount
(Evaluation-Kit)
Installation Position Two sensors 10 ft (3 m) apart in center of driveway entrance or exit lane
Operating Temperature -30°C to +70°C / -22°F to +158°F
Storage Temperature -40°C to +85°C / -40°F to +185°F
Activation Type OTAA (over the air activation)
Certifications FCC (915MHz), CE (868MHz)
• LoRaWAN compliant
-minimum hole 4.5 in (11.43 cm)
3.75 in (9.525 cm) height
-minimum hole 4.5 in (11.43 cm)
1.25 in (3.15 cm) height
Footnote:
* Specifications are subject to change.
Table 4-2 PlacePod Vehicle Counting Sensor Default Settings
For Customer Support, please contact PNI Sensor at: https://www.pnicorp.com/support/
PNI Sensor
PlacePod Vehicle Counting Sensor User Manual R01 4/19 Page 28 of 29

Copyright ©2018 Protonex LLC dba PNI Sensor. All Rights Reserved.
Reproduction, adaptation, or translation without prior written permission is prohibited, except as allowed under
copyright laws.
PNI Sensor
2331 Circadian Way
Santa Rosa, CA 95407, USA
Tel: (707) 566-2260
DO NOT OPEN THE PLACEPOD SENSOR. THE PLACEPOD SENSOR IS SHIPPED READY TO ACTIVATE AND INSTALL.
THE SENSOR SHOULD NOT BE OPENED FOR ANY REASON. OPENING THE SENSOR VOIDS THE PRODUCT
WARRANTY.
Warranty and Limitation of Liability – PlacePod Vehicle Counting Sensor (“Product”). PNI Sensor ("PNI") manu-
factures its Products from parts and components that are new or equivalent to new in performance. PNI warrants
that each Product to be delivered hereunder, if properly used, will, for one year (365 days) following the date of
shipment be free from defects in material and workmanship and will operate in accordance with PNI’s published
specifications and documentation for the Product in effect at time of order. Any Product that is non-functional and
unresponsive to firmware and software updates will be considered failed hardware units and will be replaced at no
charge. This warranty includes one year (365 days) of debugging maintenance for customers that use the PNI Parking Management Software to manage PNI’s Product.
This warranty does not cover wear and tear due to normal use, or damage to the Product as the result of improper
installation, misuse, neglect of care, alteration, vandalism, theft, accident, or unauthorized repair.
THE ABOVE WARRANTY IS IN LIEU OF ANY OTHER WARRANTY, WHETHER EXPRESSED, IMPLIED, OR STATUTORY,
INCLUDING BUT NOT LIMITED TO, ANY WARRANTY OF MERCHANTABILITY, FITNESS FOR ANY PARTICULAR
PURPOSE, OR ANY WARRANTY OTHERWISE ARISING OUT OF ANY PROPOSAL, SPECIFICATION, OR SAMPLE. PNI
NEITHER ASSUMES NOR AUTHORIZES ANY PERSON TO ASSUME FOR IT ANY OTHER LIABILITY.
If any Product furnished hereunder fails to conform to the above warranty, Customer’s sole and exclusive remedy
and PNI’s sole and exclusive liability will be, at PNI’s option, to repair, replace, or credit Customer’s account with
an amount equal to the price paid for any such Product which fails during the applicable warranty period provided
that (i) Customer promptly notifies PNI in writing that such Product is defective and furnishes an explanation of the
deficiency; (ii) such Product is returned to PNI’s service facility at Customer’s risk and expense; and (iii) PNI is satisfied that claimed deficiencies exist and were not caused by improper installation, misuse, neglect of care, alteration, vandalism, theft, accident, or unauthorized repair. If a Product is defective, transportation charges for the
return of the Product to Customer within the United States and Canada will be paid by PNI. For all other locations,
the warranty excludes all costs of shipping, customs clearance, and other related charges. PNI will have a reasonable time to make repairs or to replace the Product or to credit Customer’s account. PNI warrants any such repaired
or replacement Product to be free from defects in material and workmanship on the same terms as the Product
originally purchased.
Except for the breach of warranty remedies set forth herein PNI shall have no liability for any indirect or speculative damages (including, but not limited to, consequential, incidental, punitive and special damages) relating to the
use of or inability to use this Product, whether arising out of contract, negligence, tort, or under any warranty theory, or for infringement of any other party’s intellectual property rights, irrespective of whether PNI had advance
notice of the possibility of any such damages, including, but not limited to, loss of use, revenue or profit. In no
event shall PNI’s total liability for all claims regarding a Product exceed the price paid for the Product. PNI neither
assumes nor authorizes any person to assume for it any other liabilities.
PNI Sensor
PlacePod Vehicle Counting Sensor User Manual R01 4/19 Page 29 of 29
 Loading...