


Model PX-M402U
MPEG-1/2/4 AND DivX® DIGITAL VIDEO CONVERTER
FOR USB 2.0 INTERFACE
INSTALLATION AND USERS MANUAL
FEBRUARY 2004
Plextor reserves the right to make improvements in the products described in this manual at any time without prior notice.
Plextor makes no representation or warranties with respect to the contents hereof and specifically disclaims any implied warranties of merchantability or fitness for any particular purpose. Further, Plextor Corp. reserves the right to revise this manual and to make changes in its content without obligation to notify any person or organization of such revision or change.
This manual is copyrighted, all rights reserved. It may not be copied, photocopied, translated, or reduced to any electronic medium or machine-readable form without Plextor’s prior permission.
Manual copyright ©2004, Plextor Corp.
Second edition, February 2004.
Licenses and Trademarks
Plextor, and the Plextor logo are registered trademarks and ConvertX is a trademark of Plextor Corp. InterVideo is a registered trademark, and WinDVD Creator and WinDVD are trademarks of InterVideo, Inc. DivX and the DivX logo are registered trademarks of DivX Networks, Inc. in the USA and other countries. All other licenses and trademarks are property of their respective owners.
Notice
This product and software are designed to help you in reproducing materials for which you own the copyright or have obtained permission to copy from the copyright owner. Unless you own the copyright or have permission to copy from the copyright owner, you may be violating copyright laws and may be subject to payment of damages and/or other penalties. If you are uncertain about your rights, you should contact your legal advisor.
DECLARATION OF CONFORMITY
Model Number: PX-M402U
Trade Name: PLEXTOR
Responsible Party: PLEXTOR Corp.
Address: 48383 Fremont Blvd, Suite 120, Fremont, CA 94538-6509, USA
Telephone Number: 510-440-2000
This device complies with Part 15 of the FCC Rules. Operation is subject to the following two conditions:
(1) This device may not cause harmful interference, and (2) this device must accept any interference received, including interference that may cause undesired operation.
FEDERAL COMMUNICATIONS COMMISSION STATEMENT
This equipment has been tested and found to comply with the limits for a Class B digital device, pursuant to Part 15 of the FCC Rules. These limits are designed to provide reasonable protection against harmful interference in a residential installation. This equipment generates, uses, and can radiate radio frequency energy, and, if not installed and used in accordance with the instructions, may cause harmful interference to radio communications. However, there is no guarantee interference will not occur in a particular installation. If this equipment causes harmful interference to radio or television reception, which can be determined by turning the equipment off and on, the user is encouraged to try to correct the interference by one or more of the following measures:
•Reorient or relocate the receiving antenna.
•Increase the separation between the equipment and receiver.
•Connect the equipment into an outlet on a circuit different from that to which the receiver is connected.
•Consult the dealer or an experienced radio/TV technician for help.
CAUTION: Any changes or modifications not expressly approved by the party responsible for compliance could void the user's authority to operate the equipment.
CANADIAN DEPARTMENT OF COMMUNICATIONS STATEMENT
This digital apparatus does not exceed the Class B limits for radio noise emissions from digital apparatus set out in the Radio Interference Regulations of the Canadian Department of Communications.
This class B digital apparatus complies with Canadian ICES-003.
Cet appareil numérique de la classe B est conforme a la norme NMB-003 du Canada.
This page intentionally left blank.

Table of Contents |
|
1. Getting Started .............................................................................. |
1 |
About this Manual........................................................................... |
1 |
Meet Your ConvertX....................................................................... |
1 |
What You Can Do with the ConvertX......................................... |
2 |
Features of the Plextor ConvertX ................................................ |
3 |
What You Need to Use the ConvertX ............................................. |
4 |
What's in the Box ............................................................................ |
5 |
ConvertX Features and Controls ..................................................... |
6 |
Front Panel .................................................................................. |
6 |
Rear Panel ................................................................................... |
7 |
A Word about MPEG-4 and DivX .................................................. |
8 |
Precautions ...................................................................................... |
8 |
2. Installing Your ConvertX ............................................................. |
9 |
Install the ConvertX Video Converter............................................. |
9 |
Installing the ConvertX Device Driver........................................ |
9 |
Install the ConvertX Drivers ..................................................... |
14 |
Turning the ConvertX On and Off ............................................ |
15 |
Don’t Forget to Register! .......................................................... |
15 |
If the Installation Failed ............................................................ |
15 |
Make Sure the ConvertX Is Recognized ................................... |
15 |
Troubleshoot Other Devices...................................................... |
17 |
Changing to Another Computer ................................................ |
17 |
Connect the Video Input to the ConvertX..................................... |
17 |
3. Using the ConvertX with WinDVD Creator ............................. |
19 |
Install the WinDVD Creator 2 Software ....................................... |
19 |
Startup ........................................................................................... |
20 |
Understanding the Task Window .................................................. |
20 |
Overview of Creating a Personalized CD or DVD Disc ............... |
22 |
Capturing....................................................................................... |
24 |
Capturing Video ........................................................................ |
25 |
Recording Time and Disc Capacity........................................... |
28 |
Editing........................................................................................... |
29 |
Adjusting a Video Clip.............................................................. |
31 |
Adding and Adjusting a Transition ........................................... |
32 |
Adding Titles, Audio Effects, and Media Content .................... |
33 |
Plextor ConvertX PX-M402U Installation and Users Manual v |
|

Table of Contents
Previewing Your Project........................................................... |
33 |
Viewing File Properties ............................................................ |
33 |
Saving Your Project.................................................................. |
33 |
Creating......................................................................................... |
34 |
Deleting a Chapter Mark........................................................... |
36 |
Adding a Chapter Mark............................................................. |
36 |
Editing a Menu Theme.............................................................. |
36 |
Sharing.......................................................................................... |
37 |
Burning a Disc .......................................................................... |
38 |
Compression Options................................................................ |
40 |
Saving to a File ......................................................................... |
40 |
Disc Manager................................................................................ |
41 |
Capturing Directly to a DVD Disc............................................ |
42 |
Where to Go from Here ................................................................ |
44 |
4. Using the WinDVD Player ......................................................... |
45 |
Install the WinDVD 5 Software.................................................... |
45 |
Launch the WinDVD Player ......................................................... |
46 |
Use the WinDVD Controls ........................................................... |
47 |
5. Maintenance and Troubleshooting............................................ |
49 |
Upgrading Your ConvertX............................................................ |
49 |
Troubleshooting Hints .................................................................. |
50 |
Problems with Installation ........................................................ |
50 |
Problems with Capture.............................................................. |
50 |
Appendix A: Specifications ............................................................ |
51 |
ConvertX Specifications ............................................................... |
51 |
WinDVD Creator 2 Specifications................................................ |
59 |
Appendix B: Technical Support .................................................... |
61 |
How to Contact Plextor Technical Support................................... |
62 |
Before You E-mail/Log On/FAX/Call.......................................... |
62 |
Returns.......................................................................................... |
63 |
Contacting Plextor’s RMA Department.................................... |
63 |
Packing Your ConvertX............................................................ |
64 |
Shipping Your ConvertX to Plextor.......................................... |
64 |
Appendix C: Warranty................................................................... |
65 |
If You’re Outside the U.S. or Canada........................................... |
66 |
Index................................................................................................. |
67 |
vi Plextor ConvertX PX-M402U Installation and Users Manual
1. Getting Started
Congratulations! Thank you for purchasing the Plextor® ConvertX™ PX-M402U Digital Video Converter. We appreciate the confidence you have shown in us. Our goal is to put you—and keep you—on the leading edge of video capture and compression technology.
About this Manual
Please read this manual carefully and keep it handy for easy reference. Use the manual for installation, operation and troubleshooting. If your ConvertX needs service, see your dealer or call Plextor’s Technical Support Department. (See “Appendix B: Technical Support” for the different ways you can reach us.)
Meet Your ConvertX
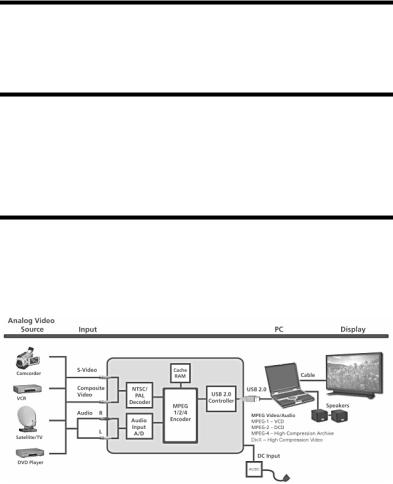
The Plextor ConvertX is a high-quality digital video converter that takes analog video from a video camera, camcorder, VCR, or cable source and provides high-quality compressed MPEG-1/2/4 digital video for display or archiving onto recordable CD or DVD discs.
Figure 1: The ConvertX changes analog video to compressed digital video
Plextor ConvertX PX-M402U Installation and Users Manual 1

Section 1. Getting Started
What You Can Do with the ConvertX
Uncompressed full-motion video with sound takes as much as one gigabyte of storage space per minute of video. But with your ConvertX, you can compress that video so that an entire movie fits onto a DVD— or even a CD!
The ConvertX PX-M402U Digital Video Converter and the bundled InterVideo® WinDVD Creator™ 2 software let you:
•Capture: Capture video and sound from analog or digital sources.
•Edit: Modify that video to get just what you want.
•Create: Author compelling DVD projects, complete with titles, menus, sounds, and music.
•Share: Actually make movies and burn them onto recordable DVD and CDs or share them over the Internet.
•Direct record: Record video directly to recordable DVD discs in one step.
In addition, the bundled WinDVD 5 software lets you view your videos and play video files.
The ConvertX lets you quickly and easily convert analog images on videotapes into digital video on CDs or DVDs. You can also create new videos for your CD or DVD player or computer, or webcasts for the Internet.
Your ConvertX offers MPEG-1, MPEG-2, MPEG-4, and DivX® video formats, with compression that allows you to store nearly two hours of digital video on a CD, or up to 10 hours on a DVD. The bundled WinDVD Creator software guides you through each step of capturing and editing video, adding effects, and burning the finished product. You get everything you need for quality digital production—just what you’d expect from Plextor.
2 Plextor ConvertX PX-M402U Installation and Users Manual

Section 1. Getting Started
Features of the Plextor ConvertX
•Analog-to-digital conversion: Convert analog video from your camcorder or VCR into digital format for a computer.
•Archiving video memories: Archive your video on long-lasting CD or DVD discs.
•Real-time MPEG-1/2/4 hardware video capture: Select the best format for your quality and speed requirements.
•Official DivX Certified™ product: Ready for video capture in the DivX format.
•USB connection: Use Hi-Speed USB 2.0 (480 megabits per second), for video capture at high bit rates. A Hi-Speed USB 2.0 connection maximizes data throughput to the host computer, enabling the highest speed video capture using MPEG-2 compression.
•High-quality hardware encoder: For fast, real-time conversion of analog source video into digital output video.
•Video and audio synchronization: For rich, true-to-life video.
•Bundled WinDVD Creator 2 software: For capturing, editing, authoring, and exporting video to CD or DVD.
•Bundled WinDVD 5 software: Video player for your DVDs and CDs.
•S-Video and composite video: Supports both popular types of video input.
•Easily upgradable: Just download the latest software from the Plextor web site and upgrade quickly, without connecting with the ConvertX.
•One year warranty: And unlimited toll-free tech support.
Plextor ConvertX PX-M402U Installation and Users Manual 3

Section 1. Getting Started
What You Need to Use the ConvertX
What You Need:
•Computer: Pentium® III, 800-MHz CPU or faster. (Pentium 4, 1.6- GHz CPU or faster suggested)
•Minimum memory: At least 256 megabytes of memory.
•Hard disk size: At least 10 gigabytes of free space recommended.
•Monitor resolution: 1024 x 768, 24 bit color.
•Video graphics card: With 24-bit resolution capability and DirectX support.
•Sound card: Windows-compatible sound card with 48-kHz playback. (Using a plug-in PCI sound card is recommended.)
•CD-ROM drive: For installation.
•USB interface: USB 2.0 (Hi-Speed USB) required.
•Operating system: Windows XP or 2000.
•DirectX 9.0b: Provided on the accompanying Plextor CD.
Also Highly Recommended:
•CD-RW drive: To burn CDs, Video CDs, or MiniDVDs.
•DVD+R/RW or DVD-R/RW drive: To burn DVDs, CDs or Video CDs. Also needed for direct recording to DVD.
•Operating system updates: To enhance your experience, Plextor highly recommends that you update your computer’s Windows operating system with the following service packs (or later service packs) and all Microsoft critical updates before you install the ConvertX drivers. Suggested service packs include:
Windows 2000 Service Pack 4
Windows XP Home, XP Pro Service Pack 1
4 Plextor ConvertX PX-M402U Installation and Users Manual
Section 1. Getting Started
What's in the Box
Check the contents of the box. You should have:
•ConvertX PX-M402U Digital Video Converter
•AC adapter (100–240 V) and power cord
•USB 2.0 cable
•Set of audio/video (A/V) cables
•S-Video cable
•Plextor ConvertX PX-M402U Installation and Users Manual
•Plextor CD with:
Plextor ConvertX USB device driver
InterVideo® WinDVD Creator™ 2 and WinDVD™ 5 player software
Adobe® Acrobat® Reader
PDF of French-language users manual
Plextor ConvertX PX-M402U Installation and Users Manual 5
Section 1. Getting Started
ConvertX Features and Controls
Before proceeding, become familiar with the controls and features of your ConvertX.
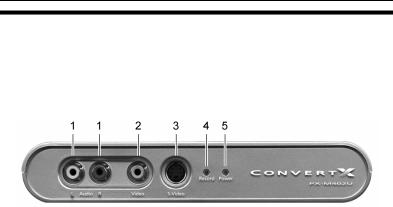
Front Panel
Figure 2: Front panel of the ConvertX PX-M402U
Digital Video Converter
|
Connector or |
Function |
|
Indicator |
|
1 |
Audio |
Audio connector: Connect audio input |
|
|
here, using the RCA audio-video |
|
|
cables. The red connector is the right- |
|
|
hand stereo channel |
2 |
Video |
Video connector: Connect composite |
|
|
video here, using the RCA A/V cable. |
3 |
S-Video |
S-Video connector: If S-Video is |
|
|
available, connect it here using the |
|
|
S-Video cable. |
|
|
|
4 |
Record |
Recording indicator LED: Amber when |
|
|
converting video from analog to |
|
|
digital. |
|
|
|
5 |
Power |
Power LED: Blue when the AC |
|
|
adapter and USB cable are connected |
|
|
and the computer is turned on. |
6 Plextor ConvertX PX-M402U Installation and Users Manual
Section 1. Getting Started
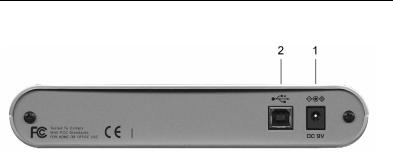
Rear Panel
Figure 3: Rear panel of the ConvertX PX-M402U
Digital Video Converter
|
Connector |
Function |
1 |
DC 9V |
Power connector: Connect the AC |
|
|
adapter here. The unit has an |
|
|
automatic power switch controlled by |
|
|
the USB cable from the PC. When the |
|
|
PC power is on, the ConvertX power |
|
|
is also on. |
|
|
CAUTION: Use only the AC adapter |
|
|
shipped with your ConvertX. |
|
|
|
2 |
USB 2.0 |
USB 2.0 connector: Connect your |
|
|
USB cable here. |
|
|
CAUTION: Use only the USB cable |
|
|
shipped with your ConvertX. |
|
|
|
Plextor ConvertX PX-M402U Installation and Users Manual 7

Section 1. Getting Started
A Word about MPEG-4 and DivX
Together, this version of the ConvertX and WinDVD Creator support two types of MPEG-4 compression:
•Real-time MPEG-4 compression, with file extension .avi, is supported by the ConvertX.
•DivX compression, with file extension .avi, is also supported by the ConvertX.
The ConvertX hardware encoder can capture video and compress it using MPEG-4 or DivX, saving valuable space on your hard disk. You can play this MPEG-4 and DivX video and view it on your computer using the WinDVD 5 player or other software. You can even edit it or convert it into another format by using WinDVD Creator.
DivX compressed video is a popular format for sharing files on the Internet. DivX files are playable with Windows Media Player with a DivX decoder (see http://www.divx.com/) and with other decoders available on the Internet
Precautions
Like the rest of your computer system, your ConvertX requires reasonable care in its installation and use.
•Operate your ConvertX only in a horizontal position.
•Keep the area around your ConvertX clean from dust, smoke, and other contaminants. The unit is not dustproof.
•Do not allow moisture or liquids, including water or cleaning fluids, to touch the ConvertX. The unit is not waterproof. Furthermore, thinner, benzene, or alcohol-based solvents can mar the surface of your ConvertX.
•Do not drop or jolt the ConvertX.
•Do not attempt to open the ConvertX and service it yourself. Entrust service to Plextor-authorized service personnel only.
8 Plextor ConvertX PX-M402U Installation and Users Manual

2. Installing Your ConvertX
Here’s how to install your ConvertX.
Install the ConvertX Video Converter
Before installation, Plextor highly recommends that you get the latest updates available for your computer’s operating system. Current service packs and critical updates are available from http://windowsupdate.microsoft.com.
If you have a computer with Windows 2000 or Windows XP, use the following procedure to connect your ConvertX USB Digital Video Converter.
Installing the ConvertX Device Driver
NOTE: Be sure you do this procedure to install the ConvertX Digital Video Converter driver from the CD before connecting the ConvertX to your computer.
To install the ConvertX Digital Video Converter Driver:
1.Turn ON your computer system and make sure that all applications are turned off. Do not connect the ConvertX yet.
Plextor ConvertX PX-M402U Installation and Users Manual 9
Section 2. Installing Your ConvertX
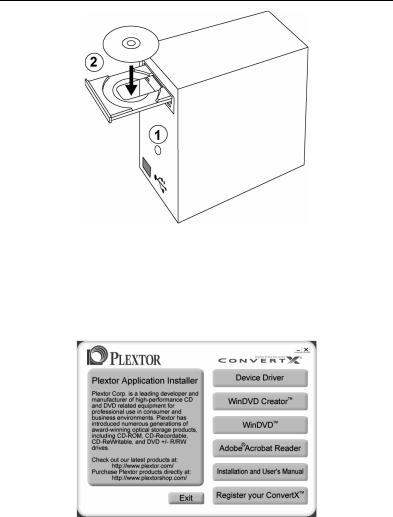
Figure 4: Turn on the computer and insert the ConvertX software disc
2.Insert the ConvertX software disc into your CD or DVD drive. You see the Plextor Application Installer screen. (If you don’t see the installer screen right away, use Windows Explorer to navigate to the CD or DVD drive, and double-click the Plextor.exe file.)
Figure 5: Plextor Application Installer screen
10 Plextor ConvertX PX-M402U Installation and Users Manual

Section 2. Installing Your ConvertX
3.Select the ConvertX Device Driver button. You may see a window that asks if you want to install DirectX version 9.0b. (If you don’t see this window, you have the correct version of DirectX already installed. Skip to step 9 below.)
4.If you see the DirectX installation window, Select OK. You see a window with the Welcome to setup for DirectX and license agreement.
5.Click the I accept the agreement choice, then select Next. You see the DirectX Setup window.
6.Select Next to start the installation. You see the installation of DirectX as it proceeds. When installation is done, you see the Restart Computer window.
7.Make sure all applications are closed, remove the Plextor ConvertX software disc, then select Finish to restart your computer. Windows shuts down, then restarts.
8.After Windows restarts, re-insert the ConvertX software disc into your CD or DVD drive. You see the Plextor Application Installer screen. (If you don’t see the installer screen right away, use Windows Explorer to navigate to the CD or DVD drive, and doubleclick the Plextor.exe file.)
9.In the Plextor Application Installer screen, select the ConvertX Device Driver button. You see the location for the installation folder where the Plextor PX-M402U files will be unpacked.
Plextor ConvertX PX-M402U Installation and Users Manual 11

Section 2. Installing Your ConvertX
Figure 6: Location for the installation folder
10.Click Finish. You see a text box asking if you want to create the folder.
11.Click Yes. You see the License Agreement.
Figure 7: Review the license agreement
12 Plextor ConvertX PX-M402U Installation and Users Manual
Section 2. Installing Your ConvertX
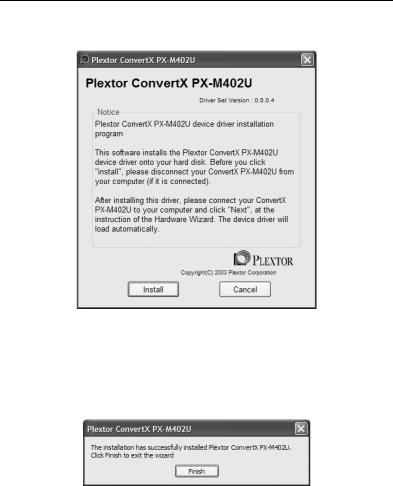
12.When you have read the entire agreement, click Next. You see the driver installation for the ConvertX PX-M402U.
Figure 8: Beginning of the driver installation
13.As directed by the driver installation, make sure your ConvertX PX-M402U is not connected to your computer yet. Then click Install. You see a text box indicating the Plextor ConvertX PX-M402U has been installed.
Figure 9: When the ConvertX has been installed, select Finish
14.Click Finish. You have successfully installed the ConvertX device driver.
Plextor ConvertX PX-M402U Installation and Users Manual 13
Section 2. Installing Your ConvertX
Install the ConvertX Drivers
IMPORTANT NOTE: In the next steps of this procedure, you will be installing driver files into your computer. You’ll see the “Found New Hardware” window more than once, and you may feel like you’re seeing the same dialog over and over again. This is normal. You don’t need to shut down or reboot your computer until all drivers have been installed.
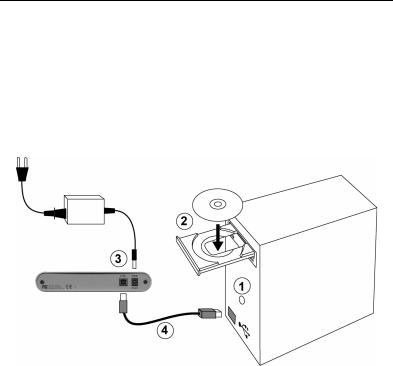
1.You will use a USB cable to connect the ConvertX to your computer as shown in Figure 10. Begin by making sure your computer is on.
Figure 10: 1) Make sure the computer is on, 2) make sure the Plextor disc is inserted, 3) plug in the AC adapter, and then 4) connect the ConvertX with the included USB cable.
2.Make sure the Plextor disc is in the computer’s drive.
3.Connect the AC adapter to an electrical outlet and to your ConvertX.
4.Connect the USB cable from your ConvertX to the computer.
The drivers are installed automatically. When all drivers are installed, your ConvertX is automatically recognized by the computer. (If you are asked to reboot, remove the Plextor disc from the drive and restart your computer.)
14 Plextor ConvertX PX-M402U Installation and Users Manual
Section 2. Installing Your ConvertX
Turning the ConvertX On and Off
Note that there’s no power switch on the ConvertX. When the computer power is on, the ConvertX is on. When the computer power is off, the ConvertX is off.
Don’t Forget to Register!
Don’t forget to register your ConvertX! In the Plextor Application Installer, select Register Your ConvertX and follow the prompts. Registration means you’ll stay abreast of valuable information about new features, updated drivers, and more.
If the Installation Failed
If the ConvertX installation failed, check for these causes:
•Make sure you are using Windows 2000 or Windows XP. The ConvertX won’t work with Windows 95, 98, 98SE, or Windows Me. You need to upgrade your computer’s operating system to Windows 2000 or Windows XP.
•Launch the installation manually: If you have to launch the installation manually, look on the Plextor CD and double-click the Plextor ConvertX PX-M402U.exe file.
•Make sure the ConvertX is recognized. See “Make Sure the ConvertX Is Recognized” below.
•Troubleshoot other devices. (See “Troubleshoot Other Devices” on page 17.
Make Sure the ConvertX Is Recognized
After installation, you may want to make sure the ConvertX is recognized by your computer. To check whether it is recognized:
To see if the ConvertX is recognized in Windows:
1.In Windows XP or 2000, go to Start | Settings | Control Panel.
2.In Control Panel, double-click the System icon. You see the System Properties window.
Plextor ConvertX PX-M402U Installation and Users Manual 15
Section 2. Installing Your ConvertX
3.In System Properties, click the Hardware tab, then click on the Device Manager button. You see the Device Manager.
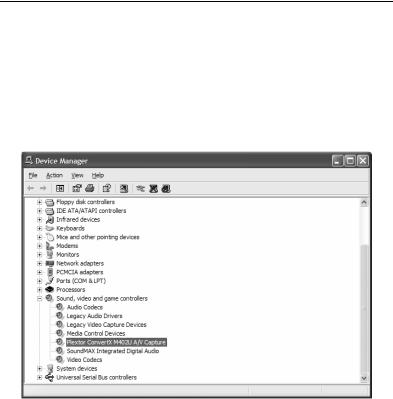
4.Locate the icon for Sound, video and game controllers, and click the + sign next to it to expand the entry list.
5.Look for an entry for Plextor ConvertX M402U A/V Capture.
NOTE: You won’t see the Plextor ConvertX icon unless the ConvertX is connected to your PC.
Figure 11: Device Manager shows the ConvertX device
6.If Sound, video and game controllers are listed and do not have a yellow diamond with an exclamation point, but you do not see the Plextor ConvertX icon listed among the devices, contact our Technical Support group at 1-800-886-3935, or e-mail us at support@Plextor.com for help troubleshooting.
16 Plextor ConvertX PX-M402U Installation and Users Manual

Section 2. Installing Your ConvertX
7.If the ConvertX does not operate even though 1) the sound, audio and game controllers are listed and do not have a yellow diamond with an exclamation point, and 2) the Plextor ConvertX device is listed, in Device Manager double-click the Plextor ConvertX device and then select the Remove button. Then restart your computer. The computer will automatically perform another hardware scan and this time it should install the digital video converter correctly.
Troubleshoot Other Devices
•In the Device Manager, if any of your entries for Other devices have a yellow diamond with an exclamation point (!), troubleshoot your Plextor ConvertX device for compatibility problems or other conflicts. It may just be a matter of obtaining the latest USB driver or Windows 2000 or Windows XP Service Pack from Microsoft’s Windows Update.
•To update the PX-M402U driver, right-click on the question mark and select Properties, then select the Driver tab and click Update driver. Look for the device driver on the Plextor CD.
Changing to Another Computer
Your ConvertX does not have firmware. It downloads its operating program from your computer each time you turn the computer on or reconnect the ConvertX.
Before using your ConvertX on a different computer, use the ConvertX installation CD and install the ConvertX drivers on that computer.
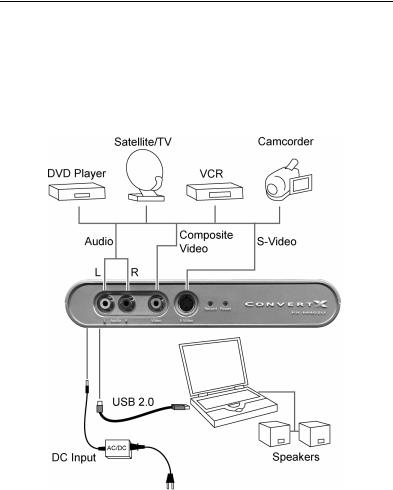
Connect the Video Input to the ConvertX
Connect the analog video source to the ConvertX input connectors. Figure 12 shows some of the sources you can use.
Plextor ConvertX PX-M402U Installation and Users Manual 17
Section 2. Installing Your ConvertX
•If you want to connect composite video: Use the RCA A/V cables to connect the Line Out or Video/Audio Out connectors from the source to the front-panel Audio and Video connectors of the ConvertX.
•If you want to connect S-Video: Use the S-Video cable to connect from the S-Video connector at the source to the front-panel S-Video connector on the ConvertX.
Figure 12: Connecting the video and audio sources to the ConvertX
18 Plextor ConvertX PX-M402U Installation and Users Manual
 Loading...