


 Loading...
Model PX-760A Internal ATAPI Drive
Model PX-760SA Internal SATA Drive
DVD±R DL (DOUBLE LAYER/DUAL LAYER), DVD±R/RW, CD-R/RW DRIVE
INSTALLATION AND USERS MANUAL
March 2006

Plextor reserves the right to make improvements in the products described in this manual at any time without prior notice.
Plextor makes no representation or warranties with respect to the contents hereof and specifically disclaims any implied warranties of merchantability or fitness for any particular purpose. Further, Plextor Corp. reserves the right to revise this manual and to make changes in its content without obligation to notify any person or organization of such revision or change.
This manual is copyrighted, all rights reserved. It may not be copied, photocopied, translated, or reduced to any electronic medium or machine-readable form without Plextor’s prior permission.
Manual copyright ©2006 Plextor Corp.
First edition, March 2006.
Licenses and Trademarks
Plextor, PlexTools, and the Plextor logo are registered trademarks of Plextor Corp. All other licenses and trademarks are property of their respective owners.
Record Your Serial Number
For future reference, record the serial number and the TLA code (found on your drive’s label) in the space provided below.
TLA/Firmware Revision Number
FEDERAL COMMUNICATIONS COMMISSION STATEMENT
This device complies with Part 15 of the FCC Rules. Operation is subject to the following two conditions:
(1)This device may not cause harmful interference, and
(2)this device must accept any interference received, including interference that may cause undesired operation.
CAUTION: Any changes or modifications not expressly approved by the party responsible for compliance could void the user's authority to operate the equipment.
CANADIAN DEPARTMENT OF COMMUNICATIONS STATEMENT
This digital apparatus does not exceed the Class B limits for radio noise emissions from digital apparatus set out in the Radio Interference Regulations of the Canadian Department of Communications.
This class B digital apparatus complies with Canadian ICES-003.
Cet appareil numérique de la classe B est conforme a la norme NMB-003 du Canada.
LASER INFORMATION
These products have been designed and manufactured according to IEC 60825-1 on the Safety of Laser products. This product comes under “Class 1 Laser Products.”
CAUTION: Use of controls or adjustments or performance of procedures other than those specified herein may result in hazardous radiation exposure.
A Laser Caution Label is attached on the top of the internal drive model.
The laser beam emitted from the optical pickup is visible and invisible. Accordingly:
•Do not open the optical pickup housing.
•Obtain service only from Plextor-authorized personnel.
CAUTION: To disconnect the internal DVD/CD drive from an electrical current, pull out the computer’s power plug.
PX-760 Installation and Users Manual iii

Top View of Internal Drive, Showing Caution Label Location
Detail of PX-760A and PX-760SA Laser Caution Labels
iv PX-760 Installation and Users Manual

Table of Contents |
|
1. Getting Started .............................................................................. |
1 |
About this Manual........................................................................... |
1 |
Printing the Manual..................................................................... |
1 |
Meet Your PX-760 .......................................................................... |
2 |
What the PX-760 Does................................................................ |
2 |
Features of the PX-760................................................................ |
3 |
Minimum Configuration to Use the PX-760 ............................... |
7 |
What You Can Do with the PX-760............................................ |
7 |
About Plextools Professional .......................................................... |
8 |
Precautions ...................................................................................... |
8 |
Where to Go From Here.................................................................. |
9 |
2. Installing the PX-760A Internal ATAPI Drive ......................... |
11 |
PX-760A Drive Features and Controls.......................................... |
11 |
Front Panel—PX-760A Internal Drive...................................... |
11 |
Rear Panel—PX-760A Internal Drive....................................... |
12 |
What Else Is In the PX-760A Box ................................................ |
13 |
Save Your Box!......................................................................... |
14 |
PX-760A QuickStart Installation .............................................. |
15 |
Install the Bezel............................................................................. |
16 |
Mount the PX-760A Drive ............................................................ |
16 |
Open the Computer and Prepare for Installation ........................... |
16 |
Determine Your Existing IDE Configuration................................ |
17 |
Inspect Your Computer’s Cables................................................... |
18 |
Confirm That You Have an 80-Conductor IDE Cable .............. |
19 |
Do You Have Cable Select? ...................................................... |
20 |
Do You Need a Power Cable?................................................... |
21 |
Set the Drive’s Mode Jumper........................................................ |
21 |
Changing the Mode Jumper on Your PX-760A Drive .............. |
22 |
Select an IDE Configuration ......................................................... |
24 |
About Cable Select........................................................................ |
29 |
Set the PX-760A for Multiword DMA (If Needed) ...................... |
30 |
Mount the PX-760A Drive ............................................................ |
31 |
Record the Serial Number ......................................................... |
31 |
Mount the Drive in the Computer ............................................. |
31 |
PX-760 Installation and Users Manual v

Table of Contents
3. Installing the PX-760SA Internal SATA Drive ........................ |
37 |
PX-760SA Drive Features and Controls ....................................... |
37 |
Front Panel—PX-760SA Internal Drive ................................... |
38 |
Rear Panel—PX-760SA Internal SATA Drive......................... |
39 |
What Else Is In the PX-760SA Box.............................................. |
40 |
Save Your Box!......................................................................... |
40 |
Set the PX-760SA DMA Jumper (If Needed)............................... |
41 |
Mount the PX-760SA Drive ......................................................... |
42 |
Record the Serial Number......................................................... |
42 |
Mount the Drive in the Computer ............................................. |
42 |
4. Using Your PX-760 ..................................................................... |
47 |
What Media to Use ....................................................................... |
47 |
DVD Media............................................................................... |
47 |
CD-ROM Media ....................................................................... |
48 |
Tray Loading and Operation ......................................................... |
49 |
Handling DVD and CD Media.................................................. |
49 |
Cleaning Discs .......................................................................... |
50 |
Mounting Position......................................................................... |
51 |
Playing DVDs ............................................................................... |
51 |
Writing to DVD Media ................................................................. |
51 |
Specifying +R/RW or -R/RW ................................................... |
51 |
Writing to CD-R and CD-RW Media ........................................... |
52 |
Using the LED Indicator............................................................... |
52 |
Switching to SpeedRead for Video Playback ............................... |
53 |
5. Maintenance and Troubleshooting............................................ |
55 |
Cleaning the PX-760 Drive........................................................... |
55 |
Upgrading Firmware..................................................................... |
56 |
Emergency Eject ........................................................................... |
57 |
Changing the Front-Panel Color ................................................... |
58 |
Troubleshooting ............................................................................ |
62 |
Make Sure the Drive Is Recognized.......................................... |
62 |
Using the PX-760A Self-Test Diagnostics................................ |
64 |
Using the PX-760SA Self-Test Diagnostics ............................. |
68 |
6. Frequently Asked Questions ...................................................... |
71 |
Appendix A: PX-760 Specifications............................................... |
75 |
Specifications for All PX-760 Drives ........................................... |
75 |
Specifications for the PX-760A Internal ATAPI Drive ................ |
84 |
Specifications for the PX-760SA Internal SATA Drive ............... |
87 |
vi PX-760 Installation and Users Manual |
|

|
Table of Contents |
Appendix B: Technical Support..................................................... |
89 |
How to Contact Plextor Technical Support................................... |
90 |
Before You E-mail or Call for Support ......................................... |
90 |
Returns .......................................................................................... |
91 |
Contacting Plextor’s RMA Department .................................... |
91 |
Packing Your Drive................................................................... |
91 |
Shipping Your Drive to Plextor................................................. |
92 |
Appendix C: Warranty................................................................... |
93 |
If You’re Outside the U.S. or Canada ........................................... |
94 |
Index................................................................................................. |
95 |
Notes ............................................................................................... |
103 |
PX-760 Installation and Users Manual vii

Table of Contents
This page intentionally left blank.
viii PX-760 Installation and Users Manual

1. Getting Started
Congratulations! Thank you for purchasing the Plextor® PX-760, a reliable, high-performance recordable DVD and CD writer, rewriter, and player. We appreciate the confidence you have shown in us. Our goal is to put you—and keep you—on the leading edge of DVD and CD technology.
About this Manual
Please read this manual carefully and keep it handy for easy reference. Use the manual for installation, operation and troubleshooting. If your drive needs service, see your dealer or call Plextor’s Technical Support Department.
In this manual you should find all the information you need to successfully install, operate and troubleshoot your drive. If you run into a problem that doesn't seem to be covered, however, please contact us. (See “Appendix B: Technical Support” for the different ways you can reach us.) You will be connected to our friendly, helpful band of tech support engineers. What might seem like an uncooperative drive to you could very well be a 30-second fix to them. But we will never know unless you contact us.
Printing the Manual
This manual has been sized for viewing on a computer monitor screen.
To print a hard copy of this manual:
1.In Acrobat, select File | Print. You see the Print dialog box.
2.In the Print dialog box, choose the printer.
3.If you want to print on standard 8-1/2 x 11 paper, you can check the Expand small pages to paper size box. This expands the manual’s pages so they nearly fill up a standard-sized page.
4.When you have made your selections, click OK. The manual is printed.
PX-760 Installation and Users Manual 1

Section 1: Getting Started
Meet Your PX-760
The PX-760 is a DVD ReWritable/CD ReWritable drive that provides professional quality DVD and CD performance for writing, rewriting and reading.
What the PX-760 Does
For DVDs, the PX-760:
•Writes DVD+R (recordable DVD, “plus” format) media at up to 18X speed.
•Writes DVD+R DL (double layer) media at up to 10X speed.
•Writes DVD-R (recordable DVD, “dash” format) media at up to 18X speed.
•Writes DVD-R DL (dual layer) media at up to 6X speed.
•Writes DVD+RW (rewritable DVD, “plus” format) media at up to 8X speed. (Requires 8X media for 8X writing.)
•Writes DVD-RW (rewritable DVD, “dash” format) media at up to 6X speed.
•Supports DVD+VR and DVD-VR format for read and write.
•Reads stamped DVD discs at up to 16X.
•Reads DVD-Video discs with CSS at up to 2X CLV.
•Supports DVD-RW DRT-DM (Distributed Real Time Defect Management)
•Supports DVD+RW background format
For CDs, the PX-760:
•Writes to CD-R (recordable CD) media at up to 48X speed.
•Writes to CD-RW (rewritable CD) media at up to 24X speed.
•Reads all CD-ROM and CD-R data media at a maximum of 48X speed.
•Reads CD-DA (audio), CD-RW data media, and CD-R audio media at up to 40X speed.
•Reads CD-RW audio media at up to 32X speed.
2 PX-760 Installation and Users Manual
Section 1: Getting Started
Features of the PX-760
•Choice of interfaces:
ATAPI interface: The PX-760A easily installs in virtually any PC with an E-IDE ATAPI interface.
Serial ATA interface: The PX-760SA takes advantage of the benefits of the Serial Advanced Technology Attachment interface, with its smaller, more flexible cables and faster interface speed.
•High speed transfers:
The PX-760A supports data transfers via Ultra DMA66, DMA Mode 2, and PIO Mode 4.
The PX-760SA supports next-generation high speed transfers via the Serial ATA 1.0 interface.
•AUTOSTRATEGY: Writing technology for unknown media. When a writable disc isn’t listed in the drive’s internal media catalog, AUTOSTRATEGY automatically checks the disc and develops a write strategy for it.
•PoweRec for CD-R, DVD+R, DVD-R, DVD+R DL, and DVD-R DL media: Plextor Optimized Writing Error Reduction
Control (PoweRec) adjusts laser power and writing speed so they’re at the optimum settings for that particular disc.
•Replaceable front panel: For mounting in any PC, you can change the front-panel bezel and tray door from beige to black in a few moments.
•VariRec: Lets you change the write strategy to record at highest quality on different types of discs. Also provides user adjustment of the recording power above or below a default level. This adjustment lets you customize the optimum laser power to your own needs.
•Silent Mode: Unique technology that sets the drive for super-silent operation. By controlling access speed, read/write speed, and tray opening and closing speed, you reduce drive noise to a whisper.
PX-760 Installation and Users Manual 3

Section 1: Getting Started
•MMC compliance: Supports the MMC-4 command set.
•Flash memory: Allows upgrading the PX-760 to the latest firmware revision (available from the Plextor web site) without opening the computer or physically accessing the drive.
•Black tray: Reduces the effect of optical distortion by absorbing reflections from the laser beam, enhancing read quality.
•Plug and Play: Supports Windows Plug and Play.
•CPRM support: The PX-760 supports Content Protection for Recordable Media, so you can play CPRM copy-controlled media.
•Self-test diagnostics: The PX-760 has a self-test diagnostic function for easy troubleshooting.
•PlexEraser: This data destruction utility makes a recorded disc (CD-R, DVD+R, DVD-R) unreadable by overwriting the disc’s leadin and user data sectors.
•Q-Check tests: The Plextor PX-760 achieves high-quality recording on virtually any DVD or CD media. To see for yourself, use the Q- Check features to check laser operation or measure and display characteristics of the media you’re using.
•Q-Check TA (Time Analyzer): The PX-760 supports time interval analysis that shows a histogram of a disc’s lands and pits, a valuable aid in assessing disc quality.
4 PX-760 Installation and Users Manual

Section 1: Getting Started
DVD Features
•Lossless linking for DVD+R/RW and DVD+R DL: Allows DVD+RW discs to be edited and still play on DVD-ROM players.
•Zero Link for DVD-R/RW, DVD-R DL: Has 0 byte gap between sessions so the discs are compatible with all players. This allows DVD-RW discs to be edited and still play on DVD-ROM players.
•Double layer and dual layer DVD discs: Reads and writes DVD+R DL (double layer) and DVD-R DL (dual layer) discs, so you can burn up to 4 hours of high quality MPEG-2/DVD video on a single 8.5-gigabyte DVD disc.
•Wide DVD+R/RW and DVD-R/RW media compatibility: Compatible with a wide range of DVD±R and DVD±RW media.
•Multiple DVD types: Supports DVD-ROM, DVD-Video, multiborder, multi-session, DVD±VR, DRT-DM, for read and write.
•Versatile recording modes for DVD+R/RW: Including disc-at-once (DAO), multi-session, and incremental write for DVD+R DL (double layer) discs; DAO, multi-session, and incremental write for DVD+R; and random access write and sequential write for DVD+RW.
•Recording versatility for DVD-R/RW, too: Including sequential write for DVD-R DL (dual-layer); DAO, incremental recording, multiborder recording for DVD-R; and DAO, multi-border recording, incremental recording, restricted overwriting, and DRT-DM for DVD-RW.
•SpeedRead: For DVD-Video discs equipped with CSS copy protection, you can enable fast playback (SpeedRead) or leave at the factory default for quiet video playback.
PX-760 Installation and Users Manual 5

Section 1: Getting Started
CD-R and CD-RW Features
•Variety of recording modes: Supports track-at-once, disc-at-once, session-at-once, multi-session, and variable and fixed packet writing.
•Buffer Underrun Proof Technology: Eliminates buffer underrun errors, so you can safely use your computer for other tasks while you’re writing to a CD-R or CD-RW disc.
•Wide compatibility: Wide CD-R and CD-RW media compatibility.
•Orange Book compatibility: Compatible with Orange Book, Parts II and III.
•OPC and ROPC: Optimum Power Control and Running Optimum Power Control, which adjust the laser power for the optimum write strategy.
•CD-TEXT, CD+G: Supports CD-TEXT and CD+G writing.
•GigaRec: Variable capacity recording that lets you change CD-R disc capacity over a range from 60 percent to 130 percent of the rated value. You can get much more data onto a CD. Or decrease disc capacity while gaining improved audio quality.
•SecureRecording: Security protection that lets you make your CDs readable only by persons with the correct password.
•Overburn: Another way of burning more information onto a CD— audio up to 99 minutes 59 seconds in length, or a data disc up to 875 megabytes in capacity.
6 PX-760 Installation and Users Manual

Section 1: Getting Started
Minimum Configuration to Use the PX-760
Here’s what you’ll need in order to install and use the PX-760 drive.
•Computer: Pentium 4, 1.4-GHz or faster CPU.
•Minimum RAM: 256 MB.
•Interface:
Model PX-760A requires an IDE ATAPI interface.
Model PX-760SA requires a Serial ATA 1.0 interface that supports the ATAPI command set.
•Hard disk size: To write to a CD in image mode (that is, to write an image of a CD to your hard disk), you need 1 GB of free space. For a DVD, 10 GB of free space is recommended. (For more accurate guidelines, see the help files or documentation for the recording software you’re using.)
•Operating System:
Model PX-760A requires Windows XP, Windows XP 64-bit, or Windows 2000.
Model PX-760SA requires Windows XP, Windows XP 64-bit, or Windows 2000.
What You Can Do with the PX-760
Just look at some of the things you can do with your PX-760:
•Record slide shows or digital video onto DVD+R DL, DVD-R DL, DVD+R, DVD-R, DVD+RW and DVD-RW discs.
•Play DVD-ROM, DVD+R DL, DVD-R DL, DVD+R, DVD+RW, DVD-R, and DVD-RW discs.
•Record data or audio onto writable or rewritable CD media.
•Play music CDs.
•Save photos and other images on rewritable or writable CDs.
•Create a CD or DVD “sneakernet” to share information with colleagues—just use software to drag and drop files onto DVD+R, DVD+RW, CD-R or CD-RW media, then continue adding files and sharing the same disc.
•Archive images and video to DVD or CD.
•Master new software programs on DVD or CD.
PX-760 Installation and Users Manual 7

Section 1: Getting Started
About Plextools Professional
PlexTools® Professional is a powerful application software package that lets you take full advantage of the CD/DVD functions of the PX-760 drive. When installed on your computer, this software lets you use your Plextor PX-760 to burn CD-R, CD-RW, and DVD discs. It also lets you take advantage of all the special features found in the Plextor PX-760 drive, including Q-Check tests, Secure Recording, GigaRec, and more. For PlexTools Professional details and downloads, see http://www.plextools.com/.
Precautions
Like the rest of your computer system, your PX-760 requires reasonable care in its installation and use.
•Keep the area around your drive clean from dust, smoke, and other contaminants.
•Do not allow moisture or liquids, including water or cleaning fluids, to touch the drive. Thinner, benzene, or alcohol-based solvents can mar your drive’s surface.
•Do not drop or jolt the drive.
•Do not move, carry or transport a disc in the drive because this can cause damage.
•Do not attempt to open the drive and service it yourself. Removing the cover may expose you to harmful electrical voltages or the laser beam. For your safety, entrust service to experienced service personnel only.
•Keep your DVDs and CDs free of dirt or other contaminants, by storing them in jewel cases. Use only industry-standard discs. Do not insert dirty, warped, poorly balanced, or cracked discs into the drive.
8 PX-760 Installation and Users Manual

Section 1: Getting Started
•Do not clean discs using a circular motion. Instead, using a soft, dry cloth, wipe gently in a radial motion; start at the center of the disc and proceed to the outer edge.
•Do not attempt to clean your drive using solvent-based cleaners or an air compressor.
•Do not attempt to clean your drive using a CD cleaning disc. These discs can damage your drive permanently.
Where to Go From Here
•If you have a PX-760A internal ATAPI drive, see Section 2, beginning on page 11, to learn how to install your drive.
•If you have a PX-760SA internal drive with the Serial ATA interface, see Section 3, beginning on page 37, to install it.
PX-760 Installation and Users Manual 9

Section 1: Getting Started
This page intentionally left blank.
10 PX-760 Installation and Users Manual
2. Installing the
PX-760A Internal ATAPI Drive
This section explains how to physically install your PX-760A internal ATAPI drive in your computer.
PX-760A Drive Features and Controls
Before proceeding, become familiar with the controls and features of your Plextor drive. Match the parts of your drive to the illustrations below.
Front Panel—PX-760A Internal Drive
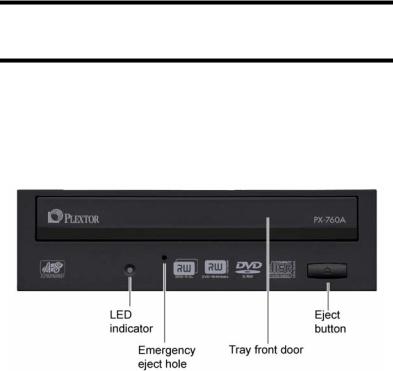
Figure 1: Front panel of the PX-760A internal ATAPI drive
•LED indicator: Illuminated yellow for disc initializing, reading, and ejecting. Illuminated amber for writing. (Blink rate indicates writing speed.) Illuminated green during standby and when Buffer Underrun Proof Technology is operational. Illuminated yellow, green and amber when AUTOSTRATEGY is operational.
PX-760 Installation and Users Manual 11
Section 2. Installing the PX-760A Internal ATAPI Drive
•Emergency eject hole: If the automatic eject button does not work, insert the emergency eject tool, paper clip, or other thin, rigid object in this hole to eject tray. Turn OFF power before using this feature.
•Tray front door: Attached to tray drawer.
•Eject button: Push once to eject tray. Push again to insert the tray back into the PX-760A. To prevent wear on the drive, always use the eject button to insert the tray.
Rear Panel—PX-760A Internal Drive
Also familiarize yourself with the drive’s rear panel.
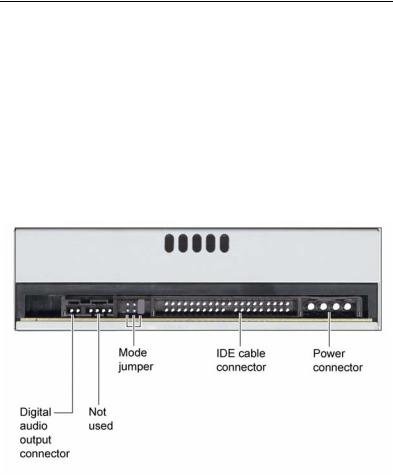
Figure 2: Rear panel of the PX-760A internal ATAPI drive
•Digital audio output connector: Outputs a digital stereo signal. Use this to connect to a sound board that supports Sony/Philips Digital Interface (SPDIF) or Digital-In.
•Analog audio output connector: Not used.
12 PX-760 Installation and Users Manual
Section 2. Installing the PX-760A Internal ATAPI Drive
•Mode jumper: Use the mode jumper to select operation as an IDE master or slave, or for cable select. In general, leave this jumper at its factory setting, which is master; and ensure that any other device on the bus is jumpered as slave.
•IDE cable connector: Connects to your computer’s IDE (ATAPI) interface using 80-conductor Ultra cable.
NOTE: Although the PX-760A will operate with a 40-wire IDE cable, it may not be able to write at 18X unless an 80-conductor IDE/ATA cable is used.
•Power connector: Connects to your computer’s power supply to provide DC +5 volts and +12 volts to the PX-760A.
What Else Is In the PX-760A Box
What you find in your Plextor box depends on what the company that sold you the box put in—or took out—while the Plextor drive was in their possession. Plextor currently sells the PX-760A drive in this configuration:
•PX-760A DVD±R DL, DVD±R/RW and CD-R/RW drive
•Replacement front bezel (beige) and disc tray front panel
•80-conductor IDE/ATA cable
•1 piece of approved DVD+R media
•4 mounting screws
•Emergency eject tool
•Spare jumper
•Plextor software disc with bundled PlexTools® Professional. Also contains Roxio Easy Media Creator 7 Basic DVD Edition, and a PDF of the PX-760 Installation and Users Manual.
•PX-760 Quick Installation Guide
PX-760 Installation and Users Manual 13

Section 2. Installing the PX-760A Internal ATAPI Drive
Save Your Box!
Be sure to save the box after you have installed your drive. The box and its packaging material were designed and drop tested to ensure your drive can endure rough treatment and still arrive in working order. If you have to ship your drive back to Plextor, you’ll want to send it in the original box. (For more details about returning your drive to Plextor, see page 91.)
If the security sticker on top of your box is cut, there may be a good reason: for example, a dealer may have added other components or software. Carefully check the contents to ensure nothing has been removed. If something is missing, contact the party from whom you purchased the box for an explanation.
NOTE: This applies to the Plextor retail box. Your drive may have been shipped in a different box with other contents, depending on whom you purchased the drive from and what they included inside the box.
If your drive came pre-installed, some or all of the items above may have been installed and may not be separately available. See the Plextor web site for locations to purchase additional or replacement accessories.
14 PX-760 Installation and Users Manual

Section 2. Installing the PX-760A Internal ATAPI Drive
PX-760A QuickStart Installation
For Experienced PC Users Only
If you’ve installed computer peripherals before, use this QuickStart installation to get up and running quickly.
IMPORTANT NOTE: To ensure maximum writing speed, you must connect the PX-760A to an 80-conductor IDE/ATA flat ribbon cable. (This newer 80-conductor ribbon cable is physically interchangeable with the 40-conductor cable found in older computers.) The Plextorsupplied cable is an 80-conductor cable.
Typical Scenario 1: You have a PC with an IDE interface installed, you have Windows 2000 or XP, and you have nothing installed on the secondary IDE port. What to do: Leave the PX-760A’s jumper set to Master, attach it to the secondary IDE port, and go. Windows will recognize the drive automatically.
Typical Scenario 2: You have a PC with an IDE interface installed, you have Windows 2000 or XP, the primary IDE port already has two devices connected and you have a CD-ROM installed on the secondary IDE port. What to do: Change the CD-ROM to Slave, leave the PX-760A’s jumper set to Master and attach the PX-760A to the secondary IDE port. Windows recognizes the new drive automatically.
If neither of these situations applies to you, or you’re not comfortable with IDE installation, read the rest of this section for more detailed installation instructions.
PX-760 Installation and Users Manual 15

Section 2. Installing the PX-760A Internal ATAPI Drive
Install the Bezel
If the PX-760A drive’s current front-panel color is suitable for your computer, you can proceed to “Mount the PX-760A Drive” below. But if you want to change the bezel color, first install the ivory or the black bezel and disc tray front panel as outlined under “Changing the FrontPanel Color” on page 58.
Mount the PX-760A Drive
Here’s an overview of what you’ll do to mount the drive:
1.Turn OFF your computer system.
2.Set the jumpers for your new PX-760A drive, if necessary.
3.Mount the drive into an available drive bay inside the computer system.
4.Make all necessary cabling connections: IDE cable, power cable, and audio cable.
5.Turn your computer system ON.
The following pages give more details for this procedure.
Open the Computer and Prepare for Installation
To determine whether your PX-760A will be a Master or a Slave, open your computer and examine the IDE connections to the motherboard.
To open the computer:
1.Before proceeding, make sure the power to your computer and any external peripherals is OFF and your computer is UNPLUGGED from its power source.
16 PX-760 Installation and Users Manual
Section 2. Installing the PX-760A Internal ATAPI Drive
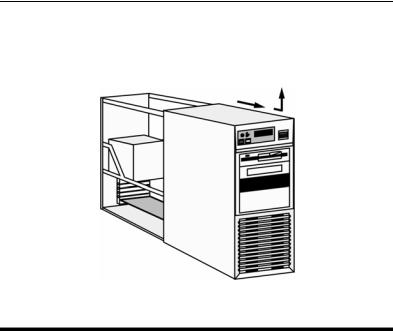
2.Remove your computer’s cover, following the directions provided by your computer’s manufacturer. Typically, this involves loosening or removing several screws on the back panel of your computer and sliding off the cover. See Figure 3 for an example.
Figure 3: Removing a typical computer's cover
Determine Your Existing IDE Configuration
With your computer open, determine the existing IDE configuration. You can do this by looking at the IDE ribbon cable (or cables—there may be two) and seeing what is connected to them.
One end of the IDE cable connects to the IDE port on your computer’s motherboard; and there are usually two other connectors for attaching peripheral devices such as a hard disk, DVD or CD-ROM drive, or your PX-760A drive. If there are two devices, one is configured as Master and the other the Slave, as indicated by the position of jumpers on the back of the drive.
If your computer is set up for Cable Select, or CSEL, both devices will be jumpered as Cable Select. In older computer, this configuration required a special Cable Select cable.
PX-760 Installation and Users Manual 17

Section 2. Installing the PX-760A Internal ATAPI Drive
If there are two IDE cables, one is for the primary IDE bus and the other is for the secondary bus.
Before you install your PX-760A, your computer’s IDE configuration is usually one of the following:
•Configuration A: Hard disks connected as Master and Slave devices on primary IDE port; DVD or CD-ROM drive connected as the Master device on secondary IDE port.
•Configuration B: Hard disk connected as Master device and DVD or CD-ROM drive connected as Slave on the primary IDE port; nothing connected to secondary IDE port.
•Configuration C: Hard disk connected as Master device on primary IDE port; nothing connected to secondary IDE port.
•Configuration D: System uses special “Cable Select” cables; all devices are jumpered for Cable Select.
Inspect Your Computer’s Cables
To ensure that it can write at maximum rated speed (18X), you should make sure the PX-760A is connected to an 80-conductor IDE/ATA flat ribbon cable. If you have an older computer, it may still be equipped with a 40-conductor cable.
NOTE: Although the newer IDE/ATA cable has 80 conductors (wires), its connectors have only 40 pins, so it’s physically interchangeable with the older cable. And in fact, your PX-760A drive may work fine with a 40conductor cable. But to ensure writing at maximum speed, it’s best to use the newer 80-conductor cable, such as the one provided by Plextor. The 80-conductor cable cancels interference much better than the older model, allowing faster data transfers.
CAUTION: The length of any IDE cable cannot exceed 18 inches.
18 PX-760 Installation and Users Manual
Section 2. Installing the PX-760A Internal ATAPI Drive
Confirm That You Have an 80-Conductor IDE Cable
How can you tell? The 80-conductor cable is slightly wider than the older 40-conductor version. The wires in the 80-conductor version are narrower, too.
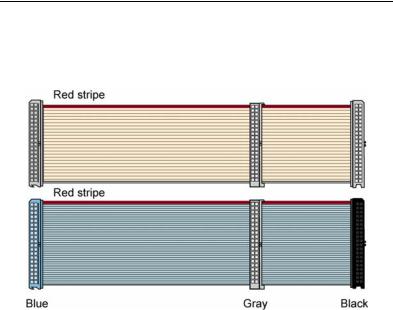
Figure 4: Comparing the older 40-conductor cable (top) to the new 80conductor type (bottom). Be sure to use the 80-conductor cable.
The extra IDE/ATA cable shipped with your PX-760A is the new 80conductor version. So if you have an older 40-conductor cable, replace it with the 80-conductor cable that came with your Plextor drive. (Or purchase an 80-conductor IDE/ATA cable at an electronics supply store.)
PX-760 Installation and Users Manual 19
Section 2. Installing the PX-760A Internal ATAPI Drive
Do You Have Cable Select?
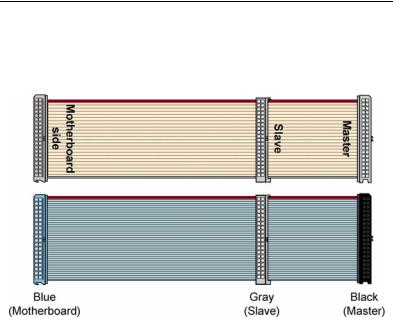
Many computers from major manufacturers use special Cable Select cables. The Cable Select cable typically has markings that identify the connectors for Master, Slave, and Motherboard.
Figure 5: If you have an older 40-conductor Cable Select cable (top), replace it with the new 80-conductor cable (bottom).
If you have one of these older Cable Select cables, replace it with the 80-conductor IDE/ATA cable from Plextor. (All 80-conductor cables that meet the ATA specifications also support Cable Select.) The connector color identifies master and slave.
With the 80-conductor cable:
•The blue connector attaches to the computer motherboard or controller.
•The gray connector is in the middle of the cable, and goes to any slave (device 1) drive, if present.
•The black connector is at the opposite end from the host connector and goes to the master drive (device 0), or to a single drive if only one is used.
20 PX-760 Installation and Users Manual

Section 2. Installing the PX-760A Internal ATAPI Drive
If you are unsure whether or not your system has a Cable Select cable installed, either look at the cable or look at the jumpers on the existing DVD-ROM or CD-ROM drive. If any device is jumpered as Cable Select, then both devices on that cable must be jumpered that way.
Do You Need a Power Cable?
In most computers, you will find extra power connectors in the computer ready for your use. When you open the computer, check the cable running from your power supply to your hard disk drive and see if it has extra connectors on it. If so, you can plug one of these into the power connector found on the rear panel of the PX-760A.
If you do not find any additional connectors (either because they were not supplied or they are all in use), you will have to buy a “splitter” or a “Y-connector.” These can also be found at most retail and mail-order computer stores.
Set the Drive’s Mode Jumper
You specify your drive's Master, Slave, or Cable Select setting before installing it. You do this by changing the position of a jumper on the mode jumper block at the rear of the drive.
Your drive ships from our factory with its mode jumper set to operate the PX-760A as a Master. This will work in most custom system configurations. If your computer is from a large OEM system manufacturer such as IBM, Hewlett Packard/Compaq, Dell, or Gateway, you will need to pay particular attention to whether the computer uses the Cable Select scheme.
NOTE: The jumper configuration on the drive has priority over Cable Select. So if the jumper of one device on a cable is set to Master, the jumper of the other device must be set for Slave. In this case, location of the devices on the cable is not important.
If you have only one device, it must be set to Master or Cable Select, and it must be at the end of the cable.
PX-760 Installation and Users Manual 21
Section 2. Installing the PX-760A Internal ATAPI Drive
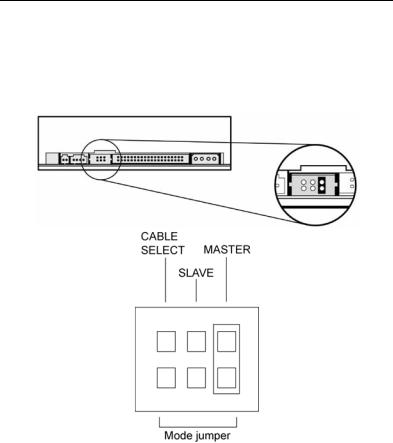
Changing the Mode Jumper on Your PX-760A Drive
The drive arrives from the factory with its mode jumper set to Master. (A function is ON if the jumper is installed and OFF if the jumper is removed.)
Figure 6: Factory settings for mode jumper at the rear of the PX-760A drive
Changing to a Master, Slave, or Cable Select
The Master/Slave/Cable Select setting for the drive is determined by the mode jumper. The jumper is placed over one of the sets of mode pins. To change the drive from Master to Slave or to Cable Select, you must move the jumper.
22 PX-760 Installation and Users Manual
Loading...