

Page 1
TRAINING BALANCE BIKE
Before reading, fold out the illustration page and get to know all of the functions of your unit.
Przed przeczytaniem należy rozłożyć bok z ilustracjami a następnie zapoznać się ze wszystkimi
funkcjami urządzenia.
Elolvasás előtt hajtsa ki az oldalt az ábrákkal és ezt követően ismerkedjen meg a készülék valamennyi
funkciójával.
Preden začnete brati, odprite stran s slikami in se seznanite z vsemi funkcijami naprave.
Před čtením si nejdříve vyklopte stránku s obrázky a seznamte se se všemi funkcemi přístroje.
Skôr než začnete návod čítať, si ho otvorte na strane s obrázkami a oboznámte sa so všetkými
funkciami prístroja.
Klappen Sie vor dem Lesen die Seite mit den Abbildungen aus und machen Sie sich anschließend mit
allen Funktionen des Artikels vertraut.
DELTA-SPORT HANDELSKONTOR GMBH
Wragekamp 6
D-22397 Hamburg
Version: 02/2015
Delta-Sport-Nr.: LR-1703
TRAINING BALANCE BIKE
Instructions for use
FUTÓKERÉKPÁR
Használati útmutató
dĚTSKÉ OdRÁŽEdLO
Návod k obsluze
LAUFRAd
Bedienungsanleitung
IAN 103988IAN 103988
ROWEREK BIEGOWY
Instrukcja obsługi
POGANJALEC
Navodilo za uporabo
dETSKE OdRAŽAdLO
Návod na obsluhu
GB Instructions and Safety Notice Page 08
PL Wskazówki bezpieczeństwa i obsługi Strona 11
HU Használati és biztonsági tudnivalók 15. Oldal
SI Navodila za uporabo in varnostni napotki Strani 19
CZ Pokyny k používání a bezpečnostní upozornění Stránky 23
SK Pokyny na obsluhu a bezpečnostné pokyny Stranu 26
DE/AT/CH Bedienungs- und Sicherheitshinweise Seite 29
Page 2
1
1
A
21
20
1
2
E G
F
22
Set 1
Set 2
10
19
4
18
17
4
5
16
15
14
12
11
7
8
13
8
3
H J
K
N
I
L
O
M
P
B
C
9
7
6
Qd
SR
S1
S2
Page 3

5
Page 4
Contents/Parts Description ................................ 8
Technical Data ..................................................... 8
Intended Use ....................................................... 8
Safety Instructions .......................................... 8 - 9
Risk of injury .................................................. 8
Safety instructions for use ............................. 9
Assembly ............................................................. 9
Install mudguard ........................................... 9
Install front wheel ......................................... 9
Install frame .................................................. 9
Install basket ................................................. 9
Install handlebar .......................................... 9
Install saddle ................................................. 9
Install protective handlebar cushion ........... 9
Sticker set ...................................................... 9
Settings .............................................................. 10
Handlebar height ....................................... 10
Saddle height ............................................. 10
Brake ........................................................... 10
Care, storage, maintenance ............................ 10
Disposal Instructions ......................................... 10
3 years warranty .............................................. 10
Contents/Spis treści/Tartalomjegyzék/Kazalo
Zawartość/oznaczenie elementów ................ 11
Dane techniczne ............................................... 11
Zastosowanie zgodne z przeznaczeniem ..... 11
Wskazówki bezpieczeństwa .................... 11 - 12
Niebezpieczeństwo urazu ................. 11 - 12
Wskazówki bezpieczeństwa
dotyczące zastosowania ........................... 12
Montaż ...................................................... 12 - 13
Montowanie błotnika ................................. 12
Montowanie przedniego koła .................. 12
Montowanie ramy ...................................... 12
Montowanie koszyka ................................. 12
Montowanie kierownicy .............................12
Montowanie siodełka ................................ 13
Zakładanie osłony kierownicy .................. 13
Zestawy naklejek ........................................ 13
Ustawienia ........................................................ 13
Wysokość kierownicy ................................ 13
Wysokość siodełka .................................... 13
Hamulec ...................................................... 13
Pielęgnacja, przechowywanie, konserwacja 13
Wskazówki dotyczące utylizacji .................... 13
3 lata gwarancji ............................................... 14
A csomag tartalma/
Az alkatrészek megnevezése .......................... 15
Műszaki adatok ................................................ 15
Rendeltetésszerű használat ............................. 15
Biztonsági tudnivalók ............................... 15 - 16
Sérülésveszély ............................................ 15
Biztonsági tudnivalók a használatra
vonatkozóan ............................................... 16
Összeszerelés ........................................... 16 - 17
A sárvédő felszerelése ............................... 16
Az első kerék felszerelése .......................... 16
A váz felszerelése ...................................... 16
A kosár felszerelése ................................... 16
A kormány felszerelése .............................. 16
A nyereg felszerelése ................................. 16
A kormányvédő felszerelése ..................... 17
Matricák ...................................................... 17
Beállítások ......................................................... 17
A kormány magassága .............................. 17
A nyereg magassága ................................ 17
Fék ............................................................... 17
Ápolás, tárolás, karbantartás .......................... 17
Ártalmatlanítási tudnivalók ...............................17
3 év garancia ................................................... 18
6
Obseg dobave/opis delov .............................. 19
Tehnični podatki ................................................ 19
Predvidena uporaba ........................................ 19
Varnostni napotki ...................................... 19 - 20
Nevarnost poškodb ................................... 19
Varnostni napotki glede uporabe ............. 20
Montaža ............................................................ 20
Montaža zaščitne pločevine ..................... 20
Montaža sprednjega kolesa ..................... 20
Montaža okvirja ......................................... 20
Montaža košare ......................................... 20
Montaža balance .......................................20
Montaža sedeža
Pritrditev zaščite za balanco ..................... 20
Seti nalepk .................................................. 20
Nastavitve ......................................................... 21
Višina balance ............................................ 21
Višina sedeža ............................................. 21
Zavora ......................................................... 21
Nega, skladiščenje, vzdrževanje .................... 21
Napotki za odstranitev .................................... 21
3 leta garancije ........................................ 21 - 22
Page 5
Obsah/Obsah/Inhaltsverzeichnis
Obsah dodávky / Popis dílů ............................23
Technická data ...................................................23
Použití ke stanovenému účelu ...........................23
Bezpečnostní upozornění .........................23 - 24
Nebezpečí zranění .....................................23
Bezpečnostní upozornění k použití ...........24
Montáž .............................................................. 24
Montáž blatníku ......................................... 24
Montáž předního kola ............................... 24
Montáž rámu .............................................. 24
Montáž košíku ............................................ 24
Montáž řídítek ............................................ 24
Montáž sedla ............................................. 24
Montáž chrániče na řídítka ....................... 24
Sady nálepek ............................................. 24
Seřízení .............................................................. 25
Výška řídítek ................................................ 25
Výška sedla ................................................. 25
Brzda ........................................................... 25
Ošetřování, skladování, údržba ...................... 25
Pokyny k odstranění do odpadu ..................... 25
3 roky zaruky .................................................... 25
Lieferumfang/Teilebezeichnung ...................... 29
Technische Daten .............................................. 29
Bestimmungsgemäße Verwendung ................. 29
Sicherheitshinweise ................................... 29 - 30
Verletzungsgefahr .............................. 29 - 30
Sicherheitshinweise zur Verwendung ....... 30
Montage .................................................... 30 - 31
Schutzblech montieren ............................... 30
Vorderrad montieren .................................. 30
Rahmen montieren ...................................... 30
Korb montieren ........................................... 30
Lenker montieren ........................................ 30
Sattel montieren .......................................... 31
Lenkerschutz anbringen ............................. 31
Aufkleber-Sets ............................................. 31
Einstellungen ..................................................... 31
Lenkerhöhe .................................................. 31
Sattelhöhe ................................................... 31
Bremse ......................................................... 31
Pflege, Lagerung, Wartung .............................. 31
Hinweise zur Entsorgung ................................. 31
3 Jahre Garantie .............................................. 32
Obsah/označenie dielov ................................ 26
Technické údaje ................................................ 26
Použitie podľa predpisov ................................. 26
Bezpečnostné pokyny .............................. 26 - 27
Nebezpečenstvo zranenia ................ 26 - 27
Bezpečnostné pokyny pre používanie ..... 27
Montáž .............................................................. 27
Montáž blatníka ......................................... 27
Montáž predného kolesa .......................... 27
Montáž rámu .............................................. 27
Montáž koša ............................................... 27
Montáž riadidiel ........................................ 27
Montáž sedadla ......................................... 27
Upevnenie chrániča riadidiel .................... 27
Súprava nálepiek ....................................... 27
Nastavenia ........................................................ 28
Výška riadidiel ............................................ 28
Výška sedadla ............................................ 28
Brzda ............................................................28
Ošetrovanie, skladovanie, údržba .................. 28
Pokyny na likvidáciu ......................................... 28
3 roky záruka .................................................... 28
7
Page 6
Congratulations! With your purchase you
have decided on a high-quality product.
Get to know the product before you start to use
it. Carefully read the following instructions for
use. Use the product only as described and only
for the given areas of application. Keep these
instructions safe. When passing the product
on to a third party, always make sure that the
documentation is included.
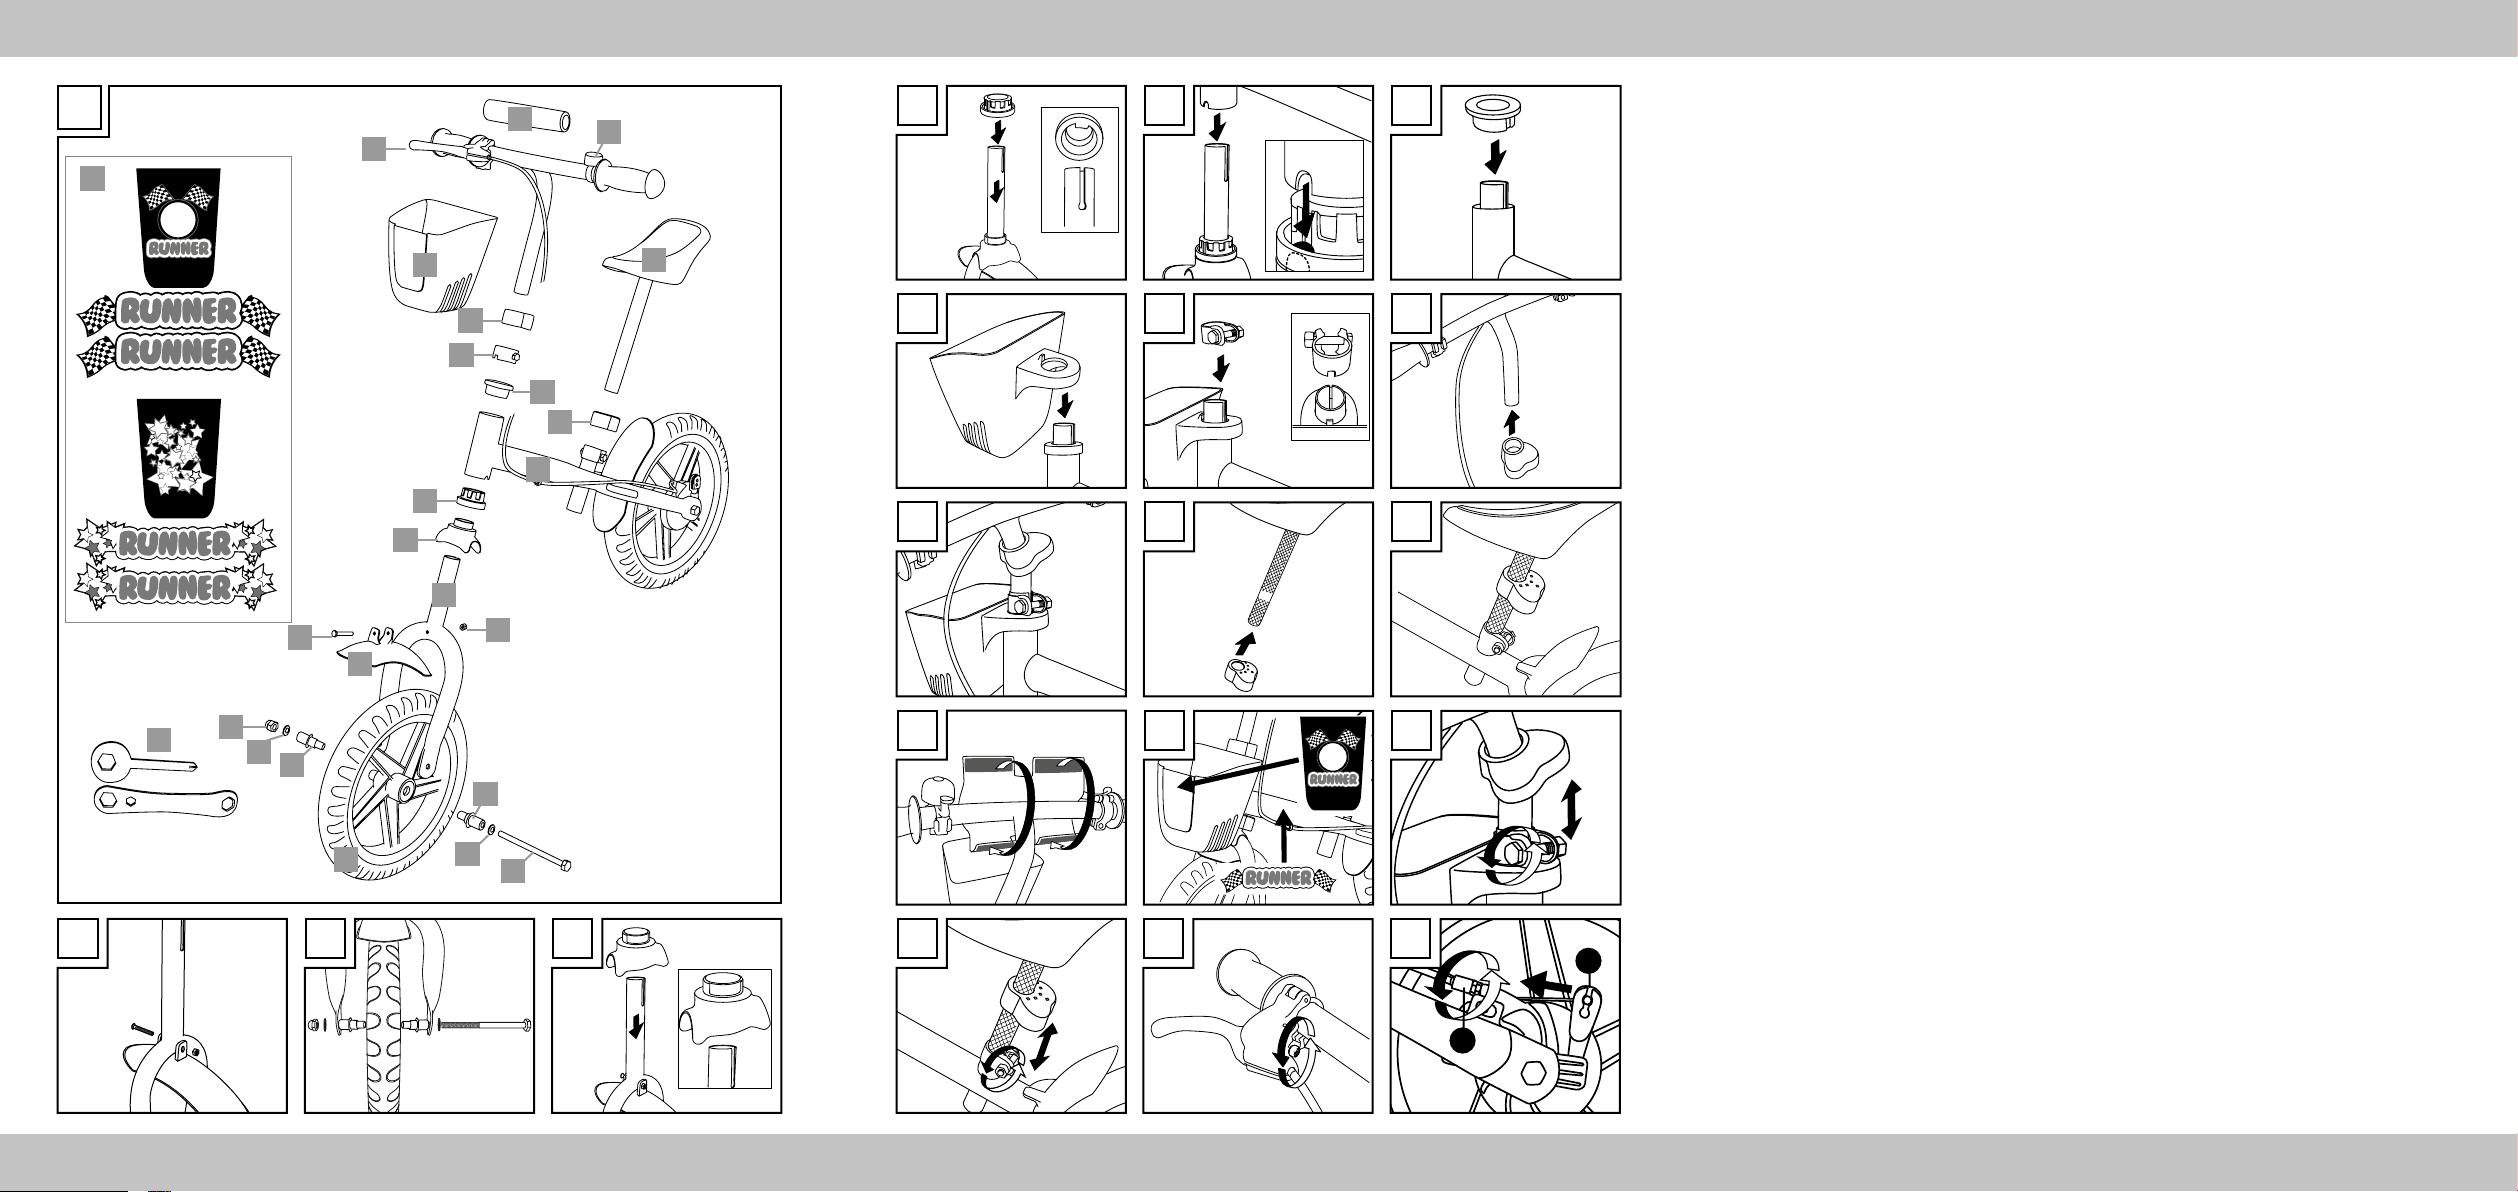
Contents/Parts description
(Fig. A)
(1) 1 x Protective handlebar cushion
(2) 1 x Bell
(3) 1 x Saddle and seatpost
(4) 2 x Covers
(5) 1 x Frame (with pre-assembled brake cable
and handlebar)
(6) 1 x Axle bolt
(7) 2 x Washers
(8) 2 x Spacers
(9) 1 x Front tyre
(10) 1 x Nut
(11) 1 x Front mudguard
(12) 1 x Screw
(13) 1 x Nut
(14) 1 x Fork
(15) 1 x T-connector
(16) 1 x Lower connector
(17) 1 x Top connector
(18) 1 x Clamp
(19) 1 x Basket
(20) 1 x Brake lever
(21) 1 x Sheet of stickers
(divided into set 1 and set 2)
(22) 2 x Tools
1 x Instructions for use
Technical Data
Max. user weight: 50kg
Weight: approx. 3.3kg
Saddle height: approx. 36.5 - 46cm
Handlebar height: approx. 56 - 60cm
Dimensions: approx. 86 x 43.5 x 56 - 60cm
Intended Use
This product is intended for private use only.
It is suitable for use as a toy by children (approx.
3 - 6 years; body height 96cm - 120cm) with a
maximum weight of 50kg. Not for use on public
roads. Please read up on legal regulations prior
to use.
Safety Instructions
Risk of injury!
• Warning! Not suitable for children under
36 months of age. Risk of suffocation: small
parts can be swallowed or inhaled!
• Check product for damage and wear before
each use. Check all connections and fasten ers are secure before each use. Check all
screws and nuts retain their self-locking
function.
• Only use this product in proper working
condition. If a product defect has been
discovered, discontinue use until the defect
has been corrected.
• Screws must always be tightened so that
children are unable to loosen them. Children
may otherwise swallow or inhale small re moved parts. Choking hazard!
• Do not modify this product. Faults caused by
incorrectly performed work to this product
may damage it and impair its operational
safety.
• Do not connect this product to other vehicles,
sporting goods or other moving objects.
This product is not designed for high speeds.
• Children must be supervised by an adult at all
times while using this product.
• Children must always wear a helmet and
solid footwear while using this product.
We recommend using suitable protective
equipment.
• Do not use this product in the dark or in poor
visibility.
• Do not use this product on steep terrain, near
stairs or open water. Avoid hazard areas.
8 GB
Page 7
Safety instructions for use
• Be aware that children are not always able
to correctly assess their own abilities and
certain dangerous situations. When distracted
by games they are playing, children can get
into hazardous situations beyond the
distributor’s/manufacturer’s responsibility.
• Instruct children on the proper use of this
product and alert them to potential risks.
• Children must be able to control braking at
all times. Practice braking by foot and by
brake before using the product.
• Smooth surfaces are slip hazards. Remember
that using this product always involves the risk
of collisions.
Assembly
CAUTION!
The product must always be assembled by
an adult.
CAUTION!
Keep children away from the product
and packing materials during assembly. Small
parts which could be swallowed or inhaled and
plastic bags may present choking hazards.
1. Install mudguard
Attach the front mudguard (11) to the fork
(14) with screw (12) and nut (13) (Fig. B).
Ensure the slot on the fork is facing the
longer side of the mudguard.
2. Install front wheel
Attach the front wheel (9) to the fork with
2x spacers (8), 2x washers (7) and the axle
screw (6) (Fig. C).
3. Install the frame
3a) Attach the T-connector (15) to the fork
(Fig. D).
Ensure the slot is facing the longer side
of the mudguard.
3b) Attach the lower connector (16) to the fork
(Fig. E).
Ensure it is slotted securely to the
T-connector.
3c) Attach the frame (5) to the fork (Fig. F).
Ensure it is slotted securely.
3d) Attach the top connector (17) to the fork
(Fig. G).
4. Install basket
Attach the basket (19) to the fork (Fig. H).
5. Install handlebar
5a) Attach the clamp (18) to the fork (Fig. I).
Ensure slotted securely.
5b) Attach a cover (4) to the handle tube (Fig. J).
5c) Insert the handle tube into the fork (Fig. K).
Please note the maximum extension
marking.
Use the tool (22) to tighten the nut on the
clamp and slide the cover over the clamp.
6. Install saddle
6a) Attach a cover to the saddle with seatpost
(3) (Fig. L).
6b) Insert the seatpost into the opening on the
frame (Fig. M).
Please note the maximum extension
marking.
Tighten the nut with the tool to secure the
saddle, then slide the cover over the nut.
7. Install protective handlebar
cushion
Attach the protective handlebar cushion
(1) to the handlebar with the hook and
loop fastener (Fig. N).
8. Sticker Set
Apply the sticker set 1 or set 2 (21) in the
specified locations (Fig. O).
9GB
Page 8

Settings
Handlebar height
Please note the maximum extension.
Slide up the cover. Loosen the clamp until you
are able to slide the handlebar up and down
and adjust the handlebar to the correct height.
Tighten the clamp, then slide the cover over the
clamp (Fig. P).
Saddle height
Note:
The seat is at the right height when the
child is able to safely touch the ground
with his/her feet.
Please note the maximum extension.
Slide up the cover. Loosen the nut until you are
able to slide the seat up and down and adjust
the seat to the correct height. Tighten the nut and
slide the cover back down (Fig. Q).
Brake
Brake handle
The maximum distance from the handle to the
brake handle is 60mm. Adjust the distance
between the brake handle (20) and the handle
by adjusting the locking screw (Fig. R).
Brake force
CAUTION!
The brake force must be adjusted so
that the rear wheel runs freely when
the brake lever is released and is
blocked when applied.
Press the brake arm (S1) in the direction of the
arrow. Turn the adjusting and locking nut (S2)
counter clockwise to reduce the braking force,
turn the adjusting and locking nut clockwise to
increase the braking force (Fig. S).
Care, storage, maintenance
We recommend thoroughly cleaning the product
with water after use.
IMPORTANT! Clean with water only, never with
harsh cleaning agents. Wipe dry with a cleaning
cloth. Always store the dry and clean product
in a temperate room. Apply a drop of oil to the
bearing bushings on the handlebar and wheels
every 3 months.
Disposal Instructions
Please dispose of packaging and product in
an environmentally friendly manner! Dispose of
product through an approved disposal facility
or through your local council. Please note the
recycling regulations in your area.
3 years warranty
The product was produced with great care and
under constant supervision. You receive a threeyear warranty for this product from the date of
purchase. Please retain your receipt.
The warranty applies only to material and
workmanship and does not apply to misuse or
improper handling. Your statutory rights, especially the warranty rights, are not affected by this
warranty.
With regard to complaints, please contact the
following service hotline or contact us by e-mail.
Our service employees will advise as to the
subsequent procedure as quickly as possible.
We will be personally available to discuss the
situation with you.
Any repairs under the warranty, statutory guarantees or through goodwill do not extend the
warranty period. This also applies to replaced
and repaired parts. Repairs after the warranty
are subject to a charge.
IAN: 103988
Service Great Britain
Tel.: 0871 5000 720 (£ 0.10/Min.)
E-Mail: deltasport@lidl.co.uk
You can also find spare parts for your product at:
www.delta-sport.com, category Service - Lidl Spare Parts
Service
10 GB
Page 9

Gratulujemy! Kupując nasz artykuł zdecydowali się Państwo na produkt o wysokiej jakości.
Przed montażem i pierwszym zastosowaniem
należy zapoznać się z artykułem. W tym celu prosimy o dokładne przeczytanie poniższej instrukcji
dot. montażu i wskazówek bezpieczeństwa. Produkt należy stosować, jak opisano w instrukcji i tylko w podanym zakresie użycia. Instrukcję obsługi
należy dokładnie przechowywać. W przypadku
przekazania artykułu osobom trzecim, należy
również przekazać im wszystkie dokumenty.
Zawartość/oznaczenie
elementów (ilustracja A)
(1) 1 x osłona przed zderzeniem
(2) 1 x dzwonek
(3) 1 x siodełko z rurą
(4) 2 x zakrycie
(5) 1 x rama (z zamontowanym kablem
hamulca i kierownicą)
(6) 1 x śruba mocująca
(7) 2 x podkładka
(8) 2 x uchwyt odstępu
(9) 1 x przednia opona
(10) 1 x nakrętka
(11) 1 x błotnik z przodu
(12) 1 x śruba
(13) 1 x nakrętka
(14) 1 x widelec
(15) 1 x łącznik T
(16) 1 x dolny łącznik
(17) 1 x górny łącznik
(18) 1 x zacisk
(19) 1 x koszyk
(20) 1 x uchwyt hamulca
(21) 1 x naklejka na koszyk
(podzielona na zestaw 1 i 2)
(22) 2 x klucz
1 x instrukcja obsługi
Dane techniczne
Maksymalna waga użytkownika: 50 kg
Waga: ok. 3,3 kg
Wysokość siodełka: ok. 36,5 - 46 cm
Wysokość kierownicy: ok. 56 - 60 cm
Wymiary: ok. 86 x 43,5 x 56 - 60 cm
Zastosowanie zgodne z
przeznaczeniem
Niniejszy artykuł został zaprojektowany do
prywatnego użytku. Przeznaczony jest do zastosowania jako zabawka przez dziecko (3 - 6
lat, wysokość 96 cm – 120 cm) o maksymalnej
wadze 50 kg. Artykuł nie może brać udziału w
ruchu publicznym. Przed zastosowaniem należy
zapoznać się z prawnymi przepisami.
Wskazówki
bezpieczeństwa
Niebezpieczeństwo urazu!
• Uwaga! Zabawka jest nieodpowied nia dla
dzieci w wieku poniżej 3 lat.
Niebezpieczeństwo uduszenia, ponieważ
małe elementy mogą zostać połknięte lub
wprowadzone do dróg oddechowych!
• Przed każdym użyciem należy sprawdzić czy
artykuł nie jest uszkodzony i nie posiada
śladów zużycia. Przed każdym zastosowa niem należy skontrolować czy wszystkie
elementy łączące i zapięcia są dobrze
dopasowane. Upewnić się, czy śruby
i nakrętki zachowują swoje właściwości
samozamykające.
• Artykuł może być stosowany wyłącznie w
nienagannym stanie! W razie wykrycia usz kodzenia artykułu, nie może on być stosowa ny, aż do usunięcia uszkodzenia!
• Śruby muszą być zawsze tak dokręcone, aby
dzieci nie mogły ich odkręcić. W przeciwnym
razie istnieje zagrożenie, że odkręcone małe
elementy zostaną przez dzieci połknięte lub
zainhalowane. Niebezpieczeństwo udusze nia!
• Przez nieodpowiednie zmiany na artykule
lub naprawy powstają niebezpieczeństwa!
Nie zmieniać artykułu!
• Nie łączyć artykuły z innymi pojazdami,
przyrządami sportowymi lub innymi
urządzeniami ciągnącymi. Artykuł nie jest
skonstruowany do dużych prędkości.
• Dziecko podczas stosowania artykułu musi
być zawsze nadzorowane przez osobę
dorosłą!
11PL
Page 10

• Dziecko podczas jazdy musi zawsze mięć
na sobie kask oraz stabilne obuwie!
Zalecamy dodatkowo zastosowanie odpo
wiedniego wyposażenia ochronnego.
• Z artykułu nie można korzystać w ciemności
lub przy złej widoczności!
• Z artykułu nie można korzystać w stromym
terenie, w pobliżu schodów i otwartych
zbiorników wodnych! Unikać obszarów
zagrożenia!
Wskazówki bezpieczeństwa
dotyczące zastosowania
• Należy zwrócić uwagę, że dzieci często nie
mogą ocenić swoich zdolności oraz pewnych
sytuacji zagrożenia! Przez dziecięcą
potrzebę zabawy może dojść do nieprze widzianych sytuacji, które wyłączają z
odpowiedzialności sprzedawcę/producenta.
• Dziecko należy poinstruować jak poprawnie
obchodzić się z artykułem i zwrócić jego
uwagę na możliwe zagrożenia!
• Dziecko musi zawsze umieć penie
zahamować. Przed zastosowaniem artykułu
należy poćwiczyć hamowanie stopami jak
również hamulcem.
• Na gładkich podłożach istnieje zagrożenie
poślizgu! Należy mięć na uwadze, że przy
zastosowaniu artykułu istnieje zagrożenie
upadku.
Montaż
UWAGA!
Montaż artykułu musi być zawsze
przeprowadzony przez osobę dorosłą!
UWAGA!
Podczas montażu należy dzieci trzymać
z dala od artykułu i materiału opakunkowego.
Niebezpieczeństwo uduszenie, ponieważ
małe elementy mogą zostać połknięte lub
zainhalowane jak również niebezpieczeństwo
uduszenia torebkami z tworzywa sztucznego.
1. Montowanie błotnika
Przymocować błotnik z przodu (11) śrubą
(12) i nakrętką (13) do widelca (14)
(ilustracja B).
Uważać przy tym aby otwór na
widelcu wskazywał ku dłuższej stronie
błotnika.
2. Montowanie przedniego koła
Przymocować przednią oponę (9) 2
uchwytami odstępu (8), 2 podkładkami
(7) i śrubą mocującą (6) do widelca
(ilustracja C).
3. Montowanie ramy
3a) Wetknąć łącznik T (15) na widelec
(ilustracja D).
Uważać przy tym aby głębszy otwór
wskazywał ku dłuższej stronie
błotnika.
3b) Wetknąć dolny łącznik (16) na widelec
(ilustracja E).
Uważać przy tym, aby prowadnica
pasowała do wnęki na łączniku T.
3c) Wetknąć ramę (5) na widelec (ilustracja F).
Uważać przy tym, aby wnęka została
wetknięta w podaną prowadnicę.
3d) Wetknąć górny łącznik (17) na widelec
(ilustracja G).
4. Montowanie koszyka
Wetknąć koszyk (19) na widelec
(ilustracja H).
5. Montowanie kierownicy
5a) Wetknąć zacisk (18) na widelec
(ilustracja I).
Uważać przy tym, aby wnęka na
zacisku pasowała do prowadnicy na
koszyku.
5b) Wetknąć zakrycie (4) na rurę kierownicy
(ilustracja J).
5c) Wetknąć kierownicę na widelec
(ilustracja K).
Uważać na maksymalną wysokość
wysunięcia!
Dokręcić nakrętkę na zacisku przy pomocy
klucza (22) i przesunąć zakrycie ponad
zacisk.
12 PL
Page 11

6. Montowanie siodełka
6a) Wetknąć zakrycie na siodełko z rurą (3)
(ilustracja L).
6b) Wetknąć rurę siodełka w otwór w ramie
(ilustracja M).
Uważać na maksymalną wysokość
wysunięcia!
Dokręcić nakrętkę przy pomocy klucza, aby
zamocować siodełko a następnie przesunąć
zakrycie ponad nakrętkę.
7. Zakładanie osłony kierownicy
Osłonę przed zderzeniem (1) zamontować
przy pomocy rzepu na kierownicy
(ilustracja N).
8. Zestawy naklejek
Nakleić zestaw naklejek 1 lub 2 (21) na
podanych pozycjach (ilustracja O).
Ustawienia
Wysokość kierownicy
Uważać na maksymalną wysokość
wysunięcia!
Nasunąć zakrycie. Poluzować zacisk, aż będzie
można przesuwać kierownicą w górę i dół i
ustawić kierownicę na odpowiedniej wysokości.
Zacisnąć ponownie zacisk a następnie
przesunąć zakrycie ponad zaciskiem
(ilustracja P).
Wysokość siodełka
Wskazówka:
Wysokość siodełka jest dobrze
ustawiona gdy dziecko może stopami
pewnie dosięgnąć podłoża.
Uważać na maksymalną wysokość
wysunięcia!
Nasunąć zakrycie. Poluzować nakrętkę, aż
będzie można przesuwać siodełkiem w górę
i dół. Siodełko ustawić na odpowiedniej
wysokości, dokręcić ponownie nakrętkę i
przesunąć zakrycie na dół (ilustracja Q).
Hamulec
Uchwyt hamulca
Odstęp od rączki do dźwigni hamulca może
wynosić maks. 60 mm. Odstęp uchwytu
hamulca (20) do rączki należy regulować przez
przestawianie śruby oporowej (ilustracja R).
Siła hamulca
UWAGA!
Siła hamulca musi zostać tak
ustawiona, żeby tylne koło przy
poluzowanej dźwigni hamulca
obracało się a przy zaciągniętej było
zablokowane.
Nacisnąć ramię hamulca (S1) w kierunku
strzałki. Przekręcić w lewo nakrętkę ustawiającą
i zabezpieczającą (S2), aby zmniejszyć
siłę hamulca, przekręcić w prawo nakrętkę
ustawiającą i zabezpieczającą, aby zwiększyć
siłę hamulca (ilustracja S).
Pielęgnacja, przechowywanie, konserwacja
Po użyciu artykułu zalecamy dokładne oczyszczenie wodą.
WAŻNE! Czyścić wyłącznie wodą, nigdy ostrymi środkami czyszczącymi. Następnie wytrzeć
do sucha szmatką. Artykuł przechowywać
zawsze suchy i czysty w pomieszczeniu o wyregulowanej temperaturze. Co 3 miesiące dawać
jedną kroplę oleju w tulejkę łożyska kierownicy
i kół.
Wskazówki dotyczące
utylizacji
Opakowanie i artykuł prosimy usunąć proekologicznie i odpowiednio do rodzaju! Artykuł
usunąć przez dopuszczony zakład gospodarki
odpadami lub przez komunalny zarząd gminy.
Przestrzegać aktualnie obowiązujących przepisów.
13PL
Page 12

3 lata gwarancji
Produkt został wyprodukowany bardzo starannie i podczas stałej kontroli. Państwo otrzymują
na ten produkt trzy lata gwarancji od daty
zakupu. Prosimy o zachowanie paragonu.
Gwarancja obejmuje tylko błędy materiałowe
lub fabryczne i traci ważność podczas
używania produktu nie właściwie i nie zgodnie z jego przeznaczeniem. Państwa prawa,
w szczególności zasady odpowiedzialności
z tytułu rękojmi, nie zostaną ograniczone tą
gwarancję.
W razie ewentualnych reklamacji należy
skontaktować się pod niżej podanym numerem
infolinii lub poprzez pocztę elektroniczną.
Nasi współpracownicy omówią z Państwem jak
najszybciej dalszy przebieg sprawy.
Z naszej strony gwarantujemy doradztwo.
Czas gwarancji nie zostanie przedłużony przez
ewentualnie podjęte naprawy na podstawie
gwarancji, prawnej odpowiedzialności z tytułu
rękojmi czy dokonania bezpłatnej naprawy.
Dotyczy to również wymienionych i naprawionych części. Po upłynięciu czasu gwarancji
powstałe naprawy są płatne.
IAN: 103988
Serwis Polska
Tel.: 22 397 4996
E-Mail: deltasport@lidl.pl
Części zamienne do Waszego produktu znajdziecie także
pod adresem: www.delta-sport.com, Rubryka serwisu - Serwis
części zamiennych Lidl
14 PL
Page 13

Tisztelt Vásárló! Köszönjük, hogy ezen
kiváló minőségű termék megvásárlása mellett
döntött. Az első használat előtt ismerkedjen
meg a termékkel. Kérjük, figyelmesen olvassa
el az alábbi szerelési útmutatót és a biztonsági előírásokat. A terméket kizárólag a leírtak
szerint, rendeltetésének megfelelően használja.
Az útmutatót gondosan őrizze meg. A termék továbbadása esetén kérjük mellékelje a termékhez
tartozó iratokat is.
A csomag tartalma/
Az alkatrészek megnevezése
(A ábra)
(1) 1 ütközésvédő
(2) 1 csengő
(3) 1 nyereg nyeregcsővel
(4) 2 kupak
(5) 1 váz (előre felszerelt fékbowdennel és
kormánnyal)
(6) 1 tengelycsavar
(7) 2 alátét
(8) 2 távtartó
(9) 1 első kerék
(10) 1 anya
(11) 1 első sárvédő
(12) 1 csavar
(13) 1 anya
(14) 1 villa
(15) 1 T-idom
(16) 1 alsó idom
(17) 1 felső idom
(18) 1 bilincs
(19) 1 kosár
(20) 1 fékkar
(21) 1 ív matrica (2 készletből áll)
(22) 2 szerszám
1 használati útmutató
Műszaki adatok
Megengedett maximális terhelés: 50 kg
Súly: kb. 3,3 kg
A nyereg magassága: kb. 36,5 - 46 cm
A kormány magassága: kb. 56 - 60 cm
Méret: kb. 86 x 43,5 x 56 - 60 cm
Rendeltetésszerű használat
A jelen terméket magáncélú használatra
szánták. Játékként, legfeljebb 50 kg-os terhelés
mellett, (3-6 éves korú, 96-120 cm magas) gyermekek általi használatra alkalmas.
A termékkel tilos részt venni a közúti forgalomban. A használat előtt tájékozódjon a törvényi
rendelkezésekről.
Biztonsági tudnivalók
Sérülésveszély!
• Figyelem! 36 hónaposnál fiatalabb gyer mekek számára nem alkalmas.
Fulladásveszély áll fenn, mivel a kisméretű ré szeket le lehet nyelni, vagy be lehet lélegezni!
• Ellenőrizze a terméket minden használat előtt,
hogy nem sérült-e és nincs-e elhasználódva.
Ellenőrizze minden használat előtt az összes
összekötő és záró elem megfelelő rögzítését.
Győződjön meg arról, hogy a csavarok és az
anyák megőrzik önzáró tulajdonságukat.
• A terméket csak kifogástalan állapotban
szabad használni! Amennyiben hibát észlel
a terméken, a terméket tilos használni a hiba
elhárításáig!
• A csavarokat mindig annyira kell meghúzni,
hogy a gyermekek ne tudják kilazítani azo kat. Ellenkező esetben fennáll a veszély, hogy
a gyermekek lenyelik vagy belélegzik a lecsa varozott apró alkatrészeket. Fulladásveszély!
• A termék szakszerűtlen módosítása vagy
javítása esetén veszély lép fel! Ne módosítsa
a terméket!
• A terméket tilos összekötni járművekkel,
sportkészülékekkel vagy egyéb vontatóberen dezésekkel. A terméket nem magas sebessé gekre tervezték.
• A termék gyermekek általi használata közben
felnőtt felügyeletére van szükség!
• A gyermekeknek kerékpározás közben
bukósisakot, valamint erős lábbelit kell
viselniük! Emellett megfelelő védőfelszerelést
is ajánlott használni.
• A terméket tilos sötétben vagy rossz látási
viszonyok mellett használni!
• A terméket tilos lejtős területen, lépcsők vagy
nyílt víz közelében használni! Kerülje a veszé lyes területeket!
15HU
Page 14

Biztonsági tudnivalók a
használatra vonatkozóan
• Vegye figyelembe azt, hogy a gyermekek
gyakran még nem tudják pontosan felmérni
saját képességeiket és a veszélyhelyzeteket!
A gyermekek játékszeretete miatt olyan előre
nem látható helyzetek állhatnak elő,
amelyekért a forgalmazó/gyártó nem vállal
felelősséget.
• Mutassa meg gyermekének a termék helyes
használatát és figyelmeztesse gyermekét a
lehetséges veszélyekre!
• A gyermekeknek mindig biztonságosan le
kell tudniuk fékezni a terméket. A használat
előtt lábbal és fékkel is gyakorolni kell a
termék lefékezését.
• Nagyon sima talajon fennáll az elcsúszás
veszélye! Vegye figyelembe, hogy a termék
használata közben mindig fennáll az elesés
veszélye.
Összeszerelés
FIGYELEM!
A termék összeszerelését mindig felnőtt
személynek kell elvégeznie!
FIGYELEM!
Az összeszerelés közben tartsa távol a
terméket és a csomagolást a gyermekektől.
Ellenkező esetben fulladásveszély áll fenn, mivel
a gyermekek lenyelhetik vagy belélegezhetik
az apró alkatrészeket, valamint fulladást
okozhatnak a műanyag zacskók is.
1. A sárvédő felszerelése
Szerelje fel az első sárvédőt (11) a
csavarral (12) és az anyával (13) a
villára (14) (B ábra).
Ügyeljen arra, hogy a villán található
horony a sárvédő hosszabbik oldala
felé mutasson.
2. Az első kerék felszerelése
Szerelje fel az első kereket (9) a
2 távtartóval (8), a 2 alátéttel (7) és a
tengelycsavarral (6) a villára (C ábra).
3. A váz felszerelése
3a) Húzza rá a T-idomot (15) a villára (D ábra).
Ügyeljen arra, hogy a bemélyedő
horony a sárvédő hosszabbik oldala
felé mutasson.
3b) Húzza rá az alsó idomot (16) a villára
(E ábra).
Ügyeljen arra, hogy a vezető
a T-idomon található horonyba
illeszkedjen.
3c) Nyomja rá a vázat (5) a villára (F ábra).
Ügyeljen arra, hogy a hornyot a
megfelelő vezetőbe dugja.
3d) Nyomja rá a felső idomot (17) a villára
(G ábra).
4. A kosár felszerelése
Húzza rá a kosarat (19) a villára (H ábra).
5. A kormány felszerelése
5a) Húzza rá a bilincset (18) a villára (I ábra).
Ügyeljen arra, hogy a bilincsen
található horony a kosáron található
vezetőbe illeszkedjen.
5b) Húzza fel az egyik kupakot (4) a
kormánycsőre (J ábra).
5c) Dugja be a kormánycsövet a villába
(K ábra).
Vegye figyelembe a jelölést, hogy
meddig húzható ki a kormány!
Húzza meg a szerszámmal (22) a bilincsen
található anyát és tolja a kupakot a bilincs
fölé.
6. A nyereg felszerelése
6a) Húzza rá az egyik kupakot a nyeregre
szerelt nyeregcsőre (3) (L ábra).
6b) Dugja bele a nyeregcsövet a vázon
található lyukba (M ábra).
Vegye figyelembe a jelölést, hogy
meddig húzható ki a nyeregcső!
Húzza meg a szerszámmal az anyát a
nyereg rögzítése érdekében, és ezt követően
tolja a kupakot az anya fölé.
16 HU
Page 15

7. A kormányvédő felszerelése
A tépőzár segítségével rögzítse fel az
ütközésvédőt (1) a kormányra (N ábra).
8. Matricák
Ragassza fel az 1. vagy a 2. készlethez
(21) tartozó matricákat a megadott helyekre
(O ábra).
Beállítások
A kormány magassága
Vegye figyelembe, hogy meddig
húzható ki a kormány!
Húzza fel a kupakot. Lazítsa ki annyira a
bilincset, hogy a kormány mozgatható legyen,
majd állítsa be a kormányt a megfelelő
magasságra. Húzza meg újra a bilincset, majd
tolja vissza a kupakot a bilincs fölé (P ábra).
A nyereg magassága
Tudnivaló:
A nyereg magassága akkor van
helyesen beállítva, ha a gyermek a
lábaival biztonságosan eléri a talajt.
Vegye figyelembe, hogy meddig
húzható ki a nyereg!
Húzza fel a kupakot. Lazítsa ki az anyát annyira,
hogy a nyereg mozgatható legyen. Állítsa be a
nyerget a megfelelő magasságra, húzza meg
újra az anyát, majd tolja vissza a kupakot
(Q ábra).
Fék
Fékkar
A kormánymarkolat legfeljebb 60 mm-es
távolságra lehet a fékkartól. Állítsa be a fékkar
(20) és a kormánymarkolat közötti távolságot az
ütközőcsavar állításával (R ábra).
Fékerő
FIGYELEM!
A fékerőt úgy kell beállítani, hogy
a hátsó kerék csak behúzott fék
esetén blokkoljon. A hátsó keréknek
akadálytalanul kell forognia, ha nincs
behúzva a fék.
Nyomja a fékpillangót (S1) a nyíl irányába.
A fékerő az állító- és ellenanya (S2) balra
forgatásával csökkenthető, jobbra forgatásával
pedig növelhető (S ábra).
Ápolás, tárolás, karbantartás
Javasoljuk, hogy használat után vízzel alaposan
tisztítsa meg a terméket.
FONTOS! Csak vízzel szabad tisztítani,
erős ápolószerekkel tilos. A tisztítás után
törlőkendővel törölje szárazra a terméket.
A terméket mindig tisztán és szárazon, állandó
hőmérsékleten tartott helyiségben kell tárolni.
3 havonta cseppentsen olajat a kormány és a
kerekek csapágyperselyeibe.
Ártalmatlanítási tudnivalók
A csomagolást és a terméket környezetbarát
módon, különválasztva kell ártalmatlanítani! A
terméket egy engedéllyel rendelkező hulladékfeldolgozó üzemben vagy a helyi önkormányzat
segítségével kell ártalmatlanítani. Vegye figyelembe az érvényben lévő előírásokat.
17HU
Page 16

3 év garancia
Ezen termék gyártása nagy gondossággal és
folyamatos ellenőrzés mellett történt.
Ön a termékre három év garanciát kap a vásárlás időpontjától. Kérjük őrizze meg a pénztárblokkot. A garancia csak anyag- és gyártási hibákra érvényes, visszaélésszerű vagy szakszerűtlen
kezelés esetén teljesen megszűnik.
Az Ön törvényes jogait, kiváltképpen a szavatosságra vonatkozó jogait, ez a garancia nem
korlátozza. Esetleges reklamáció esetén, kérjük,
hívja fel a szerviz alábbi közvetlen telefonvonalát, vagy lépjen kapcsolatba velünk e-mailben.
Szerviz szakembereink a további tennivalókat a
lehető leggyorsabban egyeztetik Önnel.
Minden esetben személyesen adunk tanácsot
Önnek. A garanciális időt garancia, törvényes
szavatosság vagy kulantéria alapján történő
esetleges javítások nem hosszabbítják meg.
Ez a pótolt vagy megjavított alkatrészekre is
érvényes. A garancia lejárta után felmerülő
javítások költségeit Önnek kell fedezni.
IAN: 103988
Szerviz Magyarország
Tel.: 0640 102785
E-Mail: deltasport@lidl.hu
Termékéhez pótalkatrészek itt is találhatók:
www.delta-sport.com, Szerviz rubrika - Pótalkatrész-ellátás Lidl
18 HU
Page 17

Čestitamo! Z nakupom ste se odločili
za kakovosten izdelek. Pred montažo in prvo
uporabo izdelka, se z njim najprej seznanite.
Natančno preberite naslednja navodila za
montažo in opozorila. Izdelek uporabljajte le,
kot je opisano in za določena področja uporabe. Navodila skrbno shranite.
Pri prenosu izdelka tretji osebi, ji predajte tudi
vse dokumente v zvezi z izdelkom.
Obseg dobave/
opis delov (slika A)
(1) 1 x zaščita pred udarci
(2) 1 x zvonec
(3) 1 x sedež s cevjo
(4) 2 x pokrov
(5) 1 x okvr (s predmontiranim kablom
ročne zavore in balanco)
(6) 1 x osni vijak
(7) 2 x podložka
(8) 2 x distančnik
(9) 1 x sprednja guma
(10) 1 x matica
(11) 1 x zaščitna pločevina spredaj
(12) 1 x vijak
(13) 1 x matica
(14) 1 x vilice
(15) 1 x T-spojnica
(16) 1 x spodnja spojnica
(17) 1 x zgornja spojnica
(18) 1 x objemka
(19) 1 x košara
(20) 1 x ročaj zavore
(21) 1 x pola nalepk
(razdeljena v komplet 1 in komplet 2)
(22) 2 x orodje
1 x navodilo za uporabo
Tehnični podatki
Največja teža uporabnika: 50 kg
Teža: pribl. 3,3 kg
Višina sedeža: pribl. 36,5 - 46 cm
Višina balance: pribl. 56 - 60 cm
Mere: pribl. 86 x 43,5 x 56 - 60 cm
Predvidena uporaba
Ta izdelek je bil razvit za osebno uporabo.
Predviden je za uporabo kot igrača za otroka
(3 - 6 let, telesna višina 96 cm – 120 cm) z
največjo težo uporabnika 50 kg.
Izdelka se v javnem cestnem prometu ne sme
uporabljati. Pred uporabo se pozanimajte o
zakonskih določilih.
Varnostni napotki
Nevarnost poškodb!
• Pozor! Ni primerno za otroke do 36. meseca
starosti. Nevarnost zadušitve, ker se lahko
majhni deli zaužijejo ali vdihnejo!
• Izdelek pred vsako uporabo preglejte za
poškodbami ali obrabami. Pred vsako upora bo preglejte trdnost vseh spojnih elementov in
delov, ki se obrabljajo. Prepričajte se, da
bodo vijaki in matice ohranile samozapiralno
lastnost.
• Uporabljate lahko samo izdelek brez napak!
Če ugotovite napako na izdelku, ga ne smete
več uporabljati, dokler napake ne odpravite!
• Vijaki morajo biti vedno trdno priviti, da
jih otroci ne bodo mogli odviti. V nasprotnem
primeru obstaja nevarnost, da otroci zaužijejo
ali vdihnejo odvite majhne dele. Nevarnost
zadušitve!
• Zaradi nestrokovne spremembe ali popravil
na izdelku lahko pride do nastanka nevarno sti! Izdelka ne spreminjajte!
• Izdelka ne povežite z drugimi vozili, športnimi
napravami ali vlečnimi napravami. Izdelek ni
zasnovan za višje hitrosti.
• Otroka mora med uporabo izdelka vedno
nadzorovati odrasla oseba!
• Otrok mora med vožnjo vedno nositi čelado
in močno obutev! Dodatno priporočamo
uporabo primerne zaščitne opreme.
• Izdelka se ne sme uporabljati v temi ali slabi
vidljivosti!
• Izdelek se ne sme uporabljati na strmem tere nu, v bližini stopnic in odprtih voda! Izogiba jte se nevarnim območjem!
19SI
Page 18

Varnostni napotki glede
uporabe
• Upoštevajte, da otroci pogosto ne znajo
oceniti svojih sposobnosti in določenih ne varnih situacij! Zaradi potrebe po igranju
lahko pride do nepredvidljivih situacij, ki
izključujejo odgovornost proizvajalca.
• Otroka podučite glede pravilne uporabe
izdelka in ga opozorite na mogoče nevar nosti!
• Otrok mora kadarkoli biti v stanju zavreti
izdelek. Zaviranje vadite tako s stopali kot
tudi z zavoro pred uporabo izdelka.
• Na gladkih tleh obstaja nevarnost zdrsa!
Upoštevajte, da pri uporabi izdelka vedno
obstaja nevarnost padca.
Montaža
POZOR!
Montažo izdelka mora vedno izvesti
odrasla oseba!
POZOR!
Med montažo naj se otroci ne nahajajo
v bližini izdelka in embalažnega materiala.
Nevarnost zadušitve zaradi možnosti zaužitja
ali vdiha majhnih delov ter nevarnost zadušitve z
vrečkami iz umetne mase.
1. Montaža zaščitne pločevine
Zaščitno pločevino pritrdite spredaj (11) z
vijakom (12) in matico (13) na vilicah (14)
(slika B).
Pazite, da bo odprtina na vilicah
obrnjena proti daljši strani zaščitne
pločevine.
2. Montaža sprednjega kolesa
Sprednje kolo (9) pritrdite z 2x
distančnikoma (8), 2x podložkama (7)
in osnim vijakom (6) navilice (slika C).
3. Montaža okvirja
3a) Pritrdite T-spojnico (15) na vilice (slika D).
Pazite, dabo daljša odprtina obrnjena
proti daljši strani zaščitne pločevine.
3b) Pritrdite spodnjo spojnico (16) na vilice
(slika E).
Paite, da se bo vodilo prilegalo odprtini
na T-spojnici.
3c) Pritrdite okvir (5) na vilice (slika F).
Pazite, da boste odprtino namestili na
predvideno vodilo.
3d) Pritrdite zgornjo spojnico (17) na vilice
(slika G).
4. Montaža košare
Pritrdite košaro (19) na vilice (slika H).
5. Montaža balance
5a) Pritrdite objemko (18) na vilice (slika I).
Pazite, da se bo odprtina objemke
prilegala na vodilo košare.
5b) Pokrov (4) namestite na cev balance
(slika J).
5c) Pritrdite cev balance na vilice (slika K).
Upoštevajte oznako najvišjega
možnega izvleka!
Matico na objemki privijte z orodje (22) in
pokrov povlecite preko objemka.
6. Montaža sedeža
6a) Pokkrov namestite na sedež s cevjo (3)
(slika L).
6b) Pritrdite cev sedeža v odprtino na okviru
(slika M).
Upoštevajte oznako najvišjega
možnega izvleka!
Matice na objemki privijte z orodje za
pritrditev sedeža in pokrov povlecite preko
matice.
7. Pritrditev zaščite za balanco
Zaščito pred udarci (1) na balanci pritrdite s
sprijemalnim zapiralom (slika N).
8. Seti nalepk
Nalepke iz seta 1 ali seta 2 (21) nalepite na
predvidena mesta (slika O).
20 SI
Page 19

Nastavitve
Višina balance
Upoštevajte oznako najvišjega
možnega izvleka!
Pokrov potegnite navzgor. Odvijte objemko,
dokler balance ne boste lahko porinili navzdol
ali je potegnili navzgor ter nastavite primerno
višino. Objemko ponovno privijte in pokrov
povlecite preko objemke (slika P).
Višina sedeža
Napotek:
Višina sedeža je nastavljena pravilno,
če se otrok s stopali zaneslljivo doseže
tla.
Upoštevajte oznako najvišjega
možnega izvleka!
Pokrov potegnite navzgor. Odvijte matico,
dokler ne boste sedeža lahko potegnili navzgor
oziroma ga porinili navzdol. Sedež nastavite
na primerno višino, matico ponovno privijte in
pokrov ponovno potegnite navzdol (slika Q).
Zavora
Ročaj zavore
Razdalja med ročajem in ročico je lahko največ
60 mm. Razdaljo ročaja zavore (20) do ročaja
nastavite z omejevalnim vijakom (slika R).
Zaviralna moč
POZOR!
Zaviralno moč morate nastaviti tako,
da se bo zadnje kolo pri spuščeni
zavorni ročici vrtelo in da bo blokirano
pri pritisnjeni zavorni ročici.
Ročico zavore (S1) pritisnite v smeri puščice.
Privijte nastavitveno matico in protimatico
(S2) v levo, če želite zmanjšati zaviralno moč,
nastavitveno matico in protimatico privijte v
desno, že želite povečati zaviralno moč (slika S).
Nega, skladiščenje,
vzdrževanje
Po uporabi izdelka priporočamo temeljito
čiščenje z vodo.
VAŽNO! Čistite samo z vodo, nikoli z ostrimi
čistilnimi sredstvi. Nato izdelek posušite s čistilno
krpo. Čist in suh izdelek vedno hranite v temperiranem prostoru. Vsake 3 mesece dajte kapljico
olja v ležajno pušo in kolesi.
Napotki za odstranitev
Embalažo in izdelek prosimo odstranite na
okolju prijazen način! Izdelek odstranite preko
pooblaščenega podjteja za odstranjevanje
odpadkov ali preko Vaše občinske uprave.
Upoštevajte trenutno veljavne predpise!
3 leta garancije
Izdelek je bil izdelan skrbno in pod stalnim
nadzorom. Garancija izdelka velja 3 leta od
datuma nakupa. Prosimo shranite račun.
Garancija velja le za napake v materialu in
proizvodnji ter ugasne ob zlorabi ali neustrezni
uporabi izdelka. Vaše pravne koristi, posebno pravica do garancije, s to garancijo niso
omejene.
V primeru pritožb se prosimo obrnite na spodaj
navedeno telefonsko številko servisa ali nam
pošljite elektronsko pošto. Naši sodelavci na
servisu se bodo tako hitro kot je le mogoče
dogovorili z Vami glede nadaljnjih ukrepov.
Vsekakor bomo osebno stopili v stik z Vami.
Čas garancije se zaradi morebitnih popravil na
podlagi garancije, pravnih koristi ali kulantnosti
ne podaljša. To velja tudi za nadomeščene ali
popravljene dele. Po poteku garancije so popravila plačljiva.
IAN: 103988
Servis Slovenija
Tel.: 080080917
E-Mail: deltasport@lidl.si
Nadomestne dele za Vaš izdelek najdete na:
www.delta-sport.com, rubrika servis - servis z rezervnimi
deli Lidl
21SI
Page 20

Garancijski list
1. S tem garancijskim listom jamčimo
DELTA-SPORT HANDELSKONTOR GMBH,
da bo izdelek v garancijskem roku ob nor malni in pravilni uporabi brezhibno deloval
in se zavezujemo, da bomo ob izpolnjenih
spodaj navedenih pogojih odpravili more bitne pomanjkljivosti in okvare zaradi napak
v materialu ali izdelavi oz. po svoji presoji
izdelek zamenjali ali vrnili kupnino.
2. Garancija je veljavna na ozemlju Republike
Slovenije.
3. Garancijski rok za proizvod je 3 leta od
dneva izročitve balga. Dan izročitve blaga
je enak dnevom prodaje, ki je razviden iz
računa.
4. Kupec je dolžan okvaro javiti pooblaščene mu servisu oz. se informirati o nadaljnjih
postopkih na zgoraj navedeni telefonski
številki. Svetujemo vam, da pred tem na tančno preberete navodila o sestavi in
uporabi izdelka.
5. Kupec je dolžan pooblaščenemu servisu
predložiti garancijski list in račun, kot potrdi lo in dokazilo o nakupu.
6. V primeru, da proizvod popravlja nepo oblaščeni servis ali oseba, kupec ne more
uveljavljati zahtevkov iz te garancije.
7. Vzroki za okvaro oz. nedelovanje izdelka
morajo biti lastnosti stvari same, in ne vzroki,
ki so zunaj proizvajalčeve oz. prodajalčeve
sfere. Kupec ne more uveljavljati zahtevkov iz
te garancije, če se ni držal priloženih navodil
za sestavo in uporabo izdelka ali, če je
izdelek kakorkoli spremenjen ali nepravilno
vzdrževan.
8. Jamčimo servisiranje in rezervne dele za
minimalno dobo, ki je zahtevana s strani
zakonodaje.
9. Obrabni deli oz. potrošni material so izvzeti
iz garancije.
10. Vsi potrebni podatki za uveljavljanje garan cije se nahajajo na dveh ločenih dokumentih
(garancijski list, račun).
11. Ta garancija proizvajalca ne izključuje
pravic potrošnika, ki izhajajo iz odgovorn osti prodajalca za napake na blagu.
Prodajalec:
Lidl d.o.o. k.d., Pod lipami 1, SI-1218 Komenda
22 SI
Page 21

Srdečně blahopřejeme! Vaší koupí jste se
rozhodli pořídit si kvalitní výrobek. Před montáží
a vlastním uvedením do provozu se nejdříve seznamte s výrobkem. K tomu si přečtěte pozorně
následující návod k montáži a bezpečnostní
upozornění. Používejte výrobek jen podle
uvedeného popisu a jen v uvedených oblastech.
Tento návod si dobře uschovejte. Při předávání
výrobku třetí osobě předávejte i tento návod.
Obsah dodávky / Popis dílů
(obr. A)
(1) 1 x chránič na řídítka
(2) 1 x zvonek
(3) 1 x sedlo s trubkou
(4) 2 x kryt
(5) 1 x rám (s předmontovaným
brzdovým lankem a řídítky)
(6) 1 x osa se šroubem
(7) 2 x podložka
(8) 2 x distance
(9) 1 x přední kolo
(10) 1 x matka
(11) 1 x přední blatník
(12) 1 x šroub
(13) 1 x matka
(14) 1 x vidlice
(15) 1 x mezikus ve tvaru T
(16) 1 x dolní mezikus
(17) 1 x horní mezikus
(18) 1 x objímka
(19) 1 x košík
(20) 1 x rukojeť brzdy
(21) 1 x arch s nálepkami
(rozdělené na sadu 1 a 2)
(22) 2 x nářadí
1 x návod k obsluze
Technická data
Maximální váha uživatele: 50 kg
Váha: cca 3,3 kg
Výška sedla: cca 36,5 - 46 cm
Výška řídítek: cca 56 - 60 cm
Rozměry: cca 86 x 43,5 x 56 - 60 cm
Použití ke stanovenému účelu
Tento artikl byl vyvinutý k privátnímu používání.
Je vhodný k použití jako hračka pro děti (3 - 6
let, tělesná výška 96 cm – 120 cm) s maximální
váhou 50 kg. Artikl se nesmí používat ve veřejné
silniční dopravě. Před použitím se informujte o
zákonných ustanoveních.
Bezpečnostní upozornění
Nebezpečí zranění!
• Pozor! Nevhodné pro děti mladší 36 měsíců.
Nebezpečí udušení, neboť malé díly mohou
být spolknuty nebo vdechnuty!
• Před každým použitím kontrolujte artikl, jestli
není poškozený nebo opotřebovaný.
Kontrolujte před každým použitím pevné
držení všech spojovacích elementů a uzávěrů.
Kontrolujte samojistící funkci šroubů a matek.
• Artikl se smí používat jen v bezvadném stavu!
Jestliže zjistíte závadu, nesmíte artikl před
opravou dále používat!
• Šrouby musí být utaženy tak, aby je děti
nemohly sami povolit. V opačném případě
hrozí nebezpečí, že děti odšroubované díly
spolknou nebo vdechnou.
Nebezpečí udušení!
• Neodborně provedené změny nebo opravy
vytváří nebezpečí! Neměňte artikl!
• Nepřipojujte artikl za jiná vozidla, sportovní
nářadí nebo jiná tažná zařízení. Artikl není
konstruovaný pro vyšší rychlosti.
• Děti musí být při používání artiklu pod
dohledem dospělé osoby!
• Děti musí nosit při jízdě helmu a pevnou obuv!
Doporučujeme použití vhodných přídavných
ochranných pomůcek a vybavení.
• Artikl se nesmí používat za tmy nebo při
špatné viditelnosti!
• Artikl se nesmí používat v terénu se spádem,
blízkosti schodů a nechráněných vodních
toků! Vyhýbejte se nebezpečným místům!
23CZ
Page 22

Bezpečnostní upozornění
k použití
• Dbejte na to, že děti ještě neumí správně
odhadnout své schopnosti a nebezpečné
situace! Hravost dětí může vyvolat
nepředvídatelné situace, za jejichž následky
dodavatel ani výrobce neručí.
• Vysvětlete dětem správné zacházení s
artiklem a upozorněte je na možná
nebezpečí!
• Děti musí kdykoliv ovládat brzdění artiklu.
Před použitím artiklu cvičte s dětmi jeho
brzdění nohama i brzdou.
• Na hladkém povrchu hrozí nebezpečí uklouz nutí! Myslete na to, že při používání artiklu
vždy hrozí nebezpečí pádu.
Montáž
POZOR!
Montáž artiklu musí provádět vždy
dospělá osoba!
POZOR!
Během montáže držte děti mimo dosah
k pracovišti a obalovému materiálu. Hrozí
nebezpečí udušení - děti mohou spolknout
nebo vdechnout malé díly nebo se udusit
umělohmotnými sáčky.
1. Montáž blatníku
Přišroubujte přední blatník (11) šroubem (12)
a matkou (13) na vidlici (14) (obr. B).
Dbejte přitom na to, aby ukazoval
výřez na vidlici k delší straně blatníku.
2. Montáž předního kola
Přišroubujte přední kolo (9), spolu s 2
distancemi (8), 2 podložkami (7) a
šroubem (6), na vidlici (obr. C).
3. Montáž rámu
3a) Nasaďte mezikus ve tvaru T (15) na vidlici
(obr. D).
Dbejte na to, aby ukazovala prohlubeň
směrem k delší straně blatníku.
3b) Nastrčte dolní mezikus (16) na vidlici
(obr. E).
Dbejte na to, aby zapadlo vedení do
vybrání na mezikusu ve tvaru T.
3c) Nastrčte rám (5) na vidlici (obr. F).
Dbejte na to, aby zapadlo vybrání do
předurčeného vedení.
3d) Nastrčte horní mezikus (17) na vidlici
(obr. G).
4. Montáž košíku
Nastrčte košík (19) na vidlici (obr. H).
5. Montáž řídítek
5a) Nastrčte objímku (18) na vidlici (obr. I).
Dbejte na to, aby zapadlo vybrání na
objímce do vedení na košíku.
5b) Nastrčte kryt (4) na trubku řídítek (obr. J).
5c) Nastrčte trubku řídítek do vidlice (obr. K).
Dávejte pozor na maximální výšku
vytažení!
Utáhněte matku na objímce nářadím (22) a
přesuňte kryt přes objímku.
6. Montáž sedla
6a) Nastrčte kryt na trubku sedla (3) (obr. L).
6b) Nastrčte trubku se sedlem do vybrání v rámu
(obr. M).
Dávejte pozor na označenou maximální
výšku vytažení!
Pro zafixování sedla utáhněte matku
nářadím a nakonec přesuňte kryt přes
matku.
7. Montáž chrániče na řídítka
Připevněte chránič na řídítka (1) pomocí
suchého zipu (obr. N).
8. Sady nálepek
Nalepte sadu nálepek 1 nebo 2 (21) na
předurčená místa (obr. O).
24 CZ
Page 23

Seřízení
Výška řídítek
Dávejte pozor na maximální výšku
vytažení!
Vysuňte kryt nahoru. Povolte objímku, až je
možné řídítka volně posouvat a nastavte je na
požadovanou výšku. Utáhněte znovu objímku a
nakonec zase přes ní přetáhněte kryt (obr. P).
Výška sedla
Upozornění:
Sedlo je nastavené na správnou výšku,
jestliže může dítě dosáhnout bezpečně
nohama na zem.
Dávejte pozor na maximální výšku
vytažení!
Posuňte kryt nahoru. Povolte matku, až je
možné sedlo volně posouvat. Nastavte sedlo na
požadovanou výšku, utáhněte zase pevně matku
a zase přes ní přetáhněte kryt (obr. Q).
Brzda
Rukojeť brzdy
Odstup rukojeti brzdy od rukojeti řídítek smí být
maximálně 60 mm. Nastavte odstup rukojeti
brzdy (20) k rukojeti řídítek pomocí dorážejícího
šroubu (obr. R).
Síla brzdění
POZOR!
Síla brzdění musí být nastavena tak,
aby se při puštěné brzdě volně točilo
zadní kolo a blokovalo při stisknuté
rukojeti brzdy.
Stlačte rameno brzdy (S1) ve směru šipky.
Pro snížení brzdné síly točte nastavovací matku
s kontramatkou (S2) doleva, pro zvýšení síly
doprava (obr. S).
Ošetřování, skladování,
údržba
Po použití artiklu doporučujeme jeho důkladné
omytí vodou.
DŮLEŽITÉ! Používejte jen vodu, nikdy ostré čistící
prostředky. Nakonec vysušte artikl hadrem.
Artikl skladujte vždy čistý a suchý ve vytápěné
místnosti. Každé 3 měsíce promažte kapkou
oleje pouzdra ložisek na řídítkách a kolech.
Pokyny k odstranění do
odpadu
Prosíme, odstraňujte artikl a obalový materiál do
odpadu roztříděné a ekologicky! K odstranění
do odpadu použijte služby připuštěné sběrny
nebo Vaší komunální správy obce anebo města.
Dbejte na aktuálně platné předpisy.
3 roky zaruky
Produkt byl vyrobený s velkou pečlivostí a byl
průběžně kontrolovaný ve výrobní procesu.
Na tento produkt obdržíte tříroční záruku ode
dne zakoupení. Uschovejte si pokladní stvrzenku.
Záruka se vztahuje jen na vady materiálu a
chyby z výroby, nevztahuje se na závady
způsobené neodborným zacházením nebo
použitím k jinému účelu. Tato záruka neomezuje
Vaše zákonná ani záruční práva.
Při případných reklamacích se obraťte na
dole uvedenou servisní horkou linku nebo nám
zašlete email. Náš servisní pracovník s Vámi
co nejrychleji upřesní další postup. V každém
případě Vám osobně poradíme.
Záruční doba se neprodlužuje po případných
opravách v době záruky ani v případě zákonného ručení nebo kulance. Toto platí také pro
náhradní a opravené díly. Opravy prováděné
po vypršení záruční lhůty se platí.
IAN: 103988
Servis Česko
Tel.: 800143873
E-Mail: deltasport@lidl.cz
Náhradní díly pro Váš výrobek najdete také na webové
stránce: www.delta-sport.com, Rubrika Servis - Servis pro
náhradní díly Lidl
25CZ
Page 24

Srdečne Vám blahoželáme! Vašou kúpou
ste sa rozhodli pre mimoriadne kvalitný produkt.
S produktom sa oboznámte ešte pred jeho
montážou a uvedením do činnosti. K tomu si
pozorne prečítajte nasledovný návod na montáž
a bezpečnostné pokyny. Produkt používajte len
v súlade s pokynmi uvedenými v návode a na
uvedené účely. Tento návod si odložte.
Ak produkt odovzdáte tretej osobe, priložte jej
aj všetky podklady.
Obsah/označenie dielov
(obr. A)
(1) 1 x chránič proti nárazom
(2) 1 x zvonec
(3) 1 x sedadlo s rúrkou
(4) 2 x kryt
(5) 1 x rám (s namontovaným brzdovým
káblom a riadidlami)
(6) 1 x os nápravy
(7) 2 x podložka
(8) 2 x dištančná vložka
(9) 1 x predné koleso
(10) 1 x matica
(11) 1 x predný blatník
(12) 1 x skrutka
(13) 1 x matica
(14) 1 x vidlica
(15) 1 x spojovací prvok v tvare T
(16) 1 x spodný spojovací prvok
(17) 1 x vrchný spojovací prvok
(18) 1 x objímka
(19) 1 x kôš
(20) 1 x brzdová rukoväť
(21) 1 x hárok s nálepkami
(rozdelený do súpravy 1 a súpravy 2)
(22) 2 x náradie
1 x návod na obsluhu
Technické údaje
Maximálna hmotnosť užívateľa: 50 kg
Hmotnosť: cca 3,3 kg
Výška sedadla: cca 36,5 - 46 cm
Výška riadidiel: cca 56 - 60 cm
Rozmery: cca 86 x 43,5 x 56 - 60 cm
Použitie podľa predpisov
Tento produkt bol vyvinutý na súkromné použitie.
Je vhodný na hranie pre deti (vek 3 - 6 rokov,
telesná výška v rozsahu 96 cm – 120 cm),
maximálna hmotnosť užívateľa je 50 kg.
Produkt sa nesmie používať vo verejnej cestnej
premávke. Skôr ako sa bude produkt používať,
sa informujte o zákonných ustanoveniach.
Bezpečnostné pokyny
Nebezpečenstvo zranenia!
• Pozor! Výrobok nie je vhodný pre deti
mladšie ako 36 mesiacov.
Hrozí nebezpečenstvo zadusenia, pretože
drobné časti by mohli byť prehltnuté alebo
vdýchnuté!
• Produkt pred každým použitím skontrolujte,
či nie je poškodený alebo opotrebený.
Pred každým použitím skontrolujte pevnosť
všetkých spojovacích prvkov a zatváracích
častí. Uistite sa, či si skrutky a matice zachová vajú svoje samoaretačné vlastnosti.
• Produkt sa smie používať len v bezchybnom
stave! Ak spozorujete poškodenie, produkt
nepoužite až do odstránenia chyby!
• Skrutky musia byť vždy pevne dotiahnuté tak,
aby ich nemohli uvoľniť deti. V opačnom
prípade môžu deti odskrutkované drobné
časti prehltnúť alebo vdýchnuť.
Nebezpečenstvo ohrozenia života
zadusením!
• Ak sa na produkte neodborne vykonajú
zmeny alebo opravy, produkt predstavuje pre
dieťa nebezpečenstvo! Na produkte nevy konávajte žiadne zmeny!
• Produkt nepripájajte k iným dopravným
prostriedkom, športovým nástrojom alebo
k iným ťažným zariadeniam. Produkt nie je
konštruovaný pre vyššie rýchlosti.
• Keď dieťa produkt používa, musí naň vždy
dozerať dospelá osoba!
• Dieťa musí počas jazdy vždy nosiť prilbu
a pevnú obuv! Dodatočne odporúčame nosiť
vhodnú ochrannú výbavu.
• Produkt sa nesmie používať v tme alebo za
zlej viditeľnosti!
26
SK
Page 25

• Dieťa nesmie produkt používať na šikmom
teréne, v blízkosti schodíšť a voľných vodných
plôch! Vyhýbajte sa nebezpečným miestam!
Bezpečnostné pokyny pre
použitie produktu
• Nezabúdajte, že deti nie sú často schopné
správne zhodnotiť svoje vlastné schopnosti
a určité nebezpečné situácie! Deti sa chcú
neustále hrať, v dôsledku čoho sa môžu
dostať do nepredvídaných situácií, za ktoré
nemôže zodpovedať distribútor/výrobca
produktu.
• Dieťa naučte správne používať produkt a
upozornite ho na možné nebezpečenstvá!
• Dieťa musí vedieť vždy bezpečne zabrzdiť.
Skôr ako produkt odovzdáte dieťaťu, naučte
ho brzdiť nohami a aj brzdou.
• Na hladkých podkladoch hrozí
nebezpečenstvo šmyku! Nezabúdajte, že
dieťa môže počas jazdy kedykoľvek spadnúť.
Montáž
UPOZORNENIE!
Produkt môže montovať len dospelá osoba!
UPOZORNENIE!
Deti sa nesmú počas montáže priblížiť
k produktu ani k obalovému materiálu.
Hrozí nebezpečenstvo ohrozenia života
udusením v dôsledku prehltnutia alebo
vdýchnutia drobných častí alebo plastových
vreciek.
1. Montáž blatníka
Predný blatník (11) upevnite skrutkou (12) a
maticou (13) na vidlicu (14) (obr. B).
Dajte pozor, aby drážka na vidlici
smerovala k dlhšej strane blatníka.
2. Montáž predného kolesa
Predné koleso (9) upevnite pomocou 2
dištančných vložiek (8), 2 podložiek (7) a
osi nápravy (6) na vidlicu (obr. C).
3. Montáž rámu
3a) Spojovací prvok v tvare T (15) nasuňte na
vidlicu (obr. D).
Dajte pozor, aby prehĺbený výrez
smeroval k dlhšej strane blatníka.
3b) Spodný spojovací prvok (16) nasuňte na
vidlicu (obr. E).
Dajte pozor, aby vedenie zapadlo do
výrezu na spojovacom prvku v tvare T.
3c) Rám (5) nasuňte na vidlicu (obr. F).
Dajte pozor, aby bol výrez zasunutý do
určeného vedenia.
3d) Vrchný spojovací prvok (17) nasuňte na
vidlicu (obr. G).
4. Montáž koša
Kôš (19) nasuňte na vidlicu (obr. H).
5. Montáž riadidiel
5a) Objímku (18) nasuňte na vidlicu (obr. I).
Dajte pozor, aby výrez na objímke
zapadol do vedenia na koši.
5b) Kryt (4) nasuňte na rúrku riadidiel (obr. J).
5c) Rúrku riadidiel vsuňte do vidlice (obr. K).
Rešpektujte maximálne vyznačenú
výšku vysunutia!
Pomocou náradia (22) dotiahnite maticu na
objímke a kryt nasuňte na objímku.
6. Montáž sedadla
6a) Na sedadlo s rúrkou (3) nasaďte kryt
(obr. L).
6b) Rúrku sedadla vsuňte do otvoru v ráme
(obr. M).
Rešpektujte maximálne vyznačenú
výšku vysunutia!
Pomocou náradia dotiahnite maticu a
zafixujte sedadlo. Na maticu potom
nasuňte kryt.
7. Upevnenie chrániča riadidiel
Chránič proti nárazom (1) pripevnite suchým
zipsom na riadidlá (obr. N).
8. Súprava nálepiek
Nálepky súpravy 1 alebo súpravy 2 (21)
nalepte na určené miesta (obr. O).
SK
27
Page 26

Nastavenia
Výška riadidiel
Rešpektujte maximálnu výšku
vysunutia!
Kryt posuňte nahor. Povoľte objímku, aby sa
riadidlá dali posunúť nahor a nadol a riadidlá
nastavte na vhodnú výšku. Objímku znova
dotiahnite a potom nasuňte na ňu kryt (obr. P).
Výška sedadla
Upozornenie:
Výška sedadla je správne nastavená
vtedy, keď dieťa dosiahne chodidlami
bezpečne na zem.
Rešpektujte maximálnu výšku
vysunutia!
Kryt posuňte nahor. Povoľte maticu, aby sa
sedadlo dalo ešte posunúť nahor alebo nadol.
Sedadlo nastavte na vhodnú výšku, maticu
znova dotiahnite a kryt znova posuňte nadol
(obr. Q).
Brzda
Rukoväť brzdy
Vzdialenosť od držadla k páke brzdy môže byť
max. 60 mm. Vzdialenosť rukoväte brzdy (20) k
držadlu nastavte prestavením dorazovej skrutky
(obr. R).
Sila brzdy
UPOZORNENIE!
Silu brzdy nastavte tak, aby sa
zadné koleso pri uvoľnenej brzdovej
páke voľne otáčalo a pri zatiahnutej
brzdovej páke bolo zablokované.
Brzdové rameno (S1) zatlačte v smere šípky.
Otáčaním nastavovacej a poistnej matice (S2)
vľavo sa sila brzdy zníži, otáčaním nastavovacej
a poistnej matice vpravo sa sila brzdy zvýši
(obr. S).
Ošetrovanie, skladovanie,
údržba
Po použití produkt dôkladne vyčistite vodou.
DÔLEŽITÉ UPOZORNENIE! Čistite len vodou,
nikdy nie agresívnymi ošetrovacími prostriedkami. Po vyčistení utrite dosucha handričkou.
Produkt skladujte vždy vo vykurovanej miestnosti
na suchom a čistom mieste. Do ložiskových puzdier riadidiel a kolies kvapnite každé 3 mesiace
po kvapke oleja.
Pokyny na likvidáciu
Obal a produkt zlikvidujte ekologicky a separovane! Produkt odovzdajte v autorizovanej zberni
na likvidáciu odpadu, alebo zabezpečte jeho
likvidáciu prostredníctvom komunálnej správy vo
Vašej obci. Rešpektujte aktuálne platné predpisy.
3 roky záruka
Produkt bol vyrobený s maximálnou
zodpovednosťou a v priebehu výroby bol neustále kontrolovaný. Na tento produkt máte tri roky
záruku od dátumu kúpy produktu. Pokladničný
lístok si odložte.
Záruka sa vzťahuje len na chyby materiálu
a výrobné chyby a zaniká pri neodbornej
manipulácii s produktom. Záruka nemá vplyv na
Vaše zákonné práva, predovšetkým na práva
vyplývajúce zo záruky.
V prípade reklamácie sa obráťte na nižšie uvedenú servisnú linku, alebo nám napíšte e-mail.
Naši servisní zamestnanci sa s Vami dohodnú
na ďalšom postupe a urýchlene vykonajú všetky
potrebné kroky. V každom prípade Vám poradíme osobne.
Záručná lehota sa nepredlžuje v dôsledku eventuálnych opráv na základe záruky, zákonného
plnenia záruky alebo v dôsledku prejavu ochoty. To platí tiež pre vymenené alebo opravené
diely. Opravy vykonané po uplynutí záručnej
lehoty sú spoplatnené.
IAN: 103988
Servis Slovensko
Tel.: 0850 232001
E-Mail: deltasport@lidl.sk
Náhradné diely na Váš produkt nájdete aj na:
www.delta-sport.com, servisná rubrika – servis náhradných
dielov Lidl
28
SK
Page 27

Herzlichen Glückwunsch! Mit Ihrem Kauf
haben Sie sich für ein hochwertiges Produkt
entschieden. Machen Sie sich vor der Montage
und der ersten Inbetriebnahme mit dem Produkt
vertraut. Lesen Sie hierzu aufmerksam die nachfolgende Montage- und Bedienungsanleitung
und die Sicherheitshinweise. Benutzen Sie das
Produkt nur wie beschrieben und für die angegebenen Einsatzbereiche. Bewahren Sie diese
Anleitung gut auf. Händigen Sie alle Unterlagen
bei Weitergabe des Produkts an Dritte ebenfalls
mit aus.
Lieferumfang/
Teilebezeichnung (Abb. A)
(1) 1 x Aufprallschutz
(2) 1 x Klingel
(3) 1 x Sattel mit Sattelrohr
(4) 2 x Abdeckung
(5) 1 x Rahmen (mit vormontiertem
Bremskabel und Lenker)
(6) 1 x Achsschraube
(7) 2 x Unterlegscheibe
(8) 2 x Abstandshalter
(9) 1 x Vorderreifen
(10) 1 x Mutter
(11) 1 x Schutzblech vorne
(12) 1 x Schraube
(13) 1 x Mutter
(14) 1 x Gabel
(15) 1 x T-Verbindungsstück
(16) 1 x unteres Verbindungsstück
(17) 1 x oberes Verbindungsstück
(18) 1 x Schelle
(19) 1 x Korb
(20) 1 x Bremsgriff
(21) 1 x Bogen Aufkleber
(unterteilt in Set 1 und Set 2)
(22) 2 x Werkzeug
1 x Bedienungsanleitung
Technische Daten
Maximales Benutzergewicht: 50 kg
Gewicht: ca. 3,3 kg
Sattelhöhe: ca. 36,5 - 46 cm
Lenkerhöhe: ca. 56 - 60 cm
Maße: ca. 86 x 43,5 x 56 - 60 cm
Bestimmungsgemäße
Verwendung
Dieser Artikel ist für den privaten Gebrauch entwickelt worden. Er ist geeignet für die Verwendung als Spielzeug von einem Kind (3 - 6 Jahre,
Körpergröße von 96 cm – 120 cm) mit einem
maximalen Benutzergewicht von 50 kg.
Der Artikel ist kein Fahrzeug im Sinne der StVO
und darf nicht am öffentlichen Straßenverkehr
teilnehmen. Informieren Sie sich vor der Verwendung über die gesetzlichen Bestimmungen
Sicherheitshinweise
Verletzungsgefahr!
• Achtung! Nicht geeignet für Kinder unter
36 Monaten. Erstickungsgefahr, da Kleinteile
verschluckt oder eingeatmet werden können!
• Prüfen Sie den Artikel vor jedem Gebrauch
auf Beschädigungen oder Abnutzungen.
Kontrollieren Sie vor jeder Verwendung den
festen Sitz aller Verbindungselemente und
Verschlussteile. Vergewissern Sie sich, dass
Schrauben und Muttern ihre Selbstsperreigen schaft bewahren.
• Der Artikel darf nur in einwandfreiem Zustand
verwendet werden! Wird ein Defekt am Ar tikel festgestellt, darf dieser bis zur Behebung
des Defekts nicht weiter verwendet werden!
• Schrauben müssen immer so fest angezogen
werden, dass Sie von Kindern nicht gelöst
werden können. Ansonsten besteht die
Gefahr, dass abgeschraubte Kleinteile von
Kindern verschluckt oder eingeatmet werden.
Erstickungsgefahr!
• Durch unsachgemäße Veränderung oder
Reparaturen am Artikel entstehen Gefahren!
Verändern Sie den Artikel nicht!
• Verbinden Sie den Artikel nicht mit anderen
Fahrzeugen, Sportgeräten oder sonstigen
Zugeinrichtungen. Der Artikel ist nicht für
höhere Geschwindigkeiten konstruiert.
• Das Kind muss beim Verwenden des Artikels
immer durch einen Erwachsenen beaufsichtigt
werden!
• Der Artikel darf nicht im Dunkeln oder bei
schlechten Sichtverhältnissen verwendet
werden!
29DE/AT/CH
Page 28

• Das Kind muss beim Fahren immer einen
Helm sowie festes Schuhwerk tragen!
Wir empfehlen zusätzlich die Verwendung
geeigneter Schutzausrüstung.
• Der Artikel darf nicht auf abschüssigem
Gelände, in der Nähe von Treppen und
offenen Gewässern verwendet werden!
Vermeiden Sie Gefahrenbereiche!
Sicherheitshinweise zur
Verwendung
• Beachten Sie, dass Kinder ihre eigenen
Fähigkeiten und bestimmte Gefahren situationen oft noch nicht richtig einschätzen
können! Durch das Spielbedürfnis von
Kindern kann es zu unvorhersehbaren
Situationen kommen, die eine Verantwortung
des Inverkehrbringers/Herstellers aus schließen.
• Unterweisen Sie das Kind im richtigen
Umgang mit dem Artikel und machen Sie es
auf mögliche Gefahren aufmerksam!
• Das Abbremsen des Artikels muss durch das
Kind jederzeit sicher beherrscht werden.
Üben Sie das Abbremsen sowohl mit den
Füßen als auch mit der Bremse vor der
Verwendung des Artikels.
• Auf glatten Böden besteht Rutschgefahr!
Bedenken Sie, dass bei der Verwendung des
Artikels immer die Gefahr eines Sturzes
besteht.
Montage
ACHTUNG!
Die Montage des Artikels muss immer
durch einen Erwachsenen erfolgen!
ACHTUNG!
Halten Sie während der Montage Kinder
von dem Artikel und dem Verpackungsmaterial
fern. Erstickungsgefahr, da kleine Teile verschluckt oder eingeatmet werden können, sowie
Erstickungsgefahr durch Kunststofftüten.
1. Schutzblech montieren
Befestigen Sie das Schutzblech vorne (11)
mit Schraube (12) und Mutter (13) an der
Gabel (14) (Abb. B).
Achten Sie darauf, dass der Schlitz
an der Gabel zur längeren Seite des
Schutzblechs zeigt.
2. Vorderrad montieren
Befestigen Sie den Vorderreifen (9) mit 2x
Abstandshalter (8), 2x Unterlegscheibe (7)
und Achsschraube (6) an der Gabel
(Abb. C).
3. Rahmen montieren
3a) Stecken Sie das T-Verbindungsstück (15) auf
die Gabel (Abb. D).
Achten Sie darauf, dass die vertiefte
Aussparung zur längeren Seite des
Schutzblechs zeigt.
3b) Stecken Sie das untere Verbindungsstück
(16) auf die Gabel (Abb. E).
Achten Sie darauf, dass die Führung in
die Aussparung am T-Verbindungsstück
passt.
3c) Stecken Sie den Rahmen (5) auf die Gabel
(Abb. F).
Achten Sie darauf, dass die Aussparung
in die vorgegebene Führung gesteckt
wird.
3d) Stecken Sie das obere Verbindungsstück
(17) auf die Gabel (Abb. G).
4. Korb montieren
Stecken Sie den Korb (19) auf die Gabel
(Abb. H).
5. Lenker montieren
5a) Stecken Sie die Schelle (18) auf die Gabel
(Abb. I).
Achten Sie darauf, dass die Aussparung
an der Schelle in die Führung am Korb
passt.
5b) Stecken Sie eine Abdeckung (4) auf das
Lenkerrohr (Abb. J).
5c) Stecken Sie das Lenkerrohr in die Gabel
(Abb. K).
Beachten Sie die maximal gekennzeichnete Auszugshöhe!
Ziehen Sie die Mutter an der Schelle mit
dem Werkzeug (22) an und schieben Sie
die Abdeckung über die Schelle.
30 DE/AT/CH
Page 29

6. Sattel montieren
6a) Stecken Sie eine Abdeckung auf den Sattel
mit Sattelrohr (3) (Abb. L).
6b) Stecken Sie das Sattelrohr in die Aussparung
am Rahmen (Abb. M).
Beachten Sie die maximal gekennzeichnete Auszugshöhe!
Ziehen Sie die Mutter mit dem Werkzeug
an, um den Sattel zu fixieren und schieben
Sie anschließend die Abdeckung über die
Mutter.
7. Lenkerschutz anbringen
Montieren Sie den Aufprallschutz (1) per
Klettverschluss am Lenker (Abb. N).
8. Aufkleber-Sets
Kleben Sie die Aufkleber Set 1 oder
Set 2 (21) an die vorgegebenen Positionen
(Abb. O).
Einstellungen
Lenkerhöhe
Beachten Sie die maximale Auszugshöhe!
Schieben Sie die Abdeckung hoch.
Lösen Sie die Schelle, bis sich der Lenker hoch
und runter schieben lässt und stellen Sie den
Lenker auf die passende Höhe ein.
Ziehen Sie die Schelle wieder an und schieben
Sie anschließend die Abdeckung über die
Schelle (Abb. P).
Sattelhöhe
Hinweis:
Die Sattelhöhe ist richtig eingestellt,
wenn das Kind mit den Füßen den
Boden sicher erreichen kann.
Beachten Sie die maximale Auszugshöhe!
Schieben Sie die Abdeckung hoch. Lösen
Sie die Mutter, bis sich der Sattel noch oben
oder unten verschieben lässt. Stellen Sie den
Sattel auf die passende Höhe ein, ziehen Sie
die Mutter wieder fest und schieben Sie die
Abdeckung wieder nach unten (Abb. Q).
Bremse
Bremsgriff
Der Abstand von Griff zum Bremshebel darf
max. 60 mm sein. Justieren Sie den Abstand des
Bremsgriffs (20) zum Griff durch Verstellen der
Anschlagschraube (Abb. R).
Bremskraft
ACHTUNG!
Die Bremskraft muss so eingestellt
werden, dass das Hinterrad bei
gelöstem Bremshebel freigängig ist
und bei angezogenem Bremshebel
blockiert.
Drücken Sie den Bremsarm (S1) in Pfeilrichtung.
Drehen Sie Einstell- und Kontermutter (S2) nach
links, um die Bremskraft zu verringern, drehen
Sie Einstell- und Kontermutter nach rechts, um die
Bremskraft zu erhöhen (Abb. S).
Pflege, Lagerung, Wartung
Nach Gebrauch des Artikels empfehlen wir
gründliches Reinigen mit Wasser.
WICHTIG! Nur mit Wasser reinigen, nie mit
scharfen Pflegemitteln. Anschließend mit einem
Reinigungstuch trocken wischen. Den Artikel
immer trocken und sauber in einem temperierten
Raum lagern. Geben Sie alle 3 Monate einen
Tropfen Öl in die Lagerbuchsen des Lenkers und
der Räder.
Hinweise zur Entsorgung
Verpackung und Artikel bitte umweltgerecht und
sortenrein entsorgen! Entsorgen Sie den Artikel
über einen zugelassenen Entsorgungsbetrieb
oder über Ihre kommunale Gemeindeverwaltung. Beachten Sie die aktuell geltenden
Vorschriften.
31DE/AT/CH
Page 30

3 Jahre Garantie
Das Produkt wurde mit großer Sorgfalt und unter
ständiger Kontrolle produziert. Sie erhalten auf
dieses Produkt drei Jahre Garantie ab Kaufdatum. Bitte bewahren Sie den Kassenbon auf.
Die Garantie gilt nur für Material- und Fabrikationsfehler und entfällt bei missbräuchlicher oder
unsachgemäßer Behandlung. Ihre gesetzlichen
Rechte, insbesondere die Gewährleistungsrechte, werden durch diese Garantie nicht
eingeschränkt.
Bei etwaigen Beanstandungen wenden Sie sich
bitte an die unten stehende Service-Hotline oder
setzen Sie sich per E-Mail mit uns in Verbindung.
Unsere Servicemitarbeiter werden das weitere
Vorgehen schnellstmöglich mit Ihnen abstimmen.
Wir werden Sie in jedem Fall persönlich beraten.
Die Garantiezeit wird durch etwaige Reparaturen aufgrund der Garantie, gesetzlicher
Gewährleistung oder Kulanz nicht verlängert.
Dies gilt auch für ersetzte und reparierte Teile.
Nach Ablauf der Garantie anfallende Reparaturen sind kostenpflichtig.
IAN: 103988
Service Deutschland
Tel.: 0800-5435111
E-Mail: deltasport@lidl.de
Service Österreich
Tel.: 0820 201 222 (0,15 EUR/Min.)
E-Mail: deltasport@lidl.at
Service Schweiz
Tel.: 0842 665566 (0,08 CHF/Min.,
Mobilfunk max. 0,40 CHF/Min.)
E-Mail: deltasport@lidl.ch
Ersatzteile zu Ihrem Produkt finden Sie auch unter:
www.delta-sport.com, Rubrik Service - Ersatzteilservice Lidl
32 DE/AT/CH
 Loading...