

Page 1
LAUFRAD
Klappen Sie vor dem Lesen die Seite mit den Abbildungen aus und machen Sie sich anschließend mit
allen Funktionen des Artikels vertraut.
Dépliez la page avec les illustrations avant la lecture et informez-vous ensuite au sujet des fonctions de
l‘appareil.
Prima di leggere ribaltare la pagina con le immagini e familiarizzare poi con tutte le funzioni
dell´apparecchio.
Klap voor het lezen de pagina met de afbeeldingen open en maak u vervolgens vertrouwd met alle
functies van het apparaat.
Before reading, fold out the illustration page and get to know all of the functions of your unit.
DELTA-SPORT HANDELSKONTOR GMBH
Wragekamp 6
D-22397 Hamburg
Version: 02/2013
Delta-Sport-Nr.: KB-1566
LAUFRAD
Bedienungsanleitung
BICICLETTA SENZA PEDALI
Istruzioni d‘uso
TRAINING BALANCE BIKE
Instructions for use
IAN 78912IAN 78912
VÉLO SANS PÉDALES
Notice d’utilisation
LOOPFIETS
Gebruiksaanwijzing
DE/AT/CH Bedienungs- und Sicherheitshinweise Seite 08
FR/CH Instructions d‘utilisation et de sécurité Page 12
IT/CH Istruzioni d´uso e di sicurezza Pagina 16
NL Gebruiksaanwijzingen en veiligheidsinstructies Pagina 20
GB Instructions and Safety Notice Page 24
Page 2
A
21
20
1
2
E G
F
Set 1
Set 2
22
10
19
4
18
17
4
5
16
15
14
12
11
7
8
13
8
3
H J
K
N
I
L
O
M
P
B
9
7
6
QC D
SR
S1
S2
Page 3

5
Page 4
Inhaltsverzeichnis/Table des matieres/Indice/Inhoudsopgave
Bedienungsanleitung
Lieferumfang/Teilebezeichnung ........................ 8
Technische Daten ................................................ 8
Bestimmungsgemäße Verwendung ................... 8
Sicherheitshinweise ........................................ 8 - 9
Verletzungsgefahr ................................... 8 - 9
Sicherheitshinweise zur Verwendung ......... 9
Montage ...................................................... 9 - 10
Schutzblech montieren ................................. 9
Vorderrad montieren .................................... 9
Rahmen montieren ........................................ 9
Korb montieren ............................................. 9
Lenker montieren .......................................... 9
Sattel montieren .......................................... 10
Lenkerschutz anbringen ............................. 10
Aufkleber-Sets ............................................. 10
Einstellungen ..................................................... 10
Lenkerhöhe .................................................. 10
Sattelhöhe ................................................... 10
Bremse ......................................................... 10
Pflege, Lagerung, Wartung .............................. 10
Hinweise zur Entsorgung ................................. 10
3 Jahre Garantie .............................................. 11
Istruzioni d‘uso
Confezione/descrizione componenti ............. 16
Dati tecnici ......................................................... 16
Utilizzo previsto ................................................ 16
Avvertenze di sicurezza ........................... 16 - 17
Pericolo di lesione ...................................... 16
Avvertenze di sicurezza per l’utilizzo ...... 17
Montaggio ................................................ 17 - 18
Montare il parafango ...................................... 17
Montare la ruota anteriore ....................... 17
Montare il telaio ......................................... 17
Montare il cestino ...................................... 17
Montare il manubrio .................................. 17
Montare la sella ......................................... 17
Applicare la protezione per il manubrio . 18
Set di adesivi .............................................. 18
Impostazioni ...................................................... 18
Altezza manubrio ....................................... 18
Altezza sella ............................................... 18
Freno ............................................................ 18
Cura, conservazione e manutenzione ............ 18
Avvertenze per lo smaltimento rifiuti ............... 18
3 anni di garanzia ............................................ 19
Notice d’utilisation
Contenu de l’emballage / Désignation des pièces 12
Données techniques ......................................... 12
Utilisation conforme .......................................... 12
Consignes de sécurité .............................. 12 - 13
Risque de blessure ..................................... 12
Consignes de sécurité sur l’utilisation ....... 13
Montage .................................................... 13 - 14
Monter le garde-boue ............................... 13
Monter la roue avant ................................. 13
Monter le cadre ......................................... 13
Monter le panier ........................................ 13
Monter le volant ......................................... 13
Monter la selle .............................................13
Installer la protection du guidon ................ 14
Sets d’autocollants ..................................... 14
Réglages ............................................................ 14
Hauteur du guidon ...................................... 14
Hauteur de la selle ..................................... 14
Frein ............................................................. 14
Entretien, rangement, maintenance ................. 14
Mise au rebut .................................................... 14
3 ans de garantie ............................................. 15
Gebruiksaanwijzing
Omvang van de levering/
beschrijving van de onderdelen ...................... 20
Technische gegevens ........................................ 20
Correct gebruik ................................................. 20
Veiligheidsinstructies ................................. 20 - 21
Gevaar voor letsel .............................. 20 - 21
Veiligheidsinstructies voor het gebruik ..... 21
Montage .................................................... 21 - 22
Spatbord monteren .................................... 21
Voorwiel monteren ..................................... 21
Frame monteren .......................................... 21
Mandje monteren ....................................... 21
Stuur monteren ........................................... 21
Zadel monteren .......................................... 22
Stuurbescherming vastmaken .................... 22
Stickersets .................................................... 22
Instellingen ........................................................ 22
Stuurhoogte ................................................ 22
Zadelhoogte ............................................... 22
Rem .............................................................. 22
Verzorging, opslag, onderhoud ...................... 22
Opmerkingen voor de verwijdering ................ 22
3 jaar garantie .................................................. 23
6
Page 5

Instructions for use
Contents/Parts Description .............................. 24
Technical Data ...................................................24
Intended Use ..................................................... 24
Safety Instructions ..................................... 24 - 25
Risk of injury ................................................ 24
Safety instructions for use ...........................25
Assembly ........................................................... 25
Install mudguard ......................................... 25
Install front wheel ....................................... 25
Install frame ................................................ 25
Install basket ............................................... 25
Install handlebar ........................................ 25
Install saddle ............................................... 25
Install protective handlebar cushion ......... 25
Sticker set .................................................... 25
Settings .............................................................. 26
Handlebar height ....................................... 26
Saddle height ............................................. 26
Brake ........................................................... 26
Care, storage, maintenance ............................ 26
Disposal Instructions ......................................... 26
3 years warranty .............................................. 26
Contents
7
Page 6
Herzlichen Glückwunsch! Mit Ihrem Kauf
haben Sie sich für ein hochwertiges Produkt
entschieden. Machen Sie sich vor der Montage
und der ersten Inbetriebnahme mit dem Produkt
vertraut. Lesen Sie hierzu aufmerksam die nachfolgende Montage- und Bedienungsanleitung
und die Sicherheitshinweise. Benutzen Sie das
Produkt nur wie beschrieben und für die angegebenen Einsatzbereiche. Bewahren Sie diese
Anleitung gut auf. Händigen Sie alle Unterlagen
bei Weitergabe des Produkts an Dritte ebenfalls
mit aus.
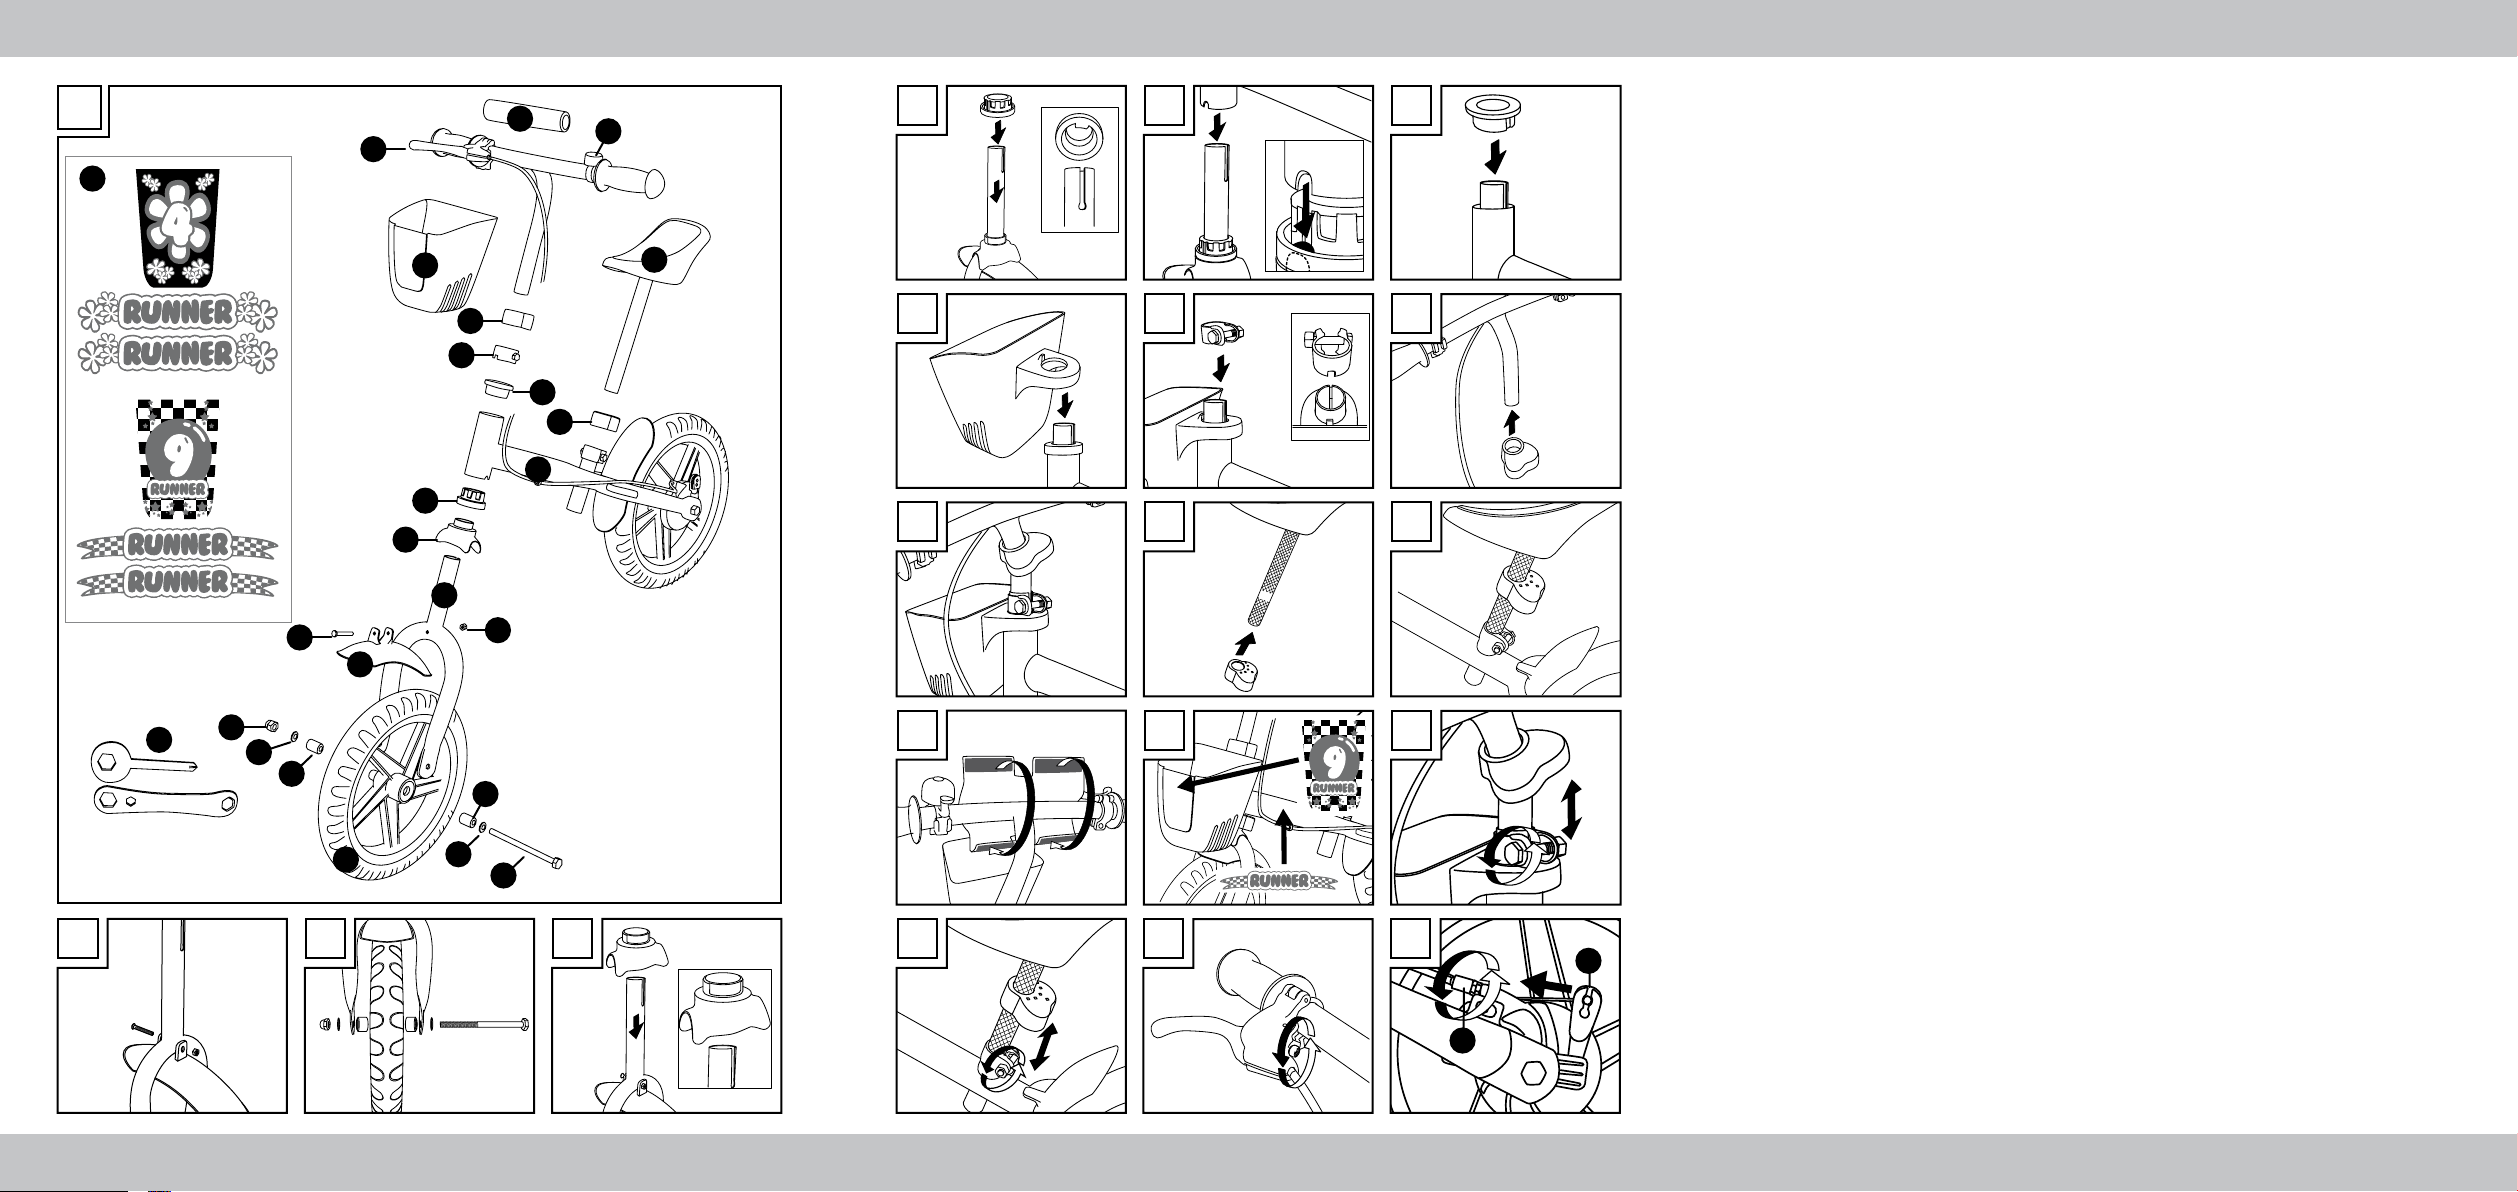
Lieferumfang/
Teilebezeichnung (Abb. A)
(1) 1 x Aufprallschutz
(2) 1 x Klingel
(3) 1 x Sattel mit Sattelrohr
(4) 2 x Abdeckung
(5) 1 x Rahmen (mit vormontiertem
Bremskabel und Lenker)
(6) 1 x Achsschraube
(7) 2 x Unterlegscheibe
(8) 2 x Abstandshalter
(9) 1 x Vorderreifen
(10) 1 x Mutter
(11) 1 x Schutzblech vorne
(12) 1 x Schraube
(13) 1 x Mutter
(14) 1 x Gabel
(15) 1 x T-Verbindungsstück
(16) 1 x unteres Verbindungsstück
(17) 1 x oberes Verbindungsstück
(18) 1 x Schelle
(19) 1 x Korb
(20) 1 x Bremsgriff
(21) 1 x Bogen Aufkleber
(unterteilt in Set 1 und Set 2)
(22) 2 x Werkzeug
1 x Bedienungsanleitung
Technische Daten
Maximales Benutzergewicht: 50 kg
Gewicht: ca. 3,3 kg
Sattelhöhe: ca. 36,5 - 46 cm
Lenkerhöhe: ca. 56 - 60 cm
Maße: ca. 86 x 43,5 x 56 - 60 cm
Bestimmungsgemäße
Verwendung
Dieser Artikel ist für den privaten Gebrauch entwickelt worden. Er ist geeignet für die Verwendung als Spielzeug von einem Kind (3 - 6 Jahre,
Körpergröße von 96 cm – 120 cm) mit einem
maximalen Benutzergewicht von 50 kg.
Der Artikel ist kein Fahrzeug im Sinne der StVO
und darf nicht am öffentlichen Straßenverkehr
teilnehmen. Informieren Sie sich vor der Verwendung über die gesetzlichen Bestimmungen
Sicherheitshinweise
Verletzungsgefahr!
- Prüfen Sie den Artikel vor jedem Gebrauch
auf Beschädigungen oder Abnutzungen.
Kontrollieren Sie vor jeder Verwendung den
festen Sitz aller Verbindungselemente und
Verschlussteile. Vergewissern Sie sich, dass
Schrauben und Muttern ihre Selbstsperreigen schaft bewahren.
- Der Artikel darf nur in einwandfreiem Zustand
verwendet werden! Wird ein Defekt am
Artikel festgestellt, darf dieser bis zur Behe bung des Defekts nicht weiter verwendet
werden!
- Schrauben müssen immer so fest angezogen
werden, dass Sie von Kindern nicht gelöst
werden können. Ansonsten besteht die
Gefahr, dass abgeschraubte Kleinteile von
Kindern verschluckt oder eingeatmet werden.
Erstickungsgefahr!
- Durch unsachgemäße Veränderung oder
Reparaturen am Artikel entstehen Gefahren!
Verändern Sie den Artikel nicht!
- Verbinden Sie den Artikel nicht mit anderen
Fahrzeugen, Sportgeräten oder sonstigen
Zugeinrichtungen. Der Artikel ist nicht für
höhere Geschwindigkeiten konstruiert.
- Das Kind muss beim Verwenden des Artikels
immer durch einen Erwachsenen beaufsichtigt
werden!
- Das Kind muss beim Fahren immer einen
Helm sowie festes Schuhwerk tragen!
Wir empfehlen zusätzlich die Verwendung
geeigneter Schutzausrüstung.
8 DE/AT/CH
Page 7
- Der Artikel darf nicht im Dunkeln oder bei
schlechten Sichtverhältnissen verwendet
werden!
- Der Artikel darf nicht auf abschüssigem
Gelände, in der Nähe von Treppen und
offenen Gewässern verwendet werden!
Vermeiden Sie Gefahrenbereiche!
Sicherheitshinweise zur
Verwendung
- Beachten Sie, dass Kinder ihre eigenen
Fähigkeiten und bestimmte Gefahren situationen oft noch nicht richtig einschätzen
können! Durch das Spielbedürfnis von
Kindern kann es zu unvorhersehbaren
Situationen kommen, die eine Verantwortung
des Inverkehrbringers/Herstellers aus schließen.
- Unterweisen Sie das Kind im richtigen
Umgang mit dem Artikel und machen Sie es
auf mögliche Gefahren aufmerksam!
- Das Abbremsen des Artikels muss durch das
Kind jederzeit sicher beherrscht werden.
Üben Sie das Abbremsen sowohl mit den
Füßen als auch mit der Bremse vor der
Verwendung des Artikels.
- Auf glatten Böden besteht Rutschgefahr!
Bedenken Sie, dass bei der Verwendung des
Artikels immer die Gefahr eines Sturzes
besteht.
Montage
ACHTUNG!
Die Montage des Artikels muss immer
durch einen Erwachsenen erfolgen!
ACHTUNG!
Halten Sie während der Montage Kinder
von dem Artikel und dem Verpackungsmaterial
fern. Erstickungsgefahr, da kleine Teile verschluckt oder eingeatmet werden können, sowie
Erstickungsgefahr durch Kunststofftüten.
1. Schutzblech montieren
Befestigen Sie das Schutzblech vorne (11)
mit Schraube (12) und Mutter (13) an der
Gabel (14) (Abb. B).
Achten Sie darauf, dass der Schlitz
an der Gabel zur längeren Seite des
Schutzblechs zeigt.
2. Vorderrad montieren
Befestigen Sie den Vorderreifen (9) mit 2x
Abstandshalter (8), 2x Unterlegscheibe (7)
und Achsschraube (6) an der Gabel
(Abb. C).
3. Rahmen montieren
3a) Stecken Sie das T-Verbindungsstück (15) auf
die Gabel (Abb. D).
Achten Sie darauf, dass die vertiefte
Aussparung zur längeren Seite des
Schutzblechs zeigt.
3b) Stecken Sie das untere Verbindungsstück
(16) auf die Gabel (Abb. E).
Achten Sie darauf, dass die Führung in
die Aussparung am T-Verbindungsstück
passt.
3c) Stecken Sie den Rahmen (5) auf die Gabel
(Abb. F).
Achten Sie darauf, dass die Aussparung
in die vorgegebene Führung gesteckt
wird.
3d) Stecken Sie das obere Verbindungsstück
(17) auf die Gabel (Abb. G).
4. Korb montieren
Stecken Sie den Korb (19) auf die Gabel
(Abb. H).
5. Lenker montieren
5a) Stecken Sie die Schelle (18) auf die Gabel
(Abb. I).
Achten Sie darauf, dass die Aussparung
an der Schelle in die Führung am Korb
passt.
5b) Stecken Sie eine Abdeckung (4) auf das
Lenkerrohr (Abb. J).
5c) Stecken Sie das Lenkerrohr in die Gabel
(Abb. K).
Beachten Sie die maximal gekennzeichnete Auszugshöhe!
Ziehen Sie die Mutter an der Schelle mit
dem Werkzeug (22) an und schieben Sie
die Abdeckung über die Schelle.
9DE/AT/CH
Page 8

6. Sattel montieren
6a) Stecken Sie eine Abdeckung auf den Sattel
mit Sattelrohr (3) (Abb. L).
6b) Stecken Sie das Sattelrohr in die Aussparung
am Rahmen (Abb. M).
Beachten Sie die maximal gekennzeichnete Auszugshöhe!
Ziehen Sie die Mutter mit dem Werkzeug
an, um den Sattel zu fixieren und schieben
Sie anschließend die Abdeckung über die
Mutter.
7. Lenkerschutz anbringen
Montieren Sie den Aufprallschutz (1) per
Klettverschluss am Lenker (Abb. N).
8. Aufkleber-Sets
Kleben Sie die Aufkleber Set 1 oder
Set 2 (21) an die vorgegebenen Positionen
(Abb. O).
Einstellungen
Lenkerhöhe
Beachten Sie die maximale Auszugshöhe!
Schieben Sie die Abdeckung hoch.
Lösen Sie die Schelle, bis sich der Lenker hoch
und runter schieben lässt und stellen Sie den
Lenker auf die passende Höhe ein.
Ziehen Sie die Schelle wieder an und schieben
Sie anschließend die Abdeckung über die
Schelle (Abb. P).
Sattelhöhe
Hinweis:
Die Sattelhöhe ist richtig eingestellt,
wenn das Kind mit den Füßen den
Boden sicher erreichen kann.
Beachten Sie die maximale Auszugshöhe!
Schieben Sie die Abdeckung hoch. Lösen
Sie die Mutter, bis sich der Sattel noch oben
oder unten verschieben lässt. Stellen Sie den
Sattel auf die passende Höhe ein, ziehen Sie
die Mutter wieder fest und schieben Sie die
Abdeckung wieder nach unten (Abb. Q).
Bremse
Bremsgriff
Der Abstand von Griff zum Bremshebel darf
max. 60 mm sein. Justieren Sie den Abstand des
Bremsgriffs (20) zum Griff durch Verstellen der
Anschlagschraube (Abb. R).
Bremskraft
ACHTUNG!
Die Bremskraft muss so eingestellt
werden, dass das Hinterrad bei
gelöstem Bremshebel freigängig ist
und bei angezogenem Bremshebel
blockiert.
Drücken Sie den Bremsarm (S1) in Pfeilrichtung.
Drehen Sie Einstell- und Kontermutter (S2) nach
links, um die Bremskraft zu verringern, drehen
Sie Einstell- und Kontermutter nach rechts, um die
Bremskraft zu erhöhen (Abb. S).
Pflege, Lagerung, Wartung
Nach Gebrauch des Artikels empfehlen wir
gründliches Reinigen mit Wasser.
WICHTIG! Nur mit Wasser reinigen, nie mit
scharfen Pflegemitteln. Anschließend mit einem
Reinigungstuch trocken wischen. Den Artikel
immer trocken und sauber in einem temperierten
Raum lagern. Geben Sie alle 3 Monate einen
Tropfen Öl in die Lagerbuchsen des Lenkers und
der Räder.
Hinweise zur Entsorgung
Verpackung und Artikel bitte umweltgerecht und
sortenrein entsorgen! Entsorgen Sie den Artikel
über einen zugelassenen Entsorgungsbetrieb
oder über Ihre kommunale Gemeindeverwaltung. Beachten Sie die aktuell geltenden
Vorschriften.
10 DE/AT/CH
Page 9

3 Jahre Garantie
Das Produkt wurde mit großer Sorgfalt und unter
ständiger Kontrolle produziert. Sie erhalten auf
dieses Produkt drei Jahre Garantie ab Kaufdatum. Bitte bewahren Sie den Kassenbon auf.
Die Garantie gilt nur für Material- und Fabrikationsfehler und entfällt bei missbräuchlicher oder
unsachgemäßer Behandlung. Ihre gesetzlichen
Rechte, insbesondere die Gewährleistungsrechte, werden durch diese Garantie nicht
eingeschränkt.
Bei etwaigen Beanstandungen wenden Sie sich
bitte an die unten stehende Service-Hotline oder
setzen Sie sich per E-Mail mit uns in Verbindung.
Unsere Servicemitarbeiter werden das weitere
Vorgehen schnellstmöglich mit Ihnen abstimmen.
Wir werden Sie in jedem Fall persönlich beraten.
Die Garantiezeit wird durch etwaige Reparaturen aufgrund der Garantie, gesetzlicher
Gewährleistung oder Kulanz nicht verlängert.
Dies gilt auch für ersetzte und reparierte Teile.
Nach Ablauf der Garantie anfallende Reparaturen sind kostenpflichtig.
IAN: 78912
Service Deutschland
Tel.: 01805772033
(0,14 EUR/Min. aus dem
dt. Festnetz,
Mobilfunk max. 0,42 EUR/Min.)
E-Mail: deltasport@lidl.de
Service Österreich
Tel.: 0820 201 222 (0,15 EUR/Min.)
E-Mail: deltasport@lidl.at
Service Schweiz
Tel.: 0842 665566 (0,08 CHF/Min.,
Mobilfunk max. 0,40 CHF/Min.)
E-Mail: deltasport@lidl.ch
11DE/AT/CH
Page 10

Félicitations ! Vous venez d’acquérir un
produit de qualité. Veuillez vous informer sur le
produit avant la première utilisation. Pour cela,
lisez soigneusement les consignes d’utilisation
et de sécurité. Utilisez uniquement le produit
suivant les indications et dans les domaines
d’application indiqués. Conservez soigneusement cette notice. Transmettez tous les documents en cas de cession du produit à un tiers.
Contenu de l’emballage /
Désignation des pièces (ill. A)
(1) 1 x Mousse pare-chocs
(2) 1 x Sonnette
(3) 1 x Selle avec tube
(4) 2 x Caches
(5) 1 x Cadre (avec câble de freinage
pré-monté et guidon)
(6) 1 x Vis d’axe
(7) 2 x Rondelles
(8) 2 x Espaceurs
(9) 1 x Frein avant
(10) 1 x Écrou
(11) 1 x Garde-boue avant
(12) 1 x Vis
(13) 1 x Écrou
(14) 1 x Fourche
(15) 1 x Pièce de raccord en T
(16) 1 x Pièce de raccord inférieure
(17) 1 x Pièce de raccord supérieure
(18) 1 x Collier
(19) 1 x Panier
(20) 1 x Poignée de freinage
(21) 1 x Fiche d’autocollants
(répartie dans le set 1 et le set 2)
(22) 2 x Outils
1 x Notice d’utilisation
Données techniques
Poids maximal de l’utilisateur : 50 kg
Poids : env. 3,3 kg
Hauteur de la selle : env. 36,5 - 46 cm
Hauteur du guidon : env. 56 - 60 cm
Dimensions : env. 86 x 43,5 x 56 - 60 cm
Utilisation conforme
Ce vélo a été développé pour un usage privé.
Il doit être utilisé comme un jouet par un enfant
(3-6 ans, taille de 96 à 120 cm) avec un poids
maximal de 50 kg. Le vélo ne doit pas être utilisé sur une voie de circulation. Veuillez vous informer des dispositions légales avant l’utilisation.
Consignes de sécurité
Risque de blessure !
- Contrôlez le vélo avant chaque utilisation
du point de vue d’éventuelles dégradations
ou usures. Avant chaque utilisation, contrôlez
que tous les éléments de raccord et toutes les
pièces de fermeture sont bien fixés. Assurez vous que les vis et les écrous sont bien serrés.
- Le vélo doit être utilisé uniquement en parfait
état ! Si un défaut est constaté sur le vélo, il
ne doit pas être utilisé avant que le défaut soit
éliminé !
- Les vis doivent être toujours bien serrées
de sorte que les enfants ne puissent pas les
desserrer. Sinon, les petites pièces dévissées
risquent soient d’être avalées ou aspirées par
les enfants. Risque d’étouffement !
- Toute modification non conforme ou
réparation du vélo entraîne des risques !
Ne modifiez pas le vélo !
- N’attacher pas le vélo à d’autres véhicules, à
des appareils de sport ou à d’autres disposi tifs de traction. Le vélo n’a pas été conçu pour
de grandes vitesses.
- L’enfant doit toujours être surveillé par un
adulte lors de l’utilisation du vélo!
- L’enfant doit toujours porter un casque et des
chaussures solides lorsqu’il roule à vélo.
Nous recommandons d’utiliser en plus un
équipement de protection adapté.
- Le vélo ne doit pas être utilisé de nuit ou en
cas de mauvaise visibilité !
- Le vélo ne doit pas être utilisé sur des terrains
en pente, à proximité d’escaliers ou de cours
d’eau librement accessibles ! Évitez les zones
à risque !
12 FR/CH
Page 11

Consignes de sécurité sur
l’utilisation
- Notez que les enfants ne peuvent pas évaluer
correctement leurs propres capacités et cer taines situations dangereuses ! Le besoin chez
les enfants de jouer peut entraîner des situa tions imprévisibles pour lesquels le distributeur
/ le fabricant décline toute responsabilité.
- Apprenez à l’enfant à bien se servir du vélo
et attirez son attention sur les risques possi bles !
- L’enfant doit maîtriser à tout moment et en
toute sécurité le freinage. Qu’il s’entraine à
freiner aussi bien avec les pieds qu’avec le
frein lors de l’utilisation du vélo.
- Risque de glisser sur les sols lisses ! N’oubliez
pas que lors de l’utilisation du vélo, il existe
toujours un risque de chute.
Montage
ATTENTION !
Le montage du vélo doit toujours être
réalisé par un adulte !
ATTENTION !
Pendant le montage, éloignez les enfants
du vélo et du matériel d’emballage. Risque
d’asphyxie, car les petites pièces peuvent
être avalées ou aspirées, risque d’étouffement
également avec les sacs en plastique.
1. Monter le garde-boue
Fixez le garde-boue avant (11) avec la vis
(12) et l’écrou (13) sur la fourche (14)
(ill. B).
Veillez à ce que la fente de la fourche
soit orientée vers le côté long du gardeboue.
2. Monter la roue avant
Fixez le frein avant (9) avec 2 x espaceurs
(8), 2 x rondelles (7) et la vis d’axe (6) sur
la fourche (ill. C).
3. Monter le cadre
3a) Fixez la pièce de raccord en T (15) sur la
fourche (ill. D).
Veillez à ce que le renfoncement soit
orienté vers le côté le plus long du
garde-boue.
3b) Fixez la pièce de raccord inférieure (16) sur
la fourche (ill. E).
Veillez à ce que le guide soit adapté à
l’ouverture de la pièce de raccord en T.
3c) Fixez le cadre (5) sur la fourche (ill. F).
Assurez-vous que l’ouverture soit fixée
dans le guide disponible.
3d) Fixez la pièce de raccord supérieure (17)
sur la fourche (ill. G).
4. Monter le panier
Fixez le panier (19) sur la fourche (ill. H).
5. Monter le volant
5a) Fixez le collier de serrage (18) sur la
fourche (ill. I).
Veillez à ce que l’ouverture sur le
collier de serrage passe dans le
guide du panier.
5b) Fixez un cache (4) sur le tube du guidon
(ill. J).
5c) Fixez le tube du guidon dans la fourche
(ill. K).
Veuillez respecter la hauteur maximale
marquée !
Serrez l’écrou sur le collier de serrage avec
outils (22) et placez le cache sur le collier
de serrage.
6. Monter la selle
6a) Fixez un cache sur la selle avec le tube (3)
(ill. L).
6b) Insérez le tube de la selle dans l’ouverture
du cadre (ill. M).
Veuillez respecter la hauteur
télescopique maximale marquée !
Serrez l’écrou avec l’outil afin de fixer la
selle et déplacez ensuite le cache sur
l’écrou.
13FR/CH
Page 12

7. Installer la protection du guidon
Montez la mousse pare-chocs (1) avec la
bande auto-grippante sur le guidon (ill. N).
8. Sets d’autocollants
Collez les autocollants set 1 ou set 2 (21)
sur les emplacements indiqués (ill. O).
Réglages
Hauteur du guidon
Veuillez respecter la hauteur
télescopique maximale marquée !
Soulevez le cache. Desserrez le collier de
serrage jusqu’à ce que le guidon puisse être
déplacé vers le haut et le bas et ajustez-le à la
bonne hauteur.
Resserrez le collier de serrage et replacez le
cache sur le collier de serrage (ill. P).
Hauteur de la selle
Remarque :
La hauteur de la selle est correctement
réglée lorsque l’enfant peut atteindre le
sol avec les pieds en toute sécurité.
Veuillez respecter la hauteur
maximale !
Soulevez le cache. Desserrez l’écrou jusqu’à ce
que la selle puisse être déplacée vers le haut ou
vers le bas. Réglez la selle à la bonne hauteur,
resserrez l’écrou et replacez le cache vers le bas
(ill. Q).
Frein
Poignée de freinage
La distance entre la poignée et le levier de frein
ne doit pas dépasser 60 mm. Réglez la distance
de la poignée de freinage (20) en réglant la vis
de butée (ill. R).
Force de freinage
ATTENTION !
La force de freinage doit être réglée
de sorte que la roue arrière fonctionne
librement lorsque le levier de freins est
désactivé et qu’elle se bloque lorsque le
levier de freins est tiré.
Appuyez sur le bras de freinage (S1) dans
la direction de la flèche. Tournez l’écrou de
réglage et de blocage (S2) vers la gauche pour
réduire la force de freinage, tournez-le vers la
droite pour augmenter la force de freinage
(ill. S).
Entretien, rangement,
maintenance
Après l’utilisation du vélo, nous recommandons
de le nettoyer soigneusement à l’eau.
IMPORTANT ! Laver uniquement à l’eau, jamais
avec des produits nettoyants agressifs. Puis,
essuyer avec un chiffon. Le vélo doit toujours être
rangé sec et propre dans un espace tempéré.
Ajouter tous les trois mois une goutte d’huile aux
bagues de roulement du guidon et des roues.
Mise au rebut
Veuillez éliminer l’emballage et l’article dans
le respect des règles environnementales et des
règles de recyclage ! Éliminez l’article auprès
d’un centre de collecte. Veuillez respecter les
directives actuellement en vigueur.
14 FR/CH
Page 13

3 ans de garantie
Le produit a été fabriqué avec le plus grand soin
et sous un contrôle permanent. Vous avez sur ce
produit une garantie de trois ans à partir de la
date d’achat. Conservez le ticket de caisse.
La garantie est uniquement valable pour les
défauts de matériaux et de fabrication, elle perd
sa validité en cas de maniement incorrect ou non
conforme. Vos droits légaux, tout particulièrement les droits relatifs à la garantie, ne sont pas
limitées par cette garantie.
En cas d‘éventuelles réclamations, veuillez vous
adresser à la hotline de garantie indiquée cidessous ou nous contacter par e-mail.
Nos employés du service client vous indiqueront
la marche à suivre le plus rapidement possible.
Nous vous renseignerons personnellement dans
tous les cas.
La période de garantie n‘est pas prolongée par
d’éventuelles réparations sous la garantie, les
garanties implicites ou le remboursement.
Ceci s‘applique également aux pièces remplacées et réparées. Les réparations nécessaires
sont à la charge de l’acheteur à la fin de la
période de garantie.
IAN : 78912
Service Suisse
Tel. : 0842 665566
(0,08 CHF/Min.,
mobile max. 0,40 CHF/Min.)
E-Mail : deltasport@lidl.ch
15FR/CH
Page 14

Congratulazioni! Con il Vostro acquisto
avete scelto un prodotto di alta qualità.
Prendete dimestichezza con il prodotto prima
del montaggio e della prima messa in funzione.
Leggete attentamente le seguenti istruzioni di
montaggio e le avvertenze di sicurezza.
Usate il prodotto solo come descritto e solo
per gli ambiti di utilizzo indicati. Conservate
queste istruzioni con cura. Consegnate tutti i
documenti se passate il prodotto a terzi.
Confezione/descrizione
componenti (fig. A)
(1) 1 x Protezione contro gli urti
(2) 1 x Campanello
(3) 1 x Sella con tubo
(4) 2 x Coperture
(5) 1 x Telaio (con cavo per freno premontato
e manubrio)
(6) 1 x Vite assiale
(7) 2 x Rondelle
(8) 2 x Distanziatori
(9) 1 x Ruota anteriore
(10) 1 x Dado
(11) 1 x Parafango anteriore
(12) 1 x Vite
(13) 1 x Dado
(14) 1 x Forcella
(15) 1 x Raccordo a T
(16) 1 x Raccordo inferiore
(17) 1 x Raccordo superiore
(18) 1 x Collare
(19) 1 x Cestino
(20) 1 x Leva freno
(21) 1 x Foglio con adesivi
(suddiviso in set 1 e set 2)
(22) 2 x Attrezzi
1 x Istruzioni d’uso
Dati tecnici
Peso massimo utilizzatore: 50 kg
Peso: ca. 3,3 kg
Altezza sella: ca. 36,5 - 46 cm
Altezza manubrio: ca. 56 - 60 cm
Dimensioni: ca. 86 x 43,5 x 56 - 60 cm
Utilizzo previsto
Il prodotto è concepito per l‘uso privato.
E’ adatto per l’uso come giocattolo per un
bambino (3 - 6 anni, altezza da 96 cm – 120
cm) con un peso massimo di 50 kg. L’articolo
non deve essere utilizzato nel traffico stradale.
Informarsi sulle norme legali prima dell’utilizzo.
Avvertenze di sicurezza
Pericolo di lesione!
- Prima di ogni utilizzo controllare che il prodot to non sia danneggiato o usurato. Prima di
ogni utilizzo controllare che tutti gli elementi
di raccordo e di chiusura siano ben saldi.
Assicurarsi che le viti e i dadi mantengano le
loro capacità di bloccaggio.
- Il prodotto può essere utilizzato solo in
perfette condizioni. Se viene rilevato un
difetto all’articolo, esso non deve essere
utilizzato fino alla sua riparazione.
- Le viti devono essere serrate in modo tale
da non essere svitabili dai bambini.
Altrimenti sussiste il pericolo che le piccole
parti svitate possano essere ingerite dai
bambini. Pericolo di soffocamento!
- Con un uso o riparazioni dell’articolo non
conformi sussistono dei pericoli. Non alterare
l’articolo.
- Non collegare l’articolo ad altri veicoli,
attrezzi sportivi o particolari ingranaggi.
L’articolo non è concepito per elevate
velocità.
- Mentre utilizza l’articolo, il bambino deve
essere sempre controllato da un adulto.
- Mentre va in bici, il bambino deve indossare
sempre un casco e scarpe robuste.
Consigliamo inoltre l’uso di un equipaggia mento di protezione adeguato.
- L’articolo non deve essere usato al buio o in
condizioni di visibilità limitate.
- Non usare l’articolo su terreni in pendenza,
vicino a scale e acque aperte. Evitare zone
pericolose.
16 IT/CH
Page 15

Avvertenze di sicurezza per
l’utilizzo
- Ricordarsi che i bambini potrebbero non
valutare correttamente le proprie capacità e
le situazioni di pericolo. Il desiderio di
giocare dei bambini può portare a situazioni
imprevedibili che escludono la responsabilità
del commerciante/produttore.
- Insegnate al bambino il corretto uso
dell’articolo e rendetelo cosciente dei
pericoli possibili.
- Il bambino deve essere sempre sicuro nel
governare il freno. Fatelo esercitare a frenare
con i piedi e con il freno prima di utilizzare
l’articolo.
- Sui pavimenti lisci sussiste pericolo di
scivolamento. Tenere presente che durante
l’uso dell’articolo sussiste sempre il pericolo
di un urto.
Montaggio
ATTENZIONE!
Il montaggio dell’articolo deve essere
sempre eseguito da un adulto.
ATTENZIONE!
Tenere lontani i bambini dall’articolo e dal
materiale di imballaggio durante il montaggio.
Pericolo di soffocamento, poiché le piccole
parti potrebbero essere ingerite o inalate e può
esserci pericolo di soffocamento a causa delle
buste di plastica.
1. Montare il parafango
Fissare il parafango anteriore (11) con la
vite (12) e il dado (13) alla forcella (14)
(fig. B).
Accertarsi che l’apertura della forcella
sia rivolto verso il lato più lungo della
lamiera di protezione.
2. Montare la ruota anteriore
Fissare la ruota anteriore (9) con 2x
distanziatori (8), 2x rondelle (7) e la
vite assiale (6) alla forcella (fig. C).
3. Montare il telaio
3a) Fissare il raccordo a T (15) sulla forcella
(fig. D).
Accertarsi che l’incavo profondo sia
rivolto verso il lato più lungo della
lamiera di protezione.
3b) Fissare il raccordo inferiore (16) sulla
forcella (fig. E).
Accertarsi che la guida nell’incavo sia
adatta al raccordo a T.
3c) Fissare il telaio (5) sulla forcella (fig. F).
Accertarsi che l’incavo sia inserito nella
guida a ciò predisposta.
3d) Inserire il raccordo superiore (17) sulla
forcella (fig. G).
4. Montare il cestino
Fissare il cestino (19) sulla forcella (fig. H).
5. Montare il manubrio
5a) Fissare il collare (18) sulla forcella (fig. I).
Accertarsi che l’incavo sul collare sia
adatto alla guida del cestino.
5b) Inserire la copertura (4) sul tubo del
manubrio (fig. J).
5c) Inserire il tubo del manubrio nella forcella
(fig. K).
Rispettare l’altezza massima di
estrazione.
Avvitare il dado sul collare con l’attrezzo
(22) e spingere la copertura sul collare.
6. Montare la sella
6a) Inserire una copertura sulla sella con il tubo
(3) (fig. L).
6b) Inserire il tubo del manubrio nell’incavo sul
telaio (fig. M).
Rispettare l’altezza massima di
estrazione.
Avvitare il dado con l’attrezzo, per fissare la
sella e infine spingere la copertura sul dado.
17IT/CH
Page 16

7. Applicare la protezione per il
manubrio
Montare la protezione contro gli urti (1)
sul manubrio tramite la chiusura a strappo
(fig. N).
8. Set di adesivi
Attaccare gli adesivi del set 1 o set 2 (21)
sulle posizioni indicate (fig. O).
Impostazioni
Altezza manubrio
Rispettare l’altezza massima di
estrazione.
Tirare su la copertura. Svitare il collare finché
si possa alzare o abbassare il manubrio e
regolarlo all’altezza adeguata. Riavvitare il
collare e infine spingere la copertura sul collare
(fig. P).
Altezza sella
Avvertenza:
L’altezza della sella è posizionata
correttamente se il bambino può
toccare per terra con i piedi in modo
sicuro.
Rispettare l’altezza massima di
estrazione.
Tirare verso l’alto la copertura. Svitare il dado
fino a quando è possibile spostare la sella
verso l’alto o verso il basso. Regolare la sella
all’altezza adatta, riavvitare bene il dado e
spingere di nuovo la copertura verso il basso
(fig. Q).
Freno
Leva freno
La distanza della manopola dalla leva freno
deve essere di max. 60 mm. Regolare la
distanza della leva freno (20) dalla manopola
spostando la vite di arresto (fig. R).
Forza frenante
ATTENZIONE!
La forza frenante deve essere regolata
in modo tale, che la ruota posteriore
sia libera con la leva freno sbloccata e
bloccata con la leva freno tirata.
Premere la leva freno (S1) in direzione della
freccia. Girare il dado di regolazione e il
controdado (S2) verso sinistra, per limitare
la forza frenante, girarli verso destra per
aumentare la forza frenante (fig. S).
Cura, conservazione e
manutenzione
Dopo l’uso dell’articolo consigliamo di pulirlo a
fondo con acqua.
IMPORTANTE! Pulire solo con acqua, mai con
detergenti corrosivi. Asciugare poi con un panno
asciutto. Conservare sempre l‘articolo asciutto e
pulito in un locale temperato. Applicare ogni 3
mesi una goccia d’olio nella bussola di supporto
del manubrio e delle ruote.
Avvertenze per lo
smaltimento rifiuti
Si prega di smaltire la confezione e l’articolo nel
rispetto dell’ambiente e in maniera differenziata.
Smaltire l’articolo tramite le imprese di smaltimento a ciò adibiti o tramite l’amministrazione
comunale. Rispettare le normative vigenti.
18 IT/CH
Page 17

3 anni di garanzia
Questo prodotto è stato fabbricato con grande
attenzione e sottoposto a costanti controlli.
La garanzia è di tre anni dalla data d’acquisto.
Conservi lo scontrino fiscale.
La garanzia vale solo su difetti di materiale o di
fabbricazione e decade in caso di uso errato o
non conforme. Questa garanzia non costituisce
una limitazione ai Suoi diritti legali e in particolare al diritto di garanzia.
Per eventuali reclami vi preghiamo di contattare il seguente servizio hotline o mettervi
in comunicazione con noi via e-mail. I nostri
addetti all‘assistenza concorderanno con voi
come procedere nel modo più rapido possibile.
In qualsiasi caso vi consiglieremo per le vostre
esigenze specifiche.
Il periodo di garanzia non viene prolungato
a seguito di riparazioni effettuate in garanzia,
secondo il diritto di garanzia o per correntezza
commerciale. Lo stesso vale anche per le parti
sostituite o riparate. Le riparazioni dopo la
scadenza della garanzia verranno effettuate a
pagamento.
IAN: 78912
Assistenza Svizzera
Tel.: 0842 665566
(0,08 CHF/Min.,
telefonia mobile
max. 0,40 CHF/Min.)
E-Mail: deltasport@lidl.ch
19IT/CH
Page 18

Hartelijk gefeliciteerd! Met uw koop hebt u
voor een hoogwaardig product gekozen. Maak
u vertrouwd met het product voor de montage
en de eerste ingebruikname. Lees hiervoor de
navolgende montage- en de veiligheidsinstructies door. Gebruik het product uitsluitend zoals
beschreven en voor het aangegeven gebruiksdoeleinde. Bewaar deze gebruiksaanwijzing goed.
Overhandig alle documenten als u het product
aan derden geeft.
Omvang van de levering/
beschrijving van de onderdelen (afb. A)
(1) 1 x Botsbescherming
(2) 1 x Fietsbel
(3) 1 x Zadel met zadelbuis
(4) 2 x Afdekking
(5) 1 x Frame (met reeds gemonteerde
remkabels en stuur)
(6) 1 x Asschroef
(7) 2 x Onderlegring
(8) 2 x Afstandshouder
(9) 1 x Voorwiel
(10) 1 x Moer
(11) 1 x Spatbord voor
(12) 1 x Schroef
(13) 1 x Moer
(14) 1 x Vork
(15) 1 x T-verbindingsstuk
(16) 1 x Onderste verbindingsstuk
(17) 1 x Bovenste verbindingsstuk
(18) 1 x Klem
(19) 1 x Mandje
(20) 1 x Handrem
(21) 1 x Vel stickers (verdeeld in set 1 en set 2)
(22) 2 x Gereedschap
1 x Gebruiksaanwijzing
Technische gegevens
Maximaal gewicht van de gebruiker: 50 kg
Gewicht: ca. 3,3 kg
Zadelhoogte: ca. 36,5 - 46 cm
Stuurhoogte: ca. 56 - 60 cm
Afmetingen: ca. 86 x 43,5 x 56 - 60 cm
Correct gebruik
Dit artikel is alleen ontwikkeld voor privégebruik.
Het is geschikt voor gebruik als speelgoed door
een kind (3 - 6 jaar, lichaamslengte van 96 cm 120 cm) met een maximaal gewicht van 50 kg.
Het product mag niet aan het openbare wegverkeer deelnemen. Informeer u voor het gebruik
over de wettelijke bepalingen.
Veiligheidsinstructies
Gevaar voor letsel!
- Controleer het artikel voor ieder gebruik op
beschadigingen of slijtage. Controleer voor
ieder gebruik het vastzitten van alle verbin dingselementen en sluitonderdelen.
Controleer of alle schroeven en moeren hun
borgende werking behouden.
- Het product mag alleen in een feilloze
toestand worden gebruikt! Als u een defect
aan het product hebt geconstateerd mag dit,
totdat het defect is verholpen, niet meer wor den gebruikt!
- Schroeven moeten steeds zo stevig wor den vastgedraaid, dat ze niet door kinderen
losgedraaid kunnen worden. Anders bestaat
het risico, dat vastgeschroefde kleine onder delen door kinderen ingeslikt of ingeademd
kunnen worden. Verstikkingsgevaar!
- Door ondeskundige veranderingen of
reparaties aan het product ontstaan gevaren!
Verander het product niet!
- Koppel het product niet aan andere voertu igen, sporttoestellen en andere trekvoorzie ningen. Het product is niet ontwikkeld voor
hoge snelheden.
- Het kind dient tijdens het gebruik van het
product altijd door een volwassene in de
gaten gehouden te worden!
- Het kind dient tijdens het fietsen een helm
alsook stevig schoeisel te dragen! Wij raden
u bovendien aan, extra beschermers te gebru iken.
- Het product mag niet in het donker of onder
slechte weersomstandigheden worden ge bruikt!
20 NL
Page 19

- Het product mag niet op een hellende onder grond, in de buurt van trappen of open water
gebruikt worden! Vermijd gevaarlijke gebie den!
Veiligheidsinstructies voor het
gebruik
- Houd er alstublieft rekening mee, dat
kinderen hun eigen vaardigheden en
bepaalde gevaarlijke situaties vaak nog niet
goed kunnen inschatten! Door de speeldrang
van kinderen kunnen onvoorspelbare situaties
ontstaan, die buiten de verantwoordelijkheid
van de distributeur/leverancier vallen.
- Instrueer het kind in de juiste omgang met het
product en maak het attent op alle mogelijke
gevaren!
- Het kind moet het afremmen van het product
op ieder tijdstip veilig beheersen. Oefen het
afremmen zowel met de voeten alsook met de
rem voor het gebruik van het product.
- Op een gladde ondergrond bestaat het
gevaar uit te glijden! Houd er rekening mee,
dat bij het gebruik van het product altijd het
gevaar bestaat te vallen.
Montage
ATTENTIE!
De montage van het product dient altijd
door een volwassene uitgevoerd te worden!
ATTENTIE!
Houd kinderen tijdens de montage
uit de buurt van het product en de
verpakkingsmaterialen. Verstikkingsgevaar,
omdat kleine voorwerpen verslikt of ingeademd
kunnen worden alsook verstikkingsgevaar door
plastic zakken.
1. Spatbord monteren
Bevestig het spatbord aan de voorkant (11)
met schroef (12) en moer (13) aan de vork
(14) (afb. B).
Let erop, dat de sleuf aan de vork naar
het langere uiteinde van het spatbord
wijst.
2. Voorwiel monteren
Bevestig het voorwiel (9) met 2x
afstandsstuk (8), 2x onderlegschijf (7) en
asschroef (6) aan de vork (afb. C).
3. Frame monteren
3a) Plaats het T-verbindingsstuk (15) op de vork
(afb. D).
Let erop, dat de verdiepte uitsparing
naar het langere uiteinde van het
spatbord wijst.
3b) Plaats het onderste verbindingsstuk (16) op
de vork (afb. E).
Let erop, dat de geleiding in de
uitsparing van het T-verbindingsstuk
past.
3c) Plaats het frame (5) op de vork (afb. F).
Let erop, dat de uitsparing in de
aangegeven geleiding wordt geplaatst.
3d) Plaats het bovenste verbindingsstuk (17) op
de vork (afb. G).
4. Mandje monteren
Plaats het mandje (19) op de vork (afb. H).
5. Stuur monteren
5a) Plaats de klem (18) op de vork (afb. I).
Let erop, dat de uitsparing aan de klem
in de geleiding van het mandje past.
5b) Plaats de afdekking (4) op de stuurstang
(afb. J).
5c) Plaats de stuurstang in de vork (afb. K).
Neem de maximaal gekenmerkte
uittrekhoogte in acht!
Draai de moer aan de klem met het
gereedschap (22) vast en schuif de
afdekking over de klem.
21NL
Page 20

6. Zadel monteren
6a) Plaats een afdekking op het zadel met
zadelbuis (3) (afb. L).
6b) Plaats de zadelbuis in de uitsparing van het
frame (afb. M).
Neem de maximaal gekenmerkte
uittrekhoogte in acht!
Draai de moer met het gereedschap vast
om het zadel te fixeren en schuif vervolgens
de afdekking over de moer.
7. Stuurbescherming vastmaken
Monteer de botsbescherming (1) door
middel van de klittenband aan het stuur
(afb. N).
8. Stickersets
Plak het stickerset 1 of set 2 (21) op de
hiervoor bestemde plekken (afb. O).
Rem
Handrem
De afstand van het handvat tot de handrem
mag max. 60 mm bedragen. Stel de afstand
van de handrem (20) ten opzichte van het
handvat in door de positie van de instelschroef
te veranderen (afb. R).
Remkracht
ATTENTIE!
De remkracht moet zo worden
ingesteld, dat het achterwiel bij een niet
ingedrukte handrem vrij beweegt en bij
een aangetrokken handrem blokkeert.
Druk de remarm (S1) in de richting van de pijl.
Draai de instel- en contermoer (S2) naar links,
om de remkracht te verminderen, draai de instelen contermoer naar rechts, om de remkracht te
verhogen (afb. S).
Instellingen
Stuurhoogte
Houd rekening met de maximale
uittrekhoogte!
Schuif de afdekking omhoog. Maak de klem
los, totdat het stuur omhoog en omlaag kan
worden geschoven en stel het stuur op de juiste
hoogte in. Draai de klem weer vast en schuif de
afdekking vervolgens weer over de klem
(afb. P).
Zadelhoogte
Opmerking:
De zadelhoogte is correct ingesteld, als
het kind met de voeten goed aan de
grond kan komen.
Houd rekening met de maximale
uittrekhoogte!
Schuif de afdekking omhoog. Draai de moer los,
totdat het zadel omhoog en omlaag geschoven
kan worden. Stel het zadel op de juiste hoogte
in, draai de moer weer vast en schuif de afdekking vervolgens weer naar beneden (afb. Q).
Verzorging, opslag,
onderhoud
Na gebruik van het product raden wij u aan het
product grondig met water te reinigen.
BELANGRIJK! Alleen met water reinigen, nooit
met agressieve reinigingsmiddelen. Vervolgens
met een reinigingsdoekje afdrogen. Het product
altijd droog en schoon op kamertemperatuur
opbergen. Doe elke 3 maanden een druppeltje olie in de lagerbussen van het stuur en de
wielen.
Opmerkingen voor de
verwijdering
Verpakking en product alstublieft op een milieuvriendelijke manier verwijderen! Verwijder het
artikel via een geautoriseerd afvalverwijderingsbedrijf of via uw gemeentelijke afvalbrengstation. Neem de actueel geldende voorschriften in
acht.
22 NL
Page 21

3 jaar garantie
Het product is geproduceerd met grote zorg en
onder voortdurende controle. U ontvangt een
garantie van drie jaar op dit product, vanaf
de datum van aankoop. Bewaar alstublieft uw
aankoopbewijs.
De garantie geldt alleen voor materiaal- en fabricagefouten en vervalt bij foutief of oneigenlijk
gebruik. Uw wettelijke rechten, met name het
garantierecht, worden niet beïnvloed door deze
garantie.
In geval van reclamaties dient u zich aan de
beneden genoemde service-hotline te wenden of
zich per e-mail met ons in verbinding te zetten.
Onze servicemedewerkers zullen de verdere
handelswijze zo snel mogelijk met u afspreken.
Wij zullen u in ieder geval persoonlijk te woord
staan.
De garantieperiode wordt na eventuele reparaties en op basis van de garantie, wettelijke
garantie of coulance niet verlengd. Dit geldt ook
voor vervangen en gerepareerde delen.
Na afloop van de garantieperiode dienen eventuele reparaties te worden betaald.
IAN: 78912
Service Nederland
Tel.: 0900 0400223 (0,10 EUR/Min.)
E-Mail: deltasport@lidl.nl
23NL
Page 22

Congratulations! With your purchase you
have decided on a high-quality product. Get to
know the product before you start to use it.
Carefully read the following operating instructions. Use the product only as described and
only for the given areas of application. Keep these instructions safe. When passing the product
on to a third party, always make sure that the
documentation is included.
Contents/Parts description
(Fig. A)
(1) 1 x Protective handlebar cushion
(2) 1 x Bell
(3) 1 x Saddle and seatpost
(4) 2 x Covers
(5) 1 x Frame (with pre-assembled brake cable
and handlebar)
(6) 1 x Axle bolt
(7) 2 x Washers
(8) 2 x Spacers
(9) 1 x Front tyre
(10) 1 x Nut
(11) 1 x Front mudguard
(12) 1 x Screw
(13) 1 x Nut
(14) 1 x Fork
(15) 1 x T-connector
(16) 1 x Lower connector
(17) 1 x Top connector
(18) 1 x Clamp
(19) 1 x Basket
(20) 1 x Brake lever
(21) 1 x Sheet of stickers
(divided into set 1 and set 2)
(22) 2 x Tools
1 x Instructions for use
Technical Data
Max. user weight:50kg
Weight: approx. 3.3kg
Saddle height: approx. 36.5-46cm
Handlebar height: approx. 56-60cm
Dimensions: approx. 86 x 43.5 x 56 - 60cm
Intended Use
This product is intended for private use only. It
is suitable for use as a toy by children (approx.
3-6 years; body height 96cm-120cm) with a
maximum weight of 50kg. Not for use on public
roads. Please read up on legal regulations prior
to use.
Safety Instructions
Risk of injury!
- Check product for damage and wear before
each use. Check all connections and fasten ers are secure before each use. Check all
screws and nuts retain their self-locking
function.
- Only use this product in proper working
condition. If a product defect has been
discovered, discontinue use until the defect
has been corrected.
- Screws must always be tightened so that
children are unable to loosen them. Children
may otherwise swallow or inhale small re moved parts. Choking hazard!
- Do not modify this product. Faults caused by
incorrectly performed work to this product
may damage it and impair its operational
safety.
- Do not connect this product to other vehicles,
sporting goods or other moving objects.
This product is not designed for high speeds.
- Children must be supervised by an adult at all
times while using this product.
- Children must always wear a helmet and
solid footwear while using this product.
We recommend using suitable protective
equipment.
- Do not use this product in the dark or in poor
visibility.
- Do not use this product on steep terrain, near
stairs or open water. Avoid hazard areas.
24 GB
Page 23

Safety instructions for use
- Be aware that children are not always able
to correctly assess their own abilities and
certain dangerous situations. When distracted
by games they are playing, children can get
into hazardous situations beyond the
distributor’s/manufacturer’s responsibility.
- Instruct children on the proper use of this
product and alert them to potential risks.
- Children must be able to control braking at
all times. Practice braking by foot and by
brake before using the product.
- Smooth surfaces are slip hazards. Remember
that using this product always involves the risk
of collisions.
Assembly
CAUTION!
The product must always be assembled by
an adult.
CAUTION!
Keep children away from the product
and packing materials during assembly. Small
parts which could be swallowed or inhaled and
plastic bags may present choking hazards.
1. Install mudguard
Attach the front mudguard (11) to the fork
(14) with screw (12) and nut (13) (Fig. B).
Ensure the slot on the fork is facing the
longer side of the mudguard.
2. Install front wheel
Attach the front wheel (9) to the fork with
2x spacers (8), 2x washers (7) and the axle
screw (6) (Fig. C).
3. Install the frame
3a) Attach the T-connector (15) to the fork
(Fig. D).
Ensure the slot is facing the longer side
of the mudguard.
3b) Attach the lower connector (16) to the fork
(Fig. E).
Ensure it is slotted securely to the
T-connector.
3c) Attach the frame (5) to the fork (Fig. F).
Ensure it is slotted securely.
3d) Attach the top connector (17) to the fork
(Fig. G).
4. Install basket
Attach the basket (19) to the fork (Fig. H).
5. Install handlebar
5a) Attach the clamp (18) to the fork (Fig. I).
Ensure slotted securely.
5b) Attach a cover (4) to the handle tube (Fig. J).
5c) Insert the handle tube into the fork (Fig. K).
Please note the maximum extension
marking.
Use the tool (22) to tighten the nut on the
clamp and slide the cover over the clamp.
6. Install saddle
6a) Attach a cover to the saddle with seatpost
(3) (Fig. L).
6b) Insert the seatpost into the opening on the
frame (Fig. M).
Please note the maximum extension
marking.
Tighten the nut with the tool to secure the
saddle, then slide the cover over the nut.
7. Install protective handlebar
cushion
Attach the protective handlebar cushion
(1) to the handlebar with the hook and
loop fastener (Fig. N).
8. Sticker Set
Apply the sticker set 1 or set 2 (21) in the
specified locations (Fig. O).
25GB
Page 24

Settings
Handlebar height
Please note the maximum extension.
Slide up the cover. Loosen the clamp until you
are able to slide the handlebar up and down
and adjust the handlebar to the correct height.
Tighten the clamp, then slide the cover over the
clamp (Fig. P).
Saddle height
Note:
The seat is at the right height when the
child is able to safely touch the ground
with his/her feet.
Please note the maximum extension.
Slide up the cover. Loosen the nut until you are
able to slide the seat up and down and adjust
the seat to the correct height. Tighten the nut and
slide the cover back down (Fig. Q).
Brake
Brake handle
The maximum distance from the handle to the
brake handle is 60mm. Adjust the distance
between the brake handle (20) and the handle
by adjusting the locking screw (Fig. R).
Brake force
CAUTION!
The brake force must be adjusted so
that the rear wheel runs freely when
the brake lever is released and is
blocked when applied.
Press the brake arm (S1) in the direction of the
arrow. Turn the adjusting and locking nut (S2)
counter clockwise to reduce the braking force,
turn the adjusting and locking nut clockwise to
increase the braking force (Fig. S).
Care, storage, maintenance
We recommend thoroughly cleaning the product
with water after use.
IMPORTANT! Clean with water only, never with
harsh cleaning agents. Wipe dry with a cleaning
cloth. Always store the dry and clean product
in a temperate room. Apply a drop of oil to the
bearing bushings on the handlebar and wheels
every 3 months.
Disposal Instructions
Please dispose of packaging and product in
an environmentally friendly manner! Dispose of
product through an approved disposal facility
or through your local council. Please note the
recycling regulations in your area.
3 years warranty
The product was produced with great care and
under constant supervision. You receive a threeyear warranty for this product from the date of
purchase. Please retain your receipt.
The warranty applies only to material and
workmanship and does not apply to misuse or
improper handling. Your statutory rights, especially the warranty rights, are not affected by this
warranty.
With regard to complaints, please contact the
following service hotline or contact us by e-mail.
Our service employees will advise as to the
subsequent procedure as quickly as possible.
We will be personally available to discuss the
situation with you.
Any repairs under the warranty, statutory guarantees or through goodwill do not extend the
warranty period. This also applies to replaced
and repaired parts. Repairs after the warranty
are subject to a charge.
IAN: 78912
Service Great Britain
Tel.: 0871 5000 720 (£ 0.10/Min.)
E-Mail: deltasport@lidl.co.uk
26 GB
Page 25

27
Page 26

28
 Loading...