

Page 1

Page 2

345 Encinal Street
Santa Cruz, California 95060
800.544.4660
www.plantronics.com
Printed in the U.S.A. 69022-01 (11• 04)
© 1999– 2004 Plantronics, Inc. All rights
reserved. Plantronics, the logo design,
Plantronics and the logo design
combined, DuoSet, Polaris, Quick
Disconnect, the voice tube clear color
trade dress, and the shape trade dress are
trademarks or registered trademarks of
Plantronics, Inc.
Patents U.S. D394,437, and D403,327;
Finland 20183 and 20184; German M 98
02 622.4; GB Regd.Des.No. 2073246, and
GB Regd.Des.No.2073247; Sweden 64 176
and 64 177
Page 3

User Guide
DuoSet
®
Headset
Models H141/H141N/P141/P141N
Page 4
1
A B
C
D
E
F
G
H
I
J
K
Page 5
2
DIAGRAM
Page 6

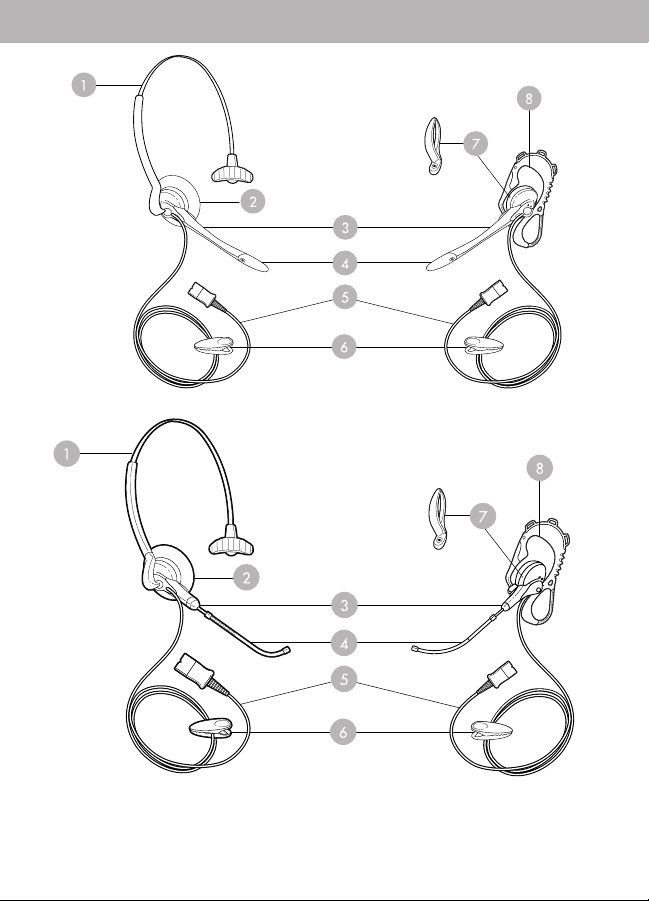
3
Adjustable Headband
(P/N 43298-01)
Ear Cushion Assembly
(P/N 43299-01)
Headset Assembly
Voice Boom
Cord
Clothing Clip
(P/N 43220-01)
Pivot Ball Ring
(P/N 45650-01)
Flexible Earloop
(P/N 45651-01)
3
6
5
1
2
4
7
Headset
(Both Configurations Shown)
8
DIAGRAM KEY
Page 7

16
Page 8

Page 9

Page 10

WEL
CO
ME
Thank you for selecting the DuoSet
®
Headset from Plantronics. This User
Guide will help you install your
DuoSet Headset and learn its basic
operation. The Amplifier is
described in a separate guide
which should be read following
familiarization with the headset.
Page 11

5
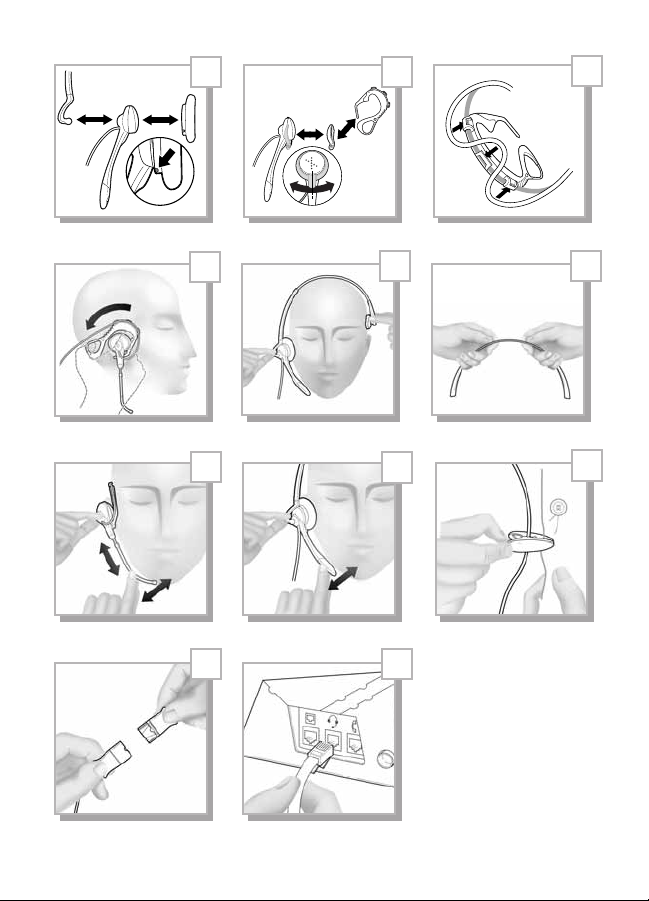
OVER-THE-EAR-CONFIGURATION
If already in place, unsnap the Headband from the rear of
the Headset Assembly .
If already in place, remove the Ear Cushion and
Rubber Ring from the Headset Assembly .
Press the Pivot Ball Ring onto the Headset Assembly
aligning the Pivot Ball Ring with the Voice Boom .
Insert the Earloop into either side of the Pivot Ball Ring ,
depending on whether the headset is to be worn over the left
or the right ear.
For added stability, press the Headset Cord under the
Cord Guides on the Earloop.
Expand the Earloop around your ear as shown and release.
Rotating the Pivot Ball Ring on the Headset Assembly
may provide a better fit.
B
A
A
B
C
D
Page 12

6
OVER-THE-HEAD CONFIGURATION
If already in place, remove the Pivot Ball Ring and
Earloop .
Press the Ear Cushion and Rubber Ring onto the Headset
Assembly . Align the notch in the ring with the Voice
Boom .
Snap the ball on the end of the Headband into the socket
on the rear of the Headset Assembly .
Place the Headband over the top of your head, with the
Ear Cushion resting gently against your ear and the T-Bar
positioned above the opposite ear.
If the headband is too tight or too loose, grasp the metal part
of headband and gently bend in the middle. The headband
length may be adjusted for fit and comfort.
A
F
B
A
E
Page 13

7
POSITIONING THE BOOM
If you have the Voice Tube version of the product, pull-out,
push-in, rotate, or swivel the Voice Boom into a position
near the corner of your mouth that best transmits your voice.
If you have the Noise-Canceling version of the product,
position the tip of the Voice Boom as near to the corner of
your mouth as you comfortably can.
G
H
Page 14

8
SECURING THE HEADSET
Attach the Clothing Clip at about chest level. The clip keeps
the headset properly seated and free of the weight of the
Headset Cable . This is particularly important in the Earloop
configuration.
I
Page 15

9
Using the Quick Disconnect™Module
Use the Quick Disconnect (QD) Module to place a call
on hold and move away from the phone without removing
the headset.
To put your call on hold, grasp the QD Module as shown and
pull straight apart.
To resume your conversation, reconnect the two halves.
Polaris
™
Headset Variations
Polaris Headset Variations, designed for use with phones with a
clearly marked headset jack, do not require an Amplifier. Insert
the Polaris connector directly into the headset jack. Consult your
telephone's instruction manual for more information.
For Non Polaris Versions
You are now ready to install the Amplifier.
CONNECTING THE HEADSET
J
K
Page 16

10
CALLERS CANNOT HEAR ME
For Voice Tube models, determine if the Voice Tube is clogged
or positioned improperly.
For Noise-Canceling models, make sure the microphone is
positioned properly at the corner of your mouth.
If you have a separate Amplifier, verify that the Speak Volume
is set properly.
If you have a separate Amplifier, verify that the Mute function
has not been activated.
I CANNOT HEAR CALLERS
Verify that the Quick Disconnect™ Module is connected.
Make sure the Headset Assembly is centered on your ear.
If you have a separate Amplifier, verify that it is installed
correctly.
If you have a separate Amplifier, verify that the Listen Volume
is set properly.
TROUBLESHOOTING
Page 17

11
EARLOOP IS UNSTABLE
Experiment with the insertion of the Earloop into the
Pivot Ball Ring.
Rotate the Pivot Ball Ring on the Headset Assembly.
If a comfortable fit cannot be achieved using the Earloop,
consider using the Headband.
PLANTRONICS HELP DESK
The Plantronics Help Desk is ready to assist you!
Dial 1-800-544-4660 Monday through Friday 8:00
A.M.
to 5:00
P.M. Pacific Standard Time or visit our website at
www.plantronics.com.
TROUBLESHOOTING
Page 18

12
For information on supplies and accessories, call
Plantronics at 1-800-544-4660 or visit our website at
www.plantronics.com. See also Diagram Key for
additional part numbers.
Cushions (2) (P/N 43937-01)
Replace when torn or soiled.
Earloops (3 Sizes) (P/N 43297-01)
Non-flexible earloops offer fit variations.
Extension Cord (P/N 40711-01)
Increase mobility in your work area; lets you stay on the
line while moving away from the amplifier.
Voice Tube (P/N 29960-01)
Replace if clogged or damaged.
SUPPLIES AND ACCESSORIES
Page 19

13
This equipment complies with Part 68 of the FCC Rules. The FCC Part 68 Label is
located on the bottom of the unit. This label contains the FCC Registration
Number and Ringer Equivalence Number (REN) for this equipment. If requested
this information must be provided to your telephone company.
The REN is useful to determine the quantity of devices you may connect to your
telephone line and still have all of those devices ring when your telephone number is called. In most, but not all areas, the sum of the RENs of all devices connected to one line should not exceed five (5.0). To be certain of the number of
devices you may connect to your line, as determined by the REN, you should
contact your local telephone company to determine the maximum REN for your
calling area.
Connection to the telephone network should be made by using standard modular
telephone jacks, type RJ11. The plug and/or jacks used must comply with FCC
Part 68 rules. If this telephone equipment causes harm to the telephone network,
the telephone company will notify you in advance that temporary discontinuance
of service may be required. But if advance notice isn’t practical, the telephone
company will notify the customer as soon as possible. Also, you will be advised
of your right to file a complaint with the FCC if you believe it is necessary.
The telephone company may make changes in its facilities, equipment, operations or procedures that could affect the proper functioning of your equipment.
If they do, you will be notified in advance in order for you to make necessary
modifications to maintain uninterrupted service.
NOTE: If your home has specially wired alarm equipment connected to the telephone line, be sure that installing the system does not disable your alarm equipment. If you have questions about what will disable your alarm equipment, contact your telephone company or a qualified installer.
FCC REGISTRATION INFORMATION
Page 20

WARRANTY AND SERVICE
LIMITED WARRANTY
for Plantronics Commercial Products Purchased in the US and Canada
• This warranty covers defects in materials and workmanship of Commercial
Products manufactured, sold or certified by Plantronics which were purchased
and used in the United States and Canada.
• This warranty lasts for two years from the date of purchase of the Products.
• This warranty extends to you only if you are the end user with the original
purchase receipt.
• We will, at our option, repair or replace the Products that do not conform to
the warranty. We may use functionally equivalent reconditioned/refurbished/
remanufactured/pre-owned or new Products or parts.
• To obtain service in the U.S. contact Plantronics at (800) 544-4660 and in
Canada call (800) 540-8363. If you need additional information, please
contact our service centers at the numbers provided.
• THIS IS PLANTRONICS’ COMPLETE WARRANTY FOR THE PRODUCTS.
• This warranty gives you specific legal rights, and you may also have other
rights which vary from state to state or province to province. Please contact
your dealer or our service center for the full details of our limited warranty,
including items not covered by this limited warranty.
14
Page 21

 Loading...