

Page 1

CS530A™
Wireless Headset System
User Guide
Page 2

ContentsContents
Welcome 3
What’s in the box 4
Base and headset basics 5
Accessories 6
Customise your headset 7
Left ear wearing 8
Connect your desk phone 9
Connect the power 9
Charge the headset 9
Connect and configure your desk phone 10
Desk phone (standard) 10
Check configuration and make a test call 11
Desk phone plus HL10 lifter (sold separately) 12
Desk phone plus EHS cable 14
Position your base 15
Your headset 16
Headset controls 16
Talk time 16
Low battery warning 17
Muting your headset during a call 17
Adjusting your headset volume 17
Out of range warning tones 17
Your base 18
Base phone button and switches 18
Subscription button 18
Wideband/Narrowband audio switch 19
Auto answer switch 19
Daily use 20
Place an outgoing call 20
Answer an incoming call 20
Conference up to three additional headsets 20
Troubleshooting 21
Headset 21
Desk phone 21
2
Page 3

Welcome
Congratulations on purchasing your new Plantronics product. This guide contains instructions for
setting up and using your CS530A Wireless Headset System.
Please refer to the separate safety instructions for important product safety information prior to
installation or use of the product.
The enclosed DECT Standard wireless product uses restricted wireless radio frequencies that vary
by country. DECT Standard devices are generally authorised for use in Europe, Australia and New
Zealand. Use of this DECT Standard product in unauthorised countries is a violation of law, may
disrupt telecommunications networks and devices and can subject you to fines and penalties by
regulatory agencies. For specific countries in which DECT Standard devices may be lawfully used,
please consult the following:
http://www.dect.org/content.aspx?id=28
3
Page 4
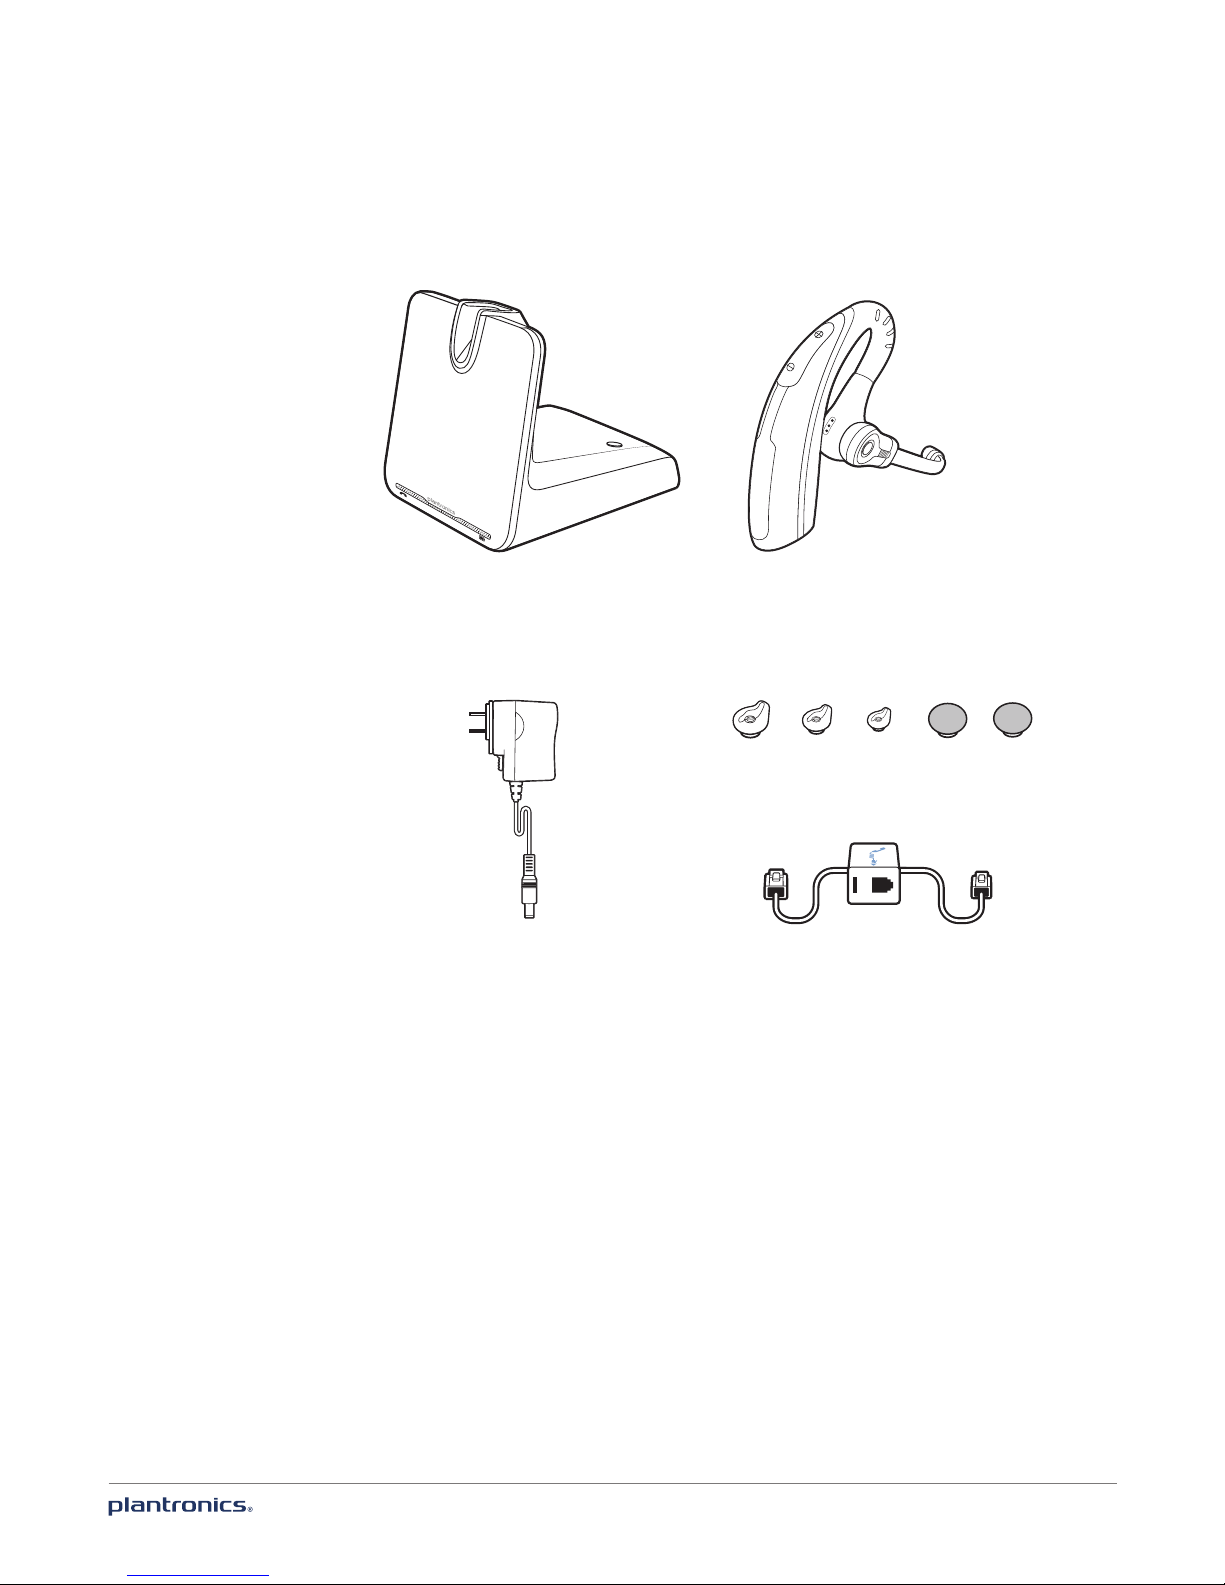
What’s in the box
Base
Power supply
Headset
Eartips
Telephone interface cable
4
Page 5
Base and headset basics
Base overview
FRONT
1
2
1 Call/mute LED
2 Power on/subscription LED
3 Charging LED
4 Subscription button
5 Narrowband/wideband audio switch
6 Power jack
7 Handset lifter/EHS cable jack
8 Telephone interface cable jack
9 Auto answer switch
10 Listening volume dial*
11 Speaking volume dial*
12 Configuration switch*
* For installation set up
3
4
10
BACK
BOTTOM
6
5
8 9
7
1211
Headset overview
1
2
1 Volume up button
2 Volume down button
3 Call control button
4 Indicator light
5 Microphone
5
3
4
5
Page 6
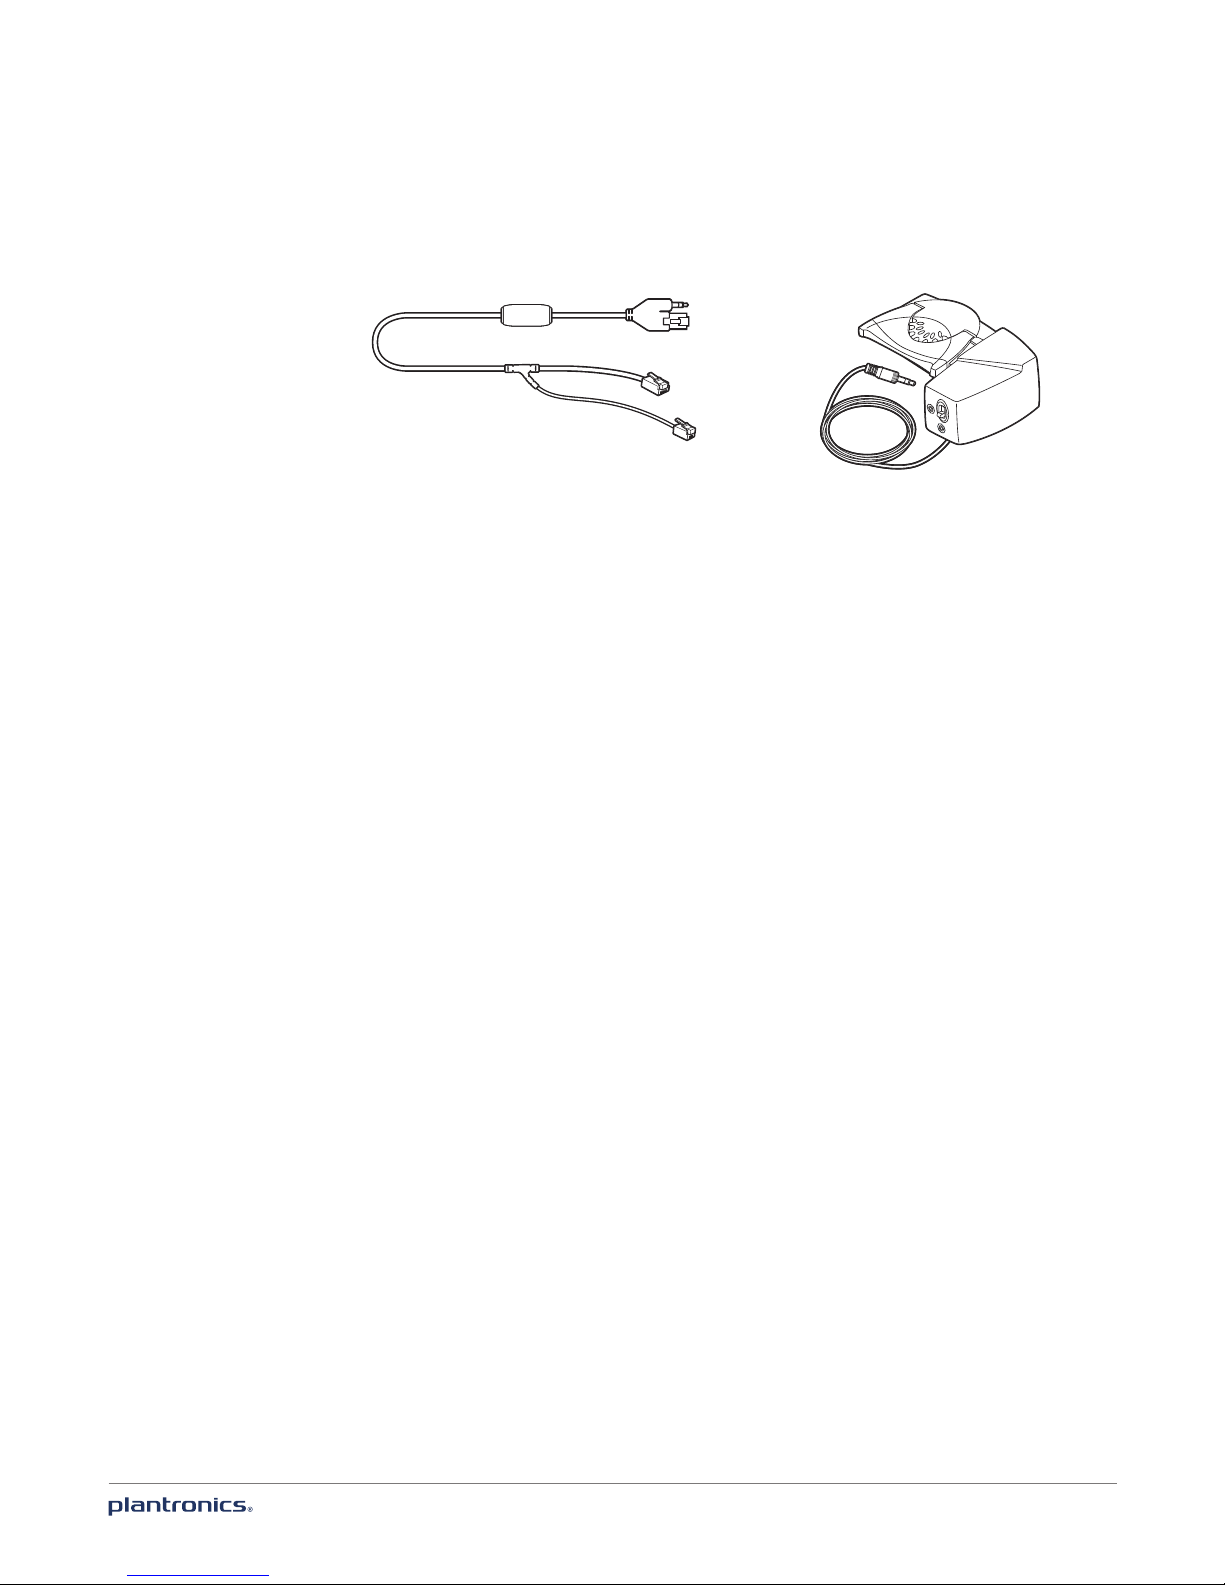
Accessories
1
2
1 Electronic Hookswitch Cable (EHS) Electronically takes your desk phone handset off hook.
Enables remote call answer/end with your headset.
2 HL10™ Lifter Automatically lifts handset and returns it to the cradle. Enables remote call
answer/end with your headset
6
Page 7
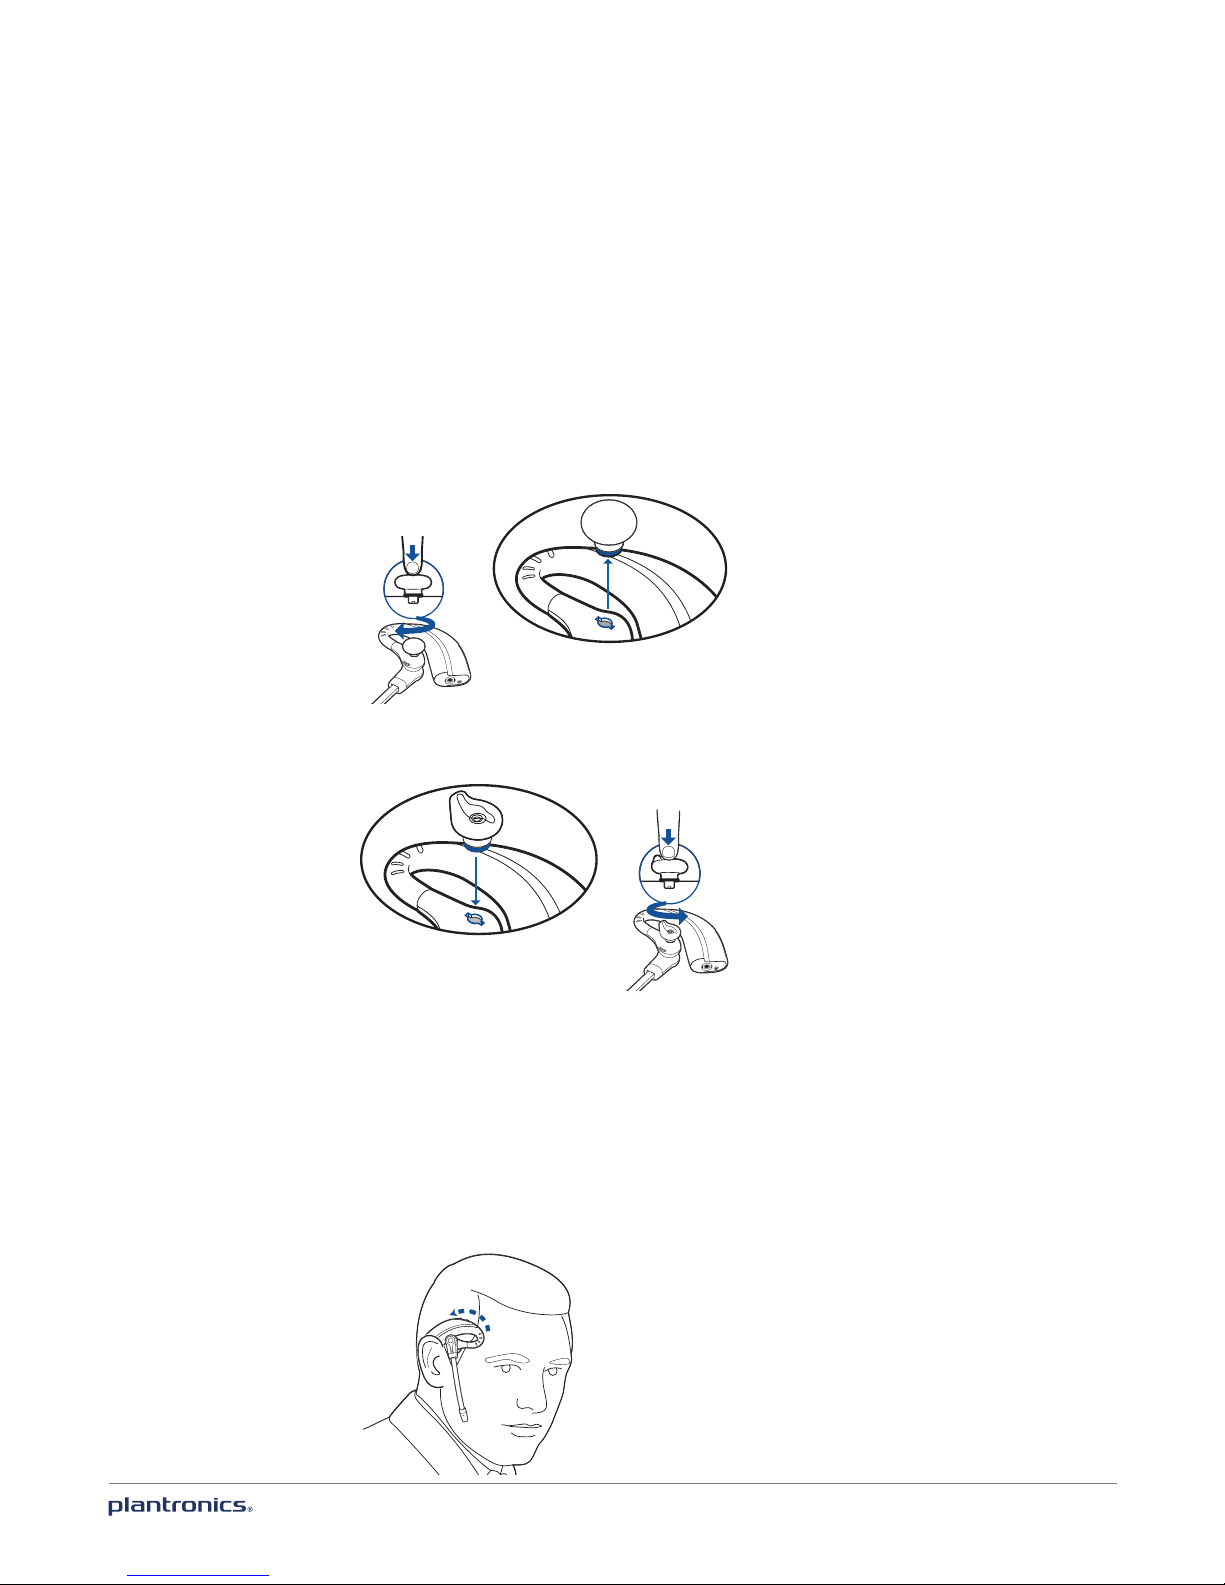
Customise your headset
Customise the headset by changing the ear tip, wearing it on the right or left
and optimising the position of the microphone
Change the ear tip
1 The headset comes with a pre-installed ear tip. To install a different ear tip see the following:
Remove the pre-installed ear tip by pushing in and turning the ear tip CLOCKwise, then pull
firmly.
2 Choose the size and style of ear tip that fits most comfortably. Align ear tip tabs with notches
in headset. Push in firmly and twist COUNTER clockwise.
NOTE When installing a gel tip ensure the raised part of the ear tip is pointed toward the curved
section of the headset as shown.
Position your headset
When you wear the headset, the microphone should rest as close to your cheek as possible
without touching. The microphone can be adjusted inward by the pivoting earpiece to optimize
the position of the headset.
1 Slide the headset over and behind your ear, then press gently toward your ear.
7
Page 8

2 Rotate the microphone boom until it is pointed toward your mouth.
Left ear wearing
1 The headset can be converted for wearing on left ear as follows:
2 Turn microphone boom around.
3 Rotate microphone boom down.
8
Page 9

Connect your desk phone
This section describes how to connect the base to your desk phone.
Connect the power
Plug one end of the power supply into the power jack on the back of the base and the other end
into a working power outlet. The Power On LED will be solid white.
Charge the headset
Place the headset in the charge cradle. The charging LED on the base will flash green when
charging and turn solid green when the headset is fully charged. Charge for at least 20 minutes
prior to the first use. A full charge takes 3 hours.
=
20
9
Page 10

Connect and configure your desk phone
There are three setup options for connecting the CS530A to your desk phone. Select one of the
following and continue.
• Desk phone (standard)
• Desk phone + HL10 lifter (sold separately)
• Desk phone + EHS cable (sold separately)
NOTE If you will be using a standard desk phone set up or a desk phone with an HL10 lifter, continue
below. If you will be using the desk phone with an EHS cable, refer to Desk phone plus EHS cable
section in this guide. For further installation information refer to the EHS Getting Started guide that
came with your EHS cable or at plantronics.com/accessories.
Desk phone (standard)
1 Connect one end of the telephone interface cable to the back of the base.
2 Disconnect the handset coil cord from the desk phone and re-connect it to the telephone
interface cable junction box.
3 Connect the remaining end of the telephone interface cable into the open handset port on the
desk phone.
NOTE Your desk phone handset will continue to work; it’s just hooked up differently.
USE
NOTE If your phone has a built-in headset port, you should only use the headset port if you will not
be using the HL10 lifter. In this configuration, you must press both the headset button on your phone
and the call control button on the headset to answer or end calls.
10
Page 11

Check configuration and make a test call
1 If your desk phone has a volume control set it to mid-range.
2 Look at the bottom panel of your base and make sure the default settings are correct. Set your
desk phone’s volume also.
listening volume dial ( ) = 2 and speaking volume dial ( ) = 2
configuration switch = A
desk phone volume = mid-range
3 Remove the handset from desk phone cradle.
4 While wearing your headset, press the call control button on the headset.
5 If you do not hear a dial tone, adjust the configuration switch (A-G) until you do.
NOTE For most phones, these factory default settings will sound the best.
6 Dial a test call from the desk phone. If needed, fine tune the volume with the headset volume
controls. You can also adjust the desk phone speaking and listening volumes on the bottom of
the base.
11
Page 12

Desk phone plus HL10 lifter (sold separately)
NOTE First follow the steps above for Desk phone (standard).
1 Firmly press the handset lifter power cord into the handset lifter jack.
USE
2 While wearing your headset, slide the handset lifter arm under the handset until the lifter base
touches the side of the phone.
3 Slide the lifter up to where it nearly touches the handset earpiece.
4 Press the call control button on your headset to activate the lifter.
5 If you hear a dial tone the lifter is set correctly and needs no adjustment.
6 Remove the protective strips from the 3 mounting tapes on the underside of the lifter.
7 Gently place the lifter on the desk phone in the pre-determined position.
8 Press firmly to adhere.
12
Page 13

If you do not hear a dial tone
1 If you do not hear a dial tone, raise the lifter height switch to the next highest position.
2 Repeat steps 2 through 5 above as necessary until you hear a dial tone.
3 When you hear a dial tone, secure the lifter as described in steps 6 though 8.
Additional parts (if required)
Use extender arm when the handset lifter needs additional stability lifting and returning
handset to cradle.
Extender arm
1 Slide extender arm onto lifter.
2 Stabilizers can be shifted left and right. Position stabilizers on outsides of handset to gently
grip the phone.
2
1
2
Ringer microphone
Use ringer microphone only when the telephone speaker is not located directly under the
handset.
1 Remove cover from ringer microphone jack on back of lifter.
2 Connect ringer microphone plug.
3 Place ringer microphone over phone speaker. Remove adhesive tape and attach.
1
2
3
13
Page 14

For Nortel phones only
Desk phone plus EHS cable
1 Connect the end of the EHS cable to the base and the other end to the desk phone as described
in the EHS Adapter Getting Started guide.
NOTE For further installation information refer to the EHS Getting Started guide that came with
your EHS cable or at plantronics.com/accessories.
14
Page 15

Position your base
The minimum recommended separation between your desk phone and the base is 15
centimetres.
The minimum recommended separation between the base and computer is 30 centimetres.
Incorrect position can cause noise and interference problems.
30cm
15cm
15
Page 16

Your headset
Now that you’ve adjusted your headset and connected your desk phone, read
this section to learn about the headset features, how to use the controls and
more.
Headset controls
1
2
1 Volume up
Increase the volume Press the volume button up +
2 Volume down/Mute button
Decrease the volume
Mute/unmute a call
3 Call control button
Place, answer, end a call Press the call control button
4 Headset LED Flashes white when in use
5 Microphone
3
4
Press the volume button down –
To mute/unmute the headset, press the volume button down – for 1.5
seconds
5
IMPORTANT For your safety, do not use headset at high volumes for extended periods of
time. Doing so can cause hearing loss. Always listen at moderate levels. For more
information on headsets and hearing visit: plantronics.com/healthandsafety.
Talk time
With a single full charge, the CS530A will provide up to 6 hours of talk time. Talk time will
be reduced when operating in wideband mode or if the headset is used consistently at a far
distance from the base.
16
Page 17

Low battery warning
If you are on a call and the headset battery is critically low, you will hear a repeated single
low tone every 15 seconds indicating that the battery is low. You should recharge the headset
immediately.
If you are not on a call and press the call control button, you will hear three low tones if the
battery is critically low. You should recharge the headset immediately.
Muting your headset during a call
To mute/unmute the call, press the volume button down – for 1.5 seconds.
When mute is activated, the Call/mute LED on the base will be solid red and you will hear three
high tones (you will still be able to hear the caller).
Adjusting your headset volume
Fine-tune your headset volume by pressing the volume [+] button to increase or the volume [–]
button to decrease.
Make set up volume adjustments for the desk phone with the base volume dials.
Out of range warning tones
If you are on a call and go out of the operating range, you will hear three low tones. You will
hear a single mid tone when you are back in range.
If you stay out of range, an active call will be suspended. The call will be re-established when
you walk back into range. If you remain out of range for more than 5 minutes, the system will
drop the call.
If you are not on a call and go out of the operating range and then press the call control button,
you will hear a single tone for the button press and three low tones for the failure to make a
link.
17
Page 18

Your base
Base phone button and switches
1 2 3
1 Subscription button
The headset and base that came in the box are subscribed (connected) to each other. However,
if you wish to use a new headset or need to restore subscription to your current headset, the
units can be subscribed to each other by the following two methods.
Automatic secure subscription
With your system idle, docking a headset will automatically subscribe it to the base, making
it the primary headset. The Power On/Subscription LED will flash white during subscription
process and become solid white when the new subscription is established.
Manual over-the-air subscription
1 With your system idle and your headset undocked, press and hold the subscription button on
the base for three seconds. The Power on/subscription light will flash white.
2 Press and hold the volume up button on the headset for three seconds until the headset LED
turns solid white. When the Power on/subscription LED on the base becomes solid white, the
headset and base are subscribed to one another.
NOTE If the subscription process times out after two minutes or if the subscription process fails,
the subscription LED on the base will go dark for three seconds and then re-illuminate steadily to
indicate power is applied to the base. If this occurs, try to re-subscribe the headset again.
Ending subscription
If the base is in subscription mode and you want to stop the base from searching for a headset,
press the subscription button again. The subscription LED on the base will go dark for three
seconds and then re-illuminate steadily to indicate power is applied to the base.
Power on/Subscription LED
Base Status Power On/Subscription LED
Primary headset subscription Flashes white
Primary headset subscribed to base Solid white
Conference call headset subscription Flashes white
Active conference call with guest headsets Flashes white
18
Page 19

2 Wideband/Narrowband audio switch
The CS530A has wideband audio, which allows speech to sound clearer and more natural. If
your desk phone is capable of wideband audio, set the Wideband-Narrowband audio switch to
yellow for wideband.
NOTE: Talk time will be reduced when operating in wideband mode.
Set the switch to black (narrowband) for longer headset battery life or to increase the number
of systems that can work in a small area.
3 Auto answer switch
Auto answer saves a button press to establish the radio link between headset and base. When
auto answer is set to black you must press the headset call button to answer an incoming call.
When auto answer is set to grey you can answer a call just by lifting headset from the base.
NOTE Auto answer/end capability requires the use of an EHS cable or HL10 lifter. Visit
plantronics.com/accessories for more information.
19
Page 20

Daily use
Place an outgoing call
1 Wearing your headset, press the headset call control button.
2 Remove the handset from the cradle. You will hear a dial tone.
NOTE This step will be automatic if you install a lifter or EHS cable accessory. For a complete list of
accessories, visit plantronics.com/accessories.
3 Dial the number using your desk phone.
4 To end the call, press the headset call control button and hang up the handset.
Answer an incoming call
1 Wearing your headset, press the headset call control button.
2 Remove the handset from the cradle speak to your caller.
NOTE This step will be automatic if you install a lifter or EHS cable accessory. For a complete list of
accessories, visit plantronics.com/accessories.
3 To end the call, press the headset call control button and hang up the handset.
Conference up to three additional headsets
You can conference up to three additional headsets to a call in progress.
Join a conference call
While in an active link between the primary headset and the base (on a call), place the guest
headset into the primary user’s charging cradle (this connects the headset to the base). The base
subscription LED will begin flashing. After a few moments, the primary user will hear a triple
tone in their headset indicating the guest headset wishes to join the call. Within ten seconds of
hearing the triple tone, press the primary headset’s call button to accept the guest headset. If
the process fails or times out because the button was not pressed within ten seconds the guest
subscription is terminated and the guest will hear an error tone in their headset.
To connect a guest headset that is of a different variety to the primary headset, press the base
subscription button while the base has an active link. Next, press the guest headset volume up
button until the indicator light turns on. The base subscription LED will begin flashing and the
primary user will hear a triple tone in their headset indicating the guest headset wishes to join
the call. Within ten seconds of hearing the triple tone, press the primary headset’s call button to
accept the guest headset. If the process fails or times out because the button was not pressed
within ten seconds the guest subscription is terminated and the guest will hear an error tone in
their headset.
NOTE Headsets in a conference maintain independent mute controls. The base only indicates the
primary user’s mute state.
Exit a conference call
Guests’ headsets can remain as guests through multiple calls. To remove a guest headset, press
the guest headset’s call button or dock the primary user’s headset in the charging cradle. A single
tone in the master headset will be heard as each guest leaves the call.
NOTE The user of the primary headset in a multiple headset conference scenario may hear
additional tones (triple tones) in their headset and see the subscription LED on the base flash as guest
headsets join the call. These additional tones and flashing LED indicate that the guest headset has a
different version of firmware to the primary headset, but can still be used for conferencing.
20
Page 21

Troubleshooting
Headset
Headset has to be charged
too often.
Talk time is not as long as
stated.
Talk time performance
is significantly degraded
even after a full recharge.
Switch the Wideband-Narrowband audio switch to narrowband (black).
Battery is wearing out. Call Plantronics at (800) 544-4660 for factory
replacement information or contact us at plantronics.com/support.
Desk phone
I can’t hear a dial tone in
the headset.
I hear static. Make sure there is at least 12 inches between your base and your computer,
The sound is distorted. Lower the Speaking volume dial or Listening volume dial on the base. For
Make sure your headset is charged.
Make sure your headset is subscribed to base. See Subscription button.
Press the call control button on your headset.
If using a lifter, make sure the lifter is lifting the handset high enough to
operate the hookswitch; set to a higher setting if necessary.
Adjust the configuration switch on the base until a dial tone is heard.
Fine tune the listening volume on the headset.
If the volume is still too low, adjust the Listening volume dial on the base.
and 6 inches between your base and your telephone. You may hear static as
your headset is going out of range; move closer to the base.
most telephones the correct setting is position 2.
If your desk phone has a volume control, lower until the distortion
disappears.
If the distortion is still present, adjust the headset volume control to lower
the headset speaker volume. If the distortion persists, lower the Listening
volume dial on the base.
Make sure there is at least 12 inches between your base and your computer,
and at least 6 inches between your base and your telephone.
I hear echo in the headset. Lower the Listening volume dial and Speaking volume dial on the base. For
People I talk to can hear a
buzz in the background.
The handset lifter is
installed but does not lift
the handset.
21
most telephones, the correct setting is position 2.
If the audio level is too low in this position, adjust the headset volume control
to increase the headset speaker volume.
If your speaking volume is too low for your listener in this position, adjust the
position of the headset to make sure the microphone is a finger’s width from
the corner of your mouth.
Adjust the Configuration switch. The most commonly used position is “A”.
Move the base further away from your phone.
If the base power supply is plugged into a power strip, plug it into the wall
directly.
Be sure the handset lifter power cord is firmly pushed into the handset lifter
jack on the base.
Page 22

Congratulations!
The product you have just purchased carries the TCO Certified Headsets 2 label. This means that your headset is designed and
manufactured according to some of the strictest performance and environmental criteria in the world. The manufacturer of this
headset has selected it to be certified to TCO Certified Headsets 2 as a sign of usability, high performance and reduced impact
Products certified to TCO Certified Headsets 2 are specifically designed for limiting the risk for hearing impairment. The headsets have acoustic limit
protection to protect the user from sudden “sound-spikes” caused by interference on the telephone lines.
Other features of TCO Certified Headsets 2:
Ergonomics
• Volume control, individual adjustment and adaptation, replaceable parts and quality durability.
Energy
• Low energy consumption on the charging station.
Emissions
• Low SAR value. Low electromagnetic fields surrounding the charger.
Ecology
• Product is designed for recycling. Manufacturer must have a certified environmental management system such as EMAS or ISO 14 001
• Restrictions on
o Chlorinated and brominated flame retardants and polymers
o Hazardous heavy metals such as cadmium, mercury, hexavalent chromium and lead.
All TCO labelled products are verified and certified by TCO Development, an independent third party labelling organization. For over 20 years,
TCO Development has been at the forefront of moving the design of IT equipment in a more user-friendly direction. Our criteria are developed in
collaboration with an international group of researchers, experts, users and manufacturers. Since the program’s inception, TCO labelled products have
grown in popularity and are now requested by users and IT-manufacturers all over the world.
Full specifications and lists of certified products can be found on our homepage – www.tcodevelopment.com
Avoid touching the contacts at the rear of the unit unnecessarily. If operation is interrupted by a static event, power-cycle the product to restore
normal functions.
on the natural environment.
NEED MORE HELP?
plantronics.com/support
Plantronics, Inc.
345 Encinal Street
Santa Cruz, CA 95060
United States
© 2013 Plantronics, Inc. All rights reserved. Plantronics, the logo design, CS530A, and HL10 are trademarks or registered trademarks of Plantronics, Inc.
All other trademarks are the property of their respective owners.
Patents US 6735453; 7633963; D603,372; BR DI69024340; China ZL 200930195205.X; EM 001151336-0002; IN 223634; Taiwan D135154
200977-07 (07.13)
Plantronics BV
South Point Building C
Scorpius 140
2132 LR Hoofddorp
Netherlands
 Loading...