

Page 1
User Guide
Bluetooth®Headset with Digitally Enhanced Sound for Clear Conversations
Page 2

TABLE OF CONTENTS
Package Contents & Features 3
Charging 4
Pairing 6
Powering 7
Adjusting Fit 8
Using Your Headset 9
Indicator Lights 11
Optional Accessories 12
Troubleshooting 13
Product Specifications 13
Technical Assistance 14
Warranty 14
Regulatory Notices 15
WELCOME
Thank you for purchasing a Plantronics headset.
Let us provide you with the best possible service and technical support. After you
review this user guide, if you need additional assistance or have any product
questions, please contact:
• www.plantronics.com/support
REGISTER YOUR PRODUCT ONLINE
Visit www.plantronics.com/productregistration to register your product online
so we can provide you with the best possible service and technical support.
Page 3
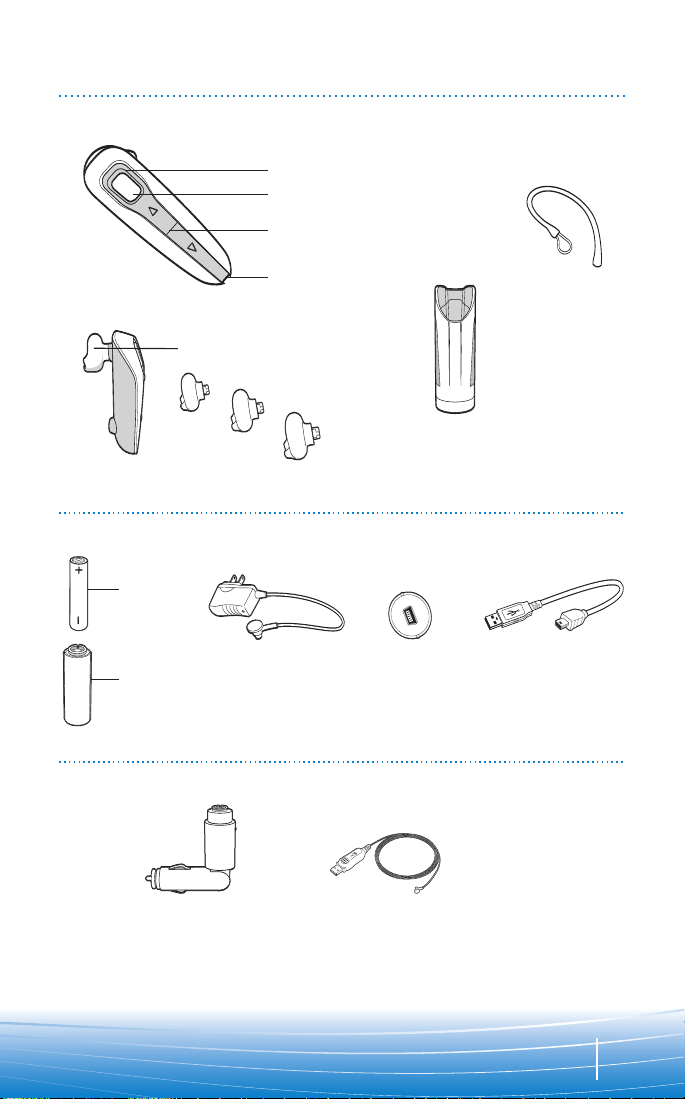
PACKAGE CONTENTS & FEATURES
PLANTRONICS DISCOVERYTM
655 AND 665
Vehicle
charging
adapter
USB charge cable
Mini USB-to-USB
charging cable
DISCOVERY 665 ACCESSORIES
AC charger
DISCOVERY 655 ACCESSORIES
Indicator light
Call control button (on/off)
Volume/mute buttons
Microphone
Soft gel ear tips
Ear loop
AAA
battery
small
medium
large
Headset
charging
pocket
AAA
battery
charger
Mini USB
charger
3
Page 4

CHARGING
PLANTRONICS DISCOVERY 655
Before using, you must first charge your headset.
1 hour = minimum charge 3 hours = full charge
Option A: Using the included AC charger
The indicator light flashes red while charging and
turns off when fully charged.
1. Plug the AC charger into the base of the charging
pocket and connect it to your power source.
2. Insert the headset into the charging pocket.
Option B: Using a AAA battery
One AAA battery recharges the headset to full capacity
up to three times.
1. Twist the bottom of the AAA battery charger
counter-clockwise and release the battery holder.
2. Insert the battery into the AAA battery holder.
3. Slide the battery holder back into the battery
charger and turn clockwise.
4. Snap battery charger to charging pocket.
Ensure that the indentation on the battery
charger connector aligns with the shirt clip on
the charging pocket.
5. Insert the headset into the charging pocket.
CAUTION
Only replace with a non-rechargeable AAA battery.
A
B
DISCONNECTING COMPONENTS
To separate components, grasp both the battery charger and the charging pocket
with the shirt clip facing you. Bend the components back and they will snap apart.
NOTE Do not twist the components apart.
4
Page 5
CHARGING
Mini USB
charger
12 Volts
12 Volts
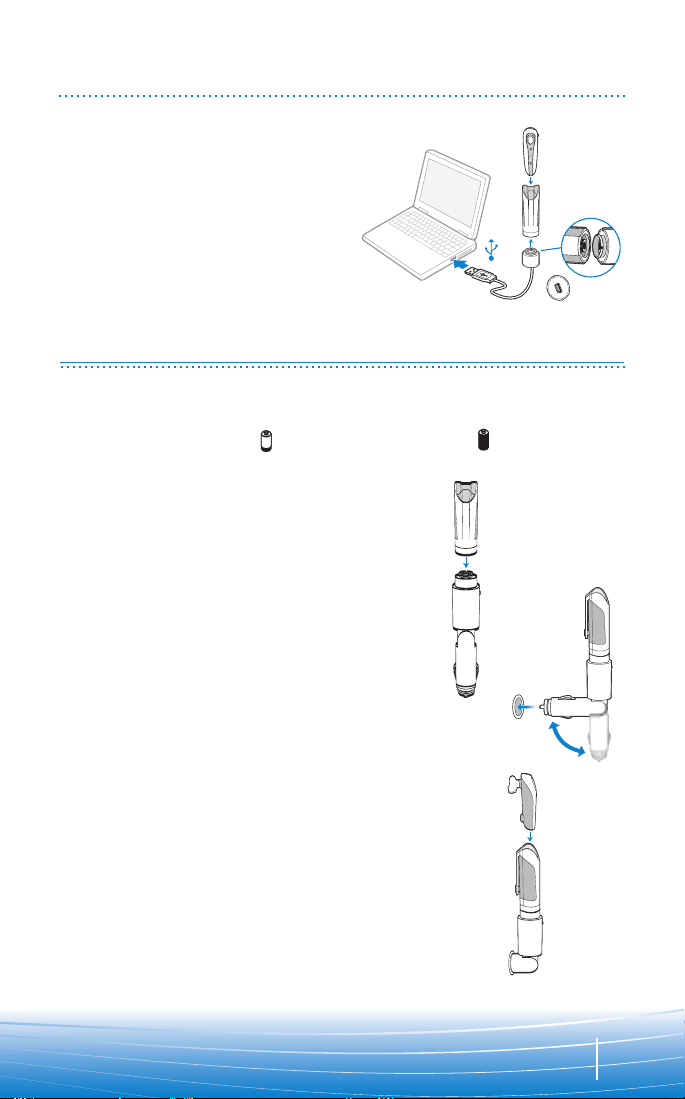
Option C: Using the Mini USB-to-USB
charging cable
1. Snap the mini USB charger to
the charging pocket.
2. Use the mini USB-to-USB charging
cable to connect the headset to your
computer or laptop.
3. Turn your computer or laptop on.
C
PLANTRONICS DISCOVERY 665
Before using, you must first charge your headset.
1 hour = minimum charge 3 hours = full charge
Option A: Using the vehicle charging adapter.
1. Snap the headset charging pocket onto the
vehicle charging adapter as shown.
2. Plug the vehicle charging adapter into vehicle
power socket and adjust the charging pocket
angle so that the headset is within easy reach.
CAUTION Select a mounting option that does
not interfere with car controls.
3. Dock the headset into the charging pocket
as shown. If power is available to the vehicle
power socket, the charging pocket will flash
when the headset is docked.
NOTE The headset charges only when power
is supplied to the vehicle power socket.
The green indicator on the vehicle charging
adapter lights when power is supplied.
1.
3.
2.
Option B: Using USB charging cable
1. Use the USB charging cable to connect the
headset charging pocket to your computer
or laptop.
2. Turn your computer or laptop on.
5
Page 6

PAIRING
1.
Before using your headset for the first time, you must pair it with your Bluetooth
phone or device. Be sure the headset is fully charged. For set up and pairing
instructions with Bluetooth devices other than mobile phones, please consult your
Bluetooth device user guide.
Begin with headset turned off.
1. Press and hold down the call
control button for 10 seconds
until the headset status indicator
begins to flash red then blue.
The headset is now in pairing
mode for the next 120 seconds.
2. While the headset is flashing,
use the phone menu to search
for
“6xxPlantronics”.
3. When prompted for a passkey,
enter 0000. Headset will flash
blue when paired successfully.
2.
3.
Bluetooth devices and select
6
Page 7

POWERING
1. Turn on the headset by pressing
and holding the call control button
until the indicator light glows blue.
If you are wearing the headset, you
will hear a beep when the power
turns on. The indicator light will
flash blue every 5 seconds when
the power is on.
CHARGE LEVEL INDICATION
When the headset is turned on, the
indicator light will briefly show the
headset charge level.
3 red flashes = greater than 2/3 battery charge
2 red flashes = 1/3 to 2/3 battery charge
1 red flash = less than 1/3 battery charge
2. Turn off the headset by pressing
the call control button for 6-8
seconds until the indicator light
glows red or until you hear the
beep. The indicator light remains
unlit when the power is off.
7
Page 8

R
L
Right Ear
Left Ear
NNN
ADJUSTING FIT
1.
2.
The Plantronics Discovery 655 and
Discovery 665 headsets come with
three soft gel ear tips and an optional
ear loop.
1. The medium-sized ear tip is pre-
installed and aligned for wearing
on the right ear (R).
2. For left ear wearing, twist the ear
tip counter clockwise.
3. Place the headset into your ear and
check to see that it fits comfortably.
If the headset is either too tight
or too loose, remove the medium-
3.
4.
sized ear tip from the headset by
turning the ear tip to the center
or neutral position.
4. In the neutral position, the ear tip
can easily be removed by pulling
the ear tip directly away from the
headset.
Next, select the ear tip size that
fits most comfortably in your ear.
Hold the ear tip with the elongated
edge pointing down toward the
neutral position and then push
the ear tip onto the headset.
USING THE OPTIONAL EAR LOOP
The ear loop may be attached to the
headset to improve stability.
1. Remove the ear tip from the
headset by turning the ear tip to
the center or neutral position and
pulling the ear tip away from the
headset.
2. Attach the ear loop between the
ear tip and the headset.
3. Replace the ear tip.
8
Page 9

USING YOUR HEADSET
ANSWERING/
ENDING/MAKING
CALLS
To answer or end a call, briefly press
the call control button.
To make a call, enter number on your
phone, press send, and the call is
automatically transferred to the
headset; no need to press the call
control button.
NOTE When answering a call, wait
until you hear a ring from the headset
itself (not the ring from your phone),
before pressing the call control button.
AUTO ANSWER
If the headset is placed in the carrying
pocket when a call is received, the
charging pocket will vibrate (Discovery
655) or light up (Discovery 665)
when connected to power. Removing
the headset from the pocket will
automatically answer the call.
Returning the headset to the
charging pocket will end the call.
ADJUSTING
VOLUME
To increase listening volume, press
the upper end (+) of the volume/mute
button. To decrease listening volume,
press the lower end (-).
CAUTION Do not use
headphones/headsets at high
volumes for an extended period of
time. Doing so can cause hearing
loss. Always listen at moderate levels.
MUTE A CALL
To turn the mute on while on a call,
press both sides of the volume/mute
button simultaneously until you hear
a beep.
To turn the mute off, press both
buttons again.
9
Page 10

USING YOUR HEADSET
ADDITIONAL FEATURES
Redialing Last Number
To activate last number redial, double
press the call control button. You will
hear a high tone after each double
key press.
Power Saving Mode
Power saving mode temporarily
disables the digital signal processing
(DSP) feature of the Discovery 655 and
665 headsets to provide a longer talktime. To enable power saving mode,
press both the volume up and down
keys at the same time before you
make a call. To re-enable DSP, press
both the volume up and down keys at
the same time. Power saving mode
cannot be turned on while engaged in
a call.
NOTE After you turn off the headset,
DSP will be re-enabled the next time
you turn it on.
Using Voice Dialing
With the headset on, press and hold
the call control button for 2 seconds
to activate voice dialing.
NOTE To use voice activated dialing,
the voice dialing feature must be
enabled on your phone. See your
Bluetooth phone manual for
instructions.
Rejecting a Call
When receiving an incoming call,
press and hold the call control button
for 8 seconds to reject the call.
Switching a Call from Phone to Headset
To switch an active call from your
phone to your headset, briefly press
the call control button for 2 seconds.
Switching a Call from Headset to Phone
To switch an active call from your
headset to your phone, press and hold
the call control button for 2 seconds.
MOVING OUT OF RANGE
As the headset moves more than 33 feet (10 meters) away from the Bluetooth device
or encounters interference:
• Audio quality will degrade
• A beep will be heard in the headset when the connection drops between headset
and Bluetooth device
• When out of range, only the power off function will operate
If any of the above occur, move closer to your
Bluetooth device.
10
Page 11

INDICATOR LIGHTS
Headset Status Headset Indicator Light
Powering on Blue light appears and flashes every
Power on Blue light flashes every 5 seconds.
Powering off Red light appears and goes off.
Power off —
Charging battery Red light flashes every 5 seconds.
Battery fully charged Red light goes off.
Low battery Red light flashes every second.
Pairing mode Red then blue light flashes for 120 seconds
Missed call Purple light flashes every 5 seconds.
Ringing Purple light flashes rapidly.
Headset in pocket (Discovery 655) Headset vibrates to indicate incoming call.
Headset in pocket and connected Headset and charging pocket light up to
to power source (Discovery 665)* indicate incoming call.
On Line Indicator (OLI) Blue light flashes every 10 seconds.
6 seconds
Press any button to cancel.
*If no power source is connected, charging pocket will not light up.
11
Page 12

OPTIONAL ACCESSORIES
73646-01
Vehicle Charging
Adapter
69519-01 USB
Headset Charger
73647-01
Soft Gel Ear Tips
and Ear Loop
73651-01
Mini USB
Charger
73649-01
AAA Battery
Charger
73650-01
4-pack Charge
Adapter Kit
MOTOROLA
NOKIA
PALM
SONY
AVAILABLE FOR PURCHASE
To order, please contact your Plantronics supplier or go to www.plantronics.com.
12
Page 13

TROUBLESHOOTING
PROBLEM SOLUTION
My headset does not work
with my phone.
Headset was not in pairing mode when mobile
phone menu selections were made. See page 6
“Pairing”.
Incorrect menu selections were made on your
mobile phone. See page 6 “Pairing”.
I did not enter my passkey.
Callers cannot hear me.
I cannot hear caller/dialing
tone.
Your phone did not locate the headset.
Repeat the pairing process on page 6.
Incorrect menu selections were made on your
mobile phone. Repeat the pairing process on page 6.
Mute is turned on. Press both sides of the
volume/mute button simultaneously.
The headset is not turned on. Press the call control
button for approximately 10 seconds until you hear
a beep or see the indicator light glow blue to turn
headset on.
Your headset is out of range. Move the headset
closer to the phone or
Your headset battery is drained. Charge your battery
using the AC charger, AAA battery, mini USB
charger, or vehicle charging adapter above.
See page 4 “Charging”.
The listening volume is too low. Press the volume/
mute button to increase the sound heard in the
headset.
Bluetooth device.
PRODUCT SPECIFICATIONS
Talk time* Up to 3.5 hours
Standby time* Approximately 80 hours
Charge time 3 hours
Range Bluetooth standard 33 feet (10 meters)
Power requirements 5V DC – 300 mA
Battery type Lithium Ion
Version Bluetooth 2.0
Supports Bluetooth Hands-Free and Headset Profiles.
*Performance may vary by device.
13
Page 14

TECHNICAL ASSISTANCE
Visit our Web site at www.plantronics.com/support for technical support including
frequently asked questions, compatibility and accessibility information. The For
Technical Assistance contact Plantronics:
In Australia: 1-800-793-150; or 1-800-428-526
In New Zealand: 00-800-5444-6600
WARRANTY
LIMITED WARRANTY
• This warranty covers defects in materials and workmanship of products
manufactured, sold or certified by Plantronics which were purchased and used
in Australia and New Zealand.
• The warranty lasts for one year from the date of purchase of the products.
• This warranty extends to you only if you are the end user with the original
purchase receipt.
• We will at our option, repair or replace the products that do not conform to
the warranty. We may use functionally equivalent reconditioned/refurbished/
remanufactured/pre-owned or new products or parts.
• To obtain warranty service contact Plantronics:
In Australia: 1-800-793-150, or 1-800-428-526.
In New Zealand: 00-800-5444-6600.
• THIS IS PLANTRONICS’ COMPLETE WARRANTY FOR THE PRODUCTS.
• This warranty gives you specific legal rights, and you may also have other rights
that vary from state to state. Please contact your dealer or our service center for
the full details of our limited warranty, including items not covered by this
limit
ed warranty.
14
Page 15

REGULATORY NOTICES
FCC REQUIREMENTS PART 15
This device complies with Part 15 of the FCC Rules. Operation is subject to the
following two conditions:
1. This device may not cause harmful interference, and
2. This device must accept any interference received, including interference that
may cause undesired operation.
This equipment has been tested and found to comply with the limits for a Class B
digital device, pursuant to Part 15 of the FCC Rules. These limits are designed to
provide reasonable protection against harmful interference in a residential
installation. This equipment generates, uses, and can radiate radio frequency
energy and, if not installed and used in accordance with the instructions, may cause
harmful interference to radio communications.
However, there is no guarantee that interference will not occur in a particular
installation. If this equipment does cause harmful interference to radio or television
reception which can be determined by turning the radio or television off and on, the
user is encouraged to try to correct interference by one or more of the following
measures:
1. Reorient or relocate the receiving antenna.
2. Increase the separation between the equipment and receiver.
3. Connect the equipment into an outlet on another circuit.
4. Consult the dealer or an experienced radio/TV technician for help.
EXPOSURE TO RADIO FREQUENCY
RADIATION
This device and its antenna must not be co-located or operated in conjunction with
any other antenna or transmitter. To comply with FCC RF exposure requirements,
only use supplied antenna. Any unauthorized modification to the antenna or device
could void the user’s authority to operate this device.
15
Page 16

Plantronics, Inc.
345 Encinal Street
Santa Cruz, CA 95060 USA
Tel: (800) 544-4660
www.plantronics.com
© 2006 Plantronics, Inc. All rights reserved. Plantronics, the logo design, Plantronics Discovery and Sound
Innovation are trademarks or registered trademarks of Plantronics, Inc. The Bluetooth®word mark and logos
are owned by the
trademarks are the property of their respective owners.
Patents U.S. 5,210,791; and EM 392600-0001; Patents Pending.
Printed in U.S.A. 72448-06 (5/06)
Bluetooth SIG, Inc. and any use of such marks by Plantronics, Inc. is under license. All other
N10687
Z109
 Loading...