

Page 1

Voyager 5200 UC
Wireless Headset System
User Guide
Page 2

Contents
Headset Overview 3
Charge case overview 4
Charge case to PC or USB wall charger 4
Charge your Headset 5
Check Battery Level 5
Low battery warnings 6
Use charge case 7
Fit 8
8
8
Connect and pair 9
Connect to PC 9
Configure for media 9
Pair to mobile device 9
NFC pairing 10
Re-Pair the USB adapter 10
The Basics 11
Make/Take/End Calls 11
Adjust the volume 11
Voice assistant 12
Enable Amazon Alexa 12
Mute 12
Pause or restart streaming audio 12
Use sensors 12
Advanced features 14
Enable Tile 14
Voice alerts list 14
Adjust voice alert volume 14
Load software 15
Firmware Update 16
Headset recovery 16
Troubleshooting 17
What's in the box 18
Accessories 19
Specifications 20
Support 21
2
Page 3
Siri, Google Now,
Alexa*
NFC
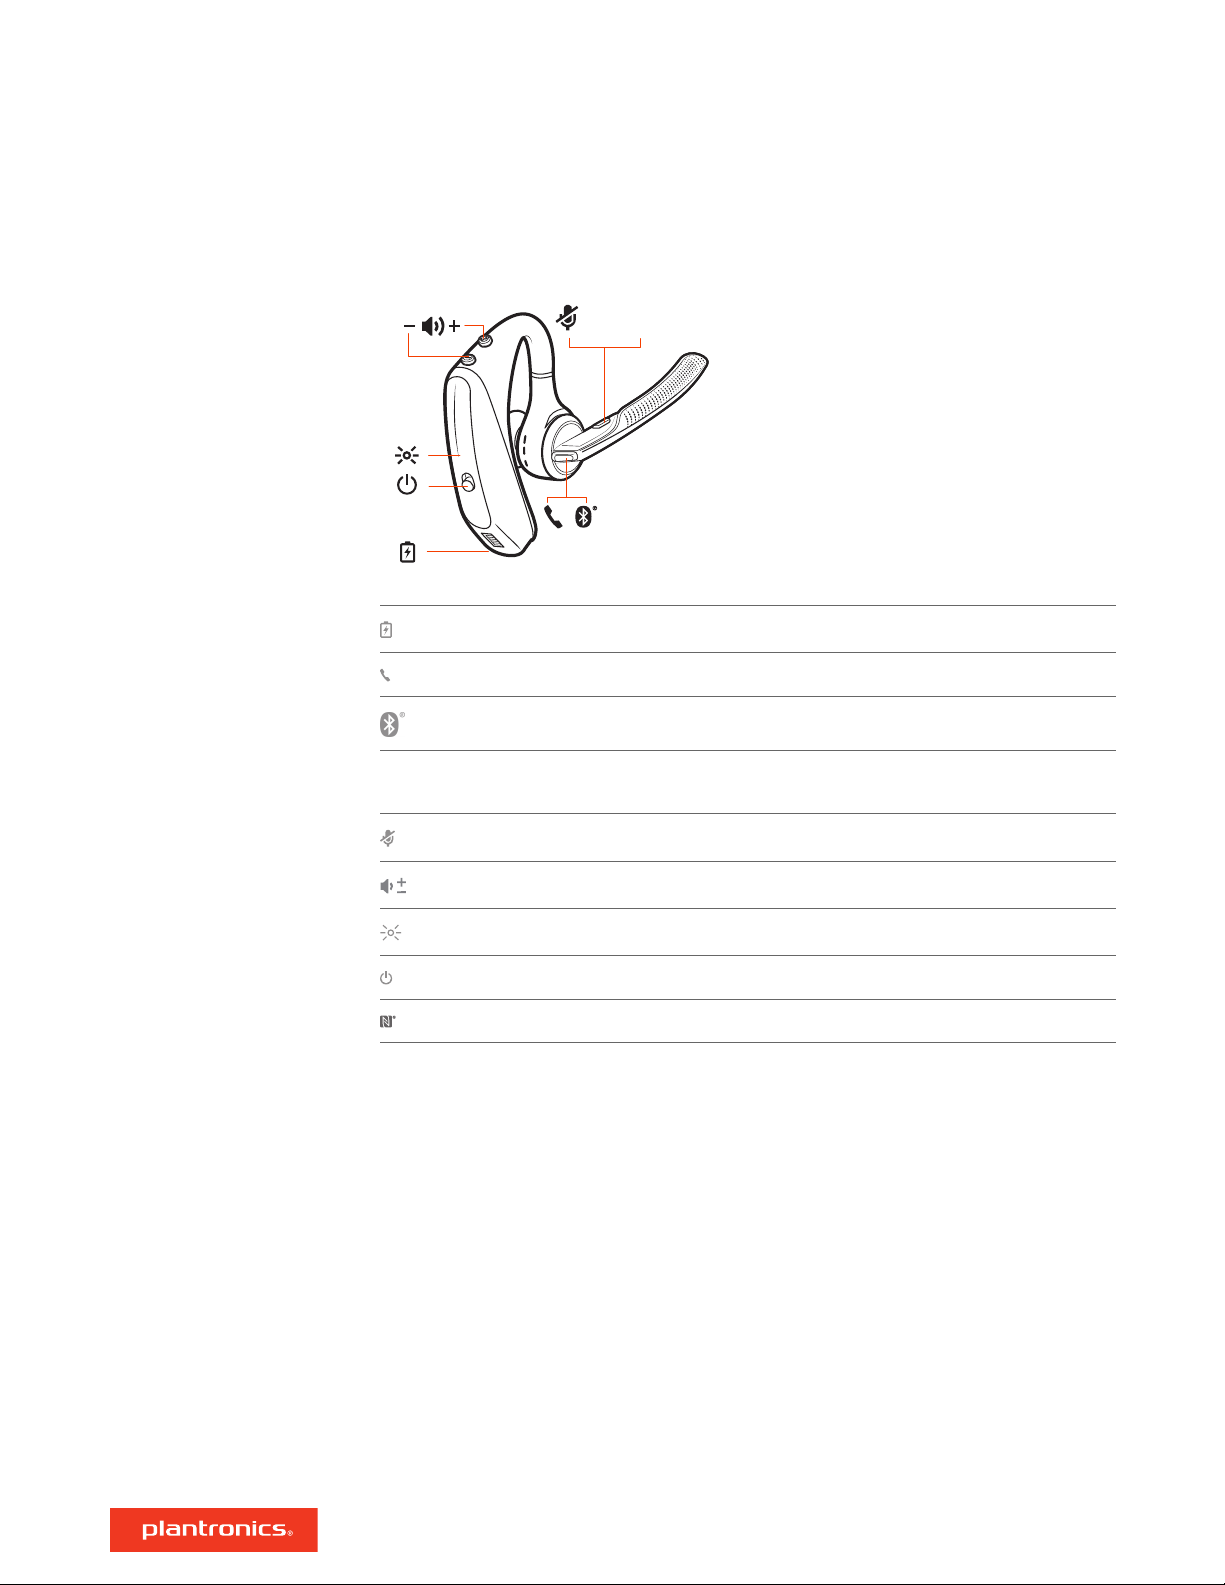
Headset Overview
Charge port
Call button
Siri, Google Now,
Alexa*
Bluetooth button (use when pairing a device)
Virtual Personal Assistant (VPA) button *Alexa requires Plantronics Hub app
Mute button
Volume buttons
Indicator light
Power button
Near Field Communication
3
Page 4
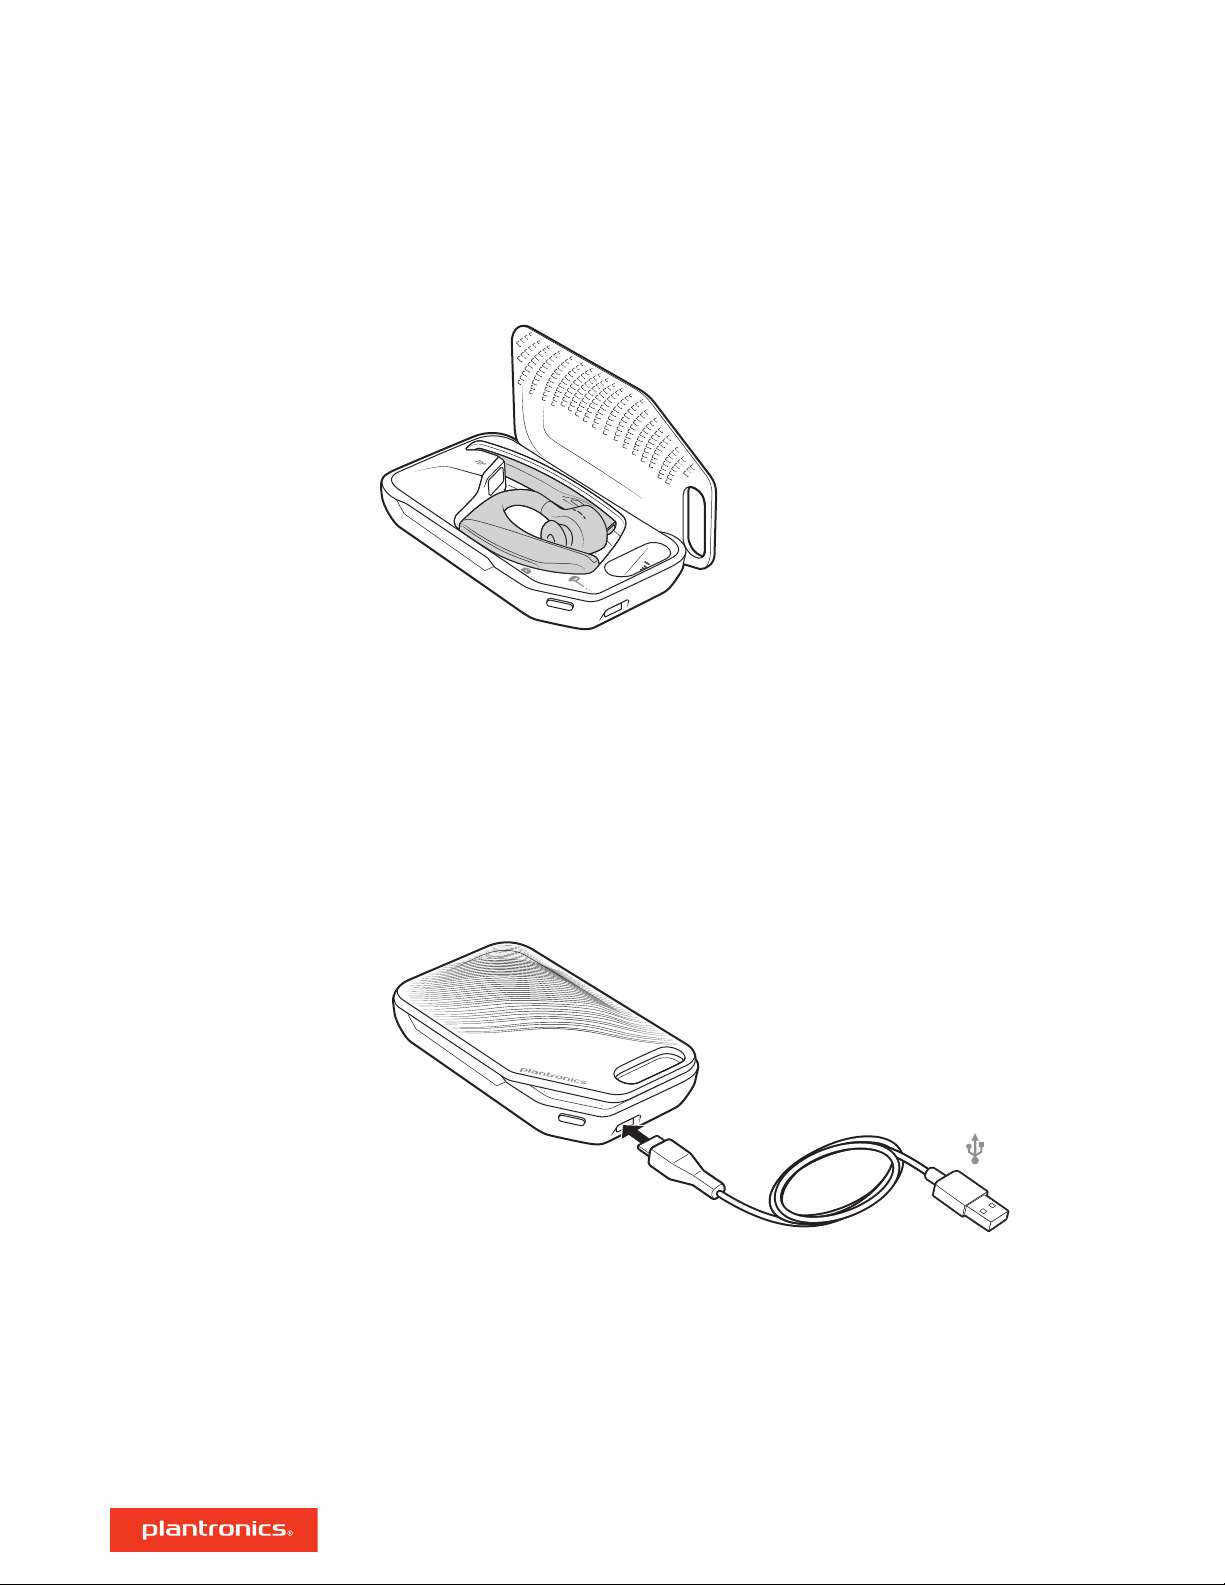
Charge case overview
The USB Bluetooth adapter is stored inside of the charge case.
IMPORTANT The charge case is placed in deep sleep mode after manufacturing to save power and
protect the battery. To wake-up the charge case, plug it into a power source for a minimum of 1
minute. The LEDs flash when charging.
Charge case to PC or USB
wall charger
Charge the case for 90 minutes before docking your headset. Once the case is fully charged, it
can recharge your headset twice while on the go before needing connection to a charge cable
providing up to 14 hours of talk time.
4
Page 5
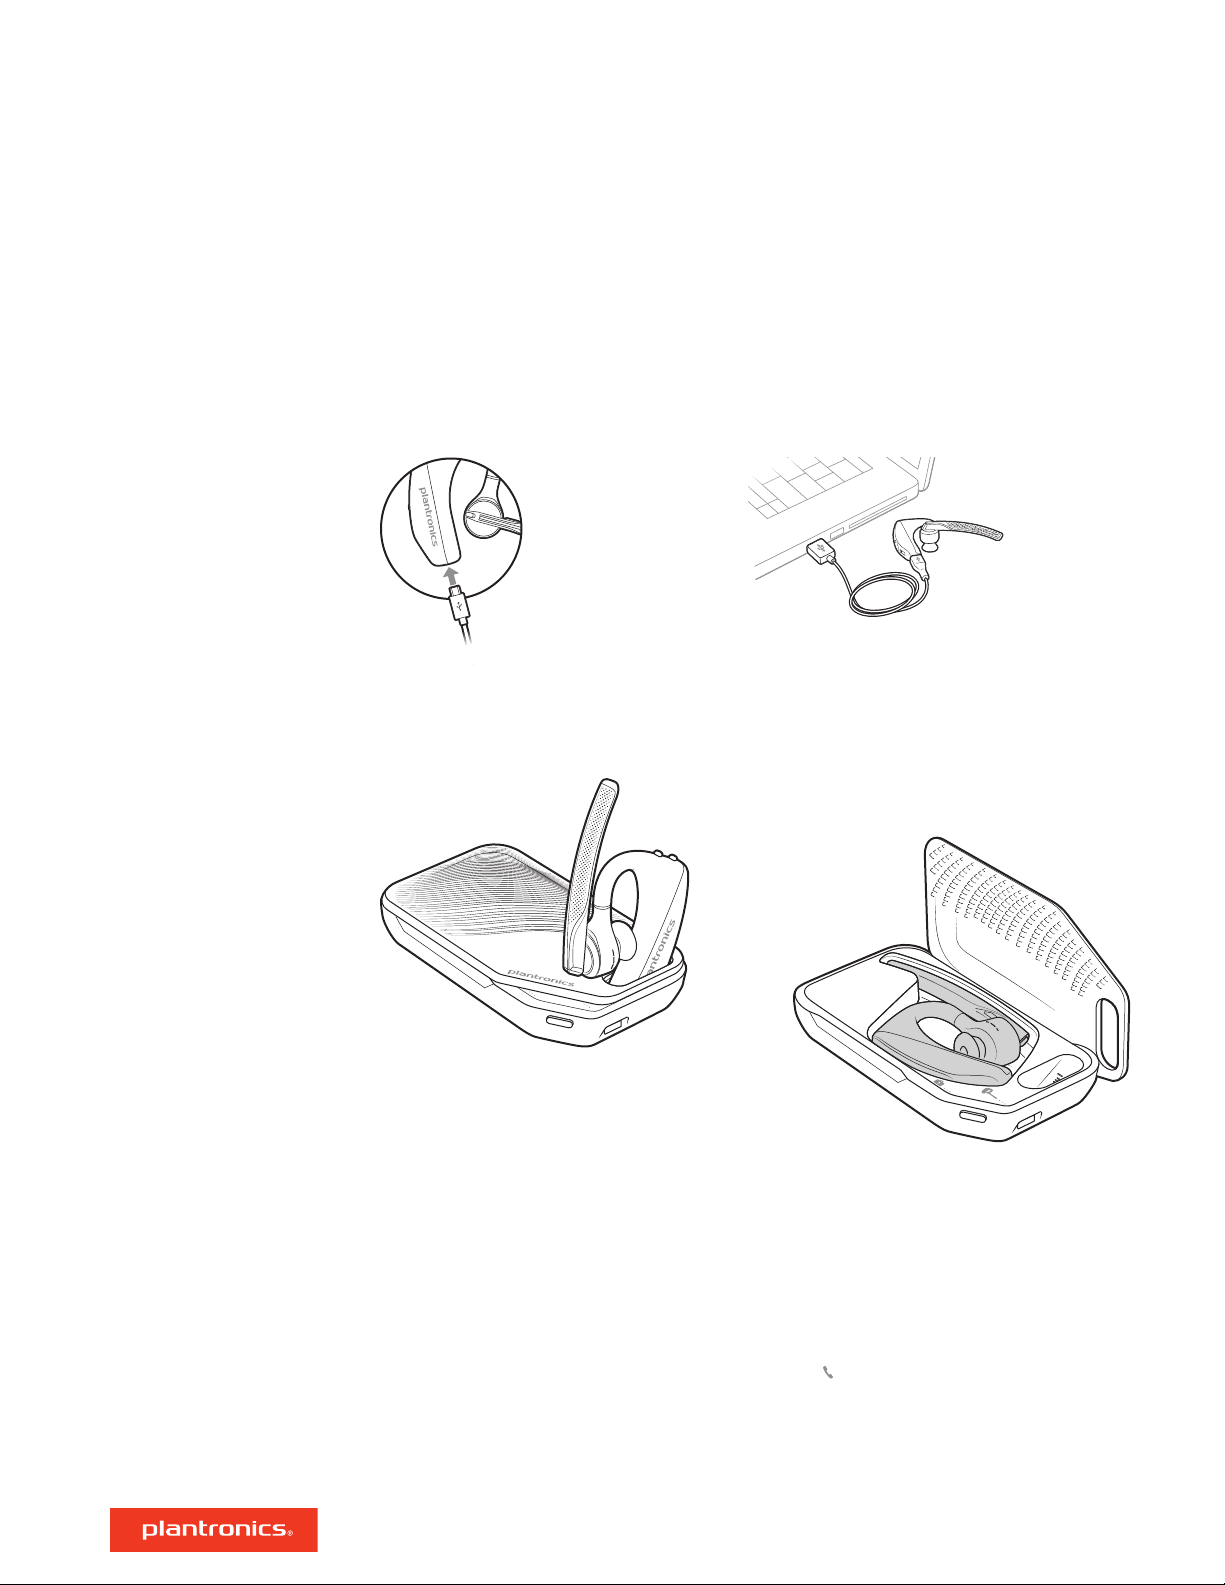
Charge your Headset
Your new headset has enough power to pair and make a few calls directly out of the box. It takes
approximately 90 minutes to fully charge the headset; the indicator light turns off once charging is
complete.
A micro USB cable is supplied to allow you to charge the headset with an AC wall charger (not
included) or through a PC's USB port. The PC must be powered on to charge via USB 2.0 or higher.
Or you can use the charge case.
NOTE Always charge at near room temperatures; never charge battery at temperatures below 0°C
(32°F) or above 40°C (104°F).
Check Battery Level
There are multiple ways to check the battery level of the headset:
• Listen to voice prompts on the headset by pressing the Call
• Check the LED indicators on the headset or charging case.
• Use the Plantronics Hub application for desktop or mobile. You can download the software by
visiting plantronics.com/software.
button.
5
Page 6

Headset LED behavior
Off Charging complete
Battery high
Battery medium
Battery low
Battery critical
Low battery warnings
Battery Level Voice Prompt
30 minutes of talk time remaining "Battery Low" repeats every 15 minutes
10 minutes of talk time remaining "Recharge Headset" every 5 minutes
6
Page 7
Use charge case
A fully charged case can recharge your headset fully two times for an additional 14 hours of
headset talk time.
IMPORTANT The charge case is placed in deep sleep mode after manufacturing to save power and
protect the battery. To wake-up the charge case, plug it into a power source for a minimum of 1
minute. The LEDs flash when charging.
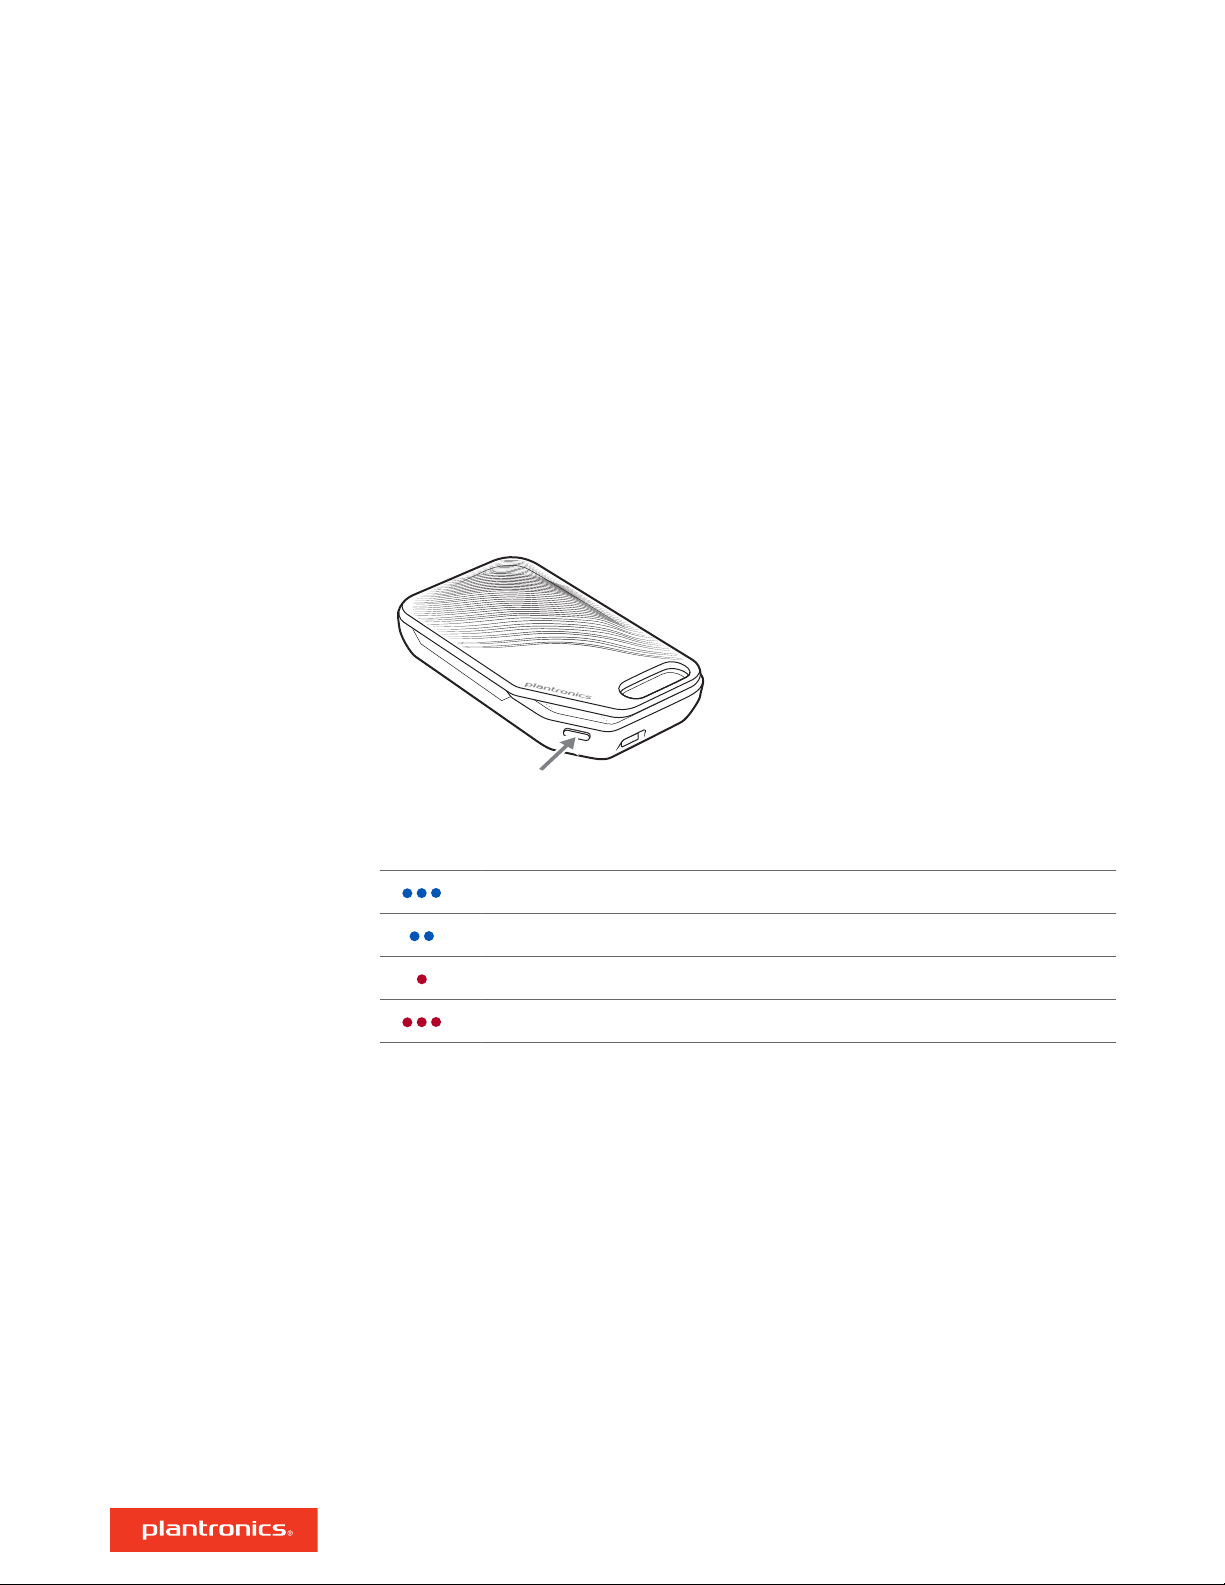
Check the charge case battery status by pressing the button on the side.
Battery status LEDs for charge case
Battery high
Battery medium
Battery low
Battery critical; Recharge case/headset
7
Page 8

2 3
1
1
2
2
3
2
1
Fit
1 Slide headset over and behind your ear, then press gently toward your ear.
NOTE Remove your eyeglasses before donning the headset for best fit.
2 Rotate microphone boom until it is pointed toward your mouth.
3 Mic boom moves up and down for a better fit.
Change the eartip for a better fit.
1 Push in eartip and rotate to the left to unlock it.
2 Align new eartip into slot; push, rotate to the right and lock into place.
To wear the headset on your other ear, rotate the boom upwards then twist it around so the eartip
is on the other side before lowering the mic boom.
8
Page 9

Connect and pair
Connect to PC
Configure for media
Your Bluetooth USB adapter comes pre-paired to your headset.
1 Turn on your headset and insert the Bluetooth USB adapter into your laptop or PC.
2 The USB adapter LED flashes blue and then turns solid blue to indicate the headset is connected to
the USB adapter. If you are wearing your headset you will hear “PC connected” to indicate the
connection has been established. When on a call, the LED on the USB adapter will flash blue.
When not on a call the LED will be solid blue.
3 OPTIONAL Load Plantronics Hub for Windows and Mac by visiting plantronics.com/software. This
will allow you to customize your headset behavior through advanced settings and options.
Your USB Bluetooth adapter comes ready to take calls, but listening to music takes some
additional configuration.
Windows
1 To configure your Bluetooth USB adapter to play music, go to Start menu > Control Panel > Sound
> Playback tab. Select Plantronics BT600, set it as the Default Device and click OK.
2 To pause music when you place or receive calls, go to Start menu > Control Panel > Sound >
Communications tab and select the desired parameter.
Mac
1 To configure the Bluetooth USB adapter, go to Apple menu > System Preferences > Sound. On
both the Input and Output tabs, select Plantronics BT600.
Pair to mobile device
1 To put your headset in pair mode, press and hold the Call button until you hear "pairing" and the
headset LEDs flash red and blue.
2 Activate Bluetooth on your phone and set it to search for new devices.
• iPhone Settings > Bluetooth > On*
• Android Settings > Bluetooth: On > Scan for devices*
NOTE *Menus may vary by device.
3 Select “PLT V5200 Series.”
If necessary, enter four zeros (0000) for the passcode or accept the connection.
Once successfully paired, you hear “pairing successful” and the headset LEDs stop flashing.
NOTE Your headset can pair with up to 8 devices but only maintain 2 connections simultaneously;
this includes the Plantronics Bluetooth USB adapter as one of the 2 simultaneously connected devices.
9
Page 10

NFC pairing
NFC pairing is an option if you have no more than one other device already connected. NFC pairing
will not work if there are two devices connected already.
1 On your mobile phone ensure NFC is enabled and your phone’s display is unlocked. (Phones may
vary and some phones may not have NFC support.)
2 With the headset powered on, lay the headset on the back of phone near the NFC tag on phone as
shown until NFC pairing completes. If necessary, accept the connection.
Re-Pair the USB adapter
1 Insert the USB Bluetooth adapter into your laptop or computer and wait for your computer to
recognize it.
2 Put your USB Bluetooth adapter into pair mode by gently pressing and holding the pair button
with a pen or paperclip until the USB Bluetooth adapter flashes red and blue. Put your headset in
pair mode.
3 Put your headset in pair mode.
Pairing is successful when you hear "pairing successful" and the Bluetooth USB adapter LED is
solid blue.
10
Page 11

Siri, Google Now,
Alexa*
NFC
The Basics
Make/Take/End Calls
Answer a call
• Put the headset on to answer a call, or
• Say “answer” after call is announced, or
• Tap the Call button.
Answer a second call on VOIP
• First, double key press the Call button to put the first call on hold and answer the second call. To
switch between calls, double press key the Call
first call, tap the Call
End a call
• Tap the Call button.
Reject incoming call
• Press the Call button for 2 seconds.
Redial last outgoing call
• Double-tap the Call button.
Caller Announcement (mobile phone only)
When wearing your headset, you will hear the name of a contact calling so you can decide whether
to answer or ignore the call without having to check the phone screen.
An incoming caller name is announced:
• if your phone supports Phone Book Access Profile (PBAP)
button.
button. To end the second call and retrieve the
Adjust the volume
• if you granted access to your contacts during pairing process (for many mobile phones, this is
preset out-of-the box and may not be necessary)
• if the caller is stored in the phone's contacts list
An incoming caller name is not announced: if the caller is unknown, unlisted, blocked, or the
language is not supported.
Press the Volume buttons
While not on a call or streaming audio you can press the Volume buttons
level for Caller Announce and other voice prompts.
Adjust headset microphone volume (softphone)
Place a test softphone call and adjust softphone volume and PC sound volume accordingly.
up (+) or down (–) during a call or while streaming audio.
to adjust the volume
11
Page 12

Voice assistant
Siri, Google Now™, Amazon Alexa When not on a call, press and hold the red Mute button until
you hear the tone. Wait for the phone prompt to activate voice controls.
NOTE Alexa functionality requires app. See Enable Amazon Alexa.
Enable Amazon Alexa
Mute
Pause or restart
streaming audio
Use sensors
With Amazon Alexa enabled on your headset, you can ask for directions, call friends, access Alexa
Skills and more.
NOTE Amazon Alexa isn't available in all languages and countries.
1 Connect the headset to your mobile device
2 Update your Plantronics Hub mobile app (software) if necessary
3 Launch Plantronics Hub app and ensure that your headset (firmware) is up-to-date
4 From Plantronics Hub main menu, choose Apps > Amazon Alexa > Enable
5 Download and launch the Amazon Alexa app and follow the instructions to set up your headset
Press the Mute
settings in Plantronics Hub app.
• Press and hold the Call button for 2 seconds to either pause or restart playback.
Smart sensors in this headset recognize if the headset is being worn and can automatically
perform time-saving functions.
Putting on your headset will:
• Answer an incoming call
• Transfer an active call from your phone
• Resume streaming audio
button to mute or unmute your headset during an active call. Customize mute
Taking off your headset will:
• Transfer an active call to your phone
• Pause streaming audio
12
Page 13

Reset sensors
You may need to reset the sensors if they are not working as expected.
• Wearing the headset, tap the Call button to test sensors. A talk time voice alert means sensors
are working. A tone or lack of voice prompts means sensors need to be reset.
• To reset the sensors, power on the headset, connect the headset to a USB cable and plug the cable
into your computer's USB port or an AC wall adapter (not included). Then place the headset on a
flat, non-metallic surface for more than 10 seconds.
• If you don't have your charging cable available you can also reset your sensors by first turning off
the headset, then pressing and holding the Call and Mute buttons simultaneously until the
LED turns off. Then put on your headset and turn it on.
Disable sensors
• You can disable your headset smart sensors through Plantronics Hub software under the Settings
menu or in an idle state (not on a call or streaming music). Simultaneously press and hold the Call
and Mute buttons for 5 seconds and a voice prompt will inform you of smart sensors status.
13
Page 14

Advanced features
Enable Tile
Voice alerts list
Use the Tile app to ring your lost headset or locate it on a map and ask the Tile community for
help.
1 Connect the headset to your mobile device
2 Launch Plantronics Hub app and ensure that your firmware is up-to-date
3 From Plantronics Hub main menu, choose Apps > Tile > Enable
4 Launch the Tile app and follow the instructions to connect your headset
Following is a list of common voice alerts, you can use Plantronics Hub to customize some of these
alerts. Download Plantronics Hub at plantronics.com/software
• "Answering call"
• "Battery low"
• "Redialing last outgoing call"
• "Incoming call"
• "Mute on/off/muted"
• "No phone is connected"
• "Pairing"
• "Pairing incomplete, restart headset"
• "Pairing successful"
• "Power on/off"
Adjust voice alert volume
• "Phone X connected/disconnected"
• "Recharge headset"
• "Smart sensors on/off"
• "Talk time X hours"
• "Volume maximum/minimum"
Toggle the volume button when the headset is powered on and idle (not on a call or streaming
music) to adjust the volume of the headset's voice alerts.
14
Page 15

Load software
Some softphones require the installation of Plantronics Hub for Windows and Mac to enable
headset control (answer/end and mute) functionality.
Install Plantronics Hub for Windows and Mac onto your computer by visiting plantronics.com/
software
Manage your headset settings with your computer or mobile device with Plantronics Hub for
Windows and Mac or Plantronics Hub for iOS and Android, respectively (plantronics.com/
software).
Plantronics Hub iOS and Android Windows and Mac
Call control for softphones X
Change headset language X X
Update firmware X X
Turn features on/off X X
View user guide X X
Battery meter X X
15
Page 16

Firmware Update
Firmware updates are designed to keep your headset current with the latest technology. Update
your firmware to:
• Change voice alert/command languages
• Improve performance
• Add new features to your device
You can update your headset wirelessly using either your smartphone or your desktop PC with
Plantronics Hub. Download at plantronics.com/software
With Plantronics Hub for Android/iOS installed on your smartphone, check Settings to see if an
update is available.
With Plantronics Hub for Windows/Mac installed on your computer, check Updates to see if a
new version of
Tips
If you are performing an update using Plantronics Hub from your phone:
• Remove your headset from your ear. Do not use your headset or smartphone until the update is
complete.
firmware is available for your device.
Headset recovery
• Disconnect your headset from other devices such as phones, tablets and computers.
• Do not start a second update from a second phone.
• Do not play music on your phone during the update.
• Do not answer or place a call during the update.
NOTE If you receive a lot of calls, emails or texts that interrupt your update, try turning on the Do
Not Disturb feature in your phone's setting while you update.
If you are performing an update using Plantronics Hub for Windows from your computer using
your wireless USB Bluetooth adapter:
• Remove your headset from your ear. Do not use your headset or computer until the update is
complete.
• Disconnect your headset from other devices such as phones, tablets and computers.
• Do not start a second update from another device such as a phone or another computer.
• Disconnect other Bluetooth headsets from your computer.
• Do not answer or place a call during the update.
If you receive an over-the-air update failure message, or experience an update failure, take the
following steps:
• Download and install Plantronics Hub for Windows/Mac at https://www.plantronics.com/
product/plantronics-hub-desktop
• Connect your headset to your computer using a USB cable.
• Open Plantronics Hub, go to Help > Support > Firmware Updates & Recovery and enter your
Product ID (PID) to complete the recovery.
16
Page 17

Troubleshooting
Callers can't hear me.
I can't hear callers or music.
• Ensure headset is paired and connected to your phone.
• On iOS, check your audio output on your smartphone to make sure
that the audio is directed to the headset and not another audio
output.
• Reposition headset on your ear as the sensors may not be
detecting it is on.
• Reset your sensors (following above instructions) as they may need
recalibrating.
• Disable your sensors as they may be incompatible with your
specific ear shape.
• Disable HD Voice (Wideband Audio) via Plantronics Hub application
as this setting may be incompatible with your phone.
• Ensure headset is paired and connected to your phone.
• On iOS, check your audio output on your smartphone to make sure
that the audio is directed to the headset and not another audio
output.
• Reposition headset on your ear as the sensors may not be
detecting it is on.
• Reset your sensors (following above instructions) as they may need
recalibrating.
• Disable your sensors as they may be incompatible with your
specific ear shape.
My headset will not report 7 hours
of talk time after it is fully charged.
• Ensure headset is paired and connected to your phone.
• Disable HD Voice (Wideband Audio) which uses more power.
• Completely discharge your headset's battery then give it a full
charge.
• Some phones have less efficient Bluetooth connections and thus
will not allow for an optimal talk time of 7 hours. The talk time
remaining estimate is partly calculated by your historical use so
inconstancies in an estimate may occur based on your particular
use patterns.
17
Page 18

What's in the box
Headset
USB Bluetooth adapter
Eartips (S, M, L)
Charge case
Micro USB cable
18
Page 19

Accessories
Sold separately at plantronics.com/accessories.
Vehicle power
charger Eartips with foam covers
Wall charger
19
Page 20

Specifications
Talk time
Bluetooth
Standby time
Weight
Smart sensor technology
Noise cancelling
Water resistance
NFC pairing`
Operating distance (range)
Bluetooth profiles
Up to 7 hours talk time without using case; Up to 14
hours additional talk time using fully-charged case.
Version 4.1
9 days if connected to a mobile device, 7 days if
connected to the Plantronics USB Bluetooth adapter.
20 grams
Dual capacitive sensors wearing status for improved
reliability.
• Four-mic active Digital Signal Processing (DSP)
• Acoustic echo cancellation
• Sidetone detection
P2i nano-coating on headset to repel moisture
Touch headset to NFC-enabled phones to complete
pairing process
98 feet, 30 meters
Advanced Audio Distribution Profile (A2DP), Phone Book
Access Profile (PBAP), Audio/Video Remote Control
Profile (AVRCP), Wideband Hands-free (HFP) Profile 1.6
and Headset (HSP) Profile 1.2
Mulltipoint technology
Battery type
Charge connector
Headset battery meter
Charge time (maximum)
Operating and storage temperature
Connect two Bluetooth devices and answer calls or
stream media from either device
Rechargeable, non-replaceable lithium-ion polymer
Micro USB charging on headset
Automatically shows on-screen for iPhone and iPad. With
Plantronics Hub for iOS/Android this shows on your
smartphone screen
90 minutes for full charge
32°F – 104°F (0 – 40°C)
NOTE * Performance is dependent upon battery and may vary by device.
20
Page 21

Support
NEED MORE HELP?
plantronics.com/support
Plantronics, Inc.
345 Encinal Street
Santa Cruz, CA 95060
United States
©
2019 Plantronics, Inc. Plantronics and Voyager are trademarks of Plantronics, Inc. registered in the US and other countries, and OpenMic and PLT are
trademarks of Plantronics, Inc. Bluetooth is a registered trademark of Bluetooth SIG, Inc. and any use by Plantronics, Inc. is under license. Google Play and
the Google Play logo are trademarks of Google Inc. The N-Mark is a trademark or registered trademark of NFC Forum, Inc. in the United States and in
other countries. All other trademarks are the property of their respective owners.
206544-06 (09.19)
Plantronics B.V.
Scorpius 171
2132 LR Hoofddorp
Netherlands
 Loading...