

Page 1
Page 2
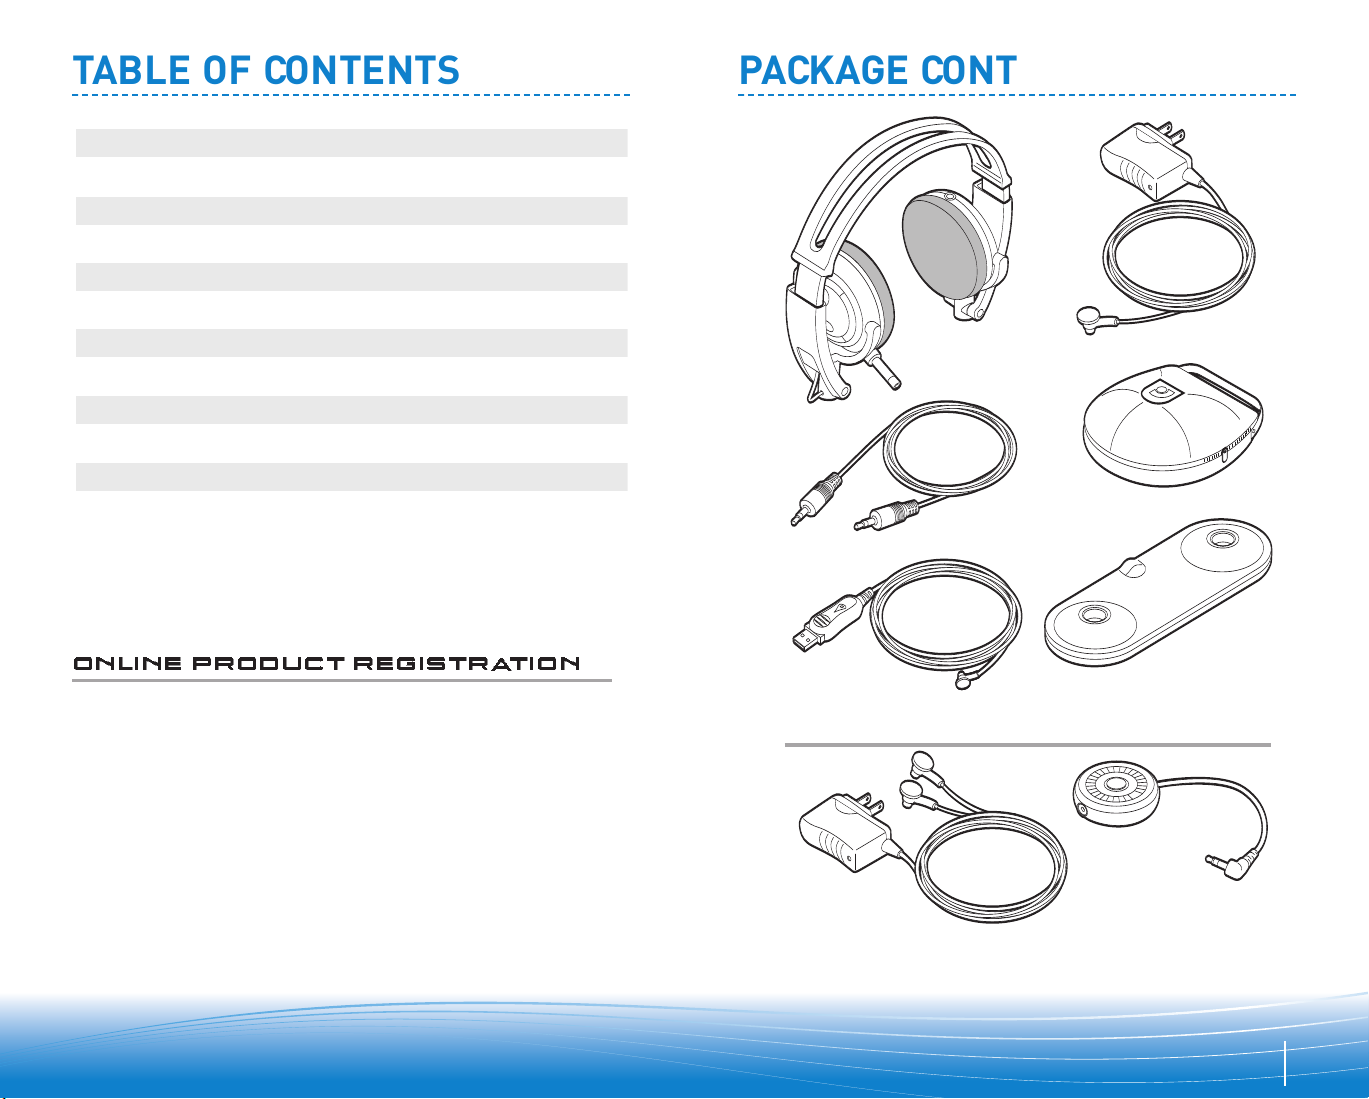
AC Charger
AC Charger
Headset
Universal Adapter
Desktop Charging
Stand
USB Charging Cable
In-flight Cable
Travel Case
Pulsar 590A only
Package Contents
Features
Charging
Pairing
Adjusting
Powering
In-flight & Other Uses
2
3
5
7
9
6
Indicator Lights
6
11
Headset Controls
10
Technical Assistance
Troubleshooting
14
13
Regulatory Notices
14
TABLE OF CONTENTS PACKAGE CONTENTS
ONLINE PRODUCT REGISTRATION
Visit www.plantronics.com/productregistration to
register your product online so we can provide you
with the best possible service and technical support.
2
Page 3
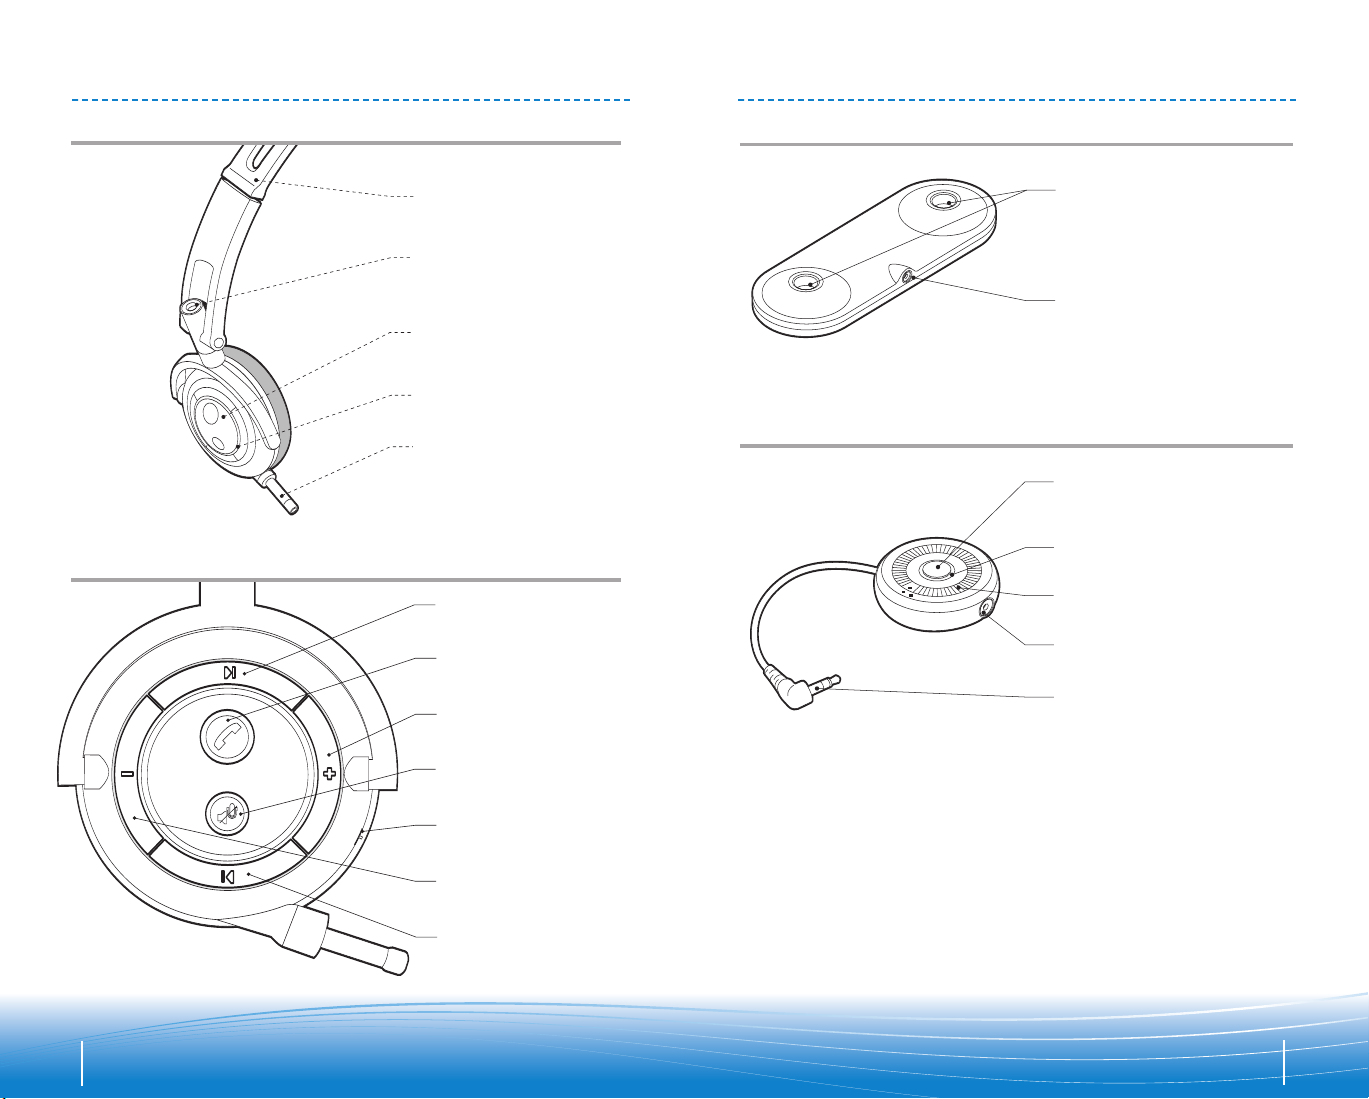
UNIVERSAL ADAPTER*
DESKTOP CHARGING STAND
Power Dial
*Universal adapter included with Pulsar 590A only or sold separately.
AC Charging Jack
AC Charging Jack
Headset Charging
Jack Ports
3.5mm Plug
Pairing/Connect
Button
Indicator Light
Adjustable
Headband
Headset
Charging Jack
Headset Controls
Telescoping
Voice Tube
Call Control Button
Indicator Light
Volume Up
Track Forward
Volume Down
Power Switch
Mute or Play/Pause
Track Back
HEADSET
HEADSET CONTROLS
FEATURES
FEATURES
3
4
Page 4
1
Option A*
2
22
3
3
1
1
590
Option B*
Option C*
CHARGING POWERING
Universal Adapter
Headset
Power
Flashes red
Pairing
Flashes red and blue
Charging
Flashes red
When fully charged light will turn blue
Streaming Audio/
Connected to Headset
Flashes blue
Battery Indicators
•3 red flashes
for full charge
•2 red flashes
for half charge
•1 red flash
for low battery
INDICATOR LIGHTS
Condition Indicator Light
3
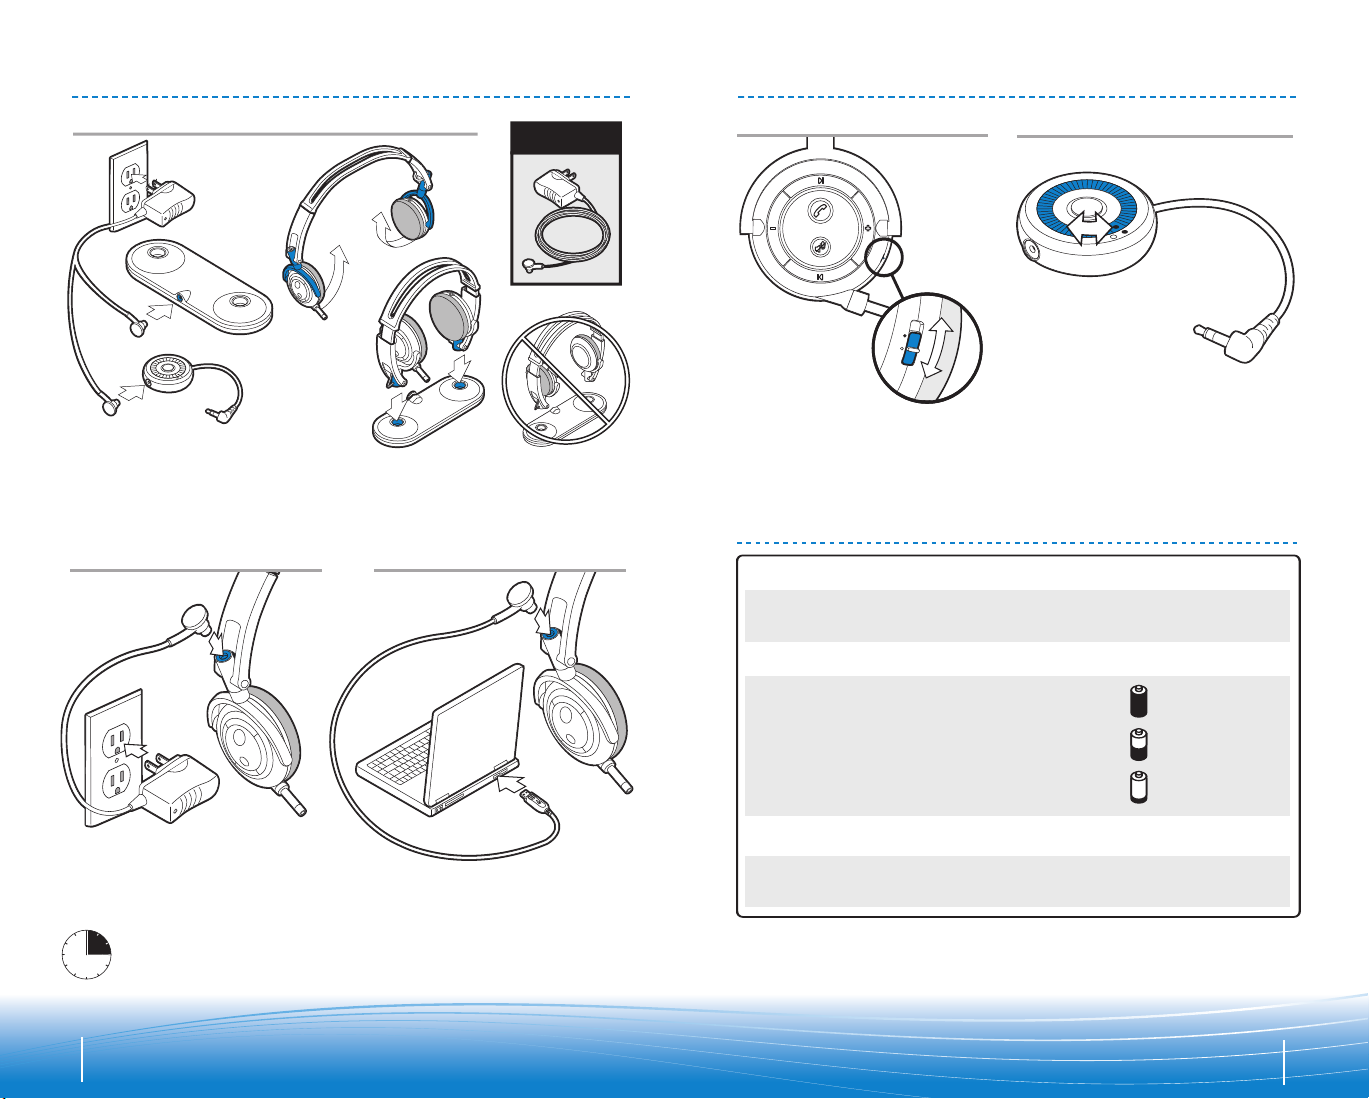
1. Connect AC charger to desktop charging stand.
2. Rotate earpieces under headband so pointing inward.
3. Place headset charging jacks into charging jack ports.
*Charge for 3 hours before first use. Headset indicator light will flash red
when charging and turn solid blue when fully charged.
Slide power switch up/down to turn
power on/off.
Rotate power dial counterclockwise/
clockwise to turn power on/off.
5
6
Page 5
590
Plantronics
B
Headset Passkey
0000
33
44
1
A
22
PAIRING
1
A
22
B
11
2
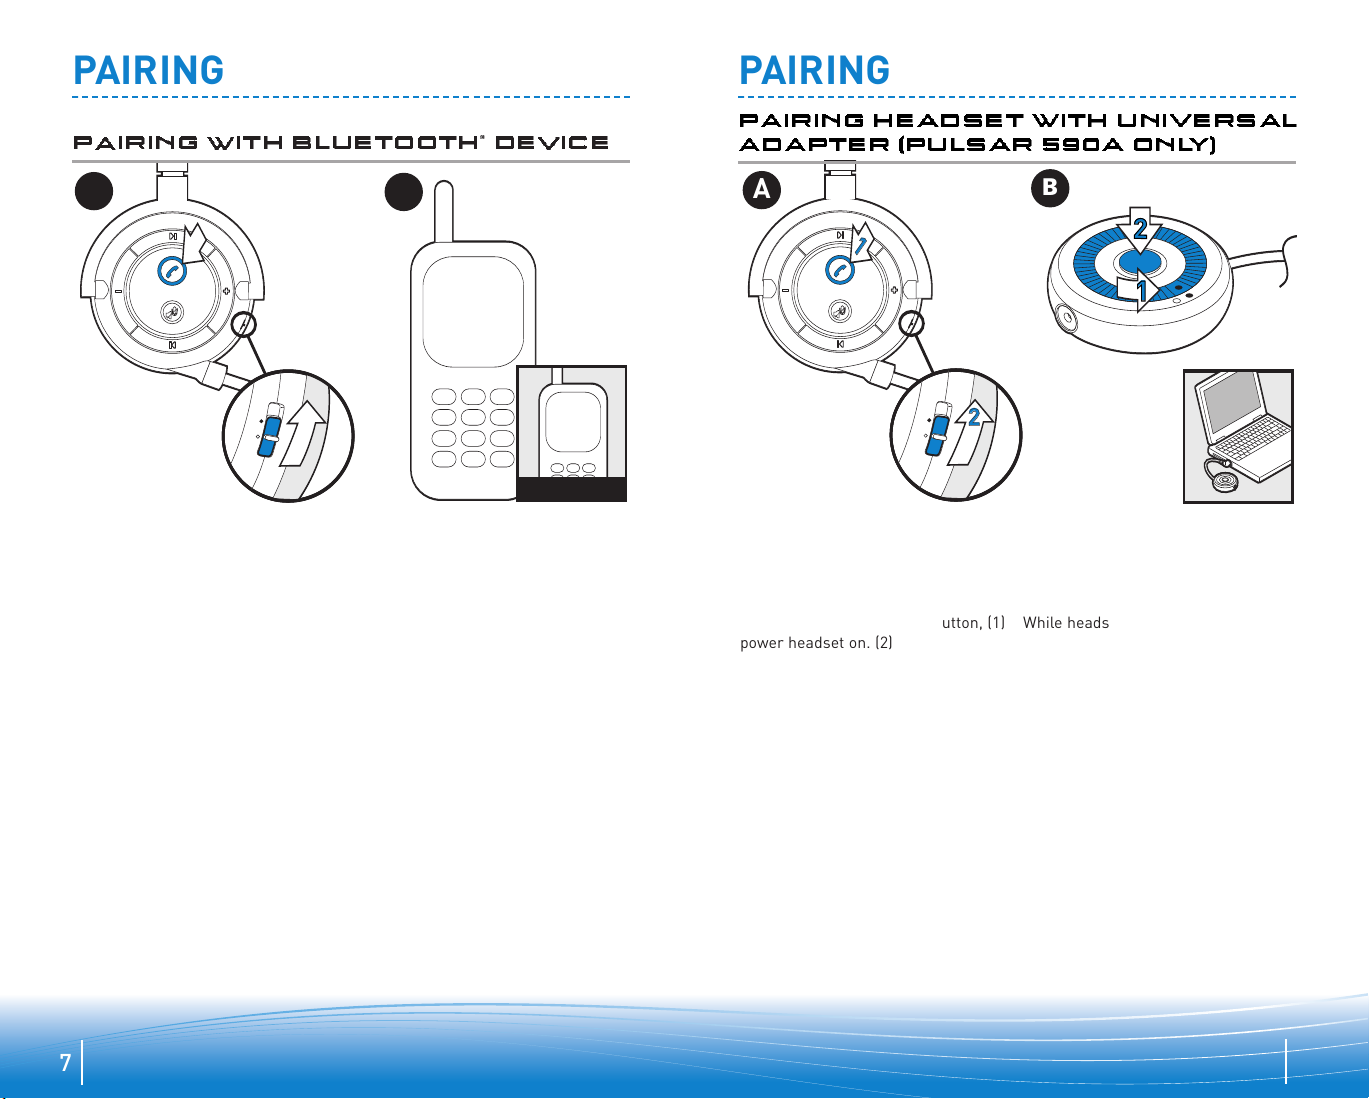
PAIRING WITH BLUETOOTH®DEVICE
PAIRING
PAIRING HEADSET WITH UNIVERSAL
ADAPTER (PULSAR 590A ONLY)
While pressing call control button, (1)
power headset on. (2)
7
1. While headset indicator light is
flashing red and blue, navigate
to the Bluetooth
screen on your device.
2. Place device in Discovery mode.
3. Select “590 Plantronics.” (3)
4. When asked for passkey, enter
0000. (4)
®
discovery
NOTE: The Pulsar headset is paired with the universal adapter at the factory.
However, after powering on, if adapter and headset flash red, rather than blue,
you may need to connect or pair them again. To reconnect, simply press the
adapter pairing/connect button. To pair again, follow directions below.
While pressing call control button, (1)
power headset on. (2)
While headset is flashing red and blue:
1. Power adapter on.
2. Press and hold the adapter pairing/
connect button for 5-7 seconds until
the adapter is flashing red and blue,
then release the button.
Headset and adapter will flash blue
when paired successfully.
8
Page 6
11
2
2
1
ADJUSTING
IN-FLIGHT AND OTHER USES
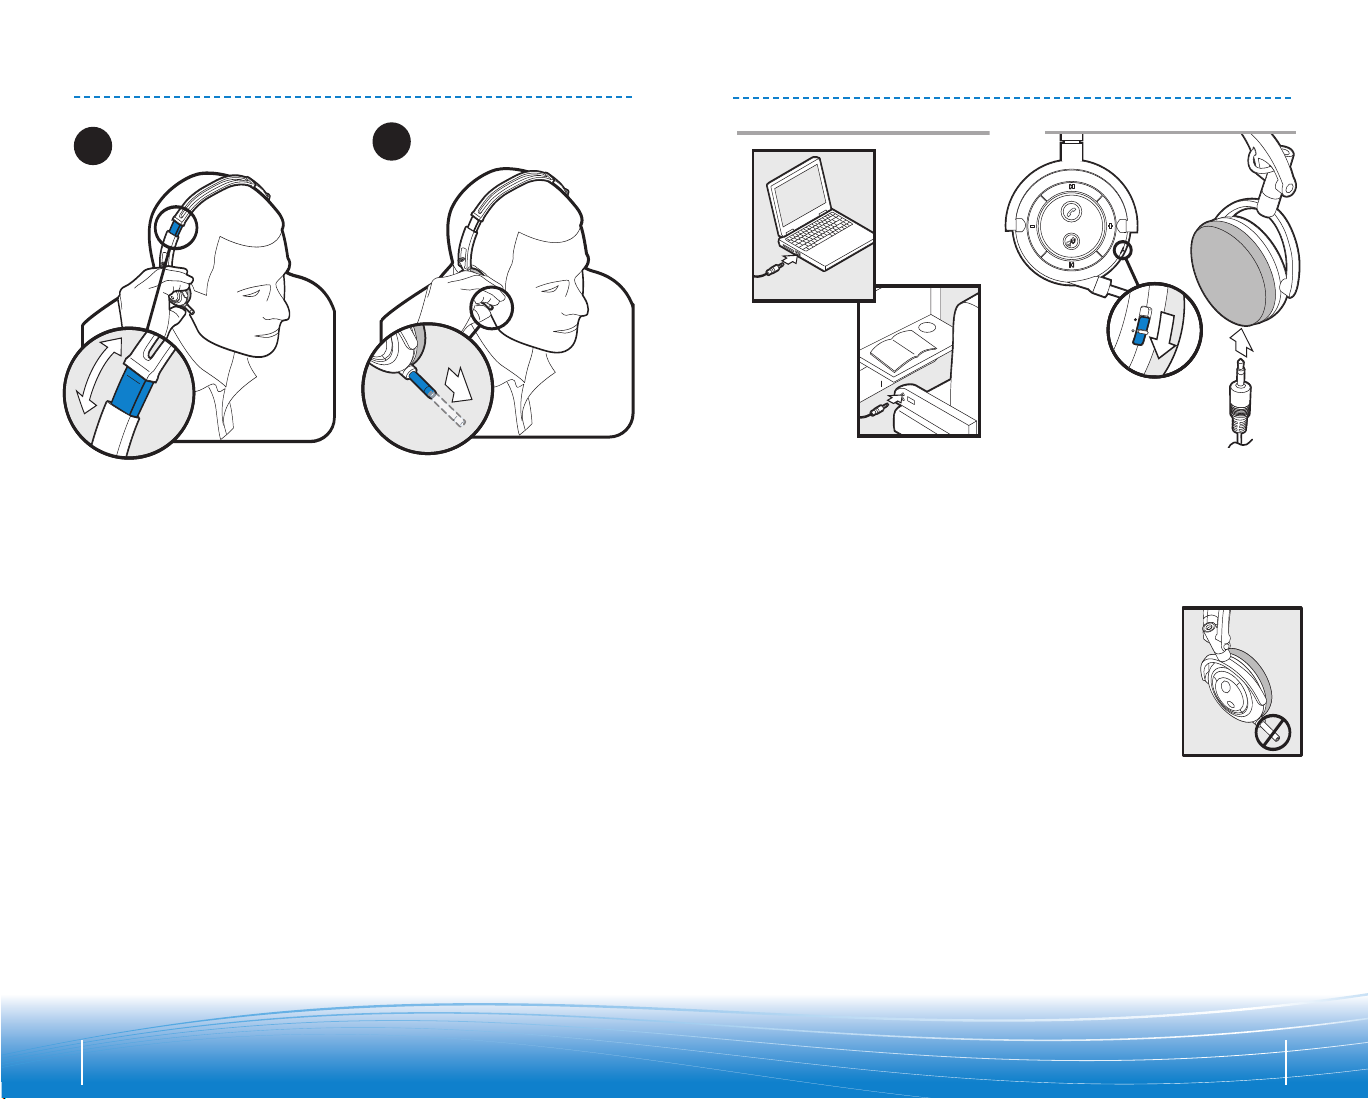
Position so that telescoping voice
tube is on right ear. Adjust headband
if desired.
Point telescoping voice tube tip
toward mouth and extend for optimal
voice transmission.
In-flight cable can be used with any
3.5mm audio jack to convert your
wireless Pulsar 590 headset into
wired headphones.
1. Power headset off. (1) In-flight
cable will not operate when
headset is powered on.
2. Insert in-flight cable into
3.5mm jack on left earpiece. (2)
Note: Telescoping
voice tube is
disabled when
in-flight cable is
in use.
109
Page 7
Features must be supported by host device or service provider.
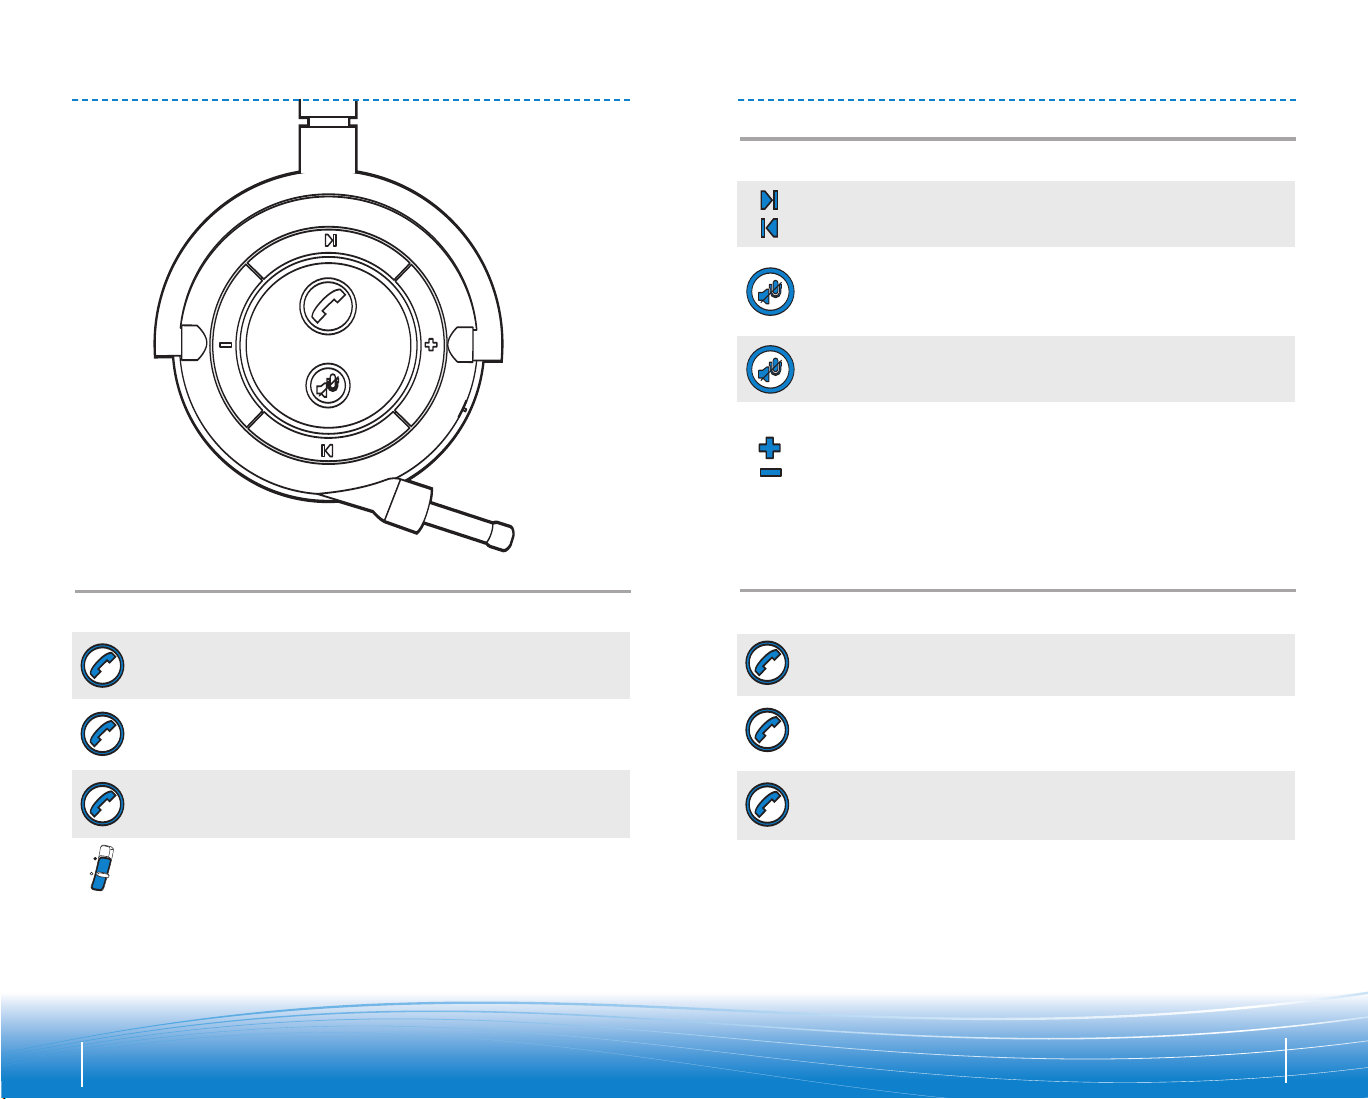
Power On / Off
Making / answering /
ending calls
Switching a call from
phone to headset
Switching a call from
headset to phone
*Only works with Bluetooth® Audio/Video Remote Control Profile (AVRCP);
Activate voice
dial
Call reject
Activate last
number redial
Short key press.
Long key press.
Long key press.
High tone
followed by
low tone.
High tone
followed by
low tone.
Long key press.
High tone followed
by low tone.
Short key press.
High tone.
High tone.
Slide switch.
Play and pause*
Track forward
and back*
Muting a call
Short press to skip /
go back to next /
previous track.
Short press to mute /
unmute telescoping
voice tube or speakers.
Repeating
low tone.
High tone.
High tone.
Short press to
pause / resume audio.
Adjusting
volume
Short press for
incremental change.
Hold for continuous
change.
Mid tone for
each adjustment.
Double low tone
at limit.
Double short
key press.
High tone for
each key press.
Key Feature Action Tone
Key Feature Action Tone
FEATURES
HANDS-FREE FEATURES
FEATURES
Features must be supported by host device or service provider.
*Only works with Bluetooth® Audio/Video Remote Control Profile (AVRCP);
does not work when using universal adapter.
Activate voice
dial
Call reject
Activate last
number redial
Long key press.
High tone
followed by
low tone.
Long key press.
High tone followed
by low tone.
Play and pause*
Track forward
and back*
Muting a call
Short press to skip /
go back to next /
previous track.
Short press to mute /
unmute telescoping
voice tube or speakers.
Repeating
low tone.
High tone.
High tone.
Short press to
pause / resume audio.
Adjusting
volume
Short press for
incremental change.
Hold for continuous
change.
Mid tone for
each adjustment.
Double low tone
at limit.
Double short
key press.
High tone for
each key press.
Key Feature Action Tone
HANDS-FREE FEATURES
FEATURES
HEADSET CONTROLS HEADSET CONTROLS
11
12
Page 8

P
roblem
Problem
M
y headset does not
work with my phone.
Callers cannot hear me.
Callers say my voice is too quiet.
I cannot hear caller/dial tone.
Headset doesn’t charge in the
desktop charging stand.
I cannot hear audio when
using the inflight cable.
I cannot complete the pairing
with my Bluetooth device.
I do not get a sound from my
headset when using the
universal adapter.
Volume is too high / low when
listening to audio, but fine
when making a phone call.
See pages (7-8) “Pairing with
B
luetooth Device.”
Headset is muted. Press the mute button
on the headset to unmute the microphone.
Ensure that the telescoping voice tube is
fully extended and point the tip toward the
corner of your mouth. Ensure the end of the
microphone is not blocked with dirt or debris.
•Headset is turned off. Check the power
switch and slide up to ON.
•Headset is out of range. Walk to within
30 feet (10 meters) of the phone and check
the Bluetooth link.
•Headset battery is dead. Charge your
battery using the AC charger supplied.
•Listening volume is too low. Press
the Volume Up button to increase the
sound heard in the headset.
Ensure that headset is completely inserted
into the charging stand—if properly inserted,
a red indicator light on the headset will
slowly flash.
Headset must be turned off when using
the in-flight cable.
Universal adapter must be turned
off when pairing to another device.
•It may take up to 30 seconds for the
devices to connect and audio to stream.
•Press the connect button on the headset
or adapter after 30 seconds if there is
still no sound.
•Check audio mute on the headset. Press
the mute button on the headset to unmute.
•Check pairing. See page (8) “Pairing
with universal adapter. ”
Check the volume of the audio
source device.
S
olution
Solution
PULSAR 590 & 590A
PULSAR 590A ONLY
Plantronics Technical Assistance Center (TAC) is ready to assist you!
Dial (866) 363-BLUE(2583), or visit the Support section of our website at
www.plantronics.com.
TECHNICAL ASSITANCETROUBLESHOOTING
Plantronics Technical Assistance Center (TAC) is ready to assist you!
Dial (866) 363-BLUE(2583), or visit the Support section of our website at
www.plantronics.com.
FCC REQUIREMENTS PART 15
This device complies with Part 15 of the FCC Rules. Operation is
subject to the following two conditions:
1. This device may not cause harmful interference, and
2. This device must accept any interference received, including interference
that may cause undesired operation.
This equipment has been tested and found to comply with the limits for a
Class B digital device, pursuant to Part 15 of the FCC Rules.
These limits are designed to provide reasonable protection against harmful
interference in a residential installation. This equipment generates, uses,
and can radiate radio frequency energy and, if not installed and used in
accordance with the instructions, may cause harmful interference to radio
communications. However, there is no guarantee that interference will not
occur in a particular installation. If this equipment does cause harmful
interference to radio or television reception which can be determined by
turning the radio or television off and on, the user is encouraged to try to
correct interference by one or more of the following measures:
1. Reorient or relocate the receiving antenna.
2. Increase the separation between the equipment and receiver.
3. Connect the equipment into an outlet on another circuit.
4. Consult the dealer or an experienced radio/TV technician for help.
EXPOSURE TO RF RADIAT I ON
This device and its antenna must not be collocated or operated in
conjunction with any other antenna or transmitter. To comply with FCC RF
exposure requirements, only use supplied antenna. Any unauthorized
modification to the antenna or device could void the user’s authority to
operate this device.
13
REGULATORY NOTICES
14
Page 9
 Loading...