

Page 1

User’s Manual
NAS-7202
2-Bay SATA NAS RAID Server
1
Page 2

Copyright
Copyright (C) 2012 PLANET Technology Corp. All rights reserved.
The products and programs described in this User’s Manual are licensed products of PLANET
Technology, This User’s Manual contains proprietary information protected by copyright, and this User’s Manual and all
accompanying hardware, software, and documentation are copyrighted.
No part of this User’s Manual may be copied, photocopied, reproduced, translated, or reduced to any electronic medium
or machine-readable form by any means by electronic or mechanical. Including photocopying, recording, or informatio n
storage and retrieval systems, for any purpose other than the purchaser's personal use, and without the prior ex press
written permission of PLANET Technology.
Disclaimer
PLANET Technology does not warrant that the hardware will work properly in all environments and applications, and
makes no warranty and representation, either implied or expressed, with respect to the quality, performance,
merchantability, or fitness for a particular purpose.
PLANET has made every effort to ensure that this User’s Manual is accurate; PLANET disclaims liability for any
inaccuracies or omissions that may have occurred.
Information in this User’s Manual is subject to change without notice and does not represent a commitment on the part of
PLANET. PLANET assumes no responsibility for any inaccuracies that may be contained in this User’s Manual. PLANET
makes no commitment to update or keep current the information in this User’s Manual, and reserves the right to make
improvements to this User’s Manual and/or to the products described in this User’s Manual, at any time without notice.
If you find information in this manual that is incorrect, misleading, or incomplete, we would appreciate your comments and
suggestions.
CE mark Warning
There are class A and class B device, in a domestic environment, this product may cause radio interference, in which case
the user may be required to take adequate measures.
Trademarks
The PLANET logo is a trademark of PLANET Technology. This documentation may refer to numerous hardware and
software products by their trade names. In most, if not all cases, these designations are claimed as trademarks or
registered trademarks by their respective companies.
WEEE Regulation
To avoid the potential effects on the environment and human health as a result of the presence of hazardous
substances in electrical and electronic equipment, end users of electrical and electronic e quipment should
understand the meaning of the crossed-out wheeled bin symbol. Do not dispose of WEEE as unsorted
municipal waste and have to collect such WEEE separately.
Revision
User’s Manual for PLANET 2-Bay SATA NAS RAID Server
Model: NAS-7202
Rev: 2.00 (April. 2012)
2
Page 3

Table of Contents
1. Introduction ...................................................................................................................... 4
1.1 Overview.....................................................................................................................................4
1.2 Key Features...............................................................................................................................4
1.3 Package Contents........................................................................................................................4
2. Front and Rear Panel ........................................................................................................ 5
2.1 Hardware Installation...................................................................................................................7
2.2 Connection and Removing Connection ..........................................................................................9
3. Setup Wizard.................................................................................................................. 10
3.1 Use the product on PC (Windows XP/Vista/Windows 7)................................................................10
3.2 Use the product on MAC (above Mac 10.5.5)...............................................................................16
4. Explorer ......................................................................................................................... 17
5. Downloads ..................................................................................................................... 18
5.1 Downloading.............................................................................................................................18
5.2 Complete ..................................................................................................................................19
5.3 Trash ........................................................................................................................................20
6. Settings.......................................................................................................................... 21
6.1 User..........................................................................................................................................21
6.2 Folder.......................................................................................................................................22
6.3 Disk..........................................................................................................................................23
6.4 Network Setting.........................................................................................................................26
6.5 Network Services.......................................................................................................................33
6.6 Power.......................................................................................................................................40
6.7 System......................................................................................................................................43
6.8 Wizard......................................................................................................................................46
7. Help............................................................................................................................... 47
Appendix A: iTunes service.................................................................................................. 48
Appendix B: DLNA service................................................................................................... 50
Appendix C: Access on PC.................................................................................................. 53
Appendix D: Functional Specifications .................................................................................. 55
3
Page 4

1. Introduction
Thank you for purchasing NAS-7202. It is a flexible, economical and powerful solution for your network
storage application. The following instructions will help you to learn more about the connections, set-ups,
and configurations of it.
1.1 Overview
This user’s manual explains how to operate the NAS-7202 from a computer. Basically, the user’s manual is
written to be read on the computer display . However, users might consider printing it out to access easily and
read it before you operate the NAS-7202. This manual sho ws how to set up the NAS-7202.
1.2 Key Features
Supports RAID 0, 1 and JBOD
Provides scalability up to 6TB (with 3TB per HDD)
Mobile Devices Remote Monitoring (NAS Viewer)
Easy access with PLANTE Dynamic DNS
Supports Windows / MAC utility and Web based management
Share music, pictures, movies and data over network
Supports BT download, DLNA, iTunes Media Server
The administrator can allocate the amount of available disk space to individual users
Aluminum enclosure with an internal cooling fan for continuous operation
2 standard USB 2.0 port for external USB HDD and print server sharing
Gigabit Ethernet for speedy performance with read speed up to 400Mbit/s
10/100/1000 Base-TX (Auto MDI / MDI-X) interface supports auto crossover detection
Supports most popular OS including Windows 7 / V ist a / XP, Mac OS x v10.5 or above, Linux Kernel 2.6 and
above
1.3 Package Contents
NAS-7202 x 1
Power Adapter x 1
RJ-45 Cable x 1
CD-ROM x 1
Quick Installation Guide x 1
HDD Screw x 8
1. If any of the above items are missing, please contact your dealer
ÍNote
2. Using the power supply that is not the one included in unit packet will cau se
immediately.
damage and void the warranty for this product.
4
Page 5
2. Front and Rear Panel
Physical Details
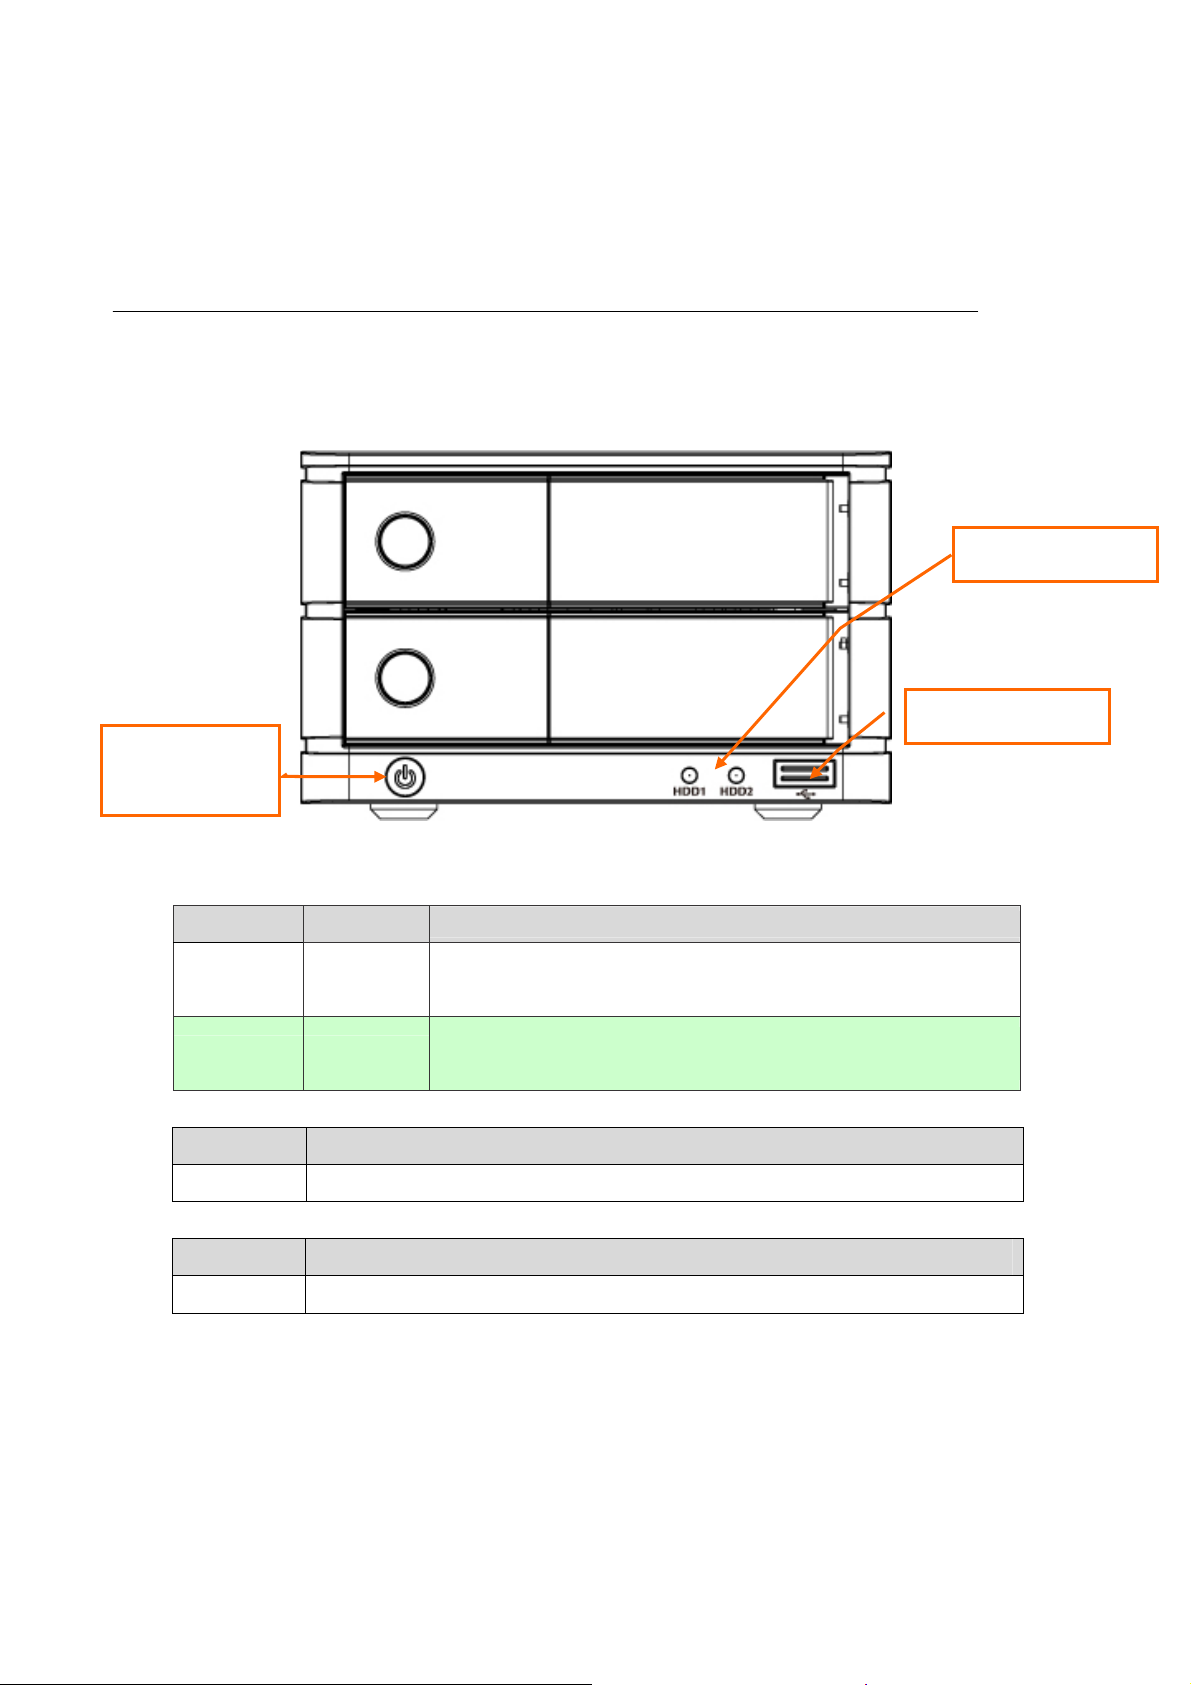
The following figure illustrates the front/rear panel of NAS-7202.
Front View
HDD 1/2 Activate
Power
Button / LED
NAS-7202 Front view
LED Color
Power
HDD Green
Blue
Button Description
Power Press to start or shut down.
Connector Description
USB Connect your print server
Description
On: Power on.
Off: Power off.
Blinking: HDD is accessing.
Off: HDD is no action.
USB Socket
5
Page 6

Reset Button
DC In Jack
NAS-7202 Rear view
Fan
LAN Port
COPY Button
Activity LED
USB Socket
LEDs Color
Act
Orange Activity status of USB Storage
Description
Connector Description
DC Connector Connect the bundled power adapter.
LAN Supports 10/100/1000Base-T interface.
USB Connect your USB flash disk for firmware upgrade.
Button Description
Reset Press to reset NVR to factory default.
6
Page 7
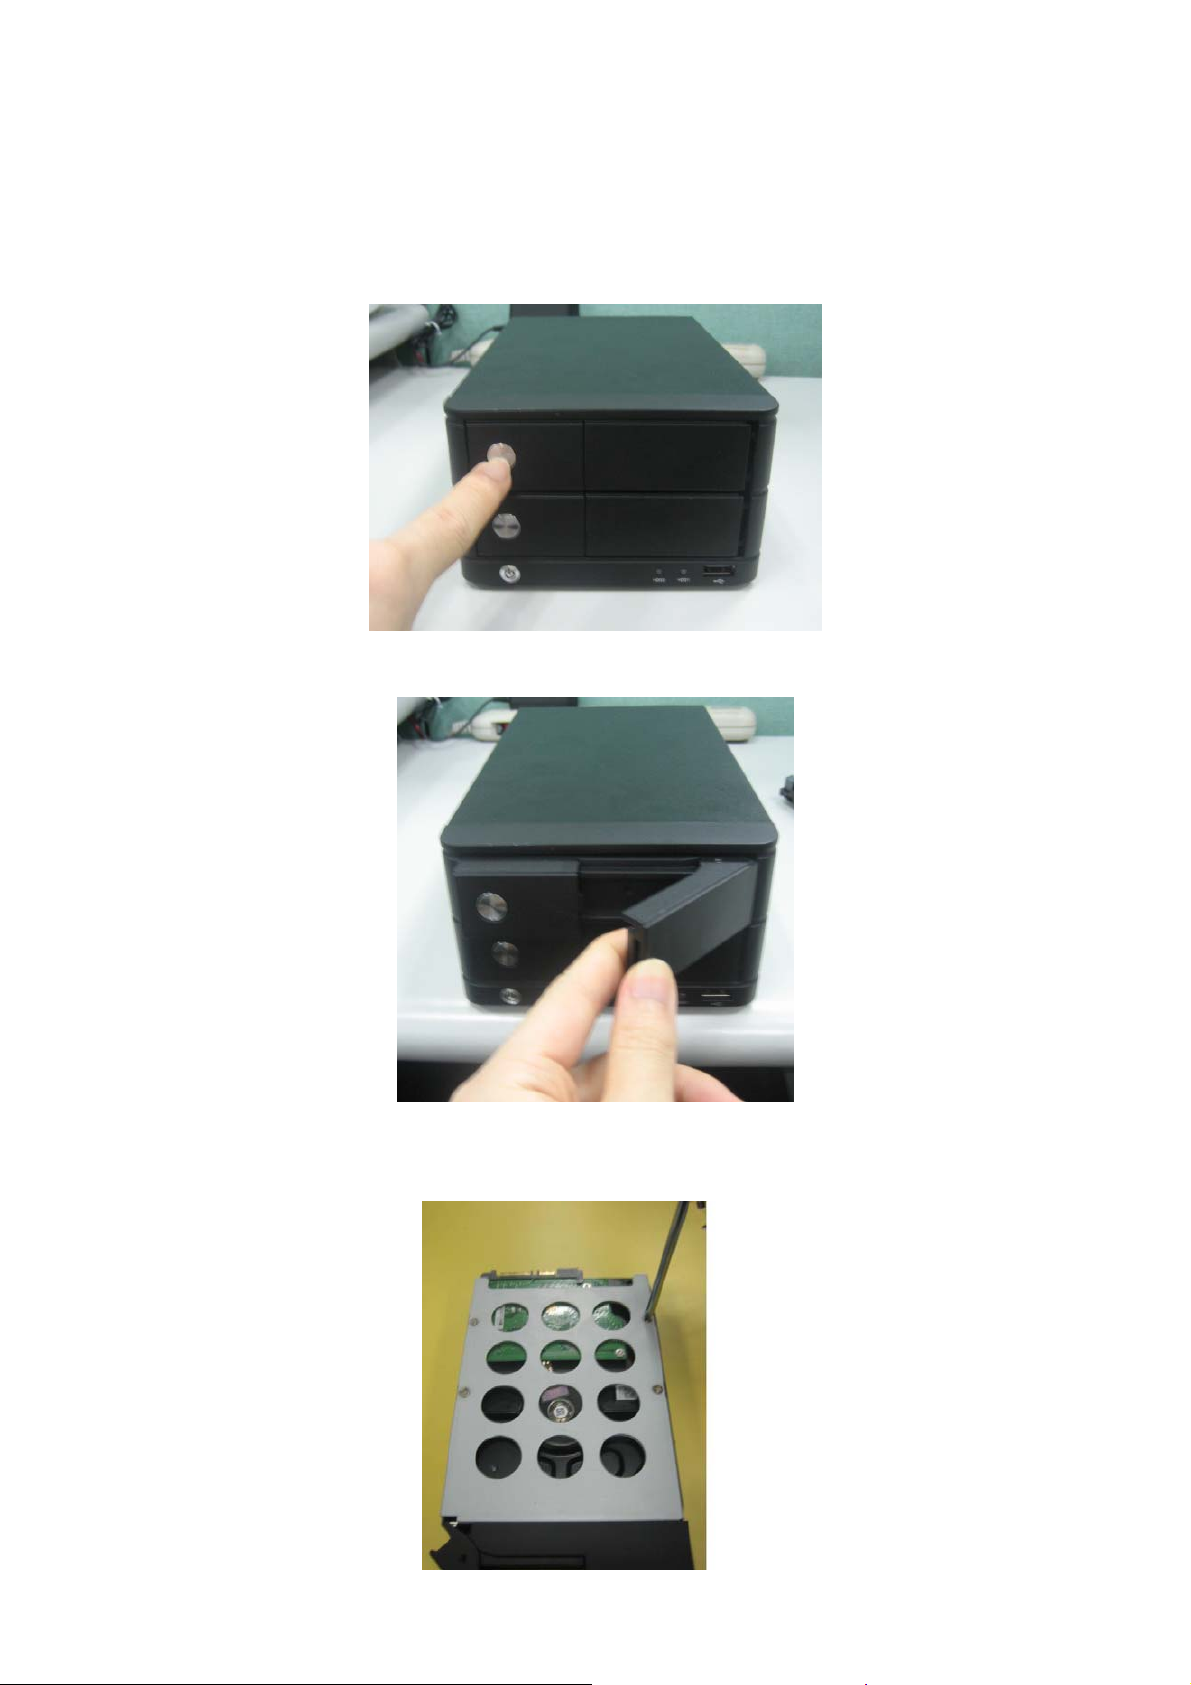
2.1 Hardware Installation
Step 1: Push the silver button to release the HDD tray.
Step 2: Pull out the HDD tray.
Step 3: Place the HDD on the tray and secure the HDD with the screws at the bottom (as
illustrate).
7
Page 8
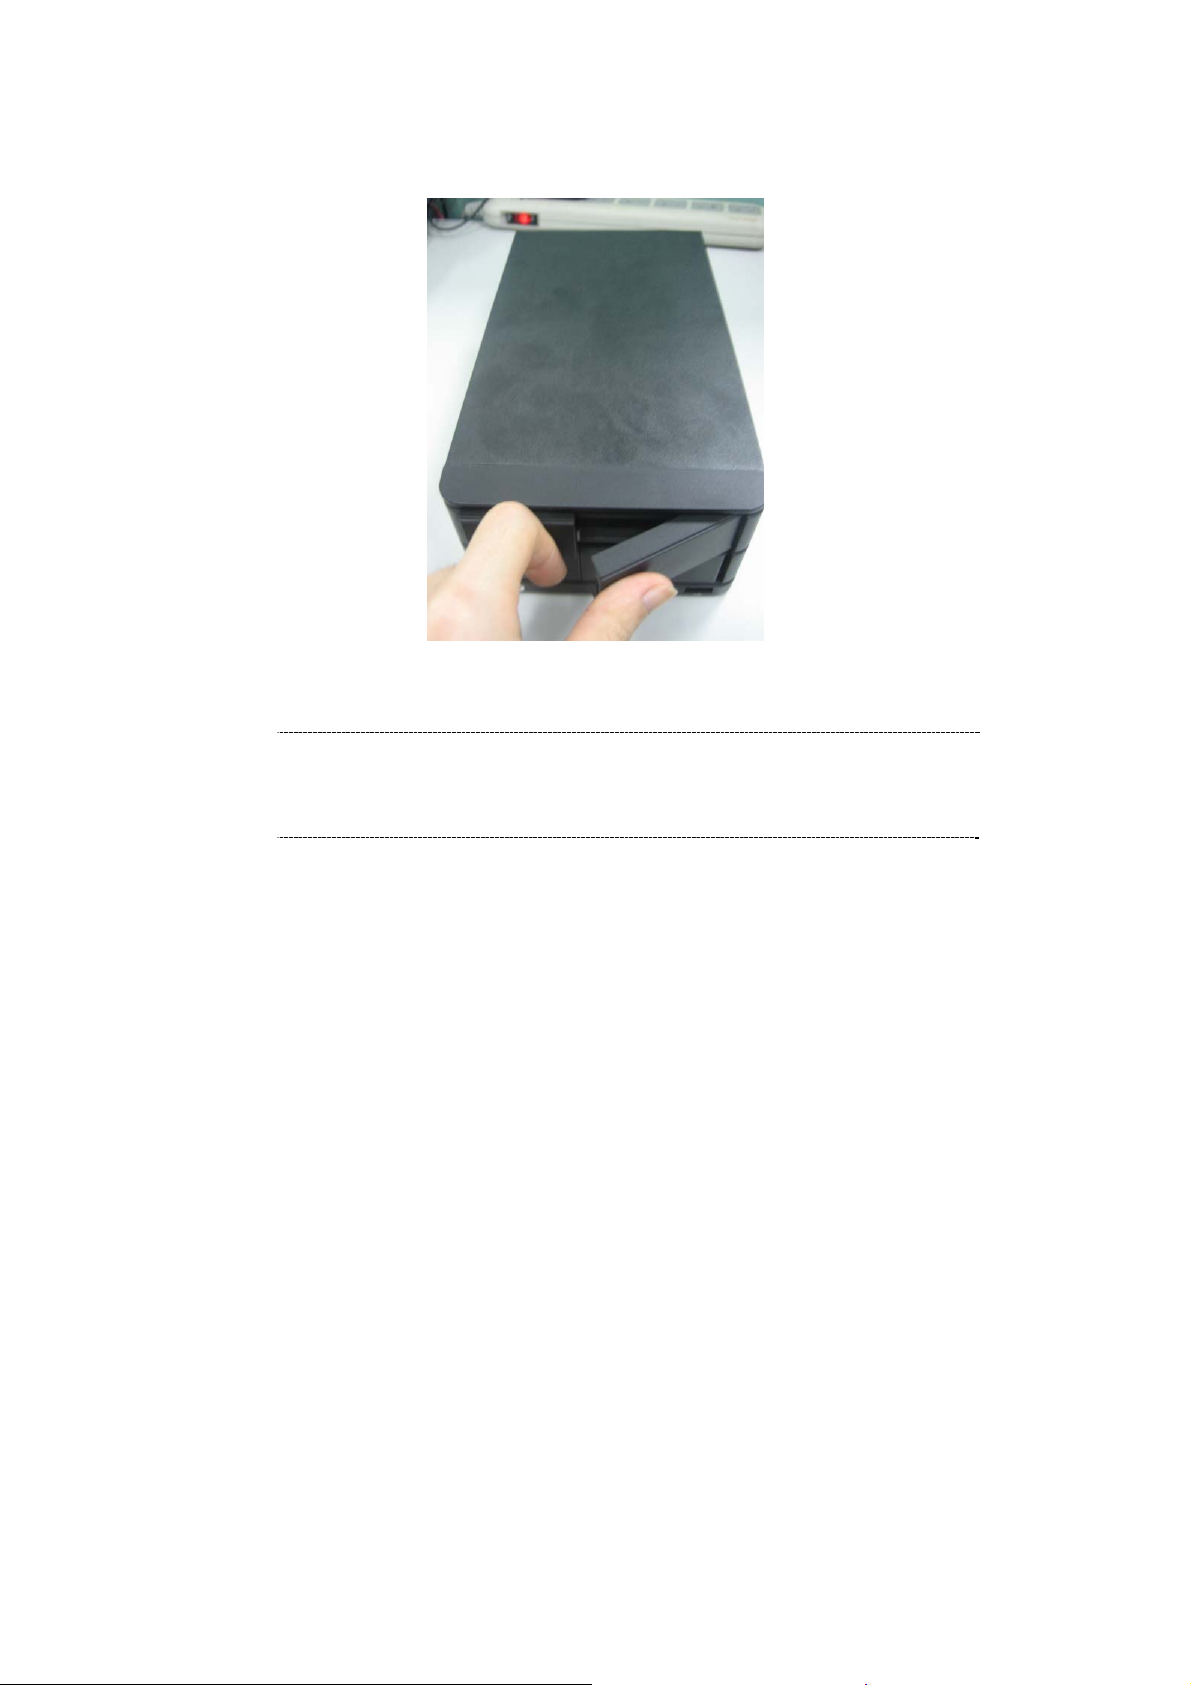
Step 4: Push the tray back in the unit and press down the black bar to secure the tray.
ÍNote
Before slide in the HDD, please do make sure the HDD is in the correct
direction. Slide in and push the HDD with violent could damage the SATA
interface of the RAID Server.
8
Page 9
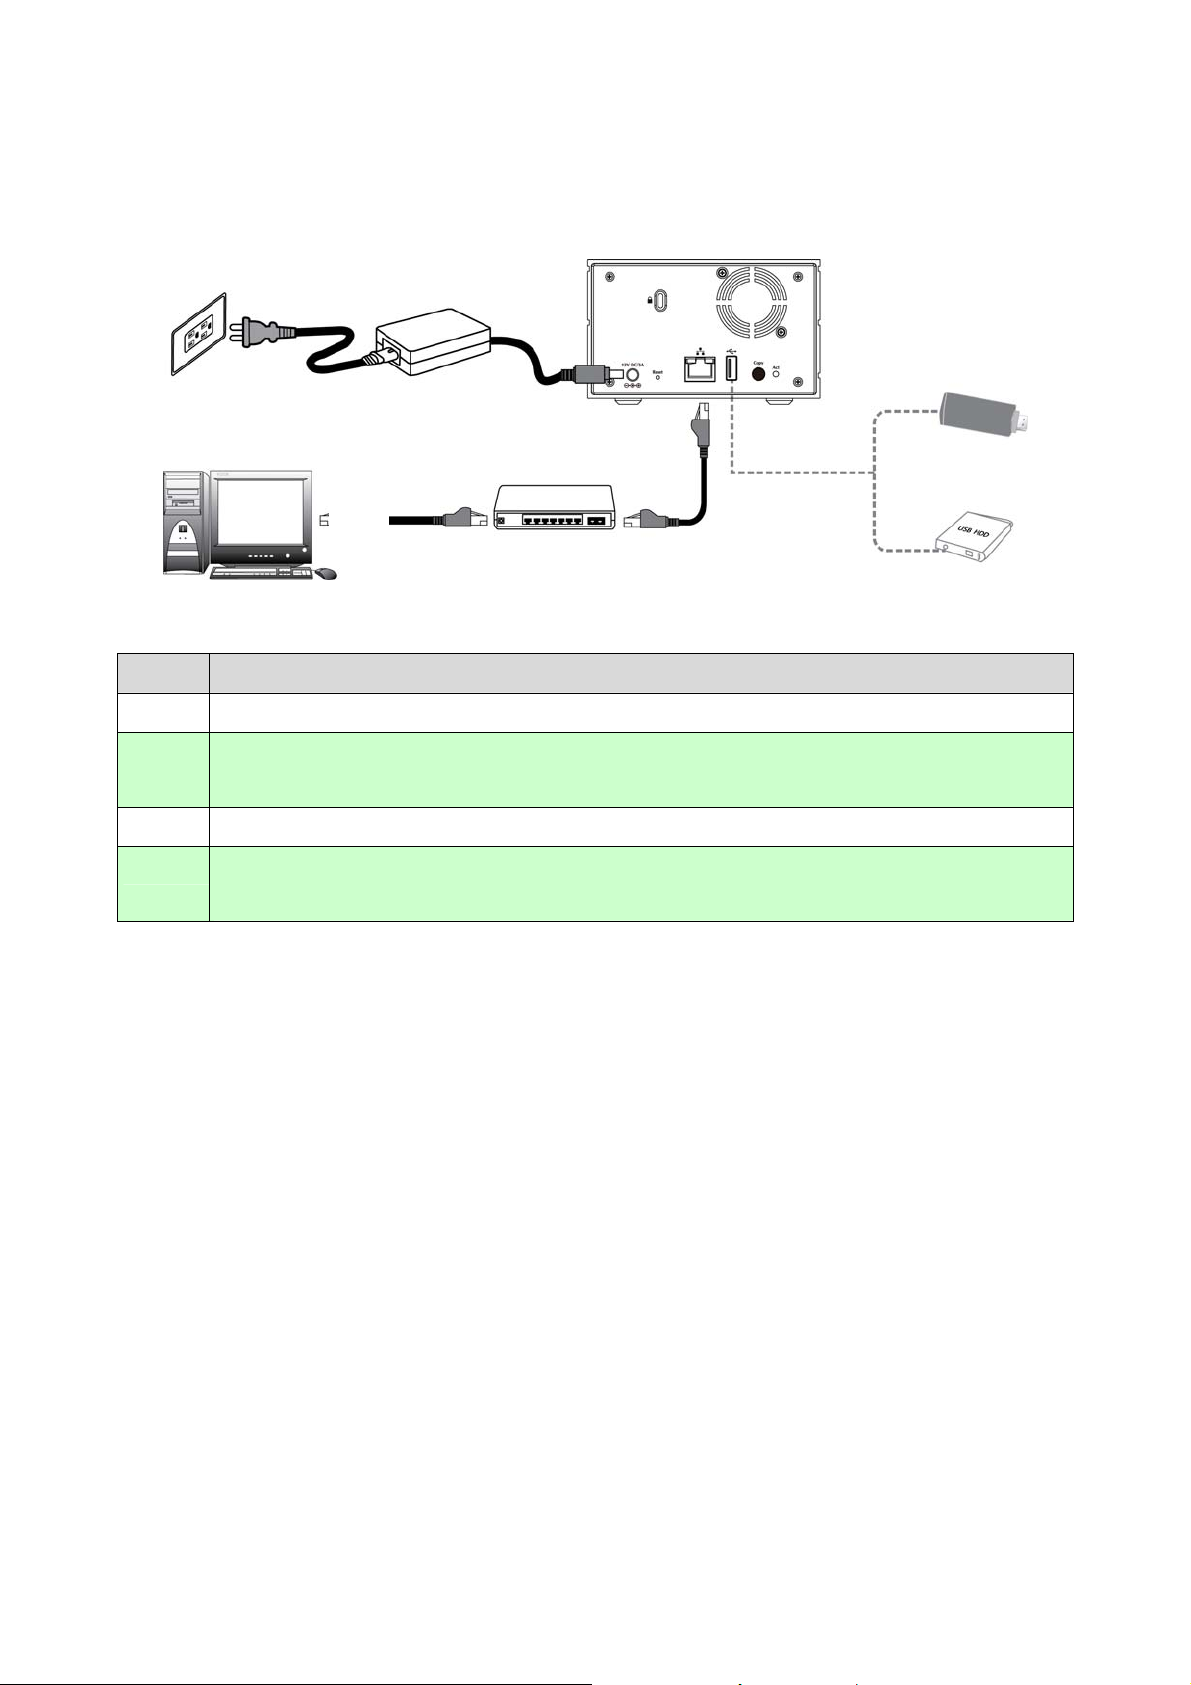
2.2 Connection and Removing Connection
n
o
Steps
1
2
3
4
Description
Connect NAS-7202 and a Switch, Hub, Router, or computer with RJ-45 Ethernet cable.
[optional] Connect USB storage device(s) to this device with USB cable(s).
NAS-7202 can automatically mount the USB devices connected.
Connect the power supply to NAS-7202.
Press the “Power button” to turn on NAS-7202. The HDD activate LED on the front panel will light
up during booting-up. NAS-7202 will be ready to use when the blue LED lights up steady.
9
Page 10
3. Setup Wizard
3.1 Use the product on PC (Windows XP/Vista/Windows 7)
3.1.1 Client tool installation
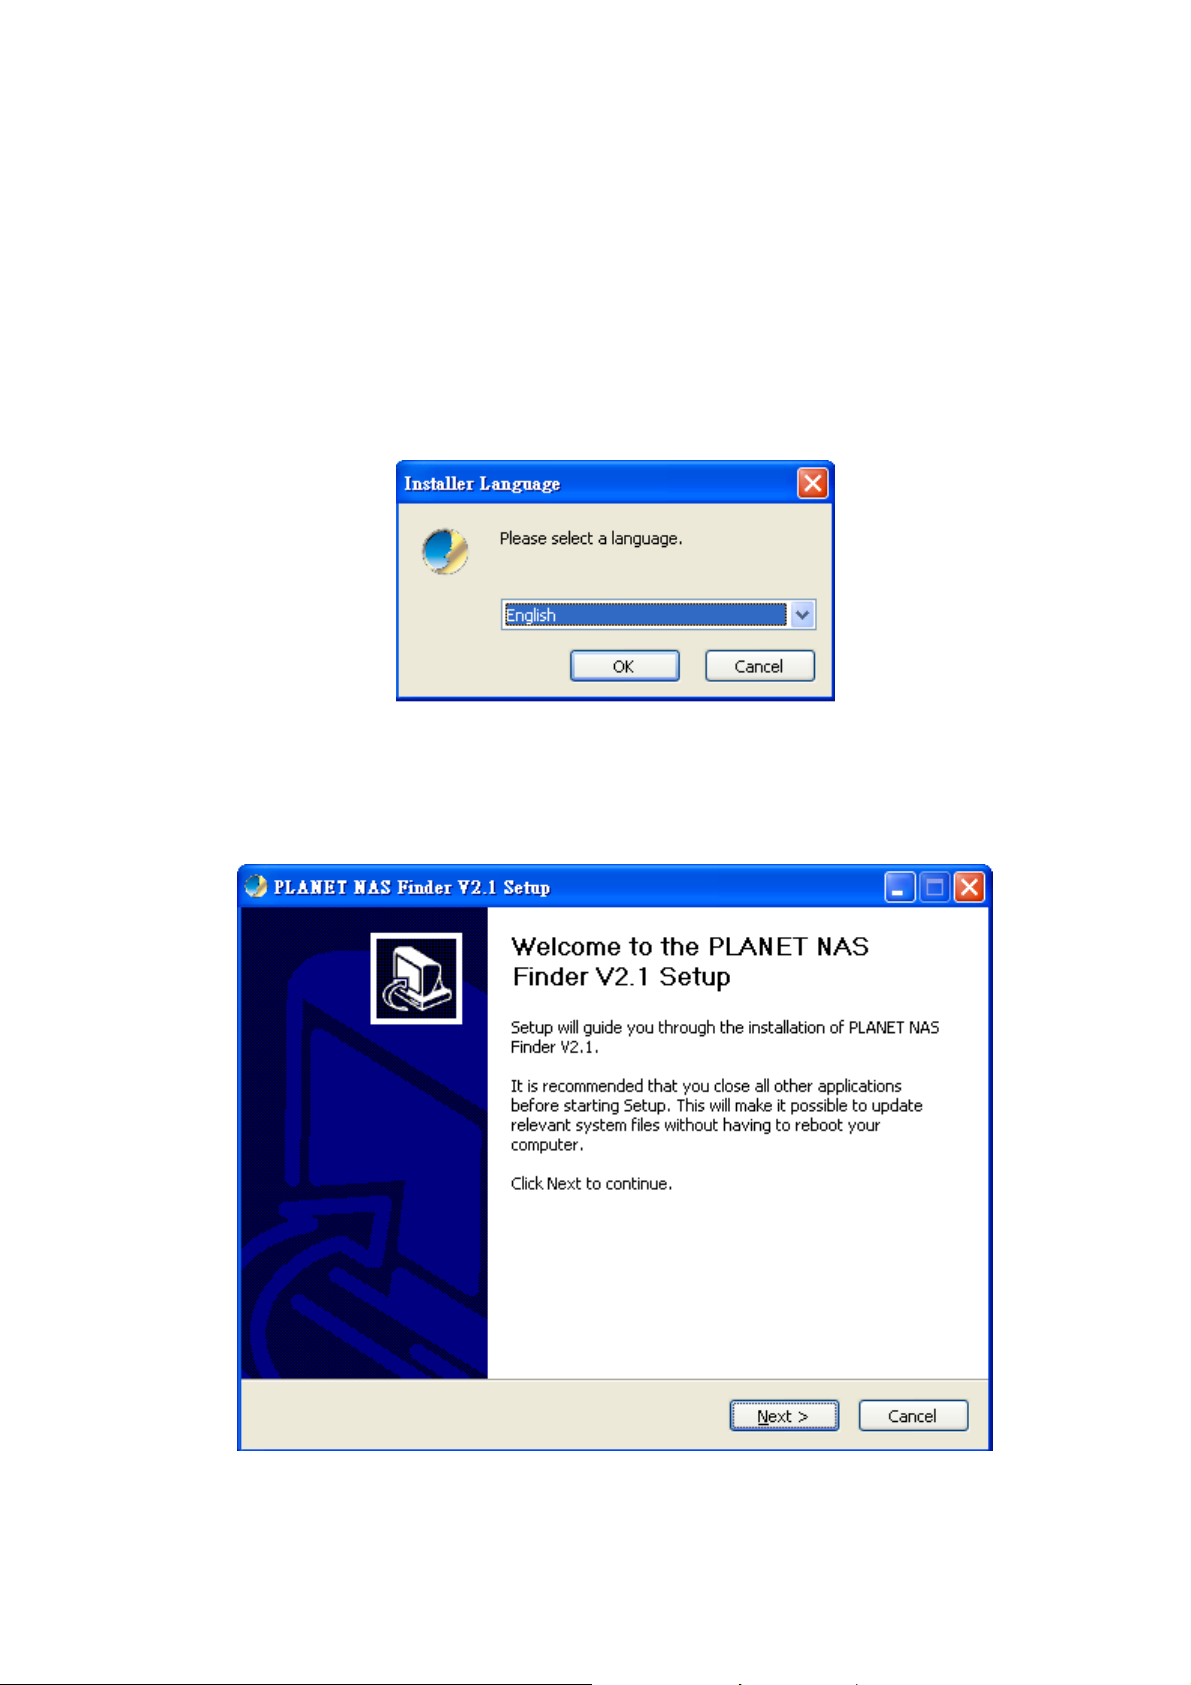
Once you insert the CD into your computer, open up the folder and double cli ck “NAS Finder for Windo ws
V2.1 Setup.exe” for installation. The Language setup window will pop up.
After a language is selected (If the operating system is English System, this step is not needed), click
“OK”, and then the PLANET Tools Setup Wizard will pop-up.
10
Page 11
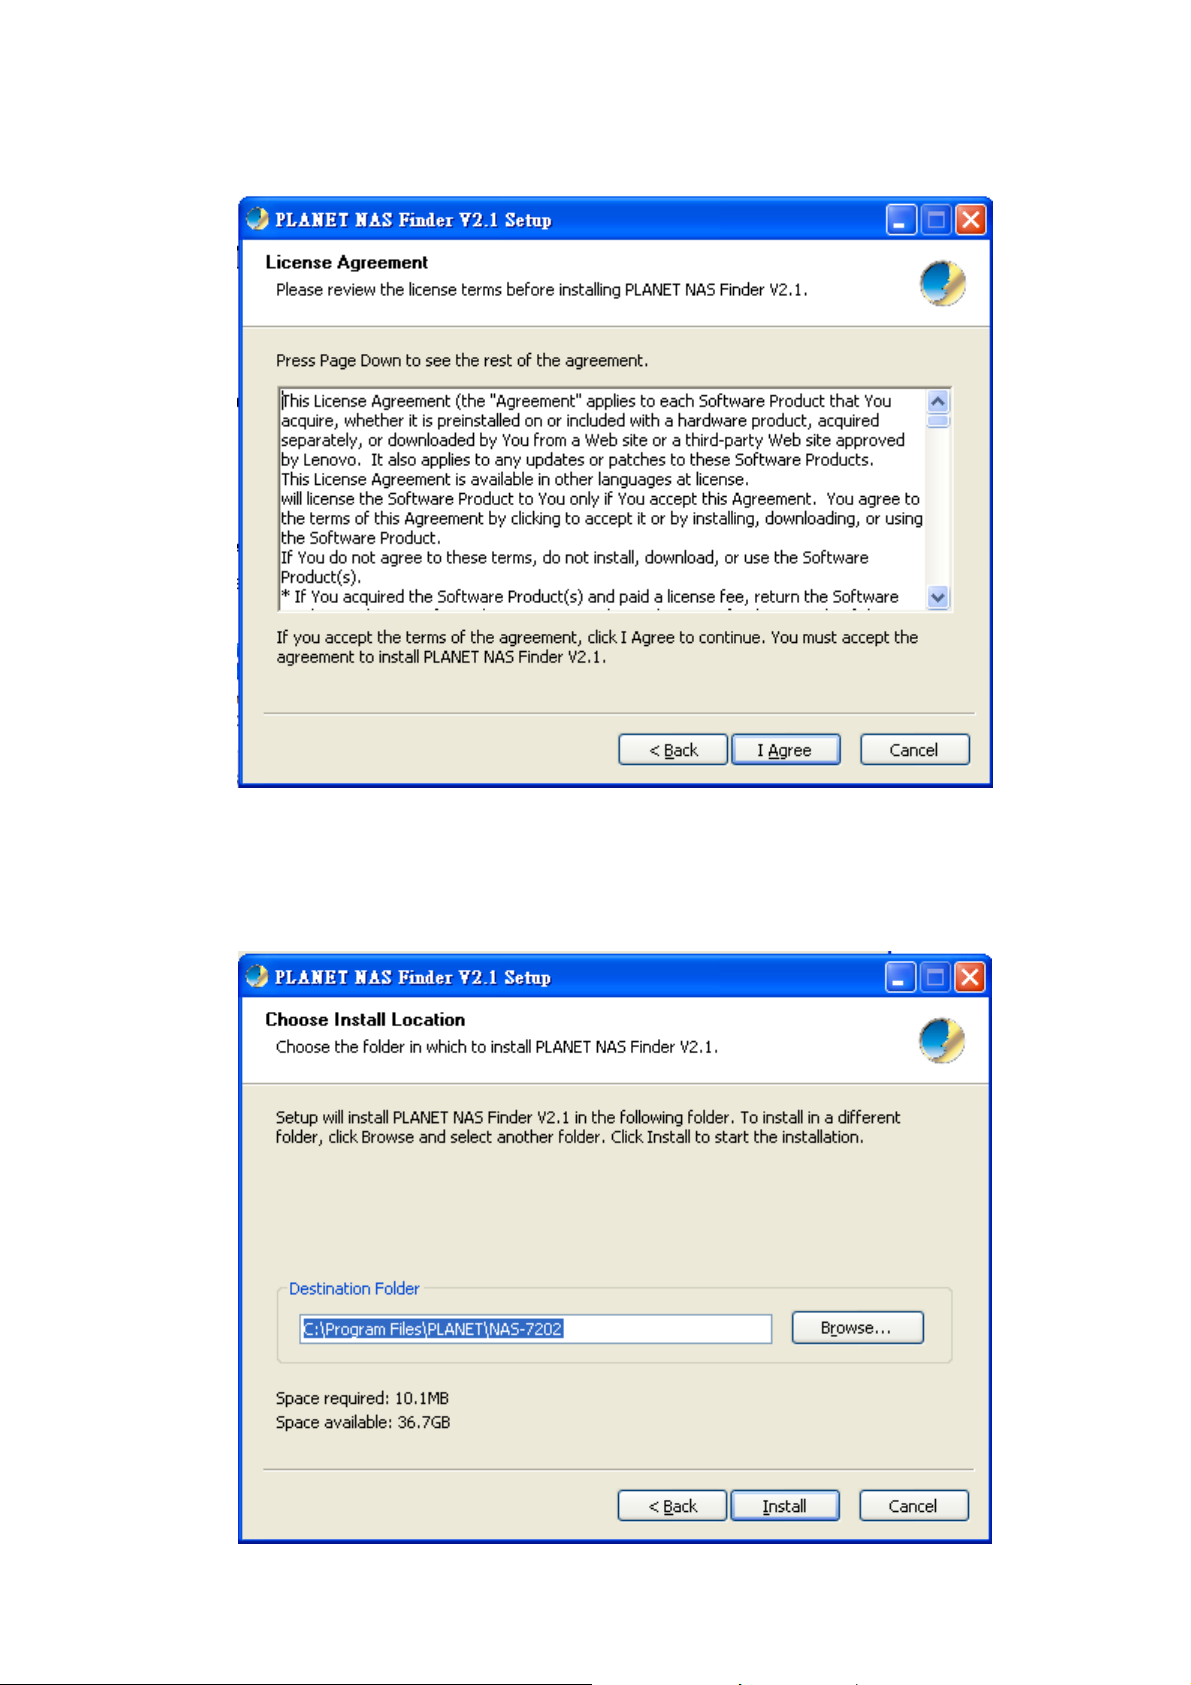
Click “Next” to continue, a License Agreement window will pop up. The software installation will
continue only after the terms listed under License Agreement are accepted by clicking “I Agree”.
After clicking “I Agree”, ent er installation path selection screen. Click “Browse” to choose a custom
installation path or use the default setting to install.
11
Page 12
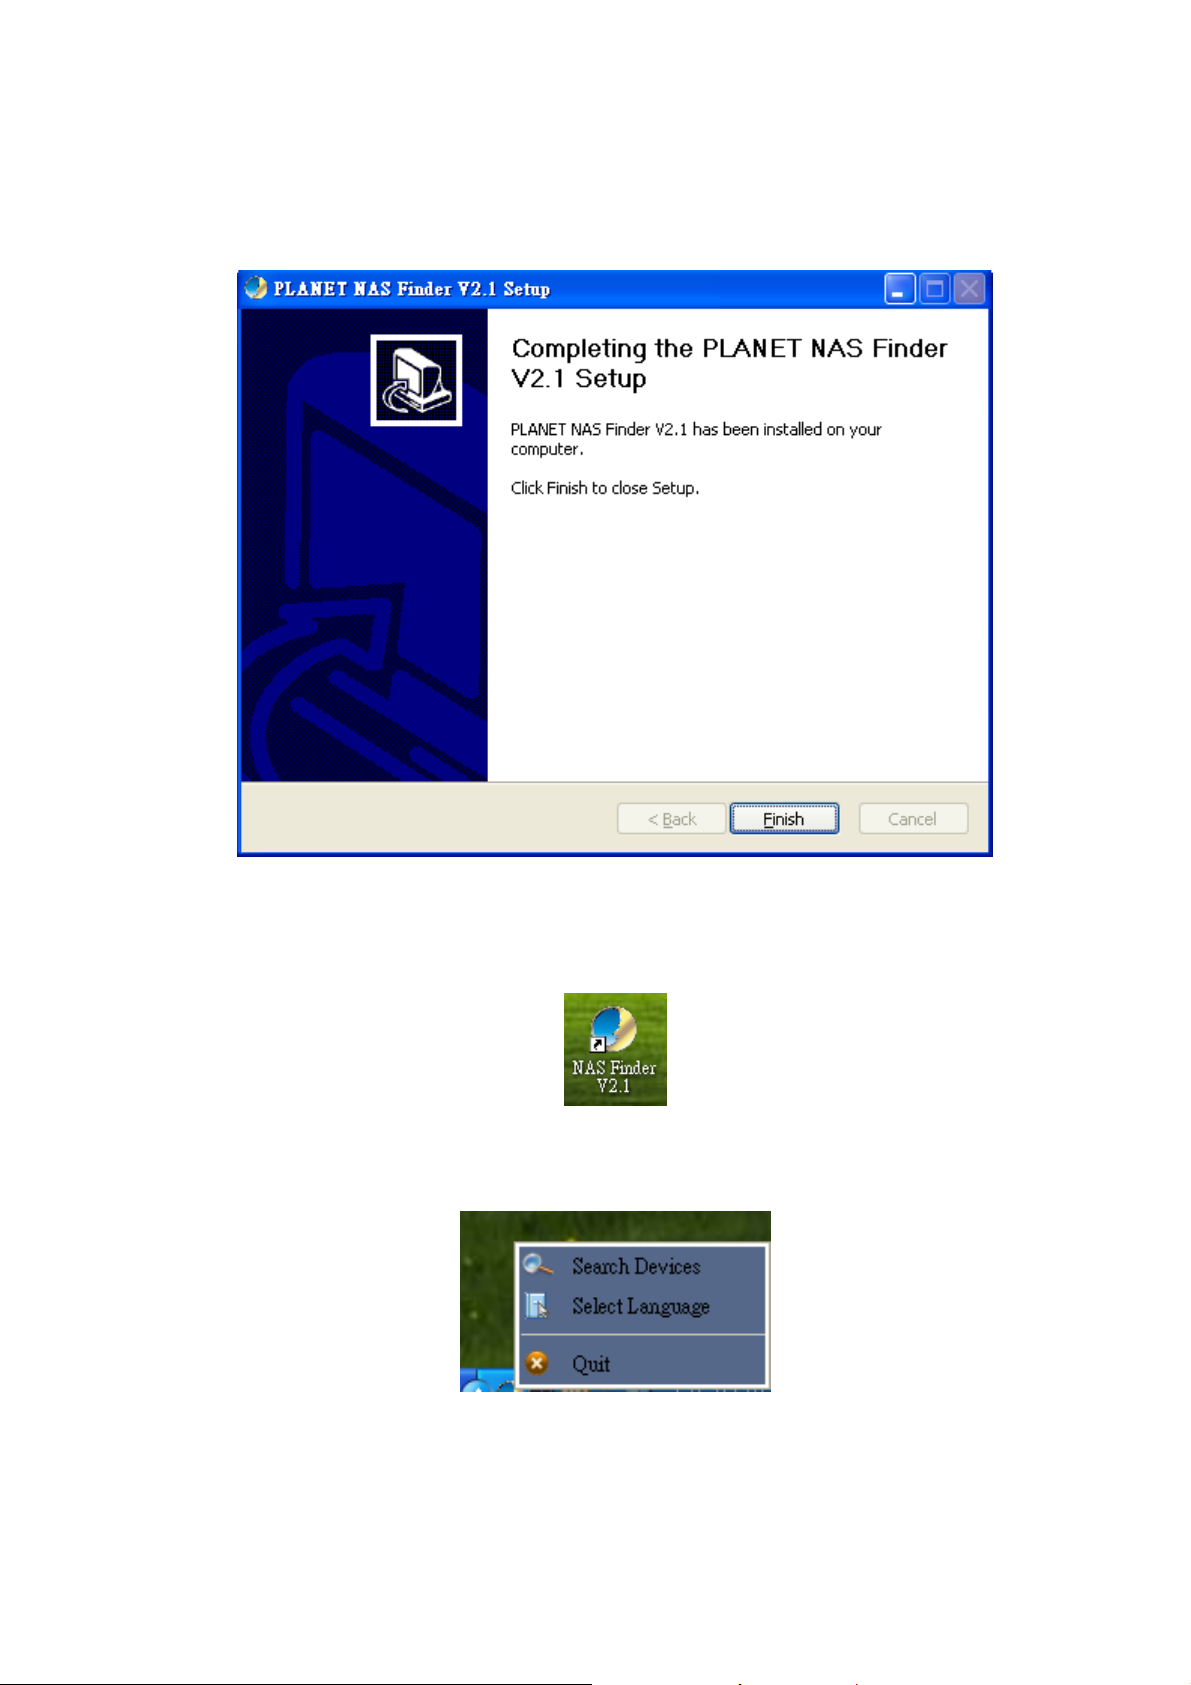
Click “Install” button for the installation of sof t ware and the installation progress will be shown at the
bottom of interface of path. After the inst a llation, a dialogue box of “running the progra m now or not” pop s
up and it is shown as follows.
Click “Finish” to complete the installation, the installation is completed. The PLANET Tools shortcut icon
will appear on the desktop automatically and the Quick Launch Toolbar.
Right click tool icon at the toolbar, you can search devices located in your LAN and select language.
12
Page 13
3.1.2 Use the client tool
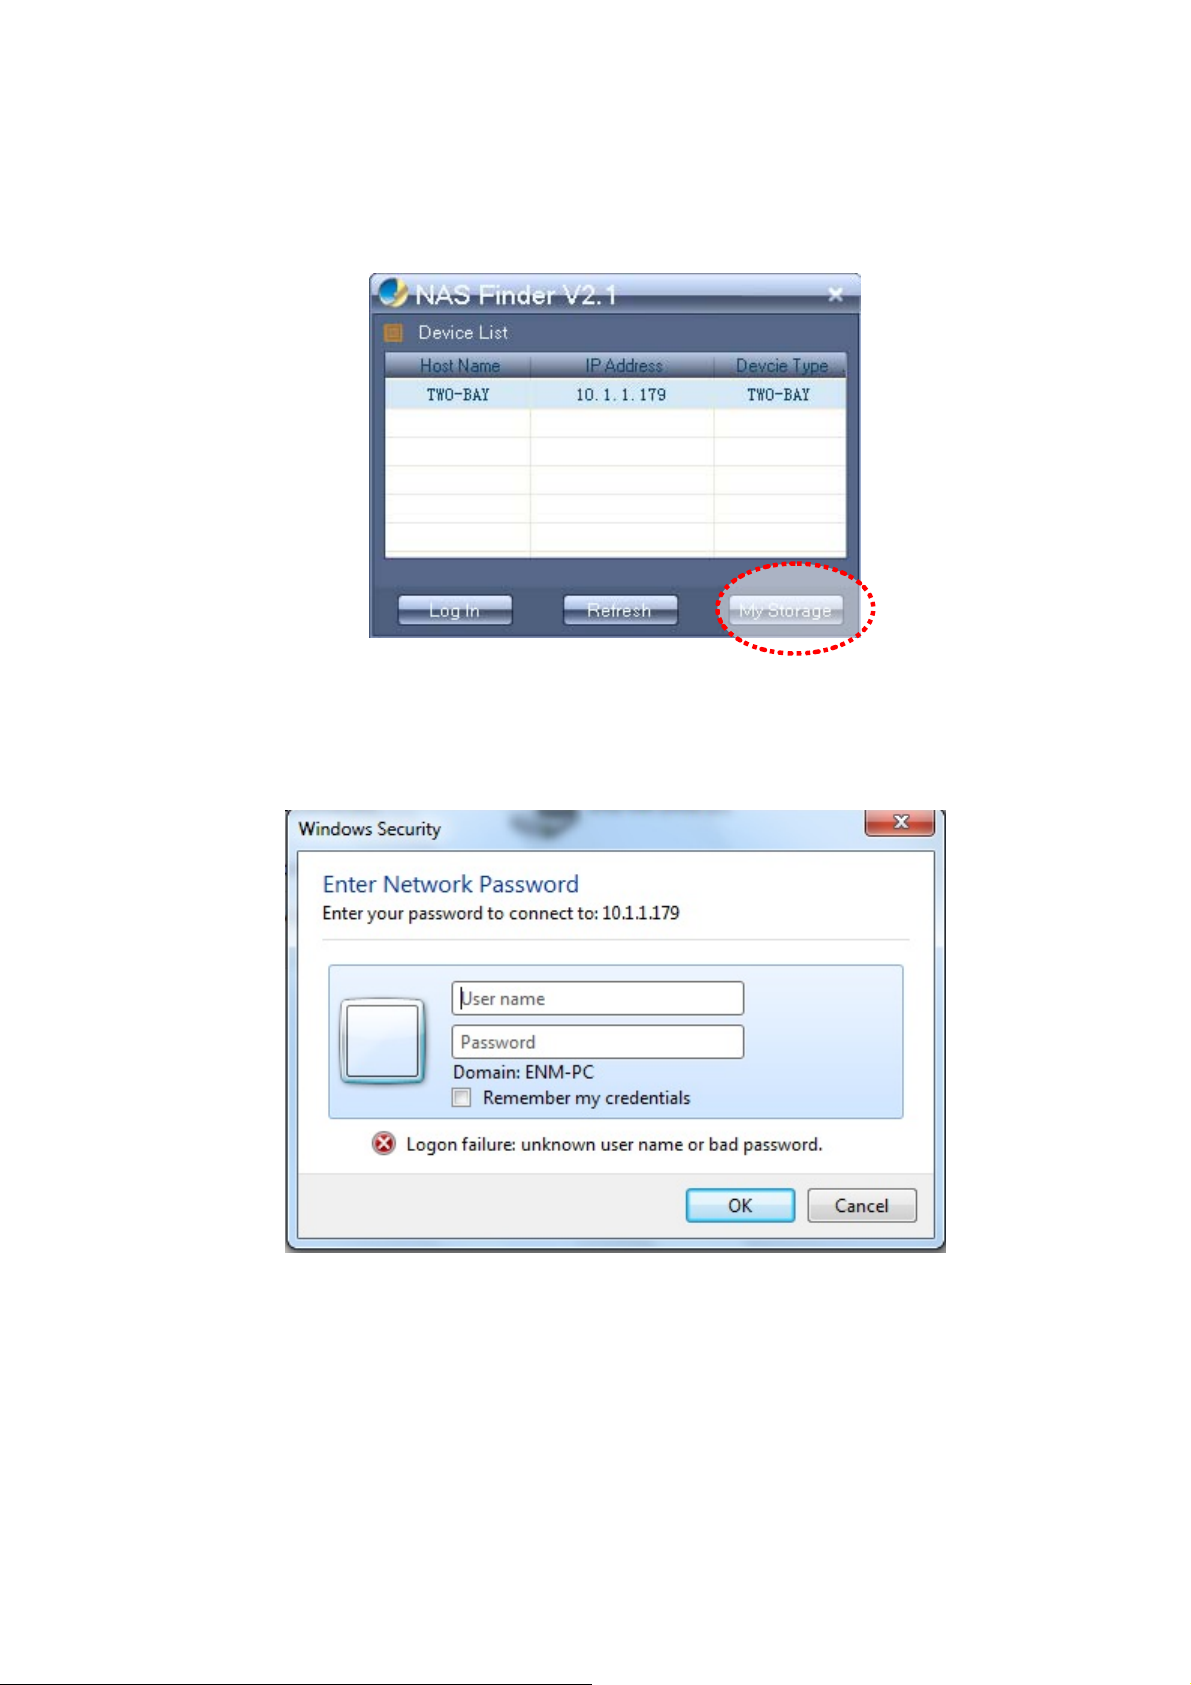
3.1.2.1 My Storage
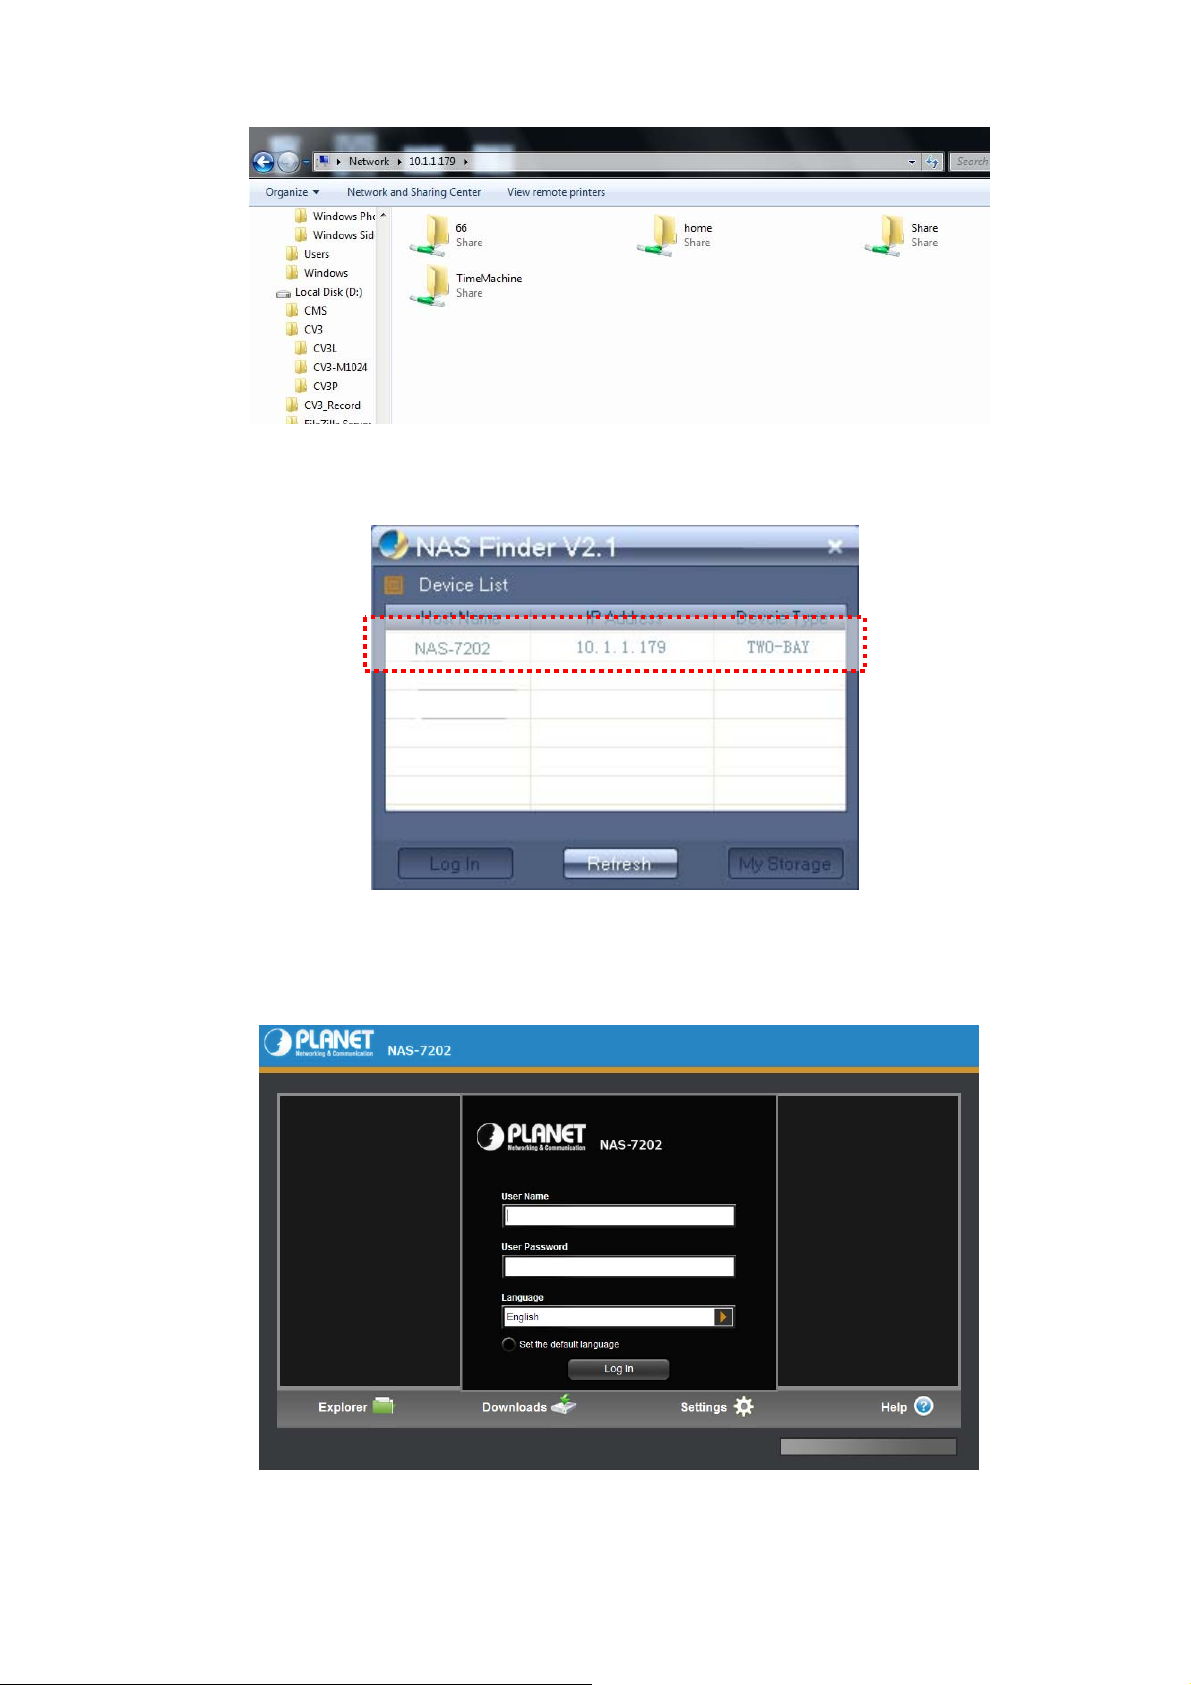
Open this tool and click “Storage” button to access my storage.
System will pop up a window as below. Enter user name and password and click “OK” to login. (The
default User Name and Password are both “admin”).
Finally you can discover these folders: home、Share、Time machine and others created by admin.
13
Page 14
3.1.2.2 Web login
As shown in the picture above, please select your device, and click “Login” button. It will go to the Web
management page on web browser.
14
Page 15
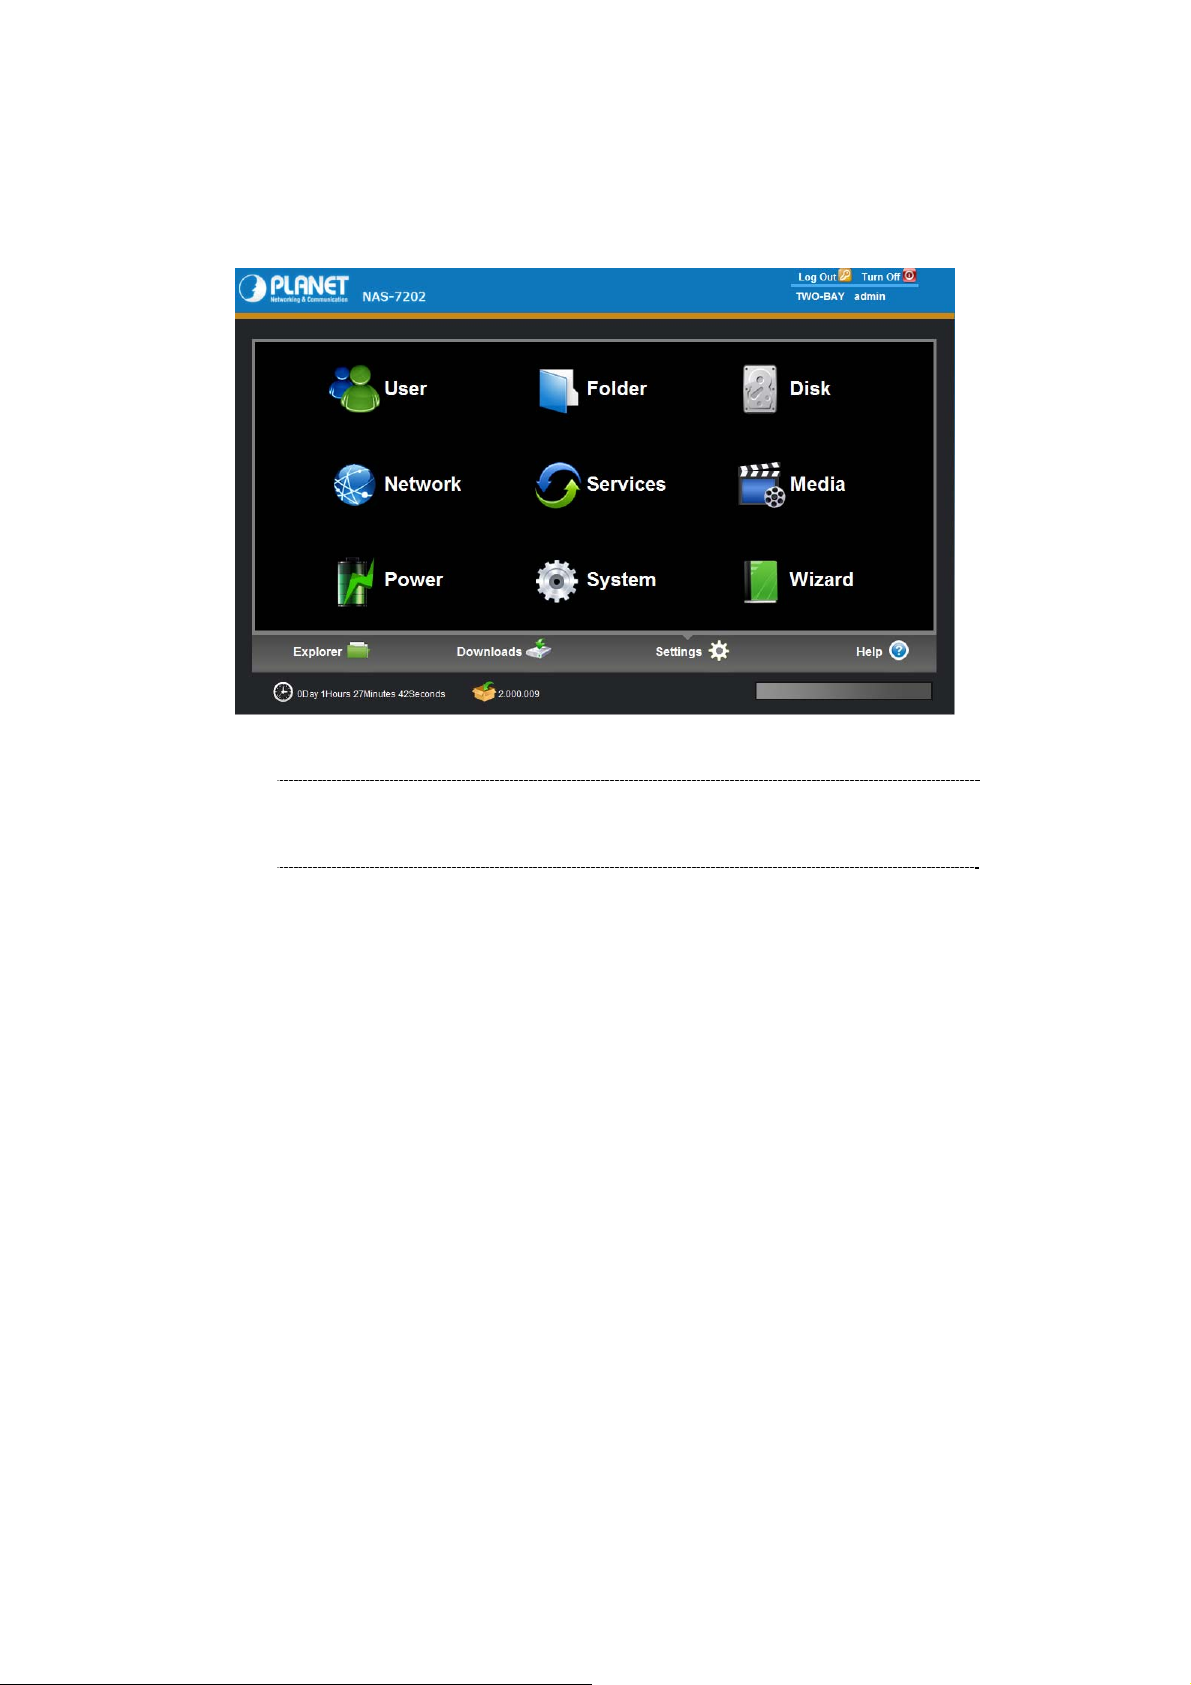
Enter User Name and Password to login. Default User Name and Password are “admin”. (If you want to
change User Name and the Password, once you login as admin, you can custom your User Name and
Password by the pop up wizard.
ÍNote
Also you can access web manually by typing IP address on web explorer,
like http://xx.xx.xx. (Default is “192.168.0.100”).
15
Page 16
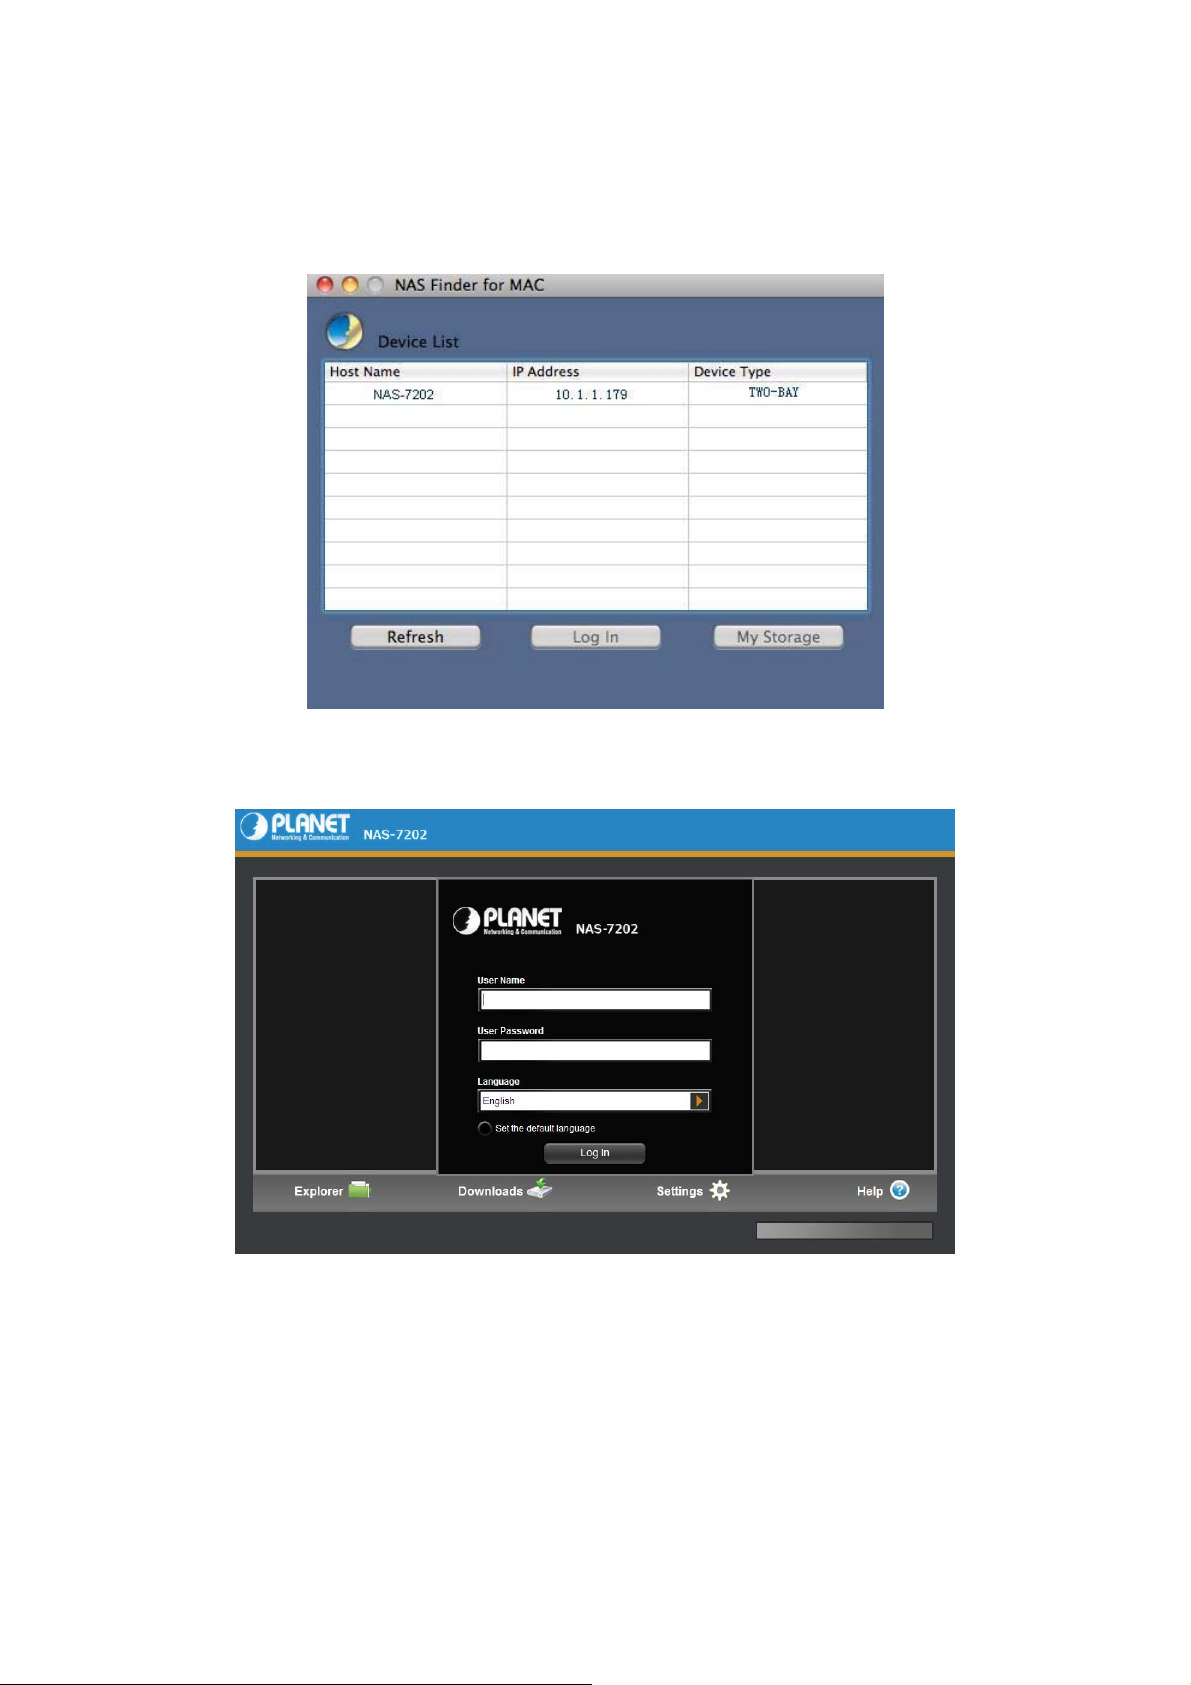
3.2 Use the product on MAC (above Mac 10.5.5)
Use the MAC version client tool to search device, then press “log in” to access NAS by safari.
Or you can access NAS by way of opening Safari and type IP address as http://xx.xx.xx. (Default is
“192.168.0.100”) and go.
16
Page 17
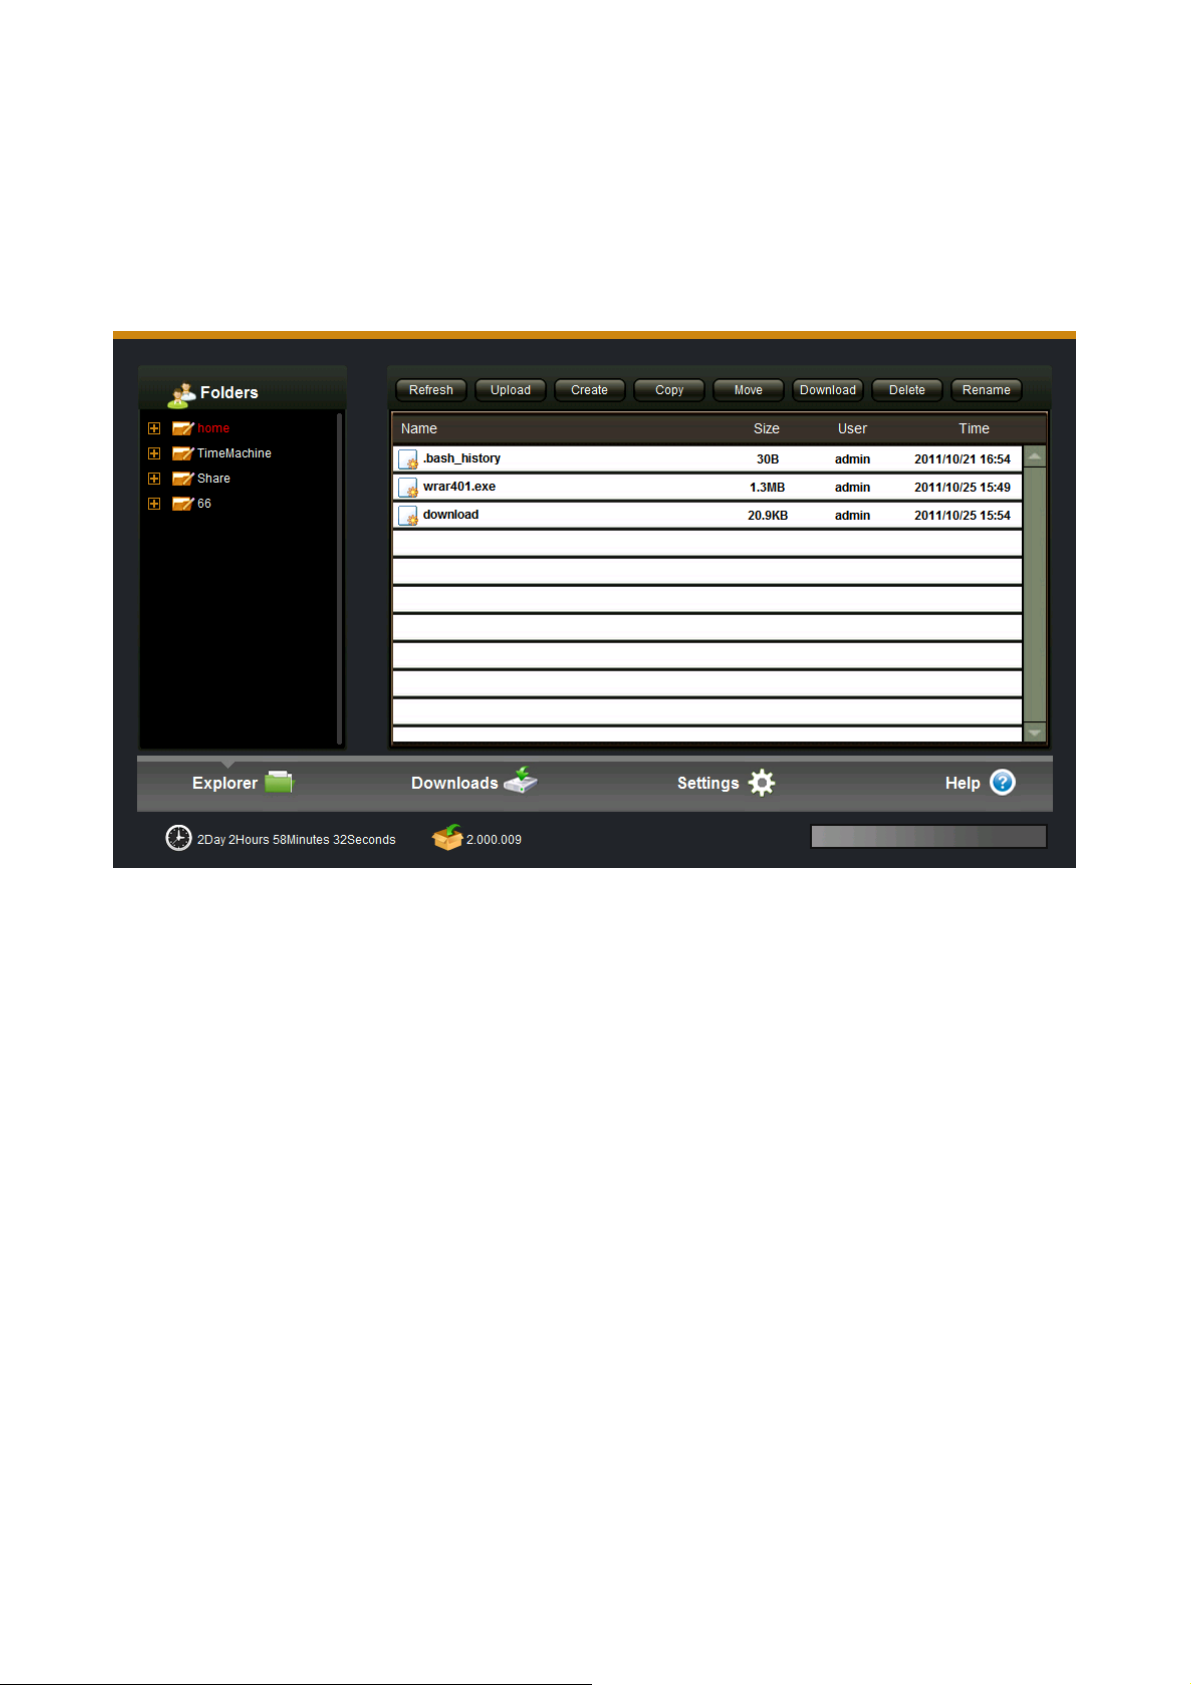
4. Explorer
There is a NAS folder explorer through WebDAV,you can do download(upload) files from(to) between NAS
and client computer. Also you can do copy/move/create operation on NAS.
17
Page 18

5. Downloads
To add new BT download task, set the “BT seed” option first, find and select BT Seed File, then select an
appropriate path for the download file to be save. Click “confirm” and the newly created download task is
displayed on the downloading list.
5.1 Downloading
Item Action
Start Click “Start” to resume a Task, which has been paused
Stop Click “Stop” to suspend the downloading task.
Delete Click “Delete” to stop and delete the download task. The deleted task
will be removed to Trash and it can be restored.
Info Select one task, and press information icon to see the more detail
information of this task.
Settings You can set downloading task number, max download speed, max
upload speed and so on.
18
Page 19

5.2 Complete
The completed tasks are displayed on the sidebar of the completed tasks list. Select a task and click “Delete”
to delete the completed task. Only the download task will be deleted and the actual download ed file will still
remain in the saved directory.
19
Page 20

5.3 Trash
Trash has a function of retrieving a deleted task to continue downloading. Click “Trash” to select a deleted
task that you want to continue downloading and then click “Rel oad ”. The task will be restored to the download
list
ÍNote
It will continue downloading from the last completed percentage when it was
deleted.
20
Page 21

6. Settings
6.1 User
Administrator cans create/edit/remove general user accounts. The general user accou nts are used to login
services to confirm whether can accessed these services, including web mana gement a cce ss, sam ba ac ce ss,
NFS access, ftp access, AFT/time machine service and so on.
ÍNote
Item Action
User Name This is the user account name when you login in
Password The password is case sensitive and should be 6 to 64 displayable
characters, including letters, numbers.
Add user Press “Add user” button, enter the user information and press “save”
button to create one user account.
Password must be alphanumeric and at least 6 characters long. Password
is case sensitive.
21
Page 22

6. 2 Folder
Administrator can create/remove and edit share folders, for each share folder, administrator can set access
privilege separately for each user account.
Select the target share folder at left list, at right window, set privilege which general users access to folder.
Press “save” button to execute the change.
There are “Read”, “Read/Write” and “No Acce ss” option for access privilege setting. The default setting is
“no access”, that’s mean this user cannot even see this folder.
The folder name only uses letters and numbers. The dash (-) or underscore (_) may be used to separate two
names. Maximum folder name is up to 26 characters.
The privilege setting works in all kinds of access modes, including ftp/samba/web/AFP and so on.
22
Page 23

6.3 Disk
1) Disk : Here is the hard disk physical information. Administrator can check disk model, Power on time, disk
health status, capacity and temperature.
That information comes from hard disk S.M.A.R.T message.
If the temperature is up to 55 degree C, the build in Fan will begin to work.
2) External USB storage: you can get the capacity information, and safely remove it.
3) Volume: There are volume settings; for example, create a new volume, and format current volume. Also it
can check volume information such as, available free space and types of file system.
Only support XFS format file system
Format or create volume operation will cause lost data in the hard disk. In wizard setting, when you enter to
create disk volume, there are four disk array mode to choose ,such as “Create single Disk Volume” , “Create
RAID 0 Volume” ,”Create RAID 1 Volume ”and “Create JBOD Volume”.
ÍNote
Creating single disk volume, If you just put one disk, please places it on
disk1 (disk1 that location on the disk box above)
23
Page 24

Item Action
Create Single
Disk Volume
Create RAID 0
Volume
If you don’t want to create the disk array model, perhaps you can
choose the mode. If install two hard disks, you should create two
volumes, also system files stored the first volume and the two volumes
without correlation.
Note: This mode can also be one hard disk, and then you just
need create one volume.
RAID 0, also known as Striping or Stripe, It represents the highest of
all RAID levels of storage performance. Improve the performance of
RAID 0 storage principle is the continuous data access acro ss two
disks, This data parallel operation on the bus can take advantage of
the bandwidth, significantly improving the speed of disk storage.
If one of disks has a smaller capacity, the total array size will be based
on the smaller capacity multiplied by 2. For example, if a 120GB disk
is striped together with a 100GB disk, the size of the array will be
200GB.
Note: if one hard disk is unhealthy, all data is lost. And this mode
is not conducive to data security storage.
Create RAID 1
Volume
RAID 1 also known as Mirror or Mirroring (mirroring), and its purpose
is to ensure maximum data availability and user-repairable. RAID 1
mode is the user data written to disk one hundred percent
automatically copied to another hard disk. Mirror, although not
improve storage performance, but because of its high data security,
24
Page 25

JBOD JBOD (Just a Bunch Of Disks, JBOD) is installed on a floor with
making it particularly suitable for storing important data, such as
server and database storage and other fields.
Total array size can only be as big as the smallest capacity disk. For
example, if you connect a 120GB disk and a 100GB disk, the size of
the array will only be 100GB.
Note: In order to improve the stability of RAID and disk
utilization, we suggest the best use of the two disks which are the
same brand, same capacity, and same cache.
multiple disk drive storage devices. Usually referred to as Span. JBOD
is logically combine several physical disks one by one in series
together, thus providing a large logical disk. Data storage starts from
the first hard disk when the first disk storage space is exhausted, and
then began to turn from the back of the disk to store data. JBOD
access to exactly the same performance on a single disk access
operation. JBOD does not provide data security. It simply provides a
method of using disk space, JBOD storage capacity equal to the
composition of the sum of the capacity of all disks.
25
Page 26

6.4 Network Setting
Network settings include hostname, TCP/IP setting, DDNS setting, HTTP setting.
6.4.1 Host Name
Hot Name Host name is used to identify this product in LAN. You can use the
Item Action
host name to login in samba (on windows series, type”\\hostname
file manager address bar), ftp (on windows series, type”ftp:
//hostname” in web explorer address bar), and web (on windows
” in
series, type”http://hostname” in web explorer address bar). Also you
can use the host name to identify the NAS on our application tools on
PC/MAC. And so on.
The host name must begin with a letter and followed by a combination
of letters and numbers. Maximum 8 characters.
26
Page 27

6.4.2 TCP/IP Settings
Auto Auto: It is default option, if the LAN have DHCP server, the NAS will
Item Action
get these configurations from DHCP server, if not or cannot get
configurations successfully, the system will set to default IP address:
192.168.0.100
Manual You can configure these settings manually; you can reference your
computer configurations or get more help from internet.
27
Page 28

6.4.3 DDNS Setting
DDNS means Dynamic DNS; it is a method / protocol / network service that provides the capability for a
networked device, to notify a Domain Name System
DNS configuration of its configured hostnames, addresses or other information. So DDNS can let you access
your NAS
on Internet at anywhere.
(DNS) name server to change. In real time, the active
You can apply a username/password at www.planetddns.com and choose “planet” to log in.
28
Page 29

Configure DDNS steps:
Step 1: Enable DDNS option through accessing web page of NAS
Step 2. Select on DDNS server provide, and register an account if you do not use yet.
Let’s take dyndns.org as an example. Register an account in http://planetddns.com
or https://www.dyndns.com/account/entrance
free of charge, shown as follows:
29
Page 30

An account and password are acquired once the registration succeeds, and then apply for a DDNS domain
name. Enter “my account”, click “add host services” to enter the application window of domain name.
Fill hostname/IP address, (hostname will be as domain name go to access NAS, fill IP addre ss by Address li st
box below showing). If your PC and NAS are in the same LAN, type http://domain name (planetrd.dyndns.org)
to access NAS in the WAN (filling domain name and IP are corresponding)
30
Page 31

Meanwhile, select the purpose of application;
Your domain name can be seen in Host Service of DynDNS website once the application succeeds, shown as
follows:
31
Page 32

Step 3:
Enter the hostname/username/password as just got from server provider. And press “confirm” to
execute the setting, also you should add NAS IP address to router DMZ zone, see router manual for more
reference. Follow:
6.4.4 HTTP Settings
32
Page 33

HTTP Access Port HTTP setting is used to set web access port, the default port is 9080,
Item Action
you can modify as need. Also we support standard default port 80
additional at same time. This port is very important for DDNS.
6.5 Network Services
Two Methods to acce ss NAS by FTP are described below. Please make FTP service enable in the web
management
6.5.1 FTP Service
.
1)User can access NAS data through FTP service in LAN or WAN(based on DDNS).
2)Support Unicode filename: select the right option based on your language you used.
3)Anonymous enable: enable this option to let anonymous user access your data, anonymous user
only can see “share” folder.
4)FTP access port: the default access port is standard 21, you can change the option if needed.
33
Page 34

6.5.2 Win File Service
Win file service make it possible that you can share files with others in local area network. First enable this
function before use.
6.5.3 Linux File Service
It is used on Linux OS to access NAS through NFS.
Allow write IP address: Access IP is used to specify a range of IP address in your local network for computers
that can access and do write operation on NFS share directory.
34
Page 35

How to use NFS:
1. Enable the NFS server function in “service-ÆLinux file service “on web.
2. On Linux OS, open terminal and change into root account as below
[steve@localhost ~]$ su
password:
3 .In Terminal, show the NAS server’s directory as below commands:
[root@localhost steve]#showmount -e xxx.xxx.xxx (NAS’s IP address)
Export list for xxxx.xxx.xxx.xxx:/data/HardDisk1/Volume1 *
4. In Terminal, restart the NFS server as below command:
[root@localhost steve]# service nfs restart
Shutting down NFS mountd: [ OK ]
Shutting down NFS daemon: [ OK ]
Shutting down NFS quotas: [ OK ]
Shutting down NFS services: [FAILED]
WARNING: Deprecated config file /etc/modprobe.conf, all config files belong into /etc/modprobe.d/.
Starting NFS services: [ OK ]
Starting NFS quotas: [ OK ]
Starting NFS daemon: [ OK ]
Starting NFS mountd: [ OK ]
5. In Terminal, mount the NAS directory to Linux OS as below command:
[root@localhost steve]# mount -t nfs 192.168.7.186:/data/HardDisk1/Volume1/Share /mnt -o nolock
At last you can check that the NAS directories have been displayed in filesystem -(mnt on your Linux com puter,
and you can do operation as it is in local.
35
Page 36

6.5.4 MAC File Service
This is function is used to work with Mac computer and comp atible with Time Machine backup function, for
more information about Ti me Machine. If you need h elp, please re fer to MacOs help or go on their website for
more information.
How to use this function:
Enable this function in server---〉Mac file service on web
On MAC computer, go to system preference-ÆTime Machine, turn on the function and in “select disk”
option, select the NAS folder as the target, you need type the NAS account and password. Now it work
and then your backup data will be stored into NAS at Time Machine folder.
36
Page 37

37
Page 38

6.5.5 SSH Service
SSH allowed you to remote login to the NAS Linux OS and do some operation, you can use “putty” or other
tool to connect. You can use admin or general account to login, or you can use “root “account (password:
20080826) to login.
6.5.6 Download Service
38
Page 39

6.5.7 Media Services
6.5.7.1 ITunes Music
ITunes service allows user play NAS music library at iTunes client.
6.5.7.2 UPnP/DLNA
DLNA allow NAS streaming media (movie/photo/music) to client player, like windows media player, net TV,
network Media Player, Play station 3, Xbox 360 and other DLNA compatible d evices.
39
Page 40

6.6 Power
6.6.1 Disk Sleep
This setting is used to let system go to sleep mode after no access setting time. In sleep mode, the hard disk
will go to sleep and the fan will be shut off. When there are access requirement from user, the system will
leave sleep mode to general mode.
6.6.2 POWER Off / Restart
To power off the device, select “power off” option and click “confirm” button and system will power off and
Status LED will flicker then off.
To restart the device, select “restart” option and click “confirm” button to do, Status LED will flicker then be on
when restart is finished. Web page turns to the new page for login.
40
Page 41

6.6.3 Fan Control
Some model have built in fan, the system always check the hard disk temperature, if the temperature is e qual
or higher than the setting limitation. The fan will work when the temperature is exceeding the limitation,
otherwise it will be off.
Fan open temperature: it is used to set the fan working temperature threshold.
41
Page 42

Level 1
Temperature
Level 2
Temperature
Item Action
When the disk temperature is higher than the temperature of level1
setting and lower than the temperature of the level2 setting, the fan will
run at low speed.
When the disk temperature is higher than the temperature of level2
setting, the fan will run at high speed.
6.6.4 Schedule On/Off
You can create schedule to guide NAS shutdown or power time.
Status Make sure it is on state, thus your setting is effective.
Type If you check Power On, means that you set the time will guide NAS
Item Action
boot; If you check Power Off, means that you set the time will guide
NAS shutdown.
Period / Time The two options will guide NAS shutdown or power time.
42
Page 43

6.7 System
6.7.1 Time Settings
The time of the device can be set automatically, over the Internet using NTP (Network Time Protocol) server
or by hand setting.
Depending on the location, select the time zone from the drop-down list. If the time is set over the internet
enable Internet Sync, enter time sync frency (NTP update frequency). It will become effective after press
confirm button.
6.7.2 Notification Settings
Setting of email notification: in case of application of email notification service, it’s required to fill in the email
address, email server, user name and email password, confirm the password and press “confirm” button to
execute this setting.
The email specified by user can receive the prompt message and completed downlo ad task of device.
43
Page 44

6.7.3 Backup Settings
Backup settings are used to save the current setting parameters of the Device system. Also you can restore
the setting from the saved setting file.
6.7.4 Firmware Upgrade
This feature is used to update device firmware.
Step 1. Download the latest version of firmware from the device manufactu rer website. Cli ck the folder icon
to locate the downloaded firmware.
Step 2.Click “confirm” button to begin upgrading. Af ter upgradin g the system will rebo ot and yo u can ch ec k
firmware version at the bottom of main UI.
44
Page 45

6.7.5 Reset Settings
ÍNote
Item Action
Restore to
Factory Default
The feature only restores the device default settings for all functions. The
current downloading tasks are not affected by this operation. After the device is
restored to default configuration, the IP address is 192.168.0.100.
Restoring the NAS to the factory default settings will remove all the
customized configuration and will destroy all the content of the NAS
45
Page 46

6.7.6 About
Here is some information of the device.
6.8 Wizard
Here is a wizard for basic setting step by step.
46
Page 47

7. Help
Here is Help information of the device.
47
Page 48

Appendix A: iTunes service
Step1.Enable the iTunes service in the web management
Step2. Copy several songs to built-in disk by samba or FTP, which are recommended put into “music” inside
of “share”.
Step3. Then open iTunes in your computer. It will search network share devices automatically, you can find
device name at the left list, pitch on the device to open music playlist.
48
Page 49

File types supported by iTunes server
• *.mp3
• *.m4a
• *.wav
• *.aiff
ÍNote
(1) Newly increased media files to device maybe need restart of iTunes
service, and then iTunes client can recognize them.
(2) Not only on Mac but also on PC, this function can be applied
properly.
49
Page 50

Appendix B: DLNA service
Enable DLNA service in the web ma nagement.
Application on PC
Operation procedure:
1. Please make sure client PC has been set to a shared network.(In Windows 7 for example)
Click the lower right corner on the toolbar of PC monitor "network" icon, click the option "Open Network and
Sharing Center".
50
Page 51

Click the option "Change advanced sharing settings" on the left side of the interface.
Open “Media streaming” that you can find media on the network.
2. Add media files folders to the shared.
Access device by Samba / FTP (section 3, section 4), and copy multimedia files to ”Music”, “Movies”,
“Pictures” fodder under the “share” directory.
51
Page 52

Media Types Supported by DLNA
Shared Audios Shared Videos Shared Photos
Audio Files Video Files Image Files
MP3
WMA
WAV
MP4
M4A
AAC
AC3
AIFF
3. Open Windows Media Player 11 (Windows Vista / Windows 7), click the device name on the left, and you
will see media files stored in the device. Then you can select the desired one to play.
AVI
DIVX
M2TS
MKV
MOV
MP4
NPG
TS
VOB
WMV
JPEG
PNG
TIFF
BMP
GIF
ÍNote
DLNA service can also support other DLNA-compatible devices, such as Media
Player, Play station 3, Xbox 360.
52
Page 53

Appendix C: Access on PC
Accessing device with FTP client tool
1. Please install FTP client software like Filezilla Client.
2. Double click the icon on desktop to open, and then enter the host name as “ftp:// xx.xx.xx”.(IP address) or
“ftp://device name”, user name, and password to login, shown as below.
53
Page 54

Accessing device without tool
1. Type “ftp:// xx.xx.xx “ (e.g. ftp://192.168.7.200) in “my computer” or browser.
2. Then enter user name and password to login. (For more detail please see 6.1.1)
ÍNote
When access the device through above two methods, if Chinese characters
show messy code, please try to change the encoded mode for UTF-8 in the
browser or FTP terminal software.
54
Page 55

Appendix D: Functional Specifications
Hardware Specification
Supported HDD Two 3.5”, SATA I/II interface
LAN Connector One RJ-45 Interface (10/100/1000Mbps)
USB Connector 2 x USB 2.0 Compatible (Type A)
USB Connectivity External Storage and Network Printer Server
Transport Protocol TCP/IP, NTP, SMTP, DDNS
File Protocols WebDAV, SMB/CIFS, FTP, NFS, AFP (Apple Talk) / Time Machine,
SSH
Multimedia Server iTunes/ DLNA / UPnP AV Server
Client OS Windows 7/Vista/XP , Mac OS 10.5 and above , Linux Kernel 2.6
and above
System Configuration Windows/Mac Base utility, Web Browser
Supported Concurrent Users 32
Max. User Account 12
Backup USB One-touch Backup
Operating Temperature: 5 ~ 40 Degree C
Humidity: 5 ~ 90% (non-condensing)
Storage Temperature: 0 ~ 60 Degree C
Humidity: 5 ~ 90% (non-condensing)
Dimension (W x D x H) 220 x 126 x 78.2mm
Weight 730g (without HD)
Power Adapter 12V / 3A
Regulatory FCC, CE
55
 Loading...